13
UNIVERSITY OF WISCONSIN-STEVENS POINT QUEST MANUAL AN EMPLOYER GUIDE FOR THE UWSP JOB QUEST SYSTEM

U N I V E R S I T Y O F W I S C O N S I N - S T E V E N S P O I N T
QUEST MANUAL
AN EMPLOYER GUIDE FOR THE
UWSP JOB QUEST SYSTEM

2
TABLE OF CONTENTS
Logging In ……………………………………………………………… 3
Employer Profile …………………………..…………………………… 4
Posting a New Job ……………………………………………………… 5
Re-Posting a Job ………………………………………………………. 6
Searching Students …………………………………………………….. 8
Viewing Work Study Allotments ………………………………………. 8
Hiring A New Employee ………………………………………………. 9
Re-Hire An Employee …………………………………………………. 11
Change Wage …………………………………………………………… 11
Previously Hired Students …………………………………………….. 12
Lump Sum Payment …………………………………………………… 13
3
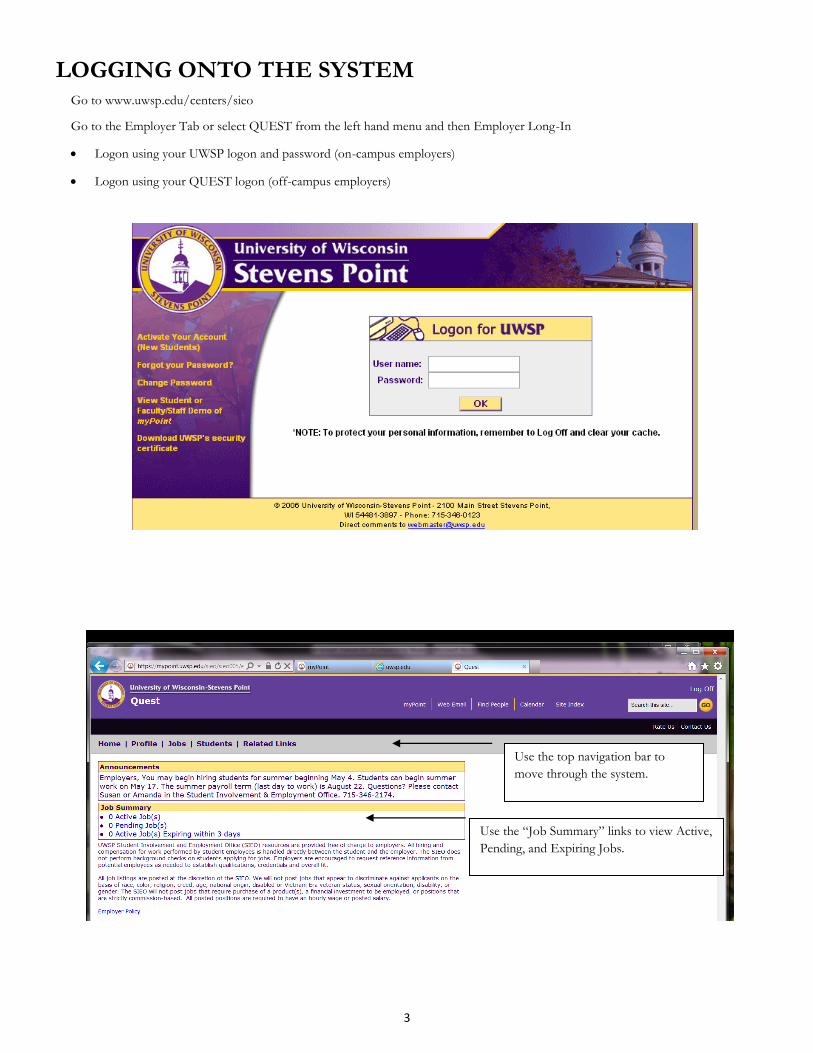
LOGGING ONTO THE SYSTEM Go to www.uwsp.edu/centers/sieo
Go to the Employer Tab or select QUEST from the left hand menu and then Employer Long-In
Logon using your UWSP logon and password (on-campus employers)
Logon using your QUEST logon (off-campus employers)
Use the top navigation bar to
move through the system.
Use the “Job Summary” links to view Active,
Pending, and Expiring Jobs.

4
YOUR EMPLOYER PROFILE
Contact Information
Login ID - Your campus logon ID
Name, address, and phone – Listed as it
appears in the campus information system.
Keep contact Info. Private – Used for
employers that do not want students to view
their contact information. Typically, on-
campus employers would use the default
“no”.
Your employer profile includes information
about your office and your contact information.
Selecting “Edit” will allow the contact to
change fields.
Employer Name - The official name of your department.
Web Site – Your office or department web site (optional).
Profile – A brief description of your office or your mission statement (optional). We recommend that employers list both a profile and a website. As we educate students on researching potential places of employment, this information is useful.
Select “Edit” to change your web site address or profile.

5
POSTING A NEW JOB
From the Main Menu – Select “Jobs” and then “Add Job”
Contact information is automatically loaded into the job. However,
you can change the job contact information if needed.
Enter the Job Title
List specific qualifications, certifi-
cations, or training required.
List specific duties of position and
include any incentives.
Describe how the applicant should contact
your about the position. In person, via
phone or email, or by mail.
All positions require a wage and must meet the state
minimum wage requirements. Positions requiring stu-
dents to “invest” in materials (purchase product and
then re-sell) or strictly commission positions will not
be posted.
Position Start date must be written in MM/DD/YYYY format.
If you are eligible to post work study positions, you can choose
“Work Study,” :Non-Work Study,: or “Non-WS or Work Study.”

6
Submit for Review—Position will be posted after
review.
Inactive—Position will not be posted for students to
view.
Calendar icon allows you to select a specific date
from an online calendar. Posting Start Date—When you would like students to begin
viewing the job.
Posting End Date—When the posting will close.
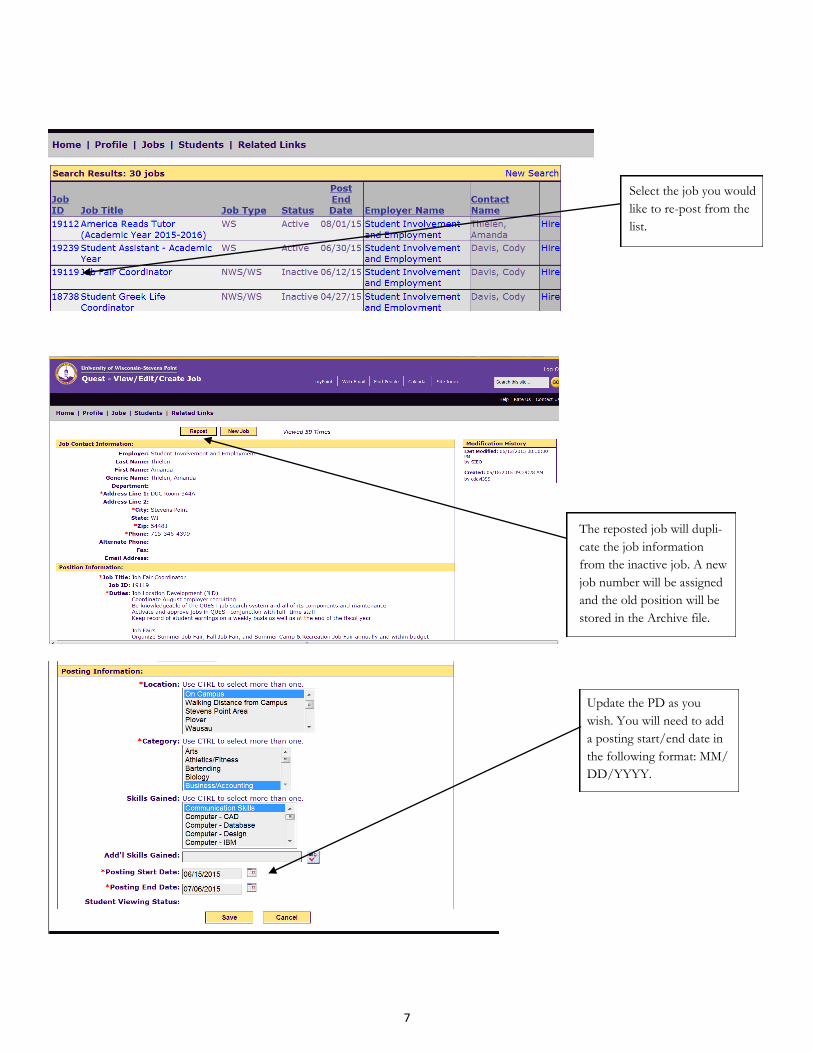
REPOSTING A POSITION
From the Main Menu – Select “Jobs” and then “View/Edit Job”
Enter search criteria to find the job
you would like to re-post and select
“Search.”
If another person has posted the posi-
tion in the past, you will need to search
under their name. Click on Contacts:
and choose All Contacts. Then select
the position you would like to update.
Required fields. To select multiple categories,
hold the <Control> button while choosing.
Skills Gained—Us this area to select skills that an
employee will gain as a result of working in your area.
7
Select the job you would
like to re-post from the
list.
The reposted job will dupli-
cate the job information
from the inactive job. A new
job number will be assigned
and the old position will be
stored in the Archive file.
Update the PD as you
wish. You will need to add
a posting start/end date in
the following format: MM/
DD/YYYY.

8
SEARCHING FOR STUDENTS AND VIEWING WORK STUDY ALLOTMENTS
From the Main Menu – Select “Students” and then “View Students”
Students Work Study Award and Balance—Please keep this information confidential.
Type in last name, first name
to see list of students.

9
HIRING A NEW EMPLOYEE
From the Main Menu – Select “Students” and then “Hire”
Verify Student Name
Add Start Date and Hourly Rate of Pay
Select “Hire” to process the paperwork electronically.
You can hire multiple students for the same position by selecting the “Clear Students” button after selecting the “Hire” button.
Don’t know the job ID? Select
“Jobs” and then “View/Edit Job.”
The ID will be the first number.
Move your cursor to the far right
and click on “Hire.”
Choose one of five pay categories:
Labor/Attendant
Clerical
Technical
Instructional Support
Administrative/Supervisory
Enter student’s ID number
Your Job ID Number
Select “Find”
The account from which the student will be paid.
10
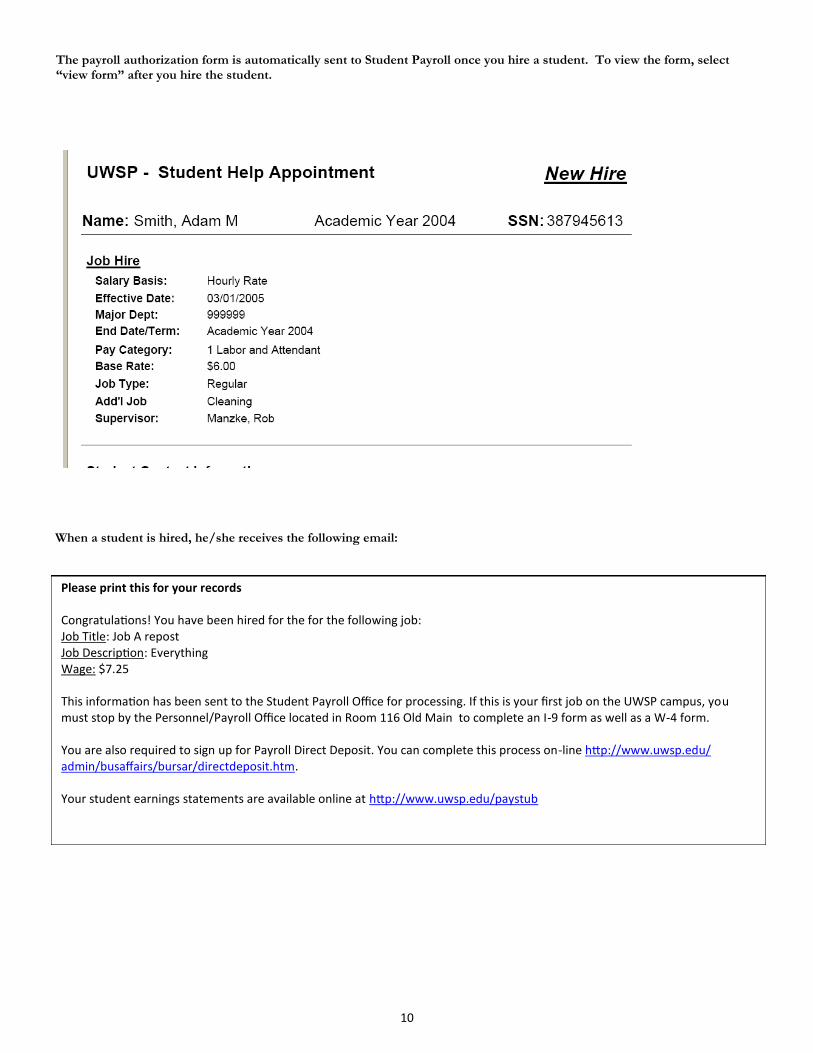
The payroll authorization form is automatically sent to Student Payroll once you hire a student. To view the form, select “view form” after you hire the student.
When a student is hired, he/she receives the following email:
Please print this for your records Congratulations! You have been hired for the for the following job: Job Title: Job A repost Job Description: Everything Wage: $7.25 This information has been sent to the Student Payroll Office for processing. If this is your first job on the UWSP campus, you must stop by the Personnel/Payroll Office located in Room 116 Old Main to complete an I-9 form as well as a W-4 form. You are also required to sign up for Payroll Direct Deposit. You can complete this process on-line http://www.uwsp.edu/admin/busaffairs/bursar/directdeposit.htm. Your student earnings statements are available online at http://www.uwsp.edu/paystub

11
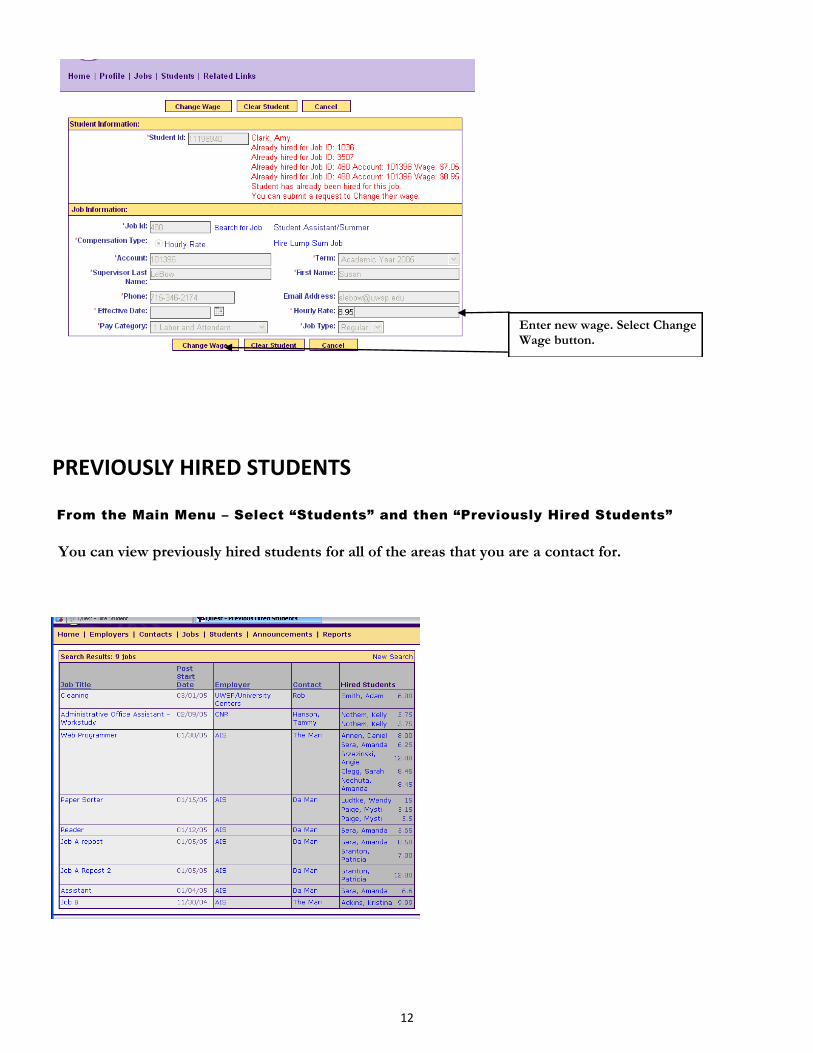
WAGE CHANGES & REHIRES
From the Main Menu – Select “Students” and then “Wage Change/Rehire”
Enter student information
In Hire History table on the right hand side, click "Wage Change/Rehire" link of the job.
Select the student
Employers are able to increase student employee wages and/or re-hire* a student through the following process.
* Employers can use this same process to “rehire” a student. Students who have worked for you in the same position, in a prev ious
pay session (ex. Worked during the academic year and will continue to the summer), would be “re-hired” into the system. New
employees or students changing jobs would be “hired” into the system.
12
Enter new wage. Select Change Wage button.
PREVIOUSLY HIRED STUDENTS
From the Main Menu – Select “Students” and then “Previously Hired Students”
You can view previously hired students for all of the areas that you are a contact for.
13
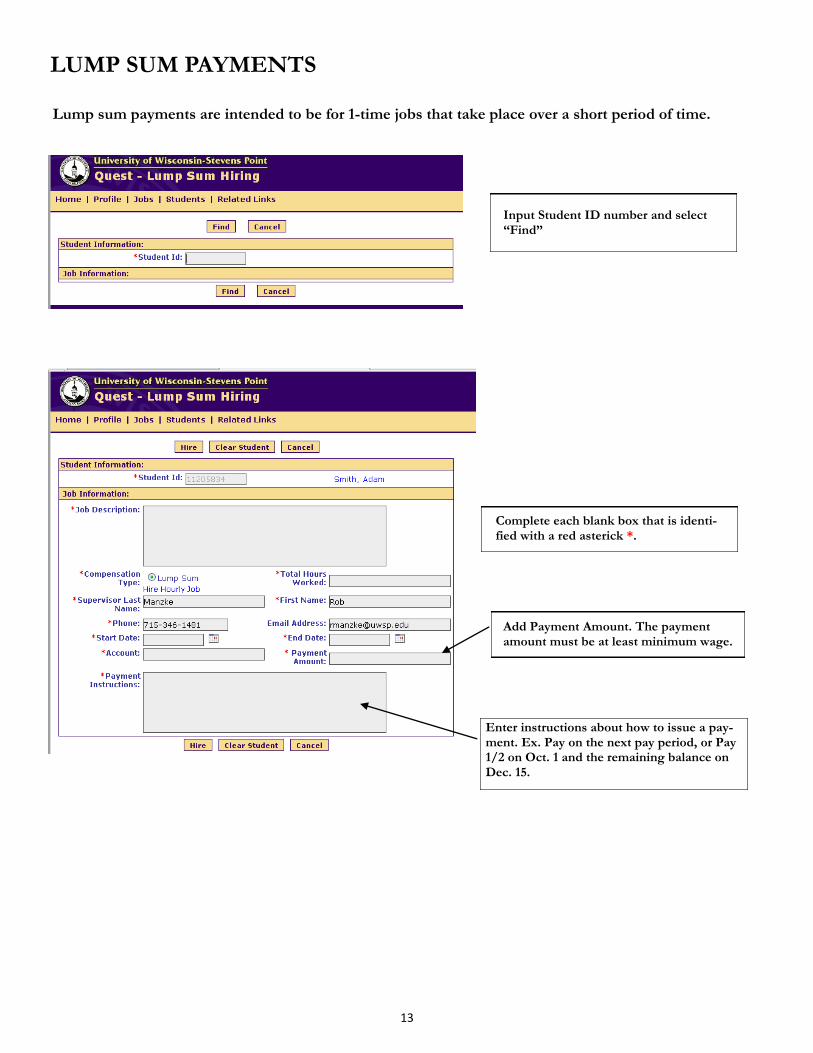
LUMP SUM PAYMENTS
Input Student ID number and select “Find”
Complete each blank box that is identi-fied with a red asterick *.
Add Payment Amount. The payment amount must be at least minimum wage.
Enter instructions about how to issue a pay-ment. Ex. Pay on the next pay period, or Pay 1/2 on Oct. 1 and the remaining balance on Dec. 15.
Lump sum payments are intended to be for 1-time jobs that take place over a short period of time.


