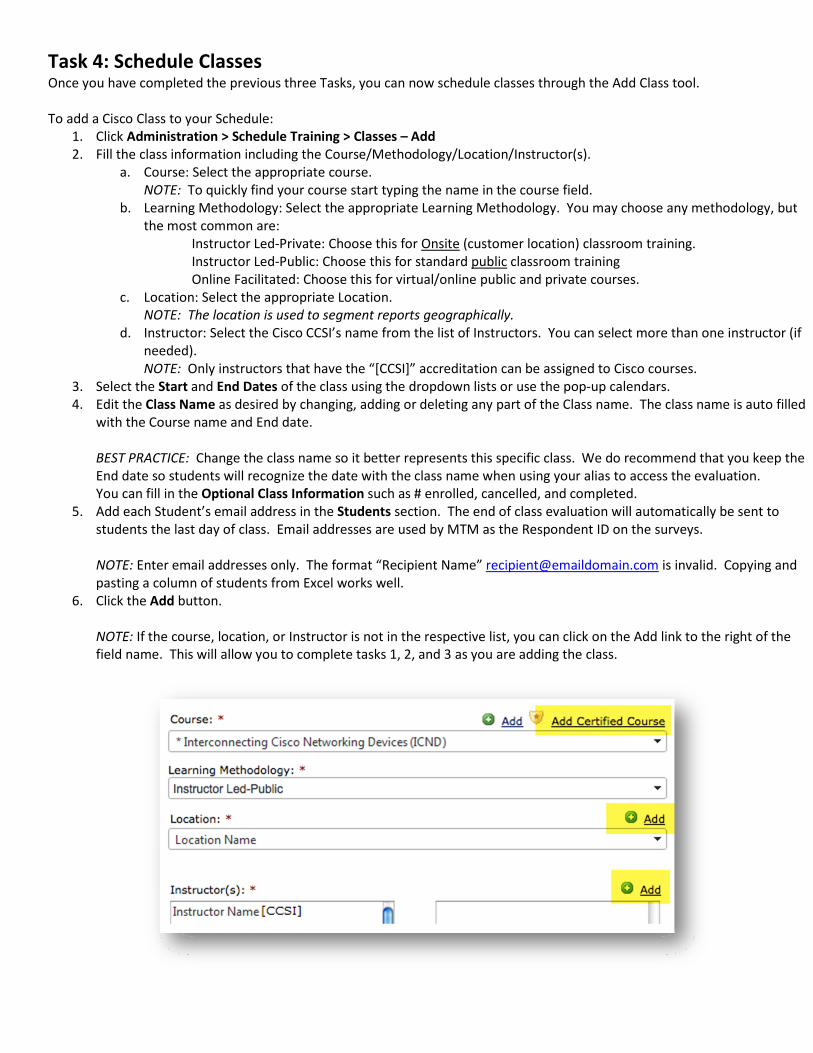
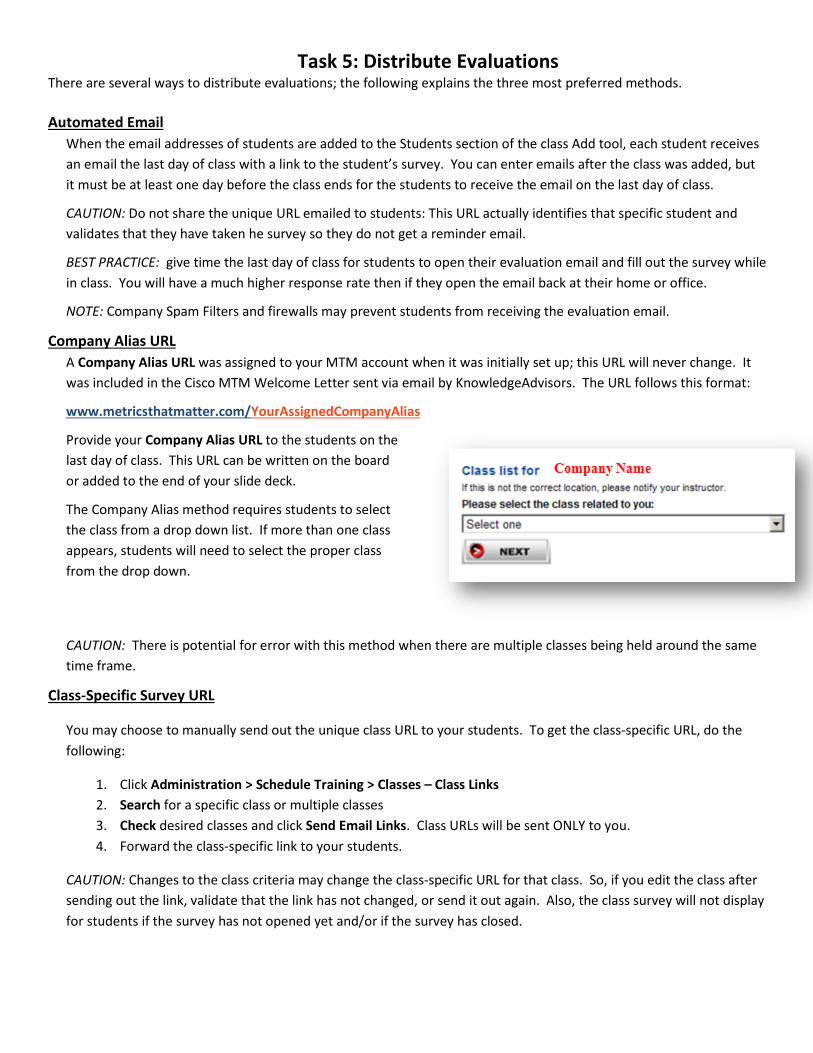
Metrics That Matter ® Quick Start Guide For Cisco Learning Partner Metrics That Matter® Administrators This Quick Start Guide will walk you through the steps to set up and get started with MTM. We have included best practices and notes throughout this guide to get you up and running quickly. There are five main tasks you will need to do before you can start collecting survey data. These tasks are: 1. Add Cisco Certified Courses 2. Add Locations 3. Add Cisco Certified Instructors (CCSIs) 4. Schedule Classes 5. Distribute Evaluations 6. Distribute Certificate Getting Started: If you have not already done so, you will want to login to MTM and personalize your login ID and password. To login to MTM use this URL: www.metricsthatmatter.com/mtm Note: You should have already received an email with your token and login ID. If it has been past 5 days, please click the “Forgot your Password?” link to obtain a new security token. In the login box at the top right side of the homepage, type in your login ID and password, and then click login. NOTE: You can check the ‘Remember Login’ box for future uses. You can also click the “Forgot Password?” hyperlink to reset your password by entering your MTM login name and email address. To Reset your Login ID and Password do the following: 1. Click on the My Settings tab, 2. Click on My Profile in the left hand menu 3. Edit the appropriate fields 4. Click the Update Setting button at the bottom of the page For Further Help Online Tutorials are available for each of these tasks at: Getting Started Help – Administration Training Videos
Transcript
Metrics That Matter® Quick Start Guide
For Cisco Learning Partner Metrics That Matter® Administrators
This Quick Start Guide will walk you through the steps to set up and get started with MTM. We have included best practices
and notes throughout this guide to get you up and running quickly. There are five main tasks you will need to do before you
can start collecting survey data.
These tasks are:
1. Add Cisco Certified Courses
2. Add Locations
3. Add Cisco Certified Instructors (CCSIs)
4. Schedule Classes
5. Distribute Evaluations
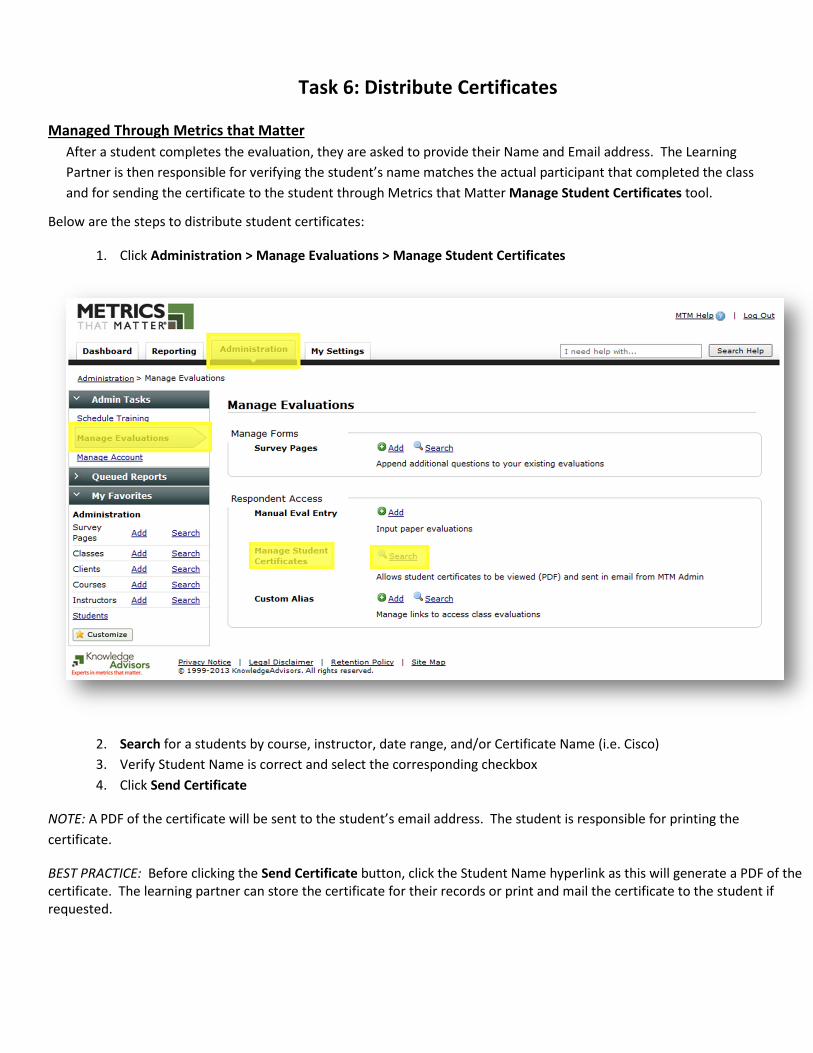
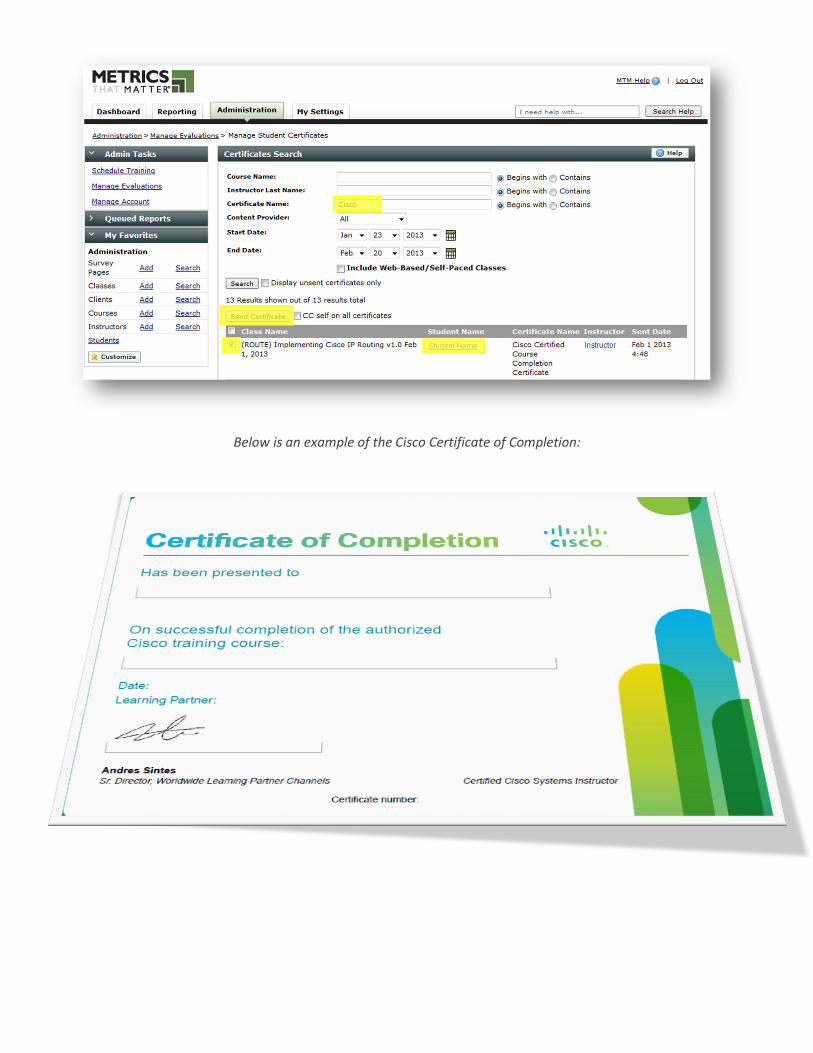
6. Distribute Certificate
Getting Started: If you have not already done so, you will want to login to MTM and personalize your login ID and password. To login to MTM
use this URL: www.metricsthatmatter.com/mtm
Note: You should have already received an email with your
token and login ID. If it has been past 5 days, please click
the “Forgot your Password?” link to obtain a new security
token.
In the login box at the top right side of the homepage, type
in your login ID and password, and then click login.
NOTE: You can check the ‘Remember Login’ box for future
uses. You can also click the “Forgot Password?” hyperlink to
reset your password by entering your MTM login name and
email address.
To Reset your Login ID and Password do the following:
1. Click on the My Settings tab,
2. Click on My Profile in the left hand menu
3. Edit the appropriate fields
4. Click the Update Setting button at the bottom of the page
For Further Help Online Tutorials are available for each of these tasks at:
Getting Started Help – Administration Training Videos
Task 1: Add Courses The Standard Cisco Course Titles are stored in a master list and maintained by KnowledgeAdvisors within MTM. As a Cisco
Learning Partner, you will need to add the specific Courses that your organization teaches to your MTM account. These course
names will then be available to choose from each time you schedule a class.
DO NOT CREATE YOUR OWN CISCO COURSE TITLES.
To add a Cisco Course to your account:
1. On the Administration tab, click Schedule Training on Admin Tasks side bar, and in the Courses tool window on the
right, click Add Certified Course.
2. Enter the full, or part of the course name and select
Contains.
3. Select Cisco as the Content Provider and click Search
BEST PRACTICE: Due to the View Results limitation in MTM
(displays the first 200 results), narrow your search
parameters (as needed) by including as much of the Course
Name as possible and click the Contains radio button.
4. Check the Add Box for the course(s) you wish to add to your account and then click the Add To My Courses
button.
If the Cisco course you need is not in the list, email Sanhita Bandyopadhyay ([email protected]). Please allow 24 to 48
hours for the course name to show in the Master Cisco list.
BEST PRACTICE: Verify that the courses have been added to your account by searching your account course list (Administration
> Scheduled Training > Courses – Search).
NOTE: If you hold a class on an older version of the Standard Cisco Course and the Name no longer appears within MTM, select
the Standard Course Name. Then rename the class with the product version in the Class Name field when scheduling that class.
NOTE: If you would like to schedule a Derivative Course, select Cisco Derivative from the Content Provider drop down. See
below:
Task 2: Add Locations
Locations are needed so you can assign the appropriate location for each class you schedule. Once you have created your
account’s training locations, you will be able to choose them from the dropdown list each time you add a class.
BEST PRACTICE: Before you create a new location, do a search to make sure it doesn’t already exist under a different name
(Administration > Scheduled Training > Location – Search).
To add a location to your account:
1. Click Administration > Schedule Training > Locations – Add
2. Select your Cisco Organization name from the dropdown list; unless you are a multi-channel partner, you will only have
one name in the list.
3. Enter the name of the location using the following convention:
For Your “Company” Locations: Examples
Your Company Name – City ACME Training – San Jose
OR
Your Company Name – City, State/Province ACME Training – San Jose, CA
For Your “Customer On Site” Locations: Examples
Your Company Name – On Site ACME Training – On Site
OR
Your Company Name – Customer One Site ACME Training – Customer On Site
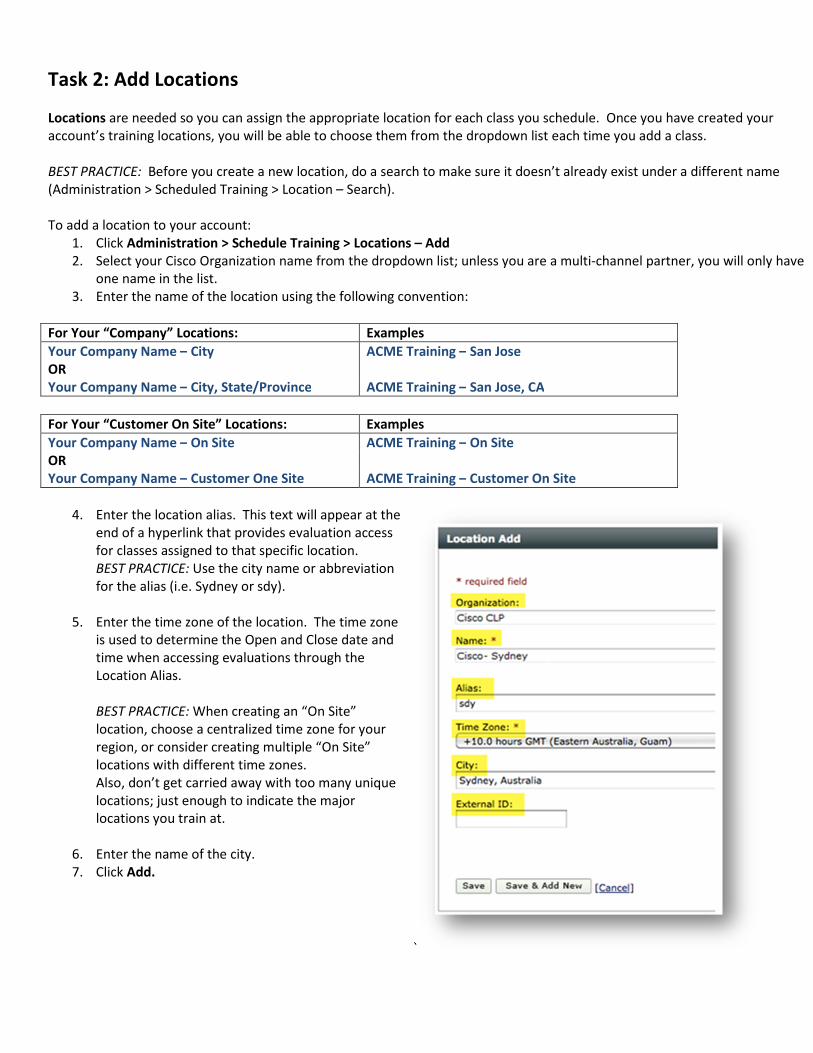
4. Enter the location alias. This text will appear at the
end of a hyperlink that provides evaluation access
for classes assigned to that specific location.
BEST PRACTICE: Use the city name or abbreviation
for the alias (i.e. Sydney or sdy).
5. Enter the time zone of the location. The time zone
is used to determine the Open and Close date and
time when accessing evaluations through the
Location Alias.
BEST PRACTICE: When creating an “On Site”
location, choose a centralized time zone for your
region, or consider creating multiple “On Site”
locations with different time zones.
Also, don’t get carried away with too many unique
locations; just enough to indicate the major
locations you train at.
6. Enter the name of the city.
7. Click Add.
`
Task 3: Add Instructors
You may need to add Authorized Instructors to your MTM account so they will be available to assign to specific classes.
IMPORTANT: MTM requires that Cisco courseware must be associated to a Cisco Certified Systems Instructor (CCSI) when
scheduling classes. Failing to add a CCSI to your MTM account will prevent you from scheduling Cisco classes.
BEST PRACTICE: Before you add a new Instructor, do a search to make sure he or she doesn’t already exist (Administration >
Scheduled Training > Users/Instructors – Search)
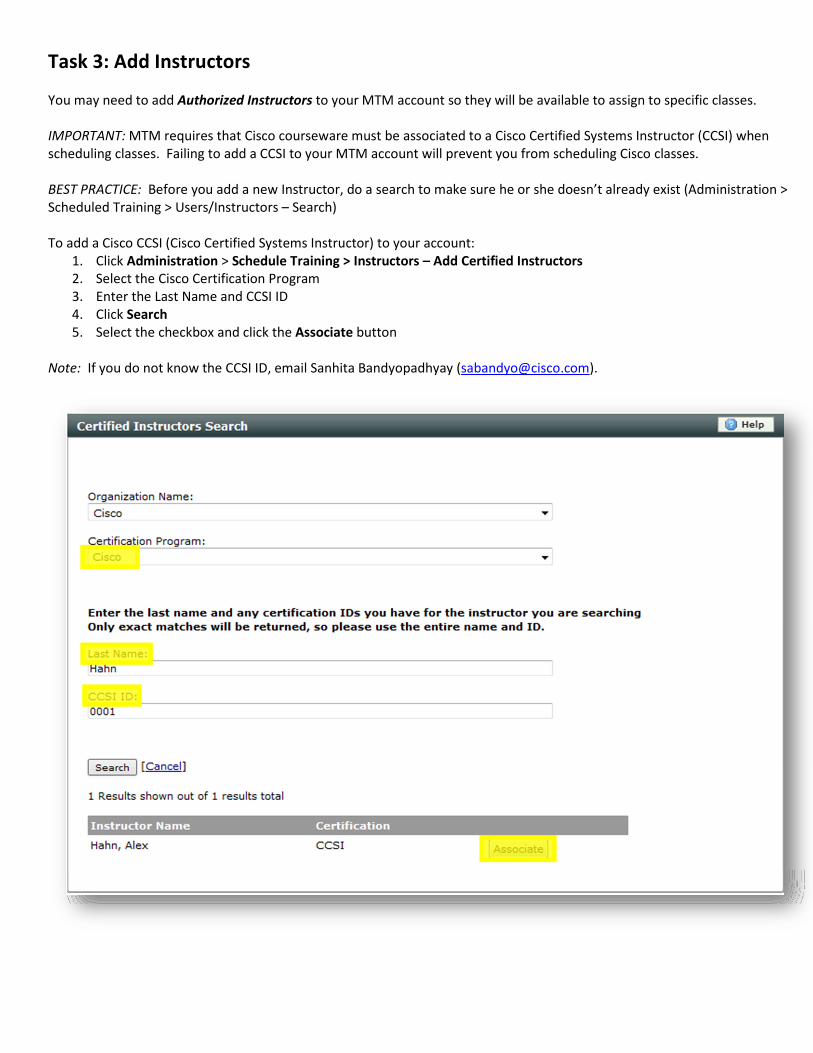
To add a Cisco CCSI (Cisco Certified Systems Instructor) to your account: