30
AddressObject Email Object NameObject PhoneObject Quick Start Guide for Java

AddressObject EmailObject NameObject PhoneObject
Quick Start Guide for Java

Melissa Data Corporation
Data Quality Suite for Java
Quick Start Guide

CopyrightCompanies, names, and data used in examples herein are fictitious unless otherwise noted. No part of this document may be reproduced or transmitted in any form or by any means, electronic or mechanical, for any purpose, without the express written permission of Melissa Data Corporation. This document and the software it describes are furnished under a license agreement, and may be used or copied only in accordance with the terms of the license agreement.
Copyright © 2012 by Melissa Data Corporation. All rights reserved.
Information in this document is subject to change without notice. Melissa Data Corporation assumes no responsibility or liability for any errors, omissions, or inaccuracies that may appear in this document.
TrademarksData Quality Suite, Address Object, Phone Object, Name Object, and Email Object are registered trademarks of Melissa Data Corp. Windows is a registered trademark of Microsoft Corp.
The following are registered trademarks of the United States Postal Service®: CASS, CASS Certified, DMM, DPV, DSF2, eLOT, First-Class Mail, LACSLink, NCOALink, PAVE, Planet Code, Post Office, Postal Service, RDI, Standard Mail, U.S. Postal Service, United States Post Office, United States Postal Service, USPS, ZIP, ZIP Code, and ZIP + 4.
DSF2 are provided by a nonexclusive licensee of the USPS. Melissa Data is a nonexclusive Interface Distributor and NCOALink Full Service Provider, DPV and LACSLink Licensee of the United States Postal Service. The prices for NCOALink and DPV services are not established, controlled, or approved by the United States Postal Service.
All other brands and products are trademarks of their respective holder(s).
Melissa Data Corporation22382 Avenida Empresa Rancho Santa Margarita, CA 92688-2112
Phone: 1-800-MELISSA (1-800-635-4772) Fax: 949-589-5211
E-mail: [email protected] Internet: www.MelissaData.com
For the most recent version of this document, visit http://www.melissadata.com/
Document Code: DQTAPIDQSJRG Revision Number: 17122012.10

Dear Developer,
I would like to take this opportunity to thank you for your interest in Melissa Data products and introduce you to the company.
Melissa Data has been a leading provider of data quality and address management solutions since 1985. Our data quality software, Cloud services, and data integration components verify, standardize, consolidate, enhance and update U.S., Canadian, and global contact data, including addresses, phone numbers, and email addresses, for improved communications and ROI. More than 5,000 companies rely on Melissa Data to gain and maintain a single, accurate and trusted view of critical information assets.
This manual will guide you through the functions of our easy-to-use programming tools. Your feedback is important to me, so please don’t hesitate to email your comments or suggestions to me at: [email protected].
I look forward to hearing from you.
Best Wishes,
Raymond F. Melissa
President/CEO

Quick Start Guide
i
ContentsIntroduction .....................................................................................1
About Address Object ...........................................................................................................1
Add-Ons To Address Object ..........................................................................................2
About Email Object ...............................................................................................................3
Features Include: .............................................................................................................3
An Example: .....................................................................................................................4
Trial Versions ...................................................................................................................5
Where To Find Help ...............................................................................................................5
Installation .......................................................................................6System Requirements ............................................................................................................6
Installing The Data Quality Suite ...........................................................................................6
Linux ................................................................................................................................6
Configuring The Data Quality Suite ......................................................................................7
Windows ...........................................................................................................................7
Linux .................................................................................................................................8
Samples ...........................................................................................8Sample Implementation ........................................................................................................8
Address Object Sample — Addresscheck ....................................................................9
Address Object Sample — Street Data Interface ......................................................11
Address Object Sample — Zipdata Interface .............................................................14
Address Object Sample — Parse Interface ................................................................16
Phone Object Sample ...................................................................................................18
Name Object Sample ....................................................................................................20
Email Object Sample ....................................................................................................23

Quick Start Guide Introduction
1
IntroductionWelcome to the Data Quality Suite. These customizable developer tools have been designed to help you efficiently manage your contact data for superior performance and profitablity. This is the crucial point that turns collected data into usable information. Depending on the objects you have purchased from this Suite, you will be able to verify and standardize addresses, validate phone numbers and update area codes, parse and genderize names, validate email addresses, and more.
About Address Object Clean up contact data of bad, incomplete information before it invades your database and creates a negative impact on your data-driven initiatives. You’ll reduce undeliverables, increase communication efforts and save money on all your direct marketing and CRM campaigns.
Address Object’s functionality is divided into four interfaces: AddressCheck, Parse, StreetData, and ZipData.
• AddressCheck can verify that an address is a properly formatted address that matches a true and valid point of delivery using the DPV® database. It also matches the address to the LACSLink® file to determine if the address has been converted (usually from a rual route to a standard city-street address) and automatically updates the address. The CASS Certified™ address checking logic includes DPV and LACSLink processing mandatory to qualify your mailings for postal discount by appending the ZIP + 4® codes to only validated addresses. Address Object also generates Form 3553 required by the Postal Service™ to claim the discounts. The AddressCheck interface also enhances your mailing list by providing additional information, such as Congressional District, County name and FIPS code, time zone and more.
• The Parse interface breaks down a street address into its component parts, such as street number, directional (S, NW and so on), street name and suffix (ST, RD, BLVD). If the first pass does not yield the expected results because the street address follows a non-standard format, the ParseNext function will offer an alternate parsing. The AddressCheck interface also parses the submitted data, but the Parse interface can be used without initializing the data files required for AddressCheck, making Parse faster to use when full address checking is not necessary. This interface can also parse Last Line data (city, state and ZIP Code™) into the separate parts. This is handy if your address data comes to you as lines of plain text instead of discrete fields.

Introduction DQS Java
2
• The StreetData interface can match a street name or just a partial name against a ZIP Code and return the known valid address ranges that match that pattern. Used in conjunction with the AddressCheck interface, StreetData can be used to match incorrect or misspelled addresses to a valid address range. For example, if “123 Main Ave” is not a valid address for the ZIP Code, the StreetData interface can determine that the number 123 falls within a valid range for “Main St,” allowing you to use an address record that would otherwise result in an undeliverable mail piece.
• The ZipData interface performs several functions, matching geographic data to ZIP Code and city information. First, the FindZip function returns geographic data about one or more city names that match the input ZIP Code, including automation (or carrier route) information, county name and FIPS code, postal facility type, official “last line” indicator, and latitude/longitude for each match. The FindZipInCity functions can return the same information for every ZIP Code that matches that input city and state combination. The FindCityInState functions can determine if the input full or partial city name matches a valid city name with the state. This can be useful to help correct misspelled city names in your mailing list.
Add-Ons To Address Object • Canadian Address Object — Increase the accuracy of your Canadian addresses. Use this API with
your custom PC & Web applications to validate, correct and standardize Canadian addresses and qualify your mailings to meet Canada Post requirements.
• RBDI (Residential Business Delivery Indicator) — Most shipping carriers charge a higher price for residential deliveries. RBDI helps ensure that you select the most cost-effective method for shipping parcels by identifying residential addresses... therefore maximizing your savings potential.
About Phone Object Use Phone Object to reduce data entry errors, catch area code splits early, save time looking up area codes, provide dealer lookup for customers, and link U.S. numbers to city, state, ZIP Code, and county.
Phone Object takes a phone number with an area code, parses it and retrieves geographic data corresponding to the area code and prefix. It can also update phone numbers that have undergone a recent area code split, helping to keep your data current and error-free.
Also, by parsing your phone number data and relating each area code and prefix to geographic information, such as longitude and latitude, Phone Object can provide an additional tool for planning a marketing campaign.

Quick Start Guide Introduction
3
About Name Object Use Name Object to increase response rates with personalized messages, merge individual components into form documents, identify gender makeup of your list for more targeted marketing, and reduce waste on fraudulent entries.
Name Object takes a string containing one or two full names, such as “John James Smith” or “Mr. John J. Smith and Ms. Mary Jones,” and breaks it into first, middle and last names, as well as any titles, generational suffixes, or other information.
Name Object will also attempt to indicate the gender of the person based on the first name, if possible. For instance, “James” would return an “M” for male, “Cheryl” an “F” for female but names like “Chris” or “Tracy” can be either male or female and would return “N” for “neutral.” Name Object can be configured to give preference to either male or female for lists that have a strong bias toward one gender or another.
Name Object will also flag names containing possible vulgar words to help you screen out possible hoaxes, pranks, nuisance names (“Mickey Mouse”) and possible Company Names (“Microsoft, Inc”). It can also create salutations, such as “Dear Mr. Jones,” using the parsed name information (Salutation uses the first person’s name if two full names are present).
About Email Object Email Object gives integrators a simple way to verify, correct, and standardize email address domains, to ensure legitimate email addresses are captured in contact databases. Email Object can be used in batch or at the point of entry, and has three optional levels of verification: Syntax, Local Database, and MXlookup. Email Object also allows for easy customization of domain changes, common misspellings, and suppression of bad domains.
Features Include:• Check for and remove syntax errors: (@@#$5!..`]> • Standardize Casing [email protected] -> [email protected] • Check for and update domain name changes @home.com –> cox.net • Check for and correct top level domain name (TLD) .con-> .com • Check for and correct misspellings in the domain: yohoo.com -> yahoo.com • Validate a domain name against a database of known good and bad domains • Validate domains via an optional MaileXchange (MX) Lookup • Parse email addresses into various components: bud, @, 800mail, com • Return the top level domain description
Introduction DQS Java
4
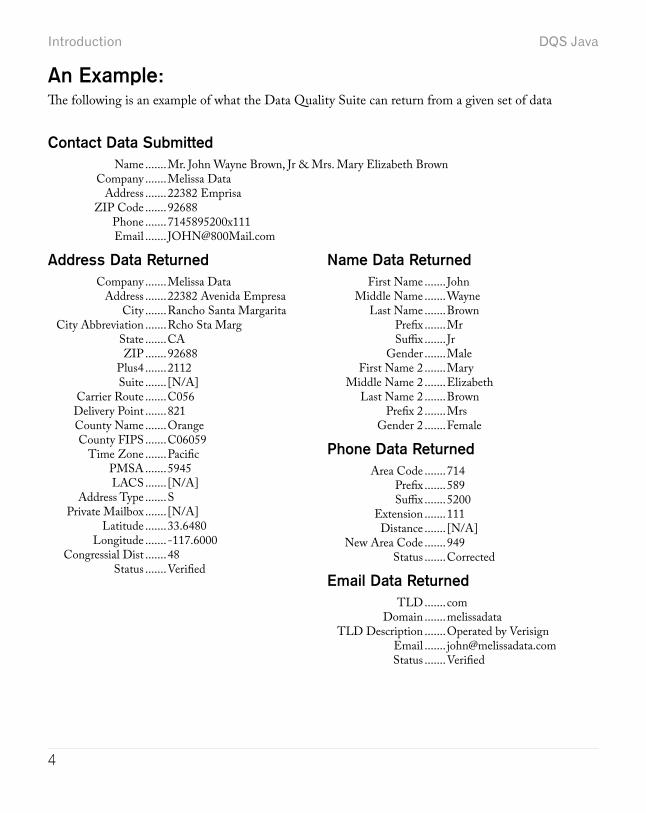
An Example:The following is an example of what the Data Quality Suite can return from a given set of data
Contact Data Submitted Name .......Mr. John Wayne Brown, Jr & Mrs. Mary Elizabeth Brown Company .......Melissa Data Address .......22382 Emprisa ZIP Code .......92688 Phone .......7145895200x111 Email ....... [email protected]
Address Data Returned Company .......Melissa Data Address .......22382 Avenida Empresa City .......Rancho Santa Margarita City Abbreviation .......Rcho Sta Marg State .......CA ZIP .......92688 Plus4 .......2112 Suite ....... [N/A] Carrier Route .......C056 Delivery Point .......821 County Name .......Orange County FIPS .......C06059 Time Zone .......Pacific PMSA .......5945 LACS ....... [N/A] Address Type .......S Private Mailbox ....... [N/A] Latitude .......33.6480 Longitude .......-117.6000 Congressial Dist .......48 Status .......Verified
Name Data Returned First Name ....... John Middle Name .......Wayne Last Name .......Brown Prefix .......Mr Suffix ....... Jr Gender .......Male First Name 2 .......Mary Middle Name 2 .......Elizabeth Last Name 2 .......Brown Prefix 2 .......Mrs Gender 2 .......Female
Phone Data Returned Area Code .......714 Prefix .......589 Suffix .......5200 Extension .......111 Distance ....... [N/A] New Area Code .......949 Status .......Corrected
Email Data Returned TLD .......com Domain .......melissadata TLD Description .......Operated by Verisign Email ....... [email protected] Status .......Verified

Quick Start Guide Introduction
5
Trial Versions All of the Data Quality Tools found on the DVD Suite can be used in demo mode to help you get familiar with our products before purchasing a license. The trial versions contain the same features found in the full versions, but are limited. Address Object and GeoCoder Object will only process ZIP™ codes in Nevada. Phone Object will only process Nevada area codes.
The trial versions for Name Object and Email Object can be used with a free 30-day license, after which the object must be purchased to continue using.
If you wish to purchase any or all of the tools in this Suite, simply contact your sales representative at 1-800-MELISSA (1-800-635-4772). Upon purchasing the product, you will be provided with a license string to unluck its full functionality.
Where To Find Help
Reference Guide The Data Quality Suite Reference Guide contains the functions available for the various objects. A PDF file of this guide is located on your DVD-ROM.
Many Linux versions come with a built in reader, such as Xpdf, to view the Reference Guide.
To view using other operating systems, you must have Adobe Acrobat Reader installed on your computer. This program can be downloaded from the Adobe web site (http:// www.adobe.com).
The Quick Start Guide and the Reference Guide are also available in HTML format. You can access this from the Technical Support web page on the Melissa Data web site (www.MelissaData.com).
Melissa Data Web Site Check out the technical support section on our web site at www.MelissaData.com, where you can view the current application notes and FAQs. Our web site also contains the latest product information for the Data Quality Suite and other Melissa Data products.
Call Us Toll Free If you need help using the Data Quality Suite, please call Technical Support toll free at 1-800-MELISSA (1-800-635-4772). Our technical support staff is available Monday through Friday from 6 a.m. - 5 p.m. Pacific Standard Time. You can also post a question on our forums at http://forum.MelissaData.com or send an e-mail to [email protected].

Installation DQS Java
6
Installation
System RequirementsThe Data Quality Suite is shipped on a DVD. It is recommended that you copy the data files to your local or network hard drive in order to access the data faster. Because these objects are in essence programmer’s tools, they should be installed on a system that has a development environment in order to utilize the power of the objects.
The following are additional hardware and software requirements:
2GB hard disk space (for data files)
Windows Users — Windows 2000, XP, Server 2003 or Server 2008 (32 or 64 bit); Pentium III or better. Most Windows-based programming languages.
Linux users — 32 or 64-bit (x86 or x64) distribution. GNU G++ 3.2 or later; glibc 3.2 or later
The actual deployment system does not require use of the development tools.
Installing The Data Quality Suite
Linux You do not need any special privileges when installing the objects in the Data Quality Suite, nor do you have to log in as root.
During installation, nothing will be modified out side of the target directory.
To install any of the objects:
1. Place the Data Quality Suite DVD in your DVD-ROM drive.2. From the shell prompt ($), mount the DVD and run the applicable setup.sh script to install the
object(s) to the desired directory.
All of the Unix-based OS sample programs assume that they can locate the required data files and object libraries in the current directory. It is not necessary to modify your PATH or LD_LIBRARY_PATH. If you prefer, you can run the sample program straight from the DVD ROM — there is no need to install anything.

Quick Start Guide Installation
7
The final deployment install has to be done manually or by using your system administration utilities. Since the deployment standards vary widely, Melissa Data does not provide any specific instructions. Remember the following:
• The objects in the Data Quality Suite do not require any special privileges • All files can be made read-only• There is no need for a setuid or setgid, neither as file permissions nor anywhere in your application
code.
File LocationsMost of the files are placed in subdirectories of C:\Program Files\Melissa Data\DQT\. During the installation process, there may be some files placed in your Windows system directory — these files are required by the Microsoft Visual C++ runtime.
Configuring The Data Quality SuiteA current license string is required to use the full functionality of the object in the Data Quality Suite. Without a license string, they will work in demo mode.
The license string should be entered as an environment variable. This allows you to update your license string without editing and recompiling your code. You must still call the SetLicenseString function, but you simply pass an empty string as the parameter.
These are the environment variable names for the objects in the Data Quality Suite:
• Address: MDADDR_LICENSE• Phone: MDPHONE_LICENSE• Name: MDNAME_LICENSE• Email: MDEMAIL_LICENSE
Setting The License String Environment Variable
WindowsWindows users can set environment variables by doing the following:

Samples DQS Java
8
1. Select Start > Settings, and then click Control Panel. 2. Double-click System, and then click the Advanced tab. 3. Click Environment Variables, and then select either System Variables or Variables for the user X. 4. Click New. 5. Enter the variable name (MDADDR_LICENSE, MDPHONE_LICENSE, MDNAME_
LICENSE, or MDEMAIL_LICENSE) in the Variable Name box. 6. Enter the license string in the Variable Value box and then click OK.Please remember that these settings take effect only upon start of the program. You may need to quit and restart the development environment to incorporate the changes.
LinuxUnix-based OS users can simply set their license string via the following:
export MDADDR_LICENSE=A1B2C3D4E5
Obviously, you must use the correct variable name for the object you are configuring. If you decide to put this setting in your .profile, remember to restart your shell.
Samples
Sample ImplementationThis section describes how to build simple applications using the objects in the Data Quality Suite.
Instantiation And InitializationDeclaring and creating an instance of the object being used is followed by one or more initialization steps to prepare it for use. These steps only need to be performed once per instance of the object in use.
LookupIn this section, the required data is passed to the input functions and the VerifyAddressfunction to process the data is called. Many functions in this suite accept the input data as parameters and do not require that any “set” functions be called before calling them.
ProcessingIn the processing stage, you’ll display or examine the return values of the “get” functions.

Quick Start Guide Samples
9
TerminationThis stage involves destroying the current instance of the object in use when you close the application, freeing up memory to be used by other processes.
Address Object Sample — AddresscheckIn order to use the Java wrapper, you will need the intermediate Java to C++ object and the Java wrapper JAR file. These files are located in the address\[OS]\interfaces\java folder, where [OS] is the operating system you are using. View the readme.txt in this directory for more detailed instructions.
The .Java wrapper must be able to find the Address Object’s standard DLL file, mdAddr.dll (libmdAddr.so for unix). The simplest method is to copy this file from the installed location, “C:\Program Files\Melissa DATA\DQT\AddrObj,” to the same folder that contains the intermediate wrapper and the JAR file.
Step 1 — Reference: Importing the JAR fileAdd the following line to the beginning of your Java code to import the generated JAR file. This is the default package generated by the Java wrapper setup. Additionally, you must ensure Java (java.library.path and classpath) can locate the intermediate wrapper, the JAR file, and Address Object. Please view the provided sample scripts as a template.
Add the following line to the beginning of your Java code.
import com.melissadata.*;
Step 2 — Instantiation: Add an Object Declaration Begin by declaring the object as a new object variable.
mdAddr ao = new mdAddr();
Step 3 — Initialization: Set the License StringCall the SetLicenseString function for Address Object to retrieve the license string from the MDADDR_LICENSE environment variable.
boolean test = ao.SetLicenseString(“”);
Step 4 — Initialization: Error CheckingThe next step is to tell Address Object where it can find its data files. The initialization will either be successful, or an error message will display stating why the error occurred.

Samples DQS Java
10
The path to the Canadian data files is only necessary if you are using those options. The path to the U.S. data files can be omitted if you are only processing Canadian address data.
The initialization error code is returned as a text string.
private static string dPath = “C:\\Program Files\\Melissa Data\\DQT\\Data Files”; ao.SetPathToUSFiles(dPath); ao.SetPathToDPVDataFiles(dPath); ao.SetPathToLACSLinkDataFiles(dPath); ao.SetPathToCanadaFiles(dPath);
If (ao.InitializeDataFiles() != mdAddr.ProgramStatus.ErrorNone) { String InitErrorString = ao.GetInitializeErrorString(); } Else { String InitErrorString = ao.GetInitializeErrorString(); String DatabaseDate = ao.GetDatabaseDate(); String ExpDate = ao.GetExpirationDate(); String BuildNum = ao.GetBuildNumber();}
Step 5 — Lookup: Input Required for VerifyAddress FunctionThe minimum required input is a street address, plus either the city and state or the five-digit ZIP Code™. Company name may be necessary for an accurate ZIP + 4® in the case of business or other facility addresses that have their own unique nine-digit ZIP Code.
ao.SetAddress(“22382 Avenida Empresa”);ao.SetZip(“92688”);ao.SetCompany(“Melissa Data Corp”);
Step 6 — Lookup: Calling the VerifyAddress Function If the return value is false, then the address could not be properly coded.
ao.VerifyAddress();
Step 7 — Processing: Checking the Results If the VerifyAddress could not code the input address, you can check the reason by querying the return value of the GetResults function.
private string resultCode = ao.GetResults();

Quick Start Guide Samples
11
The GetResults function replaces the GetStatusCode, GetErrorCode, GetErrorString, GetSuiteStatus and GetDPVFootnotes functions. Those functions should be considered deprecated going foward, but if your existing code requires that you continue to use these functions, GetStatusCode should be called first. If Address Object could not return a result, then the GetErrorCode function will give you additional information about the reason why the query failed. Both functions return text strings that are exactly one character long. GetErrorString returns a fuller description of the results returned by GetErrorCode.
Step 8 — Processing: Retrieving the Results The VerifyAddress function populates return values of numerous functions, a few of which are illustrated in the example below. For a complete list of the values returned by the VerifyAddress function, see the Address Object Reference Guide.
String Address1 = ao.GetAddress();String Address2 = ao.GetAddress2();String Suite = ao.GetSuite();String City = ao.GetCity();String State = ao.GetState();String Zip = ao.GetZip();String Plus4 = ao.GetPlus4();String CountyName = ao.GetCountyName();
These are just the basics. See the Data Quality Suite Reference Guide for information about all the information that Address Object can return.
Step 9 — Termination: Destroying the Instance Be sure to recycle your memory bits. We do not believe Address Object leaks allocated resources, however, you must properly destroy Address Object to force the release of memory.
addrObj.Delete();
Address Object Sample — Street Data Interface The StreetData interface returns a list of all possible address ranges matching a specific street name or portion of a street name within a given ZIP Code. This is useful when VerifyAddress returns an error code for an address indicating that the address falls outside any known deliverable range. Rather than discarding the address as useless, you can attempt to match it against known ranges on the same street or similarly named streets in the same ZIP Code. This might give you a list of alternate possible addresses.

Samples DQS Java
12
If you are using Address Object as part of your web application and a customer enters a bad address, or their address matches more than one record, StreetData enables you to catch it immediately and present the customer with the opportunity to select the correct address.
The FindStreet function accepts a full or partial street name (“MA*” for all streets beginning with the letters M-A) and a five-digit ZIP Code, like this:
result = sd.FindStreet(“Ash*”, “92899”, false);
This function would then return values filled with the first address range that matches that street name and ZIP Code, such as Ash Street and Ashland Avenue. The information returned includes the street name, the high and low values of the street number range, the high and low values of the Plus 4 portion of the ZIP Code, and the high and low values for the range of suite numbers, if any. FindStreet also returns indicators that show if the above numbers in the range are odd, even or both.
You could then use the IsAddressInRange2 function to determine if a specific address falls within that range. If not, you would then call the FindStreetNext function to return the next matching range, and compare the address to that range, repeating until you exhaust all possibilities.
Step 1 — Instantiation: Declaring and Creating an InstanceSee Step 1 above under the AddressCheck sample for information on adding Address Object to your project.
private mdStreet sd = New mdStreet();
Step 2 — Initialization: Set the License String Follow the same process used in Step 3 under the AddressCheck interface above.
Step 3 — Initialization: Initialize the Data FilesStreetData uses a different initialization method than AddressCheck. The Initialize function calls for two string values containing the path to the Address Object’s data files named mdAddr.dat, mdAddr.nat, mdAddr.lic, and mdAddr.str.
There is a third, optional parameter that is no longer used. If your programming environment does not support optional parameters, pass an empty string to this function as a third parameter.
int result = sd.Initialize(DataPath, NationalPath, "");if result != 0 { System.out.println(sd.GetInitializeErrorString());}

Quick Start Guide Samples
13
Step 4 — Lookup: Calling the FindStreet FunctionThe FindStreet function returns the first address range that matches the street name or partial name and ZIP Code passed as parameters.
boolean result = false;result = sd.FindStreet(street_name, zip_code, false);
Step 5 — Processing: Calling the IsAddressInRange2 FunctionIf the FindStreet function finds a range which matches the street name and ZIP Code submitted, it returns values to several functions which can then be compared to specific address data to see if the address falls within the returned range.
The IsAddressInRange2 function compares a submitted value to a high and low value to see if the value falls within the range. The function can also exclude odd or even values. You can use this function as a backstop for VerifyAddress to check an address that could not be verified to find alternate possible addresses that might be valid.
boolean in_range = false;String high = “”;String low = “”;String odd = “”;
while (result) { high = sd.GetPrimaryRangeHigh(); low = sd.GetPrimaryRangeLow(); odd = sd.GetPrimaryRangeOddEven(); in_range = sd.IsAddressInRange2(Range, High, Low, Odd); if (in_Range) { System.out.println(“Match found”); }
Step 6 — Lookup: Find the Next Match with FindStreetNextThe FindStreetNext function returns the next match to the pattern passed to the last call to the FindStreet function. If there are no more matches, the function returns a value of false. This allows you to loop through all possible street data matches and use the IsAddressInRange2 function to find any that might match your address. The complete structure might look something like the code below.
result = sd.FindStreetNext();}

Samples DQS Java
14
Step 7 — Termination: Destroying the InstanceBe sure to recycle your memory bits. We do not believe Address Object leaks allocated resources, however, you must properly destroy your StreetData Object to force the release of memory.
sd.Delete();
Address Object Sample — Zipdata InterfaceZIP Data interface returns both ZIP Code data based on city and state information and city/ state information based on ZIP Code. Using the example of a web application processing customer addresses, this interface could be used in the event that the customer enters an unrecognized city, state or ZIP Code. After the VerifyAddress function catches errors, the ZipData functions can generate a list of cities or ZIP codes to be presented to the customers as alternatives to what they entered.
Step 1 — Instantiation: Declaring and Creating an InstanceSee Step 1 under the Address Check sample above for information on adding Address Object to your project.
private mdZip zd = New mdZip();
Step 2 — Initialization: Set the License StringFollow the same process used in Step 3 under the AddressCheck interface above.
Step 3 — Initialization: Initialize the Data FilesZipData uses the same initialization functions as the Street Data interface. See Step 3 under StreetData for an example.
Step 4 — Lookup: Calling the FindZip FunctionThe FindZip function retrieves the first record found for the submitted five-digit ZIP Code, which includes city name, state, county information and geographical information, and populates the return value of the corresponding functions. Often there will be only one unless the ZIP Code covers more than one city or there is at least one alternative name for a city. If the record returned includes the official preferred city name, a function called GetLastLineIndicator will return the letter “L.” You can use this function to standardize your address data by using only the official city name.
The FindZipNext function retrieves the next record for the last call to FindZip, if any. If there is another record, this function returns true, false otherwise.
boolean result = false;result = zd.FindZip(“92688”, false);while (Result) {
Quick Start Guide Samples
15
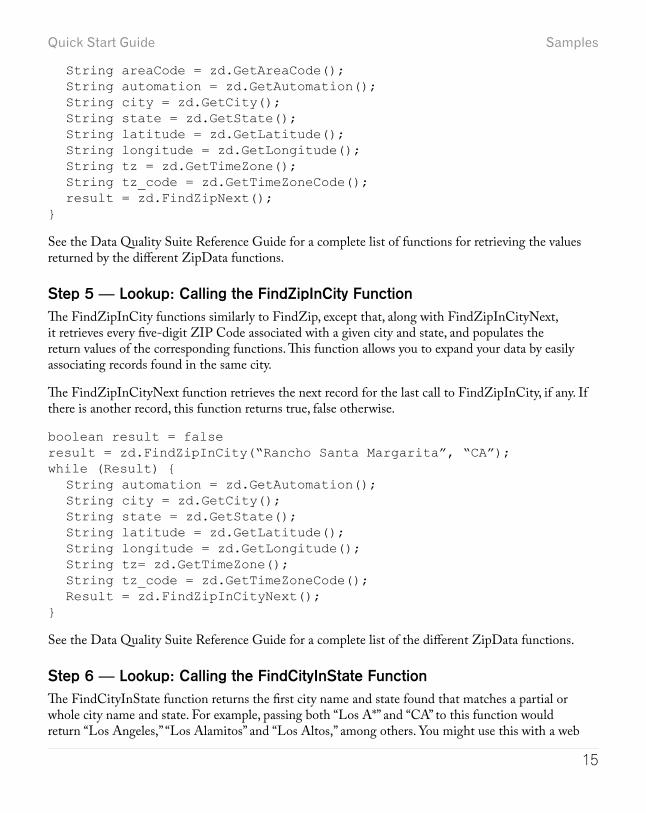
String areaCode = zd.GetAreaCode(); String automation = zd.GetAutomation(); String city = zd.GetCity(); String state = zd.GetState(); String latitude = zd.GetLatitude(); String longitude = zd.GetLongitude(); String tz = zd.GetTimeZone(); String tz_code = zd.GetTimeZoneCode(); result = zd.FindZipNext();}
See the Data Quality Suite Reference Guide for a complete list of functions for retrieving the values returned by the different ZipData functions.
Step 5 — Lookup: Calling the FindZipInCity FunctionThe FindZipInCity functions similarly to FindZip, except that, along with FindZipInCityNext, it retrieves every five-digit ZIP Code associated with a given city and state, and populates the return values of the corresponding functions. This function allows you to expand your data by easily associating records found in the same city.
The FindZipInCityNext function retrieves the next record for the last call to FindZipInCity, if any. If there is another record, this function returns true, false otherwise.
boolean result = falseresult = zd.FindZipInCity(“Rancho Santa Margarita”, “CA”);while (Result) { String automation = zd.GetAutomation(); String city = zd.GetCity(); String state = zd.GetState(); String latitude = zd.GetLatitude(); String longitude = zd.GetLongitude(); String tz= zd.GetTimeZone(); String tz_code = zd.GetTimeZoneCode(); Result = zd.FindZipInCityNext();}
See the Data Quality Suite Reference Guide for a complete list of the different ZipData functions.
Step 6 — Lookup: Calling the FindCityInState FunctionThe FindCityInState function returns the first city name and state found that matches a partial or whole city name and state. For example, passing both “Los A*” and “CA” to this function would return “Los Angeles,” “Los Alamitos” and “Los Altos,” among others. You might use this with a web
Samples DQS Java
16
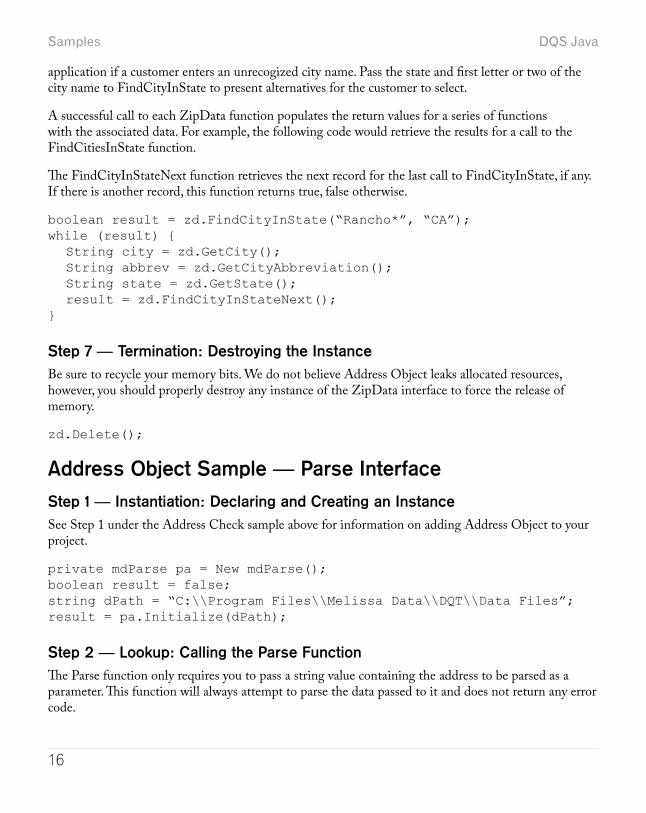
application if a customer enters an unrecogized city name. Pass the state and first letter or two of the city name to FindCityInState to present alternatives for the customer to select.
A successful call to each ZipData function populates the return values for a series of functions with the associated data. For example, the following code would retrieve the results for a call to the FindCitiesInState function.
The FindCityInStateNext function retrieves the next record for the last call to FindCityInState, if any. If there is another record, this function returns true, false otherwise.
boolean result = zd.FindCityInState(“Rancho*”, “CA”);while (result) { String city = zd.GetCity(); String abbrev = zd.GetCityAbbreviation(); String state = zd.GetState(); result = zd.FindCityInStateNext();}
Step 7 — Termination: Destroying the InstanceBe sure to recycle your memory bits. We do not believe Address Object leaks allocated resources, however, you should properly destroy any instance of the ZipData interface to force the release of memory.
zd.Delete();
Address Object Sample — Parse Interface
Step 1 — Instantiation: Declaring and Creating an InstanceSee Step 1 under the Address Check sample above for information on adding Address Object to your project.
private mdParse pa = New mdParse();boolean result = false;string dPath = “C:\\Program Files\\Melissa Data\\DQT\\Data Files”;result = pa.Initialize(dPath);
Step 2 — Lookup: Calling the Parse FunctionThe Parse function only requires you to pass a string value containing the address to be parsed as a parameter. This function will always attempt to parse the data passed to it and does not return any error code.
Quick Start Guide Samples
17
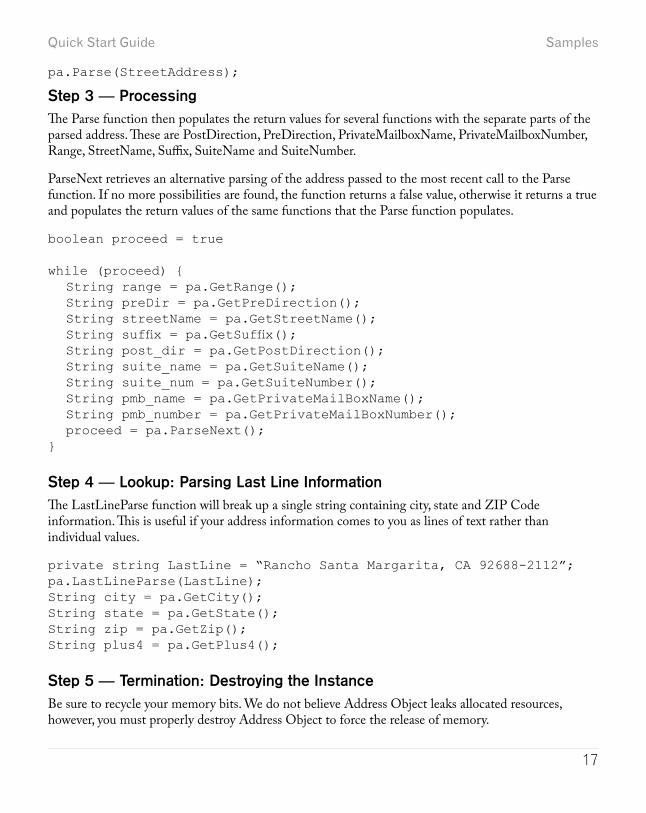
pa.Parse(StreetAddress);
Step 3 — ProcessingThe Parse function then populates the return values for several functions with the separate parts of the parsed address. These are PostDirection, PreDirection, PrivateMailboxName, PrivateMailboxNumber, Range, StreetName, Suffix, SuiteName and SuiteNumber.
ParseNext retrieves an alternative parsing of the address passed to the most recent call to the Parse function. If no more possibilities are found, the function returns a false value, otherwise it returns a true and populates the return values of the same functions that the Parse function populates.
boolean proceed = true
while (proceed) { String range = pa.GetRange(); String preDir = pa.GetPreDirection(); String streetName = pa.GetStreetName(); Stringsuffix=pa.GetSuffix(); String post_dir = pa.GetPostDirection(); String suite_name = pa.GetSuiteName(); String suite_num = pa.GetSuiteNumber(); String pmb_name = pa.GetPrivateMailBoxName(); String pmb_number = pa.GetPrivateMailBoxNumber(); proceed = pa.ParseNext();}
Step 4 — Lookup: Parsing Last Line InformationThe LastLineParse function will break up a single string containing city, state and ZIP Code information. This is useful if your address information comes to you as lines of text rather than individual values.
private string LastLine = “Rancho Santa Margarita, CA 92688-2112”; pa.LastLineParse(LastLine);String city = pa.GetCity();String state = pa.GetState();String zip = pa.GetZip();String plus4 = pa.GetPlus4();
Step 5 — Termination: Destroying the Instance Be sure to recycle your memory bits. We do not believe Address Object leaks allocated resources, however, you must properly destroy Address Object to force the release of memory.

Samples DQS Java
18
pa.Delete();
Phone Object SampleThe Phone Object retrieves geographic information based on a submitted phone number and also parses out the area code and prefix from the phone number. This includes longitude, latitude, county, and demographic area information based on the centroid of the area code/ prefix combination.
Being able to sort records by area code, telephone prefix or both gives you additional tools to get more value out of your contact data.
In order to use the Java wrapper, you will need the intermediate Java to C++ object and the Java wrapper JAR file. These files are located in the phone\[OS]\interfaces\java folder, where [OS] is the operating system you are using. View the readme.txt in this directory for more detailed instructions.
The .Java wrapper must be able to find Phone Object’s standard DLL file, mdPhone.dll (libmdPhone.so for unix). The simplest method is to copy this file from the installed location, “C:\ProgramFiles\Melissa DATA\DQT\PhoneObj,” for windows to the same folder that contains the intermediate wrapper and the JAR file.
Step 1 — Reference: Importing the JAR fileAdd the following line to the beginning of your Java code to import the generated JAR file. This is the default package generated by the Java wrapper setup. Additionally, you must ensure Java (java.library.path and classpath) can locate the intermediate wrapper, the JAR file, and Phone Object. Please view the provided sample scripts as a template.
import com.melissadata.*;
Step 2 — Initialization: Create an Instance of Phone Object Begin by declaring the object as a new object variable.
private mdPhone po = New mdPhone();
Step 3 — Initialization: Setting the License StringCall the SetLicenseString function for Phone Object to retrieve the license string from the MDPHONE_LICENSE environment variable.
po.SetLicenseString (“”);
Step 4 — Initialization: Initialize the Data Files The Initialize function requires a string value containing the path to Phone Object’s data files.

Quick Start Guide Samples
19
mdPhone.ProgramStatus Result = po.Initialize(DataPath);If (Result != 0) { System.out.println(po.GetInitializeErrorString);}
Step 5 — Lookup: Calling the Lookup FunctionThe Lookup function accepts a string containing a phone number and populates the return values of several functions if it successfully locates the area code and prefix in the database.
boolean result = false;result = po.Lookup(“949-589-5200”, “92688”);
If the Lookup function returns a false value, an error has occurred. Check the GetErrorCode and GetStatusCode functions to determine the cause.
Step 6 — Processing: Retrieve the Return ValuesA successful call to the Lookup function populates the return values of the functions listed below. The functions return string values. If you need to perform any calculations, you will need to convert numbers to the correct data type.
String area_code = po.GetAreaCode();Stringprefix=po.GetPrefix();Stringsuffix=po.GetSuffix();String ext = po.GetExtension();String city = po.GetCity();String country = po.GetCountryCode();Stringfips=po.GetCountyFips();String county = po.GetCountyName();String latitude = po.GetLatitude();String longitude = po.GetLongitude();String state = po.GetState();String tz = po.GetTimeZone();String tz_code = po.GetTimeZoneCode();
Step 7 — Processing: Correcting Area CodesPhone Object also includes a CorrectAreaCode function, which checks the submitted phone number against a database of recently updated area codes and retrieves the new area code. The function then populates the GetAreaCode and GetNewAreaCode functions. If there has been an area code split, the updated area code will be passed to the GetNewAreaCode function. If there has been no change, the return values of both functions will be the same.

Samples DQS Java
20
boolean result = po.CorrectAreaCode(“949-589-5200”, “92688”);If (result) { String area_code = po.GetAreaCode(); String new_area_code = po.GetNewAreaCode();} else { String results = po.GetResults();}
Step 8 — Termination: Destroying the Instance Be sure to recycle your memory bits. We do not believe Phone Object leaks allocated resources, however, you must properly destroy any instance of Phone Object to force the release of memory.
po.Delete();
Name Object SampleMelissa Data’s Name Object takes a person’s full name and parses it into first, middle and last. It can also recognize titles and honorifics such as “Ms.” or “Dr.”, as well as generational and educational suffixes like “Jr.” or “MD.” Name Object can, in many cases, recognize the gender of the first name and can also flag names containing possible vulgarities, screening out hoaxes or other bad data. This object enables you to sort by last name if your data comes to you with the contact name contained in a single string value. The ability to “genderize” your name data allows you to more accurately target direct mail advertising even when the customer did not supply gender information.
In order to use the Java wrapper, you will need the intermediate Java to C++ object and the Java wrapper JAR file. These files are located in the address\[OS]\interfaces\java folder, where [OS] is the operating system you are using. View the readme.txt in this directory for more detailed instructions.
The .Java wrapper must be able to find Name Object’s standard DLL file, mdName.dll (libmdName.so for unix). The simplest method is to copy this file from the installed location, “C:\ProgramFiles\Melissa DATA\DQT\NameObj,” for windows to the same folder that contains the intermediate wrapper and the JAR file.
Step 1 — Reference: Importing the JAR fileAdd the following line to the beginning of your Java code to imported the generated JAR file. This is the default package generated by the java wrapper setup. Additionally, you must ensure java (java.library.path and classpath) can locate the intermediate wrapper, the JAR file, and address object. Please view the provided sample scripts as a template.
import com.melissadata.*;

Quick Start Guide Samples
21
Step 2 — Initialization: Create an Instance of Name Object Begin by declaring the object as a new object variable.
mdName no = New mdName();
Step 3 — Initialization: Setting the License StringCall the SetLicenseString function for Name Object to retrieve the license string from the MDNAME_LICENSE environment variable.
no.SetLicenseString(“”);
Step 4 — Initialization: Initialize the Data FilesBefore initializing the data files, you must call the SetPathToNameFiles function using a string containing the path to the mdName data files.
no.SetPathToNameFiles(strDataPath);int Result = no.InitializeDataFiles();if (Result != 0) { System.out.println(no.GetInitializeErrorString);}
Step 5 — Lookup: Set the Name Object OptionsThe Name Object has several optional settings that control how the object genderizes names, builds salutations, and handles misspelled first names. The following lines show the default settings. See the Name Object Reference Guide for detailed information on each setting.
no.SetFirstNameSpellingCorrection(1);no.SetGenderPopulation(1);no.SetGenderAggression(1);no.AddSalutation(mdName.Formal);no.AddSalutation(mdName.FirstLast);no.AddSalutation(mdName.Informal);no.AddSalutation(mdName.Slug);no.SetSalutationPrefix(“Dear”);no.SetSalutationSuffix(“;”);no.SalutationSlug(“Valued Customer”);no.PrimaryNameHint(mdName.VeryLikelyFull);

Samples DQS Java
22
Step 6 — Lookup: Calling the Parse FunctionThe Parse function accepts a single string value containing a full name. Ideally, this name should be formatted as first name, middle name, and last name. Name Object can handle last name first if the string is properly formatted and punctuated (last name, comma, first name and middle name) or if PrimaryNameHint is set to handle an inverse name.
no.SetFullName(“Mr. John J. Smith, Jr. and Mrs. Mary Q. Jones”);no.Parse();
Step 7 — Processing: Retrieving the Parsed Name A successful call to the Parse function populates the return values of the following functions: FirstName (“John”), MiddleName (“J”), LastName (“Smith”), Prefix (“Mr.”), Suffix (“Jr”) and Gender (“M”). If a second full name was present, Name Object also populates the values for a second set of functions: FirstName2 (“Mary”), MiddleName2 (“Q”), LastName2 (“Jones”), Prefix2 (“Mrs.”), Suffix2 (empty in this case) and Gender2 (“F”).
The object also sets the return value of the GetSalutation function using the first name found in the full name, if more than one was present (“Dear Mr. Smith;”)
String FirstName = no.GetFirstName();String MiddleName = no.GetMiddleName();String LastName = no.GetLastName();StringPrefix=no.GetPrefix();StringSuffix=no.GetSuffix();String Gender = no.GetGender();String FirstName2 = no.GetFirstName2();String MiddleName2 = no.GetMiddleName2();String LastName2 = no.GetLastName2();StringPrefix2=no.GetPrefix2();StringSuffix2=no.GetSuffix2();String Gender2 = no.GetGender2();String Salutation = no.GetSalutation();
Step 8 — Processing: Check The ResultsCheck the output of the GetResults function to determine the degree of success and any problems with Parsing or Genderizing.
If First Name Spelling Correction was enabled, the results codes will also indicate if one or both first names were corrected.
ResultsString=no.GetResults();

Quick Start Guide Samples
23
if(ResultsString.contains(“NS01”)) System.out.println(“NS01: There were no errors.”);if(ResultsString.contains(“NS03”)) System.out.println(“NS03:ThespellingoftheFirstNamefieldwas corrected”);if(ResultsString.contains(“NS04”)) System.out.println(“NS04:ThespellingoftheFirstName2fieldwas corrected”);if(ResultsString.contains(“NS02”)) System.out.println(“NS02: A parse error was found...”);if(ResultsString.contains(“NE01”)) System.out.println(“NE01: Two names were detected but theFullName string was not in a recognized format”);if(ResultsString.contains(“NE02”)) System.out.println(“NE02:Multiplefirstnames-couldnot accurately genderize”);if(ResultsString.contains(“NE03”)) System.out.println(“NE03: A vulgarity was detected in the name”);if(ResultsString.contains(“NE04”)) System.out.println(“NE04: A nuisance name [such as Mickey Mouse] was detected in the name”);if(ResultsString.contains(“NE05”)) System.out.println(“NE05: The name contained words normally found in a company name”);if(ResultsString.contains(“NE06”)) System.out.println(“NE06: The name contained a non-alphabetic character”);}
Step 9 — Termination: Destroying the Instance Be sure to recycle your memory bits. We do not believe Name Object leaks allocated resources, however, you must properly destroy Name Object to force the release of memory.
no.Delete();
Email Object SampleIn order to use the Java wrapper, you will need the intermediate Java to C++ object and the Java wrapper JAR file. These files are located in the email\[OS]\interfaces\java folder, where [OS] is the operating system you are using. View the readme.txt in this directory for more detailed instructions.

Samples DQS Java
24
The .Java wrapper must be able to find Email Object’s standard DLL file, mdEmail.dll (libmdName.so for unix). The simplest method is to copy this file from the installed location, “C:\ProgramFiles\Melissa DATA\DQT\EmailObj,” for windows to the same folder that contains the intermediate wrapper and the JAR file.
Step 1 — Reference: Importing the JAR file Add the following line to the beginning of your Java code to import the generated JAR file. This is the default package generated by the Java wrapper setup. Additionally, you must ensure Java (java.library.path and classpath) can locate the intermediate wrapper, the JAR file, and Email Object. Please view the provided sample scripts as a template.
import com.melissadata.*;
Step 2 — Initialization: Create an Instance of Email Object Begin by declaring the object as a new object variable.
mdEmail eo = New mdEmail();
Step 3 — Initialization: Setting the License String and Data PathCall the SetLicenseString function for Email Object to retrieve the license string from the MDEMAIL_LICENSE environment variable.
eo.SetLicenseString(“”);
Step 4 — Initialization: Initializing the Data FilesInitialializing connects Email Object to its data files. If it does not initialize, then display the GetInitializeErrorString for an explanation of the error.
eo.SetPathToEmailFiles(Datapath);If (eo.InitializeDataFiles() != mdEmail.ProgramStatus.None) { System.WriteLine(eo.GetInitializeErrorString());}
Step 5 — Initialization: Setting the Verification OptionsEmail Object has five boolean functions to enable or disable certain options before verifying an email address. For more information on these functions, see the Data Quality Suite Reference Guide.
eo.SetCorrectSyntax(true);eo.SetDatabaseLookup(true);eo.SetMXLookup(true);eo.SetStandardizeCasing(true);eo.SetUpdateDomain(true);

Quick Start Guide Samples
25
Step 6 — Processing: Verifying the Email AddressVerifying the email address is simply a matter of passing the email address to the VerifyEmail function, which returns a boolean true if successful. You can then extract the various parts of the standardized address using the functions shown below.
The GetChangeCode function returns a number that can be used to check what has been changed. Use the AND operator to check the first four bits.
If the VerifyEmail function cannot verify the submitted email address, Email Object returns the Error and Status Codes to reveal the reason why the address could not be successfully verified.
If (eo.VerifyEmail(InputEmail)) { String Mailbox = eo.GetMailBoxName(); String TLD = eo.GetTopLevelDomain(); String TLDDesc = eo.GetTopLevelDomainDescription(); String EmailAddress = eo.GetEmailAddress(); String Domain = eo.GetDomainName(); String ChangeList = “”; long ChangeCode = eo.GetChangeCode; If ((ChangeCode & 1) == 1) { ChangeList += “Syntax Changed” + “\n”; } If ((ChangeCode & 2) == 2) { ChangeList += “TLD Updated” + “\n”; } If ((ChangeCode & 4) == 4) { ChangeList += “Domain Spelling” + “\n”; } If ((ChangeCode & 8) == 8) { ChangeList += “Domain Updated” + “\n”; }} else { String ResultsCode = eo.GetResults();}
Step 7 — Termination: Destroying the Instance Be sure to recycle your memory bits. We do not believe Email Object leaks allocated resources, however, you must properly destroy this instance of Email Object to force the release of memory.
eo.Delete();


