About ZappitiZappiti is a French company based in Paris. Zappiti designs and manufactures only professional grade Video Management Systems; delivering the highest quality, outstanding performance, and best possible user experience. The sofware development & enginering, design and support teams are located in France (Europe).
All of the Zappiti products are designed to provide our end-user customers with convenient and intuitive access to their entire movie library collection, in stunning 4K, High Definition resolution. The award winning Zappiti devices are being successfully used to improve the movie watching experience, in residential and commercial environments all over the globe.
To ensure the ultimate performance, all Zappiti devices are supplied to authorized resellers through a worldwide network of established and well respected distribution partners.
Zappiti products are distributed in over 40 countries worldwide.
More info: zappiti.com
Getting More InformationDue to the regular evolution and the addition of new functionalities, provided by firmware and software updates, it is impossible to cover all functionalities in this user's guide. For this reason, we invite you to visit our online Zappiti Knowledge Base. You will find a large amount of tutorials and various help topics concerning the use of the media player and Zappiti applications:zappiti.uservoice.com/knowledgebase
3English 3TLista de contenidos
Table of ContentsEnglishQuick Start Guide
General, Key FeaturesOrganize your Video Collection with Movie CoversPackage Contents Exterior, IR ExtenderRemote Control, Connect a Computer Keyboard / MouseGetting Started, HDMI Outputs, Black Border Issue (overscan)Firmware Upgrade, Audio & Video Settings
Connecting USB Drives, Using Internal Drive, SD / MMC CardsZappiti Video, Zappiti Music & Zappiti Explorer, Create An Account
Accessing Network Drives and Access to Zappiti StorageHow to Transfer your Files Using Zappiti ExplorerVideo and Audio Playback Options, Slideshow Function, PropertiesHow to Install an App, Add an App Shortcut to the Home Page
Adding a Movie File, Deleting a Movie FileCómo identificar películas no encontradas, cómo identificar archivos 3D, 4K y UHD
4 • 5 • 6 • 7 • 8 • 9 •
10 • 11 • 12 • 13 • 13 •
13 • 13 •
Ethernet, Wi-Fi, Bluetooth, Audio/Video Mirroring14 • Zappiti Music, How To Control Your Zappiti Using your Tablet / Smartphone14 •
15 • 16 • 16 •
Parental Control, Personal Categories, Zappiti On Start-Up, Subtitle options17 • Default Subtitles and Language, User Support, Zappiti Db Community17 •
How to Create a Movie Collection in Zappiti Video
4
Lista de contenidosCastellanoGuía de inicio rápido18 • 19 • 20 • 21 • 22 • 23 • 24 • 25 • 26 • 26 • 27 • 27 •
27 • 27 •
28 • 28 • 29 • 30 •
Introducción, funciones principalesSistema de carátulas integradoContenido de la caja, Extensor IRVista exteriorMando a distancia, Conecte el teclado o un ratón para ordenadorencendido, Puesta en marchaActualización del firmware, Ajustes de audio y videoZappiti Video, Zappiti Music y Zappiti Explorer, GrabaciónDisco duro externo, Conexiones USB, Disco duro internoUso de tarjetas de memoria SDAcceder a carpetas de redCopie y administre sus archivos con Zappiti ExplorerOpciones de reproducción de video y audio, función de presentación de diapositivasCómo instalar una app, agregar una aplicación de acceso directo a la página de inicioEthernet, Wi-Fi, Bluetooth, Audio/Video MirroringZappiti Music, Controle su Zappiti mediante una tablet o un smartphone Crear una colección de películas / series con Zappiti VideoUtilisation de Zappiti Vidéo, Film non trouvé, Fichiers 3D et UHD
31 • Control parental, Categorías personalizadas, Zappiti al arrancar, Ajuste de subtítulos31 • Subtítulos e idioma predeterminados, Zappiti Db Community, Soporte al Usuario31 • Instalar una aplicación de terceros, agregar un acceso directo a la página de inicio
16
Vote for future featuresTo propose a new feature or vote for an upcoming feature, please visit: zappiti.uservoice.com
4 Quick Start Guide
GeneralThe Zappiti One SE 4K HDR is an all-in-one solution for video playback with HDMI 2.0a, Dual HDMI output, 4K60p, HDR and 3D capabilities.
Key FeaturesHDR: Display your HDR video content, while also providing increased dynamic range on your HDR display (TV/projector).Dual HDMI: Use the second HDMI to separate audio and video for the best performances.4K 50/60p: Display your 4K video content in 3840x2160p at 50 Hz or 60 Hz (HDMI 2.0a).MKV Player: Playback SD, HD and UHD video contents in MKV, M2TS, DVD / BD / UHD ISO and other modern video file containers and formats, including top quality HEVC/H.265 video codec, with very high bit-rates up to 400 Mbp/s.HDD Rack Option with Hot Swap Function: Easily and quickly insert and exchange internal 3.5’’ SATA hard drives.Network Player: Connect your Zappiti on your local network and enjoy your content from a computer PC/MAC or a NAS via SMB.USB Ports: Conveniently connect hard drives, USB flash drives, USB card readers, computer mouse / keyboard, and other USB storage devices.USB Port 3.0 and Type-C: Read or copy your files in ultra high speed.Full Range of A/V Connectors: S/PDIF coaxial and optical audio output, audio analog RCA, RCVBS, HDMI 2.0 CEC, HDMI Audio only, HDMI Input.Multichannel home cinema audio: Bitstream (RAW), downmix LPCM stereo .Hi-Res Music Playback: Play your Hi-Res Audio quality music files and control them from your smartphone / tablet (iOS/Android) without the need of TV.Video Output Flexibility: Output video in any resolution and format including SD, 1080p (1920x1080), Ultra HD (3840x2160p) and true 4K (4096x2160p) up to 12-bit by primary color.Auto Framerate: Auto framerate detection 24/50/60p (compatible 24.000 Hz / 23.976 Hz).Playback Memory: Resume playback from the last position.Advanced File Browser: Convenient file browser with powerful file management (select, select all, copy, cut, past, delete, rename, ...).Audio playback functions: Album cover art support, folder playback, random, repeat, loop...Photo slideshows: Convenient features to easy create beautiful photo slideshow with music and amazing transition effects.Backlit Remote Control: High quality remote control with direct access and shortcuts with backlit buttons and recordable buttons to control another device.Wi-Fi 5 GHz with 2 removable antennas: Playback and transfer your video content wirelessly with high bitrate.
●
●●●
●
●
●
●●
●●
●
●●●
●●
●
●
5English
Organize your Video Collection with Movie Covers●
●
●
●●
●
●
●●●
●●
●
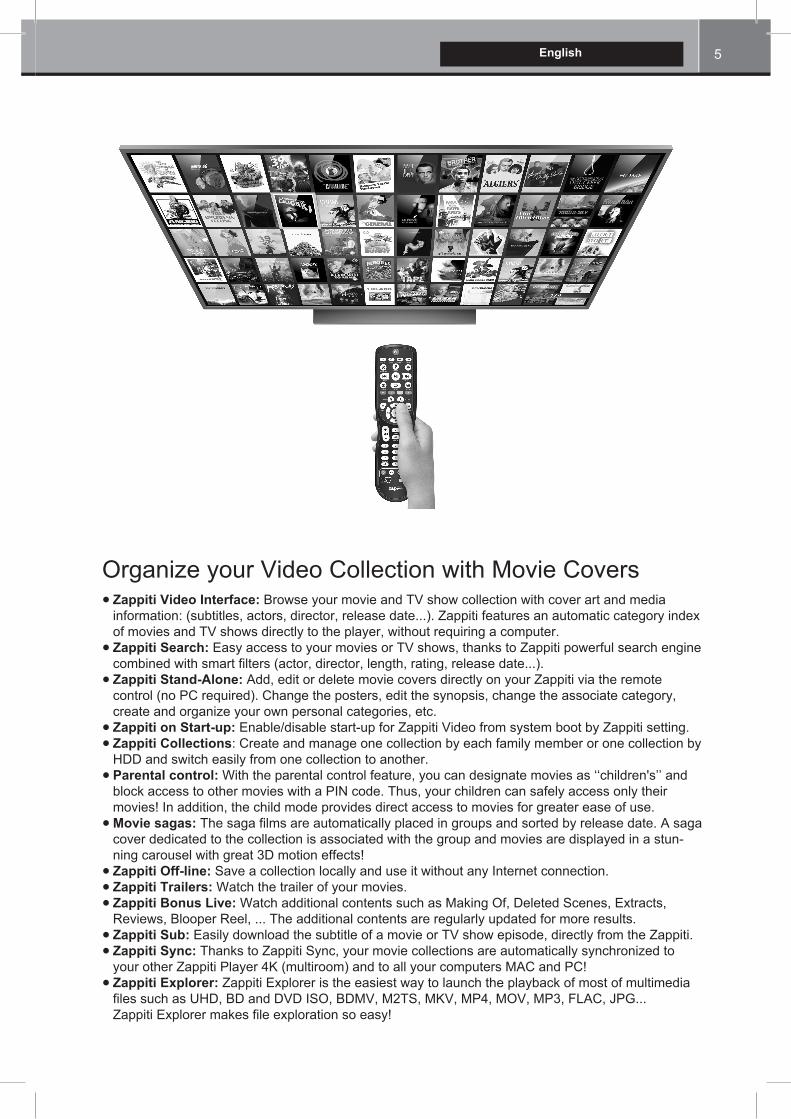
Zappiti Video Interface: Browse your movie and TV show collection with cover art and media information: (subtitles, actors, director, release date...). Zappiti features an automatic category index of movies and TV shows directly to the player, without requiring a computer.Zappiti Search: Easy access to your movies or TV shows, thanks to Zappiti powerful search engine combined with smart filters (actor, director, length, rating, release date...).Zappiti Stand-Alone: Add, edit or delete movie covers directly on your Zappiti via the remote control (no PC required). Change the posters, edit the synopsis, change the associate category, create and organize your own personal categories, etc.Zappiti on Start-up: Enable/disable start-up for Zappiti Video from system boot by Zappiti setting. Zappiti Collections: Create and manage one collection by each family member or one collection by HDD and switch easily from one collection to another.Parental control: With the parental control feature, you can designate movies as ‘‘children's’’ and block access to other movies with a PIN code. Thus, your children can safely access only their movies! In addition, the child mode provides direct access to movies for greater ease of use.Movie sagas: The saga films are automatically placed in groups and sorted by release date. A saga cover dedicated to the collection is associated with the group and movies are displayed in a stun-ning carousel with great 3D motion effects!Zappiti Off-line: Save a collection locally and use it without any Internet connection.Zappiti Trailers: Watch the trailer of your movies. Zappiti Bonus Live: Watch additional contents such as Making Of, Deleted Scenes, Extracts, Reviews, Blooper Reel, ... The additional contents are regularly updated for more results.Zappiti Sub: Easily download the subtitle of a movie or TV show episode, directly from the Zappiti.Zappiti Sync: Thanks to Zappiti Sync, your movie collections are automatically synchronized to your other Zappiti Player 4K (multiroom) and to all your computers MAC and PC!Zappiti Explorer: Zappiti Explorer is the easiest way to launch the playback of most of multimedia files such as UHD, BD and DVD ISO, BDMV, M2TS, MKV, MP4, MOV, MP3, FLAC, JPG... Zappiti Explorer makes file exploration so easy!
6
NOTE:
1. Zappiti One SE 4K HDR2. IR Remote Control3. IR Extender4. Wi-Fi Antennas5. HDMI 4K Cable6. Power Adaptor7. Quick Install Guide
Additional items (optional) may be included into the package, depending on player configuration, region, and distributor.
Package Contents
Quick Start Guide
1
5
2
76
3 4
IR ExtenderIf your Zappiti is hidded behind the TV or something else, you can use the provided IR exender. Connect it to the dedicated port as following:
Zappiti back panel
IR Extender
HDMI CableThe supplied cable is compatible with 4K HDR. For longer lengths, we recommend the cables offered on store.zappiti.com. All the proposed HDMI cables have been tested in 3840x2160 resolution at 60 Hz, and in 4:4:4 / 10-bit in real situation on Zappiti 4K HDR media players. By choosing one of the cables offered by Zappiti, you will have the insurance of optimal operation. Indeed, a large number of HDMI cables yet certified 4K 60p and 2.0 are not compatible with Zappiti boosted video streams and it can happen that the picture displays jerks, freezes, white pixels, or a black screen .
7English
1. Wi-Fi Antenna2. Analog Audio Output Right / Left 3. Analog Video Output CVBS4. Coaxial Digital Audio Output5. Optical Digital Audio Output6. IR IN (IR extenter included)
9. USB 3.0 Host 10. LAN 10/100/100011. HDMI Input 12. Audio HDMI Output (Audio only)13. Main HDMI Output (Video + Audio)14. DC Power 12V 2A15. Power Switch ON/OFF7. USB 2.0 Host
8. USB TYPE-C
Rear View
Front View
Side View (Right)
1. Rack HDD Door
1. USB 2.0 Host
2. Restore
3. SD/MMC Card Reader
1. LED Indicator
Side View (Left)
1
1
1
3
2 3
2
2
4 5 6 7 8 9 10 11 12 13
1
14 15
1
8
Remote Control
Quick Start Guide
1. POWER: Toggle power ON/OFF.2. POWER ON: Power ON.3. ZOOM: Zoom In / Out (overscan).4. DELETE: Delete / Change home template.5. POWER OFF: Power OFF.6. ASP. RATIO: Switch the Aspect Ratio.7. DIMMER: Toggle Front LED ON/OFF.8. 3D: Toggle 3D mode (2D / 3D).9. PREV: Go to the previous chapter.10. PLAY/PAUSE: Start / Pause playback.11. NEXT: Go to the next chapter.12. ZAPPITI: Zappiti Media Center shortcut.13. REPEAT: Repeat playback (file, all, off). 14. EXPLORER: Zappiti Explorer shortcut. 15. RED: For future function.16. GREEN: Shortcut to Settings.17. YELLOW: Shortcut to HDMI IN Recording page.18. BLUE: Shortcut to Firmware Upgrade page.19. HOME: Go to Main Menu (Home Page).20. MOUSE: Switch to the virtual mouse mode.21. MENU: Show / Hide the pop-up menu.22. BACK: Return or Stop playback.23-26. ARROWS: Navigate menu selection.23,25. UP: Fast forward. DOWN: Fast backward.24,26. LEFT/RIGHT: Timeline navigation (+/-1 min).27. OK: Enter or validate the current item. 28-29. VOLUME +/-: Increase / Decrease volume.30. INFO: Show / Hide the pop-up info (properties).31-32. PAGE+/-: Timeline navigation (+/-10 sec).33. MUTE: Mute audio.34. NUMBER Buttons: - 1-9: direct playback access to 10 - 90%. - 0: Restart the playback from the beginning.35. SUBTITLE: Subtitle switch / settings.36. AUDIO: Audio track switch.37-41. TV: TV remote.37. POWER: Toggle power ON / OFF.38-39. VOLUME +/-: Increase / Decrease volume.41. LEARN: Record an external RC. RC/BACKLIT: Activate backlit.
1
4
5
8
11
14
18172023
22
26
31
3233
36
4039
3
276
109
1312151619212724253028
29
34
35
373841
LEARN
Programming Buttons1. Press and hold the LEARN button (41) until the ON button is lit in red (not blinking).2. Please take the TV remote control then press and hold the button you want to learn (example Vol +) until the Zappiti remote's ON button flashes red (blinking).3. Take the Zappiti remote control and press the button (37-40) you want to assign to the programming (example Vol +).4. Repeat steps 2 and 3 for the other buttons to be programmed.5. To finish programming, quickly press the LEARN button (41).
Note: It is possible to connect a keyboard and a computer mouse to the Zappiti. By default, the keyboard is set in QWERTY. To switch the keyboard recognition to AZERTY or other key position, first connect your keyboard to one of the available USB ports. Press the GREEN button on the remote control to access the Android settings. Then, click Languages & input. Finally, choose your language in Current Keyboard section, Android Keyboard & Physical Keyboard. Warning! The mouse is not compatible with Zappiti Video, Zappiti Music and Zappiti Explorer apps. But it can be useful for third-party apps downloaded from GooglePlay or AptoideTV.
9English
● Please use alkaline AA batteries. Please observe polarity when inserting batteries. ● Please Remove the plastic film from the Z logo of the front panel. The IR led is located behind.● If RC functions only at short distances or stops functioning, make sure to replace the batteries.● Point the remote control at the Zappiti. There must be no obstacles between the RC and the media player.● Some RC buttons may be available only in certain player modes or only during playback of a certain content.
Getting Started Please make sure there is enough space around the device for proper cooling (10 cm at minimum). Ensure the remote control has batteries installed. Connect the player to your TV and other A/V equipment in an appropriate way. Use HDMI connection to get the best possible audio and video quality. Make sure to power off the player and related A/V equipment before connecting them. Ensure your TV and other A/V equipment are configured to use proper inputs/outputs. For the best audio experience, please use the HDMI Audio Only output if you own an AV receiver.
***Please make sure to use HDMI OUT (Main) and not HDMI IN connection to link your Zappiti to your TV or your front projector.Switch on the Zappiti. The media player will perform its initial boot up procedure, which may take up to about 1 minute (depends on apps). During the boot up procedure, “Z” logo is shown on the TV.
***If you have a black screen or no video signal, please visit the Zappiti Knowledge Base.zappiti.uservoice.com/knowledgebase
Finally, you should see the main screen with access to applications Video (Media Center), Music and Explorer. On the top you’ll find access to the Settings and MyApps.
To adjust the player settings, press the GREEN button of your RC or click on “SETTINGS” item located on the top of the screen. In particular, you can adjust the following settings: video, audio, and network configurations. To choose the language of the Android menus, please use: Settings / Personal / Language & input setting. Zappiti apps use specific language settings. To set Default Audio Language, during video playback, press the MENU button of your RC, and click on Advance. Then you will be able to set the Default Audio and Subtitle language.
HDMI IN
HDMI Video (Main)HDMI Audio Only
Zappiti back panel
AV Receiver TV / projector
AUDIO/VIDEO MULTI-CHANNEL RECEIVER
HDMI INBlack Border& OverscanIf you have a black border problem all around the screen, press the "zoom" button on the remote control (3). You can also adjust the aspect ratio of your TV (Fit to Screen option).
!
!
10 Quick Start Guide
Firmware UpgradeTo access the Firmware upgrade page and update the firmware online or via USB, please press the BLUE button of the RC. To check the most recent changes, latest firmware versions and get recovery firmware, please visit our website at: zappiti.com/firmwares
Audio SetupThe Audio section of the Settings Menu allows you to configure preferences for audio output formats. To access the audio settings, please go to “Settings/Device/Sound and notification”. If you are using an AV receiver compatible with HDMI and multichannel audio, please set the HDMI output to “Auto”. If your AV receiver is compatible HDMI but not compatible HDR, please connect your Zappiti to your AV receiver using the HDMI Audio only output. You can also force it to “RAW” (Bitstream). If your AV receiver is not compatible with HDMI, please set the S/PDIF output to “RAW” for bitstream or LPCM 2Ch for stereo configuration.
Force SD Audio: The S/PDIF does not support HD Audio such as DTS-HD or Dolby TrueHD. To convert HD audio into SD Audio (DTS-HD to DTS or Dolby TrueHD to Dolby Digital), please switch “ON” the Force SD Audio option located in Settings/Developer options. More info: zappiti.uservoice.com/knowledgebase
Video SetupBy default, the Zappiti is able to auto adjust the video output. But you can manually select the resolution and frequency of the GUI. To force the output resolution, please switch “ON” the Ignoring HDMI EDID option located in Settings/Developer options. Then go back to the general settings by pressing the BACK button of your RC, and go to “Display”. You will be able to see all the output modes available in Manual Settings but the Auto mode will be not available anymore. To adjust the Color Space and the Deep Color (OFF/10/12-Bit), go to Settings/Developer options. For the best performances, we advise you the following settings: Y’CbCr 4:4:4 / 10-Bit (if your display is compatible). Note: the auto framerate is still activated even if you force the HDMI output in a specific resolution/fre-quency, however, in some cases, the manual resolution mode can generate some issues.
AUDIO/VIDEO MULTI-CHANNEL RECEIVER
Coaxial In
Optical In
Please connect one of these cables:
SPDIF Optical (Toshlink) cable
Coaxial cable
Zappiti back panel
AV Receiver
Headphones To connect wired headphones, please use RCA to 3.5 mm female adapter. Then, connect the RCA connectors to the RCA inputs of the Zappiti.
For video playback without audio-video sync issue, please choose a wireless headphones compatible with Apt-X Low Latency technology.
Zappiti RCA OutputHeadphones
11English
Use the RC buttons UP, DOWN, LEFT, RIGHT, OK, RETURN to navigate through the player menu. Use the MENU RC button to show the list of available commands. Use the INFO RC button to show the INFO panel.
The Home Page features 3 main applications: Zappiti Video, Zappiti Music and Zappiti Explorer.
Zappiti VideoZappiti Video is a media player, software and entertainment hub, featuring an impressive user interface with movie covers. With Zappiti Video, you can experience your entire movie and TV series collection, browse and play your titles from local and network storage media, view cast information, download subtitles, play trailers and much more.
Zappiti MusicZappiti Music is an app dedicated to music playback designed for Zappiti players. Listen to your favorite tracks, and manage your music collection in a simple way. With Zappiti Music you can play your favorite music stored anywhere on your home network or on a local drive connected to your Zappiti media player. With Zappiti Music, you can control your music playback through your Zappiti media player, from your smartphone or tablet (iOS or Android) without the need of TV. Select the Zappiti media player you want to control and manage your music collection directly from your tablet or smartphone.
Zappiti ExplorerZappiti Explorer is a File Manager. You can easy explore and launch playback of your music, pictures and video content. But Zappiti Explorer is more than just a file explorer — it also provides many advanced multimedia features and a complete file management system.
Before to start using the Zappiti apps, you have to create a Zappiti account and register your device. First, connect your media player to Internet through Wi-Fi or Ethernet. Please launch one app and select you language. Then, follow the on-screen instructions. If you have never used Zappiti before and if you don’t have any Zappiti account, please click on Create an account now.
Then, you’ll be invited to enter your Zappiti Token. The token number is printed on a sticker located under the Zappiti case. You’ll have to enter it only one time. Then, all the info of your account will be saved in the internal memory.
Login
Click here to create a Zappiti account
Email
Login
Create an account now
Forgotten password?Return
Password
Note: If you do not have any Internet connection, you can explore your files using: MyApps/Media Browser.
12 Quick Start Guide
Using Internal DriveTo insert the internal 3.5’’ SATA HDD, please open the rack door, then insert the drive into the internal enclosure until 3/4, then complete the installation by closing the door. This operation will complete the installation of the disk into the rack. The Zappiti media player is compatible with drives formatted in NTFS, ExFAT, FAT16, FAT32, HFS, EXT2/3. It is not possible to format hard drives via the Zappiti. You must use a computer for this purpose. In case of NTFS GPT, please use 64 Ko allocation tables.
***Note: Please make sure that your hard drive is correctly formatted before you insert it in the tray.
More info: zappiti.uservoice.com/knowledgebase
Connecting USB DrivesYou can connect your USB drives to one of the available USB ports. If you want to play video files, USB 2.0 is enough to support very high bitrate (up to 480 Mbps). If you want to transfer files, we advise you to use USB 3.0 or USB Type-C (not available on Zappiti Mini 4K HDR model).
***Note: A dedicated USB icon located on the home page can help you to detect if the drive is connected correctly.
Power provided by USB ports may not be enough to allow the USB drive to function correc-tly; depending on the drive. Please do not disconnect or switch off the USB drive during write (copy / transfer) operations.
The Zappiti players are compatible with UASP HDD docking stations as well as USB hubs.
Using SD / MMC Memory CardsTo use a memory card, insert it in the memory card slot located on the left side of the media player. It will be detected as USB device (USB icon on the home page). Some SD memory cards may not be recognized by the player or may work incorrectly ; in such case, please use a different model of memory card.
Zappiti Side View (right)
Open the tray and insert the HDD, keeping the connectors on the front
External USBIf you are using an external HDD 2.5’’, please use the USB cable provided with your HDD for best performance.
Zappiti back panel
External HDD
Pre-formated HDDs are available on sale here:store.zappiti.com
13English
Accessing Network Drives and Access to Zappiti StorageThe Zappiti media player features a Samba client (SMB) to explore and playback your videos, pictures and music, located on your local network (NAS, computers, ...). The SMB Server is activated by default. You can access your Zappiti using the Zappiti IP address as following: \\192.168.1.15 (example). To find the IP address of your Zappiti, go to: SETTINGS (GREEN button of the RC) / Ethernet Configuration.More info about SMB Server, FTP and DLNA Server here: zappiti.uservoice.com/knowledgebase
The Zappiti media player also features a function called Zappiti Share, based on Samba server technology. This allows you to access your video, pictures and music content, located on internal HDDs (or local drive connected in USB to the media player) from another Zappiti player 4K or 4K HDR through your local network. You can playback video contents, in 5 different rooms simultaneously, equipped with Zappiti media players. Thanks to Zappiti Share, a NAS server or computer is not required to stream your media content in different rooms of your home. To use Zappiti Share, please select Zappiti Share instead of Local drive in the Zappiti Video Folder Configuration.
How to Transfer your Files Using Zappiti Explorer
Slideshow FunctionZappiti Explorer offers a slideshow function with cross fades and transition effects. To access the slide show display settings inclu-ding the frame time, transitions and effects, press the MENU button on the remote control (slide show off). To add a music to a slide show, simply place an audio file in the folder contai-ning your pictures. If several audio files are in the same folder as the photos, the tracks will be linked one after the other and played in alphanumeric order.
PropertiesTo view the complete technical information of the file being played, press the INFO button on the remote control. You will find in particular, the datarate, framerate, video and audio codec and format, size, resolution, and more...
Zappiti Explorer is a File Explorer, but also a com-plete file manager with features such as: Copy, Cut, Paste, Select, Select All, Delete, and Rename. Zappiti Explorer is also multi-tasking. To access these functions and display the task manager, press the MENU button on the Zappiti's remote control.
Video and Audio Playback OptionsThe Zappiti Explorer MENU also provides access to various video and audio playback options such as sequencing of file playback, loop playback, ...
Copy
Cut
Paste
Rename
Delete
How to Install a New AppTo install a new app, please go to My Apps / AptoideTV. You’ll find many apps dedicated to media players that can be controlled by RC. You can also use GooglePlay but some apps may be not compatible with the Zappiti. If you want to install an APK from a USB stick, please use Zappiti Explorer or MediaBrowser.
How to add an App Shortcutto the Home PageTo add a shortcut to a favorite app on the home page, please click on icon and select your favorite app to add it to the home page.
14
EthernetThe Zappiti provides two network connection methods: through Ethernet cable or through the built-in wireless LAN adapter. For the fastest and most stable network connection, we recommend using an Ethernet cable whenever possible. Plug one end of a network cable (straight Ethernet cable) into the LAN port on the back of the Zappiti (Category 5E or more). Then, plug the other end of the network cable into a LAN port on the broadband router or modem (or switch if you are using one).
Zappiti MusicOn the main page of the Zappiti, you will find Zappiti Music, an app dedicated to Music playback. Use the UP/DOWN button to browse your music folders. Use the RIGHT button to access the additional options. Press ENTER on Favorite button to mark the current track as Favorite. Press ENTER 2 times on Favorite button to mark the current track as Excluded track. To create a folder shortcut, select a folder, press MENU and press ENTER on Create a shortcut. The shortcut will be placed on the Zappiti Music home page. Press ENTER on to filter a music title by entering a keyword.
How to Control your Zappiti Using your Tablet / SmartphoneYou can also control the Music and Video playback using the dedicated apps named Zappiti Video Control and Zappiti Music Control available for iOS and Android. To install them, switch on your tablet or smartphone, then go to the Play Store (Android) or App Store and search them using Zappiti control keywords. Then, launch the app and enter your zappiti account credentials. You will be access to you video and music contents and control the music without the need of TV. More info on: zappiti.com
Quick Start Guide
Internet Connection
WAN 1 2 LAN 3 4
Internet Ethernet cable
LAN
Router / Modem
Favorite Excluded Unchained Chained Shuffle ABC order Loop Loop Off PlaylistAdd toplaylist
Zappiti rear panel
Wi-FiTo set the wireless feature, please click on the “Settings” icon located on the top of the home page, then click on the Wi-Fi settings. You will be able to select a wireless network and enter the security password.
BluetoothThe Zappiti player is compatible with devices using Bluetooth technology. To access the list of Bluetooth-enabled devices, go to Settings / Bluetooth. Then switch the option to “On”.
Audio & Video MirorringFor more info about mirorring audio & video, please search “mirroring” using the search engine in the Knowledge Base here: zappiti.uservoice.com/knowledgebase
15English
How to Create a Movie Collection in Zappiti VideoBefore starting, you must create a folder named MOVIE on your HDD. Then, place all your movies inside this folder. If you have TV shows, place them in a dedicated folder named SERIES or TV SHOWS.
Movies1. On your NAS or HDD, please create a movie folder named MOVIES. Place all your movie files in it.2. Your files should be named with the title of each movie. For example, the file of the movie "Metropolis" should be named "Metropolis.mkv". You can create subfolders in the folder MOVIES if you want.
TV Shows / TV Series1. On your NAS or HDD, please create a folder named SERIES or TV SHOWS .2. Then, create a subfolder for each TV Show / Series. You can create a subfolder for each season if you want. Then, place all your TV Show episodes in it.3. Your episodes must be named as: "Seriename s01e01" ("Seriename 1x01" also supported).For the special episodes, please name them as: ‘‘s00e01’’.
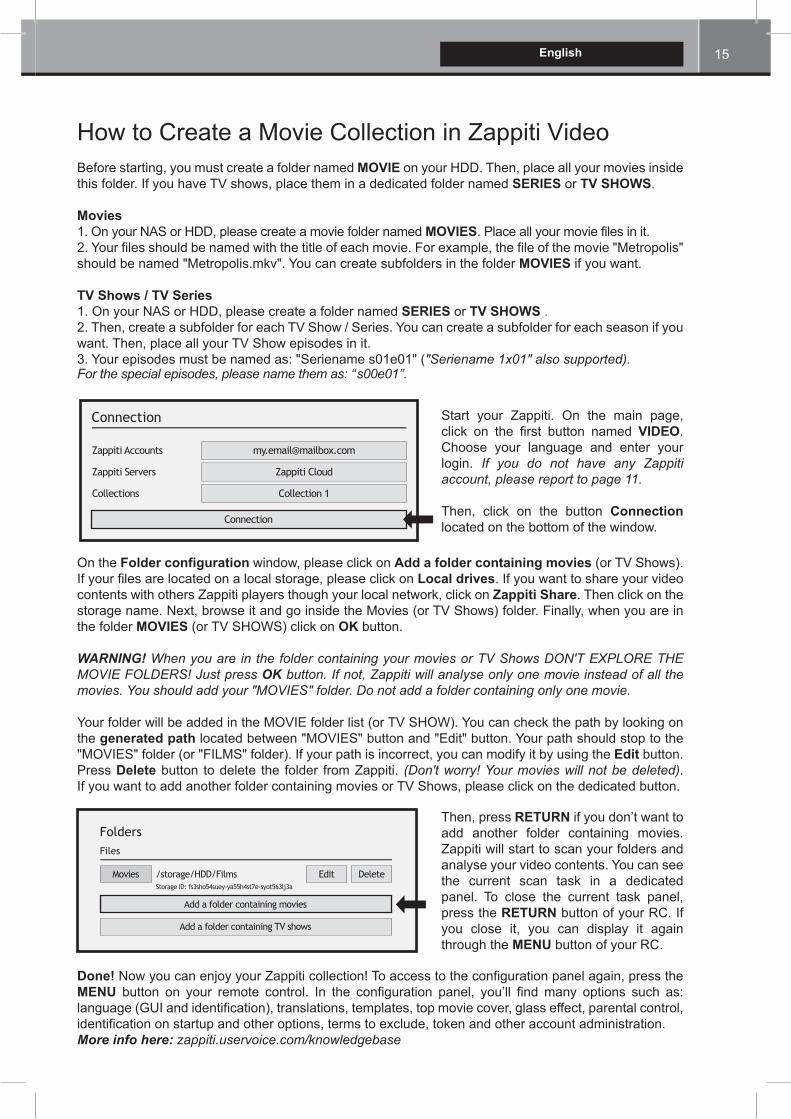
On the Folder configuration window, please click on Add a folder containing movies (or TV Shows). If your files are located on a local storage, please click on Local drives. If you want to share your video contents with others Zappiti players though your local network, click on Zappiti Share. Then click on the storage name. Next, browse it and go inside the Movies (or TV Shows) folder. Finally, when you are in the folder MOVIES (or TV SHOWS) click on OK button.
WARNING! When you are in the folder containing your movies or TV Shows DON'T EXPLORE THE MOVIE FOLDERS! Just press OK button. If not, Zappiti will analyse only one movie instead of all the movies. You should add your "MOVIES" folder. Do not add a folder containing only one movie.
Your folder will be added in the MOVIE folder list (or TV SHOW). You can check the path by looking on the generated path located between "MOVIES" button and "Edit" button. Your path should stop to the "MOVIES" folder (or "FILMS" folder). If your path is incorrect, you can modify it by using the Edit button. Press Delete button to delete the folder from Zappiti. (Don't worry! Your movies will not be deleted). If you want to add another folder containing movies or TV Shows, please click on the dedicated button.
Done! Now you can enjoy your Zappiti collection! To access to the configuration panel again, press the MENU button on your remote control. In the configuration panel, you’ll find many options such as: language (GUI and identification), translations, templates, top movie cover, glass effect, parental control, identification on startup and other options, terms to exclude, token and other account administration.More info here: zappiti.uservoice.com/knowledgebase
Start your Zappiti. On the main page, click on the first button named VIDEO. Choose your language and enter your login. If you do not have any Zappiti account, please report to page 11.
Then, click on the button Connection located on the bottom of the window.
Then, press RETURN if you don’t want to add another folder containing movies. Zappiti will start to scan your folders and analyse your video contents. You can see the current scan task in a dedicated panel. To close the current task panel, press the RETURN button of your RC. If you close it, you can display it again through the MENU button of your RC.
ALLIn this section you can find all your video contents sorted by alphabetical order.
MOVIESIn this section you can find all your movies.
TV SHOWSIn this section you can find all your TV Shows and Series Episodes.
RECENTIn this section you can find the most recent video contents.
CATEGORIESIn this section you can find your video contents sorted by categories.
Adding a Movie FileWhen you add a movie file to your ‘Movies’ folder, Zappiti will automatically index it during the next restart of the application. To force the analysis, please use the dedicated option located in the Zappiti Menu. (Please use the MENU button on the remote).
Deleting a Movie FileWhen you delete a movie file from your ‘Movies’ folder, Zappiti automatically removes its cover and descriptive page from your Zappiti collection during the next analysis. You can manually remove a movie using the Delete option located in the Zappiti menu.
How to Identify Unidentified Movies & TV ShowsEven if your files are not named correctly with the name of the film (or TV show), Zappiti can identify it but only if a Zappiti user previously identified it manually. If you are living in a country where Zappiti is not yet popular, which could happened often at the beginning, mostly if you are using a Zappiti NAS Rip because the generated files are rarely named correctly. But day after day, Zappiti Db will become more and more reliable as users will manually identify files of movies and TV series.
Press MENU of the RC and select X to Identify. You’ll see the list of the files that are not identified. Then, click on the button named Identify... On the Identify window, please enter again the movie name.
You can also enter the IMDb, TMDb or TVDb ID code to identify your movie or your TV show. On TMDb, TVDb or IMDb, the ID code is located in the URL of the movie page. For instance, the URL of the movie "Metropolis" will be "http://www.imdb.com/title/tt0017136/". Enter the ID number "tt0017136" into the field instead of the title name. Then press the "Search" button. Zappiti will find the right movie at 100%. If your movie or TV show does not exist on TMDb or TVDb, you can add it by creating an account on it.
3D, 4K and UHD FilesThe 3D BD ISO, UHD ISO and 4K ISO files as well as BDMV folders for 3D and 4K UHD are not identi-fied automatically. To identify the container, please add the following tags in the name as following:
3D Files: "3D". (For exemple: "Metropolis.3D.iso").UHD Files: "UHD" or "ULTRAHD" or "ULTRA-HD". (For exemple: "Metropolis.UHD.iso").4K Files: "4K" or "4096" (For exemple: "Metropolis.2160x4096.iso").
16 Quick Start Guide
If you get a wrong storage ID with « 00000000000 », it means that Zappiti cannot write on the drive due a defective sector. Please format it again.
To access to additional features, press MENU button of your IR remote control.
/storage/HDD/FilmsStorage ID: 000000000000000
17English
Parental ControlTo tag a movie as Allow for children, select a movie (or a group of movies), then press the MENU button on the RC and click on Allow for children. Then, enter a 4-digit pin code.
Personal CategoriesBy default, the movies and TV shows are automatically associated to categories. But you can create your own categories and associate manually your movies. To create a category, go the categories, then press MENU and click on Create a categorie. Then, enter a name and choose an icon. The contextual menu give also access to additional options such as: modify the position of the categories, edit or remove.
Zappiti On Start-UpTo activate this function, press MENU, then go to Settings, click on the second tab and switch ON the option in the list.
Filter and SortTo sort your movies, press MENU, then go to Filter and sort. Then click on the first item. Then select the sorting: A to Z, Z to A, Release date, Duration, Addition... To filter your movies, please click the following options: Seen, Ongoing, or Not seen.
Subtitle Display OptionsTo change the subtitle display options such as color, position, or sync, press the MENU button on the remote control during video playback, then go to Subtitle and change the desired option. To change the vertical position of the Blu-ray subtitles (PGS), go to the ADVANCE section, then click on PGS Subtitle Offset and decrease or increase the vertical position of the subtitles. To add external subtitles, please use the same name of the video file as following: Metropolis.mkv / Metropolis-en.srt / Metropolis-es.srt
User Support & Zappiti DbFor User Support, please contact us at: [email protected]
To join the Zappiti Db Community and create movie covers and fanarts for Zappiti, please contact us at: [email protected]
Decreasing Release date
Filter and sort
Seen videos
Ongoing videos
Not seen videos
Please enter a 4-digit pin code.This code will allow you to lock your collectionand restrict access to movie tagged ‘‘Allowed forchildren’’.
Cancel
Parental code
* 7
Third PartyControlYou can control your Zappiti using third party devices such as Control4, Crestron, ProControl, RTI, Logitech, Pronto, ...
More info:zappiti.uservoice.com/knowledgebase
Factory ResetTo reset the Zappiti, go to MyApps / Factory Reset.
Auto launch Zappiti on start-up
Auto-start
Proponga nuevas características Para proponer una nueva función o solicitar una nueva prestación, visite: zappiti.uservoice.com
18 Guía de inicio rápido
IntroducciónEl Zappiti One SE 4K HDR es un reproductor multimedia de gama alta compatible con HDMI 2.0,10 bits, 4K 60p, HDR y 3D.
Funciones principalesHDR : Muestra el contenido de video HDR para obtener más dinámica en una pantalla HDR.Doble salida HDMI: Conecte su Zappiti a su televisor o proyector a través de la salida HDMI principal y conecte la segunda salida HDMI (solo audio) a su amplificador para un mejor rendimiento o para disfrutar de su amplificador de anterior generación incompatible con HDR.4K 50/60p : Vea su contenido de video con resolución 3840x2160p en 50Hz / 60Hz.MKV : Reproducción de contenido de video SD, HD y UHD en formato MKV y otros formatos de archivos de video nuevos, como el códec de video HEVC/H.265 para una calidad superior con velocidades de datos muy altas de hasta 400 Mb/s.Entrada de disco duro de intercambio en caliente: Inserte y cambie fácilmente sus discos duros de 3,5 sin necesidad de apagar el reproductor.Reproductor en red: reproduce sus medios almacenados en su red local (PC/MAC/Linux o NAS a través de SMB).Tomas USB: Conecte fácilmente discos duros, unidades flash USB, lectores de tarjetas y otros dispositi-vos USB.Toma USB Type-C: Lea o copie sus archivos a alta velocidad.Conectividad A/V completa: Salidas de audio S/PDIF coaxial y ótica, audio analógico, HDMI 2.0 CEC, Compuesto.Sonido Cine en Casa multicanal: Bitstream, downmix estéreo.Reproducción de música de alta calidad: Audio sin compresión (hasta 32 bits/192 kHz ).Salida de audio flexible: Muestra el video en diferentes resoluciones y frecuencias, incluyendo SD, 1080p (1920x1080), Ultra HD (3840x2160p) y 4K (4096x2160p) hasta 12 bits de color (36 bit).Auto Framerate: Detección automática de velocidad de frames de 24/50/60p (compatible con 24 Hz y 23,976 Hz).Memoria de Reproducción: La reproducción automática se reanuda desde la última posición de repro-ducción grabada.Explorador de archivos: Explorador y Administrador de archivos (copia, mueve, elimina, cambia el nombre).Funciones de lectura de audio: Admite carátulas, reproducción de carpetas, reproducción mixta, repetición.Diapositivas musicales: función de presentación de diapositivas con opciones de transición dinámica.Mando a distancia retroiluminado: Mando a distancia de alta gama con teclas de acceso directo.Wi-Fi 5 GHz con dos antenas: Reproduzca y transfiera su contenido de video inalámbrico con alto rendimiento.
●●
●●
●
●
●
●●
●●●
●●
●●●●●
19Castellano
Sistema de carátulas integrado●
●
●
●●
●
●
●●
●
Carátulas: Sistema de exploración de carátulas para tus películas y series de TV con presenta-ción de información (subtítulos, actores, director, fecha de lanzamiento...). Indexación automática de películas y series de TV por género directamente al reproductor.Motor de búsqueda: acceso fácil a sus películas o programas de televisión, gracias al potente motor de búsqueda Zappiti combinado con filtros inteligentes (actor, director, duración, clasifica-ción, fecha de lanzamiento ...).Edición desde el reproductor Zappiti: agregue, edite o elimine portadas de películas directa-mente en su Zappiti a través del mando a distancia (no se requiere PC). Cambie los carteles, edite la sinopsis, cambie la categoría, cree y organice sus propias categorías personales, etc.Zappiti al inicio: Active automáticamente Zappiti Video al arrancar el reproductor.Multi colecciones: Cree una colección de películas y series TV por miembro de la familia o disco duro y cambie fácilmente de uno a otro.Control parental: Con la función Control parental, puede etiquetar sus películas como "película infantil" y bloquear el acceso a otras películas con un PIN. ¡De esta manera, sus hijos podrán acceder de forma segura a sus películas! Además, el modo infantil ofrece acceso directo a películas sin sinopsis para una mayor facilidad de uso.Sagas: Las películas de una saga se colocan automáticamente en un grupo y se ordenan por fecha de lanzamiento. Una portada dedicada a la colección se asocia con el grupo y las películas se muestran en un bonito carrusel 3D con un llamativo efecto.Zappiti Offline: Guarde su colección en la unidad para uso local sin una conexión a Internet.Trailers: Vea los trailers de sus películas (en francés).Bonus Live: acceda al contenido relacionado con sus películas, como making of, escenas eliminadas, clips, reseñas, tomas falsas, bandas sonoras.Descarga automática de subtítulos: con Zappiti, puede descargar los subtítulos de un episodio de TV o película con un solo clic.Zappiti Explorer: explore sus carpetas y comience a reproducir sus archivos de video de una manera rápida y fácil.
20 Guía de inicio rápido
1. Zappiti One SE 4K HDR2. Mando a distancia 3. Extensor IR4. Antenas Wi-Fi5. Cable HDMI 4K6. Adaptador de corriente7. Manual de instrucciones
Contenido de la caja
NOTA: Los accesorios suplementarios (opcionales) pueden incuirse en la caja dependiendo del país,del distribuidor y de la configuración del reproductor.
Extensor IRSi su reproductor está oculto detrás de su televisor u otro objeto, conecte el extensor IR proporcionado como se muestra aquí:
Parte trasera del Zappiti
Extensor IR
1
5
2
76
3 4
Cable HDMIEl cable suministrado es compatible con 4K HDR. Para longitudes más largas, recomendamos los cables que se ofrecen en store.zappiti.com. Todos los cables ofrecidos han sido probados a 3840x2160 a 60 Hz, y a 4:4:4/10 bits en la vida real en unidades Zappiti 4K HDR. Al elegir uno de los cables de Zappiti, tendrá la certeza de un funcionamiento óptimo. De hecho, una gran cantidad de cables HDMI con certificación 4K 60p y 2.0 no son compatibles con las transmisiones de video que pueden ofrecer los reproductores Zappiti, y la imagen puede mostrar tirones, pausas, píxeles blancos o una pantalla negra.
21Castellano
1. Antenas Wi-Fi2. Toma RCA audio analógico L/R3. Video Compuesto4. Salida de audio digital coaxial 5. Salida de audio digital óptica6. Toma IR IN para extensor infrarrojo
9. Toma USB 3.0 10. Ethernet 10/100/1000 (LAN)11. Entrada HDMI12. Salida HDMI audio (Audio únicamente)13. Salida HDMI principal (Video + Audio)14. Conector de alimentación 12V / 2A15. Botón de encendido / apagado (ON/OFF)7. Toma USB 2.0
8. USB TYPE-C
Parte trasera
Parte frontal
Lado derecho
1. Puerta del rack de disco duro
1. Toma USB 2.0
2. Reinicialización (Restaurar)
3. Lector de tarjetas SD/MMC
1. Indicador LED
Lado izquierdo
1
1
1
3
2 3
2
2
4 5 6 7 8 9 10 11 12 131 14 151
22 Guía de inicio rápido
Mando a distancia1. POWER: Botón de Encendido/Apagado2. POWER ON: Encendido3. ZOOM: Ajuste de pantalla (overscan)4. DELETE: Borrar / Cambiar el tema gráfico5. POWER OFF: Apagado6. ASP. RATIO: Cambio de formato de imagen7. DIMMER: Encendido / Apagado del logo8. 3D: 2D / 3D.9. PREV: Capítulo anterior10. PLAY/PAUSE: Reproducción/Pausa11. NEXT: Capítulo siguiente12. ZAPPITI: Acceso a Zappiti Media Center13. REPEAT: Repetición de reproducción (OFF, pista, todos) 14. EXPLORER: Acceso a Zappiti Explorer 15. ROJO: Acceso directo para uso futuro16. VERDE: Ajustes Android (Settings)17. AMARILLO: Selección HDMI18. AZUL: Actualización del firmware19. HOME: Volver a la pantalla de Inicio20. MOUSE: Modo ratón virtual21. MENU: Menú contextual22. BACK: Retorno al Menú o modo precedente23/25. ARRIBA/ABAJO: Avance/Retroceso24/26. IZQ./DER.: Avance/Retroceso 1 min.27. OK: Confirmar o validar (ENTER)28-29. VOLUMEN +/-: Modificar el volumen30. INFO: Acceso a la información técnica31-32. PÁGINA+/-: Avance/Retroceso 10 seg.33. MUTE: Désactivación / Activación del audio34. Teclas numéricas: - 1-9: acceso directo (10 - 90% de la duración) - 0: Reiniciado de la posición de lectura35. SUBTITLE: Cambio de subtítulos36. AUDIO: Chambio de la pista de audio37-41. TV: Teclas programables.37. POWER: ON/OFF.38-39. VOLUMEN +/-: Modificar el volumen41. LEARN: Programación de las teclasPulsación rápida: tecla de retroiluminación
1
4
5
8
11
14
18172023
22
26
31
3233
36
4039
3
276
109
1312151619212724253028
29
34
35
373841
LEARN
Programación de las teclas1. Mantenga pulsado el botón LEARN (41) hasta que el botón ON se ilumine en rojo (sin parpadear).2. Coja el mando a distancia del televisor y mantenga presionada la tecla para aprender (por ejemplo, Vol +) hasta que el botón rojo ENCENDIDO del mando del Zappiti parpadee en rojo.3. Coja el mando del Zappiti y pulse una de las teclas programables para asignar al botón guardado (por ejemplo, Vol +).4. Repita los pasos 2 y 3 para que se programen las otras teclas (37-40).5. Para terminar la programación, pulse rápidamente el botón LEARN (41)Nota: el mando se iluminará.
Nota: Es posible conectar un teclado y un ratón de ordenador al reproductor. Para cambiar el reconocimiento del teclado a QWERTY, primero conecte su teclado a uno de los puertos USB. Pulse el botón VERDE en el mando para acceder a la configuración de Android. Luego, haga clic en Idiomas. Finalmente, elija el idioma Español en Teclado actual, Teclado de Android y Teclado físico. ¡Atención! El ratón no es compatible con Zappiti Video, Zappiti Music y Zappiti Explorer. Pero puede ser útil para aplicaciones de terceros (GooglePlay).
23Castellano
NOTAS:● Use pilas AA y recuerde respetar la polaridad de las mismas cuando las inserte en el mando a distancia.● Retire la película protectora de plástico ubicada en el logotipo Z en la parte frontal del Zappiti. El receptor IR se encuentra detrás.● Si el mando no funciona en distancias cortas o no funciona del todo, reemplace las pilas. .● Algunos botones en el mando pueden tener múltiples funciones en la reproducción.● Apunte el mando a distancia hacia el reproductor. No debe haber obstáculos entre el mando y el reproductor.
Puesta en marchaPara el funcionamiento correcto del reproductor, asegúrese de tener al menos 10 cm de espacio libre a ambos lados del mismo. Compruebe que las pilas estén colocadas correctamente en el mando y en la polaridad correcta. Conecte el reproductor Zappiti a su televisor u otro equipo de A/V, según corres-ponda. Preferentemente, use la conexión HDMI para obtener la mejor calidad de imagen y sonido.
¡ATENCIÓN! Asegúrese de conectar su televisor al conector HDMI OUT en lugar de al conector HDMI IN del reproductor Zappiti. El cable HDMI suministrado es compatible con 4K y recomendamos su uso. Si desea usar otro cable HDMI, compruebe que sea compatible con 4K y especialmente certificado 18 Gb/s (HDMI 2.0). Asegúrese de apagar el reproductor y todo el equipo de audio y video antes de hacer cualquier conexión. Asegúrese de que el TV y sus dispositivos estén configurados en las entradas, luego encienda sus dispositivos comenzando con su TV, luego su amplificador o su barra de sonido y finalmente encienda el reproductor Zappiti cambiando el botón de encendido ubicado en la parte posterior del reproductor a "ON". Debería ver el logotipo de carga "Z" y luego se mostrará la página de inicio.En caso de problemas durante el encendido, consulte la ayuda online:zappiti.uservoice.com/knowledgebase
Para configurar el reproductor en Español, vaya al siguiente menú: Configuración / Personal / Idioma y entrada.El botón de Configuración (ilustrado como un engranaje) le permitirá acceder a la configuración de audio y video.También puede acceder directamente pulsando el botón VERDE en el mando a distancia.
HDMI IN
HDMI Main(Audio y Video )
HDMI Audio Only(Audio únicamente)
Zappiti : parte posterior
Amplificador de Cine en Casa TV / proyector
AUDIO/VIDEO MULTI-CHANNEL RECEIVER
HDMI IN
Borde negro (overscan)Si ve un borde negro alrededor de la pantalla, pulse el botón ZOOM en el mando (3). También puede elegir el modo Ajuste pantalla en la configu-ración de relación de aspecto de su televisor.
24 Guía de inicio rápido
Auricular Para conectar unos auriculares con cable, utilice un adaptador RCA a Mini-Jack 3.5 hembra.
Actualización del firmwarePara acceder a la página de actualización del firmware de forma online o a través de USB, pulse el botón AZUL en el mando a distancia. Más información: zappiti.com/FR/zappiti_player_firmwares.html
Ajustes del sonidoLa sección Audio del menú Configuración (Ajustes) le permite configurar las preferencias de los formatos de salida de audio. Para acceder a la configuración de audio, vaya a "Configuración / Sonido y Notificación". Si está utilizando un receptor AV compatible con HDMI y multicanal, confi-gure la salida HDMI en "Auto". También puede forzarlo a "RAW" (Bitstream). Si su receptor AV no es compatible con HDMI, configure la salida S/PDIF en "RAW" (flujo de bits) para la configuración multicanal, o "LPCM 2Ch" para la configuración estéreo. Forzar Audio en SD: la toma S/PDIF no admite audio de alta definición. Para para convertir audio HD (DTS-HD a DTS o Dolby TrueHD a Dolby Digital), active la opción Habilitar audio en SD ubicada en Configuraciones / Opciones de desarrollador. Más información:zappiti.uservoice.com/knowledgebase
Ajustes de ImagenPor defecto, el reproductor Zappiti puede ajustar automáticamente la salida de video. Pero puede seleccio-nar manualmente la resolución y la frecuencia de salida. Para forzar la resolución de salida, habilite la opción Ignorar HDMI EDID en las opciones de Configuración/Opciones para desarrolladores. Luego vuelva a la configuración general, pulsando el botón BACK en su mando a distancia, y vaya a Pantalla. Podrá ver todos los modos de salida disponibles en la activación manual, pero el modo automático ya no será accesible. Para ajustar el espacio de color y Color profundo (8/10/12-bit), vaya a Configuración / Opciones para desarrolladores. Si su televisor o proyector es compatible, recomendamos el modo Y'CbCr 4:4:4/10 Bit para obtener el mejor rendimiento de video.Nota: La velocidad de fotogramas automática aún está activa incluso si fuerza una resolución/ frecuencia específica. Por otro lado, la resolución manual de la resolución puede causar problemas con algunos dispositivos. Por lo tanto, recomendamos que use el modo de resolución Auto.
Amplificador de Cine en CasaAuriculares sin cablePara evitar problemas de sincronización de audio y video, al reproducir video, elija un auricular inalámbrico que sea compatible con Aptx Low Latency.
EntradaCoaxial
25Castellano
Use las teclas IZQUIERDA, DERECHA, ARRIBA, ABAJO, del mando para navegar a través de los menús del reproductor. Utilice la tecla MENU del mando para seleccionar la lista de comandos disponibles. Utilice la tecla INFO del mando para acceder a la información disponible del elemento seleccionado.
El reproductor Zappiti ofrece 3 aplicaciones principales, a saber: Video, Music y Explorer.
Zappiti VideoZappiti Video es una aplicación de gestión para colecciones de películas y series de TV. Zappiti Video organiza su colección de videos con descarga automática de carteles, sinopsis, noticias, actores, fondos de pantalla, notas, etc., categorización automática, filtros de clasificación, motor de búsqueda, control parental, descarga de subtítulos, trailers, etc.
Zappiti MusicZappiti Music es una aplicación dedicada a la reproducción de música, diseñada para reproductores Zappiti. Con Zappiti Music, puede disfrutar de su biblioteca de música y organizar sus listas de reproduc-ción de una manera sencilla. Con Zappiti Music, puede reproducir su música favorita almacenada en cualquier lugar de la red doméstica o en un disco local conectado a su reproductor multimedia Zappiti. También puede controlar la reproducción de música de su Zappiti sin TV con una tablet o smartphone iOS o Android.
Zappiti ExplorerZappiti Explorer es un administrador de archivos. Esta aplicación permite explorar y ejecutar de forma sencilla la reproducción de sus archivos de video, fotos y audio, pero también ofrece muchas característi-cas multimedia avanzadas, tales como: copiar, pegar, cortar, cambiar el nombre, eliminar funciones, una función de presentación de diapositivas de música, sin pausa, funciones de juego aleatorias, etc. Para usar las funciones avanzadas, pulseel botón MENÚ en el control remoto.
RegistroAntes de empezar a usar las aplicaciones de Zappiti, debe crear una cuenta de Zappiti y registrar su dispositivo. Comience conectando su reproductor multimedia a Internet a través de Wi-Fi o Ethernet. Inicie una de las aplicaciones y seleccione su idioma. Luego sigue las instrucciones en la pantalla. Si no ha utilizado Zappiti antes y no tiene una cuenta de Zappiti, haga clic en Crear cuenta ahora.
Luego se le pedirá que escriba su número de Token Zappiti. El número del token está impreso en una pega-tina pegada debajo de la carcasa del lector Zappiti. Deberá informarlo solo una vez. Entonces toda la informa-ción en su cuenta se guardará en la memoria interna del reproductor.
Conexión
Clicke aquí para crear un cuenta Zappiti
Email
Conexión
Crea una cuenta ahora
¿Olvidó la contraseña?Volver
Contraseña
Si no tiene una conexión a Internet, puede navegar por sus archivos a través de: MyApps / MediaBrowser
Lado derecho del Zappiti
Abra la puerta e inserte el disco, los conectores están en el interior
26 Guía de inicio rápido
Disco duro internoPara insertar un disco duro interno SATA de 3,5", abra la puerta situada en el lateral, luego inserte el disco duro pero no hasta el final, luego complete la inserción cerrando la puerta. Esto empujará el disco duro hasta que se conecte al puerto SATA en la parte inferior del rack. Zappiti Media Player es compatible con discos duros formateados en NTFS (WINDOWS), ExFAT, FAT16, FAT32, HFS (MAC OS), EXT 2/3 (LINUX). Para conectar una unidad interna de 2.5", use una caja adaptadora.Asegúrese de que su disco duro esté formateado correctamente con tablas de asignación de 64 K. ¡Atención! Los discos duros dedicados a servidores NAS no son compatibles.Para más información, por favor, consulte la base de conocimiento:zappiti.uservoice.com/knowledgebase
Periféricos USBPuede conectar sus discos duros o memorias USB a uno de los puertos USB disponibles. Si desea reproducir archivos de video, USB 2.0 es suficiente para soportar una tasa de bits muy alta (hasta 480 Mbps). Si desea transferir archivos, le recomendamos utilizar los puertos USB 3.0 o USB tipo C.
Nota: Un icono de USB ubicado en la esquina superior derecha de la página de inicio puede ayudarle a detectar si el dispositivo está conec-tado correctamente. El icono aparece atenuado cuando no se reconoce hardware USB y esblanco si se reconoce.
La potencia proporcionada por los puertos USB puede no ser suficiente para el correcto funciona-miento de los discos duros USB. No desenchufe ni apague la unidad USB durante las operaciones de escritura (copia).
Las unidades Zappiti son compatibles con estaciones de acoplamiento de disco duro UASP y con conectores USB.
Utilizar una tarjeta de memoria SD / MMCPara usar una tarjeta de memoria, insértela en la ranura dedicada situada en el lado izquierdo de la unidad. Se detectará como un dispositivo USB (icono de USB en la página de inicio). Algunas tarjetas de memoria SD pueden no ser reconfiguradas por el reproductor o pueden funcionar mal. En ese caso, use otro modelo de tarjeta de memoria.
Los discos duros preformateados están a la venta en: store.zappiti.com
Disco duro externoSi está utilizando un disco duro externo de 2.5 ", use el cable USB que viene con su disco duro para un rendimiento óptimo.
Panel trasero del Zappiti
Disco duro externo
27Castellano
Acceso a la redLa unidad Zappiti es compatible con Samba Server (SMB). Puede explorar y leer sus videos, imágenes y música ubicados en su red local (NAS, computadoras, ...) en una calidad óptima y sin problemas. Para acceder a su Zappiti en red, escriba su dirección IP en el explorador de archivos de su ordenador. Por ejemplo: \\192.168.1.15. Para encontrar la dirección IP de su Zappiti, vaya a Configuración / Configuración Ethernet. Para obtener más información sobre otras funciones de red, como el servi-dor FTP o el servidor DLNA (MiniDLNA / UPnP), consulte la base de conocimiento: zappiti.uservoice.com/knowledgebase
El reproductor Zappiti también ofrece la función Zappiti Share (Servidor SMB) para acceder a sus archivos de video, foto y audio ubicados en el disco duro interno (o unidad local conectada al USB al reproductor multimedia) desde otro reproductor multimedia Zappiti (todas las generaciones) conectado a la red. De este modo, es posible leer hasta 5 archivos de video al mismo tiempo desde varias salas de la casa y esto sin servidor NAS u ordenador. Para aprovechar esta función, configure el acceso a la carpeta Zappiti Video eligiendo Zappiti Share en lugar de Disco Local.
Copie y administre sus archivos con Zappiti Explorer
Función de presentaciónZappiti Explorer ofrece una función de presenta-ción de diapositivas con desvanecimientos y efectos de transición. Para acceder a los ajustes de visuali-zación de la presentación con diapositivas, incluidos el tiempo de fotogramas, las transiciones y los efectos, pulse el botón MENÚ en el mando (presentación de diapositivas desactivada). Para asociar música con una presentación de diapositi-vas, simplemente coloque un archivo de audio en la carpeta que contiene sus fotos. Si hay varios archivos de audio en la misma carpeta que las fotos, las pistas se vincularán una tras otra en orden alfanumérico.
Tecla de informaciónPara ver la información técnica completa del archivo que se está reproduciendo, pulse el botón INFO en el mando. Se indicará la veloci-dad, el códec, la resolución...
Zappiti Explorer es un Explorador de archivos, pero también un administrador de archivos completo con características tales como: Copiar, Cortar, Pegar, Seleccionar, Seleccionar todo, Eliminar y Cambiar nombre. Zappiti Explorer también es multitarea. Para acceder a estas funciones y al administrador de tareas, pulse el botón MENÚ en el mando del Zappiti.
Opciones de reproducción de vidéo y audioEl MENU del Zappiti Explorer también brinda acceso a varias opciones de reproducción de video y audio, como secuencia de reproducción de archivos, reproducción de bucles...
Copiar
Cortar
Pegar
Renombrar
Eliminar
Instalar una aplicación de tercerosPara instalar una nueva aplicación, vaya a MyApps / AptoideTV. Encontrará muchas aplicaciones dedica-das a reproductores de medios que se pueden contro-lar a distancia. También puede usar GooglePlay, pero algunas aplicaciones serán incompatibles con Zappiti. Si desea instalar un archivo APK desde una unidad USB, use Zappiti Explorer o MediaBrowser.
Añadir un acceso directoPara añadir un acceso directo a una app favorita en la página de inicio, haga clic en el icono y seleccione su aplicación favorita para agregarla a la página de inicio.
28 Guía de inicio rápido
EthernetPara una conexión de red rápida y estable, recomendamos usar la conexión Ethernet. Conecte un extremo de un cable de red (cable Ethernet directo) al puerto LAN en la parte posterior de la unidad Zappiti (Categoría 5E o superior). Luego, conecte el otro extremo del cable de red al puerto LAN de su router o switch Ethernet si está utilizando uno. La configuración es automática. Tenga en cuenta que algunos conmutadores de red a veces pueden causar problemas en el video.
Zappiti MusicEn la página principal de Zappiti encontrará Zappiti Music, una app dedicada a la reproducción de música. Use las teclas ARRIBA / ABAJO para navegar por sus carpetas de música. Use el botón DERE-CHA en el mando para acceder a opciones adicionales. Haga clic en el ícono Favorito para agregar la pista seleccionada a favoritos. Haga doble clic en el icono Favoritos para marcar la pista actual como la pista excluida. Para crear un acceso directo a una carpeta, seleccione una carpeta, pulse la tecla MENÚ y haga clic en Crear acceso directo. El acceso directo se colocará en la página de inicio de Zappiti Music. Clicke en para filtrar un título de música (o más) al introducir una palabra clave.
Controle su Zappiti mediante tablet / smartphoneTambién puede controlar la reproducción de música y video usando las aplicaciones Zappiti Video Control y Zappiti Music Control disponibles para iOS / Android.Instalación: encienda su tablet / smartphone, luego vaya a Play Store (Android) o App Store y busque la aplicación usando las palabras clave "Zappiti control" e instale la aplicación. Luego, inicie la aplicación y escriba sus credenciales de cuenta de Zappiti. Tendrá acceso a sus videos y podrá contro-lar la lectura musical sin necesidad de encender su televisor. Más información en: zappiti.com
Conexión Internet
WAN 1 2 LAN 3 4
InternetCable RJ45 cat. 5E o superior
LAN
Switch Internet / Router
Panel trasero del Zappiti
Wi-FiUna vez que la unidad se haya iniciado, vaya a Configuración y luego a Wi-Fi y cambie el botón a Activado. Luego, elija su red personal de la lista. Finalmente, escriba su clave de seguridad y confirme.
BluetoothEl reproductor Zappiti es compatible con dispositivos que usan tecnología Bluetooth. Para acceder a la lista de dispositivos habilitados para Bluetooth, vaya a Configuración / Bluetooth. Luego, cambie el interruptor a "Activado".
Duplicar audio y videoPara obtener más información sobre la duplicación de audio y video, busque con la palabra clave "duplicación" utilizando el motor de búsqueda en la Base de conocimiento aquí:zappiti.uservoice.com/knowledgebase
Ajouterà la Playlist
Titreexclu
Titrefavori
Lectureseule
Lectureenchaînée
Ordrealphab.
Ordrealéatoire
Boucledésactivée
Boucle Liste delecture
29Castellano
Crear una collección de películas / series con Zappiti VidéoAntes de comenzar a usar Zappiti, necesita crear 2 carpetas separadas en su espacio de almacenamiento en el que agregará todas sus películas y episodios de TV:
Películas1. Cree una carpeta "PELÍCULAS" y coloque todas sus películas y conciertos.2. Cambie el nombre de sus archivos de película con el nombre exacto de la película. Por ejemplo, el archivo de película "Metropolis" en formato MKV tendrá que llamarse "Metropolis.mkv".
Series1. Cree una carpeta "SERIES" y coloque todas sus Séries TV.2. Los archivos de episodios deben colocarse en una carpeta dedicada a cada temporada. Luego las carpetas las temporadas deben colocarse en una carpeta llamada "SERIES". Los archivos de episodios deben nombrarse de la siguiente manera: «nombreserie s01e01 ». El formato «nombreserie 1x01» también está soportado. Utilice «s00e01» para los episodios especiales.
En la pantalla de configuración de la carpeta, haga clic en Agregar una carpeta que contenga sus películas (o series). Si sus archivos están en almacenamiento local (disco duro o unidad USB conec-tada a Zappiti), elija Discos locales en la lista. Si tiene varios reproductores, elija Compartir Zappiti. Luego vaya a la carpeta PELÍCULAS (o SERIES), luego haga clic en el botón OK en la parte inferior de la ventana una vez dentro de la carpeta que desea agregar.
¡Atención! Si hace clic en OK mientras explora una subcarpeta dentro de la carpeta PELICULAS, solo se explorarán las películas en esta subcarpeta. No agregue cada carpeta que contiene una película, sino solo la carpeta principal que contiene todas las películas, incluso si tiene subcar-petas. Zappiti escaneará automáticamente las subcarpetas.
Su carpeta se agregará a la lista de carpetas para escanear. El nombre de la carpeta agregada debe aparecer entre el botón Películas (o Series) y el botón Editar. Si la ruta de la carpeta no parece correc-ta, puede usar el botón Editar. Si desea eliminar una carpeta de esta lista, haga clic en el botón Elimi-nar (esto no eliminará los archivos en el disco duro, sino solo la carpeta de indexación). Puede agregar otras carpetas repitiendo el procedimiento anterior.
Para acceder al panel de control, pulse el botón MENÚ. Encontrará muchas opciones como: idioma, traducciones, temas, control parental, identificación de inicio, cuenta, tokens, etc.
La configuración está completa.Ahora puede disfrutar de su colección de películasy programas de TV.Más información: zappiti.uservoice.com/knowledgebase
Encienda su reproductor Zappiti. En la página principal, haga clic en el primer botón etiquetado VIDEO. Elija su idioma y escriba sus credenciales de Zappiti. Si todavía no tiene una cuenta de Zappiti, le invitamos a crear una (ver página 25). Luego, haz clic en el botón Conexión en la parte inferior de la ventana.
Una vez que haya agregado su carpeta (s) de archivos PELÍCULAS, salga de esta pantalla pulsando la tecla Return en el mando. Zappiti comenzará a escanear y hacer referencia a todos sus archivos de video en las carpetas PELÍCULAS y SERIES mencionadas anteriormente. Luego se muestra un panel de informa-ción que indica las diversas tareas en progreso. Para salir, presione la tecla Return. Para volver a mostrar el panel de tareas actual, pulse la tecla MENÚ y luego haga clic en Tareas actuales.
Uso de Zappiti VidéoTODOSAquí encontrará todos sus videos (películas y series de TV), ordenados alfabéticamente.
PELÍCULASEsta sección contiene todas Sus películas.
SERIESEsta sección contiene todas sus series y episodios.
RECIENTESEncontrará los últimos videos analizados.
CATEGORÍASSus videos están ordenados aquí por categoría (o género).
Agregar un archivo de películaCuando agrega un archivo de película en su carpeta "Películas", Zappiti lo indexará automáticamente al siguiente reinicio de la aplicación. Para forzar el análisis, use la opción dedicada ubicada en el menú (tecla MENÚ en el mando).
Eliminar un archivo de películaPara eliminar una película, pulse la tecla MENÚ y luego haga clic en Eliminar.
Película o episodio no encontradoIncluso cuando los archivos no se nombran correctamente solo con el título de la película (o serie de TV), Zappiti puede en la mayoría de los casos identificar las películas, pero solo cuando un usuario de Zappiti ha identificado previamente el mismo archivo que usted. De hecho, Zappiti Db es una base de datos partici-pativa y de propiedad comunitaria. Pero si su archivo es único (por ejemplo, si lo ha vuelto a comprimir) o si nunca lo ha identificado manualmente otro usuario de Zappiti, no se identificará. En este caso, siga este procedimiento:
Pulse la tecla MENÚ y haga clic en X para identificar. Verá la lista de archivos no identificados. Luego, haga clic en el botón Identificar... En el campo de búsqueda puede volver a introducir el nombre de la película y haga clic en Buscar. Pero otra técnica 100% confiable es introducir el código de identificación único de la película en lugar del nombre de la película. El código de identificación IMDb, TMDb o TVDb se puede encontrar en la URL de la descripción de la película. Por ejemplo, para la película Terror in Shanghai Express (1972), la URL será: https://www.themoviedb.org/movie/32613-horror-express. La ID es: 32613. En el campo de entrada, escriba el código ID "32613", luego confirme. La película será identificada correc-tamente.Si una película está marcada incorrectamente, selecciónela en la lista de películas, pulse la tecla MENÚ, luego haga clic en Identificar de nuevo y use el método descrito anteriormente. Si su película o serie no existe en TMDb o TVDb, puede crear una película o una tarjeta de serie. Todo lo que necesita hacer es crear una cuenta en TMDb o TVDb. Las películas o series creadas serán entonces visibles para Zappiti.
Archivos 3D y UHDLos archivos ISO BD 3D, ISO UHD e ISO 4K, así como BDMV para carpetas 3D y 4K / UHD no se identifi-can automáticamente. Para identificar el contenedor, agregue las siguientes etiquetas en el nombre:
Archivos 3D: "3D" (ejemplo: "Metropolis.3D.iso").Archivos UHD: "UHD" o "ULTRAHD" o "ULTRA-HD" (ejemplo: "Metropolis.UHD.iso").Archivos 4K: "4K" o "4096" (ejemplo: "Metropolis.2160x4096.iso").
Si le Storage ID indique «00000000», cela signifie que Zappiti ne peut pas écrire sur le disque dur. Dans ce cas, reformatez ou remplacez le disque .
Pour accéder à de plus amples fonctionnalités, pressez la touche MENU de la télécommande.
/storage/HDD/FilmsStorage ID: 000000000000000
31Castellano
Control parentalPara marcar una película como Apta para niños, seleccione una película (o grupo), luego presione el botón MENÚ y haga clic en Permitir a niños. Luego escriba un PIN de 4 dígitos.
Categorías personales Por defecto, las películas y los programas de TV se asocian automáti-camente con las categorías. Pero puede crear sus propias categorías y asociar sus películas manualmente. Para crear una categoría, vaya a categorías, luego pulse MENÚ en el control remoto y haga clic en Crear categoría. Introduzca un nombre y elija un icono. El menú contextual también brinda acceso a opciones adicionales para categorías tales como: cambiar posición, editar o eliminar.
Zappiti Video al InicioPara activar la opción, inicie Zappiti Video, presione MENÚ, vaya a Configuración / segunda pestaña y active la opción en la lista.
Filtros y clasificaciónPara clasificar sus películas, pulse la tecla MENÚ. Luego, en la sección Filtros y clasificación, haga clic en el primer elemento. Luego seleccione la clasificación deseada: de la A a la Z, fecha de publicación, duración, adición ... Para filtrar sus películas, haga clic en la siguiente opción: Visto, En progreso o No visto.
Opciones de visualización de subtítulosPara clasificar sus películas, pulse la tecla MENÚ. Luego, en la sección Filtros y clasificación, haga clic en el primer elemento. Luego seleccione la clasificación deseada: de la A a la Z, fecha de publicación, duración, adición ... Para filtrar sus películas, haga clic en la siguiente opción: Visto, En progreso o No visto.
Asistencia al usuario y Zappiti DbPuede contactar con Asistencia al Usuario en la dirección: [email protected]
Para unirse a la comunidad Zappiti Db y participar en el diseño gráfico de carteles, póngase en contacto a través de: [email protected]
Anular
Código parental
* 7
Códigos IR / IPPuede controlar su reproductor multimedia Zappiti utilizando dispositivos de terceros como RTI, ProControl, Control4, Crestron, Logitech...
Más info:zappiti.uservoice.com/knowledgebase
Modo de fábricaPara reinicializar el reproductor: MyApps / Factory Reset.
Abre Zappiti Video automáticamente cuando el reproductor se enciende
Inicio automático
Fecha de lanzamiento decreciente
Filtros y clasificación
Videos vistos
Videos en curso
Videos no vistos
Teclee un PIN de 4 dígitos.Este código le permitirá bloquear su colección y restringir el acceso a las películas marcadas como "Autorizadas para niños".