15
Quick Start Guide Focus V201016

Quick Start Guide
Focus
V201016

1
• Printer• Printhead Filament Paste• Powercable• Glassplate• tape
What’s in the suitcase
3
510 12 86 7
9
4
13
14
1112
Image 1 - Focus 3D Printer1. 3D printer2. Lid3. Frame4. Z-axis5. Display/Touchscreen6. Glassplate7. Magnetic connection for printhead8. Closures9. Home button10. Suitcase hinges11. Power inlet + power button12. Frame hinges13. Z-axis knob14. Connector for printhead

2
• Open the lid [2] and remove it from the case hinges [10][picture 1].
• Lift the grey frame [3] to the angle of 90° until you hear the clicking of the frame hinges[12][picture 2].
WARNING! Don’t put your fingers between the frame and the hinge.
• Connect the printhead to the vertical Z axis [7] of the frame. The magnet in the backplate of the printhead will align and stabilize the print-head to the frame.
• Connect the power cable to the power input port at the backside of the printer, as well as to an electrical outlet. Turn on the printer by switching on the power-button [11].
• The LED on the printhead will turn on and the display will show which pastehead is connected.
Prepare1
TIP. If the vertical Z axis is too low to place the printhead, twist the white knob [13] on top of the axis to adjust its position.
Picture 2 - Printer in open state.
Picture 3 - Frame to 90°
Picture 4 - Connect printhead to printer
Picture 5 - Backside of printer
90°.
WARNING! Don’t connect or remove the printhead when the power is on. Always turn off the printer first.

3
Set up2.1
• To print an object on the Focus 3D printer, first generate a g-code using a slicing software. For more instructions how to use slicing software, go to page page 8 in FAQ section
• Upload your file on the Focus 3D printer via WiFi in the following steps: 1. Connect your PC or Laptop to the WiFi network of the Focus (byFlow_[serialnumber]; password: withflow); 2. Open a browser on your computer and go to: http://192.168.0.1/ in the address bar; 3. Click on upload file and select the g-code that you want to print. When the file is uploaded to the printer, you will get a popup that the uploading was successful.
WARNING! Don’t upload files while the 3D printer is printing!
• Once you uploaded your file(s), you can disconnect the byFlow WiFi-network.
Printing2

4
2.2.1 Load the filament• The printhead should be a few centimetres
away from the glassplate. If it’s not, adjust the height by twisting the white knob [13] on top of the Z axis.
• Preheat the printhead and printbed: Prepare >> Preheat and wait until both temperatures are reached. This is dependent on the used material (PLA or ABS) and can be seen on the display.
TIP! Check your filament for the right temperature settings. When in need of adjusting the temperature, go to ... >> ...
• Insert a filament (1.75mm) into the opening in the prinhead lid [17] until you feel resistance.
• On the touchscreen press Prepare >> Extrude. The printer will pull the filament and extrude it through the nozzle.
• Wait until the material is extruded and remove the excessive filament from the nozzle (the bottom part of the printhead) with a pincet
WARNING! The nozzle and glassplate are hot.
• If you want to change the filament, go to Prepare >> Withdraw. The material will be unloaded from the printhead and you can pull it out of the printhead. After this, you will be able to load another plastic.
TIP! If you don’t use your printer for a while, it is best to remove the filament so it won’t get stuck.
Plastic filament printing2.2 16 17
15
Image 6 - Filament printhead15. Electronics connector16. Power connector17. Opening printhead lid

5
2.2.2 Print• Before you start printing, spray the glassplate
with 3DLAC, so that the print doesn’t get loose from the printing surface. For more instructions on how to remove the glassplate for spraying, see FAQ, page 10.
WARNING! Don’t spray 3DLAC elsewere except the glassplate.
• Press Print and select the file to be printed. If desired, modify settings and check the estimated printing time. Make sure the temperature is right for the filament which is used.
TIP. Suggested printing temperature should be written on the filament roll. To adjust temperature while printing, go to Tune and change temperature
• To confirm, press Print again. Depending on the current nozzle and glassplate temperature, the machine will take a moment to heat up to the set the temperature.
TIP. If you notice that the nozzle is too high (lines not connecting each other, Img.7) or too low (very rough surface, Img.8) from the glassplate you can always adjust its height by twisting the knob on top of the printer (clockwise for lowering).
Image 7 - Lines not connecting
Image 8 - Rough surface

6
2.3.1 Fill the syringe.• Fill the syringe with the paste material (for
more instructions, see FAQ, page 11). Close the syringe with the red cap and fix the nozzle on the bottom of the syringe. Make sure the nozzle diameter is set in the slicing software (default: 1.6mm olive-green nozzle).
2.3.2. Load the syringe into the printhead.• Push the button on the right side [18] of the
printhead and pull the rack [19] up.
TIP! You can disattatch the printhead from the printer for loading the syringe.
Paste printing2.318 19 20
21
Image 9 - Paste printhead18. Side button19. Rack20. Electronics connector21. Magnectic connector
WARNING! Don’t connect or remove the printhead when the power is on. Always turn off the printer first.
7
Image 12 - Nozzle too close to surface
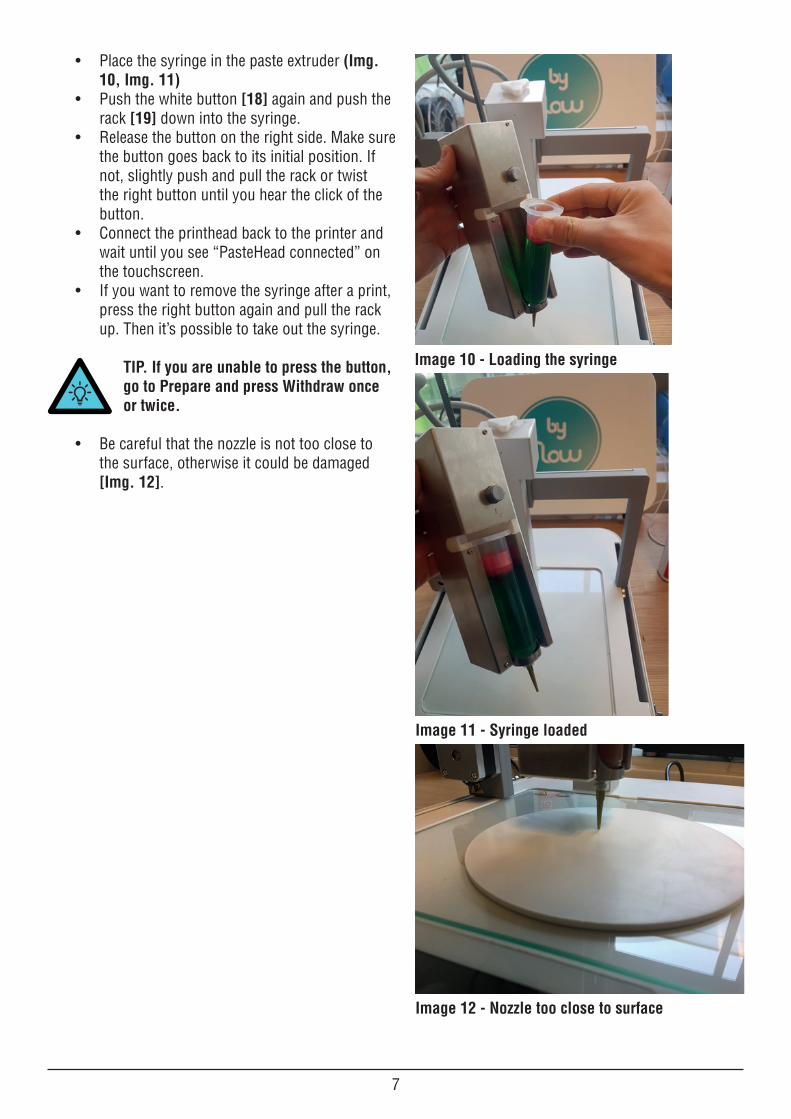
• Place the syringe in the paste extruder (Img. 10, Img. 11)
• Push the white button [18] again and push the rack [19] down into the syringe.
• Release the button on the right side. Make sure the button goes back to its initial position. If not, slightly push and pull the rack or twist the right button until you hear the click of the button.
• Connect the printhead back to the printer and wait until you see “PasteHead connected” on the touchscreen.
• If you want to remove the syringe after a print, press the right button again and pull the rack up. Then it’s possible to take out the syringe.
TIP. If you are unable to press the button, go to Prepare and press Withdraw once or twice.
• Be careful that the nozzle is not too close to the surface, otherwise it could be damaged [Img. 12].
Image 10 - Loading the syringe
Image 11 - Syringe loaded

8
TIP. If you notice that the nozzle is too high (Img. 15) or too low (Img. 16) from the glassplate, you can always adjust its height by twisting the knob on top of the printer (clockwise for lowering).
Image 15 - Nozzle too high above surface
Image 16 - Nozzle too low on surface
2.3.3 Print• Before starting to print, adjust the height of
nozzle to the surface you want to print on, by twisting the white knob [13] on the top of the printer to about 1mm from the printing surface (Img 13 - Img 15).
• Build up the pressure inside the syringe by extruding some of the material. Press Prepare >> Extrude several times, until you see the paste material emerging from the nozzle.
• Press Print and select the file to be printed. Press Print again to confirm.
Image 14 - Nozzle 1 mm above surface
Image 13 - Turning the white knob
• WARNING! YOU NEED TO RECALIBRATE THE HEIGHT OF THE NOZZLE EVERYTIME YOU TURNED THE WHITE KNOB DURING PRINTING OR AFTER RESTARTING THE PRINTER. OTHERWISE THE NOZZLE GETS RUINED.

9
FAQ - Software1. Where can I get 3D designs from?
There are two possibilities to get a 3D model for printing: • Create your own 3D model by using 3D modelling software eg. Solidworks, Meshmixer etc. and save it as .stl file • Download a 3D model online by searching .stl files (eg. www.thingiverse.com)
2. What is a g-code? G-code is a control language for 3D printers. This tells the machine how to move to various points at a desired speed, control the spindle speed, turn on and off various coolants and all sorts of other process parameters to obtain a three dimensional object.
How do I generate a g-code? There are a few slicing software programmes that you can use to turn a 3D model into a g-code. We recommend Slic3r, but it is also possible to use Cura or Simplify3D. If you decide to use Slic3r, follow the steps: • Download the Slic3r for free (www.slic3r.org)
3. • Set Slic3r to expert mode by clicking File >> Preferences >> Expert mode • Load the configuration file with proper printing parameters for the Focus 3D printer (File >> Load config… >> select the configuration file which can be downloaded from www.3dbyflow.com/support)
• Go the every Print/Filament/Printer settings tabs [img. S3.3] to select the config file in the dropdown menu on the left and and save it by clicking the disk icon. The config is now saved.• Open your .STL 3D model by clicking Add… button
• You can modify any parameters in Print/Filament/Printer settings tabs [img. S3.3-S3.5], as well as see the preview of the printing process by clicking the Preview tab on the bottom of the screen. If you’re ready, generate the g-code by clicking on Export G-code… on the right side of the screen and save the file.
Image S3.1 - Slic3r Load Config...
Image S3.2 - Add a .STL model
Image S3.3 - Settings tabs Image S3.4 - Settings tabs Image S3.5 - Export G.code

10
1. How do I remove the glassplate for cleaning or spraying? The glassplate is fixed to the printer by 3 flexible bedholders – two in corners and one at the rear side of the plate. In order to remove the glassplate, you have to push the rear bedholder horizontally until the plate is lifted (Img. H1.1 - Img. H1.3). Then you can easily take it and clean or spray a little bit prior to filament printing (Img. H1.4). Afterwards, press it under corner bedholders (Img. H1.5), press the rear bedholder horizontally (Img. H1.6) and press the glassplate down to the printer. If the plate is fixed, you can start printing again.
Image H1.1 - Hold your finger against the holder
Image H1.3 - Lift the glassplate
Image H1.5 - Plate in corner holders
Image H1.2 - Push the holder backwards
Image H1.4 - Spray the glassplate with 3DLAC
Image H1.6 - Push the backholder back onto the plate
FAQ - Hardware

11
2. How should I fill the syringe with paste materials? There are three ways you can fill the syringe with paste material. Overall, great attention should be paid to prevent any air bubbles to be introduced while filling the syringe.
2.1 Add small portions of paste by using a teaspoon (Img. H2.1). After each portion tap the syringe on a table or any firm surface to let the paste fall down to the bottom of the syringe and release any air from it (Img. H2.2 - H2.3). Repeat it until you reach 1-2cm from the top of the syringe (Img. H2.4). Then put the red cap on it and press it until it goes completely into the syringe (Img. H2.5 - H2.6). It is important not to have any air between the paste and red cap, so it is necessary to fill the full syringe if using this method. At the end, connect a nozzle of a correct size by screwing it in the tip of the syringe (Img. H2.7).
Image H2.1 - Filling the syringe
Image H2.4 - Paste goes to bottom of syringe
Image H2.2 - Paste in syringe
Image H2.4 - Full syringe

12
5.2 Transfer the paste into a pastry bag, making sure there is no air (Img. H2.8). Then compress the bag into the shape that let it fit into the syringe. Place the bag into the bottom of the syringe and start pressing out the paste and simultaneously pull the bag out of the syringe (H2.9 - H2.10).
Image H2.5 - Press red cap on syringe Image H2.6 - Red cap on syringe
Image H2.7 - Nozzle on syringe
Image H2.8 - Pastry bag Image H2.9 - Filling syringe Image H2.10 - Pull back pastry bag
13
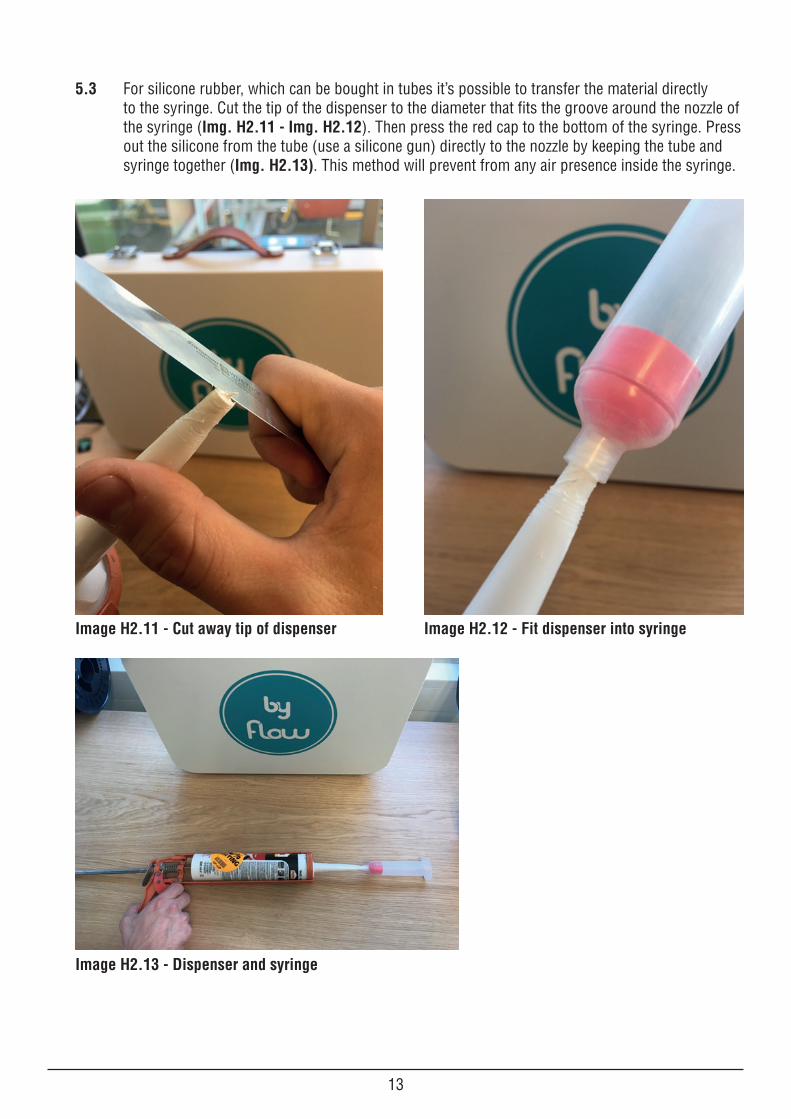
5.3 For silicone rubber, which can be bought in tubes it’s possible to transfer the material directly to the syringe. Cut the tip of the dispenser to the diameter that fits the groove around the nozzle of the syringe (Img. H2.11 - Img. H2.12). Then press the red cap to the bottom of the syringe. Press out the silicone from the tube (use a silicone gun) directly to the nozzle by keeping the tube and syringe together (Img. H2.13). This method will prevent from any air presence inside the syringe.
Image H2.11 - Cut away tip of dispenser Image H2.12 - Fit dispenser into syringe
Image H2.13 - Dispenser and syringe

14
3. It happened to me that the paste printhead went down to the printer and thereby destroyed the nozzle. How can I avoid it? After you switch on the printer you have to adjust the height to the printing surface manually, as mentioned in the Quick Start Guide, page 7. However, you only need to do it once. After you print you don’t have to set the height manually again, because the printer remembers its initial position if it’s been switched on since the last adjustment. It means that if you print another object, the printhead will go down to the previous starting height, so if you lower the printhead in the meantime, it can try to go down anyway and thereby destroy the nozzle. If you want to set a new starting level, switch off and switch on the printer again.


