16
Twilight Render V2.0 Quick Start Guide Twilight Render LLC All rights reserved www.TwilightRender.com

Twilight Render V2.0Quick Start Guide
Twilight Render LLCAll rights reserved
www.TwilightRender.com
Table of ContentsA Quick Look at Version 2.0......................................................................................................................2Activating your License.............................................................................................................................3Rendering...................................................................................................................................................4
A quick look at the rendering controls..................................................................................................4Lighting......................................................................................................................................................6Environment...............................................................................................................................................7Materials.....................................................................................................................................................8
Templates...............................................................................................................................................8Channels................................................................................................................................................9Deep Material Editor...........................................................................................................................10
Proxy Geometry.......................................................................................................................................11More!........................................................................................................................................................12
Section Planes......................................................................................................................................12Post Processing....................................................................................................................................13Exploration Renderer..........................................................................................................................14
Converting from V1.................................................................................................................................15
www.TwilightRender.comTwilight Render LLC, all rights reserved
1
A Quick Look at Version 2.0
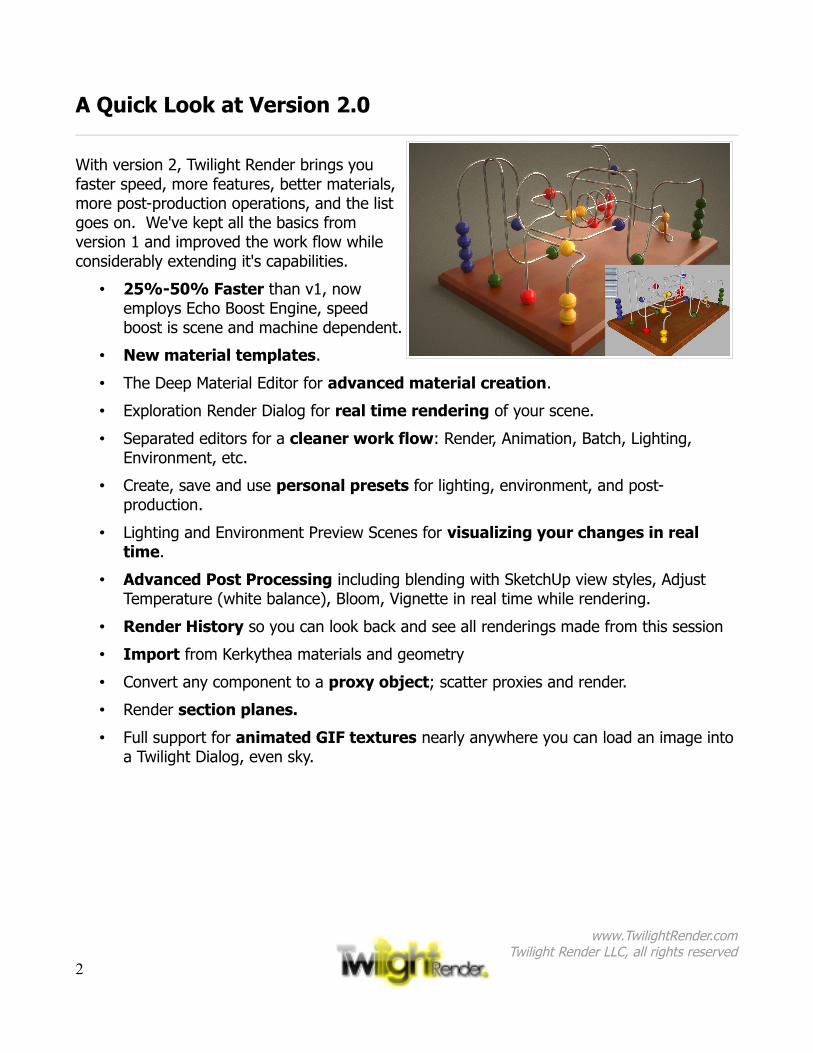
With version 2, Twilight Render brings you faster speed, more features, better materials, more post-production operations, and the list goes on. We've kept all the basics from version 1 and improved the work flow while considerably extending it's capabilities.
• 25%-50% Faster than v1, now employs Echo Boost Engine, speed boost is scene and machine dependent.
• New material templates.
• The Deep Material Editor for advanced material creation.
• Exploration Render Dialog for real time rendering of your scene.
• Separated editors for a cleaner work flow: Render, Animation, Batch, Lighting, Environment, etc.
• Create, save and use personal presets for lighting, environment, and post-production.
• Lighting and Environment Preview Scenes for visualizing your changes in real time.
• Advanced Post Processing including blending with SketchUp view styles, Adjust Temperature (white balance), Bloom, Vignette in real time while rendering.
• Render History so you can look back and see all renderings made from this session
• Import from Kerkythea materials and geometry
• Convert any component to a proxy object; scatter proxies and render.
• Render section planes.
• Full support for animated GIF textures nearly anywhere you can load an image into a Twilight Dialog, even sky.
www.TwilightRender.comTwilight Render LLC, all rights reserved
2

Activating your License
Twilight Render Version 2 provides a new, more flexible licensing policy to its users. The complete set of license terms can be found here: www.TwilightRender.com/licensing_terms.php.
Essentially, in plain english, this means that for every license you buy, you, the user, can install and use Twilight Render on as many devices as you want, provided it is only used on one computer at a time and is used by only one person. This is not a license to activate Twilight Render for multiple users; each license can only be used by a single person, no matter how many activations have been made.*
After purchase, our web store will send out an instruction email along with a Product ID. Do not lose this ID! You must have it to activate Twilight Render. If you do not receive the email within one hour of purchase, please check your junk / spam mail folder. If it is not present there, your email provider is probably blocking our emails as spam. You can contact us at [email protected].
Note: When activating a license, your activation code will be emailed to the email address you used when making your purchase! Make sure your email address is correct (especially if using PayPal), and if possible, ensure you can receive emails from TwilightRender.com.
To activate Twilight Render.
1. Launch SketchUp and go to Plugins pull-down menu
2. Select Twilight V2 -> Options
3. When the Options window opens, click on 'License' on the left-hand side
4. Under 'Computer ID', click on the Copy button.
5. Click on the activation link. It will open a webbrowser and point it at our website at www.TwilightRender.com.
6. On the webpage, into the appropriate place, paste your unique Computer ID as well as your Product ID (from the previous email), and choose “Activate”.
7. Your activation code will be emailed to the email address you used when making your purchase.
8. Copy this code from the email and paste it, into the appropriate place, in the “Edit Options” dialog box and activate the product.
9. Restart SketchUp.
*Organizations that wish to activate Twilight Render on a single computer for use by multiple individuals (a 'rendering station') may do so under the terms of the previous Twilight Render V1 license in which a single computer may be activated per purchase.
www.TwilightRender.comTwilight Render LLC, all rights reserved
3

Rendering
Rendering with Twilight Render is simple. Just click on the Render toolbar button to open the Render editor.
Set the render size and choose a render preset.
Then just hit the play button!
The main render window will show the progress of your render. You can pause, stop, and save your render at anytime. You can minimize the render window to continue working in SketchUp while your image is rendering.
A quick look at the rendering controlsAside from the Play, Pause, and Stop buttons that control the progress of your render, the Render Editor provides the following:
• Render Size
www.TwilightRender.comTwilight Render LLC, all rights reserved
4

• Render Preset
• Content Selection
• Camera View / Scene Selection
• Camera Settings
• Layer Visibility (click to cycle visibility)
• Post-production (tone-mapping, Bloom, Vignette, Temperature, etc)
Remember, great renderings need four (4) things.
• Good Models (A poorly detailed model will look as such, or even more clearly so, in a rendering.)
• Good Lighting (A well-lit model is simple in Twilight if you follow the principal of “light it as you would do so in real life”.)
• Good Materials (Quality materials are key to convincing renderings. Learn to observe the world around you closely.)
• A Quality Render Engine like Twilight Render
www.TwilightRender.comTwilight Render LLC, all rights reserved
5

Lighting
Adding lights to your scene is easy. Click the light tool button in the toolbar to activate the light tool. Adding lights, requires three clicks:
1. Set the reference point. This may be a spot on the ceiling or wall.
2. Set the anchor point. This is where the center of the light will be positioned.
3. Set the target point. This is where the light will point (spotlight, projector, ies).
At any time when inserting a light, you can right-click in the scene to change the type of light you are adding.
After a light is added, the Light Editor will open to allow you to make changes to the intensity, color, and physical properties of the light. If you are adding a projector or IES light, this is where you set the image or .ies data file to use. The realtime preview shows a rendered representation of your light.
The preset button allows you to create reusable presets of all the light's characteristics so you can easily apply them to other lights in the future.
Each light in the scene can be edited by right-clicking on the light component and choosing Twilight V2 Edit Light→ . Or by opening the light editor and choosing from the Lights menu.
www.TwilightRender.comTwilight Render LLC, all rights reserved
6

Environment
Environment means the sun and sky. Configuring a realistic environment adds a lot to a good render.
The Environment Editor allows you to choose from a list of sky or background types as well as configure the color, intensity, and shadows of the sun.
All background types listed as 'Background' (Background Color, Background Fit Image, etc) provide only a background; they do not contribute any lighting to the scene.
Hemispherical, Spherical, and Sky Probe all provide background images and lighting from a user-selected image (Image Based Lighting).
Note that it is important to choose the right method for the format and shape of
your image!
Physical Sky, the default choice, creates a realistic sky with sun position matching your scene's date, time, and location.
www.TwilightRender.comTwilight Render LLC, all rights reserved
7

Materials
When it comes to materials, Twilight Render provides a great deal of power to quickly apply physically accurate material properties to any SketchUp material painted on a face in your scene. Good materials are key to a good rendering. With Twilight's Material Editors it is easy to convert your SketchUp materials into good materials.
With Twilight Render, you are not creating “new” materials, but modifying the materials you already have painted in SketchUp. Hi-res textures applied in SketchUp are
automatically optimized by SketchUp for quicker display while working, but the hi-res texture linked to the material will be passed through to Twilight and used for rendering. If there is no material applied, it can not be edited with the Material Tool.
TemplatesThe heart of the Twilight Render material system is the Template Library. Templates are preconfigured materials that seamlessly incorporate the SketchUp color or texture into your render. Each template provides a set of simple properties that you can adjust to fine tune the exact appearance of your material. The real-time preview updates with each change to show the final result.
You can choose from a long list of templates from the Template menu. The settings and appearance of the material will automatically update to your choice.
www.TwilightRender.comTwilight Render LLC, all rights reserved
8

ChannelsWhile the properties for each template may be vary, most templates have some properties in common, specifically the color/texture “channels”.
By default, each template is configured to use the color or texture of the SketchUp material, shown by the “SketchUp” choice next to the channel name. In addition to the SketchUp setting, however, you can choose a custom Color, Texture, or Procedural.
Note that changing the type of channel, from SketchUp to
Color, Texture, or Procedural, will not change the appearance of your SketchUp model, only the result of your render. You can make adjustments to the SketchUp material directly by using the SketchUp material editor or by clicking on the SketchUp dropdown at the bottom of the Material Editor.
Depending on the Template, there are more than just a Color channel. You can choose a Bump texture (to give your material roughness), Reflection, Translucency, Light Emission, and more.
Twilight Render makes it easy to experiment, so take the time to try each setting!
Tip: Try the Edge Lines setting under the Advanced dropdown at the bottom of the Material Editor to add
emphasis to the edges of your models!
www.TwilightRender.comTwilight Render LLC, all rights reserved
9
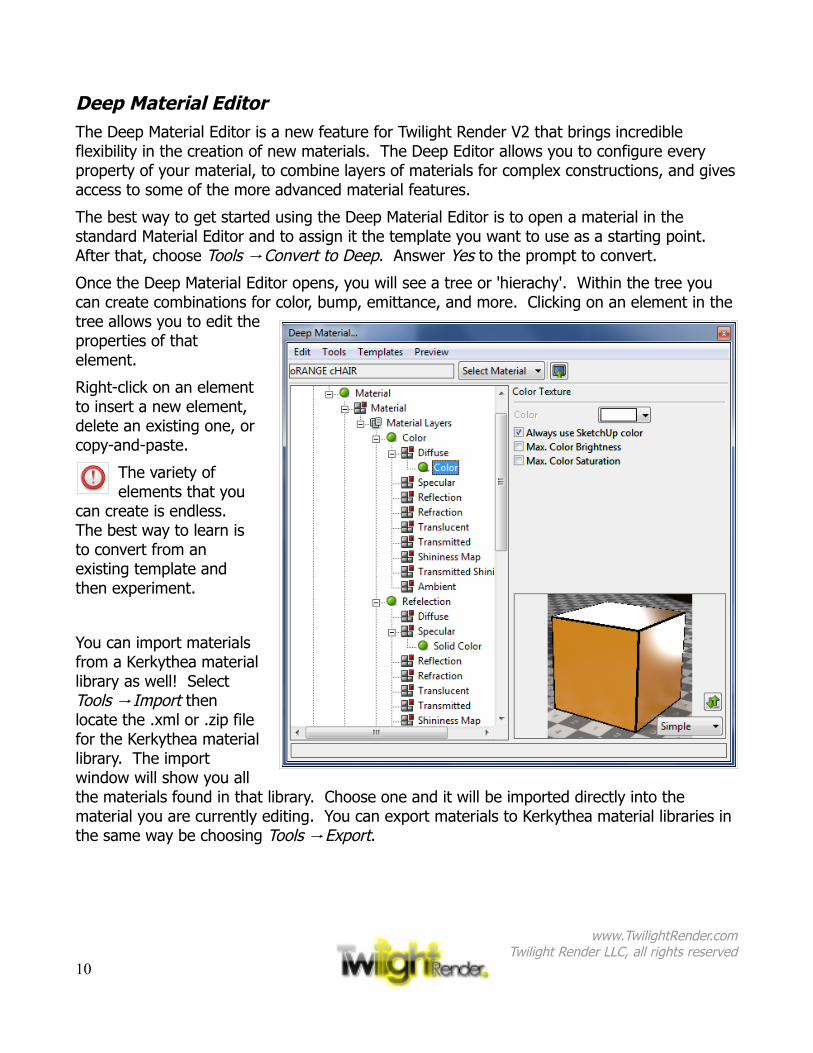
Deep Material EditorThe Deep Material Editor is a new feature for Twilight Render V2 that brings incredible flexibility in the creation of new materials. The Deep Editor allows you to configure every property of your material, to combine layers of materials for complex constructions, and gives access to some of the more advanced material features.
The best way to get started using the Deep Material Editor is to open a material in the standard Material Editor and to assign it the template you want to use as a starting point. After that, choose Tools Convert to Deep→ . Answer Yes to the prompt to convert.
Once the Deep Material Editor opens, you will see a tree or 'hierachy'. Within the tree you can create combinations for color, bump, emittance, and more. Clicking on an element in the tree allows you to edit the properties of that element.
Right-click on an element to insert a new element, delete an existing one, or copy-and-paste.
The variety of elements that you
can create is endless. The best way to learn is to convert from an existing template and then experiment.
You can import materials from a Kerkythea material library as well! Select Tools Import→ then locate the .xml or .zip file for the Kerkythea material library. The import window will show you all the materials found in that library. Choose one and it will be imported directly into the material you are currently editing. You can export materials to Kerkythea material libraries in the same way be choosing Tools Export→ .
www.TwilightRender.comTwilight Render LLC, all rights reserved
10

Proxy Geometry
Twilight Render V2 brings you the power of Proxy Geometry, placeholder components that are lightweight so your SketchUp scene isn't dragged down by excessive geometry, but convert automatically to full geometry components when rendered.
To get started, right-click on a SketchUp Component and choose Twilight V2 Proxy Tool→ . This will create a wireframe for the selected component and launch the tool to allow you to position the proxies around your scene.
Note that each proxy wireframe has a box in the center. The box shows the material that will be applied to that instance of the component when it is rendered, replacing the
Default material of the original component. You can uniquely position, size, and color each proxy object!
www.TwilightRender.comTwilight Render LLC, all rights reserved
11
More!
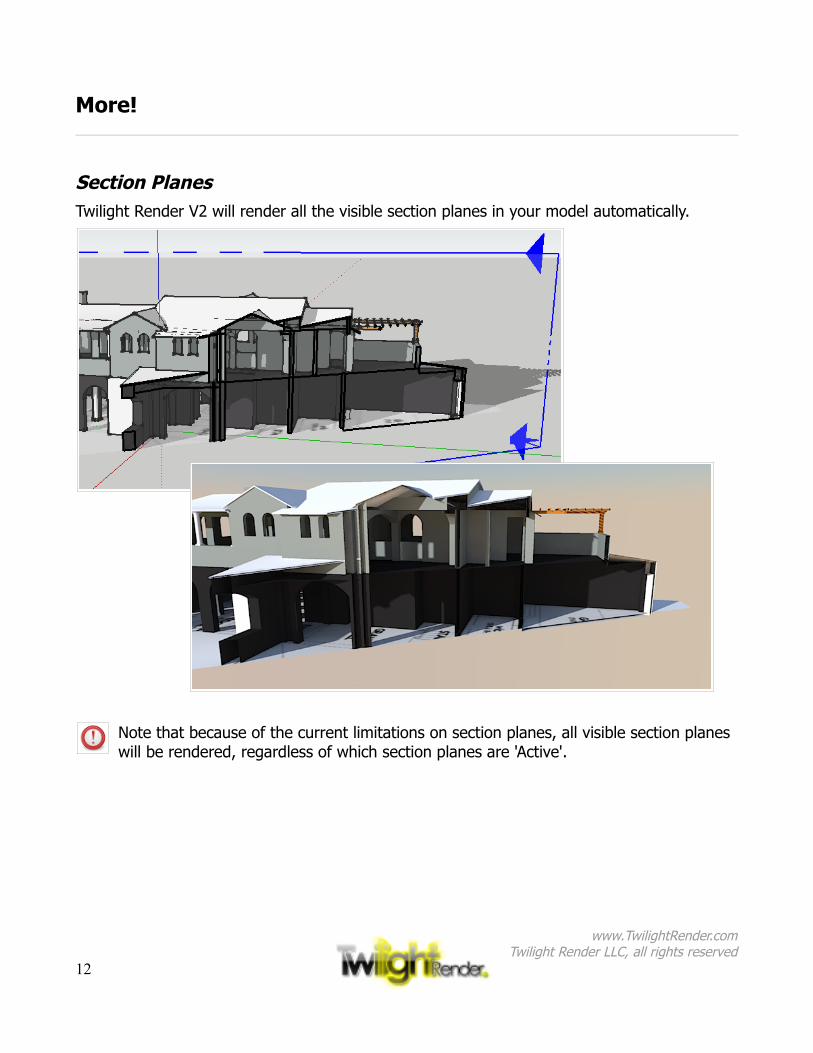
Section PlanesTwilight Render V2 will render all the visible section planes in your model automatically.
Note that because of the current limitations on section planes, all visible section planes will be rendered, regardless of which section planes are 'Active'.
www.TwilightRender.comTwilight Render LLC, all rights reserved
12
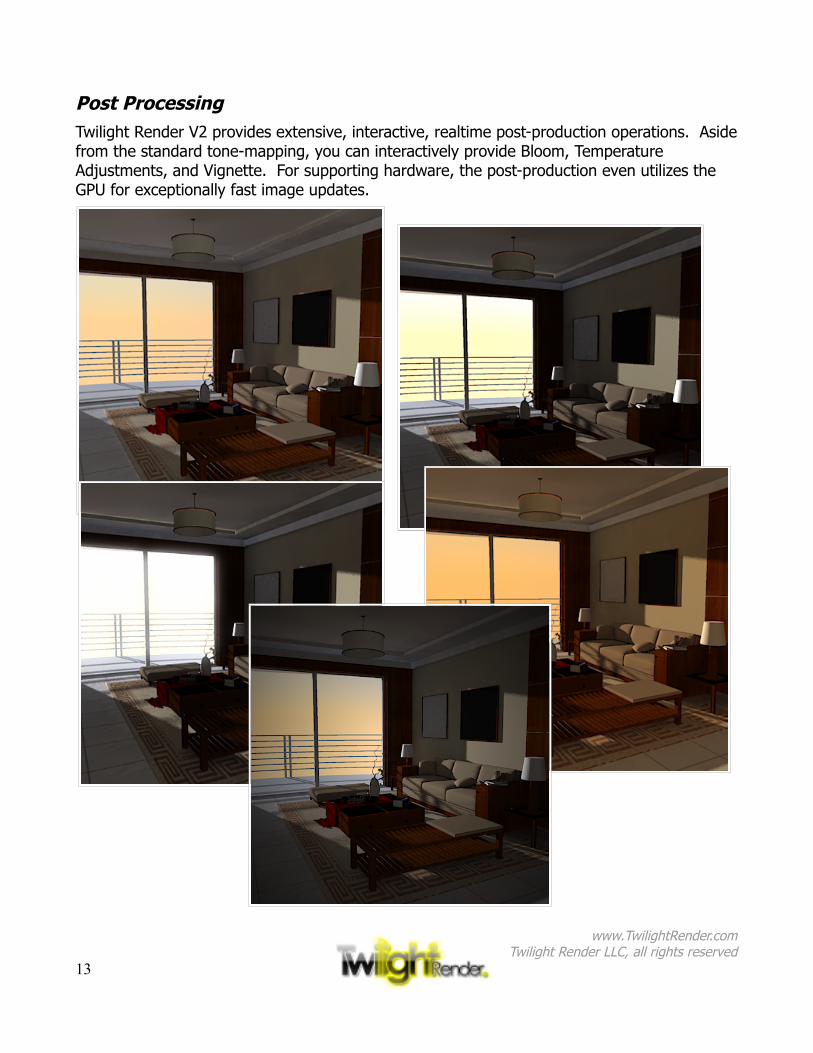
Post ProcessingTwilight Render V2 provides extensive, interactive, realtime post-production operations. Aside from the standard tone-mapping, you can interactively provide Bloom, Temperature Adjustments, and Vignette. For supporting hardware, the post-production even utilizes the GPU for exceptionally fast image updates.
www.TwilightRender.comTwilight Render LLC, all rights reserved
13

Exploration RendererThe Exploration Renderer is a real-time render preview that automatically adjusts to your current camera view, as well as detecting and rendering changes to materials,
lighting, and sun/shadows. The renderer allows you to quickly frame the perfect shot or easily adjust the environment sky without the overhead of rerendering.
When the Exploration Renderer first opens, you have to click the Play button to start the render. After clicking Play, SketchUp may be non-responsive while the scene geometry is loaded. After the scene load is complete, the renderer will not reload any geometry unless you click the Reload button.
Tip: When make multiple changes to materials or lighting, you may want to pause the Exploration Renderer to reduce the overhead of updating the render until your changes
are complete.
www.TwilightRender.comTwilight Render LLC, all rights reserved
14
Converting from V1
All settings from Twilight Render V1.X can be automatically converted to V2. With your V1 scene loaded in SketchUp, choose Plugins Twilight V2 ReConvert 1.x to 2.x→ → . All your lighting and materials will be automatically updated to the format required for V2.
Library materials used by V1.X scenes will be automatically loaded and converted to Deep Materials. In order to do so, the library material must be in the Twilight Render V1 Library folder.
Note that any V2 settings you have saved in your scene may be overwritten by choosing to convert from V1.X.
www.TwilightRender.comTwilight Render LLC, all rights reserved
15


