55
Quick Start Program Basic Manual ContactWise 9.0

Quick Start Program Basic ManualContactWise 9.0

ContactWise QuickStart Program Basic Manual
Copyright © 2009 GroupLink Corporation. All Rights Reserved. ContactWise is a registered trademark of Grou-pLink Corporation. All other trademarks are the property of their respective owners.
Released April, 2010 for ContactWise (version 9.0) by GroupLink Corporation.
This material may not, in whole or in part, be copied, photocopied, reproduced, translated, or reduced to any electronic medium or machine-readable form without prior consent in writing from GroupLink Corporation 563 W 500 S Suite 400, Bountiful, UT 84010.
ALL EXAMPLES WITH NAMES, COMPANY NAMES, OR COMPANIES THAT APPEAR IN THIS MANUAL ARE FICTION-AL AND DO NOT REFER TO OR PORTRAY IN NAME OR SUBSTANCE ANY ACTUAL NAMES, COMPANIES, ENTITIES, OR INSTITUTIONS. ANY RESEMBLANCE TO ANY REAL PERSON, COMPANY, ENTITY, OR INSTITUTION IS PURELY COINCIDENTAL.
Every effort has been made to ensure the accuracy of this material. However, GroupLink Corporation makes no warranties with respect to this documentation and disclaims any implied warranties of merchantability and fit-ness for a particular purpose. GroupLink Corporation shall not be liable for any errors or for incidental or con-sequential damages in connection with the furnishing, performance, or use of this material or the examples herein. The information in this material is subject to change without notice.
Produced byGroupLink Corporation563 West 500 South, Suite 400Bountiful, Utah(801)335-0700
Copyright © GroupLink® Corporation 2009 All Rights Reserved
2

Table of ContentsChapter 1 - Overview ............................................................................................................................................5
Chapter 2 – Opening ContactWise ........................................................................................................................62.1 – Opening ContactWise From the Window’s Start Menu ................................................................................62.2 – Opening ContactWise From GroupWise .......................................................................................................62.3 – Opening ContactWise From Outlook ............................................................................................................72.4 – Opening Up a Database ................................................................................................................................72.5 – Contacts Tab ..................................................................................................................................................82.6 – Contact Filter .................................................................................................................................................82.7 – Incremental Search Feature ........................................................................................................................102.8 – Quick Filter...................................................................................................................................................102.9 – Extended View ............................................................................................................................................11
Chapter 3 – Basic Data Entry ...............................................................................................................................123.1 – Add a New Organization to ContactWise (Full Add) ....................................................................................12 3.1.1 – Adding an Organization Address ...........................................................................................................153.2 – Add a New Contact to ContactWise (Full Add) ...........................................................................................16 3.2.1 – Phone and Address Tab .........................................................................................................................173.3 – Quick Add ....................................................................................................................................................19 3.3.1 – Quick Add New Person ..........................................................................................................................19 3.3.2 – Quick Add New Company ......................................................................................................................21 3.3.3 – Create Mode versus Edit Mode .............................................................................................................21 3.3.4 – Modify Existing Contact or Organization Information ...........................................................................223.4 – Properties Section Overview .......................................................................................................................24 3.4.1 – Edit Field ................................................................................................................................................24 3.4.2 – Drop-down Field ....................................................................................................................................25 3.4.3 – Linked Field ............................................................................................................................................25 3.4.4 – Date Field ..............................................................................................................................................26 3.4.5 – Members Tab .........................................................................................................................................26
Chapter 4 – History .............................................................................................................................................294.1 – Viewing Contact History ..............................................................................................................................294.2 – Organization History ...................................................................................................................................294.3 – Creating History Notes ................................................................................................................................304.4 – Edit History Notes .......................................................................................................................................31
Chapter 5 – ContactWise Events .........................................................................................................................335.1 – Refresh vs. Calendar Update .......................................................................................................................335.2 – Scheduling an Appointment ........................................................................................................................335.3 – Assigning an Appointment ..........................................................................................................................345.4 – Scheduling a Task ........................................................................................................................................355.5 – Assigning a Task ...........................................................................................................................................355.6 – Scheduling a Call Back .................................................................................................................................365.7 – Completing Scheduled Calls ........................................................................................................................365.8 – Assigning a Call Back ...................................................................................................................................375.9 – Creating a Note / Reminder ........................................................................................................................385.10 – Outlook Calendar Events ...........................................................................................................................38
3

Chapter 6 – Groups .............................................................................................................................................406.1 – Public Groups vs. Private Groups ................................................................................................................40 6.1.1 – Creating a Private or Public Group ........................................................................................................406.2 – Adding a Contact or Organization to an Existing Group .............................................................................436.3 – Add or View a Group from within a Contact Record ..................................................................................456.4 – Other Options to do from the Group Tab .....................................................................................................46
Chapter 7 – Filters ..............................................................................................................................................47
Chapter 8 – Call Lists .........................................................................................................................................498.1 – Creating a Call List ......................................................................................................................................498.2 – Public and Private Call Lists ........................................................................................................................498.3 – Adding Members to a Call List ....................................................................................................................498.4 – Removing Members from a Call List ..........................................................................................................498.5 – Managing Call Lists .....................................................................................................................................49
Chapter 9 – ContactWise Help Screen ..............................................................................................................51
APPENDIX...........................................................................................................................................................55
4
Chapter 1: OverviewContactWise is a CRM (Customer Relationship Management) software application. ContactWise centralizes and manages business-critical contact information for organizations of various sizes. ContactWise users span across various industries including state and local government, higher-education institutions, banking, manufacturing, healthcare, and service industries. The purpose of this beginner’s guide is to give an overview of ContactWise and its functions, as well as to essentially help the end-user build a solid foundation of the application and CRM “Best Practices.”
This first section will outline the main features and terminology of ContactWise.
One question that you may have asked is, “what is the purpose of learning a new software application?” You may already have a method of keeping track of contacts. Therefore, it is important to keep the end in mind and answer the question, “how can ContactWise help me perform your job better?” ContactWise will help you stay organized, track correspondence, perform quick and powerful searches of your database, and allow you and others to share critical customer information. Keeping track of your interactions with even a small number ofcontacts can prove to be a long and arduous process. ContactWise will help you simplify that process.
The following is a list that highlights a few things that ContactWise can help you do. These will be covered in greater depth throughout the course of this Basic Manual.
• Contact Management
o Create and store the history of a contact. o Search the ContactWise database to find contacts with defined properties. o Capture all incoming and outgoing emails. o Log all incoming and outgoing phone calls.
• Calendaring
o Manage the GroupWise or Outlook calendar from ContactWise. o Assign and schedule tasks, appointments, and call backs to others. o Receive reminders through your email system of appointments set up through ContactWise.
• Group Management
o Define and categorize contacts with similar properties into public or private groups. o Add contacts and organizations to a multiple number of groups.
• Call Lists
o Create call lists of your contacts.
5

Chapter 2: Opening ContactWiseAfter ContactWise has been installed on your machine, there are several options that you have to open the program. They are listed below.
2.1 Opening ContactWise from the Windows Start Menu
To start ContactWise from the Windows Start Menu follow the steps outlined below as shown in Figure 2.1
• Select the “Start” Menu Bar. • Open “All Programs.” • Select GroupLink. • Select ContactWise and ContactWise.
Figure 2.1
Once the ContactWise program has been started, ContactWise will open and default to the last database that you had open on your machine.
2.2 Opening ContactWise from GroupWise
While in GroupWise you can also open ContactWise using the button shown in Figure 2.2.
6

Figure 2.2
• Click the ContactWise button in the GroupWise toolbar and select “Open ContactWise.”
2.3 Opening ContactWise from Outlook
Opening ContactWise in Outlook is similar to the way it is opened in GroupWise (Figure 2.3).
Figure 2.3
• Click the ContactWise button in the Outlook toolbar and select “Open ContactWise.”
2.4 Opening up a Database
To open a database that has already been created follow these steps: (Figure 2.4)
• Open the file menu. • Click on “Reopen database.” • Select the database you wish to open.
Figure 2.4
When you open ContactWise, the last database that was closed will be the database that you will be connect-ed to.
7
2.5 Contacts Tab
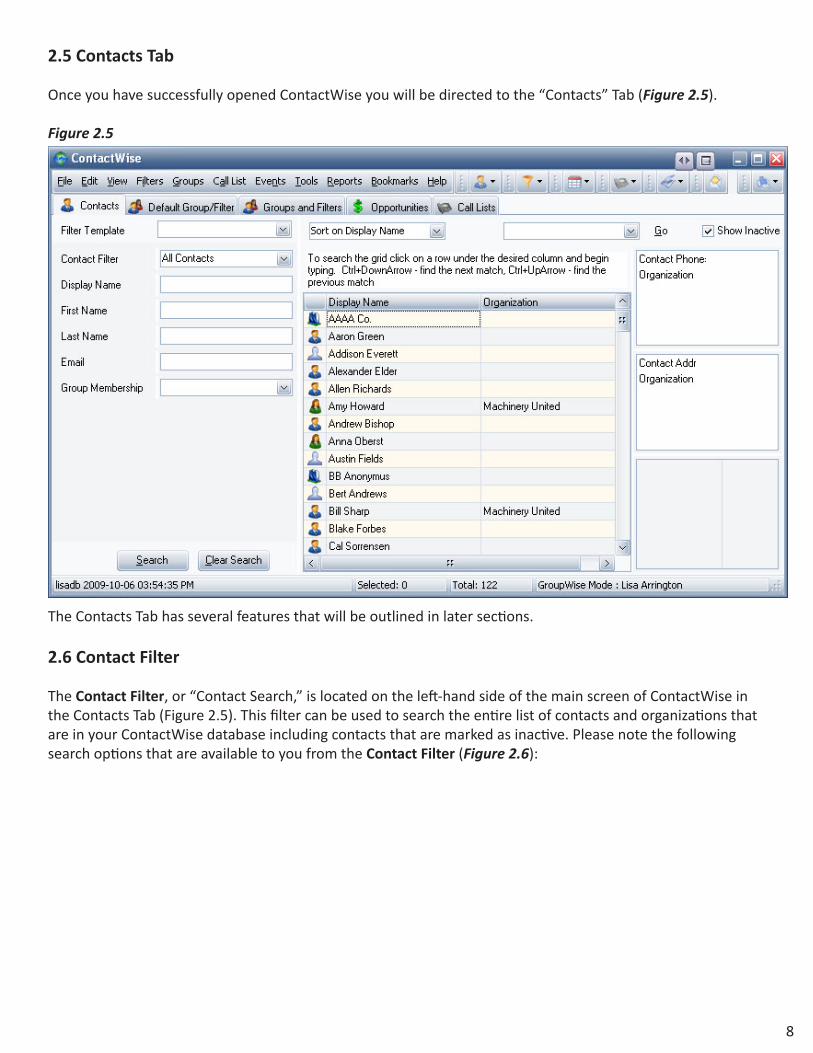
Once you have successfully opened ContactWise you will be directed to the “Contacts” Tab (Figure 2.5).
Figure 2.5
The Contacts Tab has several features that will be outlined in later sections.
2.6 Contact Filter
The Contact Filter, or “Contact Search,” is located on the left-hand side of the main screen of ContactWise in the Contacts Tab (Figure 2.5). This filter can be used to search the entire list of contacts and organizations that are in your ContactWise database including contacts that are marked as inactive. Please note the following search options that are available to you from the Contact Filter (Figure 2.6):
8

Figure 2.6
• Filter Template: A Filter Template is set up by the ContactWise database administrator in your organiza- tion. It can be customized to give you more search options than the 6 options shown in Figure 2.6. This manual will only cover the standard search options. • Contact Filter: A Contact Filter allows you to search for “All Contacts” (contacts and organizations), Person (contacts), or organization. If you wish the result list to only display contacts, and not any organizations, you would select “person.” • Display Name: This is the name of the person or organization as seen in the database. If you were to search by the display name of “John,” the database would give you a result list of every “John” listed, whether they were people or organizations. • First Name: This allows you to search the database for all first names equal to a certain value. • Last Name: This allows you to search the database for all last names equal to a certain value. • Email: This allows you to conduct a search for a given email address. • Group Membership: Groups will be discussed in a later chapter of this manual. Once a group is created you can search for all contacts that belong to a particular group.
To initiate a search click on the “search” key or press the “enter” key. To clear a search click onthe “clear search” button or press the “esc” key.
You are able to select more than one field to search on at a time. For example, you could search for all the names of “John” that have the email address of [email protected] to see a result list.
As an additional option, you are also able to use the wild card key “*” to make your search more generic. For example, say you are not sure if the name “John” is spelled “JON” or “JOHN.” You can use the * key as follows: Jo* to search for all names in the database that start with “JO.” You can also use this key for email searches. If you need to search for all email addresses that contain “GroupLink” you can do a wildcard search as *@grou-plink.* The result list will pull up all names that contain “@grouplink.” in the database.
Note that if you would like to include inactive contacts in your search, mark the Show Inactive Contacts check-box in the upper, right-hand corner of the ContactWise screen.
9
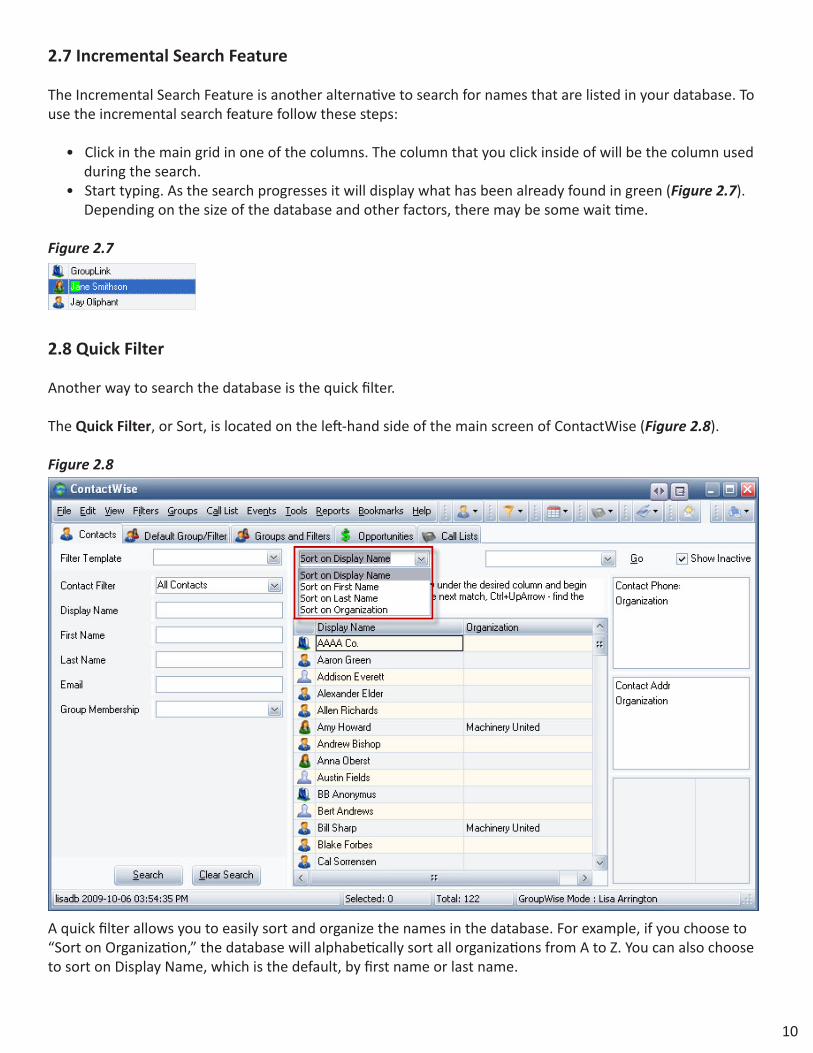
2.7 Incremental Search Feature
The Incremental Search Feature is another alternative to search for names that are listed in your database. To use the incremental search feature follow these steps:
• Click in the main grid in one of the columns. The column that you click inside of will be the column used during the search. • Start typing. As the search progresses it will display what has been already found in green (Figure 2.7). Depending on the size of the database and other factors, there may be some wait time.
Figure 2.7
2.8 Quick Filter
Another way to search the database is the quick filter.
The Quick Filter, or Sort, is located on the left-hand side of the main screen of ContactWise (Figure 2.8).
Figure 2.8
A quick filter allows you to easily sort and organize the names in the database. For example, if you choose to “Sort on Organization,” the database will alphabetically sort all organizations from A to Z. You can also choose to sort on Display Name, which is the default, by first name or last name.
10

2.9 Extended View
The purpose of the Extended View is to allow quick access to information stored in a contact orcompany record.
• To access information through the Extended View, select a contact in the ContactWise main contact screen and the appropriate portions of that Contact’s record will show up in the Extended View. In Figure 2.9 you will notice the selected contact, Casey Trujillo, has his phone information displayed in blue, and address information displayed in red. • As Figure 2.9 demonstrates, there are two sections in the Extended View:
1. Phone number section: The top half of this section displays the phone numbers for the current con- tact while the bottom half displays the phone numbers of the company associated with the current contact. 2. Address section: The left-hand side of this section shows all of the address descriptions that belong to the selected record. The address fields for the description are in bold type and will be shown on the right-hand side of this section. To see a different address for the same contact, click on another de- scription. (Please note: the associated company addresses are not displayed in the extended view). 3. Property fields section: This section displays information that is chosen by the System Administrator. The information shown in this section can be edited from the main ContactWise screen and will be reflected in the property tab for the contact.
Figure 2.9
11
Chapter 3: Basic Data EntryOne of the primary purposes of ContactWise is to help you build and maintain strong customer relationships. A critical part in maintaining strong relationships is being able to have a centralized location of all contact and organization information needed for day to day correspondence. This section will outline how to add an orga-nization or contact, how to modify an existing organization or contact, and how to input address, phone, email, and fax information for these contacts.
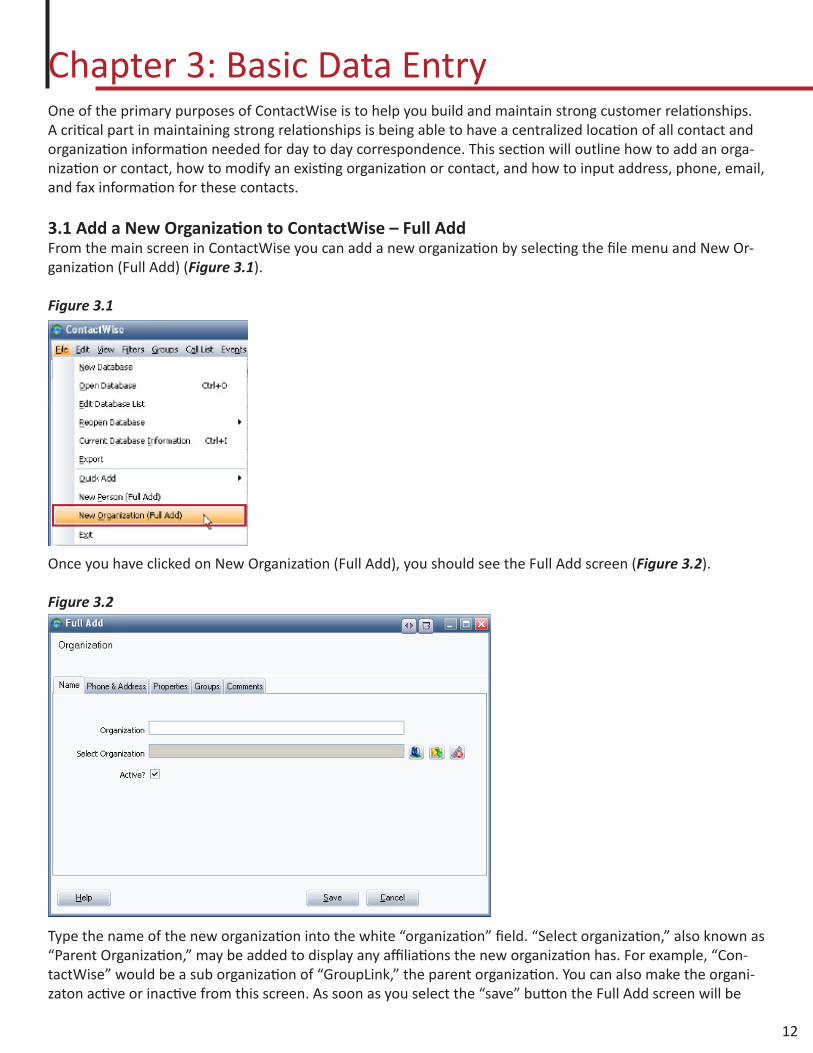
3.1 Add a New Organization to ContactWise – Full AddFrom the main screen in ContactWise you can add a new organization by selecting the file menu and New Or-ganization (Full Add) (Figure 3.1).
Figure 3.1
Once you have clicked on New Organization (Full Add), you should see the Full Add screen (Figure 3.2).
Figure 3.2
Type the name of the new organization into the white “organization” field. “Select organization,” also known as “Parent Organization,” may be added to display any affiliations the new organization has. For example, “Con-tactWise” would be a sub organization of “GroupLink,” the parent organization. You can also make the organi-zaton active or inactive from this screen. As soon as you select the “save” button the Full Add screen will be
12
closed. If you wish to continue to input information about your organization before closing do not select the save button at this point. For further information on the difference between create and edit modes please refer to the section Modify Existing Contacts or Organization Information.
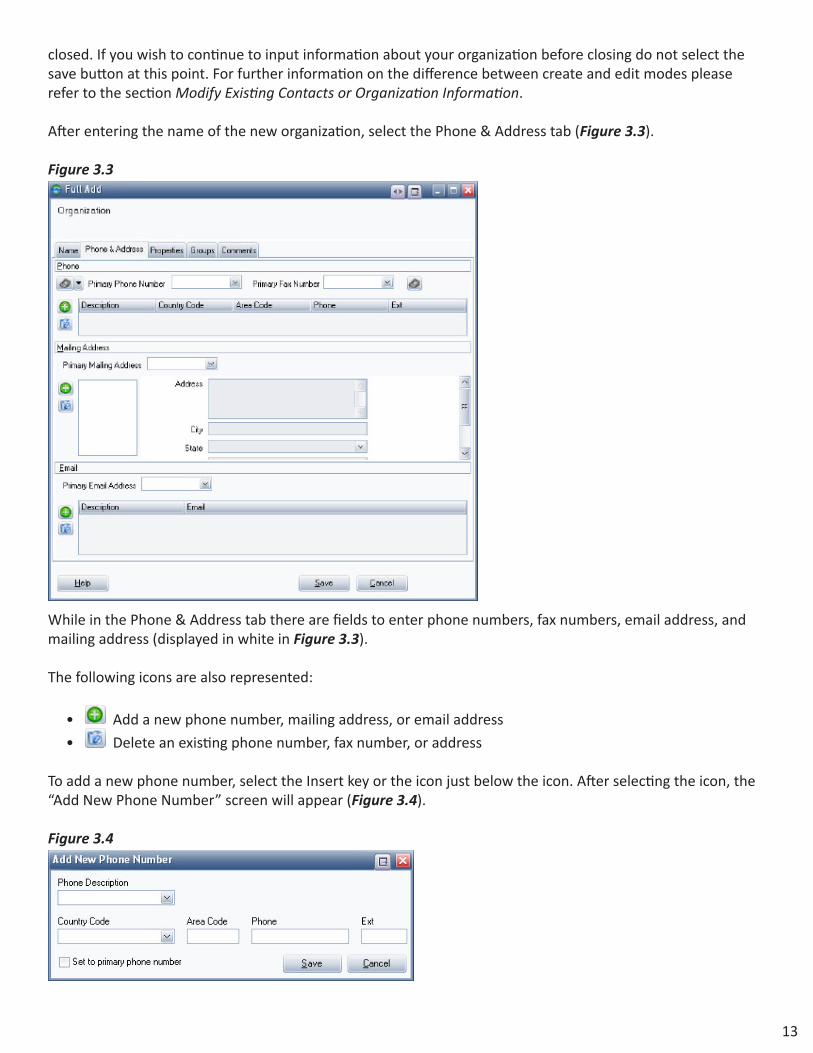
After entering the name of the new organization, select the Phone & Address tab (Figure 3.3).
Figure 3.3
While in the Phone & Address tab there are fields to enter phone numbers, fax numbers, email address, and mailing address (displayed in white in Figure 3.3).
The following icons are also represented:
• Add a new phone number, mailing address, or email address
• Delete an existing phone number, fax number, or address
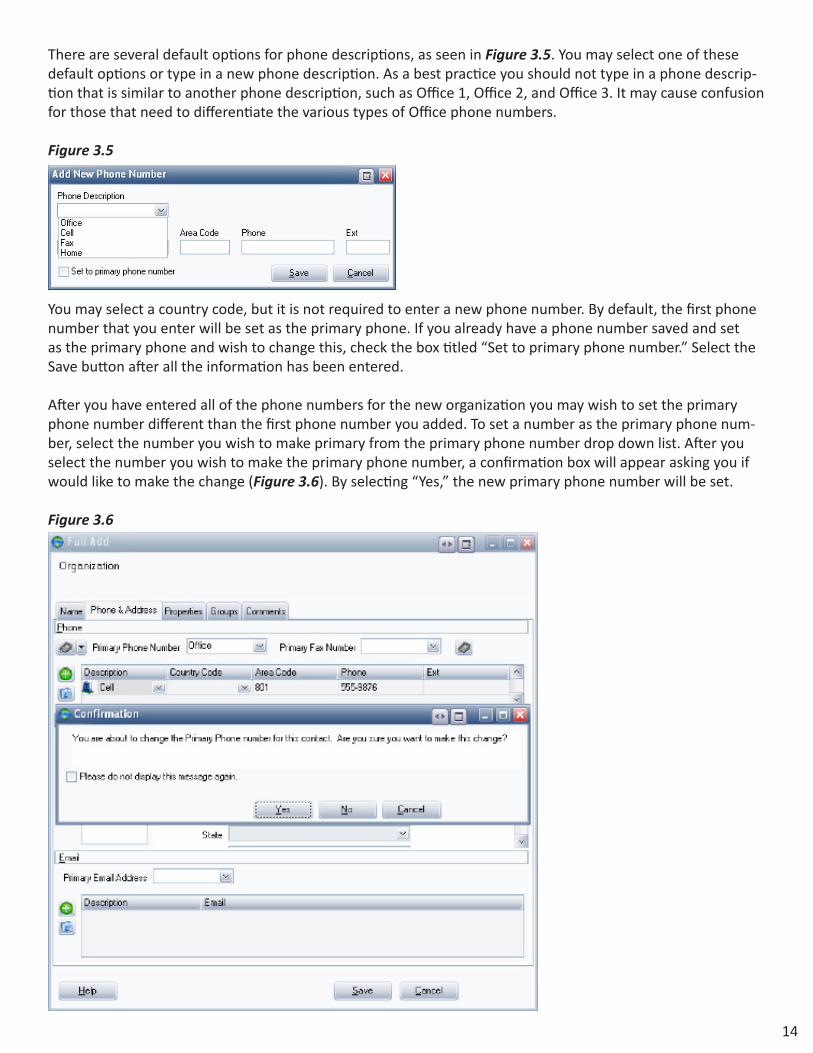
To add a new phone number, select the Insert key or the icon just below the icon. After selecting the icon, the “Add New Phone Number” screen will appear (Figure 3.4).
Figure 3.4
13
There are several default options for phone descriptions, as seen in Figure 3.5. You may select one of these default options or type in a new phone description. As a best practice you should not type in a phone descrip-tion that is similar to another phone description, such as Office 1, Office 2, and Office 3. It may cause confusion for those that need to differentiate the various types of Office phone numbers.
Figure 3.5
You may select a country code, but it is not required to enter a new phone number. By default, the first phone number that you enter will be set as the primary phone. If you already have a phone number saved and set as the primary phone and wish to change this, check the box titled “Set to primary phone number.” Select the Save button after all the information has been entered.
After you have entered all of the phone numbers for the new organization you may wish to set the primary phone number different than the first phone number you added. To set a number as the primary phone num-ber, select the number you wish to make primary from the primary phone number drop down list. After you select the number you wish to make the primary phone number, a confirmation box will appear asking you if would like to make the change (Figure 3.6). By selecting “Yes,” the new primary phone number will be set.
Figure 3.6
14
15
After selecting the new primary phone number, enter in any fax numbers that correspond to the new organiza-tion. The Primary Fax Number feature provides a way to designate a phone number as the primary fax number regardless of the actual description.
Selecting a new fax number will follow the same steps as entering a new phone number with one minor dif-ference; the primary fax number does not automatically set after saving. The fax number is saved, but not set as the primary fax number. You need to select the drop down fax menu to set the primary fax or it will not be saved as the primary. You may choose to store more than one fax number, but be sure to use unique identifiers for each number (example: Office fax, Home fax).
To delete a phone or fax number, click on the desired phone or fax number field and then click the delete but-
ton .
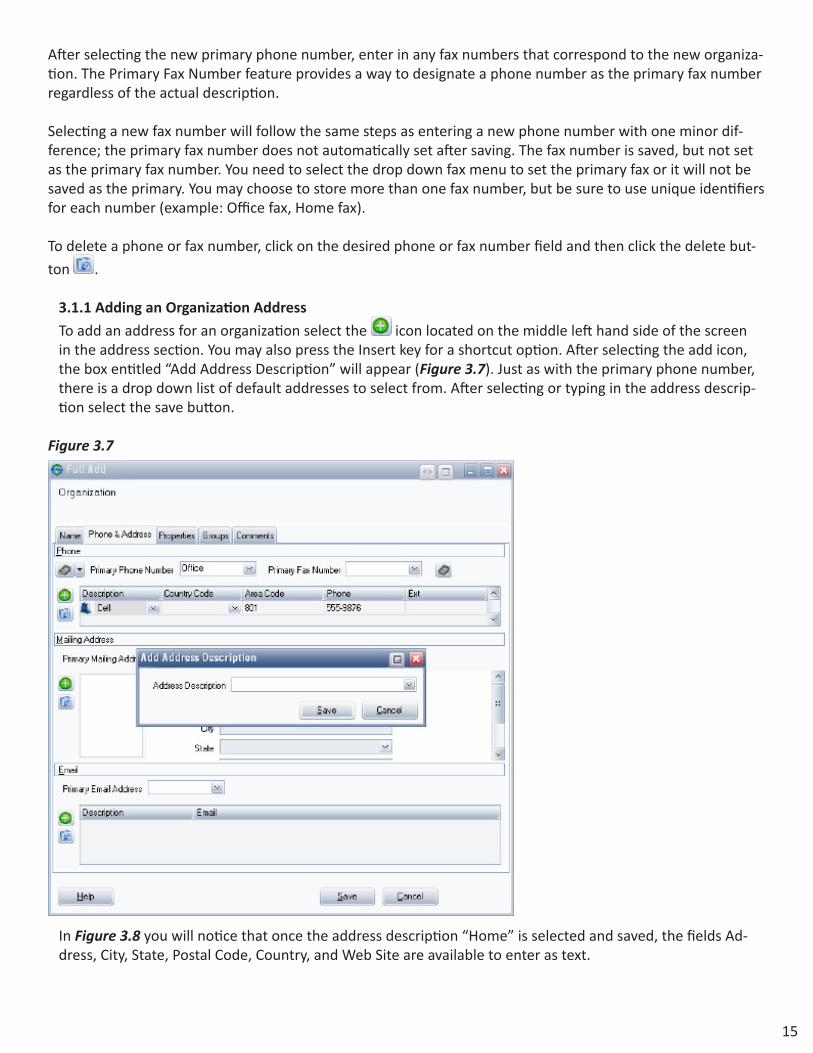
3.1.1 Adding an Organization Address
To add an address for an organization select the icon located on the middle left hand side of the screen in the address section. You may also press the Insert key for a shortcut option. After selecting the add icon, the box entitled “Add Address Description” will appear (Figure 3.7). Just as with the primary phone number, there is a drop down list of default addresses to select from. After selecting or typing in the address descrip- tion select the save button.
Figure 3.7
In Figure 3.8 you will notice that once the address description “Home” is selected and saved, the fields Ad- dress, City, State, Postal Code, Country, and Web Site are available to enter as text.
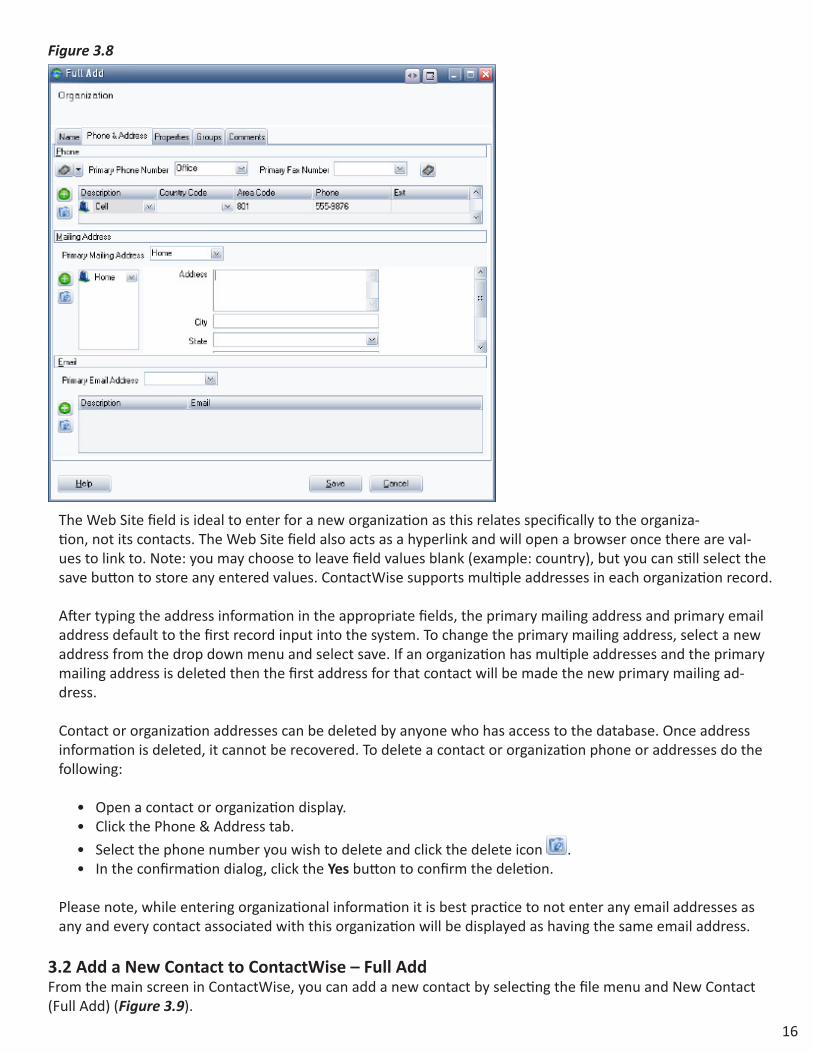
Figure 3.8
The Web Site field is ideal to enter for a new organization as this relates specifically to the organiza- tion, not its contacts. The Web Site field also acts as a hyperlink and will open a browser once there are val- ues to link to. Note: you may choose to leave field values blank (example: country), but you can still select the save button to store any entered values. ContactWise supports multiple addresses in each organization record.
After typing the address information in the appropriate fields, the primary mailing address and primary email address default to the first record input into the system. To change the primary mailing address, select a new address from the drop down menu and select save. If an organization has multiple addresses and the primary mailing address is deleted then the first address for that contact will be made the new primary mailing ad- dress.
Contact or organization addresses can be deleted by anyone who has access to the database. Once address information is deleted, it cannot be recovered. To delete a contact or organization phone or addresses do the following:
• Open a contact or organization display. • Click the Phone & Address tab.
• Select the phone number you wish to delete and click the delete icon . • In the confirmation dialog, click the Yes button to confirm the deletion.
Please note, while entering organizational information it is best practice to not enter any email addresses as any and every contact associated with this organization will be displayed as having the same email address.
3.2 Add a New Contact to ContactWise – Full AddFrom the main screen in ContactWise, you can add a new contact by selecting the file menu and New Contact (Full Add) (Figure 3.9).
16

Figure 3.9
Once you have clicked on New Contact (Full Add), you should see the Full Add screen (Figure 3.10).
Figure 3.10
The name screen differs from the full add for a new organization in that you are able to type fields such as: Sal-utation, Title, First Name, Middle Name, Last Name, Generational Qualifier (Suffix - Jr., Senior, III, etc.), Gender
(displayed with the male icon female icon or the silhouette icon if no gender is chosen), Display Name and Organization. You also have the option to make the contact active or inactive.
When typing in the contact’s information, the Display Name (required field) field will be Autofilled as you type in the other name components. The Display Name is how the contact information will appear in the Contact-Wise main screen. If a contact were to have a nickname and you wanted to use it as the display name, this would need to be entered directly into the display name field.
3.2.1 Phone & Address Tab After entering the information on the name tab, click on the Phone & Address tab. This tab, similar to the Phone & Address tab for an organization, displays a complete list of the contact’s phone numbers and ad- dresses as well as the phone numbers and addresses contained in the associated organization record. The phone numbers and addresses from the associated organization are displayed for convenience and cannot be edited here, but rather have to be edited from within that organization’s record.
17
Although the actual tab itself is similar, there are other items to take into consideration when entering con- tact information. It is important to realize that the primary email address may be left blank. Setting a primary email address is used to determine which email address will be the default when using any of the following functions:
• Send email • Document Merge Utility • Export Utility
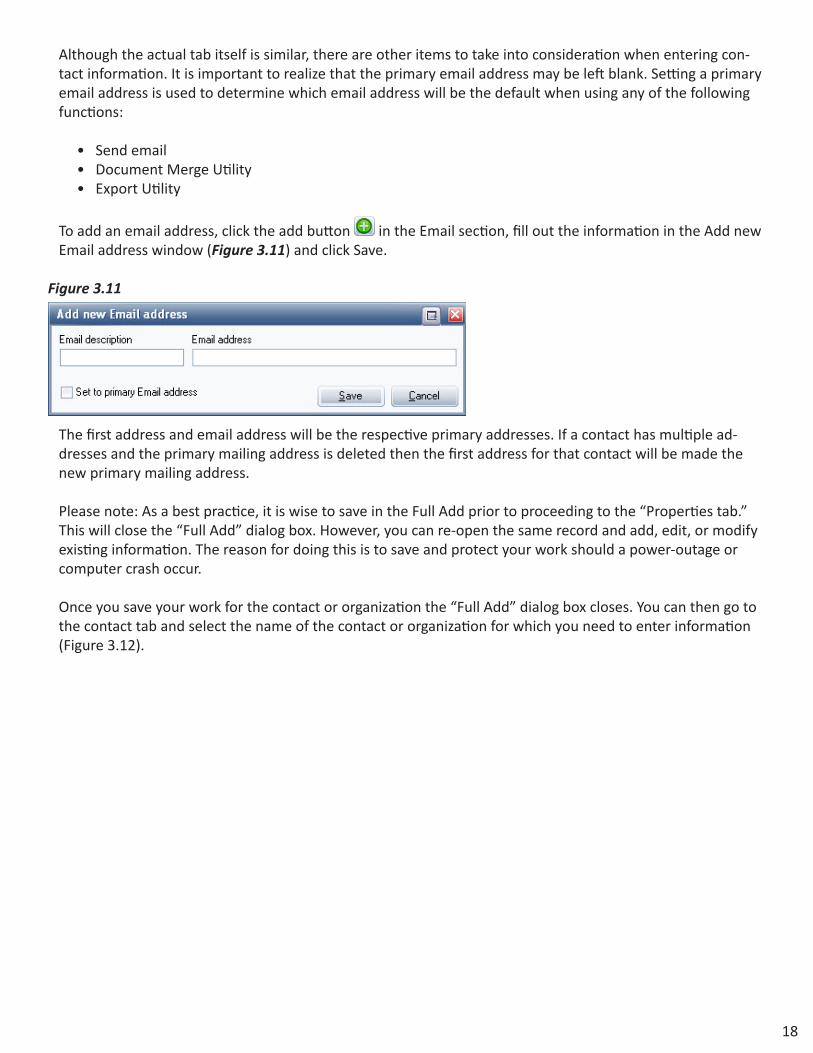
To add an email address, click the add button in the Email section, fill out the information in the Add new Email address window (Figure 3.11) and click Save.
Figure 3.11
The first address and email address will be the respective primary addresses. If a contact has multiple ad- dresses and the primary mailing address is deleted then the first address for that contact will be made the new primary mailing address.
Please note: As a best practice, it is wise to save in the Full Add prior to proceeding to the “Properties tab.” This will close the “Full Add” dialog box. However, you can re-open the same record and add, edit, or modify existing information. The reason for doing this is to save and protect your work should a power-outage or computer crash occur.
Once you save your work for the contact or organization the “Full Add” dialog box closes. You can then go to the contact tab and select the name of the contact or organization for which you need to enter information (Figure 3.12).
18

Figure 3.12
3.3 Quick AddThere may be occasions when you wish to quickly add a contact and store the information to the database. The Quick Add is an alternate way to perform this task.
To open the Quick Add:
• Select the drop down icon displayed in Figure 3.13 • Select Quick Add
o You will have the option to Quick Add a Person or a Company
Figure 3.13
3.3.1 Quick Add New Person If you select Quick Add New Person the screen demonstrated in Figure 3.14 will appear:
19
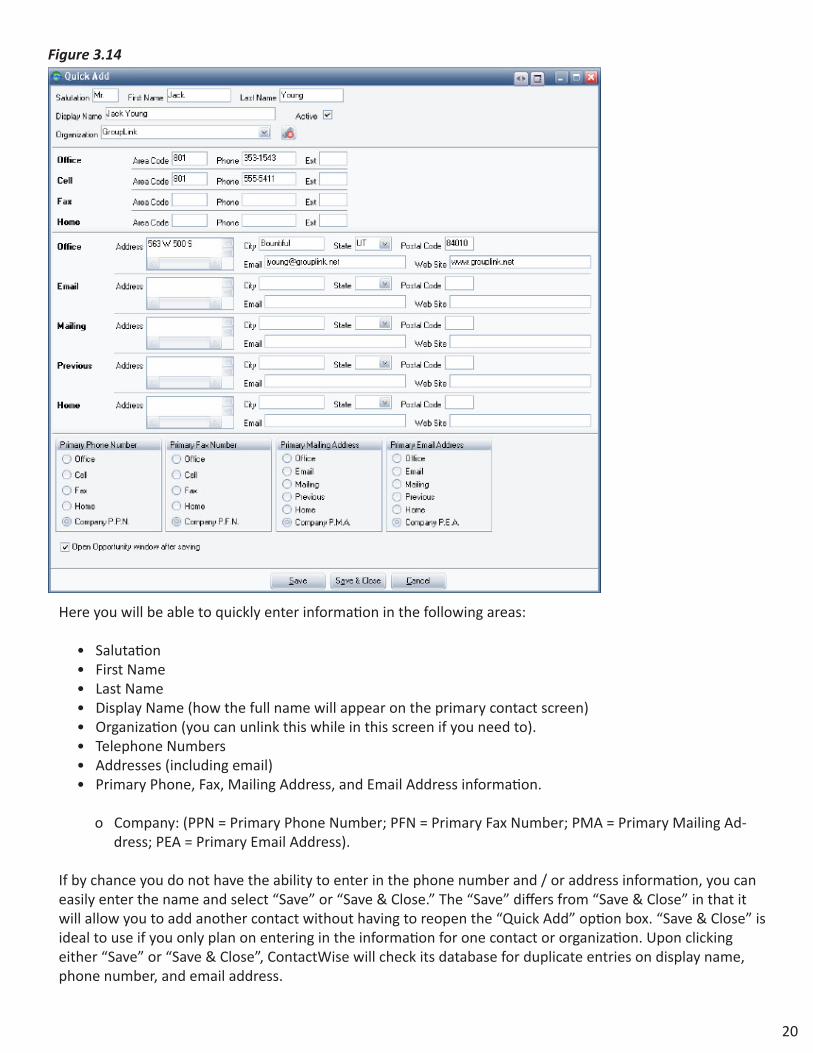
Figure 3.14
Here you will be able to quickly enter information in the following areas:
• Salutation • First Name • Last Name • Display Name (how the full name will appear on the primary contact screen) • Organization (you can unlink this while in this screen if you need to). • Telephone Numbers • Addresses (including email) • Primary Phone, Fax, Mailing Address, and Email Address information.
o Company: (PPN = Primary Phone Number; PFN = Primary Fax Number; PMA = Primary Mailing Ad- dress; PEA = Primary Email Address).
If by chance you do not have the ability to enter in the phone number and / or address information, you can easily enter the name and select “Save” or “Save & Close.” The “Save” differs from “Save & Close” in that it will allow you to add another contact without having to reopen the “Quick Add” option box. “Save & Close” is ideal to use if you only plan on entering in the information for one contact or organization. Upon clicking either “Save” or “Save & Close”, ContactWise will check its database for duplicate entries on display name, phone number, and email address.
20
After clicking either “Save” or “Save & Close” the newly created contact will automatically open to the Op- portunity Tab for editing.
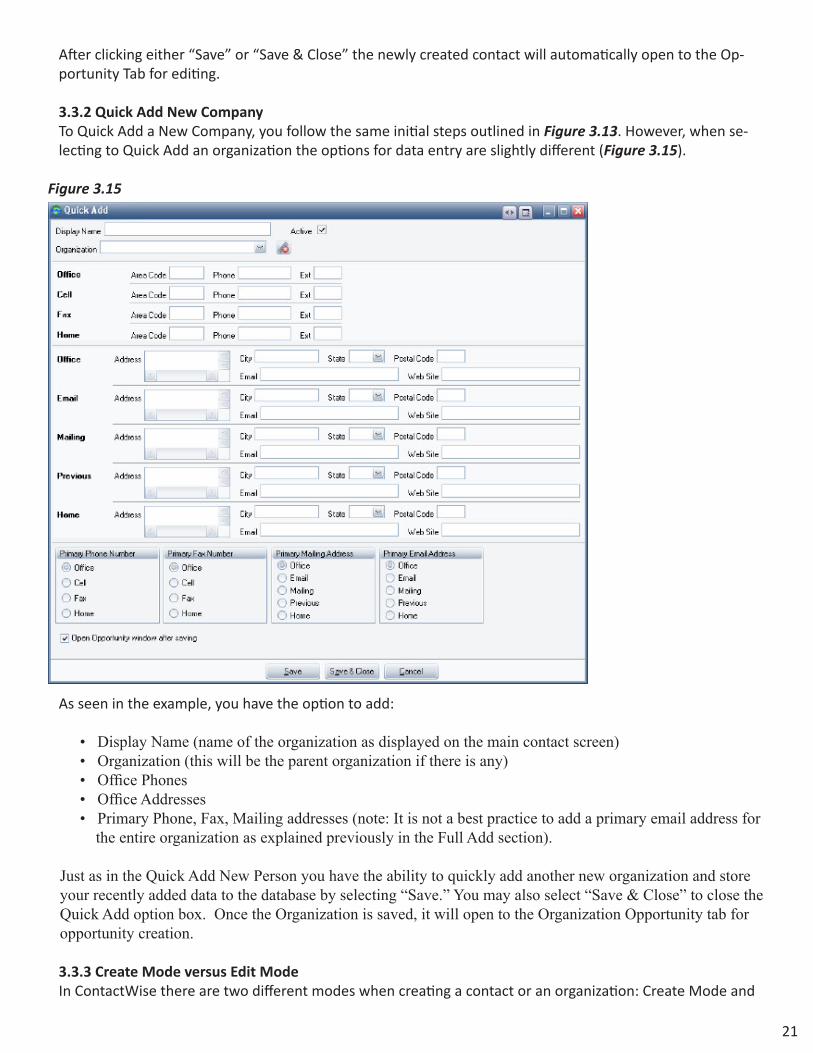
3.3.2 Quick Add New Company To Quick Add a New Company, you follow the same initial steps outlined in Figure 3.13. However, when se- lecting to Quick Add an organization the options for data entry are slightly different (Figure 3.15).
Figure 3.15
As seen in the example, you have the option to add:
• Display Name (name of the organization as displayed on the main contact screen) • Organization (this will be the parent organization if there is any) • Office Phones • Office Addresses • Primary Phone, Fax, Mailing addresses (note: It is not a best practice to add a primary email address for the entire organization as explained previously in the Full Add section).
Just as in the Quick Add New Person you have the ability to quickly add another new organization and store your recently added data to the database by selecting “Save.” You may also select “Save & Close” to close the Quick Add option box. Once the Organization is saved, it will open to the Organization Opportunity tab for opportunity creation.
3.3.3 Create Mode versus Edit Mode In ContactWise there are two different modes when creating a contact or an organization: Create Mode and
21

Edit Mode. You will be in Create Mode when you choose the “Full Add” option for a contact or an organiza- tion, as well as while you are in Quick Add and have not selected the “Save” or “Save & Close” button yet. While in Create Mode the contact or organization has not yet been saved to the database. Once you have “saved” the information you have input in “Full Add,” the newly created contact record will close. This signi- fies the name has now been stored on the database.
Once you open the newly created contact that has been stored to the database you will be in Edit Mode. You will notice there are no “Save” options in any of the screens. All new information is now saved automatically as soon as you click off of an updated field. While editing information for a contact or an organization you do not need to close the record in order for it to save your work.
3.3.4 Modify Existing Contact or Organization Information As was described in the “Full Add” mode, you can choose to add, delete, or modify information that has al- ready been input for a contact or organization. Refer to the following three examples to represent this.
First, let’s say you need to change the primary phone number for Jane Smithson from “Main Office” to “Cell.” You follow these steps to do so:
• Open Jane Smithson from the main contact screen (Figure 3.12). You will notice that all of the informa- tion entered for Jane remains intact from your previous time opening the record. • To change her primary phone number select “Cell” from the Primary Phone drop down list. • A subsequent dialog box will then ask you if you wish to make the described change (Figure 3.16). • Select “Yes” to make the change. This is saved automatically as you are in “edit mode.”
Figure 3.16
Second, let’s say you need to delete Anna Oberst’s “Fax” number. Follow these steps:
• Open Anna Oberst’s record from the main contact screen (Figure 3.12). You will notice that all of the information previously entered for Anna remains intact from your previous time opening the record.
• To delete her fax number highlight/click on the Fax record and select the delete icon . • A subsequent dialog box will then ask you if you wish to make the described change (Figure 3.17). • Select “Yes” to make the change. This is saved automatically as you are in “edit mode.”
22

Figure 3.17
For the third example, let’s say you need to make sure you have the display name updated for Calvin Sor- rensen to be accurate with what he prefers to be called, “Cal.” Follow these steps:
• Open Calvin Sorrensen’s record from the main contact screen (Figure 3.12). You will notice that all of the information previously entered for Calvin remains intact from your previous time opening the record. • To update the display name open the name tab and update it to “Cal Sorrensen.” Note that you can change or update any other fields in this tab or other tabs in Cal’s record (Figure 3.18).
Figure 3.18
23

3.4 Properties Section OverviewContactWise has several configuration options to provide each user organization with the ability to track per-tinent data. The properties tab is one area in ContactWise that is specifically configured by a database admin-istrator used to display organization or contact information. Organizations may often have different property fields than contacts as most user organizations track information in different ways. This is also configured by the database administrator. This section will outline the different types of property fields you may encounter, property tabs, and how to enter data into a property field.
In Figure 3.19 the fields Title, Department, Assistant, Referred By, Contact Type, Birthday, Status, Account, and Description have been configured by the database administrator.
Figure 3.19
There are four types of field options a property field may have: edit field, drop down field, linked field, and date field. While within each property field type the value could be alphanumeric, decimal number, or whole number. Each of these fields will be described in greater detail.
3.4.1 Edit Field The first option is an edit field. In Figure 3.20 the user has the ability to type in the property field “title” for the contact John Phillips. In this example, the user typed “Majority Leader.” At any time a user connected to the same database has the ability to format the name while in edit mode and to type in any alphanumeric value into this field.
Figure 3.20
24

3.4.2 Drop-down Field The second example is the drop down field. Referring to the example in Figure 3.21, the user has the option to select one of the following fields in the drop down menu: Contractor, Client, Reseller, or Supplier. Drop- down fields typically are “read-only” as would be shown in a choice between “yes” or “no” and only allow you to select from the choices on the list. However, there are occasions in which the database administrator may allow you to “edit” or enter data that is not listed in the drop down menu. For example, if an “edit” mode were configured and the user wanted to enter a value of “PRD” they would be able to do so.
Figure 3.21
3.4.3 Linked Field The third option is a Linked Field. Linked fields allow you to link the property field value with a contact or organization that is listed in the database. In Figure 3.22 the user has the option to select from contacts and organizations within the database.
Figure 3.22
Take note of the icon options that you may choose from while in the Linked Field in the properties tab:
• Select a contact from the database to add to the property field. • Open the selected contact record. • Unselect the contact in the property field. Please note: selecting “Yes” will not delete the contact from the database; it will only remove the link from the given location (Figure 3.23).
25

26
Figure 3.23
3.4.4 Date Field The last field option for a property field is the date option. By selecting this option you will be able to select from a calendar. In Figure 3.24 you can see that this field is storing the birthday information for a contact.
Figure 3.24
As Figure 3.24 represents, there may be more than one property tab under the properties menu (e.g., “Cus- tom Fields,” “Grants”). These are set up strictly by the database administrator to organize property fields in a way that is most beneficial to the end user organization.
3.4.5 Members Tab The members tab is used to keep track of all of the contacts and / or sub organizations that are associated with a parent organization.
To access the members tab you first need to open the organization for which you wish to see the members

and/or sub organizations. In this example, GroupLink is opened from the main Contacts Screen (Fig- ure 3.25).
Figure 3.25
After opening the record for GroupLink, the following screen appears (Figure 3.26).
Figure 3.26
While in the organization record for GroupLink, you can select to modify any existing information, or enter additional information. In this example, the “Members” tab will be accessed. After opening the “Members” tab you can see the total sub-organizations (DEF State Line), and all associated contacts for GroupLink (Cal Sorrensen, Gilbert Lance, Heidi Cameron, etc.) (Figure 3.27).
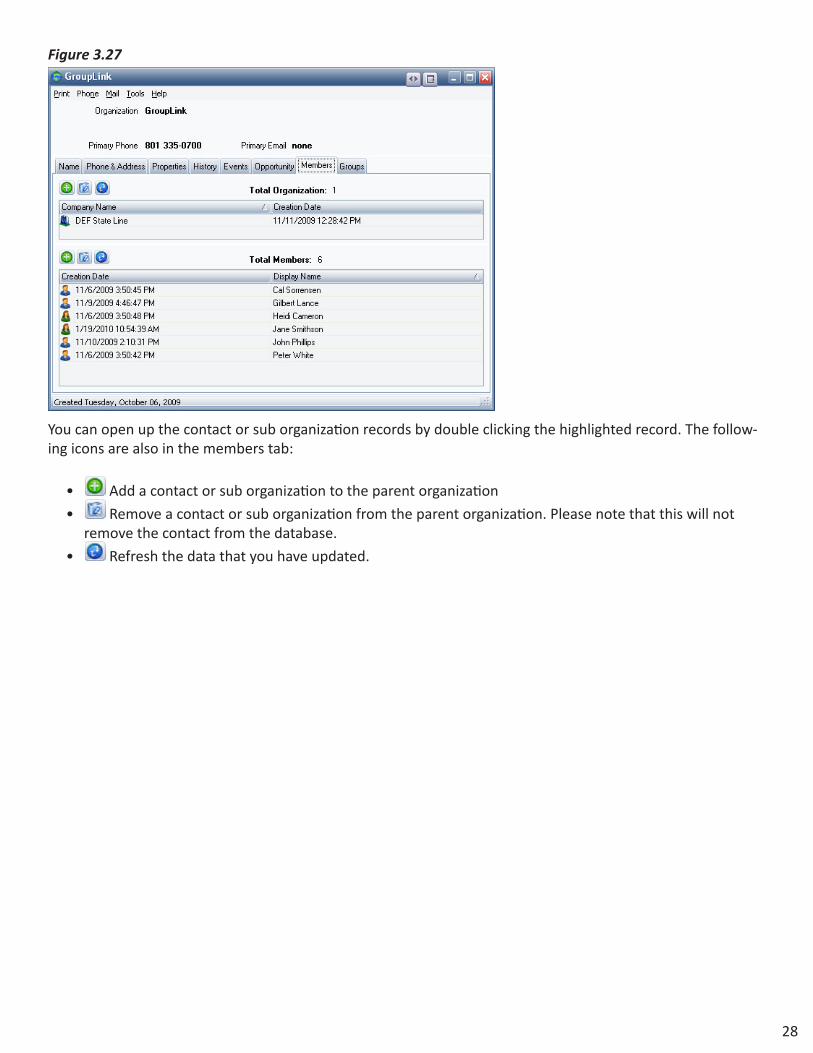
Figure 3.27
28
You can open up the contact or sub organization records by double clicking the highlighted record. The follow-ing icons are also in the members tab:
• Add a contact or sub organization to the parent organization
• Remove a contact or sub organization from the parent organization. Please note that this will not remove the contact from the database.
• Refresh the data that you have updated.

Chapter 4: HistoryContactWise has the ability to store history correspondence with a contact or organization. A history of a per-son or organization record keeps track of notes, phones calls and email messages made to or from a contact within ContactWise. From ContactWise you can open GroupWise Email messages that have been imported into the database. By default, history modification rights are only granted to the person who created the his-tory item.
4.1 Viewing Contact HistoryTo view contact history, follow these steps:
• Open the contact or company’s record. • Click on the History Tab (Figure 4.1).
Figure 4.1
In this example, you will notice the contact, John Doe, has several history notes dating back to 11/27/2006 listed in his history summary. Here is a summary of each of the icons you may see in a history summary:
• Email Received • Placed Call • Received a Call • Email Sent • Manually input History Note
4.2 Organization HistoryOrganization history is accessed by opening an organization record and selecting the history tab.
The primary difference between a contact and organization history is all histories from an organization and its members can be viewed in one place by opening the Organization record and clicking on the history tab. Con-tact history only records the correspondence with that single contact. In Figure 4.2 you will notice the organi-zation, “GroupLink,” has a list of all of the history correspondence of the organization as well as contacts that belong to the organization, such as John Doe.
29

Figure 4.2
4.3 Creating History NotesHistory notes are automatically created after performing actions such as:
• Sending out an email message successfully from ContactWise, creating a “While you were out” message, taking notes in “Place a Call” or “Receive a Call,” or completing a call back connected to a ContactWise record. These topics are covered in the ContactWise QuickStart Program Advanced Manual
To create a generic history note, follow these steps:
• After opening the history tab in a contact or organization record, select the “add history note” located on the left-hand side of the screen (Figure 4.3).
Figure 4.3
• The screen in Figure 4.4 will then appear:
30

Figure 4.4
• To create a note you can either type in the subject the history corresponds to, or you may select from the drop down menu as demonstrated in Figure 4.5.
Figure 4.5
• You will notice there are several options at the bottom of the “create history note” screen.
o Note editor – this option gives you the ability to add effects such as “Bold” or “Highlight,” just as Mi- crosoft Word does. o Insert Object – this will be covered in the advanced manual. o Print – print the selected note o Spell check o Save o Cancel – exit the current history note screen.
• After typing in your note, select the “Save” button.
4.4 Edit History notesYou may wish to edit a history note that has already been created. Please note: only the original creator of the history can modify or delete a history note. All others can view the history note in read-only mode. Each his-tory note contains the name of its creator.
To edit history information on a note for which you are the creator, follow these steps:
• Open the history note you wish to modify. • Make the necessary changes. • Save the changes by selecting the “Save” button.
31

If you wish to remove a history note / item for which you are the creator follow these steps:
• Open a contact and go to the history tab • Select a history item that you created. • Click the delete icon (Figure 4.6). • NOTE: Any deleted history items will not be able to be recovered.
Figure 4.6
32
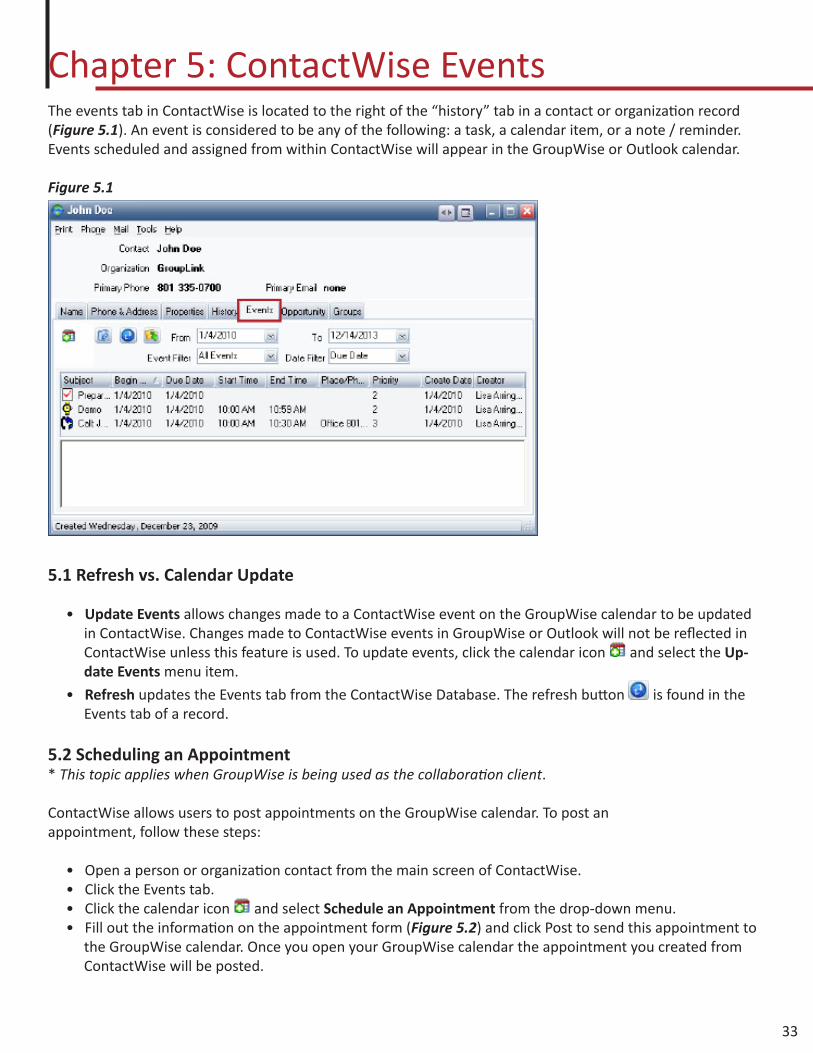
Chapter 5: ContactWise EventsThe events tab in ContactWise is located to the right of the “history” tab in a contact or organization record (Figure 5.1). An event is considered to be any of the following: a task, a calendar item, or a note / reminder. Events scheduled and assigned from within ContactWise will appear in the GroupWise or Outlook calendar.
Figure 5.1
5.1 Refresh vs. Calendar Update
• Update Events allows changes made to a ContactWise event on the GroupWise calendar to be updated in ContactWise. Changes made to ContactWise events in GroupWise or Outlook will not be reflected in ContactWise unless this feature is used. To update events, click the calendar icon and select the Up- date Events menu item.
• Refresh updates the Events tab from the ContactWise Database. The refresh button is found in the Events tab of a record.
5.2 Scheduling an Appointment* This topic applies when GroupWise is being used as the collaboration client.
ContactWise allows users to post appointments on the GroupWise calendar. To post anappointment, follow these steps:
• Open a person or organization contact from the main screen of ContactWise. • Click the Events tab. • Click the calendar icon and select Schedule an Appointment from the drop-down menu. • Fill out the information on the appointment form (Figure 5.2) and click Post to send this appointment to the GroupWise calendar. Once you open your GroupWise calendar the appointment you created from ContactWise will be posted.
33

Figure 5.2
5.3 Assigning an Appointment* This topic applies when GroupWise is being used as the collaboration client.
ContactWise allows users to assign appointments to other GroupWise users within your organization’s net-work. When an appointment is assigned, the appointment is sent to both the person who scheduled the ap-pointment, as well as each recipient listed. The appointment is automatically posted to the calendar of each recipient as well. The recipients cannot modify the posted appointment but can choose to accept or decline the invitation. To assign an appointment:
• Open a person or organization contact from the main screen of ContactWise. • Click the Events tab. • Click the calendar icon and select Assign an Appointment from the drop-down menu. • Fill out the information on the appointment form (Figure 5.3). • Indicate the other people inside your company’s network who should receive this appointment and enter their names in the Recipient line. • Click Send to send this appointment to the GroupWise calendar.
Figure 5.3
34
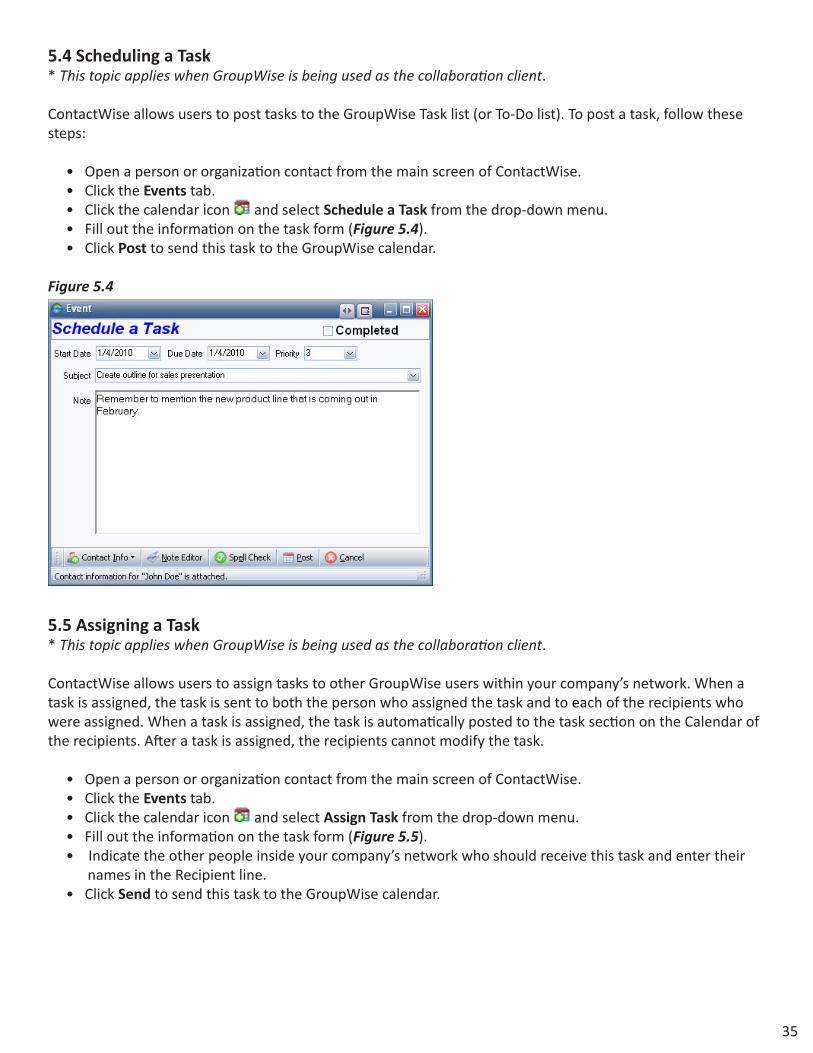
5.4 Scheduling a Task* This topic applies when GroupWise is being used as the collaboration client.
ContactWise allows users to post tasks to the GroupWise Task list (or To-Do list). To post a task, follow these steps:
• Open a person or organization contact from the main screen of ContactWise. • Click the Events tab. • Click the calendar icon and select Schedule a Task from the drop-down menu. • Fill out the information on the task form (Figure 5.4). • Click Post to send this task to the GroupWise calendar.
Figure 5.4
5.5 Assigning a Task* This topic applies when GroupWise is being used as the collaboration client.
ContactWise allows users to assign tasks to other GroupWise users within your company’s network. When a task is assigned, the task is sent to both the person who assigned the task and to each of the recipients who were assigned. When a task is assigned, the task is automatically posted to the task section on the Calendar of the recipients. After a task is assigned, the recipients cannot modify the task.
• Open a person or organization contact from the main screen of ContactWise. • Click the Events tab. • Click the calendar icon and select Assign Task from the drop-down menu. • Fill out the information on the task form (Figure 5.5). • Indicate the other people inside your company’s network who should receive this task and enter their names in the Recipient line. • Click Send to send this task to the GroupWise calendar.
35

Figure 5.5
5.6 Scheduling a Call BackContactWise allows users to remember to call a customer back at a future date and time by posting special call back appointments on the GroupWise calendar.
• Open a person or organization contact from the main screen of ContactWise. • Click the Events tab. • Click the calendar icon and select Schedule a Call Back from the drop-down menu. • Fill out the information on the appointment form (Figure 5.6). • Click Post to send this call back appointment to the GroupWise calendar.
Figure 5.6
5.7 Completing Scheduled Calls* This topic applies when GroupWise is being used as the collaboration client.
Completing a scheduled or assigned call can be done in the following way.
1. Open the Call Back to be completed. This can be done from within ContactWise or from within Group Wise.
36
• ContactWise: Open the contact with whom the Call Back is associated. Go to the Events tab. Find the Call Back to be completed and open it by doubleclicking on it. • GroupWise: Go to the calendar and find the Call Back and double-click on it to open it. When opening the Call Back from within GroupWise, ContactWise must be connected to the same database to which it was connected when the Call Back was originally created.
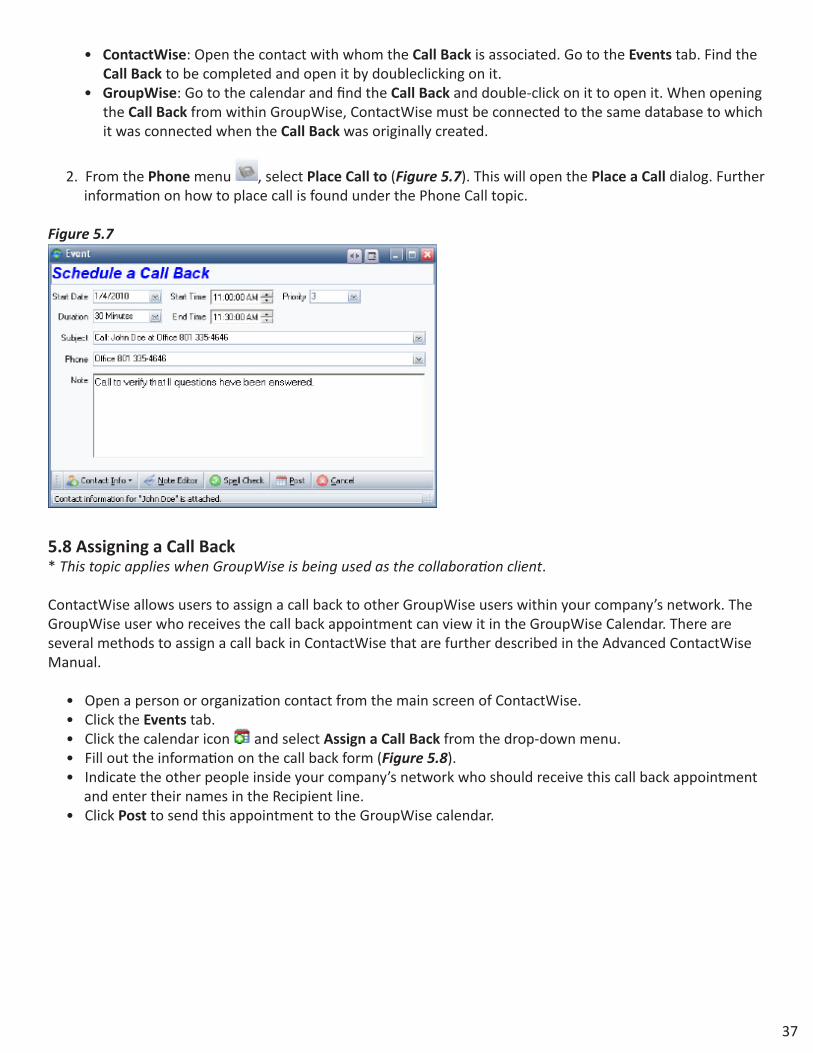
2. From the Phone menu , select Place Call to (Figure 5.7). This will open the Place a Call dialog. Further information on how to place call is found under the Phone Call topic.
Figure 5.7
5.8 Assigning a Call Back* This topic applies when GroupWise is being used as the collaboration client.
ContactWise allows users to assign a call back to other GroupWise users within your company’s network. The GroupWise user who receives the call back appointment can view it in the GroupWise Calendar. There are several methods to assign a call back in ContactWise that are further described in the Advanced ContactWise Manual.
• Open a person or organization contact from the main screen of ContactWise. • Click the Events tab. • Click the calendar icon and select Assign a Call Back from the drop-down menu. • Fill out the information on the call back form (Figure 5.8). • Indicate the other people inside your company’s network who should receive this call back appointment and enter their names in the Recipient line. • Click Post to send this appointment to the GroupWise calendar.
37
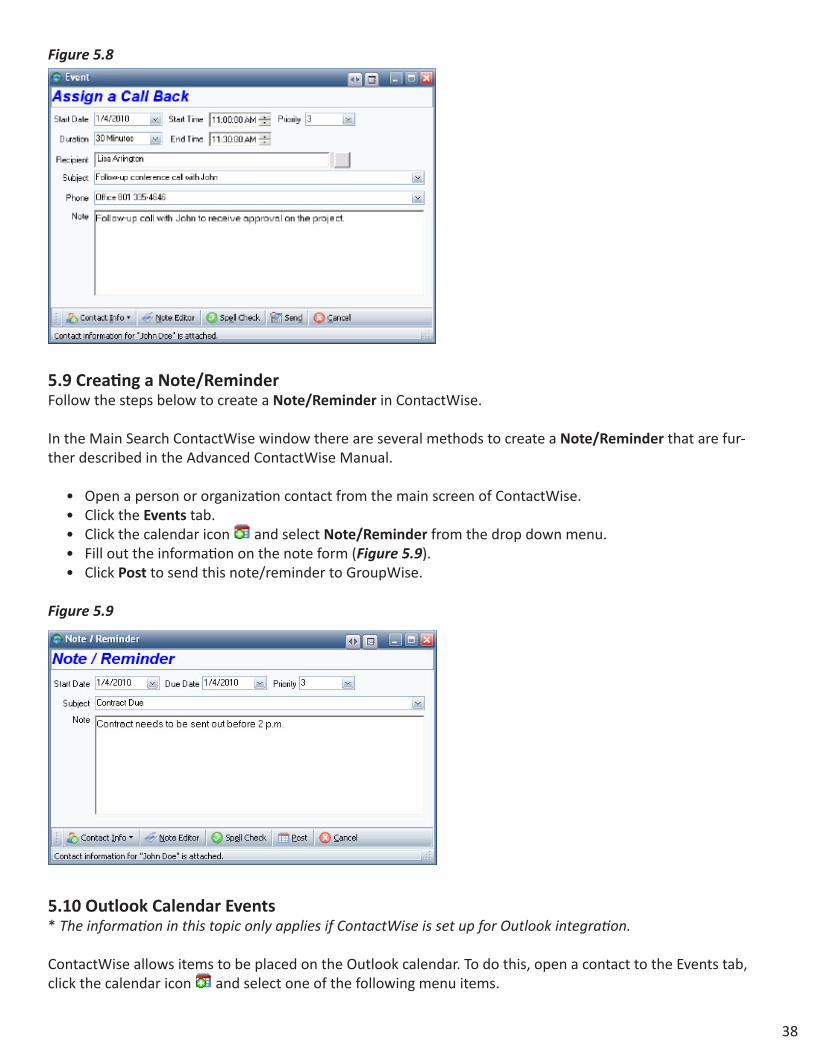
Figure 5.8
5.9 Creating a Note/ReminderFollow the steps below to create a Note/Reminder in ContactWise.
In the Main Search ContactWise window there are several methods to create a Note/Reminder that are fur-ther described in the Advanced ContactWise Manual.
• Open a person or organization contact from the main screen of ContactWise. • Click the Events tab. • Click the calendar icon and select Note/Reminder from the drop down menu. • Fill out the information on the note form (Figure 5.9). • Click Post to send this note/reminder to GroupWise.
Figure 5.9
5.10 Outlook Calendar Events* The information in this topic only applies if ContactWise is set up for Outlook integration.
ContactWise allows items to be placed on the Outlook calendar. To do this, open a contact to the Events tab, click the calendar icon and select one of the following menu items.
38
• Schedule a Task • Schedule a Callback • Schedule an Appointment • Assign a Task • Assign a Callback • Assign an Appointment • Note/Reminder
When any of these items are chosen, the appropriate Outlook window will appear on the screen. Fill out the dialog as would normally be done if the dialog had been opened directly from Outlook. By initiating one of the above items from ContactWise, the item will appear on both the Outlook calendar as well as on the contact’s Events tab.
39

Chapter 6: GroupsGroups – a Group is a collection of contacts and / or organizations that can be created or viewed* by those connected to the same ContactWise database. Groups allow you to combine, or group, contacts that have similarities together. For example, a group could be created to show all ContactWise database contacts that at-tended a recent tradeshow, or all contacts that live within a certain zip code. There are limitless ways in which contacts can be grouped together using the “Groups” feature.
(*please refer to the section on viewing privileges in public and private groups)
6.1 Public Groups vs. Private GroupsThere are two types of groups in ContactWise: Public Groups and Private Groups. A Public group is a group that can be viewed by any person that is connected to the ContactWise database. If a group is a Public Group, group information can be modified by anyone connected to the same database (e.g., adding or removing contacts to a group). Public Groups are typically the most used in an organization and do not have any sensitive information that cannot be seen by others connected to the database.
In contrast, a Private Group is a group that can only be viewed or modified by the Private Group creator. Pri-vate Groups are typically used if there is sensitive information (e.g., high-profile contacts) that should not be seen across the organization.
6.1.1 Creating a Private or Public Group To create a public group or private group, follow these steps:
• First – click on the groups tab located on the top toolbar. You can create a New Public Group, or New Private Group. Group creation follows the same steps in both Public and Private Groups. In this exam- ple, New Public Group will be chosen (Figure 6.1).
Figure 6.1
• Second – you will be asked to create a name for the public group. In Figure 6.2 “First Quarter Trade Show Attendees” is the name of the new group.
Figure 6.2
40
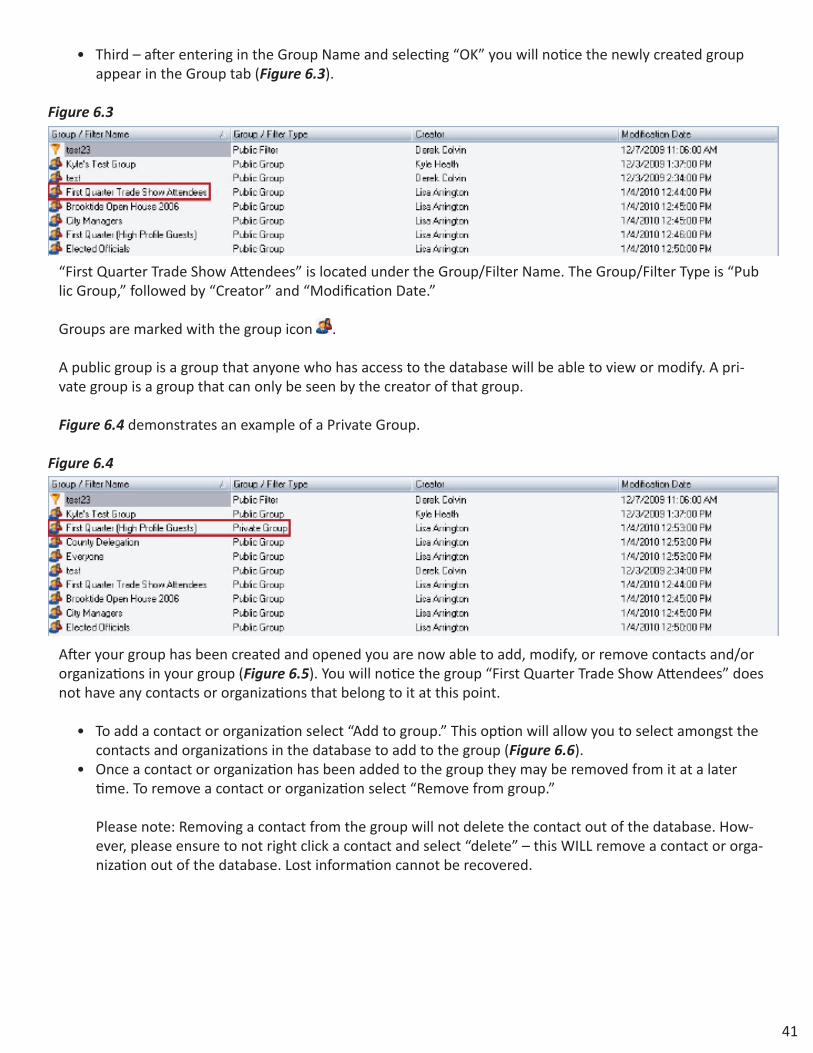
• Third – after entering in the Group Name and selecting “OK” you will notice the newly created group appear in the Group tab (Figure 6.3).
Figure 6.3
“First Quarter Trade Show Attendees” is located under the Group/Filter Name. The Group/Filter Type is “Pub lic Group,” followed by “Creator” and “Modification Date.”
Groups are marked with the group icon .
A public group is a group that anyone who has access to the database will be able to view or modify. A pri- vate group is a group that can only be seen by the creator of that group.
Figure 6.4 demonstrates an example of a Private Group.
Figure 6.4
After your group has been created and opened you are now able to add, modify, or remove contacts and/or organizations in your group (Figure 6.5). You will notice the group “First Quarter Trade Show Attendees” does not have any contacts or organizations that belong to it at this point.
• To add a contact or organization select “Add to group.” This option will allow you to select amongst the contacts and organizations in the database to add to the group (Figure 6.6). • Once a contact or organization has been added to the group they may be removed from it at a later time. To remove a contact or organization select “Remove from group.”
Please note: Removing a contact from the group will not delete the contact out of the database. How- ever, please ensure to not right click a contact and select “delete” – this WILL remove a contact or orga- nization out of the database. Lost information cannot be recovered.
41
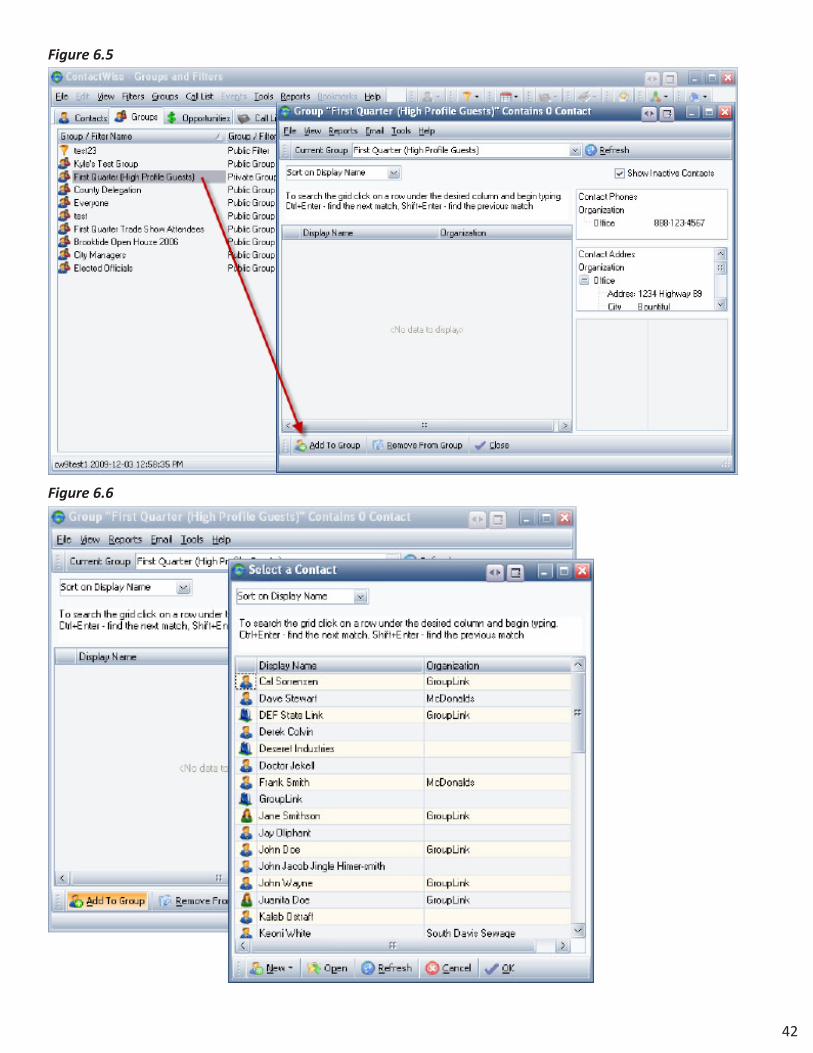
Figure 6.5
Figure 6.6
42
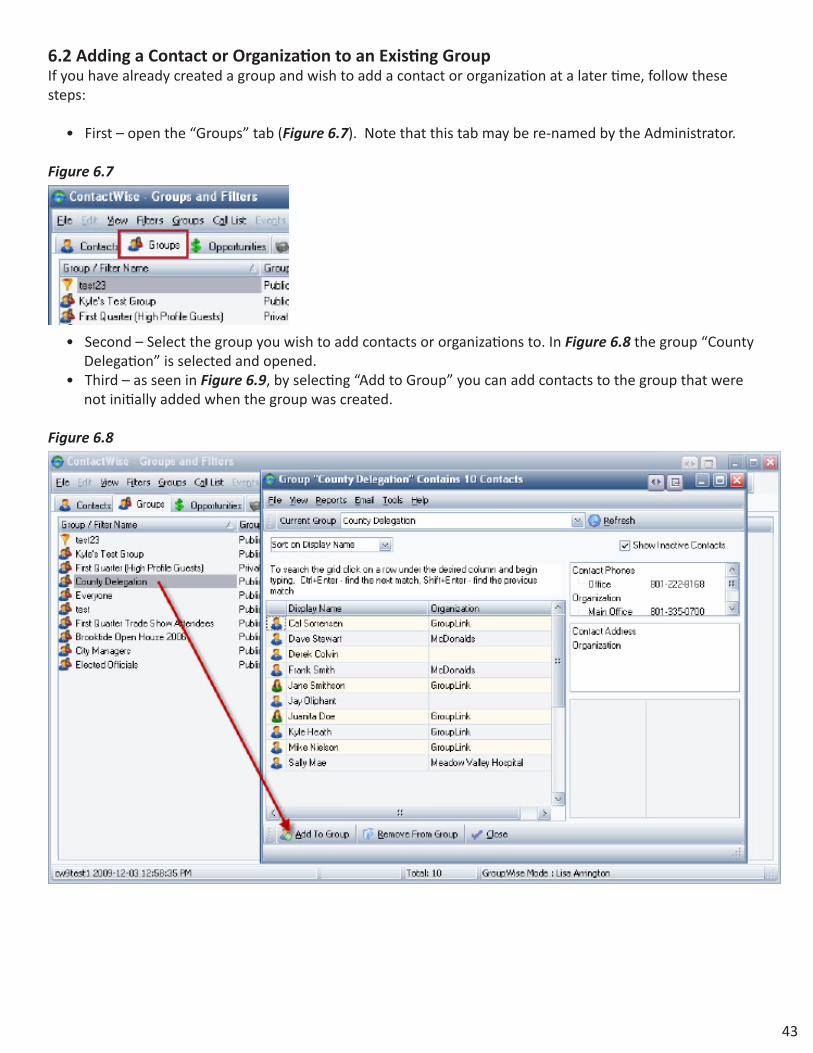
6.2 Adding a Contact or Organization to an Existing GroupIf you have already created a group and wish to add a contact or organization at a later time, follow these steps:
• First – open the “Groups” tab (Figure 6.7). Note that this tab may be re-named by the Administrator.
Figure 6.7
• Second – Select the group you wish to add contacts or organizations to. In Figure 6.8 the group “County Delegation” is selected and opened. • Third – as seen in Figure 6.9, by selecting “Add to Group” you can add contacts to the group that were not initially added when the group was created.
Figure 6.8
43

Figure 6.9
After you have added the contact or organization to the group you will notice it will successfully appear in the group (Figure 6.10).
Figure 6.10
44

6.3 Add or View a Group from within a Contact Record
• To view the group or groups that a contact or organization belongs to, open the “groups” tab within a contact or organization (Figure 6.11).
Figure 6.11
• From this screen you may also choose to add or remove the specified contact or organization to or from the group. In this example the groups that John Doe belongs to are checked. To change the groups Aaron belongs to, check or uncheck the desired group from the list of groups in the database (Figure 6.12).
Figure 6.12
45

46
6.4 Other Options to do from the Group Tab
• Print a report based on all of the contacts that belong to the group (Figure 6.13).
Figure 6.13
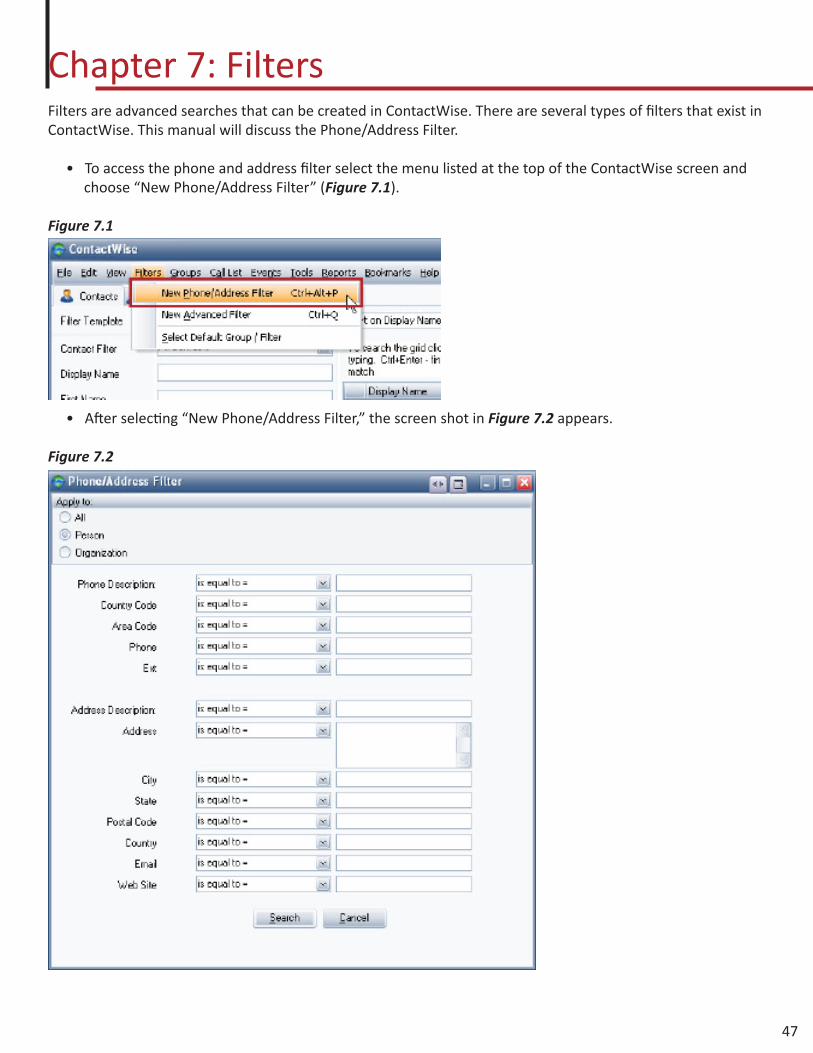
Chapter 7: FiltersFilters are advanced searches that can be created in ContactWise. There are several types of filters that exist in ContactWise. This manual will discuss the Phone/Address Filter.
• To access the phone and address filter select the menu listed at the top of the ContactWise screen and choose “New Phone/Address Filter” (Figure 7.1).
Figure 7.1
• After selecting “New Phone/Address Filter,” the screen shot in Figure 7.2 appears.
Figure 7.2
47
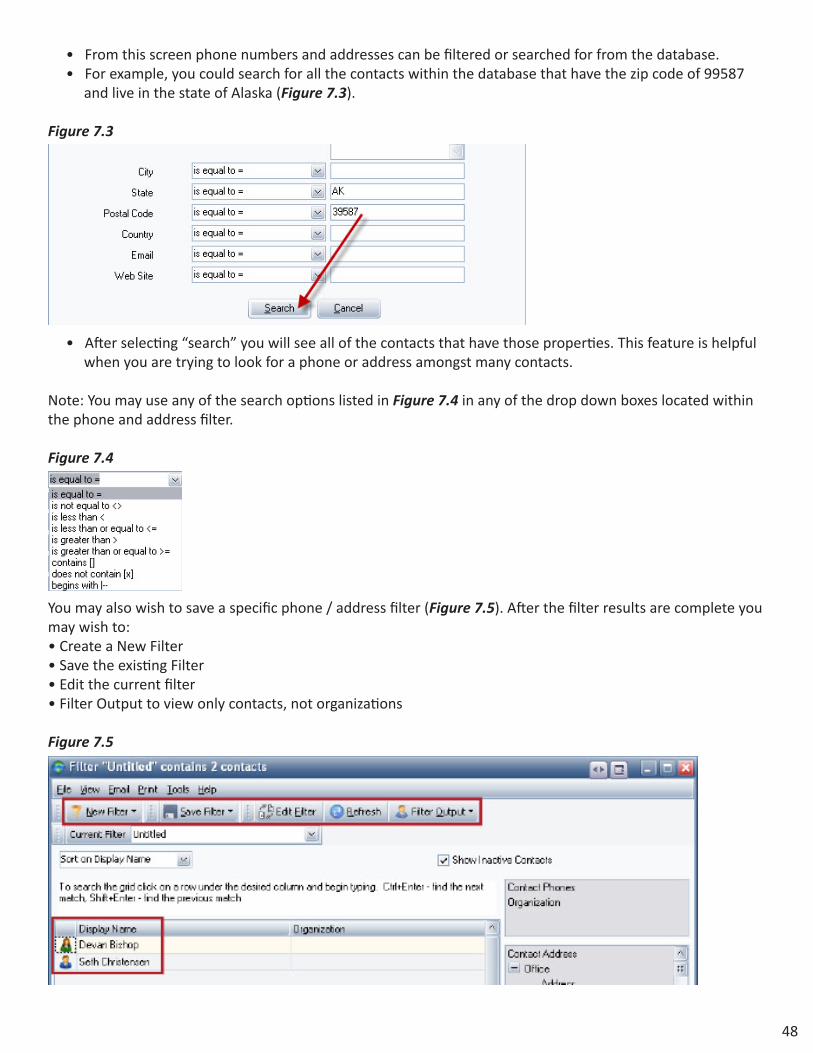
• From this screen phone numbers and addresses can be filtered or searched for from the database. • For example, you could search for all the contacts within the database that have the zip code of 99587 and live in the state of Alaska (Figure 7.3).
Figure 7.3
• After selecting “search” you will see all of the contacts that have those properties. This feature is helpful when you are trying to look for a phone or address amongst many contacts.
Note: You may use any of the search options listed in Figure 7.4 in any of the drop down boxes located within the phone and address filter.
Figure 7.4
You may also wish to save a specific phone / address filter (Figure 7.5). After the filter results are complete you may wish to:• Create a New Filter• Save the existing Filter• Edit the current filter• Filter Output to view only contacts, not organizations
Figure 7.5
48

Chapter 8: Call Lists8.1 Creating a Call ListTo create a call list from within the Call Lists Section of the main ContactWise window do the following:
1. Go to the Call Lists Tab of the ContactWise main screen. 2. Select New Public Call List or New Private Call List from the Call List menu. 3. Enter a name for the Call List in the dialog that comes up, and then click OK.
8.2 Public and Private Call ListsCall lists are static lists of contacts in the database. When a call list is created, the call list can be either public or private. Anyone who has access to open the database will be able to see a public call list. A private call list can only be seen by the creator of that call list.
8.3 Adding Members to a Call ListContacts from the database can be added to a call list in two different ways:
1. In the Call Lists section of the ContactWise main screen:
• Double click on a call list you want to add records to.
• In the Call List display, add a member to a group by clicking the Add to Call List button . • In the Select a Contact dialog select or multi-select the contacts you wish to add to the call list and click the OK button. Or
2. From the Main ContactWise screen:
• Right click on the name of a contact. • Select “Add Contacts to Call List.” • Select the appropriate call list and click the OK button.
8.4 Removing Members from a Call ListTo remove a contact from a call list, follow these steps:
1. Go to the Call List tab in the main screen of ContactWise. Double click on the name of the call list from which you want to remove a member. 2. In the Call List window, select the contact or contacts you wish to remove. 3. Click the Remove from Call List button.
8.5 Managing Call ListsCall Lists in ContactWise allow you to make a static list of contacts in your database and give that list a name. From this list there is capability to open the respective contact or call list, send email to each member of the call list, etc.
When a call list is opened the user is shown a snap shot of the call list. If more than one user has access to the same database any changes made will not automatically show up in the call list. For this reason when a call list is open the Update button must be used periodically to see possible changes (Figure 8.1).
49
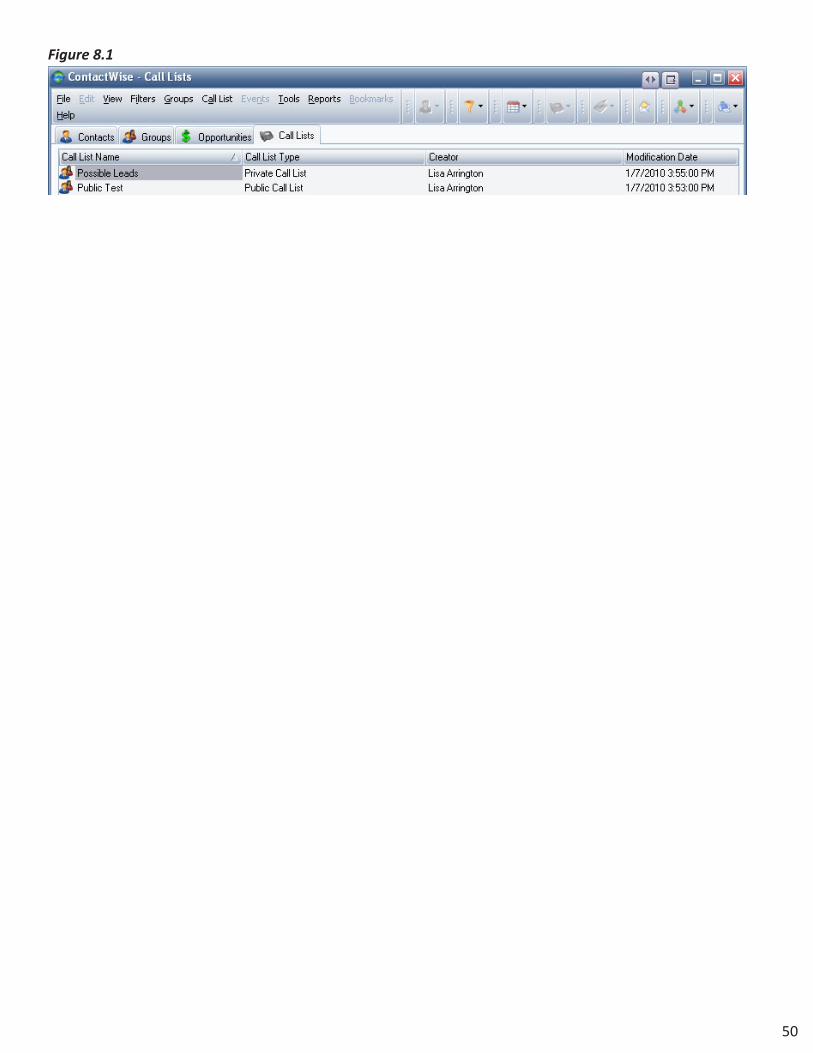
Figure 8.1
50

Chapter 9: ContactWise Help ContentsIf you should require assistance while working with ContactWise, the Help Contents in the software is a great way to find answers to your questions.
The ContactWise Help Contents may be accessed by either pressing the F1 key, or by clicking Help in the Main Menu and selecting Contents (Figure 9.1).
Figure 9.1
Once the Help Screen opens, a list of articles can be accessed by clicking on the Contents taband double clicking the Features of ContactWise category (Figure 9.2).
Figure 9.2
51

To open a specific article, double-click the topic you would like to open, and then click the article you would like to view.
• For example, if you need a reminder on how to store history notes for your contacts, double click the History topic and then click the article Add a Note to History. An article will display on the right por- tion of the screen (Figure 9.3). If you wish, you may print the article by clicking the Print icon at the top of the screen.
Figure 9.3
As you read through the article, you may see hyperlinks (or underlined text). Clicking on these links will open windows to illustrate the instructions you are currently reading.
• For example, in the help screen below (Figure 9.4), as you read how to create a history note, you may click on the link that says Note, and a picture of the note screen will appear. When you are done viewing the picture, click a blank portion of the screen and the picture will disappear.
Figure 9.4
52
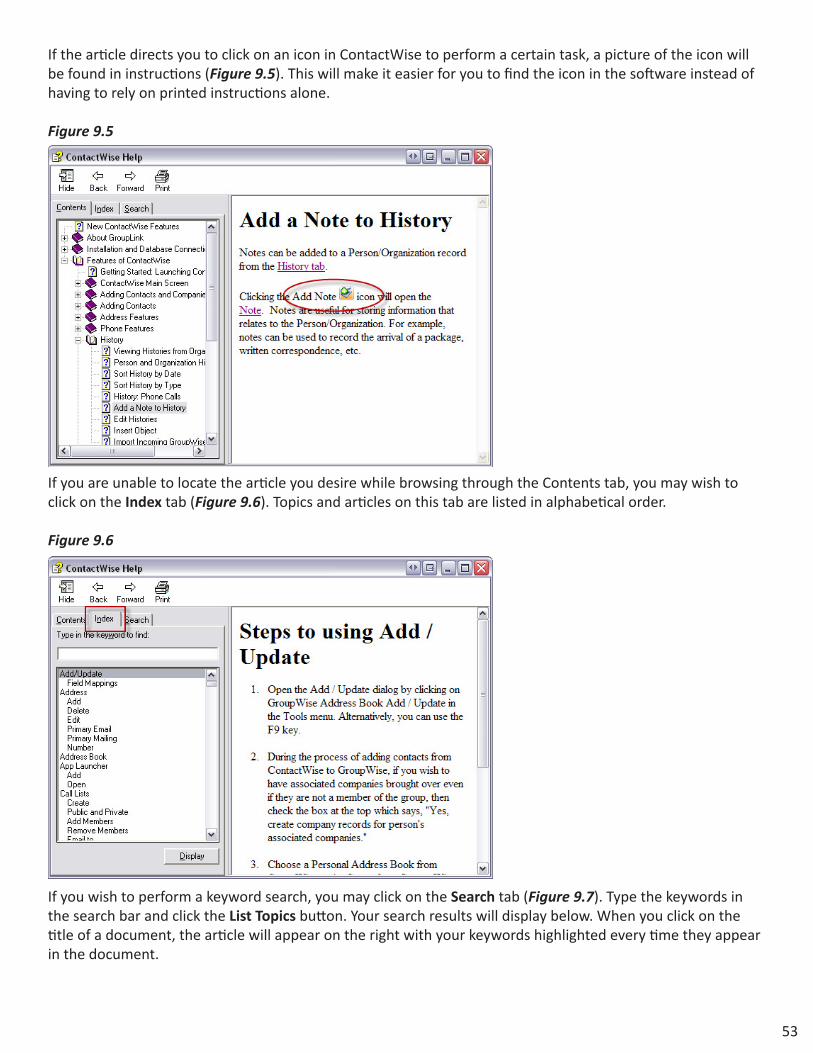
If the article directs you to click on an icon in ContactWise to perform a certain task, a picture of the icon will be found in instructions (Figure 9.5). This will make it easier for you to find the icon in the software instead of having to rely on printed instructions alone.
Figure 9.5
If you are unable to locate the article you desire while browsing through the Contents tab, you may wish to click on the Index tab (Figure 9.6). Topics and articles on this tab are listed in alphabetical order.
Figure 9.6
If you wish to perform a keyword search, you may click on the Search tab (Figure 9.7). Type the keywords in the search bar and click the List Topics button. Your search results will display below. When you click on the title of a document, the article will appear on the right with your keywords highlighted every time they appear in the document.
53
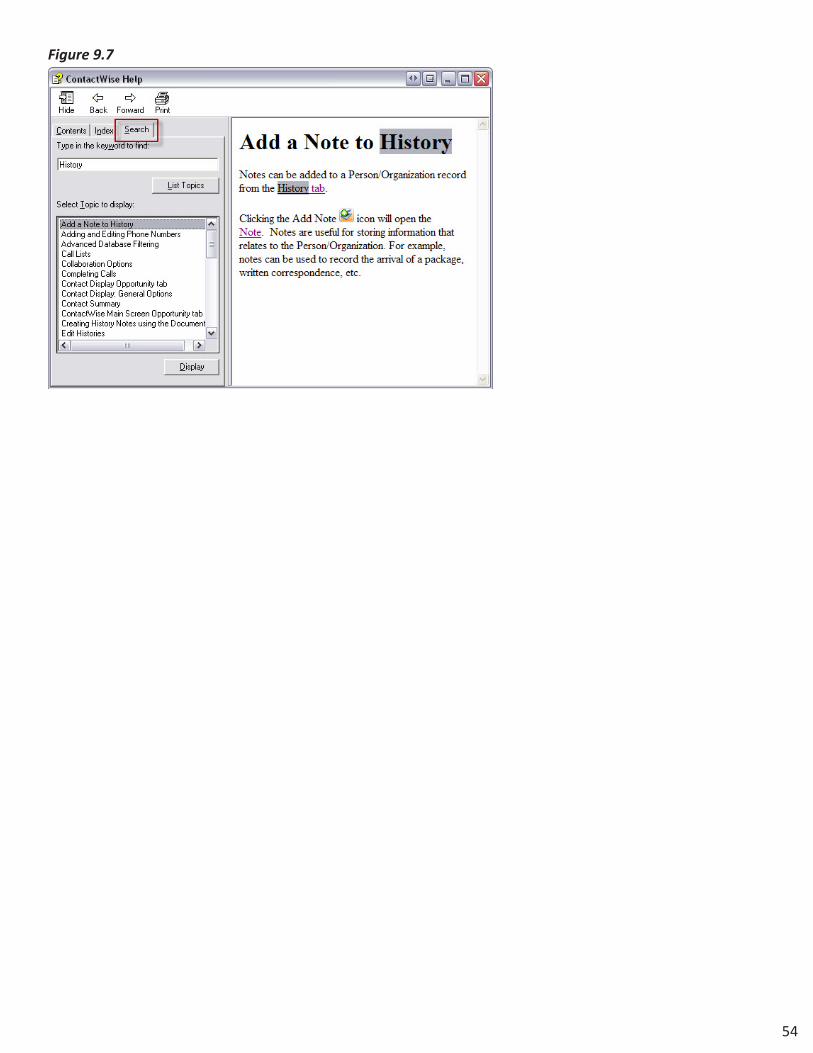
Figure 9.7
54
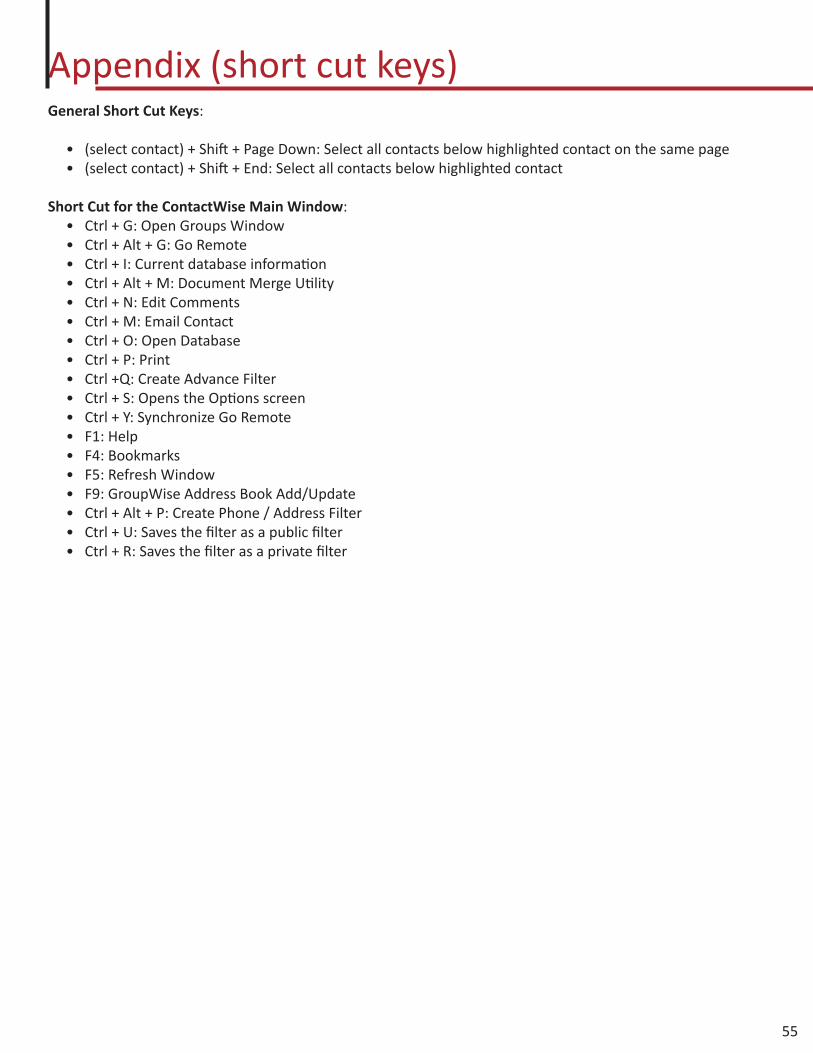
Appendix (short cut keys)General Short Cut Keys:
• (select contact) + Shift + Page Down: Select all contacts below highlighted contact on the same page • (select contact) + Shift + End: Select all contacts below highlighted contact
Short Cut for the ContactWise Main Window: • Ctrl + G: Open Groups Window • Ctrl + Alt + G: Go Remote • Ctrl + I: Current database information • Ctrl + Alt + M: Document Merge Utility • Ctrl + N: Edit Comments • Ctrl + M: Email Contact • Ctrl + O: Open Database • Ctrl + P: Print • Ctrl +Q: Create Advance Filter • Ctrl + S: Opens the Options screen • Ctrl + Y: Synchronize Go Remote • F1: Help • F4: Bookmarks • F5: Refresh Window • F9: GroupWise Address Book Add/Update • Ctrl + Alt + P: Create Phone / Address Filter • Ctrl + U: Saves the filter as a public filter • Ctrl + R: Saves the filter as a private filter
55


