1 Quick Start User’s Guide to ARRIVAL CHECKLIST for PSC (March 2018) This checklist provides crews with a convenient means to check the status of key items onboard ship that are often the focus of PSC inspections and to ensure that all such items are in good order prior to arrival into port. It is hoped that this simple Quick Start User’s Guide will prove helpful in describing the basic features and functions of this checklist. Getting Started In general, each screen of the Checklist App has three main parts. The top portion (marked in blue in the image at right) includes the title of the function items managed by the screen, along with information on connectivity, the time, and power levels of the device being used. The middle portion (marked in red in the image at right) includes the work items and main functions controlled by the screen, such as checklist details, option selection, data input, editing, and other functions. The bottom portion (marked in green in the image at right) is uniform to all screens and has links to three basic app functions that allow the user to go directly to the checklist top screen, the settings screen, or the info screen.
Transcript
1
Quick Start User’s Guide to ARRIVAL CHECKLIST for PSC
(March 2018)
This checklist provides crews with a convenient means to check the status of key items onboard
ship that are often the focus of PSC inspections and to ensure that all such items are in good
order prior to arrival into port. It is hoped that this simple Quick Start User’s Guide will prove
helpful in describing the basic features and functions of this checklist.
Getting Started
In general, each screen of the Checklist App has three main parts.
The top portion (marked in blue in the image at right) includes the
title of the function items managed by the screen, along with
information on connectivity, the time, and power levels of the
device being used.
The middle portion (marked in red in the image at right) includes
the work items and main functions controlled by the screen, such
as checklist details, option selection, data input, editing, and other
functions.
The bottom portion (marked in green in the image at right) is
uniform to all screens and has links to three basic app functions
that allow the user to go directly to the checklist top screen, the
settings screen, or the info screen.
2
Creating and Editing a New Checklist
Tap the “Create New Checklist” in the “Arrival Checklist for PSC” screen (upper left image
below) to create a new checklist. In this case, the upper center image will appear. Five types
of information can be inputted, as can be seen in the image. This information identifies the
ship and port location where the ship is scheduled to arrive, as well as the display settings for
“User Defined Category” (see below for further details) in a new checklist.
Tap “Ship: (Input or Select Ship)” to enter (type in) the name of the ship for which the arrival
checklist is being prepared. Enter the name of the ship in the empty space at the top of the
blank screen. (A keyboard should appear in the bottom half of the screen after tapping the
empty box that you can use to type in the information.) Press “OK” to complete entry of the
ship’s name. Tap the left-pointing arrow in the upper left-hand corner of the screen to go back
to the previous screen and press again to go back to the Checklist Information screen.
3
In the same manner, enter the data for each of the remaining items, Voyage No., Country, and
Port, by entering the requested items in each respective screen, in order. (Please note that
instead of inputting the name of the country or port, you can also select them through screens
indicating the area (region), country, and then the port within the country, as shown below.)
4
If you have added original checklist items using the “Add Checklist Item” function (see below for
further details), these items can be included in a newly created checklist. If you intend to
include them in a New Checklist, tap the “On” switch in the “User Defined Category”. If they
are not needed, tap the “Off” switch in the “User Defined Category”.
Once you have entered all the items and pressed “OK”,
the completed screen should appear as in the image at
right:
Press “Save” to create and save the data to the newly
created checklist.
5
After
checking
items
The following images show an example of the top page of the checklist itself. A list of different
locations onboard should appear. These refer to the categories covered by the checklist.
The numbers to the right indicate the number of items covered by each category and the
number of items checked. Hence, the number “9/9” shown in the example below right means
that all nine of the nine checklist items under this category have been checked and confirmed.
In this case, a checkmark will appear in front of that category indicating that the questions for
that section of the checklist have all been completed.
Click on each category in turn to access and check each item under that category.*
* Users can choose to view the questions one at a time (convenient for smartphone users) or
several questions at a time (convenient for tablet users) by selecting either “Single” or “Multi”
in the “Select Checklist Display Settings” in the “General Settings” screen, which can be
accessed by pressing the “Settings” icon at the bottom of the screen. (see page 11 below)
6
Notes and pictures can also be added to support replies made to each item in the checklist.
This can be done by tapping on either the ‘pen on paper’ mark next to “Add Note” and/or the
‘plus in a box’ mark next to “Add Image”, as shown below. This will open the respective screen,
accordingly. Photos of good and bad examples of some items can be seen by tapping “See
additional info”. This will open another screen with reference photos, such as the sample
shown in the lower left below.
To add a note, just tap the blank space in the box at the top of the screen, type in the note, and
tap “OK” in the upper right to return to the checklist item screen.
To add a photo, tap “Camera”, take the photo and save it to “Album” in the checklist. Then, to
append Title and Comment on the added photo, tap the ‘pen on paper’ mark next to the photo.
After inputting the Title and Comment details, tap “OK” in the upper right corner of the screen to
return to the previous screen.
Tap the leftward pointing arrow in the upper left corner of the screen to return to the checklist
item screen (the previous screen).
7
After
checking
all items
Changes can be made by using the “Edit” function in the “View and Edit Checklist” screen as
described below. Press “Checklist” at the bottom left of the screen to return to the checklist
menu.
Then, tap “View and Edit Checklist” to access the checklist. The following screen should then
appear. A list of the checklists that have been created for each ship, voyage number, and port
should appear. In this case, the top item is the link to the newly created checklist for the
subject ship. (Note: The checkmark in front of any ship name means that the checklist for that
ship has been completed.)
8
Sending the Checklist
Once all items in the checklist have been confirmed, you can send the checklist to the parties
concerned by tapping “Send Checklist” in the “ARRIVAL CHECKLIST for PSC” screen. A
screen will then open showing a list of all the checklists that have been prepared to date, as
shown in the example below center.
Tap the name of the ship whose checklist you wish to send. A new “Select Mailing List” screen
will appear which lists various address options (see example below right). Select the option
you want and in the next screen, you can either select or manually input the addresses where
you want to send the checklist. (Users can pre-set e-mail addresses via the “Mailing List”
screen accessible in the “Settings” screen. See below.) Tap the applicable item in the screen,
either type in or confirm the content of the cover message that next appears, and then send.
(Please note that the checklist will be attached to the message automatically.)
9
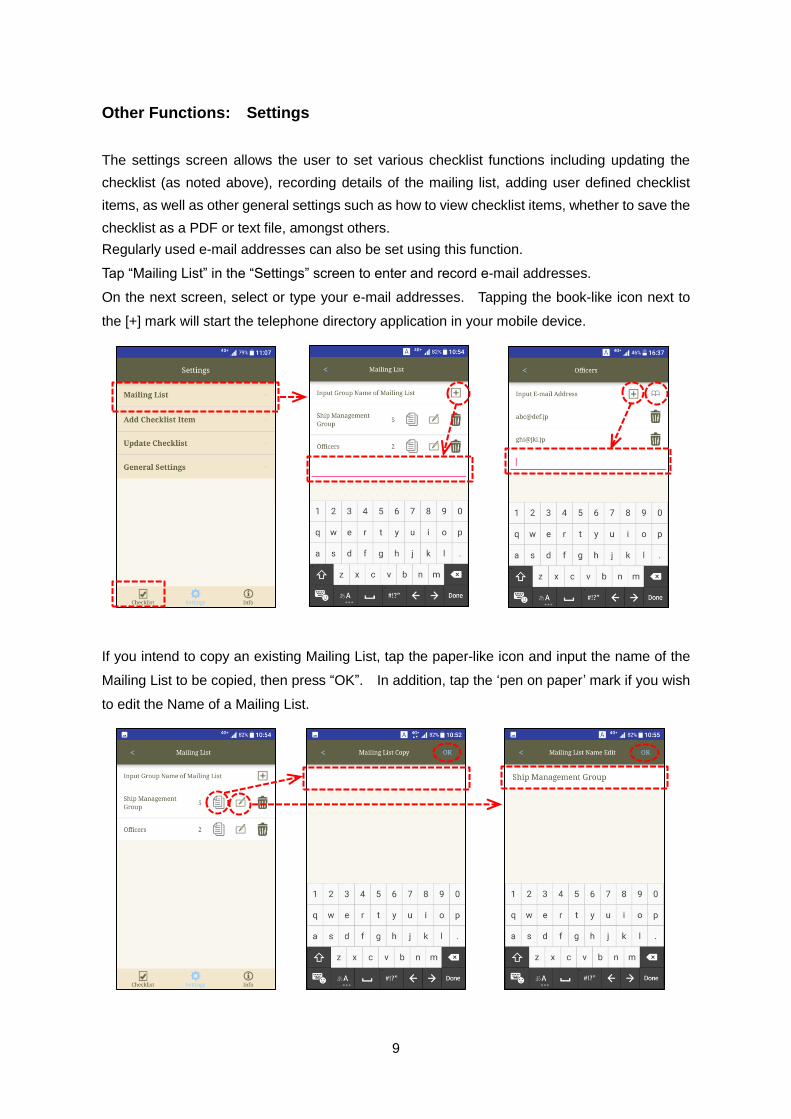
Other Functions: Settings
The settings screen allows the user to set various checklist functions including updating the
checklist (as noted above), recording details of the mailing list, adding user defined checklist
items, as well as other general settings such as how to view checklist items, whether to save the
checklist as a PDF or text file, amongst others.
Regularly used e-mail addresses can also be set using this function.
Tap “Mailing List” in the “Settings” screen to enter and record e-mail addresses.
On the next screen, select or type your e-mail addresses. Tapping the book-like icon next to
the [+] mark will start the telephone directory application in your mobile device.
If you intend to copy an existing Mailing List, tap the paper-like icon and input the name of the
Mailing List to be copied, then press “OK”. In addition, tap the ‘pen on paper’ mark if you wish
to edit the Name of a Mailing List.
10
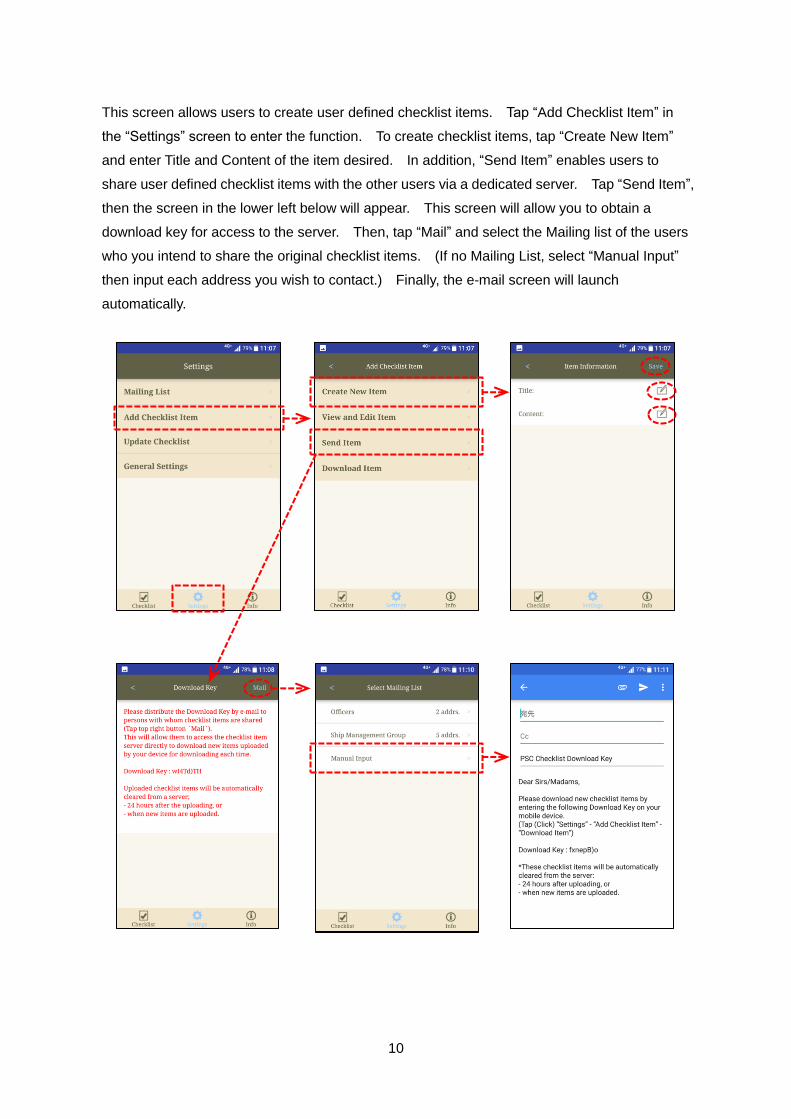
This screen allows users to create user defined checklist items. Tap “Add Checklist Item” in
the “Settings” screen to enter the function. To create checklist items, tap “Create New Item”
and enter Title and Content of the item desired. In addition, “Send Item” enables users to
share user defined checklist items with the other users via a dedicated server. Tap “Send Item”,
then the screen in the lower left below will appear. This screen will allow you to obtain a
download key for access to the server. Then, tap “Mail” and select the Mailing list of the users
who you intend to share the original checklist items. (If no Mailing List, select “Manual Input”
then input each address you wish to contact.) Finally, the e-mail screen will launch
automatically.
11
To download checklist items uploaded onto the server, tap “Download Item”, then input the
download key distributed by the uploader of the checklist items mentioned above.
Use the “Select Checklist File Type to Send” in the “General Settings” screen to determine if the
checklist should be sent as a PDF file or text file. It should be noted that it will not be possible
to send any photos or other attachments if the checklist is sent as a text file. However, a text
file will be much lighter and easier to send than a PDF file. An image of the General Settings
screen is shown at right image below.
12
Other Functions: Information
Both types of information can be very useful when preparing to enter port.
To access a given issue of “ClassNK PSC Bulletin”, simply tap the Issue Number at the head of
the item you wish to see. Country information on PSC detentions can be accessed by tapping
on the name of the country in the list.
Tapping on the leftward pointing arrow in the upper left hand corner of the screen will return you
to the Info top page.
Users are also encouraged to offer any feedback they may have on this Arrival Checklist for
PSC or any of its features. Suggestions for improving any features, content, or other aspect of
the application would be especially most welcome.
The Information function provides access to a range of
topics, statistics, and other useful information. Notable
among these are the latest “Topics”, “Statistics on PSC
Detentions”, and “ClassNK PSC Bulletin”. Each includes
the latest publications concerning that area published by the
Society. Please browse these items to gain some insights
into recent areas requiring special attention about PSC.
To access, simply tap the desired item.
Tapping on “Statistics on PSC Detentions”, for example, will
give the user access to a country-by-country list showing the
number and main types of matters for which ships were
detained by PSC during the past year, while “ClassNK PSC
Bulletin” includes all issues of “PSC Bulletin” issued by the
Society on PSC matters that require particular attention.