September, 2010 1725-47061-001 Rev.E 1 Quick Tip 44011 Registering Standalone Polycom ® SoundPoint ® IP, SoundStation ® IP, and VVX ® 1500 Phones This Quick Tip provides step-by-step instructions for users on how to register standalone SoundPoint IP, SoundStation IP, and VVX 1500 phones. Introduction You have just received or purchased a SoundPoint IP, SoundStation IP, or VVX 1500 phone and you want to connect it to a SIP capable PBX system. If your organization does not have a boot server for provisioning VoIP phones, you will need to configure the phone yourself. This Quick Tip provides detailed information on the following topics: • Before You Begin • Setting Up Your Phone For more information, contact your system administrator or refer to the appropriate User Guide and the latest Administrator’s Guide at http://www.polycom.com/support/voicedocumentation/ . This information applies to: • SoundPoint IP, SoundStation IP, and Polycom VVX 1500 phones running SIP software 3.1.2 RevB or later. • SoundPoint IP 321/331 phones running SIP 3.1.2 RevC or later. • SoundPoint IP 335 phones running SIP 3.2.1 RevB or later. • SoundStation IP 5000 phones running SIP 3.2.3 or later. This technical bulletin is up-to-date for Polycom UC Software 3.3.0. Polycom recommends using a boot server to configure SoundPoint IP, SoundStation IP, and VVX 1500 phones. Using a boot server makes it easier to perform upgrades, track logging, and perform troubleshooting and maintenance. For example, directories and user preferences can be updated or changed remotely. For more information on using configuration files on a boot server, refer to the Configuration File Management on Polycom Phones whitepaper at www.polycom.com/support/voice/ .
Transcript
September, 20101725-47061-001 Rev.E 1
Quick Tip 44011Registering Standalone Polycom® SoundPoint® IP, SoundStation® IP, and VVX® 1500 Phones
This Quick Tip provides step-by-step instructions for users on how to register standalone SoundPoint IP, SoundStation IP, and VVX 1500 phones.
IntroductionYou have just received or purchased a SoundPoint IP, SoundStation IP, or VVX 1500 phone and you want to connect it to a SIP capable PBX system. If your organization does not have a boot server for provisioning VoIP phones, you will need to configure the phone yourself.
This Quick Tip provides detailed information on the following topics:
• Before You Begin
• Setting Up Your Phone
For more information, contact your system administrator or refer to the appropriate User Guide and the latest Administrator’s Guide at http://www.polycom.com/support/voicedocumentation/ .
This information applies to:
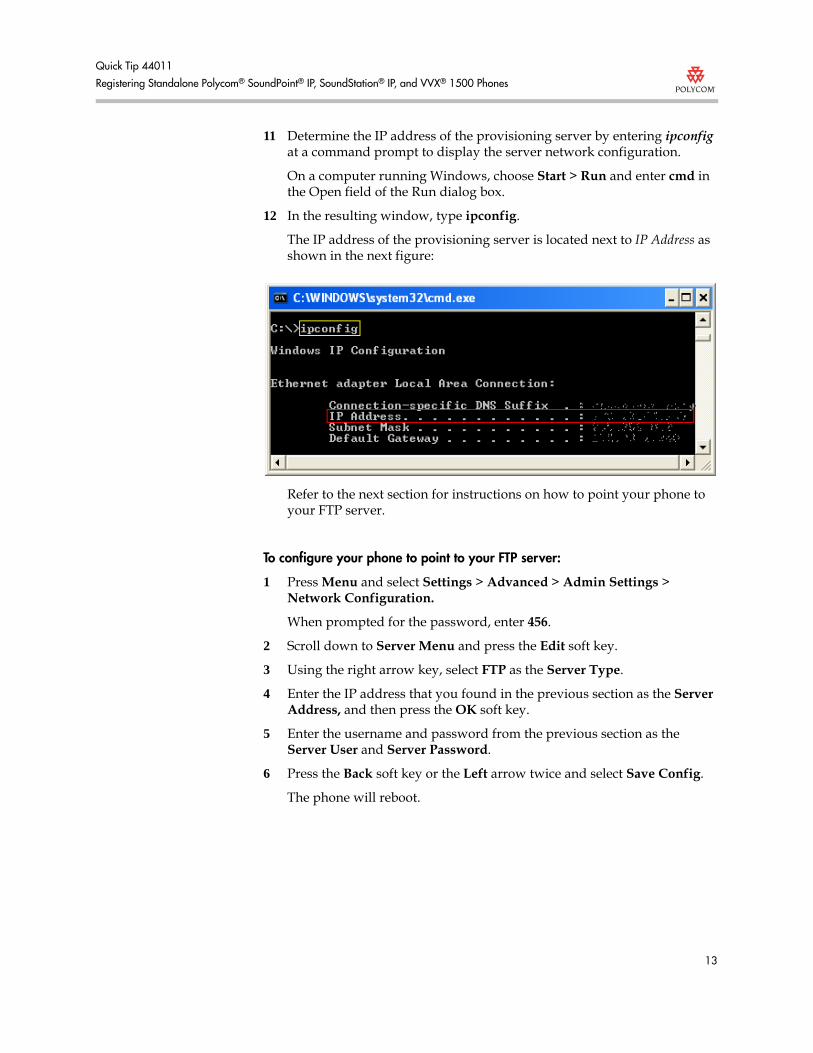
• SoundPoint IP, SoundStation IP, and Polycom VVX 1500 phones running SIP software 3.1.2 RevB or later.
• SoundPoint IP 321/331 phones running SIP 3.1.2 RevC or later.
• SoundPoint IP 335 phones running SIP 3.2.1 RevB or later.
• SoundStation IP 5000 phones running SIP 3.2.3 or later.
This technical bulletin is up-to-date for Polycom UC Software 3.3.0.
Polycom recommends using a boot server to configure SoundPoint IP, SoundStation IP, and VVX 1500 phones. Using a boot server makes it easier to perform upgrades, track logging, and perform troubleshooting and maintenance. For example, directories and user preferences can be updated or changed remotely.For more information on using configuration files on a boot server, refer to the Configuration File Management on Polycom Phones whitepaper at www.polycom.com/support/voice/ .
Before You BeginYou need the following information before you make any changes to the default configuration on your phone:
• Your phone number
• The optional SIP server user ID and password.
• The SIP server address and SIP registration address (or fully qualified domain name)
• The administrator username and password
The factory default web interface username is Polycom (case sensitive) and the default password is 456.
Setting Up Your PhoneOnce your phone is assembled and connected to the network as described the appropriate Quick Start Guide, your phone will start up using the currently loaded firmware. To register it as a standalone phone, you must change the default configuration—refer to Basic Setup on page 2. Your phone will reboot a number of times as a consequence of these changes. To make optional advanced configuration changes, refer to Advanced Setup on page page 8.
Basic SetupTo register your phone in standalone mode, you must first set up the phone to run without a provisioning server, and then configure the appropriate SIP server parameters.
Setting Up Your Phone for Standalone Mode
To set up your phone in standalone mode:
1 Reboot the phone.
A boot-up countdown screen will be displayed.
2 Press the Setup soft key during the boot-up countdown sequence.
IMPORTANT! If you are running SIP software version 3.2.x or earlier and would like to change the phone’s language from the factory default (English), you must first connect the phone to a provisioning server to download the language folder associated with the desired language. For instructions on how to set up an FTP server to download the language files, refer to Language Setup on page 12.
3 Enter the administrator password and press the OK soft key.
The default administrator password is 456.
4 Using the down arrow key, scroll down to DHCP Menu, then press the Select soft key.
Boot Server is the first menu item in the menu.
5 Press the Edit soft key and use the right arrow key to select Static as the Boot Server.
6 Press the OK soft key to save your selection and press the Exit soft key to go back to the previous menu.
7 Scroll down and select Server Menu.
8 Press the Edit soft key and use the right arrow key to select FTP as the Server Type.
Press OK to save your selection.
9 Scroll down and select Server Address.
10 Enter 0.0.0.0 as the Server Address.
Press OK to save your selection.
11 Press the Exit soft key twice.
12 Select Save & Reboot to apply your changes.
Your phone will reboot. Refer to the next section for instructions on how to configure your phone once it reboots.
Configuring Your Standalone Mode PhoneOnce you have set up standalone mode for your phone and it has rebooted, you can configure it using the phone’s menu or using the web interface to the phone.
You will need the registration information outlined in the Before You Begin section on page 2.
To configure your phone using the phone’s menu:
After your phone reboots, do the following:
1 Press the Menu key.
2 Select Settings > Advanced.
3 Enter the administrator password and press the Enter soft key.
12 Scroll down to Label, then press the Edit soft key.
13 Enter the number as you would like it to be displayed on the phone, then press the OK soft key.
For example, enter 1002 .
This number appears as the label of the first line key on your phone.
14 (Optional.) Scroll down and select Authentication.
The User ID field is the first item in the menu.
15 (Optional.) Press the Edit soft key and enter the SIP username.
16 (Optional.) Scroll down to Password, then press the Edit soft key.
17 (Optional.) Enter the SIP password, then press the OK soft key.
Press the Back soft key to return to the previous menu.
18 Press the Back soft key twice.
19 Select Save Config to apply your changes.
If you are running SIP software version 3.2.x or earlier, Save Config will be replaced with Save & Reboot. Select Save & Reboot to accept your changes and reboot your phone.
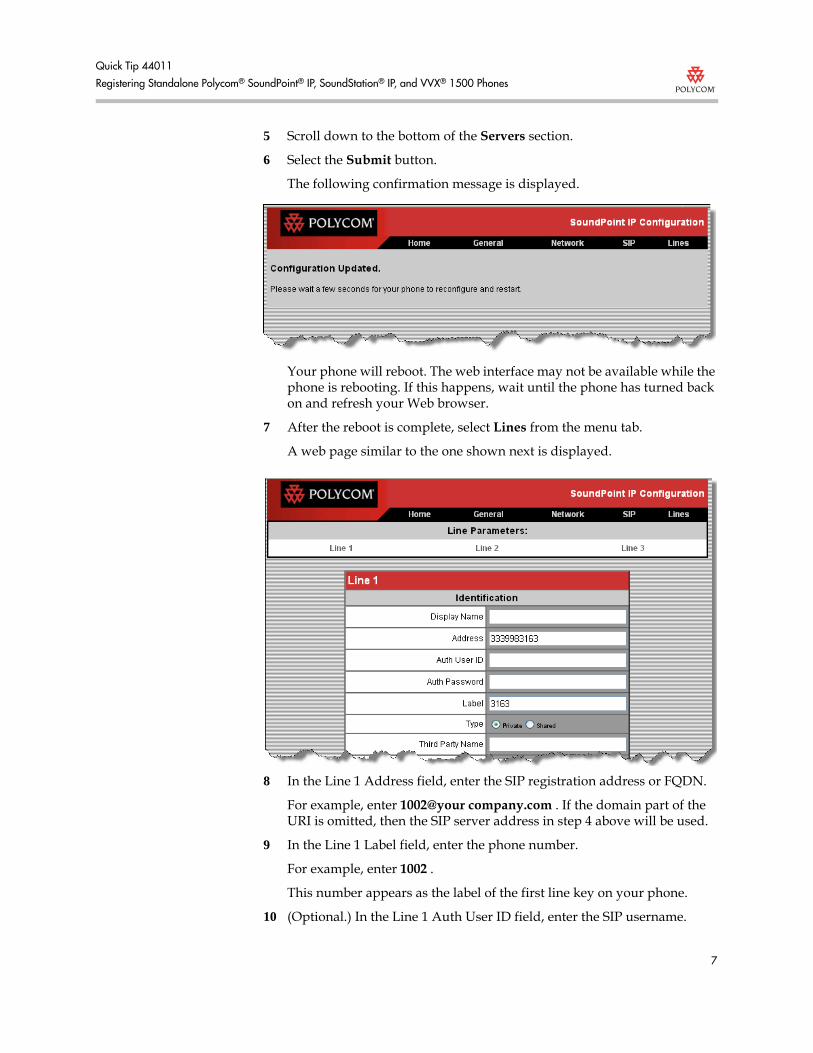
5 Scroll down to the bottom of the Servers section.
6 Select the Submit button.
The following confirmation message is displayed.
Your phone will reboot. The web interface may not be available while the phone is rebooting. If this happens, wait until the phone has turned back on and refresh your Web browser.
7 After the reboot is complete, select Lines from the menu tab.
A web page similar to the one shown next is displayed.
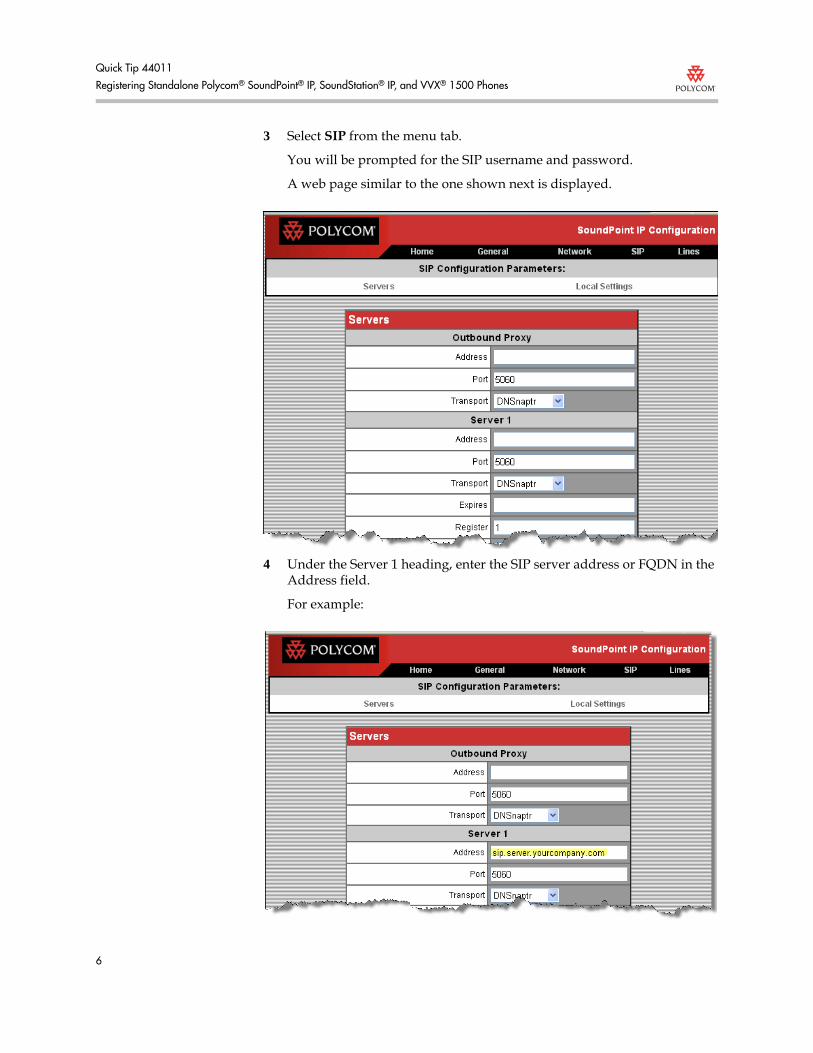
8 In the Line 1 Address field, enter the SIP registration address or FQDN.
For example, enter 1002@your company.com . If the domain part of the URI is omitted, then the SIP server address in step 4 above will be used.
9 In the Line 1 Label field, enter the phone number.
For example, enter 1002 .
This number appears as the label of the first line key on your phone.
10 (Optional.) In the Line 1 Auth User ID field, enter the SIP username.
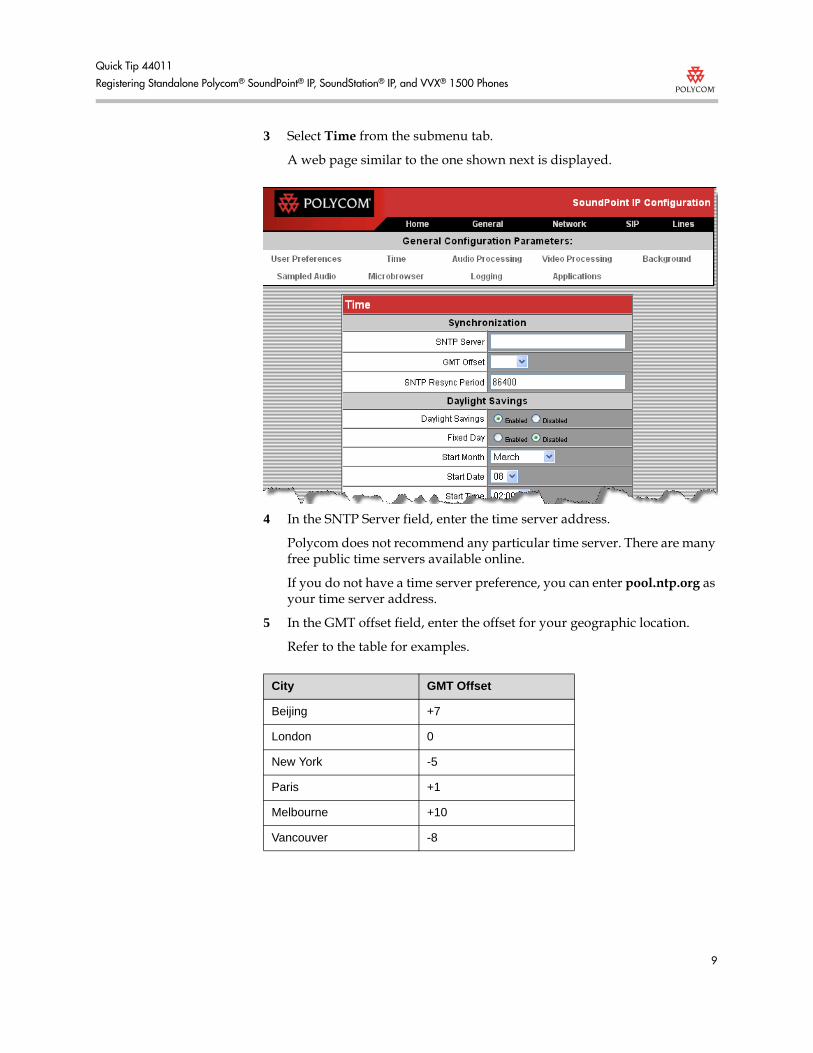
— If you are located in parts of Canada or the United States that observe daylight saving time, skip this step.
— If you are located in parts of Canada or the United States that do not observe daylight saving time (for example, Saskatchewan, Arizona, and Hawaii), click Disabled in the Daylight Savings field.
— If you are located elsewhere, update the Daylight Savings fields to reflect your location.
For example:
For more information, refer to your local measuring standards organization.
7 Click the Submit button at the bottom of the Daylight Saving section.
Your phone will reboot.
To automate dialing of phone numbers displayed on your phone using your web browser:
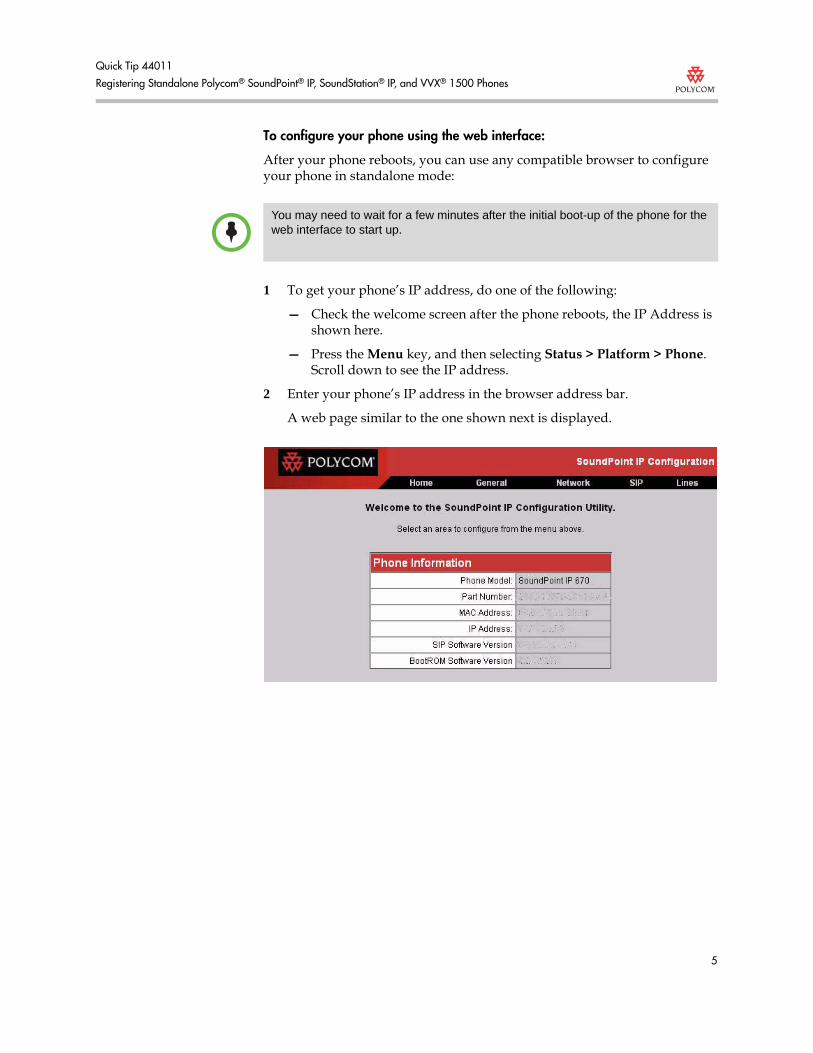
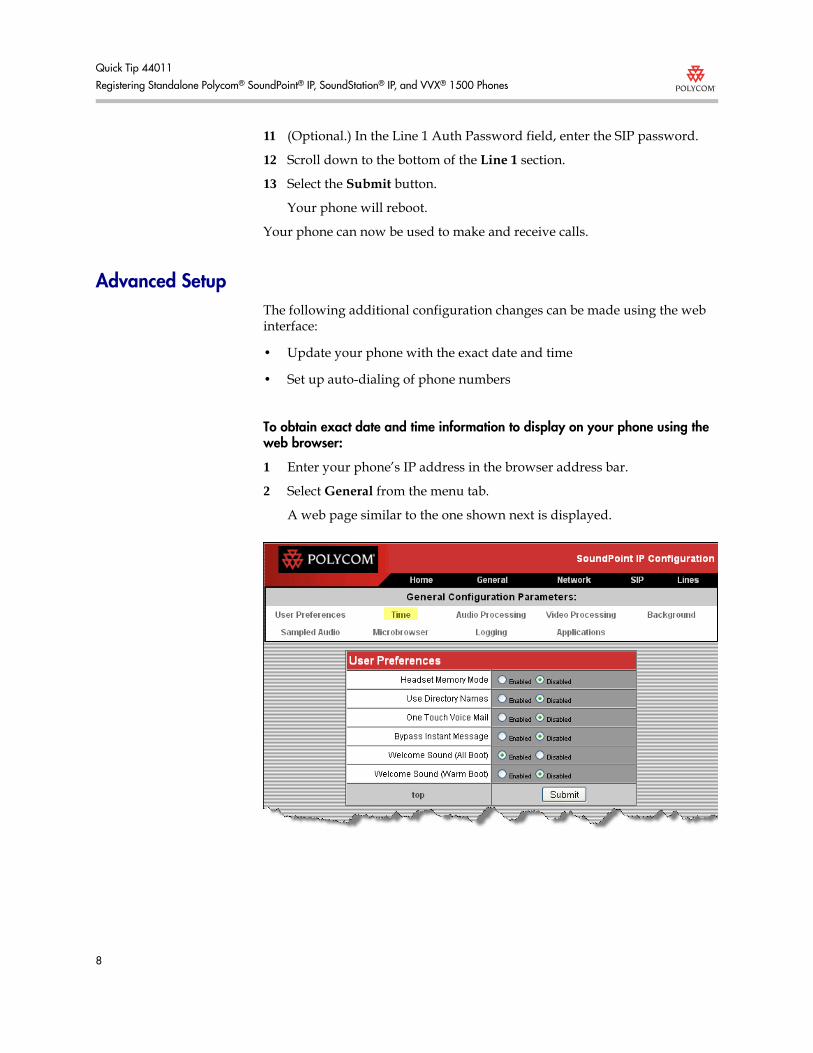
1 Enter your phone’s IP address in the browser address bar.
A web page similar to the one shown next is displayed.
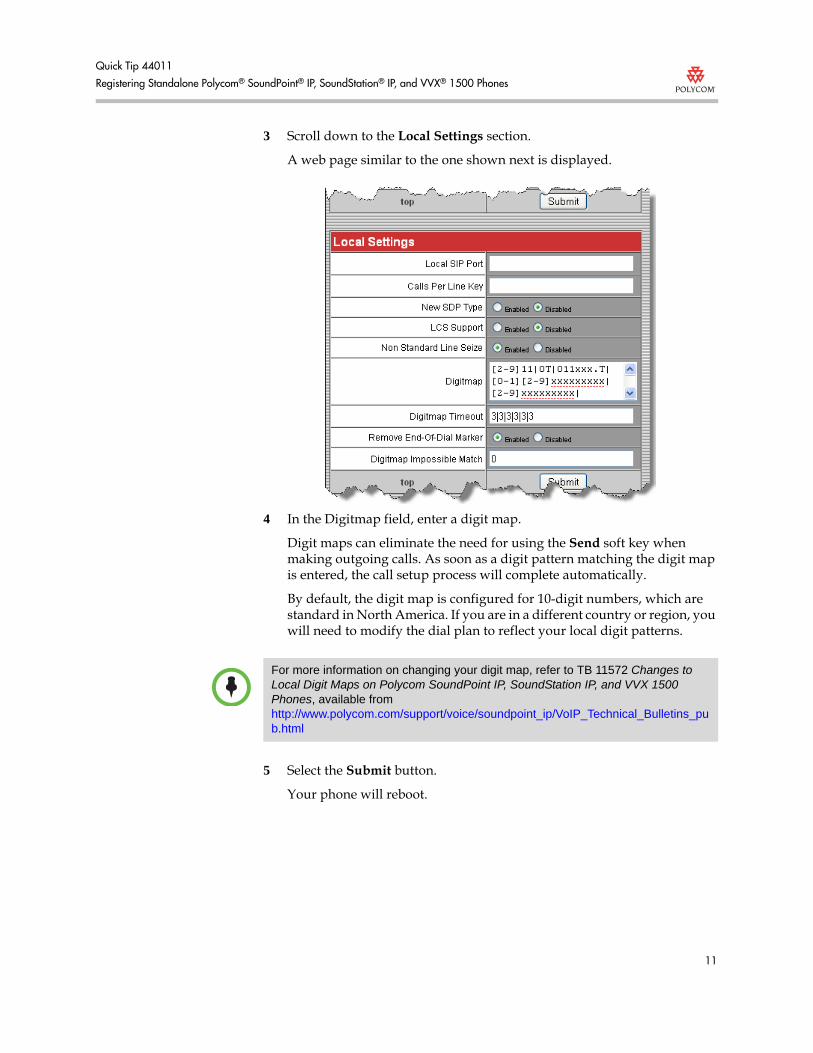
4 In the Digitmap field, enter a digit map.
Digit maps can eliminate the need for using the Send soft key when making outgoing calls. As soon as a digit pattern matching the digit map is entered, the call setup process will complete automatically.
By default, the digit map is configured for 10-digit numbers, which are standard in North America. If you are in a different country or region, you will need to modify the dial plan to reflect your local digit patterns.
5 Select the Submit button.
Your phone will reboot.
For more information on changing your digit map, refer to TB 11572 Changes to Local Digit Maps on Polycom SoundPoint IP, SoundStation IP, and VVX 1500 Phones, available fromhttp://www.polycom.com/support/voice/soundpoint_ip/VoIP_Technical_Bulletins_pub.html
As of Polycom UC Software 3.3.0, you can change the language of a standalone phone from the phone’s menu.
For phones running SIP software version 3.2.x or earlier, a simple provisioning server must be setup in order to download another language to the phone.
A simple provisioning server uses File Transport Protocol (FTP). Although FTP servers are free, they require installations, logins and passwords.
A free and popular server, called FileZilla Server, is available for Windows at http://filezilla-project.org . This application has been tested with SoundPoint IP, SoundStation IP and VVX 1500 phones.
To set up an FTP server:
1 Download and install the latest version of FileZilla Server.
2 After installation, you are presented with a Connect to Server pop-up. Click OK to open the administrative user interface.
3 To configure a user, select Edit > Users in the status bar.
4 Select Add.
5 Enter the user name for the phone and select OK.
For example, bob or bill 123.
The phone will use this password to login.
6 Select the Password checkbox and enter a password.
For example, 1234 or phone567.
The phone will use this password to login.
7 Select Page > Shared folders to specify the server-side directory where the provisioning files will be located (and the log files uploaded).
8 Select Add and pick the directory.
9 To allow the phone to upload logs onto the provisioning server, goto Shared Folders and select the Write and Delete checkboxes under the Files heading.
10 Download the latest SIP software version 3.2.x release from www.polycom.com/support/voice/ . Copy the entire SoundPointIPLocalization folder from the software download into the provisioning server directory specified above.
This section only applies to standalone phones running SIP software version 3.2.x or earlier. To change the language on a phone running Polycom UC Software version 3.3.0 or later, refer to the phone’s User Guide, available from www.polycom.com/support/voice/
1 Follow the preceeding steps to set up a provisioning server with the required language folders.
The language folders must be located in the SoundPointIPLocalization folder on the provisioning server.
2 Press Menu and navigate to Settings > Basic > Preferences > Language and select the desired language.
Provided that the corresponding language folder is in the SoundPointIPLocalization folder on the provisioning server, the language will change.
3 Once the phone is set up in the desired language, refer to Setting Up Your Phone on page 2 for information on how to register the phone in standalone mode.