Quick Tips to Using I-DEAS I-DEASTutorials: Fundamental Skills Learn about: • windows • mouse buttons • applications and tasks • menus • icons • part modeling • viewing • selecting • data management • using the online tutorials
Transcript
Quick Tips to Using I-DEASI-DEAS Tutorials: Fundamental Skills
Learn about:
• windows• mouse buttons• applications and tasks• menus• icons• part modeling• viewing• selecting• data management• using the online tutorials
2
Setup 1 of 2
If you didn’t start I-DEAS with a new (empty) model file,open a new one now by clicking on File, then Open.
FileOpen
I-DEAS Question
Save changes before switching model files?
Yes
Open Model File form
Model File name: any unique name
OK
OK
Things to notice This symbol is used in the tutorials whenever you should select from the top menu (either File, Options, or Help).
This symbol is used whenever youshould click a button on an I-DEASform.
This symbol is used whenever youshould fill in a field on an I-DEAS form.
3
Setup 2 of 2
Make sure you’re in the following application and task:
Design,Manufacturing, orSimulation
Master Modeler
Things to notice
This symbol is used in the tutorialswhenever you should select an itemfrom a pull-down menu.
Save your model file. File
Save
Warning! If, during this tutorial, you are prompted by I-DEAS tosave your model file, respond:
NoSave only when the tutorial instructions tell you to––notwhen I-DEAS prompts for a save.
If you make a mistake at any time between saves andcan’t recover, you can reopen your model file to the lastsave and start over from that point.
Hint To reopen your model file to the previous save, pressControl-z.
4
Windows 1 of 3
I-DEAS creates four windows on your screen:
1. Graphics window
2. I-DEAS List window
3. I-DEAS Prompt window
4. I-DEAS Icons window
1
2 3
4
5
Windows 2 of 3
1. Graphics window
The Graphics window displays the workplane and yourparts or assemblies.
2. I-DEAS List window
The I-DEAS List window displays output informationgenerated by commands.
3. I-DEAS Prompt window
The I-DEAS Prompt window prompts you for informationneeded to complete a process, such as dimensionvalues.
4. I-DEAS Icons window
The I-DEAS Icons window contains the pull-down menusto change the application or task; it also shows the task,application, and I-DEAS-wide icons that control thesoftware.
1
2 3
4
6
Windows 3 of 3
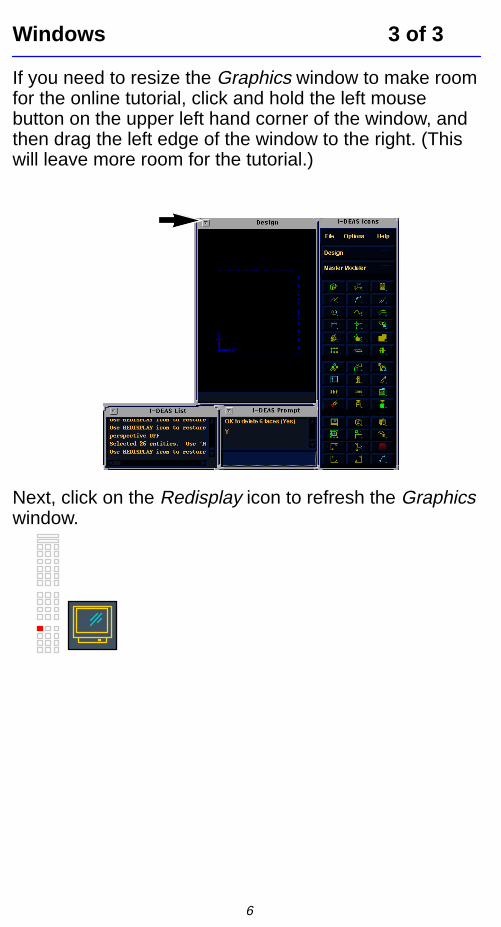
If you need to resize the Graphics window to make roomfor the online tutorial, click and hold the left mousebutton on the upper left hand corner of the window, andthen drag the left edge of the window to the right. (Thiswill leave more room for the tutorial.)
Next, click on the Redisplay icon to refresh the Graphicswindow.
7
Mouse buttons 1 of 2
The three mouse buttons have a consistent use in eachof the I-DEAS applications. The mouse buttons are usedas follows:
left mouse button
The left mouse button is used for most operations, suchas selecting menus and icons, while some operationsuse a “click and drag” or a “double-click” of the leftmouse button.
middle mouse button
The middle mouse button is the same as the Enter orReturn key, often used to accept the default answer toprompts, or to end the selection of entities and perform acommand.
right mouse button
The right mouse button pops up a menu of other choicessuch as to modify the mode of picking graphics. Whenyou use the right mouse button, you hold down the rightbutton and slide the mouse pointer up or down to selectthe desired command. With the command selected,release the button. If you change your mind and don’twant to make a choice, slide the mouse pointer to theside, off the pop-up menu.
The table on the next page summarizes the differentmouse button operations.
shift-click Pick multiple graphic items,or deselect items.Select a range of items in aform
control-click Select multiple items in aform.
hold, drag Pop up more icon choices.Pick items within a boxedarea on the screen.
double-click Used in forms to “open” alisted item name that is fol-lowed by ...
multiple clicks “Walk” the part hierarchy,e.g., first click picks edgeor face, second click picksthe whole part, third clickpicks the feature. Theselection is indicated bybeing highlighted: a yellowbounding box on features;a white bounding boxaround the part.
click Same as Return key.Use to pick default answer,or to end an operation.
hold, drag Select other pop-up“Menu” choice.
9
Applications and tasks 1 of 3
I-DEAS is divided into “applications,” which are furtherdivided into “tasks,” a few of which are shown below.
Applications Tasks
Design Master Modeler
Master Assembly
Mechanism Design
Sheet Metal
Simulation Master Modeler
Boundary Conditions
Meshing
Model Solution
Post Processing
Optimization
Manufacturing Master Modeler
Generative Machining
Assemble Setup
Test Time History
Histogram
Model Preparation
Signal Processing
Modal
Fatigue Life
Post Processing
Drafting Drafting Detailing
Drafting Setup
10
Applications and tasks 2 of 3
When you signed on to I-DEAS, you selected anapplication and a task on the Start form.
You can also change applications and tasks from the topof the icon panel when the software is running.
For example, click on the application menu and see theapplications that are available.
DesignDraftingSimulationTestManufacturingManagementOpen Data/PC B
Make sure you’re still in the application you started in.
Design–or–
Simulation–or–
Manufacturing
11
Applications and tasks 3 of 3
Now click on the task menu and see the tasks that areavailable.
Master ModelerMaster AssemblyMechanism DesignHarness DesignDrafting SetupRelational Data Manager
Make sure you’re still in the Master Modeler task.
Master Modeler
Things to notice These two menus let you know exactly where you are.That is, if you look at the menus now, you know whatapplication you are in, and that you are in the MasterModeler task.
When you switch to another application and task, theicons on the icon panel change. You will learn moreabout these later in this tutorial.
12
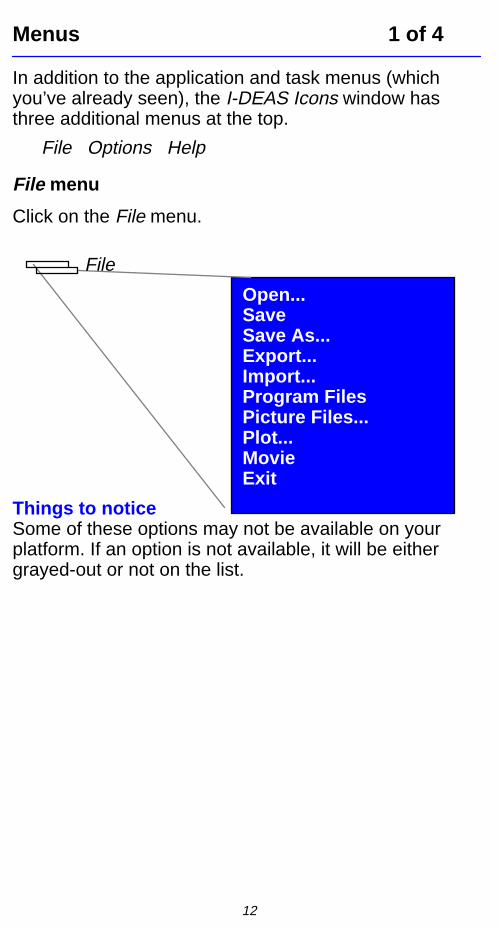
Menus 1 of 4
In addition to the application and task menus (whichyou’ve already seen), the I-DEAS Icons window hasthree additional menus at the top.
Things to notice Some of these options may not be available on yourplatform. If an option is not available, it will be eithergrayed-out or not on the list.
13
Menus 2 of 4
Recovery Point
FileSave
If you did not enter a model file name on the Startform, the software will ask you to enter a name now.
Model File name: enter any name
Check I-DEAS List . Look at the I-DEAS List window. A message will tellyou that your model file has been saved.
Things to notice You can use the Help menu when you need help or wantto get information about an icon, process, task, etc.
Click on About... Help
About
Help on Version form
OK
Recovery Point
FileSave
16
Icons 1 of 6
The icon panel in the I-DEAS Icons window is dividedinto three sections.
top section = task icons
middle section = application icons
bottom section = display and view icons
Move the mouse over the icon panel and notice theQuick Help text at the bottom-left of the Graphicswindow.
Creates a series of lines that are connected end-to-end
Displays history tree access form for a selected part
Redraws graphics window
17
Icons 2 of 6
You select icons by clicking them with the left mousebutton. Click quickly on the Polylines icon with the leftmouse button.
Things to notice Notice that the Polylines icon is highlighted, whichindicates that it has been selected and is active.
Since the Polylines icon is active, I-DEAS is expectingyou to sketch something. You’ll start sketching a littlelater in the tutorial. To deactivate the icon, press themiddle mouse mouse while the cursor is in the Graphicswindow.
(to deactivate the command)
1
2
1
2 3
132
18
Icons 3 of 6
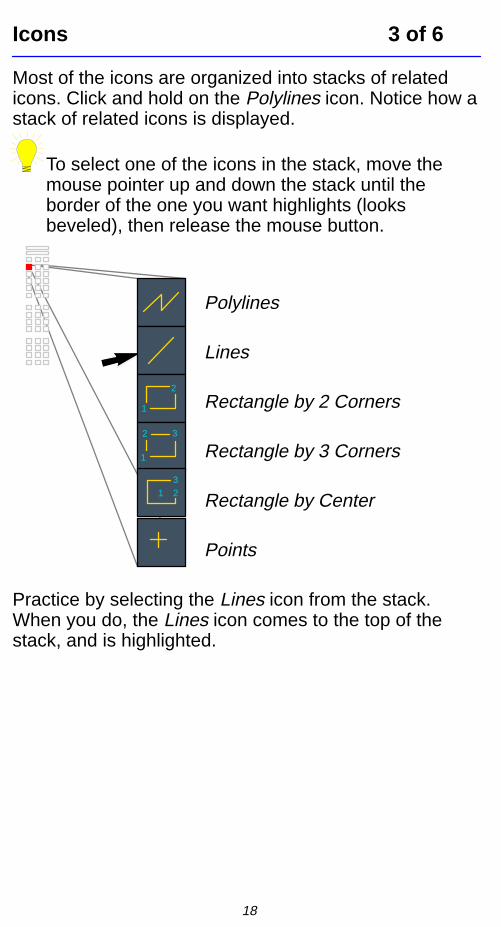
Most of the icons are organized into stacks of relatedicons. Click and hold on the Polylines icon. Notice how astack of related icons is displayed.
To select one of the icons in the stack, move themouse pointer up and down the stack until theborder of the one you want highlights (looksbeveled), then release the mouse button.
Polylines
Lines
Rectangle by 2 Corners
Rectangle by 3 Corners
Rectangle by Center
Points
Practice by selecting the Lines icon from the stack.When you do, the Lines icon comes to the top of thestack, and is highlighted.
19
Icons 4 of 6
Things to notice Notice that a prompt is given asking you to “Locatestart.” Also, an odometer is shown in the upper corner ofthe Graphics window to show your XY locations. Movethe mouse and watch the odometer change.
Draw a few lines, clicking once with the left mousebutton for the start of the line, and once with the leftmouse button for the end of the line. Don’t worry if someof your lines have dimensions shown.
Check I-DEAS Prompt . Get in the habit of watching the I-DEAS Promptwindow for questions and instructions.
1 2
3 45
6 7
89 10
Terminate the Lines icon by pressing the middle mousebutton.
(to deactivate icon)
Things to notice
1 This symbol is used throughout the tutorialswhenever you should use the left mouse button toclick on the corresponding position shown on thesketch or part.
20
Icons 5 of 6
Next, reopen your model file to the last save, so you’llhave an empty workbench to sketch the next shape.
Hint
(to deactivate the command)
Control-z
Click on the Polylines icon with the left mouse button.
Sketch the boundary as shown below, using the leftmouse button to pick points 1 through 6. Don’t worryabout the dimensions.
After picking point 6, terminate the command bypressing the middle mouse button.
12
3
4
6
5
Things to notice Notice that the Polylines icon is no longer highlighted.You ended the command when you pressed the middlemouse button.
21
Icons 6 of 6
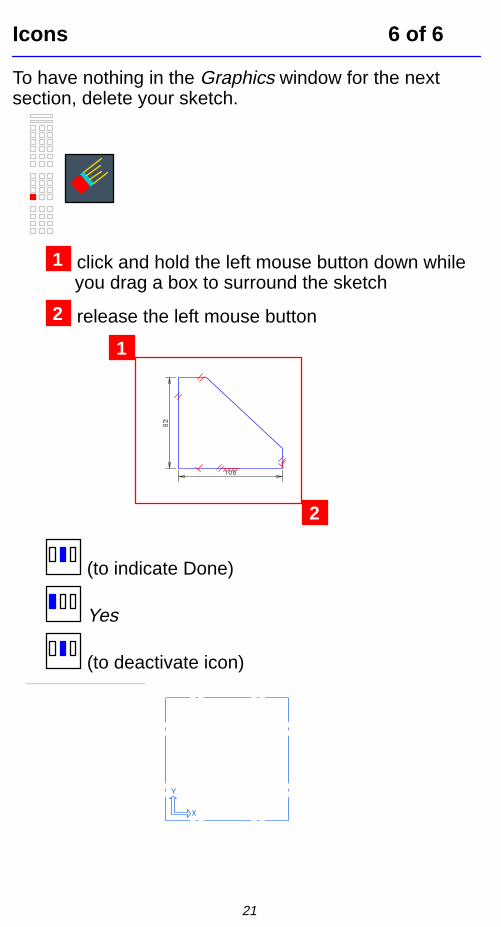
To have nothing in the Graphics window for the nextsection, delete your sketch.
1 click and hold the left mouse button down whileyou drag a box to surround the sketch
2 release the left mouse button
1
2
(to indicate Done)
Yes
(to deactivate icon)
22
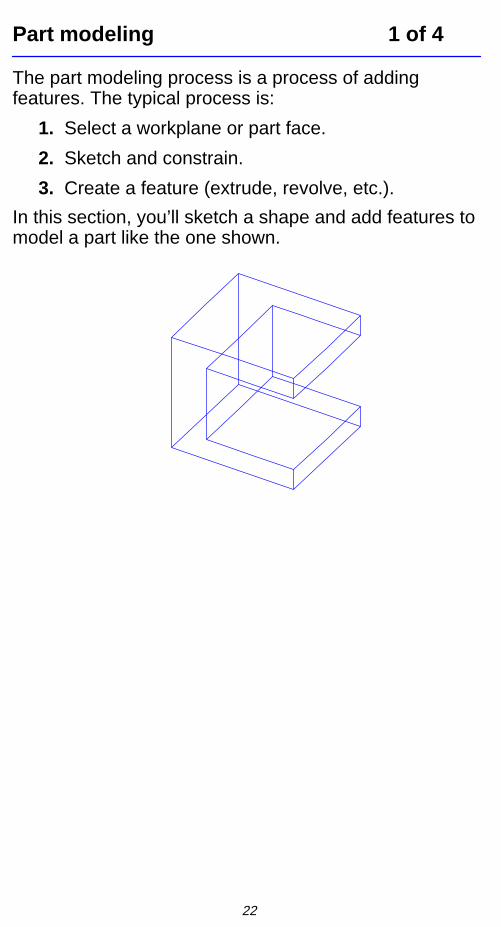
Part modeling 1 of 4
The part modeling process is a process of addingfeatures. The typical process is:
1. Select a workplane or part face.
2. Sketch and constrain.
3. Create a feature (extrude, revolve, etc.).
In this section, you’ll sketch a shape and add features tomodel a part like the one shown.
23
Part modeling 2 of 4
In a front view, use the Polylines icon to sketch a closedshape something like the one shown below. Don’t worryabout dimensions.
Y
X
12
3
4
6
5
7
9
8
Remember After picking point 9, terminate the command by pressingthe middle mouse button.
24
Part modeling 3 of 4
Select an isometric view. Use the Extrude command toextrude this shape into a solid part.
XY
Z
1 pick any line
(to indicate Done)
1
25
Part modeling 4 of 4
Extrude Section form
Distance: 100
OK
Recovery Point File
Save
26
Viewing 1 of 3
The icons in the lower left corner of the icon panelchange the viewing direction to front, top, right, andisometric view.
Try each of the icons to see how the view changes.
Y
X
XY
Z
Z
Y
X
Z
Switch to isometric view before continuing.
XY
Z
27
Viewing 2 of 3
Try the following function keys to dynamically change theview.
Make sure you have “focus” by clicking in theI-DEAS Graphics window, or when you press F1,your Acrobat Reader Help will be displayed. If thishappens, use File, Close in the Help window––notFile, Exit.
F1 – pan
Hint Start with the mouse pointer in the center of theGraphics window, hold down the F1 function key, andmove the mouse to pan left and right, or up and down onthe screen.
F2 – zoom
Hint Start with the mouse pointer in the center of theGraphics window, hold down the F2 function key, andmove the mouse down to zoom in, up to zoom out.
28
Viewing 3 of 3
F3 – 2D and 3D rotation
Hint • 2D––start with the mouse pointer near a corner of
the Graphics window, hold down the F3 functionkey, and rotate around the center of the screen.
Hint • 3D––start with the mouse pointer in the center of
the Graphics window, hold down the F3 functionkey, and move the mouse up/down or left/right.
When you’re finished, switch to isometric view andzoom all.
XY
Z
29
Selecting 1 of 3
Move the mouse pointer over the part in the Graphicswindow.
Things to notice Notice how the lines are pre-highlighted even before youclick to select.
1 click on one line using the left mouse button
1
2 hold down the Shift key and click on another lineusing the left mouse button
2
Things to notice The first line remains selected.
Leave these two entities selected and continue tothe next page.
30
Selecting 2 of 3
Click and hold the right mouse button. Whenyou do, a menu appears.
While holding the right mouse button down, move thepointer up and down the pop-up menu and when All isselected, release the mouse button.
Things to notice All entities of the same type that are selected (in thiscase lines) are highlighted.
If your lines aren’t highlighted, look in the I-DEASList window to see if it tells you to use theHighlight_Selection option. If it does, hold your rightmouse button down and select the option from themenu.
Highlight Selection
Use the right mouse button menu to deselect all thelines.
Deselect All
32
Data management 1 of 3
The parts you create will be organized into projects.There will typically be many projects in your datainstallation. Each project can contain multiple librariesand catalogs for shared data, and model files forpersonal scratch areas.
Model files are further subdivided into bins, which arestorage containers used to help you organize andmanage your parts.
Parts need to be named to be used by otherapplications. Give the part you just created the name“First Part.”
Pull down the icon stack and select the NameParts... icon. Then release the mouse button.
XXX
pick anywhere on the part
Name form
Name: First Part
OK
(to indicate Done)
33
Data management 2 of 3
Save your changes to your model file. File
Save
Select the Manage Bins icon to see what is in yourmodel file.
Pull down the icon stack to select the Manage Binsicon.
Manage form
The Manage form shows you that your part is assignedto the default bin (the default bin is called the “Main” bin).
Dismiss the Manage form.
Dismiss
Bins and libraries are explained in detail insubsequent tutorials.
34
Data management 3 of 3
Although you just saw that the part was “assigned” to themain bin, it isn’t “in” the bin yet.
Put your part away to the bin.
pick anywhere on part
(to indicate Done)
35
Using the online tutorials
The online tutorial you take next depends on your areaof interest. The tutorials are designed and organized totake you through a learning path to teach you the skillsnecessary to perform certain activities. The availablepaths are:
• Design – Part Modeling• Design – Surfacing• Design – Assemblies• Drafting• Simulation• Manufacturing• Test
Some of these paths have two levels of tutorials:
1 – Fundamental Skills
2 – Advanced Projects
Some tutorials are required before continuing to the nextstep, while others are optional, but highly recommended.As you progress through a path, each tutorial will tell youwhat is required, what is recommended, and where youshould go next.
36
Tutorial wrap-up
You have completed the Quick Tips to Using I-DEAStutorial.
See also...For additional information on many of the conceptscovered in this tutorial, see the following in the I-DEASHelp facility:
Help, Getting Started Help, Manuals, Table of Contents
Interacting with I-DEASGetting Started with the Software
What’s next?To continue, exit the tutorial window by selecting:
FileExit
After exiting, choose the Fundamental Skills tutorial thatis next in the learning path you are following.
Warning! Do not use the menu in the I-DEAS Icons window to exit.Use the menu in the tutorial window.