119
QuickQ Automatic Call Distributor System Manager’s Guide For Windows NT ® and Windows 2000 ® Operating Systems

QuickQ Automatic Call DistributorSystem Manager’s Guide
For Windows NT® and Windows 2000® Operating Systems

Comdial October, 02
Comdial® strives to design the features in our communications systems to be fully interactive with one another. However, this is not always possible, as the combinations of accessories and features are too varied and extensive to insure total feature compatibility. Accordingly, some features identified in this publication will not operate if some other feature is activated. Comdial disclaims all liability relating to feature non-compatibility or associated in any way with problems which may be encountered by incompatible features. Notwithstanding anything contained in this publication to the contrary, Comdial makes no representation herein as to the compatibility of features.
GCA70-357.0310/02Printed in U.S.A.

TABLE OF CONTENTS
1. Introducing The QuickQ ACD System ............................................................................71.1 Understanding This Guide ............................................................................................7
1.1.1 Becoming Familiar With Conventions Used in This Guide ............................... 71.2 Understanding QuickQ .................................................................................................81.3 Organizing The Call Center Staff ................................................................................81.4 Describing The System Components ............................................................................9
1.4.1 Call Processor ..................................................................................................... 91.4.2 Digital Voice Announcer .................................................................................... 91.4.3 Telephone Extensions ....................................................................................... 10
1.5 Understanding The Wallboards ..................................................................................101.5.1 Modes Of Operation ......................................................................................... 10
Parameter Mode .................................................................................................10Text Mode ..........................................................................................................11Priorities .............................................................................................................11
1.6 Describing QuickQ System Features ..........................................................................121.6.1 Answer Bin ....................................................................................................... 121.6.2 Abandoned Bin ................................................................................................. 121.6.3 Call Queuing ..................................................................................................... 121.6.4 Even Distribution .............................................................................................. 121.6.5 Delay Announcements ...................................................................................... 131.6.6 Understanding the Messages ............................................................................ 13
1.7 Management Information System (MIS) Reporting ...................................................141.7.1 Describing QuickQ Agent Features .................................................................. 15
Account Codes ...................................................................................................15Calls Waiting Indication ....................................................................................15Log-in / Log-out .................................................................................................15Make Set Busy ...................................................................................................15Supervisor Help and Monitoring .......................................................................15Wrap-up Time ....................................................................................................16
1.8 Describing QuickQ Group Features ...........................................................................16Alarm Threshold (Time) ....................................................................................16Alarm Threshold (Calls in Queue) .....................................................................16Automatic Day-to-Night Mode ..........................................................................16Automatic Answer Mode ...................................................................................16Manual Answer Mode .......................................................................................17Overflow Group .................................................................................................17Overflow Threshold ...........................................................................................17Priority Call Handling ........................................................................................17Redirect Threshold .............................................................................................17Call Screen Mode ...............................................................................................18Notes ..................................................................................................................18
2. Programming QuickQ ......................................................................................................192.1 Understanding System Startup ....................................................................................19
Oct 02 Comdial i

2.1.1 Preparing System Layout / Worksheets ............................................................ 192.1.2 Programming QuickQ Without A Protection Key ............................................ 202.1.3 Programming QuickQ From Another PC Through Networking ...................... 20
2.2 Signing In ...................................................................................................................202.2.1 Signing In to the Manager’s Level ................................................................... 20
2.3 Enabling the Toolbar and Status Bar ..........................................................................212.3.1 Signing Through to the Group Supervisor’s Level ........................................... 21
2.4 Signing Out .................................................................................................................212.4.1 Signing Out and Exiting QuickQ ...................................................................... 22
2.5 Manager Programming ...............................................................................................222.5.1 Entering your Company’s Data ........................................................................ 222.5.2 Activating a Group ............................................................................................ 232.5.3 Deactivating A Group ....................................................................................... 242.5.4 Activating Group Supervisor ............................................................................ 242.5.5 Setting The Intergroup Overflow ...................................................................... 252.5.6 Assigning Account Codes ................................................................................. 262.5.7 Arranging the Stat Bins ..................................................................................... 272.5.8 Controlling the Wallboards ............................................................................... 28
Setting Up a Wallboard ......................................................................................29Programming Wallboard Parameters .................................................................30
2.5.9 Changing Your Password ................................................................................. 312.5.10 Setting Announcement Titles .......................................................................... 322.5.11 Synchronizing the Date and Time .................................................................. 332.5.12 Backing Up Announcements .......................................................................... 342.5.13 Restoring Announcements .............................................................................. 34
2.6 Supervisor Programming ............................................................................................352.6.1 Preparing the Group Layout/Worksheet ........................................................... 352.6.2 Programming Modes of Operation ................................................................... 35
Modes .................................................................................................................352.6.3 Programming the Thresholds ............................................................................ 372.6.4 Configuring The Day to Night Schedule .......................................................... 382.6.5 Activating the Agent Group .............................................................................. 392.6.6 Activate a Line Group ...................................................................................... 402.6.7 Changing Your Password ................................................................................. 412.6.8 Using the Calling Number ID ........................................................................... 41
Setting Up a Customer List ................................................................................42Adding a New Customer ....................................................................................43
2.6.9 Configuring Line Group Announcements ........................................................ 442.6.10 Configuring Agent Groups ............................................................................. 45
Adding, Changing, and Deleting Agents ...........................................................45Notes ..................................................................................................................46
3. Operating the QuickQ System .........................................................................................473.1 Detailing the QuickQ Telephones ...............................................................................473.2 Logging In and Out of QuickQ ...................................................................................483.3 Operating As An Agent ..............................................................................................50
3.3.1 Answering Automatically ................................................................................. 50
ii Comdial October, 02

3.3.2 Answering Manually ......................................................................................... 503.3.3 Wrapping Up A Call ........................................................................................ 513.3.4 Making Your Telephone Busy .......................................................................... 513.3.5 Requesting Help ................................................................................................ 513.3.6 Transferring Calls In or Out of QuickQ ............................................................ 523.3.7 Making an Outgoing Call ................................................................................. 523.3.8 Entering Account Codes ................................................................................... 533.3.9 Using Calling Number ID ................................................................................. 53
3.4 Operating As a Supervisor ..........................................................................................543.4.1 Changing the Mode of Operation ..................................................................... 543.4.2 Reviewing The DVA16 Announcement Messages .......................................... 553.4.3 Monitoring The Agents ..................................................................................... 563.4.4 Viewing The Current Call Statistics ................................................................. 57
3.5 QuickQ Displays For Scout Telephones .....................................................................584. Using Management Information .....................................................................................59
4.1 Obtaining a Detailed Printout .....................................................................................594.2 Selecting Setup ...........................................................................................................604.3 Selecting Real Time Reports ......................................................................................61
4.3.1 System Real Time Reports ............................................................................... 614.3.2 System Real Time - Lines ................................................................................. 614.3.3 System Real Time - Agents .............................................................................. 614.3.4 Supervisor’s Real Time Report ......................................................................... 62
4.4 Selecting the Historical Reports .................................................................................624.4.1 Selecting the Hourly Report ............................................................................. 63
4.5 Selecting Current Reports ...........................................................................................644.6 Selecting the Report Schedule ....................................................................................65
4.6.1 Daily Reports .................................................................................................... 654.6.2 Weekly Reports ................................................................................................. 654.6.3 Monthly Reports ............................................................................................... 66
4.7 Working with Wallboards ...........................................................................................674.7.1 Programming Wallboard Messages .................................................................. 67
Creating a New Wallboard Message ................................................................67 ...........................................................................................................................69Revising a Wallboard Message ..........................................................................69Sending a Wallboard Message ...........................................................................70Deleting a Wallboard Message ..........................................................................70
4.7.2 Setting Wallboard Alarms .............................................................................. 70Creating a New Wallboard Alarm Threshold ....................................................71Revising a Wallboard Alarm Threshold ............................................................72
4.7.3 Creating Wallboard Schedules .......................................................................... 72Creating a New Wallboard Schedule .................................................................72Revising the Scheduled Programming for a Selected Wallboard Message .......73
4.8 Selecting the Abandoned Calling Number ID Report ................................................734.9 Selecting Configuration Reports .................................................................................74
4.9.1 Selecting The Reports ....................................................................................... 744.10 Selecting QuickQ MIS Reports ................................................................................75
Oct 02 Comdial iii

4.10.1 Viewing Typical MIS Reports ........................................................................ 76Answer Bins Report ...........................................................................................77Abandon Bins Reports .......................................................................................78Incoming Call Report .........................................................................................79Average Time Report–Total Time Agent Report Definitions ...........................81
5. Appendix A ........................................................................................................................855.1 Using QuickQ With a Mouse ......................................................................................85
5.1.1 Clicking (Selecting an Item) ............................................................................. 855.1.2 Dragging (Moving a Window) ......................................................................... 85
5.2 Understanding QuickQ Window Graphics .................................................................866. Appendix B ........................................................................................................................87
6.1 System Layout / Worksheet ........................................................................................877. Appendix C ........................................................................................................................91
7.1 Group Layout / Worksheet .........................................................................................917.1.1 Group Setup ...................................................................................................... 917.1.2 Agent Group Setup ........................................................................................... 927.1.3 Line Group Setup .............................................................................................. 937.1.4 Management Information ................................................................................. 937.1.5 Message Scripts ................................................................................................ 947.1.6 Preferred Customer Abandoned Call Record Setup ......................................... 967.1.7 Wallboard Setup Record ................................................................................... 977.1.8 Wallboard Parameter Setup .............................................................................. 977.1.9 Wallboard Messages ......................................................................................... 987.1.10 Wallboard Schedules ...................................................................................... 997.1.11 Wallboard Alarms ......................................................................................... 100
8. Appendix D ......................................................................................................................1038.1 Reviewing The Programming Road Map .................................................................103
Start-up, and System Manager’s Windows ......................................................103Group Supervisor’s Window ...........................................................................106
9. Appendix E ......................................................................................................................1099.1 Backing Up System Reports .....................................................................................109
9.1.1 What is the Windows NT Backup option? ..................................................... 1099.1.2 Why should you use it? ................................................................................... 1099.1.3 How often should you use it? ......................................................................... 1099.1.4 How do you use it? ......................................................................................... 109
10. Appendix F ....................................................................................................................11110.1 Understanding Emergency Operations ...................................................................111
10.1.1 Notifying Agents ........................................................................................... 11110.1.2 Rebooting The QuickQ System .................................................................... 11110.1.3 Signing-In Agents ......................................................................................... 11110.1.4 Printing Screen Information .......................................................................... 11110.1.5 Saving Call Statistics .................................................................................... 112
11. Appendix G ....................................................................................................................11311.1 Detailing Comdial’s Technical Assistance .............................................................113
11.1.1 Verifying Equipment Operation ................................................................... 11311.1.2 Explaining The Repair Service ..................................................................... 113
iv Comdial October, 02

11.1.3 Upgrading Your System Knowledge ............................................................ 114
Oct 02 Comdial v

This page is intentionally blank.
vi Comdial October, 02

QuickQ System Manager’s Guide
1. INTRODUCING THE QUICKQ ACD SYSTEM
1.1 Understanding This Guide
This manual will assist you in using your QuickQ automatic call distributor. It provides a complete description of the QuickQ features, a detailed outline of the system configuration, and general operating instructions. This manual is one of two manuals that comprise the system documentation
1.1.1 BECOMING FAMILIAR WITH CONVENTIONS USED IN THIS GUIDE
Certain typographical conventions appear throughout this guide to simplify the instructions. These are explained below:
Items appearing on a screen that you should click on with your mouse to cause a desired action are shown in bold letters.
Important text showing on a screen is shown in italics.
Keys that you are required to press are shown as, Enter.
NOTE: On some keyboards, the Enter key may be called Return.
The word message is used exclusively when referring to text messages and the word announcement is used exclusively when referring to voice announcements.
The word wallboard is used exclusively when referring to the optional electronic display board. This device may be called electronic message center, reader board, display, sign, or other names in related literature.
Many of the QuickQ programming windows contain one or more of the following commands you can click on with your mouse:
New - Click on this word when you want the system to produce a dialog box that will allow you to make a new entry.
Properties - Click on this word when you want to edit the item on the screen that you have high-lighted.
Remove - Click on this word when you want to remove the item on the screen that you have high-lighted.
Help - Clicking on this word will cause text to appear on your screen to explain items on the associated window
Notes bring your attention to a particular item. Notes are given between paragraphs of text, and are shown in the following form:
NOTE: If you are using the keyboard use the Tab key to move from field to field. If you are using the mouse, click on the field you wish to work with.
October, 02 Comdial 1

Introducing The QuickQ ACD System
Unless otherwise noted, the name Digital Communications System used throughout this manual encompasses all three Comdial systems—DXP, DXP Plus, or FX Series.
1.2 Understanding QuickQ
QuickQ is an Automatic Call Distribution (ACD) system designed to handle incoming calls as effi-ciently and economically as possible. It answers calls by distributing the workload equally among the Agent staff. Typically, QuickQ speed, efficiency and management control usually results in a 20–40 percent increase in the productivity of the Agent force and a 10 to 20 second decrease in the average call answer time. The four primary functions of the QuickQ are as follows:
• Provide a waiting queue to increase the effective arrival rate of the incoming calls, and to allow more productive time for the Agent.
• Play prerecorded announcements when no Agents are available thus encouraging the caller to wait in a queue.
• Automatically distribute the workload among the Agents to allow an equal distribution of duties, effecting greater productivity.
• Provide comprehensive statistical management reports that allow rational and efficient allocation of the call center’s resources, and provide quick feedback to agents on system status via optional electronic displays called wallboards.
Any corporation or company that answers incoming telephone calls with a staff of Agents or trained people is a potential candidate for the considerable cost savings and service benefits of the QuickQ.
In an automatic call distribution (ACD) application, a calling customer needs to reach a service person in a particular area but does not need to reach a specific individual. For example, the customer may be calling a company to place an order, check a reservation, or talk to a support or help desk. In all cases, it is important that the call be answered as quickly as possible by any service person in that area.
It is statistically proven that a single large group of agents is more productive than an equal number of agents in several smaller groups provided that the calls are homogeneous.
Calling traffic is considered homogeneous when anyone within a group of trained representatives can effectively handle the call; however, this uniformity does not imply that ACD systems can handle only one type of call. Many successful operations exist where different types of calls reach specially trained operators in a busy call center. However, it is more efficient to separate different types of calls into groups. QuickQ has the ability to configure the ACD operation into 16 groups, each of which can have four line groups.
1.3 Organizing The Call Center Staff
An ACD center requires specialized personnel. If the department is large enough, an effective ACD staff will consist of the following personnel:
• System Manager,
• Group Supervisors,
2 Comdial October, 02
QuickQ System Manager’s Guide
• Telephone Agents.
The System Manager is directly responsible for the day-to-day operation and maintenance of the ACD center. In smaller systems, the System Manager’s task may be combined with the Group Super-visor’s responsibilities. The System Manager can monitor the overall performance of the ACD center and has several responsibilities including the following items:
• Control of systems configuration, such as the number of groups and overflow between groups.
• Assign personnel based on the traffic demands of the various groups for maximum operating efficiency of the ACD center.
The Group Supervisor is directly responsible for the following responsibilities:
• Moving, adding and deleting Agents required for the call center.
• The telephone service provided by Agents in their respective groups.
• Monitoring the activity of the Agents.
• Evaluating the performance of the Agents.
• Providing assistance on calls beyond the capability or training of the Agents.
The Telephone Agent is often referred to as a Customer Service Representative (CSR) and is mainly responsible for a particular group of telephone lines or a certain type of call; however, the system allows assignment of multiple group agents that are a part of more than one group.
1.4 Describing The System Components
NOTE: You can ensure continuous QuickQ operation by adding an uninterruptable power source to both the digital voice announcer and central call processor, and an optional battery backup assembly to the digital communications system. Wireless devices may need additional backup.
1.4.1 CALL PROCESSOR
The call processor is the brain of the QuickQ. It consists of the QuickQ software and a personal com-puter with a WindowsNT operating system. The call processor monitors and controls all activities within the boundaries of the call center.
1.4.2 DIGITAL VOICE ANNOUNCER
The Digital Voice Announcer (DVA) is a stand-alone voice processing system designed to directly interface with the digital communications system. Two models are available—the DVA01 can store up to four digitized voice announcements for playback under control of the central call processing unit while the DVA16 can store up to 16 announcements. In a busy call center when all Agents are busy, the DVA intercepts incoming calls and plays prerecorded voice announcements.
When using the DVA01 with QuickQ, the following limitations apply.
October, 02 Comdial 3

Introducing The QuickQ ACD System
1. QuickQ cannot support more than two DVA01 units.2. You must record four messages and they must be assigned to message numbers 1 through 4 in
QuickQ which correspond to 44 through 47 in the Digital Communications System. These mes-sage numbers are reserved for QuickQ. You must record all four messages even if you are not using them all.
3. QuickQ cannot support both DVA16 and DVA01 at the same time.4. You must control all DVA01 functions, like recording or deleting messages, from the attendant’s
station (station 10) through DCS attendant voice programming.5. You can record messages on the DVA01 while QuickQ is active; however, if you are recording
at the same time the system is receiving a call, the caller may not hear any recorded message.6. The installer must know where the QuickQ messages reside and program the appropriate exten-
sion numbers using the voice port programming screen.7. Neither the QuickQ technician nor the supervisor can record or play messages on the DVA01
using the QuickQ message playback/record.8. QuickQ cannot display message limits for the DVA01.9. The DVA status, displayed in the CLOCK window, always shows DVA when the system is using
the DVA01.10. The announcement (message) backup feature is disabled.
1.4.3 TELEPHONE EXTENSIONS
The Agent’s and Supervisor’s stations are typical proprietary telephones (12 or 24 Button LCD Sets) or optionally Scout II cordless phones can be used by Supervisors and/or Agents.
1.5 Understanding The Wallboards
QuickQ can support up to 16 optional wallboards. Both mono and color wallboards are functional in version 3.1. The color wallboards have a 40-character display (two rows of 20 characters) consisting of red, yellow, and green LEDs. The mono wallboards display a single row of 20 characters in red.
1.5.1 MODES OF OPERATION
QuickQ wallboards are allowed two modes of operation—parameter mode and text mode. In the parameter mode they display operational parameters and in the text mode they display text messages.
Parameter Mode
Wallboards display several parameters—six for the color version or three for the mono version as shown in the example below. See Table 3-1 for the wallboard parameters.
When a summary is selected, every hour the wallboard displays the totals for the past hour and the totals of the day up to display time. When the system goes into the night mode, the totals for the past hour (or part of an hour) together with the final totals for the day are displayed. For 24-hour sites, QuickQ is reset to a new day at 00:00 (midnight). As a result, the last summary of the day is displayed at 00:00 (midnight). When the first agent signs in, the wallboard is initiated into the day mode.
4 Comdial October, 02

QuickQ System Manager’s Guide
When an alarm condition is met, the color wallboard either displays a scrolling message or it shows the display parameters in red. The audible alarm (buzzer) will also sound, if that option is programmed.
Figure 1-1 Wallboard Display
Text Mode
A total of 32 messages can be stored in the QuickQ message library. Each message can contain a maximum of 70 characters with up to six parameter tokens (see Table 3-1). A parameter token is a two-letter abbreviation, enclosed in brackets, representing a parameter; for example, [IH] means incoming calls received in the current hour. The tokens are embedded within the text and are replaced at display time by the actual value. Invalid parameters will be displayed as text on the wallboard.
A text message can be initiated by a manual request via the keyboard of the QuickQ’s PC. Alternately, users can program the wallboard to display messages at a specified time of the day and on a specified day of the week. Text messages can also be initiated on an event basis, as when a threshold condition is met.
Scrolling text messages always appear in red with their titles (if used) in green. Text messages scroll continuously for three times. To alert agents of a new text message, users can activate the audible alarm option. The color wallboard example below illustrates how parameter tokens SH and SD are converted to actual values in the scrolling text message.
Figure 1-2 Scrolling Text Message
Priorities
When more than one message is sent to a wallboard or a group of wallboards at the same time, prior-ities are used to determine the sequence in which these messages will be displayed. The order of pri-ority to display messages are as follows:
1. Scheduled messages (triggered by time).2. Alarm messages (triggered by an alarm threshold).3. General messages (manually sent).4. Parameter mode information (parameters and group titles).
October, 02 Comdial 5

Introducing The QuickQ ACD System
Parameters are the only kind of displayed information that can be over-written. All other messages will remain on the wallboard until their preset duration expires. Not until then will another set of mes-sages appear on the wallboard.
1.6 Describing QuickQ System Features
1.6.1 ANSWER BIN
An Answer bin is the length of time between when a call arrives in the queue and when it is answered by an Agent. There are six answer bins in the system. The system answer bin default time is zero. By setting the time frames in the answer bins, the Manager can look at one factor in the total customer service picture. An example of a typical answer bin record is shown below.
1.6.2 ABANDONED BIN
Abandoned bin is the time between when a call arrives in the queue and when the caller hangs up without being connected to an Agent. There are six abandoned bins in the system. The system aban-doned bin time defaults are zero. By setting time frames in the abandoned bins, the Manager can determine how tolerant customers are of the waiting time to which they are being subjected. An example of a typical abandoned bin is shown below.
1.6.3 CALL QUEUING
The QuickQ manages incoming calls in a logical sequence. The number of incoming calls arriving at a call center at any one time is random. The calls are queued on a first in first out principle. Call queuing ensures that calls are handled in a timely and efficient manner. Priority can be assigned to preferred lines such as Inwats (800 lines).
1.6.4 EVEN DISTRIBUTION
The QuickQ effectively shares the incoming call workload evenly among agents. This ensures the optimum productivity of all agents by distributing calls to the agents who have been idle the longest.
Answer Bin
Number of Calls
Time Definition
Bin 01 0 00:20 The number of calls answered between 0 and 20 seconds, (0)
Bin 02 5 00:40 The number of calls answered between 20 and 40 seconds, (5)
Bin 03 2 01:00 The number of calls answered between 40 seconds and 1 minute, (2)
Abandoned Bin
Number of Calls
Time Definition
Bin 01 0 00:10 The number of calls abandoned between 0 and 10 seconds, (0)
Bin 02 11 00:30 The number of calls abandoned between 10 and 30 seconds, (11)
Bin 03 15 00:50 The number of calls abandoned between 30 and 50 seconds, (15)
6 Comdial October, 02

QuickQ System Manager’s Guide
1.6.5 DELAY ANNOUNCEMENTS
Delay announcements are important money-saving features that help keep the queue working in an efficient manner. Since telephone traffic is random, there will be occasional bursts of calls to any ACD. Such sporadic increases in volume may force callers to wait for connection longer than they would like. By recording delay announcements (such as, Hello you have reached XYZ Company. All of our operators are busy at the moment, but please hold and our next available operator will be with you momentarily) you assure the callers they are important and that their call will be answered in sequence, and that they should wait and not hang up. Without this announcement most people will hang up after five or six rings.
Note: Be creative with your messages, provide important information, advertise special promotions and in general, keep your customers entertained and informed while they are waiting.
1.6.6 UNDERSTANDING THE MESSAGES
The QuickQ system can store up to 16 messages. The Message window (refer to Setting Announcement Titles on Page 3-9) allows you to view the length and number of these messages. You can enter a description to label each one if you wish.
The Current setting shows the length of the message in minutes and seconds. The Limit setting shows the time available for the message. QuickQ allows a total of 320 seconds of message recording time.
October, 02 Comdial 7

Introducing The QuickQ ACD System
The recording medium is a random access memory (RAM) chip; however, a cassette tape was used in the following figures to illustrate for you the recording technique you can use to create buffers. These buffers allow you to replace messages with new ones of longer length without disturbing other stored messages.
Figure 1-3 Typical Recording Technique
1.7 Management Information System (MIS) Reporting
The QuickQ system provides both real time and historical statistical information on the performance of the call center (Agent or line activity).
Real-time screens are shown for System Managers and for Groups in Section 5 under the heading Selecting The Real Time Report.
8 Comdial October, 02
QuickQ System Manager’s Guide
Historical information is described in details in Section 5 under the heading Selecting Historical Reports.
1.7.1 DESCRIBING QUICKQ AGENT FEATURES
Account Codes
The system can provide a table of account codes arranged so that a unique number corresponds to a specific call type (for example, call content, product type, and so forth). For example, a software help desk may wish to use account codes to categorize its calls as follows:
Agents can enter the account code that corresponds to the type of call they have just dealt with. This information is stored in the systems statistics. System Managers can use the Management Information Report System to analyze the types of traffic and the topics of that traffic. Account codes can be optional, forced and verified. This is a QuickQ feature—do not confuse this with the Digital Commu-nications System’s Account Code feature.
Calls Waiting Indication
The calls waiting indication details the number of calls waiting in the queue. The system displays this information on both the Agents and Supervisors telephones. The calls waiting indication prompts Agents to quickly complete their present activity and answer the calls waiting in the queue. It alerts Supervisors to release available Agents who had been assigned to other tasks. Map this button as OAI61 on the agent’s or supervisor’s set.
Log-in / Log-out
Agents move in or out of the system on an individual basis. Each Agent has his or her own three-digit user ID and password. Agents log into the system at the start of their day and log out of the system at the end of their day. When they take lunch or coffee breaks, they use the make set busy feature.
Make Set Busy
An Agent can manually make their telephone busy by pressing the BUSY interactive button. This allows the Agent to temporarily leave the system (during lunch or breaks).
Supervisor Help and Monitoring
The Supervisor uses the help and monitoring capabilities to provide expert advice to Agents on dif-ficult calls. Supervisors can listen to Agent/customer conversations to ensure courteous and efficient service. The Help function allows the Agents to request help without interrupting the call in progress.
Code Call Category Code Call Category100 Help with Setup 300 Help with Word Processing200 Help with MS NT 301 Help with Databases201 Help with Networked NT 302 Help with Spreadsheets
October, 02 Comdial 9

Introducing The QuickQ ACD System
Wrap-up Time
Immediately after he or she terminates a call, the system places that Agent’s telephone into the wrap-up mode. During this wrap-up time, the agent will not be presented any calls. Usually the Agent will take this time to finish any paperwork associated with the call just completed. The Group Supervisor programs the wrap-up time for each individual Agent. Experienced Agents may require less time to wrap up a call than less experienced Agents.
An Agent can shorten a call’s wrap-up time by pressing the READY interactive button, and similarly can extend a call’s wrap-up time by pressing the BUSY interactive button.
1.8 Describing QuickQ Group Features
Each Group Supervisor can program these features independently for each group to meet its specific requirements.
Alarm Threshold (Time)
Alarm Threshold (Time) is a pre-programmed time parameter to monitor the number of calls waiting in queue (default period is 45 seconds).
Alarm Threshold (Calls in Queue)
Provides an indication to Agents & Supervisors that the number of calls waiting in queue has gone beyond the Alarm Threshold (Time). If the Alarm Threshold (Calls in Queue) is set to a number higher than zero (0), an audible tone will go off at all Agent’s telephones when that preset number of calls has reached the Alarm Threshold (Time). If the Alarm Threshold (Calls in Queue) is set equal to zero (0), the alarm will not go off even if calls have reached the Alarm Threshold (Time). Statistics will still be collected for MIS Reports and supervisors’ wallboards.
Automatic Day-to-Night Mode
QuickQ switches from night mode to day mode when the first Agent of the group logs into the system to take calls. This ensures there is always someone logged in to take calls before the system accepts them.
Each Group Supervisor can set their group to automatically switch from day mode to night mode.
In night mode, the system answers the incoming calls, plays the prerecorded night announcement, and releases the call.
The system will automatically log all agents out when all calls holding, prior to night mode are answered.
Automatic Answer Mode
An Agent that operates in the automatic answer mode wears a head set. For incoming calls, the system rings the agent’s telephone and connects the call directly to it.
10 Comdial October, 02

QuickQ System Manager’s Guide
Manual Answer Mode
An Agent in manual answer mode chooses to answer the incoming call or to reject it using the inter-active buttons on his or her telephone.
Overflow Group
The overflow group is a secondary group of Agents to whom the system will direct calls after the overflow threshold time-out occurs (default is 3 minutes, 30 seconds). The overflow group allows agents in more than one group to handle calls. By handling calls from other groups, Agents increase the overall call handling efficiency of the system. The system allows up to 16 overflow extensions. The overflow groups are set by the System Manager.
NOTE: Overflow level 4 can be set in technician programming to a specific non-ACD extension.
Example: Agents in Group Two will receive calls from Group One when the pre-programmed period of time (default is 210 seconds) has gone beyond the overflow threshold. The overflow threshold is preset depending on the group’s requirements. Since the overflowed calls remain in both queues (for Groups One and Two), the system will direct each call to the first available agent in either group. This feature is known as “look back.”
Overflow Threshold
The overflow threshold is the period of time that the system holds a call before it transfers it to an overflow group.
Priority Call Handling
There are four call handling priority levels (01 is the highest priority and 04 is the lowest priority). System Managers can assign a priority status to sub-groups of telephone lines. The system will queue the calls that arrive on those lines ahead of the calls that arrive on non-priority lines.
Example: Assign 800 numbers a priority of 01 so Agents will answer these calls before they answer any other call. This is important, as network billing starts as soon as the QuickQ answers the call.
Individual Agents can have a priority status (01 to 04). The system assigns calls to Agents with the highest priority before it assigns calls to lower priority Agents.
Example: Assign Agent 200 a priority of 01 and Agent 209 a priority of 04. Agent 200 will receive incoming calls before Agent 209 receives any calls regardless of idle time. This allows Agent 209 to be available for calls yet be less likely to be interrupted from any other assigned work. This means Agent 209 can do assigned paperwork during a known slack period and still be available to answer calls if all other Agents are busy.
Redirect Threshold
If a call is not answered by an Agent (for example, the Agent forgot either to log-out or to make their telephone busy before leaving their desk) for a period of time defined as the redirect threshold time, the system will redirect the call to another Agent or group and automatically make the Agent’s telephone busy. This occurs only in Manual Answer Mode.
October, 02 Comdial 11

Introducing The QuickQ ACD System
Call Screen Mode
This mode of call routing sends all calls to the digital voice announcer. Callers hear the complete initial delay announcement before their call is directed to an Agent. Usually the message is used to provide the caller with certain information (promotional information or instructions such as “Please have your credit card number ready”) prior to talking to an Agent.
Notes
12 Comdial October, 02

QuickQ System Manager’s Guide
1. PROGRAMMING QUICKQ
This section describes programming procedures for the QuickQ system manager and for the QuickQ group supervisor. All programming is accomplished at a QuickQ system console using a Windows95 or WindowsNT operating system. As a system manager or group supervisor, you will do all of your programming by pointing and clicking objects on the console’s screen using a mouse. If you are not familiar with using a mouse in a windows-based graphic environment, refer to Appendix A.
1.1 Understanding System Startup
At initial installation, the installer performs system startup and programs the Digital Communications System and the QuickQ to work together.
The system begins operation with the following default settings:
To determine which settings are applicable to you, refer to the relevant headings on the following pages.
1.1.1 PREPARING SYSTEM LAYOUT / WORKSHEETS
Prepare the system manager’s programming worksheet before you actually begin configuring the system at the console, and use this worksheet as a reference to assist you in entering the information required. There is an example worksheet in Appendix B.
• Agent Password None • Group 1 Supervisor ID # 901• Agent Priority Level 01 • Group 1 Supervisor Password 901• Agent Wrap-up 10 sec. • Group 2-16 Supervisor ID # 000• Agent’s ID # None • Groups 2-16 Supervisor Pswd 000• Alarm Threshold Calls in Queue 0 • Line Priority Level 01• Alarm Threshold 45 sec. • Night Announcement 3• All Agents Busy Alarm No • On Hold Interval 30 sec.• Allow Suspension of Agent Set No • Overflow Group None• Answer Mode Manual • Overflow Threshold 210 sec.• Call Screening No • Priority Override 90 sec.• Calling Number ID No • Redirect Threshold 20 sec.• Day to Night Mode Yes • Second Announcement 2• First Ann. Intercept Delay 10 sec. • Special Announcement 4• First Announcement 1 • System Manager ID # 900• Force Account Code No • System Manager Password 900• Time for each Day-Night Mode 5:30 pm
October, 02 Comdial 13
Programming QuickQ
1.1.2 PROGRAMMING QUICKQ WITHOUT A PROTECTION KEY
You can program QuickQ without a protection key. QuickQ version 4 software will operate for approx-imately one hour without a software key installed.
1.1.3 PROGRAMMING QUICKQ FROM ANOTHER PC THROUGH NETWORKING
QuickQ managers or supervisors who are working on a network connected to the QuickQ server can program features and run reports from his or her personal computer, called a client. All that is required is a Comdial networking card installed in both the server and the client.
The network limit is 10 clients, but only one client can communicate with QuickQ at a time.
1.2 Signing In
Use the following steps to gain access to the system.
1.2.1 SIGNING IN TO THE MANAGER’S LEVEL
From the main QuickQ screen, you can sign into the manager level. This will allow you to access all of the QuickQ windows that you will need to complete the system programming.
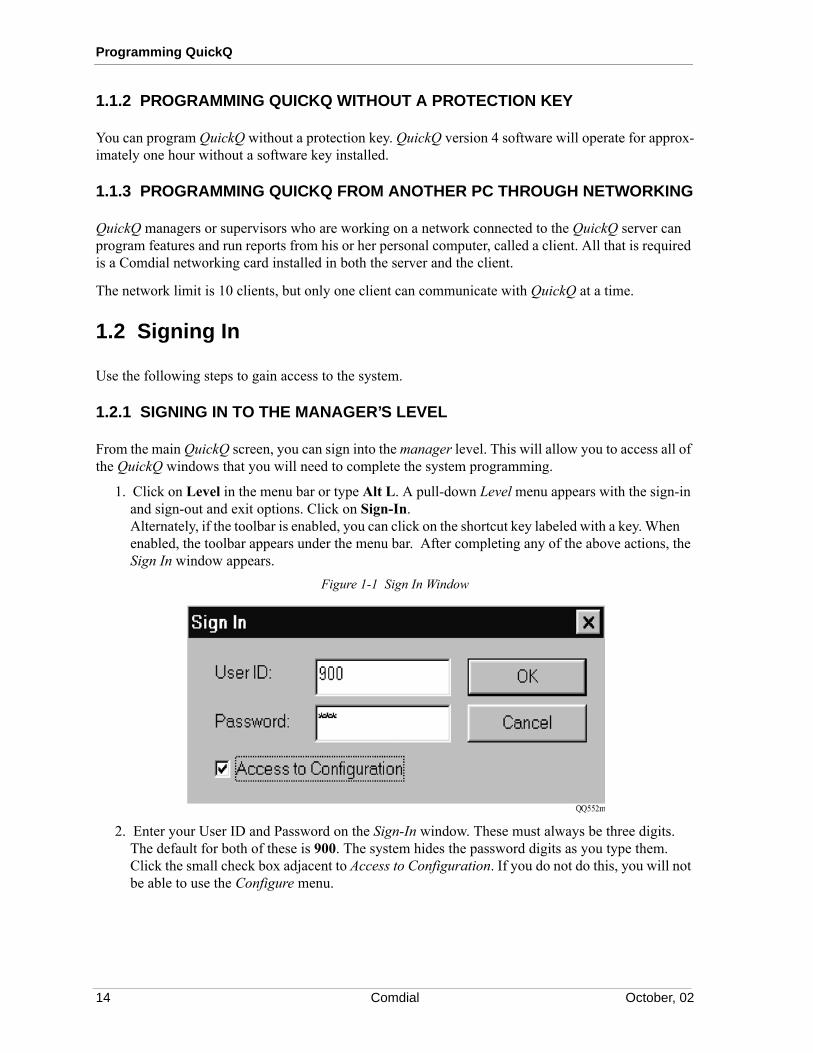
1. Click on Level in the menu bar or type Alt L. A pull-down Level menu appears with the sign-in and sign-out and exit options. Click on Sign-In. Alternately, if the toolbar is enabled, you can click on the shortcut key labeled with a key. When enabled, the toolbar appears under the menu bar. After completing any of the above actions, the Sign In window appears.
Figure 1-1 Sign In Window
2. Enter your User ID and Password on the Sign-In window. These must always be three digits. The default for both of these is 900. The system hides the password digits as you type them. Click the small check box adjacent to Access to Configuration. If you do not do this, you will not be able to use the Configure menu.
14 Comdial October, 02

QuickQ System Manager’s Guide
3. Click on OK to close the Sign-In window and open the main Manager window.Figure 1-2 Main Screen
1.3 Enabling the Toolbar and Status Bar
Click on View in the menu bar or press Alt V. A pull-down menu with the Toolbar and Status Bar options appears. A small check mark adjacent to each one of these options is displayed whenever that option is enabled. Place the pointer on the option name and click to toggle the option on or off. When the option is enabled, it will be displayed on the manager screen.
1.3.1 SIGNING THROUGH TO THE GROUP SUPERVISOR’S LEVEL
After you have signed-in to the manager level, you can sign through to the group supervisor level. Doing this will let you access all of the QuickQ windows that are available to the group supervisor.
1. Click on Level. A pull-down menu with several options appears.2. Click on Sign-Through. Another pull-down menu appears with selections for the active groups.3. Click on the name for the active group that you want to program. The title bar at the top of the
window changes to display Manager - (group name).
1.4 Signing Out
Click on Level to open the Level menu, and then click on Sign-Out. This action backs you up to the previous level. For example, if you previously signed through to the Group Supervisor level, clicking on Sign-Out backs you up to the Manager level.
October, 02 Comdial 15
Programming QuickQ
1.4.1 SIGNING OUT AND EXITING QUICKQ
Click on Level to get the level pull-down menu. Click on Sign-Out & Exit to exit QuickQ and return to the WindowsΝΤ desktop.
1.5 Manager Programming
From the main manager window, you can program the QuickQ features described on the following pages.
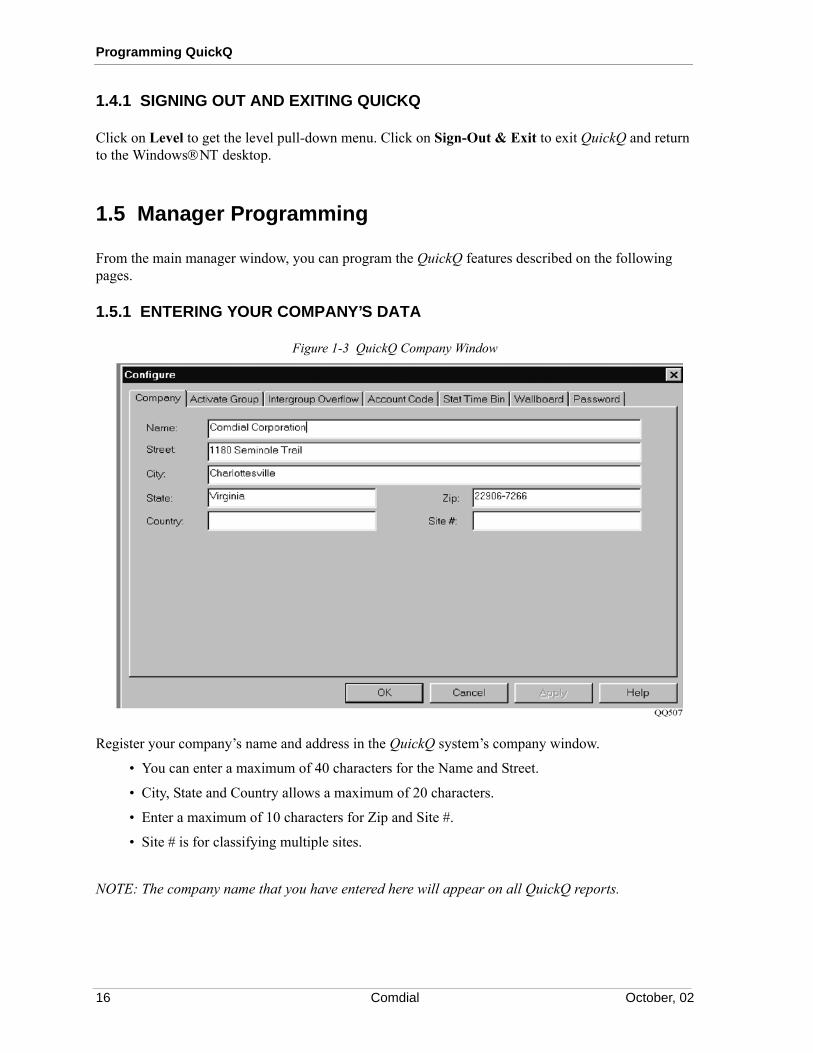
1.5.1 ENTERING YOUR COMPANY’S DATA
Figure 1-3 QuickQ Company Window
Register your company’s name and address in the QuickQ system’s company window.
• You can enter a maximum of 40 characters for the Name and Street.
• City, State and Country allows a maximum of 20 characters.
• Enter a maximum of 10 characters for Zip and Site #.
• Site # is for classifying multiple sites.
NOTE: The company name that you have entered here will appear on all QuickQ reports.
16 Comdial October, 02

QuickQ System Manager’s Guide
1.5.2 ACTIVATING A GROUP
In QuickQ you can set up a total of 16 Groups, with up to four Line Groups in each Group. Each Group is independently programmed with different agents, modes of operations, and overflow settings. When a Group is further divided into different Line Groups, each Line Group will be assigned separate announcements, priority levels, and statistics. To change the Group Status in the Active Group window, highlight the Group and select Properties.
Figure 1-4 Activate Group Menu
Figure 1-5 Activate Group Properties Window
October, 02 Comdial 17

Programming QuickQ
In The Activate Group Properties window:
1. Click on the Activated check box to enable the group. A check mark indicates the group is active.
2. Enter Group Name in up to 7 characters. 3. Changes made in this window reflect in the technician level’s Activate Group dialog box. 4. All combo boxes displaying the Group are also updated.
NOTE: When a group is activated, the system creates agent group automatically since a minimum of one agent group is required to make a group functional. The system deletes Agent Group 1 automati-cally when someone deactivates Group 1. However, you must first make sure all agents are removed from the agent group to do this.
1.5.3 DEACTIVATING A GROUP
When deactivating a group,
1. All agents are removed from the agent group.2. No wallboards are connected to the group.3. The group is not being assigned for intergroup overflow.4. All line groups are disabled. This can only be done by a technician.
1.5.4 ACTIVATING GROUP SUPERVISOR
1. Click Supervisor tab to access the Activate Group Supervisor window. Here, you can change supervisor name, ID, and password.
2. Enter Supervisor Name in up to 7 characters.3. Enter ID and Password in 3 digits, range from 100 - 999.4. The ID and password that you have set up will reflect in the group supervisor’s Password dialog
box of the programming level.Figure 1-6 Activate Group Supervisor Window
18 Comdial October, 02

QuickQ System Manager’s Guide
1.5.5 SETTING THE INTERGROUP OVERFLOW
An overflow group is a secondary group of agents to whom QuickQ will direct calls, which has exceeded the overflow threshold time. Overflow programming is defined separately with four levels for each activated group.
To change the settings of an overflow group:
1. Highlight the group in the Intergroup Overflow window. Only the active groups are shown in the window.
Figure 1-7 Intergroup Overflow Window
October, 02 Comdial 19

Programming QuickQ
2. Select Properties to access the Intergroup Overflow Properties window. Figure 1-8 Properties Menu
3. Click on the down arrow and select the options you wish to apply for each overflow level. 4. Only the active groups are listed for each overflow level.5. If the technician has set up an Overflow extension, it will be listed as an option for Overflow
Group in Level 4. In this way, you can program the system to send callers to an extension when all overflow groups are busy. The extension can be a receptionist extension or voice mail exten-sion.
6. When the no overflow option is selected for all levels, QuickQ will not overflow the call to another group.
7. You cannot change the group name here.
1.5.6 ASSIGNING ACCOUNT CODES
Agents can classify calls by entering a three-digit account code during or after a call. The Account Code dialog box displays a list of account codes and its descriptions.
1. To assign a new account code, select New.2. To change the description for an account code, highlight the account code and select Properties.3. To delete an existing account code, highlight the account code. Click Remove.
20 Comdial October, 02

QuickQ System Manager’s Guide
NOTE: Account codes, which are set up here, are used system wide.Figure 1-9 Account Code Setup
1.5.7 ARRANGING THE STAT BINS
Answer Time Bins are for monitoring the number of calls that are answered within a user-defined period. Statistics collected will reflect the duration callers are put on hold prior to being answered by an available agent.
Abandon Time Bins are for monitoring the number of calls that are abandoned within a user-defined period. Statistics collected will reflect the time callers are willing to wait before abandoning.
To program Answer and Abandon Time Bins:
1. Enter the parameters in minutes and seconds such as “00:20” for 20 seconds in the Stat Time Bin window. Refer to Figure 3-12.
2. Use Tab to move from one time bin to the next. 3. Make sure that each time bin holds a higher time than the previous one. For instance, if you set
20 seconds for Time Bin 01, you may wish to set 40 seconds for Time Bin 02.
October, 02 Comdial 21

Programming QuickQ
4. There is no need, however, to set each Time Bin in equal intervals. Just set them to suit your analysis requirements.
Figure 1-10 Statistic Bins
1.5.8 CONTROLLING THE WALLBOARDS
Each of the 16 wallboards is listed with its current settings in the Wallboard window. Refer to Figure 3-13. To setup a new wallboard or to change wallboard parameters, highlight the wallboard number and click Properties.
22 Comdial October, 02

QuickQ System Manager’s Guide
Setting Up a Wallboard
1. Click Settings to access the Wallboard Settings window.Figure 1-11 Wallboard Settings
2. Assign the wallboard to the system or to an active group. If you select Not Used, you cannot edit other options in this dialog box.
3. Identify whether you are programming a Mono or Color wallboard. If you select the mono wall-board type, the Title option will automatically be disabled. This is because only color wallboards can show a title.
Figure 1-12 Wallboard Properties
October, 02 Comdial 23

Programming QuickQ
4. If you select the color wallboard type, you can enable or disable the Title option by clicking on the check box. You can enter up to 16 characters to describe the Title.
5. Click Summary if you wish to see hourly totals for your selected parameters.6. If you wish to enable the buzzer when a message is sent to the wallboard or when an alarm
threshold is met by one of the parameters showing on the wallboard, click Buzzer.
Programming Wallboard Parameters
1. Click Parameters to access Wallboard Parameter window.2. This window is only accessible when a wallboard is connected to a group or to the system.3. Click the down arrow of each parameter from P1 to P6. 15 two-character abbreviations, each
representing a specific parameter, will be listed.4. When an abbreviation is selected, Parameter Information will display its definition.5. For mono wallboards and for color wallboards with a title, you can program three parameters
(from P1 to P3) to show call statistics.6. For color wallboards without a title, you can program all six parameters, from P1 to P6.7. After you specify each parameter, the wallboard will display its call statistics accordingly.
Figure 1-13 Wallboard Parameters
24 Comdial October, 02

QuickQ System Manager’s Guide
1.5.9 CHANGING YOUR PASSWORD
All passwords are restricted to 3 digits, ranging from 100 - 999. Manager’s user ID is factory set and is unchangeable.
If you wish to change the Manager’s password, access the Password window.Figure 1-14 Password Window
1. Enter your existing password in Old Password.2. Enter 3 new digits in New Password.3. Key in the 3 new digits again in Confirm Password.4. The new password will reflect in the Password dialog box of the Technician programming level.
The system manager can also change the supervisor’s user ID and password of an active group.
1. On the System menu, click Configure and then select Activate Group.2. Highlight a group and click Properties. 3. If the group is activated, you can click Supervisor to change the group supervisor’s user ID and
password.4. You cannot make any changes in the Supervisor dialog box if the group is not enabled.
October, 02 Comdial 25
Programming QuickQ
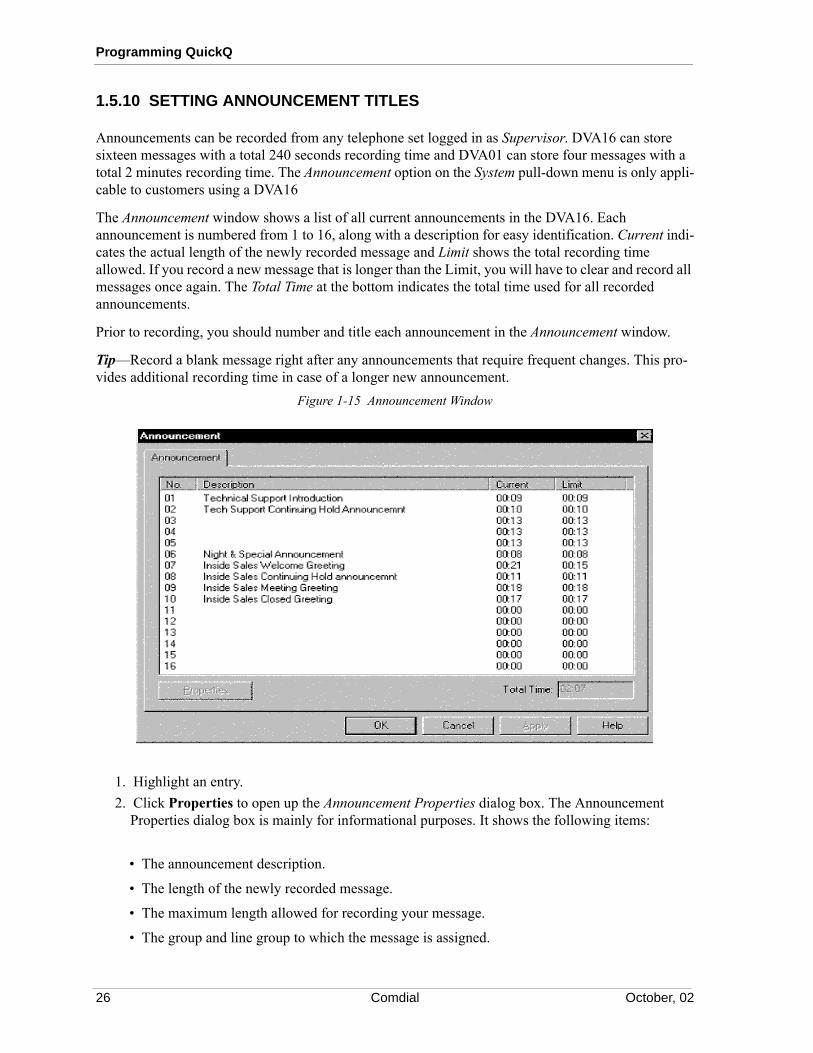
1.5.10 SETTING ANNOUNCEMENT TITLES
Announcements can be recorded from any telephone set logged in as Supervisor. DVA16 can store sixteen messages with a total 240 seconds recording time and DVA01 can store four messages with a total 2 minutes recording time. The Announcement option on the System pull-down menu is only appli-cable to customers using a DVA16
The Announcement window shows a list of all current announcements in the DVA16. Each announcement is numbered from 1 to 16, along with a description for easy identification. Current indi-cates the actual length of the newly recorded message and Limit shows the total recording time allowed. If you record a new message that is longer than the Limit, you will have to clear and record all messages once again. The Total Time at the bottom indicates the total time used for all recorded announcements.
Prior to recording, you should number and title each announcement in the Announcement window.
Tip—Record a blank message right after any announcements that require frequent changes. This pro-vides additional recording time in case of a longer new announcement.
Figure 1-15 Announcement Window
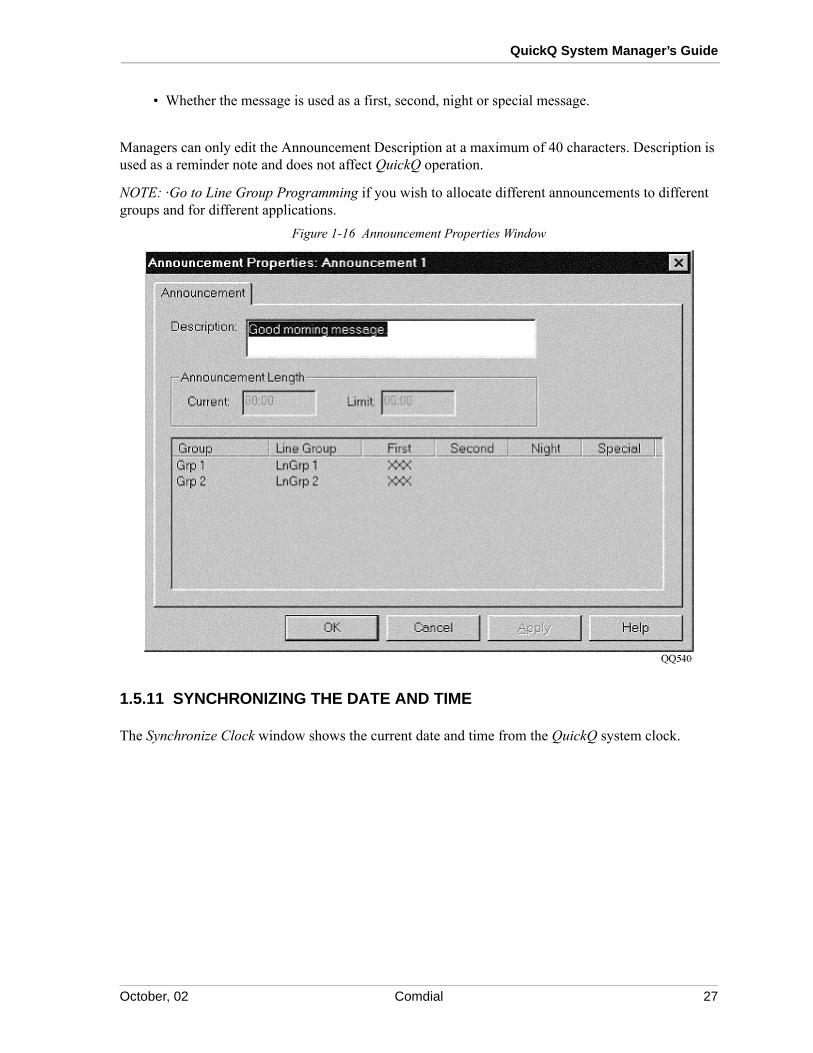
1. Highlight an entry.2. Click Properties to open up the Announcement Properties dialog box. The Announcement
Properties dialog box is mainly for informational purposes. It shows the following items:
• The announcement description.
• The length of the newly recorded message.
• The maximum length allowed for recording your message.
• The group and line group to which the message is assigned.
26 Comdial October, 02
QuickQ System Manager’s Guide
• Whether the message is used as a first, second, night or special message.
Managers can only edit the Announcement Description at a maximum of 40 characters. Description is used as a reminder note and does not affect QuickQ operation.
NOTE: ·Go to Line Group Programming if you wish to allocate different announcements to different groups and for different applications.
Figure 1-16 Announcement Properties Window
1.5.11 SYNCHRONIZING THE DATE AND TIME
The Synchronize Clock window shows the current date and time from the QuickQ system clock.
October, 02 Comdial 27

Programming QuickQ
To synchronize the QuickQ system clock with the Data Communications System, click the Sync Clock button.
Figure 1-17 Synchronizing Clock
1.5.12 BACKING UP ANNOUNCEMENTS
The Backup Announcement option on the System pull-down menu is only selectable when a DVA16 is connected to the QuickQ system. By selecting this option, you can copy all messages currently stored in the Digital Voice Announcer onto a floppy disk.
NOTE: This feature is not applicable for the DVA01 Voice Announcer.
1. Put a floppy disk into the floppy drive located on the Digital Voice Announcer.2. Click Backup Announcement on the System pull-down menu and the system will start copying
all current Digital Voice Announcer messages onto the floppy disk located on the Digital Voice Announcer.
Figure 1-18 Backup Announcement Menu
3. If this option is non-selectable, ask a technician to check the Digital Voice Announcer status.4. The status bar at the bottom of the Main Manager window will display DVA Backup.
1.5.13 RESTORING ANNOUNCEMENTS
The Restore Announcement option on the System pull-down menu is only selectable when a DVA16 is connected to the QuickQ system. By selecting this option, you can retrieve all messages from the floppy disk to the DVA memory.
NOTE: This feature is not applicable to the DVA01 Voice Announcer.
1. Insert the floppy disk into the floppy drive located on the Digital Voice Announcer.
28 Comdial October, 02
QuickQ System Manager’s Guide
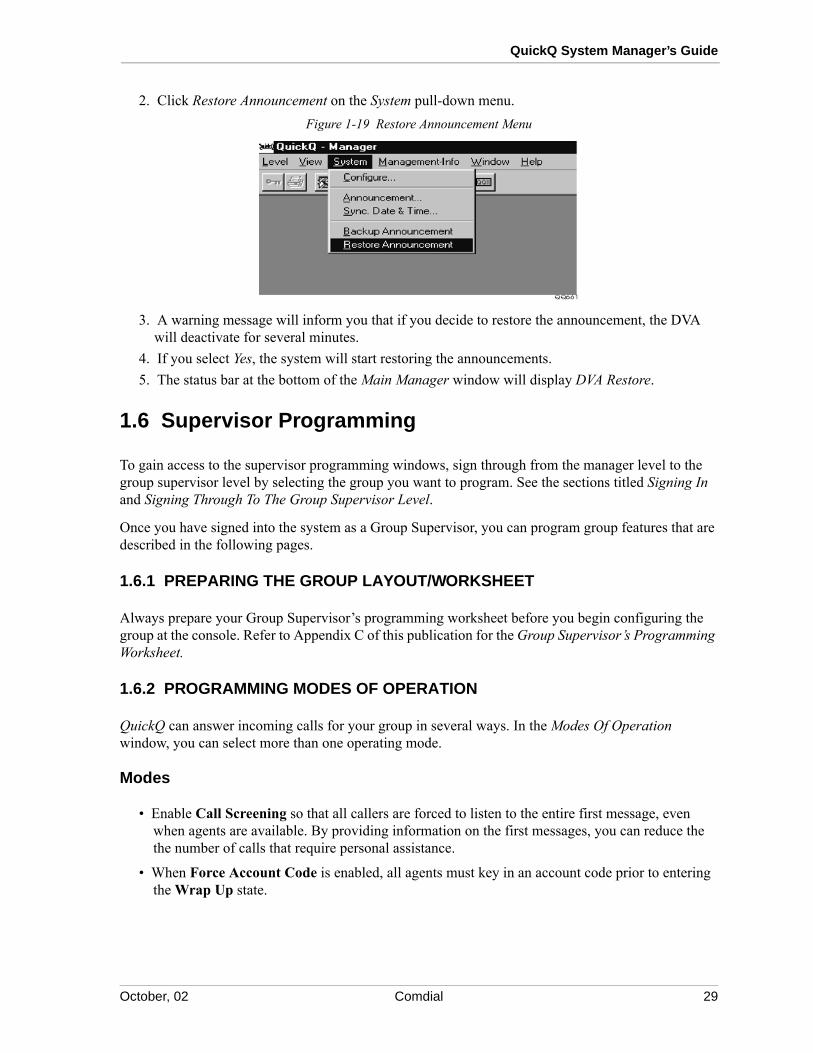
2. Click Restore Announcement on the System pull-down menu.Figure 1-19 Restore Announcement Menu
3. A warning message will inform you that if you decide to restore the announcement, the DVA will deactivate for several minutes.
4. If you select Yes, the system will start restoring the announcements.5. The status bar at the bottom of the Main Manager window will display DVA Restore.
1.6 Supervisor Programming
To gain access to the supervisor programming windows, sign through from the manager level to the group supervisor level by selecting the group you want to program. See the sections titled Signing In and Signing Through To The Group Supervisor Level.
Once you have signed into the system as a Group Supervisor, you can program group features that are described in the following pages.
1.6.1 PREPARING THE GROUP LAYOUT/WORKSHEET
Always prepare your Group Supervisor’s programming worksheet before you begin configuring the group at the console. Refer to Appendix C of this publication for the Group Supervisor’s Programming Worksheet.
1.6.2 PROGRAMMING MODES OF OPERATION
QuickQ can answer incoming calls for your group in several ways. In the Modes Of Operation window, you can select more than one operating mode.
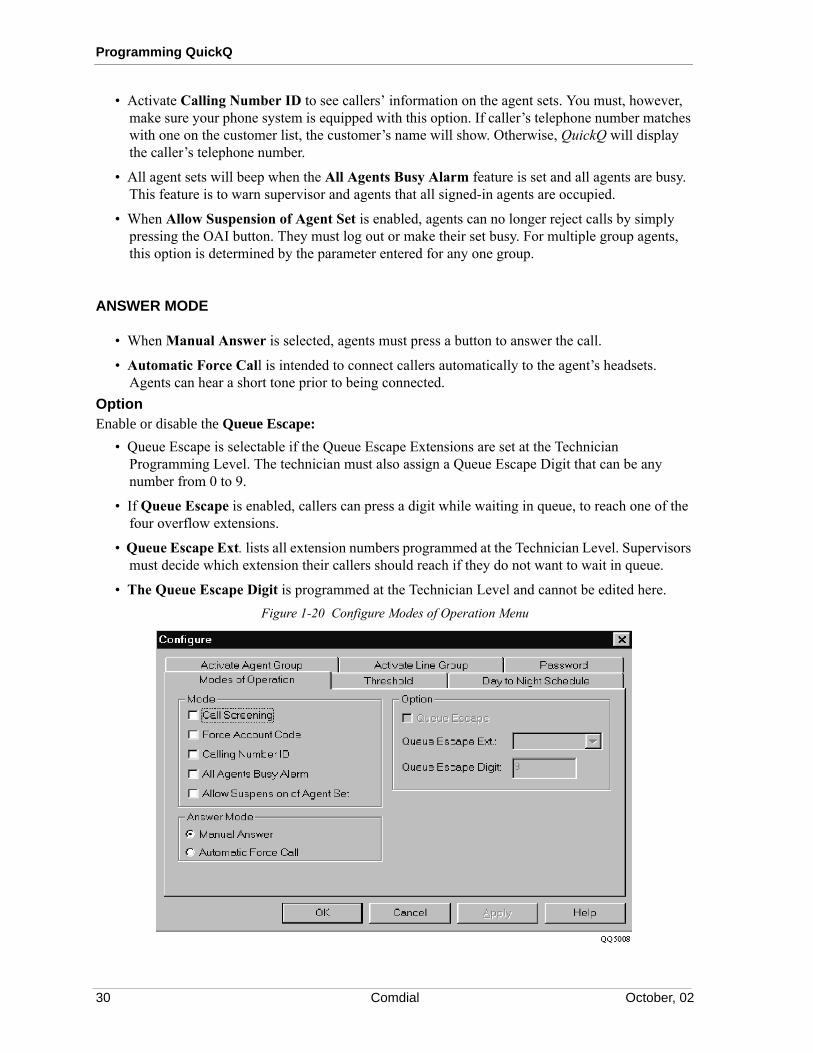
Modes
• Enable Call Screening so that all callers are forced to listen to the entire first message, even when agents are available. By providing information on the first messages, you can reduce the the number of calls that require personal assistance.
• When Force Account Code is enabled, all agents must key in an account code prior to entering the Wrap Up state.
October, 02 Comdial 29
Programming QuickQ
• Activate Calling Number ID to see callers’ information on the agent sets. You must, however, make sure your phone system is equipped with this option. If caller’s telephone number matches with one on the customer list, the customer’s name will show. Otherwise, QuickQ will display the caller’s telephone number.
• All agent sets will beep when the All Agents Busy Alarm feature is set and all agents are busy. This feature is to warn supervisor and agents that all signed-in agents are occupied.
• When Allow Suspension of Agent Set is enabled, agents can no longer reject calls by simply pressing the OAI button. They must log out or make their set busy. For multiple group agents, this option is determined by the parameter entered for any one group.
ANSWER MODE
• When Manual Answer is selected, agents must press a button to answer the call.
• Automatic Force Call is intended to connect callers automatically to the agent’s headsets. Agents can hear a short tone prior to being connected.
OptionEnable or disable the Queue Escape:
• Queue Escape is selectable if the Queue Escape Extensions are set at the Technician Programming Level. The technician must also assign a Queue Escape Digit that can be any number from 0 to 9.
• If Queue Escape is enabled, callers can press a digit while waiting in queue, to reach one of the four overflow extensions.
• Queue Escape Ext. lists all extension numbers programmed at the Technician Level. Supervisors must decide which extension their callers should reach if they do not want to wait in queue.
• The Queue Escape Digit is programmed at the Technician Level and cannot be edited here.Figure 1-20 Configure Modes of Operation Menu
30 Comdial October, 02
QuickQ System Manager’s Guide
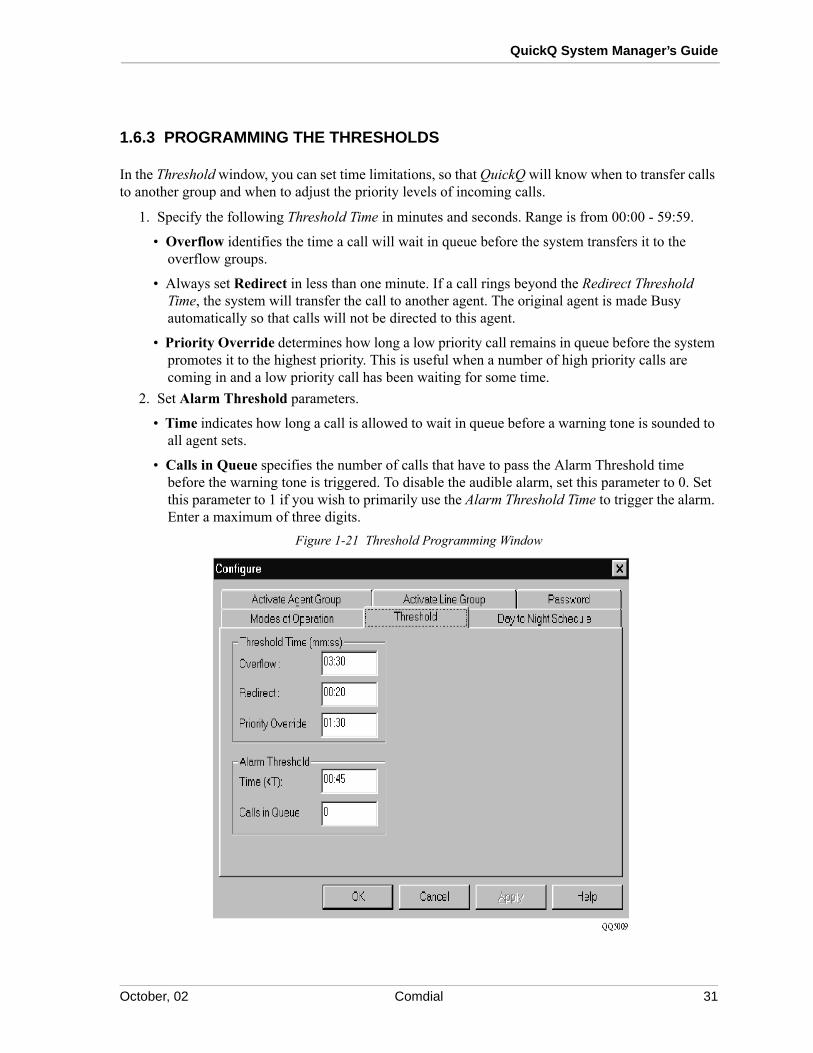
1.6.3 PROGRAMMING THE THRESHOLDS
In the Threshold window, you can set time limitations, so that QuickQ will know when to transfer calls to another group and when to adjust the priority levels of incoming calls.
1. Specify the following Threshold Time in minutes and seconds. Range is from 00:00 - 59:59.
• Overflow identifies the time a call will wait in queue before the system transfers it to the overflow groups.
• Always set Redirect in less than one minute. If a call rings beyond the Redirect Threshold Time, the system will transfer the call to another agent. The original agent is made Busy automatically so that calls will not be directed to this agent.
• Priority Override determines how long a low priority call remains in queue before the system promotes it to the highest priority. This is useful when a number of high priority calls are coming in and a low priority call has been waiting for some time.
2. Set Alarm Threshold parameters.
• Time indicates how long a call is allowed to wait in queue before a warning tone is sounded to all agent sets.
• Calls in Queue specifies the number of calls that have to pass the Alarm Threshold time before the warning tone is triggered. To disable the audible alarm, set this parameter to 0. Set this parameter to 1 if you wish to primarily use the Alarm Threshold Time to trigger the alarm. Enter a maximum of three digits.
Figure 1-21 Threshold Programming Window
October, 02 Comdial 31
Programming QuickQ
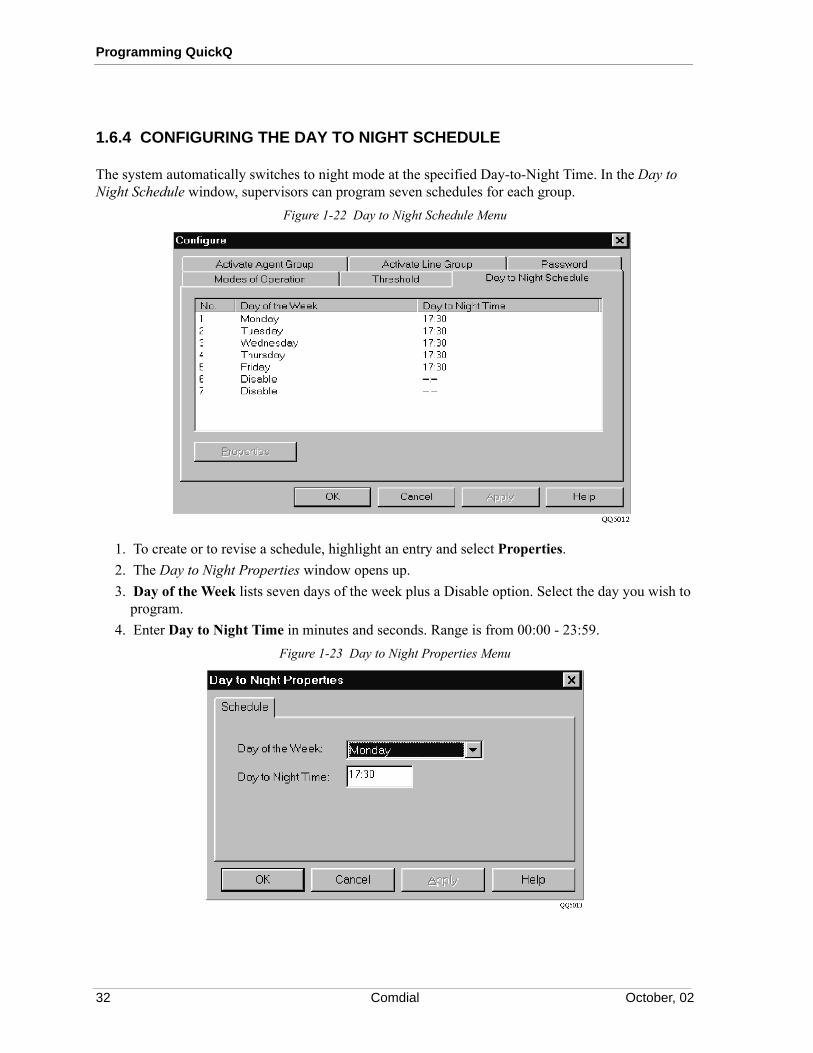
1.6.4 CONFIGURING THE DAY TO NIGHT SCHEDULE
The system automatically switches to night mode at the specified Day-to-Night Time. In the Day to Night Schedule window, supervisors can program seven schedules for each group.
Figure 1-22 Day to Night Schedule Menu
1. To create or to revise a schedule, highlight an entry and select Properties. 2. The Day to Night Properties window opens up.3. Day of the Week lists seven days of the week plus a Disable option. Select the day you wish to
program.4. Enter Day to Night Time in minutes and seconds. Range is from 00:00 - 23:59.
Figure 1-23 Day to Night Properties Menu
32 Comdial October, 02

QuickQ System Manager’s Guide
1.6.5 ACTIVATING THE AGENT GROUP
When you enable a group at the Manager Level, the system automatically activates Agent Group 1, so you can start assigning agents to the group. If you wish to split up your agents in more than one Agent Group, click on the check boxes in the Activate Agent Group window (refer to Figure 3-26) to activate a new Agent Group. You can set up four Agent Groups in one Group.
Agent Groups are only found on statistical reports. They do not affect the way QuickQ distributes calls to the Group. For instance, customer service agents in Group 1 are further divided into 2 Agent Groups. Agent Group 1 consists of all full time agents and Agent Group 2 consists of all part time agents. When a call comes in, QuickQ will simply send the call to any available agent in Group 1. It will not recognize the Agent Groups. If an agent from Agent Group 1 answers the call, QuickQ will update call statistics for the agent and will show on QuickQ reports.
If you wish to assign agents to an Agent Group, select an active Agent Group from the Group menu. You will be able to enter the agent’s name, user ID, the wrap-up time allowed for that agent plus the agent’s priority level.
NOTE: You cannot disable Agent Group 1. The system removes Agent Group 1 automatically when a technician disables a Group. The system cannot disable an Agent Group unless all agents in the group are removed.
Figure 1-24 Activate Agent Group Dialog Screen
October, 02 Comdial 33
Programming QuickQ
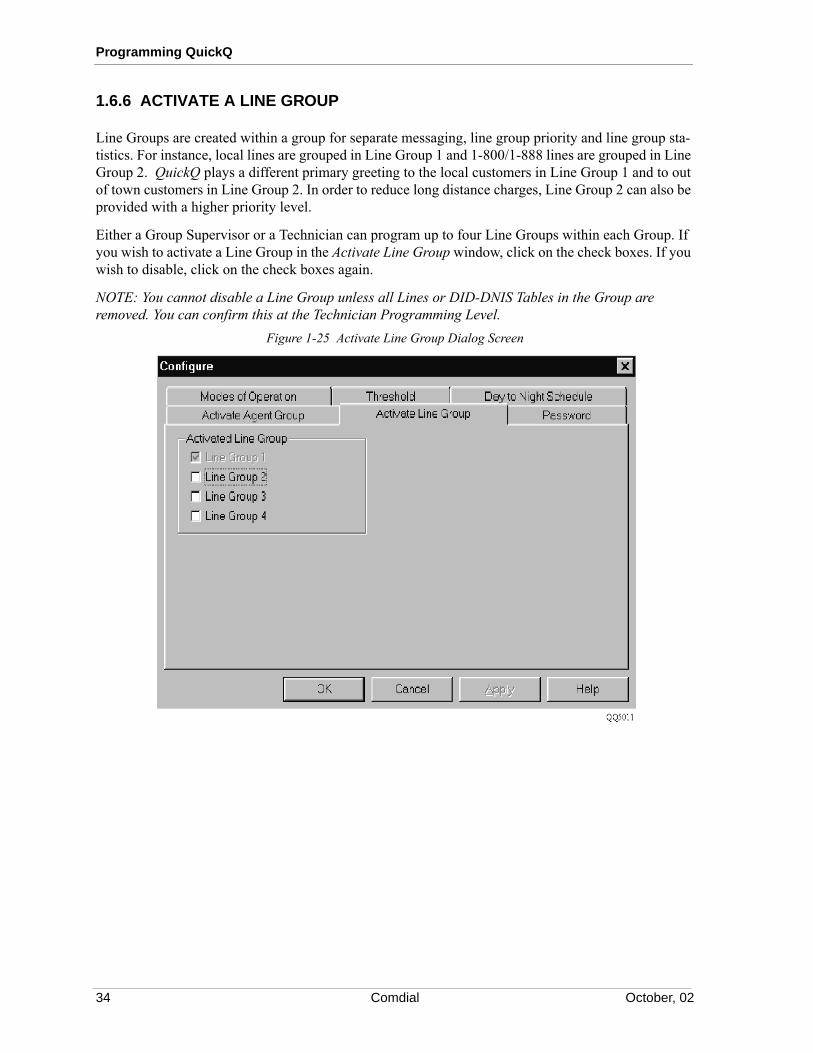
1.6.6 ACTIVATE A LINE GROUP
Line Groups are created within a group for separate messaging, line group priority and line group sta-tistics. For instance, local lines are grouped in Line Group 1 and 1-800/1-888 lines are grouped in Line Group 2. QuickQ plays a different primary greeting to the local customers in Line Group 1 and to out of town customers in Line Group 2. In order to reduce long distance charges, Line Group 2 can also be provided with a higher priority level.
Either a Group Supervisor or a Technician can program up to four Line Groups within each Group. If you wish to activate a Line Group in the Activate Line Group window, click on the check boxes. If you wish to disable, click on the check boxes again.
NOTE: You cannot disable a Line Group unless all Lines or DID-DNIS Tables in the Group are removed. You can confirm this at the Technician Programming Level.
Figure 1-25 Activate Line Group Dialog Screen
34 Comdial October, 02

QuickQ System Manager’s Guide
1.6.7 CHANGING YOUR PASSWORD
The Group Supervisor’s User ID is factory set. It can only be changed at the Manager Level.
NOTE: All passwords are restricted to three digits, ranging from 100 - 999.Figure 1-26 Configure Password Dialog Window
To change the Group Supervisor’s password:
1. Enter your existing password in Old Password.2. Enter three new digits in New Password.3. Key in the three new digits again in Confirm Password.
1.6.8 USING THE CALLING NUMBER ID
Calling Number ID allows agents to get ready for callers before answering. If Calling Number ID option is enabled in Modes of Operation, QuickQ will display the customer’s name or phone number on the agent set. It will also route customers to their designated group and at a preset priority level.
To make this feature functional, you must also create a customer list that includes frequent callers or VIP customers. If QuickQ can match the caller’s telephone number with a telephone number on the customer list, the customer’s name will show on the agents’ telephones. Otherwise, QuickQ will display the caller’s telephone number.
October, 02 Comdial 35

Programming QuickQ
Setting Up a Customer List
1. Click on Night Mode Routing to enable or disable this option that only applies to customers listed on the Calling Number ID window. When Night Mode Routing is enabled, QuickQ will send customers to the groups assigned to them on the Calling Number ID list. Callers will hear a night message from the specified group. When Night Mode Routing is disabled, QuickQ will not route callers to their designated group and callers will hear a night message from the primary group.
Figure 1-27 Calling Number ID Dialog Window
2. To add a new customer to the list, click New.3. To revise current customer information, highlight the entry and select Properties.4. To delete a customer, highlight the customer and select Remove.
You can generate the following two reports from the Calling Number ID customer list:
• Preferred Customers Call Report provides incoming call statistics of customers, who are listed on the Calling Number ID dialog box.
• Abandoned Call Report provides supervisors with a list of Calling Number ID customers who hang up while waiting in queue.
36 Comdial October, 02

QuickQ System Manager’s Guide
Adding a New Customer
Figure 1-28 New Customer Dialog Window
1. Type in a maximum of seven characters for Name.2. Type in a maximum of ten characters for Phone Number.3. Select one Priority level. 1 is the highest priority and 4 is the lowest. 4. All active groups are listed in Group.5. Line Group lists all line groups that are available for the group. Decide which telephone line the
customer will call into and select one option.
Tip—You can use wildcards (X) can be used to program telephone numbers in the Calling Number ID window.
You can use (X) for the first three digits and for the last four digits. For example, (XXX) 555-XXXX, where 555 is all 555 calling area.
You can leave the 3-digit area code blank for local callers. For example: ( )555-1234.
October, 02 Comdial 37

Programming QuickQ
1.6.9 CONFIGURING LINE GROUP ANNOUNCEMENTS
From the Line Group Name dialog, enter the name—it can be a maximum of seven characters.Figure 1-29 Line Group Name Dialog Window
From the Line Group Configuration dialog take the following actions:
1. Specify which message (16 available messages) the system will use for each announcement. Enter from a range of 0 - 16. If all agents are busy, the First Announcement offers an introductory message and puts customers on hold. The Second Announcement reassures customers that an agent will be with them shortly. At night mode, QuickQ plays a Night Announcement and dis-connects the caller at the end of the message. Special Announcement is used in unusual circum-stances such as early office closure. After listening to a Special Announcement, callers are disconnected automatically.
Figure 1-30 Line Group Dialog Window
2. Set Announcement Timing in minutes and seconds. Range is from 00:00 - 59:59.3. First Message Intercept Delay is the period of time when QuickQ waits before answering the
call and playing the first message to the caller if all agents are busy.4. On Hold Interval is the time between playing different announcements.5. Select one Priority level for the line group. To cut down long distance costs, assign 1-800 or 1-
888 lines to a higher priority.
38 Comdial October, 02

QuickQ System Manager’s Guide
1.6.10 CONFIGURING AGENT GROUPS
Figure 1-31 Agent Group Dialog Window
From the Agent Group dialog, select Name and enter the agent group name—it can be a maximum of seven characters.
Adding, Changing, and Deleting Agents
To change or delete an agent, from the Agent Group dialog, select Agent to open the Agent dialog.Figure 1-32 Agent Dialog Window
To change existing agent information, highlight the agent in the list box and select Properties.
To delete an agent from the Agent Group, highlight the agent and select Remove. Then, select Yes to confirm.
NOTE: You cannot remove Group Supervisor for Agent Group 1. The system automatically removes the supervisor information when you disable group at the Manager level.
October, 02 Comdial 39

Programming QuickQ
To enter a new agent, click on New. The New Agent window opens.Figure 1-33 New Agent Dialog Window
NOTE: You can assign an agent to multiple groups, which allows agents to handle calls from more than one group; however, you cannot repeat an agent ID in the same group.
1. Enter Agent Name in up to seven characters2. Enter User ID in three digits, ranging from 100 - 999.3. Enter Password in three digits, ranging from 100 - 999.4. Wrap Up Time occurs right after an agent terminates a call. During this time, QuickQ will not
send calls to agents, so that they can finish any paperwork associated with the call just com-pleted. Specify the agent’s Wrap Up Time in minutes and seconds. The valid range is from 00:00 - 15:00.
5. Assign the agent’s Priority Level. QuickQ will initially send incoming calls to agents with the highest priority level.
Tip—You can duplicate agent’s User ID in different groups (for multiple group agents), but not in the same group. —When the agent’s User ID matches with one in another group, agent information such as Agent Name and Password can be shared. In this way, when the Agent Name and Password changes in one Agent Group, it will automatically update in another Agent Group for multiple agents.
Notes
40 Comdial October, 02

QuickQ System Manager’s Guide
1. OPERATING THE QUICKQ SYSTEM
1.1 Detailing the QuickQ Telephones
The screens illustrated on the following pages are typical for telephones having a 32-character display (16 characters by two lines). Because the Scout cordless telephone, which can optionally be used by QuickQ supervisors, has a 20-character display (10 characters by two lines), many of the messages must be abbreviated. The Scout displays are illustrated on the following pages adjacent to the 32-char-acter displays.
Beginning with software release 5.0, the QuickQ application also supports the Comdial Large Screen Display Speakerphone. This telephone provides a 24-character wide, six line high liquid crystal display (LCD). The large screen display telephone also provides 13 interactive buttons for use that are under software control (five along each side of the display and three along the bottom).
QuickQ uses the top three lines of the display and one button either side of the display for special pur-poses as detailed in the illustration shown below. Lines five and six of the display and the bottom three buttons provide the same information as do the telephones that have a 16-character by two line display, which is shown on the following pages.
Figure 1-1 Telephone Display
October, 02 Comdial 41

Operating the QuickQ System
1.2 Logging In and Out of QuickQ
The following Log-In and Log-Out procedures apply to both Agent and Supervisor. They differ in the following areas:
• ID# and password are different.
• Agents can log into several groups at once.
• Supervisors can choose whether to receive calls or not.
Follow this procedure to log into the system.
1. Press the QuickQ button on the telephone and the following screen will appear. This display notifies you that you are about to log into QuickQ.
2. Type your three digit Agent ID number. If you enter an incorrect Agent ID number, press the RETRY interactive button and enter the correct ID number, or use the QUIT interactive button to exit the Log-In procedure.
3. Type your Agent password. Remember, use RETRY or QUIT if necessary.
4. For Agents: The system asks the agents to log into the appropriate group. If the supervisor has assigned you to multiple groups, use the displayed screen to locate the group into which you wish to log. Press the IN interactive button to log into the displayed group. The system displays your next group. You can press the IN interactive button to log into that group or press the SKIP interactive but-ton to display the next group after that and so on. Alternately, press the ALL interactive button and log into all of the groups at once.
For Supervisors: The system pre-sents supervisor with a screen that asks if they wish to accept calls or not. Respond by pressing either the YES or NO interactive button.
:_
Ans Call?
Ys No
Paswrd:
Rt Qt
Group01?
InSkAl
Welcome->QQ
Agt Id:
Rt Qt
Answer Call?
Yes No
Agent Id: _
RETRY QUIT
Password:
RETRY QUIT
Group 1?
IN SKIP ALL
Welcome -> QuickQ
42 Comdial October, 02

QuickQ System Manager’s Guide
5. The following screens indicates you are now ready to accept ACD calls:
For Agents:
For Supervisors:
6. Logging Out:
(a) For Agents logged into one group: You can log out from QuickQ while in the Ready, Busy or Wrap-up modes. To do this, press the LOG interactive button. You are now in the Log Procedure, press the OUT interactive button to log out.
(b) For Agents logged into multiple groups: After you press the OUT interactive button from the Log Procedure, the system asks which group you wish to log out from. You can press the OUT interactive button to log out of the group shown on the display. You can press the SKIP interac-tive button to display the next group. Press the ALL interactive button to log out of all the groups that have more than one agent.
(c) The last agent cannot log out of QuickQ if the group is in day mode. If attempted, the follow-ing screens will appear:
:
QuickQ Group Name
BUSY HELP LOG
QQ Group01
ByHpLg
Group02 Dy
MnMdLg
Group Name :Day
MENU MODE LOG
Log Procedure
IN CANCEL OUT
Log Proced
ure InCnOt
Group Name
OUT SKIP ALL
Group01
OtSkAl
Can’t Sign Out
CANCEL
Can’t Sign
Out Cn
Busy
CANCEL HELP LOG
Busy
CnHpLg
after 2 seconds
October, 02 Comdial 43
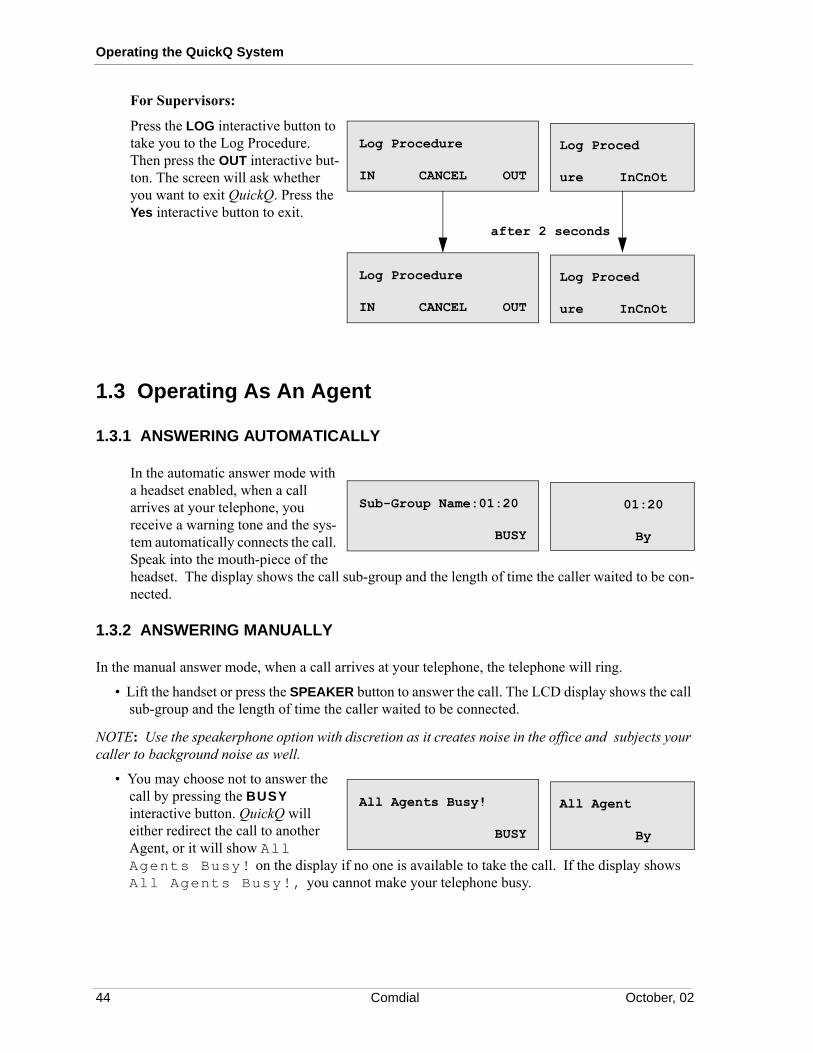
Operating the QuickQ System
For Supervisors:
Press the LOG interactive button to take you to the Log Procedure. Then press the OUT interactive but-ton. The screen will ask whether you want to exit QuickQ. Press the Yes interactive button to exit.
1.3 Operating As An Agent
1.3.1 ANSWERING AUTOMATICALLY
In the automatic answer mode with a headset enabled, when a call arrives at your telephone, you receive a warning tone and the sys-tem automatically connects the call. Speak into the mouth-piece of the headset. The display shows the call sub-group and the length of time the caller waited to be con-nected.
1.3.2 ANSWERING MANUALLY
In the manual answer mode, when a call arrives at your telephone, the telephone will ring.
• Lift the handset or press the SPEAKER button to answer the call. The LCD display shows the call sub-group and the length of time the caller waited to be connected.
NOTE: Use the speakerphone option with discretion as it creates noise in the office and subjects your caller to background noise as well.
• You may choose not to answer the call by pressing the BUSY interactive button. QuickQ will either redirect the call to another Agent, or it will show All Agents Busy! on the display if no one is available to take the call. If the display shows All Agents Busy!, you cannot make your telephone busy.
Scout Display
Log Procedure
IN CANCEL OUT
Log Proced
ure InCnOt
Log Procedure
IN CANCEL OUT
Log Proced
ure InCnOt
after 2 seconds
Sub-Group Name:01:20
BUSY
01:20
By
All Agents Busy!
BUSY
All Agent
By
44 Comdial October, 02

QuickQ System Manager’s Guide
• When a call has reached the preset redirect threshold time, the system will forward the call to another agent and will make your set BUSY at the same time.
1.3.3 WRAPPING UP A CALL
At the end of each call the system sets aside an installer-programmed time (individually programmable for each Agent in minutes and seconds) before presenting the next call. This time allows you to finish any processing or paperwork associated with the call you just completed.
• When you disconnect the call, the wrap-up timer starts and the display shows the wrap-up time, the number of calls in queue, and the number of those calls that have waited beyond the alarm threshold.
• Either remain in wrap-up mode until the wrap-up timer expires or press the READY interactive button to return to Ready mode.
1.3.4 MAKING YOUR TELEPHONE BUSY
You can arrange your telephone to be unavailable to answer calls (for such times as lunch and breaks).
• To make your telephone busy, press the BUSY interactive button.
• To return to the ready mode, press the CANCEL interactive button.
1.3.5 REQUESTING HELP
When necessary, you can use this procedure to request help from your Supervisor.
1. While engaged on a call, press the HELP interactive button. If the Supervisor is busy or unavailable (after 5 seconds of prompting) your telephone display shows Super-visor Busy! . You can either retry or cancel the request.
:
Busy
CANCEL HELP LOG
Busy
CnHpLg
Waiting : 00
READY ALL BUSY
Wrap-up->20 sec
READY ACC BUSY
WT: >T
RdAlBy
WrpUp: 000s
RdAcBy
after 2 seconds
Busy
CANCEL HELP LOG
Busy
CnHpLg
Line Name Sub Grp Name
ACC WRAP HELP
LinNameSup
p901AcWpHp
October, 02 Comdial 45

Operating the QuickQ System
2. When the Supervisor calls you, you can either bring him or her into the call (conference) or put the caller on hold and speak to the Supervisor in private.
3. If you choose to speak to the Supervisor with the call on HOLD , you have the option of bringing in the customer into the conversation later by pressing the CONF soft key. Alternately, you can press TRANS to transfer the call to the Supervisor, or press RETURN to get back to the caller after receiving assistance from the Supervisor.
4. While in conference with the Supervisor, you can press the RELEASE button to drop the Supervisor from the call or transfer the call to the Supervisor.
1.3.6 TRANSFERRING CALLS IN OR OUT OF QUICKQ
Use this procedure to transfer calls to insure proper updating of call statistics.
1. Press Wrap-Up.
2. While on the call, press the telephone’s TRANS button.
3. Dial the intercom number of the station to receive the transfer. The system will transfer the call.
1.3.7 MAKING AN OUTGOING CALL
To make an outside call, press the LINE GROUP button to connect your telephone to an outgoing line, and make your call in the normal way. While on an outgoing call, you can either request help from your Supervisor, enter an account code for the call, or wrap-up the call in the same way as on an incoming call.
Super Redy
Cf Hd
Supervisor Ready!
CONF HOLD
Line Name: Held
CONF RETURN TRANS
LinName He
Ld! CfRnTR
Ln Name: Supvr Name
CONF RETURN TRANS
LinName
CfRnTR
Outgoing
ACC WRAP-UP HELP
Outgoing
ACWpHp
46 Comdial October, 02

QuickQ System Manager’s Guide
1.3.8 ENTERING ACCOUNT CODES
You can use any screen that has the ACC option to enter an account code to categorize the call according to the call type.
1. Press the ACC interactive button at any time during the call or during wrap-up mode. Enter the three digit account code (the System Manager manages the account codes). If you enter an incorrect account code, press the RETRY interactive button and enter the correct account code or exit to abandon and return to the original screen.
2. Press OK to verify the code or RETRY if you enter an incorrect account code. If the code is invalid, the system prompts you to re-enter the code.
1.3.9 USING CALLING NUMBER ID
1. The Calling Number ID feature displays the customer’s name or telephone number on the agent set. When a call rings at an agent set, the following screen appears for about three seconds. The Group Name and Sub-Group Name is displayed.
2. If the Calling Number ID feature is enabled, the previous screen changes after three seconds. Caller information that can be less than or equal to eight digits will be dis-played. The length of time the caller has waited will also appear on the same line.
3. If the Caller ID information con-tains more than eight digits, the screen below will appear after three seconds. Note that the length of time the caller waited no longer exists on this screen.
Acc Cd:
Rt Ex
Acc Code: ___
RETRY EXIT
Account Description
RETRY OK
Acc Desc:
Rt Ok
Group Name Sub-Grp Name
RETRY OK
##############
######## 01:20
October, 02 Comdial 47

Operating the QuickQ System
4. When the call is picked up by an agent, Caller ID information that is less than or equal to eight digits will have the Line Group Name appear on the same line.
5. If the Caller ID information is more than eight digits, the screen changes to the following when an agent picks up the call. The Line Group Name no longer exists.
6. If the Caller ID feature is not enabled, the screen changes to dis-play the Line Group Name and the length of time the caller waited when a call rings at an agent set.
7. When an agent picks up the call, the screen changes to display the Line Group Name and the Line #.
1.4 Operating As a Supervisor
As a Supervisor, you can log in at either the QuickQ console or the Digital Communications System telephone.
1.4.1 CHANGING THE MODE OF OPERATION
There are three distinct answering modes—Day, Night and Special.
• Day Answering Mode—The system answers with the day message, places calls on hold and distributes incoming calls to the next available Agent. The call distribution is based on the longest idle time, or the priority of the Agent or incoming line.
• Night Answering Mode—The system answers with the night message then disconnects the caller. This mode is enabled automatically at a preset time. The system automatically logs out all agents when calls in queue have been cleared. Supervisor can change the state manually.
• Special Mode—The Group Supervisor initiates the special mode for unique situations (for example, network problems). During this mode of operation, the system answers callers with the special message and disconnects them. When the preset night mode time is reached, the system will automatically switch from special mode to night mode.
Use the following procedure to select the required mode of operation:
########Line Group Name
##############
Line Group Name 01:20
Line Group Name Line#
48 Comdial October, 02

QuickQ System Manager’s Guide
1. From the Supervisor’s telephone, press the MODE interactive button.
2. Select the mode of operation from the following displayed options: DAY, NIGHT, SPECIAL . After you make your selection, the dis-play returns to the Supervisor main menu and shows the new mode at the top right corner.
1.4.2 REVIEWING THE DVA16 ANNOUNCEMENT MESSAGES
You can use your telephone to review and change any announcement message. For messages that are to be changed frequently, record your message with a buffer. For instance, record message #1 which takes up 10 seconds, follow by 10 seconds of silence. Go ahead and record message #2. After finished recording message #2, go back to record message #1 again. In this way, customers will only hear the message, and not the blank silence following it. The blank time will be saved as a buffer for future usage. If there is a change in message #1, it can be 10 seconds longer than the original message. Refer to the discussion titled Recording Announcement Message and Playback in the QuickQ operations section of this guide for message recording and playback information.
Use the following procedure to record a message.
1. Press the MENU interactive but-ton.
2. Press the MSG interactive button.
The system displays the total time remaining for the new messages.
3. Dial the number of the message that you wish to record or change. For numbers lower than 10, dial a leading 0 (for example, 01–09). Press RETRY if you enter an invalid number, Press CLEAR to clear all message or QUIT to return to the main menu.
Group01: Dy
MnMdLg
Group 1 :Day
MENU MODE LOG
Group 1 :Day
MENU MODE LOG
Group01: Dy
MnMdLg
Waiting:02> T:00
MSG REPORT AGENT
Msg#:
RtCrQt
Message #:
RETRY CLEAR QUIT
Wt: >T
MsRpAg
October, 02 Comdial 49

Operating the QuickQ System
4. The display shows the message length in seconds (it shows 0 sec-onds for new messages). Press the REC interactive button, a tone will alert you to start recording, speak the message into the telephone handset.
5. When you have finished, press the STOP interactive button, a tone indicates the end of the recording.
NOTE: If possible, record all of the messages as a group. If you do re-record a message, the new message must be the exact length as it was before or you will record over the next message. For example, if you replace a 15-second message with a 20-second message, you will record over the next message.
6. To review the message, press the PLAY interactive button.
7. The system plays the message through the handset.
8. Press YES to accept the message or NO to re-record the message.
1.4.3 MONITORING THE AGENTS
You can monitor an Agent’s activity status or telephone conversation. The activity status names the Agent and details the following status items:
• Engaged on an incoming call,
• Engaged on an outgoing call,
• Engaged in Make Busy Mode,
• Idle, ready to receive a call.
Message 01: 00sec
REC PLAY QUIT
Msg01: 000s
RcPyQt
Recording Msg 01
STOP
Record Msg
01 St
Accept Message?
YES NO PLAY
Accept MSG
YsNoPy
Playing Msg 01
STOP
Play Msg01
St
Accept Message?
YES NO PLAY
Accept Msg
YsNoPy
50 Comdial October, 02

QuickQ System Manager’s Guide
Use this procedure to monitor a particular Agent:
1. Press the MENU interactive but-ton.
2. Press the AGENT interactive but-ton.
3. Dial the ID# of the Agent you wish to monitor or press SCAN and let the system select an Agent number for you.
4. Press the SELECT interactive button to monitor the Agent’s call.
5. Press the SCAN interactive button to monitor another system selected Agent or press QUIT to return to step 3.
6. Press QUIT again to return to the Supervisor’s menu.
1.4.4 VIEWING THE CURRENT CALL STATISTICS
QuickQ causes your LCD speakerphone to display the current number of answered and abandoned (lost) calls within a group.
Use this procedure to view the call statistics.
1. Press the MENU interactive button.
2. Press the REPORT interactive button.
Accept Message?
YES NO PLAY
Accept Msg
YsNoPy
Waiting:02>T:00
MSG REPORT AGENT
Wt:00 >T00
MsRpAg
Agent Id: ___
SCAN RETRY QUIT
Agt Id: ___
SnRtQt
Agent Name :Incall
SCAN SELECT QUIT
Agnt Name:
SnSeQt
Agnt101:Idle
SCAN SELECT QUIT
Agnt101:Id
Le SnSeQt
Waiting: 02 >T:00
MSG REPORT AGENT
Wt >T
MsRpAg
October, 02 Comdial 51

Operating the QuickQ System
3. Your LCD speakerphone dis-plays the number of answered and abandoned calls.
4. Press QUIT to return to Supervisor menu.
1.5 QuickQ Displays For Scout Telephones
You may encounter some Scout telephone displays that are not included in the illustrations in the pre-vious section. To interpret the interrupt button abbreviations used on these displays, refer to the abbre-viations in the following table:.
Table 3-1 Interrupt Button Abbreviations Used on the Scout Display
Scout Display Standard Display Scout Display Standard DisplayAb ABORT Ok OKAc ACC Ot OutAg AGENT Py PLAYAl ALL Qt QUITAs ANSWER Rd READYBy BUSY Rc RECORDCn CANCEL Rj REJECTCr CLEAR Rs RELEASECf CONF Rp REPORTDy DAY Rt RETRYEx EXIT Rn RETURNHp HELP Sn SCANHd HOLD Se SELECTIn IN Sk SKIPLg LOG Sp SPEC’LLg LOGOUT St STOPMn MENU Tr TRANSMd MODE Vc VOICEMs MSG Wp WRAPUPNt NIGHT Ys YESNO NO
A:123 L:4
Qt
Ans: 123 Lost: 4
QUIT
52 Comdial October, 02
QuickQ System Manager’s Guide
1. USING MANAGEMENT INFORMATION
1.1 Obtaining a Detailed Printout
You can obtain a detailed printout of the system configuration for the manager level or the supervisor level.
When you select the Management Info. menu bar option in the manager window, the system presents a menu that has the following options:
• Setup
• Real Time
• Historical Reports
• Current Reports
• Report Schedule
• Wallboard
• Configuration Report
NOTE: All report statistics are stored in Microsoft Access format. Also note, the choices available to group supervisors are the same as those available to system managers, except for the following addi-tional item that is added at the group supervisor levelAbandoned Calling Number ID Report.
October, 02 Comdial 53
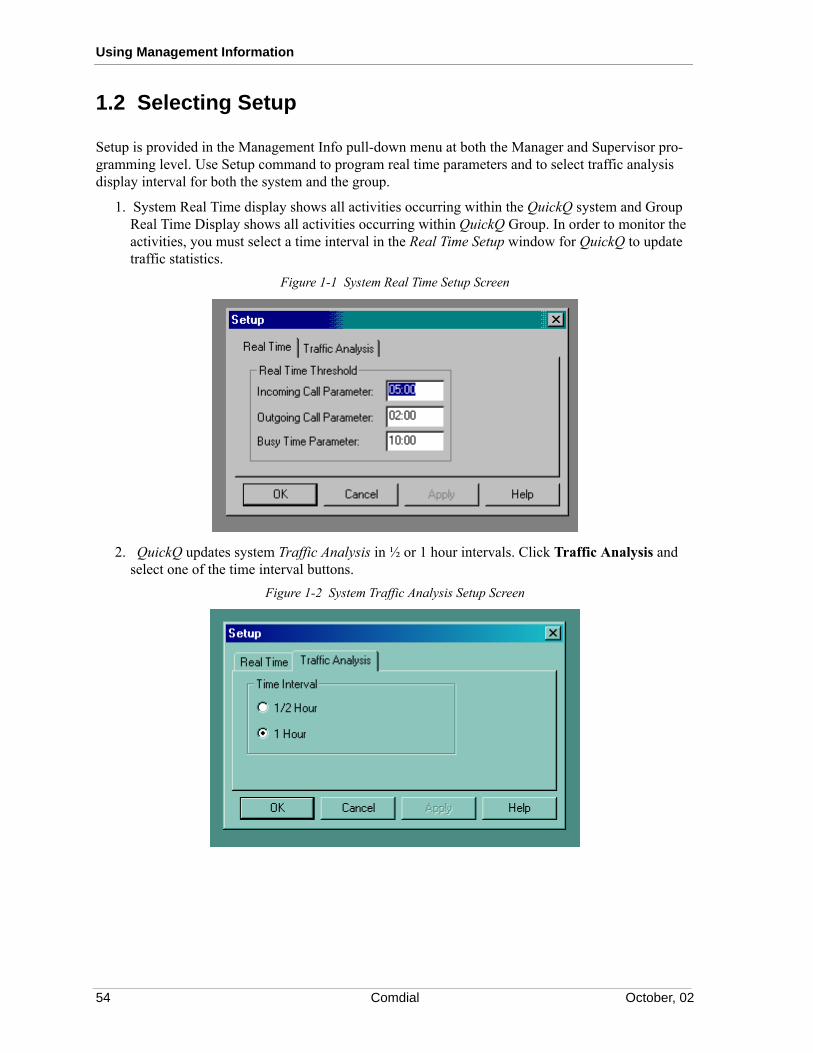
Using Management Information
1.2 Selecting Setup
Setup is provided in the Management Info pull-down menu at both the Manager and Supervisor pro-gramming level. Use Setup command to program real time parameters and to select traffic analysis display interval for both the system and the group.
1. System Real Time display shows all activities occurring within the QuickQ system and Group Real Time Display shows all activities occurring within QuickQ Group. In order to monitor the activities, you must select a time interval in the Real Time Setup window for QuickQ to update traffic statistics.
Figure 1-1 System Real Time Setup Screen
2. QuickQ updates system Traffic Analysis in ½ or 1 hour intervals. Click Traffic Analysis and select one of the time interval buttons.
Figure 1-2 System Traffic Analysis Setup Screen
54 Comdial October, 02

QuickQ System Manager’s Guide
1.3 Selecting Real Time Reports
1.3.1 SYSTEM REAL TIME REPORTS
The System Real Time window shows all line and agent activities within the QuickQ system.
1.3.2 SYSTEM REAL TIME − LINES
This displays the number of lines assigned to a given group, the number of calls waiting in queue, the number of calls that have waited beyond a preset threshold (>Alarm) and the number of lines engaged in outgoing and incoming calls. A running timer also displays the duration of each group’s longest held call.
1.3.3 SYSTEM REAL TIME − AGENTS
This displays the group number, the number of logged-in agents and the number of agents engaged in each call activity. This screen serves as an ideal tool for the manager to monitor all groups simulta-neously. The Agent, Dur., Group and Status button are for sorting call statistics.
1. Select Agent will sort the agent list by the agents’ first name, their Group ID, and agent’s name.2. Select Dur. will sort the agent list first by duration, status, Group ID and agent’s name.3. Select Group will arrange agents into different groups. It will then sort agents by their first
name, status and duration.4. Select Status will arrange the agent list in different status. It will then sort by duration, by group
and by agent’s name alphabetically.Figure 1-3 System Real Time Window
October, 02 Comdial 55
Using Management Information
1.3.4 SUPERVISOR’S REAL TIME REPORT
Supervisors can look at the Supervisor Real Time window to monitor the group’s current call activ-ities. Group traffic and activities are shown in real time statistics that is updated by QuickQ in approx-imately three-second intervals.
The supervisor Real Time window consists of three report screens:
1. Group Real Time − Chart provides a graphical presentation of what is happening within the group. The use of colors allows supervisors to check group activity at a glance. Any calls exceeding the user-defined alarm thresholds are shown in red to instantly alert the supervisor to potential trouble.
2. Group Real Time − Agents is a color-coded graphical presentation of each agent’s stage. As an agent moves from one activity to another, their name will transfer to the appropriate column. Agents are arranged in each column by the duration of time they have been in that state.
3. Group Real Time − Status displays the following statistics in numerical format:4. Traffic Status, that shows the number of lines assigned to a given group and the state they are
currently in.5. Agent Status that identifies the number of logged-in agents and the number of agents engaged
in each call activity type.6. Service Status is an indication of the group’s Grade of Service, meaning the ratio of calls suc-
cessfully answered versus the total number of calls received.
1.4 Selecting the Historical Reports
Use the follow procedures to obtain Historical Reports:
1. If you wish to view reports from a different date, specify the month and the year by clicking the down arrow of each box.
2. Click on a day and then select one option from Hourly, Daily, Weekly or Monthly. These options are non-selectable if no reports are available for the selected day.
3. The main report dialog box opens up if Daily, Weekly or Monthly is selected.4. When Hourly is selected, the Hourly Report dialog box appears, showing the hourly intervals
with reports available.
56 Comdial October, 02
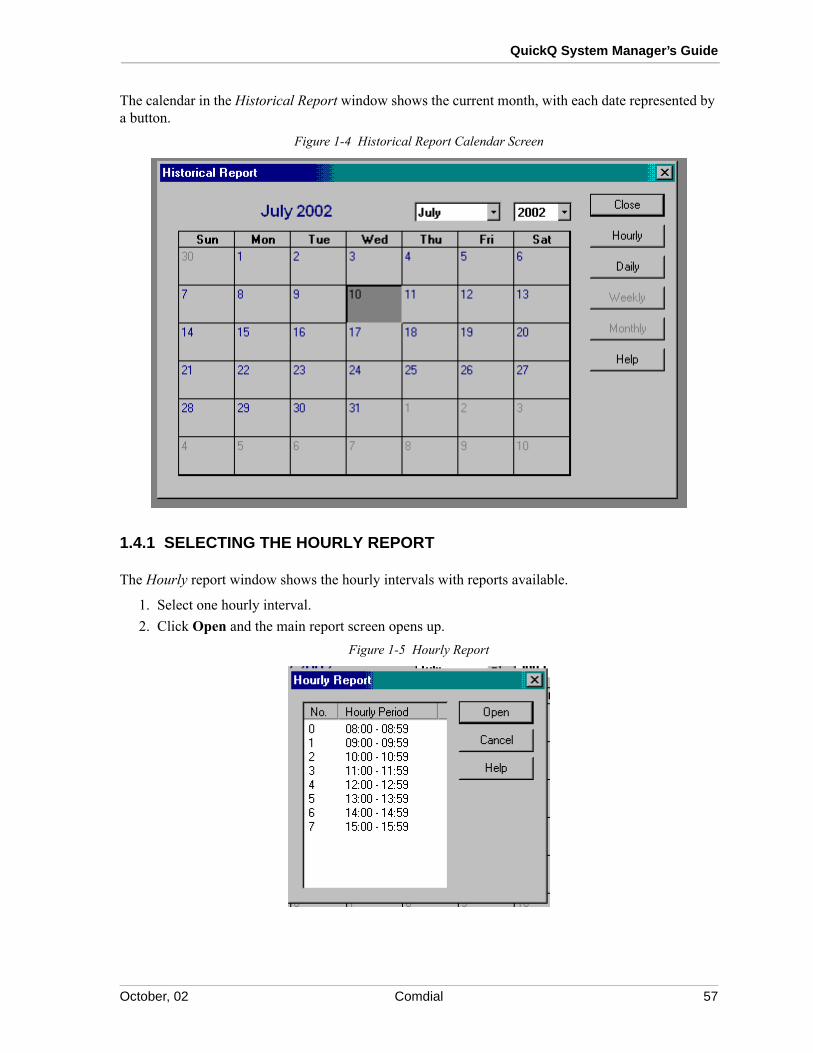
QuickQ System Manager’s Guide
The calendar in the Historical Report window shows the current month, with each date represented by a button.
Figure 1-4 Historical Report Calendar Screen
1.4.1 SELECTING THE HOURLY REPORT
The Hourly report window shows the hourly intervals with reports available.
1. Select one hourly interval.2. Click Open and the main report screen opens up.
Figure 1-5 Hourly Report
October, 02 Comdial 57

Using Management Information
Tip—To view or to print a specific hourly report:
• On the Title Bar of the Main Report window, click Report and a list of seven report types will display.
• Select one report option.
• Click View and choose either Graph or Numeric. QuickQ will show the selected report accordingly.
• To print the selected report, click File and then select Print.
1.5 Selecting Current Reports
To select the current hourly reports, click on Current Reports from the Management Info menu and select Hourly. When the Current Hourly Report window opens, click Report on the menu bar. A menu with the following selections opens:
To select the current daily reports, click on Current Reports from the Management Info menu and select Daily. When the Current Daily Report window opens, click Report on the menu bar. A menu with the following selections opens:
NOTE: The system also makes a Preferred Customer Report available at the group supervisor level.
• Answer Bin • Incoming Call • Average Time • Account Code• Abandon Bin • Total Time • System Capacity • Note
• Answer Bin • Incoming Call • Average Time • Account Code• Abandon Bin • Total Time • System Capacity • Traffic Analysis• • • • Note
58 Comdial October, 02
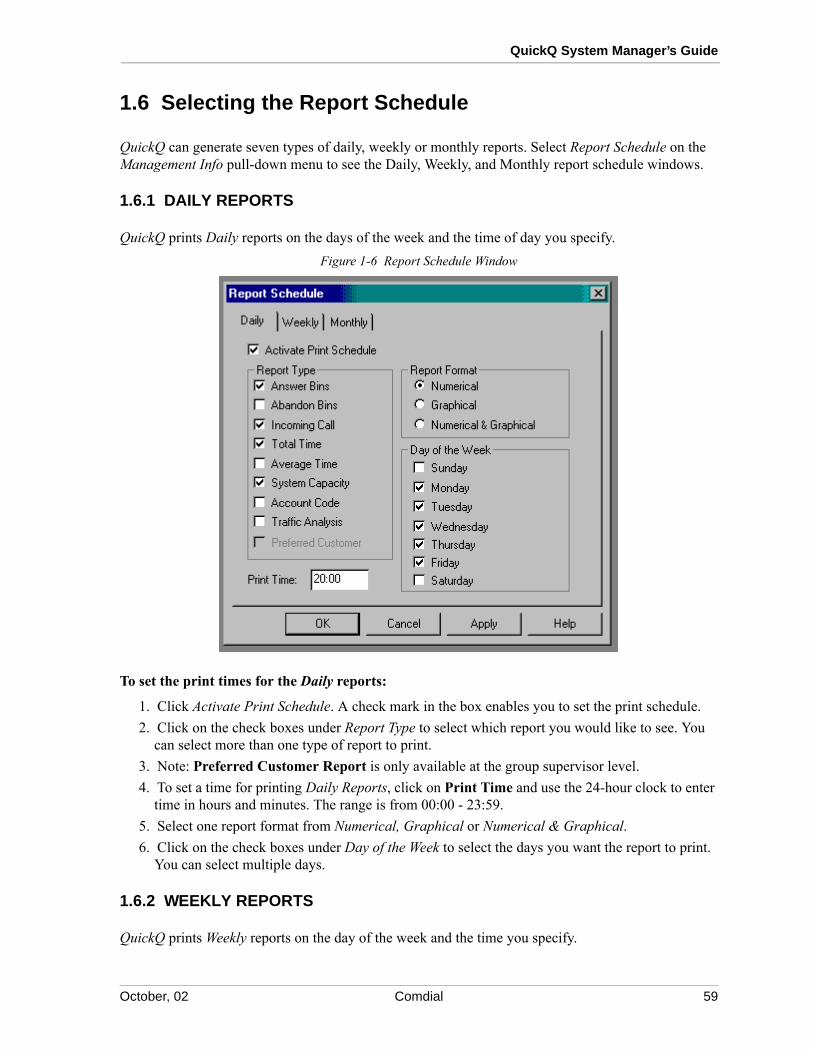
QuickQ System Manager’s Guide
1.6 Selecting the Report Schedule
QuickQ can generate seven types of daily, weekly or monthly reports. Select Report Schedule on the Management Info pull-down menu to see the Daily, Weekly, and Monthly report schedule windows.
1.6.1 DAILY REPORTS
QuickQ prints Daily reports on the days of the week and the time of day you specify.Figure 1-6 Report Schedule Window
To set the print times for the Daily reports:
1. Click Activate Print Schedule. A check mark in the box enables you to set the print schedule. 2. Click on the check boxes under Report Type to select which report you would like to see. You
can select more than one type of report to print.3. Note: Preferred Customer Report is only available at the group supervisor level.4. To set a time for printing Daily Reports, click on Print Time and use the 24-hour clock to enter
time in hours and minutes. The range is from 00:00 - 23:59.5. Select one report format from Numerical, Graphical or Numerical & Graphical.6. Click on the check boxes under Day of the Week to select the days you want the report to print.
You can select multiple days.
1.6.2 WEEKLY REPORTS
QuickQ prints Weekly reports on the day of the week and the time you specify.
October, 02 Comdial 59

Using Management Information
To set the print times for the Weekly reports:
1. Click Activate Print Schedule. A check mark in the box enables the print schedule set.2. Click on the check boxes under Report Type to select which report you would like to see. You
can select to print more than one type of report.3. Note: Preferred Customer Report is only available at the group supervisor level.4. Select one report format from Numerical, Graphical or Numerical & Graphical.5. To set a time for printing Weekly Reports, click on Print Time and use the 24-hour clock to enter
time in hours and minutes. The range is from 00:00 - 23:59.6. Select one day under Day of the Week. QuickQ will then print reports for the entire preceding
week, from Sunday to Saturday on the day you select.
1.6.3 MONTHLY REPORTS
QuickQ prints Monthly reports at the time you specify.
To set the print times for the Monthly reports:
1. Click Activate Print Schedule. A check mark in the box enables the print schedule set.2. Click on the check boxes under Report Type to select which report you would like to see. You
can select to print more than one type of report.3. Note: Preferred Customer Report is only available at the group supervisor level.4. Select one report format from Numerical, Graphical or Numerical & Graphical.5. To set a time for printing Monthly Reports, click on Print Time and use the 24-hour clock to
enter time in hours and minutes. The range is from 00:00 - 23:59.
60 Comdial October, 02
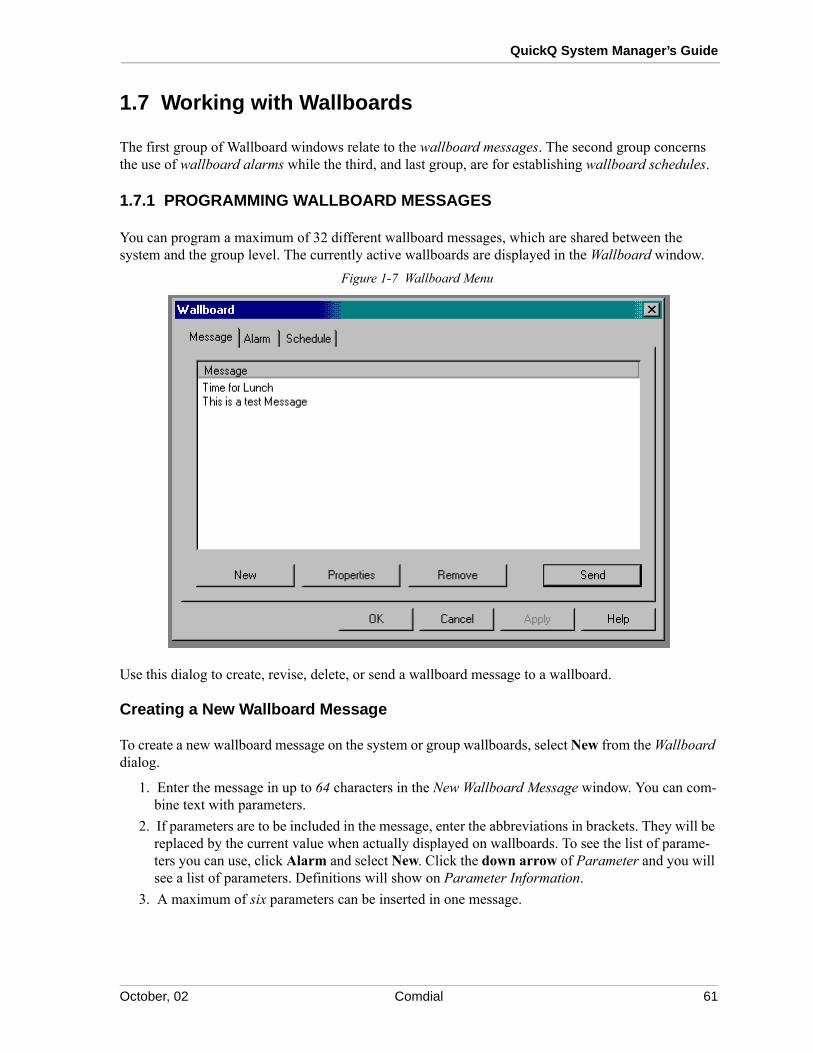
QuickQ System Manager’s Guide
1.7 Working with Wallboards
The first group of Wallboard windows relate to the wallboard messages. The second group concerns the use of wallboard alarms while the third, and last group, are for establishing wallboard schedules.
1.7.1 PROGRAMMING WALLBOARD MESSAGES
You can program a maximum of 32 different wallboard messages, which are shared between the system and the group level. The currently active wallboards are displayed in the Wallboard window.
Figure 1-7 Wallboard Menu
Use this dialog to create, revise, delete, or send a wallboard message to a wallboard.
Creating a New Wallboard Message
To create a new wallboard message on the system or group wallboards, select New from the Wallboard dialog.
1. Enter the message in up to 64 characters in the New Wallboard Message window. You can com-bine text with parameters.
2. If parameters are to be included in the message, enter the abbreviations in brackets. They will be replaced by the current value when actually displayed on wallboards. To see the list of parame-ters you can use, click Alarm and select New. Click the down arrow of Parameter and you will see a list of parameters. Definitions will show on Parameter Information.
3. A maximum of six parameters can be inserted in one message.
October, 02 Comdial 61

Using Management Information
4. To ensure the new message will display properly, click Test. QuickQ will try sending the new message to display on system wallboards.
Figure 1-8 New Wallboard Message
Obtaining a List of Parameter Abbreviations and Descriptions
1. Select Configure under the System menu.2. Click Wallboard.3. Highlight one wallboard entry.4. Click Properties.5. Click Parameter.6. Click the down arrow of any one parameter to display a list of abbreviations.7. When you select an abbreviation, the description will show under Parameter Information.
62 Comdial October, 02
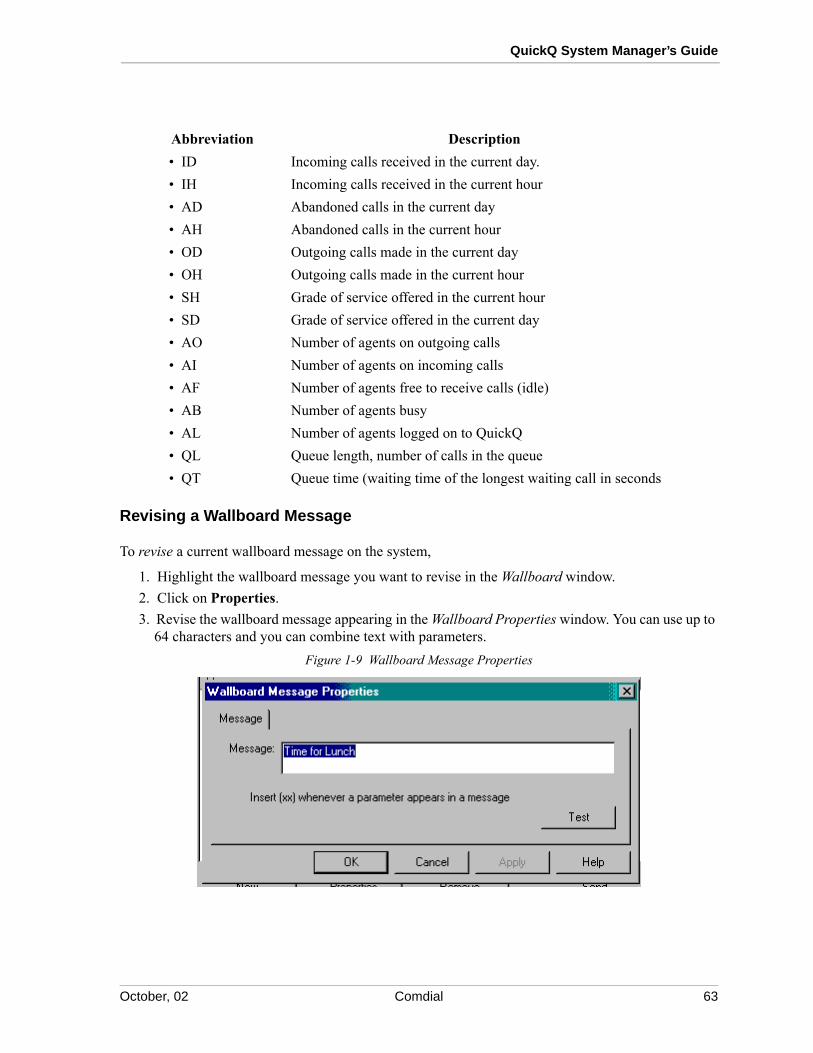
QuickQ System Manager’s Guide
Revising a Wallboard Message
To revise a current wallboard message on the system,
1. Highlight the wallboard message you want to revise in the Wallboard window.2. Click on Properties.3. Revise the wallboard message appearing in the Wallboard Properties window. You can use up to
64 characters and you can combine text with parameters.Figure 1-9 Wallboard Message Properties
Abbreviation Description• ID Incoming calls received in the current day.• IH Incoming calls received in the current hour• AD Abandoned calls in the current day• AH Abandoned calls in the current hour• OD Outgoing calls made in the current day• OH Outgoing calls made in the current hour• SH Grade of service offered in the current hour• SD Grade of service offered in the current day• AO Number of agents on outgoing calls• AI Number of agents on incoming calls• AF Number of agents free to receive calls (idle)• AB Number of agents busy• AL Number of agents logged on to QuickQ• QL Queue length, number of calls in the queue• QT Queue time (waiting time of the longest waiting call in seconds
October, 02 Comdial 63

Using Management Information
4. If parameters are to be included in the message, enter the abbreviations in brackets. They will be replaced by the current value when actually displayed on wallboards. To see the list of parame-ters you can use, click Alarm and select New. Click the down arrow of Parameter and you will see a list of parameters. Definitions will show on Parameter Information.
5. A maximum of six parameters can be inserted in one message.6. To ensure the new message will display properly, click Test. QuickQ will try sending the new
message to display on system wallboards.
Sending a Wallboard Message
1. Return to the Wallboard window.2. Highlight the wallboard message you want to send.3. Click on Send. The Send Wallboard Message window opens.4. Select System Wallboard or All Wallboards and click OK to send the wallboard message.
Figure 1-10 Send Wallboard Message
Deleting a Wallboard Message
To delete a current wallboard message, highlight the entry and select Remove.
NOTE: You cannot remove a wallboard message that is used in Wallboard Alarm or Schedule.
1.7.2 SETTING WALLBOARD ALARMS
When a wallboard alarm condition occurs, the parameter value will display in red on color wallboards and will flash on mono wallboards. If an alarm message is being programmed, it will also appear on the wallboard. At the manager programming level, you can only program alarm conditions for system wallboards.
1. Click on Alarm in the Wallboard window to open the Wallboard Alarm window. See Figure 4-11.
64 Comdial October, 02

QuickQ System Manager’s Guide
2. You must, first of all, make sure the wallboard is connected to the system.Figure 1-11 Wallboard Alarm
3. Select New to create a new alarm threshold.4. To revise an existing alarm threshold, highlight the entry and select Properties.5. To delete an alarm threshold, highlight the entry and click Remove. Then, select Yes to confirm.
Creating a New Wallboard Alarm Threshold
1. Select an abbreviation from Parameter and Parameter Information will display its definition.Figure 1-12 Wallboard Alarm
2. Define the function used for comparing the threshold and the parameter. Choose one function from the three options available.
October, 02 Comdial 65

Using Management Information
3. Enter a value of up to four digits for Threshold. The alarm will trigger when the parameter reaches this value.
4. Select one option from Message. The wallboard will display the selected message when an alarm threshold condition is met. If No Message is selected, the wallboard will not display any messages during an alarm condition. However, if a parameter is used to trigger the wallboard alarm, the parameter will flash on a mono wallboard and will turn to red on a color wallboard.
Revising a Wallboard Alarm Threshold
1. Select an abbreviation from Parameter and Parameter Information will display its definition.2. Define the function used for comparing the threshold and the parameter. Choose one from the
three options available.3. Enter a value of up to four digits for Threshold. The alarm will trigger once the parameter
reaches this value.4. Select one option from Message. The wallboard will display the selected message when an
alarm threshold condition is met. If No Message is selected, the wallboard will not display any messages during an alarm condition. However, if a parameter is used to trigger the wallboard alarm, the parameter will flash on a mono wallboard and will turn to red on a color wallboard.
1.7.3 CREATING WALLBOARD SCHEDULES
QuickQ displays each wallboard message according to the day and time that you specified. Managers can program wallboard schedules for the system and Group Supervisors can program wallboard schedules for their own group. The schedules appear in the Wallboard Schedule window. See Figure 5-16.
1. First, make sure a wallboard is connected to the system.2. To add a New Schedule, click New. 3. To revise schedule information, highlight an entry and select Properties.4. To delete, highlight the entry, and select Remove; then, select Yes to confirm.
Note: Wallboard messages must exist prior to programming the schedule. The New button is non-selectable until messages are entered.
You can program QuickQ to display a selected message on the system or group wallboard(s) at a certain time and on a certain date.
Creating a New Wallboard Schedule
You can create a new wallboard schedule In The Wallboard Schedule Window.
1. Day lists the seven days of the week plus additional options such as Mon.-Fri., Mon.-Sat and Daily. Select one option and QuickQ will display the selected message on the day(s) assigned.
2. Use the 24-hour clock to enter Time in minutes and seconds. The range is from 00:00 - 23:59.
66 Comdial October, 02

QuickQ System Manager’s Guide
3. Message shows all messages that you have entered. Select a message to display on the system or group wallboard(s) on the day(s) and time specified above.
Figure 1-13 Wallboard Schedule Properties
Revising the Scheduled Programming for a Selected Wallboard Message
To revise the scheduled programming for a selected wallboard message on the Wallboard Schedule Properties window,
1. Day lists the seven days of the week plus additional options such as Mon.-Fri., Mon.-Sat and Daily. Select one option and QuickQ will display the selected message on the day(s) assigned.
2. Use the 24-hour clock to enter Time in minutes and seconds. The range is from 00:00 - 23:59.3. Message shows all messages that you have entered. Select a message to display on the group
wallboard(s) on the day(s) and time specified above.
1.8 Selecting the Abandoned Calling Number ID Report
The Abandoned Call Report is available only at the group supervisor level. This report shows a record of all abandoned calls including customer name (from the Calling Number ID customer list), telephone number, the group to which the call was transferred and the time customer had waited.
The system stores Abandoned Call Reports for the past seven days and for the current day. The most current report automatically replaces the oldest reports.
To select the Abandoned Calling Number ID Report for a specific day:
1. Select Abandoned Calling Number ID Report from the Management Info pull-down menu.
October, 02 Comdial 67
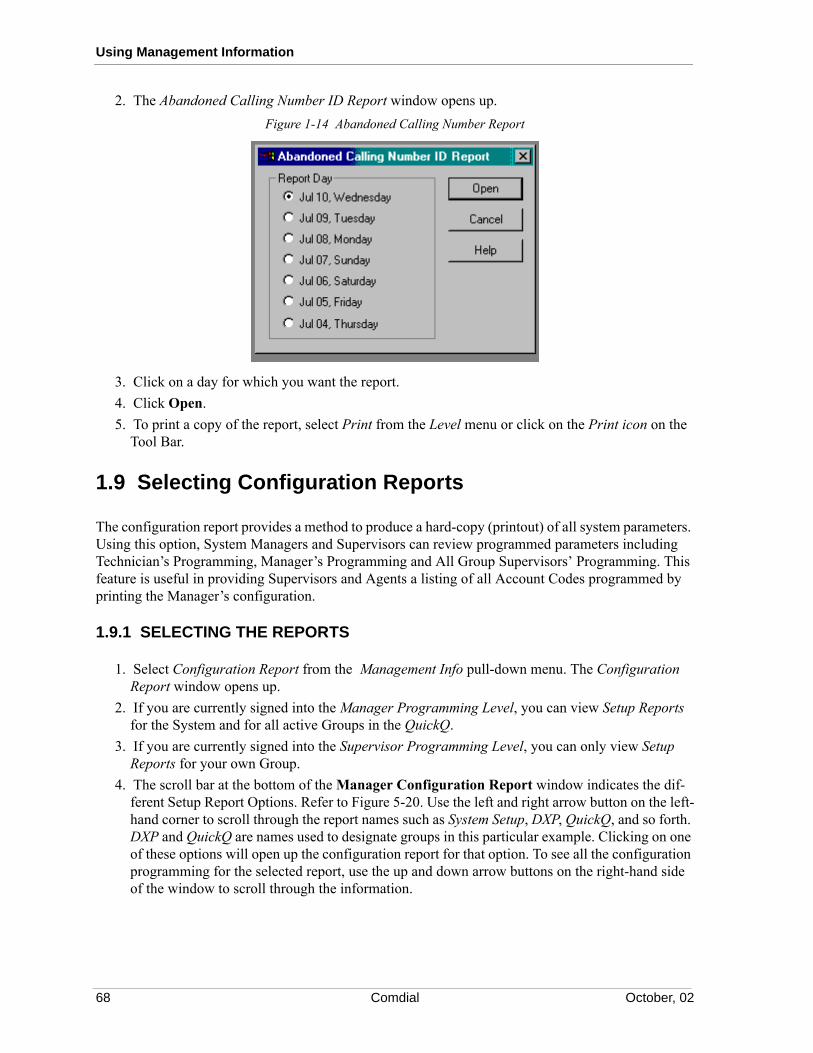
Using Management Information
2. The Abandoned Calling Number ID Report window opens up.Figure 1-14 Abandoned Calling Number Report
3. Click on a day for which you want the report.4. Click Open.5. To print a copy of the report, select Print from the Level menu or click on the Print icon on the
Tool Bar.
1.9 Selecting Configuration Reports
The configuration report provides a method to produce a hard-copy (printout) of all system parameters. Using this option, System Managers and Supervisors can review programmed parameters including Technician’s Programming, Manager’s Programming and All Group Supervisors’ Programming. This feature is useful in providing Supervisors and Agents a listing of all Account Codes programmed by printing the Manager’s configuration.
1.9.1 SELECTING THE REPORTS
1. Select Configuration Report from the Management Info pull-down menu. The Configuration Report window opens up.
2. If you are currently signed into the Manager Programming Level, you can view Setup Reports for the System and for all active Groups in the QuickQ.
3. If you are currently signed into the Supervisor Programming Level, you can only view Setup Reports for your own Group.
4. The scroll bar at the bottom of the Manager Configuration Report window indicates the dif-ferent Setup Report Options. Refer to Figure 5-20. Use the left and right arrow button on the left-hand corner to scroll through the report names such as System Setup, DXP, QuickQ, and so forth. DXP and QuickQ are names used to designate groups in this particular example. Clicking on one of these options will open up the configuration report for that option. To see all the configuration programming for the selected report, use the up and down arrow buttons on the right-hand side of the window to scroll through the information.
68 Comdial October, 02

QuickQ System Manager’s Guide
5. To print a copy of the configuration report, select Print from the Level pull-down menu.Figure 1-15 Configuration Report
1.10 Selecting QuickQ MIS Reports
The QuickQ provides comprehensive Management Information System (MIS) reports for both the system manager and group supervisor. You can either view these reports on the call processor com-puter screen or print them as a hard copy. The system updates and automatically stores all reports and can present the data in both graphical and numerical formats. This reported information assists the System Manager in making efficient use of lines and agents.
October, 02 Comdial 69
Using Management Information
The system collects over 63,000 different statistics and presents them in 80 different MIS reports. The system reports are related to the following time periods:
• hourly,
• daily,
• weekly,
• monthly.
The system reports are categorized for the following four operational levels:
• The System level reports show data for all lines and agents on the system.
• The Group level reports provide data for each group programmed on the system.
• The Line level reports provide data for each telephone line within a specific group.
• The Agent level reports show data for each agent in a specific group.
1.10.1 VIEWING TYPICAL MIS REPORTS
The system provides the following report formats:
• Answer Bins
• Abandon Bins
• Incoming Call
• Total Time
• Average Time
• System Capacity
• Account Code
• Traffic Analysis
• Preferred Customer (available only to group supervisors)
70 Comdial October, 02

QuickQ System Manager’s Guide
Answer Bins Report
The Answer Bins report shows the percent of answered calls within the seven programmable time bins. It also shows supervisors the response rates of their departments.
Figure 1-16 Answer Bin Report
October, 02 Comdial 71

Using Management Information
Abandon Bins Reports
This report shows the percent of abandoned calls within the seven programmable time bins. It also shows supervisors the tolerance of callers.
Figure 1-17 Abandoned Bins Report
72 Comdial October, 02

QuickQ System Manager’s Guide
Incoming Call Report
Incoming Calls — Line Report Definitions
• Total I/C = total incoming calls
• Incoming Calls–ANS = answered incoming calls
• Incoming Calls–ABD = abandoned calls dropped by caller or connected for less than nine seconds
• Incoming Calls–NIGHT= any calls at night mode (ans, abn, msg)
• Answered Calls–DIR = calls answered before announcement
• Answered Calls–ANNC = calls answered after announcement
• Ans>T = calls answered after programmed alarm threshold
• GOS % = grade of service (see Traffic Analysis for explanation)Figure 1-18 Incoming Call Report
October, 02 Comdial 73

Using Management Information
Incoming Calls — Agent Report Definitions
• Total Calls–ANS = total incoming calls answered by agent
• Total Calls–O/G = total outgoing calls placed by agents
• Answered Calls–DIR = calls answered before announcement
• Answered Calls–ANNC = calls answered after announcement
• HELP REQ = total help calls placed by agents on incoming
Total Time Report–Total Time Agent Report Definitions
• Sign In Time = total agent sign in time–updated only if agent has signed out
• Incoming Time = total time agents are engaged in incoming calls
• Outgoing Time = total time agents are engaged in outgoing calls
• Wrap Up Time = total time agents are in wrap-up state
• Busy Time = total time agent set busy (agent press busy & auto busy due to redirect)
• Idle Time = total time agents are in idle state–updated only if agents have signed out [(1 - 2 - 3 - 4) = 6]
Figure 1-19 Total Time Report
74 Comdial October, 02

QuickQ System Manager’s Guide
Average Time Report–Total Time Agent Report Definitions
• Sign In Time= total agent sign in time–updated only if agent has signed out
• Incoming Time= total time agents are engaged in incoming calls
• Outgoing Time= total time agents are engaged in outgoing calls
• Wrap Up Time= total time agents are in wrap-up state
• Busy Time= total time agent set busy (agent press busy & auto busy due to redirect)
• Idle Time = total time agents are in idle state–updated only if agents have signed out [(1 - 2 - 3 - 4) = 6]
Figure 1-20 Average Time Report
October, 02 Comdial 75

Using Management Information
System Capacity Report
The System Capacity Report shows the total number of times all lines were busy and the total time in hours, minutes, and seconds. It also shows the total number of times that no agents were available and the total time in hours, minutes and seconds.
Figure 1-21 System Capacity Report
Account Code Report
The Account Code Report lists the account codes with their descriptions. It also shows the number of calls logged by the agents for each account code and the average duration of that call.
Figure 1-22 Account Code Report
76 Comdial October, 02

QuickQ System Manager’s Guide
Traffic Analysis Report–Traffic Analysis Line Report Definitions
• Total Calls–I/C = total incoming calls
• Total Calls–O/G = total outgoing calls
• Incoming Calls–ANS = answered incoming calls
• Incoming Calls–ABD = abandoned calls–calls dropped by the caller or connected for less than nine seconds
• Average Time–Waiting = average waiting time for each answered incoming call
• Average Time–Abandoned = average waiting time for each abandoned call
• GOS = grade of service [(3) - (number of calls answered after alarm threshold has expired, obtained from incoming call line report) ]÷ (3+4) = 7 x 100% Figure 5-24. Traffic Analysis Report
Figure 1-23 Traffic Analysis Report
Preferred Customer Report (available only at the group supervisor level)
The Preferred Customer Report lists the customers and their telephone numbers.Figure 1-24 Preferred Customer Report
October, 02 Comdial 77

Using Management Information
Notes
78 Comdial October, 02

QuickQ System Manager’s Guide
1. APPENDIX A
1.1 Using QuickQ With a Mouse
A mouse is a device that allows you to move a cursor on the computer screen to specific points for data entry, and to make menu selections. An arrow image, called the mouse pointer, moves on the screen when you move the mouse. Practice moving the pointer. Stay away from the menu bar at the top of the screen. (If you accidentally make a menu appear, you can make it disappear by moving the pointer out of the menu and pressing and releasing the left mouse button.)
Occasionally the pointer might seem to disappear. Usually it is just off the screen. To make the pointer reappear, move the mouse in a circle a few times.
To move the mouse without moving the pointer, lift up the mouse. The pointer does not move while the mouse is in the air.
Most of the time, you use one of the following two mouse button techniques:
• clicking
• dragging
1.1.1 CLICKING (SELECTING AN ITEM)
To click, press the left button and immediately release it. By clicking, you can select an item, such as a menu or an icon.
Note that the top left corner of the screen has a Sign-In label called Level. Use it to perform the fol-lowing exercise. Place the pointer on Level and click the mouse button. The QuickQ opens the Sign-In window.
1.1.2 DRAGGING (MOVING A WINDOW)
Dragging consists of the following three steps:
• pressing and holding the left mouse button
• moving the mouse
• releasing the mouse button
Dragging allows you to move the position of a window (for example, the Configure window) on the screen to give yourself a better view of system set-up parameters. Drag real-time windows to see more agents.
To move the sign-in window, place the pointer on the title bar, and drag. As you drag, an outline of the window moves with the pointer. Practice moving the sign-in window on the screen.
October, 02 Comdial 79
Appendix A
1.2 Understanding QuickQ Window Graphics
If you are familiar with a windowing environment, you can skip this discussion.
QuickQ is easy to use. Most of what you see and do in the QuickQ console happens in a window. A window is a screen area that the QuickQ system uses to exchange information with you. There are many QuickQ windows. Such as, the one on which you enter your password or the one that shows line group data. You can move, resize, overlap, close and open one or more windows in one screen. While you can have any number of windows opened, only one window can be active at a time. The active window is the one that you are currently working in. Any command you choose or text you type gen-erally applies only to the active window. The active window may have a close box, scroll bars, and a resize corner. If your windows are overlapping, the active window is always the one on top of all the others.
All windows in QuickQ have the following things in common:
• Title Bar—The topmost horizontal bar of a window contains the name of the window. You can drag the title bar to move the window.
• Close Box—This is the box in the upper left corner. You double click on this box to quickly close the window.
• ButtonsThe QuickQ windows contain many buttons that you click to complete the following actions:
OK − Saves all changes you made to the active window and closes the window.
Apply − Saves all changes you made but does not close the window.
Cancel − Reverts all changes up to the last Apply action and closes the window.
Help − Provides help information on the current window.
New − Creates a new item. This is equivalent to the Add command used in previous QuickQ ver-sions.
Properties − Opens up the properties page for the highlighted item. The properties window may be the same as the New window with some of the items being non-selectable. This is equiva-lent to the Edit command used in previous QuickQ versions.
Remove − Removes the highlighted item. This is equivalent to the Delete command used in pre-vious QuickQ versions.
80 Comdial October, 02

QuickQ System Manager’s Guide
Note: Group 00 re-fers to the System Manager’s ID and Passwords. This isnot one of the callprocessing groups.
1. APPENDIX B
1.1 System Layout / Worksheet
System Setup (Copy pages as required for customer records)
Company NameID# and Password
Group Grp. Name Supv. Name PasswordGrp 00Grp 01Grp 02Grp 03Grp 04Grp 05Grp 06Grp 07Grp 08Grp 09Grp 10Grp 11Grp 12Grp 13Grp 14Grp 15Grp 16
October, 02 Comdial 81

Appendix B
Intergroup Overflow
Announcements
NOTE: Space is provided on the Group Layout / Worksheet for the scripting of messages.
Group Level 1 Level 2 Level 3 Level 4Grp 01Grp 02Grp 03Grp 04Grp 05Grp 06Grp 07Grp 08Grp 09Grp 10Grp 11Grp 12Grp 13Grp 14Grp 15Grp 16
Description Group Line Sub-Group
01
02
03
04
05
06
07
08
09
10
11
12
13
14
15
16
82 Comdial October, 02

QuickQ System Manager’s Guide
Account Codes
Stat-Bins
Code Description
Answer Bins Time Abandon Bins TimeTime Bin 01 Time Bin 01Time Bin 02 Time Bin 02Time Bin 03 Time Bin 03Time Bin 04 Time Bin 04Time Bin 05 Time Bin 05Time Bin 06 Time Bin 06
October, 02 Comdial 83

Appendix B
This page is intentionally blank
84 Comdial October, 02

QuickQ System Manager’s Guide
1. APPENDIX C
1.1 Group Layout / Worksheet
NOTE: Make additional copies of the Group Layout / Worksheet for each of your system groups.
1.1.1 GROUP SETUP
Thresholds
Overflow TimeRedirect TimeAlarm TimeAlarm (# of calls)Priority Override Time
Mode
Call Screening (Yes/No)Automatic Force Call (Yes/No)Manual (Yes/No)Day to Night (Yes/No)Time for Day to Night Mode (24 hr.)
October, 02 Comdial 85

Appendix C
1.1.2 AGENT GROUP SETUP
Grp 01
Group Name
Agent Name Agent ID Password Priority Wrap-up
Grp 02
Group Name
Agent Name Agent ID Password Priority Wrap-up
Grp 03
Group Name
Agent Name Agent ID Password Priority Wrap-up
Grp 04
Group Name
Agent Name Agent ID Password Priority Wrap-up
86 Comdial October, 02
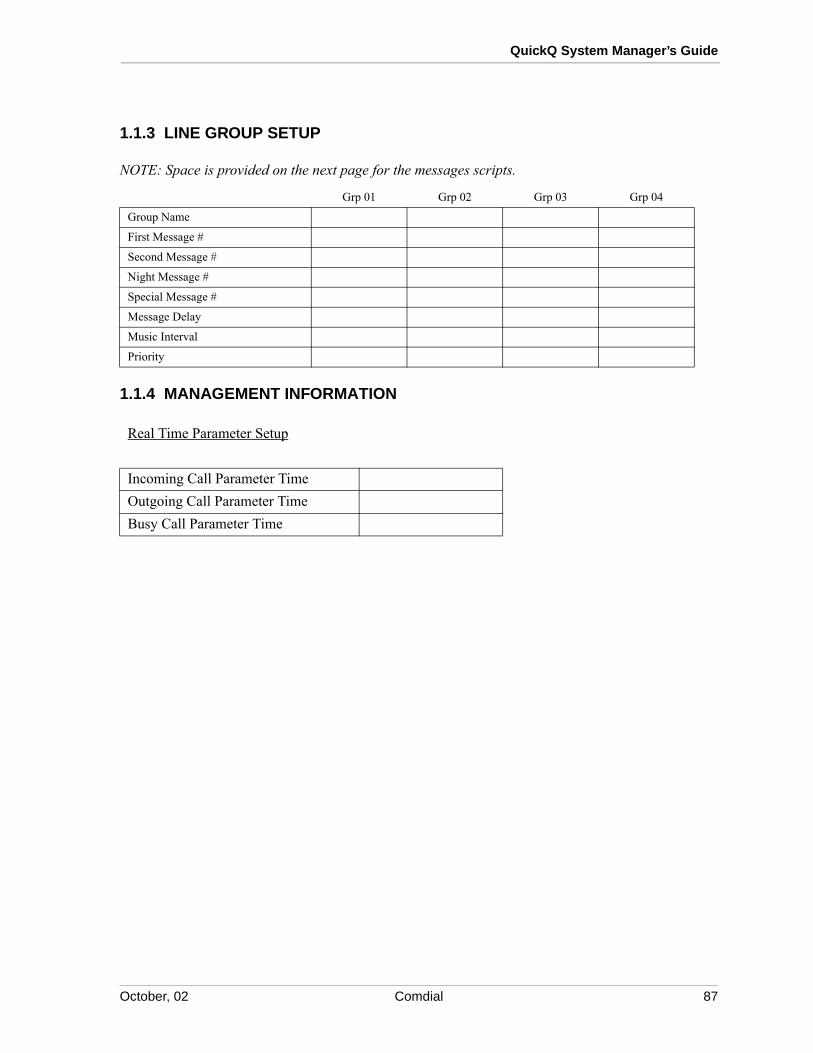
QuickQ System Manager’s Guide
1.1.3 LINE GROUP SETUP
NOTE: Space is provided on the next page for the messages scripts.
1.1.4 MANAGEMENT INFORMATION
Grp 01 Grp 02 Grp 03 Grp 04
Group Name
First Message #
Second Message #
Night Message #
Special Message #
Message Delay
Music Interval
Priority
Real Time Parameter Setup
Incoming Call Parameter TimeOutgoing Call Parameter TimeBusy Call Parameter Time
October, 02 Comdial 87

Appendix C
1.1.5 MESSAGE SCRIPTS
Line Group 01
First Message
Second Message
Night Message
Special Message
Line Group 02
First Message
Second Message
Night Message
Special Message
88 Comdial October, 02

QuickQ System Manager’s Guide
Line Group 03
First Message
Second Message
Night Message
Special Message
Line Group 04
First Message
Second Message
Night Message
Special Message
October, 02 Comdial 89

Appendix C
1.1.6 PREFERRED CUSTOMER ABANDONED CALL RECORD SETUP
Select the day or days of the week to print the Preferred Customer Line Abandoned Report (check appropriate box or boxes).
Sunday
Monday
Tuesday
Wednesday
Thursday
Friday
Saturday
Set up the automatic printing interval (check the appropriate box).
Disabled
30 Minutes
1 Hour
2 Hours
4 Hours
6 Hours
8 Hours
12 Hours
24 Hours
90 Comdial October, 02

QuickQ System Manager’s Guide
1.1.7 WALLBOARD SETUP RECORD
1.1.8 WALLBOARD PARAMETER SETUP
NOTE: When a title is used, P4-P6 are not available because the top line of the wallboard is used to display the title.
Wallboard Group Type Title Title Display Summary Buzzer
Example 1 2 Color Yes Have a Good Day No Yes
Example 2 4 Color No Not used Yes No
1
2
3
4
5
6
7
8
9
10
11
12
13
14
15
16
Wallboard P1 P2 P3 P4 P5 P6
Example IH ID OH OD SH SD
1
2
3
4
5
6
7
8
9
10
11
12
13
14
15
16
October, 02 Comdial 91

Appendix C
1.1.9 WALLBOARD MESSAGES
NOTE: Insert up to six tokens (xx) to identify parameters in a message (see example 1).
Wallboard Text up to 70 characters for scrolling messages.Example 1 TEAM 1 RECEIVED (ID) CALLS TODAY AND GRADE OF SERVICE WAS (SD)
Example 2 WORK SAFELY TODAY!
1
2
3
4
5
6
7
8
9
10
11
12
13
14
15
16
92 Comdial October, 02

QuickQ System Manager’s Guide
1.1.10 WALLBOARD SCHEDULES
Message (up to 32) Day Time
Day Choices are: Time Choices• Monday • Saturday 0001-2400 (24 Hour Format)
• Tuesday • Monday-Friday
• Wednesday • Monday-Saturday
• Thursday • Daily
• Friday
October, 02 Comdial 93

Appendix C
1.1.11 WALLBOARD ALARMS
Parameter Function Threshold Message(Example) QL >= 5 There are (QL) Calls in the Queue at this time.....
94 Comdial October, 02

QuickQ System Manager’s Guide
1. APPENDIX D
1.1 Reviewing The Programming Road Map
Start-up, and System Manager’s Windows
Start-Up Window Account Code Line GroupLevel (first) New First
Sign-In Account Code XXX SecondUser ID XXX Description NightPassword XXX Properties Sync Date & TimeAccess to Configuration Description Date MM/DD/YY
Yes/No Remove Time HH:MM:SSSign-Out & Exit Stat Time Bin Backup Announcement
Level (second) Answer Time Bin Restore AnnouncementSign-Through Time Bin 1- Time Bin 6 Management-Info
Grp 1 MM:SS Setup- Abandon Time Bin Real Time- Time Bin 1 - Time Bin 6 Incoming Call ParameterGrp16 MM:SS MM:SS
Print Setup Wallboard Outgoing Cal ParameterSign-Out (return to previous level) No. 1 - No. 16 MM:SSSign-Out & Exit Properties Busy Time Parameter
System Managers Window Settings MM:SSSystem Assigned to No. ___ Traffic AnalysisConfigure Type Color/Mono Time Interval
Company Title Yes/No 1/2 HourName Title ___ 1 HourStreet Options Real TimeCity Summary Yes/No Historical ReportsState Buzzer Yes/No HourlyCountry Parameter 00:00 - 01:59ZIP P1-P6 23:00 - 23:59Site # Password File
Activate Group User ID PrintGroup 01-16 Old Password XXX Close
Activate Group New Password XXX ViewState Yes/No Confirm Password XXX GraphGroup Name Announcement NumericXXXXXXX No 01 - No. 16 Report (see Note 1)
Intergroup Overflow Properties DailyGroup 01-16 Description File
Level 1 Announcement Length PrintLevel 2 Current MM:SS CloseLevel 3 Limit MM:SS ViewLevel 4 Group Graph
NumericReport (see Note 2)
October, 02 Comdial 97

Appendix D
Current Reports Numerical & Graphical Average TimeHourly Print Time MM:SS System Capacity
File Wallboard Account CodePrint Message Traffic AnalysisClose Message 1 Group Supervisor’s Screen
View - Group SetupGraph - Overflow Threshold MM:SSNumeric Message 32 Redirect Threshold MM:SS
Report (see Note 1) New Alarm Threshold MM:SSDaily Enter New Message Alarm Threshold Calls in Queue
File Properties Priority Override MM:SSPrint Edit Selected Message Call Screening Yes/NoClose Remove Automatic Force Call Yes/No
View Remove Selected Message Manual Answer Yes/NoGraph Alarm Day to Night Mode Yes/NoNumeric New Time-Day to Night Mode HH:MM
Report (see Note 2) Parameter XX Agent Group - SetupReport Schedule Function (=,<=, >=) AgGp 01
Daily Threshold XXXX AgGp 02Activate Print Schedule Yes/No Message (1-32) AgGp 03Report Type (see note 3) Properties AgGp 04Print Time MM:SS Parameter XX Agent Group NameReport Format Function (=,<=, >=) Agent Name
Numerical Threshold XXXX ID # XXXGraphical Message (1-32) Password XXXNumerical & Graphical Remove Priority 01-04
Day of the Week Remove Selected Alarm Wrap-up MM:SSSunday Yes/No Schedule Line Group Setup- New LnGp 01Saturday Yes/No Day LnGp 02
Weekly Sunday LnGp 03Activate Print Schedule Yes/No - LnGp 04
Report Type (see note 3) - Line Group NameReport Format Saturday First Message XNumerical Mon-Fri Second Message XGraphical Mon-Sat Night Message XNumerical & Graphical Daily Special Message XPrint Time MM:SS Time HH:MM First Message Delay MM:SSDay of the Week Message (#1 - #32) Music Interval MM:SS
Monthly Remove Line Group Priority 01-04Activate Print Schedule Remove Selected ScheduleYes/No Configuration Report
Report Type (see note 3) Report Types are –Report Format Answer BinsNumerical Abandon BinsGraphical Incoming Call
Total Time
98 Comdial October, 02

QuickQ System Manager’s Guide
The following six notes define the various Report Types that are referenced in the Programming Road Maps on the previous pages
Management Info Incoming Call System CapacityReal Time Setup Agent Activity Call Profile
Incoming Call Parameter MM:SS Average Time Account CodeOutgoing Call Parameter MM:SS System Capacity Report FormatBusy Call Parameter MM:SS Report Format Numerical
Real Time Numerical GraphicalTraffic Activity Graphical NoteAgent Activity Note PrintTraffic Status Print ConfigurationService Status Daily GroupAgent Status Report Type Print
Historical Waiting TimeCurrent Abandon CallHourly Incoming CallReport Type Agent Activity
Waiting Time Average TimeAbandon Call
Note 1 Note 2 Note 3 Note 4 Note 5 Note 6
Answer Bin Answer Bin Answer Bin Answer Bin Answer Bin Answer Bin
Abandon Bin Abandon Bin Abandon Bin Abandon Bin Abandon Bin Abandon Bin
Incoming Call Incoming Call Incoming Call Incoming Call Incoming Call Incoming Call
Total Time Total Time Total Time Total Time Total Time Total Time
Average Time Average Time Average Time Average Time Average Time Average Time
System Capacity System Capacity System Capacity System Capacity System Capacity System Capacity
Account Code Account Code Account Code Account Code Account Code Account Code
Note Traffic Analysis Traffic Analysis Prefer Customer Traffic Analysis Traffic Analysis
Note Prefer Customer Prefer Customer
Note
October, 02 Comdial 99
Appendix D
Group Supervisor’s Window
Group Customer Z SettingConfigure New Wrap-Up Time MM:SS
Modes of Operation Name PriorityMode Phone Number Priority 1-4
Call Screening Yes/No Priority (1-4) RemoveForce Account Code Yes/No Group (01-16) Remove AgentCalling Number ID Yes/No Line Group (1-4) Management-InfoAll Agents Busy Alarm Yes/No Properties SetupAllow Suspension of Agent Set Name Real Time
Answer Mode Priority (1-4) Real Time ThresholdManual Answer Group (01-16) Incoming Call Parameter MM:SSAutomatic Force Call Option Line Group (1-4) Outgoing Call Parameter MM:SSQueue Escape Yes/No Remove Busy Time Parameter MM:SSQueue Escape Ext (select) Remove Calling Number ID Traffic Analysis
Threshold Line Group (active) Time IntervalThreshold Time Name 1/2 Hour
Overflow MM:SS Line Group Name 1 HourRedirect MM:SS Configure Real TimePriority Override MM:SS Announcement Group Real Time - AgentsAlarm Threshold Time MM:SS First Announcement (1-4) Group Real Time - ChartsCalls in Queue XXXX Second Announcement (1-4) Group Real Time - StatsDay to Night Schedule Night Announcement (1-4) Historical ReportsProperties Special Announcement (1-4) HourlyDay of the Week Priority 00:00 - 01-59Sunday Priority 1-4 -- Announcement Timing -Saturday First Announcement 23:00 - 23:59Day to Night Time HH:MM Intercept Delay MM:SS FileActivate Agent Group On-Hold Interval MM:SS PrintAgent Group 1 Yes/No Agent Group (active) CloseAgent Group 2 Yes/No Name ViewAgent Group 3 Yes/No Agent Group Name GraphAgent Group 4 Yes/No Agent NumericActivate Line Group New Report (see Note 4)Line Group 1 Yes/No Agent Information DailyLine Group 2 Yes/No Agent Name FileLine Group 3 Yes/No User ID PrintLine Group 4 Yes/No Password ClosePassword Setting ViewUser ID Wrap-up Time MM:SS GraphOld Password Priority 1-4 NumericNew Password Agent Report (see note 5)Confirm Password PropertiesCalling Number ID Agent InformationNight Mode Routing Yes/No Agent NameCustomer A
100 Comdial October, 02

QuickQ System Manager’s Guide
Current Reports Tuesday Yes/No Message # 32Hourly Wednesday Yes/No NewFile Thursday Yes/No Enter New MessagePrint Friday Yes/No PropertiesClose Saturday Yes/No Edit Selected MessageView Weekly RemoveGraph Activate Print Schedule Yes/No Remove Selected MessageNumeric Report Type (see note 6) AlarmReport (see note 4) Report Format NewDaily Numerical Parameter XXFile Graphical Function (=, <=, >=)Print Numerical & Graphical Threshold XXXXClose Print Time MM:SS Message (1-32)View Monthly PropertiesGraph Activate Print Schedule Yes/No Parameter XXNumeric Report Type (see note 6) Function (=, <=, >=)Report (see note 5) Report Format Threshold XXXXAbandoned Calling Number ID Report Numerical Message (1-32)Report Day Graphical Removecurrent day Numerical & Graphical Remove Selected Alarm- Print Time MM:SS Schedule- Abandon Calling Number ID NewCurrent day -6 Automatic Printing DayOpen Interval SundayReport Schedule Disable -Daily 30 Minutes -Activate Print Schedule Yes/No 1 Hour -Report Type (see note 6) 2 Hours SaturdayPrint Time MM:SS 3 Hours Mon-FriReport Format 4 Hours Mon-SatNumerical 6 Hours DailyGraphical 8 Hours Time HH:MMNumerical & Graphical 12 Hours Message (1-32)Day of the Week 24 Hours PropertiesSunday Yes/No Wallboard Day Monday Yes/no Message Sunday
Message # 1 -SaturdayMon-FriMon-SatDailyTime HH:MMMessage (1-32)RemoveRemove Selected ScheduleConfiguration Report
October, 02 Comdial 101

Appendix D
The following six notes define the various Report Types that are referenced in the Programming Road Maps on the previous pages
Note 1 Note 2 Note 3 Note 4 Note 5 Note 6
Answer Bin Answer Bin Answer Bin Answer Bin Answer Bin Answer Bin
Abandon Bin Abandon Bin Abandon Bin Abandon Bin Abandon Bin Abandon Bin
Incoming Call Incoming Call Incoming Call Incoming Call Incoming Call Incoming Call
Total Time Total Time Total Time Total Time Total Time Total Time
Average Time Average Time Average Time Average Time Average Time Average Time
System Capacity System Capacity System Capacity System Capacity System Capacity System Capacity
Account Code Account Code Account Code Account Code Account Code Account Code
Note Traffic Analysis Traffic Analysis Prefer Customer Traffic Analysis Traffic Analysis
Note Prefer Customer Prefer Customer
Note
102 Comdial October, 02

QuickQ System Manager’s Guide
1. APPENDIX E
1.1 Backing Up System Reports
1.1.1 WHAT IS THE WINDOWS NT BACKUP OPTION?
The Windows NT Backup option allows you to make security backup copies of the statistical data (that is, the report files) gathered by the ACD. These copies are made to standard 3.5-inch high-density floppy disks.
Once you have made backup copies of files you want to save, you can use the backup option to delete the old copies of these files from the hard disk of the ACD.
1.1.2 WHY SHOULD YOU USE IT?
As well as providing a measure of security for your data, using the backup option will free up space for the ACD to reuse, and will prevent the ACD from slowing down due to congestion of the hard disk with too many old files.
1.1.3 HOW OFTEN SHOULD YOU USE IT?
Typically, you should use the backup option at least once every three months.
1.1.4 HOW DO YOU USE IT?
1. From the Windows NT desktop, click on Start − Programs − Accessories − System Tools − Backup to get the Microsoft Backup Welcome window.
2. Click OK and the Microsoft Backup Warning box opens up. 3. After reading the warning, click OK to open up the Microsoft Backup dialog. Use this dialog to
select files that you want to backup and follow the directions provided. For additional backup information, you can click on Help.
October, 02 Comdial 103

Appendix E
Notes
104 Comdial October, 02

QuickQ System Manager’s Guide
1. APPENDIX F
1.1 Understanding Emergency Operations
QuickQ contains built-in protection to minimize operational problems that could occur as the result of system interruptions such as power failures. This appendix outlines actions that QuickQ causes when these emergencies occur.
1.1.1 NOTIFYING AGENTS
Whenever normal operation is interrupted, QuickQ notifies all of the active (signed-in) agents for five seconds. The message, System Rebooting is displayed on each agent’s display telephone along with an audible tone.
1.1.2 REBOOTING THE QUICKQ SYSTEM
Within the first 10 seconds, the System Manager can reboot the system manually. After 10 seconds of idling, following a system interruption, the system will reboot itself automatically. Rebooting normally takes a maximum of two minutes.
Note: You cannot reboot directly in QuickQ if you are using a swap file.
The following actions occur during system rebooting:
• All relevant files are closed.
• Calls that are engaged with agents will remain connected with those agents.
• When the system is using DVA01 units, all calls in the ACD queue will be dropped.
• When the system is using DVA16 units, all calls in the ACD queue will be dropped except those that are queued in the music state. Those calls will hear music continuously until they hang up.
• All Do Not Disturb (DND) conditions will be cleared on the active agents’ telephones. This affects DND conditions that are either set manually or automatically. (The system automatically sets the DND condition on agents’ telephones during call transferring.)
1.1.3 SIGNING-IN AGENTS
Agents are signed-in automatically up to 30 minutes following a system interruption. Agents will be signed-in, in the busy state. If the interruption lasts longer than thirty minutes, the agents are not signed-in automatically.
Also, if the automatic day-to-night mode is selected by the group, and the time that the system was rebooted is later than the time set for the day-to-night mode to occur, agents are not signed-in automat-ically.
1.1.4 PRINTING SCREEN INFORMATION
At the time the system operation is interrupted, the system registers along with other information is written to the screen directly. The system manager can print this information.
October, 02 Comdial 105

Appendix F
1.1.5 SAVING CALL STATISTICS
All call statistics are saved during a system interruption except for the accumulated current Hourly report up to the time of system reboot. For example, if the system is rebooted at 11:30 and the hourly call statistics are collected on the hour, then no call statistics are saved for the period from 11:00 to 11:30. However, the hourly report will include call statistics for the period from 11:30 to 12:00.
106 Comdial October, 02

QuickQ System Manager’s Guide
1. APPENDIX G
1.1 Detailing Comdial’s Technical Assistance
1.1.1 VERIFYING EQUIPMENT OPERATION
Comdial installation specialists strongly suggest that you temporarily install the equipment and test the system operation at your facility before you take it to the permanent installation site. When you do this, you ensure that the equipment is operational, and if it is not operational, you give yourself an oppor-tunity to correct any problems that exist.
Follow the installation details closely in this manual and double check your work for mistakes. If you cannot resolve the operating failure, you may need the technical assistance that Comdial makes available.
1.1.2 EXPLAINING THE REPAIR SERVICE
FCC regulations do not permit repair of customer owned equipment by anyone except the manufac-turer or their authorized agent. Unless specifically detailed, Comdial policy does not warrant its equipment as field repairable items.
If the equipment needs repair subsequent to the warranty period, you may return it to Comdial for repair. Comdial repair personal will, at their option, either repair the defective equipment or replace it with a remanufactured unit. This repair will be done at a fixed charge. For information on this charge, call or write to the following address:
Comdial
106 Cattlemen Road
Sarasota, Fl 34232
Attention: Repair Department
Telephone: 1-800-877-4448
When returning equipment for repair, pack it carefully to prevent damage. The purchaser is responsible for any damages during shipment. Ship the equipment freight or postage prepaid. The shipping address is as follows:
Comdial
106 Cattlemen Road
Sarasota, Fl 34232
Attention: Repair Department
October, 02 Comdial 107

Appendix G
1.1.3 UPGRADING YOUR SYSTEM KNOWLEDGE
From time-to-time, Comdial Engineers will enhance equipment software or add to the hardware capa-bility. The technical publications personnel document these changes on Technical Advisory Bulletins that they make available to you in several ways:
• you may turn to the appropriate section in your system’s instruction binder and find the TABs that are currently available,
• you may access the web site at http:echannel.comdial.com.
• In addition to TAB information, the echannel also contains the latest Comdial manuals and system software that you can download.
108 Comdial October, 02

INDEXAAbandon Bins Reports 78Abandoned Bin 12Abandoned Calling Number ID Report 73Abreviations and Descriptions List 68Account Code Assignment 26Account Codes 15Activate a Line Group 40Activating a Group 23Activating Group Supervisor 24Activating the Agent Group 39Adding a New Customer 43Adding, Changing, and Deleting Agents 45Agent Group Activation 39Agent Group Configuration 45Agent Monitoring 56Agent Operation 50Alarm Threshold (Calls in Queue) 16Announcement Backup 34Announcement Messages 55Announcement Restoration 34Announcement Titles 32Answer Bin 12Answer Bins Report 77Answer Mode 36Answering Automatically 50Answering Manually 50Appendix A 85Appendix B 87Appendix C 91Appendix D 103Appendix E 109Appendix F 111Appendix G 113Arranging the Stat Bins 27Assigning Account Codes 26Automatic Answer Mode 16Automatic Day-to-Night Mode 16
BBacking Up Announcements 34Backing Up System Reports 109Button Abbreviations 58
CCall Center Staff Organization 8Call Processor 9Call Queuing 12Call Screen Mode 18Call Statistics 112Calling Number ID 41, 53Calls Waiting Indication 15Changing the Mode of Operation 54Changing Your Password 31, 41Changing, and Deleting Agents 45Comdialís Technical Assistance 113Configuration Reports 74Configuring Agent Groups 45
Configuring Line Group Announcements 44Configuring The Day to Night Schedule 38Controlling the Wallboards 28Creating a New Wallboard Alarm Threshold 71Creating a New Wallboard Message 67Creating Wallboard Schedules 72Current Call Statistics 57Current Reports 64Customer List 42
DDaily Reports 65Date and Time Synchronizing 33Day to Night Schedule 38Deactivating A Group 24Delay Announcements 13Deleting a Wallboard Message 70Deleting Agents 45Describing QuickQ Agent Features 15Describing QuickQ Group Features 16Describing QuickQ System Features 12Describing The System Components 9Digital Voice Announcer 9Displays For Scout Telephones 58DVA16 Announcement Messages 55
EEmergency Operations 111Enabling the Toolbar and Status Bar 21Entering Account Codes 53Even Distribution 12
GGroup Layout / Worksheet 91Group Layout/Worksheet 35
HHistorical Reports 62Hourly Report 63
IIncoming Call Report 79Introducing The QuickQ ACD System 7
LLine Group Activation 40Line Group Announcement Configuration 44Logging In and Out of QuickQ 48Log-in / Log-out 15
MMake Set Busy 15Making an Outgoing Call 52Making Your Telephone Busy 51Management Infomation 59
Index-1
Management Information System (MIS) Reporting 14Manual Answer Mode 17MIS Reports 75Mode of Operation 54Modes 35Modes of Operation 35Monitoring The Agents 56Monthly Reports 66
NNew Customer Addition 43Notifying Agents 111
OObtaining a Detailed Printout 59Operating As a Supervisor 54Operating As An Agent 50Operating the QuickQ System 47Organizing The Call Center Staff 8Overflow Threshold 17
PPassword Change 31Password Changing 41Preparing the Group Layout/Worksheet 35Printing Screen Information 111Printout 59Priority Call Handling 17Programming Modes of Operation 35Programming QuickQ 19Programming QuickQ From Another PC Through
Networkingg 20
Programming QuickQ Without A Protection Key 20Programming Road Map Review 103Programming the Thresholds 37Programming Wallboard Messages 67Programming Wallboard Parameters 30
QQuickQ Agent Features 15QuickQ Displays For Scout Telephones 58QuickQ From Another PC Through Networking 20QuickQ Group Features 16QuickQ Introduction 7QuickQ Login and Logout 48QuickQ MIS Reports 75QuickQ Programming 19QuickQ System Feature Description 12QuickQ System Operation 47QuickQ Telephone Details 47QuickQ Understanding 8QuickQ Window Graphics 86QuickQ Without A Protection Key 20
RReal Time Reports 61Rebooting The QuickQ System 111Redirect Threshold 17Repair Service 113Report Schedule 65
Report, Hourly 63Report, Selecting TheAbandoned Calling Number ID 73Report, Supervisors's Real Time 62Reports, Current 64Reports, Historical 62Reports, QuickQ MIS 75Reports, Selecting Configuration 74Reports, Selecting Real Time 61Requesting Help 51Restoring Announcements 34Reviewing The DVA16 Announcement Messages 55Reviewing The Programming Road Map 103Revising a Wallboard Alarm Threshold 72Revising a Wallboard Message 69Revising the Scheduled Programming for a Selected
Wallboard Messagellboard Message 73
SSaving Call Statistics 112Scout Telephone Displays 58Selecting Configuration Reports 74Selecting Current Reports 64Selecting QuickQ MIS Reports 75Selecting Real Time Reports 61Selecting the Abandoned Calling Number ID Report 73Selecting the Historical Reports 62Selecting the Hourly Report 63Selecting the Report Schedule 65Sending a Wallboard Message 70Set Up A Customer List 42Setting Announcement Titles 32Setting The Intergroup Overflow 25Setting Up a Wallboard 29Setting Wallboard Alarms 70Signing In 20Signing In to the Managerís Level 20Signing Out 21Signing Out and Exiting QuickQ 22Signing Through to the Group Supervisorís Level 21Signing-In Agents 111Stat Bin Arrangement 27Supervisor Help and Monitoring 15Supervisor Operation 54Supervisor Programming 35Supervisorís Real Time Report 62Synchronizing the Date and Time 33System Component Description 9System Layout / Worksheet 87System Layout / Worksheets 19System Real Time - Agents 61System Real Time - Lines 61System Startup 19
TTelephone Extensions 10Threshold Programming 37Transferring Calls In or Out of QuickQ 52
UUnderstanding Emergency Operations 111Understanding QuickQ 8
Index-2 Comdial October, 02

Understanding QuickQ Window Graphics 86Understanding System Startup 19Understanding the Messages 13Understanding This Guide 7Using Calling Number ID 53Using Management Infomation 59Using QuickQ With a Mouse 85Using the Calling Number ID 41
VViewing The Current Call Statistics 57
WWallboard Alarm Threshold Creation 71Wallboard Alarm Threshold Revision 72
Wallboard Alarms 70Wallboard Control 28Wallboard Message Programming 67Wallboard Message, Deleting 70Wallboard Message, New 67Wallboard Message, Revision 69Wallboard Message, Sending 70Wallboard Modes Of Operation 10Wallboard Parameter Programming 30Wallboard Schedules 72Wallboard Setup 29Wallboards 67Weekly Reports 65Working with Wallboards 67Wrapping Up A Call 51Wrap-up Time 16
Index-3

This manual has been developed by Comdial Corporation (the “Company”) and is intended for the use of its customers and service personnel. The information in this manual is subject to change without notice. While every effort has been made to eliminate errors, the Company disclaims liability for any difficulties arising from the interpretation of the information contained herein.
The information contained herein does not purport to cover all details or variations in equipment or to provide for every possible contingency to be met in connection with installation, operation, or maintenance. Should further information be desired, or should particular problems arise which are not covered sufficiently for the pur-chaser’s purposes, contact Comdial, Inside Sales Department, Sarasota, Florida 34232.

GCA70-357.03Quick Q System Manager’s GuideOctober, 2002Printed in U.S.A.


