QUICKSTART GUIDE ENGLISH ( 3 – 4 ) MANUAL DE INICIO RÁPIDO ESPAÑOL ( 5 – 6 ) GUIDE D’UTILISATION RAPIDE FRANÇAIS ( 7 – 8 ) GUIDA RAPIDA ITALIANO ( 9 – 10 ) SCHNELLSTART-ANLEITUNG DEUTSCH ( 11 – 12 ) SNELSTARTGIDS NEDERLANDS ( 13 – 14 )
Transcript
QUICKSTART GUIDE ENGLISH ( 3 – 4 )
MANUAL DE INICIO RÁPIDO
ESPAÑOL ( 5 – 6 )
GUIDE D’UTILISATION RAPIDE FRANÇAIS ( 7 – 8 )
GUIDA RAPIDA
ITALIANO ( 9 – 10 )
SCHNELLSTART-ANLEITUNG DEUTSCH ( 11 – 12 )
SNELSTARTGIDS
NEDERLANDS ( 13 – 14 )
3
volume
m1
m2
pitch x y z
- +octave
accomp storetap
phrase latch
a n a l o g m o d e l i n g s y n t h
push
rhyth ms
p
atterns
progra m
s setups
conf ig
BOX CONTENTS ZEPHYR mixer Power adapter Quickstart Guide Safety Instructions & Warranty Information booklet
CONNECTION DIAGRAM
Power
House Speakers*
Keyboard*
Drum Machine*
Microphones*
Headphones*
Notes:
Microphones, monitors, amplifier, speakers, cables, etc. are not included. To reduce electrical hum at high gain settings, keep the mixer's power supply away from your guitar
cable and the mixer's channel inputs.
* not included
4
REAR PANEL FEATURES 1. POWER IN – Use the included power adapter to
connect the mixer to a power outlet. While the power is switched off, plug the power supply into the mixer first, then plug the power supply into a power outlet.
2. POWER SWITCH – Turns the mixer on and off. Turn on the mixer after all input devices have been connected and before you turn on amplifiers. Turn off amplifiers before you turn off the mixer.
3. MIC INPUT – Connect a microphone to these inputs with an XLR cable.
4. LINE INPUT * – Connect line-level devices to these inputs with 1/4" cables.
5. GAIN – Adjusts the channel audio level (pre-fader and pre-EQ gain). Adjust this so that the PEAK LED just barely lights up during the loudest parts of the song.
6. HI EQ (TREBLE) – Adjusts the high (treble) frequencies of the channel.
7. LO EQ (BASS) – Adjusts the low (bass) frequencies of the channel.
8. CHANNEL PAN – Adjusts the (mono) channel's position in the stereo field.
9. BALANCE (CH 2/3 & 4/5) – Adjusts the balance between Channels 2 and 3 and Channels 4 and 5.
10. PEAK LED – The LED will flash if the signal is clipping. If this happens, decrease the setting of the GAIN knob or CHANNEL VOLUME knob.
11. CHANNEL VOLUME – Adjusts the audio level on the channel.
12. AUX INPUTS – You may connect these inputs to the outputs of an external sound source using a standard stereo RCA cable (sold separately). You can send this channel to the monitor mix (using the AUX TO PHONES switch) and/or the main mix (using the AUX TO MIX switch).
13. AUX OUTPUTS – You may connect these outputs to the inputs of an external recording device using a standard stereo RCA cable (sold separately).
14. MAIN MIX OUTPUTS – Use standard 1/4" cables to connect these outputs to the house speaker or amplifier system. The level of these outputs is controlled by the MAIN LEVEL knob.
15. PHONES OUTPUT – Connect your 1/4" stereo headphones to this output. The PHONES knob controls the volume.
16. AUX MIX – Press this button to select which signal is routed to the MAIN MIX OUTPUTS – the main mix or the signal from the AUX INPUTS.
17. AUX TO PHONES – Press this button to select which signal is routed to your headphones – the main mix or the signal from the AUX INPUTS.
18. PHONES – Adjusts the volume of the PHONES output.
19. MAIN LEVEL – Adjusts the volume of the MAIN MIX OUTPUTS.
20. LED METERS – Shows the audio level of the main mix. Turn the volume down if the CLIP LED lights up excessively.
21. POWER LED – Illuminates when the mixer is on.
* When using LINE INPUTS 2/3 and 4/5: • If only the left channel is used, the signal
will be heard in both left and right channels and the balance will not be adjustable.
• If only the right channel is used, the signal will be heard in the right channel only.
1
34
4
5
6
8
8 9
9
10
11 11
11
12
14
14 15
1617
18
19
20 21
12
13
13
10
10
2
5
volume
m1
m2
pitch x y z
- +octave
accomp storetap
phrase latch
a n a l o g m o d e l i n g s y n t h
push
rhyth ms
p
atterns
progra m
s setups
conf ig
CONTENIDO DE LA CAJA Mezclador ZEPHYR Adaptador de alimentación Guía de inicio rápido Folleto de instrucciones de seguridad e información sobre la garantía
DIAGRAMA DE CONEXIÓN
Suministro eléctrico
Altavoces del auditorio*
Teclado*
Caja de ritmos*
Micrófono*
Auriculares*
Notas:
No se incluyen micrófonos, amplificador, altavoces, cables, etc. Para reducir el zumbido eléctrico cuando se usan ajustes altos de ganancia, mantenga la fuente de
alimentación del mezclador alejada del cable de su guitarra y de las entradas de los canales del equipo.
* no incluido
6
CARACTERÍSTICAS 1. ENTRADA DE ALIMENTACIÓN - Use el adaptador
de alimentación incluido para conectar el mezclador a un tomacorriente alimentado. Con la alimentación eléctrica desconectada, enchufe la fuente de alimentación al mezclador primero, y luego al tomacorriente.
2. INTERRUPTOR DE ENCENDIDO – Enciende y apaga el mezclador. Encienda el mezclador después de desconectar todos los dispositivos de entrada y antes de encender los amplificadores. Apague los amplificadores antes de apagar el mezclador.
3. ENTRADA DE MICRÓFONO – Conecte a estas entradas un micrófono con un cable XLR.
4. ENTRADA DE LÍNEA * – Conecte a estas entradas dispositivos de nivel de línea con cables de 1/4”.
5. GANANCIA – Ajusta el nivel de ganancia de audio del canal (preecualización y pre-fader). Ajuste este control de modo que el LED PEAK apenas se encienda durante las partes más sonoras del tema.
6. ECUALIZACIÓN DE ALTOS (AGUDOS) – Ajusta las altas frecuencias (agudos) del canal.
7. ECUALIZACIÓN DE BAJOS (GRAVES) – Ajusta las bajas frecuencias (graves) del canal.
8. PANEO DE CANAL – Ajusta la posición del canal (mono) en el campo estéreo.
9. BALANCE (CANALES 2/3 Y 4/5) – Ajusta el balance entre los canales 2 y 3 y los canales 4 y 5.
10. LED DE PICO – El LED destella si la señal se está recortando. Si esto sucede, disminuya el ajuste de la perilla GAIN o la perilla de volumen CHANNEL (Canal).
11. VOLUMEN DE CANAL – Ajusta el nivel de audio del canal.
12. ENTRADAS DE AUXILIAR – Es posible conectar estas entradas a las salidas de una fuente de sonido externa mediante un cable RCA estéreo estándar (se vende por separado). Puede enviar este canal a la mezcla de monitor (mediante el interruptor AUXILIAR A AURICULARES y/o la mezcla principal (mediante el interruptor AUXILIAR A MEZCLA PRINCIPAL).
13. SALIDAS DE AUXILIAR – Es posible conectar estas salidas a las entradas de un dispositivo de grabación externa mediante un cable RCA estéreo estándar (se vende por separado).
14. SALIDAS DE MEZCLA PRINCIPAL – Use cables estándar TRS de 1/4" para conectar estas salidas al sistema de amplificador o altavoces. El nivel de estas salidas está controlado por la perilla de VOLUMEN MAESTRO.
15. AURICULARES – Conecte sus auriculares estéreo de ¼” a esta salida. La perilla PHONES controla el volumen.
16. AUXILIAR A MEZCLA PRINCIPAL – Pulse este botón para seleccionar la señal que se aplica a las SALIDAS DE MEZCLA PRINCIPAL — la mezcla principal o la señal procedente de las ENTRADAS DE AUXILIAR.
17. AUXILIAR A AURICULARES – Pulse este botón para seleccionar la señal que se aplica a sus auriculares —la mezcla principal o la señal procedente de las ENTRADAS DE AUXILIAR.
18. PHONES (VOLUMEN DE AURICULARES) – Ajusta el volumen de sus auriculares.
19. VOLUMEN PRINCIPAL – Ajusta el volumen de las SALIDAS DE MEZCLA PRINCIPAL.
20. MEDIDORES LED – Muestran el nivel de audio de la mezcla principal. Baje el volumen si el LED CLIP se enciende excesivamente.
21. LED DE ENCENDIDO – Se ilumina cuando el mezclador está encendido.
* Cuando use las ENTRADAS DE LÍNEA 2/3 y 4/5: • Si sólo se usa el canal izquierdo, la señal
se oirá en los canales izquierdo y derecho y no se puede ajustar el balance.
• Si sólo se usa el canal derecho, la señal se oirá sólo en ese canal.
1
34
4
5
6
8
8 9
9
10
11 11
11
12
14
14 15
1617
18
19
20 21
12
13
13
10
10
2
7
volume
m1
m2
pitch x y z
- +octave
accomp storetap
phrase latch
a n a l o g m o d e l i n g s y n t h
push
rhyth ms
p
atterns
progra m
s setups
conf ig
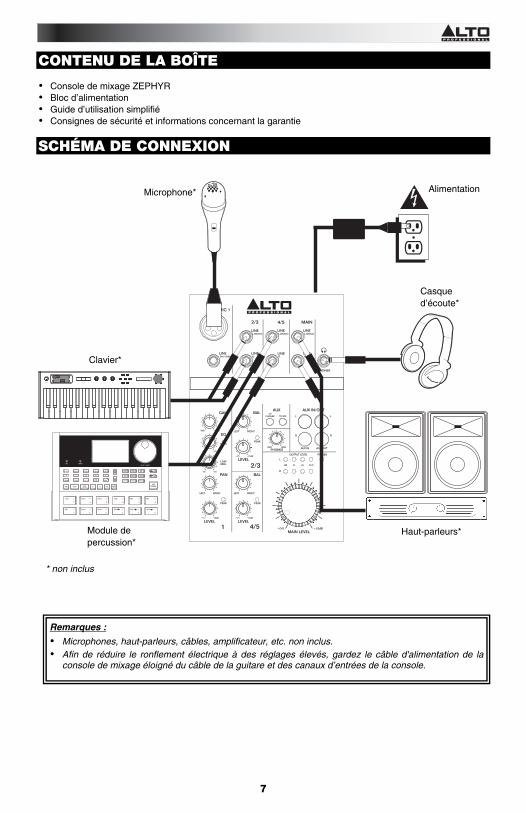
CONTENU DE LA BOÎTE Console de mixage ZEPHYR Bloc d’alimentation Guide d’utilisation simplifié Consignes de sécurité et informations concernant la garantie
SCHÉMA DE CONNEXION
Alimentation
Haut-parleurs*
Clavier*
Module de percussion*
Microphone*
Casque d’écoute*
Remarques :
Microphones, haut-parleurs, câbles, amplificateur, etc. non inclus. Afin de réduire le ronflement électrique à des réglages élevés, gardez le câble d'alimentation de la
console de mixage éloigné du câble de la guitare et des canaux d’entrées de la console.
* non inclus
8
CARACTÉRISTIQUES 1. ENTRÉE D'ALIMENTATION – Branchez le câble
d’alimentation inclus pour brancher la console de mixage dans une prise d’alimentation. Lorsque la console de mixage est hors tension, branchez le câble d'alimentation dans la console, puis dans la prise de courant.
2. INTERRUPTEUR D'ALIMENTATION – Cette touche permet de mettre l’appareil sous et hors tension. Branchez la console de mixage après avoir branché tous les appareils et avant de mettre les amplificateurs sous tension. Mettez les amplificateurs hors tension avant de mettre la console de mixage hors tension.
3. ENTRÉES MICROPHONES (1 à 4) – Ces entrées permettent de brancher chacune un microphone à l’aide d’un câble XLR.
4. ENTRÉES NIVEAU LIGNE * – Ces entrées permettent de brancher des appareils à niveau ligne à l’aide d’un câble ¼ po.
5. GAIN – Ces boutons rotatifs permettent d'ajuster le niveau du signal audio pré-atténuation et pré-égalisation du canal correspondant. Ajustez ce réglage afin que le témoin d'écrêtage s’allume à peine durant les parties les plus fortes de la chanson.
6. ÉGALISEUR (AIGUËS) – Ces boutons rotatifs permettent d'ajuster le niveau des hautes fréquences du signal audio du canal correspondant.
7. ÉGALISEUR (GRAVES) – Ces boutons rotatifs permettent d'ajuster le niveau des basses fréquences du signal audio du canal correspondant.
8. PANORAMIQUE – Ces boutons rotatifs permettent d'ajuster la position du canal (mono) dans le champ stéréo.
9. BALANCE (2/3 et 4/5) – Ces boutons rotatifs permettent de régler l’équilibre entre les canaux 2 et 3 et les canaux 4 et 5.
10. TÉMOIN D’ÉCRÊTAGE (PEAK) – En présence d'écrêtage, le témoin DEL clignote. Pour remédier à l’écrêtage, diminuez le réglage du bouton du gain (GAIN) ou du niveau (LEVEL) du canal.
11. RÉGLAGE DU NIVEAU (LEVEL) – Ces boutons rotatifs permettent d'ajuster le niveau du signal audio du canal correspondant.
12. ENTRÉES AUXILIAIRE– Vous pouvez brancher ces entrées aux sorties d’une source audio externe à l’aide d’un câble RCA standard (vendu séparément). Vous pouvez envoyer le signal de ce canal au canal de pré-écoute (à l’aide du SÉLECTEUR D’AFFECTATION DU SIGNAL DE PRÉ-ÉCOUTE) et/ou le mix général (à l’aide du SÉLECTEUR D’AFFECTATION DU SIGNAL PRINCIPAL).
13. SORTIES AUXILIAIRE– Vous pouvez brancher ces sorties aux entrées d’un appareil d’enregistrement externe à l’aide d’un câble RCA standard (vendu séparément).
14. SORTIES PRINCIPALES – Utilisez des câbles ¼ po standards afin de brancher ces sorties à un haut-parleur ou à un système de sonorisation. Le niveau de ces sorties est commandé par le bouton MAIN VOLUME.
15. CASQUE D’ÉCOUTE – Cette sortie permet de brancher un casque d’écoute stéréo doté d’une fiche de ¼ po. Le niveau de cette sortie est commandé par le bouton PHONES.
16. SÉLECTEUR D’AFFECTATION DU SIGNAL PRINCIPAL – Ce bouton permet de sélectionner le signal à envoyer aux sorties principales – le mixe général ou le signal des ENTRÉES AUXILIAIRE.
17. SÉLECTEUR D’AFFECTATION DU SIGNAL DE PRÉ-ÉCOUTE – Ce bouton permet de sélectionner le signal à envoyer au casque – le mixe général ou le signal des ENTRÉES AUXILIAIRE.
18. NIVEAU PHONES – Ce bouton rotatif permet d’ajuster le niveau du signal du casque.
19. VOLUME GÉNÉRAL – Ce bouton rotatif permet d'ajuster le niveau du volume des SORTIES PRINCIPALES.
20. DEL – Ces DEL permettent de contrôler le niveau audio du mixe général. Baissez le volume si la DEL CLIP s’allume excessivement.
21. DEL D’ALIMENTATION – Cette DEL s’allume lorsque la console de mixage est sous tension.
* Lors de l’utilisation des entrées à niveau ligne 2/3 et 4/5 et des retours auxiliaires : • Si seulement le canal gauche est utilisé, le
signal sera entendu sur les canaux gauche et droit et l’équilibre ne peut être ajusté.
• Si seulement le canal droit est utilisé, le signal sera entendu seulement sur le canal droit.
1
34
4
5
6
8
8 9
9
10
11 11
11
12
14
14 15
1617
18
19
20 21
12
13
13
10
10
2
9
volume
m1
m2
pitch x y z
- +octave
accomp storetap
phrase latch
a n a l o g m o d e l i n g s y n t h
push
rhyth ms
p
atterns
progra m
s setups
conf ig
CONTENUTI DELLA CONFEZIONE Mixer ZEPHYR Adattatore di alimentazione Guida rapida Istruzioni di sicurezza e garanzia
SCHEMA DEI COLLEGAMENTI
Alimentazione
Altoparlanti domestici*
Tastiera*
Drum Machine*
Microfono*
Cuffie*
Note:
Microfoni, mixer, monitor, amplificatore, altoparlanti, cavi, ecc. non in dotazione. Per ridurre il ronzio elettrico con impostazioni elevate di guadagno, tenere l’alimentazione del mixer
lontana dal cavo della chitarra e dagli ingressi canale del mixer.
Servirsi del cavo di alimentazione in dotazione per collegare il mixer ad una presa di alimentazione. Ad alimentazione spenta, collegare l’alimentazione elettrica innanzitutto nel mixer, quindi ad una presa elettrica.
2. INTERRUTTORE DI ALIMENTAZIONE (POWER) – Accende e spegne il mixer. Accendere il mixer dopo aver collegato tutti i dispositivi d’ingresso e prima di accendere gli amplificatori. Spegnere gli amplificatori prima di spegnere il mixer.
3. INGRESSO MICROFONO – Collegare un microfono a questi ingressi servendosi di un cavo XLR.
4. INGRESSI DI LINEA * – Collegare dispositivi a livello di linea a questi ingressi servendosi di cavi da 1/4”.
5. GAIN – Regola il livello audio del canale (guadagno pre-fader e pre EQ). Regolarlo in modo che PEAK LED si accenda unicamente nelle parti più rumorose della canzone.
6. HI EQ (TREBLE) – Regola le frequenze alte (treble) del canale.
7. LOW EQ (BASS) – Regola le frequenze basse (bass) del canale.
8. CHANNEL PAN – Regola la posizione (mono) del canale nel campo stereo.
9. BALANCE (CH 2/3 & 4/5) – Regola il bilanciamento tra i canali 2 e 3 e i canali 4 e 5.
10. PEAK LED – Il LED lampeggia se il segnale salta. Se ciò dovesse accadere, abbassare l’impostazione della manopola GAIN o della manopola CHANNEL VOLUME.
11. CHANNEL VOLUME (volume canale) – Regola il livello audio sul canale.
12. INGRESSI AUX – Si possono collegare questi ingressi alle uscite di una fonte audio esterna servendosi di un cavo stereo standard RCA (venduto separatamente). Si possono inviare questo canale al mix monitor (servendosi dell'interruttore AUX A CUFFIE) e/o il mix principale (servendosi dell'interruttore AUX A MAIN).
13. USCITE AUX – Si possono collegare queste uscite agli ingressi di un dispositivo di registrazione esterno servendosi di un cavo stereo standard RCA (venduto separatamente).
14. USCITE MAIN MIX – Servirsi di cavi standard da 1/4" per collegare queste uscite ad un amplificatore o impianto di altoparlanti. Il livello di queste uscite è controllato dalla manopola MAIN VOLUME.
15. USCITE CUFFIE – Collegate a questa uscita le vostre cuffie da 1/4”. La manopola CUFFIE controlla il volume.
16. AUX A MAIN – Premere questo tasto per selezionare quale segnale convogliare alle USCITE MAIN MIX: il mix principale o il segnale dagli INGRESSI AUX.
17. AUX A CUFFIE – Premere questo tasto per selezionare quale segnale convogliare alle USCITE CTRL ROOM e alle cuffie: il mix principale o il segnale dagli INGRESSI AUX.
18. CUFFIE – Regola il volume delle cuffie.
19. MAIN VOLUME – Regola il livello del volume dell’USCITE MAIN MIX.
20. MISURATORI A LED – Mostrano il livello audio del mix principale. Abbassare il volume se il LED CLIP si accende troppo.
21. LED DI ALIMENTAZIONE – Si illumina quando il mixer è acceso.
* Quando si utilizzano INGRESSI DI LINEA 2/3, 4/5 e AUX RETURNS: • Se viene utilizzato solo il canale sinistro,
il canale si sente sia nel canale di sinistra che in quello di destra e l'equilibrio non sarà regolabile.
• Se viene utilizzato solo il canale di destra, il segnale si sentirà unicamente nel canale di destra.
1
34
4
5
6
8
8 9
9
10
11 11
11
12
14
14 15
1617
18
19
20 21
12
13
13
10
10
2
11
volume
m1
m2
pitch x y z
- +octave
accomp storetap
phrase latch
a n a l o g m o d e l i n g s y n t h
push
rhyth ms
p
atterns
progra m
s setups
conf ig
LIEFERUMFANG ZEPHYR Mixer Netzteil Schnellstart-Anleitung Sicherheitshinweise und Garantieinformationen
ANSCHLUSSÜBERSICHT
Stromversorgung
HiFi-Anlage*
Keyboard*
Drum Machine*
Mikrofone*
Kopfhörer*
Hinweise:
Mikrofone, Monitore, Verstärker, Lautsprecher, Kabel, etc. sind nicht im Lieferumfang enthalten. Um Brummgeräusche bei hohen Gain-Einstellungen zu reduzieren, bewahren Sie das Netzteil des
Mixers nicht in der Nähe des Gitarrenkabels oder der Kanaleingänge des Mixers auf.
* nicht im Liefterumfang enthalten
12
FUNKTIONEN 1. POWER IN – Verwenden Sie das mitgelieferte
Netzteil, um den Mixer mit einer Steckdose zu verbinden. Stellen Sie sicher, dass das Gerät ausgeschaltet ist. Verbinden Sie das Stromkabel mit dem Mixer und stecken das Netzteil dann in eine Steckdose.
2. POWER SWITCH – Schaltet das Gerät ein/aus. Schalten Sie den Mixer ein, nachdem alle Eingabegeräte angeschlossen wurden und bevor Sie die Verstärker einschalten. Schalten Sie die Verstärker aus, bevor Sie das Mischpult ausschalten.
3. MIC-EINGANG - Schließen Sie ein Mikrofon mit einem XLR-Kabel an diese Eingänge an.
4. LINE-EINGANG* - Schließen Sie Line-Geräte mit 1/4"-Kabeln an diese Eingänge an.
5. GAIN – Regelt die Lautstärke des Kanals (Pre-Fader und Pre-EQ-Gain). Stellen Sie diese so ein, dass die PEAK LED bei den lautesten Passagen des Songs kurz aufleuchtet.
6. HI EQ (HÖHEN) – Regelt die hohen Frequenzen (Treble) des Kanals.
7. LOW EQ (BASS) – Regelt die tiefen Frequenzen (Bass) des Kanals.
8. KANAL-PAN – Regelt die Kanalposition (Mono) im Stereo-Feld.
9. BALANCE (CH 2/3 & 4/56) – Regelt die Balance zwischen den Kanälen 2 und 3 sowie zwischen 4 und 5.
10. PEAK LED – Sobald das Signal übersteuert, blinkt die LED. Wenn dies geschieht, verringern Sie den Wert des GAIN-Reglers oder des KANALLAUTSTÄRKE-Reglers.
11. KANALLAUTSTÄRKE – Regelt die Lautstärke des Kanals.
12. AUX-EINGÄNGE – Sie können diese Eingänge mit den Ausgängen einer externen Tonquelle verbinden, indem Sie ein handelsübliches Stereo-Cinch-Kabel (separat erhältlich) verwenden. Sie können diesen Kanal (mit dem AUX TO PHONES-Schalter) an den Monitor-Mix und/oder an den Main Mix (mit dem AUX TO MAIN MIX-Schalter) senden.
13. AUX-AUSGÄNGE – Sie können diese Ausgänge mit den Eingängen eines externen Aufnahmegeräts verbinden, indem Sie ein handelsübliches Stereo-Cinch-Kabel (separat erhältlich) verwenden.
14. MAIN MIX AUSGÄNGE – Verwenden Sie handelsübliche 1/4"-Kabel, um diese Ausgänge an Ihre HiFi-Anlage oder Ihr Verstärkersystem anzuschließen. Die Lautstärke dieser Ausgänge steuern Sie über den Regler für GESAMTLAUTSTÄRKE.
15. KOPFHÖRERAUSGANG – Schließen Sie 1/4" Stereo-Kopfhörer an diesen Ausgang an. Die Lautstärke regeln Sie über KOPFHÖRER.
16. AUX TO MAIN MIX – Mit dieser Taste können Sie wählen, welches Signal an die MAIN MIX AUSGÄNGE geleitet wird – der Main Mix oder das Signal der AUX-EINGÄNGE.
17. AUX TO PHONES – Mit dieser Taste können Sie wählen, welches Signal an Ihre Kopfhörer geleitet wird – der Main Mix oder das Signal der AUX-EINGÄNGE.
18. KOPFHÖRER – Regelt die Lautstärke des Kopfhörer.
19. GESAMTLAUTSTÄRKE – Regelt die Lautstärke der MAIN MIX AUSGÄNGE.
20. LED-ANZEIGE – Zeigt die Lautstärke des Main Mix an. Reduzieren Sie die Lautstärke, falls die CLIP-LED oft leuchtet.
21. POWER-LED - Leuchtet, wenn der Mixer eingeschaltet ist.
* Wenn Sie LINE EINGÄNGE 2/3, 4/5 und AUX RETURNS verwenden: • Wenn nur der linke Kanal verwendet
wird, wird das Signal sowohl am linken als auch am rechten Kanal zu hören sein. Die Balance kann nicht justiert werden.
• Wenn nur der rechte Kanal verwendet wird, wird das Signal nur am rechten Kanal zu hören sein.
1
34
4
5
6
8
8 9
9
10
11 11
11
12
14
14 15
1617
18
19
20 21
12
13
13
10
10
2
13
volume
m1
m2
pitch x y z
- +octave
accomp storetap
phrase latch
a n a l o g m o d e l i n g s y n t h
push
rhyth ms
p
atterns
progra m
s setups
conf ig
INHOUD VAN DE DOOS ZEPHYR mengpaneel Stroomadapter Snelstartgids Veiligheidsvoorschriften & boekje met informatie over de garantie
VERBINDINGSDIAGRAM
Stroom
Luidsprekers*
Keyboard*
Drumcomputer*
Microfoons*
Hoofdtelefoons*
Opmerkingen:
Microfoons, monitoren, versterker, luidsprekers, kabels, enz. zijn niet inbegrepen. Houd de voeding van het mengpaneel verwijderd van uw gitaarkabel en de kanaalingangen van het
mengpaneel om bij hoge gain-instellingen elektrische brom te verminderen.
* niet inbegrepen
14
EIGENSCHAPPEN 1. POWER IN: Gebruik de meegeleverde stroomadapter
om het mengpaneel aan te sluiten op een stopcontact. Sluit de voeding eerst aan op het mengpaneel en daarna op het stopcontact. Zorg ervoor dat het apparaat ondertussen uit staat.
2. POWER SWITCH: Zet het mengpaneel aan en uit. Zet het mengpaneel aan nadat alle invoerapparaten zijn aangesloten en voordat u de versterkers aanzet. Schakel de versterkers uit voordat u de mixer uitzet.
3. MIC INPUT: Sluit met behulp van een XLR-kabel een microfoon aan op deze ingangen.
4. LINE INPUT*: Sluit lijnniveau-apparaten aan op deze ingangen met 1/4"-kabels.
5. GAIN: Regelt het geluidsniveau van het kanaal (pre-fader en pre-EQ gain). Pas dit zo aan dat de PEAK LED maar lichtjes oplicht tijdens de luidste delen van de song.
6. HI EQ (TREBLE): Regelt de hoge frequenties (treble) van het kanaal.
7. LOW EQ (BASS): Regelt de lage frequenties (bassen) van het kanaal.
8. CHANNEL PAN: Past de plaats aan van het (mono)kanaal in het stereoveld.
9. BALANS (CH 2/3 & 4/5): Regelt de balans tussen Kanalen 2 en 3 en Kanalen 4 en 5.
10. PEAK LED: De LED knippert wanneer het signaal overstuurd wordt. Als dit gebeurt, verlaag dan de instelling van de GAIN-knop of de CHANNEL VOLUME-knop.
11. CHANNEL VOLUME: Past het geluidsniveau aan van het kanaal.
12. AUX INPUTS: U kunt deze ingangen verbinden met de uitgangen van een externe geluidsbron met behulp van een standaard stereo RCA-kabel (afzonderlijk verkrijgbaar). U kunt dit kanaal naar de monitormix (met behulp van de AUX RETURN TO PHONES-schakelaar) en/of de hoofdmix sturen (met behulp van de AUX RETURN TO MAIN MIX-schakelaar).
13. AUX OUTPUTS: U kunt deze uitgangen aansluiten op de ingangen van een extern opnameapparaat met behulp van een standaard stereo RCA-kabel (afzonderlijk verkrijgbaar).
14. MAIN MIX OUTPUTS: Gebruik standaard 1/4"-kabels om deze uitgangen aan te sluiten op de hoofdluidsprekers of -versterker. Het geluidsniveau van deze uitgangen wordt gecontroleerd door de MAIN LEVEL-knop.
15. PHONES OUTPUT: Sluit uw 1/4"-stereohoofdtelefoon aan op deze uitgang. De PHONES-knop bepaalt het volume.
16. AUX RETURN TO MAIN MIX: Druk op deze toets om te kiezen welk signaal wordt doorgestuurd naar de MAIN MIX-uitgangen: de hoofdmix of het signaal van de AUX-ingangen.
17. AUX RETURN TO PHONES: Druk op deze toets om te kiezen welk signaal wordt doorgestuurd naar de je hoofdtelefoon: de hoofdmix of het signaal van de AUX-ingangen.
18. PHONES: Regelt het volume van de je hoofdtelefoon.
19. MAIN LEVEL: Regelt het volume van de MAIN MIX OUTPUTS.
20. LED METERS: Toont de geluidsniveau van de hoofdmix. Zet het volume lager als de CLIP-LED te vaak oplicht.
21. POWER LED: Brandt wanneer de luidspreker is ingeschakeld.
* Bij gebruik van LIJNINGANGEN 2/3, 4/5 en de AUX RETURNS: • Als alleen het linkerkanaal wordt gebruikt,
zal het signaal hoorbaar zijn in zowel linker- als rechterkanaal en is de geluidsbalans niet aanpasbaar.
• Als alleen het rechterkanaal wordt gebruikt, dan is het signaal enkel hoorbaar in het rechterkanaal.
1
34
4
5
6
8
8 9
9
10
11 11
11
12
14
14 15
1617
18
19
20 21
12
13
13
10
10
2
TECHNICAL SPECIFICATIONS FREQUENCY RESPONSE: All inputs: 20 Hz – 22 kHz (±1 dB) THD+N: All inputs: < 0.005% (@ 4 dBu, 1 kHz) GAIN RANGE: Mic inputs (Channel 1): 0 – 44 dB
Line input (Channel 1): 12 – 30 dBu Line inputs (Channels 2-5): 0 dBu MAX VOLTAGE GAIN: 74 dB (MIC INPUT to MAIN MIX OUTPUT and AUX OUTPUT) 80 dB (MIC INPUT to PHONES OUPTUT) 30 dB (LINE INPUT to MAIN MIX OUTPUT) SNR: All inputs: > 110 dBu IMPEDANCE: Mic inputs: 3.9 kΩ All other inputs: > 10 kΩ Aux output : 1 kΩ
All other outputs: 120 Ω EQUALIZATION: High: ±15 dB @ 12 kHz Low: ±15 dB @ 80 Hz CROSSTALK: Adjacent inputs: < -80 dB @ 1 kHz Inputs to outputs: < -75 dB @ 1 kHz (stereo L/R, Channel 1, panned hard left
or right)
MAIN MIX: AUX OUTPUT, PHONES OUTPUT: 0 dBu, unbalanced, 1/4" jacks Max output: +22 dBu, unbalanced, 1/4" jacks Bus noise: < -90 dB @ 20 Hz ~ 22 kHz (Channel and Main Mix levels at 0 dB,
others at minimum) POWER SUPPLY: 18 V, 500mA POWER CONSUMPTION: 9 W DIMENSIONS (W x D x H): 5.1" x 8"x 1.5" (128 mm x 204 mm x 38 mm) WEIGHT: 1.65 lbs (0.75 kg) * Specifications are subject to change without notice Under rare circumstances, if this product is exposed to electromagnetic interference during use, there may be a slight drop in signal-to-noise ratio. This unit is well designed to prevent any inrush current.