KANVAS STUDIO • 132 WEST 36TH ST, 4TH FLOOR NEW YORK, NY 10018 • 212-840-3250 • BENARTEX.COM
Share your finished quilt with the Benartex community on social media by tagging #benartexfabrics!
NOTE: If this Benartex pattern is included in a kit, any questions about the kit should be addressed to the vendor from whom you bought it.
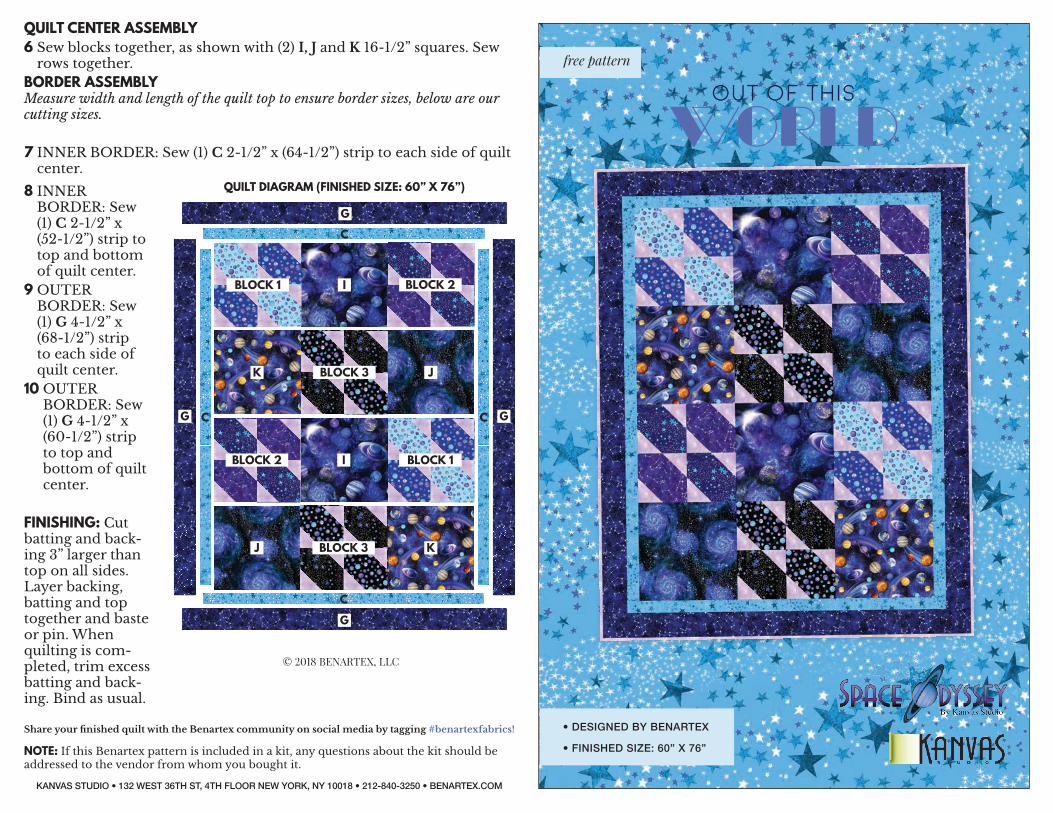
QUILT CENTER ASSEMBLY6 Sew blocks together, as shown with (2) I, J and K 16-1/2” squares. Sew
rows together.BORDER ASSEMBLY Measure width and length of the quilt top to ensure border sizes, below are our cutting sizes.
7 INNER BORDER: Sew (1) C 2-1/2” x (64-1/2”) strip to each side of quilt center.
• DESIGNED BY BENARTEX
• FINISHED SIZE: 60” X 76”
free pattern
OUT OF THIS
WorldQUILT DIAGRAM (FINISHED SIZE: 60” X 76”)
BLOCK 1
BLOCK 1
BLOCK 2
BLOCK 2
BLOCK 3
BLOCK 3
I
I
K
K
J
J
G G
G
G
C
C
C C
8 INNER BORDER: Sew (1) C 2-1/2” x (52-1/2”) strip to top and bottom of quilt center.
9 OUTER BORDER: Sew (1) G 4-1/2” x (68-1/2”) strip to each side of quilt center.
10 OUTER BORDER: Sew (1) G 4-1/2” x (60-1/2”) strip to top and bottom of quilt center.
FINISHING: Cut batting and back-ing 3” larger than top on all sides. Layer backing, batting and top together and baste or pin. When quilting is com-pleted, trim excess batting and back-ing. Bind as usual.
CUTTING INSTRUCTIONSWOF = Width of fabric | *Sew strips via short ends, then subcut as indicated
FOR THE FOLLOWING FABRICS: From 1 FQ, cut (4) 8-1/2” squares
A STARRY NIGHT 8922-12 Black/Royal
B STARRY NIGHT 8922-55 Navy/Turquoise
D NEW WORLD DOT 8926-12 Black
E NEW WORLD DOT 8926-50 Royal
C (7) 2-1/2” x WOF strips; Inner Border
5/8 yd
STARRY NIGHT 8922-84 Turquoise
F NEW WORLD DOT 8926-84 Turquoise
H CONSTELLATIONS 8927-66 Purple
G (7) 4-1/2” x WOF strips; Outer Border
1 yd CONSTELLATIONS 8927-55 Blue
I UNIVERSE 8928-55 Blue
J GALACTIC STARS 8929-55 Deep Blue
K CELESTIAL PLANETS 8930-99 Multi
FOR THE FOLLOWING FABRICS:
(1) 16-1/2” x WOF strip, subcut (2) 16-1/2” squares
1/2 yd
L (6) 4-1/2” x WOF strips, subcut (48) 4-1/2” squares(7) 2-1/4” x WOF strips; Binding
1-1/4 yd
NEW HUE 8673-06 Lilac
UNIT ASSEMBLY 1 Draw a diagonal line on the wrong side of (1) L 4-1/2” square. Place
square, right sides together, at a corner of (1) F 8-1/2” square. Sew on drawn line. Trim 1/4” away from sewn line. Open and press to reveal L corner triangle. Repeat with another L 4-1/2” square on opposite corner of F square to complete FL Unit. Make 4.
2 Repeat to make the following units. Make 4 each.
repeat steps on opposite corner
open and presstrim 1/4” away from sewn line
sew on drawn line
F
L L
FF
L
F
L
L
L
LE
L
LD
L
LA
L
LB
L
LH
BLOCK ASSEMBLY 3 Sew (1) FL unit to (1) EL unit. Square to 16-1/2”. Make 4.4 Sew (2) sewn units together to complete Block 1. Make 2.
5 Repeat to make the following blocks. Make 2 each.