A View & Do™ Octagon and Starmaker® 8 Pattern Octagons by Kaye Wood. Octagons ™ ™ 8 Starmaker 8 designed by 4 piece wedge 8 piece w edge 16 2 3 4 5 6 10 11 12 13 14 15 16 1 2 3 4 5 6 7 8 9 10 1 1 1 2 3 4 5 6 7 8 9 10 11 1 2 3 4 5 6 1 2 3 4 4 kaleidoscope Kaye Wood 16 piece Dresden Plate 16 piece wedge 6 8" octagon fussy-cut blocks Block Border Strips Light ⅓ yd Dark ⅓ yd Accent Strips yellow two 1" strips red two 1" strips Purple two 1" strips Corners ½ yd 1st Border ¼ yd 2nd Border ½ yd binding ¼ yd batting 17" x 73" backing 17" x 73" View & Do™ Octagon Shape Starmaker® 8 Fussy-Cut embroidery designs or fabric prints. e floral embroidery designs are made by Dalco Dimensions 3D Flowers. Quilting the Kaye Wood Way! It's the technique that makes it easy. Tumbling Winds Tablerunner 15½" x 69" by Kaye Wood Skill level for piecing: intermediate Construction Time: 8 hours + embroidery time Cut 6 fussy-cut 8" octagons Use the opening in the 8" Octagon Shape to visually center the fabric or embroidery design. Rotary cut around the outside of the 8" Octagon Shape. Accent strip to match flower. Cut a 1" strip for each block for the accent fabric. Fold the accent strip, wrong sides together, and press. e folded strip is ½" wide. Sew the accent strip to one side of the octagon, with all raw edges even, using a ⅛" seam allowance. Place the 8" Octagon Shape on top of the octagon and accent strip. Rotary cut both ends of the accent strip. Continue sewing and cutting the accent strips clockwise to each of the octagon sides, following Step 2, 3 and 4. Border Strips for the Blocks. Cut strips needed to border the blocks: Light Cut 7 1½" strips. Dark Cut 7 1½" strips. Mark the center of the top of each of the fabric octagons with a pin. is will insure the light and dark strips are placed correctly around the octagon. Sew a #1 (light) piece to the top (pin marked) of each fabric octagon. Sew a partial seam by starting the seam at the center pin. Press the seam allowance toward the strip and away from the octagon. Fold 1 2 3 4 5 6 7 8 9 10 11 12 13 14 15 16 Start Stitching extend 2" Octagon—8" ™ CLOVER Pin Mark—place a pin at the top of the design. CLOVER Octagon—8" ™ Rotary cut the accent strip on both sides Sew the folded strip using ⅛". Sew the strips to the octagon in their numbered order.
Transcript
A View & Do™ Octagon and
Starmaker® 8 Pattern
Octagonsby
Kaye Wood.
Octagons™
™
8
Starmaker 8
designed by
4 pie
ce w
edge 8 piece
wedge
16
2
3
4
5
6
10
11
12
13
14
15
16
12
34
56
78
910
11
1 2 3 4 5 6 7 8 9 10 11
1
2
3
4
5
6
12
34
4
kaleidoscope
Kaye Wood
16 pieceDresden
Plate
16 piecewedge
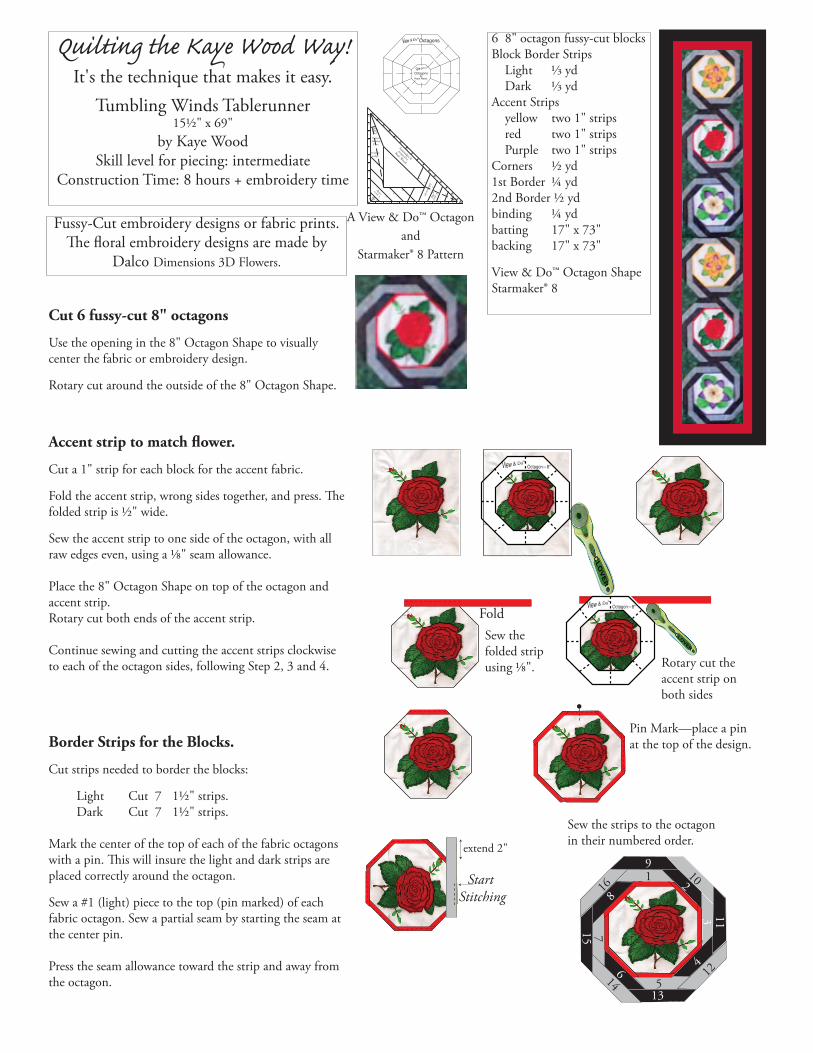
6 8" octagon fussy-cut blocksBlock Border Strips Light ⅓ yd Dark ⅓ ydAccent Strips yellow two 1" strips red two 1" strips Purple two 1" stripsCorners ½ yd1st Border ¼ yd2nd Border ½ ydbinding ¼ ydbatting 17" x 73"backing 17" x 73"
View & Do™ Octagon ShapeStarmaker® 8
Fussy-Cut embroidery designs or fabric prints.The floral embroidery designs are made by
Dalco Dimensions 3D Flowers.
Quilting the Kaye Wood Way!It's the technique that makes it easy.
Tumbling Winds Tablerunner15½" x 69"
by Kaye WoodSkill level for piecing: intermediate
Construction Time: 8 hours + embroidery time
Cut 6 fussy-cut 8" octagons
Use the opening in the 8" Octagon Shape to visually center the fabric or embroidery design.
Rotary cut around the outside of the 8" Octagon Shape.
Accent strip to match flower.
Cut a 1" strip for each block for the accent fabric.
Fold the accent strip, wrong sides together, and press. The folded strip is ½" wide.
Sew the accent strip to one side of the octagon, with all raw edges even, using a ⅛" seam allowance.
Place the 8" Octagon Shape on top of the octagon and accent strip.Rotary cut both ends of the accent strip.
Continue sewing and cutting the accent strips clockwise to each of the octagon sides, following Step 2, 3 and 4.
Border Strips for the Blocks.
Cut strips needed to border the blocks:
Light Cut 7 1½" strips. Dark Cut 7 1½" strips. Mark the center of the top of each of the fabric octagons with a pin. This will insure the light and dark strips are placed correctly around the octagon.
Sew a #1 (light) piece to the top (pin marked) of each fabric octagon. Sew a partial seam by starting the seam at the center pin.
Press the seam allowance toward the strip and away from the octagon.
Fold
1 2
3
4
56
7
8
910
11
12
1314
15
16Start
Stitching
extend 2"
Octagon—8"™
CLO
VER
Pin Mark—place a pin at the top of the design.
CLOVER
Octagon—8"™
Rotary cut the accent strip on both sides
Sew the folded strip using ⅛".
Sew the strips to the octagon in their numbered order.
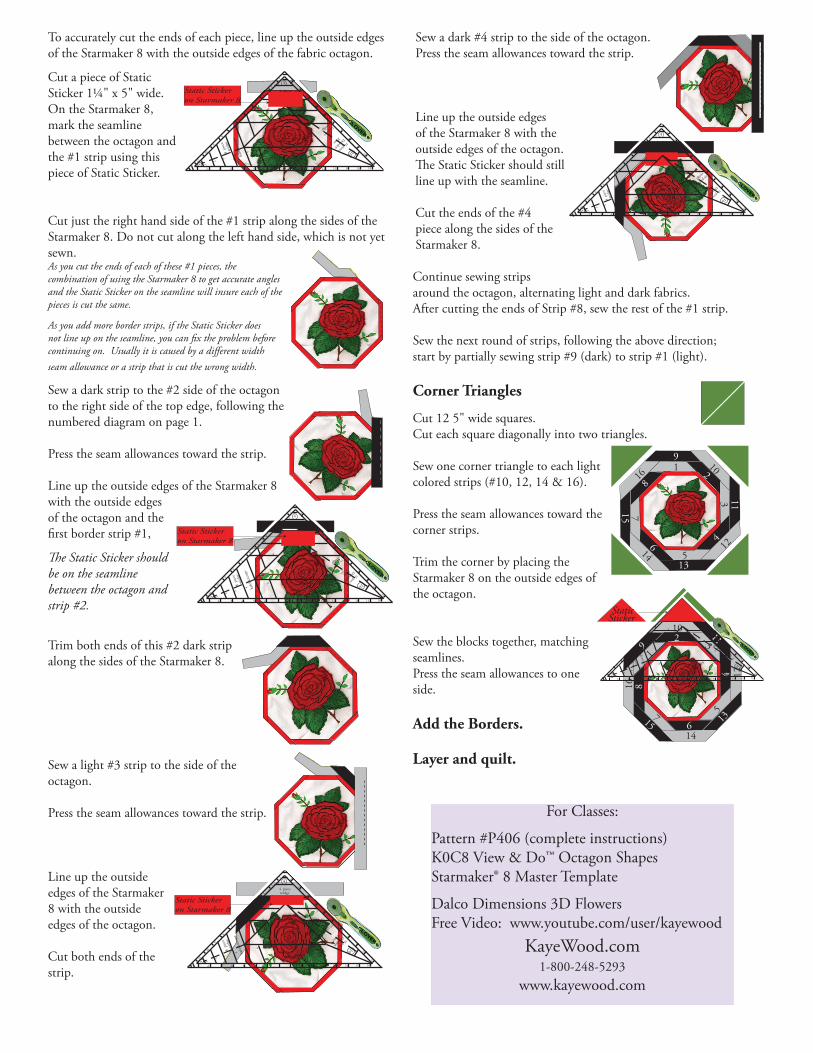
To accurately cut the ends of each piece, line up the outside edges of the Starmaker 8 with the outside edges of the fabric octagon.
Cut a piece of Static Sticker 1¼" x 5" wide.On the Starmaker 8, mark the seamline between the octagon and the #1 strip using this piece of Static Sticker. Cut just the right hand side of the #1 strip along the sides of the Starmaker 8. Do not cut along the left hand side, which is not yet sewn.As you cut the ends of each of these #1 pieces, the combination of using the Starmaker 8 to get accurate angles and the Static Sticker on the seamline will insure each of the pieces is cut the same.
As you add more border strips, if the Static Sticker does not line up on the seamline, you can fix the problem before continuing on. Usually it is caused by a different width seam allowance or a strip that is cut the wrong width.
Sew a dark strip to the #2 side of the octagon to the right side of the top edge, following the numbered diagram on page 1.
Press the seam allowances toward the strip.
Line up the outside edges of the Starmaker 8 with the outside edges of the octagon and the first border strip #1,
The Static Sticker should be on the seamline between the octagon and strip #2.
Trim both ends of this #2 dark strip along the sides of the Starmaker 8.
Sew a light #3 strip to the side of the octagon.
Press the seam allowances toward the strip.
Line up the outside edges of the Starmaker 8 with the outside edges of the octagon.
Cut both ends of the strip.
CLOVER
8
Starmaker 8
designed by
4 piece wedge
8 p
iece
wed
ge
16
2 3 4 5 6 10 11 12 13 14 15 16
1
2
3
4
5
6
7
8
9
10
11
1
2
3
4
5
6
7
8
9
10
11
1
2
3
4
5 6
1
2
3
4
4
kalei
dosc
ope
Kaye Wood
16 piece
Dresden
Plate
16 piece
wedge
Static Stickeron Starmaker 8
CLOVER
8
Starmaker 8
designed by
4 piece wedge
8 p
iece
wed
ge
16
2 3 4 5 6 10 11 12 13 14 15 16
1
2
3
4
5
6
7
8
9
10
11
1
2
3
4
5
6
7
8
9
10
11
1
2
3
4
5 6
1
2
3
4
4
kalei
dosc
ope
Kaye Wood
16 piece
Dresden
Plate
16 piece
wedge
Static Stickeron Starmaker 8
Sew a dark #4 strip to the side of the octagon.Press the seam allowances toward the strip.
Line up the outside edges of the Starmaker 8 with the outside edges of the octagon.The Static Sticker should still line up with the seamline.
Cut the ends of the #4 piece along the sides of the Starmaker 8.
Continue sewing strips around the octagon, alternating light and dark fabrics.After cutting the ends of Strip #8, sew the rest of the #1 strip. Sew the next round of strips, following the above direction;start by partially sewing strip #9 (dark) to strip #1 (light). Corner Triangles
Cut 12 5" wide squares.Cut each square diagonally into two triangles.
Sew one corner triangle to each light colored strips (#10, 12, 14 & 16).
Press the seam allowances toward the corner strips.
Trim the corner by placing the Starmaker 8 on the outside edges of the octagon.
Sew the blocks together, matching seamlines.Press the seam allowances to one side.