22
. V . V 2 0 4 R • • 1 0 4 R

.V.V 204 R • • 104 R

13
ENG
LISHSUMMARY
WARRANTY
IMPORTANT WARNING
INTRODUCTION TO YOUR NEW R 401 • R 402 • R 402 V.V. BOWL CUTTER/VEGETABLE PREPARATION
SWITCHING ON THE MACHINE• Advice on electrical connections
• Control panel
ASSEMBLY• Bowl cutter attachment
• Vegetable preparation attachment
USES AND EXAMPLES• Bowl cutter attachment
• Vegetable preparation attachment
OPTIONS• Serrated blade
• Slightly serrated blade
CLEANING• Motor base
• Bowl cutter attachment
• Vegetable preparation attachment
• Blade
MAINTENANCE• Blade
• Motor seal
• Bowl locating plates
TECHNICAL SPECIFICATIONS• Weight
• Dimensions
• Working height
• Noise level
• Electrical data
SAFETY
STANDARDS
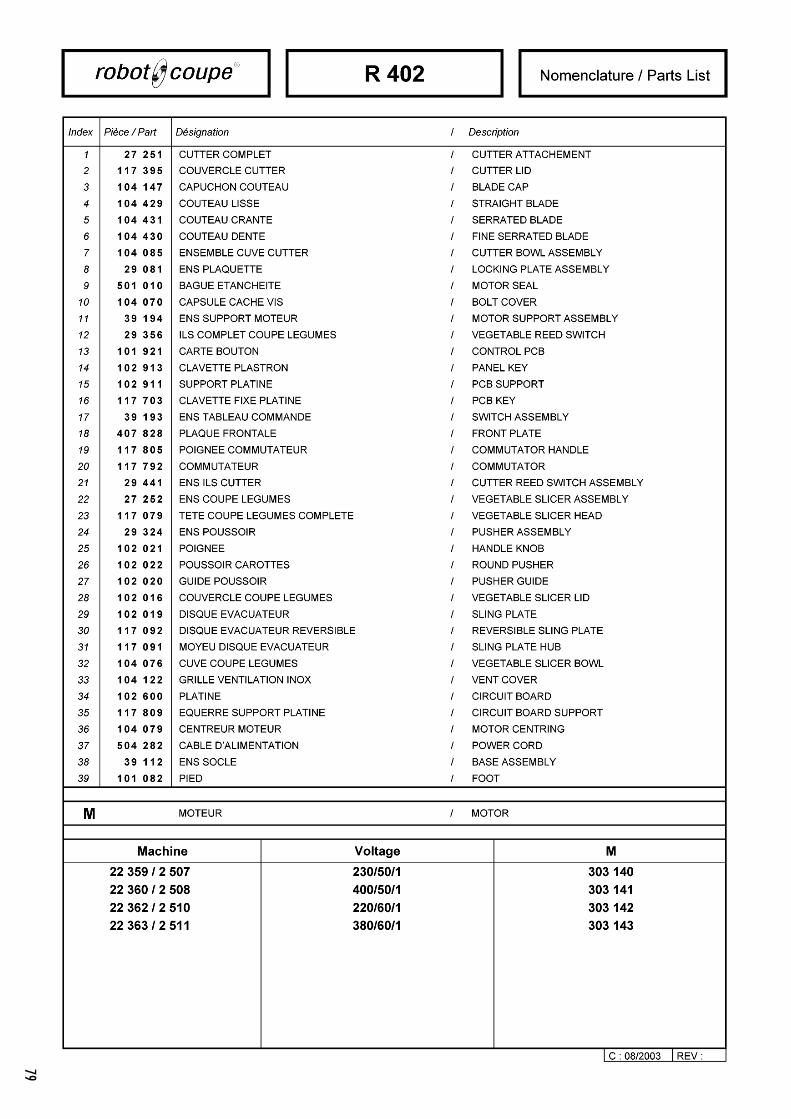
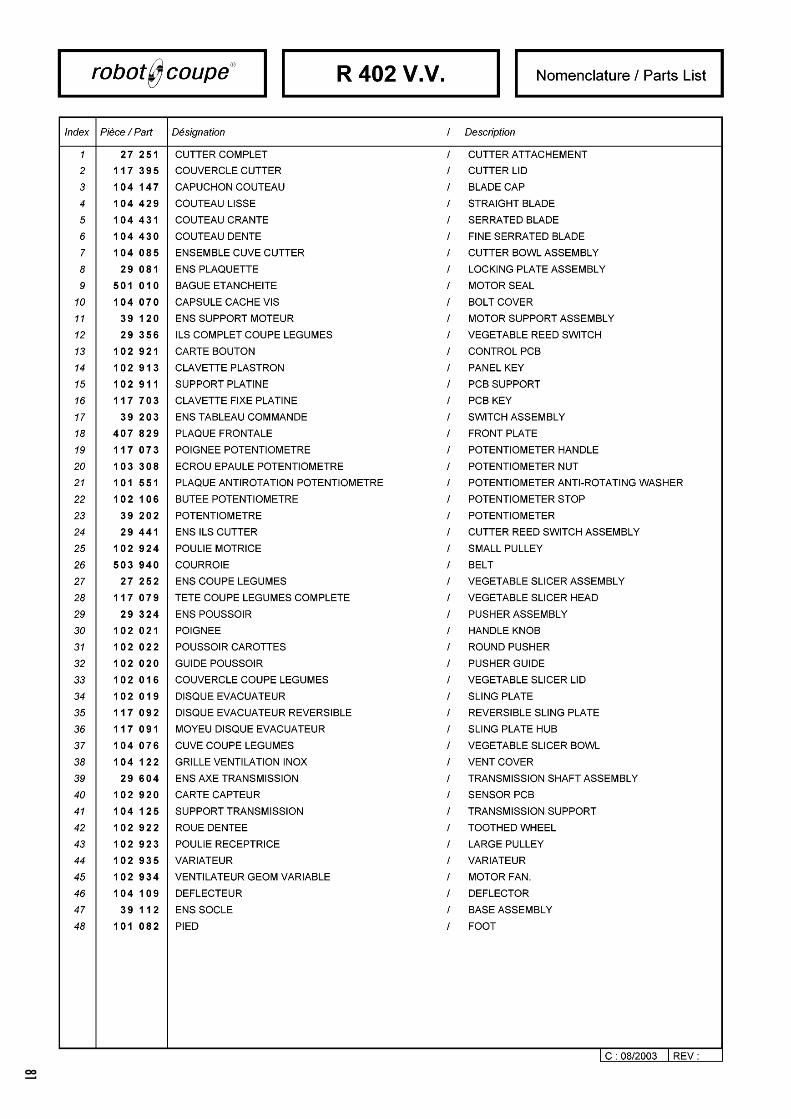
TECHNICAL DATA • Exploded views
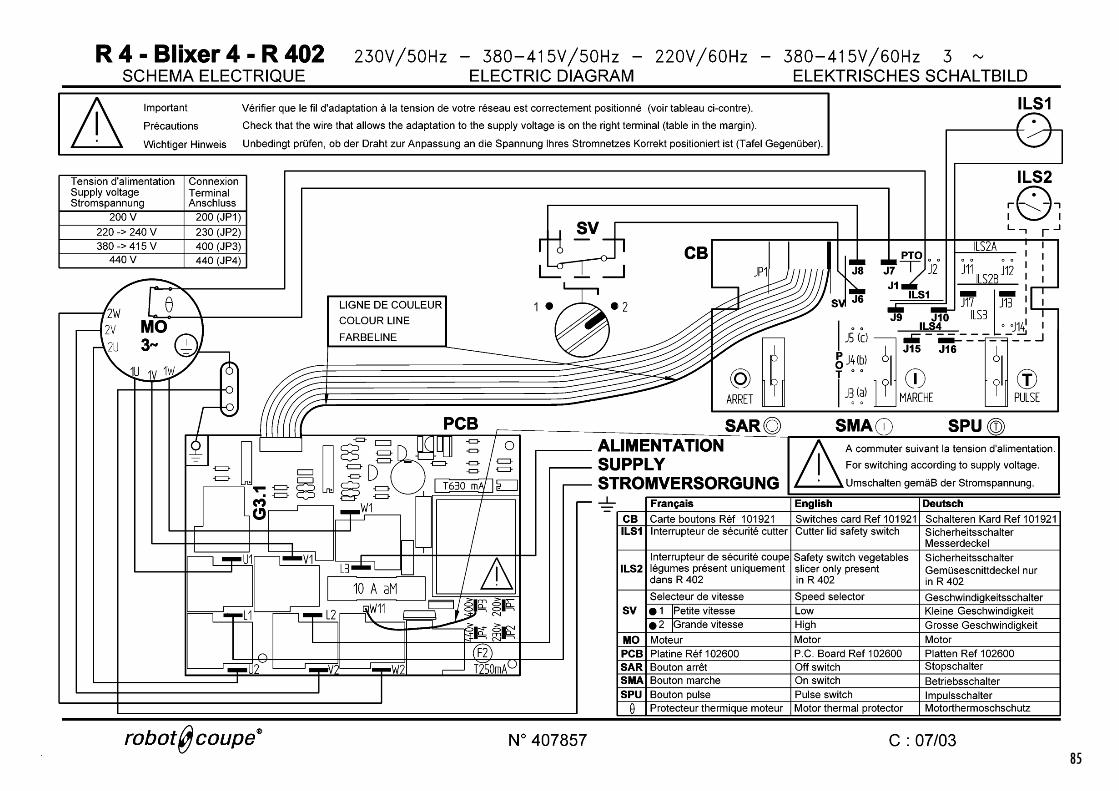
• Electric diagram

14
ROBOT-COUPE S.N.C., LIMITED WARRANTY
Your new ROBOT-COUPE appliance is war-ranted to the original buyer for a period ofone year from the date of sale if youbought it from ROBOT-COUPE S.N.C.
If you bought your ROBOT-COUPE productfrom a distributor your product is coveredby your distributor’s warranty (Please checkwith your distributor terms and conditionsof the warranty).
The ROBOT-COUPE S.N.C. limited warrantyis against defects in material and/or work-manship.
The ROBOT-COUPE S.N.C. warranty is gi-ven expressly and in lieu of all other war-ranties, expressed or implied, for mer-chantability and for fitness toward a parti-cular purpose and constitutes the onlywarranty made by ROBOT-COUPE S.N.C.France.
THE FOLLOWING ARE NOT COVEREDBY THE ROBOT-COUPE S.N.C.WARRANTY:
1 - Damage caused by abuse, misuse, drop-ping, or other similar damage caused by or resulting from failure to follow assembly, opera-ting, cleaning, user maintenance or storage ins-tructions.
2 - Labour to sharpen and/ or replacements forblades which have become blunt, chipped orworn after a normal or excessive period of use.
3 - Materials or labour to replace or repairscratched, stained, chipped, pitted, dented ordiscoloured surfaces, blades, knives, attachmentsor accessories.
4 - Any alteration, addition or repair that hasnot been carried out by the company or anapproved service agency.
5 - Transportation of the appliance to or from anapproved service agency.
6 - Labour charges to install or test new attach-ments or accessories (i.e., bowls, discs, blades, at-tachments) which have been arbitrarity replaced.
7 - The cost of changing direction-of-rotation ofthree-phase electric motors (Installer is responsible).
8 - SHIPPING DAMAGES. Visible and latentdefects are the responsibility of the freight carrier.The consignee must inform the carrier and consi-gnor immediately, or upon discovery in the caseof latent defects.KEEP ALL ORIGINAL CONTAINERS AND PACKING MATERIALS FOR CARRIER INSPEC-TION.
Neither ROBOT-COUPE S.N.C. nor its affiliatedcompanies or any of its distributors, directors,agents, employees, or insurers will be liable forindirect damage, losses, or expenses linked to theappliance or the inability to use it.

15
ENG
LISH
WARNING: In order to limit accidents such as electric shocks, personal injury or fire, and in order to limit material damage due to misuseof the appliance, please read these instructions carefully and follow them strictly. Reading the operating instructions will help you get toknow your appliance and enable you to use the equipment correctly. Please read these instructions in their entirely and make sure thatanyone else who may use the mixer also reads them beforehand.
IMPORTANT WARNING
UNPACKING• Carefully remove the equipment from the packa-ging and take out all the boxes or packets containingattachments or specific items.
• WARNING - some of the tools are very sharp e.g.blade, discs... etc.
INSTALLATION• We recommend you install your machine on a per-fectly stable solid base.
CONNECTION• Always check that your mains supply correspondsto that indicated on the rating plate on the motor unitand that it can take the amperage.
• The machine must be earthed.
• With the three-phased version, always check thatthe blade rotates in an anti-clockwise direction.
HANDLING• Always take care when handling the blades ordiscs - they are very sharp.
ASSEMBLY PROCEDURES• Follow the various assembly procedures carefully(see page 17) and make sure that all the attachmentsare correctly positioned.
USE• Never try to override the locking and safety sys-tems.
• Never introduce any object into the containerwhere the food is being processed.
• Never push the ingredients down with your hand.
• Do not overload the appliance.
• Never switch the appliance on while it is empty.
CLEANING• As a precaution, always unplung your appliancebefore cleaning it.
• Always clean the appliance and its attachments atthe end of each cycle.
• Never place the motor unit in water.
• For parts made of aluminum alloys, use cleaningfluids suitable for aluminum.
• For plastic parts , do not use detergents that aretoo alkaline (i.e., containing too much caustic sodaor ammonia...)
• Robot-Coupe can in no way be held responsiblefor the user’s failure to follow the basic rules of cleaning and hygiene.
MAINTENANCE
• Before opening the motor housing, it is absolutelyvital unplung the appliance.
• Check the seals and washers regularly andensure that the safety devices are in good workingorder.
• It is particularly important to maintain and checkthe attachments since certain ingredients containcorrosive agents e.g. citric acid.
• Never operate the appliance if the power cord or plug has been damaged in any way or if the appliance fails to work properly or has been dama-ged in any way.
• Do not hesitate to contact your local MaintenanceDepartment if something appears to be wrong.
KEEP THESE INSTRUCTIONS IN A SAFE PLACE
W A R N I N G
16
INTRODUCTION TO YOUR NEW R 401 • R 402 • R 402 V.V. BOWL CUTTER/ VEGETABLE PREPARATIONATTACHMENT
The food processor is perfectly geared to professionalneeds. It can perform any number of tasks, whichyou will gradually discover as you use it.
The food processor consists of a bowl cutter and vegetable preparation attachment. In cutter mode, it can be used to process meat, vegetables, fine stuffing, mousse, grinding, kneading,… in less than 5 minutes for even the longest tasks. In the vegetable preparation version, the device has awide range of discs for thin slicing, grating and julienne vegetables. The R 402 / R 402 V.V. allowsmore functions : dicing and French fries.
Its numerous functions will open the door to a wholenew culinary world.
Thanks to its simple design, all components requi-ring frequent handling for maintenance or cleaningcan be fitted and removed in a trice
This manual contains important information designedto help the user get the most out of his or her R 401 /R 402 / R 402 V.V. bowl cutter/vegetable prepara-tion device.
We therefore recommend that you read it carefullybefore using your machine. We have also includeda few examples to help you get the feel of your newmachine and appreciate its numerous advantages.
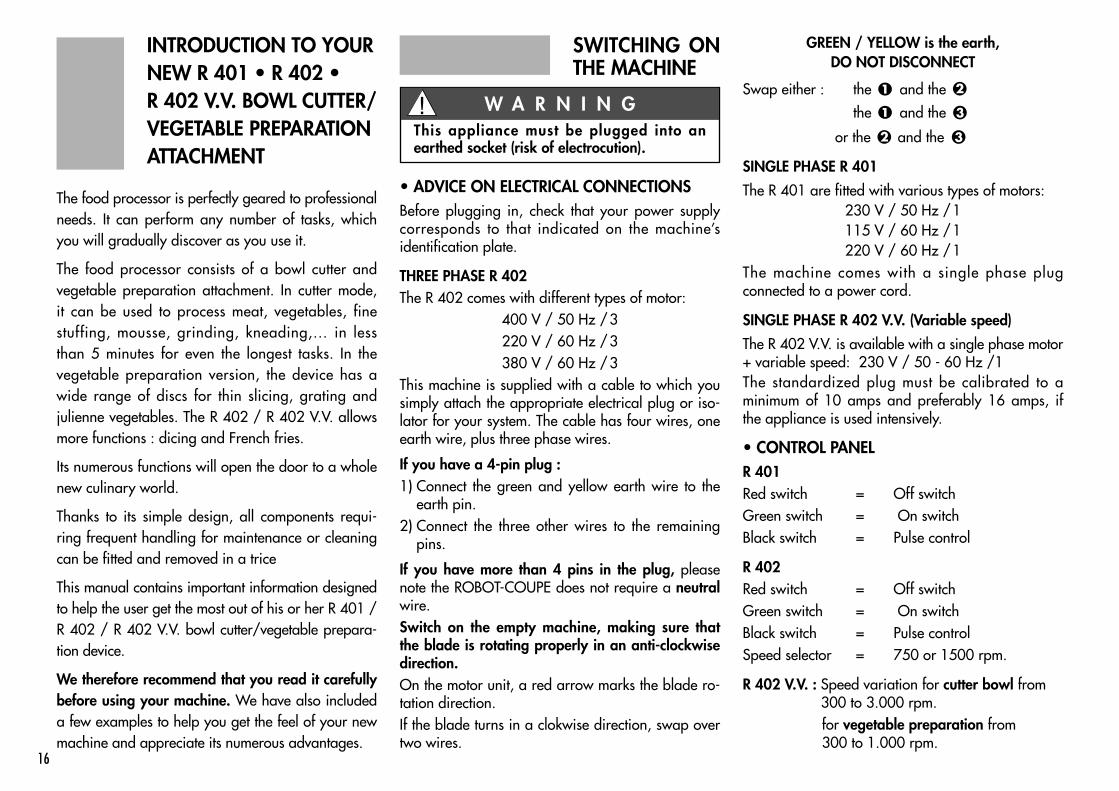
• ADVICE ON ELECTRICAL CONNECTIONSBefore plugging in, check that your power supply corresponds to that indicated on the machine’sidentification plate.
THREE PHASE R 402The R 402 comes with different types of motor:
400 V / 50 Hz /3220 V / 60 Hz /3380 V / 60 Hz /3
This machine is supplied with a cable to which yousimply attach the appropriate electrical plug or iso-lator for your system. The cable has four wires, oneearth wire, plus three phase wires.
If you have a 4-pin plug :1) Connect the green and yellow earth wire to the
earth pin.2) Connect the three other wires to the remaining
pins.
If you have more than 4 pins in the plug, pleasenote the ROBOT-COUPE does not require a neutralwire.Switch on the empty machine, making sure that the blade is rotating properly in an anti-clockwisedirection.On the motor unit, a red arrow marks the blade ro-tation direction.If the blade turns in a clokwise direction, swap overtwo wires.
SWITCHING ONTHE MACHINE
This appliance must be plugged into an earthed socket (risk of electrocution).
W A R N I N G
GREEN / YELLOW is the earth,DO NOT DISCONNECT
Swap either : the and the
the and the
or the and the
SINGLE PHASE R 401
The R 401 are fitted with various types of motors: 230 V / 50 Hz /1115 V / 60 Hz /1220 V / 60 Hz /1
The machine comes with a single phase plugconnected to a power cord.
SINGLE PHASE R 402 V.V. (Variable speed)
The R 402 V.V. is available with a single phase motor+ variable speed: 230 V / 50 - 60 Hz /1The standardized plug must be calibrated to a minimum of 10 amps and preferably 16 amps, ifthe appliance is used intensively.
• CONTROL PANELR 401Red switch = Off switchGreen switch = On switchBlack switch = Pulse control
R 402Red switch = Off switchGreen switch = On switchBlack switch = Pulse controlSpeed selector = 750 or 1500 rpm.
R 402 V.V. : Speed variation for cutter bowl from 300 to 3.000 rpm.for vegetable preparation from 300 to 1.000 rpm.
32
31
21

ENG
LISH
17
ASSEMBLY
• CUTTER BOWL ATTACHMENT
1) With the motor base fa-cing you, make sure that thebowl is straight in relation tothe motor shaft, with themagnetic bar moved slightlyto the left.
2) Turn the bowl to the rightuntil the motor base connec-tors are securely positionedin their sockets. The handle is now in frontof you.
3) Engage the blade on themotor shaft and lower itright to the bottom of thebowl.Make sure that it is correctlypositioned, by rotating it inthe bowl.
3) Engage the white plasticsling plate on the motorshaft and check that it isproperly positioned at thebottom of the bowl. Depending on type of use(Side A or B), disengage theplate from the ejecting dischub, return it and engage it back.
SIDE A facing upwards (ejection ribdownwards) for any vegetables or citrus fruit which require careful handling(tomatoes, mushrooms...).SIDE B facing upwards (ejection rib up-wards) for all other types of fruit or vegetables.
4) Choice of disc:a) If you have opted for aslicing, grating or juliennedisc:Position the disc on the slingplate.
Only for the R 402 / R 402 V.V. models:
b) If you have chosen thedicing equipment:i.e. a grid and slicing disc.Only the 8 mm and 10 mmdiscs can be fitted with adicing grid.Position the dicing grid inthe vegetable preparationbowl
4) Place the lid on the bowland rotate to the right untilit clicks.
The device is now ready for use. The green lightshould therefore be illuminated.
• VEGETABLE PREPARATION ATTACHMENT
The vegetable preparation attachment consists oftwo detachable parts: the stainless steel vegetablepreparation bowl and the lid.
1) With the motor base facing you, fit the bowl ontothe motor base; the ejectionchute should be on yourright.
2) Turn the bowl to the rightuntil the motor base connec-tors are securely positionedin their sockets.

18
Next fit the appropriate sli-cing disc and screw the sli-cer on the motor shaft withthe butterfly nut.
USE EXAMPLES
• BOWL CUTTER ATTACHMENTThe cutter will enable you to perform all your cutting tasks in minimum time; we recommend therefore, that you keep a close eye on the mixturein order to obtain the desired results.The pulse control allows you to stop and start themachine for high-precision control when workingwith certain types of ingredients.
• INSTALLING THE DICING GRID:
These grids can be positioned in two differentways depending on the type of hopper used inorder to avoid any false starts.
• Position 1: Using the large hopper.In this case, the dicing grid should bepositioned so that itsblades are verticallyaligned with the hopper. (You must beable to see the gridblades when looking into the hopper.)
• Position 2: Using the cylindrical hopper.
In this case, the gridmust be positioned sothat the blades arevertically aligned withthe tube. (You must beable to see the gridblades when lookinginto the tube.)
c) If you want to use theFrench fries potatoes cut-ting equipment:
This equipment comprises aFrench fries grid and a special French fries slicingdisc.
Position the French fries gridin the vegetable preparationbowl. Check that i t is correctly positioned with theFrench fries plate positionedat the outlet.
Next f i t the appropriate slicing disc and screw theslicer on the motor shaftwith the butterfly nut.
For both R 401, R402 and R 402 V.V. models:
5) Place the lid on the bowl and rotate to the right until the lid clicks, to form an extension of thebowl.
Max
USES processing Suggested ProcessingQuantity Speed time(in kg) (Rpm) (in mn)
CHOP
• MEAT
Hamburgers/steak tartare 1 1200/1500 3
Sausagemeat/tomatoes 1,2 1200/1500 3
Terrine/pâté 1,2 1200/1500 4
• FISHBrandade 1,2 3000 5
Terrines 1,2 3000 5
• VEGETABLESGarlic/parsley/onion/shallots 0,5 / 0,8 1500/2000 3
Soup / purées 1,2 2500/3000 4
• FRUIT
Compotes /purées 1,2 2500/3000 4
EMULSIFY
Mayonnaise / ailloli /remoulade sauce 2 600/1500 3
Hollandaise/béarnaise 2 600/1500 5
Snail or salmon butter 2 600/1500 4

19
ENG
LISH
Max
USES processing Suggested ProcessingQuantity Speed time(in kg) (Rpm) (in mn)
KNEAD
Shortcrust pastry/shortbread 1 900/1500 4
Flaky pastry 1 900/1500 4
Pizza dough 1 900/1500 4
BROYER
Dried fruit 0,8 900/1500 4
Ice 0,8 900/1500 4
Breadcrumbs 0,8 900/1500 4
The cutter version of the R 401 / R 402 / R 402 V.V.has numerous other applications. The above quanti-ties and times are approximate and may vary according to the quality of the ingredients and recipes.
• VEGETABLE PREPARATION ATTACHMENTThe vegetable preparation attachment consists oftwo hoppers:- one large hopper for cutting vegetables such as
cabbage, celeriac, etc…- a cylindrical hopper for long vegetables and
high-precision cutting.For optimum cutting, use this section as a guide.
HOW TO USE THE LARGE HOPPER- Raise the lever and release the hopper opening.- Fill hopper with vegetables.- Replace the lever at the base of the hopper.- Start to press the lever, switch on machine and
maintain pressure until there are no vegetablesleft in the hopper.
HOW TO USE THE CYLINDRICAL HOPPER- Fill hopper with vegetables.- Start to press the button and switch on machine.- Maintain pressure until all the vegetables have
been processed.
SLICERS S 1 carrot / cabbage / cucumber / onion / potato / leekS 2 / S 3 lemon / carrot / mushroom / cabbage / potato / cucumber /
zucchini / onion / leek / bell pepperS 4 / S 5 eggplant / beet root / carrot / mushroom / cucumber /
bell pepper / radish / lettuce / potato / leek / tomatoS 6 eggplant / beet root / carrot / mushroom / cucumber /
bell pepper / radish / lettuce / potato / leek
RIPPLE CUT SLICER S 2 beet root / potato / carrot
GRATERS G 1,5 celeriac / cheeseG 2 carrot / celeriac / cheeseG 3 carrotG 6 cabbage / cheese
JULIENNE J 2x2 carrot / celeriac / potatoJ 2x4 carrot / beet root / zucchini / potatoJ 2x6 carrot / beet root / zucchini / potatoJ 4x4 eggplant / beet root / zucchini / potatoJ 6x6 eggplant / beet root / celeriac / zucchini / potatoJ 8x8 celeriac / potato
G 9 cabbage / cheeseParmesan / chocolateRadish 0.7 mmRadish 1 mm
For R 401, R 402 and R 402 V.V. models
For R 402 and R 402 V.V. only
DICED 8x8 potato / carrot / zucchini /
beet root / turnipD 10x10 potato / carrot / zucchini /
beet root / turnip
FRENCH FRIES F 8x8 potato F 10x10 potato
OPTIONS
A serrated blade is avai-lable as an option and ismainly intended for knea-ding and grinding.
A slightly serrated blade isalso available. This bladehas the same function as astraight blade. It has beenconceived for a longer lasting cut performance but with no sharpeningpossibility.We advise you to use this blade mainly to chopparsley.
CLEANING
As a precaution, always unplug your appliancebefore cleaning it (risk of electrocution).
W A R N I N G
• MOTOR BASENever immerse the motor base in water. Cleanusing a damp cloth or sponge.

20
MAINTENANCE
• BLADEWe strongly recommend that the blades (smoothones) are sharpened daily using sharpening stonesupplied with machine.
The quality of the cut depends mainly on the sharp-ness of your blades and the degree of wear. Theblades are actually wearing parts, which should bereplaced occasionally to ensure consistent quality inthe final product.
• MOTOR SEAL
The motor seal on the shaft should be lubricated re-gularly using a food safe lubricant.
In order to keep the motor completely watertight, itis advisable to check the motor seal regularly forwear and tear and replace if necessary.
The motor seal can be easily replaced without ha-ving to remove the motor, so we strongly advise youto ensure that is in good condition.
• BOWL LOCATING PLATES
If these plates wear out, the bowl will no longer besecurely attached to the motor base.
This makes it awkward to use since the bowl cancome loose during processing.
There is no risk to the user however, because thesafety system will automatically stop the machine.
It is advisable therefore to change these plates inorder to ensure maximum ease of use.
TECHNICALSPECIFICATIONS
• WEIGHTnet weight gross weight
R 401 (without disc) 13 kg 16 kg
R 402 (without disc) 15 kg 18 kg
R 402 V.V. (without disc) 15 kg 18 kg
• BOWL CUTTER ATTACHMENTAfter removing the lid, remove the bowl from the motor base by rotating it to the left. Pull up todisengage, leaving the blade in the bowl in order toprevent any spillage when working with liquids. If the food has a solid consistency, remove the bladeand empty the bowl.Replace the bowl, place the blade back on the shaftand switch on the machine in order to remove anymixture which may have stuck to the blade.If you wish, you can rinse the bowl by filling it withhot water and switching on for a few minutes.
• VEGETABLE PREPARATION ATTACHMENTRemove each of the parts, i.e.: the lid, disc, slingplate and bowl and clean.Diswashers are best avoided. Instead we recommendthat you clean the machine by hand, using washing-up liquid.
• BLADEAfter cleaning the blade, always dry the blades wellto prevent rusting.
• DIMENSIONS (in mm)
Check that your detergent is suitable for cleaningplastic parts. Some washing agents are too alka-line (e.g. high levels of caustic soda or ammonia)and totally incompatible with certain types ofplastic, causing them to deteriorate rapidly.
I M P O R T A N T
• WORKING HEIGHTWe recommend that you position the food processoron a stable worktop so that the upper edge of thelarge feed hopper is at a height of between 1.20 mand 1.30 m.
• NOISE LEVELThe equivalent continuous sound level when thefood processor is operating on no-load is less than70 dB(A).
• ELECTRICAL DATA
R 401 single-phase machine
Speed Power IntensityMotor (Rpm) (Watts) (Amp.)
230 V/50 Hz 1500 700 5,7
115 V/60 Hz 1800 700 12,0
220 V/60 Hz 1800 700 5,7
R 402R 402 V.V.
A 224B 304C 226D 590E 320F 745G 530H 440I 190J 235
R 401
A 204B 304C 226D 570E 320F 725G 530H 440I 190J 235
A
F
D
E
CB
H
J
G
I

21
ENG
LISH
The R 401, R 402 and R 402 V.V. are fitted with athermal cut-out which automatically stops the motorif the machine is left on for too long or overloaded.If this happens, allow the machine to cool completelybefore restarting.
STANDARDS
MACHINES IN COMPLIANCE WITH:
• The following European directives and relatednational legislation:
- Modified "machinery" directive 98/37/EEC,
- "Low voltage" directive 73/23/EEC,
- "EMC" directive 89/336/EEC,
- "Materials and parts in food contact" directive89/109/EEC,
- "Plastic materials and parts in food contact" direc-tive 90/128/EEC.
• The following European harmonized standardsand standards setting out health and safety rules:
- EN 292 - 1 and - 2,
- EN 60204 -1 (1992),
- For Food Processors and blenders : EN 12852,- For Vegetable cutting machine : EN 1678.
The blades and discs are extremely sharp.Handle with care.
W A R N I N G
R 402 three-phase machine
Vegetable Cutter Power IntensityMotor Attachment speed (Watts) (Amp.)Speed (Rpm) (Rpm)
400V/50 Hz750 400 1,3
1500 750 1,6
220V/60 Hz900 400 2,3
1800 750 3,0
R 402 V.V. single-phase machineVegetable Cutter Power IntensityMotor Attachment speed (Watts) (Amp.)Speed (Rpm) (Rpm)
230V/50-60 Hz 300 to 1000 300 to 3000 1000 10
SAFETY
The R 401 / R 402 / R 402 V.V. are fitted with amagnetic safety device and motor braking system.As soon as you open the cutter lid, the motor stops. To restart the machine, simply close the lid andpress the green switch.
As soon as you open the lever of the vegetable preparation attachment, the motor stops. As soonas you close the lever, the machine restarts. Beyond4 or 5 seconds opening time, simply close the leverand press the green switch. In order to avoid splash when processing liquidpreparation in the cutter bowl, we recommend youto stop the machine before opening the lid.
Never try to override the locking and safetysystems.Never insert an object into the container wherethe food is being processed.Never push the ingredients down with your hand.Do not overload the appliance.
R E M E M B E R

74

75

77

78
79

80
81

83

84
85

87

Réf.
40
7 7
29
- 0
9/2
00
3 -
R 4
01
• R
40
2 •
R 4
02
V.V
.
Administration Commerciale France &Service Après-Vente
Tél. : 03 85 69 50 00 - Fax : 03 85 69 50 0712, avenue du Maréchal Leclerc - BP 134 71305 Montceau-en-Bourgogne Cedexemail : [email protected]
Agence de Service Après-Vente pour la Région Parisienne
Tél. : 01 43 98 88 15 - Fax : 01 43 74 36 26 13, rue Clément Viénot 94305 Vincennes Cedex
FABRIQUÉ EN FRANCE PAR ROBOT-COUPE S.N.C.
Export Department
Tel. : + 33 1 43 98 88 33 - Fax : + 33 1 43 74 36 2618, rue Clément Viénot - BP 15794305 Vincennes Cedex - Francehttp://www.robot-coupe.com - email : [email protected]
We
rese
rve
the
right
to a
lter a
t any
tim
e w
ithou
t not
ice th
e te
chni
cal s
pecif
icatio
ns o
f thi
s app
lianc
e.
© A
ll rig
hts r
eser
ved
for a
ll co
untri
es b
y: R
OBO
T-CO
UPE
S.N.C
.


![Index [assets.cambridge.org] · associated leuconorite, 402 associated quartz mangerite, 402 coarse grain size, 401, 402 composition of plagioclase, 402 crystal size distribution](https://static.documents.pub/doc/80x56/606c9147757c7d7d903e2249/index-associated-leuconorite-402-associated-quartz-mangerite-402-coarse-grain.jpg)


