13
2/14/2013 DDE4/5 ECU loom installation instructions | Mike Jones RALLYRAID UK DDE4/5 AFTERMARKET ECU LOOM

2/14/2013
DDE4/5 ECU loom installation instructions | Mike Jones
RALLYRAID
UK DDE4/5 AFTERMARKET ECU LOOM
Version V3.001 -001 Author Mike Jones
Project bd RnD\Racing_RA\RA.DDE4_5 non race ECU
looms.001
Status FINAL 17 12
2014
Date 17 Dec. 14 page 1
DDE4/5 aftermarket ECU loom
Table of Contents DISCLAIMER......................................................................................................................................... 2
Foreword ............................................................................................................................................. 2
What’s in the KIT? ............................................................................................................................... 3
What you need to get ......................................................................................................................... 3
Basic schematic ................................................................................................................................... 4
Connector function description .......................................................................................................... 5
A: BODY connector: ......................................................................................................................... 5
B: OBD plug ..................................................................................................................................... 6
C: EWS immobiliser plug ................................................................................................................. 7
D: Ring Aerial plug ........................................................................................................................... 7
E: Throttle pedal plug ...................................................................................................................... 8
G: ECU plug ..................................................................................................................................... 8
OTHER connections needed to run the Engine ................................................................................... 9
1: ENGINE fuse box: ........................................................................................................................ 9
2: Engine -> body plug. .................................................................................................................. 10
3: ECU relay ................................................................................................................................... 10
4: BATT power to the engine ........................................................................................................ 11
5: Auxiliary power wire ................................................................................................................. 11
Other things you need to run the engine ......................................................................................... 11
And last: ........................................................................................................................................ 12
REMOVE THE SWIRL FLAPS IN THE INLET MANIFOLD ...................................................................... 12

Version V3.001 -001 Author Mike Jones
Project bd RnD\Racing_RA\RA.DDE4_5 non race ECU
looms.001
Status FINAL 17 12
2014
Date 17 Dec. 14 page 2
Version History
Date Note by
04 Dec 2014 First version WIP bd
17 Dec 2014 Conversion to booklet bd
DISCLAIMER
BMW make many versions of this engine and/or loom, This document is only a rough guide to assist you .
You MUST check your engine loom with the BMW WDS, If you are unsure use a professional auto electrician.
Foreword The BMW diesel is arguably the best diesel engine in the world and very very reliable, Common rail
diesels can appear intimidating if you have never worked on one before but after a while you will
find them simple and easy to use, the loom you have purchased from us does most of the hard
thinking in making the engine work in non-standard fitments, the wires are military raychem 44 spec
and with the BMW quality on the OEM loom you should get a very reliable car.
Enjoy
Paul Round
&
bd

Version V3.001 -001 Author Mike Jones
Project bd RnD\Racing_RA\RA.DDE4_5 non race ECU
looms.001
Status FINAL 17 12
2014
Date 17 Dec. 14 page 3
What’s in the KIT? We supply this manual and a loom to connect the ECU to the car side of your project.
Connector Function
A Body connector
B OBD plug
C EWS immobiliser plug
D Arial ring
E Throttle plug
F Earth ring
G DDE4 ECG plug
Plus the opposite connectors and pins for plug A and D.
What you need to get All other the parts + patience.
This manual will help you with the complex electronics BUT it is NOT a mechanics training lesson.
Version V3.001 -001 Author Mike Jones
Project bd RnD\Racing_RA\RA.DDE4_5 non race ECU
looms.001
Status FINAL 17 12
2014
Date 17 Dec. 14 page 4
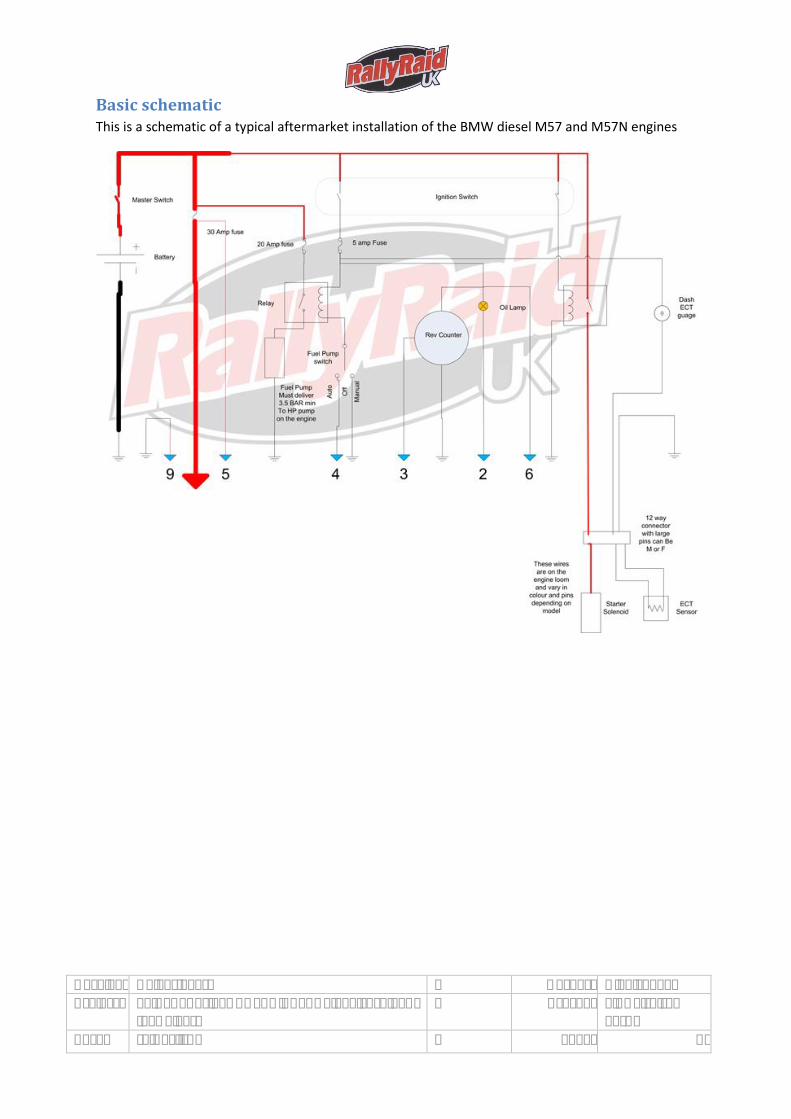
Basic schematic This is a schematic of a typical aftermarket installation of the BMW diesel M57 and M57N engines

Version V3.001 -001 Author Mike Jones
Project bd RnD\Racing_RA\RA.DDE4_5 non race ECU
looms.001
Status FINAL 17 12
2014
Date 17 Dec. 14 page 5
Connector function description
A: BODY connector:
This is one of two connectors that connects your engine to the rest of your car, the other is
on the engine loom and is a 12 way white ( or black sometimes) it has the starter wire and varies
other sensor wires depending on what car the engine came from {see below 2: Engine -> body plug.}
PIN Function Wire colour Notes
1 Charge warning light RD/YW Any buld is OK, the alternator will still function without this light.
2 OIL light RD/GN
3 RPM WE/BK 12v Pulsed signal , should work with most aftermarket Rev counter
4 Fuel pump BK Low side driver for fuel pump relay
5 BATT RD Permanent 12V feed
6 Ignition 12v / KL15 PK This should go live when your key turns ON, it will stop the engine when you turn the key OFF
In the kit are the other half to this connector and the contacts

Version V3.001 -001 Author Mike Jones
Project bd RnD\Racing_RA\RA.DDE4_5 non race ECU
looms.001
Status FINAL 17 12
2014
Date 17 Dec. 14 page 6
B: OBD plug
This is a standard OBD 16 way plug, varies OBD reader or BMW ediabas can be used to read the ECU
and EWS.
NOTE on the OEM car the EWS is connected to the body computer and communications are through
that gateway, as you are unlikely to have the BMW OE body computer our loom connects the EWS K-
line to pin 7 of the OBD plug along with the ECU K-line, if you use another diagnostic to talk to the
EWS you will have to adapt to this wiring change. The diagnostics kits shown below do this
automatically.
Rallyraid UK sell a DDE quick and a rugged diagnostic kit that will do everything you need to get
running and keep running, even in the worst situations…they have both been tested in 17 Dakar’s !!!
The rugged diagnostic kit see Link to shop RRUK diagnostic page
The DDE_Quick is a little plug in device that is great and quick and a must to carry in the car with you.
It does 3 simple things
1. Test the immobiliser status
2. Delete all the DTC error codes
3. Re-sync the ECU and EWS
Buy the DDE_Quick here
neither of these diagnostics will program keys to the EWS, you need to get a ECU / EWS lock set with
matching keys ,ECU and EWS to get started.

Version V3.001 -001 Author Mike Jones
Project bd RnD\Racing_RA\RA.DDE4_5 non race ECU
looms.001
Status FINAL 17 12
2014
Date 17 Dec. 14 page 7
C: EWS immobiliser plug
This plugs into the white immobiliser box that you got with the ECU:
This box MUST match the ECU and ignition key as a set, there are serial numbers in them that cannot
be changed.
Yours will look similar to this and have EWS 3.3 in black writing on the
top.
D: Ring Aerial plug
This connects to the ring aerial that is around the original BMW ignition barrel
Cut the shroud around the connector away carefully and solder on two wires to the exposed pins,
use the connector supplied on the other end of these wires, the polarity is not important. To start
with, tape the key into the ring to get the engine started, it can be sensitive to position , you will
know it’s worked when you here the starter release relay in the EWS box click, when your happy with
the position glue the ignition key into the ring permanently . You can cut the metal key part from the
key to save space. The immobiliser chip is not on the circuit board in the key so if you cut the key
down be careful of the small black chip that is embedded in the plastic is not damaged.

Version V3.001 -001 Author Mike Jones
Project bd RnD\Racing_RA\RA.DDE4_5 non race ECU
looms.001
Status FINAL 17 12
2014
Date 17 Dec. 14 page 8
E: Throttle pedal plug
There is 2 metres of cable to this plug, you can shorten it, but make sure you do a good job the
connection is important. The pedals are very reliable and you shouldn’t have any problems with one
from the breaker yards, the ones from Minis that look the same will also work (and can look better),
however we have seen the connectors keyed slightly differently, a quick trim with the knife usually
fixes it, if the pedal is faulty or not correct then the engine will start but only tickover.
E: Earth ring
Weld a 6mm stainless steel bolt to the roll cage/Body, and make sure all earths are good, electronics
hate bad earths and will give weird faults if they are poor and possible immobilise the ECU/EWS. The
stainless steel bolt will last forever and give you no problems and a reliable car. This is the earth for
the EWS and part of the ECU, on the engine loom will be another large earth with either brown or
brown/yellow wires on it, connect it to the same bolt, this is the earth for the sensors /actuators on
the engine.
NOTE : there must be large earth strap for the Starter/Alternator from the engine block to the
chassis, failure to do this will fry the ECU/sensor ground wires the moment you try to start the car.
G: ECU plug
This plugs into the ECU, they are all different you can’t get it in the wrong hole.

Version V3.001 -001 Author Mike Jones
Project bd RnD\Racing_RA\RA.DDE4_5 non race ECU
looms.001
Status FINAL 17 12
2014
Date 17 Dec. 14 page 9
OTHER connections needed to run the Engine
On the engine loom will be various other connectors.
This is a DDE5 loom but the other looms are similar, if the engine is from an auto there will be some
connectors for the ECU for the gearbox, usually coloured blue and looking similar to the ECU
connectors.
The important ones for you are 2 and 4 and the earth ( see earth connection E: above)
1: ENGINE fuse box:
This contains standard blade fuses for the sensors and actuators on the engine: it doesn’t power the
ECU.

Version V3.001 -001 Author Mike Jones
Project bd RnD\Racing_RA\RA.DDE4_5 non race ECU
looms.001
Status FINAL 17 12
2014
Date 17 Dec. 14 page 10
2: Engine -> body plug.
This 12 way plug varies in connections but will always have the starter wire on it,
Some off the other connection can be
The X6011 12 way white connector pin outs
Pin Colour BMW X5 Use
1 Sw/gr Air con clutch
2 Blue Alternator to Dash/IKE
3 Black Starter
4 Brown Reverse light sw gnd
5
6 Gn/ws Oil level sensor earth
7 RT/WS Power out to abs, steering angle sensor
8
9 Gr/br Oil level signal TOG
10 Br/vi dual temp sensor +
11 Br/ge Dual temp sensor ground -
12 Gr/vi Reverse light switch signal S_RFL
This plug may be a different on some looms, look for the starter wire to identify this plug.
This is a good plug to use if you have other sensors on the engine and want to keep the installation
need and be able to easily unplug the engine for removal. We run oil pressure and boost sensors
through it on the Dakar cars.
RRUK can supply the opposite side to this 12 way connector and the pins, contact us if you want to it,
you will need to look which type it is male or female as it varies from engine to engine.
3: ECU relay
This is a relay that is controlled by the ECU, it isolates all the power to the engine sensors and
actuators when the engine is stopped, to stop battery drain, we have had problems in race
conditions with this relay and now by pass as is shown in the schematic at the top of this document,
you will need a race car type battery isolator if you do this or your battery will drain overnight.
Version V3.001 -001 Author Mike Jones
Project bd RnD\Racing_RA\RA.DDE4_5 non race ECU
looms.001
Status FINAL 17 12
2014
Date 17 Dec. 14 page 11
The reliability on road cars is very good. If you change the relay be careful of the pin outs, they are
not a normal relay.
4: BATT power to the engine
This connector goes to the main permanent battery power, shown on the schematic between the
blue pin 9 and 5.
If you are fitting it into a race car this will go to you master switch, a fuse is not required as they are
in the grey fuse block on the engine loom.
5: Auxiliary power wire
The thick red/blue wire is used by BMW for the gearbox ECU or other ancillaries; it is controlled by
the BLUE relay and fused in the grey fuse box so you could use it to power things on the engine a
keep the loom tidy and simple
Other things you need to run the engine
Apart from fitting it and having water etc. connected. Then after you have wired it up then the most
important thing is fuel supply.
You need an electric fuel pump capable of > 4 bar/60psi, it can be controlled by the fuel pump relay
control from the ECU ( see schematic at the beginning) this is the safest method, a SPDT switch as
shown will give you a manual override.
Use a good fuel filter!!! Common rail diesels HATE dirt in the fuel and can be expensive to fix, so be
careful when fitting /working on the engine
You can also just wire up the LP fuel pump off the ignition key only the pressure supplied to the HP
fuel pump is important for the engine to run.
The return fuel pipe must NOT any flow restrictions in it and it’s recommended to use a small cooler
to prevent the fuel getting too hot, this can be a simple loop of metal pipe in a good air flow, or a
little sexy cooler like fitted to early BMW diesel like the E46 or Range rover TD6 etc. Usually by the
fuel filter.

Version V3.001 -001 Author Mike Jones
Project bd RnD\Racing_RA\RA.DDE4_5 non race ECU
looms.001
Status FINAL 17 12
2014
Date 17 Dec. 14 page 12
If you are fitting a DDE4 /M57 engine then a good sensor to have is the pressure sensor in the top of
the fuel filter it can help with diagnostic and can prevent damage to the HP pump if the LP feed side
dies or is intermittent ( like air bubbles) . If you do not fit it or it’s disconnected, the ECU will give 4
bar/60 psi default value and ignore it (fuel supply problems will still affect the running)
And last:
The water coolant sensor ECT on the BMW engine can be one of two types, on basic saloons it is a
single type on the X5 X3 and Range Rover TD6 is a dual sensor, if it is a dual sensor 9 easy to identify
it is round and has 4 pins) then the second sensor has both side of it is brought to the 12 way body
connector to use on the OE display. You can use this for your display if you can calibrate your display.
The BMW WDS gives the spec of the sensor.
If you have the single type sensor then you have two methods to display the water temp,
1. Put an aftermarket sensor in the pipe from the cylinder head to the radiator ( run the wires
through the 12 way body connector )
2. The ECU gives out the engine temperature over CAN BUS and is very accurate , if you want to
use the CAN BUS contact [email protected] for some guidance, we do make adapters for
various other cars that use the BMW CAN-BUS system
REMOVE THE SWIRL FLAPS IN THE INLET MANIFOLD If they are fitted, some engine do not have them.. they break off and fall in the engine, just take off
the flaps by snapping the heads of the little screws and pull out the shaft then block the hole with a
bit of RTV silicon and a pop rivet.
YOU HAVE BEEN WARNED.


