RA-23/28/40/60/65 Celica Engine Upgrade Excuse The Formatting This Was Previously A Web Page. Hey Rob, how long is a piece of string and how much does a piece of string cost?....... Yeah that's right I'm sick of answering all your damn questions. :: October 2nd 2002 :: Introduction - That Tired Old 18R-C. So you've found yourself driving an RA model celica with a clapped out 18R-C, you tell your friends "hey its a classic", if they are quick they'll reply "yeah a classics POS" then blow your doors off in their ricey excel, or lancer or even worse an auto VL commondore.... Ok sure its fun to pull up at the lights next to grandma and grandpa and scare the beejeezus outta them with that death rattle coming from your timing chain, but at the end of the day this truck
Transcript
RA-23/28/40/60/65 Celica Engine Upgrade
Excuse The Formatting This Was Previously A Web Page.
Hey Rob, how long is a piece of string and how much does a piece of string cost?....... Yeah that's right I'm sick of answering
all your damn questions.
:: October 2nd 2002
:: Introduction - That Tired Old 18R-C.
So you've found yourself driving an RA model celica with a clapped out 18R-C, you tell your friends "hey its a classic", if they are quick they'll reply "yeah a classics POS" then blow your doors off in their ricey excel, or lancer or even worse an auto VL commondore.... Ok sure its fun to pull up at the lights next to grandma and grandpa and scare the beejeezus outta them with that death rattle coming from your timing chain, but at the end of the day this truck engine (yes that's right truck engine) is VERY uninspiring. Well, not much left over pocket change... what are your options?
Option 1 - Rebuild the 18R-C.... webber carb, agressive cam, headwork, extractors, dizzy remap, what do u get? A an engine that's an absolute pig in traffic, drinks fuel like its going outta style, and its still gonna be a truck engine. A wise man once said, "you cant polish a turd".
Option 2 - Zoom on down to your local engine importer and buy
yourself a 1G.
:: Engine - What's a 1G You Ask?
image below:: click to enlarge. The 1G-GE is a 2 litre, inline 6 cylinder, twin cam, with EFI, it comes in naturally aspirated, supercharged and twin turbo versions and was sort of the black sheep of Toyota engines in the 1980's and early 90's. Most 6 cylinder (and 8 cylinder) Toyotas in Japan come with a 2 litre engine option due to taxes on engine capacity, so these engines found their way into supra's (GA61/70), soarer's (GZ20), cressida's (GX63) and crowns (GS11?) from facotry. There aren't many examples of these on Australian roads, I know of one GA70 in Melb, but thats soon to be converted to a JZA70. Ok so its an unpopular engine in Japan, a 2 litre engine hauling around a 1600+ kg MK3 supra, not an enthusiasts 1st choice, but that's good, it means more of them are going to wind up at your local engine importer. These engines are excellent replacements for the 18R/21R and reasonably straight forward to fit.
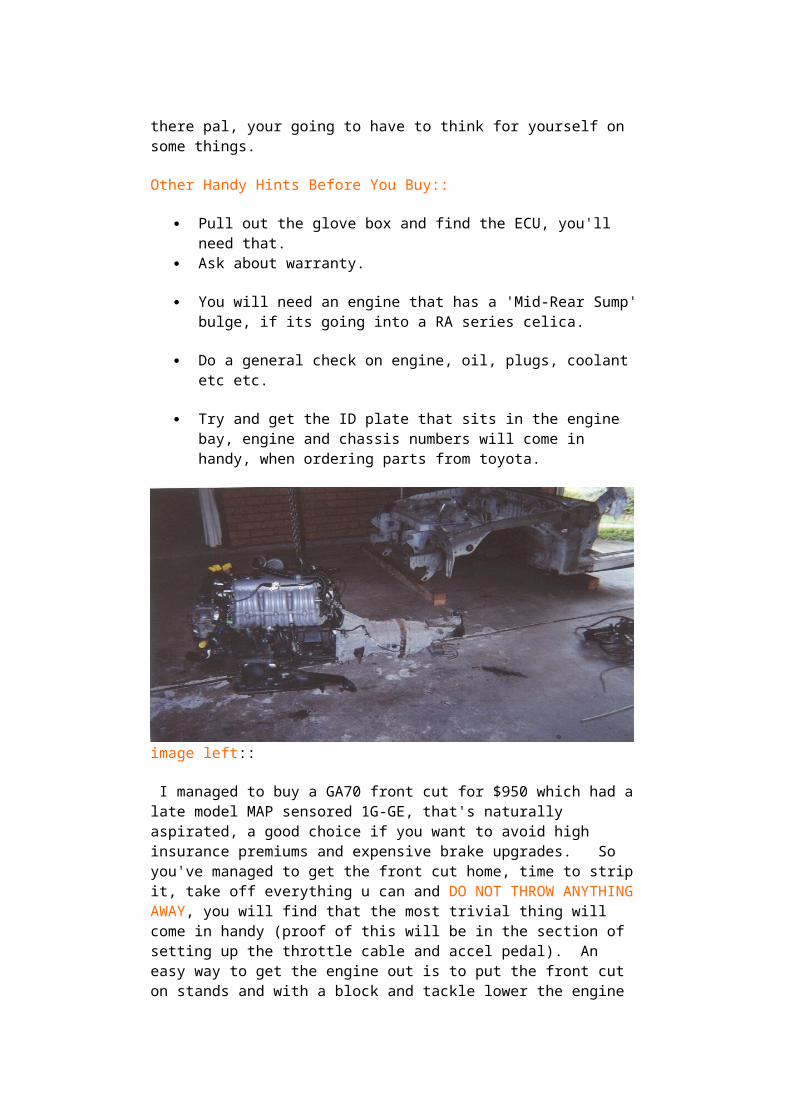
image left:: The easiest way to start an engine conversion is to purchase a front cut, this is pretty much just the front half (or back if the engine is mid-mounted) of a car with the engine sitting in the engine bay as if it was complete and running. This can allow you to organise a battery fuel pump and start the engine at the importers before you buy it, this is a handy way to see if your buying a dud engine. If your unable to organise to start the engine make sure you check it for as much as you can, when I purchased my front cut it was missing a starter motor. Another good reason to buy a front cut rather than just an engine is that it will come with a HEAP of other handy parts ie throttle cable, a HEAP of nuts and bolts and you will also get a heap of good parts to sell to any MA70 owners you meet on the street, (yeah I used to approach them in parking lots), but hey I made over AU$500 back from selling the left over parts, which is great especially when I paid AU$950 for the front cut, hows that for a good deal. Ok so your forking out for that front cut, MAKE SURE YOU GET A RECEIPT, or else you will run into A LOT of trouble when registering the car and trying to prove that you actually own the engine that's sitting in your engine bay. Now "how the hell do I get half a freakin car back to my place" u ask? Well your on your own there pal, your going to have to think for yourself on some things.
Other Handy Hints Before You Buy::
Pull out the glove box and find the ECU, you'll need that. Ask about warranty.
You will need an engine that has a 'Mid-Rear Sump' bulge, if its going into a RA series celica.
Do a general check on engine, oil, plugs, coolant etc etc.
Try and get the ID plate that sits in the engine bay, engine and chassis numbers will come in handy, when ordering parts from toyota.
image left::
I managed to buy a GA70 front cut for $950 which had a late model MAP sensored 1G-GE, that's naturally aspirated, a good choice if you want to avoid high insurance premiums and expensive brake upgrades. So you've managed to get the front cut home, time to strip it, take off everything u can and DO NOT THROW ANYTHING AWAY, you will find that the most trivial thing will come in handy (proof of this will be in the section of setting up the throttle cable and accel pedal). An easy way to get the engine out is to put the front cut on stands and with a block and tackle lower the engine (still attached to the crossmember) onto the floor, then with 3 or 4 mates you can lift the chassis up and junk it. That's the stripped shell in the background.
:: Engines Out - So Now I Just Chuck It Into The Car Right??
WRONG:: this is the time to put the engine onto an engine stand and service it. Everything is accessible so why not make it easier for yourself. Ok a few things to do, take the cam covers off check the cams for damage or a thrown shim, also take note of the colour of the oil and any residue on the underside of the cam covers. Take the spark plugs out and check for symptoms of oil deposits, detonation, mechanical damage etc. While the sparkies are out try and have a look inside each cylinder, remember the engine may have been turned upside down during its travels to Australia. If it looks good inside the cylinders take a note of what spark plugs it was running (buy a new set) and put the old plugs in until u can get the new ones, same with oil, fuel, and air filters. Now take off the timing cover and take the timing belt off get a new one (even if it hasn't done many, km's) you never know how long it has been sitting at the wreckers getting all hard. Behind the timing cover replace all of the front oil seals (that's 2 cams, front main, oil pump, and water pump) and also replace the rear oil
seal. WARNING: make sure you buy the exact same seals that are on the engine, go down to a good bearing shop and get them matched, and PAY ATTENTION TO THE ARROWS on the seals. You do not want to finish up an engine conversion only to find out that when you started the car all of the seals were spun out and pissed oil everywhere. Next thing is to go get those injectors tested and cleaned. Ok don't let me hold your hand too much, do what else u can to prepare the engine before you put it in, you will be glad you do this while its out, now its time to start the conversion.
:: Engine Mounts - Please Can We Put The Engine In.
Sorry not just yet, but, its safe to say that the conversion has officially started. The engine mounts can be bolted to 2 locations on the 1G block. Rear Position and Mid Position, the mounts will need to be bolted to the mid position. If the mounts are on the rear position you will have to move them but when moving the engine mounts to the mid position the bolt pattern on the block doesn't suit the bolt pattern on the mount, the mount on the exhaust side of the engine can fit with some bending and stretching but the mount on the intake side of the is harder to fit, you will need to redrill them. Now they are in the correct location to be bolted directly to the celica crossmember. All you need is a 10mm Spacer plate to go between the 18R rubber and the engine mount. You should be able to find some aluminium off cuts at you local steel yard. If your going to run a 1G-GTE it would be wise to cut the mounts from the crossmember and re-weld to the crossmember into the proper position, then get new rubbers, this will lower the engine and give some well needed room between the top of the engine and the bottom of the bonnet. Be sure to keep the engine on a ~15 degree tilt to the passengers side or you'll have turbo to steering box clearance problems. NOTE: notice that the engine comes mounted on a tilt from factory *shruggs*
:: Sump - Now Where's My Hammer.
If you did you homework you got an engine with a mid-rear sump bulge, this will be the easiest to modify as only a steering linkage is in the way, bashing it with a hammer is an easy fix but risky business, it just wont shape out like you want it to and it may end up with a hole, I was lucky with mine as it survived. if u want to spend more time for a nicer looking sump then I suggest getting itcut and re welded. images below::
:: Gearbox Mounts - Whoops Need To Go Back To The Steelyard.
image left:: The original gearbox crossmember can be used (lucky you got a front cut aye?) you will need to make a slight modification, now go find someone who can weld.
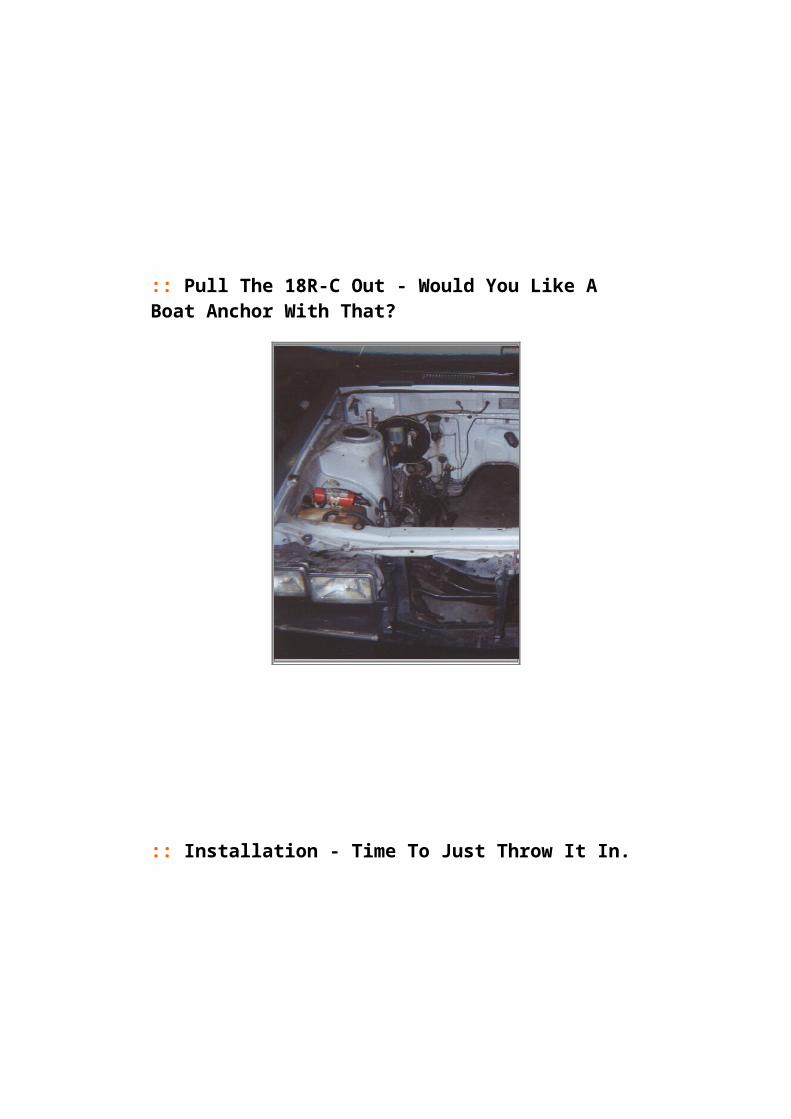
:: Pull The 18R-C Out - Would You Like A Boat Anchor With That?
:: Installation - Time To Just Throw It In.
image left:: 4 chassis stands, a trolley jack and a engine crane comes in VERY handy. Once again self explanatory, just watch the paint!
You will find that depending on the car and engine the shifter position will do either 2 things, sit perfectly centre in the hole of the floor pan or sit too far back, if it sits too far back (it will only be an inch or 2) then you will have
to cut the floopan, be sure to weld a plate covering the original hole to stop any noxious gases seeping into the cabin, see pics below::
:: The Left Overs - Its Time For Some Ingenuity.
Radiator:: If you want it to clear the air conditioning compressor you have to get the radiator moved 10mm forward which means just getting the mounts resoldered, any reputable radiator shop can do this. I also compared the celica radiator with the front cut radiator and noticed the nozzles were on opposite sides of the tank so you can asked the radiator guy to swap the nozzles over as well. While all this is happening I strongly suggest to get a triple core put in, most radiator shops stock a triple core replacement for the tanks on a celica radiator and all up (mounts, nozzles and core) it will cost around AU$350. Once this is done the bottom hose that came from the front cut will fit perfectly, you will have to find a hose for the top, I used two bends joined with a thermo-fan switch.
Gearbox Slave Cylinder:: The supra gearbox slave is on the other side of the bell housing than the18R box so a rerouting of slave cylinder plumbing was needed, you can use what was on the supra front cut, you can bend it to suit it will not crimp or pierce unless you play with it too much. Once again lucky you kept those front cut parts.
Heater Hoses:: Once again use what you had from the front cut and 18R, if you cant then its not hard to buy some suitably shaped hoses.
Accelerator Cable:: The accelerator on the 18R isn't a cable so what I did was cut the top off the front cut pedal and weld it onto the top of the existing celica pedal so the cable could be connected to it. NOTE: the depth or throw of the 18R pedal was far more than the throw of the throttle butterfly on the 1G so a steel stop has to be fixed to the floor under the pedal to prevent the accelerator cable snapping, rummage through your front cut parts, once again wasn't it a great idea that you kept them.
Engine Fan:: No more room for that so go out an buy a GOOD quality electric fan, use your imagination and the left over front cut parts to mount it
either in front or behind the radiator.
Speedo Cable:: The existing celica one will screw right in without a problem..
Tailshaft:: The existing celica tailshaft will connect up with the gearbox without a problem, God I love Toyotas, its as if the 1G was meant to be there.
:: Fuel System - Mr Simpson The Fumes Are Making Me Dizzy...
Yeah, they'll do that.......
image left:: Ok bare with me here, this pic is a mock up of the fuel system you will need. Why? Well your carby 18R had built in mechanical fuel pump, this fed a small reservoir in the carburettor, this means that if you ever got air in the fuel lines (fuel tank is not baffled either), the car will not suffer from fuel loss as it can feed from the little reservoir. Now if you are hooking up an EFI engine to an unbaffled fuel tank you will need a surge tank to be sure the engine will not starve when air gets into the fuel lines, this causes to engine to stutter and can most likely happen during a time when you are low on fuel while doing some spirited cornering on your favourite mountain pass, not good. Ok so why do you need two pumps, well high pressure pumps that feed an EFI engine don't like to suck, this means you need a low pressure lift pump to lift fuel from your FUEL tank into your SURGE tank. then from there the high pressure pump can feed the engine. Follow the little arrows in the picture, notice how the fuel returns from the engine into the surge tank and then returns once again from the surge tank to the main fuel tank. You can buy surge tanks from your local performance parts shop, if you are handy u can make one by welding closed the ends of some steel pipe then putting in the 4 nozzles. Another quick note, the size of the surge tank depends on the engine (N/A or turbo), they range from two thirds of a litre to about 3 litres, I ran my naturally aspirated 1G with a 2/3 litre tank with no troubles at all, I do recommend going larger with the GTE though. Hey Rob I own a RA65 with a 22R-E in it. Well good for you, you've already got what you need for an EFI fuel system. Hey Rob I own a RA60. So go grab an RA65
fuel tank and pump and bolt it straight in.
:: Exhaust - Please For Gods Sake Be Reasonable.
Unlike the 18R, the 1G has a crossflow head that means that the exhaust will be coming out the side opposite to the 18R. Any reputable exhaust shop can fit your exhaust and then cross it over to the passenger side of the bottom of the car (dont forget to install a cat converter too now your running unleaded). I recommend you cross the exhaust under the tailshaft, and remember to get the exhaust flanged. I can't tell you what size to use, what type of muffler or whether to go over or under the axle. However if you do go the naturally aspirated route don't go overboard with the size, or else you will lose a lot of low down torque, which, is one thing the N/A 1G-GE really needs. My choice was a 2.25 inch witch puts out a relatively humble 88db, gives me ample low down torque a nice and free revving top end and an awesome sound, yeah that's right I reckon bigger doesn't always sound better.
:: Wiring - Okay Now I'm Stumped.
This is where I'm going to have to leave you hanging, you can either do as I did and leave your car in to a performance shop to get wired up (never again, my God some people are shoddy, and they were people I trusted), or you can find yourself a wiring diagram and hook into it yourself. Just a word of warning, it is better that you use the factory ECU with these engines as the after market ones will give you nothing but trouble and an empty wallet (spent on dyno tuning). Same sentiments for intercooler plumbing your on your own, but it isn't really that complicated.
:: Brakes - Dad I Broke The Brakes.... You What?
Different engineers will require you to do different things with your brakes, it is best to talk to your local engineer (yes you need one to be street legal) they will tell you what you need. An easy upgrade for the RA23/28/40 is a set of RT132 corona brakes, grab the whole complete front strut off it and bolt it right in, it will come with 10.5 inch solid discs and twin piston sumitomo calipers. The RA60 and 65 have larger vented discs with single piston callipers and the corona struts will NOT bolt in.
:: That's About It - I've Held Your Hand Long Enough.
Its time for you to get your hands dirty, though I do stress that this is not a step by step recipe for a 1G, but rather a rough guide, you will encounter your own problems and you will have to overcome them yourself. As I said I have held your hand long enough, if you still have a hundred questions to ask me then well its probably best you shouldn't be doing an engine conversion in the first place, you still need to be mechanically minded, and willing to just get in and do things. I also accept no responsibility for any wrong data or bad advice, I spent a good chunk of my spare time writing this for everyone to enjoy and learn, this is not my job so I give you all this information in good will, if you stuff up, if you buy a dud engine, and if you fart in front of your mother in-law its your problem mate, with that said, happy driving, hope to see you on the road some time soon.
:: Pics You Should See - And Some Funny Facts.
Funny Fact 1: The 1G-GE is supposed to come with a W55 manual box as per designation on the VIN plate, but on close inspection of the sandwich plate tells me my gearbox is a W58, some one was playin silly buggers in Japan, but hey I aint complaining
Funny Fact 2: I managed to sell my tired old 18R-C and gearbox for AU$350, YAY! that paid for my radiator recore
Funny Fact 3: You can find a version of the 1G in the Australian Lexus IS200, it is called the 1G-FE, it is still twincam but uses a more economical cam profile and also comes with VVTi
This is the engine and box all painted and read to go.
She's off to get the wiring done, damn disposable cameras can't aim for crap.
New paint, wheels are widened stockies, trying to keep the factory look and the circa 1990's look (I mean it was made in 1981 now wasn't it)