www.oracle.com Alejandro Vargas Principal Support Consultant RAC 10g R2, How to Add a Node Using Database Control Alejandro Vargas Oracle Support Israel June 04, 2006 Index Steps In Brief ............................................................................................................................................................................................................... 2 Pre-Rac Install: OS install and Hardware preparation ................................................................................................................................................. 2 Install Oracle Clusterware on the new node ................................................................................................................................................................ 3 Install Oracle RDBMS and ASM Home on the new node ........................................................................................................................................ 10 Configure the Listener on the new Node ................................................................................................................................................................... 14 Create an ASM Instance on the new node. ................................................................................................................................................................ 16 Create a Database Instance on the new node. ............................................................................................................................................................ 21 END of the Procedure. ............................................................................................................................................................................................... 27
Transcript
www.oracle.com
Alejandro Vargas Principal Support Consultant
RAC 10g R2, How to Add a Node Using Database Control
Alejandro Vargas Oracle Support Israel
June 04, 2006 Index Steps In Brief ...............................................................................................................................................................................................................2 Pre-Rac Install: OS install and Hardware preparation.................................................................................................................................................2 Install Oracle Clusterware on the new node ................................................................................................................................................................3 Install Oracle RDBMS and ASM Home on the new node ........................................................................................................................................10 Configure the Listener on the new Node ...................................................................................................................................................................14 Create an ASM Instance on the new node. ................................................................................................................................................................16 Create a Database Instance on the new node. ............................................................................................................................................................21 END of the Procedure. ...............................................................................................................................................................................................27
www.oracle.com
Alejandro Vargas Principal Support Consultant
Steps In Brief Pre-Rac Install: OS install and Hardware preparation Install Oracle Clusterware on the new node Install Oracle RDBMS on the new node Add a Database Instance to the Cluster on the new node with Database Control.
Pre-Rac Install: OS install and Hardware preparation Follow the instructions for pre-install from the Document: "Step by Step RAC on Linux", points 1 through 14 1) Request Network configuration from Unix 2) Identify the network cards where these IP's belong 3) Check ping from all nodes to all nodes 4) Create the Oracle User and Group DBA 5) Configure the Kernel Parameters on each node 6) Set Limits for user Oracle 7) Configure the Hangcheck Timer on all nodes 8) Configure SSH 9) Configure User Equivalence (Note that user equivalence is established for the current session only. If you switch to a different session or log out and back in, you will have to run ssh-agent and ssh-add again to re-establish user equivalence.) 10) Prepare Disks Partitions for ASM 11)) Configure ASMlib for ASM Management 12) Configure RAW Devices for OCR, Voting Disk and Spfile 13) Create mount points for Oracle Software 14) Configure Cluster Verification Utility
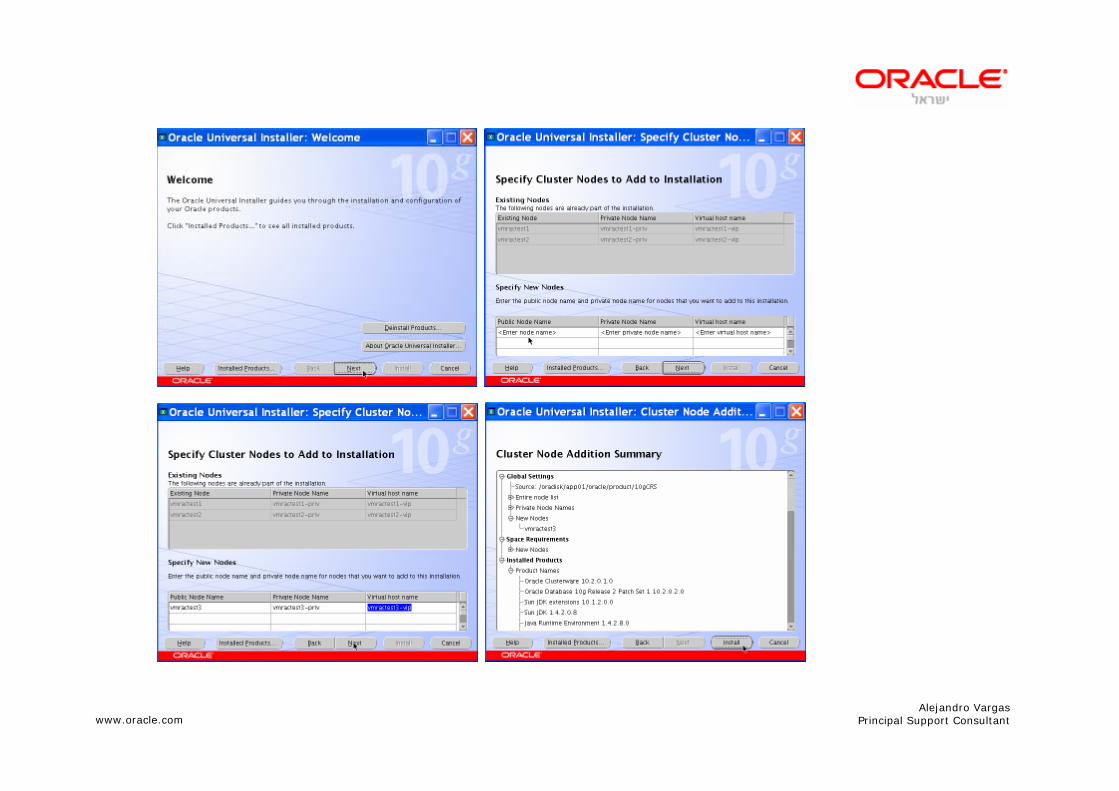
The Oracle Clusterware Install needs to be executed from node 1. Login as the Oracle user and set the CRS_HOME to the Oracle clusterware home ( same as in the existing nodes, node1 & node2 ). Set the DISPLAY environment variable and export it. setenv DISPLAY osn3082:0.0 execute: xhost+ (for accepting the X redirection) cd $CRS_HOME/oui/bin ./addNode.sh
www.oracle.com
Alejandro Vargas Principal Support Consultant
www.oracle.com
Alejandro Vargas Principal Support Consultant
www.oracle.com
Alejandro Vargas Principal Support Consultant
www.oracle.com
Alejandro Vargas Principal Support Consultant
www.oracle.com
Alejandro Vargas Principal Support Consultant
www.oracle.com
Alejandro Vargas Principal Support Consultant
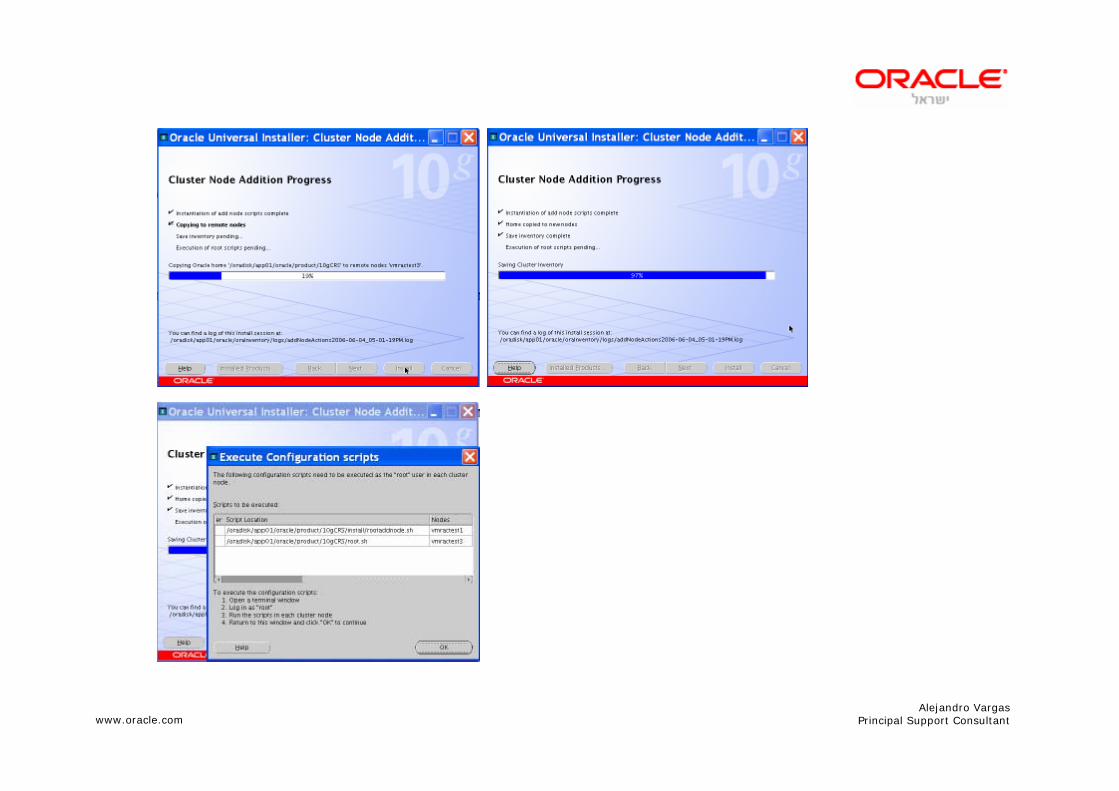
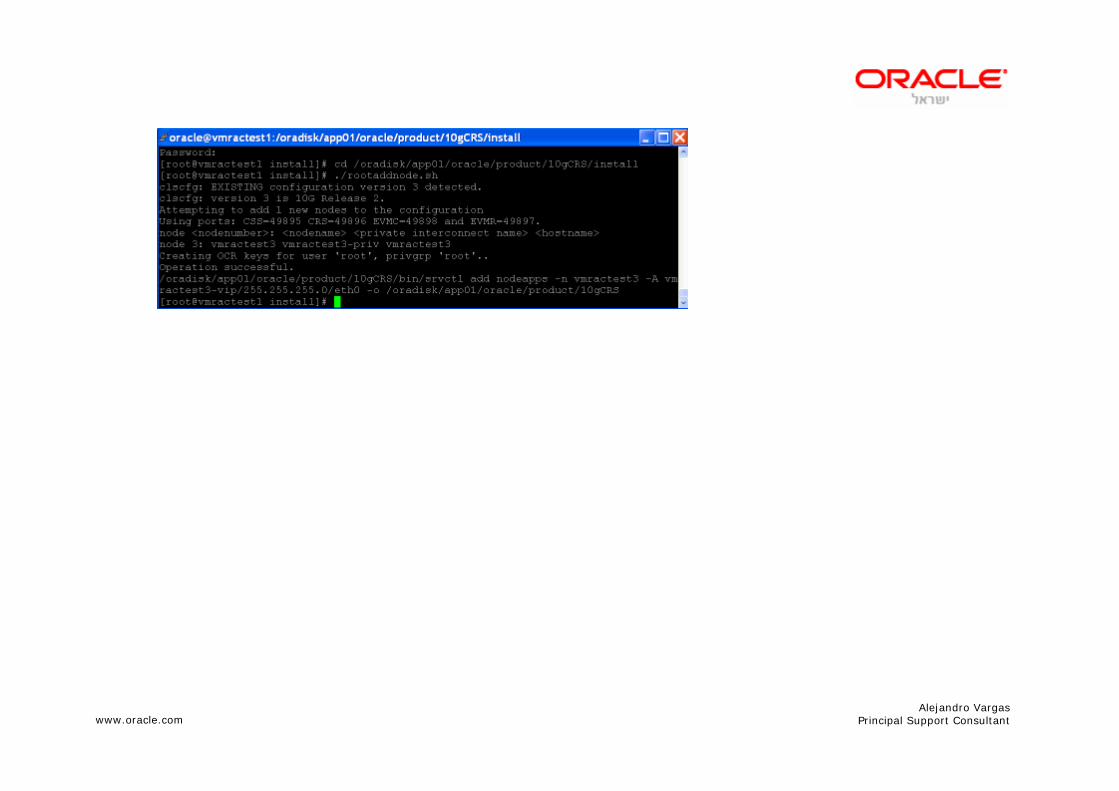
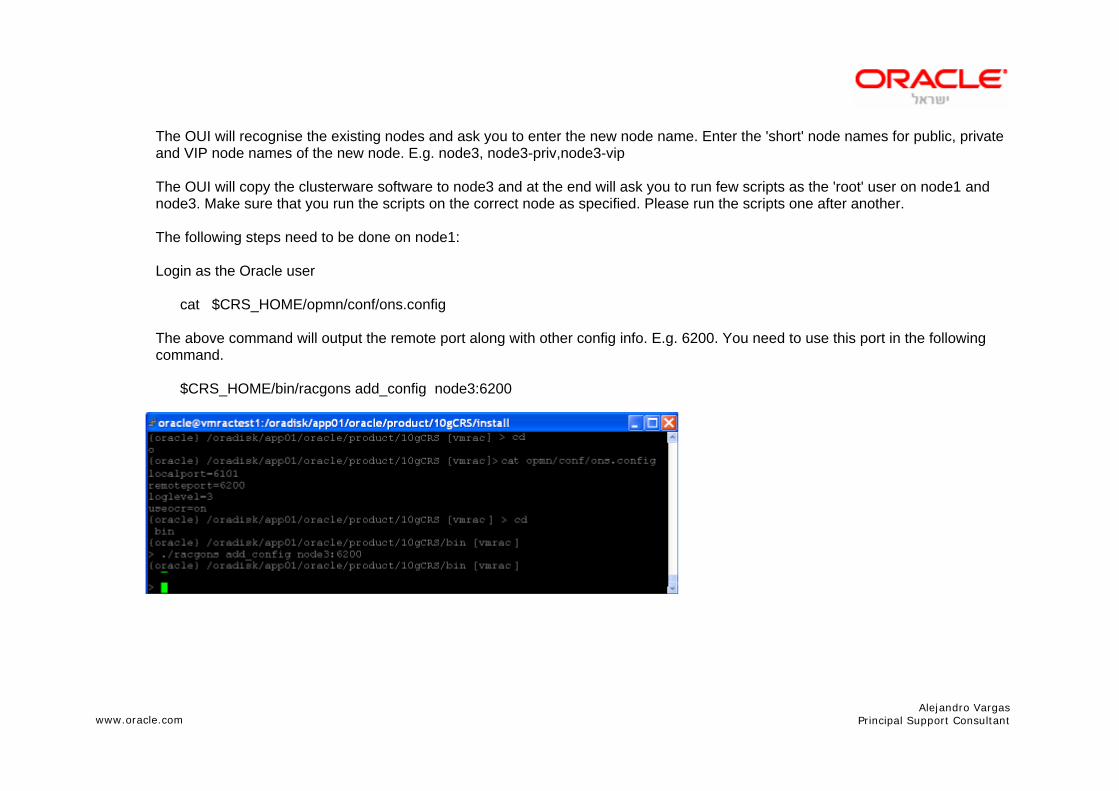
The OUI will recognise the existing nodes and ask you to enter the new node name. Enter the 'short' node names for public, private and VIP node names of the new node. E.g. node3, node3-priv,node3-vip The OUI will copy the clusterware software to node3 and at the end will ask you to run few scripts as the 'root' user on node1 and node3. Make sure that you run the scripts on the correct node as specified. Please run the scripts one after another. The following steps need to be done on node1: Login as the Oracle user cat $CRS_HOME/opmn/conf/ons.config The above command will output the remote port along with other config info. E.g. 6200. You need to use this port in the following command. $CRS_HOME/bin/racgons add_config node3:6200
www.oracle.com
Alejandro Vargas Principal Support Consultant
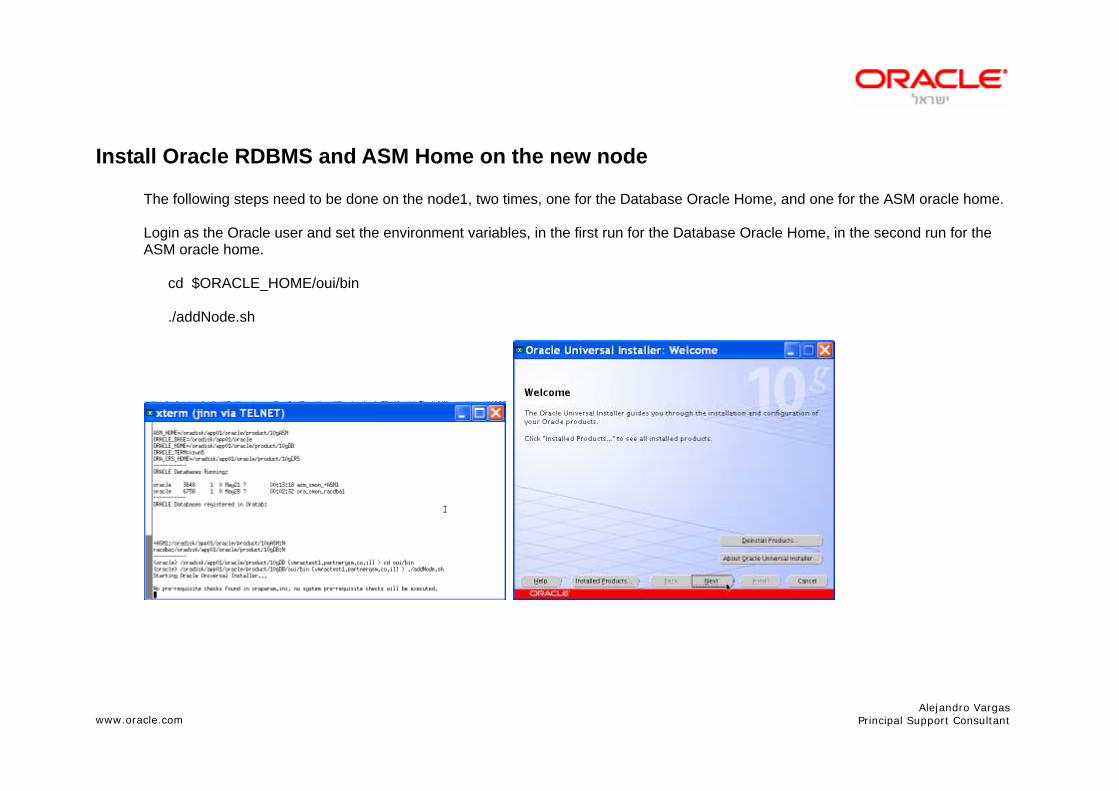
Install Oracle RDBMS and ASM Home on the new node
The following steps need to be done on the node1, two times, one for the Database Oracle Home, and one for the ASM oracle home. Login as the Oracle user and set the environment variables, in the first run for the Database Oracle Home, in the second run for the ASM oracle home. cd $ORACLE_HOME/oui/bin ./addNode.sh
www.oracle.com
Alejandro Vargas Principal Support Consultant
Select node3 from the first screen
www.oracle.com
Alejandro Vargas Principal Support Consultant
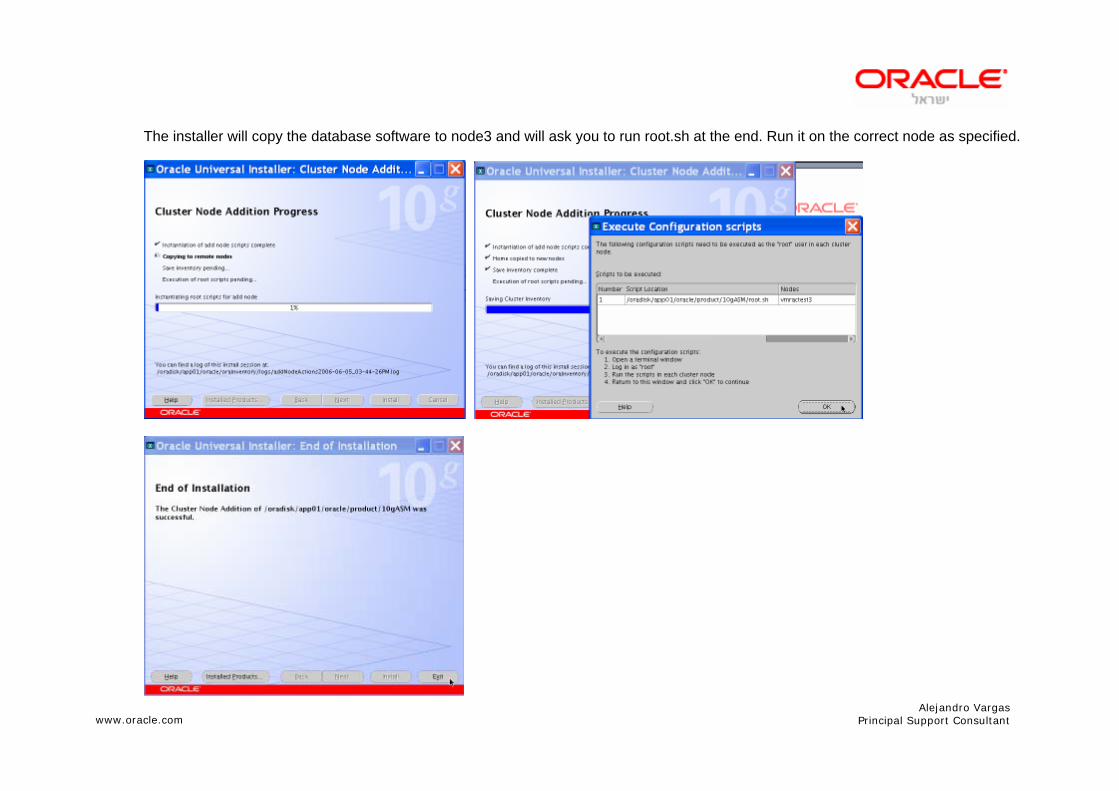
The installer will copy the database software to node3 and will ask you to run root.sh at the end. Run it on the correct node as specified.
www.oracle.com
Alejandro Vargas Principal Support Consultant
Once Finished until this point repeat for the ASM home.
www.oracle.com
Alejandro Vargas Principal Support Consultant
Configure the Listener on the new Node
The following steps need to be done on node3: Login as the oracle user and set the environment to the database home. Remember to set the DISPLAY environment variable and export it. $ORACLE_HOME/bin/netca Choose Cluster management Choose Listener
www.oracle.com
Alejandro Vargas Principal Support Consultant
Choose ADD Choose the name as LISTENER
www.oracle.com
Alejandro Vargas Principal Support Consultant
The above steps will add a listener on node3 with the name LISTENER_node3.
Create an ASM Instance on the new node.
www.oracle.com
Alejandro Vargas Principal Support Consultant
The following steps need to be done on node1: Login as the Oracle user and set the environment to ASM home. $ORACLE_HOME/bin/dbca
Select 'racdb' (or whatever the cluster database name you have) as the database and enter the sys username/password at the bottom of the screen. It will display the existing instances. Click next and on the following screen enter racdb3 as the instance name and choose node3. This will create a database instance (racdb3 onnode3). During creation it will ask if the ASM instance should be extended to node3. You need to choose 'Yes'.
www.oracle.com
Alejandro Vargas Principal Support Consultant
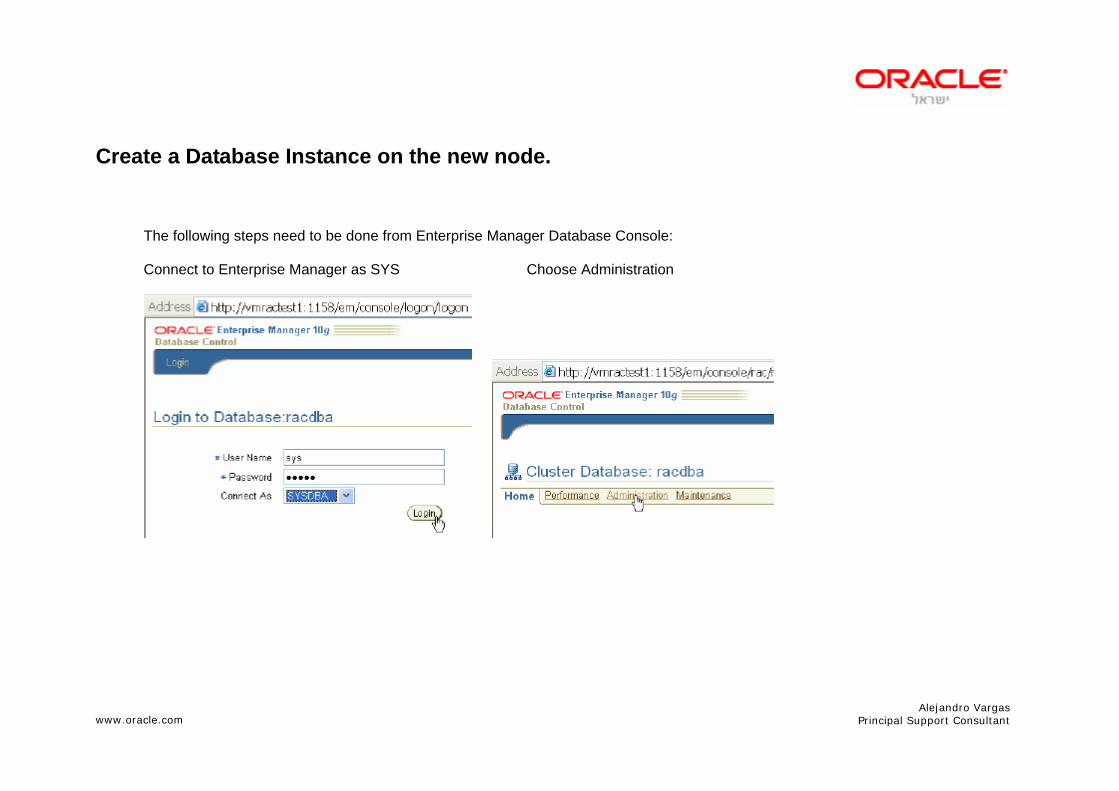
Create a Database Instance on the new node.
The following steps need to be done from Enterprise Manager Database Console: Connect to Enterprise Manager as SYS Choose Administration
www.oracle.com
Alejandro Vargas Principal Support Consultant
On Administration choose Add Instance On the first screen enter OS and Database Users/passwords
www.oracle.com
Alejandro Vargas Principal Support Consultant
Choose the instance to add, and press next
Press Submit Job
www.oracle.com
Alejandro Vargas Principal Support Consultant
Press View Job to start monitoring the progress
And then press on the add instance link, this will show the job log
www.oracle.com
Alejandro Vargas Principal Support Consultant
The log is displayed, to refresh it go back and forth from the previous step
The job status is displayed once completed
www.oracle.com
Alejandro Vargas Principal Support Consultant
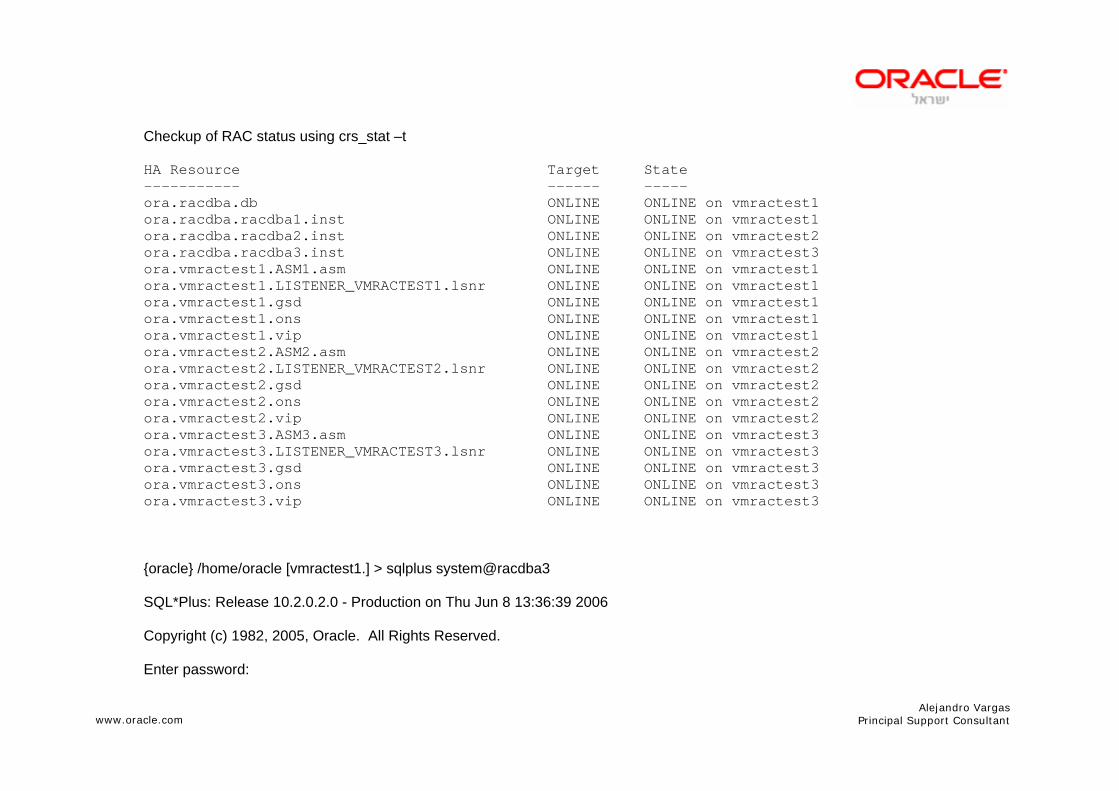
Checkup of RAC status using crs_stat –t HA Resource Target State ----------- ------ ----- ora.racdba.db ONLINE ONLINE on vmractest1 ora.racdba.racdba1.inst ONLINE ONLINE on vmractest1 ora.racdba.racdba2.inst ONLINE ONLINE on vmractest2 ora.racdba.racdba3.inst ONLINE ONLINE on vmractest3 ora.vmractest1.ASM1.asm ONLINE ONLINE on vmractest1 ora.vmractest1.LISTENER_VMRACTEST1.lsnr ONLINE ONLINE on vmractest1 ora.vmractest1.gsd ONLINE ONLINE on vmractest1 ora.vmractest1.ons ONLINE ONLINE on vmractest1 ora.vmractest1.vip ONLINE ONLINE on vmractest1 ora.vmractest2.ASM2.asm ONLINE ONLINE on vmractest2 ora.vmractest2.LISTENER_VMRACTEST2.lsnr ONLINE ONLINE on vmractest2 ora.vmractest2.gsd ONLINE ONLINE on vmractest2 ora.vmractest2.ons ONLINE ONLINE on vmractest2 ora.vmractest2.vip ONLINE ONLINE on vmractest2 ora.vmractest3.ASM3.asm ONLINE ONLINE on vmractest3 ora.vmractest3.LISTENER_VMRACTEST3.lsnr ONLINE ONLINE on vmractest3 ora.vmractest3.gsd ONLINE ONLINE on vmractest3 ora.vmractest3.ons ONLINE ONLINE on vmractest3 ora.vmractest3.vip ONLINE ONLINE on vmractest3 {oracle} /home/oracle [vmractest1.] > sqlplus system@racdba3 SQL*Plus: Release 10.2.0.2.0 - Production on Thu Jun 8 13:36:39 2006 Copyright (c) 1982, 2005, Oracle. All Rights Reserved. Enter password:
www.oracle.com
Alejandro Vargas Principal Support Consultant
Connected to: Oracle Database 10g Enterprise Edition Release 10.2.0.2.0 - Production With the Partitioning, Real Application Clusters, OLAP and Data Mining options SQL> select instance_name from v$instance;