8
RADIANT PANEL SYSTEM PLANNING & INSTALLATION Roth Radiant Heating Systems
RADIANT PANEL SYSTEM
PLANNING & INSTALLATION
Roth Radiant Heating Systems

RADIANT PANEL
SYSTEM®
PLANNING & INSTALLATION
MANUAL
ROTH HEATING SYSTEMS
The Roth Radiant Panel System® was developed for the wood frame houses of the North American and Scandinavian markets. It was designed for easy installation over any new or existing sub-floor, wood or concrete, and for use with many different floor coverings, such as carpet, tile or hardwood. This is done without the structural changes needed to accommodate the additional load of lightweight concrete and with minimal effects to the finished floor height. It is ideal for retrofit systems, but it’s also great for new construction when you don’t want the weight, expense or water problems of lightweight concrete. The efficient design of the system, heavy gauge, full-face aluminum sheet on top and EPS insulating foam on the bottom, focuses the heat exactly where you want it – directly under the finished floor – so that the system can run at the lowest temperature possible. The quick recovery time makes this system one of the few times that temperature setback makes sense in radiant floor heating. These are just some of the advantages you will receive from the
intelligent design and high quality of the Roth Radiant Panel System®.
INTRODUCTION
INSTALLATION INSTRUCTIONS
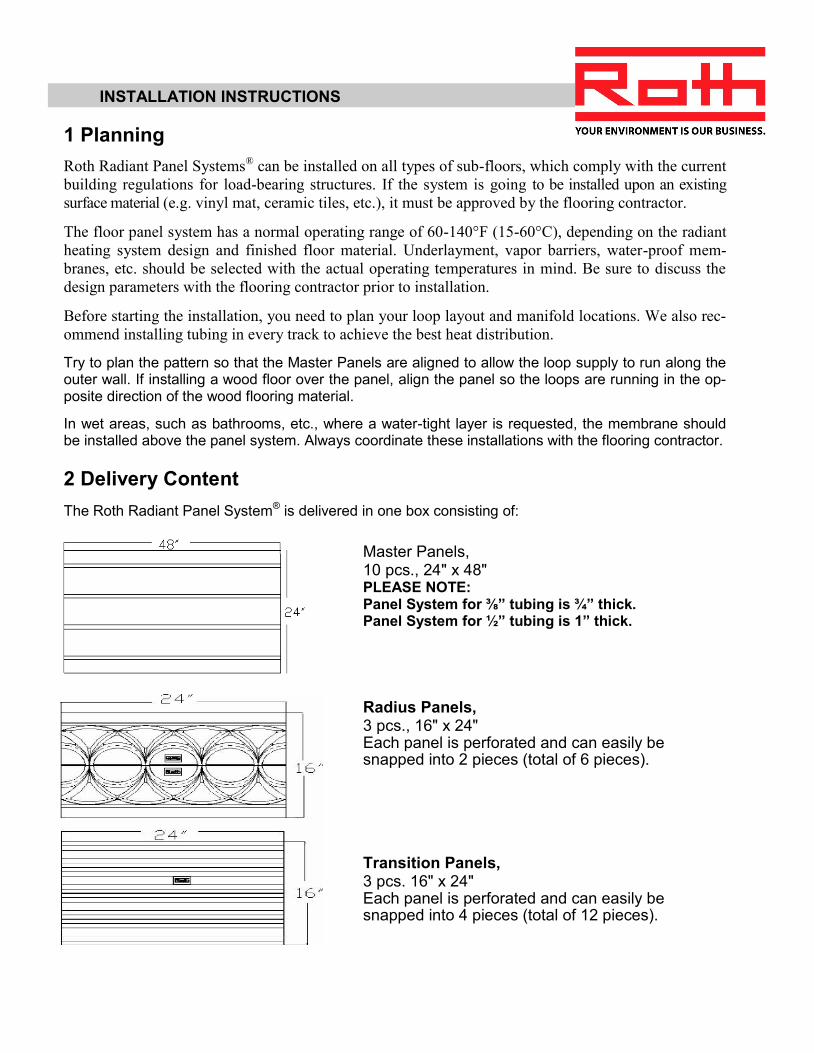
Master Panels, 10 pcs., 24" x 48" PLEASE NOTE: Panel System for ⅜” tubing is ¾” thick. Panel System for ½” tubing is 1” thick.
Radius Panels, 3 pcs., 16" x 24" Each panel is perforated and can easily be snapped into 2 pieces (total of 6 pieces).
Transition Panels, 3 pcs. 16" x 24" Each panel is perforated and can easily be snapped into 4 pieces (total of 12 pieces).
1 Planning
Roth Radiant Panel Systems® can be installed on all types of sub-floors, which comply with the current
building regulations for load-bearing structures. If the system is going to be installed upon an existing
surface material (e.g. vinyl mat, ceramic tiles, etc.), it must be approved by the flooring contractor.
The floor panel system has a normal operating range of 60-140°F (15-60°C), depending on the radiant
heating system design and finished floor material. Underlayment, vapor barriers, water-proof mem-
branes, etc. should be selected with the actual operating temperatures in mind. Be sure to discuss the
design parameters with the flooring contractor prior to installation.
Before starting the installation, you need to plan your loop layout and manifold locations. We also rec-
ommend installing tubing in every track to achieve the best heat distribution.
Try to plan the pattern so that the Master Panels are aligned to allow the loop supply to run along the outer wall. If installing a wood floor over the panel, align the panel so the loops are running in the op-posite direction of the wood flooring material.
In wet areas, such as bathrooms, etc., where a water-tight layer is requested, the membrane should be installed above the panel system. Always coordinate these installations with the flooring contractor.
2 Delivery Content
The Roth Radiant Panel System® is delivered in one box consisting of:

INSTALLATION INSTRUCTIONS
3 Installation of the Panel
The sub-floor must be smooth, clean and level. Surface irregularities should not exceed more than 0.02" per foot. The Roth Radiant Panel System
® should be secured to the subfloor with
countersunk screws or a foam board compatible adhesive. Apply the adhesive according to the manufacturer’s instructions.
Start the installation by laying the radius panel first. If you need an extra track you can start with a transition panel. A strip of plywood can be installed on the perimeter for tack strip when carpet is the finished floor material. It is important to plan the installation in advance to be sure that you have the correct number of tracks when installing the tubing. Transition and radius panels can be installed upside down as filler pieces.
When securing the panels to a wood subfloor, we recommend using at least eight (8) countersunk screws spaced 12” (30 cm) apar t and 6” (15 cm) from the edges. When installing over concrete, you can use countersunk concrete fasteners in the same pattern. Be aware that floor conditions may require use of additional fasteners. The panels can also be secured with latex base adhesives com-patible with foam board products. These are applied with either a caulking gun or notched trowel. Follow the manufacturer’s instruc-tions for application. Curing time can vary widely between brands of adhesive and with the temperature and humidity conditions at the time of installation.

INSTALLATION INSTRUCTIONS
Continue to lay the master panels. When cut-ting the master panels, mark the plate and saw it with EPS side up. You can use any saw with a fine-toothed metal blade. After cutting the panel, remove any burrs. When cutting the last master panel in the first row, use the rest of the panel to start the next row. This will provide staggered joints for the field panels.
After completion of the panel installation in an area, use a vacuum to clean up thor-oughly before installing the tubing. Dirt and debris in the tracks can create noise when the system is put into operation.
INSTALLATION INSTRUCTIONS
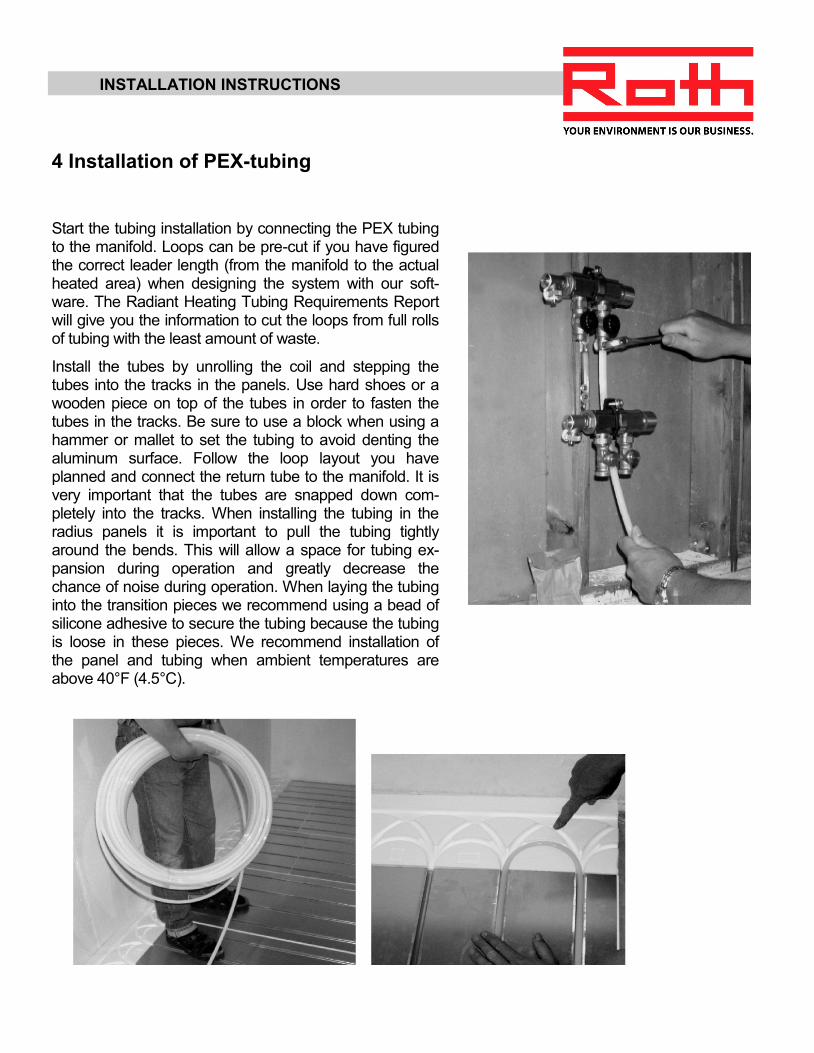
4 Installation of PEX-tubing
Start the tubing installation by connecting the PEX tubing to the manifold. Loops can be pre-cut if you have figured the correct leader length (from the manifold to the actual heated area) when designing the system with our soft-ware. The Radiant Heating Tubing Requirements Report will give you the information to cut the loops from full rolls of tubing with the least amount of waste.
Install the tubes by unrolling the coil and stepping the tubes into the tracks in the panels. Use hard shoes or a wooden piece on top of the tubes in order to fasten the tubes in the tracks. Be sure to use a block when using a hammer or mallet to set the tubing to avoid denting the aluminum surface. Follow the loop layout you have planned and connect the return tube to the manifold. It is very important that the tubes are snapped down com-pletely into the tracks. When installing the tubing in the radius panels it is important to pull the tubing tightly around the bends. This will allow a space for tubing ex-pansion during operation and greatly decrease the chance of noise during operation. When laying the tubing into the transition pieces we recommend using a bead of silicone adhesive to secure the tubing because the tubing is loose in these pieces. We recommend installation of the panel and tubing when ambient temperatures are above 40°F (4.5°C).
INSTALLATION INSTRUCTIONS
5 Pressure Test/Start-up After installation of the panel and tubing, but before laying the finished floor, you need to perform a pressure test. Fill the system with air or water and maintain a pressure of 2 to 3 times the working pressure of the system, about 25 to 50 psi (1.7 to 3.4 bar) for 6 hours. Use a leak detection solution (if testing with air) to locate and repair any leaks in the system. A small leak can take a long time to register on a 60 psi (4 bar) gauge. Please note: If the system cannot be started up after the pressure test and there is a danger of freeze, you must use air or a glycol solution! Do not use plain water! Run the system at normal operating pressure at about 140°F (60°C) for 30 minutes to allow the tubing to relax and settle into the tracks. Noise can occur at this time but will reduce as the tubing settles. If the noise persists, locate the source and apply some silicone adhesive to the tubing at that location. After the start-up is complete, the finished flooring can be installed.
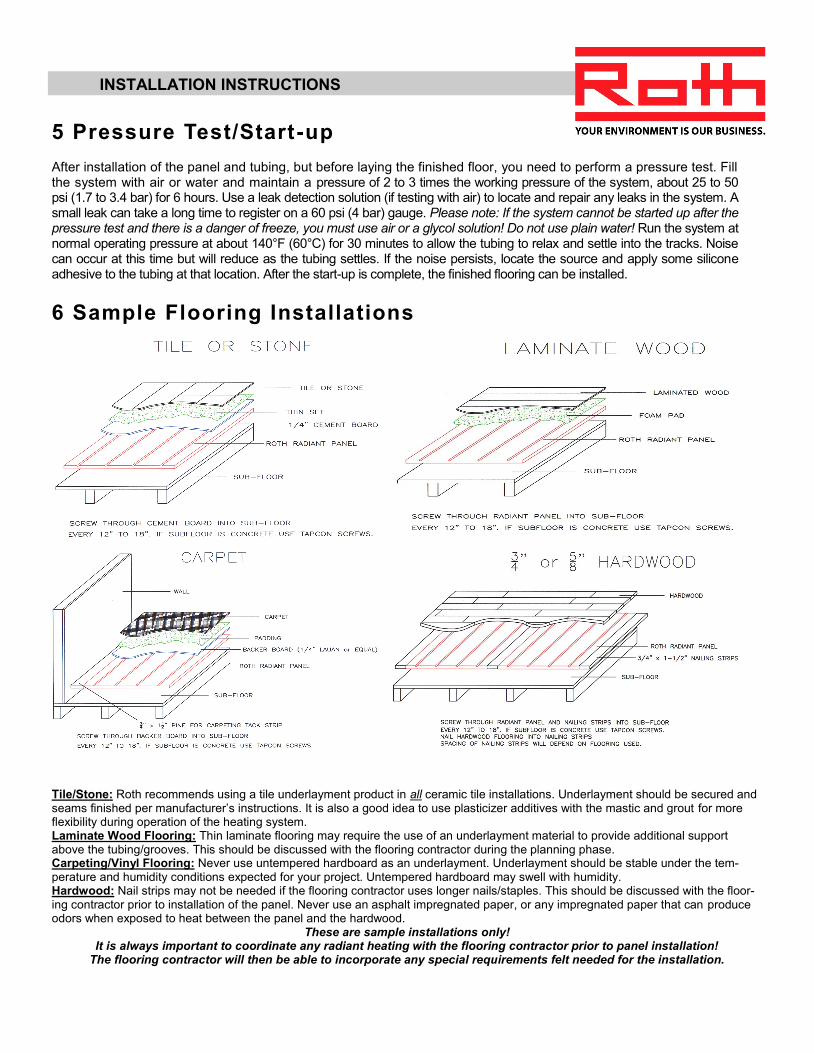
6 Sample Flooring Installations
Tile/Stone: Roth recommends using a tile underlayment product in all ceramic tile installations. Underlayment should be secured and seams finished per manufacturer’s instructions. It is also a good idea to use plasticizer additives with the mastic and grout for more flexibility during operation of the heating system. Laminate Wood Flooring: Thin laminate flooring may require the use of an underlayment material to provide additional support above the tubing/grooves. This should be discussed with the flooring contractor during the planning phase. Carpeting/Vinyl Flooring: Never use untempered hardboard as an underlayment. Underlayment should be stable under the tem-perature and humidity conditions expected for your project. Untempered hardboard may swell with humidity. Hardwood: Nail strips may not be needed if the flooring contractor uses longer nails/staples. This should be discussed with the floor-ing contractor prior to installation of the panel. Never use an asphalt impregnated paper, or any impregnated paper that can produce odors when exposed to heat between the panel and the hardwood.
These are sample installations only! It is always important to coordinate any radiant heating with the flooring contractor prior to panel installation!
The flooring contractor will then be able to incorporate any special requirements felt needed for the installation.
Roth’s success is the result of flexibility in products, targeted investments
and theme oriented solutions. Our growth stems form continuous research
and development of new and innovative products. Manufacturing keys to
success are combinations of know-how, modern production sites and equip-
ment, latest production technologies and motivated personnel. Ultimate
Comfort Zone ®
Distributed by:
Roth reserves the right to change model specifications and descriptions used in this document at any time, without notice.
NORTH AMERICA
Roth Industries, Inc. 268 Bellew Ave South
Watertown, NY 13601
P: (888)-266-7684 F: (401) 267-9048 Email: [email protected]
www.roth-usa.com
Roth Canada 1607, rue de l’Industrie
Beloeil (Quebec) Canada J3G 4S5
P: (800) 969-7684 F: (450) 464-7950 Email: [email protected]
www.roth-canada.com Part Number #2300100024


