©Raggedy Ruff Designs Pattern is for personal use only. 18 Medina Close, Derby DE24 0UD England. www.raggedyruffdesigns.com email:[email protected]
1
Raggedy Ruff Designs
Sweet peas
Finished size 8.5” by 8.5” (or 12.5” by 12.5”)
Raggedy Ruff Designs
©Raggedy Ruff Designs Pattern is for personal use only. 18 Medina Close, Derby DE24 0UD England. www.raggedyruffdesigns.com email:[email protected]
2
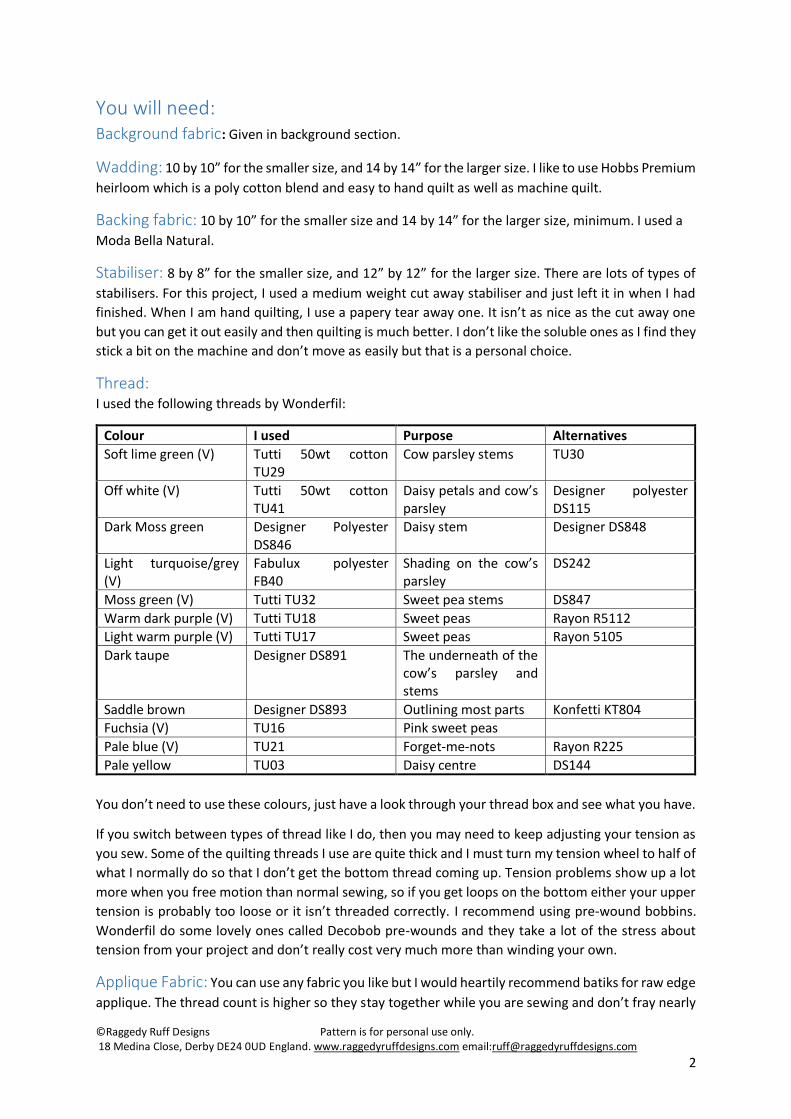
You will need: Background fabric: Given in background section.
Wadding: 10 by 10” for the smaller size, and 14 by 14” for the larger size. I like to use Hobbs Premium
heirloom which is a poly cotton blend and easy to hand quilt as well as machine quilt.
Backing fabric: 10 by 10” for the smaller size and 14 by 14” for the larger size, minimum. I used a
Moda Bella Natural.
Stabiliser: 8 by 8” for the smaller size, and 12” by 12” for the larger size. There are lots of types of
stabilisers. For this project, I used a medium weight cut away stabiliser and just left it in when I had
finished. When I am hand quilting, I use a papery tear away one. It isn’t as nice as the cut away one
but you can get it out easily and then quilting is much better. I don’t like the soluble ones as I find they
stick a bit on the machine and don’t move as easily but that is a personal choice.
Thread: I used the following threads by Wonderfil:
Colour I used Purpose Alternatives
Soft lime green (V) Tutti 50wt cotton TU29
Cow parsley stems TU30
Off white (V) Tutti 50wt cotton TU41
Daisy petals and cow’s parsley
Designer polyester DS115
Dark Moss green Designer Polyester DS846
Daisy stem Designer DS848
Light turquoise/grey (V)
Fabulux polyester FB40
Shading on the cow’s parsley
DS242
Moss green (V) Tutti TU32 Sweet pea stems DS847
Warm dark purple (V) Tutti TU18 Sweet peas Rayon R5112
Light warm purple (V) Tutti TU17 Sweet peas Rayon 5105
Dark taupe Designer DS891 The underneath of the cow’s parsley and stems
Saddle brown Designer DS893 Outlining most parts Konfetti KT804
Fuchsia (V) TU16 Pink sweet peas
Pale blue (V) TU21 Forget-me-nots Rayon R225
Pale yellow TU03 Daisy centre DS144
You don’t need to use these colours, just have a look through your thread box and see what you have.
If you switch between types of thread like I do, then you may need to keep adjusting your tension as
you sew. Some of the quilting threads I use are quite thick and I must turn my tension wheel to half of
what I normally do so that I don’t get the bottom thread coming up. Tension problems show up a lot
more when you free motion than normal sewing, so if you get loops on the bottom either your upper
tension is probably too loose or it isn’t threaded correctly. I recommend using pre-wound bobbins.
Wonderfil do some lovely ones called Decobob pre-wounds and they take a lot of the stress about
tension from your project and don’t really cost very much more than winding your own.
Applique Fabric: You can use any fabric you like but I would heartily recommend batiks for raw edge
applique. The thread count is higher so they stay together while you are sewing and don’t fray nearly
©Raggedy Ruff Designs Pattern is for personal use only. 18 Medina Close, Derby DE24 0UD England. www.raggedyruffdesigns.com email:[email protected]
3
as quickly. I like to use hand dyed batiks with no printed pattern. They give a lovely water colour effect.
I use the Kota batiks by Moda, Timeless treasure tonga blenders, Hoffman water colours and Sew
Simple Batiks. For this embroidery, I used:
Code Item Colour Size for 8” Size for 12”
A1 Kota Vanilla Daisy Light cream 3.5” by 2” 6 by 3”
A2 Kota baby lilac Sweet peas Light warm purple
2 by 2” 3 by 3”
A3 Kota jungle lavender Sweet peas Lilac 2 by 2” 3 by 3”
A4 SSB030 Sweet peas Mid pink 2 by 2” 3 by 3”
A5 Kota dark pink Sweet peas Dark pink 2.5 b 2.5” 4 by 4”
A6 SSB100 Sweet peas Lavender 2.5 b 2.5” 4 by 4”
A7 SSB094 Sweet peas Dark purple 2 by 2” 3 by 3”
A8 SSB090 Sweet peas Warm bright purple
1 by 1” 1.5 by 1.5”
Freezer paper: Freezer paper is ideal to trace the pattern pieces and then you can iron them (warm
iron) onto your fabric and then cut them out and carefully peel away the paper.
Bottom bobbin threads: Just a note here to say that I am lazy so I only ever use either a dark
brown/grey/cream thread on my bottom bobbin. I adjust my tension to make sure I don’t get any
noticeable thread colour coming up from underneath. I recommend using pre-wound bobbins.
Wonderfil do some lovely ones called Decobob pre-wounds and they take a lot of the stress about
tension from your project and don’t really cost very much more than winding your own.
Free motion foot and ability to either drop or cover up your feed dogs: Everyone’s machine
is different and I’m not going to try and explain all the different types of free motion sewing foot. But
you are going to need one. And to know how to use it! This one is mine. I have a Pfaff Creative 2056
(which is getting on a bit.) I used to have the proper free motion foot for it but I broke it so I am back
to the darning foot the machine came with, but to be honest it works just as well so I haven’t bothered
changing it.
At the back of the instructions there are the outline drawings. If you wish to construct the embroidery
using needle turn applique you will need to add seam allowances on as they are not included. I am
not going to give the instructions for needle turn applique but if you follow the same order as for the
raw edge applique and remember to add on your seam allowance you should be fine, and you could
embroider the extra details or smaller pieces by hand.
©Raggedy Ruff Designs Pattern is for personal use only. 18 Medina Close, Derby DE24 0UD England. www.raggedyruffdesigns.com email:[email protected]
4
Background instructions for 8” panel Below are the fabric requirements for the 8” patchwork background. The placement for each piece
are indicated in the chart by the reference number. All the patchwork seams are constructed using a
¼ inch seam. I would highly recommend labelling with G1 etc which you have cut out your pieces so
you don’t get muddled!
Code Description Pieces to cut Fabric size supplied
G1 Bella Mint Mint green plain 5.5” by 5.5” 6 by 6”
G2 Amelia green Bright light green plain 5.5” by 2.5” time 2 6 by 6”
G3 S&S Aqua Dark green pattern batik 5.5” by 1.5” times 2 6 by 4”
G4 SSB066 Dark teal batik 1.5” By 1.5” 2 by 2”
G5 Hoffmann Parakeet Dark teal pattern batik 1.5” By 2.5” times 2 3 by 4”
G6 SSB075 Light turquoise batik 2.5 by 2.5” 3 by 3”
Background instructions for 12” panel Below are the fabric requirements for the 12” patchwork background. The placement for each piece
are indicated in the chart by the reference number. All the patchwork seams are constructed using a
¼ inch seam. I would highly recommend labelling with G1 etc which you have cut out your pieces so
you don’t get muddled!
Code Description Pieces to cut Fabric size supplied
G1 Bella Mint Mint green plain 8” by 8” 9 by 9”
G2 Amelia green Bright light green plain 8” by 3.5” time 2 9 by 8”
G3 S&S Aqua Dark green pattern batik 8” by 2” times 2 9 by 5”
G4 SSB066 Dark teal batik 2” By 2” 2.5 by 2.5”
G5 Hoffmann Parakeet Dark teal pattern batik 2” By 3.5” times 2 5 by 4”
G6 SSB075 Light turquoise batik 3.5 by 3.5” 4 by 4”
Piecing Instructions
G1 G2 G3
G3 G4 G5
G5 G6
G2
©Raggedy Ruff Designs Pattern is for personal use only. 18 Medina Close, Derby DE24 0UD England. www.raggedyruffdesigns.com email:[email protected]
5
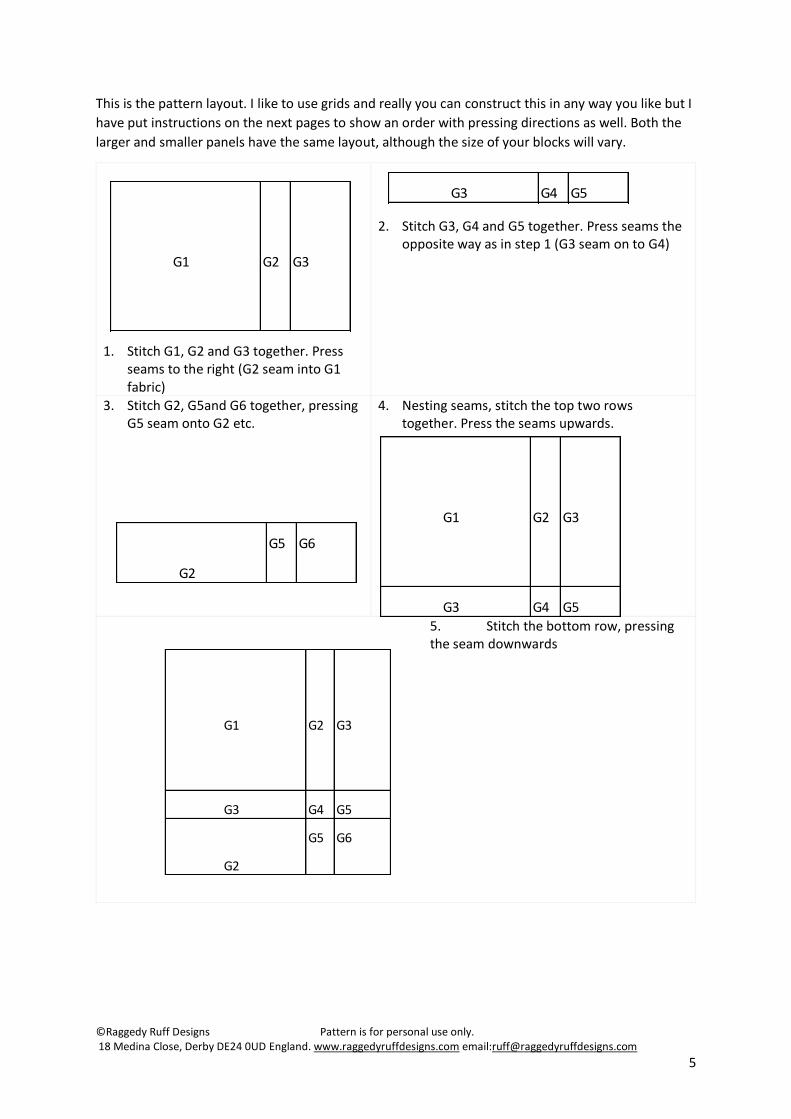
This is the pattern layout. I like to use grids and really you can construct this in any way you like but I
have put instructions on the next pages to show an order with pressing directions as well. Both the
larger and smaller panels have the same layout, although the size of your blocks will vary.
1. Stitch G1, G2 and G3 together. Press seams to the right (G2 seam into G1 fabric)
2. Stitch G3, G4 and G5 together. Press seams the opposite way as in step 1 (G3 seam on to G4)
3. Stitch G2, G5and G6 together, pressing G5 seam onto G2 etc.
4. Nesting seams, stitch the top two rows together. Press the seams upwards.
5. Stitch the bottom row, pressing the seam downwards
G1 G2 G3
G3 G4 G5
G5 G6
G2
G1 G2 G3
G3 G4 G5
G1 G2 G3
G3 G4 G5
G5 G6
G2
©Raggedy Ruff Designs Pattern is for personal use only. 18 Medina Close, Derby DE24 0UD England. www.raggedyruffdesigns.com email:[email protected]
6
Embroidery Instructions At the back of the instructions there are the outline drawings. If you wish to construct the embroidery
using needle turn applique you will need to add seam allowances on as they are not included. I am
not going to give the instructions for needle turn applique but if you follow the same order as for the
raw edge applique and remember to add on your seam allowance you should be fine, and you could
embroider the extra details or smaller pieces by hand.
Video links (In addition to the written instructions I also have videos on my YouTube channel. Please go to
https://www.youtube.com/channel/UCp1RjC_f3WiZiZWhyxzCZxw or search for Raggedy Ruff Designs
on YouTube. There isn’t a specific one for this pattern but the other tutorials might be helpful.)
Basic cutting out guidelines To use freezer paper, you do the following:
• Trace your design with a pencil on to the matt side of your freezer paper.
• Cut out your shape with paper scissors (or if you are naughty like me you can just roughly cut
out the shape with your fabric scissors and trim it down properly when you cut your fabric.
This isn’t great for the life of your scissors but it does improve your cutting accuracy.)
• With a warm iron, press your shape onto the right-hand side of your fabric. You can fussy cut
if you want but make sure that you have all the shapes fitting onto your fabric before you cut,
you don’t want to find that you only have enough fabric left for half a mouse!
• Cut the shape and peel off the freezer paper.
I like to build up my designs through layers where possible to reduce the amount of raw edge seams
cutting across a shape and make positioning easier. So, trace out all the design lines unless they are
clearly embroidery only (like the eyes or the mice paws, bird’s legs etc.). I try to show embroidery lines
with a thinner pen line, and fabric changes with a thicker pen line. When you peel off the freezer
paper, you can then trim down the shape to the next layer of fabric and reuse it.
If you are using a fabric kit to make this panel, please remember that some of the applique fabric
pieces will be used in different parts of the embroidery. It would be a good idea to trace out of the
designs and cut out all the pieces for one applique fabric colour at a time so that you ensure you
position the pieces optimally or you may not have sufficient fabric later.
Adhesives I don’t use any adhesives on my appliques. I don’t like the feel of them and I like the freedom to keep
arranging my pieces as I go along. You can pin your pieces down if you like or use adhesive but I won’t
be mentioning them in the patterns as it isn’t how I work. To stop the pieces from puckering, I keep
smoothing the applique fabric pieces away from the machine needle with my fingers. It is one of the
reasons I like to layer my fabric so if anything does shift a little bit, you don’t end up with a gap between
sections.
©Raggedy Ruff Designs Pattern is for personal use only. 18 Medina Close, Derby DE24 0UD England. www.raggedyruffdesigns.com email:[email protected]
7
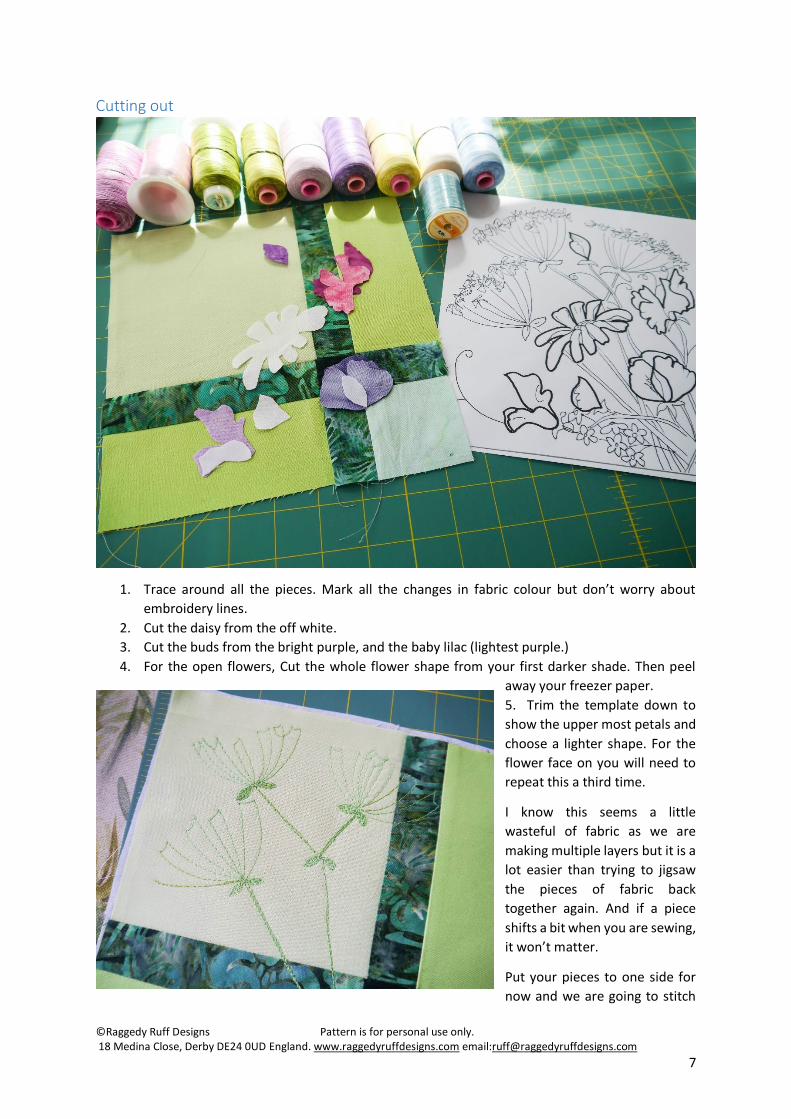
Cutting out
1. Trace around all the pieces. Mark all the changes in fabric colour but don’t worry about
embroidery lines.
2. Cut the daisy from the off white.
3. Cut the buds from the bright purple, and the baby lilac (lightest purple.)
4. For the open flowers, Cut the whole flower shape from your first darker shade. Then peel
away your freezer paper.
5. Trim the template down to
show the upper most petals and
choose a lighter shape. For the
flower face on you will need to
repeat this a third time.
I know this seems a little
wasteful of fabric as we are
making multiple layers but it is a
lot easier than trying to jigsaw
the pieces of fabric back
together again. And if a piece
shifts a bit when you are sewing,
it won’t matter.
Put your pieces to one side for
now and we are going to stitch
©Raggedy Ruff Designs Pattern is for personal use only. 18 Medina Close, Derby DE24 0UD England. www.raggedyruffdesigns.com email:[email protected]
8
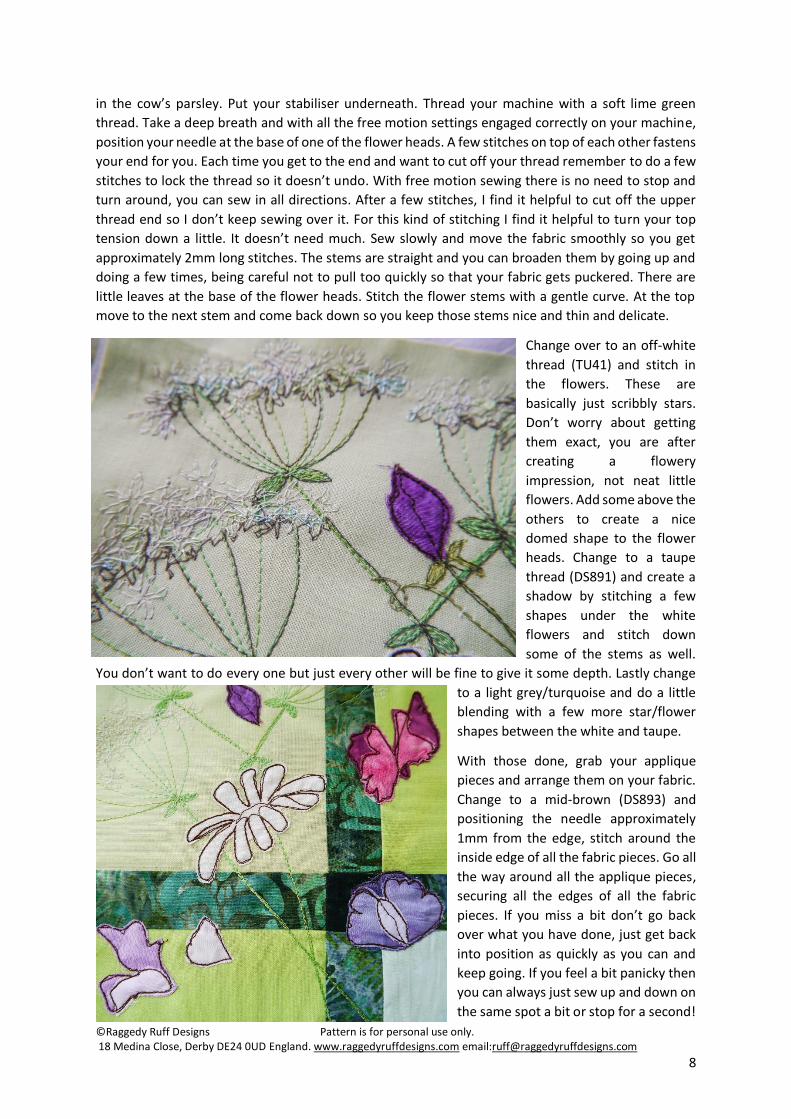
in the cow’s parsley. Put your stabiliser underneath. Thread your machine with a soft lime green
thread. Take a deep breath and with all the free motion settings engaged correctly on your machine,
position your needle at the base of one of the flower heads. A few stitches on top of each other fastens
your end for you. Each time you get to the end and want to cut off your thread remember to do a few
stitches to lock the thread so it doesn’t undo. With free motion sewing there is no need to stop and
turn around, you can sew in all directions. After a few stitches, I find it helpful to cut off the upper
thread end so I don’t keep sewing over it. For this kind of stitching I find it helpful to turn your top
tension down a little. It doesn’t need much. Sew slowly and move the fabric smoothly so you get
approximately 2mm long stitches. The stems are straight and you can broaden them by going up and
doing a few times, being careful not to pull too quickly so that your fabric gets puckered. There are
little leaves at the base of the flower heads. Stitch the flower stems with a gentle curve. At the top
move to the next stem and come back down so you keep those stems nice and thin and delicate.
Change over to an off-white
thread (TU41) and stitch in
the flowers. These are
basically just scribbly stars.
Don’t worry about getting
them exact, you are after
creating a flowery
impression, not neat little
flowers. Add some above the
others to create a nice
domed shape to the flower
heads. Change to a taupe
thread (DS891) and create a
shadow by stitching a few
shapes under the white
flowers and stitch down
some of the stems as well.
You don’t want to do every one but just every other will be fine to give it some depth. Lastly change
to a light grey/turquoise and do a little
blending with a few more star/flower
shapes between the white and taupe.
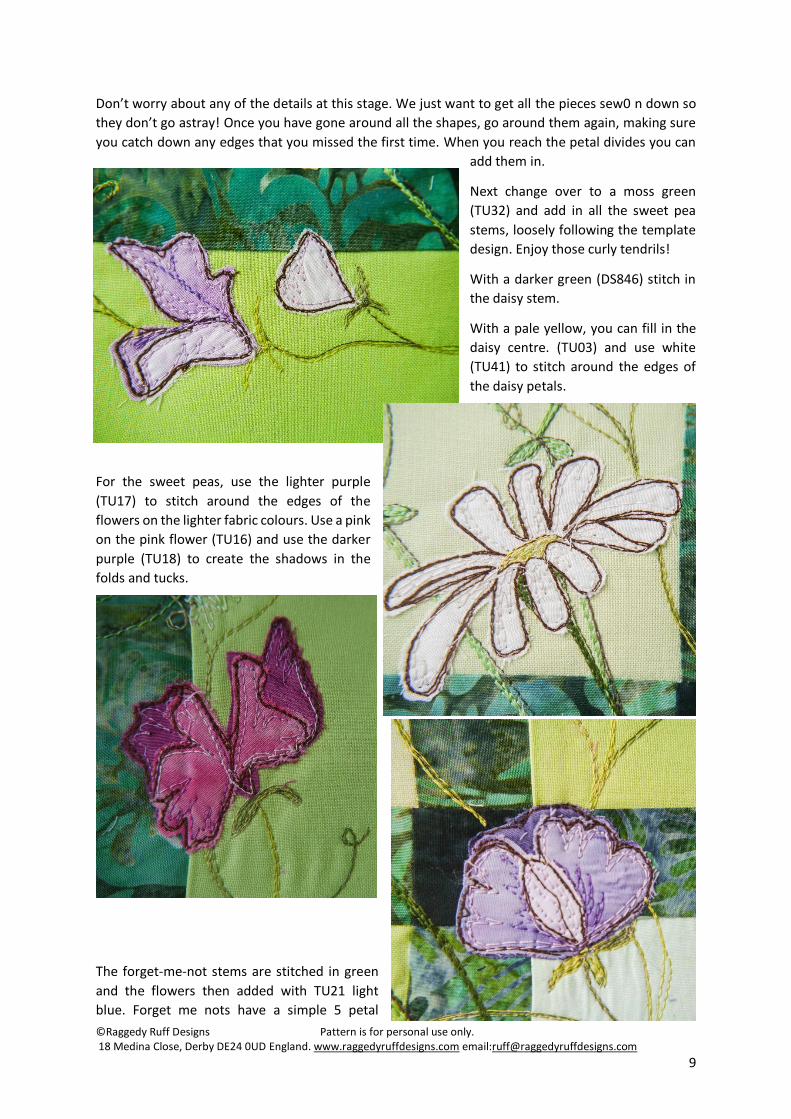
With those done, grab your applique
pieces and arrange them on your fabric.
Change to a mid-brown (DS893) and
positioning the needle approximately
1mm from the edge, stitch around the
inside edge of all the fabric pieces. Go all
the way around all the applique pieces,
securing all the edges of all the fabric
pieces. If you miss a bit don’t go back
over what you have done, just get back
into position as quickly as you can and
keep going. If you feel a bit panicky then
you can always just sew up and down on
the same spot a bit or stop for a second!
©Raggedy Ruff Designs Pattern is for personal use only. 18 Medina Close, Derby DE24 0UD England. www.raggedyruffdesigns.com email:[email protected]
9
Don’t worry about any of the details at this stage. We just want to get all the pieces sew0 n down so
they don’t go astray! Once you have gone around all the shapes, go around them again, making sure
you catch down any edges that you missed the first time. When you reach the petal divides you can
add them in.
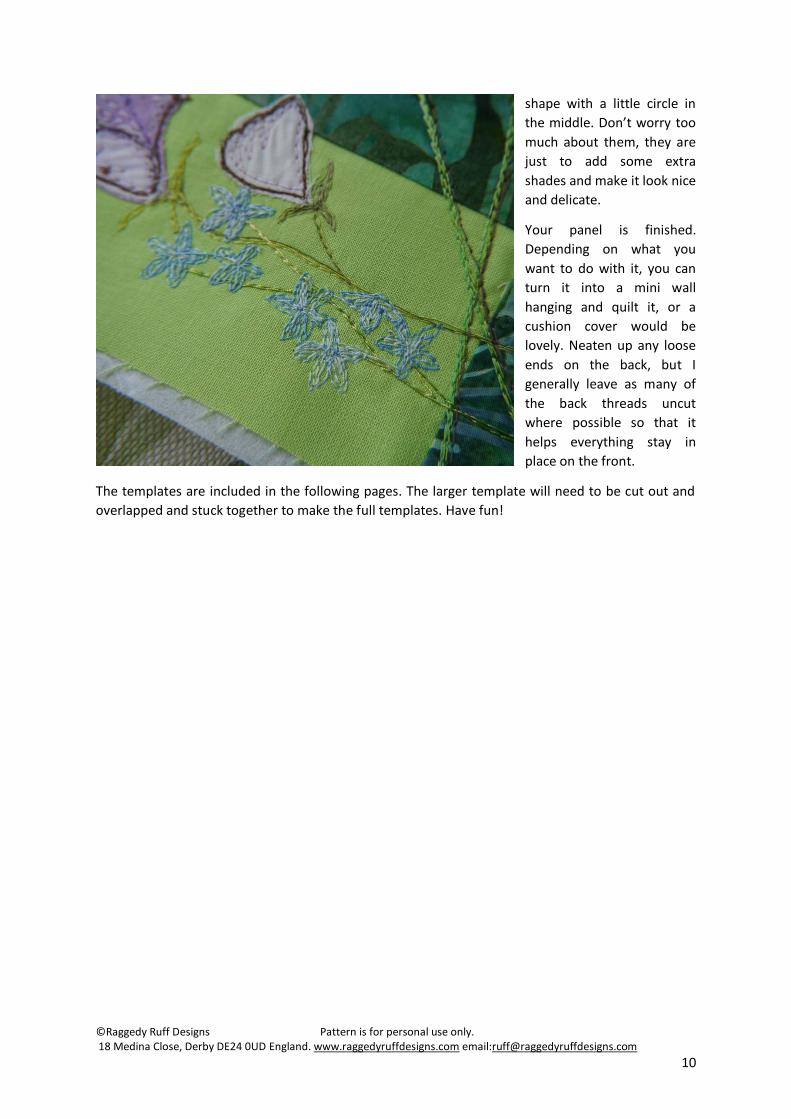
Next change over to a moss green
(TU32) and add in all the sweet pea
stems, loosely following the template
design. Enjoy those curly tendrils!
With a darker green (DS846) stitch in
the daisy stem.
With a pale yellow, you can fill in the
daisy centre. (TU03) and use white
(TU41) to stitch around the edges of
the daisy petals.
For the sweet peas, use the lighter purple
(TU17) to stitch around the edges of the
flowers on the lighter fabric colours. Use a pink
on the pink flower (TU16) and use the darker
purple (TU18) to create the shadows in the
folds and tucks.
The forget-me-not stems are stitched in green
and the flowers then added with TU21 light
blue. Forget me nots have a simple 5 petal
©Raggedy Ruff Designs Pattern is for personal use only. 18 Medina Close, Derby DE24 0UD England. www.raggedyruffdesigns.com email:[email protected]
10
shape with a little circle in
the middle. Don’t worry too
much about them, they are
just to add some extra
shades and make it look nice
and delicate.
Your panel is finished.
Depending on what you
want to do with it, you can
turn it into a mini wall
hanging and quilt it, or a
cushion cover would be
lovely. Neaten up any loose
ends on the back, but I
generally leave as many of
the back threads uncut
where possible so that it
helps everything stay in
place on the front.
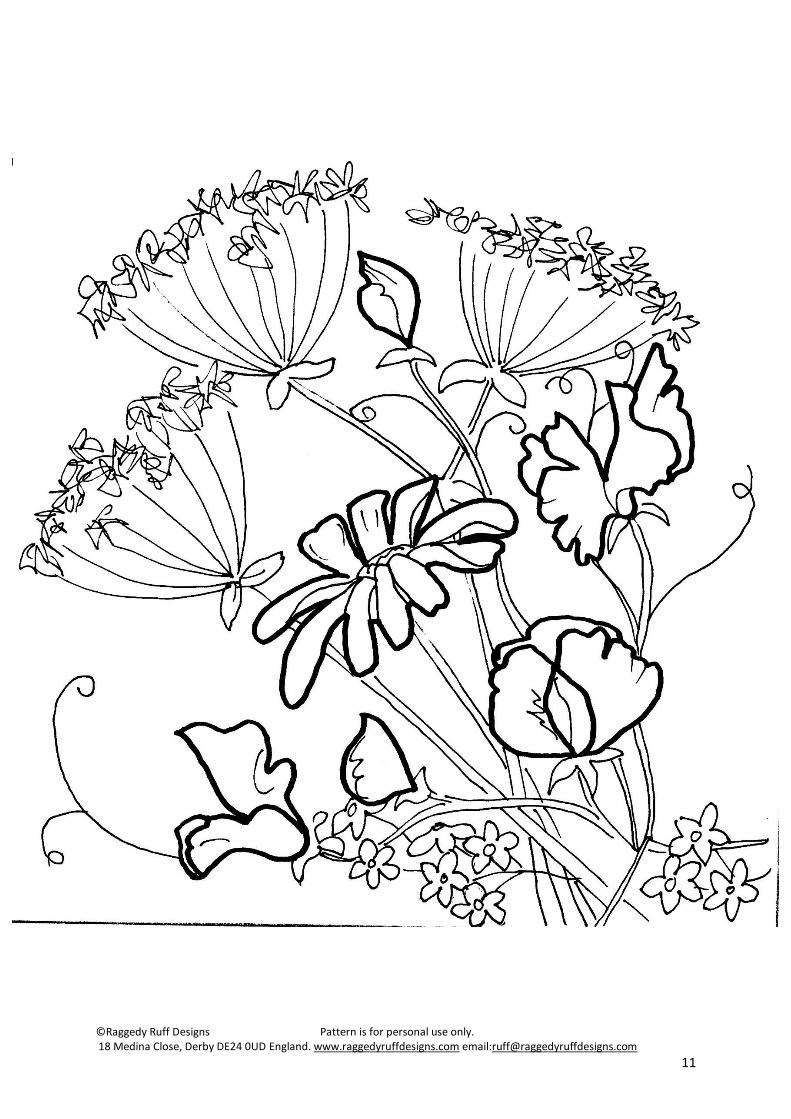
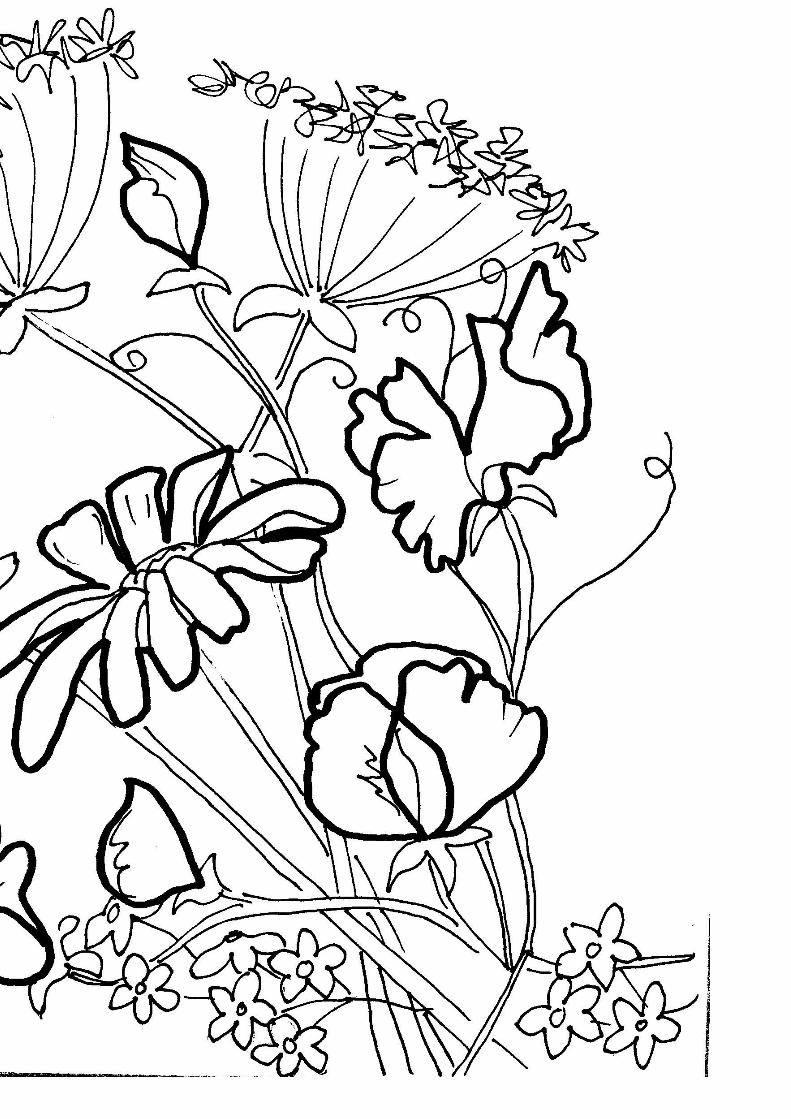
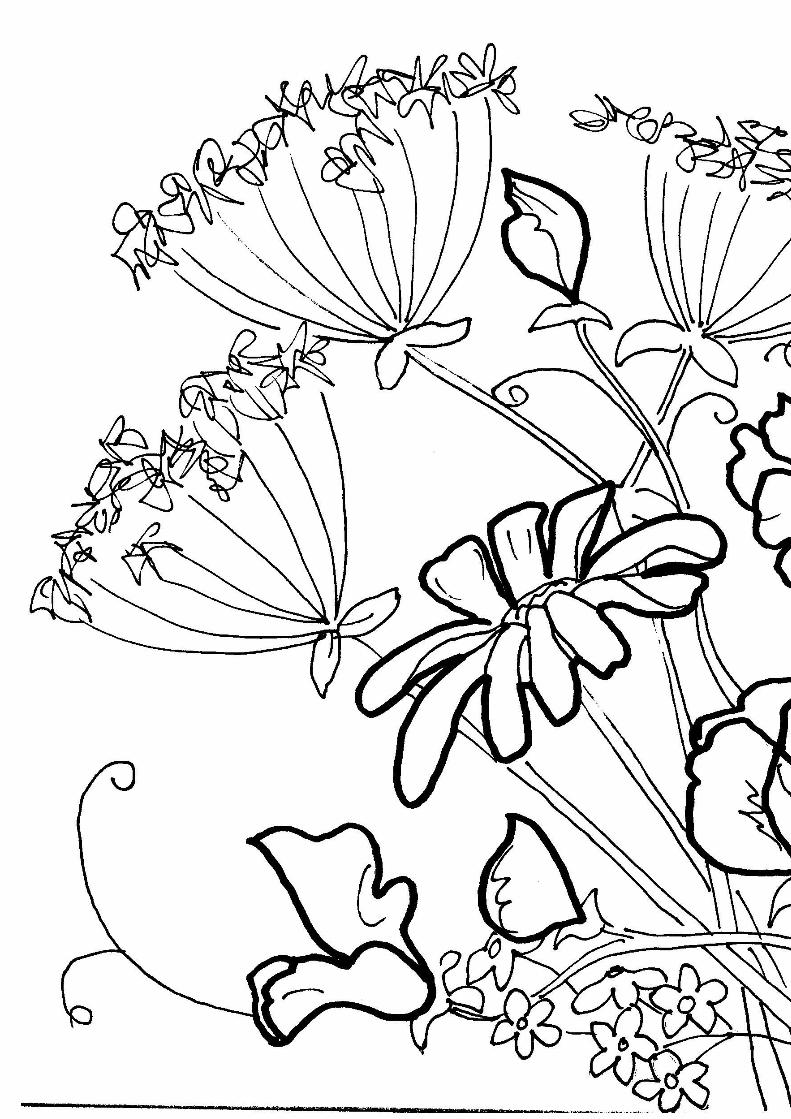
The templates are included in the following pages. The larger template will need to be cut out and
overlapped and stuck together to make the full templates. Have fun!
©Raggedy Ruff Designs Pattern is for personal use only. 18 Medina Close, Derby DE24 0UD England. www.raggedyruffdesigns.com email:[email protected]
11
©Raggedy Ruff Designs Pattern is for personal use only. 18 Medina Close, Derby DE24 0UD England. www.raggedyruffdesigns.com email:[email protected]
12
©Raggedy Ruff Designs Pattern is for personal use only. 18 Medina Close, Derby DE24 0UD England. www.raggedyruffdesigns.com email:[email protected]
13


![Ruff Newsletter Oct2010[1]](https://static.documents.pub/doc/80x56/577d35991a28ab3a6b90e32e/ruff-newsletter-oct20101.jpg)
![Ruff Newsletter Dec2010[1]](https://static.documents.pub/doc/80x56/577d2fea1a28ab4e1eb2fbd9/ruff-newsletter-dec20101.jpg)


