28
RazorGage xT User Manual 1 | Page RagorGage xT

RazorGage xT User Manual
2 | P a g e
Table of Contents
General Safety Rules for Woodworking Machinery ............................................... 3
Installation ............................................................................................................. 5
Mounting RazorGage xT to the Table ........................................................ 5
Mounting Electrical Enclosure .................................................................. 5
Electrical Connections .............................................................................. 6
Setup ................................................................................................................. 7
General Operation ........................................................................................... 12
Main Screen ........................................................................................... 12
Cutlist Screen ......................................................................................... 13
Downloading a Cutlist File ...................................................................... 14
Presets Screen ......................................................................................... 16
Machine Adjustments ....................................................................................... 17
Belt Tension Adjustment ......................................................................... 17
Changing the Hand of the RazorGage xT .................................................. 18
Shortening Stroke of the RazorGage xT ................................................... 21
Replacement Parts List ...................................................................................... 25
Troubleshooting ............................................................................................... 26
Electrical Schematics ............................................................................... 26
Troubleshooting Guide ............................................................................ 27

RazorGage xT User Manual
3 | P a g e
General Safety Rules for Woodworking Machinery
WARNING The operator must thoroughly read and understand this manual before operating the saw or starting any servicing. All safety and warning instructions should be followed. This manual must be available to all operators.
1. For your own safety, read the operation manual carefully. Know your machine. Learn its applications and limitations, and any hazards specific to this machine. All personnel should be trained in the operational procedures and received safety instruction before operating this equipment. If you have not received proper training in the use of this machine, DO NOT OPERATE THIS MACHINE, damage to the equipment or injury to the operator is possible.
2. This machine should not be operated without all of the guards in place and safety devices in
operation. Removal of any guards or disabling any of the safety devices may result in damage to the equipment or injury to the operator. If any of the guards or safety devices are missing, damaged or not working properly, DO NOT OPERATE THIS MACHINE, notify your supervisor immediately.
3. If the operator has any safety concerns or questions regarding the operation of this equipment, DO
NOT OPERATE THIS MACHINE, the machine should be locked out and your supervisor notified immediately.
4. All Lock Out/Tag Out procedures must be followed before servicing or adjusting this equipment. If
you have not received proper training in the Lock Out/Tag Out procedures for this machine, DO NOT OPERATE THIS MACHINE, damage to the equipment or injury to the operator is possible.
5. In case of any equipment malfunction or jam the machine should be powered off and locked out
before clearing any materials from the operational areas of this machine. Once cleared the reset procedures need to be followed when powering up the equipment. At no time should any of the machine control systems including electrical, hydraulic or pneumatic circuits be manually overridden.
6. Check machine for damaged parts. Before continued machine use any damaged guard or part
must be carefully checked for proper operation of its intended function. Check all moving parts for proper alignment, check for binding of moving parts, breakage of parts, proper secure mounting, and any other condition that may affect machine operation. Guards or other parts that are damaged must be properly repaired or replaced.
7. Machine must be properly grounded.
8. Maintain and clean machine at recommend intervals. Intervals may need to be adjusted due to
work load or material type to keep machine in top condition. Follow instructions for lubrication, setup, and changing accessories

RazorGage xT User Manual
4 | P a g e
9. Disconnect machine from power source before, changing accessories, or any servicing activity.
10. Avoid accidental starting. Make sure switch is in the off position before connecting to power.
11. Remove any tools or loose objects from work surface of machine. Make sure any tools used for adjustment or maintenance are removed from machine before machine is restarted. Make a habit of scanning for tools and scraps every time the machine is started.
12. Keep work area clean. Cluttered work areas and workbenches increase the likelihood of an
accident.
13. Do not use in dangerous environments. Do not use machine in damp or wet locations, or expose them to rain. Keep work area well illuminated.
14. Keep children away. All visitors should be kept at a safe distance from work area.
15. Make workshop childproof, with padlocks, master switches, or by removing starter keys.
16. Do not force the machine. It will function better and safer at its designed rate.
17. Use the right tools. Do not force the machine or attachments to do a job for which they were not
designed. Contact the manufacturer or distributor if there is any question about the machine’s suitability for a particular job.
18. Use only recommended accessories. Consult the operation manual for recommended
accessories.
19. Wear proper apparel. Avoid loose clothing, gloves, neckties, rings bracelets, or jewelry which could be tangled in moving parts. Keep long hair contained to prevent entanglement. Non-slip footwear is recommended.
20. Always wear safety glasses.
21. Secure the work piece.
22. Keep proper footing and balance at all times.
23. Do not use machine while under the influence of drugs, alcohol, or any medication.
24. Always wear a face mask or dust mask if operation creates excessive dust or chips. Always operate
machine in a well-ventilated area and provide proper dust removal.
25. Never leave machine running unattended. Turn power off. Do not leave machine until it comes to a complete stop.

RazorGage xT User Manual
5 | P a g e
Installation
Mounting RazorGage xT to the Table
Mounting Electrical Enclosure
Position the beam on your table with the motor end next to the
saw. Align the beam with the saw fence and mark the front
edge of the fence on your table. Remove the beam and strike
a line 0.781” back from your marks. Drill 11/32 holes along the
line to mount the beam. Three holes should be enough.
The xT Enclosure
MUST be flush with the
edge when mounted to
the RazorGage
extrusion. Otherwise
the carriage could hit
the enclosure during
homing.
Use the cap screws and T-slot nuts provided
to mount the enclosure to the motor side of the
RazorGage beam. With the RazorGage
unplugged, remove the side panel of the
control box to access the second mounting
screw.
The beam is held to the table with
5/16 carriage bolts as shown.

RazorGage xT User Manual
6 | P a g e
Electrical Connections
Plug the tablet power cable into the micro-
USB slot on the side of the tablet and then
the other end into the 110 VAC outlet on the
back of the box. Do not use this outlet for
anything other than tablet charger.
Thread the two motor cables onto the
mating connectors on the back on the
motor.
With a 7/64” Allen wrench remove the two
screws holding on the side panel. Once side
panel has been removed. Locate the second
mounting screw in the bottom of the enclosure
and use the t-nut and cap screw provided to
finish mounting the enclosure.

RazorGage xT User Manual
7 | P a g e
With the positioner at the home position,
slide the stop extension to a point about
an inch from the saw blade cutting plane
and tighten the locking screw.
Setup
Once your RazorGage is securely mounted to your table and electrical connect have been made, the
first-time calibration process can begin. First the stop extension is adjusted. The RazorGage will then
be powered up. Next the home offset will be set. And finally, the scale factor will be calibrated. Follow
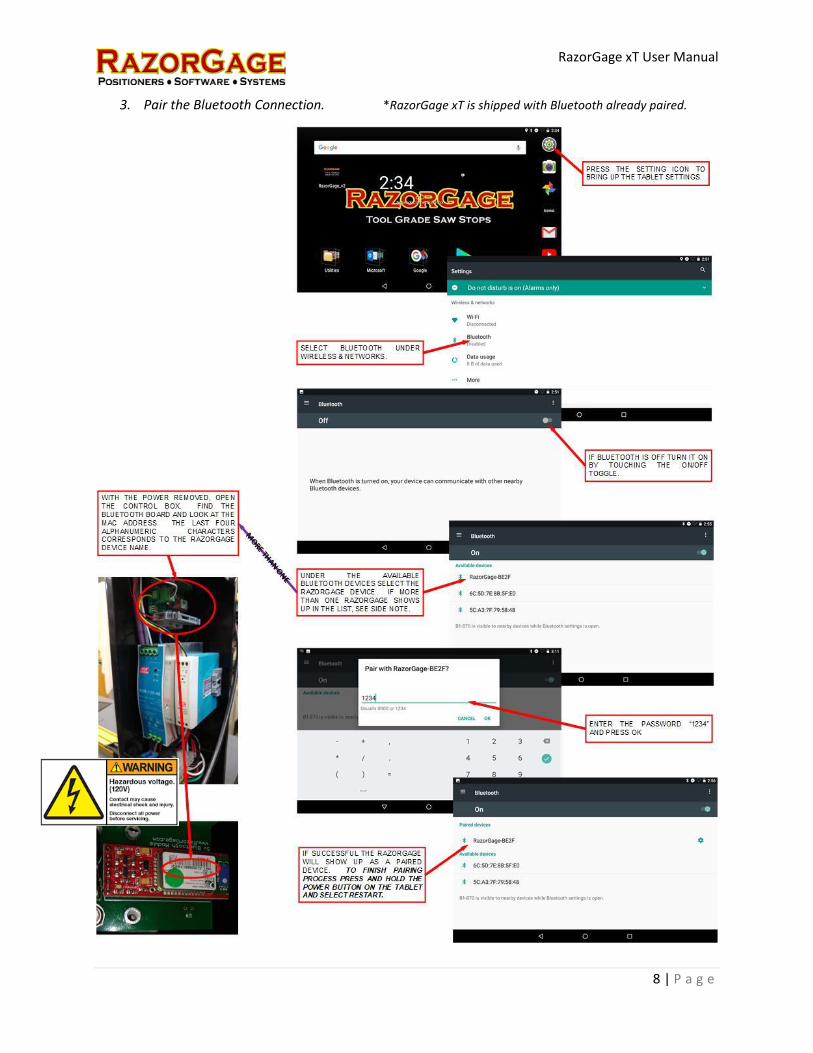
instructions below to complete setup of the RazorGage. The RazorGage xT Bluetooth connect will
be paired and scale factor calibrated upon arrival.
1. Adjust the Stop Extension
2. Power up the RazorGage.
To adjust the stop extension, loosen the mounting screws on the stop extension and slide it away from the saw so that
it won’t hit your saw when you home the machine. With the power off, push the moving carriage toward the motor end
of the RazorGage until the carriage hits the internal hard stop. Now extend the stop extension toward the saw blade
until it is as close as you want it to be. The stop extension should be adjusted so that the distance from the cut to the
stop face is less than the shortest part you want to be able to cut. Tighten the stop extension screws.
It is very important to
note that there are
TWO things to power
on the RazorGage
and the Tablet.
RazorGage xT User Manual
8 | P a g e
3. Pair the Bluetooth Connection. *RazorGage xT is shipped with Bluetooth already paired.

RazorGage xT User Manual
9 | P a g e
4. Open the RazorGage xT App.
5. Enter the Serial Number of the RazorGage.
6. Open Setup Screen
7. Check the Stoke

RazorGage xT User Manual
10 | P a g e
8. Cut a Short Piece of Material & Measure with Calipers.
9. Set Home Offset
From the Main Screen, move the RazorGage into position and cut
a short piece of stock material. Measure the length of the piece
with calipers. Take note of both the intended length and the actual
length of the part cut.
RazorGage xT User Manual
11 | P a g e
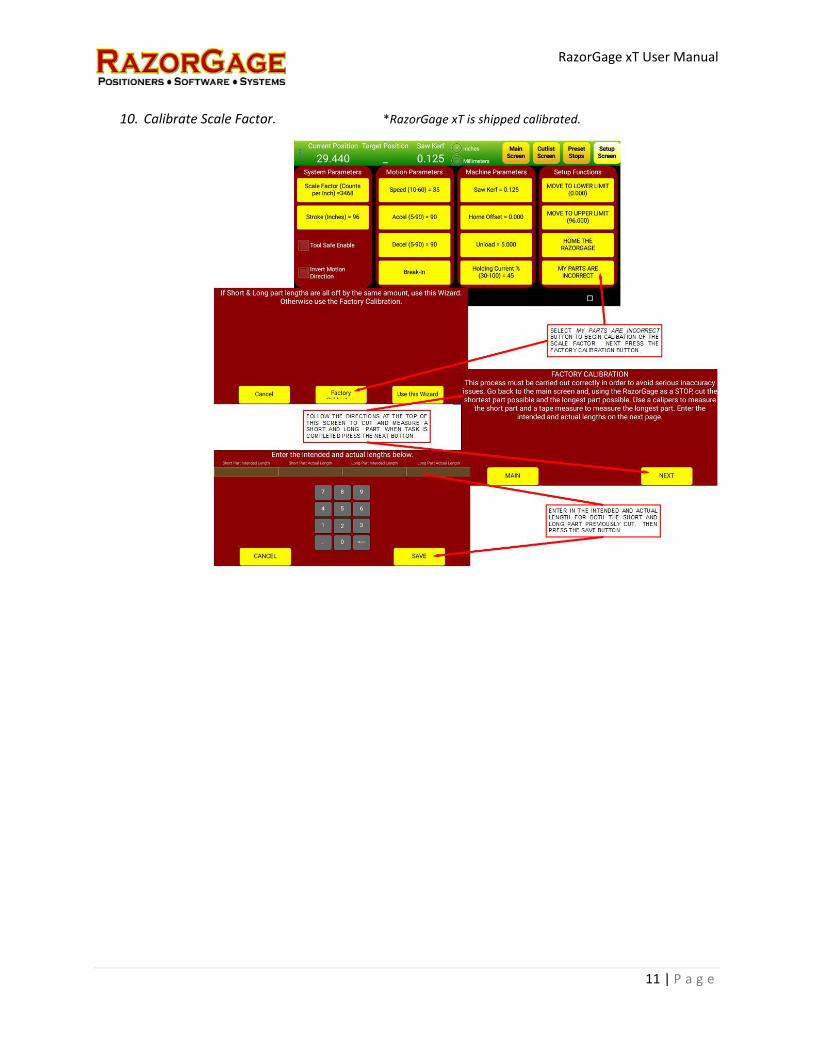
10. Calibrate Scale Factor. *RazorGage xT is shipped calibrated.

RazorGage xT User Manual
12 | P a g e
General Operation
Main Screen
The Main Screen is used for moving the RazorGage by manually entering part lengths. On the Main Screen a target position can be entered by punching in the whole number and decimal followed by the enter key. Alternatively, when using fractions punching in the whole number followed by pressing the FRACTIONS button followed by the desired fraction will move the RazorGage to the selected position. The UNLOAD button will back the RazorGage up allowing room to remove completed part. Pressing this button, a second time will return to the previously entered position.
RazorGage xT User Manual
13 | P a g e
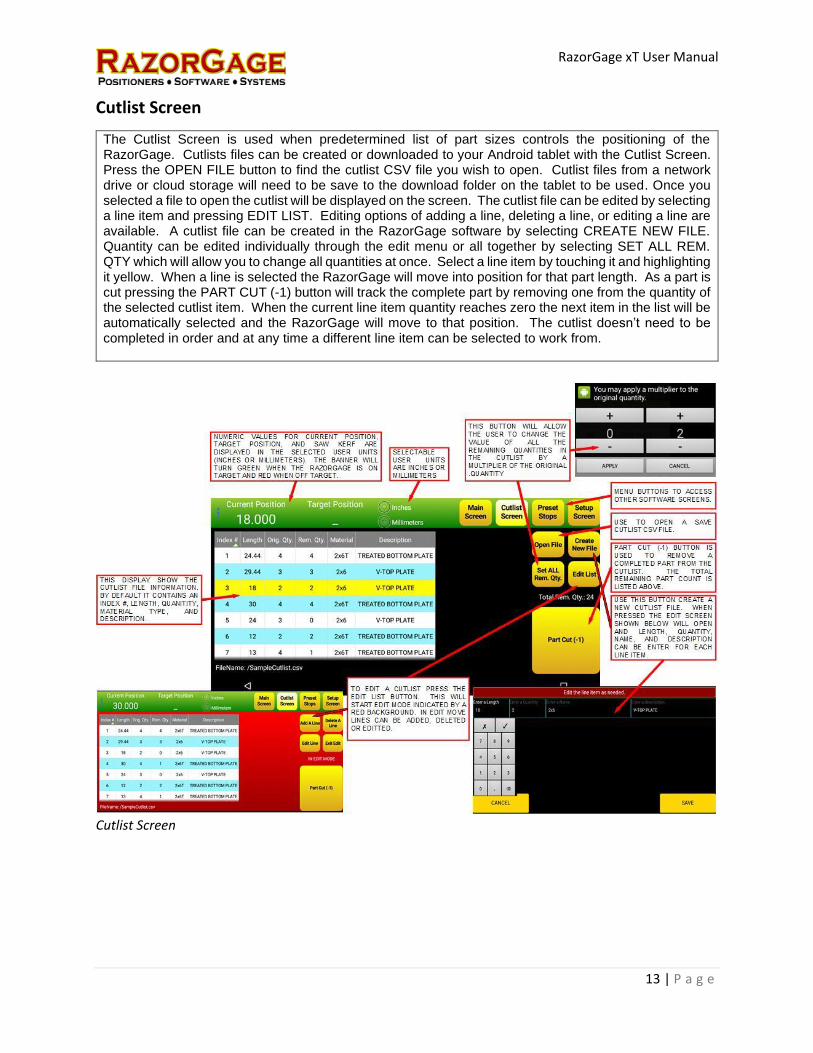
Cutlist Screen
The Cutlist Screen is used when predetermined list of part sizes controls the positioning of the RazorGage. Cutlists files can be created or downloaded to your Android tablet with the Cutlist Screen. Press the OPEN FILE button to find the cutlist CSV file you wish to open. Cutlist files from a network drive or cloud storage will need to be save to the download folder on the tablet to be used. Once you selected a file to open the cutlist will be displayed on the screen. The cutlist file can be edited by selecting a line item and pressing EDIT LIST. Editing options of adding a line, deleting a line, or editing a line are available. A cutlist file can be created in the RazorGage software by selecting CREATE NEW FILE. Quantity can be edited individually through the edit menu or all together by selecting SET ALL REM. QTY which will allow you to change all quantities at once. Select a line item by touching it and highlighting it yellow. When a line is selected the RazorGage will move into position for that part length. As a part is cut pressing the PART CUT (-1) button will track the complete part by removing one from the quantity of the selected cutlist item. When the current line item quantity reaches zero the next item in the list will be automatically selected and the RazorGage will move to that position. The cutlist doesn’t need to be completed in order and at any time a different line item can be selected to work from.
Cutlist Screen

RazorGage xT User Manual
14 | P a g e
This column must
be populated with
row number. They
do not need to be
in sequential order
but you must not
duplicate row
numbers.
Length is in decimal inches
or millimeters. Do not use
feet or fractions in this
column. The RazorGage
software will not convert
the values in the cutlist to
other units. If the software
is in inch mode, the
numbers in this column will
represent inches. If the
software is put into metric
mode, the values will
represent millimeters.
This column contains the
quantity of parts
needed. If this list
represents a single
assembly, the xT
software gives you the
option to multiply the
Original Qty values to
create multiple
assemblies.
Initially populate this column with
same values as the Orig. Qty.
column. The values in this column
get decremented as parts are cut.
The xT software allows you to
multiply the values in the Original
Qty column by a number so that
you can make parts required for
multiple assemblies. That
multiplied value gets put in this
column.
<<<DELETE THIS ENTIRE ROW ONCE YOU UNDERSTAND THE INSTRUCTIONS. The
RazorGage xT software automatically creates column headings from the first row of
the cutlist. If you don't delete Row 1 of this spreadsheet, the cutlist won't load
properly on the machine. The RazorGage xT software will accept more than 5 columns.
The first four columns must contain the information shown in this template.
Remaining columns can contain any kind of information desired. If there are so many
columns that they won't fit on the Android screen, the operator will have to swipe or
scroll to see them. When you're done creating the cutlist, save it as a .csv file and
email that file to your RazorGage xT's Gmail address. You must create a Gmail account
for your machine and install the Gmail app on your RazorGage xT in order to do this.
Consult the Google website for instructions regarding setting up a Gmail account and
installing the Gmail App on the RazorGage xT Android tablet. Remember to delete this
row once you understand the instructions.INDEX# LENGTH ORIG. QTY REM. QTY. MATERIAL PART DESCRIPTION
1 3.000 2 2 OAK RAIL
2 3.001 3 3 OAK STILE
3 3.002 4 4 OAK RAIL
4 3.003 5 5 OAK STILE
5 3.004 6 6 OAK RAIL
6 3.005 7 7 OAK STILE
7 3.006 8 8 OAK RAIL
8 3.007 9 9 OAK STILE
9 3.008 10 10 OAK RAIL
10 3.009 11 11 ALUM SASH
11 3.01 12 12 ALUM SILL
12 3.011 13 13 ALUM SASH
13 3.012 14 14 ALUM SILL
14 3.013 15 15 ALUM SASH
15 3.014 16 16 ALUM SILL
16 3.015 17 17 ALUM SASH
17 3.016 18 18 ALUM SILL
18 3.017 19 19 ALUM SASH
Remaining columns can be any
kind of information you need.
Cutlists created on the machine
itself using the RazorGage
software will contain
inforamtion as shown below so
if you intend to use cutlists
created on the machine and
cutlists created remotely you
may want to use these two
columns as shown below.
Creating a Cutlist in a Spreadsheet
Downloading a Cutlist File
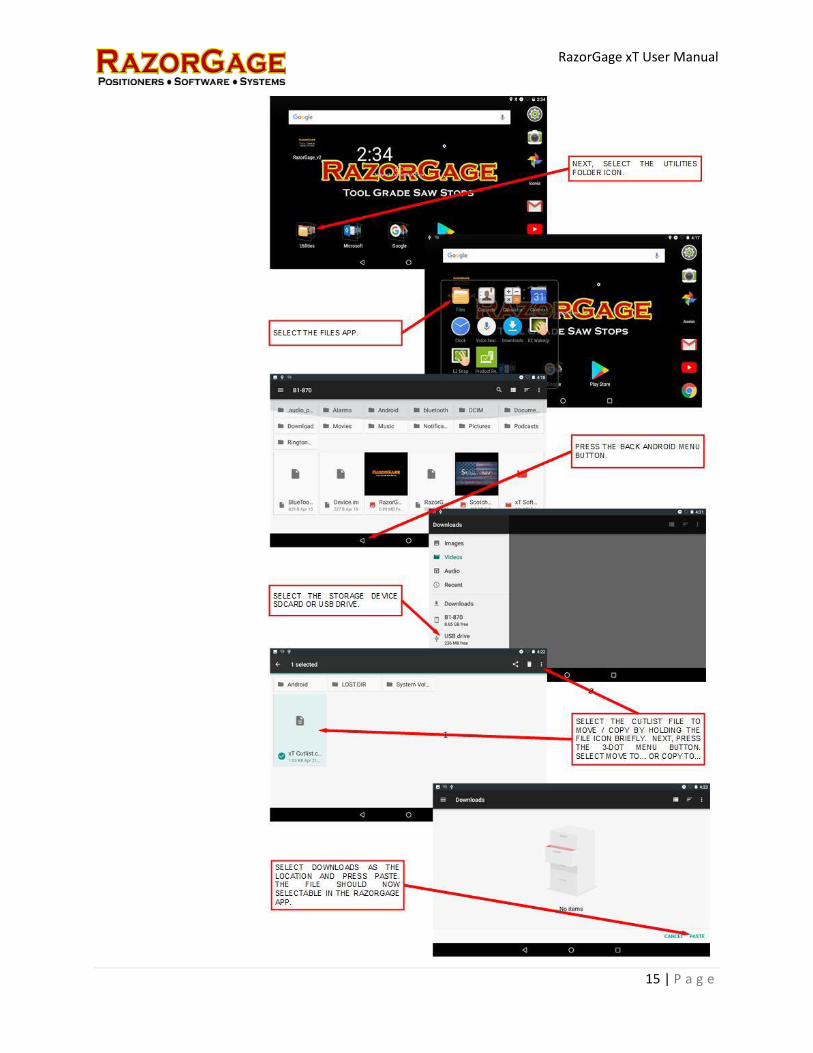
Cutlists created outside of the RazorGage xT app must be saved in .CSV format. Cutlist files accessed from a network drive, cloud storage, email, sdcard, etc. will need to be downloaded to the tablet before they can be used by the app. Once the file has been downloaded onto the device make sure it is located in the Downloads folder of the Android tablet. The following instructions show how to move a cutlist file from a SDCard or USB drive to the downloads folder.

RazorGage xT User Manual
16 | P a g e
Presets Screen
The Presets Screen is for an application where the RazorGage position is controlled by custom selectable buttons. With the Presets Screen customizable buttons or list items can store various part lengths referenced by a label. A preset button can be setup by pressing the ADD NEW ITEM button. A window will popup where a length and label can be entered. When editing an existing button, the same Edit Presets Parameter window will open to make changes. Press the SAVE button to finish the setup. Once a button is setup simply press the customized button or list item and the RazorGage will move to that position.
Preset Stops Screen – Grid View List View
Edit Preset Parameters Screen

RazorGage xT User Manual
17 | P a g e
Machine Adjustments
Belt Tension Adjustment
The belt tension is set at the factory but may need to be adjusted after changing hands (direction) of the RazorGage or if the motor gearbox is replaced. Follow the directions below to complete this adjustment.

RazorGage xT User Manual
18 | P a g e
Change the Hand of the RazorGage xT
The RazorGage xT is able to be setup for either right or left-hand operation. Use the instructions below
to make the adjustment. No software settings will need to be changed for this procedure.
RazorGage xT User Manual
21 | P a g e
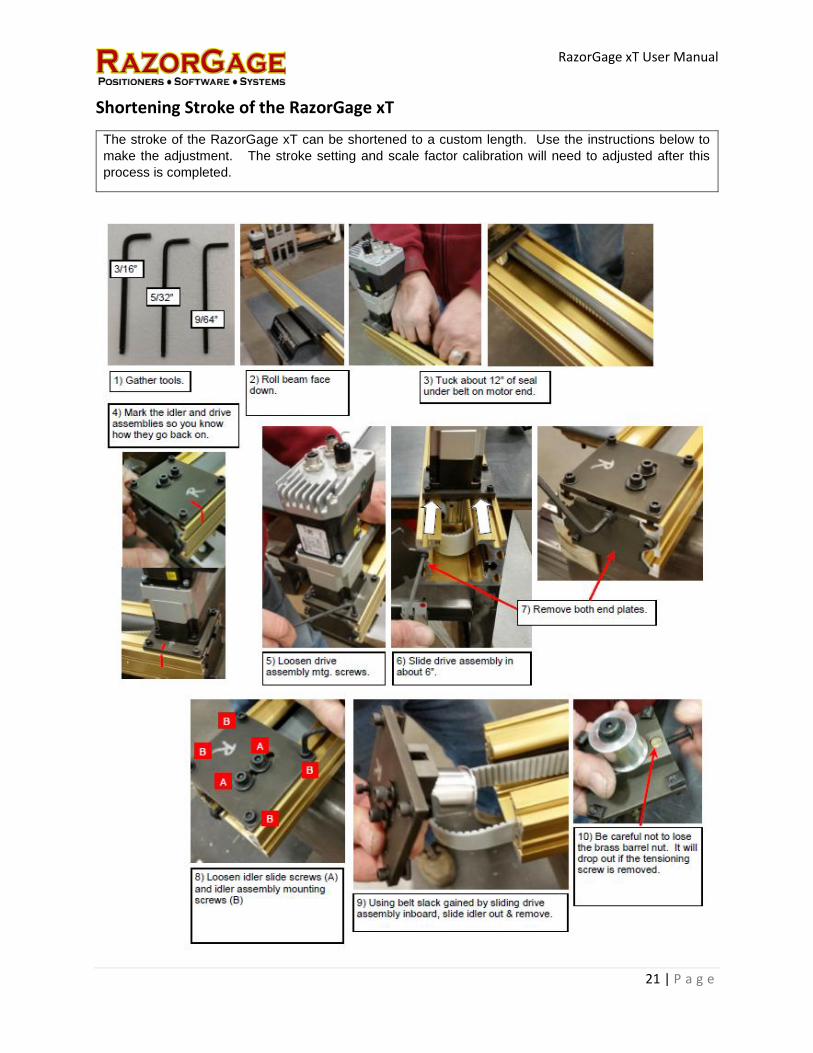
Shortening Stroke of the RazorGage xT
The stroke of the RazorGage xT can be shortened to a custom length. Use the instructions below to
make the adjustment. The stroke setting and scale factor calibration will need to adjusted after this
process is completed.
RazorGage xT User Manual
25 | P a g e
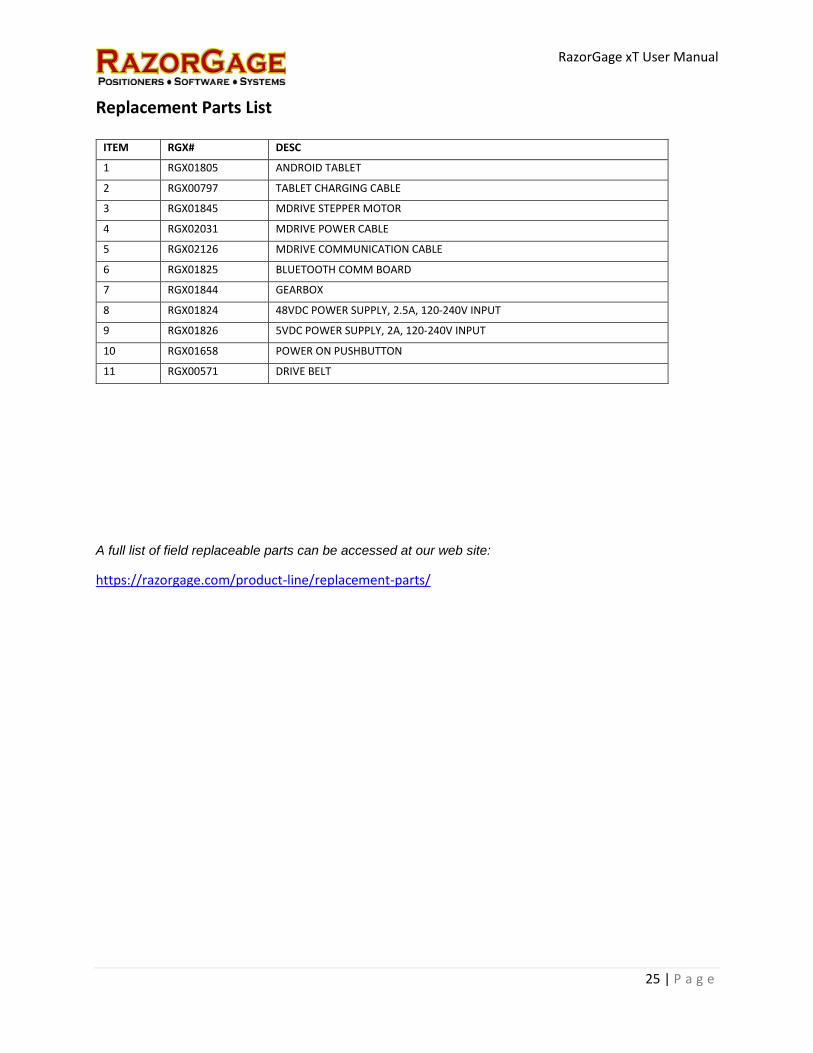
Replacement Parts List
ITEM RGX# DESC
1 RGX01805 ANDROID TABLET
2 RGX00797 TABLET CHARGING CABLE
3 RGX01845 MDRIVE STEPPER MOTOR
4 RGX02031 MDRIVE POWER CABLE
5 RGX02126 MDRIVE COMMUNICATION CABLE
6 RGX01825 BLUETOOTH COMM BOARD
7 RGX01844 GEARBOX
8 RGX01824 48VDC POWER SUPPLY, 2.5A, 120-240V INPUT
9 RGX01826 5VDC POWER SUPPLY, 2A, 120-240V INPUT
10 RGX01658 POWER ON PUSHBUTTON
11 RGX00571 DRIVE BELT
A full list of field replaceable parts can be accessed at our web site:
https://razorgage.com/product-line/replacement-parts/
RazorGage xT User Manual
26 | P a g e
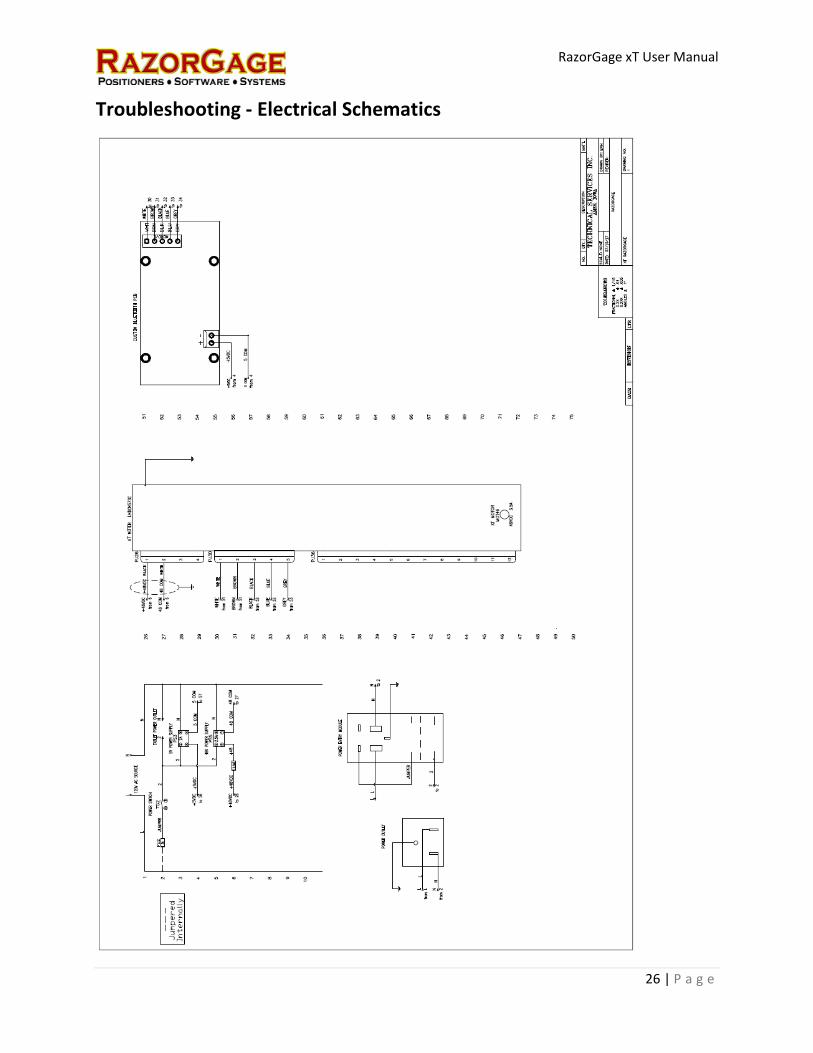
Troubleshooting - Electrical Schematics

RazorGage xT User Manual
27 | P a g e
Troubleshooting Guide
Description Possible Causes Corrective Action
1 RAZORGAGE APP STUCK ON “PLEASE
WAIT CONNECTING TO
RAZORGAGE” SCREEN.
• RazorGage enclosure power
is off.
• Lost Bluetooth connection.
• Motor power connection is
loose.
• Motor communications
connection is loose.
• Failed motor.
• Check PUSH ON / PUSH OFF button on RazorGage enclosure
is illuminated if not press the button to turn control power on.
If the button still doesn’t illuminate, check the 3Amp fuse FU2
inside the enclosure and replace if necessary.
• In the Android tablet settings select Bluetooth and check to see
if the RazorGage is showing up as a paired device. If not
follow the instructions in the Setup section step #3 to pair the
device again.
• If PUSH ON / PUSH OFF button is illuminated and the MS
indicator on the motor is off, check the power cable connection
on the motor and wire termination in the enclosure.
• If PUSH ON / PUSH OFF button is illuminated and the MS
indicator on the motor is off, check the communications cable connection on the motor and wire termination in the enclosure.
• If you have exhausted all the above actions, the motor has
likely failed and needs to be replaced.
3 RAZORGAGE STALLS DURING MOVE.
• The RazorGage speed is set
too high.
• The RazorGage accel and/or
decel is set too high.
• The RazorGage drive belt is
tensioned too tightly.
• Stroke is not properly set.
• Scale factor is not calibrated
correctly.
• Go to the SETUP SCREEN and check the Motion Parameter
Speed. Set the speed to 14 or less.
• Go to the SETUP SCREEN and check the Motion Parameters
Accel & Decel. Set each to 20 or less.
• Check the drive belt tension and loosen the belt tension if it is
too tight. Check RazorGage scale factor anytime belt tensioning is adjusted by cutting a short and long part and
measuring them for accuracy. Recalibrate the scale factor if
necessary. See section Setup step #7.
• If stall is occurring at the high limit of the RazorGage and an
audible bang is heard, it is likely that the RazorGage is running
into the internal hard stop. On the Setup Screen check the
Stroke parameter. The standard RazorGage xT lengths are 96” or 144”. If RazorGage length has been modified the stroke can
be found by measuring the overall length of the extrusion and
minus 16”.
• If stall is occurring at the high limit of the RazorGage and an
audible bang is heard, it is likely that the RazorGage is running
into the internal hard stop. Recalibrate the scale factor. See
section Setup step #7.
3 CUTLIST FILE IS NOT
FOUND.
• The cutlist file is in the wrong
format.
• The cutlist file is not
downloaded.
• The cutlist file is not located
in correct folder.
• When making cutlist files make sure to save them in .CSV
format. The RazorGage app will not recognize other formats such as the default Excel format .XLSX for example.
• To be used by the RazorGage app cutlist file needs to be
downloaded locally to the tablet.
• If cutlist file was downloaded onto tablet and still isn’t found,
check to see if the file is in the Downloads folder and not some
other location on the tablet.

RazorGage xT User Manual
28 | P a g e
Power and Communications Indicators.
If you have more questions about RazorGage products visit our Downloads page and our You Tube channel. Both are accessible from the RazorGage home page, www.razorgage.com. If you would like to discuss an application, feel free to call us at (515) 232-3188.