Ranger Carbine Build Guide & Doctrines of Use 2020 Edition The ranger carbine concept is intended for free, open, and honest distribution and use within the firearms community. All intellectual property was developed and remains wholly owned by GunTweaks - www.guntweaks.com
Transcript
Ranger Carbine
Build Guide
&
Doctrines of Use
2020 Edition
The ranger carbine concept is intended for free, open, and honest distribution
and use within the firearms community. All intellectual property was developed
and remains wholly owned by GunTweaks - www.guntweaks.com
Table of Contents
Chapter 1: Introduction The Ranger Carbine Concept
Civilian Kit
Guiding Principles
Requirements
Desirements
Comparison to Jeff Cooper’s Scout Rifle Concept
Chapter 2: Ranger Carbine Build Guide Choosing a Base Rifle
Notes on Semi-Automatic Ranger Carbines
Barrel Contour, Length, and Fluting
Base Rifle Recommendations for Non-Conformists
Establishing a Battle Zero
Estimating Weight and Weight Reduction
Fluting, Threading, and Other Machine Work
Sample Build
Choosing a Cartridge
Notes on .223/5.56 Ranger Carbines
Concealment Equipment
Choosing a Sound Suppressor
Choosing a Flash Suppressor
Muzzle Brakes
Choosing Slings, Sling Mounts, and Sling Connectors
Weights of Popular Slings
Sling Mount Positioning and Carry Doctrine
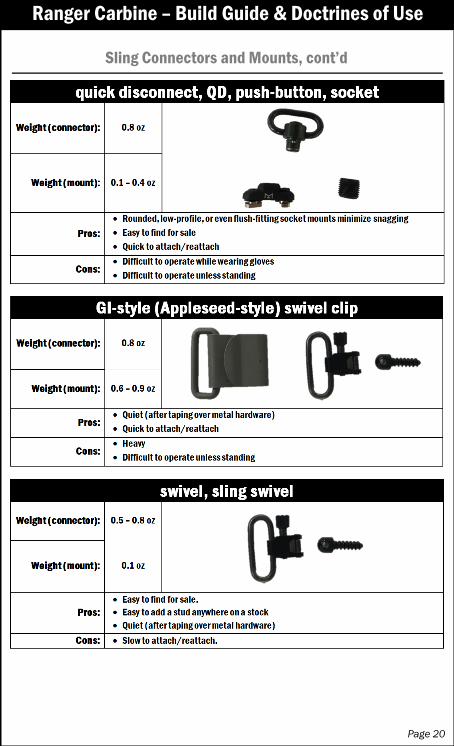
Sling Connectors and Mounts
Perfecting the Ranger Carbine’s Stock
Adjustable Stocks
Folding Stocks and Takedown Stocks
Replacing the Stock Entirely
Choosing Aesthetics and Coloration
Paints and Finish Types
Choosing a Sighting System
Chapter 3: Civilian Kit Build Guide Choosing Body Armor…or Not?
Choosing a Sidearm
Choosing a Holster
Setting Up a War Belt
Example War Belt Configuration
Choosing a Backpack
Ranger Carbine – Build Guide & Doctrines of Use
Page 2
Page 2
Page 3
Page 4
Page 4
Page 5
Page 7
Page 8
Page 8
Page 9
Page 10
Page 11
Page 11
Page 12
Page 13
Page 14
Page 15
Page 15
Page 16
Page 16
Page 17
Page 17
Page 18
Page 19
Page 21
Page 23
Page 23
Page 23
Page 24
Page 24
Page 25
Page 27
Page 27
Page 28
Page 29
Page 30
Page 31
Chapter 1
Introduction
Ranger Carbine – Build Guide & Doctrines of Use
Ranger Carbine – Build Guide & Doctrines of Use
Page 1
The ranger carbine is the core of a discreet yet potent civilian weapon rig.
“In Afghanistan, they’re
allowed to own rifles. Now if
the guy has a pechen, or a
chest rig…”
“…then you know something’s up.
But just a rifle - that’s nothing.
We’d just let them be.”
- Anonymous Officer
United States Army Special Forces
A ranger carbine is a civilian firearm built to excel at tasks and scenarios where AR-pattern, AK-
pattern, and similar rifles tend to underperform. An individual civilian has wildly different
priorities and resources versus a military or police division, so the ranger carbine optimizes
concealment, mobility, and cold-bore accuracy - a civilian's best (and sometimes only) assets.
AR-pattern, AK-pattern, and similar rifles offer enormous firepower and their place in civilian
gun vaults is assured – there are times when no other gun will do. However, the performance of
these military-derived guns burns bright and fades fast when they are cut off from a government
logistics and supply chain, such as when they are placed into civilian hands. As a civilian, if you
find yourself needing that much firepower, then you are either very unlucky or (more likely) you
have simply made too many mistakes that day.
Some threats are best neutralized via a civilian’s unique superpower: obscurity. Only as a
plainclothes civilian can you be unremarkable, even unnoticeable - until the moment you act.
The ranger carbine’s discreet appearance, outstanding mobility, and cold-bore accuracy are
potent assets in civilian hands, with the inconspicuous silhouette being arguably its most
important advantage. While all firearms will attract some amount of attention, AR-pattern, AK-
pattern, and similar rifles have extremely distinctive silhouettes that make the civilian carrier a
priority target for everything from overflying drones to hidden sharpshooters to search-and-
seizure operations intent on curbing civil unrest.
Threats such as these are incredibly discouraging - they are difficult to anticipate, often
impossible to counter, and they render an individual civilian’s bravery, skill, and firepower
meaningless. The AR-pattern, AK-pattern, and similar rifles that already populate private gun
vaults are powerful weapons well-suited for certain types of fights, but many threats on the
civilian’s battlefield demand the element of surprise and a speedy, discreet withdrawal much
more than they demand firepower.
Concealment. Mobility. Accuracy.
These are the assets of the armed civilian. These are the assets of the ranger carbine.
The Ranger Carbine Concept
Ranger Carbine – Build Guide & Doctrines of Use
Civilian Rig Toolboxes exist because no single wrench can do everything. While the ranger carbine is a good
jack of all trades, it’s just one wrench in the toolbox and isn’t meant to stand on its own.
The sidearm, war belt, and backpack multiply the individual shooter’s capabilities far beyond
what the ranger carbine alone can do. Practical, portable, and discreet, this civilian rig keeps
both hands free and lets you run, climb, crawl, and swim at a moment’s notice, achieving
civilian survivability that other weapon rigs cannot match.
Page 2
Guiding Principles of the Ranger Carbine
Ranger Carbine – Build Guide & Doctrines of Use
All design choices for your ranger carbine, from the type of optic to the length of the barrel,
should be guided by the three principles listed below.
Principle #1 – Low Carry Weight The rifle’s carry weight must be less than 7.50 pounds, a goal weight inspired by the ‘mountain
rifles’ already carried long distances over varied terrain in high-altitude hunts each year. The
carry weight includes the rifle itself, the sighting system (typically an optic), the sling, a loaded
magazine, and any other hardware or accessories. Ideally, the carry weight will be lower – 7.50
pounds is the absolute maximum. This is the most challenging principle to achieve on a budget.
Principle #2 – Discreet Practicality The rifle must have a discreet silhouette that does not readily reveal itself as more than a
civilian hunting rifle. The rifle must be chambered in an affordable, widely-available
intermediate cartridge. The rifle must be pleasant to shoot, exhibiting moderate recoil and
muzzle blast that is unlikely to cause immediate hearing damage if fired (occasionally) without
hearing protection. The rifle must be able to humanely take game up to the size of white-tailed
deer at short range. The rifle must be legal to own in most or all states of the USA and many
countries of the world.
Principle #3 – Versatile Accuracy There are two measures to this principle, one for offhand shooting and one for bipod-assisted
shooting – a ranger carbine must be versatile enough to accomplish both. Mid-to-high quality
hunting or tactical ammunition is preferred for testing against this principle, as this is the
ammunition the shooter could reasonably expect to have on-hand at any given time.
• With the shooter standing and using only an optional sling for stability, the rifle (and shooter)
must achieve a 5 shot group with a maximum spread of 8.00 MOA in under 45 seconds.
• With the shooter prone or sitting and using only a bipod for stability, the rifle (and shooter)
must achieve a 5 shot group with a maximum spread of 1.50 MOA in under 45 seconds.
The Versatile Accuracy Principle is tested on the longest range available to the shooter, up to a
maximum of 300 meters. The table below summarizes the accuracy requirements at various
distances. Note that the group size measurements are calculated using simplified “shooter’s
MOA” (1.0 inches at 100 meters) rather than true MOA (1.047 inches at 100 meters).
Note: To effectively simulate field conditions, shooting bags, rifle rests, and other heavy-duty
shooting aids cannot be used in lieu of a bipod when testing the Versatile Accuracy Principle.
The only shooting rest permitted is the bipod itself.
Ranger Carbine
Accuracy Requirement
Range in Meters
50 100 150 200 300
Maximum
Allowable
Group Size
Standing Offhand
(sling is permitted) 4.0” 8.0” 12.0” 16.0” 24.0”
Bipod-assisted 0.75” 1.50” 2.25” 3.0” 4.5”
Page 3
Requirements
Ranger Carbine – Build Guide & Doctrines of Use
In addition to achieving the three Guiding Principles, the below features must be present for
your rifle to qualify as a ranger carbine:
• Flash suppressor
• Detachable magazine
• Bipod (carried stowed, does not count toward the Low Carry Weight Principle)
• Sling
• Training sessions totaling 50 rounds per quarter or 200 rounds per year (minimum).
• An anti-reflective device (if the sighting system features a glass lens).
“Desire-ments” The below features are highly recommended for your ranger carbine, but are not required:
• Sound suppressor (carried stowed, does not count toward the carry weight).
• Sighting system dialed to a “battle zero” setting.
• Multiple spare magazines including one low-capacity, flush-fit magazine for distance carry.
• Length-of-pull adjustments to custom-fit the stock to your body.
• Comb height adjustments to custom-fit the stock to your face’s shape and chosen sight.
• Discreet ventilation holes in the stock forearm to enhance barrel cooling.
• Accurizing enhancements, such as glass bedding and pillar bedding.
• A dull-colored stock, periodically re-painted to match season or geography.
• A ‘proof trial’ consisting of a multi-mile hike through technical terrain while carrying your
ranger carbine and full civilian rig, including sidearm, war belt, and backpack. The purpose of
this hike is to test the comfort, maneuverability, and durability of your chosen kit
components.
− Hunting season is a good time to make this hike, as hunting areas will provide both an
opportunity to hike with a slung rifle, as well as testing whether your kit “blends in”
without attracting undue attention.
− This hike will show what does and doesn’t work about your kit – most of your insights will
appear in the first mile, if not the first 500 feet.
Note: Adjustments to your kit based on lessons learned during this hike form the final step of
assembling your ranger carbine and civilian rig.
Page 4
Ranger Carbine – Build Guide & Doctrines of Use
While similar in appearance and function to Jeff Cooper’s scout rifle concept, the ranger carbine
differs in several critical ways that each provide unique advantages. Many of these differences
stem from one major design difference between the ranger carbine and the scout rifle:
The ranger carbine is not chambered in .308 or any other full-power rifle round.
The ranger carbine opts for an intermediate cartridge such as 7.62x39, rather than the scout
rifle’s .308 chambering. Cooper chose .308 (7.62 NATO) to let the scout rifle hunt any animal in
North America, both four-legged and two-legged. However, the scout rifle’s .308 chambering led
to a number of serious flaws when actually owning and shooting the rifle day-to-day:
• .308 from a carbine barrel risks immediate, permanent hearing damage if fired without ear
protection, as well as creating a huge, easy-to-spot muzzle flash (with most loads).
• .308’s case volume is too large to be easily optimized for subsonic (suppressed) shooting.
• .308 requires heavy action parts, in turn requiring extremely costly carbon fiber stocks or
skinny barrels (which overheat quickly) in order to keep the overall rifle’s weight low.
• .308 scout rifles have very stout recoil - target practice with a 6.6 lb .308 just isn’t much fun.
Narrowing the ranger carbine’s hunting range to thin-skinned game (deer) and below permits
chambering in a more practical intermediate cartridge, which alleviates all the above problems
and provides the ranger carbine with three critical advantages over the scout rifle:
(1) It is lighter – the “stripped” rifle (no accessories) should weigh under 6.0 lbs.
Dropping the .308 chambering lets the ranger carbine set the bar even lower than Cooper’s
scout rifle. The base ranger carbine rifle should weigh in well under 6.0 pounds, whereas J.
Cooper’s scout rifle weighed in at 6.6 pounds.
(2) It is much cheaper, both in initial purchase price and ammunition costs.
Opting for an intermediate cartridge permits a smaller, lighter action, eliminating the need for
expensive weight-saving solutions like titanium parts or carbon fiber stocks. At least three
manufacturers offer intermediate caliber bolt-actions that weigh at or below 6.0 pounds for
under $500, less than half the cost of a typical scout rifle such as the Steyr Scout. Training
ammunition is also (typically) much less expensive.
(3) It is much more pleasant to shoot.
Target practice with 6.6 pound .308 scout rifle tends to stop after a box or two (whether the
owner will admit why or not). Recoil is a consideration in a lightweight, fixed-action carbine - if
your rifle’s recoil is unpleasant, sooner or later you will find excuses to train with it less.
Additionally, there is not always time to put on hearing protection. Pop two or three shots and
it’s great news that you’ve resolved the situation, but if your ears are ringing for the next few
hours, then you haven’t really done your survivability any favors. While no firearm is truly
hearing-safe without a suppressor, intermediate cartridges are noticeably quieter than full-
power rifle rounds like Cooper’s .308, especially when fired from carbine-length barrels.
Miscellaneous Differences The ranger carbine’s required flash suppressor and optional sound suppressor optimizes the
weapon for use as a concealed sharpshooter’s rifle. Additionally, the ranger carbine’s detailed
build guide clarifies the points left vague in the scout rifle concept, such as whether an optic is
included in the weight limit. Finally, the ranger carbine drops most of Cooper’s more idealistic
requirements, such as integrating a bipod into the forearm and insisting on LER scopes for their
improved peripheral vision. The end result is a gun that is light, fun to shoot, and cheap enough
for most people to own - when was the last time you saw a Steyr Scout in-person?
Comparison to Jeff Cooper’s Scout Rifle Concept
Page 5
Chapter 2
Ranger Carbine Build Guide
Ranger Carbine – Build Guide & Doctrines of Use
Choosing a Base Rifle
Ranger Carbine – Build Guide & Doctrines of Use
For most shooters, a bolt-action rifle is the smart choice for building a ranger carbine. However,
many common (and even well-respected) bolt-actions are grossly overweight – if an optic will be
used, the base rifle should weigh less than 6.0 pounds, but most bolt-actions from Remington,
Winchester, Savage, and similar companies weigh over 7.0 pounds without any accessories.
These fat rifles can be quickly slimmed by wrapping a $600 hand-laid synthetic stock around
them, but that is cost-prohibitive for most shooters. Instead, it’s best to start with a rifle that
was built light from the ground up. The three rifles below are each offered in variants that weigh
near, or below, 6.0 pounds:
Howa 1500 Mini
Pros
• 3-position safety can lock the bolt closed during carry.
• Howa’s HTAC trigger leaves little room for improvement right out of the box.
• Mauser action is time-tested, easy to single-load, and mounted in a light, feature-rich stock.
• Available in a broad range of calibers.
Cons
• Only 5-round magazines are available in 7.62x39 and 6.5 Grendel (no flush-fit or extended
options, although magazines can be modified by hand to fit flush or increase capacity).
• Bottom metal/magazines are all plastic (aftermarket aluminum bottom metal is available).
• The front-mounted magazine catch is easy to hit accidentally, which will drop the magazine.
CZ 527
Pros
• CZ’s single-set trigger is one of the best triggers available, both factory and aftermarket.
• Mauser action is time-tested, easy to single-load, and mounted in a light, feature-rich stock.
• Choose between 7.62x39, .300 Blackout/.300 Whisper, and .223 Remington/5.56 NATO.
Cons
• High base price, compared to the competition.
• Magazines are expensive at around $50 each, and not all calibers/models are available with
flush-fit magazines. No extended magazine options.
• Bolt cannot be locked closed for transport (aftermarket 3-position safety is available).
Ruger American – Ranch
Pros
• Low base price, compared to the competition.
• Factory 16” threaded barrel, so the only additional cost is barrel fluting.
• Uses Ruger Mini-30 or AR-15 magazines, which are cheap and available in many capacities.
• Double-stack magazine can be topped off through the ejection port.
• Full-diameter bolt body and 70˚ bolt throw make the action fast and virtually bind-free.
• Available in a broad range of calibers.
Cons
• Tube-stock receiver is more difficult to single-load, although it is cheap and accurate.
• Budget-conscious stock with integrated trigger guard has suspect long-term durability.
• Action and trigger pack are inexpensive and (comparatively) unproven.
• Bolt cannot be locked closed and could open if handle catches on foliage or vehicle interiors.
Page 7
Ranger Carbine – Build Guide & Doctrines of Use
There are several reasons that semi-automatic rifles are not an ideal choice when building a
ranger carbine. The first reason is pure availability – most semi-automatic rifles are just too
heavy and/or too inaccurate. A ranger carbine base rifle should weigh less than 6 pounds, and
there are precious few semi-automatic rifles in that weight range than can live up to the ranger
carbine’s 1.5 MOA bipod-assisted accuracy standard. The obvious exception is an AR-pattern
rifle with lightweight furniture and a quality barrel, but this brings us to the second reason semi-
automatics are not ideal: they draw too much attention.
Like most semi-automatic rifles, an AR-pattern rifle has an extremely distinctive silhouette, and
carrying one is an excellent way to guarantee that a drone operator overhead or a sharpshooter
in the brush or will decide you to lavish their attention on you in particular. Although there are a
few furniture options that make ARs look less militaristic, they are all very heavy and will quickly
push the finished rifle’s weight above the maximum of 7.50 pounds.
More importantly, the firepower offered by semi-automatics doesn’t mesh with the ranger
carbine’s tactical doctrine – the gun is not meant to slice pies or storm doors. A ranger carbine
should only be fired in anger when the shooter has the element of surprise, and once that
element is gone, it’s time to relocate. Mobility and a discreet appearance are far more critical to
civilian survivability than pure firepower. Furthermore, the average civilian has neither backup
nor resupply coming to them - if you find yourself in a situation where you really need the
firepower of a semi-automatic rifle, then you have made too many mistakes that day.
Finally, the third reason semi-automatics make poor ranger carbines is that they are subject to
legal restrictions in certain locales and are therefore a more niche weapon – if you cannot bring
it with you, or the local authorities seize it during a period of civil unrest, then all that firepower
is useless to you.
That said, semi-automatics can be made into ranger carbines. They are not ideal, but as long as
you’ve met the three Guiding Principles, then you’ve done it right. If you insist on having a semi-
automatic ranger carbine, see the Base Rifles for Nonconformists section on the next page. It
recommends a number of unusual rifles that can be built into ranger carbines, including a few
semi-automatics.
Notes on Semi-Automatic Ranger Carbines
One of the biggest drawbacks of the J. Cooper’s scout rifle concept was that it almost always
required a lightweight, sporter-profile barrel. This made training drills and even routine target
practice a headache, as the skinny barrels would quickly overheat and lose accuracy for long
stretches while they slowly cooled.
A well-built ranger carbine, on the other hand, has no problem making weight with a medium or
even heavy-profile barrel, despite the base rifle weight requirement being half a pound lighter
(or more) than J. Cooper’s scout rifle. A ranger carbine’s action (and thus its stock and bottom
metal) is substantially lighter by default, since it isn’t chambered in .308, and a ranger
carbine’s barrel is both shorter and (almost always) aggressively fluted, both of which cut
weight even more. This translates to a lot less time spent waiting for your barrel to cool, and a
lot more time spent hitting the target.
In short, a ranger carbine’s barrel should be short, thick, and aggressively fluted, ensuring
extreme rigidity as well as resisting the accuracy-diminishing effects of heat and cooling much
more quickly than a comparable hunting rifle or scout rifle barrel due to its greatly increased
surface area. Some or all of these features can be found in factory rifles, but typically, time and
money must be spent at a gunsmith to achieve all three.
Barrel Contour, Length, and Fluting
Page 8
For most shooters, the search for a base rifle will end with one of the bolt-actions listed on
page 7. However, there are a few designs out there that manage to meet (or almost meet) the
requirements for a ranger carbine while maintaining a discreet silhouette and also bringing
unique benefits to the table.
Ruger 77/357
A bolt-action, box magazine-fed rifle chambered in .357 Magnum and weighing a svelte 5.5
pounds. Steel-cased .38 Special is dirt cheap, and while this gun is pricey and .357 is no rifle
round, this is the only ranger carbine that could share ammunition with a companion revolver.
M1 Carbine or clone (various manufacturers)
One of few semi-automatics that can both make weight and keep a low profile, the M1 Carbine
is proven, potent, and weighs a feathery 5.1 pounds. .30 Carbine is modestly priced and while
its hunting prowess and accuracy are suspect, this gun’s semi-auto firepower can compensate.
Browning BLR
This lever-action, box magazine-fed rifle has an quick rate of fire and a sleek profile. Some
models break into two halves for transport and all boast Browning-grade accuracy. Drawbacks
are a 4-round magazine, a high price tag, and .223/5.56 is the only intermediate chambering.
Ruger Mini-14 & Mini-30
The Ruger Mini is a reliable semi-automatic offered in several calibers, but its accuracy is no
more than acceptable and its cost is disappointingly high. More problematic is weight – there
just aren’t many, if any, cost-effective ways to get this rifle down below 6.0 pounds.
Remington 7615
This pump-action rifle offers a much higher rate of fire than any bolt-action, and a free-floating
barrel keeps accuracy up to par while also feeding from standard AR-15 magazines. The regular
7600 is still produced, but this .223/5.56-only model is both discontinued and a bit heavy.
AIA M10A2
This rare bolt-action rifle feeds 7.62x39mm from any AK-pattern magazine. The action is a Lee-
Enfield variant, famous for its quick-firing, cock-on-closing operation. Sadly, importation of this
rifle ceased years ago, it’s a bit heavy, and its accuracy suffered from poor quality control.
Ranger Carbine – Build Guide & Doctrines of Use
Base Rifles for Non-Conformists
Page 9
Ranger Carbine – Build Guide & Doctrines of Use
Page 10
Establishing a Battle Zero
A ‘battle zero’ is a method of zeroing a rifle’s sighting system to permit point-of-aim hits at both
close range and long range, with no adjustment – just point and shoot. In contrast, a
traditionally zeroed firearm will only be able to score point-of-aim hits at/near the zeroing
distance, and will need to be adjusted for encounters at other ranges. Battle zeroes are set at
very close ranges, so they are also substantially easier to dial in versus the more traditional
100, 200, or 300 yard zeroes as there is both greater precision available from the rifle at short
range, and a lot less walking downrange. However, parallax error is also more pronounced, so
be careful with your cheek weld to ensure your zero is true.
The trick to a battle zero is to use a relatively close-range zero, often between 10 - 40 yards. For
a typical ranger carbine with a 16” barrel, chambered in 7.62x39mm and with a compact scope
mounted 1.5” above the bore, a good battle zero setting is around 22 yards.
To achieve a hit on point-of-aim at such a short range, the sighting system will need to be
adjusted until the rifle’s barrel is tilted slightly upward (since the sight’s centerline is above the
barrel’s centerline). This means the bullet is still gaining altitude by the time it hits zero, which
simulates a reduced bullet drop at longer distances and allows a rifle zeroed at only a few
dozen meters to maintain a very similar point-of aim out to a few hundred meters.
Zeroed at 22 yards, a typical 7.62x39mm ranger carbine is headshot-accurate from 0 to 200
yards, as the bullet will impact no more than ~2.50” off from the point of aim. The same gun is
easily capable of center mass hits out to 300 yards, at which point less than 20.0” of drop will
be seen. This allows point-and-shoot firing from 0 – 300 yards without one single click of
elevation adjustment, in spite of 7.62x39mm not being a particularly flat-shooting cartridge.
The below table shows point-of-impact changes, relative to point-of-aim, at various distances
with this rifle configuration:
The ideal battle zero will vary based on an individual gun’s chambering, barrel length, and the
sighting system’s height-over-bore. There are many free resources online to determine your
particular rifle’s muzzle velocity with a given load, and ballistic calculators to determine your
optimal battle zero, but all data should be verified with live rounds in the field.
Estimating Weight and Weight Reduction
Ranger Carbine – Build Guide & Doctrines of Use
5.5 – 6.0 lb
1.0 – 1.5 lb (16 – 24 oz)
0.5 lb (8 oz)
0.2 lb (~4 oz)
0.1 lb (~2 oz)
Page 11
7.5 pounds may seem like a generous weight limit, but in most builds, the base rifle (receiver,
barrel, trigger group, stock) will need to weigh 6.0 pounds or less in order to meet this goal.
Accessories, in particular optics, will quickly eat up the remaining 1.5 pounds of weight.
A typical ranger carbine build will often break down along these lines:
• Base rifle with loaded magazine...........................................