21/02/2015 Raspberry Pi Home Server: Part 6, Adding a hard drive | MelGrubb.ToBlog() https://melgrubb.wordpress.com/2014/08/01/raspberrypihomeserverpart6addingaharddrive/ 1/25 This article is part of a series. See the Index for more information. Running the Raspberry Pi off of an SD card is simple, affordable, and very convenient. SD cards are also very small compared to hard drives, though, and they can only be written to a finite number of times. That number is ridiculously large, but some have said that it can still be used up faster than you think by things like virtual memory swap files which are written and rewritten constantly. Whether you believe that or not, one thing is certain; In order to be a useful home server, the Raspberry Pi is going to need access to more storage space than you get from a simple SD card. The Raspberry Pi Home Server is going to need a proper hard drive, and as long as you’re adding a hard drive, you may as well take advantage of its speed and boot the Raspberry Pi from it. Okay, I’ll level with you. You can’t actually boot entirely from the hard drive, but you can boot mostly from the hard drive. When the Raspberry Pi boots up, it looks to the first partition on the SD card for instructions on what to do next. That boot partition contains just a tiny piece of the boot process, but at least for now, its location is nonnegotiable. That’s just the way it is. That’s not to say things couldn’t change in the future. I saw someone on a forum claiming to have done away with the SD card altogether, but I’ll believe it when I see it. What you can do is to move all the stuff that comes after that first step to a different device, such as the external hard drive. All that stays behind on the SD card is a very small boot partition, everything else moves to the hard drive. The resulting system should run faster and smoother, and you won’t be using up your SD card’s limited number of write cycles on highfrequency stuff like a virtual memory swap file. Acknowledgements This article would not have been possible if not for others that went before me. In particular, Ted Hale’s article at http://raspberrypihobbyist.blogspot.com/2013/07/runningfromexternalharddrive.html is pretty much the blueprint I started from. In turn, that article was based on a forum post by “Rattus” at http://www.raspberrypi.org/phpBB3/viewtopic.php?f=26&t=10914&p=129474&hilit=resizefs#p122476 . I’ve added my own bits, such as consulting the boot/cmdline.txt file rather than simply assuming the root file system’s location, using UUIDs to identify the partitions, and expanding the existing swap file rather than creating a separate swap partition. I’ve turned these resources into a walkthrough that matches the rest of this series, but I wanted to at least point out where my source material originated. It's all about the code… mostly.
Transcript
21/02/2015 Raspberry Pi Home Server: Part 6, Adding a hard drive | MelGrubb.ToBlog()
Raspberry Pi Home Server: Part 6, Adding a hard drivePosted on August 1, 2014
This article is part of a series. See the Index for more information.
Running the Raspberry Pi off of an SD card is simple, affordable, and very convenient. SD cards are also verysmall compared to hard drives, though, and they can only be written to a finite number of times. That number isridiculously large, but some have said that it can still be used up faster than you think by things like virtualmemory swap files which are written and rewritten constantly.
Whether you believe that or not, one thing is certain; In order to be a useful home server, the Raspberry Pi isgoing to need access to more storage space than you get from a simple SD card. The Raspberry Pi Home Server isgoing to need a proper hard drive, and as long as you’re adding a hard drive, you may as well take advantage of itsspeed and boot the Raspberry Pi from it.
Okay, I’ll level with you. You can’t actually boot entirely from the hard drive, but you can boot mostly from thehard drive. When the Raspberry Pi boots up, it looks to the first partition on the SD card for instructions on whatto do next. That boot partition contains just a tiny piece of the boot process, but at least for now, its location isnonnegotiable. That’s just the way it is. That’s not to say things couldn’t change in the future. I saw someone on aforum claiming to have done away with the SD card altogether, but I’ll believe it when I see it.
What you can do is to move all the stuff that comes after that first step to a different device, such as the externalhard drive. All that stays behind on the SD card is a very small boot partition, everything else moves to the harddrive.
The resulting system should run faster and smoother, and you won’t be using up your SD card’s limited number ofwrite cycles on highfrequency stuff like a virtual memory swap file.
Acknowledgements
This article would not have been possible if not for others that went before me. In particular, Ted Hale’s article athttp://raspberrypihobbyist.blogspot.com/2013/07/runningfromexternalharddrive.html is pretty much theblueprint I started from. In turn, that article was based on a forum post by “Rattus” athttp://www.raspberrypi.org/phpBB3/viewtopic.php?f=26&t=10914&p=129474&hilit=resizefs#p122476.
I’ve added my own bits, such as consulting the boot/cmdline.txt file rather than simply assuming the root filesystem’s location, using UUIDs to identify the partitions, and expanding the existing swap file rather than creatinga separate swap partition.
I’ve turned these resources into a walkthrough that matches the rest of this series, but I wanted to at least pointout where my source material originated.
This post uses some software packages that are not included by default in the Raspbian distribution. You’re goingto need NTFS filesystem support, and the gdisk tool. Install them before continuing.
Pretty much any external USB hard drive will do. For my own server at home, I’m using a dualdrive 2TB RAIDenclosure (Cavalry CADASA2). This might seem like overkill for a Raspberry Pi, but one of my home server’s jobsis to centralize and share my music collection. It took me four solid weeks to rip every CD I own, and I do not planto repeat that process. My family photos and videos are on that drive as well. Basically, this is all stuff I don’t wantto lose due to a hard drive failure.
Note: Yes, I have an offline backup, too, but swapping out a dead drive in a RAID is easier than rebuilding thewhole thing by hand.
Linux device names
Before we start, lets take a moment to discuss the way in which Linux refers to devices in general, and morespecifically the way it refers to hard drives. Windows users are used to seeing multiple drives show up withdifferent letters. You have your “C” drive, where Windows and all of your programs are installed. Maybe you alsohave a second hard drive called “D”, or maybe “D” is CD or DVD drive on your computer. “A” and “B” used to referto floppy drives, and are reserved for historical purposes. Each of these devices is completely separate, and has itsown individual root.
Linux has no drive letters. Linux uses what’s called a “unified file system”, meaning that files, folders, and evenentire drives appear together under one root. You can see all of these different devices in the “/dev” folder. Take a
look:
ls /dev
21/02/2015 Raspberry Pi Home Server: Part 6, Adding a hard drive | MelGrubb.ToBlog()
I won’t go into what all of these entries mean, but you can see that there are a lot of them. If I were to plug in anexternal hard drive, or perhaps a flash drive, I would see new entries pop up in the list. Here’s another screen shotafter I’ve plugged in a flash drive.
image
Look about halfway down the third column, and you’ll see new entries called “sda” and “sda1”. These represent
the flash drive, and the first partition it contains, respectively.
Storage devices like a flash drive or a hard drive can be divided up into multiple pieces called partitions that canmake it appear to be multiple drives. This list of where the partitions begin and end is called the “partition table”,and every drive has one. If there were more partitions on the flash drive, there would be more entries in /dev
On a computer where drives are connected via SCSI (Small Computer System Interface), “a” would be the firstdevice, “b” would be the second, etc. Drives connected via IDE (Integrated Drive Electronics), or SATA (Serial ATAttachment) have similar concepts of “first”, “second”, etc.
This is not the case with USB. USB devices have no concept of “first” or “second” and so their names are assignedon a firstcome, firstserved basis. The first drive to be ready gets to be “sda”, the next one “sdb” and so on.
If you only have one drive, then it will obviously always be called “sda”, and there’s no problem, but since you’re
building a server, it’s conceivable, and even likely that you will eventually end up with more than one hard driveattached to it. Perhaps one drive will house videos, and another one will have music on it.
Even if you don’t see a need for that yet, you’ll end up filling up a drive eventually, and you’ll want to add anotherone. As soon as you add more USB drives, however, you can’t count on their names being the same every time themachine starts up. As a result, drives may end up mounted in the wrong places, and programs won’t find theirfiles where they expect them to be because the drive that used to be “sda” was a little slower off the line one
morning and got stuck with the name “sdb” instead.
Let’s take care of that particular problem before going any further.
Format the hard drive
If the drive you’re planning to use already has stuff on it, then back its contents up somewhere. and restore themwhen you’re done. This approach calls for nuking and repaving the whole hard drive.
Caution: Even if you wanted to live dangerously and manipulate the partitions in place, I wouldn’t do it without abackup copy first. There are just too many things that could go wrong. What if the power went out partwaythrough the process? Don’t risk it. Just copy your stuff to another drive, and copy it back when you’re done.
The key to fixing the device naming problem requires us to have a specific kind of partition table called a GUIDPartition Table. This is different than the older Master Boot Record which is used by most Windows machines.
In order to create a GPT, you’ll need to use Linux’s Partition Editor (parted) application. Raspbian alreadyincludes parted, so there’s nothing to install. Run it with the following command:
sudo parted
You should see something almost, but not quite entirely unlike a command line. To see a list of all the knowndevices and partitions, type “print all”. Parted should print out a table with two rows similar to this:
The rows in the table represent the partitions. The columns will tell you where each partition begins and ends,how large it is, and what kind of filesystem it contains.
If you see more than one table at this point, then you probably have another drive plugged in somewhere. Istrongly advise shutting down and removing all drives other than the SD card before continuing.
The SD card in the image above was created using the Raspbian image file, and has two partitions on it, a small“boot” partition, and the root filesystem partition. If you started by using NOOBS, then you probably have fivepartitions. Future releases could divide things up differently, so don’t worry if your output doesn’t look like theexample.
Attach the hard drive
Plug your external drive into a free USB port on the Raspberry Pi, and give the OS a few seconds to notice it. Listthe known partitions by typing “print all” again.
This time, there are two tables. In my example, the second one is the external drive, although the order is notguaranteed here.
Notice the headers above the tables. The header tells you information about the drive in general. In this case, theheader tells us that the hard drive was assigned the name “/dev/sda”, that it’s 2TB in size, and that its partition
table type is “msdos”. That means it’s using the old MBRstyle partition table, and that’s not going to work for thisserver.
Select the external drive by typing “select /dev/sda”. Type “print” all by itself to make sure. You should see
the second table from above again. Read the header carefully, and make sure it’s referring to the external drive,because you’re about to blow away the partition table.
Create a new partition table with the command “mklabel gpt”. Read the warning carefully, and make sure it
refers to “/dev/sda”.
image
Follow
Follow“MelGrubb.ToBlog()”Get every new post deliveredto your Inbox.
Answer “y” to the prompt, and in a few seconds, you will have a nice blank slate to work with. Check the resultswith another “print”. The header should now say that the partition table type is “gpt”, and there should be no
partitions on it.
image
Create new partitions
Next, you’ll need to create two new partitions; one to hold the root filesystem, and one to hold general data. Youcould make one big partition, combining the root filesystem and data storage in one, but there are some benefitsto keeping the data partition separate. The root filesystem must be formatted using Linux’s native filesystem, ext4.The data partition, however, can be any type you want, which means you can pick something other, nonLinuxcomputers will understand.
Root Partition
This is where Linux and your programs will go. You can think of it as Windows’ C: drive. The size is up to you, but16GB is probably fine for the simple server described in this series. If your existing SD card is larger, or you areplanning to install a lot of programs, go bigger. Just make sure the partition is at least as large as the SD card youare currently using.
Create a new, 16GB partition starting at the beginning of the drive:
mkpart primary 0GB 16GB
Data Partition
This is where you’ll put your “stuff”, and it should take up the rest of the available drive space. The mkpartcommand can interpret the beginning and ending parameters in a variety of different formats. Use this ability tocreate a second partition that begins where the first partition ends, and takes up all the rest of the space on thedrive:
Finally, use the “print” command again to see the results.
image
That’s it for the partitions, so type “q” and press enter to exit parted. You can ignore the warning about updating
/etc/fstab for now. We’ll get to that soon enough. You now have two partitions, but they’re completely blank at
this point.
Copy the old root partition to the new drive
The file /boot/cmdline.txt specifies the location of the root filesystem. You’ll need to edit this file later in
order to boot from the hard drive, but for now, you just need to know for sure where the root filesystem currentlyresides. Show the cmdline file’s contents like this:
The part immediately to the right of “root=” specifies the device and partition that holds the root filesystem, and
that’s the partition whose contents you need to move to the hard drive. In my case, it says “mmcblk0p2”. If youstarted from the raw Raspbian image, then yours probably says the same thing. If you started from NOOBS, thenit’s probably “mmcblk0p6”
Copy the existing root partition’s contents to the new 16GB partition (sda1) on the hard drive, changing thehighlighted part to match the current root filesystem path from above.
This can run for quite a while, depending on how large your SD card is. Unfortunately, the dd command doesn’t
give you any kind of feedback. In this case, no news is good news. As long as the drive appears to be busy, thenkeep waiting.
Here’s what that all means:
“dd” copies things“if” specifies the input file, in this case an entire partitions“of” specifies the output file“bs” specifies how many bytes to copy in one chunk, here it’s 32 MB“conv” specifies how to convert things as they are copied
noerror says to continue if anything goes wrongsync does some padding during the copy
When the copy process eventually finishes, check the target partition on the hard drive for errors.
Press enter at the prompts to fix any errors that it finds. You can probably expect one about the free block count,and one about the free inodes count.
Since the image that you just copied over from the SD card is almost definitely smaller than the partition youcopied it to, you’ll want to expand it to fill up the available space:
sudo resize2fs /dev/sda1
Format the data partition
That takes care of the root filesystem. Now on to the data partition. Choosing NTFS as the filesystem will allowyou to simply plug the drive into any Windows, MAC, or Linux desktop computer and manipulate the drivecontents. This can be especially helpful for loading up large amounts of data, such as the family’s music and photocollection, without having to squeeze it all through the network connection.
Format the second partition as follows, filling in whatever name you want the partition to have. I’ve called mine“Data”.
sudo mkfs.ntfs Q L Data /dev/sda2
Note: Don’t forget the –Q (Quick) or you’ll be waiting around a while.
Uniquely identifying a drive
Warning: Because the next section involves copying around large strings of unmemorizable data, I recommendperforming the steps through a remote SSH window, or from a terminal on the X desktop. The Ids you’ll need tocopy need to be copied verbatim, letter for letter, or you’ll find yourself unable to boot, and you’ll have to startover again from your last backup.
Currently, the cmdline.txt file specifies that the root file system is on the second partition of the internal SD card(/dev/mmcblk0p2). We’d like that to say “/dev/sda1” instead, but there’s a problem. As I mentioned earlier,
we don’t have any guarantee that this particular drive will be called “sda” in the future. What we need is a way to
uniquely refer to this drive no matter what letter it get assigned on any given day.
This was why we built the drive with a GUID Partition Table. Each partition on a GPT device is assigned auniversallyunique identifier (UUID).
Note: The difference between GUID and UUID is not important here, they are, for all intents and purposes, thesame thing; a very long, randomlyassigned number.
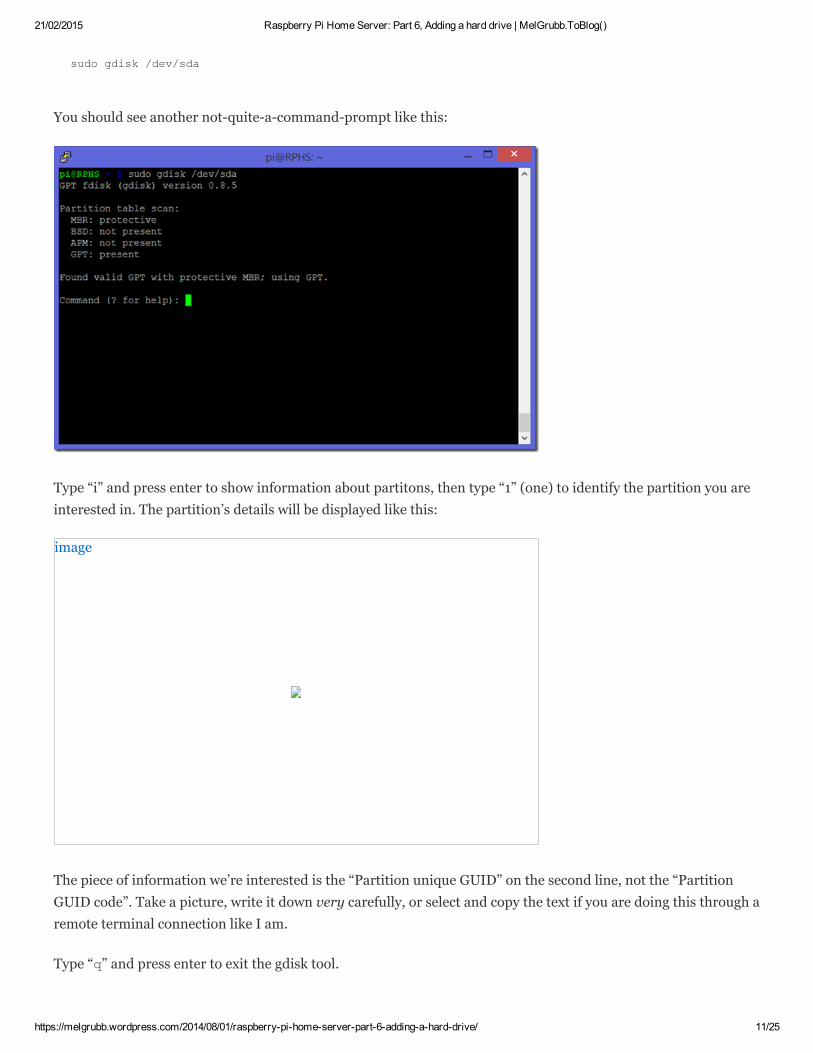
Instead of identifying the root filesystem’s partition by location, we want to refer to it by Id so that it can be foundno matter what order the drives were discovered in. Use the “gdisk” package you installed earlier to find out moreabout /dev/sda1:
21/02/2015 Raspberry Pi Home Server: Part 6, Adding a hard drive | MelGrubb.ToBlog()
You should see another notquiteacommandprompt like this:
Type “i” and press enter to show information about partitons, then type “1” (one) to identify the partition you areinterested in. The partition’s details will be displayed like this:
image
The piece of information we’re interested is the “Partition unique GUID” on the second line, not the “PartitionGUID code”. Take a picture, write it down very carefully, or select and copy the text if you are doing this through aremote terminal connection like I am.
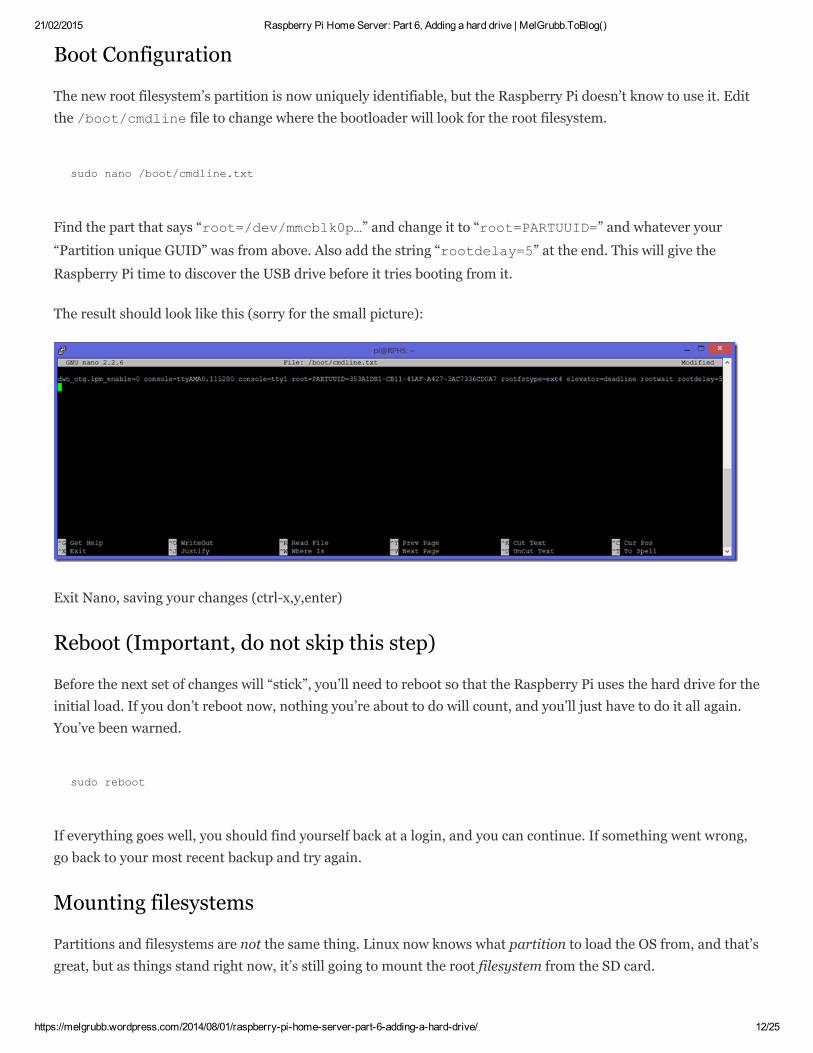
The new root filesystem’s partition is now uniquely identifiable, but the Raspberry Pi doesn’t know to use it. Editthe /boot/cmdline file to change where the bootloader will look for the root filesystem.
sudo nano /boot/cmdline.txt
Find the part that says “root=/dev/mmcblk0p…” and change it to “root=PARTUUID=” and whatever your
“Partition unique GUID” was from above. Also add the string “rootdelay=5” at the end. This will give the
Raspberry Pi time to discover the USB drive before it tries booting from it.
The result should look like this (sorry for the small picture):
Exit Nano, saving your changes (ctrlx,y,enter)
Reboot (Important, do not skip this step)
Before the next set of changes will “stick”, you’ll need to reboot so that the Raspberry Pi uses the hard drive for theinitial load. If you don’t reboot now, nothing you’re about to do will count, and you’ll just have to do it all again.You’ve been warned.
sudo reboot
If everything goes well, you should find yourself back at a login, and you can continue. If something went wrong,go back to your most recent backup and try again.
Mounting filesystems
Partitions and filesystems are not the same thing. Linux now knows what partition to load the OS from, and that’sgreat, but as things stand right now, it’s still going to mount the root filesystem from the SD card.
To complete the transition to the hard drive, you’ll need to edit the filesystem table. This file controls what getsmounted where, and in what order, and it needs to know where the root filesystem is. Take a look at the currentcontents.
cat /etc/fstab
That third line is the root filesystem, which you can tell by the “/” in the second column. Unfortunately, and it’s
still loading from the 2nd partition on the SD card (mmcblk0p2). You could change this to say “/dev/sda1”, but
that would only work as long as the drive continues to get the name “sda”.
Fortunately, you can use a very similar UUIDbased trick here to uniquely identify the filesystem no matter whatletter the device gets. Filesystems have UUIDs too, and you can see them all with this command:
If you look carefully, you may notice a problem. both /dev/mmblk0p2 and /dev/sda1 have the same UUID. So
much for being unique, right? This is because of the way we cloned the old root filesystem into a new location. Itbrought the whole filesystem over, including its UUID. Before you can use a unique Id to identify the drive, you’llneed to make sure it’s actually unique.
You need to give /dev/sda1 a new UUID. First, you’ll need to get a new UUID. Go to
http://www.uuidgenerator.net/, and copy down the Id it generates for you. Then, use the following command toassign the new UUID to the first partition on the hard drive:
The system should be just about ready to boot from the hard drive, but there’s one more thing to take card ofbefore we do that. Currently, the filesystem table says to mount the second partition at /mnt/data. Before that
can succeed, you need to create a folder in that location. You can think of it as a placeholder where the actual drivewill appear later on.
sudo mkdir /mnt/data
That’s it. you’re ready to reboot again, and this time, everything should be faster.
sudo reboot
You’ll notice that the “ACT” light on the Raspberry Pi will not blink much anymore. That’s because the SD card isno longer being accessed for anything other than the boot partition. The hard drive’s activity light will now blinkwhere the Raspberry Pi’s activity light used to.
When the system has rebooted, doublecheck your filesystem table to make sure your changes are still there.
cat /etc/fstab
If you see /dev/mmcblk0p2, and no line for your data partition, it’s because you skipped that “Reboot” step
above. See? I told you it was important. Redo everything in the “Mounting filesystems” section, and reboot again.
Swap configuration
One thing you may have noticed if you’ve looked at other walkthroughs for booting from the hard drive is that theyusually create a “swap” partition on the hard drive to be used as virtual memory.
If you look back at the filesystem table from the beginning of this post, though, you’ll notice that Raspbian neverhad a swap partition in the first place. That’s because Raspbian is set up to use swap files instead of swappartitions. Raspbian’s swap file lives at /var/swap, and since we just moved the whole root filesystem onto the
hard drive, the swap file came along for the ride.
At this point, you’re already running your swap file from the hard drive, and you didn’t even have to do anything.Check it out with the “swapon” command:
swapon –s
This shows the swap summary, which will tell you what swaps are in use. It should have one entry in it(/var/swap). It’s pretty small, though; only 100MB:
21/02/2015 Raspberry Pi Home Server: Part 6, Adding a hard drive | MelGrubb.ToBlog()
The partition we created for the root filesystem is 16GB (or more if you so chose). There’s plenty of space left toexpand the swap file to something roomier.
Edit the swap file configuration:
sudo nano /etc/dphysswapfile
The configuration file that came with Raspbian only has a single line in it which says “CONF_SWAPSIZE=100”.
This is the size of the swap file in megabytes. Change the value to 2048, which will create a 2GB swap file.
image
Close Nano, saving your work (ctrlx,y,enter).
Reboot one more time to apply the changes, and check them by typing “swapon –s” again. You should see a table
similar to the first time you ran this command, only now the swap file is much larger:
image
Wrapping up
You now have a Raspberry Pi that boots (mostly) from an external USB drive. It also uses this drive for its virtualmemory swap file. The whole system should run more smoothly now, and you won’t have to worry about using upyour SD card, if that’s the sort of thing you worry about.
Although most of the important stuff is on the hard drive, you should probably make at least one more backup ofthe SD card for safety. I may cover backing up the root filesystem from the hard drive later on in another post, orupdate this one with the changes.
What’s next?
In the next post, we’ll put the new drive to work sharing files over the local network.
This entry was posted in Computers and Internet, Home Server, Raspberry Pi and tagged RPHS. Bookmark the permalink.
41 Responses to Raspberry Pi Home Server: Part 6, Adding a hard drive
Pingback: Raspberry Pi Home Server: Index | MelGrubb.ToBlog()
About these ads Like
Be the first to like this.
Related
Raspberry Pi Home Server: Part 2, Installingthe OS
Raspberry Pi Home Server: Part 10,CrashPlan
Raspberry Pi Home Server: Index
In "Computers and Internet" In "Computers and Internet"In "Computers and Internet"
Pingback: Raspberry Pi Home Server: Part 5, Remote Desktop | MelGrubb.ToBlog()
Pingback: Raspberry Pi Home Server: Part 7, Sharing Files With Samba | MelGrubb.ToBlog()
Pingback: Raspberry Pi Home Server: Part 10, CrashPlan | MelGrubb.ToBlog()
cheese says:December 24, 2014 at 9:27 am
Hi,i have an issue here that it cannot detect my external hard drive ,I reformatted it in NTFS system but ntg appear in the pi
Reply
Mel Grubb says:December 24, 2014 at 11:36 am
If the drive just never shows up at all, meaning it never appears as sda/sdb/etc, then you may have simply found adrive that’s just not compatible with the Pi. I’d double check that it’s getting power. I have an external 3.5″ drivethat has no power cord other than the USB cable. It works just fine on normal computers, but the Pi just doesn’thave enough juice to run it. The drives I’m actually using for my server are in a separatelypowered externalenclosure.
Reply
cheese says:December 25, 2014 at 8:36 am
ok thx for your information , can i use a USB drive like a 64 GB capacity would u recommend or the ones using externalpower
Reply
Mel Grubb says:December 25, 2014 at 9:46 am
Flash drives usually don’t draw much power, so it should be fine. Another approach you might try is to hook up your harddrive through a powered USB hub. They’re pretty cheap, and would take the power drain away from the Pi.
Reply
cheese says:December 29, 2014 at 10:31 am
do you mean that the hub is connected to the Pi while connecting to the drive ,or another hub separated from the Piand power?
Reply
Mel Grubb says:December 29, 2014 at 10:37 am
I mean that you get a USB hub that has its own power adapter, plug that hub into one of the fullsize USB
ports on the Pi, and plug the drive into the hub. If the hub has its own power supply, then it should be ableto power the drive.
cheese says:December 30, 2014 at 7:25 am
So if i have a powered hub thats only provide power for devices ,it won’t work cause no data will be transfered?mine is apowered hub
Reply
Mel Grubb says:December 30, 2014 at 7:47 am
No, it’s just like any other hub. If you plug the hub in to one of the fullsized USB ports on the Pi, data will betransferred. The power for the drive will come from the hub instead of the Pi, though. This should allow the driveto run. It’s just a guess, but I’m thinking that the drive simply draws more power than the Pi can provide on itsown.
Reply
cheese says:December 30, 2014 at 8:12 am
so i need to get another one…cause that only provides power for the Pi
Mel Grubb says:December 30, 2014 at 8:28 am
Actually, you CAN power the Pi off of its own hub. It looks a little funny, but it works. The microusb porton the Pi ignores the data lines entirely, and only uses the power lines. If your USB hub has enough power,you can run everything from it. You plug the hub into the Pi’s regular USB port like you would anythingelse. Next, use a microUSB cable to plug the Pi’s power line into the hub. Finally, plug the hard drive intothe hub. when you power up the hub, everything should come on at once. I haven’t done this myself,because my power strip has USB ports on it, and I use those to power the Pi. I did try it once, though, andout worked fine. Your mileage may vary, of course.
cheese says:December 30, 2014 at 11:01 pm
my hub is this ..think it’ll work ?
http://www.oricoonline.us/info.aspx?pid=839
Reply
Mel Grubb says:December 31, 2014 at 8:28 am
Aha, I see the problem. That’s not a hub. That’s just a charger. Do you have, or can you borrow a powered hub from
someone just to check whether power is the problem?
Reply
cheese says:December 31, 2014 at 9:01 am
All right , i’ll see how i can solve it
Reply
cheese says:January 3, 2015 at 6:55 am
Well..my drive is busy for awhile …after that it stop but ntg happen also
Reply
cheese says:January 3, 2015 at 6:59 am
i mean the copy part to the sda1 ,my drive stops running but ntg appear on screen so i can’r command anything
Reply
Mel Grubb says:January 3, 2015 at 8:44 am
Do you mean the partition copy from the SD card to the drive? Yeah, that can take a while, depending on the size of thepartition. My advice is to leave it running way longer than it seems like it should take. Go have dinner and come back. If itjust never finishes, then maybe there is something else going on. I’ve done this several times, though, and didn’t have aproblem. Remember that booting from the hard drive is optional. It turned out that my Pi actually didn’t like booting fromthe RAID box because of the drives I used constantly entering power saving mode, so my own personal server currentlyboots from the SD card for now. If I upgrade storage later on, I’ll go back to booting from the hard drive again.
Reply
cheese says:January 5, 2015 at 6:34 am
I solved it with “sudo reboot” and now working with Samba things..
Reply
cheese says:January 5, 2015 at 8:02 am
So now i have an serious issue my just dropped my HDD so…ya its beyong repair so how to i boot back from the SD card?
Just restore the last backup of the SD card from before you added the hard drive. If you weren’t making backups(shame), then you can just undo the changes to the fstab and cmdline.txt files. Change the “root=” part incmdline.txt back to what it originally said. If you don’t have that written down anywhere, then you might be saferstarting over than trying to guess.
Reply
cheese says:January 5, 2015 at 8:14 am
i backup after doing it…
Reply
cheese says:January 5, 2015 at 8:15 am
Guess i have to start all over again until i get another HDD
Reply
Mel Grubb says:January 5, 2015 at 8:19 am
I’d recommend making multiple backups this time through. I kept one from every step until I was finished andsatisfied, then I deleted the older ones.
Reply
cheese says:January 5, 2015 at 8:20 am
All right,thx for the advice starting over with the image…
Reply
bkonicek says:January 7, 2015 at 10:09 pm
This guide is great. However, I got to the step where I reboot after setting the boot to the UUID of the external hard drive.Once I reboot I can’t connect through SSH anymore. The first time I realized I forgot to resize the partition, but the secondtime I made sure to follow each step exactly. Any ideas what might be going wrong?
Reply
Mel Grubb says:January 8, 2015 at 11:44 am
Are you able to hook the Pi to a monitor to make sure it’s booting? If the UUID gets even a little bit wrong, it willnever find the drive, and will fail to boot. The article warns about this. If you can see that it’s booting, then I don’treally have any advice. I don’t see how the drive and ssh could be related apart from the machine not booting at all.If that’s the case, then roll back to the previous backup and try again, but be extra careful about typos.
Thanks, I can hook it up to a TV to check but didn’t have the time last night. I reread your post and anothersearch on google and realized that even after doing it twice and reading carefully I left out the PARTUUIDafter “root=”. I had thought you were saying to replace PARTUUID with the actual UUID rather than enter itafter, so this is probably the issue. This is what I get for watching Netflix while I do this kind of stuff.
I’ll try it again after work.
Alan Cai says:January 11, 2015 at 10:38 am
a quick question:will this kind of settting make the hard drive spin all the time? I want to use the raspberry pi for a server for bt sync and mySQL. I am wondering whether any of the three setting (1) booting from the external drive, (2) using bt sync, and (3) using mysql will make the driver spinning all the time.
Thanks
Reply
Mel Grubb says:January 11, 2015 at 11:30 am
Since this is a server, I think drives spinning all the time is to be expected, but most consumer hard drives will goto sleep on their own when they are not being actively used. With my own server, I found that my raid enclosuredidn’t LIKE my hard drives falling asleep to save power. I reverted to using my SD card for the system drive, andthe raid for bulk storage. If power is a concern, then maybe you should do the same. That way the drive can spindown, and you’ll use only the SD card when the server is idle.
Reply
nosko says:January 23, 2015 at 11:00 am
When i use command swapon –s, get error swapon: –s: stat failed: No such file or directory. Do you know what i do wrong ormiss something. Sorry for my bed english
Reply
Mel Grubb says:January 23, 2015 at 11:57 am
It would have to be complaining about the swap file itself. Did you start from a fresh Raspbian installation, or areyou trying to add on to an existing instance? If you are following my posts against an existing installation, I can’tguarantee that it was set up the same way as Raspbian to begin with. If you started from a fresh install, then it’spossible that something has changed in the current distribution of Raspbian, in which case I’d have to look into itbefore answering.
Pingback: The Raspberry Pi Home Server – Part 1 | UnaX.dk
Alex says:February 17, 2015 at 11:38 am
Hi, Think you for your instruction first.I met a problem, I can’t find /boot/cmdline.txt file.Then will can I find information of current boot device.
Reply
Mel Grubb says:February 17, 2015 at 12:25 pm
Off the top of my head, I would make sure you’re logging in as the “pi” users when configuring stuff like this. Itcould possibly be a permissions issue. I can’t imagine any other reason you wouldn’t be able to see the file. It HASto be there, otherwise the whole thing wouldn’t boot. You are starting from the standard Raspbian image, right?
Reply
Alex says:February 18, 2015 at 1:34 am
I use pi. I don’t think it is permission issue.I alreay use ‘sudo find / name “cmdline.txt”‘ to search the file. But nothing.
Alex says:February 18, 2015 at 2:56 am
Maybe the framework of mine is too old. it is berryBoot.Finally i find the file in its ‘FAT’ partition.But the content is like below‘smsc95xx.turbo_mode=N elevator=deadline quiet bootmenutimeout=10 datadev=mmcblk0p2′.Maybe i need to start it from very beginning.Thank you all the same
Mel Grubb says:February 18, 2015 at 11:04 am
Yes, that’s probably it. The series is written against a plain, outofthebox Raspbian image. Berryboot is amultiboot frontend, right? It will probably have moved each OS into it’s own partition, and taken overthe job of the commandline file. Without knowing more about BerryBoot, I couldn’t tell you where it hasmoved the information from the Raspbian commandline, though.
I think I will update the entire series, and draw attention to the base Raspbian assumption at the top, nextto the link to the Index. At least it should make readers aware that starting from a different distributionmeans that the instructions may not work exactly as written.