RAWTHERAPEE Users Manual This document was last edited on 2009-09-04 by Karl Loncarek. This document may be freely distributed. RawTherapee 2.4.1 – Users Manual 1 / 35 Last change 2009-09-04
Transcript
RAWTHERAPEEUsers Manual
This document was last edited on 2009-09-04 by Karl Loncarek.This document may be freely distributed.
What is RawTherapee?.....................................................................................................................4What cameras are supported?..........................................................................................................4What are the requirements?..............................................................................................................5
Starting RawTherapee...........................................................................................................................5The User Interface.................................................................................................................................5
(1) Histogram....................................................................................................................................6(2) Tools Panel..................................................................................................................................6(3) Postprocessing Profiles Switcher.................................................................................................7(4) History & Snapshots....................................................................................................................8(5) Preview Image.............................................................................................................................8(6) Image Details...............................................................................................................................9(7) Image Processing........................................................................................................................9(8) Directory & File Browser..............................................................................................................9(9) Save & Preferences & Send to editor.........................................................................................11
Frequently Asked Questions................................................................................................................24Q: RT is not starting or doing strange things (i.e runtime error), what should I do?............24Q: Is it possible to use RT on a portable device, e.g. a USB thumb drive?........................25Q: What is the recommended sequence of image processing operations?.......................25Q: How does the internal workflow of RT look like, i.e. In which order are the changedparameters applied?..........................................................................................................25Q: How to create black&white images?.............................................................................27Q: How can I restore the current image (reset all settings done)?.....................................27
Q: What happens when changing the curve in the Image Processing curve editors of Ex-posure (called Tone Curve) and Luminance Curve?..........................................................28Q: What are the best USM (unsharp mask) settings?........................................................29Q: What is color management?.........................................................................................29Q: I would like to create an own theme. How can I do that?..............................................33Q: Which keyboard shortcuts are available?......................................................................33
What is RawTherapee?RawTherapee is a free RAW converter and digital photo processing software. It is available for Win-dows and for Linux and is actively developed.
RawTherapee is used to adjust some of the most often changed parameters when optimizing digitalimages. A normal user often just wants to adjust the white balance or brightness of a photo he took. In-stead of using a big and expensive image editor you could use a small and fast (specialized) tool likeRawTherapee.
More and more cameras also support RAW formats. RAW files usually offer higher color depth thanJPGs (JPG is limited to 8 Bit per color). So the adjustments are done with the high color depth andthen afterwards converted to or saved as JPGs. Thus you loose no picture detail in the JPG as youwould when changing the JPG itself.
RawTherapee supports JPG (8 bit), PNG (8 or 16 bit) and TIFF (8 or 16 bit). All image processing isdone in 16 bit/channel mode.
Different to other RAW converters it can use EAHD as demosaicing algorithm. More information aboutthe results compared to others could be found on http://www.rawtherapee.com.
What cameras are supported?The raw loading engine of RawTherapee is based on dcraw1 (RawTherapee 2.4.1 uses DCRaw 8.97).This means that all cameras supported by dcraw are also supported, that use a classical RGB Bayerpattern sensor.
If your camera is not listed, but works with the software; or if it is listed but RawTherapee can not readit, please send me an email to: gabor at rawtherapee dot com.
Supported Cameras, i.e. formats:
● Adobe Digital Negative (DNG)
● Canon PowerShot G3, G5, G6, G7, G9, G10, G11, SD300, S30, S40, S45, S50, S60, S70,Pro1, S2 IS, S3 IS, S5 IS, A460, A470, A530, A570, A590, A610, A620, A630, A640, A650,A710 IS, A720 IS, SX1 IS, SX10
● Canon EOS D30, D60, 10D, 20D, 30D, 40D, 50D, 5D, 5D Mark II, 300D (Digital Rebel), 350D(Digital Rebel XT), 400D (Digital Rebel XTi), 450D (Digital Rebel XSi), 500D (Digital Rebel T1i),1000D (Digital Rebel XS), 1D, 1Ds, 1D Mark II, 1D Mark III, 1D Mark II N, 1Ds Mark II, 1DsMark III
What are the requirements?● A fast processor with SSE support is recommended but not required.
● At least 512MB of RAM
● Minimum recommended screen resolution 1024x768
● Windows version: Windows 2000, XP or Vista (32bit)
● Linux version: GTK+ 2.14, GTKmm 2.14 series
Starting RawTherapeeSimply double click on the RawTherapee icon. That's all.
When you provide an image filename (with or without path) to “rt.exe” RawTherapee loads this file andshows a Preview Image.
Just another thing to mention (which might be quite important to some users): RawTherapee isalready quite portable, which means that nothing is written into registry. Simply a directory Raw-Therapee is created in the HOME directory of the current user (see also here on more informationabout portable usage).
The User InterfaceWhen starting RawTherapee it is usually started in a maximized window. You will see the followingwindow:
In the above image there are several areas in the window which are marked above with numbers. Be-low a more detailed description of these areas:
(1) Histogram
Here you see the histogram of the currently edited image. Ifyou selected a Crop, you'll see a histogram of the croppedarea. Each of the displayed channels can be switched onand off separately. When you switch off one channel, the oth-ers may be magnified to fully use the available space. Dis-played channels are:
● Red (red line)● Green (green line)● Blue (blue line)● Luminance (gray line/area)
If you have a very peaky histogram double click on it andthen the scale is changed (histogram is magnified thus smal-ler values can be seen better).
(2) Tools PanelThe Tools Panel contains several symbols which allow fast usage of RawTherapee.
Hides/Displays the Histogram, Postprocessing Profile Switcher and theHistory & Snapshots. You can also use the key to hide/display them.
When pressing the first time it hides/displays the Directory & File Browser.Pressing it again enlarges the Directory & File Browser and hides the Pre-view Image (3-State Button). You can also use the key to switchbetween the different views.
Shows the most important EXIF informations of the currently edited imagein the preview area. Those informations are:
● F-stop and shutter speed● ISO setting● Focal length● Used Lens
You can drag the image with the mouse and move it when the preview isbigger than the available viewing area (because of the magnification). Thisworks also in the details window. This tool is activated by default. You canalso use the key to activate it.
The mouse cursor changes to a picker. Click with this picker on an gray orwhite area to correct the white balance, i.e. color temperature. It might benecessary to do this several times as the areas might contain small colorvariations which are not visible thus leading to totally different results. Youcan also use the key to activate it. You can cancel this function by doinga right click with the mouse. The hand tool is then automatically activatedagain.
Select the area of the image which should be used for the developed im-age. For setting the crop parameters take a look at the Crop Parameters.When you selected a part of the image the surrounding area will bedarkened or brightened. You can switch between dark and bright bordersimply by pressing and double clicking in the border area. To movethe crop area around press and drag the area with the mouse.You can also use the key to activate it.
The image will be rotated for the angle that is displayed. Use this tool todraw a line ideally over a line on your image that should be horizontal orvertical (maybe some edge). When using this function you will draw a linethat is considered to be horizontal or vertical afterwards. To achieve thatthe image will be rotated accordingly. You can also use to activate it.
The center area shows the actual position of the mouse pointer within theimage (in pixels). Also the RGB values of that point is given. When youclick on RGB: the display changes to HSV values which is also shown withthe text HSV:. This setting is not saved. Each time you run RawTherapeethis setting is reset to RGB.
Shows the area of your image that is too dark and gets clipped. With thatyou can judge whether you maybe darkened the image too much and thuswould loose important picture information. Depending on your Preferencesthis area could also blink.
Shows the area of your image that is too bright and gets clipped. With thatyou can judge whether you maybe brightened the image too much andthus would loose important picture information. Depending on your Prefer-ences this area could also blink.
Rotate the image left by 90 degrees.
Rotate the image right by 90 degrees.
Flip the image horizontally.
Flip the image vertically.
(3) Postprocessing Profiles SwitcherLet's assume you have found some great settings on sharpening or optimum settings for noise reduc-tion for use with your camera. You can save the sum of settings you did to the image in a profile. You
could then easily apply all your great settings on the image you are currently working on simply byloading a new profile. Your own profiles are saved in the users home directory.
If you want to share the newly created profile with other users of your computer you have to copy itinto the profiles folder within the applications folder.
You could even define in the Preferences which profile should be used as default when loading a RAWor JPG image.
There are already some default profiles:
● neutral – Some default values are used. No image processing is done. Same as a fresh edit ofthe image.
● default – The brightness is automatically adjusted and slight sharpening is applied.
● crisp – Same as default but additionally increased contrast and increased sharpening is ap-plied.
When you already worked on a image other choices are available:
● (Last Photo) – All of the settings used for the last edited image will be used for the current im-age also.
● (Last Saved) – All the settings are applied that have been done during the last edit of this im-age.
● (Custom) – Those are your actual settings/changes that are visible in the history.
The following buttons are available
Load and apply a profile
Save current changes to your image as new profile
Copy current changes to your image as profile to the clipboard
Apply profile from the clipboard to the actual image
(4) History & SnapshotsIn the history you can see all the adjustments you have done since loading the image. It is like a de-tailed Undo/Redo memory. Jumping back to a previous step is done by clicking on the last correct stepin the history list. You'll see also the values that have been used to achieve that step. If you do notchange anything you can easily jump back and forth to get an idea how the image looked before andafter. Undo can also be achieved by pressing + , redo is done by + + .
Additionally you could use snapshots. With snapshots you save one or more important steps or posi-tions within your history for a fast later recall. Simply click on Add to save it. Use Del to remove itagain. If you want to give a snapshot a special name simply double click on it's name in the list. Thenyou can change the name to your liking.
Snapshots are only available during editing the image. As soon you select another image for editing allsnapshots are lost.
(5) Preview ImageHere the currently edited image is displayed. If the background color in the preview area disturbs youwhen working on your image simply double click on it with the left mouse button. Then the backgroundcolor changes to black, white, and gray (default) again.
You can select the scale the image is loaded with. Basically you can influence the processing time withit. The lower the size is the lower the processing time, e.g. a scale of 1:1 needs more time for loadingthan 1:2 (4 times longer to be precise).
You have the choice between the following scales: 1:1, 1:2, 1:3, 1:4, 1:5, 1:6, 1:7, 1:8.
With using the scale, the original image is made smaller and the result is then displayed. Also all theadjustments you do are applied to the preview so you can see the effect immediately. Normally a scaleof 1:1 is not needed, as you also can check the Image Details.
When using a scale that results in an image being bigger than the preview area you can move aroundthe visible part and also can zoom it. Next on the right of the zoom icons (see below) the actual zoom-ing factor is displayed, e.g. 20%. The available zoom range is 20% - 100%. Instead of using the but-tons below you can also use the mousewheel to zoom in/out. Double clicking on the image zooms itback to 100%.
Zooms out one step
Zooms in one step
Sets the zoom so the image fits into the available Preview area.
(6) Image DetailsTo activate the Image Details simply click into the checkbox named Detail. You can select the areathat is occupied by the Image Details: Small, Normal, Large or Huge. By default each pixel on themonitor represents one pixel of the image.
You can move around the area which is visible in the Details simply by dragging the red square withthe mouse or by dragging the visible content within the Image Details box with the hand tool.
Also you can use the zoom icons below or the mouse wheel to zoom in/out the Image Details. Doubleclicking into the details windows switches automatically to 100%. The available zoom range is 100% -800%.
Zooms out the image details one step
Zooms in the image details one step
Sets the original size which means each pixel on the monitor representsone pixel of the image.
(7) Image ProcessingThe Image Processing Parameters are organized into several tabs which group the available functionsfor easier access. They are explained in detail later in this document (see below).
(8) Directory & File BrowserOn the left side you can see a directory tree. Use it to select the desired directory on your harddisk.Clicking on the triangle next to the name opens or closes that directory to show or hide the subdirect-ories. After double clicking on the desired directory thumbnails for the file browser are created right ofthe directory tree. On first opening the desired directory thumbnails are created from the images.Those thumbnails are cached to reduce later loading times. The thumbnails are displayed as soonthey have been generated. The thumbnail generation and caching continues as background process.
All changes done to the content of the directory you have currently opened in RawTherapee is mon-itored. This means additional images are also shown as thumbnails and thumbnails for deleted imagesare removed.
At the top of the File Browser you see some symbols:
Show only images ranked with the selected amount of stars
Show only images marked for deletion. Additionally you have the possibilityto finally delete those images by pressing Empty Trash.
Show processing queue. When the button Start Processing is pressed theimages are processed immediately and e.g. a JPGs are created. WhenStop Processing is pressed the images are just ready for processing. Noaction happens. This is the default setting.Additionally you can access and change the Output Options through Set-tings.
Decreases the thumbnail size
Increases the thumbnail size
Switch between vertical/horizontal alignment of the thumbnails
Additionally you can define an filter based on EXIF values. Check Apply and Setup the desired val-ues.
Below each image you will see also some basic EXIF information and the date/time (can be switchedoff in the Preferences).
Above each image you can see some markers. The visible markers may vary. This depends whethere.g. the processing queue is showed. You can directly click on those markers to set them.
Shows the ranking of the image. You can rank an image with up to 5 stars.
Move image to the internal trash
Restore image from internal trash
Send image to the processing queue
Delete image from processing queue
Move image to head of processing queue
Move image to end of processing queue
On the top left corner of the image you can see a green checkmark when you changed the Image Pro-cessing Parameters of that image. Additionally when you have saved (developed) that image an over-layed floppy disk icon is visible. Thus you can see which images you processed already in the currentsession. Restarting RawTherapee removes the floppy disk icon again.
To process an image simply double click on it. Then a Preview Image will be created and displayed inthe main working area. This might take some time depending on the size of the image. You can alsoload the next image by pressing the key , to load the previous image press .
When you right click on an image a context menu opens. This menu allows all modifications that canbe achieved by the buttons at the top of the File Browser. Some of those items can also be called dir-ectly via hotkeys. moves the image to trash, + restores it again. By press-ing + you select all images.
Additionally you can apply profiles completely or in part to the selected images. Those profiles may besaved or have been before copied to the clipboard. You can also delete applied profiles. It then lookslike the image has not been worked on yet. You can also copy and paste by using the keyboard.
+ copies the profile, + pastes it, + + does a partial paste. Partialpaste means you can select which parameters should be applied.
(9) Save & Preferences & Send to editorPressing Save Image saves (or develops) the currently edited image with the same filename (exceptthe extension) and the format in the directory you defined in the Preferences (see Output Options). Bydefault the file is saved as JPG in a subdirectory converted of the actual picture directory. If you save itagain a “-1” is added to the filename. Saving again adds “-2” etc.
Alternatively you can save the file with a different filename. Simply click on As... to do so.
When pressing the Preferences button the Preferences dialog opens and you can set some defaultsetting of RawTherapee.
This area contains also an additional button Send to editor. When you press this button the image isprocessed and afterwards opened with the image editor of your choice that can be defined at the Gen-eral tab of the preferences.
When the preferences window opens you can access several tabs which are described below. Addi-tionally you can Save and Load existing preferences. The About button shows the splashscreen.
General
You can set the default language of the GUI here. To apply your change you have to restart RawTherapee. If there are still some untranslated words in your selected language, the english words willbe displayed.
If you prefer a different look for the RawTherapee GUI you can select a different Default theme. Forthe same look as with version 2.3 select default here. You will see the result of the theme change im-mediately without the need to restart RT.
Additionally you can set the clipping indicators which could be activated in the Tools Panel. Set the val-ues which should be considered as clipped (maximum or minimum). The maximum value is 255 whichrepresents the highest possible brightness. To some of us it might be also helpful to activate blinking ofthe clipped areas for better visibility.
You can also define the date format that is used when displaying the small preview images in the filebrowser. Available formatting strings are: %y : year, %m : month, %d : day
For example, the hungarian date format is: %y/%m/%d
The last setting on this tab defines which program should be used to open the image when pressingthe button Send to editor. By default Photoshop and Gimp are supported. But by defining an owncommand line you can call every other image processing program also. The filename of the developedimage is then passed to that program as command line option.
Image Processing
Here you can define which default Postprocessing Profiles should be used when loading RAW files orthe other supported image formats.
You can also define how the processing profiles of the images should be handled. It can be saved to-gether with the input file and/or in the cache. Additionally you can define which of those should be pre-ferred when loading a Preview Image.
Also the demosaicing algorithm could be defined. You can select between EAHD, HPHD and VNG-4.HPHD is at least twice as fast as EAHD, and is parallelizable (so on dual core processors it is evenfaster), and has better noise pattern. HPHD is now the default demosaicing method in RawTherapee.It also has some drawbacks compared to EAHD: with cameras having a weak antialias filter it entailsmoire and zipper effect a bit more often. If you are not pleased with its result, you can switch back toEAHD for best quality.
Especially for Olympus users there is another algorithm: VNG-4. It eliminates mazing artifacts that arecreated by the other algorithms.
You can also define the amount of steps used to suppress false colors when applying the demosaicingalgorithm. False colors (speckles) could be introduced during the demosaicing phase where very finedetail is resolved. False color suppression is similar to color smoothing. The luminance channel is notaffected by this suppression. This is usually done by every software that does demosiacing.
File Browser
At the top you can define the Image directory at startup. It could be the RawTherapee Installationdirectory, the Last visited directory, the Home directory, or you define an Other directory.
Next you can set some File Browser Options. This option defines whether you can see date and timeor EXIF information below the images in the file browser.
You can also define a list of parsed extensions i.e. which files are recognized as images. Some exten-sions are defined by default. Those can be deactivated by removing the checkmark in front of it. If andesired extension is missing you can easily add it by using the plus button.
At the bottom of that page there are several Cache Options that influence the speed of loading/gener-ating the thumbnails. These options are quite self-explaining. When the option Live Thumbnails is ac-tivated almost all changes done to the image will be done also to the thumbnail (like rotation, crop, ex-posure settings etc.). This could lead to higher processing times though. It is recommended to notchange the cache options.
Output Options
Here you can define what file format the developed image file will have. You can choose between JPG(8 Bit), TIFF (8 bit), TIFF (16 bit), PNG (8 bit), and PNG (16 bit). For JPG you can also change thequality. For PNG you can change the compression ratio. Additionally you can define whether the pro-cessing parameters are saved together with the ouput image.
You can also define the Output Directory here. The output path is specified by a single formattedstring that can contain the following special control codes:
%f, %d1, %d2, ..., %p1, %p2, ...
These formatting strings refer to the directories and sub-paths of the path of the raw file.
For example, if /home/tom/image/02-09-2006/dsc0012.nef has been opened, the meaning ofthe formatting strings are the following: %f=dsc0012, %d1=02-09-2006, %d2=image, ...,%p1=/home/tom/image/02-09-2006, %p2=/home/tom/image, p3=/home/tom, ...
If you want to save the output image where the original is, write: %p1/%f
If you want to save the output image in a directory 'converted' located the directory of the original,write: %p1/converted/%f
If you want to save the output image in directory '/home/tom/converted' with keeping the same subdir-ectory of dates, write: %p2/converted/%d1/%f
Alternatively you can define a totally different directory for saving developed files.
Here you can define the directory where ICC profiles could be found. You should also define the ICCprofile of your monitor when you've done a calibration. If you don't do it, the displayed image will bedisplayed with wrong colors.
You can also set the colorimetric intent which defines how the ICC profiles are used for translationbetween gamuts or color spaces (a very good and detailed information about intents could be foundon Steves Digicams2 or Cambridge In Colour3. Below a summary):
● Perceptual – If the color gamut of your image is higher than that one your device (monitor orprinter) is able of then it is compressed a bit to fit the gamut of your device as far as possible.This might result in an image with reduced saturation, the hue is still kept. It might look a bitdull. But this is not really that much visible as the color relations stay the same. This method isactivated by default (recommended)
● Relative Colorimetric – The colors existing in the color gamuts of both your image and yourdevice are kept and displayed 100% perfect. If the color does not exist within the color gamutof your device the nearest possible value is taken. This might lead to some banding effects es-pecially visible in blue sky. The white point will be corrected.
● Saturation – Very similar to Perceptual, but here it is tried to keep the saturation and changethe hue instead. This is very useful for e.g. screen shots or similar. It could also be used whenyou do not care of some possible color shift as long the image does not look dull.
● Absolute Colorimetric – Similar to Relative Colorimetric. It tries to reproduce the exact colorsrecorded in the original scene. The white point will not be corrected. It is normally used, whenthe gamuts of your image and your device are nearly the same. For example for: reproductionof specific colors like reproductions of fabric or logo colors.
Image Processing ParametersThe Image Processing Parameters are organized into several tabs which group the available functionsfor easier access. There are following tabs available: Exposure, Detail, Color, Transform, andMetadata. If there is not enough space for all the tabs you'll additionally see two arrows next to the tabtitles to ease switching the active tab. Exposure functions are used to correct the brightness of the im-age. Detail functions improve the image (Sharpening, Noise Reduction etc.). The Color tab contains allfunctions used to change the color of the image (White Balance, Color Shift, Channel Mixer etc.).Transform functions change the image (Rotating, Cropping etc.). Metadata contains the functions forchanging/adding EXIF and IPTC informations.
All image processing parameters described below (including EXIF and IPTC) will be saved, when youcreate a new postprocessing profile.
General hints for the description of the Image Processing Parameters below:
Wherever you see a slider with an additional value display you can set the value by moving the slider,by entering a value, or by clicking on the up/down button. Additionally:
Clicking on this icon resets the parameter value back to its default value
ExposureThis tab contains function to adjust the brightness of the image.
The Exp. Comp. (Exposure Compensation) slider is onlyavailable for RAW images. The compensation is appliedbefore any other adjustments (gamma correction) aredone.
The Auto Levels button increases the brightness automat-ically while the percentage of the blown out area on theimage does not reach the specified maximal clipping ratioset by Clip. It is recommended to switch this button on andafterwards adjust the brightness if the resulting image istoo bright or looks dull.
The Brightness slider is similar to Exp. Comp.. But herethe brightness is adjusted after the gamma correction.Exp. Comp. is only available for RAW images.
With Highlight compression some details could be re-covered that got lost during the increase of brightness.The upper part of the dynamic range is then compressedusing values below 100. Keep in mind that no detail couldbe recovered that does not exist (was not recorded). Thevalue given is the percentage of the used dynamic rangeafter compression.
Pixel values darker than Black will be set to zero. Increas-ing the black level improves images with fog or a grayhalo.
Shadow compression does the same as compress high-lights, but it then just recovers details that where lost dur-ing increase of the black level or while darkening the im-age.
The Contrast slider increases the brightness of pixelsbrighter than the average and darkens the pixels darkerthan the average. Unlike many other image processingsoftware, increasing the contrast in RawTherapee doesnot blow highlights or loose details in shadows because aspecial sigmoid transfer function (centered at the averageluminance) is used.
With the Tone Curve you can create a custom tone curve.You can use as many defining points as you like. With thebutton Linear you can reset it. You can also load and saveyou custom curve for later usage. This curve is applied onthe RGB channels. For some examples of curves take alook at the Frequently Asked Questions.
Highlight Recovery
This function is only available when working on RAW im-ages.
On overexposed images too bright color values areclipped and therefore lost. However it happens quite oftenthat not all the three (red, green and blue) color channelsare lost on an overexposed area on the image. In this caseit is possible to recover color and detail information basedon the available remaining (not burnt) color components.
You can select whether RawTherapee could try Lumin-ance Recovery (recovered details will be gray) or ColorPropagation which will additionally try to recover colors. Itmight happen that strange (falsely guessed) color could beintroduced. Therefore it is recommended to use this fea-ture only on moderately overexposed images.
You can also choose the CIELab Blending method. Thismethod simply reduces the luminance channel to have anunclipped pixel and then tries to recover the color informa-tion as far as possible form the A and B channels.
Shadows / Highlights
With this feature it is possible to brighten the shadowswhile leaving the bright areas in the image as they are.Thus no clipping of the highlights will occur. This is donewith the slider Shadows. This feature is also known as filllight in other software. The name and function is the sameas in Photoshop.
The opposite thing, darkening the bright areas while leav-ing the shadows is done by the Highlights slider.
At first the algorithm detects the dark and bright areas.The Radius is used to decide whether a pixel belongs tothe bright or dark area. The default setting of 30 givesquite good results. The highlight Tonal Width sets thethreshold above which the pixels are considered to behighlight pixels. For example, setting it to 100 means thatall pixels brighter than the average image brightness areconsidered to be highlights. Setting it to 0 means that nopixels belong to highlights.
The shadows Tonal Width setting works the same waybut just for the shadows instead.
Local Contrast is adaptive contrast adjustment dependingon contrast within a specified area. It increases contrast insmall areas while keeping the global contrast (which couldbe set with the contrast slider in Exposure). The resultingimage will look more three-dimensional. This feature isvery useful when you have a foggy image or took your pic-ture through a window. The effect can be very subtle. Infact it is the same as an unsharp mask with high radiusand small value. For optimal results the slider should bebetween 5 and 20.
This is identical to the settings in Exposure except thatthese settings are applied on the CIELAB luminance chan-nel and not on the RGB channels.
Because it works on the CIELAB luminance channels theresult will look different when e.g. changing the Contrastin the CIELAB color space.
It's your decision what you prefer. There are people whocan make wonders with the proper adjustment of theCIELAB luminance curve.
With the Luminance Curve you can create a custom tonecurve. You can place as many defining points as you like.With the button Linear you can reset it to the shown value.You can also load and save you custom curve for later us-age. This curve is applied on the L (Luminance) channel ofthe CIELAB color space. For some examples of curvestake a look at the Frequently Asked Questions.
DetailThis tab contains functions to improve details of the image.
The sharpening in RawTherapee can be done with twoMethods: Classical unsharp mask (USM) or with the RLDeconvolution algorithm.
Lets first look at the Unsharp Mask settings: The Radiusdetermines the width of the sharpening halo. The Amountparameter controls the strength of the sharpening. TheThreshold parameter is used to prevent the sharpening ofnoise: If a pixel luminance differs only a bit from its neigh-bors (the difference is less than the threshold), then it isnot sharpened. Note that sharpening operates in 16 bit perchannel mode, thus your threshold setting you are used tofrom other image editing software has to be multiplied by256. You can set the threshold also to 0 but theneverything will be sharpened (even the noise).
In general the quality of sharpening is best if the sharpen-ing radius is as small as possible. For “normal” images(normal: not too blurry) it should be set between 0.8 and 2.My experience is that for 6 megapixel cameras 0.8 is apleasing setting with amount of 150. For DSLRs having anantialiasing filter weaker than average the amount shouldbe smaller (e.g. 100 for Nikon D70). The present 10 (andmore) megapixel cameras produce a significantly softerimage, thus the radius should be set between 1 and 1.5.
If you activate Sharpen Only Edges the noise sharpeningcan be avoided completely. The Radius is used for thenoise detection. If the noise is low a lower radius could beused and vice versa. A higher radius slows down the im-age processing. Edge Tolerance determines how much apixel has to differ from its neighbor to be considered as anedge and not as noise. It's very similar to the USMthreshold parameter and has a high impact on the visualquality. For low ISO (low noise) images use 1000 or less,for high ISO images use 2500-3000 or even more.
Halo Control is used to avoid halo effects when sharpen-ing too aggressive.
The second Method RL Deconvolution works on a differ-ent approach. Here it is assumed that there is gaussianblur (like applying a gaussian filter) that might be producedby e.g. the lens or motion. In reality the blur might comeclose to gaussian blur, but not exactly. Therefore some ar-tifacts like haloes might occur when you try to remove thegaussian blur.
You can define the Radius of the gaussian blur you wantto remove. When you set the Amount to 100% the gaussi-an blur will be removed completely, but as this gives aharsh result a lower setting is recommended. The Damp-ing is used to avoid sharpening of noise on smooth areas.
As deconvolution cannot be done perfectly at the first timeseveral Iterations are necessary. How much is changedbetween each iteration is defined by the Richardson-Lucy(RL) algorithm. The more iterations are used the more per-fectly the gaussian blur is removed. But with each iteration
the speed decreases and the danger of halo artifacts rises.Normally you don't want to remove the gaussian blur per-fectly due to personal visual taste and speed. The defaultsettings should be fine most of the time.
It is recommended to check the results of the sharpeningin the Image Details as the preview does not reflect thesharpening settings correctly.
Luminance Noise Reduction
RawTherapee has an edge preserving algorithm to re-move luminance noise from high ISO images. The Radiusis used for the noise detection. On low noise the radiuscould be low also. For noisy images a high radius givesbetter results but slows down the image processing speed.
Edge Tolerance determines how much a pixel has to dif-fer from its neighbor to be considered as an edge and notas noise. It's very similar to the USM threshold parameterand has a high impact on the visual quality. (see alsoSharpening).
On some cameras it makes sense to use the luminancenoise removal even at low ISO images. For example theNikon D70 camera has some noise even at its base ISO.Applying a tiny bit luminance noise reduction (Radius 1and Tolerance 1000) makes the images look smooth asCanon images. For high ISO images use 2500-3000 oreven more for Edge Tolerance.
It is recommended to check the results of the noise reduc-tion in the Image Details as the preview does not reflectthe denoising settings correctly.
Color Noise Reduction
To remove the color noise with RawTherapee there aretwo options: one can apply edge sensitive denoising meth-od, or the traditional Gaussian filter on the CIELAB “a” and“b” channels. It is strongly suggested to use the traditionalGaussian filter since it is much more effective in reducingthe color noise. Since it does not affect the luminancechannel the image will remain as sharp as before. You canset the Radius of the Gaussian filter. Increasing it doesnot slow down the image processing speed.
The Edge Tolerance works the same way as in Lumin-ance Noise Reduction.
It is recommended to check the results of the noise reduc-tion in the Image Details as the preview does not reflectthe denoising settings correctly.
The methods used could be:● Camera – Takes the white balance used by the
camera● Auto – Automatically corrects the white balance● Custom – Uses the values set below
You can also use the Spot WB tool (see also Tools Panel)to obtain the correct white balance of your image. You cancancel the Spot WB tool by doing a right click with yourmouse. You can also activate this function by pressing thekey . You can also set the Size of the area watched bythe spot tool.
To cancel this function simply do a right click with yourmouse.
Alternatively you can set the color temperature and theTint manually. Moving Temperature to the left makes theimage cooler (blueish), moving to the right warmer (yellow-ish). Moving the tint to the left makes the image purpleish,moving to the right greenish.
Channel Mixer
This function is used for special effects.
As you can see the Channel Mixer is divided into threesections: Red:, Green:, Blue:. Those sections representthe three available color output channels in an RGB image(see section titles). All values shown here are percent-ages.
The mixture of real current RGB values and the slider set-tings modify the respective color value mentioned in thesection title. If the other two colors have no RGB values forthis pixel, there will be no effect when you change theirsliders.
This stuff is difficult to explain and understand thus an ex-ample shows best how a channel mixer works: Lets as-sume a pixel with the RGB values 200, 100, 50.
Now lets change the the Green: output channel (see title).When you set the Green slider to 70% the RGB values ofthat point will be 200, 70, 50 (the G part has been reducedto 70% of it original value).
Now lets decrease the Red slider to -20%. Now the RGBvalues of that point will be 200, 30, 50 (the G part hasbeen reduced for 20% of the Red RGB value: 20% of 200is 40)
Now lets increase the Blue slider to 200%. The RGB val-ues of that point will change to 200, 130, 50 (the G parthas been increased for 200% of the Blue RGB value:200% of 50 is 100).
This effect works the same for each color output channel.
But beware it might easily happen that portions of your im-age might become blown or black.
Most of time the Channel Mixer will be used on black andwhite images to improve the look. Set Color Boost to -100to work on a black and white image.
Color Boost
Contrary to most software RawTherapee boosts the colorby amplifying the a&b channels in CIELAB color space byAmount. You can also boost the channels separate. Justselect the desired mode in Channel. Moving the slider to-100 sets the chrominance channels to 0 resulting in ablack and white image defined in the luminance channel.Increasing the value gives a more colorful image.
Sometimes too much color boost can burn out some colorcomponents. For example boosting a strong red color usu-ally burns out the red channel in the final image. You canavoid this by switching on Avoid Color Clipping. But be-ware: Activating it will slow down the image processingsignificantly.
Applying too much color boost may result in a very artificiallooking image because the already well saturated colorsbecome too saturated. Enable Saturation Limiter toavoid this because then pixels with more chrominancethan set by the slider will be much less boosted than theother pixels.
Color Shift
The two sliders in this tool basically shift the CIELAB “a”and “b” channels. The Green-Magenta slider shifts the “a”channel, the Blue-Yellow shifts the “b” channel. With thistool you can remove/add color cast from/to your image.
At the top you can define which Input Profile should beused. Use embedded, if possible tries to use the profilethat comes with the image itself. Camera default uses theprofile of your camera, i.e. does not apply any color trans-lations to the image. With Custom you can select someother profile stored on your computer. When you activatethis option there is another option available: Profile ap-plies Gamma. There are some custom camera profilesavailable on the internet that have gamma correctionalready implemented. To avoid that gamma correction isapplied twice (by the camera profile itself and Raw-Therapee), leading to strange colors, you should activatethis option.
You can also press the button Save reference image forprofiling. This saves the linear image before the input pro-file is applied. This file can be used for profiling i.e. creat-ing a new camera profile. Information on creating a cam-era profile could be found here4 for example.
Then you can define which Working Profile should beused. Which working profile you choose depends verymuch on the later use of your image. For highest compat-ibility use sRGB5. Use it also if you don't know what colormanagement might be useful for. If you only plan to showyour images on your monitor or in the internet this is also agood choice. Because then no profile has to be embeddedinto a JPG as sRGB is always assumed as default. If youplan to print your image Adobe RGB6 might be a betterchoice as it was developed to work best with CMYKdevices such as printers. But you could also change toProPhoto7, WideGamut8, BruceRGB9, Beta RGB10, andBestRGB. But beware using a color profile with a biggamut may lead to problems or unwanted colors depend-ing on the colorimetric intent (see Preferences – ColorManagement). See Frequently Asked Questions for moreinformations about color management and differencesbetween the available color profiles.
At the bottom you can define the Output Profile. Depend-ing on your settings you will have a list of possible colorprofiles (that could be found on your computer). At leastyou will have one choice: No ICM: sRGB output – this isstandard nowadays for all kind of images, when no profileis embedded.
TransformThis tab contains functions to change the image.
You can simply use the Select Crop tool (see also ToolsPanel) or the corresponding button here to select an im-age area that will be used for the final developed image.You can also press the key to activate this function.
It is possible to set the position (x, y), width W, and heightH of the cropped area. Alternatively you can use a Fix Ra-tio for the crop shape. Available ratios are: 3:2, 4:3, 16:9,16:10, 5:4, 2:1, 1:1, DIN. You can also set the orientationto Landscape or Portrait.
The Guide Type shows some lines to help you find theright crop for fulfilling some known positioning rules. Pos-sible values are: None, Rule of thirds, Rule of diagon-als, Harmonic means 1, Harmonic means 2, Harmonicmeans 3, Harmonic means 4.
To get a pleasing result your object or leading line shouldbe placed on one of those lines. Ideally your object shouldbe located on or at a crossing point of two lines.
If you set the DPI value of your printer you can see thephysical dimensions of the crop rectangle in cm and inchunits.
When you selected a part of the image the surroundingarea (border) will be darkened or brightened. You canswitch between dark and bright border simply by pressing
and double clicking in the border area.
To move the crop area around press and drag thearea with the mouse.
Rotate
You can simply use the Select Straight Line tool (seealso Tools Panel) or the corresponding button here to ro-tate the image. You can also activate this function bypressing the key . When using this function you willdraw a line that is considered to be horizontal or verticalafterwards. To achieve that the image will be rotated ac-cordingly.
You can also set the Degree how much the image shouldbe rotated by entering a value. A negative value will rotateclockwise, a positive counterclockwise (maximum is 45 de-grees in each direction).
When the Fill option is not checked, the image will be ro-tated but black areas (mainly in the corners) will occur.With this option checked the image will be magnifiedenough to fill those otherwise black areas will occur. Theoriginal image size will be kept.
When the Fill option is unchecked you could use AutoCrop to get an image without black edges. The crop willthen automatically be sized to contain most of the imagewithout any black edges. This means the resulting imagegets smaller.
A negative Amount will correct barrel distortion, a positivewill correct pincushion distortion of the image. Entering a 0value switches off lens distortion correction. Activating thisparameter will slow down image processing speed.
C/A Correction
The chromatic aberration can corrected by using the twosliders Red and Blue. Normally you won't see any C/A inthe preview therefore it is highly recommended to use theImage Details (I even suggest to magnify to 200%) whenyou apply this kind of correction. As in other software tools,this algorithm eliminates moderate chromatic aberrationquite well. Do not expect miracles with images having ex-tremely high chromatic aberration.
Vignetting Correction
With that tool you can correct vignetting effects on yourtaken pictures. Setting the Amount slider to a positivevalue brightens the four edges of the images to correct theclassical vignetting. Setting it to a negative value darkensthem.
The Radius influences how much of the images beginningfrom the edges will be brightened or darkened.
Resize
Here you can define how your developed image will beresized. First you can change the Method that is used forresizing. Nearest is a very fast method as it does notchange any colors but simply uses the existing color in-formation. The result will lack details. Bilinear gives a bet-ter result. Bicubic is the best available interpolation meth-od as is keeps fine details better. Bicubic come in two ad-ditional flavours Bicubic (Sharper) and Bicubic (Softer).Those do additional sharpening or softening after resizingthe image. Bicubic is the default setting here.
There are two ways to set the size: Either you set theScale or you set the Full Image Size in pixels.
The scale can be chosen between 0.2 (1:5) and 4 (4:1).
MetadataThis tab contains again two tabs. EXIF and IPTC.
EXIF
Here you can control which EXIF metadata will be contained in the saved (developed) image file. TheEXIF metadat is usually created by the camera itself and implemented into the RAW image file.
Basic EXIF informations are directly visible. Extended EXIF information and so called “makernotes”are organized into a tree. Click on the arrow at the very left of the desired subtree and you'll see it'scontent. “makernotes” are informations varying between camera manufacturers and even betweencamera models.
You can Remove, Keep, or Add/Edit EXIF metadata. Manipulating metadata does not change thesource file in any way! If you want to restore a value you maybe changed or removed by accidentsimply press Reset. Reset All works similar but is used for trees and works recursive, means all val-ues changed/removed in this subtree are restored.
You can Add/Edit the following EXIF information: Artist, Copyright, ImageDescription and Exi-f.UserComment.
Only the english names of the EXIF fields are displayed for easy reference. They are not translatedwhen you choose a different GUI language.
The EXIF information is marked with different signs:
This information is available within the source file and will be copied to thefinal (developed) image.
This information will be removed and not saved into the final image
This information was added/changed by you and the new value will besaved into the final image.
IPTC
IPTC values belong also to the group of metadata, as they are integrated into the image files but donot add any picture details (additional or different pixels) to the image. Basically the metadata sum-marized as IPTC contains additional information about your image. As this information is saved withinthe image file it cannot get lost. This eases the the workflow a lot as you don't have to care about an-other file when e.g. backing up or sorting your images.
IPTC is usually used to describe the image in detail. There are a lot image database softwares thatuse the (IPTC) information saved in images to e.g. fill their descriptive fields. For example you canalso use IPTC fields when you try to sell your images. Most online companies willing to sell your im-ages support IPTC tags when you upload your images to their databases, thus you have less work.Adding e.g. keywords on your computer at home is much more comfortable than doing it through theweb browser. Multiple Keywords and Suppl. Categories can be added/removed using the plus andminus signs next to it.
Not all available IPTC fields are supported by RawTherapee, only the most used. If you want tochange/add some other IPTC fields use some other software that supports it, e.g. XnView11.
If your source file is a JPEG it might happen that it contains already some IPTC information. This in-formation will be loaded and displayed automatically.
The button Reset resets the IPTC values to those saved in your current profile. Embedded resets allIPTC values to those stored in the source file. There are two more buttons:
This button copies your current IPTC setting to the clipboard. This is espe-cially useful, when you have multiple image you want to apply the sameIPTC values.
This button pastes the formerly copied IPTC settings from the clipboard toyour current image.
Frequently Asked QuestionsFollowing RT stands for "RawTherapee".
Q:RT is not starting or doing strange things (i.e runtime error), what should I do?
A: Close RT and delete the whole RawTherapee folder within your HOME directory. Then restartRT again. Then it should start without any problems.
Such a problem might occur, when you updated from an e.g. beta version and the configurationfile structure has changed. Alternatively the configuration file(s) might be damaged.
Q: Is it possible to use RT on a portable device, e.g. a USB thumb drive?
A: Yes it is. As RT does not write anything into the registry (windows) this is a simple task. Simplyedit the file options within the RT applications directory and change the value MultiUser=trueto MultiUser=false. With that no RAWTherapee folder is created within the users HOME dir-ectory. With MultiUser=true for each user a RawTherapee folder will be created within hisHOME directory the first time RT is run.
Q:What is the recommended sequence of image processing operations?
A: The recommended sequence is the same for all image manipulation software. First of all doWhite Balance, then do all the Transform operations if necessary, e.g. Resize, Rotate, Distortion,C/A Correction, Vignetting Correction etc., because these settings influence the image most.Only cropping could be done later. Then do the basic stuff. First correct Exposure and use acurve (or Luminance curve) for more pleasing exposure correction. Now change the Color toyour taste (Color Shift, Color Boost, Channel Mixer etc.). Then check the Shadows/Highlights,do Highlight Recovery where needed. After that do Luminance Noise Reduction (and ColorNoise Reduction where needed). And as very last thing do Sharpening.
Or simply do all operations first that change the image most. And just do Sharpening last!
On the other hand it's always best to get the image right when you're taking the photo. The lessyou have to change within RawTherapee the more details will be kept.
Q:How does the internal workflow of RT look like, i.e. In which order are the changedparameters applied?
A: Following you can see in which order all parameters are applied. The results of some groups ofparameters are cached to speed up processing. Some of those parameters are not done for thepreview image. Those are marked accordingly.
ICM: Conversion to Working Color Space (Input Profile �
Working Profile)Color
RAW JPG/TIFF
Result is cached
ResizeTransf orm
PREVIEW
Result is cached
Rotation
Lens Distortion
C/A Correction
Vignetting CorrectionTransf orm
PREVIEW
Result is cached
Channel MixerColor
Shadows / HighlightsExposure
Exposure & Tone Curve (RGB separate)Exposure
Q:How to create black&white images?
A: This is easy: Go to tab Color, open tool Color Boost then set Amount to -100 and you'll get ablack and white image. You can then use the Channel Mixer to change the image (emphasizespecific areas) to your liking.
Q: How can I restore the current image (reset all settings done)?
A: There are two ways to achieve this: 1. Right click on the thumbnail of the image then selectClear profile 2. Select a postprocessing profile. This will reset all settings you've done to thosesaved in the profile. Ideally choose the one you defined in the settings as default for your imagefile type. You can do this also directly when right clicking on the desired thumbnail and selectingApply profile or Paste profile (when you copied it before).
Conversion to CIELAB Color Space, 16 bit (Working Profile � CIELAB) InternalProcessing
Luminance CurveExposure
Color BoostColor
Color ShiftColor
Luminance Noise ReductionDetail
PREVIEW
SharpeningDetail
PREVIEW
Color Noise ReductionDetail
PREVIEW
ICM: Conversion to Output Color Space (CIELAB � Output Profile)Color
Q:What happens when changing the curve in the Image Processing curve editors ofExposure (called Tone Curve) and Luminance Curve?
A: The curve is a representation for the brightness throughout the whole tonal range. The horizontalaxis represents the brightness of the image itself (left: black, right: white). The vertical axis rep-resents the brightness of the result (bottom: black, top: white). Depending on the channel themanipulation is done with the result might look a bit different. In exposure the change influencesall colors, in luminance curve it only influences the luminance channel. The differences could bebest seen when trying the negative curve example at the end.
A curve like this will brighten the midtones of currently ed-ited image. No clipping will occur.
If you just want to darken the whole image equally use a lin-ear line and just move the top right point down (stay at theright border). No additional clipping will occur then. Movingthe point left will give additional clipping of the highlights.This simply changes the white point.
A curve like this will darken the midtones of the currently ed-ited image. No clipping will occur.
If you just want to brighten the whole image equally use alinear line and just move the bottom left point up (stay at theleft border). No additional clipping will occur then. Movingthe point right will give additional clipping of the shadows.This simply changes the black point.
The classical S-curve will be used most of time. It brightensthe darker areas and darkens the brighter areas. The blackand white point are kept. Thus no clipping occurs.
Such a curve could also be used to simply brighten thedarker areas while keeping the highlights.
The negative curve simply inverts the image.
When using this curve in Exposure the result will look like afilm negative. The colors will be inverted also.
When using this curve in Luminance Curve only the lumin-ance will be inverted, e.g. a bright shade of red will becomea dark shade of red, but it still will stay a shade of red, thecolor will not change!
This effect is hard to describe, simply try it yourself to get afeeling and see the differences in the result.
This curve simply changes the black point of the image. Thecolor value below your setting is then changed to absoluteblack.
This curve simply changes the white point of the image. Thecolor value above your setting is then changed to absolutewhite.
Q:What are the best USM (unsharp mask) settings?
A: Well there is no universal answer. It depends very much on your personal liking. See Sharpeningfor some examples.
Q:What is color management?
A: Color management is a set of software and procedures to obtain predictable colors on any out-put device, e.g. monitors and printers. Each device (camera, scanner, printer, monitor etc.) re-sponds to or produces color differently. A color profile is used to tell how the recorded colors ofan input device, e.g. a camera have to be recalculated to fit into the working color space (Work-ing Profile). You can think of a profile like of a color palette. In fact it is a table that relate numer-ical data, e.g. RGB (211,25,17), to colors expressed in device-independent CIE color spaces (of-ten CIELAB).
The heart of color management is the translation between devices with different gamuts and fileswith different color spaces. The translation between gamuts could happen with different meth-ods: Perceptual, Relative Colorimetric, Absolute Colorimetric, and Saturation. Those methodsare also known as colorimetic intent and are described above.
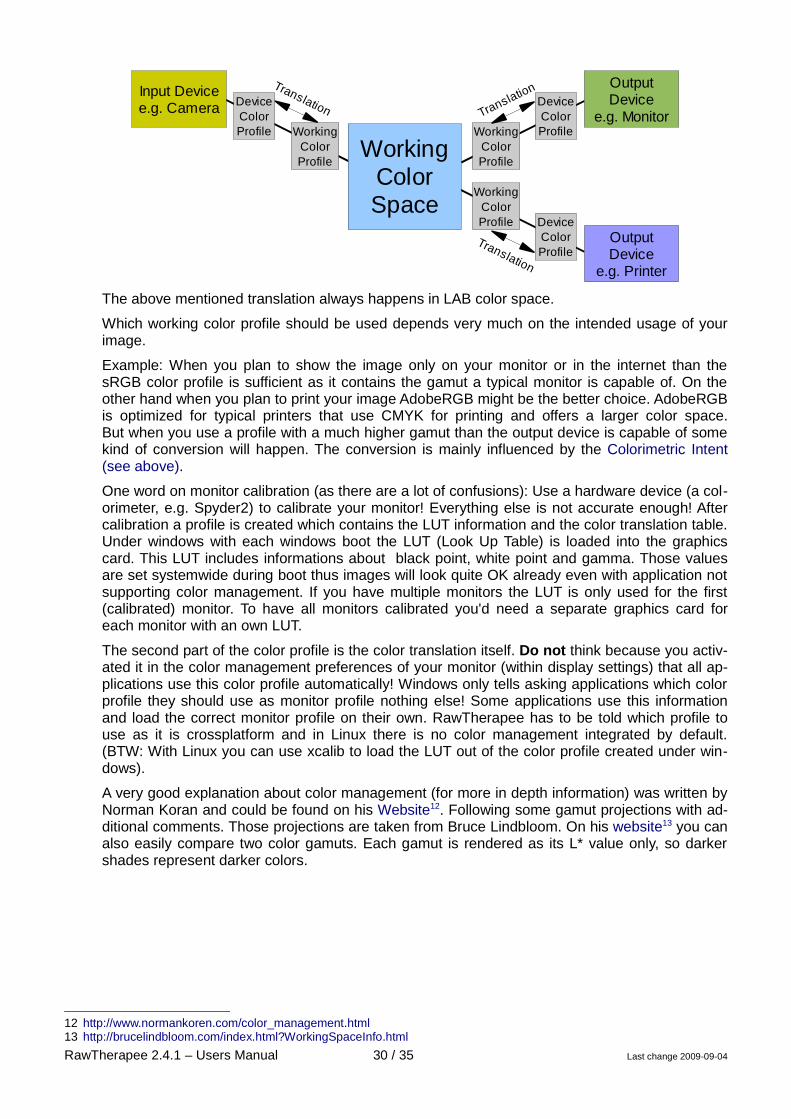
All manipulations to the image are done in the working color space. RawTherapee uses forsome operations the LAB color space that contains all the colors that a human eye can see andtherefore needs no profile for it. For the other operations it works in a RGB-like color space.Here a working color profile is needed which defines the gamut in which your changes are done.Following a small image showing where profiles are used:
The above mentioned translation always happens in LAB color space.
Which working color profile should be used depends very much on the intended usage of yourimage.
Example: When you plan to show the image only on your monitor or in the internet than thesRGB color profile is sufficient as it contains the gamut a typical monitor is capable of. On theother hand when you plan to print your image AdobeRGB might be the better choice. AdobeRGBis optimized for typical printers that use CMYK for printing and offers a larger color space.But when you use a profile with a much higher gamut than the output device is capable of somekind of conversion will happen. The conversion is mainly influenced by the Colorimetric Intent(see above).
One word on monitor calibration (as there are a lot of confusions): Use a hardware device (a col-orimeter, e.g. Spyder2) to calibrate your monitor! Everything else is not accurate enough! Aftercalibration a profile is created which contains the LUT information and the color translation table.Under windows with each windows boot the LUT (Look Up Table) is loaded into the graphicscard. This LUT includes informations about black point, white point and gamma. Those valuesare set systemwide during boot thus images will look quite OK already even with application notsupporting color management. If you have multiple monitors the LUT is only used for the first(calibrated) monitor. To have all monitors calibrated you'd need a separate graphics card foreach monitor with an own LUT.
The second part of the color profile is the color translation itself. Do not think because you activ-ated it in the color management preferences of your monitor (within display settings) that all ap-plications use this color profile automatically! Windows only tells asking applications which colorprofile they should use as monitor profile nothing else! Some applications use this informationand load the correct monitor profile on their own. RawTherapee has to be told which profile touse as it is crossplatform and in Linux there is no color management integrated by default.(BTW: With Linux you can use xcalib to load the LUT out of the color profile created under win-dows).
A very good explanation about color management (for more in depth information) was written byNorman Koran and could be found on his Website12. Following some gamut projections with ad-ditional comments. Those projections are taken from Bruce Lindbloom. On his website13 you canalso easily compare two color gamuts. Each gamut is rendered as its L* value only, so darkershades represent darker colors.
This gamut was especially developed for monitors. There-fore most monitors could display it. There are some special(expensive) monitors that could display more colors. Thisone is used for highest compatibility.
This gamut was developed with the goal to contain most ofthe colors a CMYK color printer could print. Compared tosRGB especially the green tones are improved.
It also contains almost all reflective colors that could befound nowadays. This is a safe, conservative choice for aworking color profile.
This gamut was developed by Kodak with photographic out-put in mind. As you can see there are a lot imaginary colorswhich do not exist and are not visible. When working withthat color profile it is recommended to save your image in16bit to avoid posterization. On the other hand almost thecomplete LAB color space is available. Therefore this profileis often recommended as working profile when working withRAW files.
This is an expanded version of the AdobeRGB.
This gamut was created by Bruce Fraser. It is a comprom-ise between AdobeRGB and ColorMatch RGB (shippedwith Photoshop 5). It was designed with output in mind thuscontains optimal colors for displays and printing.
This gamut was created by Bruce Lindbloom. It was createdto contain as much important colors such as different filmtypes, color charts and printing gamuts.
This gamut is features D-50 white point and gamma 2.2. Itis optimized to cover the gamut of Fujichrome Velvia .
Q: I would like to create an own theme. How can I do that?
A: You can find the themes in the theme directory within the RT installation directory. Looking intothis directory you can find some files. Basically all those files are gtkrc files which control the col-ors and font of the RT GUI. Best starting point is an existing theme which you can copy andchange to your liking. The colors within the theme file are defined with RGB hexadecimal values.Here some starting information:
bg values define the background colors of most widgets.fg values define the foreground colors of most widgets.base values set the background color of lists, editable text boxes, and other widgets.text values set the foreground color of widgets that use base for the background.
For more detailed information about this topic could be found here (see chapter “Styles”):http://library.gnome.org/devel/gtk/stable/gtk-Resource-Files.html
Q:Which keyboard shortcuts are available?
A: Here a list of available keyboard shortcuts:
Key Where? Function
File Browser Load next image file
File Browser Load previous image file
File Browser Move image to the internal trash
+ File Browser Restore image from the internal trash
+ File Browser Mark all images
+ File Browser Copy current Profile
+ File Browser Paste Profile
+ + File Browser Partially Paste Profile
GUI 3-State-Button: Hides/Displays/Maximizes the FileBrowser.
GUI Hides/Displays the Histogram, Postprocessing ProfileSwitcher and the History & Snapshots.
+ History Undo last change
+ + History Redo last change
Toolbar Activate Hand Tool
Toolbar Activate Crop Tool
Toolbar Activate WB Spot Tool
Toolbar Activate Rotate/Straighten Tool
GlossarySources for this glossary are http://www.wikipedia.org and others.
CIELAB This is a color space designed to approximate human vision. Its “L” (Luminance)component closely matches human feeling of lightness. RGB models the output ofphysical devices. The CIELAB color model is used to describe all colors visible to ahuman eye. The “a” and “b” components are opposite colors. This color space isusually much bigger than the gamut of an output device. The “a” channel can bechanged between green and magenta (red). The “b” channel can be changedbetween yellow and blue.
CMYK Cyan, Magenta, Yellow, Key – Another way to create a color. Key is black color. Thisway of representation is normally used by color printers.
Color Gamut is a complete subset of colors. Normally it refers to the subset of colors that could berepresented or displayed by e.g. a monitor or any other output device. You can alsosee it as the sum of the colors found in an image. Changing colors also changes thegamut of that image. For example: a printer is capable of printing colors that couldnot be displayed on the monitor or printed on some other printer. This comes formdifferent techniques used to show the color.
DNG Digital NeGative – Opened RAW format created by Adobe to avoid the proliferationof proprietary formats. DNG is based on the TIFF format, it can include a thumbnailand/or real size JPG preview (not necessarily up-to-date). Some brands, likePENTAX, offer the possibility to capture the picture in their PEF format or in DNGwithout quality loss. A section in the DNG format is still allocated to proprietary data.Another one permits to keep the original RAW data as backup. The presence andthe management of these sections depends on the camera and the image manipula-tion software used.
DSLR Digital Single Lens Reflex – A type of digital camera that is known to take low-noisepictures at high quality. Normally more expensive than some point-and-shoot camer-as you can buy in every electronics store. Also a lens change system is integrated.
EXIF EXchangeable Image File Format – Metadata set designed for digital cameras incor-porated in TIFF files (optional), JPEG files (optional), DNG and some proprietaryRAW formats. Those data contains information about the parameters used at cap-ture time (brand name, model number, focal length, aperture, exposure, image ori-entation, etc.)
HSV Hue, Saturation, Value – a different way to define the color of a pixel (see RGB)
ICC ICC (International Color Consortium) Profiles are normally used to display an imageon your monitor the same way as it will be displayed when being printed on yourprinter (if it also uses a profile. Most printers available nowadays do)
IPTC International Press Telecommunications Council – For images they created a stand-ard which describes how and which additional metadata information may be includedinto the image header. The additional metadata is meant for usage in press to easee.g. sorting and searching for images that contain specific attributes (keywords, cat-egories etc.). This information is integrated into the image file and are always avail-able and cannot get lost by accident. Another way to save those information as extrafile was invented by Apple and is called XMP.
RGB Red, Green, Blue – Theses are the pixel colors used to be combined to a visiblepixel by e.g. monitors. It is used mainly in computer graphics as the humans visualsystem works in a way that is similar - though not quite identical - to an RGB colorspace. The most commonly used color spaces are sRGB and Adobe RGB.
RAW file An image file format that contains the image as exactly taken by the camera sensor.Often those images do have a higher resolution per channel, e.g. 12 bit or newercameras 14 bits. Possible extensions are: CRW, NEF, CR2 etc.