103
ADMINISTRATOR’S GUIDE RealPresence ® Capture Station Pro and Portable Pro Appliances Software 6.6 | February 2014 | 3725-03848-001 Rev B
ADMINISTRATOR’S GUIDE
RealPresence® Capture Station Pro
and Portable Pro Appliances
Software 6.6 | February 2014 | 3725-03848-001 Rev B

Polycom® RealPresence® Capture Station Pro Administrator’s Guide 6.6
Polycom, Inc. 2
Copyright ©2014, Polycom, Inc. All rights reserved. No part of this document may be reproduced, translated into another language or format, or transmitted in any form or by any means, electronic or mechanical, for any purpose, without the express written permission of Polycom, Inc.
6001 America Center Drive San Jose, CA 95002 USA Trademarks
Polycom®, the Polycom logo and the names and marks associated with Polycom products are trademarks and/or
service marks of Polycom, Inc. and are registered and/or common law marks in the United States and various other countries. All other trademarks are property of their respective owners. No portion hereof may be reproduced or transmitted in any form or by any means, for any purpose other than the recipient's personal use, without the express written permission of Polycom. End User License Agreement By installing, copying, or otherwise using this product, you acknowledge that you have read, understand and agree to be bound by the terms and conditions of the End User License Agreement for this product. Patent Information The accompanying product may be protected by one or more U.S. and foreign patents and/or pending patent applications held by Polycom, Inc. Open Source Software Used in this Product This product may contain open source software. You may receive the open source software from Polycom up to three (3) years after the distribution date of the applicable product or software at a charge not greater than the cost to Polycom of shipping or distributing the software to you. To receive software information, as well as the open
source software code used in this product, contact Polycom by e-mail at [email protected]. Disclaimer While Polycom uses reasonable efforts to include accurate and up-to-date information in this document, Polycom makes no warranties or representations as to its accuracy. Polycom assumes no liability or responsibility for any typographical or other errors or omissions in the content of this document. Limitation of Liability Polycom and/or its respective suppliers make no representations about the suitability of the information contained in this document for any purpose. Information is provided “as is” without warranty of any kind and is subject to change without notice. The entire risk arising out of its use remains with the recipient. In no event shall Polycom and/or its respective suppliers be liable for any direct, consequential, incidental, special, punitive or other damages whatsoever (including without limitation, damages for loss of business profits, business interruption, or loss of business information), even if Polycom has been advised of the possibility of such damages. Customer Feedback
We are striving to improve our documentation quality and we appreciate your feedback. E-mail your opinions and comments to [email protected].
Visit the Polycom Support Center for End User License Agreements, software downloads, product documents,
product licenses, troubleshooting tips, service requests, and more.
Polycom, Inc. 3
Contents
About This Guide ........................................................................ 9
Who Should Read This Guide? ................................................................................ 9
Information Elements ............................................................................................... 9
Typographic Conventions ...................................................................................... 10
How This Guide Is Organized ................................................................................ 11
Get Help and Support ............................................................................................. 11
Welcome to the RealPresence Capture Station Pro .............. 14
What’s New in Version 6.6 ...................................................................................... 14
The RealPresence Capture Station Pro Appliances ............................................ 15
New Hardware Features ................................................................................................................. 15 New Software Features in RealPresence Capture Station 6.6 ................................................... 15
Set Up Your RealPresence Capture Station Pro Appliance .. 16
What’s in the Box .................................................................................................... 16
Connect Your RealPresence Capture Station Pro Appliance .................................................... 17
Set Up Your RealPresence Capture Station Portable Pro
Appliance ................................................................................... 19
What’s in the Box .................................................................................................... 19
Connect Your RealPresence Capture Station Portable Pro Appliance ..................................... 20
Activate Your RealPresence Capture Station Pro Software
License ....................................................................................... 23
Activate the Product License Key ......................................................................... 23
Polycom® RealPresence® Capture Station Pro Administrator’s Guide 6.6
Polycom, Inc. 4
Activate Your RealPresence Capture Station Pro Software over the Internet ... 24
Activate Your RealPresence Capture Station Pro Software without an Internet
Connection .............................................................................................................. 25
Set Language Options .............................................................. 28
Configure General Settings ...................................................... 29
Configure the People Capture Source .......................................................................................... 30 Configure Video Thumbnails ......................................................................................................... 32 Set the Content Capture Source ................................................................................................... 33 Set Up Signal Detection for Live Signals ..................................................................................... 35 Set Up Manual Captures ................................................................................................................ 35 Optimize the Capture Card Image Quality Settings .................................................................... 36
Configure Motion Detection ................................................................................... 36
Configure Motion-Detection Settings Using Default Profiles .................................................... 36 Customize, Edit, or Delete Motion-Detection Profiles ................................................................ 37
Configure Image Output Settings .......................................................................... 39
Set the Image Compression Quality ............................................................................................. 39 Trim the Output Images ................................................................................................................. 40
Create a Video-only Presentation .......................................................................... 41
Configure Project Options ..................................................................................... 42
Set Folder Publishing Options ...................................................................................................... 42 Enable the Web Controller ............................................................................................................. 43 Enable the Telnet Controller .......................................................................................................... 44 Configure Project Saving Options ................................................................................................ 45
Configure Interface Options ................................................................................... 46
Skin Options, Layouts, and Features ........................................................................................... 46 Set the Skin ..................................................................................................................................... 49
Configure Chaptering ............................................................................................. 50
Configure Break Options ........................................................................................ 52
Configure Your RealPresence Capture Station Pro for Web
Content ....................................................................................... 54
Polycom, Inc. 5
Configure Web Content Publish Points ................................................................ 54
Configure the Upload Type ............................................................................................................ 55 Configure the Publish Point Manually .......................................................................................... 58
Configure Your RealPresence Capture Station Pro for WMV
VC-1 Smooth Streaming and iOS ............................................ 60
Configure Publish Points for Smooth Streaming and iOS ................................. 60
Manually Configure Publish Points for Smooth Streaming and iOS for RealPresence Media
Manager and MSA ........................................................................................................................... 63
Configure Your RealPresence Capture Station Pro for
Windows Media ......................................................................... 65
Set Publish Points for Streaming Windows Media .............................................. 65
Manually Configure Publish Points for Windows Media for RealPresence Media Manager and
MSA .................................................................................................................................................. 68
Configure Your RealPresence Capture Station Pro for
Podcast Media ........................................................................... 69
Configure Security Settings ..................................................... 71
About Security Profiles .......................................................................................... 71
Create a Security Profile ................................................................................................................ 71 Save a Security Profile ................................................................................................................... 74
Save and Load Settings Files .................................................. 75
Integrate Your RealPresence Capture Station Pro with
RealPresence Media Manager, Software Edition ................... 76
Use the RealPresence Media Manager Wizard for the First Time ...................... 76
Edit the RealPresence Media Manager Wizard Settings after Configuration ..... 80
Control Your RealPresence Capture Station Appliance with RealPresence
Media Manager ........................................................................................................ 84
Polycom® RealPresence® Capture Station Pro Administrator’s Guide 6.6
Polycom, Inc. 6
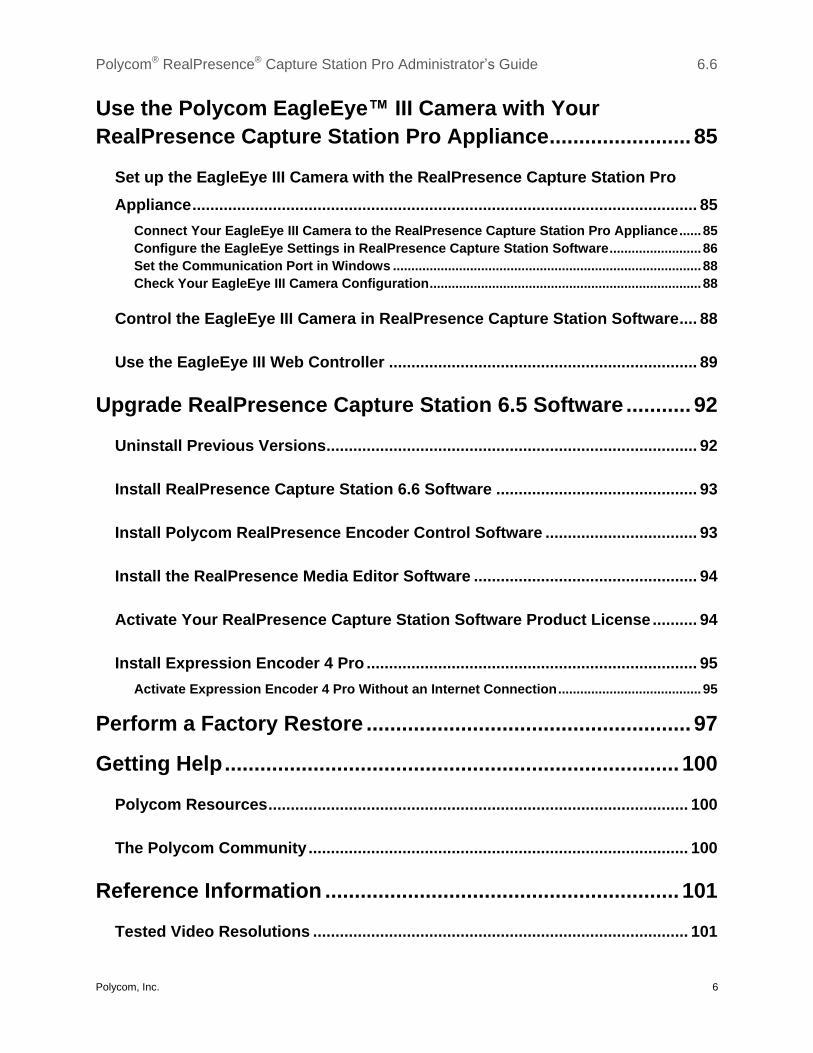
Use the Polycom EagleEye™ III Camera with Your
RealPresence Capture Station Pro Appliance ........................ 85
Set up the EagleEye III Camera with the RealPresence Capture Station Pro
Appliance ................................................................................................................. 85
Connect Your EagleEye III Camera to the RealPresence Capture Station Pro Appliance ...... 85 Configure the EagleEye Settings in RealPresence Capture Station Software ......................... 86 Set the Communication Port in Windows .................................................................................... 88 Check Your EagleEye III Camera Configuration .......................................................................... 88
Control the EagleEye III Camera in RealPresence Capture Station Software .... 88
Use the EagleEye III Web Controller ..................................................................... 89
Upgrade RealPresence Capture Station 6.5 Software ........... 92
Uninstall Previous Versions ................................................................................... 92
Install RealPresence Capture Station 6.6 Software ............................................. 93
Install Polycom RealPresence Encoder Control Software .................................. 93
Install the RealPresence Media Editor Software .................................................. 94
Activate Your RealPresence Capture Station Software Product License .......... 94
Install Expression Encoder 4 Pro .......................................................................... 95
Activate Expression Encoder 4 Pro Without an Internet Connection ....................................... 95
Perform a Factory Restore ....................................................... 97
Getting Help ............................................................................. 100
Polycom Resources .............................................................................................. 100
The Polycom Community ..................................................................................... 100
Reference Information ............................................................ 101
Tested Video Resolutions .................................................................................... 101

Polycom, Inc. 7
Ports and Protocols .............................................................................................. 102

Polycom, Inc. 9
About This Guide
This Polycom® RealPresence
® Capture Station Pro Administrator’s Guide provides instructions for
installing, configuring, and administering the RealPresence Capture Station Pro appliance and the
RealPresence Capture Station Portable Pro appliance. Specifically, this administrators’ guide shows you
how to perform the following tasks:
● Install your RealPresence Capture Station Pro appliance
● Configure your RealPresence Capture Station Pro appliance
● Configure your RealPresence Capture Station Pro appliance for integration with the RealPresence
Media Manager solution
● Record, create, and publish presentations
Who Should Read This Guide? System administrators and network engineers should read this guide to learn how properly to set up the
RealPresence Capture Station Pro and Portable Pro appliances and software. This guide describes
administration-level tasks and is not intended for end users.
Before reading this guide, you should be familiar with the following:
Computer networking and driver administration for your operating system
Microsoft Windows Server 2012 or Windows Server 2008 R2
Media server administration
Microsoft Expression Encoder 4 Pro
Capture cards and video codecs
Information Elements This guide may include any of the following icons to alert you to important information.
Icons Used in this Guide
Name Icon Description
Note
The Note icon highlights information of interest or important information needed
to be successful in accomplishing a procedure or to understand a concept.
Administrator Tip
The Administrator Tip icon highlights techniques, shortcuts, or productivity
related tips.
Caution
The Caution icon highlights information you need to know to avoid a hazard that
could potentially impact device performance, application functionality, or
successful feature configuration.

Polycom® RealPresence® Capture Station Pro Administrator’s Guide 6.6
Polycom, Inc. 10
Name Icon Description
Warning
The Warning icon highlights an action you must perform (or avoid) to prevent
issues that may cause you to lose information or your configuration setup,
and/or affect phone or network performance.
Web Info
The Web Info icon highlights supplementary information available online such
as documents or downloads on support.polycom.com or other locations.
Timesaver
The Timesaver icon highlights a faster or alternative method for accomplishing
a method or operation.
Power Tip
The Power Tip icon highlights faster, alternative procedures for advanced
administrators already familiar with the techniques being discussed.
Troubleshooting
The Troubleshooting icon highlights information that may help you solve a
relevant problem or to refer you to other relevant troubleshooting resources.
Settings
The Settings icon highlights settings you may need to choose for a specific
behavior, to enable a specific feature, or to access customization options.
Typographic Conventions A few typographic conventions, listed next, are used in this guide to distinguish types of in-text
information.
Typographic Conventions
Convention Description
Bold Highlights interface items such as menus, soft keys, file names, and directories.
Also used to represent menu selections and text entry to the phone.
Italics Used to emphasize text, to show example values or inputs, and to show titles of
reference documents available from the Polycom Support Web site and other
reference sites.
Blue Text Used for cross references to other sections within this document and for hyperlinks
to external sites and documents.
Courier Used for code fragments and parameter names.
Polycom® RealPresence® Capture Station Pro Administrator’s Guide 6.6
Polycom, Inc. 11
How This Guide Is Organized This guide is organized into two main parts, Get Started and Configure Your RealPresence Capture
Station Pro Software, each containing multiple sections:
Get Started
Welcome to the RealPresence Capture Station Pro
Set Up Your RealPresence Capture Station Pro Appliance
Set Up Your RealPresence Capture Station Portable Pro Appliance
Activate Your RealPresence Capture Station Software License
Configure Your RealPresence Capture Station Pro Software
Configure General Settings
Configure Your RealPresence Capture Station Pro Appliance for Web Content
Configure Your RealPresence Capture Station Pro Appliance for WMV VC-1 Smooth Streaming and iOS
Configure Your RealPresence Capture Station Pro Appliance for Windows Media
Configure Your RealPresence Capture Station Pro Appliance for Podcast Media
Configure Security Settings
Save and Load Settings Files
Set Language Options
Integrate Your RealPresence Capture Station Pro Appliance with Polycom RealPresence Media Manager Software Edition
Upgrade RealPresence Capture Station Software
Perform a Factory Restore
Reference Information
Get Help and Support If you are looking for help or technical support for your RealPresence Capture Station Pro appliances or
software, or related RealPresence products, the following types of documents are available at the
Polycom Support Center:
Quick Start Guides, which describe how to mount and connect RealPresence appliances
User Guides, which describe both basic and advanced features
Administrators’ Guides, which describe regular administration tasks and more complex
configuration tasks
Integration Guides, which describe integrations with partner solutions such as the Blackboard
Learn platform
Release Notes, which describe the new and changed features and corrected issues in the latest
version of the software
You can find Request for Comments (RFC) documents by entering the RFC number at
http://www.ietf.org/rfc.html.

Polycom® RealPresence® Capture Station Pro Administrator’s Guide 6.6
Polycom, Inc. 12
For support or service, please contact your Polycom reseller or visit support.polycom.com for software downloads, product document, product licenses, troubleshooting tips, service requests, and more.
We are striving to improve the quality of our documentation, and we appreciate your feedback. Please
send your e-mail to [email protected].

Polycom, Inc. 13
Get Started In the following sections, you will learn what’s new in the latest software release, how to set up and
connect your RealPresence Capture Station Pro or Portable Pro appliance, and how to activate the
software using the appropriate license key.
Polycom, Inc. 14
Welcome to the RealPresence Capture
Station Pro
The RealPresence Capture Station Pro is an easy-to-use, room-based appliance that enables
organizations to record and stream presentations from a meeting room, classroom, or auditorium. This
content-creation tool synchronizes audio, video, and presentation slides—instantly creating a feature-rich,
highly polished online multimedia presentation. Whether delivering scalable, secure, and branded
executive webcasts from the studio, automatically streaming lectures from the classroom with live
question-and-answer sessions, or recording training videos, this solution empowers organizations to
create rich media just by clicking Start.
Note: RealPresence Capture Station 6.6 Software and Older Hardware
RealPresence Capture Station 6.6 software supports only the RealPresence Capture Station Pro and Portable Pro appliances.
What’s New in Version 6.6 The RealPresence Capture Station Pro and Portable Pro appliances are new appliances that replace the
outgoing RealPresence Capture Station SD, HD, and Mobile appliances. The Polycom RealPresence
Capture Station Pro and Portable Pro appliances have been completely redesigned for simple, efficient
installation, configuration, and integration with the Polycom RealPresence Media Manager solution. The
appliances are equipped with more powerful processors and a wider choice of input sources, from
standard definition—Separate Video (S-Video), Component, and Video Graphics Array (VGA)—to high
definition—Digital Video Interface (DVI) and High-Definition Multimedia Interface (HDMI). The new
RealPresence Capture Station Pro and Portable Pro appliances are based on Windows Embedded 7,
and they enable organizations of any size to record and stream high-quality multimedia presentations
from any audiovisual (A/V) equipped meeting room, classroom, or auditorium.
The RealPresence Capture Station Pro appliances are preconfigured to work with RealPresence Media
Manager 6.5 or 6.6 software. You can operate the RealPresence Capture Station appliances manually in
the same room as the appliance or remotely using the RealPresence Media Manager software.
In addition to new hardware, RealPresence Capture Station Pro 6.6 software includes many
enhancements, new features, and new software options designed to improve usability, such as the
improved Media Manager Wizard to simplify integration with RealPresence Media Manager software.

Polycom® RealPresence® Capture Station Pro Administrator’s Guide 6.6
Polycom, Inc. 15
The RealPresence Capture Station Pro
Appliances Two appliances are available with version 6.6—the RealPresence Capture Station Pro and RealPresence
Capture Station Portable Pro.
● RealPresence Capture Station Pro This attractive, slimline, desktop or shelf-mount appliance is
similar to other A/V devices such as DVD players.
● RealPresence Capture Station Portable Pro This portable unit has a built-in LCD monitor. Note
that a battery-power option is not available for the RealPresence Capture Station Portable Pro
appliance.
New Hardware Features
Both appliances include the following hardware features:
● Native support for 16x9 widescreen with auto-detect on both the People and Content channels
● Support for the Polycom EagleEye™ III camera
● Support for DVI-I, HDMI, Component Video, VGA, and S-Video input sources on both People and
Content channels
● Support for multiple input resolutions from Standard Definition (SD) to High Definition (HD)
● Preloaded with RealPresence Capture Station 6.6 software
New Software Features in RealPresence Capture Station 6.6
RealPresence Capture Station 6.6 software includes several enhancements over previous versions,
including the following:
● Widescreen local video and audio previews of the People and Content channels
● The People and Content Preview window is now resizable
● Support for the Polycom Eagle Eye III camera, including an integrated web remote in the People
and Content Preview window
● Media Manager Wizard to guide you through configuring integration of RealPresence Capture
Station software and RealPresence Media Manager software
● Standard support for both H.264 and Windows Media VC-1 encoding
● Lite Portal is no longer available as an option.
● RealPresence Media Editor is no longer included with RealPresence Capture Station software.
New customers can purchase a stand-alone license of RealPresence Media Editor software from
their authorized Polycom partner.

Polycom, Inc. 16
Set Up Your RealPresence Capture
Station Pro Appliance
This section shows you how to connect your RealPresence Capture Station Pro appliance to peripheral
devices, your network, and a power supply. If you are setting up a RealPresence Capture Station
Portable Pro appliance, see Set Up Your RealPresence Capture Station Portable Pro Appliance.
What’s in the Box The RealPresence Capture Station Pro includes the following hardware:
● RealPresence Capture Station Pro appliance
● Mini USB keyboard with track pad
● 19V, 6.3A power supply
● CAT5e Ethernet cable
● 1 DVI cable
● 1 HDMI cable
● Adapter kit
● Factory Restore DVD
Connecting the RealPresence Capture Station Pro
Connect all video and network cables to the Capture Station before connecting the DC power supply and powering up the unit.
Polycom® RealPresence® Capture Station Pro Administrator’s Guide 6.6
Polycom, Inc. 17
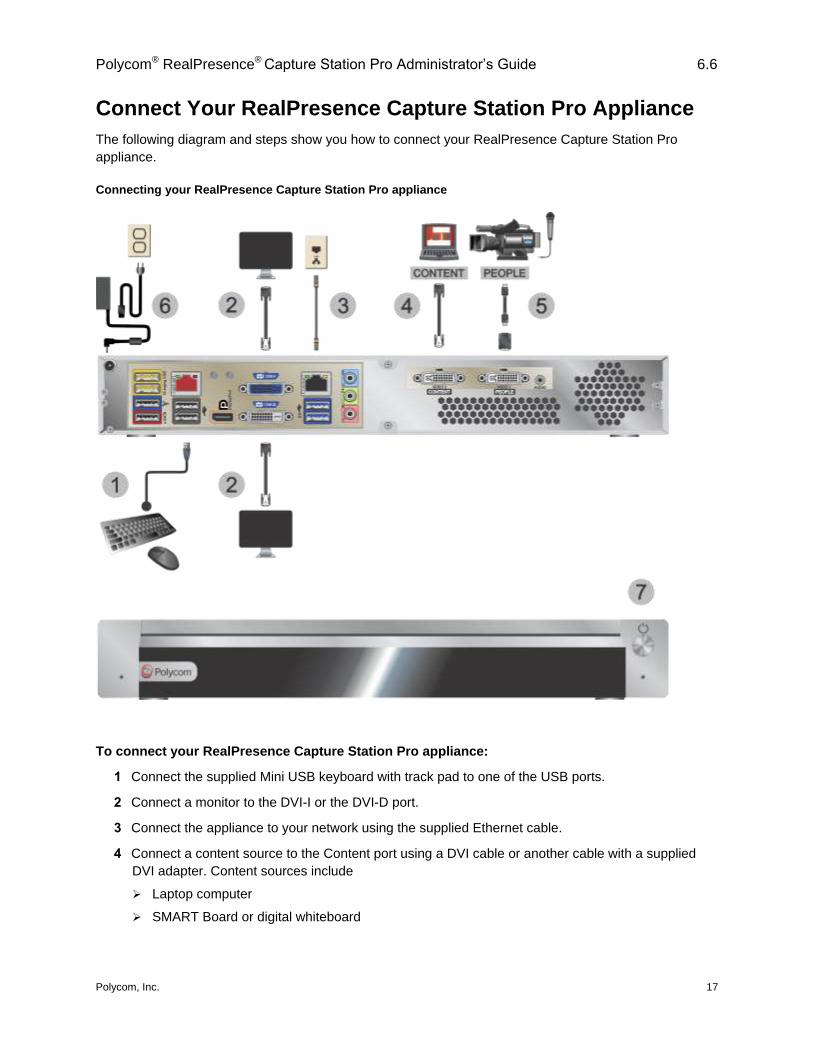
Connect Your RealPresence Capture Station Pro Appliance
The following diagram and steps show you how to connect your RealPresence Capture Station Pro
appliance.
Connecting your RealPresence Capture Station Pro appliance
To connect your RealPresence Capture Station Pro appliance:
1 Connect the supplied Mini USB keyboard with track pad to one of the USB ports.
2 Connect a monitor to the DVI-I or the DVI-D port.
3 Connect the appliance to your network using the supplied Ethernet cable.
4 Connect a content source to the Content port using a DVI cable or another cable with a supplied
DVI adapter. Content sources include
Laptop computer
SMART Board or digital whiteboard

Polycom® RealPresence® Capture Station Pro Administrator’s Guide 6.6
Polycom, Inc. 18
5 Connect a video source, such as a video camera, to the People port using the supplied HDMI cable
with a supplied HDMI-DVI adapter or a DVI cable.
6 Connect the DC power adapter to the appliance and an AC power source.
7 Power on the appliance using the power button on the front panel.
Your RealPresence Capture Station appliance will start up and the RealPresence Capture Station
software will launch. The start screen and End User License Agreement (EULA) will display
automatically. Accept the EULA, and activate the product license key.
Note: Using Copy-protected Sources
The RealPresence Capture Station Pro and Portable Pro devices will not accept copy-protected HDMI sources, commercial DVDs, commercial Blu-ray discs, video games, or the Apple MacBook Pro HDMI output as valid input sources. You will see only color bars when an HDCP-protected content source is connected to either the People or Content input.
Polycom, Inc. 19
Set Up Your RealPresence Capture
Station Portable Pro Appliance
This section shows you how to connect your RealPresence Capture Station Portable Pro appliance to
peripheral devices, your network, and a power supply. If you are setting up a RealPresence Capture
Station Pro appliance, see Set Up Your RealPresence Capture Station Pro Appliance.
What’s in the Box The RealPresence Capture Station Portable Pro includes the following hardware:
● RealPresence Capture Station Portable Pro appliance
● Mini USB keyboard with track pad
● Power cable
● CAT5e Ethernet cable
● 1 DVI cable
● 1 HDMI cable
● Adapter kit
● Factory Restore DVD
Connecting the RealPresence Capture Station Pro
Connect all video and network cables to the Capture Station before connecting the DC power supply and powering up the unit.
Polycom® RealPresence® Capture Station Pro Administrator’s Guide 6.6
Polycom, Inc. 20
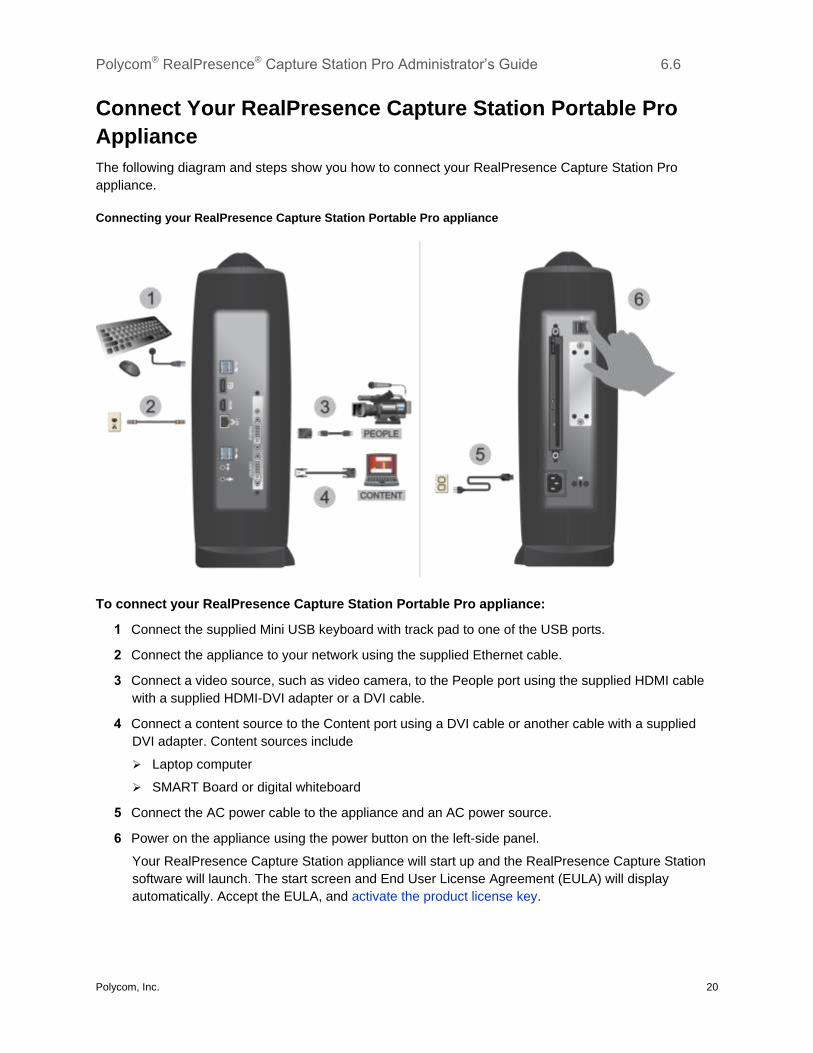
Connect Your RealPresence Capture Station Portable Pro
Appliance
The following diagram and steps show you how to connect your RealPresence Capture Station Pro
appliance.
Connecting your RealPresence Capture Station Portable Pro appliance
To connect your RealPresence Capture Station Portable Pro appliance:
1 Connect the supplied Mini USB keyboard with track pad to one of the USB ports.
2 Connect the appliance to your network using the supplied Ethernet cable.
3 Connect a video source, such as video camera, to the People port using the supplied HDMI cable
with a supplied HDMI-DVI adapter or a DVI cable.
4 Connect a content source to the Content port using a DVI cable or another cable with a supplied
DVI adapter. Content sources include
Laptop computer
SMART Board or digital whiteboard
5 Connect the AC power cable to the appliance and an AC power source.
6 Power on the appliance using the power button on the left-side panel.
Your RealPresence Capture Station appliance will start up and the RealPresence Capture Station
software will launch. The start screen and End User License Agreement (EULA) will display
automatically. Accept the EULA, and activate the product license key.

Polycom® RealPresence® Capture Station Pro Administrator’s Guide 6.6
Polycom, Inc. 21
Note: Using Copy-protected Sources -Protected Sources
The RealPresence Capture Station Pro and Portable Pro devices will not accept copy-protected HDMI sources, commercial DVDs, commercial Blu-ray discs, video games, or the Apple MacBook Pro HDMI output as valid input sources. You will see only color bars when an HDCP-protected content source is connected to either the People or Content input.


Polycom, Inc. 23
Activate Your RealPresence Capture
Station Pro Software License
Your RealPresence Capture Station Pro or Portable Pro appliance includes a free 90-day trial license. To
continue using your appliance after 90 days, you need to activate the software license. The 90-day trial
starts automatically when you start up your RealPresence Capture Station appliance the first time. You
will not be prompted to activate the full license. The following steps guide you through the activation
process.
Activate the Product License Key To activate the RealPresence Capture Station software license, you’ll need the following items:
RealPresence Capture Station appliance serial number
A RealPresence Capture Station Pro or Portable Pro appliance serial number is an auto-generated
number that is connected to a particular appliance. The serial number cannot be transferred to
other RealPresence Capture Station software installations on other appliances. You access the
RealPresence Capture Station appliance serial number on the serial number label on the exterior of
the appliance. You will need the serial number to obtain an activation key from Polycom Support.
Polycom Software License code
You received a Polycom Software License code when you purchased your RealPresence Capture
Station appliance and/or software license. Refer to your software license for the code. You will
need the code to obtain an activation key from Polycom Support.
Activation key
An activation key is generated by Polycom Support. To obtain the activation key, you need to enter
your RealPresence Capture Station appliance serial number and Polycom Software License code
through the Polycom Support portal. Then you can enter the activation key into the RealPresence
Capture Station software’s License Details page, which will activate the license.
User Tip: Record the Serial Number, License Code, and Activation Key
Store the RealPresence Capture Station appliance serial number, Polycom Software License code, and activation key in a safe location for future reference. You may need to provide the information to Polycom Support if you experience issues with the RealPresence Capture Station appliance or software.
To obtain your license activation key:
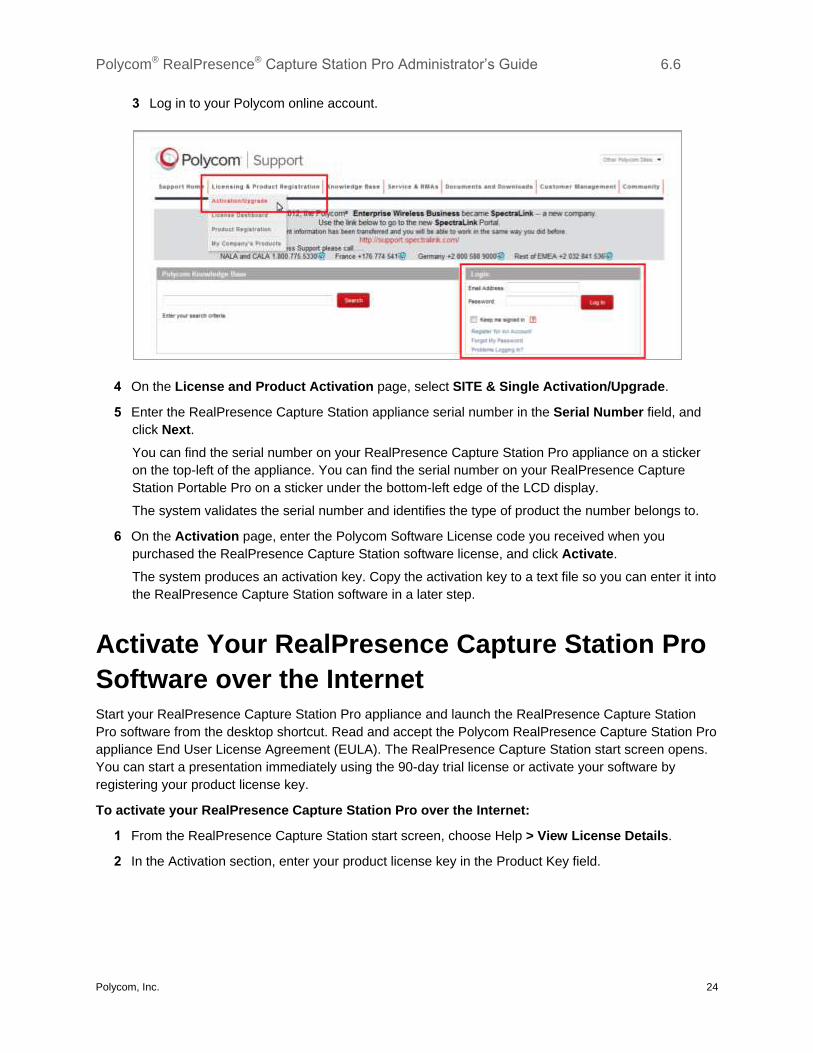
1 Using an Internet browser, visit Polycom Support at http://support.polycom.com.
2 From the Licensing & Product Registration menu, select Activation/Upgrade.
Polycom® RealPresence® Capture Station Pro Administrator’s Guide 6.6
Polycom, Inc. 24
3 Log in to your Polycom online account.
4 On the License and Product Activation page, select SITE & Single Activation/Upgrade.
5 Enter the RealPresence Capture Station appliance serial number in the Serial Number field, and
click Next.
You can find the serial number on your RealPresence Capture Station Pro appliance on a sticker
on the top-left of the appliance. You can find the serial number on your RealPresence Capture
Station Portable Pro on a sticker under the bottom-left edge of the LCD display.
The system validates the serial number and identifies the type of product the number belongs to.
6 On the Activation page, enter the Polycom Software License code you received when you
purchased the RealPresence Capture Station software license, and click Activate.
The system produces an activation key. Copy the activation key to a text file so you can enter it into
the RealPresence Capture Station software in a later step.
Activate Your RealPresence Capture Station Pro
Software over the Internet Start your RealPresence Capture Station Pro appliance and launch the RealPresence Capture Station
Pro software from the desktop shortcut. Read and accept the Polycom RealPresence Capture Station Pro
appliance End User License Agreement (EULA). The RealPresence Capture Station start screen opens.
You can start a presentation immediately using the 90-day trial license or activate your software by
registering your product license key.
To activate your RealPresence Capture Station Pro over the Internet:
1 From the RealPresence Capture Station start screen, choose Help > View License Details.
2 In the Activation section, enter your product license key in the Product Key field.

Polycom® RealPresence® Capture Station Pro Administrator’s Guide 6.6
Polycom, Inc. 25
3 Click the Activate via Internet button, as shown.
Activating RealPresence Capture Station Pro over the Internet
Note: Internet Connectivity
The RealPresence Capture Station Pro appliance is shipped preconfigured for DHCP and in most networks will automatically access the Internet. If DHCP is not enabled on your network, see your network administrator to configure your operating system’s IP address, gateway, DNS servers, and proxy for Internet connectivity manually.
Activate Your RealPresence Capture Station Pro
Software without an Internet Connection If you need to activate your RealPresence Capture Station Pro or Portable Pro appliance and the
appliance is not connected to the Internet, you can export a machine code file and e-mail it to Polycom
Support. A Support technician will generate the activation key and send it back to you.
To activate your appliance without an Internet connection:
1 From the RealPresence Capture Station start screen, choose Help > View License Details.

Polycom® RealPresence® Capture Station Pro Administrator’s Guide 6.6
Polycom, Inc. 26
2 In the Activation section, click the Export Machine Code button, as shown.
Activating RealPresence Capture Station Pro without Internet
3 Save the .c2v file with a descriptive filename in the location of your choice.
4 From a computer with Internet access, visit Polycom Support at http://support.polycom.com. On the
License and Product Activation page, log in to your Polycom account and follow the .c2v license
activation procedure.
A Polycom Support technician will generate a license file and e-mail it to you. Copy the product key
file to the RealPresence Capture Station Pro or Portable Pro appliance.
5 In the RealPresence Capture Station software start screen, choose Help > View License Details.
6 Click the Import License File button. Browse to the license file you received from Polycom Support
and click Open. Your RealPresence Capture Station software activates.
Polycom, Inc. 27
Configure Your
RealPresence Capture
Station Software Your RealPresence Capture Station Pro or Portable Pro appliance can record and publish a presentation
immediately after activation using its default settings. To maximize its capabilities and tailor the software
to your organization’s needs, configure the Advanced Settings.
Once you configure all the settings, you can save a Settings File from the Advanced Settings screen, or
load an existing Settings File created on any RealPresence Capture Station Pro 6.6 or 6.5 appliance or
RealPresence Capture Station 6.0 appliance.

Polycom, Inc. 28
Set Language Options
You can set the language and locale to your desired local language. The default setting is English (United
States).
To set the language:
1 Choose Edit > Language.
2 Choose your preferred language from the Choose a language drop-down list, as shown.
3 Choose your preferred locale from the Choose a locale drop-down list.
4 Click OK.
Polycom, Inc. 29
Configure General Settings
After you have connected your RealPresence Capture Station Pro appliance and launched the
application, configure the video and audio input and output settings, image quality settings, and capture
parameters in the Advanced Settings dialog. These settings are located in the General menu, including
pages for People Capture, Content Capture, Project Options, and Interface Options.
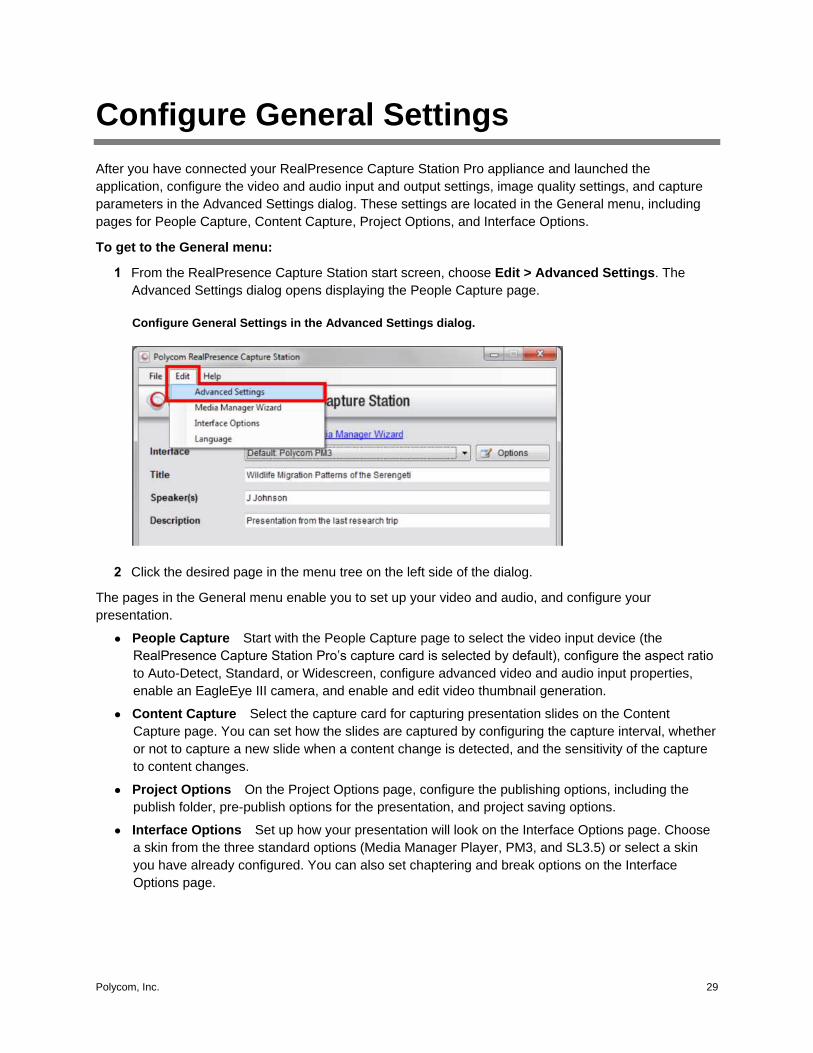
To get to the General menu:
1 From the RealPresence Capture Station start screen, choose Edit > Advanced Settings. The
Advanced Settings dialog opens displaying the People Capture page.
Configure General Settings in the Advanced Settings dialog.
2 Click the desired page in the menu tree on the left side of the dialog.
The pages in the General menu enable you to set up your video and audio, and configure your
presentation.
● People Capture Start with the People Capture page to select the video input device (the
RealPresence Capture Station Pro’s capture card is selected by default), configure the aspect ratio
to Auto-Detect, Standard, or Widescreen, configure advanced video and audio input properties,
enable an EagleEye III camera, and enable and edit video thumbnail generation.
● Content Capture Select the capture card for capturing presentation slides on the Content
Capture page. You can set how the slides are captured by configuring the capture interval, whether
or not to capture a new slide when a content change is detected, and the sensitivity of the capture
to content changes.
● Project Options On the Project Options page, configure the publishing options, including the
publish folder, pre-publish options for the presentation, and project saving options.
● Interface Options Set up how your presentation will look on the Interface Options page. Choose
a skin from the three standard options (Media Manager Player, PM3, and SL3.5) or select a skin
you have already configured. You can also set chaptering and break options on the Interface
Options page.

Polycom® RealPresence® Capture Station Pro Administrator’s Guide 6.6
Polycom, Inc. 30
Configure the People Capture Source
Configure the People Capture source settings, including selecting the video device, setting the aspect
ratio, and connecting to a Polycom Eagle Eye III camera, from the start screen.
To configure the People Capture source:
1 From the start screen, choose Edit > Advanced Settings.
2 On the left side of the screen, under General, click People Capture.
3 In the People Preview Source section, shown next, select the Video Device from the drop-down
list. For example, select Osprey-230 Video Device 1.1, as shown.
4 Select an Audio Device from the drop-down list. Click the Properties button to configure additional
audio settings or use the default settings.
Select video and audio devices
5 From the Aspect drop-down list, select Auto-Detect, Standard, or Widescreen.
Auto-Detect The RealPresence Capture Station software automatically detects the aspect ratio
of the input source, such as the camera. RealPresence Capture Station software automatically
selects the related standard or widescreen encoding profile.
Standard The Standard aspect ratio is 4:3. To use this setting, set your camera’s aspect ratio to
4:3. 4:3 can also be indicated as 1.33 or 1.33:1. This setting forces the encoding profile and skin to
use the standard aspect ratio.

Polycom® RealPresence® Capture Station Pro Administrator’s Guide 6.6
Polycom, Inc. 31
Widescreen The Widescreen aspect ratio is 16:9. To use this setting, set your camera’s aspect
ratio to 16:9. 16:9 can also be indicated as 1.78 or 1.78:1. This setting forces the encoding profile
and skin to use the widescreen aspect ratio.
Choosing an aspect ratio for the video device
6 Click the Properties button to configure other settings in the Properties dialog (shown next),
including Video Decoder, Video Decoder, Input Detect, Diagnostics, Closed Caption,
Cropping and more.
7 If you are using a Polycom EagleEye III camera, in the EagleEye Options section, select the
Display EagleEye Camera Controls in Sources Window check box.
Polycom® RealPresence® Capture Station Pro Administrator’s Guide 6.6
Polycom, Inc. 32
8 From the Communication Port drop-down list, select the com port you are using. For example,
select COM 4.
For more information, see Use the Polycom EagleEye III Camera with Your RealPresence Capture
Station Pro Appliance.
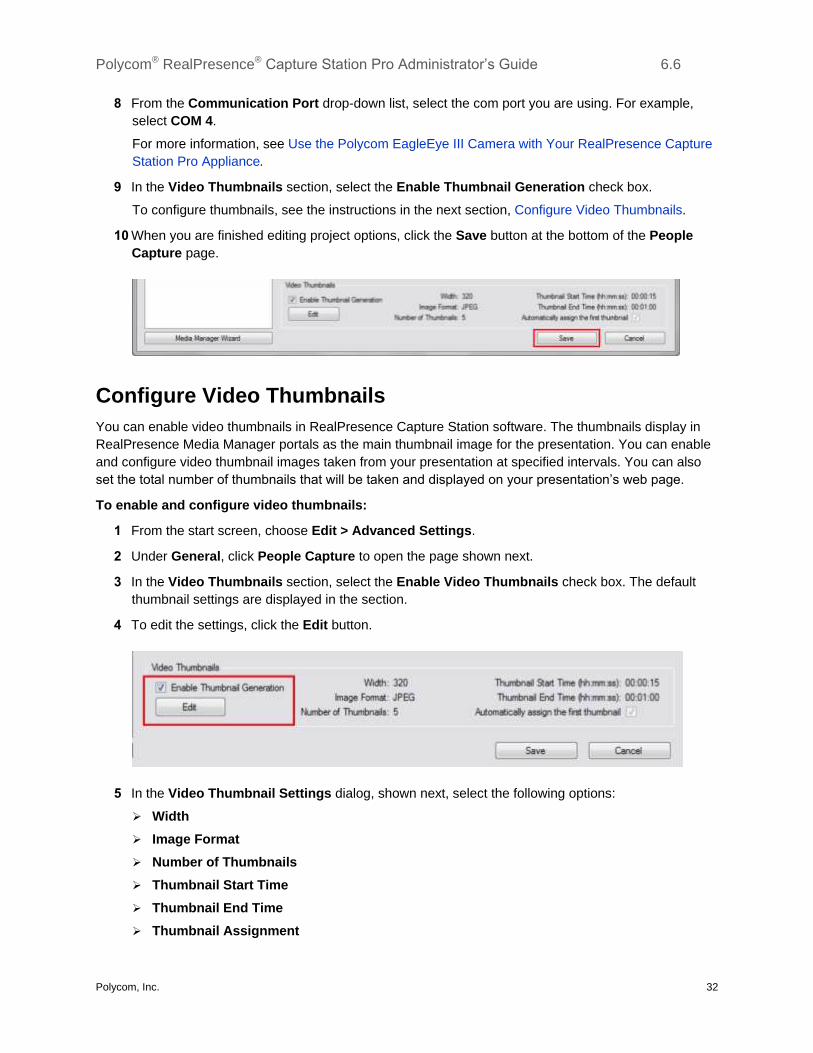
9 In the Video Thumbnails section, select the Enable Thumbnail Generation check box.
To configure thumbnails, see the instructions in the next section, Configure Video Thumbnails.
10 When you are finished editing project options, click the Save button at the bottom of the People
Capture page.
Configure Video Thumbnails
You can enable video thumbnails in RealPresence Capture Station software. The thumbnails display in
RealPresence Media Manager portals as the main thumbnail image for the presentation. You can enable
and configure video thumbnail images taken from your presentation at specified intervals. You can also
set the total number of thumbnails that will be taken and displayed on your presentation’s web page.
To enable and configure video thumbnails:
1 From the start screen, choose Edit > Advanced Settings.
2 Under General, click People Capture to open the page shown next.
3 In the Video Thumbnails section, select the Enable Video Thumbnails check box. The default
thumbnail settings are displayed in the section.
4 To edit the settings, click the Edit button.
5 In the Video Thumbnail Settings dialog, shown next, select the following options:
Width
Image Format
Number of Thumbnails
Thumbnail Start Time
Thumbnail End Time
Thumbnail Assignment

Polycom® RealPresence® Capture Station Pro Administrator’s Guide 6.6
Polycom, Inc. 33
Selecting video thumbnail settings
6 Click Save.
7 On the People Capture page, click Save when you are finished editing People Capture settings.
Set the Content Capture Source
The device is the laptop or desktop computer from which screen images are captured by the
RealPresence Capture Station Pro appliance. These images are combined with the video and audio
sources in a presentation.
To configure the Content Capture source:
1 From the start screen, choose Edit > Advanced Settings.
2 Under General, click Content Capture.
3 In the Capture Device section, select a Video Device from the drop-down list.

Polycom® RealPresence® Capture Station Pro Administrator’s Guide 6.6
Polycom, Inc. 34
Select a capture device
4 From the Aspect drop-down list, select Auto-Detect, Standard, or Widescreen.
Auto-Detect The RealPresence Capture Station software automatically detects the aspect ratio
of the input source, such as the camera.
Standard The Standard aspect ratio is 4:3. Use this setting for content with an aspect ratio of 4:3.
4:3 can also be indicated as 1.33 or 1.33:1.
Widescreen The Widescreen aspect ratio is 16:9. Use this setting for content with an aspect ratio
of 16:9. 16:9 can also be indicated as 1.78 or 1.78:1.
5 Set the Capture Interval in seconds. The default is 3 seconds, which means the RealPresence
Capture Station Pro appliance captures a screen in your presentation every 3 seconds, or if Motion
Detection is enabled, the appliance will scan for motion every 3 seconds.
6 In the Out-of-Band Sync Delay section, enter a value in seconds for Desktop systems and Mobile
systems. The default values are 60 seconds for desktop and 35 seconds for mobile.
Admin Tip: Setting the Out-of-Band Sync Delay
The Out-of-Band Sync Delay setting is the amount of time that Microsoft Expression Encoder uses to
buffer and play content before receiving a synced slide while viewing a presentation. For best results,
set the value to 60 seconds or 35 seconds for mobile. Setting the value to 0 seconds disables this
feature.
Polycom® RealPresence® Capture Station Pro Administrator’s Guide 6.6
Polycom, Inc. 35
Set Up Signal Detection for Live Signals
If you are sending a live signal to the RealPresence Capture Station Pro appliance, you can set the
appliance to detect the signal and prevent starting a presentation unless the live signal is present. If
you clear the Enable Signal Detection check box, you can start a presentation with no signal
present. With the Enable Signal Detection check box either selected or cleared, the RealPresence
Capture Station Pro appliance will continually scan for a signal and capture slides when it detects a
signal. The Enable Signal Detection check box is cleared by default.
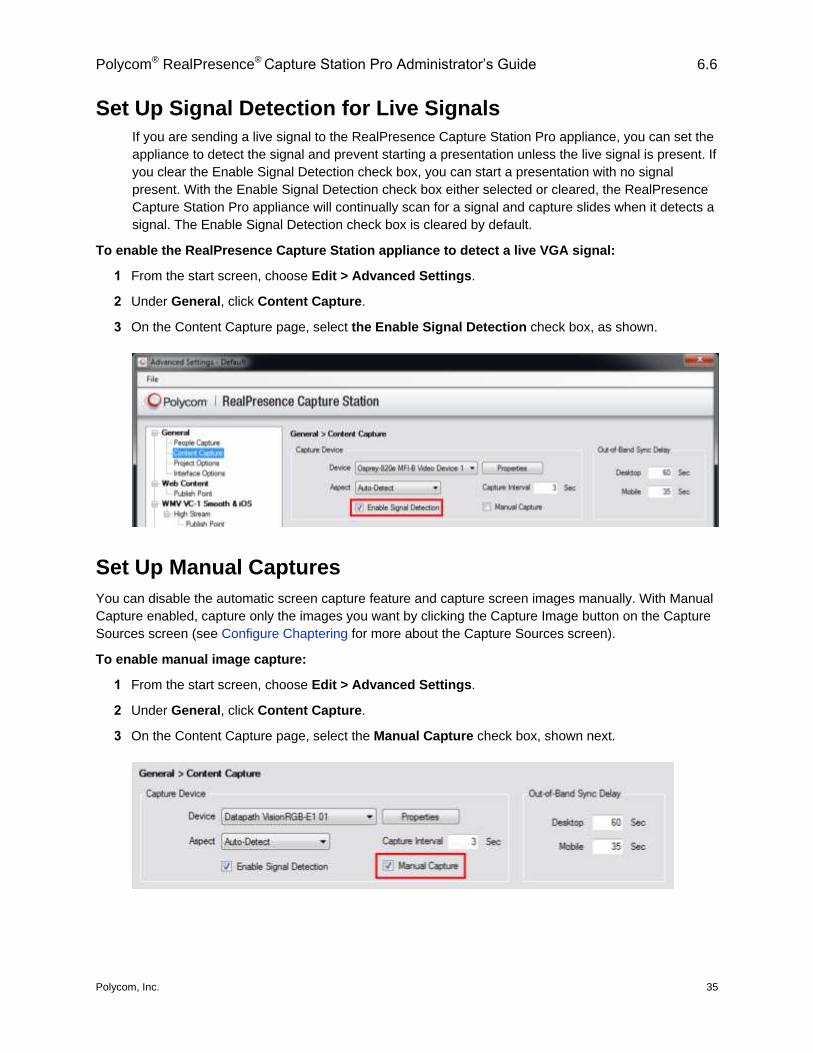
To enable the RealPresence Capture Station appliance to detect a live VGA signal:
1 From the start screen, choose Edit > Advanced Settings.
2 Under General, click Content Capture.
3 On the Content Capture page, select the Enable Signal Detection check box, as shown.
Set Up Manual Captures
You can disable the automatic screen capture feature and capture screen images manually. With Manual
Capture enabled, capture only the images you want by clicking the Capture Image button on the Capture
Sources screen (see Configure Chaptering for more about the Capture Sources screen).
To enable manual image capture:
1 From the start screen, choose Edit > Advanced Settings.
2 Under General, click Content Capture.
3 On the Content Capture page, select the Manual Capture check box, shown next.
Polycom® RealPresence® Capture Station Pro Administrator’s Guide 6.6
Polycom, Inc. 36
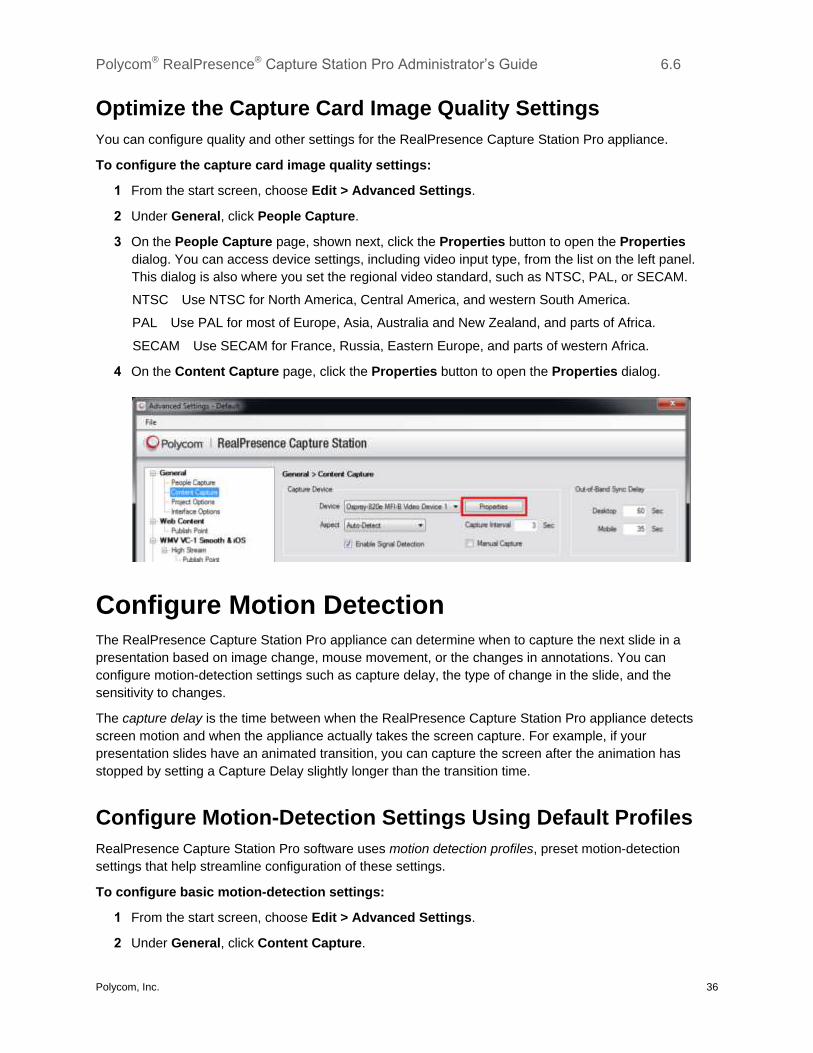
Optimize the Capture Card Image Quality Settings
You can configure quality and other settings for the RealPresence Capture Station Pro appliance.
To configure the capture card image quality settings:
1 From the start screen, choose Edit > Advanced Settings.
2 Under General, click People Capture.
3 On the People Capture page, shown next, click the Properties button to open the Properties
dialog. You can access device settings, including video input type, from the list on the left panel.
This dialog is also where you set the regional video standard, such as NTSC, PAL, or SECAM.
NTSC Use NTSC for North America, Central America, and western South America.
PAL Use PAL for most of Europe, Asia, Australia and New Zealand, and parts of Africa.
SECAM Use SECAM for France, Russia, Eastern Europe, and parts of western Africa.
4 On the Content Capture page, click the Properties button to open the Properties dialog.
Configure Motion Detection The RealPresence Capture Station Pro appliance can determine when to capture the next slide in a
presentation based on image change, mouse movement, or the changes in annotations. You can
configure motion-detection settings such as capture delay, the type of change in the slide, and the
sensitivity to changes.
The capture delay is the time between when the RealPresence Capture Station Pro appliance detects
screen motion and when the appliance actually takes the screen capture. For example, if your
presentation slides have an animated transition, you can capture the screen after the animation has
stopped by setting a Capture Delay slightly longer than the transition time.
Configure Motion-Detection Settings Using Default Profiles
RealPresence Capture Station Pro software uses motion detection profiles, preset motion-detection
settings that help streamline configuration of these settings.
To configure basic motion-detection settings:
1 From the start screen, choose Edit > Advanced Settings.
2 Under General, click Content Capture.
Polycom® RealPresence® Capture Station Pro Administrator’s Guide 6.6
Polycom, Inc. 37
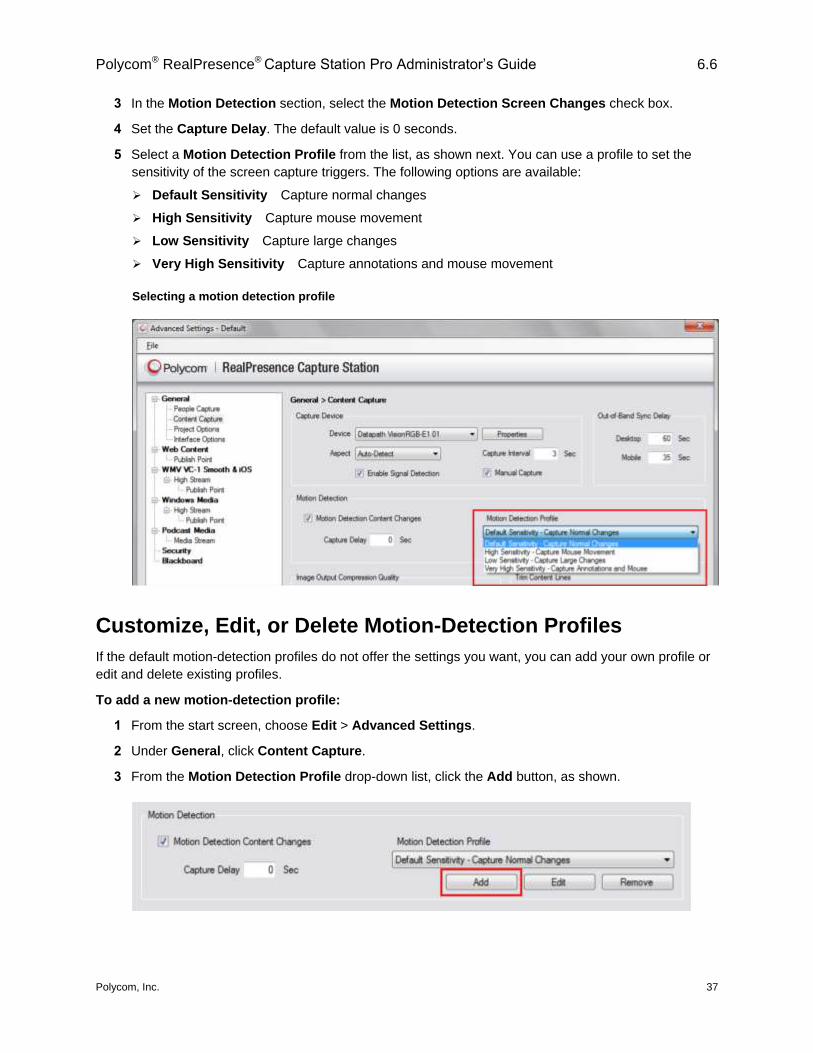
3 In the Motion Detection section, select the Motion Detection Screen Changes check box.
4 Set the Capture Delay. The default value is 0 seconds.
5 Select a Motion Detection Profile from the list, as shown next. You can use a profile to set the
sensitivity of the screen capture triggers. The following options are available:
Default Sensitivity Capture normal changes
High Sensitivity Capture mouse movement
Low Sensitivity Capture large changes
Very High Sensitivity Capture annotations and mouse movement
Selecting a motion detection profile
Customize, Edit, or Delete Motion-Detection Profiles
If the default motion-detection profiles do not offer the settings you want, you can add your own profile or
edit and delete existing profiles.
To add a new motion-detection profile:
1 From the start screen, choose Edit > Advanced Settings.
2 Under General, click Content Capture.
3 From the Motion Detection Profile drop-down list, click the Add button, as shown.
Polycom® RealPresence® Capture Station Pro Administrator’s Guide 6.6
Polycom, Inc. 38
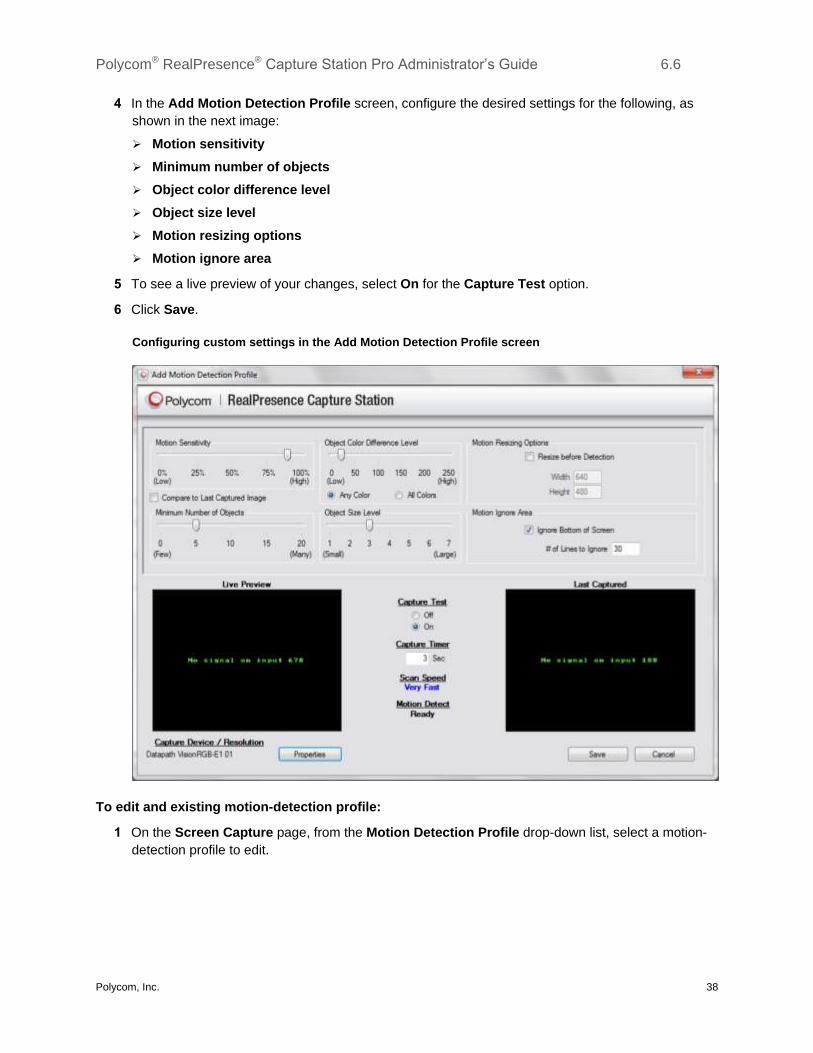
4 In the Add Motion Detection Profile screen, configure the desired settings for the following, as
shown in the next image:
Motion sensitivity
Minimum number of objects
Object color difference level
Object size level
Motion resizing options
Motion ignore area
5 To see a live preview of your changes, select On for the Capture Test option.
6 Click Save.
Configuring custom settings in the Add Motion Detection Profile screen
To edit and existing motion-detection profile:
1 On the Screen Capture page, from the Motion Detection Profile drop-down list, select a motion-
detection profile to edit.
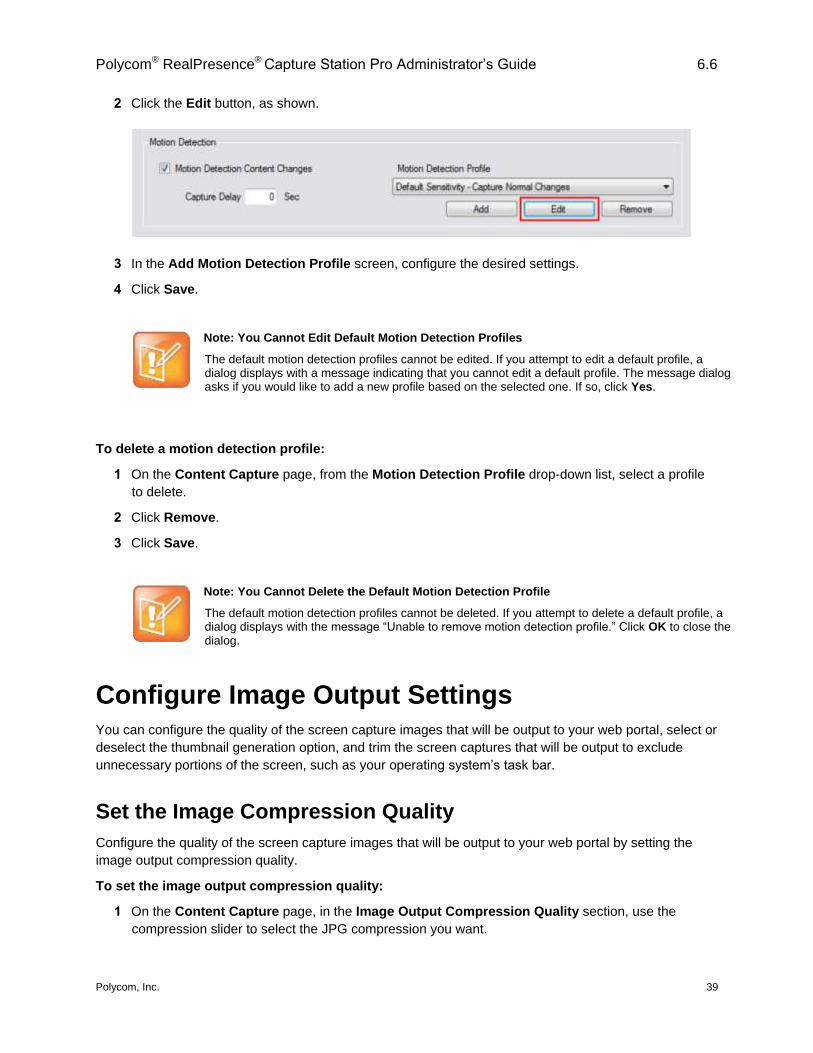
Polycom® RealPresence® Capture Station Pro Administrator’s Guide 6.6
Polycom, Inc. 39
2 Click the Edit button, as shown.
3 In the Add Motion Detection Profile screen, configure the desired settings.
4 Click Save.
Note: You Cannot Edit Default Motion Detection Profiles
The default motion detection profiles cannot be edited. If you attempt to edit a default profile, a dialog displays with a message indicating that you cannot edit a default profile. The message dialog asks if you would like to add a new profile based on the selected one. If so, click Yes.
To delete a motion detection profile:
1 On the Content Capture page, from the Motion Detection Profile drop-down list, select a profile
to delete.
2 Click Remove.
3 Click Save.
Note: You Cannot Delete the Default Motion Detection Profile
The default motion detection profiles cannot be deleted. If you attempt to delete a default profile, a dialog displays with the message “Unable to remove motion detection profile.” Click OK to close the dialog.
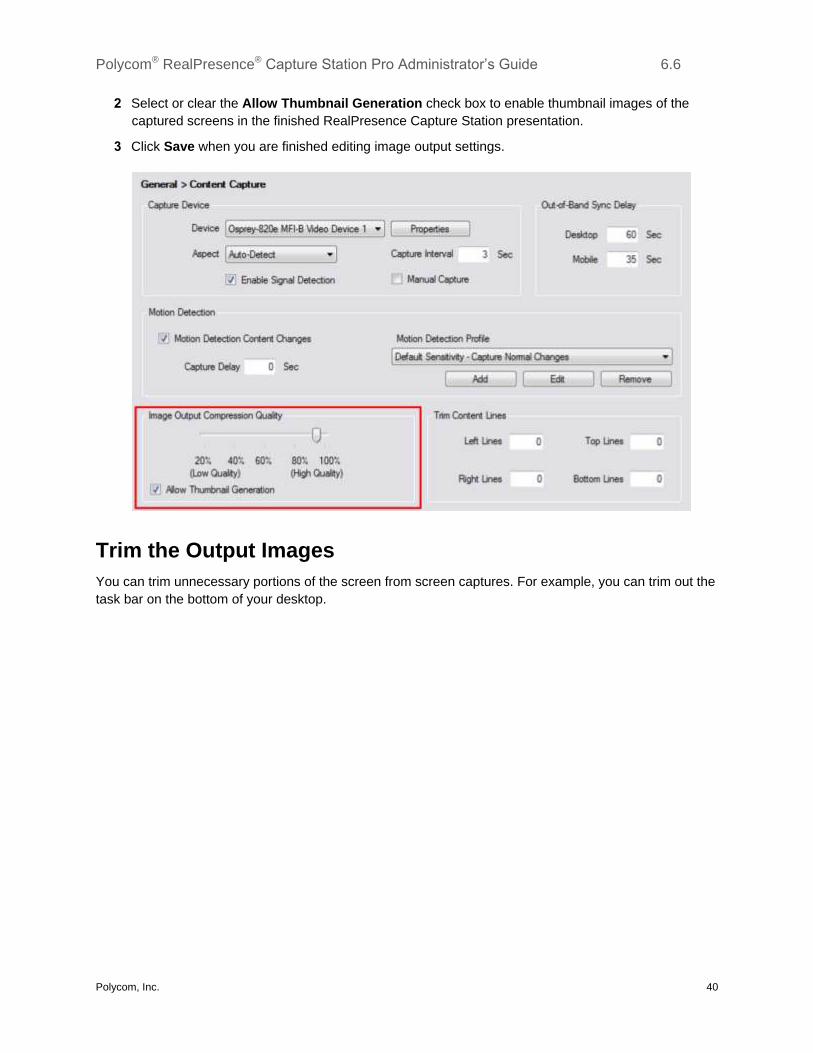
Configure Image Output Settings You can configure the quality of the screen capture images that will be output to your web portal, select or
deselect the thumbnail generation option, and trim the screen captures that will be output to exclude
unnecessary portions of the screen, such as your operating system’s task bar.
Set the Image Compression Quality
Configure the quality of the screen capture images that will be output to your web portal by setting the
image output compression quality.
To set the image output compression quality:
1 On the Content Capture page, in the Image Output Compression Quality section, use the
compression slider to select the JPG compression you want.
Polycom® RealPresence® Capture Station Pro Administrator’s Guide 6.6
Polycom, Inc. 40
2 Select or clear the Allow Thumbnail Generation check box to enable thumbnail images of the
captured screens in the finished RealPresence Capture Station presentation.
3 Click Save when you are finished editing image output settings.
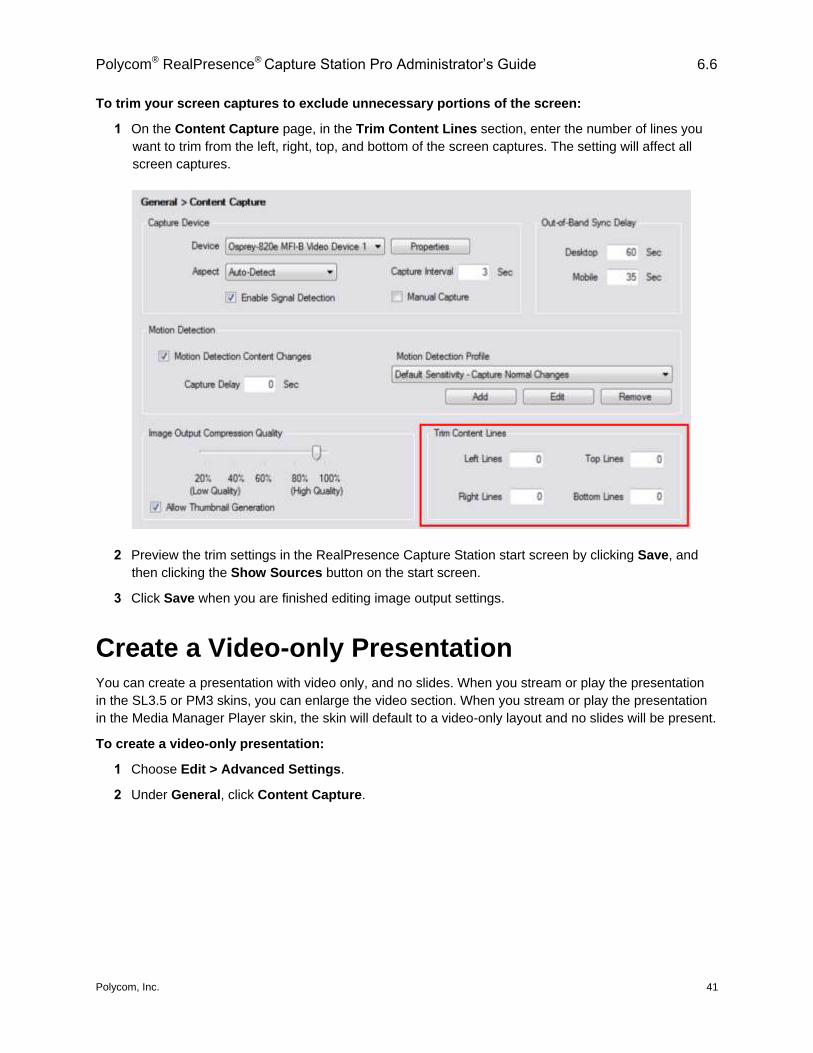
Trim the Output Images
You can trim unnecessary portions of the screen from screen captures. For example, you can trim out the
task bar on the bottom of your desktop.
Polycom® RealPresence® Capture Station Pro Administrator’s Guide 6.6
Polycom, Inc. 41
To trim your screen captures to exclude unnecessary portions of the screen:
1 On the Content Capture page, in the Trim Content Lines section, enter the number of lines you
want to trim from the left, right, top, and bottom of the screen captures. The setting will affect all
screen captures.
2 Preview the trim settings in the RealPresence Capture Station start screen by clicking Save, and
then clicking the Show Sources button on the start screen.
3 Click Save when you are finished editing image output settings.
Create a Video-only Presentation You can create a presentation with video only, and no slides. When you stream or play the presentation
in the SL3.5 or PM3 skins, you can enlarge the video section. When you stream or play the presentation
in the Media Manager Player skin, the skin will default to a video-only layout and no slides will be present.
To create a video-only presentation:
1 Choose Edit > Advanced Settings.
2 Under General, click Content Capture.

Polycom® RealPresence® Capture Station Pro Administrator’s Guide 6.6
Polycom, Inc. 42
3 In the Capture Device section, from the Device drop-down list, select None.
4 Click Save.
The RealPresence Capture Station Pro appliance will not capture content such as presentation
slides or images over the Content channel. The Capture Device/Resolution displays as “None” on
the Capture Sources screen.
Configure Project Options On the Project Options page, you can configure folder publishing options, Web Controller options, Telnet
Controller options, and project file saving.
Set Folder Publishing Options
Your presentation files, including skins, script files, presentation properties, and descriptive XML—all of
the files needed to construct the web page that displays the presentation—are stored in project folders.
You can use default automatic folder publishing to store the files in an automatically named folder when
you click the Start Presentation button. You can also enter folder naming information manually and pre-
publish your content before starting the presentation. This enables you to give your presentation a custom
name, determine the URL used when the presentation starts, and share an invitation to the presentation
with viewers.
To set folder publishing options:
1 From the start screen, choose Edit > Advanced Settings.
2 Under General, click Project Options.
3 In the Publish Folder Name section, shown next, select an option:
Automatic Your presentations are automatically saved in a folder that uses the date and time
in the folder name according to the following naming convention: YYYYMMDD-HHMMSS-
StationFolderID.

Polycom® RealPresence® Capture Station Pro Administrator’s Guide 6.6
Polycom, Inc. 43
Manual / Pre-Publish Your presentations are saved into a folder that you name, and
optionally pre-publish, before you start the presentation.
4 In the Capture Station section, enter a unique Station Folder ID. You can use any alphanumeric
text that identifies and describes the RealPresence Capture Station appliance used to create the
presentation.
5 Enter the Station ID, a unique ID assigned to each RealPresence Capture Station Pro appliance
(see the following Admin Tip). Note that you cannot change the Station ID. To copy the Station ID
if, for example, you want to paste the Station ID manually into RealPresence Media Manager
software, click .
6 Click Save when you are finished editing project options.
Admin Tip: Using Station Folder IDs
Use descriptive station IDs to help identify RealPresence Capture Station appliances when they are being controlled from RealPresence Media Manager software. For example, use a station ID such as Room101 to identify a RealPresence Capture Station appliance in room 101, and differentiate it from an appliance in another room.
Enable the Web Controller
You can use the Web Controller feature to control the RealPresence Capture Station appliance from a
web browser, using the URL and port number. For example, once enabled, you could control the
RealPresence Capture Station appliance by entering the URL for the localhost, http://127.0.0.1:81/, in the
address bar of a web browser. You can access the RealPresence Capture Station appliance using the
machine’s IP address or a Fully Qualified Domain Name (FQDN).

Polycom® RealPresence® Capture Station Pro Administrator’s Guide 6.6
Polycom, Inc. 44
To enable the Web Controller:
1 In the Web Controller section of the Project Options page, select the Web Controller Enabled
check box.
2 Enter a port number, or keep the default port number, 81.
3 Click Save when you are finished editing project options.
Enable the Telnet Controller
You can enable the Telnet Controller feature to control the RealPresence Capture Station using a
Crestron or AMX device in an existing room control system. See the RealPresence Capture Station
Telnet Controller Guide for more information about configuring and using the Telnet Controller.
To enable the Telnet Controller:
1 In the Telnet Controller section of the Project Options page, select the Telnet Controller
Enabled check box.
2 Enter a Port number, or use the default number, 23.
3 Enter a User Name and Password of your choice. This user name and password will be used only
for the Telnet Controller.
4 Click Save when you are finished editing Project Options.

Polycom® RealPresence® Capture Station Pro Administrator’s Guide 6.6
Polycom, Inc. 45
Configure Project Saving Options
You can configure where and how often your work files are automatically saved during the creation of a
presentation.
To configure project saving options:
1 In the Project section of the Project Options page, in the Work Folder field, edit the path or use
the default path: C:\CsWork\.
2 To browse to an existing work folder, click the Find button and select the folder in the dialog shown
next. Then click OK.
3 To create a new folder, in the Project section, click Create New Folder.

Polycom® RealPresence® Capture Station Pro Administrator’s Guide 6.6
Polycom, Inc. 46
4 Select the Auto-Save Media Editor Project File check box to enable automatic saving at regular
intervals during a presentation, and then select an interval from the list.
5 Click Save when you are finished editing Project Options.
Configure Interface Options You can configure interface options such as the skin, chaptering, People Preview source, and breaks.
Skin Options, Layouts, and Features
RealPresence Capture Station software includes three skin options:
● Polycom PM3 skin
● Polycom SL3.5 skin
● Media Manager Player skin
Each skin offers a choice of layout options and features that you can set before publishing a presentation.
For more information about the RealPresence Capture Station skins, see the Polycom® Default User
Interface v3.5 Manual.
See the figures shown next for layouts and features of the three skin options.

Polycom® RealPresence® Capture Station Pro Administrator’s Guide 6.6
Polycom, Inc. 47
Layout of the Polycom PM3 Skin
The following figure shows the default layout of the Polycom PM3 skin and its available features.
Default layout of the Polycom PM3 skin
1 Video player controls Play, stop, skip back, skip forward in the video and mute audio and control
the audio volume. The default Windows Media Player is shown. When using a browser other than
Internet Explorer, the PM3 skin defaults to a custom Microsoft Silverlight player (not shown).
2 Slide area Presentation slides or images display here.
3 Tabs
Info tab Click to display the presentation title, presenter or presenters, presentation date, and
description (shown).
Chapters tab Click to display a list of hyperlinks to chapters in the video.
Resources tab Click to display downloadable resources and hyperlinks that provide additional
information about the presentation content.
Email tab Click to send an email message to the presenter using your default email settings.
Q&A tab Click to submit questions to the presenter during live events.
4 Zoom video Click to enlarge the video (People) section of the presentation.
5 Swap video and slide area Click to switch positions on the screen of the video and slide sections
of the presentation.
6 Show thumbnails Click to display the video thumbnail images in the presentation. You can
navigate the presentation by clicking the thumbnails.
7 Zoom slide Click to enlarge the slide section of the presentation.
8 Closed Captions Click to display the captions below the video.

Polycom® RealPresence® Capture Station Pro Administrator’s Guide 6.6
Polycom, Inc. 48
Layout of the Polycom SL3.5 Skin
The following figure shows the default layout of the Polycom SL3.5 skin and explains its available
features.
Default layout of the Polycom SL3.5 skin
1 Video player controls Play/pause, skip back, skip forward in the video.
2 Slide area Presentation slides or images display here.
3 Chapter number The current chapter in the presentation displays here. The chapter number, title,
or both number and title can display. Click to display a complete list of chapters with a search
filter option.
4 Additional controls Click the control icons to set audio volume, toggle closed captioning on and
off, swap video and slide positions on the screen, enlarge either the video or the slide section, and
display presentation thumbnail images.
5 Email Click to send an email message to the presenter using your default email settings.
6 Moderated Q&A, resources and links, and information Click to submit a Moderated Q&A
question, access additional resources and links related to the presentation, and view presentation
information, such as speaker name, speaker image, and presentation date.
Layout of the Media Manager Player Skin
The following figure shows the layout of the Media Manager Player skin and explains its available
features.

Polycom® RealPresence® Capture Station Pro Administrator’s Guide 6.6
Polycom, Inc. 49
Layout of the Media Manager Player skin
1 Video area Video (People channel) displays here. If closed captioning is enabled and available
for the presentation, a closed captioning section displays under the video section.
2 Slide area Presentation slides (Content channel) display here. Click the slide to enlarge the slide
section of the presentation.
3 Video controls Play or pause the video playback, navigate through the video by dragging the
slider, view the elapsed time, adjust the audio volume slider, and toggle the zoom video button to
enlarge the video.
4 Information tabs
Details tab Click to display information including the presentation title, presenter, date, and
more.
Chapters tab Click to display the chapter breaks as video thumbnails in a mosaic.
Slides tab Click to display the presentation’s slides in a mosaic.
Captions tab Click to display closed captioning.
Moderated Q&A tab Click to submit questions to the presenter during live events (not shown).
Resources tab Click to display downloadable resources and hyperlinks that provide
additional information about the presentation content (not shown).
Transcription tab Click to display the transcription results from RAMP. You need to enable
RAMP metadata in the RealPresence Media Manager Admin Tool to display the Transcription
tab.
Set the Skin
To set the skin:
1 Under General, click Interface Options.

Polycom® RealPresence® Capture Station Pro Administrator’s Guide 6.6
Polycom, Inc. 50
2 In the Interface section, select a skin from the Load Interface drop-down list, as shown next.
3 To load existing skins other than the default skins, enter a path in the Interface Folder field, or click
the Find button and browse to the skin.
4 Click Save when you are finished editing Interface Options.
Configure Chaptering Chapters allow your viewers to jump to different segments of the presentation by clicking a chapter name.
The RealPresence Capture Station software creates a new chapter for each slide change. Two
chaptering options are available: automatic and manual.
● Automatic chaptering A chapter is created for each slide change.
● Manual chaptering Set chapters by selecting manual screen changes. To manually capture
images, click the Capture Image button in the Capture Sources Content Preview window.
To configure automatic chaptering:
1 Under General, click Interface Options.
2 In the Chaptering section, select the Automatic (Content Capture) check box, as shown in the
next image.
3 If you want to override the capture interval you set on the Content Capture page (see Set the
Content Capture Source), select the Timed Interval check box. Set the interval time in seconds.
The default setting is 600.
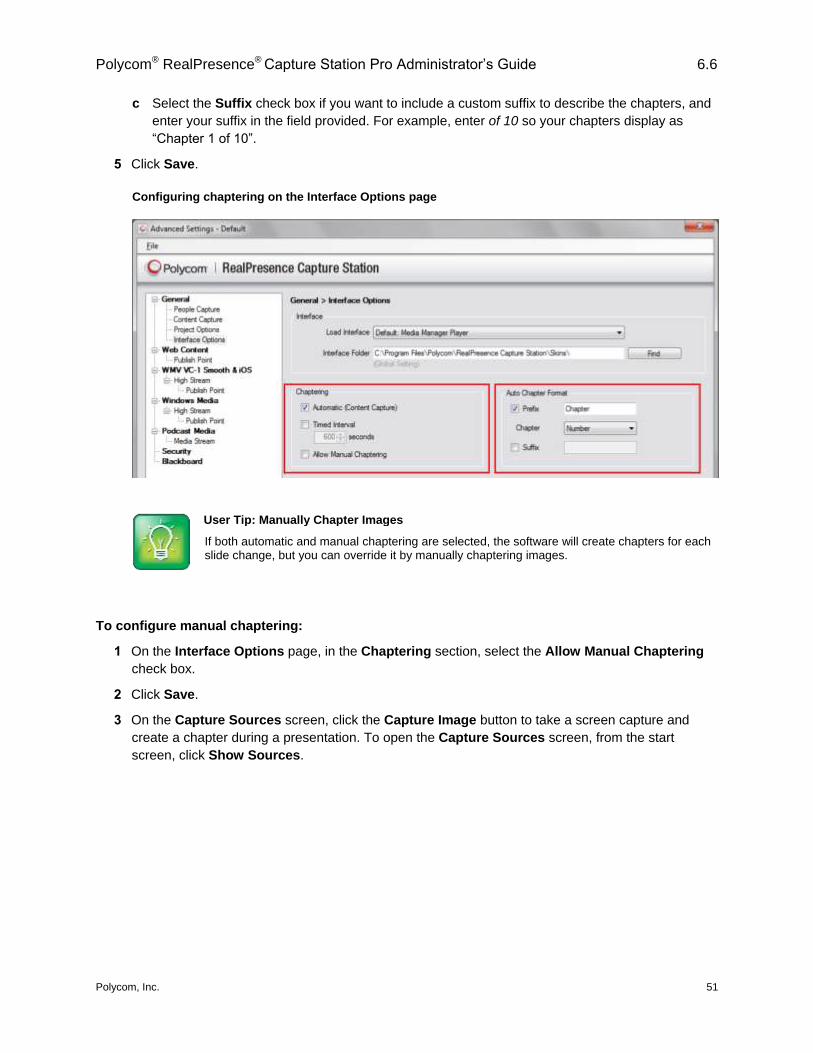
4 In the Auto Chapter Format section,
a Select the Prefix check box if you want a custom prefix, such as Chapter, to display. Enter your
prefix in the text field.
b Select a type of chapter indicator from the list. The options are None, Number, and Time.
None Select None if you want to display only the chapter title in the presentation.
Number Select Number if you want to display the Chapter number in the presentation.
Chapter numbers will increment automatically at automatically or manually selected chapter
breaks.
Time Select Time if you want to display the elapsed time in the presentation as the chapter
prefix.
Polycom® RealPresence® Capture Station Pro Administrator’s Guide 6.6
Polycom, Inc. 51
c Select the Suffix check box if you want to include a custom suffix to describe the chapters, and
enter your suffix in the field provided. For example, enter of 10 so your chapters display as
“Chapter 1 of 10”.
5 Click Save.
Configuring chaptering on the Interface Options page
User Tip: Manually Chapter Images
If both automatic and manual chaptering are selected, the software will create chapters for each slide change, but you can override it by manually chaptering images.
To configure manual chaptering:
1 On the Interface Options page, in the Chaptering section, select the Allow Manual Chaptering
check box.
2 Click Save.
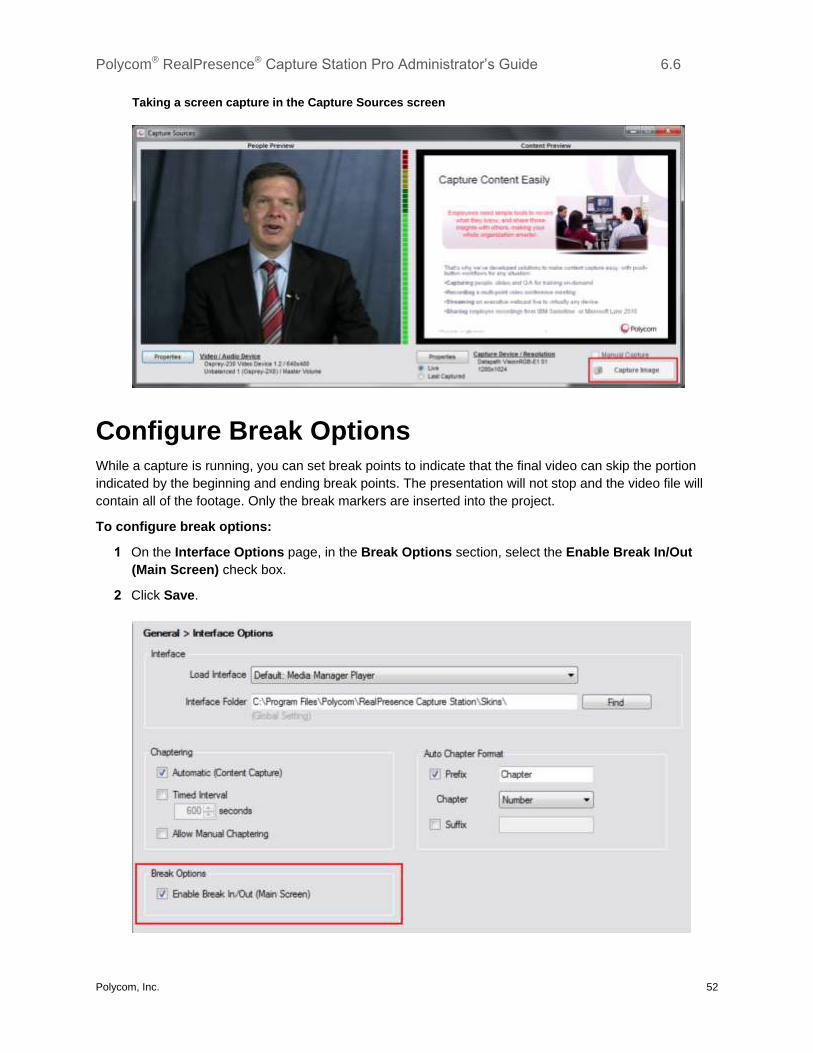
3 On the Capture Sources screen, click the Capture Image button to take a screen capture and
create a chapter during a presentation. To open the Capture Sources screen, from the start
screen, click Show Sources.
Polycom® RealPresence® Capture Station Pro Administrator’s Guide 6.6
Polycom, Inc. 52
Taking a screen capture in the Capture Sources screen
Configure Break Options While a capture is running, you can set break points to indicate that the final video can skip the portion
indicated by the beginning and ending break points. The presentation will not stop and the video file will
contain all of the footage. Only the break markers are inserted into the project.
To configure break options:
1 On the Interface Options page, in the Break Options section, select the Enable Break In/Out
(Main Screen) check box.
2 Click Save.
Polycom® RealPresence® Capture Station Pro Administrator’s Guide 6.6
Polycom, Inc. 53
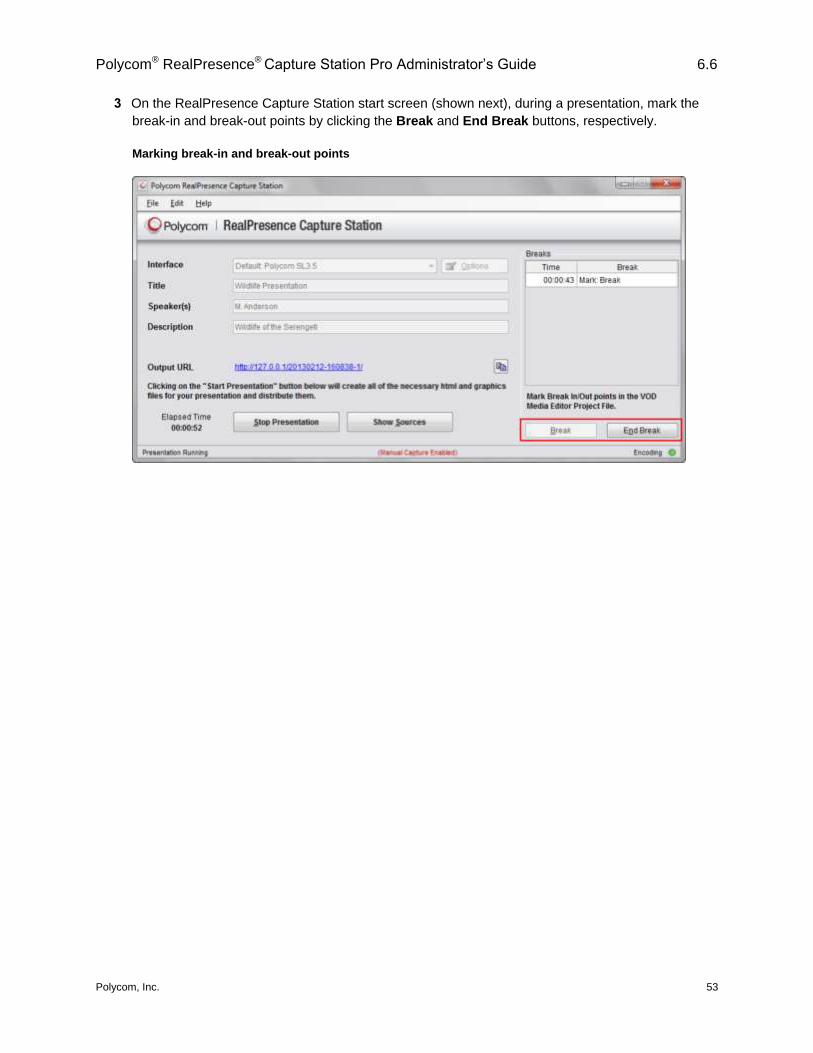
3 On the RealPresence Capture Station start screen (shown next), during a presentation, mark the
break-in and break-out points by clicking the Break and End Break buttons, respectively.
Marking break-in and break-out points

Polycom, Inc. 54
Configure Your RealPresence Capture
Station Pro for Web Content
Web content is nonstreaming content served by Microsoft Internet Information Services (IIS). This content
includes the presentation web page and slide images.
To publish a presentation, you need to set up a publish point for web content. This publish point is the
folder that contains the locations of content and publish points, but not the video file itself. Four types of
web content publish points, or upload types, are available:
● File Transfer Protocol (FTP)
● Universal Naming Convention (UNC) or Mapped Network Drive
● Secure FTP
● Polycom Media Services Agent (MSA)
RealPresence Capture Station software enables you to create up to four publish points.
Configure Web Content Publish Points To configure the web content publish point, set the web server URL, select an upload type, and enter the
settings for the upload type you are using.
To set the web server URL:
1 Choose Edit > Advanced Settings.
2 Under Web Content, click Publish Point.
3 To configure a single publish point, select Single.
If you want to configure multiple web content publish points (up to four), select Multiple Publish
Points. Then configure each web content publish point separately by clicking it in the tree under
Web Content.
4 In the Web Content Publishing section, shown next, enter the Web Server URL. This URL should
point to the folder that IIS will serve the content from when the specific presentation folder is
appended by the RealPresence Capture Station software.
Polycom® RealPresence® Capture Station Pro Administrator’s Guide 6.6
Polycom, Inc. 55
Configure the Upload Type
Set the upload type based on how you would like to publish files to the content server. Choose one of the
following options:
● FTP
● UNC or Mapped Network Drive
● Secure FTP (SFTP)
● MSA
If the RealPresence Capture Station appliance is on the same network, or inside the firewall, you can use
UNC or MSA. If the RealPresence Capture Station appliance is outside the firewall, use FTP or Secure
FTP.
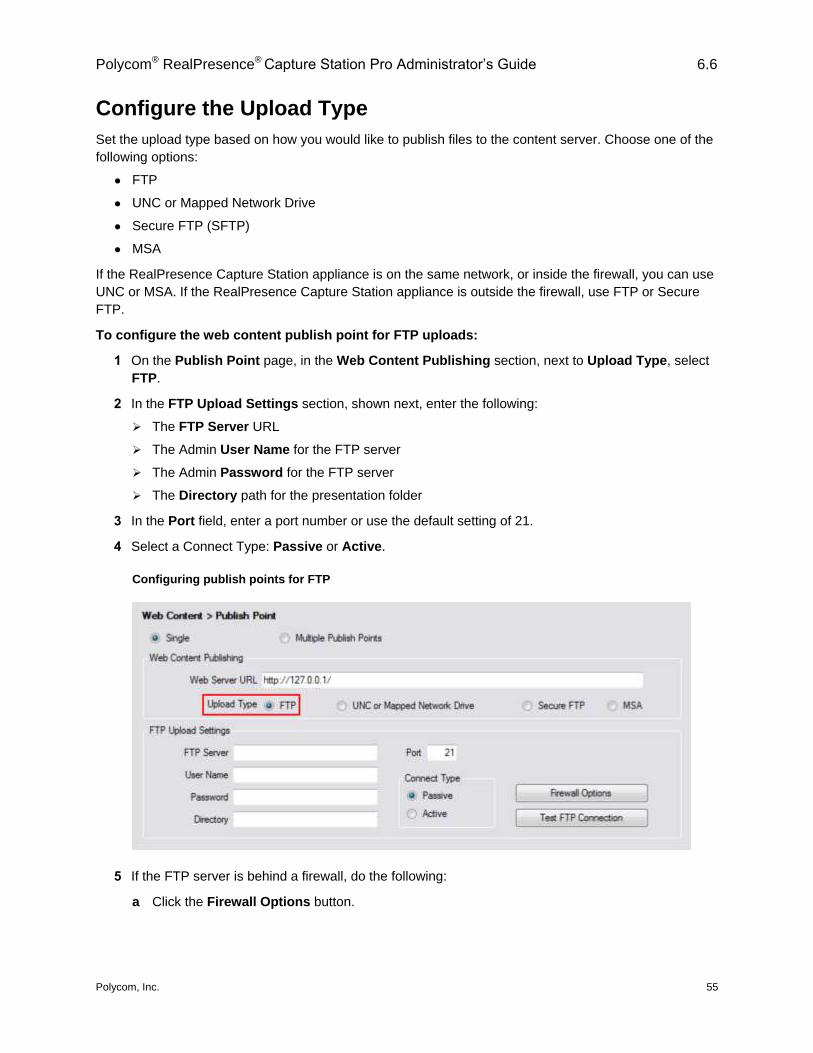
To configure the web content publish point for FTP uploads:
1 On the Publish Point page, in the Web Content Publishing section, next to Upload Type, select
FTP.
2 In the FTP Upload Settings section, shown next, enter the following:
The FTP Server URL
The Admin User Name for the FTP server
The Admin Password for the FTP server
The Directory path for the presentation folder
3 In the Port field, enter a port number or use the default setting of 21.
4 Select a Connect Type: Passive or Active.
Configuring publish points for FTP
5 If the FTP server is behind a firewall, do the following:
a Click the Firewall Options button.
Polycom® RealPresence® Capture Station Pro Administrator’s Guide 6.6
Polycom, Inc. 56
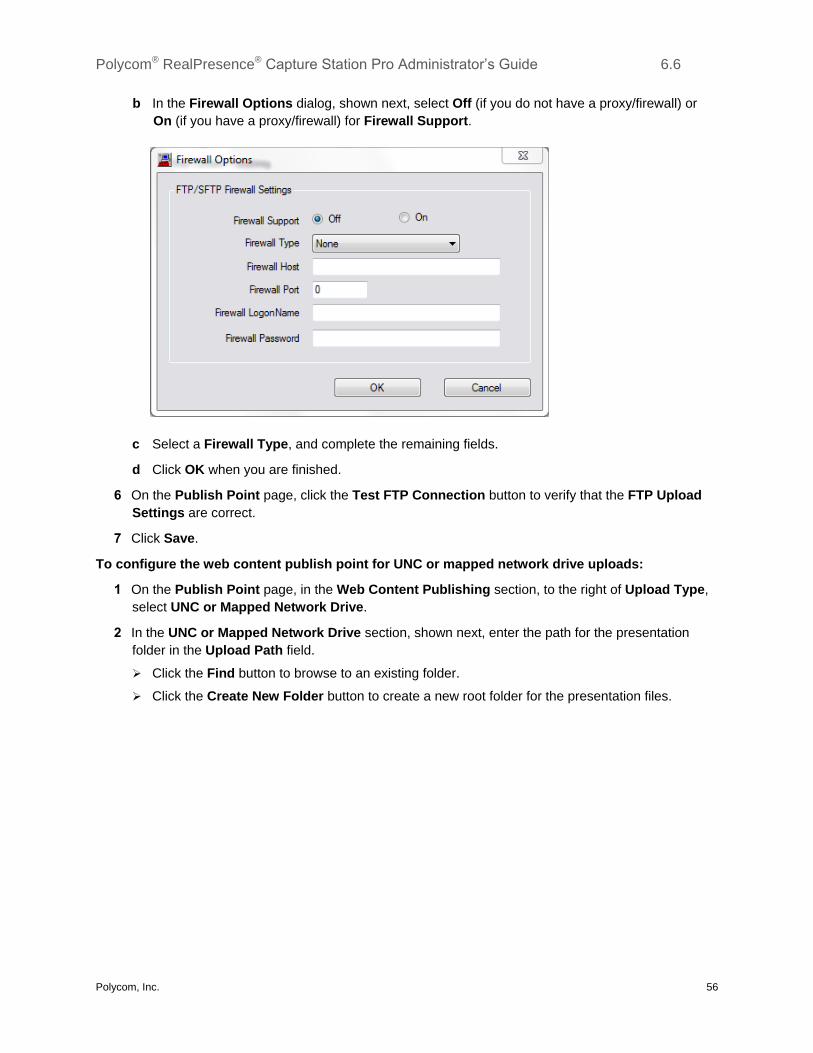
b In the Firewall Options dialog, shown next, select Off (if you do not have a proxy/firewall) or
On (if you have a proxy/firewall) for Firewall Support.
c Select a Firewall Type, and complete the remaining fields.
d Click OK when you are finished.
6 On the Publish Point page, click the Test FTP Connection button to verify that the FTP Upload
Settings are correct.
7 Click Save.
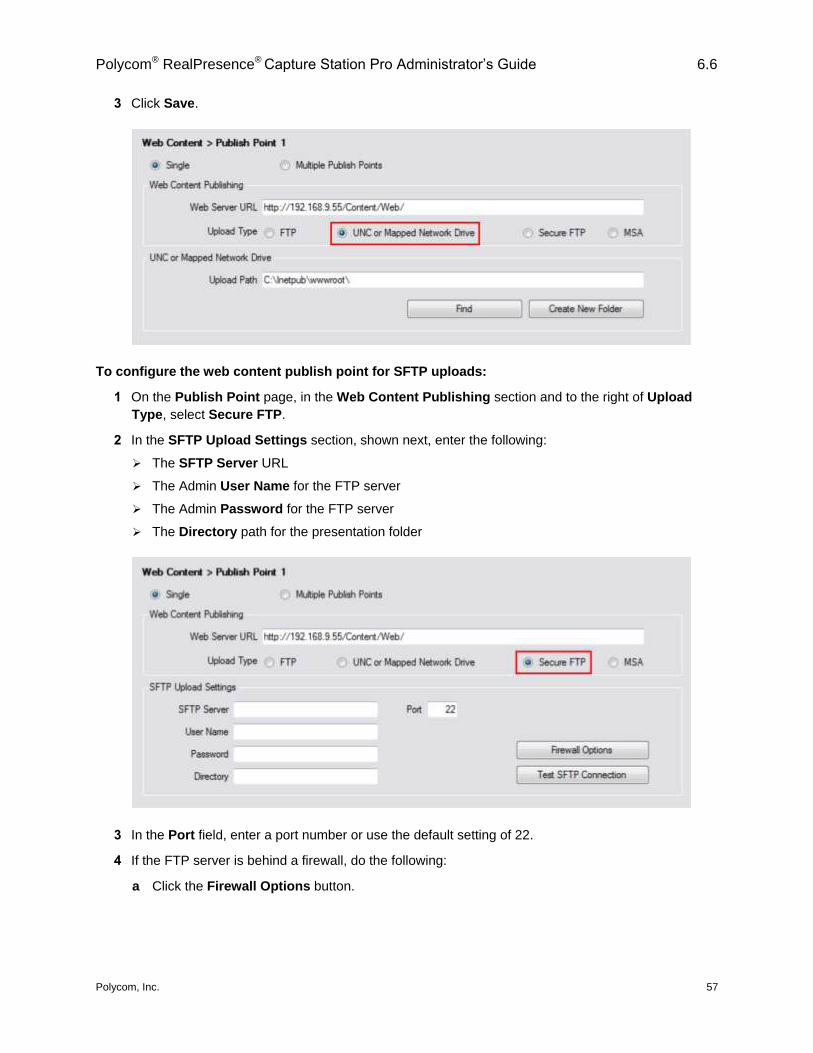
To configure the web content publish point for UNC or mapped network drive uploads:
1 On the Publish Point page, in the Web Content Publishing section, to the right of Upload Type,
select UNC or Mapped Network Drive.
2 In the UNC or Mapped Network Drive section, shown next, enter the path for the presentation
folder in the Upload Path field.
Click the Find button to browse to an existing folder.
Click the Create New Folder button to create a new root folder for the presentation files.
Polycom® RealPresence® Capture Station Pro Administrator’s Guide 6.6
Polycom, Inc. 57
3 Click Save.
To configure the web content publish point for SFTP uploads:
1 On the Publish Point page, in the Web Content Publishing section and to the right of Upload
Type, select Secure FTP.
2 In the SFTP Upload Settings section, shown next, enter the following:
The SFTP Server URL
The Admin User Name for the FTP server
The Admin Password for the FTP server
The Directory path for the presentation folder
3 In the Port field, enter a port number or use the default setting of 22.
4 If the FTP server is behind a firewall, do the following:
a Click the Firewall Options button.

Polycom® RealPresence® Capture Station Pro Administrator’s Guide 6.6
Polycom, Inc. 58
b In the Firewall Options dialog, shown next, select Off (if you do not have a proxy/firewall) or
On (if you have a proxy/firewall) for Firewall Support.
c Select a Firewall Type, and complete the remaining fields.
d Click OK when you are finished.
5 On the Publish Point page, click the Test SFTP Connection button to verify that the SFTP Upload
Settings are correct.
6 Click Save.
Configure the Publish Point Manually
If your RealPresence Capture Station appliance is integrated with a RealPresence Media Manager
software installation, you can configure the appropriate web content publish point manually (without using
the Media Manager Wizard).
For information on using the Media Manager Wizard, see Use the Polycom RealPresence Media
Manager Wizard for the First Time.
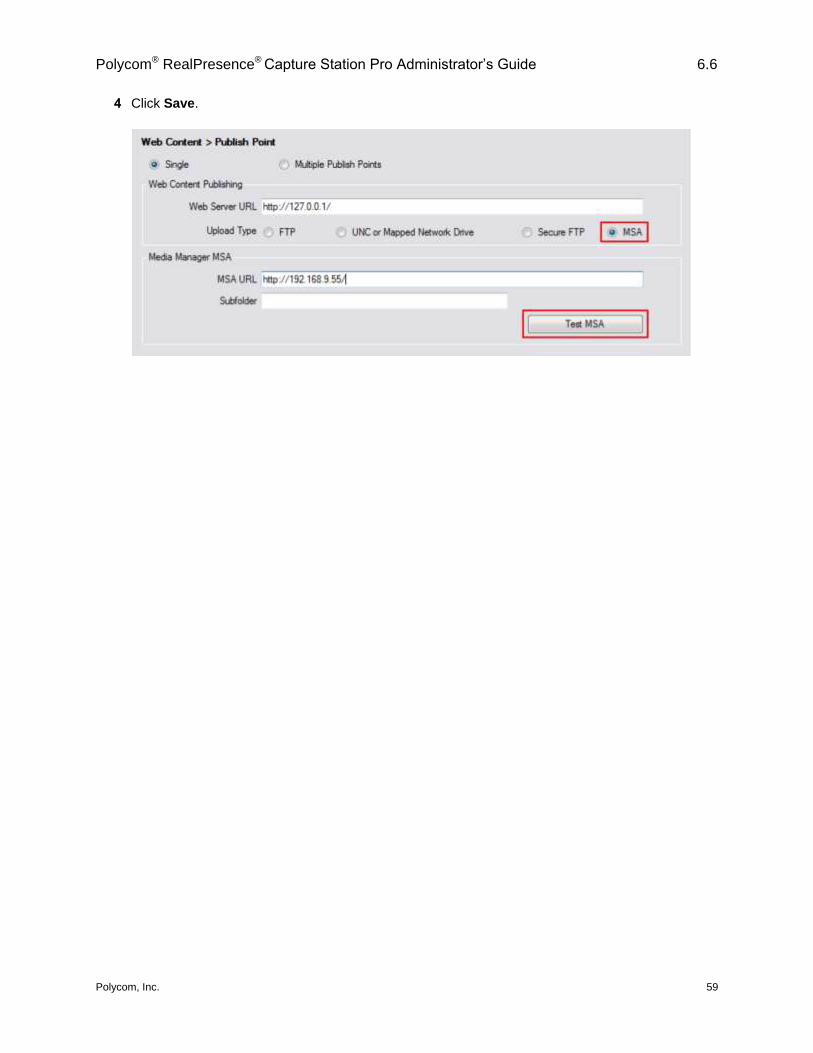
To configure the web content publish point manually for RealPresence Media Manager and MSA:
1 On the Publish Point page, in the Web Content Publishing section and to the right of Upload
Type, select MSA.
2 In the Media Manager MSA section, enter the MSA URL from which you are serving content. If the
content is in a subfolder, enter the subfolder name in the Subfolder field, and add the subfolder
name to the web server URL manually.
3 Click the Test MSA button to verify that the RealPresence Capture Station can connect to the
location on the MSA.
Polycom® RealPresence® Capture Station Pro Administrator’s Guide 6.6
Polycom, Inc. 59
4 Click Save.
Polycom, Inc. 60
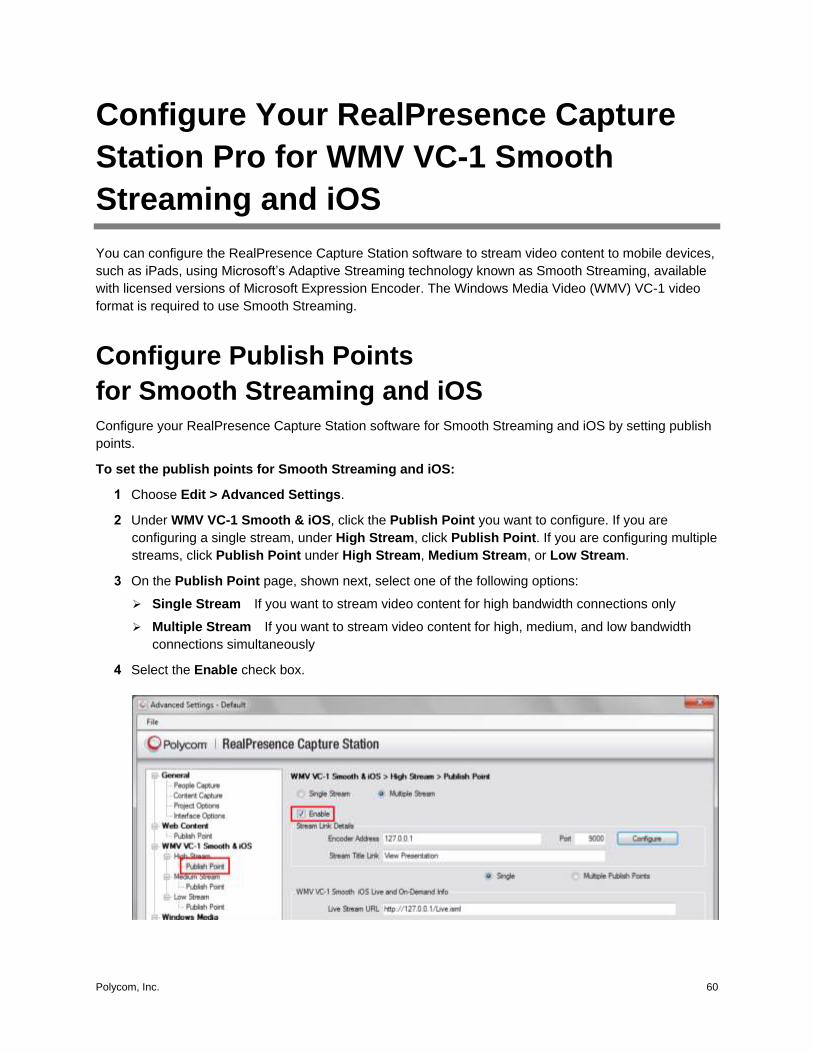
Configure Your RealPresence Capture
Station Pro for WMV VC-1 Smooth
Streaming and iOS
You can configure the RealPresence Capture Station software to stream video content to mobile devices,
such as iPads, using Microsoft’s Adaptive Streaming technology known as Smooth Streaming, available
with licensed versions of Microsoft Expression Encoder. The Windows Media Video (WMV) VC-1 video
format is required to use Smooth Streaming.
Configure Publish Points
for Smooth Streaming and iOS Configure your RealPresence Capture Station software for Smooth Streaming and iOS by setting publish
points.
To set the publish points for Smooth Streaming and iOS:
1 Choose Edit > Advanced Settings.
2 Under WMV VC-1 Smooth & iOS, click the Publish Point you want to configure. If you are
configuring a single stream, under High Stream, click Publish Point. If you are configuring multiple
streams, click Publish Point under High Stream, Medium Stream, or Low Stream.
3 On the Publish Point page, shown next, select one of the following options:
Single Stream If you want to stream video content for high bandwidth connections only
Multiple Stream If you want to stream video content for high, medium, and low bandwidth
connections simultaneously
4 Select the Enable check box.
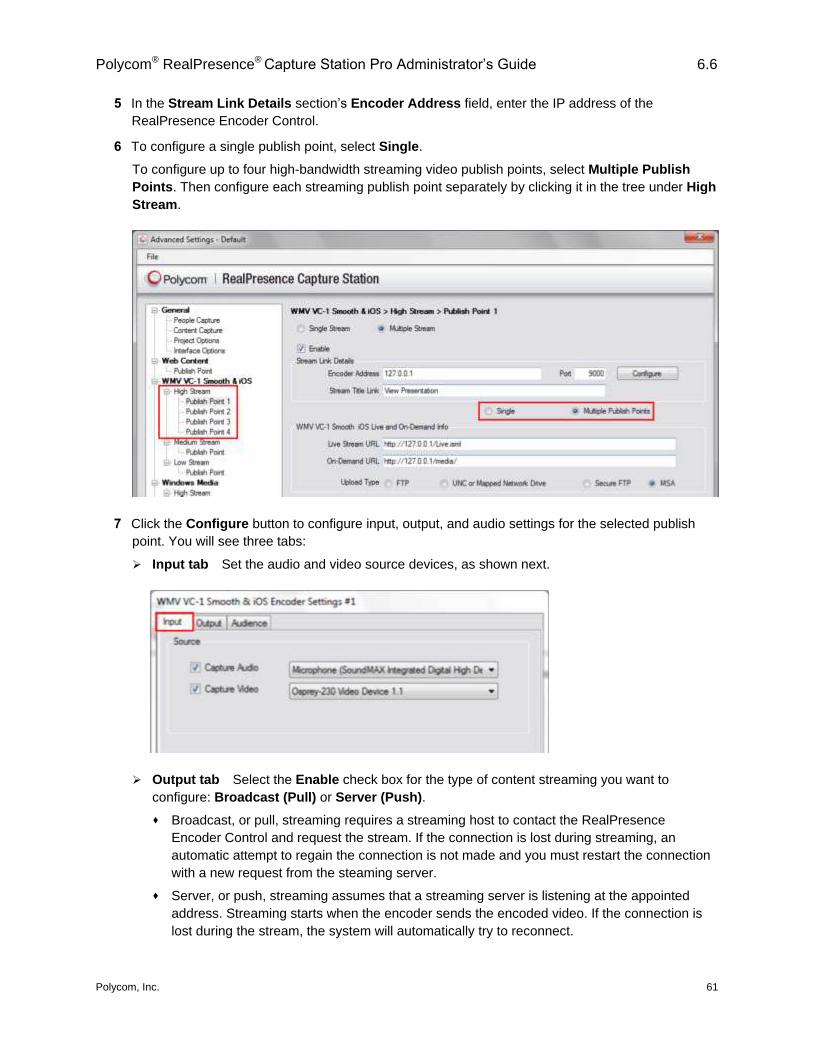
Polycom® RealPresence® Capture Station Pro Administrator’s Guide 6.6
Polycom, Inc. 61
5 In the Stream Link Details section’s Encoder Address field, enter the IP address of the
RealPresence Encoder Control.
6 To configure a single publish point, select Single.
To configure up to four high-bandwidth streaming video publish points, select Multiple Publish
Points. Then configure each streaming publish point separately by clicking it in the tree under High
Stream.
7 Click the Configure button to configure input, output, and audio settings for the selected publish
point. You will see three tabs:
Input tab Set the audio and video source devices, as shown next.
Output tab Select the Enable check box for the type of content streaming you want to
configure: Broadcast (Pull) or Server (Push).
Broadcast, or pull, streaming requires a streaming host to contact the RealPresence
Encoder Control and request the stream. If the connection is lost during streaming, an
automatic attempt to regain the connection is not made and you must restart the connection
with a new request from the steaming server.
Server, or push, streaming assumes that a streaming server is listening at the appointed
address. Streaming starts when the encoder sends the encoded video. If the connection is
lost during the stream, the system will automatically try to reconnect.
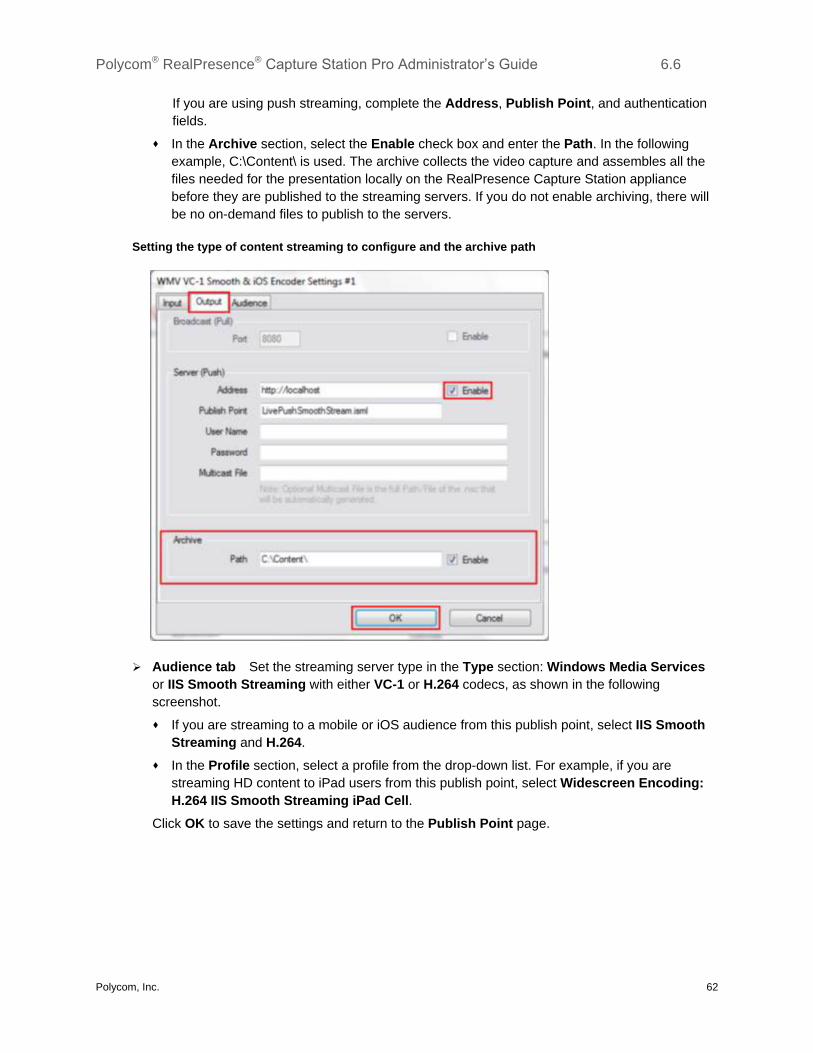
Polycom® RealPresence® Capture Station Pro Administrator’s Guide 6.6
Polycom, Inc. 62
If you are using push streaming, complete the Address, Publish Point, and authentication
fields.
In the Archive section, select the Enable check box and enter the Path. In the following
example, C:\Content\ is used. The archive collects the video capture and assembles all the
files needed for the presentation locally on the RealPresence Capture Station appliance
before they are published to the streaming servers. If you do not enable archiving, there will
be no on-demand files to publish to the servers.
Setting the type of content streaming to configure and the archive path
Audience tab Set the streaming server type in the Type section: Windows Media Services
or IIS Smooth Streaming with either VC-1 or H.264 codecs, as shown in the following
screenshot.
If you are streaming to a mobile or iOS audience from this publish point, select IIS Smooth
Streaming and H.264.
In the Profile section, select a profile from the drop-down list. For example, if you are
streaming HD content to iPad users from this publish point, select Widescreen Encoding:
H.264 IIS Smooth Streaming iPad Cell.
Click OK to save the settings and return to the Publish Point page.
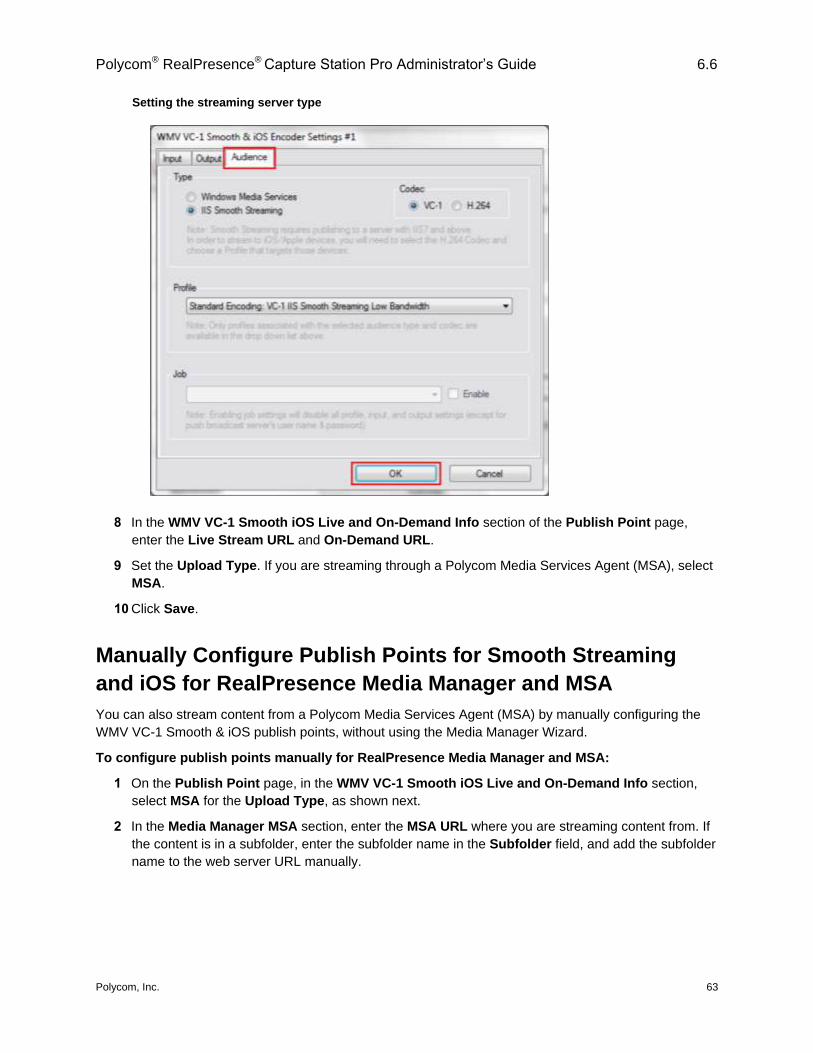
Polycom® RealPresence® Capture Station Pro Administrator’s Guide 6.6
Polycom, Inc. 63
Setting the streaming server type
8 In the WMV VC-1 Smooth iOS Live and On-Demand Info section of the Publish Point page,
enter the Live Stream URL and On-Demand URL.
9 Set the Upload Type. If you are streaming through a Polycom Media Services Agent (MSA), select
MSA.
10 Click Save.
Manually Configure Publish Points for Smooth Streaming
and iOS for RealPresence Media Manager and MSA
You can also stream content from a Polycom Media Services Agent (MSA) by manually configuring the
WMV VC-1 Smooth & iOS publish points, without using the Media Manager Wizard.
To configure publish points manually for RealPresence Media Manager and MSA:
1 On the Publish Point page, in the WMV VC-1 Smooth iOS Live and On-Demand Info section,
select MSA for the Upload Type, as shown next.
2 In the Media Manager MSA section, enter the MSA URL where you are streaming content from. If
the content is in a subfolder, enter the subfolder name in the Subfolder field, and add the subfolder
name to the web server URL manually.

Polycom® RealPresence® Capture Station Pro Administrator’s Guide 6.6
Polycom, Inc. 64
3 Click the Test MSA button to verify that the RealPresence Capture Station can connect to the
location on the MSA.
4 Click Save.
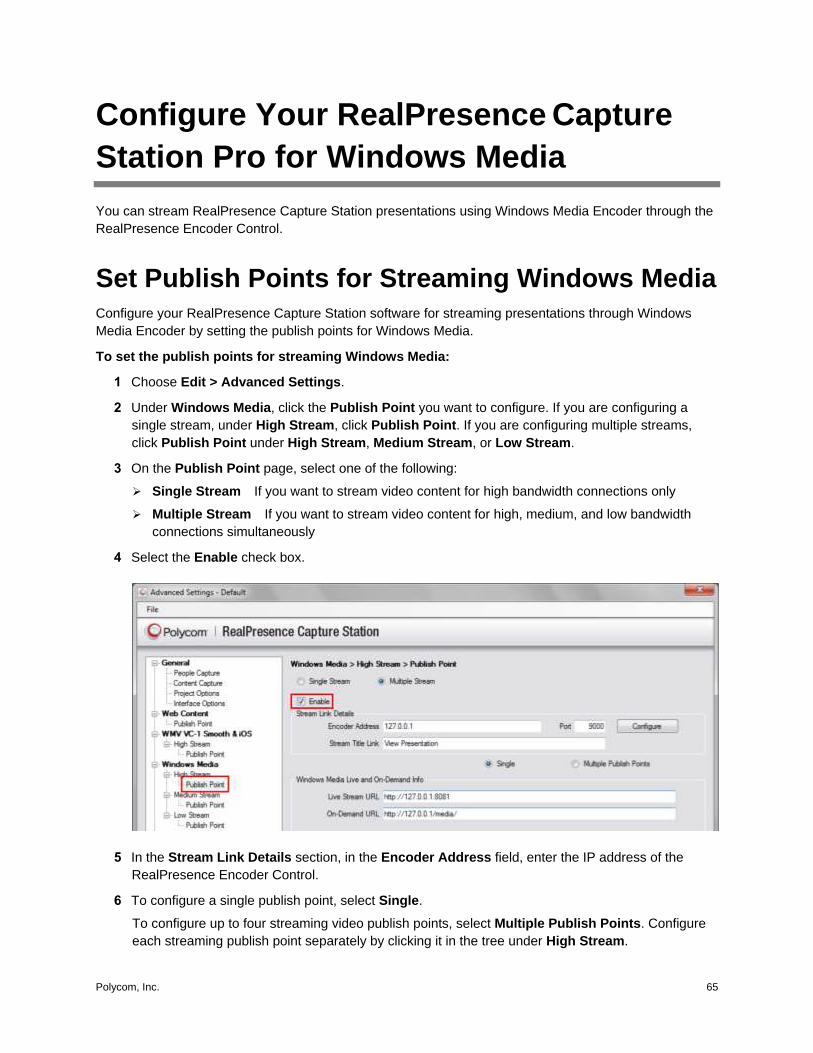
Polycom, Inc. 65
Configure Your RealPresence Capture
Station Pro for Windows Media
You can stream RealPresence Capture Station presentations using Windows Media Encoder through the
RealPresence Encoder Control.
Set Publish Points for Streaming Windows Media Configure your RealPresence Capture Station software for streaming presentations through Windows
Media Encoder by setting the publish points for Windows Media.
To set the publish points for streaming Windows Media:
1 Choose Edit > Advanced Settings.
2 Under Windows Media, click the Publish Point you want to configure. If you are configuring a
single stream, under High Stream, click Publish Point. If you are configuring multiple streams,
click Publish Point under High Stream, Medium Stream, or Low Stream.
3 On the Publish Point page, select one of the following:
Single Stream If you want to stream video content for high bandwidth connections only
Multiple Stream If you want to stream video content for high, medium, and low bandwidth
connections simultaneously
4 Select the Enable check box.
5 In the Stream Link Details section, in the Encoder Address field, enter the IP address of the
RealPresence Encoder Control.
6 To configure a single publish point, select Single.
To configure up to four streaming video publish points, select Multiple Publish Points. Configure
each streaming publish point separately by clicking it in the tree under High Stream.

Polycom® RealPresence® Capture Station Pro Administrator’s Guide 6.6
Polycom, Inc. 66
7 Click the Configure button to configure input, output, and audio settings for the selected publish
point. You will see three tabs:
Input tab Set the audio and video source devices, and then select the Resize Video check
box and enter the video resize factor, as shown next.
Output tab Select the Enable check box for the type of content streaming you want to
configure: Broadcast (Pull) or Server (Push).
Broadcast, or pull, streaming requires a streaming host to contact the RealPresence
Encoder Control and request the stream. If the connection is lost during streaming, an
automatic attempt to regain the connection is not made and you must restart the connection
with a new request from the steaming server.
Server, or push, streaming assumes that a streaming server is listening at the appointed
address. Streaming starts when the encoder sends the encoded video. If the connection is
lost during the stream, the system will automatically try to reconnect.
If you are using push streaming, complete the Address, Publish Point, and authentication
fields.
In the Archive section, select the Enable check box and enter the Path. In the following
example, C:\Content\ is used. The archive collects the video capture and assembles all the
files needed for the presentation locally on the RealPresence Capture Station appliance
before they are published to the streaming servers. If you do not enable archiving, there will
be no on-demand files to publish to the servers.
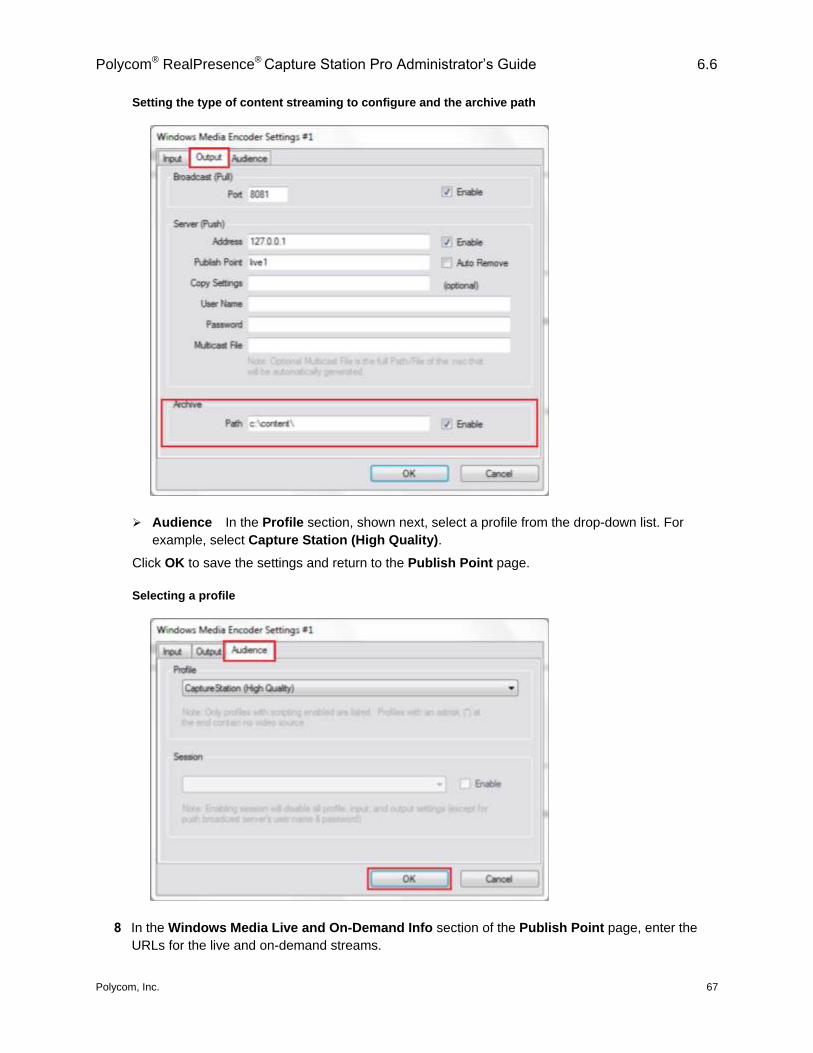
Polycom® RealPresence® Capture Station Pro Administrator’s Guide 6.6
Polycom, Inc. 67
Setting the type of content streaming to configure and the archive path
Audience In the Profile section, shown next, select a profile from the drop-down list. For
example, select Capture Station (High Quality).
Click OK to save the settings and return to the Publish Point page.
Selecting a profile
8 In the Windows Media Live and On-Demand Info section of the Publish Point page, enter the
URLs for the live and on-demand streams.
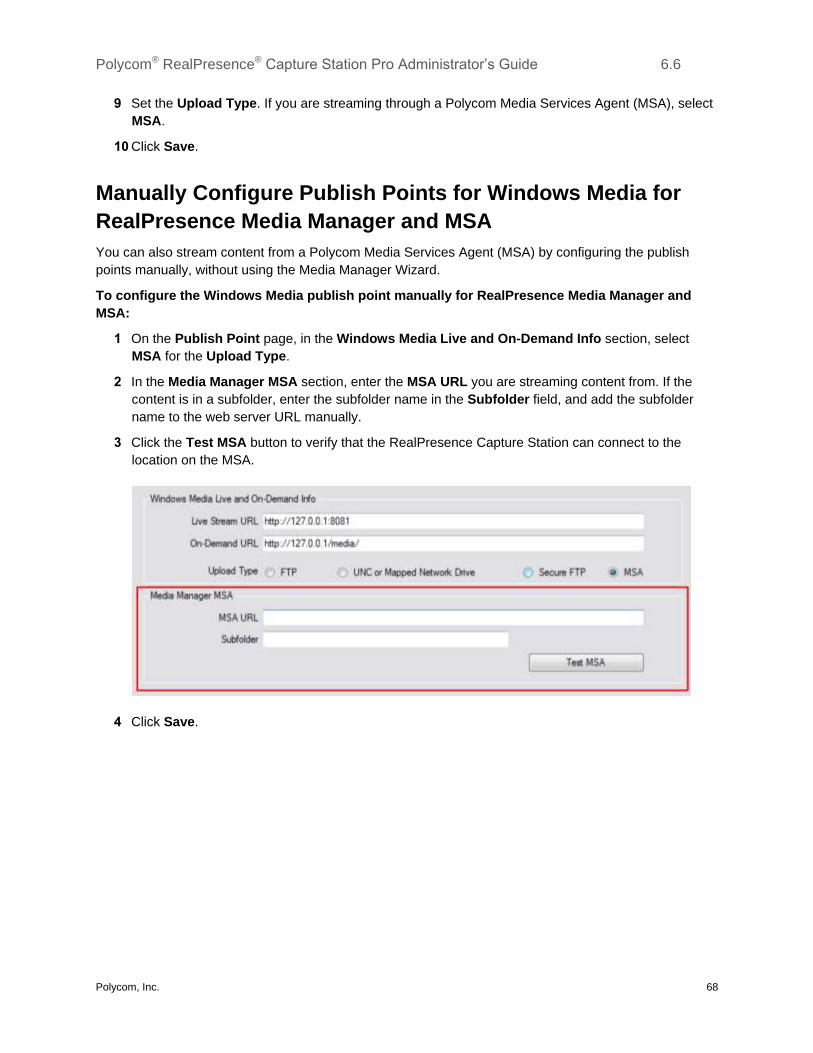
Polycom® RealPresence® Capture Station Pro Administrator’s Guide 6.6
Polycom, Inc. 68
9 Set the Upload Type. If you are streaming through a Polycom Media Services Agent (MSA), select
MSA.
10 Click Save.
Manually Configure Publish Points for Windows Media for
RealPresence Media Manager and MSA
You can also stream content from a Polycom Media Services Agent (MSA) by configuring the publish
points manually, without using the Media Manager Wizard.
To configure the Windows Media publish point manually for RealPresence Media Manager and
MSA:
1 On the Publish Point page, in the Windows Media Live and On-Demand Info section, select
MSA for the Upload Type.
2 In the Media Manager MSA section, enter the MSA URL you are streaming content from. If the
content is in a subfolder, enter the subfolder name in the Subfolder field, and add the subfolder
name to the web server URL manually.
3 Click the Test MSA button to verify that the RealPresence Capture Station can connect to the
location on the MSA.
4 Click Save.
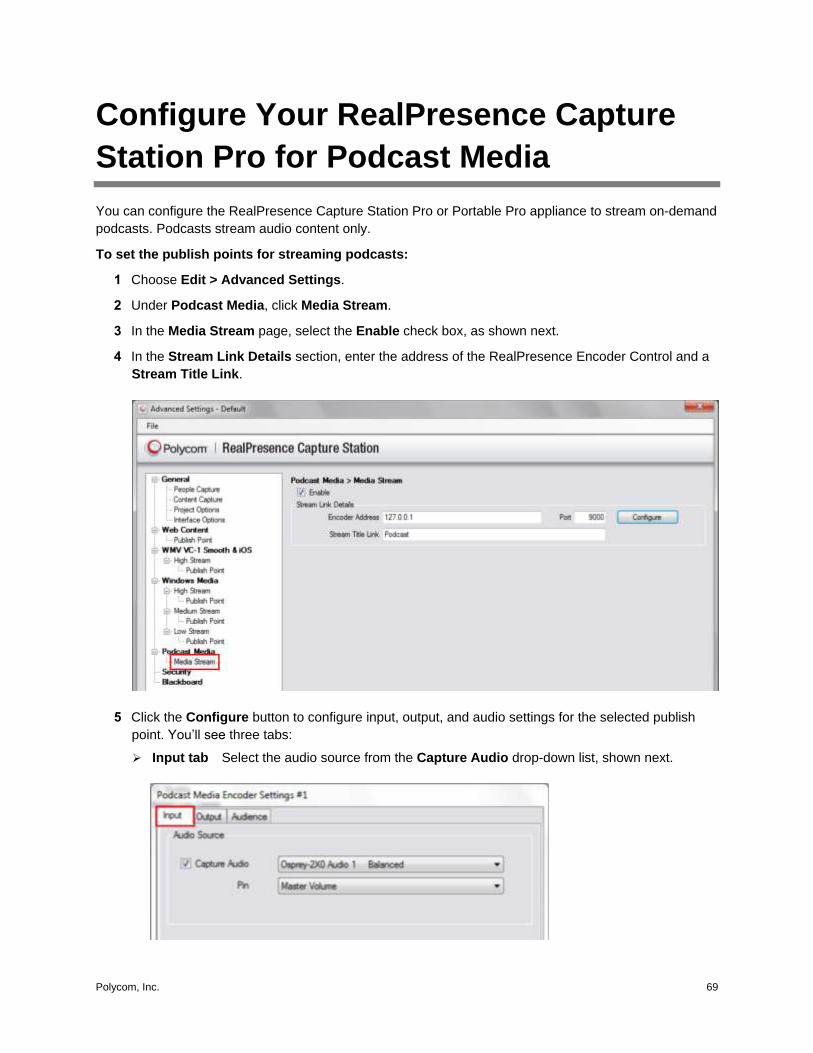
Polycom, Inc. 69
Configure Your RealPresence Capture
Station Pro for Podcast Media
You can configure the RealPresence Capture Station Pro or Portable Pro appliance to stream on-demand
podcasts. Podcasts stream audio content only.
To set the publish points for streaming podcasts:
1 Choose Edit > Advanced Settings.
2 Under Podcast Media, click Media Stream.
3 In the Media Stream page, select the Enable check box, as shown next.
4 In the Stream Link Details section, enter the address of the RealPresence Encoder Control and a
Stream Title Link.
5 Click the Configure button to configure input, output, and audio settings for the selected publish
point. You’ll see three tabs:
Input tab Select the audio source from the Capture Audio drop-down list, shown next.

Polycom® RealPresence® Capture Station Pro Administrator’s Guide 6.6
Polycom, Inc. 70
Output tab In the Archive section, shown next, enter the Path to use, such as C:\Content\
The archive collects the audio capture and assembles all the files needed for the presentation
locally on the RealPresence Capture Station appliance before they are published to the content
servers.
Audience tab In the Target Bandwidth section, select a Bitrate from the drop-down list, as
shown. Bitrates are in Kbps.
Click OK to return to the Media Stream page.
6 Click Save.

Polycom, Inc. 71
Configure Security Settings
The RealPresence Capture Station appliance starts up for the first time without requiring a security
profile. You can access the RealPresence Capture Station software’s start screen, but you need to
configure at least one security profile with administrator settings before you can enable security settings.
About Security Profiles You can save all the settings for a user in a settings file that is associated with the user’s login
credentials. When the user logs in to the RealPresence Capture Station appliance, all of his or her
settings are loaded. Once you have associated a settings file with a user, you can see that user and all
other users with the settings files associated with their accounts.
Two levels of users can be created: administrators and presenters. Administrator users can create
presentations and configure the RealPresence Capture Station software. Presenter users can only start
and stop presentations.
If users without settings files associated with their login credentials log in to a RealPresence Capture
Station appliance, default settings will be applied. These settings include the following:
● Custom web publishing folders
● Specific media servers
● Blackboard Server/login information
● Motion detection configuration
● Screen capture settings
● Project work folder
● RealPresence Encoder Controller settings
Caution: Create Security Profiles with Administrator Permissions
You should configure at least one security profile with administrator permissions to enable security settings.
Create a Security Profile
You should create at least one security profile with administrator settings.
To create a security profile:
1 Choose Edit > Advanced Settings.
2 From the list on the left, click Security.

Polycom® RealPresence® Capture Station Pro Administrator’s Guide 6.6
Polycom, Inc. 72
3 Click Add.
4 In the Type section, shown next, select Administrator if this is the first security profile you are
creating. If this is not the first security profile, and you are creating a profile for another user, select
Presenter.
5 In the Login section, enter a User Name and Password.
6 To associate an existing settings file with this security profile, click the Find button, select the
settings (.set) file you want, and click Open, as shown in the following figure.
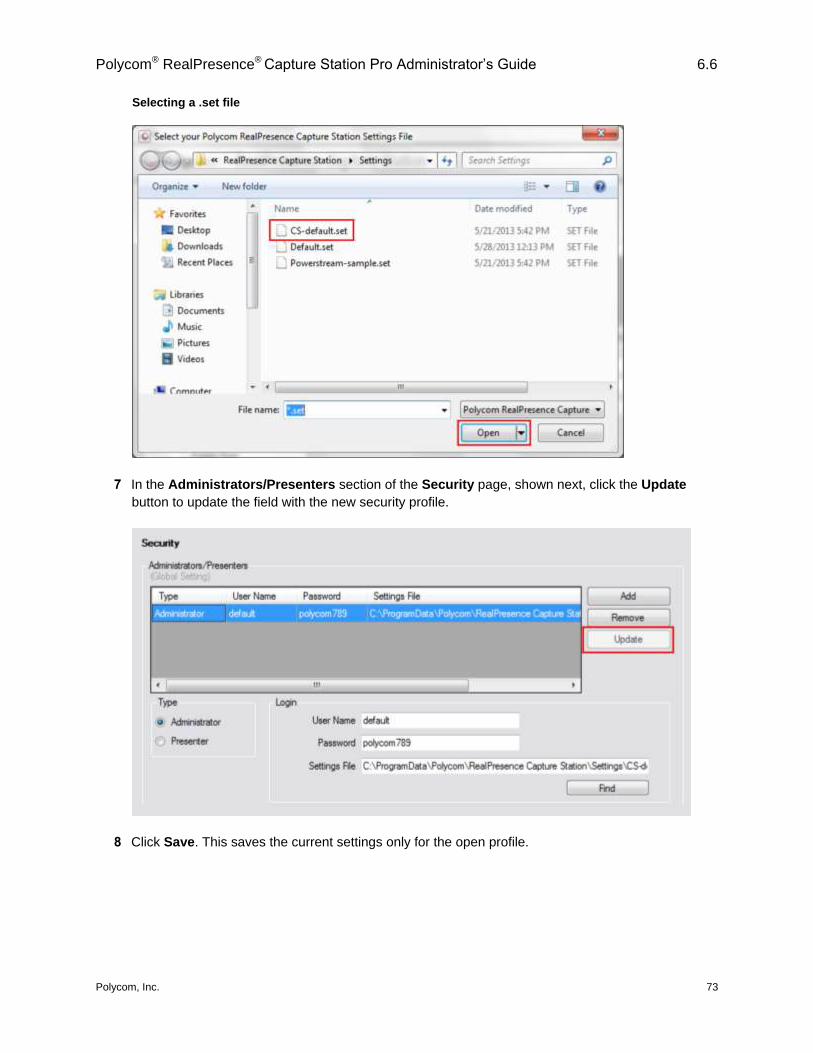
Polycom® RealPresence® Capture Station Pro Administrator’s Guide 6.6
Polycom, Inc. 73
Selecting a .set file
7 In the Administrators/Presenters section of the Security page, shown next, click the Update
button to update the field with the new security profile.
8 Click Save. This saves the current settings only for the open profile.
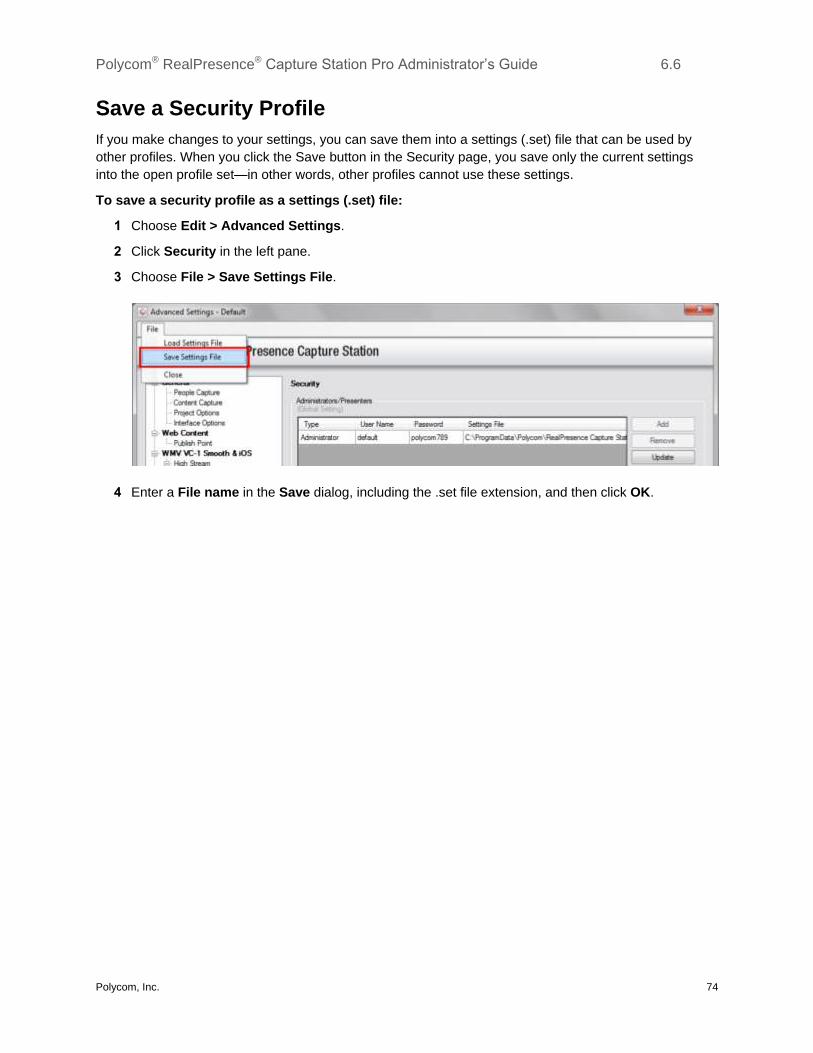
Polycom® RealPresence® Capture Station Pro Administrator’s Guide 6.6
Polycom, Inc. 74
Save a Security Profile
If you make changes to your settings, you can save them into a settings (.set) file that can be used by
other profiles. When you click the Save button in the Security page, you save only the current settings
into the open profile set—in other words, other profiles cannot use these settings.
To save a security profile as a settings (.set) file:
1 Choose Edit > Advanced Settings.
2 Click Security in the left pane.
3 Choose File > Save Settings File.
4 Enter a File name in the Save dialog, including the .set file extension, and then click OK.
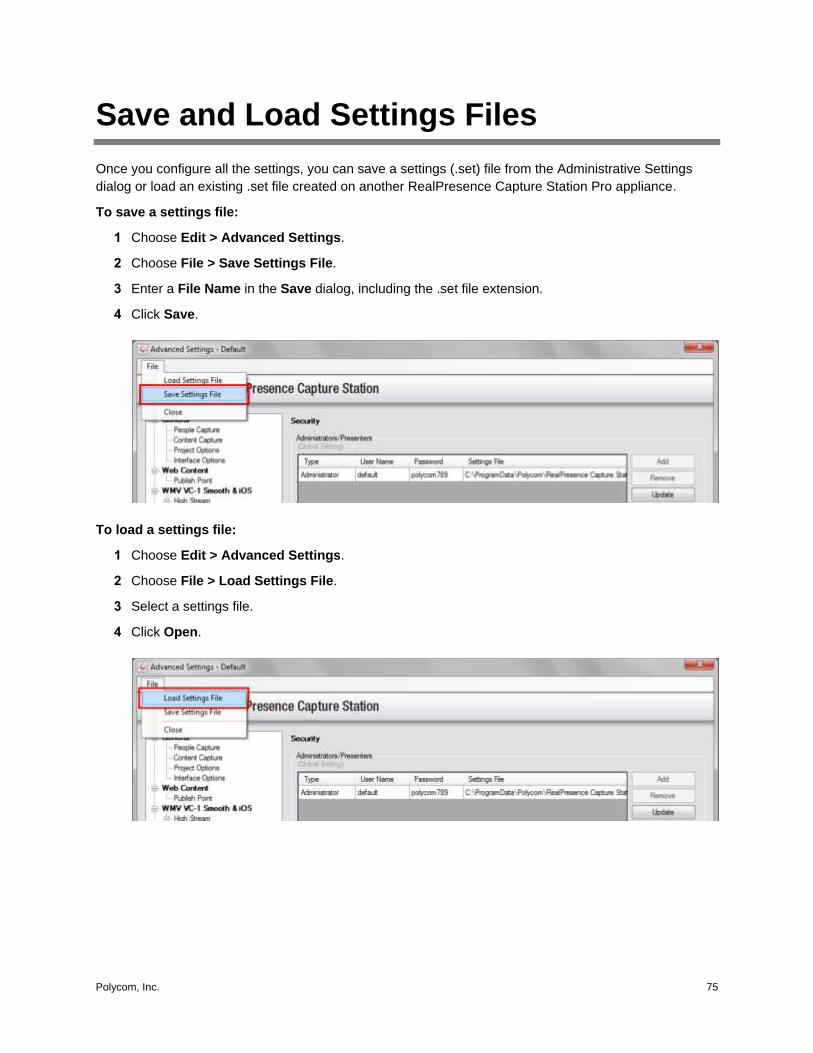
Polycom, Inc. 75
Save and Load Settings Files
Once you configure all the settings, you can save a settings (.set) file from the Administrative Settings
dialog or load an existing .set file created on another RealPresence Capture Station Pro appliance.
To save a settings file:
1 Choose Edit > Advanced Settings.
2 Choose File > Save Settings File.
3 Enter a File Name in the Save dialog, including the .set file extension.
4 Click Save.
To load a settings file:
1 Choose Edit > Advanced Settings.
2 Choose File > Load Settings File.
3 Select a settings file.
4 Click Open.

Polycom, Inc. 76
Integrate Your RealPresence Capture
Station Pro with RealPresence Media
Manager, Software Edition
You can configure the RealPresence Capture Station Pro appliance to work with RealPresence Media
Manager server using the new RealPresence Media Manager Wizard. The wizard will guide you through
the process, from logging in to your RealPresence Media Manager server, to adding additional servers
from which to stream your live and on-demand content. Once you have set up the RealPresence Media
Manager software integration, you can edit your settings.
Note: Caching Must be Enabled in RealPresence Media Manager Software
Caching must be enabled in the RealPresence Media Manager Admin Tool to connect RealPresence Capture Station appliances to the RealPresence Media Manager software using the Media Manager Wizard. To learn how to enable caching, see the Polycom RealPresence Media Manager – Software Edition Administrators’ Guide.
Use the RealPresence Media Manager Wizard
for the First Time To use the RealPresence Media Manager Wizard, you need the Media Manager Capture Station user
credentials and the URL for the RealPresence Media Manager server.
To launch the RealPresence Media Manager Wizard for the first time:
» Do one of the following:
On the RealPresence Capture Station software’s start screen, click the Media Manager Wizard
link, as shown next.
Choose Edit > Media Manager Wizard.
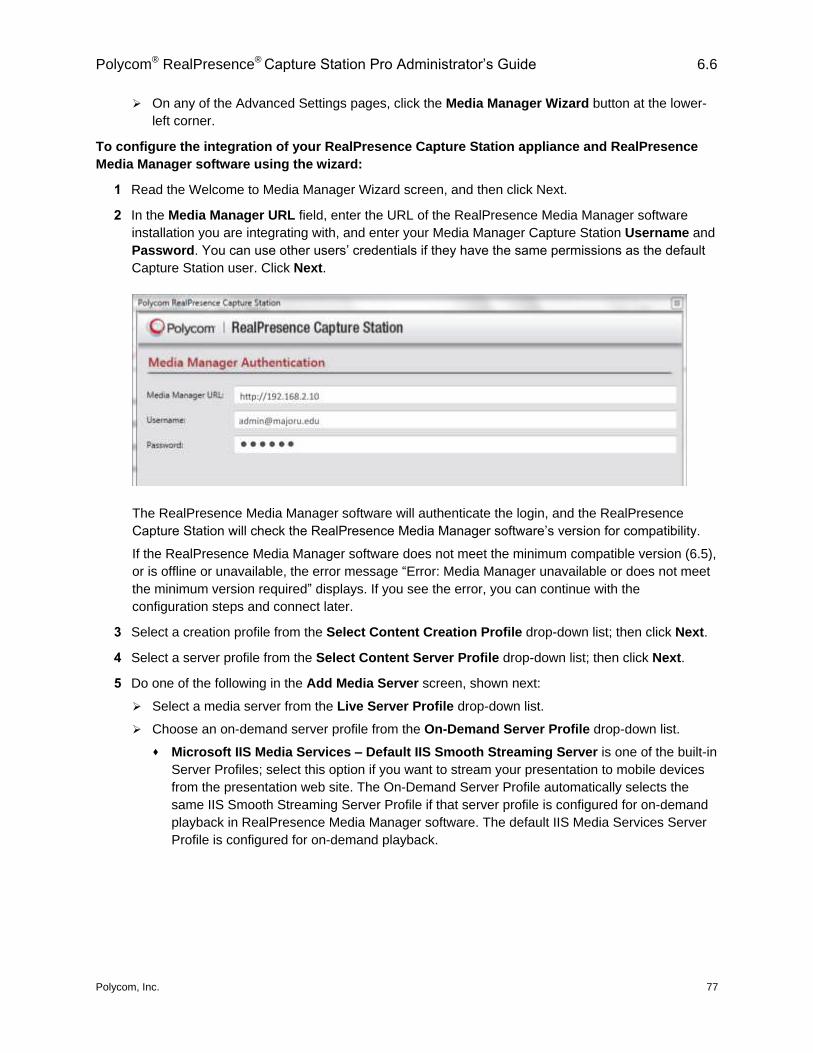
Polycom® RealPresence® Capture Station Pro Administrator’s Guide 6.6
Polycom, Inc. 77
On any of the Advanced Settings pages, click the Media Manager Wizard button at the lower-
left corner.
To configure the integration of your RealPresence Capture Station appliance and RealPresence
Media Manager software using the wizard:
1 Read the Welcome to Media Manager Wizard screen, and then click Next.
2 In the Media Manager URL field, enter the URL of the RealPresence Media Manager software
installation you are integrating with, and enter your Media Manager Capture Station Username and
Password. You can use other users’ credentials if they have the same permissions as the default
Capture Station user. Click Next.
The RealPresence Media Manager software will authenticate the login, and the RealPresence
Capture Station will check the RealPresence Media Manager software’s version for compatibility.
If the RealPresence Media Manager software does not meet the minimum compatible version (6.5),
or is offline or unavailable, the error message “Error: Media Manager unavailable or does not meet
the minimum version required” displays. If you see the error, you can continue with the
configuration steps and connect later.
3 Select a creation profile from the Select Content Creation Profile drop-down list; then click Next.
4 Select a server profile from the Select Content Server Profile drop-down list; then click Next.
5 Do one of the following in the Add Media Server screen, shown next:
Select a media server from the Live Server Profile drop-down list.
Choose an on-demand server profile from the On-Demand Server Profile drop-down list.
Microsoft IIS Media Services – Default IIS Smooth Streaming Server is one of the built-in
Server Profiles; select this option if you want to stream your presentation to mobile devices
from the presentation web site. The On-Demand Server Profile automatically selects the
same IIS Smooth Streaming Server Profile if that server profile is configured for on-demand
playback in RealPresence Media Manager software. The default IIS Media Services Server
Profile is configured for on-demand playback.
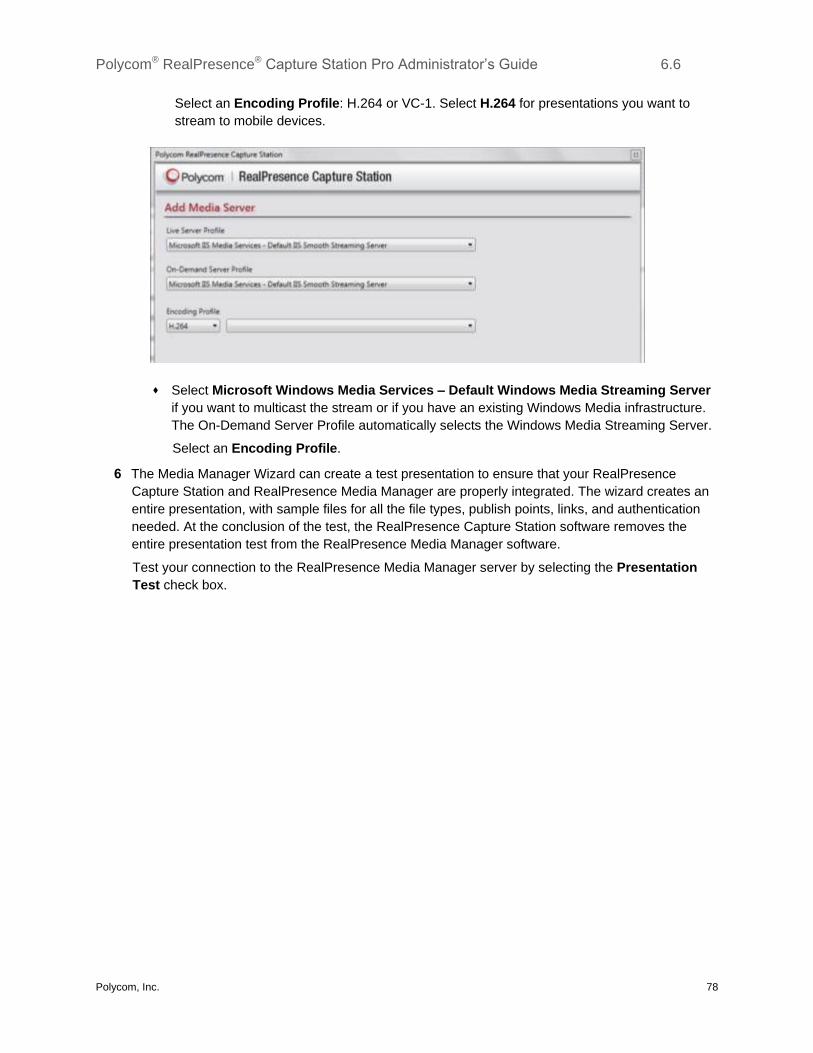
Polycom® RealPresence® Capture Station Pro Administrator’s Guide 6.6
Polycom, Inc. 78
Select an Encoding Profile: H.264 or VC-1. Select H.264 for presentations you want to
stream to mobile devices.
Select Microsoft Windows Media Services – Default Windows Media Streaming Server
if you want to multicast the stream or if you have an existing Windows Media infrastructure.
The On-Demand Server Profile automatically selects the Windows Media Streaming Server.
Select an Encoding Profile.
6 The Media Manager Wizard can create a test presentation to ensure that your RealPresence
Capture Station and RealPresence Media Manager are properly integrated. The wizard creates an
entire presentation, with sample files for all the file types, publish points, links, and authentication
needed. At the conclusion of the test, the RealPresence Capture Station software removes the
entire presentation test from the RealPresence Media Manager software.
Test your connection to the RealPresence Media Manager server by selecting the Presentation
Test check box.

Polycom® RealPresence® Capture Station Pro Administrator’s Guide 6.6
Polycom, Inc. 79
7 A list of tests that the RealPresence Capture Station software will perform displays. Click the
Perform Presentation Test button to start the test, as shown next.
Each test is marked as successful with if it passes, or with if it fails. The indicates the
current test in progress and a progress bar indicates the overall progress of the presentation test.
When all tests have been completed, a message is displayed and the presentation test is
completely removed from the RealPresence Media Manager server, as shown next.
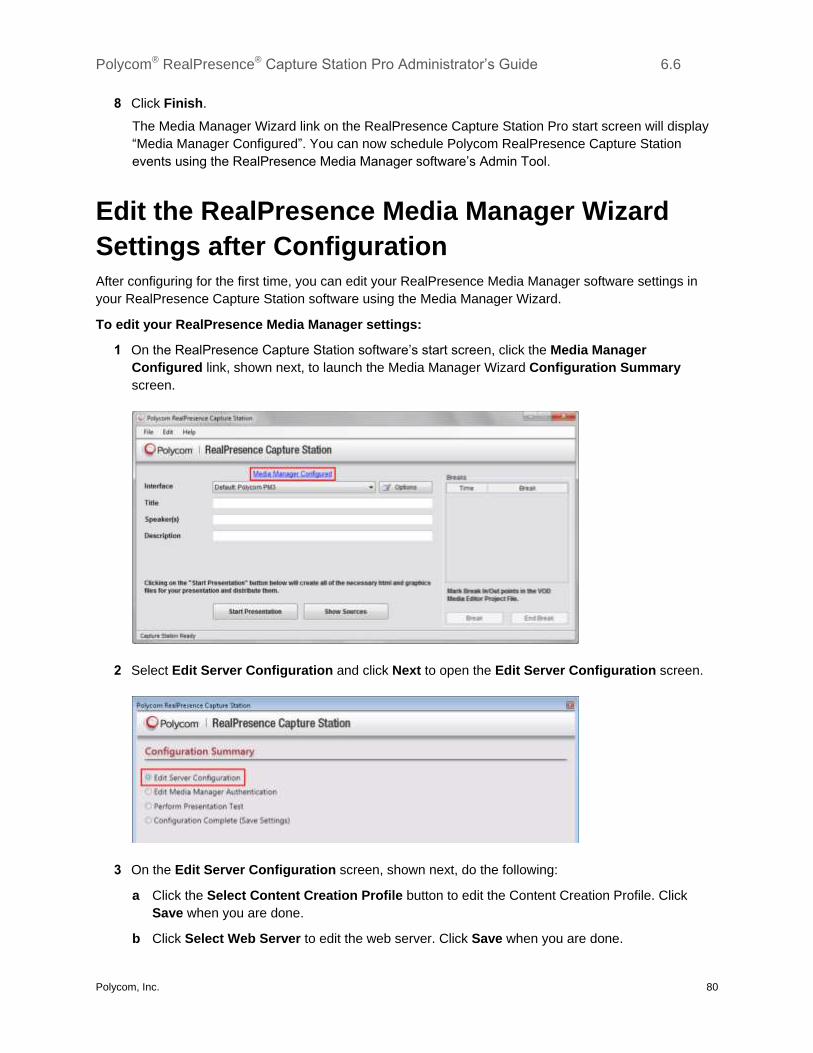
Polycom® RealPresence® Capture Station Pro Administrator’s Guide 6.6
Polycom, Inc. 80
8 Click Finish.
The Media Manager Wizard link on the RealPresence Capture Station Pro start screen will display
“Media Manager Configured”. You can now schedule Polycom RealPresence Capture Station
events using the RealPresence Media Manager software’s Admin Tool.
Edit the RealPresence Media Manager Wizard
Settings after Configuration After configuring for the first time, you can edit your RealPresence Media Manager software settings in
your RealPresence Capture Station software using the Media Manager Wizard.
To edit your RealPresence Media Manager settings:
1 On the RealPresence Capture Station software’s start screen, click the Media Manager
Configured link, shown next, to launch the Media Manager Wizard Configuration Summary
screen.
2 Select Edit Server Configuration and click Next to open the Edit Server Configuration screen.
3 On the Edit Server Configuration screen, shown next, do the following:
a Click the Select Content Creation Profile button to edit the Content Creation Profile. Click
Save when you are done.
b Click Select Web Server to edit the web server. Click Save when you are done.

Polycom® RealPresence® Capture Station Pro Administrator’s Guide 6.6
Polycom, Inc. 81
c Click Add Media Server to add media servers. Click Save when you are done.
Editing server configuration profiles
4 Click Next.
5 Select Edit Media Manager Authentication and click the Next button to open the Media Manager
Authentication screen. Edit the fields and click the Next button.
6 Select Configuration Complete (Save Settings) and click Finish.
To perform a presentation test from the Configuration Summary screen:
1 On the Configuration Summary screen, select Perform Presentation Test.
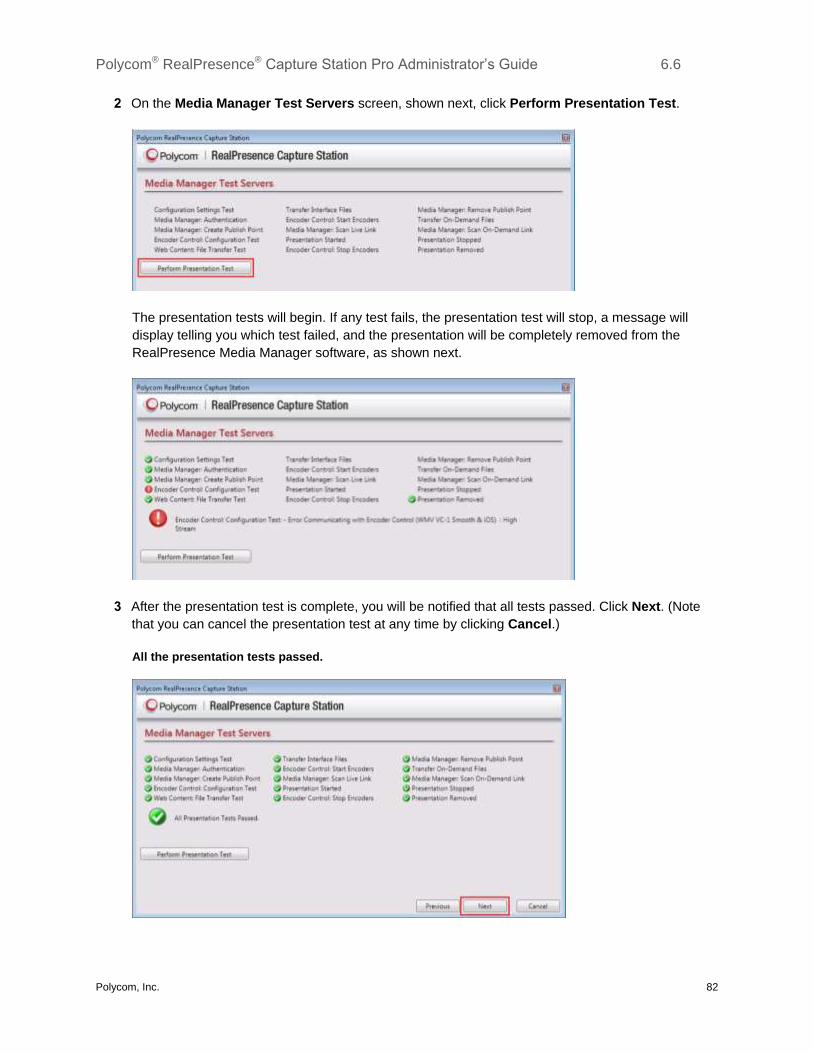
Polycom® RealPresence® Capture Station Pro Administrator’s Guide 6.6
Polycom, Inc. 82
2 On the Media Manager Test Servers screen, shown next, click Perform Presentation Test.
The presentation tests will begin. If any test fails, the presentation test will stop, a message will
display telling you which test failed, and the presentation will be completely removed from the
RealPresence Media Manager software, as shown next.
3 After the presentation test is complete, you will be notified that all tests passed. Click Next. (Note
that you can cancel the presentation test at any time by clicking Cancel.)
All the presentation tests passed.

Polycom® RealPresence® Capture Station Pro Administrator’s Guide 6.6
Polycom, Inc. 83
To undo a Media Manager Wizard configuration and revert to manual settings:
1 Choose Edit > Advanced Settings.
2 On the Web Content page, unavailable settings will display in gray, with the message Settings
Configured by Media Manager. The WMV VC-1 Smooth &iOS page will also be gray, as shown.
Unavailable settings are grayed out.
3 Click the Enable Manual Settings button to edit the publish points. You will see a warning dialog,
as shown.
4 Click OK to confirm that you want to enable manual settings.
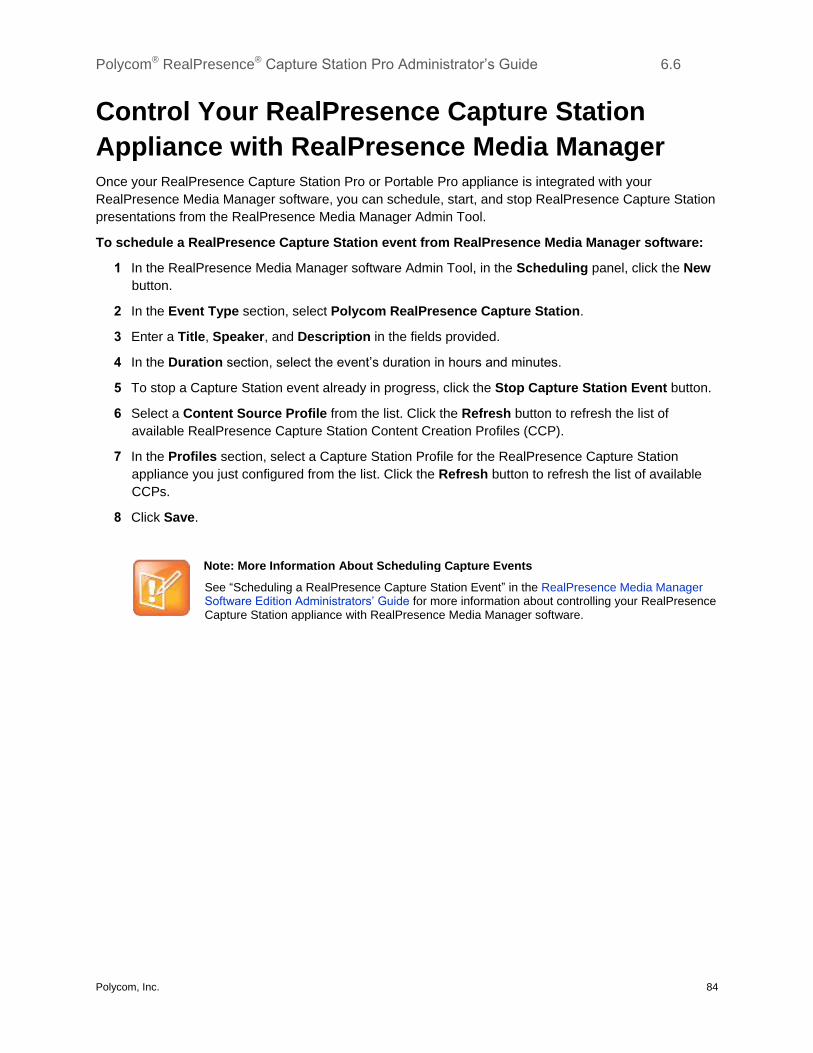
Polycom® RealPresence® Capture Station Pro Administrator’s Guide 6.6
Polycom, Inc. 84
Control Your RealPresence Capture Station
Appliance with RealPresence Media Manager Once your RealPresence Capture Station Pro or Portable Pro appliance is integrated with your
RealPresence Media Manager software, you can schedule, start, and stop RealPresence Capture Station
presentations from the RealPresence Media Manager Admin Tool.
To schedule a RealPresence Capture Station event from RealPresence Media Manager software:
1 In the RealPresence Media Manager software Admin Tool, in the Scheduling panel, click the New
button.
2 In the Event Type section, select Polycom RealPresence Capture Station.
3 Enter a Title, Speaker, and Description in the fields provided.
4 In the Duration section, select the event’s duration in hours and minutes.
5 To stop a Capture Station event already in progress, click the Stop Capture Station Event button.
6 Select a Content Source Profile from the list. Click the Refresh button to refresh the list of
available RealPresence Capture Station Content Creation Profiles (CCP).
7 In the Profiles section, select a Capture Station Profile for the RealPresence Capture Station
appliance you just configured from the list. Click the Refresh button to refresh the list of available
CCPs.
8 Click Save.
Note: More Information About Scheduling Capture Events
See “Scheduling a RealPresence Capture Station Event” in the RealPresence Media Manager Software Edition Administrators’ Guide for more information about controlling your RealPresence Capture Station appliance with RealPresence Media Manager software.

Polycom, Inc. 85
Use the Polycom EagleEye™ III Camera
with Your RealPresence Capture Station
Pro Appliance
RealPresence Capture Station 6.6 software supports the Polycom EagleEye III camera, including
integration of the camera web controller in the RealPresence Capture Station software user interface.
Using the EagleEye camera connected to a RealPresence Capture Station Pro or Portable Pro appliance
and version 6.6 software, you can control the camera settings by using the Eagle Eye web remote stand-
alone or the remote control embedded in the Capture Sources window.
Set up the EagleEye III Camera with the
RealPresence Capture Station Pro Appliance You need to connect your EagleEye III camera to the RealPresence Capture Station Pro or Portable Pro
appliance and configure settings in the RealPresence Capture Station 6.6 software.
Note: Eagle Eye III Camera Support
Only the EagleEye III camera is supported in RealPresence Capture Station 6.6 software. The EagleEye Director and EagleEye Acoustic cameras are not supported. Previous versions of RealPresence Capture Station software do not support the EagleEye III integration.
Connect Your EagleEye III Camera to the RealPresence
Capture Station Pro Appliance
Mount and connect your EagleEye III camera to the RealPresence Capture Station Pro or Portable Pro
appliance using the supplied cables and adapters, as shown in the following diagram.
To connect your EagleEye III camera to the RealPresence Capture Station Pro appliance:
1 Connect the EagleEye III camera to the People channel on the RealPresence Capture Station Pro
appliance using the supplied cables and adapters (shown next).
2 Connect the EagleEye III camera to any USB port on the RealPresence Capture Station Pro
appliance using the supplied cables and adapters (shown next).
3 Connect the EagleEye III camera to a 120V AC power source using the supplied power adapter.
4 Connect your content source to the Content channel on the RealPresence Capture Station Pro
appliance.
5 Power on the RealPresence Capture Station Pro appliance and launch the RealPresence Capture
Station 6.6 software.

Polycom® RealPresence® Capture Station Pro Administrator’s Guide 6.6
Polycom, Inc. 86
Note: Provide an Audio Source When Using the EagleEye III Camera
You need to connect a separate audio source, such as a powered microphone, when using the EageEye III camera with the RealPresence Capture Station Pro or Portable Pro appliance. Connect the audio source to the 1/8” Audio jack next to the People input. The EagleEye III camera does not have audio capability.
Connecting the EagleEye III camera
Configure the EagleEye Settings in RealPresence Capture
Station Software
You need to configure the communication port and People Capture input in RealPresence Capture
Station 6.6 software.
To configure the RealPresence Capture Station software for the EagleEye III camera:
1 Choose Edit > Advanced Settings.
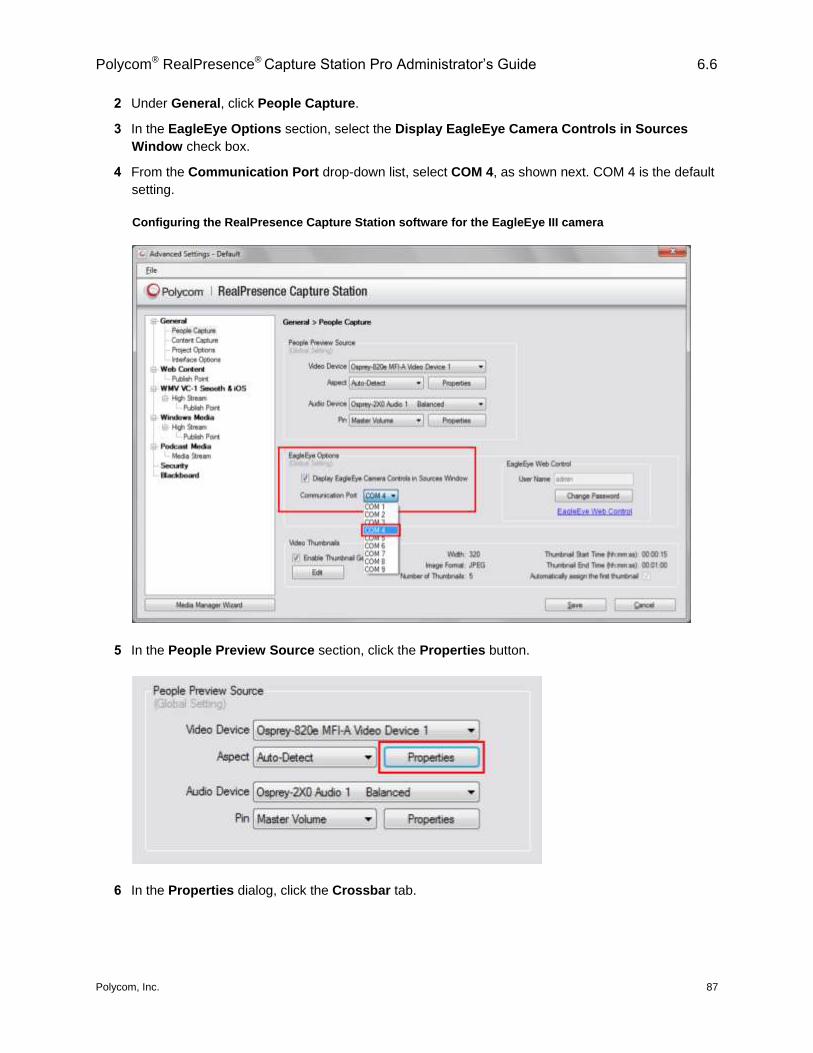
Polycom® RealPresence® Capture Station Pro Administrator’s Guide 6.6
Polycom, Inc. 87
2 Under General, click People Capture.
3 In the EagleEye Options section, select the Display EagleEye Camera Controls in Sources
Window check box.
4 From the Communication Port drop-down list, select COM 4, as shown next. COM 4 is the default
setting.
Configuring the RealPresence Capture Station software for the EagleEye III camera
5 In the People Preview Source section, click the Properties button.
6 In the Properties dialog, click the Crossbar tab.

Polycom® RealPresence® Capture Station Pro Administrator’s Guide 6.6
Polycom, Inc. 88
7 In the Input section, select Component Input 1 from the drop-down list.
8 Click OK to close the dialog and return to the People Capture screen.
9 On the People Capture screen, click Save.
Set the Communication Port in Windows
Check the communication port assigned to the USB Serial Controller in Windows on the RealPresence
Capture Station Pro appliance. The port number must match the COM number you selected in the
RealPresence Capture Station software.
To set the communication port:
1 In the Start menu, right-click Computer and choose Manage.
2 Click Device Manager from the tree on the left side.
3 Expand Ports (COM & LPT).
4 Locate USB Serial Controller and note the COM number next to it. This number must match the
COM number you selected in the RealPresence Capture Station software.
Check Your EagleEye III Camera Configuration
After connecting and configuring your EagleEye III camera, verify that it is working in the Capture Sources
window.
To display the Capture Sources window and check your configuration:
» Click Show Sources on the RealPresence Capture Station Pro start screen. You will see a live
image from the EagleEye III camera if it is connected and configured correctly.
Control the EagleEye III Camera in RealPresence
Capture Station Software You can control your Eagle Eye III camera using the Eagle Eye remote in the Capture Sources window.
To display the Capture Sources window, click Show Sources on the RealPresence Capture Station Pro
start screen.

Polycom® RealPresence® Capture Station Pro Administrator’s Guide 6.6
Polycom, Inc. 89
To control your Eagle Eye III camera:
1 With your Eagle Eye camera connected to the RealPresence Capture Station Pro appliance, open
the Capture Sources window by clicking the Show Sources button on the RealPresence Capture
Station Pro start screen.
2 In the EagleEye Controls section, click the buttons on the user interface to control the EagleEye
camera.
Use the EagleEye III Web Controller You can control the EagleEye III camera using the web controller while it is connected to the
RealPresence Capture Station Pro appliance.
To use the EagleEye III web controller:
1 Choose Edit > Advanced Settings.
2 Under General, click People Capture.
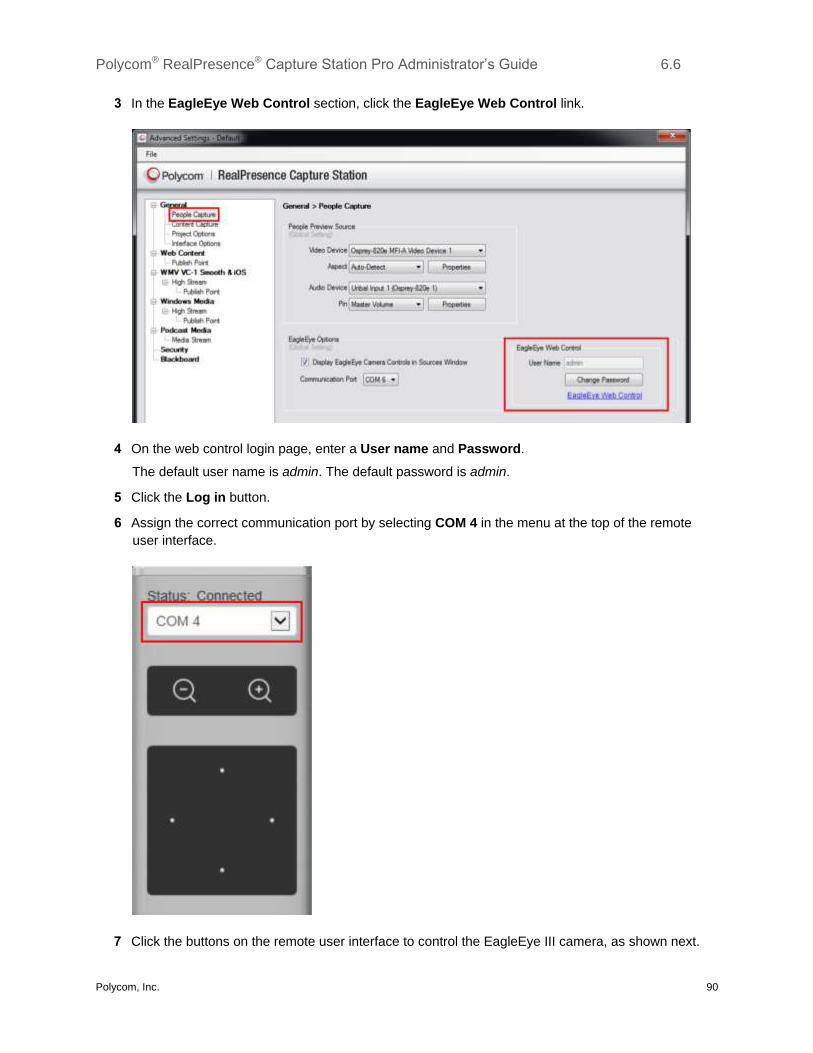
Polycom® RealPresence® Capture Station Pro Administrator’s Guide 6.6
Polycom, Inc. 90
3 In the EagleEye Web Control section, click the EagleEye Web Control link.
4 On the web control login page, enter a User name and Password.
The default user name is admin. The default password is admin.
5 Click the Log in button.
6 Assign the correct communication port by selecting COM 4 in the menu at the top of the remote
user interface.
7 Click the buttons on the remote user interface to control the EagleEye III camera, as shown next.
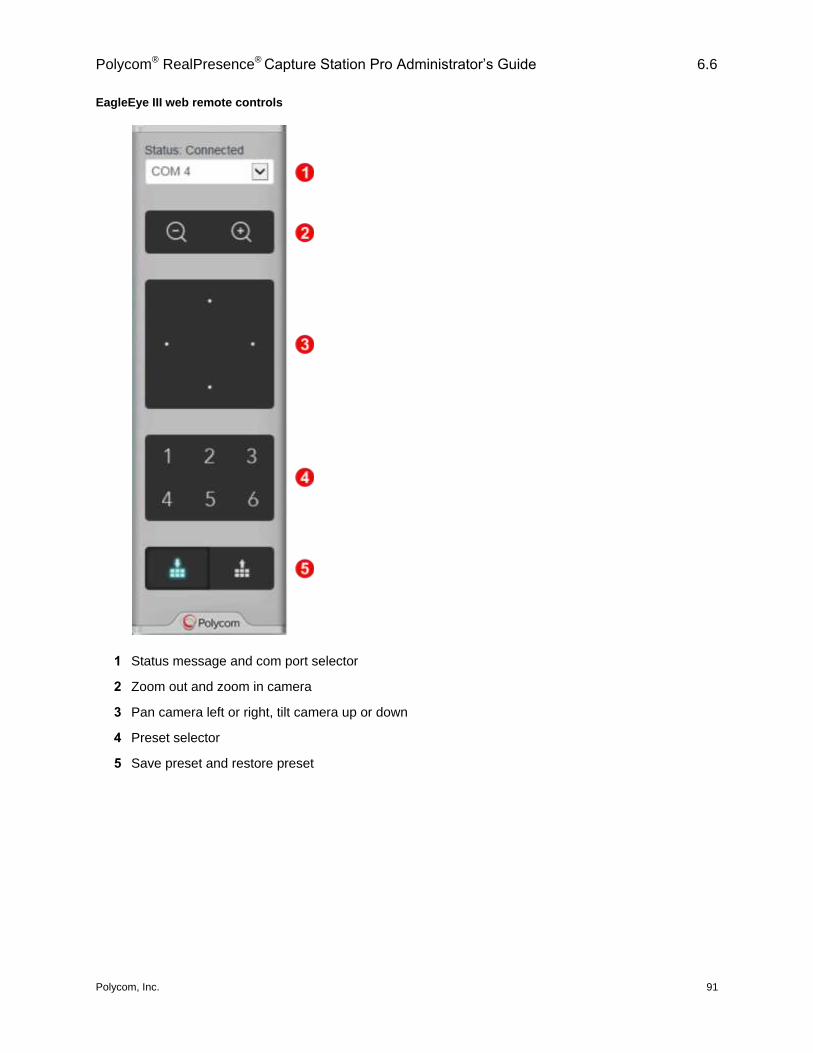
Polycom® RealPresence® Capture Station Pro Administrator’s Guide 6.6
Polycom, Inc. 91
EagleEye III web remote controls
1 Status message and com port selector
2 Zoom out and zoom in camera
3 Pan camera left or right, tilt camera up or down
4 Preset selector
5 Save preset and restore preset
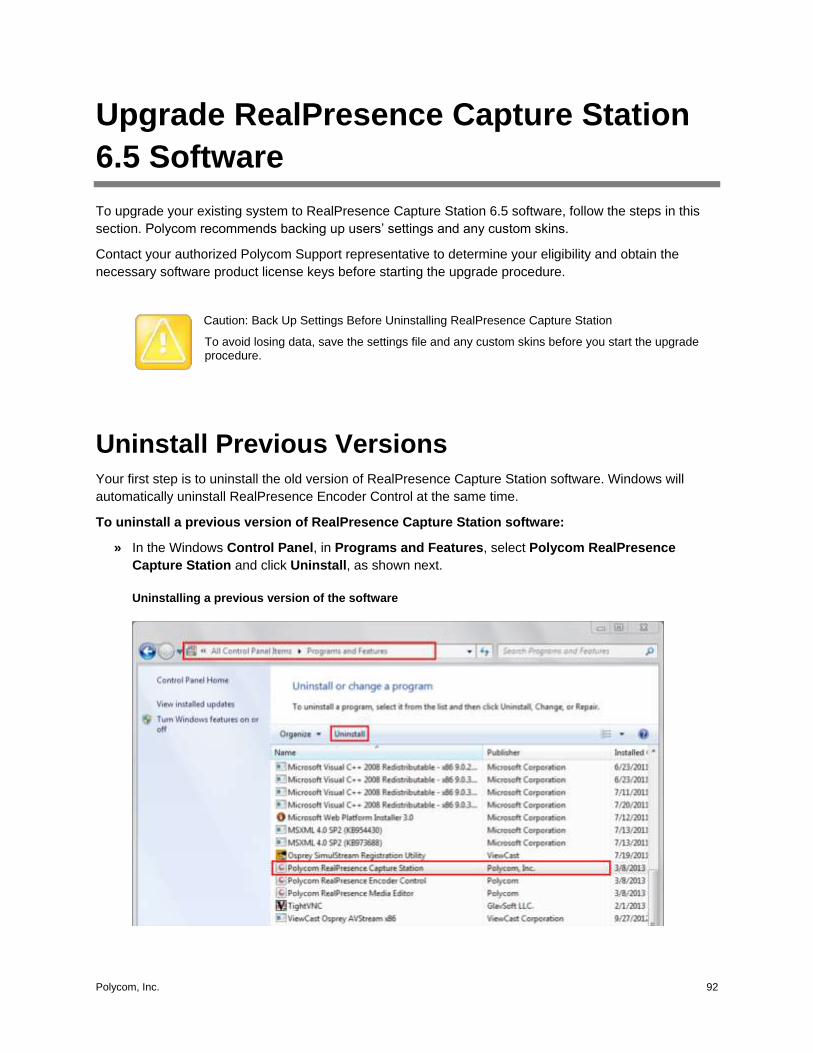
Polycom, Inc. 92
Upgrade RealPresence Capture Station
6.5 Software
To upgrade your existing system to RealPresence Capture Station 6.5 software, follow the steps in this
section. Polycom recommends backing up users’ settings and any custom skins.
Contact your authorized Polycom Support representative to determine your eligibility and obtain the
necessary software product license keys before starting the upgrade procedure.
Caution: Back Up Settings Before Uninstalling RealPresence Capture Station
To avoid losing data, save the settings file and any custom skins before you start the upgrade procedure.
Uninstall Previous Versions Your first step is to uninstall the old version of RealPresence Capture Station software. Windows will
automatically uninstall RealPresence Encoder Control at the same time.
To uninstall a previous version of RealPresence Capture Station software:
» In the Windows Control Panel, in Programs and Features, select Polycom RealPresence
Capture Station and click Uninstall, as shown next.
Uninstalling a previous version of the software
Polycom® RealPresence® Capture Station Pro Administrator’s Guide 6.6
Polycom, Inc. 93
Install RealPresence Capture Station 6.6
Software After you have uninstalled the previous version, you can unzip and install the RealPresence Capture
Station 6.6 software. The RealPresence Capture Station InstallShield Wizard also automatically detects
Microsoft Expression Encoder 4 Pro and installs it as needed.
To install RealPresence Capture Station 6.6 software:
1 Right-click the PRCS_v6.6.x.x zip icon, select Open with... > Windows Explorer.
2 Click Extract All. Browse to a folder and click Unzip.
3 Right-click PRCS_v6.6.x.x.exe and select Run as Administrator.
4 When the InstallShield Wizard opens, drag the window to the left or right of your desktop.
5 Read the warning and click Next.
6 Read the End User License Agreement (EULA), select I accept the terms in the license
agreement, and click Next.
7 Complete the remaining steps in the InstallShield Wizard and click Install.
The RealPresence Capture Station InstallShield Wizard pauses and the RealPresence Encoder
Control InstallShield Wizard opens.
Install Polycom RealPresence Encoder Control
Software The RealPresence Encoder Control InstallShield Wizard opens automatically during the RealPresence
Capture Station software installation process.
To install the RealPresence Encoder Control software:
1 When the RealPresence Encoder Control InstallShield Wizard opens, read the EULA, select I
accept the terms in the license agreement, and click Next.
2 Select the Encoder Service Running Mode you would like to use from the following options:
Run as a Windows service Run the RealPresence Encoder Control software as a Windows
service if you want it to start automatically every time the RealPresence Capture Station is
powered on, and if you want configuration to be limited to the local admin account. This setting
requires additional system administrator permissions during installation.
Run as a desktop application Run the RealPresence Encoder Control software as a desktop
application to configure it without the need for administrator permissions. This is the simplest
installation option.
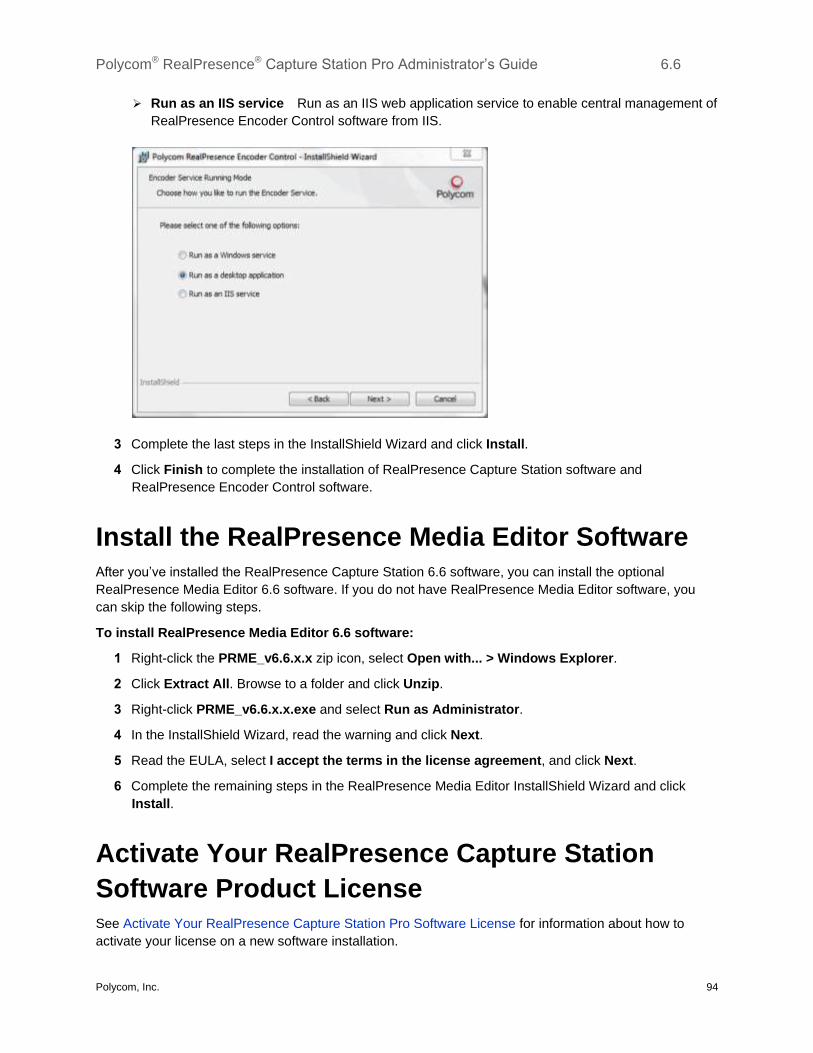
Polycom® RealPresence® Capture Station Pro Administrator’s Guide 6.6
Polycom, Inc. 94
Run as an IIS service Run as an IIS web application service to enable central management of
RealPresence Encoder Control software from IIS.
3 Complete the last steps in the InstallShield Wizard and click Install.
4 Click Finish to complete the installation of RealPresence Capture Station software and
RealPresence Encoder Control software.
Install the RealPresence Media Editor Software After you’ve installed the RealPresence Capture Station 6.6 software, you can install the optional
RealPresence Media Editor 6.6 software. If you do not have RealPresence Media Editor software, you
can skip the following steps.
To install RealPresence Media Editor 6.6 software:
1 Right-click the PRME_v6.6.x.x zip icon, select Open with... > Windows Explorer.
2 Click Extract All. Browse to a folder and click Unzip.
3 Right-click PRME_v6.6.x.x.exe and select Run as Administrator.
4 In the InstallShield Wizard, read the warning and click Next.
5 Read the EULA, select I accept the terms in the license agreement, and click Next.
6 Complete the remaining steps in the RealPresence Media Editor InstallShield Wizard and click
Install.
Activate Your RealPresence Capture Station
Software Product License See Activate Your RealPresence Capture Station Pro Software License for information about how to
activate your license on a new software installation.

Polycom® RealPresence® Capture Station Pro Administrator’s Guide 6.6
Polycom, Inc. 95
Install Expression Encoder 4 Pro You may need to install Microsoft Expression Encoder 4 Pro software.
Before you begin installation, you must download the Expression Encoder 4 Pro SP2 installer to the
server from http://www.microsoft.com/en-us/download/details.aspx?id=27870.
To install Expression Encoder Pro:
1 Browse to the Expression Encoder Pro installer, Encoder_En.exe.
2 Right-click Encoder_En.exe and select Run as administrator.
3 Follow the default installation prompts.
4 Enter the activation key, which was provided with your RealPresence Media Manager software
license key.
Activate Expression Encoder 4 Pro Without an Internet
Connection
If you do not have an Internet connection, you can still activate Expression Encoder 4 Pro by phoning a
Microsoft Product Activation Center.
To activate Expression Encoder 4 Pro without an Internet connection:
1 Open Expression Encoder 4 Pro. Choose Help > Activate Expression Encoder.
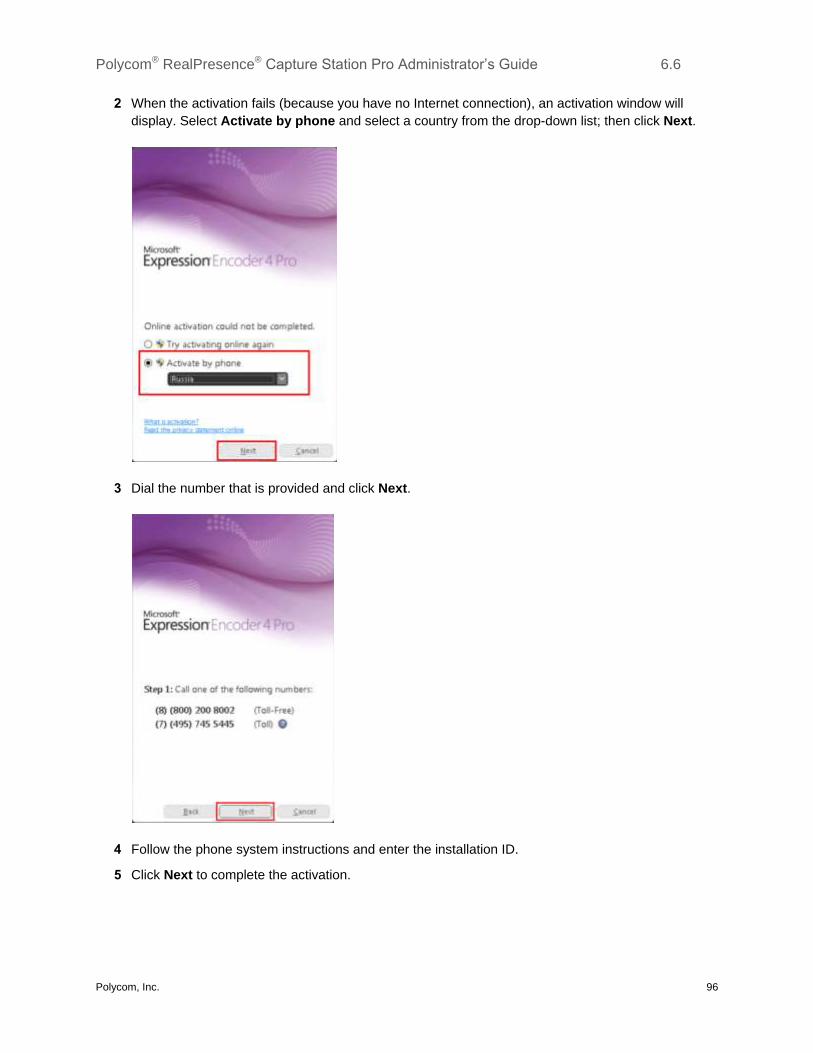
Polycom® RealPresence® Capture Station Pro Administrator’s Guide 6.6
Polycom, Inc. 96
2 When the activation fails (because you have no Internet connection), an activation window will
display. Select Activate by phone and select a country from the drop-down list; then click Next.
3 Dial the number that is provided and click Next.
4 Follow the phone system instructions and enter the installation ID.
5 Click Next to complete the activation.
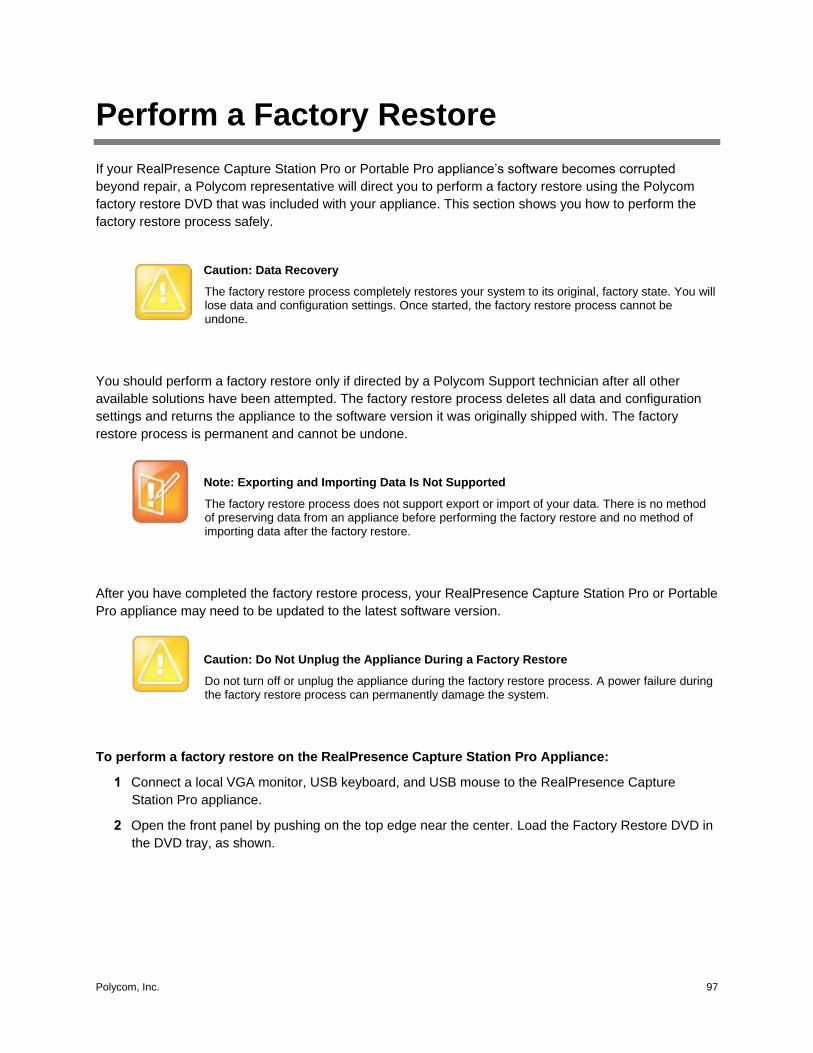
Polycom, Inc. 97
Perform a Factory Restore
If your RealPresence Capture Station Pro or Portable Pro appliance’s software becomes corrupted
beyond repair, a Polycom representative will direct you to perform a factory restore using the Polycom
factory restore DVD that was included with your appliance. This section shows you how to perform the
factory restore process safely.
Caution: Data Recovery
The factory restore process completely restores your system to its original, factory state. You will lose data and configuration settings. Once started, the factory restore process cannot be undone.
You should perform a factory restore only if directed by a Polycom Support technician after all other
available solutions have been attempted. The factory restore process deletes all data and configuration
settings and returns the appliance to the software version it was originally shipped with. The factory
restore process is permanent and cannot be undone.
Note: Exporting and Importing Data Is Not Supported
The factory restore process does not support export or import of your data. There is no method of preserving data from an appliance before performing the factory restore and no method of importing data after the factory restore.
After you have completed the factory restore process, your RealPresence Capture Station Pro or Portable
Pro appliance may need to be updated to the latest software version.
Caution: Do Not Unplug the Appliance During a Factory Restore
Do not turn off or unplug the appliance during the factory restore process. A power failure during the factory restore process can permanently damage the system.
To perform a factory restore on the RealPresence Capture Station Pro Appliance:
1 Connect a local VGA monitor, USB keyboard, and USB mouse to the RealPresence Capture
Station Pro appliance.
2 Open the front panel by pushing on the top edge near the center. Load the Factory Restore DVD in
the DVD tray, as shown.
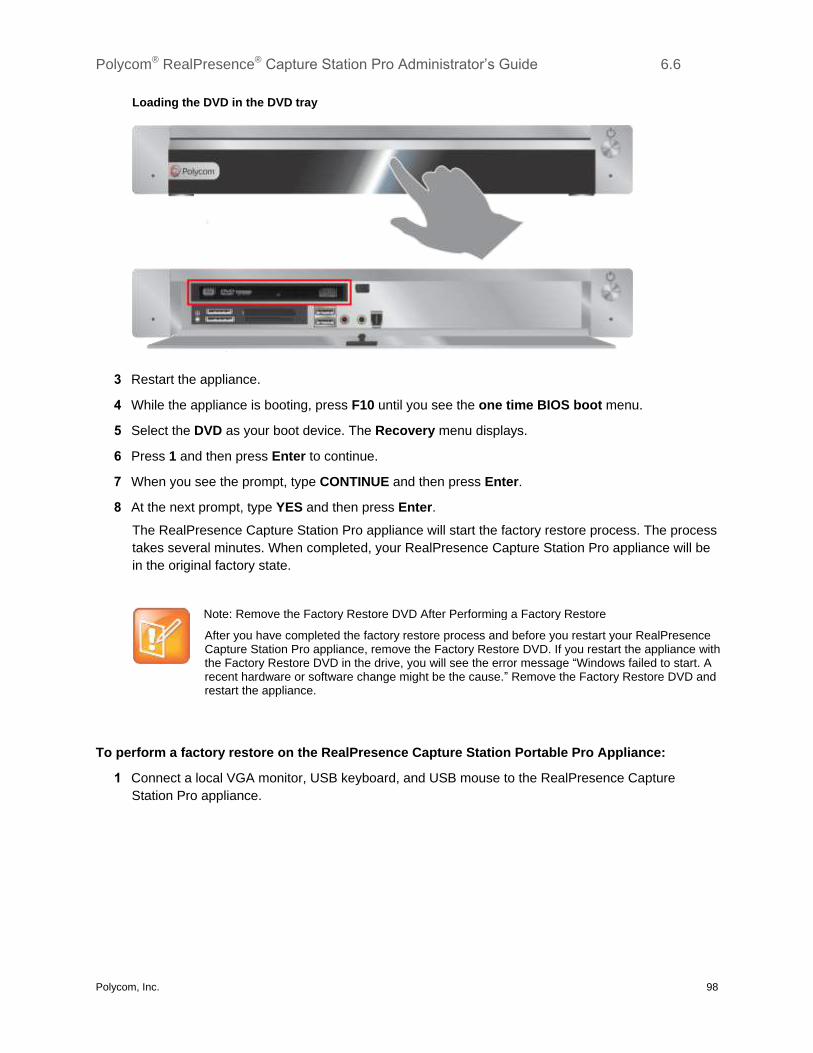
Polycom® RealPresence® Capture Station Pro Administrator’s Guide 6.6
Polycom, Inc. 98
Loading the DVD in the DVD tray
3 Restart the appliance.
4 While the appliance is booting, press F10 until you see the one time BIOS boot menu.
5 Select the DVD as your boot device. The Recovery menu displays.
6 Press 1 and then press Enter to continue.
7 When you see the prompt, type CONTINUE and then press Enter.
8 At the next prompt, type YES and then press Enter.
The RealPresence Capture Station Pro appliance will start the factory restore process. The process
takes several minutes. When completed, your RealPresence Capture Station Pro appliance will be
in the original factory state.
Note: Remove the Factory Restore DVD After Performing a Factory Restore
After you have completed the factory restore process and before you restart your RealPresence Capture Station Pro appliance, remove the Factory Restore DVD. If you restart the appliance with the Factory Restore DVD in the drive, you will see the error message “Windows failed to start. A recent hardware or software change might be the cause.” Remove the Factory Restore DVD and restart the appliance.
To perform a factory restore on the RealPresence Capture Station Portable Pro Appliance:
1 Connect a local VGA monitor, USB keyboard, and USB mouse to the RealPresence Capture
Station Pro appliance.

Polycom® RealPresence® Capture Station Pro Administrator’s Guide 6.6
Polycom, Inc. 99
2 Load the Factory Restore DVD in the DVD slot, as shown.
3 Restart the appliance.
4 While the appliance is booting, press F10 until you see the one time BIOS boot menu.
5 Select the DVD as your boot device. The Recovery menu displays.
6 Press 1 and then press Enter to continue.
7 When you see the prompt, type CONTINUE and then press Enter.
8 At the next prompt, type YES and then press Enter.
The RealPresence Capture Station Portable Pro appliance will start the factory restore process.
The process takes several minutes. When completed, your RealPresence Capture Station Portable
Pro appliance will be in the original factory state.
Note: Remove the Factory Restore DVD After Performing a Factory Restore
After you have completed the factory restore process and before you restart your RealPresence Capture Station Portable Pro appliance, remove the Factory Restore DVD. If you restart the appliance with the Factory Restore DVD in the drive, you’ll see the error message “Windows failed to start. A recent hardware or software change might be the cause.” Remove the Factory Restore DVD and restart the appliance.
Polycom, Inc. 100
Getting Help
This section provides links to related documents and websites to help you configure and use your
RealPresence Capture Station Pro appliance and software, and other Polycom products.
Polycom Resources For more information about installing, configuring, and administering Polycom products, refer to
Documents and Downloads at Polycom Support.
To find RealPresence Capture Station documentation, see RealPresence Capture Station Support.
To find RealPresence Media Manager documentation, see RealPresence Media Manager Support.
To find all Polycom partner solutions, see Polycom Global Strategic Partner Solutions.
The Polycom Community The Polycom Community gives you access to the latest developer and support information. Participate in
discussion forums to share ideas and solve problems with your colleagues. To register with the Polycom
Community, simply create a Polycom online account. When logged in, you can access Polycom support
personnel and participate in developer and support forums to find the latest information on hardware,
software, and partner solutions topics.

Polycom, Inc. 101
Reference Information
This section provides reference information, including tested video resolutions and ports used.
Tested Video Resolutions Consult the following tables for information regarding tested video resolution. The tables show the
compatible video resolutions for the People and Content channels for both the RealPresence Capture
Station Pro and Portable Pro appliances.
People Channel–Tested Video Resolutions
Input Channel
(People)
Tested Resolutions Device
DVI VC-1 IIS Smooth Streaming Low Bandwidth
VC-1 IIS Smooth Streaming SD 480p
VC-1 IIS Smooth Streaming HD 720p
H.264 IIS Smooth Streaming iPad, Mobile
H.264 IIS Smooth Streaming SD 480p
H.264 IIS Smooth Streaming HD 720p
Camera/camcorder /DVD
HDMI VC-1 IIS Smooth Streaming Low Bandwidth
VC-1 IIS Smooth Streaming SD 480p
VC-1 IIS Smooth Streaming HD 720p
H.264 IIS Smooth Streaming iPad, Mobile
H.264 IIS Smooth Streaming SD 480p
H.264 IIS Smooth Streaming HD 720p
Camera/camcorder /DVD
VGA VC-1 IIS Smooth Streaming Low Bandwidth
VC-1 IIS Smooth Streaming SD 480p
H.264 IIS Smooth Streaming iPad, Mobile
H.264 IIS Smooth Streaming SD 480p
Camera/camcorder /DVD
Component VC-1 IIS Smooth Streaming Low Bandwidth
VC-1 IIS Smooth Streaming SD 480p
VC-1 IIS Smooth Streaming HD 720p
H.264 IIS Smooth Streaming iPad, Mobile
H.264 IIS Smooth Streaming SD 480p
H.264 IIS Smooth Streaming HD 720p
Camera/camcorder /DVD
S-Video VC-1 IIS Smooth Streaming Low Bandwidth
VC-1 IIS Smooth Streaming SD 480p
H.264 IIS Smooth Streaming iPad, Mobile
H.264 IIS Smooth Streaming SD 480p
Camera/camcorder /DVD
Polycom® RealPresence® Capture Station Pro Administrator’s Guide 6.6
Polycom, Inc. 102
Input Channel
(People)
Tested Resolutions Device
3.5mm Audio Standard stereo Camera/camcorder /DVD
Note: Using Copy-Protected Sources
The RealPresence Capture Station Pro and Portable Pro appliances will not accept copy-protected
HDMI sources, commercial DVDs, commercial Blu-ray discs, video games, or the Apple MacBook Pro
HDMI output as valid input sources. You will see only color bars when an HDCP-protected content
source is connected to the People or Content input.
Content Channel–Tested Video Resolutions
Input Channel
(Content)
Tested Resolutions Device
DVI 640x480
1280x1024
1600x1200
Laptop/PC/projector
HDMI 640x480
1280x1024
1600x1200
Laptop/PC/projector
VGA 640x480
800x600
1024x768
1280x1024
Laptop/PC/projector
Component 640x480
1280x720
Laptop/PC/projector
S-Video 640x480
1280x720
Laptop/PC/projector
Ports and Protocols The following table provides a list of default port numbers and protocols used by RealPresence Capture
Station Pro components.

Polycom® RealPresence® Capture Station Pro Administrator’s Guide 6.6
Polycom, Inc. 103
RealPresence Capture Station Ports and Protocols
Component Protocol Port Description
Capture Station Scheduling
Component
HTTP 80 Capture Station to
RealPresence Media Manager
Server
Capture Station Status
Check
HTTP 81 RealPresence Media Manager
to Capture Station


