Rear Auxiliary Anti-Sway Bar Kit for Sprinter 3500 85-4255 rev. 12 10-17 ROADMASTER, Inc. • 6110 NE 127th Ave. • Vancouver, WA 98682 • 800-669-9690 • fax: 360-735-9300 • www.roadmasterinc.com part #1209-131 1½" diameter INTRODUCTION Thank you for purchasing this auxiliary anti-sway bar kit. This kit is designed to improve the handling characteristics of your Sprinter 3500 by reducing the body roll and balancing the weight transfer during cornering. The anti-sway bar kit is engineered for long life and trouble-free performance. All the hardware needed for the installation is included in this kit. Refer to the PARTS LIST in these instructions to identify the parts. SUGGESTED TOOLS The following tools are suggested to complete the installation procedures: • general shop tools • drill and drill bits • sockets: 7/16" and ½" • clamps • center punch • torque wrench Installation Instructions • If raising the vehicle to install the anti-sway bar, always support the vehicle with jack stands at both frame rails or at the rear axle before working underneath. Ensure that the jack stands are securely positioned, and are rated at or above the weight of the vehicle. •The installer must read the instructions and use all bolts and parts supplied. Use only the parts supplied by ROADMASTER to install this kit. • Minor modifications are sometimes necessary due to slight vehicle variations, even for the same year, make and model. • Regardless of year, make and model, a wide range of options for specific applications may or may not interfere with the installation. It is the installer’s responsibility to make certain that equipment is not damaged once the suspension solution travels through the full range of motion. Failure to ensure adequate clearance could result in non-warranty property damage, personal injury or even death. Failure to follow these instructions can result in property damage, per- sonal injury or even death. WARNING • If running changes were made by the manufacturer after this kit was designed, there may be weldments, braces, gussets, or other structural items which interfere with the installation. It is the in- staller’s responsibility to allow for these running changes without sacrificing the structural integrity of the anti-sway bar. Failure to securely fasten the anti-sway bar could result in property damage, personal injury or even death. •ROADMASTER will not be responsible for any damage or injury resulting from any modification or alteration. • Check ALL the fasteners for tightness before and after road testing the vehicle. • Do not use this document for custom fabrication, as it may not show all parts or structural components. • Do not use an air impact wrench when re-installing bolts, as stripped threads may result. • This anti-sway bar is only warranteed for the original installation. Installing a used anti-sway bar on another vehicle is not recom- mended and will void the warranty.
Transcript
Rear Auxiliary Anti-Sway Bar Kit for Sprinter 3500
85-4255 rev. 12 10-17
ROADMASTER, Inc. • 6110 NE 127th Ave. • Vancouver, WA 98682 • 800-669-9690 • fax: 360-735-9300 • www.roadmasterinc.com
part #1209-131 1½" diameter
INTRODUCTION Thank you for purchasing this auxiliary anti-sway bar kit. This kit is designed to improve the handling characteristics of your Sprinter 3500 by reducing the body roll and balancing the weight transfer during cornering. The anti-sway bar kit is engineered for long life and trouble-free performance. All the hardware needed for the installation is included in this kit. Refer to the PARTS LIST in these instructions to identify the parts.
SUGGESTED TOOLS The following tools are suggested to complete the installation procedures:
• general shop tools • drill and drill bits • sockets: 7/16" and ½" • clamps
• center punch • torque wrench
Installation Instructions
• If raising the vehicle to install the anti-sway bar, always support the vehicle with jack stands at both frame rails or at the rear axle before working underneath. Ensure that the jack stands are securely positioned, and are rated at or above the weight of the vehicle.
•The installer must read the instructions and use all bolts and parts supplied. Use only the parts supplied by ROADMASTER to install this kit.
• Minor modifications are sometimes necessary due to slight vehicle variations, even for the same year, make and model.
• Regardless of year, make and model, a wide range of options for specific applications may or may not interfere with the installation. It is the installer’s responsibility to make certain that equipment is not damaged once the suspension solution travels through the full range of motion. Failure to ensure adequate clearance could result in non-warranty property damage, personal injury or even death.
Failure to follow these instructions can result in property damage, per-sonal injury or even death.
WARNING• If running changes were made by the manufacturer after this kit
was designed, there may be weldments, braces, gussets, or other structural items which interfere with the installation. It is the in-staller’s responsibility to allow for these running changes without sacrificing the structural integrity of the anti-sway bar. Failure to securely fasten the anti-sway bar could result in property damage, personal injury or even death.
•ROADMASTER will not be responsible for any damage or injury resulting from any modification or alteration.
• Check ALL the fasteners for tightness before and after road testing the vehicle.
• Do not use this document for custom fabrication, as it may not show all parts or structural components.
• Do not use an air impact wrench when re-installing bolts, as stripped threads may result.
• This anti-sway bar is only warranteed for the original installation. Installing a used anti-sway bar on another vehicle is not recom-mended and will void the warranty.
PARTS LIST
2 • Auxiliary Rear Anti-Sway Bar Kit for Sprinter 3500 800-669-9690
Part #1209-131
Part # Description Qty 1. B141 Bushing clamp 2 2. B720 Axle bracket 1 3. B666 (L&R) Frame bracket 2 4. B721 Axle bracket 15. B292 End link 26. 205217-10 Bushing 2 7. 205223-00 Bushing hat 4 8. 205516-00 Metal sleeve 29. 205522-00 Bushing sleeve 2 10. 350096-80 1/2" x 1-3/4" NC GD8 Zn 8
Part # Description Qty11. 350259-00 1/2" NC Nylon Ins Ln Zp 10 12. 350308-00 1/2" Cut washer 1613. 350101-80 1/2" x 3" Bolt 214. 350347-00 9/16" Cut washer 415. 357207-00 12mm x 1.75 x 60mm 216. 357212-50 12mm x 1.75 Locknut 217. 400011-30 Aqualube 118. 580263-00 Anti-sway bar 119. 357261-00 U-bolt 220. *205223-50 Bushing hat 4 21. *B693 End link 2
Free Extended Warranty You must accurately and completely fill out and mail the product registration card within thirty (30) days from the date of purchase to qualify for your warranty. If we receive your card, completely and accurately filled out, within twenty (20) days from the date of purchase, we will extend the coverage to a total of two (2) years at no extra charge. Your product registration is an important record for ROADMASTER to keep in touch with you. It also enables us to expedite any future claim, update or recall that may arise concerning our products.
18
11
12
14
19
16
17
13
1 6
5
9
10
15
32 4
7
8
*not pictured
1. Use a floor jack or hoist to raise the vehicle.Put the vehicle in neutral. Position floor jacks under the frame, or use a hoist, to raise the vehicle so that the tires are off the ground.
WARNING Always support the vehicle by using a hoist or by using se-curely positioned jack stands at both frame rails or at the rear axle, before working underneath. Ensure that the hoist or jack stands are rated at or above the weight of the vehicle. Failure to follow these instructions may cause property dam-age, personal injury or even death.
2. Install the axle brackets.Remove the two front U-bolt nuts on each side of the rear axle. Remove the factory U-bolts, and replace them with the two U-bolts provided in the kit. Next, install the axle brackets, using the factory U-bolt nuts (Fig-ure 1).Note: The brake line supports (Figure 2) must be loosened to attach the anti-sway bar in step 4. However, it may be more con-venient to loosen the brake line supports now, in order to attach the axle brackets.
3. Install the frame brackets.The frame brackets will be located on the cross member of the front leaf spring mounts (Figure 3). First, clamp the frame brackets into position.Note: It may be necessary to remove the factory caulking (if pres-ent) in order to fit the frame brackets correctly.Next, on each side, drill two 17/32" holes. Then, bolt the frame brackets into position (Figure 3). Torque the bolts to 80 ft./lbs.
4. Install the anti-sway bar.Lubricate the inside of the bushings with the provided grease. Next, lift the anti-sway bar into position, above the axle, maneuvering it above drive line and brake lines. Then, loosely bolt each bushing clamp (Figure 4) to one of the axle brackets.
Note: make certain that the brake hoses are not contact-ing the bushing clamp or axle bracket in any way, or it could result in damage to the brake hoses.
CAUTION Do not allow the anti-sway bar to hit the drive-shaft, or the driveshaft may be damaged, which may cause unwanted vibration while driving the vehicle.
continued next page
The following instructions must be followed in the order listed to ensure a proper installation and to preserve the ROADMASTER warranty.
INSTALLATION
800-669-9690 Auxiliary Rear Anti-Sway Bar Kit for Sprinter 3500 • 3
Figure 1
Figure 2
Figure 3
Figure 4
INSTALLATION
4 • Auxiliary Rear Anti-Sway Bar Kit for Sprinter 3500 800-669-9690
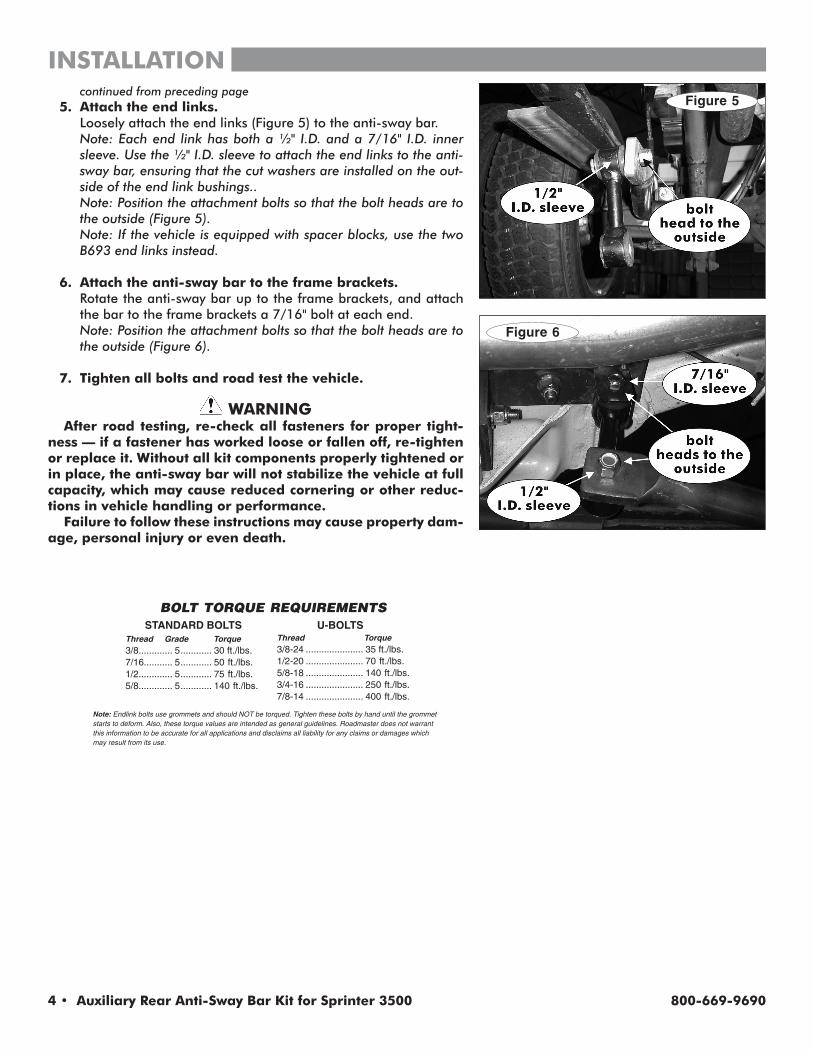
continued from preceding page 5. Attach the end links.
Loosely attach the end links (Figure 5) to the anti-sway bar. Note: Each end link has both a ½" I.D. and a 7/16" I.D. inner sleeve. Use the ½" I.D. sleeve to attach the end links to the anti-sway bar, ensuring that the cut washers are installed on the out-side of the end link bushings..Note: Position the attachment bolts so that the bolt heads are to the outside (Figure 5).Note: If the vehicle is equipped with spacer blocks, use the two B693 end links instead.
6. Attach the anti-sway bar to the frame brackets.Rotate the anti-sway bar up to the frame brackets, and attach the bar to the frame brackets a 7/16" bolt at each end.Note: Position the attachment bolts so that the bolt heads are to the outside (Figure 6).
7. Tighten all bolts and road test the vehicle.
WARNING After road testing, re-check all fasteners for proper tight-ness — if a fastener has worked loose or fallen off, re-tighten or replace it. Without all kit components properly tightened or in place, the anti-sway bar will not stabilize the vehicle at full capacity, which may cause reduced cornering or other reduc-tions in vehicle handling or performance. Failure to follow these instructions may cause property dam-age, personal injury or even death.
Note: Endlink bolts use grommets and should NOT be torqued. Tighten these bolts by hand until the grommet starts to deform. Also, these torque values are intended as general guidelines. Roadmaster does not warrant this information to be accurate for all applications and disclaims all liability for any claims or damages which may result from its use.
1a. WARRANTY OF CONFORMITY AT TIME OF SALEROADMASTER, Inc. warrants that at the time of sale of this product it will be free from defects in material and manufacture
and will conform to ROADMASTER’S specifications for the product.1b. CONDITIONAL ONE-YEAR WARRANTYIn addition to the preceding time-of-sale warranty, if the product registration card is completely and accurately filled out and
mailed to ROADMASTER within thirty (30) days of purchase, ROADMASTER will provide an additional warranty that for a periodof one year after sale the product will remain in good working order, PROVIDED THAT the product is installed and maintained inaccordance with ROADMASTER’S instructions and is not subjected to: (a) alteration or unauthorized repairs or repairs byanyone other than ROADMASTER or a ROADMASTER-authorized service center, (b) misuse, abuse, commercial use, orimproper maintenance, (c) Acts of God (including without limitation hurricanes, tornadoes, floods, or other severe weather ornatural phenomena), (d) failures due to products not supplied by ROADMASTER, or (e) other treatments, uses, or installationsfor which the product was not intended. This warranty extends only to the first retail purchaser-consumer of the product and isnot transferable.
EXTENDED WARRANTY PERIOD: If ROADMASTER receives the product registration card, completely and accurately filledout, within twenty (20) days of purchase, ROADMASTER will enlarge the one-year warranty period in the preceding paragraph toa period of two years.
2. DISCLAIMER OF OTHER WARRANTIESThe preceding warranties are the exclusive and sole express warranties given by ROADMASTER. They supersede any prior,
contrary or additional representations, whether oral or written. No agent, representative, dealer or employee has the authority toalter or increase the obligations or limitations of this warranty. Any implied warranties, including the WARRANTY OFMERCHANTABILITY and any WARRANTY OF FITNESS FOR A PARTICULAR PURPOSE, are limited in duration to thirty daysor the term of the applicable express warranty provided above, whichever is longer.
Some states do not allow limitations on how long an implied warranty lasts, so the above limitation may not apply to you.
3. EXCLUSIVE REMEDY FOR ANY NONCONFORMITIESIf during the applicable Warranty Period, the product does not conform to the preceding Warranties, notify ROADMASTER as
provided below, and within a reasonable time ROADMASTER will provide, at its option, one of the following: (1) replacementcomponents for any nonconforming or defective product or components or (2) the percentage of the purchase price for thenonconforming product equal to the percentage of the Warranty Period remaining when ROADMASTER is notified of thenonconformity. ROADMASTER will, at its option, (a) use new and/or reconditioned parts in performing warranty repairs andmaking replacement products, (b) use parts or products of original or improved design in the repair or replacement. IfROADMASTER repairs or replaces a product, its warranty continues for the remaining portion of the original Warranty Period or60 days from the date of the return shipment to the customer, whichever is greater. All replaced products and all parts removedfrom repaired products become the property of ROADMASTER. ROADMASTER will not provide, and will not be liable for, labor,costs of removal or reinstallation of components, disposal, shipping, freight, taxes, or other incidental charges.
THESE REMEDIES ARE THE EXCLUSIVE AND SOLE REMEDIES FOR ANY BREACH OF WARRANTY.For any breach of warranty, the Owner must telephone ROADMASTER at 1-800-669-9690 within thirty (30) days after
discovering the nonconformity. Do not return any product without first calling ROADMASTER and getting a return authorizationnumber. Returned products must include the return authorization number and a copy of the original invoice, bill or other proof ofthe date of purchase. The date of purchase must coincide with the original warranty registration card on file. ROADMASTERwill authorize (a) shipment of the product to ROADMASTER or (b) repair or replacement at the nearest warranty service center—in both cases with shipping at your expense. Do not purchase replacement parts or pay for repair labor—you will not bereimbursed. Compliance with the requirements of this paragraph is a condition to coverage under the Warranty: if theserequirements are not complied with, ROADMASTER will have no obligation to provide any remedy for any breach of warranty.
4. DISCLAIMER OF INCIDENTAL AND CONSEQUENTIAL DAMAGESIN NO EVENT SHALL ROADMASTER BE LIABLE FOR ANY INCIDENTAL, SPECIAL, INDIRECT OR CONSEQUENTIAL
DAMAGES, WHETHER RESULTING FROM NONDELIVERY OR FROM THE USE, MISUSE OR INABILITY TO USE THEPRODUCT OR FROM DEFECTS IN THE PRODUCT.
Some states do not allow the exclusion or limitation of incidental or consequential damages, so the above limitation may notapply to you.
5. APPLICABLE LAWThis Warranty will be interpreted, construed, and enforced in all respects in accordance with the laws of the State of
Washington, without reference to its choice of law rules. The U.N. Convention on Contracts for the International Sale of Goodswill not apply to this Warranty.
6. SEVERABILITYIf any provision of this warranty is found to be invalid or unenforceable, then the remainder shall have full force and effect,
and the invalid provision shall be partially enforced to the maximum extent permitted by law to effectuate the purpose of theagreement.
7. ADDRESS FOR NOTICES TO ROADMASTERROADMASTER, Inc., 6110 NE 127th Ave., Vancouver, WA 98682This warranty gives you specific legal rights, and you may also have other rights which vary from State to State.


![1. Distinguish between Sway and Non sway type … IV 1. Distinguish between Sway and Non – sway type problems?[M/J-15] Because of sway, there will be rotations in the vertical members](https://static.documents.pub/doc/80x56/5af80c3b7f8b9a5f588c535c/1-distinguish-between-sway-and-non-sway-type-iv-1-distinguish-between-sway.jpg)

