Recording Oral Histories Audio Recording Procedures Table of Contents Recording Oral Histories on a Computer Using Audacity Suggested Equipment (Hardware) Installing Software and Drivers Preparing for an Oral History Recording Session Recording an Oral History Session Processing the Recording Recording Oral Histories Using an Android Mobile Device Suggested Recording Apps Easy Voice Recorder (Android) Recording Oral Histories using iOS Suggested Recording Apps Voice Record Pro (iOS) Uploading Oral Histories to NY Heritage Organizing Files Creating Compound Objects in CONTENTdm Fixing Compound Object Structure & Adding Metadata Using the Internet Archive as an alternative access location for audio and video files
Transcript
Recording Oral Histories
Audio Recording Procedures
Table of Contents
Recording Oral Histories on a Computer Using Audacity Suggested Equipment (Hardware) Installing Software and Drivers Preparing for an Oral History Recording Session Recording an Oral History Session Processing the Recording
Recording Oral Histories Using an Android Mobile Device Suggested Recording Apps Easy Voice Recorder (Android)
Recording Oral Histories using iOS Suggested Recording Apps Voice Record Pro (iOS)
Uploading Oral Histories to NY Heritage Organizing Files Creating Compound Objects in CONTENTdm
Fixing Compound Object Structure & Adding Metadata Using the Internet Archive as an alternative access location for audio and video files
Recording Oral Histories on a Computer Using Audacity
Suggested Equipment (Hardware) Tascam USB audio mixer Two microphones (for interviewer/narrator) Suggested: TASCAM US366 Suggested: Shure SM48 or Shure SM58
Two XLR microphone cables Two microphone table stands (occasionally come with microphone) Suggested: On Stage microphone stand Suggested: Hosa 10’ cables
Laptop or desktop computer capable of running Audacity software
Installing Software and Drivers 1. Install Tascam Drivers: Find the drivers for the correct Tascam model under the “PC
audio interface” heading on the Tascam Downloads page. Install the most recent drivers on the laptop that will be used for the recording.
2. Install Audacity: From the Audacity Download page, select the appropriate system for your installation (Windows/Mac/Linux)—the installer is typically more userfriendly than the zip file.
a. You will also need to install the LAME MP3 encoder in order to create MP3 access copies of your recordings to be uploaded to NY Heritage. Follow the instructions here to install the plugin.
Preparing for an Oral History Recording Session 1. Before attempting to record an oral history, you will
want to test your equipment and be sure that you are comfortable with the setup.
a. Using the supplied USB cable, plug the Tascam into the computer with Audacity installed.
b. Put the microphones on the stands using the supplied microphone clip. Using XLR cables, plug the microphones into the “MIC IN” inputs.
c. Ensure that the Tascam is set up such that:
i. INPUT volume knobs for both microphones are turned almost all the way to the right. [To avoid clipping the signal, you will not want to turn them all the way up.] Having the volume around 90% should work for most interviews.
ii. PHANTOM power (48v) should be set to OFF. [Unless you have a condenser microphonethe SM48 or SM58 do not need phantom power.]
iii. Make sure the MIC/LINE GUITAR switch is set to MIC/LINE
iv. MONO should be set to OFF.
v. The PHONES/LINE OUT volume knob should also be set to around 90% of full volume.
vi. The MON MIX knob should not affect this recording process, so it can be turned all the way to the left.
d. Once you have all of the settings correct, try talking into both of the microphones. You should see the SIG/OL (signal) light turn on while you are talking. If you do not see a signal, ensure that the INPUT volume is up and the cable is inserted snugly on both ends.
2. Once the Tascam unit is properly configured, you will need to open Audacity and test to make sure you have an audio signal.
a. Make sure that the microphone is set to “LineIn (TASCAM)” and stereo recording.
b. On the toolbar, go to Edit > Preferences (Ctrl + P). Select the quality tab from the left hand column and use the following settings.
i. Default Sample Rate: 48000 Hz ii. Default Sample Format: 24bit iii. Sample Rate Converter: HighQuality iv. Dither: Shaped v. Sample Rate Converter: Best Quality (Slowest) vi. Dither: Shaped
c. Click “OK” to save the settings and return to the main screen.
d. Begin a recording using the button with the red dot (Shift + R).
e. While the recording is running, speak into each microphone separately. Be sure to speak in a reasonably loud voice, at least 35 inches away from the microphone.
i. Each microphone should record to a separate channel (Right and Left). The signal, as measured by the green bar at the top of the screen, should ideally be between 30 and 10 db. If the signal turns red, this is an indication that the signal is clipping and will be distorted when played back.
ii. If the signal is too strong (loud) then turn down the INPUT L/R volume for that microphone on the Tascam and test the microphone again. If it is too low (quiet) then the INPUT L/R will need to be turned up.
f. End the recording by clicking the stop button or pressing the spacebar.
g. Play back the recording by placing the cursor to the left of the recording wave and clicking the green play button or by pressing the spacebar.
i. Confirm that the recording is audible at normal volume levels and free of static or other distortions. Adjust the INPUT L/R on the Tascam accordingly.
h. Repeat this process as necessary until your levels are within the range of 30 10db.
i. If you are unable to get the signal level at an appropriate level using the INPUT L/R adjustment, then you may need to adjust the PHONES/LINE OUT level, or the microphone volume within Audacity.
ii. In some cases, it may be necessary to go into your operating system’s microphone settings and make adjustments there.
3. Ensure that you have a significant amount of space available on the laptop you will be using to record. Somewhere in the range of 1050 GB should be sufficient for most recordings
Recording an Oral History Session
1. Ideally, the interview should be conducted in a space with minimal ambient noise or distractions. Larger rooms tend to sound better, as they are less likely to produce reverberations and echoes. Carpeting, curtains, and other soft or deflecting surfaces tend to improve a room’s acoustics.
2. Taking a photograph of the narrator is recommended. This image can be used as a visual representation for the oral history in New York Heritage or elsewhere.
3. Place one microphone facing the narrator and the other facing the interviewer. This will allow both sides of the interview to be recorded with clarity. Ensure the TASCAM is properly connected and set to the levels determined in the steps above.
4. It helps to give the narrator that is being interviewed a quick lesson in how to use the microphone (speak loudly, position the microphone 35 inches from their mouth).
a. Before beginning the interview, it would be beneficial to test the microphones with the narrator (using the procedure outlined in the steps above). This has the double benefit of ensuring the equipment works and confirming that the narrator is audible in the recording.
5. Once the levels are within an acceptable range, click the record button (Shift + R) to begin recording.
a. Pausing or stopping the recording is not recommended, especially since it is relatively easy to edit a recording after the fact. If the recording is stopped and restarted, Audacity may begin a new audio track below the previous one. This can be avoided by placing the cursor at the end of the previous recording, which start the next recording at that location.
6. Click on the stop button or press the spacebar to end the recording.
a. Replaying a portion of the recording will give you an opportunity to ensure that the sound quality is adequate.
7. Save each interview as an Audacity project using the date of recording and the narrator’s name.
a. Audacity save files include an Audacity Project File (.aup) and a corresponding folder with the component segments of the recording. Be sure to include the data folder if you are copying this save file to another location.
Processing the Recording
1. Open the Audacity Project File that you saved after conducting the recording.
2. Click on the dropdown menu next to “Audio Track” in the upper left corner of the recording track and select “Split Stereo to Mono.”
a. This will create two separate audio tracks—one for the narrator and the other for the interviewer. By making each track mono, the microphones will not be panned to R and L as they are in the original recording. This will also allow for adjusting the volume of the narrator and interviewer independently.
3. Before editing the file any further, you will need to export a master/archival version of the file. This will maintain the integrity of the original recording, while the access copy that will be produced later can be edited for clarity.
a. Export the master copy
i. On the menu bar, click File > Export Audio (Ctrl + Shift + E) ii. Select “Other uncompressed files” in the “Save as type” field (under the
“File name”) iii. Click on “Options” and set the Header as “WAV (Microsoft)” and the
Encoding as “Signed 24bit PCM,” then click OK. iv. Ensure that the file name conforms to the naming conventions that you
are following and click Save. v. When prompted that the “tracks will be mixed to a single mono channel,”
click OK. It is not necessary to add metadata to the file itself.
Steps 35 should be taken only if necessary and only to improve clarity. Editing of the recording should be kept to a minimal to preserve the integrity of the original recording.
4. Remove any long silences (especially at the beginning and end of the recording) by dragging across the unwanted sections using the cursor tool, making sure to drag across both recordings to ensure that the audio is removed from both tracks. The section to be deleted will be highlighted in grey. Press the delete key to remove the selected section. Be sure to leave some blank space on either side of the recording so that the recording does not start/stop abruptly.
5. To remove unwanted noise from one microphone (e.g. if the interviewer coughs while the narrator is speaking), highlight the section of the track to be silenced and click on the Silence Audio button.
6. If the narrator or interviewer is noticeably louder than the other, the volume of the individual microphones can be adjusted using the gain slider for that track. Make an adjustment, then listen to the recording to ensure the volumes sound like a closer match.
7. Once the recording has been edited, it will be necessary to export the audio file into an access copy for use on NY Heritage or other web applications.
a. Export the access file
i. On the menu bar, click File > Export Audio (Ctrl + Shift + E) ii. Select “MP3 Files” in the “Save as type” field (under the “File name”) iii. Click on “Options,” set the Bit Rate Mode to “Variable,” the Quality to “0,
220260 kbps (Best Quality),” Variable Speed to “Fast,” and Channel Mode to “Stereo,” then click OK.
iv. Ensure that the file name conforms to the naming conventions that you are following and click Save.
v. When prompted that the “tracks will be mixed to a single mono channel,” click OK. It is not necessary to add metadata to the file itself.
vi. In the invalid sample rate dialog, set the sample rate to “4100”
8. The access file is ready to be uploaded to New York Heritage via the CONTENTdm Project Client.
9. Once you have exported the files and tested them to be sure they work, you may delete the Audacity Project File and the corresponding folder.
10. With the recording finalized, ideally a written transcript should be made from the recording. These transcripts should be written verbatim and include timestamps from the original recording.
Recording Oral Histories Using an Android Mobile Device
Suggested Recording Apps
● Easy Voice Recorder (Free / Pro—$3.99) ○ Records in high quality file format (16bit, 44.1 kHz) ○ Displays recording levels and pro version allows for boosting recording volume ○ Files easily exported to cloud services or a computer
Recommended for: having more control over recording quality and output files for archival purposes
● StoryCorps (Free) ○ Easy to use with builtin interview question prompts ○ Files recorded in lower quality without displaying levels ○ Uploads to directly StoryCorps account, files can be downloaded from website
Recommended for: ease of use in a complete package, popular platform for sharing oral histories
Easy Voice Recorder (Android)
1. Place your device into Airplane mode and silence all notifications and alarms that could disturb the recording process. Ensure that the device battery is full and avoid pluggingin the phone while recording.
2. Download the app from the Google Play Store onto the device that will be used to record
a. The free app offers the majority of necessary features
b. the pro version is adfree and allows for the boosting of recording volume
3. Open the app and access the settings menu by pressing the three dots in the upper right corner of the screen.
4. On the settings screen, ensure that the app is set to the following options:
a. Main Use: “Meetings and lectures” (this sets the recording volume)
b. Sound quality: “High (larger files)”
c. Under the “Tuning” submenu:
i. Microphone: “Main”
ii. Encoding: “.wav (PCM, 5 MB/minute)”
iii. Sample rate: 44kHz (CD)
d. Interface and Advanced & Troubleshooting should not need changing
5. Select the back arrow to return to the main screen
6. Place your phone or tablet face up on a table, equidistant between all people who will be speaking.
7. Test the recording process to ensure favorable levels:
a. Begin recording by pressing the red Record button or the blue microphone icon.
b. While someone is talking, the level meter (below “Storage capacity remaining”) should show a level between 25 75% of the bars. If it flashes red, then move the phone further away, if it is only showing a couple bars, then move it closer or speak louder.
c. When you are done recording, press “Done”
d. Verify that the recording sounds adequate, switch to the Player screen and press on the name of the recording.
e. If needed, you can return to the settings page and select another option under “Main use.” (“Music and raw sound” appears to bring the recording volume down, while “voice notes” brings it up). The paid version has a “Microphone boost (gain)” slider in the Tuning settings, which allows for more control over microphone volumethe higher the gain (measured in decibels), the louder the recording will be.
f. Once you have these settings at favorable levels, you’re ready to record the interview.
8. Before recording:
a. Place your device into Airplane mode and silence all notifications and alarms that could disturb the recording process.
b. Ensure that the device battery is full and avoid plugging in the device while recording.
9. Place the mobile device faceup on a table between the interviewer and the narrator (the device should be roughly 610 inches from each person). Begin recording the oral history interview by pressing the red Record button. Ideally the recording should not be paused as it is possible to cut out dead time after the fact. Try not to touch the phone at all during the recording process, as handling noise will often be perceptible in the recording.
10. Press Done to end the recording.
11. After completing the recording, go to the player view (accessible by pressing “Player” above the microphone icon).
a. You may playback the recording to confirm that the sound is acceptable
12. To move the recordings to a computer for editing, select the recording(s) that you would like saved by checking the box to the left of each recording.
a. Press the sharing button (three dots connected by lines, circled in red on the screenshot to the right)
b. Choose a file sharing platform that you use (Google Drive, Dropbox, Box, etc) to upload the file into the cloud
13. The file(s) will now be accessible on a desktop computer with Audacity, which can be used to edit the recording and export it into access and archival files. (see the Processing the Recording section above)
a. When opening the .wav file in Audacity, you will be prompted to choose an import method, it’s recommended to “make a copy of the recording before editing” in case you make a mistake and need to go back to the source recording.
b. There will be no need to use the “Split Stereo to Mono” function, since the recording will already be in the proper format
Recording Oral Histories using iOS
Suggested Recording Apps
● Voice Record Pro (Free) ○ Includes granular settings for adjusting recording quality ○ Easy to change recording volume ○ Somewhat unintuitive user interface
Recommended for: having more control over recording quality and output files for archival purposes
● StoryCorps (Free) ○ Easy to use with builtin interview question prompts ○ Files recorded in lower quality without displaying levels ○ Uploads to directly StoryCorps account, files can be downloaded from website
Recommended for: ease of use in a complete package, popular platform for sharing oral histories. Please note: this app has not been optimized for iPads and some users have had trouble with saving recordings.
Voice Record Pro (iOS) 1. Place your device into Airplane mode and silence all
notifications and alarms that could disturb the recording process. Ensure that the device battery is full and avoid plugging in the device while recording.
2. Download Voice Record Pro from the App Store
3. Open the app and access the settings by pressing the gear icon on the right side of the screen and clicking on “Settings”
a. Under the general settings, increase the “Minimum Space” to at least “500 MB”—this will help to ensure that there is enough space on the device for your recording. Press “Done” in the upper right.
4. Press the red “Record” button near the top of the screen and press the “Advanced” tab.
i. Record Format: WAV (PCM) ii. Sample Rate: 44,100 iii. Bit Depth: 16 Bits iv. Channels: Mono v. Silence Detection: No
b. Press “Level Check,” place the device into the center of the table, equidistant between the interviewer and the narrator..
i. Speaking at a normal volume, the VU meters should reach around 5 or 3 dB, without going past the 0 into the red zone (clipping). If the levels
are below this range, slide the Input Gain to the right. If the level is going above the 0, slide the Input Gain to the left.
ii. If the narrator is quieter than the interviewer, move the device toward him/her. If the interviewer is too quiet, move the device toward the interviewer.
iii. Press “Done” when the levels are within range.
5. Before recording:
a. Place your device into Airplane mode and silence all notifications and alarms that could disturb the recording process.
b. Ensure that the device battery is full and avoid plugging in the device while recording.
6. With the device still in the center of the table, press “Start” to begin the recording.
a. The red light at the center top of the screen will blink during the recording, and the timer below will track the length of the recording.
b. Although there is a slider for changing the Input Gain during a recording, changing the levels in the middle of a recording is not recommended, and should only be done if the VU meters are showing levels that are extremely low or extremely high.
c. Press “Stop” to end the recording.
7. Choose a file sharing platform that you use (Google Drive, Dropbox, Box, etc) to upload the file into the cloud.
i. The file should be uploaded to a folder named “Voice Control Pro” within your file sharing platform.
ii. Rename the files to reflect your naming conventions (e.g. “20151222Perry.WAV”).
b. The file(s) will now be accessible on a desktop computer with Audacity, which can be used to edit the recording and export it into access and archival files. (see the Processing the Recording section above)
i. When opening the .WAV file in Audacity, you will be prompted to choose an import method, it’s recommended to “make a copy of the recording before editing” in case you make a mistake and need to go back to the source recording.
ii. There will be no need to use the “Split Stereo to Mono” function, since the recording will already be in mono
Uploading Oral Histories to NY Heritage Oral history interviews should be uploaded as compound objects so that the audio files, photograph, transcripts and any other related materials are grouped together as a single digital object. If uploading a large number of oral histories simultaneously, it is recommended to use a tabdelimited file. For a small number (510) of oral histories, the manual process described below is typically more efficient.
Organizing Files 1. Organize the files (MP3 recording, PDF transcript, and photograph) such that each oral
history interview has its own file folder. It is helpful to have a consistent naming convention for all files. Folder name should correspond to the title of the oral history (e.g. “Ryan Perry Oral History”), since the folder name will be used as the name for the compound object in CONTENTdm.
Creating Compound Objects in CONTENTdm
For video files or larger audio files, it will be necessary to use the desktop Project Client. The Web Admin client will not be able to upload larger files.
2. Open the CONTENTdm Project Client.
3. If starting a new project
a. On the menu bar select Project > New
b. Ensure that the CONTENTdm Server URL is: https://server16694.contentdm.oclc.org/ and fill in your WorldCat User name and password
d. Name the project. This name is only seen by the person entering metadata, so it need not be an official title.
e. Click “Finish”
4. Click on the tab at the top that has the project title from the previous step. This is your workspace for preparing digitized items for upload to New York Heritage.
5. Click on “Add Compound Objects” on the left side of the screen. Ensure that “Compound Object Wizard” is selected in the dropdown and click “Add.”
a. On the “Choose Type” screen:
i. What type of compound object would you like to create? — select “Document”
ii. Are the compound object structure and metadata defined by a tabdelimited text file? — select “No”
iii. Click “Next”
b. On the “Select Directory” screen:
i. Browse for the directory containing the files for a single oral history interview
ii. Click “Next”
c. On the “Display Image Settings” screen:
i. Do you want CONTENTdm to generate display images from you [sic] import? — select “Yes”
ii. Click “Next”
d. On the “Page Information” screen:
i. Specify page names — select “Use file names as titles” (you will need to manually rename these later)
ii. Transcript — select “No transcripts”
iii. PDF — leave box unticked
iv. Click “Next”
e. On the “Confirm Settings” screen:
i. Confirm that your settings are equivalent to the following (with the relevant directory)
ii. Click “Finish”
f. Confirm that there are not any errors on the “Summary” screen then click “Close.”
6. If you are adding multiple oral histories at once, you may repeat Step 5 to add an additional compound object for each interview.
7. When all compound objects have been added, click “Finish” in the lower right corner of the “Add Multiple Compound Objects” screen.
a. A warning may appear, indicating that a thumbnail could not be created for the mp3 filethis should not be cause for concern, as the thumbnail can be replaced later.
b. Click “Close”
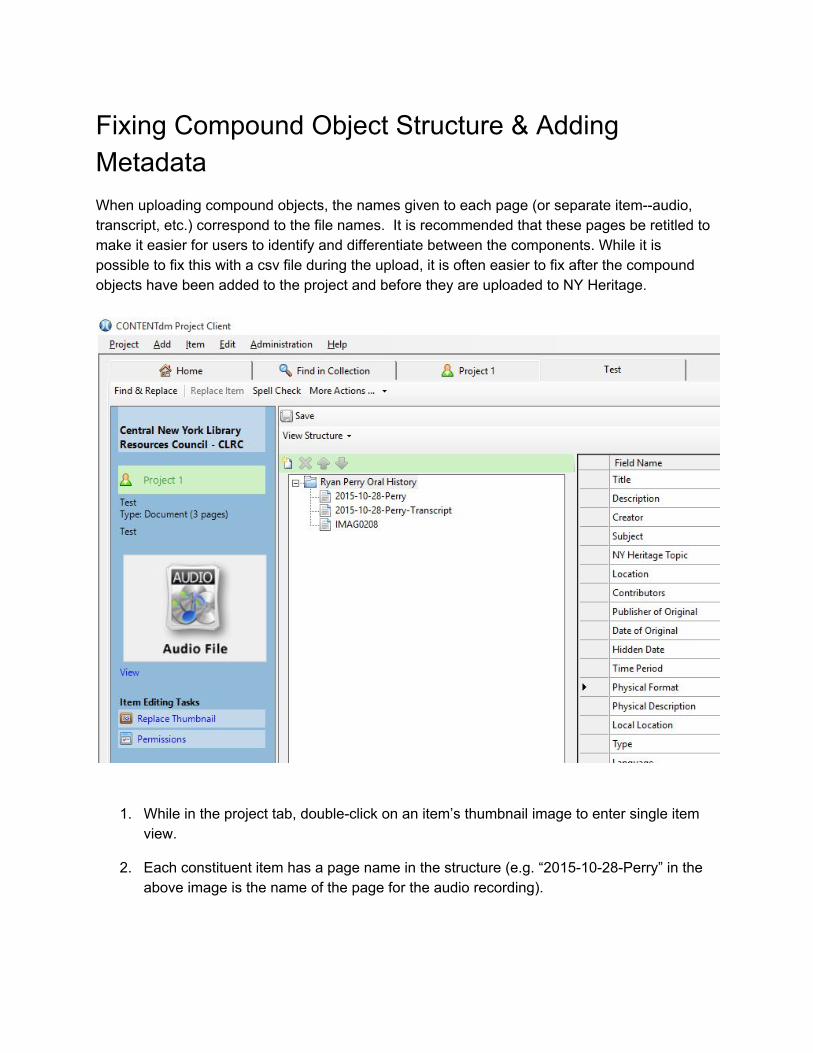
Fixing Compound Object Structure & Adding Metadata When uploading compound objects, the names given to each page (or separate itemaudio, transcript, etc.) correspond to the file names. It is recommended that these pages be retitled to make it easier for users to identify and differentiate between the components. While it is possible to fix this with a csv file during the upload, it is often easier to fix after the compound objects have been added to the project and before they are uploaded to NY Heritage.
1. While in the project tab, doubleclick on an item’s thumbnail image to enter single item view.
2. Each constituent item has a page name in the structure (e.g. “20151028Perry” in the above image is the name of the page for the audio recording).
a. To change these page names, click once on the name, wait 2 seconds then singleclick the name again to edit it. Suggested names: “Audio Recording”, “Transcript”, and “Photograph”
b. To replace the thumbnail for the compound object and audio file, select the page name and click “Replace Thumbnail” on the left side of the screen.
i. Click “Browse” and select an image file to serve as the thumbnail. Typically this would be a photograph taken of the oral history narrator.
3. Enter the metadata for the object and its constituent items using the fields on the right side of the screen or click on the “View Structure” dropdown to switch views.
4. Be sure to enter the required fields (Title, Collection ID, Rights, and File Name) for all constituent items in each compound object. The spreadsheet view will show all items simultaneously, making it easier to confirm that all required fields have been completed.
5. Once the metadata is complete, the compound objects can be uploaded for approval.
Using the Internet Archive as an alternative access location for audio and video files
You may want to provide an alternative access location for your audio and video files. This is not required, but could help improve the experience for the end user. There are various factors that can affect a user’s ability to play an audio or video on New York Heritage, including variances in browsers, flash plugins, etc. For this reason, we recommend using the Alternate Access metadata field to add a link to an external copy of the file. There are various options available such as YouTube, Vimeo, SoundCloud, or the Internet Archive. We recommend using the Internet Archive because it is committed to offering permanent online access to resources, and plays well on tablets and mobile devices.
1. Sign up for an Internet Archive account. 2. Make sure you’re logged into the account, and then click the Upload button in the menu
bar. Alternatively, you can go to your account page and there is an upload option on that screen as well.
4. To select a file for upload, drag and drop it into the box, or click Choose files to upload to select from a list of files on your computer.
5. Once you have selected a file, the metadata screen will open. Record the appropriate metadata to make the item understandable, using some of the same metadata from the CONTENTdm item. You can also select to apply a license (such as Creative Commons) to the file, and have the option to enter additional metadata fields. *Note that there is a field called Test Item, where you can designate an item to be removed after 30 days.
6. Click Upload and Create Your Item. The upload may take a few minutes depending on the size of your file.
7. Once the upload completes, you’ll be redirected to the uploaded item, and will be able to play the file and view the metadata.
8. Note the URL of the item https://archive.org/details/NYHtestvideo this is the URL that you will put into the Alternate Access field in CONTENTdm.
Watch this short video on Screencast.com for a tutorial of the upload process.