This tutorial originally appeared on Moda Fabrics’ The Cutting Table blog. www.modafabrics.com / http://blog.modafabrics.com/ Copyright 2018. All Rights Reserved. Recycled-Upcycled Jeans Bag Tutorial I didn’t make these – Allison Black did. For Spring Market 2015 in Minneapolis – using the Mon Ami collection by BasicGrey and some old jeans. Because I’m often asked about the bag on the shelf in my office – it’s the one with the yellow button, lovely Allison kindly gave it to me – and where to find the instructions, we’re sharing this again. So flashback to May 2015… my problem started before I even got home. I was obsessed with making one of these bags. Or at least two – most of my jeans come with two legs so using one leg for a bag meant I’d still have another to use.
Transcript
This tutorial originally appeared on Moda Fabrics’ The Cutting Table blog. www.modafabrics.com / http://blog.modafabrics.com/ Copyright 2018. All Rights Reserved.
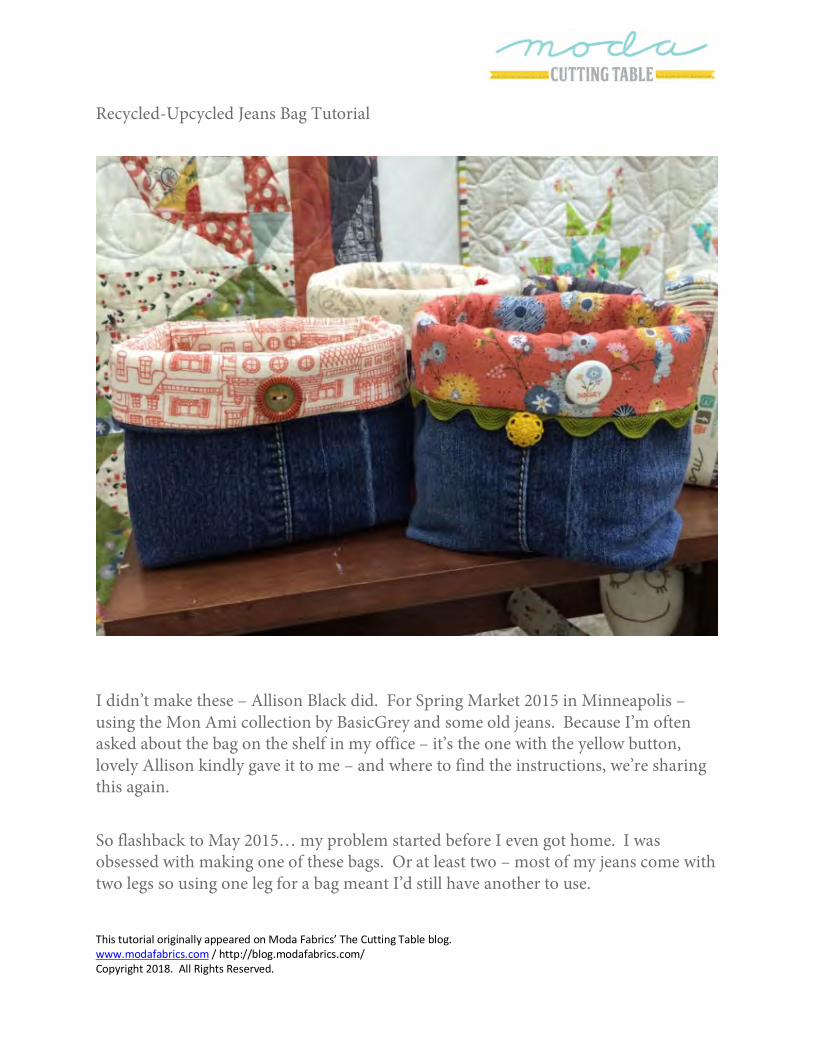
Recycled-Upcycled Jeans Bag Tutorial
I didn’t make these – Allison Black did. For Spring Market 2015 in Minneapolis – using the Mon Ami collection by BasicGrey and some old jeans. Because I’m often asked about the bag on the shelf in my office – it’s the one with the yellow button, lovely Allison kindly gave it to me – and where to find the instructions, we’re sharing this again.
So flashback to May 2015… my problem started before I even got home. I was obsessed with making one of these bags. Or at least two – most of my jeans come with two legs so using one leg for a bag meant I’d still have another to use.
This tutorial originally appeared on Moda Fabrics’ The Cutting Table blog. www.modafabrics.com / http://blog.modafabrics.com/ Copyright 2018. All Rights Reserved.
I posted a picture on Instagram and Facebook of the bag with the yellow button, and well, the requests for a tutorial began immediately. Lissa and Chelair thought it was hilarious as they both said I should have seen it coming. (Rookie mistake.)
So here goes. Start with the leg of a worn pair of jeans – the softer the better. Decorative stitching on the seam like that on the two bags above is optional.
Materials Required:
• 1 pair of jeans – actually just 1 leg of a pair of jeans • 1 fat quarter of pretty fabric – Moda, of course • Soft & Stable – recommended – a piece measuring 12″ x 20″ should suffice • Embellishments – as desired. Mini Charm packs work beautifully for this!
This tutorial originally appeared on Moda Fabrics’ The Cutting Table blog. www.modafabrics.com / http://blog.modafabrics.com/ Copyright 2018. All Rights Reserved.
Length required – that depends. I found that 10″ to 11″ worked really well regardless of the width of the jeans’ leg. If the jeans are really “big boy” jeans – a width of 18″ to 20″ – then an 1″ or so more will work. It depends on what you want to do with the finished bag.
Use the straightest part of the leg that you can find – probably in the knee to calf-area. This was cut 11 1/2″ – it was my experiment and it’s why I prefer it a bit shorter. Measure the width in a couple of places – write down the narrowest width. This leg measured 14″ in width – 7″ from side to side when flat. (No, these were not my jeans – Chelair’s grandsons contributed to my cause.)
This tutorial originally appeared on Moda Fabrics’ The Cutting Table blog. www.modafabrics.com / http://blog.modafabrics.com/ Copyright 2018. All Rights Reserved.
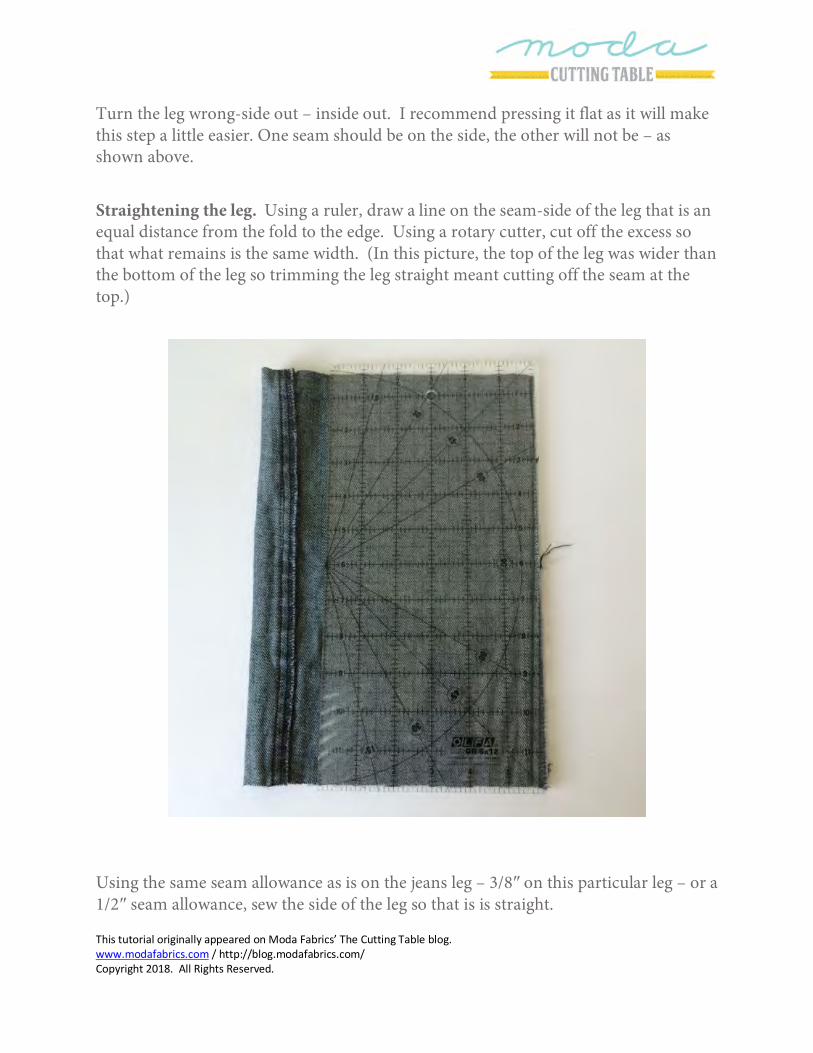
Turn the leg wrong-side out – inside out. I recommend pressing it flat as it will make this step a little easier. One seam should be on the side, the other will not be – as shown above.
Straightening the leg. Using a ruler, draw a line on the seam-side of the leg that is an equal distance from the fold to the edge. Using a rotary cutter, cut off the excess so that what remains is the same width. (In this picture, the top of the leg was wider than the bottom of the leg so trimming the leg straight meant cutting off the seam at the top.)
Using the same seam allowance as is on the jeans leg – 3/8″ on this particular leg – or a 1/2″ seam allowance, sew the side of the leg so that is is straight.
This tutorial originally appeared on Moda Fabrics’ The Cutting Table blog. www.modafabrics.com / http://blog.modafabrics.com/ Copyright 2018. All Rights Reserved.
With wrong-sides still out, center one of the seams and press the leg flat – including both seams. This leg has a line of stitching along the outside seam that I wanted to center in the front of the bag like the Basic Grey bags have
Sew a 1/2″ seam allowance all the way across the bottom.
This tutorial originally appeared on Moda Fabrics’ The Cutting Table blog. www.modafabrics.com / http://blog.modafabrics.com/ Copyright 2018. All Rights Reserved.
Using a ruler and some kind of marking tool – I used a Sharpie pen – mark the corners. The lines should be the same distance from the seam line as from the fold. Depending on the width of the jeans’ leg, I recommend 1″ to 1 1/4″.
Note: I goofed on this bag and measured from the bottom edge instead of the seam line. It still worked but it did make matching up the seams after the corners are trimmed a little less neat. Just saying.
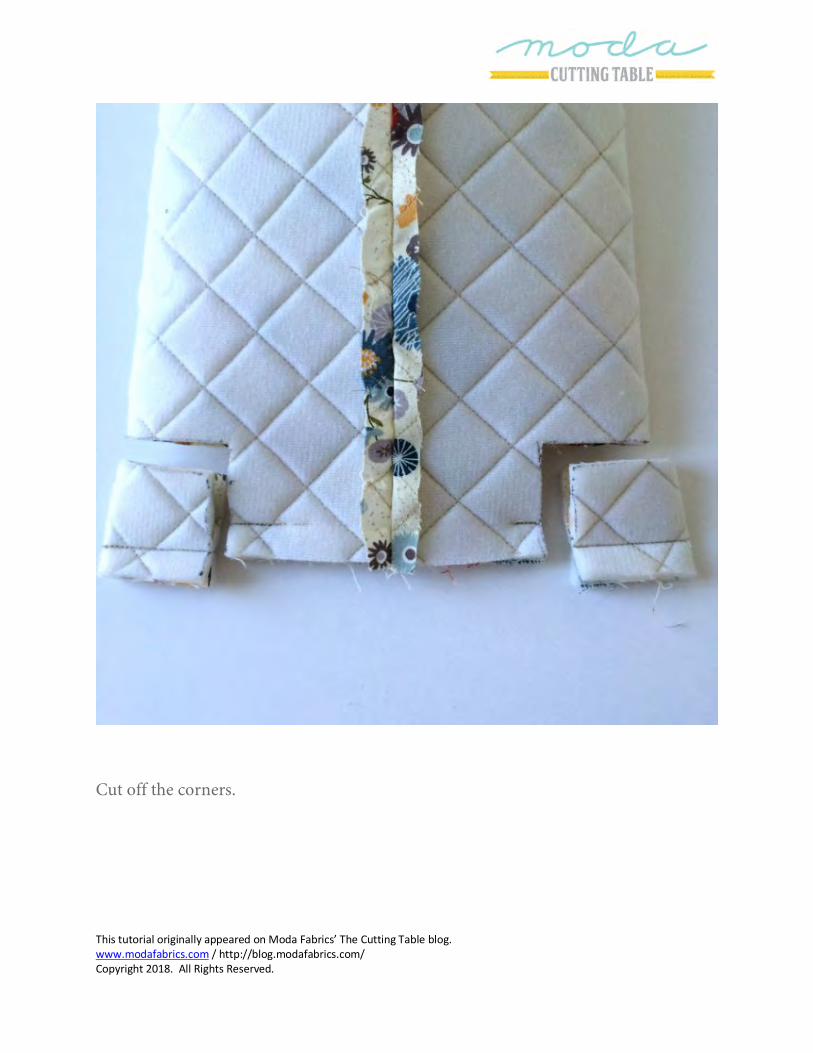
Cut off the corners.
This tutorial originally appeared on Moda Fabrics’ The Cutting Table blog. www.modafabrics.com / http://blog.modafabrics.com/ Copyright 2018. All Rights Reserved.
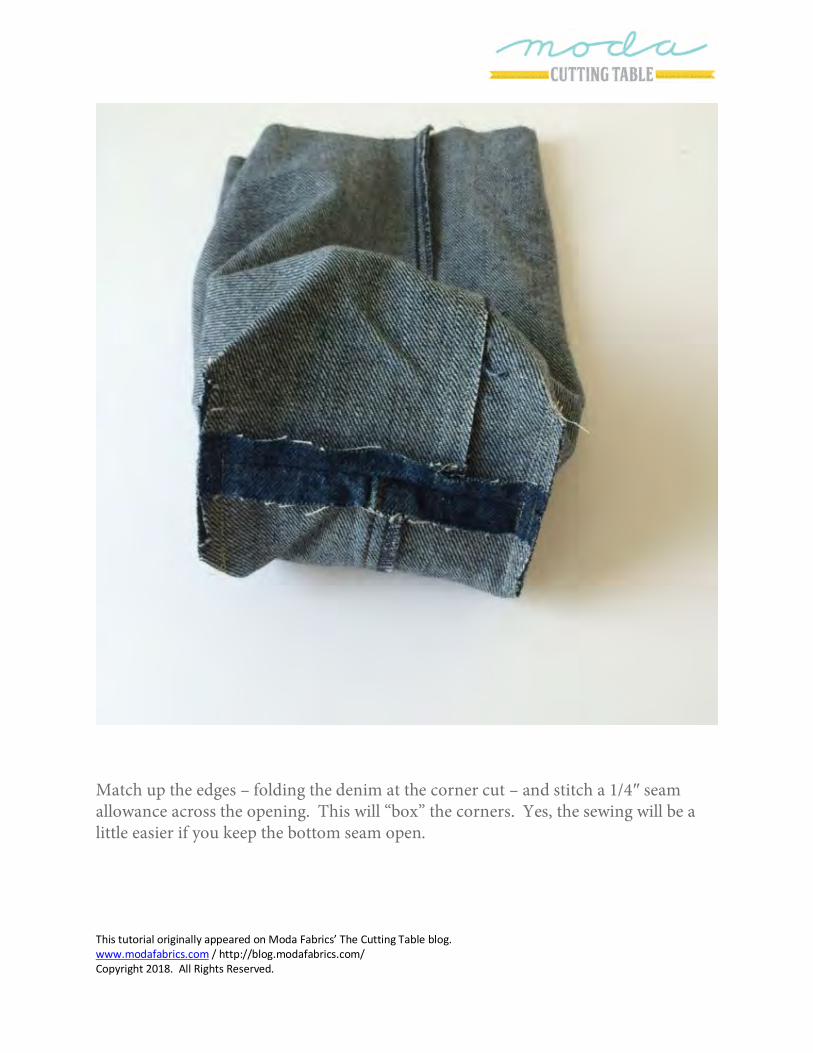
Match up the edges – folding the denim at the corner cut – and stitch a 1/4″ seam allowance across the opening. This will “box” the corners. Yes, the sewing will be a little easier if you keep the bottom seam open.
This tutorial originally appeared on Moda Fabrics’ The Cutting Table blog. www.modafabrics.com / http://blog.modafabrics.com/ Copyright 2018. All Rights Reserved.
Embellish as desired. I found it a little bit easier to do this at this point since I would have a better idea – better, not perfect – of how the bag would sit after this step.
For this, I cut squares using a scalloped rotary cutter and fused a slightly smaller square of Steam-A-Seam Lite to the back. I wanted the edges to be a little loose so I didn’t fuse first. The pieces were then fused to the jeans and machine-stitched around the edge. The rick-rack was stitched on to allow for a 1/2″ seam allowance on the top. (It’s a little high – an “it’s been a long time since I used rick-rack” goof.)
This tutorial originally appeared on Moda Fabrics’ The Cutting Table blog. www.modafabrics.com / http://blog.modafabrics.com/ Copyright 2018. All Rights Reserved.
Now for the lining. Please bear with me as the terms are going to switch – Using the measurements of the jeans’ leg, this is how to determine the size of the piece to cut:
• How wide is the strip? This is the same measurement as the length of the jeans leg. E.g., If the leg is cut to measure 11 1/2″ from top-to-bottom, the width of the strip will be 11 1/2″.
• How long is the strip? Cut the length to measure the width of the jeans plus 1″ – 1/2″ seam allowance on both sides. E.g., If the jeans leg measured 14″, cut the fabric to measure 15″ long.
So from the fat quarter, I cut a strip that measured 11 1/2″ x 15″ wide for a jeans’ leg that measured 14″ wide (7″ flat, double-thickness) x 11 1/2″ long. Whew. Still with me?
From the Soft & Stable, cut a piece that is 1/2″ less in width and 1″ less in length – or 11″ x 14″.
This tutorial originally appeared on Moda Fabrics’ The Cutting Table blog. www.modafabrics.com / http://blog.modafabrics.com/ Copyright 2018. All Rights Reserved.
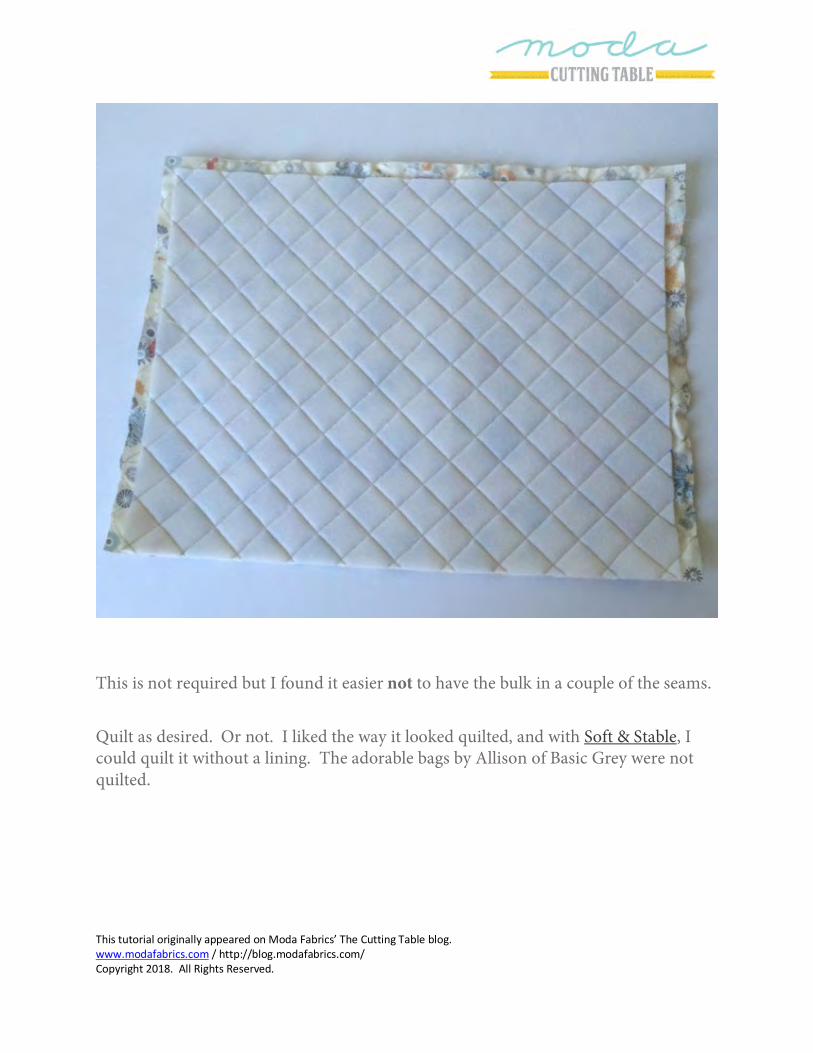
This is not required but I found it easier not to have the bulk in a couple of the seams.
Quilt as desired. Or not. I liked the way it looked quilted, and with Soft & Stable, I could quilt it without a lining. The adorable bags by Allison of Basic Grey were not quilted.
This tutorial originally appeared on Moda Fabrics’ The Cutting Table blog. www.modafabrics.com / http://blog.modafabrics.com/ Copyright 2018. All Rights Reserved.
Using a 1/2″ seam allowance, join the sides to make a tube that measures the same as the jeans’ leg. Center the seam and press it open.
Note: This picture has the bag upside down – the end with the 1/2″ exposed fabric is the top edge. The end with the batting all the way to the edge is the bottom of the bag.
This tutorial originally appeared on Moda Fabrics’ The Cutting Table blog. www.modafabrics.com / http://blog.modafabrics.com/ Copyright 2018. All Rights Reserved.
Stitch across the bottom – except don’t stitch all the way! Leave an opening approximately 2″ to 3″ – or stitch a little more than your measurement from the side. E.g., if you’re going to mark 1″ away from the side, stitch at least 1 1/2″. Sharpie – love them.
Note: Yeah yeah… as before, I wasn’t paying attention and measured the distance from the bottom edge, not from the seam line. Do what I say, not what I do!
This tutorial originally appeared on Moda Fabrics’ The Cutting Table blog. www.modafabrics.com / http://blog.modafabrics.com/ Copyright 2018. All Rights Reserved.
Cut off the corners.
This tutorial originally appeared on Moda Fabrics’ The Cutting Table blog. www.modafabrics.com / http://blog.modafabrics.com/ Copyright 2018. All Rights Reserved.
Match up the edges – fold at the corner. Use a 1/4″ seam allowance and stitch across – yes, keep the bottom seam pressed open.
This tutorial originally appeared on Moda Fabrics’ The Cutting Table blog. www.modafabrics.com / http://blog.modafabrics.com/ Copyright 2018. All Rights Reserved.
With right sides together, put the jeans’ leg inside the lining. The seam for the lining will be in the back – and it will not line up with a seam on the jeans’ leg. The boxed-corners will help with the placement of everything.
This tutorial originally appeared on Moda Fabrics’ The Cutting Table blog. www.modafabrics.com / http://blog.modafabrics.com/ Copyright 2018. All Rights Reserved.
Pin as necessary to keep the layers together. (No pins? I forgot to take the picture before I stitched.)
This tutorial originally appeared on Moda Fabrics’ The Cutting Table blog. www.modafabrics.com / http://blog.modafabrics.com/ Copyright 2018. All Rights Reserved.
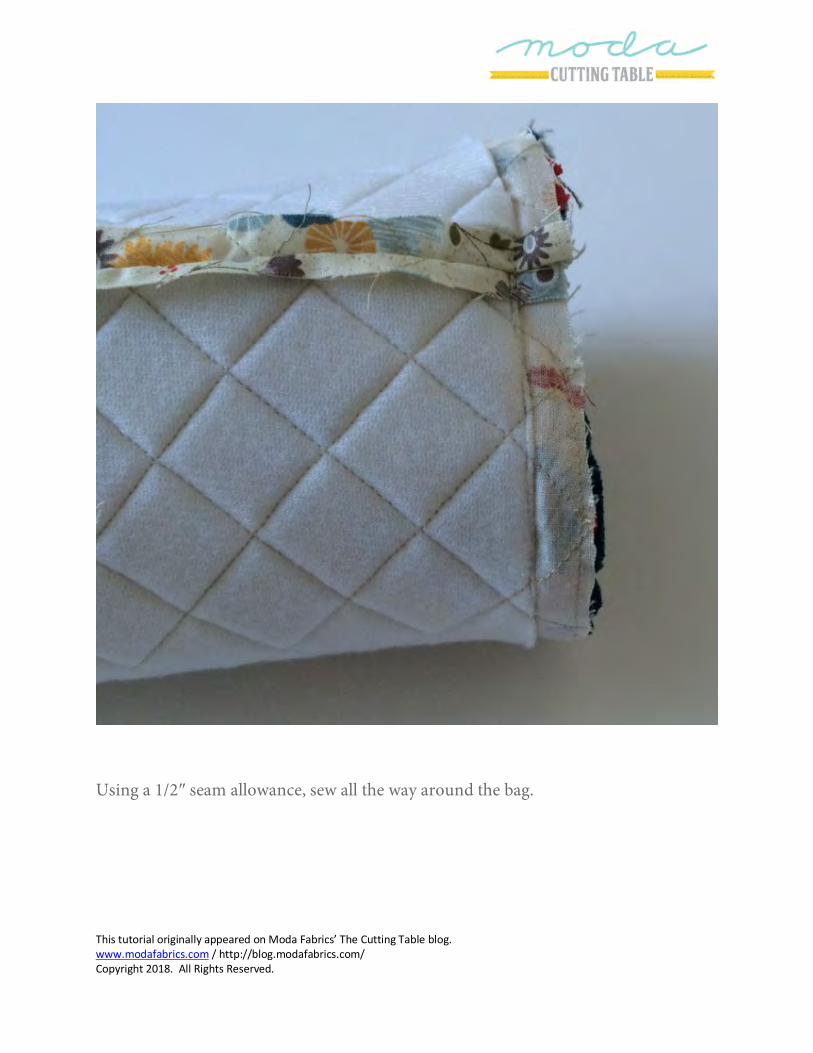
Using a 1/2″ seam allowance, sew all the way around the bag.
This tutorial originally appeared on Moda Fabrics’ The Cutting Table blog. www.modafabrics.com / http://blog.modafabrics.com/ Copyright 2018. All Rights Reserved.
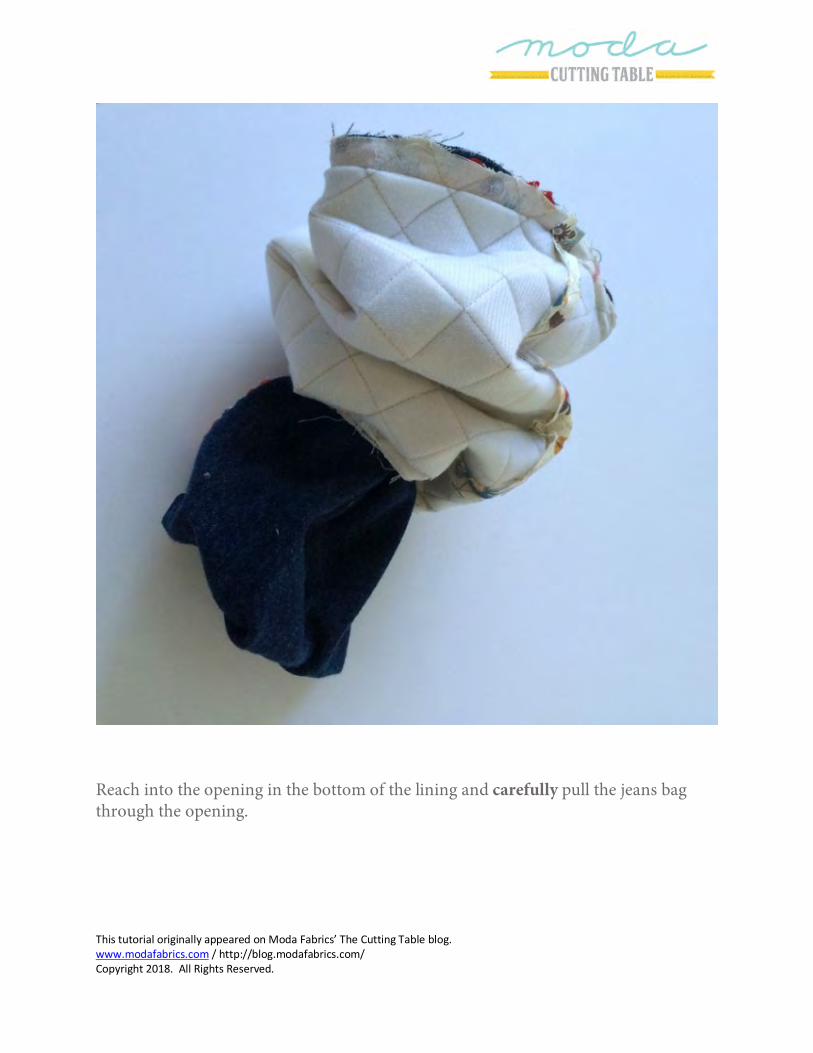
Reach into the opening in the bottom of the lining and carefully pull the jeans bag through the opening.
This tutorial originally appeared on Moda Fabrics’ The Cutting Table blog. www.modafabrics.com / http://blog.modafabrics.com/ Copyright 2018. All Rights Reserved.
Continue pulling the bag through until it is the seam joining the pieces is fully open – press as desired.
This tutorial originally appeared on Moda Fabrics’ The Cutting Table blog. www.modafabrics.com / http://blog.modafabrics.com/ Copyright 2018. All Rights Reserved.
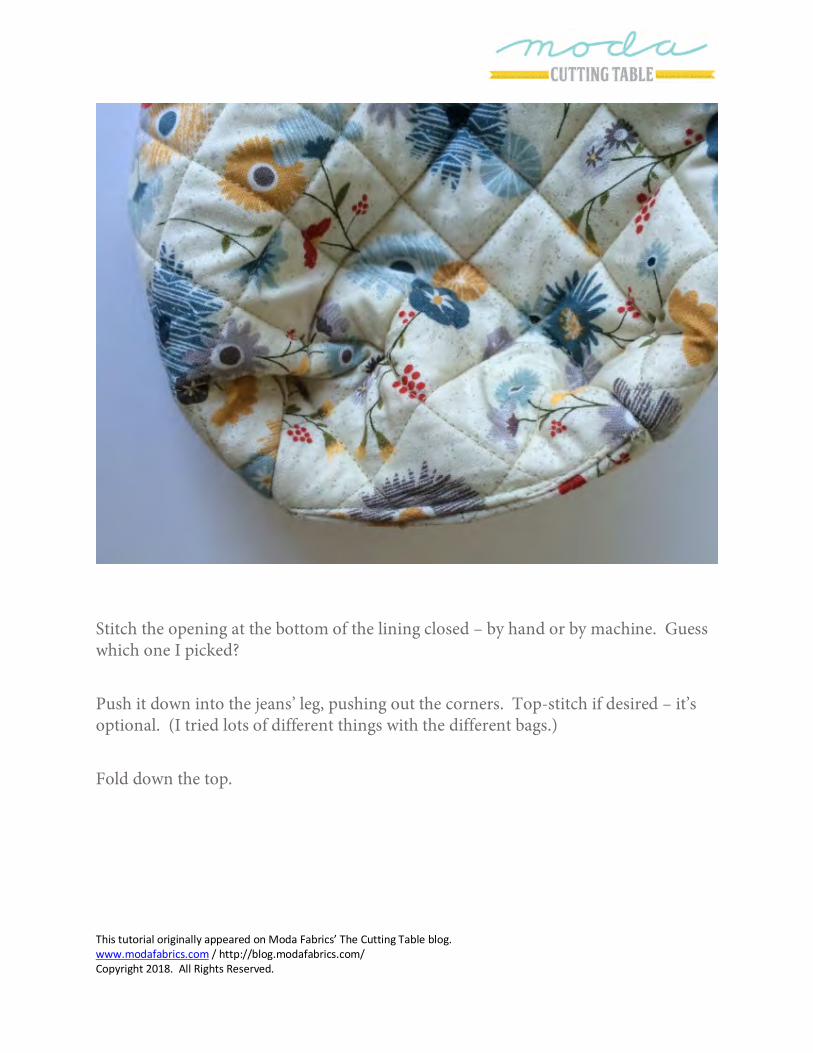
Stitch the opening at the bottom of the lining closed – by hand or by machine. Guess which one I picked?
Push it down into the jeans’ leg, pushing out the corners. Top-stitch if desired – it’s optional. (I tried lots of different things with the different bags.)
Fold down the top.
This tutorial originally appeared on Moda Fabrics’ The Cutting Table blog. www.modafabrics.com / http://blog.modafabrics.com/ Copyright 2018. All Rights Reserved.
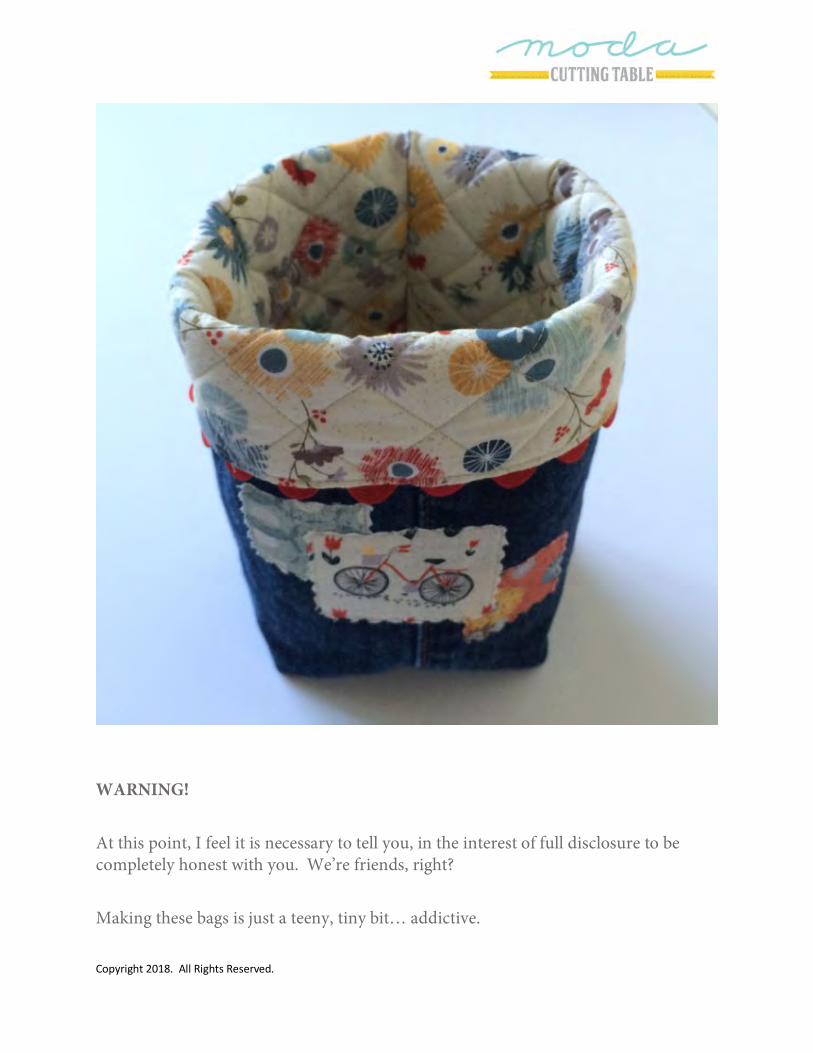
Admire your handiwork.
This tutorial originally appeared on Moda Fabrics’ The Cutting Table blog. www.modafabrics.com / http://blog.modafabrics.com/ Copyright 2018. All Rights Reserved.
WARNING!
At this point, I feel it is necessary to tell you, in the interest of full disclosure to be completely honest with you. We’re friends, right?
Making these bags is just a teeny, tiny bit… addictive.
This tutorial originally appeared on Moda Fabrics’ The Cutting Table blog. www.modafabrics.com / http://blog.modafabrics.com/ Copyright 2018. All Rights Reserved.