RED HAT ENTERPRISE LINUX 6: PERFORMANCE ADVANTAGES WITH AN OPEN SOURCE SOFTWARE STACK APRIL 2012 A PRINCIPLED TECHNOLOGIES TEST REPORT Commissioned by Red Hat, Inc. As operational and capital expenditures across the IT industry continue to soar, CIOs, CTOs, and datacenter managers are looking to cut costs by moving from traditional proprietary software to open source applications and by stretching hardware further by fully utilizing each system. Depending on the software stack that fuels your applications and your hardware, the performance and price/performance benefits from such a move could be significant. When serving a large number of Web requests, choosing the best combination of Web server, scripting language, database software, and operating system is vital, as these components directly affect the amount of processing each server has to perform. In our tests in the Principled Technologies labs, we found that the open source Red Hat® Enterprise Linux® 6-based LAMP software stack (Linux + Apache + MySQL + PHP) could deliver as much as 3.3 times greater performance for Web applications than a Windows-based WIMP stack (Windows + IIS + MySQL + PHP). The Red Hat Enterprise Linux LAMP stack that we tested excelled in running Web-based PHP/MySQL requests, which can help organizations get more out of their servers while improving performance and reducing operational expenses.
Transcript
RED HAT ENTERPRISE LINUX 6: PERFORMANCE ADVANTAGES WITH AN OPEN SOURCE SOFTWARE STACK
APRIL 2012
A PRINCIPLED TECHNOLOGIES TEST REPORT Commissioned by Red Hat, Inc.
As operational and capital expenditures across the IT industry continue to soar,
CIOs, CTOs, and datacenter managers are looking to cut costs by moving from
traditional proprietary software to open source applications and by stretching hardware
further by fully utilizing each system. Depending on the software stack that fuels your
applications and your hardware, the performance and price/performance benefits from
such a move could be significant. When serving a large number of Web requests,
choosing the best combination of Web server, scripting language, database software,
and operating system is vital, as these components directly affect the amount of
processing each server has to perform.
In our tests in the Principled Technologies labs, we found that the open source
Red Hat® Enterprise Linux® 6-based LAMP software stack (Linux + Apache + MySQL +
PHP) could deliver as much as 3.3 times greater performance for Web applications than
a Windows-based WIMP stack (Windows + IIS + MySQL + PHP). The Red Hat Enterprise
Linux LAMP stack that we tested excelled in running Web-based PHP/MySQL requests,
which can help organizations get more out of their servers while improving performance
and reducing operational expenses.
A Principled Technologies test report 2
Red Hat Enterprise Linux 6: Performance advantages with an open source software stack
HOW DOES YOUR SOFTWARE STACK UP? Reducing operational costs in the data center is an important consideration for
CIOs and IT managers. The operating system you select can provide a good foundation
for maximizing server hardware efficiency for your diverse workloads. Red Hat
Enterprise Linux 6 is a high-quality operating system that provides an open source
alternative to proprietary software.
We put the performance of two software stacks to the test. The first, a LAMP
stack, used open source software: Red Hat Enterprise Linux 6 operating system, Apache
Web Server, MySQL database, and PHP. The second, a WIMP stack, used a combination
of propriety and open source software: Microsoft Windows Server 2008 R2 SP1, Internet
Information Services (IIS), MySQL database, and PHP. We tested the performance of the
two solutions using the DVD Store 2.1 benchmark for three levels of performance
pressure/intensity, and found that the LAMP stack was able to complete up to 3.3 times
more orders per minute than the WIMP stack. (See Figure 1.)
Figure 1: The LAMP stack outperformed the WIMP stack by as much as 231.6 percent in processing online orders.
0
10,000
20,000
30,000
40,000
50,000
60,000
70,000
80,000
1 2 3
Ord
ers
pe
r m
inu
te (O
PM
)
Number of DVD Store Web Sites
Performance comparison
LAMP
WIMP
For system configuration information, see Appendix A. For step-by-step details
on how we tested, see Appendix B.
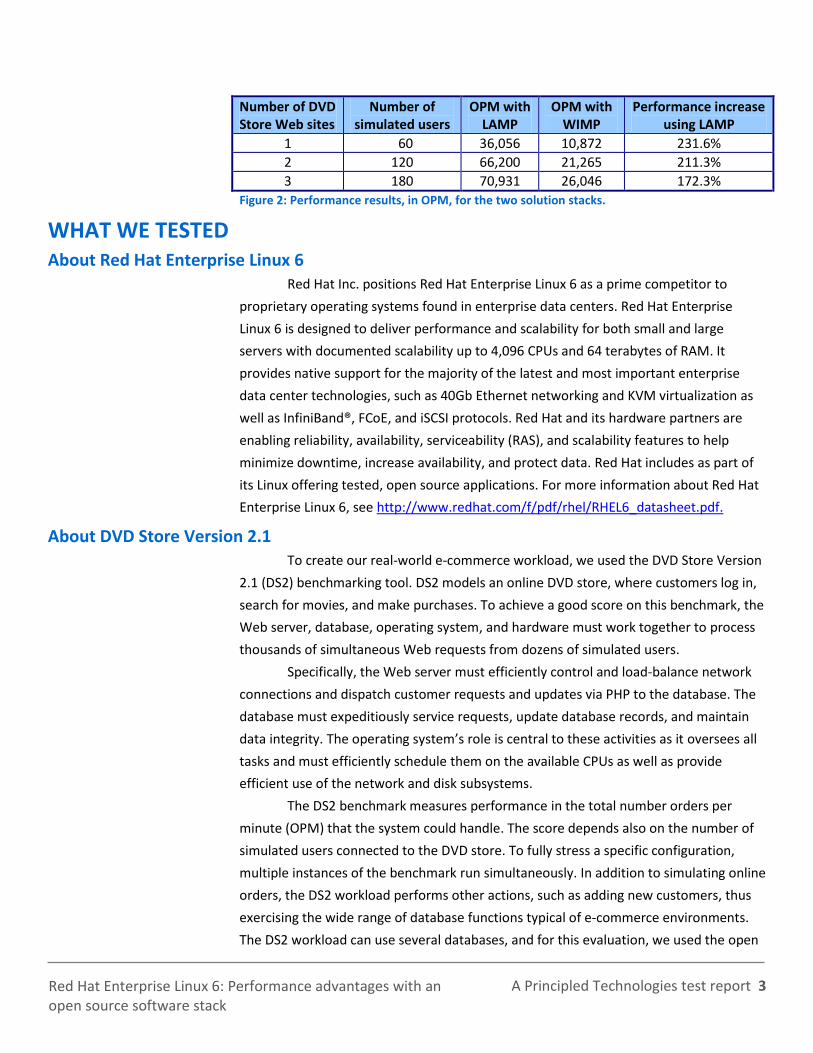
WHAT WE FOUND We found that the LAMP stack was able to process more online orders than the
WIMP stack as Web traffic increased with the number of independent DVD Store Web
sites. Figure 2 shows the performance results, in orders per minute, each software
bundle could handle, as well as the percentage performance increase the Red Hat
Enterprise Linux-based stack achieved.
A Principled Technologies test report 3
Red Hat Enterprise Linux 6: Performance advantages with an open source software stack
Number of DVD Store Web sites
Number of simulated users
OPM with LAMP
OPM with WIMP
Performance increase using LAMP
1 60 36,056 10,872 231.6%
2 120 66,200 21,265 211.3%
3 180 70,931 26,046 172.3%
Figure 2: Performance results, in OPM, for the two solution stacks.
WHAT WE TESTED About Red Hat Enterprise Linux 6
Red Hat Inc. positions Red Hat Enterprise Linux 6 as a prime competitor to
proprietary operating systems found in enterprise data centers. Red Hat Enterprise
Linux 6 is designed to deliver performance and scalability for both small and large
servers with documented scalability up to 4,096 CPUs and 64 terabytes of RAM. It
provides native support for the majority of the latest and most important enterprise
data center technologies, such as 40Gb Ethernet networking and KVM virtualization as
well as InfiniBand®, FCoE, and iSCSI protocols. Red Hat and its hardware partners are
enabling reliability, availability, serviceability (RAS), and scalability features to help
minimize downtime, increase availability, and protect data. Red Hat includes as part of
its Linux offering tested, open source applications. For more information about Red Hat
Enterprise Linux 6, see http://www.redhat.com/f/pdf/rhel/RHEL6_datasheet.pdf.
About DVD Store Version 2.1 To create our real-world e-commerce workload, we used the DVD Store Version
2.1 (DS2) benchmarking tool. DS2 models an online DVD store, where customers log in,
search for movies, and make purchases. To achieve a good score on this benchmark, the
Web server, database, operating system, and hardware must work together to process
thousands of simultaneous Web requests from dozens of simulated users.
Specifically, the Web server must efficiently control and load-balance network
connections and dispatch customer requests and updates via PHP to the database. The
database must expeditiously service requests, update database records, and maintain
data integrity. The operating system’s role is central to these activities as it oversees all
tasks and must efficiently schedule them on the available CPUs as well as provide
efficient use of the network and disk subsystems.
The DS2 benchmark measures performance in the total number orders per
minute (OPM) that the system could handle. The score depends also on the number of
simulated users connected to the DVD store. To fully stress a specific configuration,
multiple instances of the benchmark run simultaneously. In addition to simulating online
orders, the DS2 workload performs other actions, such as adding new customers, thus
exercising the wide range of database functions typical of e-commerce environments.
The DS2 workload can use several databases, and for this evaluation, we used the open
Red Hat Enterprise Linux 6: Performance advantages with an open source software stack
APPENDIX A – SYSTEM CONFIGURATION INFORMATION Figure 3 provides detailed configuration information for the test server, Figure 4 provides information about the
client machines we used in our testing, Figure 5 provides information for the external storage, and Figure 6 provides
details on the software stacks.
Test server
Platform
Vendor and model number Dell™ PowerEdge™ R710
Motherboard model number 0N0H4P
BIOS name and version Dell 3.0.0
BIOS settings Defaults
Power supplies
Total number 2
Vendor and model number Dell N870P-S0
Wattage of each (W) 870
Cooling fans
Total number 5
Vendor and model number Nidec® UltraFlo® RK385-A00
Dimensions (h x w) of each 2.5” x 2.5”
Volts 12
Amps 1.6
General
Number of processor packages 2
Number of cores per processor 6
Number of hardware threads per core 2
System power management policy Active Power Controller
CPU
Vendor Intel®
Name Xeon®
Model number X5670
Stepping B1
Socket type FCLGA1366
Core frequency (GHz) 2.93
Bus frequency 6.4
L1 cache 32 KB + 32 KB (per core)
L2 cache 256 KB (per core)
L3 cache 12 MB
Memory module(s)
Total RAM in system (GB) 96
Vendor and model number Samsung M393B1K70BH1-CH9
Type PC3-10600R
Speed (MHz) 1,333
Speed running in the system (MHz) 1,333
Timing/Latency(tCL-tRCD-tRP-tRASmin) 9-9-9-24
A Principled Technologies test report 6
Red Hat Enterprise Linux 6: Performance advantages with an open source software stack
Test server
Size (GB) 8
Number of RAM module(s) 12
Chip organization Double-sided
Rank Dual
Operating system #1
Name Red Hat Enterprise Linux Server 6.2, x86_64
Build number Santiago
File system ext4
Kernel 2.6.32-220.4.2.e16.x86_64
Language English
Updates All Red Hat updates as of 2/17/2012
Operating system #2
Name Windows Server 2008 R2 Enterprise Edition
Build number 7601
Service Pack 1
File system NTFS
Language English
Microsoft DirectX version 11
Updates All public Microsoft updates as 1/15/2012
Graphics
Vendor and model number Matrox® G200e
Graphics memory (MB) 8
RAID controller #1
Vendor and model number Dell PERC 6/i
Firmware version 1.22.32.1371
Cache size (MB) 256
RAID controller #2
Vendor and model number Dell PERC H800
Firmware version 2.100.03-1405
Cache size (MB) 512
Internal hard drive
Vendor and model number Seagate ST9146802SS/Fujitsu MBB2147RC
Number of disks in system 2/2
Size (GB) 146
Buffer size (MB) 16
RPM 10,000
Type SAS
Ethernet adapters
Vendor and model number Broadcom® NetXtreme® II GigE 5709C Quad-Port Ethernet
Type Integrated
Optical drive(s)
Vendor and model number TEAC DV-28SV
Type DVD-ROM
A Principled Technologies test report 7
Red Hat Enterprise Linux 6: Performance advantages with an open source software stack
Test server
USB ports
Number 4 external, 1 internal
Type 2.0
Figure 3: Configuration information for the server we used in our tests.
Client servers
Platform
Vendor and model number Intel D915GMH
Motherboard model number AAC68832-203
BIOS name and version Intel Corp EV9150A.86A.0482.2006.0222.2350
CPU
Vendor Intel
Name Pentium®
Model number 4
Stepping N0
Socket type 775 LGA
Core frequency (GHz) 3.20
Bus frequency (MHz) 800
Memory module(s)
Total RAM in system (GB) 1
Vendor and model number Kingston 041CE829
Type PC3200
Speed (MHz) 200
Speed running in the system (MHz) 200
Size (GB) 1
Number of RAM module(s) 1
Chip organization Double-sided
Rank Single
Operating system
Name Windows Server 2003 Enterprise Edition
Build number 3790
Service Pack 2
File system NTFS
Language English
Microsoft DirectX version 9.0c (4.09.0000.0904)
Updates All Microsoft public updates as of 1/16/2012
Graphics
Vendor and model number Intel 82915G/Gv/910GL Express Chipset
Graphics memory (MB) 128
Hard drive
Vendor and model number WDC WD800BB-55JKC0
A Principled Technologies test report 8
Red Hat Enterprise Linux 6: Performance advantages with an open source software stack
Client servers
Ethernet adapters
Vendor and model number Marvell Yukon Chipset based Ethernet Controller
Type Integrated
Optical drive(s)
Vendor and model number Sony DDU1615
Type DVD-ROM
USB ports
Number 2 front, 4 back
Type 1.0
Figure 4: Configuration information for the client servers we used in our tests.
External storage
External RAID controller
Vendor and model number Dell PERC H800
Type PCI
HDD Enclosure
Vendor and model number Dell PowerVault™ MD1220
Connectivity Unified Redundant Path
HDDs
Vendor and model number Seagate ST973452SS
Number 24
RPM 15,000 Capacity (GB) 73 Type 6Gbps SAS
RAID
RAID level RAID50 with three parity disks
Figure 5: Hardware configurations for the RAID controller and RAID level we used for the external storage.
Software solution stacks LAMP WIMP
Operating system Red Hat Enterprise Linux Server 6.2 x86_64 Kernel: 2.6.32-220.4.2.el6.x86_64
Microsoft Windows Server 2008 R2 SP1 Version: 6.1.7601
Web server Apache Web Server Version: 2.2.15 (2.2.15-15.el6_2.1.x86_64)
Internet Information Services Version: 7.5
Database MySQL Version: 5.1.61 (5.1.61-1.el6_2.1.x86_6)
MySQL Version: 5.1.57 (5.1.57-community Win64)
Web scripting language PHP Version: 5.3.3 (5.3.3-3.el6_2.6.x86_64)
PHP Version: 5.3.10
Figure 6: The software solution stacks used in our tests.
A Principled Technologies test report 9
Red Hat Enterprise Linux 6: Performance advantages with an open source software stack
APPENDIX B - HOW WE TESTED We used the same hardware configuration for each Web-application stack: a single Dell PowerEdge R710 with
132GB of RAM and Dell PowerVault MD1220 direct attached storage. The Web and database tiers both ran on this
server. To increase the load on the hardware and operating system, we added independent DVD Store instances to the
server (up to three). We chose to use virtual Web sites running on a single instance of the Apache Web server in order to
better compare the two stacks: Windows supports only a single instance of IIS. Accordingly, we gave each DVD Store
instance its own instance of MySQL.
Installing the Red Hat Enterprise Linux 6.2 Operating System 1. Insert and boot from the Red Hat Enterprise Linux 6.2 x86_64installation DVD. 2. At the welcome screen, select Install or upgrade an existing system, and press Enter. 3. At the Media test screen, select Skip, and press Enter. 4. At the Red Hat Enterprise Linux 6 title screen, click Next. 5. At the Choose an Installation Language screen, select English, and click Next. 6. At the Keyboard Type screen, select U.S. English, and click Next. 7. At the Storage Devices screen, select Basic Storage Devices, and click Next. 8. If a warning for device initialization appears, select Yes, discard any data. 9. At the Name the Computer screen, type the host name, and click Configure Network. 10. At the Network Connections screen, select the server’s main or management network interface, and click Edit. 11. At the Editing network interface screen, check Connect Automatically. 12. On the same screen, Select the IPv4 Settings tab, change the Method to Manual, and click Add. 13. On the same screen, enter the IP address, Netmask, Gateway, and DNS server. Click Apply. 14. Click Close on the Network Connections screen, and click Next on the Name the Computer screen. 15. At the Time zone selection screen, select the appropriate time zone, and click Next. 16. Enter the root password in the Root Password and Confirm fields, and click Next. 17. At the Partition selection screen, select Replace Existing Linux System(s), and click Next. 18. If a warning appears, click Write changes to disk. 19. At the default installation screen, click Next to begin the installation. 20. At the Congratulations screen, click Reboot. 21. After the system reboots, login in as root. 22. Disable SELinux by editing the file /etc/selinux/config, and change the line SELINUX=enforcing to
SELINUX=disabled. These changes take effect after rebooting:
23. Disable these unused services by running the following command-line script:
24. Enable and configure the cpuspeed service. Edit the file /etc/sysconfig/cpuspeed and modify the line containing GOVENOR to GOVERNOR=performance. Run this command-line script:
chkconfig cpuspeed on
service cpuspeed start
A Principled Technologies test report 10
Red Hat Enterprise Linux 6: Performance advantages with an open source software stack
25. Configure network adapter connected to the DVD Store clients, for example eth1, to listen on three IP addresses (aliases). Create the files /etc/sysconfig/network-scripts/ifcfg-eth1 and /etc/sysconfig/network-scripts/ifcfg-eth1-range0 with this content:
ifcfg-eth1: DEVICE=em2
ONBOOT=yes
BOOTPROTO=none
TYPE=Ethernet
IPV6INIT=no
USERCTL=no
ifcfg-eth1-range0: IPADDR_START=192.168.30.21
IPADDR_END=192.168.30.23
CLONENUM_START=0
26. Increase the amount of SysV shared-memory available to MySQL by modifying the parameters, kernel.shmmax, and kernel.shmall, in the file /etc/sysctl.conf:
# Controls the maximum shared segment size, in bytes
#kernel.shmmax = 68719476736
kernel.shmmax = 85983232000
# Controls the maximum number of shared memory segments, in pages
#kernel.shmall = 4294967296
kernel.shmall = 83968000
27. Allocate 21000 (about 41GB) standard Hugepages for MySQL by modifying the parameter, vm.nr_hugepages, in the file /etc/sysctl.conf:
vm.nr_hugepages=21000
28. Reboot the server:
shutdown –r now
29. After the system reboots, log in as root.
30. Create three pairs of disk partitions (one set for each instance of MySQL) for the MySQL data and log files, using, for example, the disk /dev/sdd, whose contents will be destroyed, and is at least 130GB in size. The size of the partitions is 20GB for the data files, and 5GB for the log files. Run this command-line script:
parted /dev/sdd mklabel gpt
parted /dev/sdd mkpart dat01 ext4 1 20GB
parted /dev/sdd mkpart dat02 ext4 20GB 40GB
parted /dev/sdd mkpart dat03 ext4 40GB 60GB
parted /dev/sdd mkpart log01 ext4 60GB 65GB
parted /dev/sdd mkpart log02 ext4 65GB 70GB
parted /dev/sdd mkpart log03 ext4 70GB 75GB
31. Create one more 50GB disk partition to hold the master DVD Store data, used to reset the system before each benchmark run:
A Principled Technologies test report 11
Red Hat Enterprise Linux 6: Performance advantages with an open source software stack
parted /dev/sdd mkpart DS2 ext4 75GB 125GB
32. Create an ext4 file system on each of the seven partitions:
for i in $(seq 7); do
mkfs.ext4 /dev/sdd${i}
done
33. Create mount points for these seven file systems:
mkdir /ds2 /mysql
mkdir /mysql/{dat,log}0{1,2,3}
34. To mount these file systems at boot time, add the following lines to /etc/fstab:
/dev/sdd7 /ds2 ext4 defaults,noatime 1 2
/dev/sdd1 /mysql/dat01 ext4 defaults,noatime 1 2
/dev/sdd2 /mysql/dat02 ext4 defaults,noatime 1 2
/dev/sdd3 /mysql/dat03 ext4 defaults,noatime 1 2
/dev/sdd4 /mysql/log01 ext4 defaults,noatime 1 2
/dev/sdd5 /mysql/log02 ext4 defaults,noatime 1 2
/dev/sdd6 /mysql/log03 ext4 defaults,noatime 1 2
35. Mount them for this session as well:
mount /ds2 /mysql/dat* /mysql/log*
36. Next, install the software packages from the Red Hat Enterprise Linux 6.2 DVD for Apache Web Server, PHP, and MySQL database.
37. Insert the Red Hat Enterprise Linux 6.2 x86_64 installation DVD, and mount it at /mnt:
mount -o ro /dev/cdrom /mnt
38. Create a yum repository file for this temporary package location by creating the file /etc/yum.repos.d/dvd.repo and adding the following lines:
[Red Hat – DVD]
name=Red Hat Enterprise Linux $releasever - $basearch - dvd
Red Hat Enterprise Linux 6: Performance advantages with an open source software stack
Installing Apache Web server and PHP on Red Hat Enterprise Linux 6.2 The benchmark used up to three independent DVD stores. They are accessed through one instance of the
Apache Web server configured with three virtual hosts listening on TCP port 80 on three separate IP addresses:
192.168.30.21, 192.168.30.22, and 192.168.30.23.
1. Modify the Apache configuration file, /etc/httpd/conf/httpd.conf. For each row in the next table, replace the line in the Apache configuration file (the entry in the left column) with the contents on the right.
Original Apache Web Server setting Updated setting KeepAlive Off KeepAlive On
2. Insert the following lines at the end of the file /etc/httpd/conf/httpd.conf to create the three virtual Web sites and to specify how PHP is to connect to the site’s MySQL instance:
Red Hat Enterprise Linux 6: Performance advantages with an open source software stack
done
mv php.conf-orig php.conf
4. Modify the default PHP configuration file /etc/php.ini. For each row in the next table, replace the line in the PHP configuration file (the entry in the left column) with the contents on the right.
mysql.default_password = mysql.default_password = web
mysqli.default_port = 3306 mysqli.default_port =
5. Create the directories that will contain the Web content:
mkdir /www
mkdir /www/html0{1,2,3}
mkdir /www/*/ds2
6. Start the Web server at boot time:
chkconfig httpd on
Installing MySQL Database on Red Hat Enterprise Linux 6.2 The MySQL database software was installed as part of the operating system installation. We configure three
independent instances, and start and stop them from scripts rather than use the init/services mechanism.
1. Stop the default MySQL instance and prevent it from automatically starting”
service mysqld stop
chkconfig mysqld off
2. The configuration file for each instance will generate from a template. Create the file /mysql/my-template.cnf with the content:
[mysql]
socket = /mysql/logXYZZY/mysql.sock
[mysqld]
user = mysql
default_storage_engine = InnoDB
socket = /mysql/logXYZZY/mysql.sock
pid_file = /mysql/logXYZZY/mysql.pid
skip-networking
large_pages = true
key_buffer_size = 32M
myisam_recover = FORCE,BACKUP
max_allowed_packet = 16M
max_connect_errors = 1000000
innodb = FORCE
datadir = /mysql/datXYZZY
A Principled Technologies test report 14
Red Hat Enterprise Linux 6: Performance advantages with an open source software stack
7. Create one MySQL user with full permissions for the DVD Store workload by starting a mysql shell with the command, mysql –uroot –pPassword1, and then entering the following commands:
grant all privileges on *.* to web@lamp001 identified by 'web';
grant all privileges on *.* to web@localhost identified by 'web';
grant all privileges on *.* to web@'%' identified by 'web';
grant all privileges on *.* to 'apache'@'localhost';
delete from mysql.user where User='';
Installing and configuring DVD Store 2.1 on the Linux server Download the DVD Store 2.1 software from the Dell repository, http://linux.dell.com/dvdstore, to the Red Hat
Enterprise Linux server. The files needed are ds21.tar.gz and ds21_mysql.tar.gz. Create MySQL data files in CSV format
for both the Linux and Windows servers, as the file line endings differ.
1. Extract the DVD Store software to the /ds2 file system:
cd /ds2
tar zxf ds21.tar.gz
tar zxf ds21_mysql.tar.gz
2. Modify the database creation SQL scripts to load the data from the local file system, rather than through the
network.
cd /ds2/mysqlds2/build
mv mysqlds2_create_db.sql mysqlds2_create_db.sql-
sed 's/TYPE=/ENGINE=/g' < sql mysqlds2_create_db.sql- > sql mysqlds2_create_db.sql
cd /ds2/mysqlds2/load
for i in */*.sql; do
cp ${i} ${i}-orig
A Principled Technologies test report 16
Red Hat Enterprise Linux 6: Performance advantages with an open source software stack
sed –i 's/ LOAD DATA LOCAL INFILE/ LOAD DATA INFILE/' ${i} done
3. Create the master data files for the tests on the Linux server; that is a 10GB DVD Store database for MySQL on
Linux:
cd /ds2
perl Install_DVDStore.pl
4. Copy the Linux master data files to a second directory and convert the files’ line endings from Linux to Windows
using the unix2dos program, which was installed earlier.
mkdir /ds2/win-data_files
cp –r /ds2/data_files /* /ds2/win-data_files
cd /ds2/win-data_files
for i in */*csv; do
echo Converting file $i
unix2dos –o $i
done
5. Bundle up the Windows data files for later use:
cd /ds2
zip –r win-data_files win-data_files
mkdir MySQL-GOLD
mv win-data_files.zip MySQL-GOLD
rm –rf win-data_files
6. Start the first MySQL instance and load the DVD Store data.
7. Stop MySQL and copy its data and log file to the gold or master file location to speed resetting DVD Store to its
original state.
sh /mysql/MySQLstop
mkdir /ds2/TMP/MySQL-GOLD/dat/
mkdir /ds2/TMP/MySQL-GOLD/log
cp -rp /mysql/log01/* /ds2/TMP/MySQL-GOLD/log &
cp –rp /mysql/dat01/* /ds2/TMP/MySQL-GOLD/dat
8. Finally, copy the DVD Store Web and PHP files to the three web-root directories.
cd /ds2/mysqlds2/web/php5
cp dsnewcustomer.php.sp dsnewcustomer.php
cp index.html ds*.php ds*.inc /www/html01/ds2
cp index.html ds*.php ds*.inc /www/html02/ds2
cp index.html ds*.php ds*.inc /www/html02/ds2
A Principled Technologies test report 17
Red Hat Enterprise Linux 6: Performance advantages with an open source software stack
Installing Microsoft Windows Server 2008 R2 operating system 1. Insert and boot from the Microsoft Windows Server 2008 R2 SP1 installation DVD. 2. At the Install Windows screen, select English, English (United States), and US for the installation language, time
format, and keyboard. Click Next. 3. On the next screen, click the arrow. 4. On the Select operating system screen, select Windows Server 2008 R2 SP1 Enterprise (Full Installation), and
click Next. 5. At the Microsoft Software License screen, select I accept the license terms, and click Next. 6. Select Custom Install. 7. At the Where do you want to install Windows screen, select the correct disk, and click Next to start the
installation process. It will reboot in the middle of the installation and continue the installation. 8. At the change password screen, click OK, enter the Administrator’s password twice, and click the arrow. 9. At the Your password has been changed screen, click OK to log on. 10. Windows will start a wizard for completing Initial Configuration tasks. 11. Click Activate Windows to enter a Product License. 12. Click Set time zone in order to set the date, time, and time zone as well as to configure automatic DST switching,
and SNTP servers. 13. Click Configure networking to open the Network Connections window. 14. Right-click the appropriate network adapter, and select Properties from the pop-up menu. 15. At the Networking screen, select Internet Protocol Version 4 (TCP/IPv4), and click Properties. 16. At the Internet Protocol Version 4 (TCP/IPv4) Properties window, select Use the following IP address, and enter
the IP address, subnet mask, and default gateway (if needed) for the management network. 17. Select Use the following DNS server address, and enter the Preferred and Alternate DNS server IP addresses. 18. Click OK to return to Networking. 19. Click OK to return to the Network Connections window. 20. Press Ctrl-W to close and return to the setup wizard. 21. Click Enable Remote Desktop. 22. At the Remote tab, select Allow connections from computers running any version of Remote Desktop Protocol. 23. Run Microsoft Update 24. Reboot the server. 25. Log in as administrator. 26. Create the folders c:\DS2, c:\MySQL, c:\MySQL\dat01, c:\MySQL\dat02, c:\MySQL\dat03,
c:\MySQL\log01, c:\MySQL\log02, and c:\MySQL\log03. 27. Start the local Server Manager, expand the Storage entry, and open Disk Management. 28. Create seven simple NTFS volumes: three 20GB volumes, three 5GB volumes, and one 50GB volume. 29. Assign the 20GB volumes to c:\MySQL\dat01, c:\MySQL\dat02, c:\MySQL\dat03. 30. Assign the 5GB volumes to c:\MySQL\log01, c:\MySQL\log02, c:\MySQL\log03. 31. Assign the 50 GB volume to c:\DS2. 32. Finally, configure the DVD Store client network interface with three IP address: 192.168.30.21, 192.168.30.22,
and 192.168.30.23 by opening the adapter’s properties, and then the Internet Protocol 4 (TCP/IPv4) properties. Enter 192.168.30.21 and 255.255.255.0 for the IP address and subnet mask.
33. Click Advanced, and click Add. 34. Enter the second IP address, and click Add. 35. Repeat for the remaining IP address. 36. Close the Properties windows.
A Principled Technologies test report 18
Red Hat Enterprise Linux 6: Performance advantages with an open source software stack
Using Microsoft Web Platform Installer (WPI) to install IIS, MySQL, and PHP on Microsoft Windows Server 2008 R2
1. Download Microsoft WPI, wpilauncher_3_10, from http://www.microsoft.com/web/downloads/platform.aspx.
2. Launch the WPI program. Select the following applications to be installed: IIS 7 Recommended Configuration,
PHP 5.3.10, PHP Manager for IIS, and MySQL Windows 5.1. Click Install.
3. Make three copies of the PHP installation directory:
C:\Program Files (x86)\PHP\v5.3–01, C:\Program Files (x86)\PHP\v5.3–02, and C:\Program Files (x86)\PHP\v5.3–03
4. Create three Web sites from the IIS manager: bind the first to 192.168.30.21:80, the second to 192.168.30.22:8,
and the third to 192.168.30.23:80.
5. Set their web root-spaces to c:\inetpub\webroot\ds2-01, c:\inetpub\webroot\ds2-02, and
c:\inetpub\webroot\ds2-03, respectively.
6. Open the PHP manager. Click Register new PHP version. Enter the path C:\Program Files
(x86)\PHP\v5.3–01. Repeat for C:\Program Files (x86)\PHP\v5.3–02 and C:\Program Files (x86)\PHP\v5.3–03
7. Modify the PHP configuration file C:\Program Files (x86)\PHP\v5.3–01. For each row in the next table,
replace the line in the PHP configuration file (the entry in the left column) with the contents on the right:
8. Modify the remaining two PHP configuration files as in the previous step, but replacing the ports 3306 with 3307
and 3308, respectively.
9. Run the MySQL Instance Configurator, MySQLInstanceConfig, once to create the default configuration file and
database. Do not install the instance as a service yet.
10. Copy the default mysql-configuration file, C:\Program Files\MySQL\MySQL Server 5.1\my.ini, to C:\MySQL\my-01.ini, C:\MySQL\my-02.ini, and C:\MySQL\my-03.ini
11. In each of the new MySQL configuration files, change the sql-mode from
Red Hat Enterprise Linux 6: Performance advantages with an open source software stack
Configuring the DVD Store client servers Each DVD Store client simulates 30 simultaneous users of one DVD Store Web site. In order to generate an
appropriate workload, we assigned two clients to each DVD Store Web site, or 60 simultaneous users. Accordingly, six
client servers, each running 32-bit Microsoft Windows Server 2003 Enterprise with Service Pack 2 were prepared with all
Windows updates as of 1/16/2012 applied.
We copied the DVD Store web-client for MySQL, ds2webdriver.exe, to the directory c:\ds2\bin on each client.
We created a DVD Store parameter file, params.txt, on each client with the following contents (the target IP address
changed to that client’s target Web site).
target=192.168.30.21
n_threads=30
ramp_rate=1
run_time=30
db_size=10GB
warmup_time=10
think_time=0
pct_newcustomers=20
n_searches=3
search_batch_size=5
n_line_items=5
virt_dir=ds2
page_type=php
windows_perf_host=
linux_perf_host=
detailed_view=n
Testing procedure To perform the test, we used a batch file, which we executed from the client machine. We stored the batch file
in the C:\ClientShare folder. The testing procedure consisted of the following steps:
1. Execute the batch file. 2. Stop the MySQL services. 3. Delete all prior database files. 4. Copy all original database files from the backup utility partition. 5. Reboot the server under test. 6. Reboot the client machine. 7. Wait for a ping response from the physical server machine. 8. Wait 10 additional minutes for any background tasks to complete. 9. Mount all necessary partitions. 10. Start the MySQL services. 11. Start the workload ramp up period. 12. Stop the workload. 13. Start the workload. 14. Stop the workload. 15. Copy all output files.
A Principled Technologies test report 22
Red Hat Enterprise Linux 6: Performance advantages with an open source software stack
ABOUT PRINCIPLED TECHNOLOGIES
Principled Technologies, Inc. 1007 Slater Road, Suite 300 Durham, NC, 27703 www.principledtechnologies.com
We provide industry-leading technology assessment and fact-based marketing services. We bring to every assignment extensive experience with and expertise in all aspects of technology testing and analysis, from researching new technologies, to developing new methodologies, to testing with existing and new tools. When the assessment is complete, we know how to present the results to a broad range of target audiences. We provide our clients with the materials they need, from market-focused data to use in their own collateral to custom sales aids, such as test reports, performance assessments, and white papers. Every document reflects the results of our trusted independent analysis. We provide customized services that focus on our clients’ individual requirements. Whether the technology involves hardware, software, Web sites, or services, we offer the experience, expertise, and tools to help our clients assess how it will fare against its competition, its performance, its market readiness, and its quality and reliability. Our founders, Mark L. Van Name and Bill Catchings, have worked together in technology assessment for over 20 years. As journalists, they published over a thousand articles on a wide array of technology subjects. They created and led the Ziff-Davis Benchmark Operation, which developed such industry-standard benchmarks as Ziff Davis Media’s Winstone and WebBench. They founded and led eTesting Labs, and after the acquisition of that company by Lionbridge Technologies were the head and CTO of VeriTest.
Principled Technologies is a registered trademark of Principled Technologies, Inc. All other product names are the trademarks of their respective owners.
Disclaimer of Warranties; Limitation of Liability: PRINCIPLED TECHNOLOGIES, INC. HAS MADE REASONABLE EFFORTS TO ENSURE THE ACCURACY AND VALIDITY OF ITS TESTING, HOWEVER, PRINCIPLED TECHNOLOGIES, INC. SPECIFICALLY DISCLAIMS ANY WARRANTY, EXPRESSED OR IMPLIED, RELATING TO THE TEST RESULTS AND ANALYSIS, THEIR ACCURACY, COMPLETENESS OR QUALITY, INCLUDING ANY IMPLIED WARRANTY OF FITNESS FOR ANY PARTICULAR PURPOSE. ALL PERSONS OR ENTITIES RELYING ON THE RESULTS OF ANY TESTING DO SO AT THEIR OWN RISK, AND AGREE THAT PRINCIPLED TECHNOLOGIES, INC., ITS EMPLOYEES AND ITS SUBCONTRACTORS SHALL HAVE NO LIABILITY WHATSOEVER FROM ANY CLAIM OF LOSS OR DAMAGE ON ACCOUNT OF ANY ALLEGED ERROR OR DEFECT IN ANY TESTING PROCEDURE OR RESULT. IN NO EVENT SHALL PRINCIPLED TECHNOLOGIES, INC. BE LIABLE FOR INDIRECT, SPECIAL, INCIDENTAL, OR CONSEQUENTIAL DAMAGES IN CONNECTION WITH ITS TESTING, EVEN IF ADVISED OF THE POSSIBILITY OF SUCH DAMAGES. IN NO EVENT SHALL PRINCIPLED TECHNOLOGIES, INC.’S LIABILITY, INCLUDING FOR DIRECT DAMAGES, EXCEED THE AMOUNTS PAID IN CONNECTION WITH PRINCIPLED TECHNOLOGIES, INC.’S TESTING. CUSTOMER’S SOLE AND EXCLUSIVE REMEDIES ARE AS SET FORTH HEREIN.