57
Red Hat Enterprise Linux 6 V2V Guide Importing Virtual Machines with virt-v2v Last Updated: 2018-05-09
Red Hat Enterprise Linux 6
V2V Guide
Importing Virtual Machines with virt-v2v
Last Updated: 2018-05-09


Red Hat Enterprise Linux 6 V2V Guide
Importing Virtual Machines with virt-v2v
Jiri HerrmannRed Hat Customer Content [email protected]
Dayle ParkerRed Hat Customer Content Services
Laura NovichRed Hat Customer Content Services
Laura BaileyRed Hat Customer Content Services
Tim HildredRed Hat Customer Content Services
David JormRed Hat Customer Content Services

Legal Notice
Copyright © 2017 Red Hat, Inc.
This document is licensed by Red Hat under the Creative Commons Attribution-ShareAlike 3.0Unported License. If you distribute this document, or a modified version of it, you must provideattribution to Red Hat, Inc. and provide a link to the original. If the document is modified, all RedHat trademarks must be removed.
Red Hat, as the licensor of this document, waives the right to enforce, and agrees not to assert,Section 4d of CC-BY-SA to the fullest extent permitted by applicable law.
Red Hat, Red Hat Enterprise Linux, the Shadowman logo, JBoss, OpenShift, Fedora, the Infinitylogo, and RHCE are trademarks of Red Hat, Inc., registered in the United States and othercountries.
Linux ® is the registered trademark of Linus Torvalds in the United States and other countries.
Java ® is a registered trademark of Oracle and/or its affiliates.
XFS ® is a trademark of Silicon Graphics International Corp. or its subsidiaries in the UnitedStates and/or other countries.
MySQL ® is a registered trademark of MySQL AB in the United States, the European Union andother countries.
Node.js ® is an official trademark of Joyent. Red Hat Software Collections is not formally relatedto or endorsed by the official Joyent Node.js open source or commercial project.
The OpenStack ® Word Mark and OpenStack logo are either registered trademarks/service marksor trademarks/service marks of the OpenStack Foundation, in the United States and othercountries and are used with the OpenStack Foundation's permission. We are not affiliated with,endorsed or sponsored by the OpenStack Foundation, or the OpenStack community.
All other trademarks are the property of their respective owners.
Abstract
This book is a guide to importing virtual machines from foreign hypervisors to Red Hat EnterpriseVirtualization and KVM managed by libvirt. The Red Hat Enterprise Linux 6 version of the virt-v2vutility has been deprecated. Users of Red Hat Enterprise Linux 6 are advised to create a Red HatEnterprise 7 virtual machine, and install virt-v2v in that virtual machine. The Red Hat EnterpriseLinux 7 version is fully supported and documented in virt-v2v Knowledgebase articles.
. . . . . . . . . . . . . . . . . . . . . . . . . . . . . . . . . . . . . . . . . . . . . . . . . . . . . . . . . . . . . . . . . . . . . . . . . . . . . . . . . . . . . . . . . . . . . . . . . . . . . . . . . . . . . . . . . . . . . . . . . . . . . . . . . . . . . . . . . . . . . . . . . . . . . . . . . . . . . . . . . . . . . . . . . . . . . . . . . . . . . . . . . . . . . . . . . . . . . . . . . . . . . . . . . . . . . . . . . . . . . . . . . . . . . . . . . . . . . . . . . . . . . . . . . . . . . . . . . . . . . . . . . . . . . . . . . . . . . . . .
. . . . . . . . . . . . . . . . . . . . . . . . . . . . . . . . . . . . . . . . . . . . . . . . . . . . . . . . . . . . . . . . . . . . . . . . . . . . . . . . . . . . . . . . . . . . . . . . . . . . . . . . . . . . . . . . . . . . . . . . . . . . . . . . . . . . . . . . . . . . . . . . . . . . . . . . . . . . . . . . . . . . . . . . . . . . . . . . . . . . . . . . . . . . . . . . . . . . . . . . . . . . . . . . . . . . . . . . . . . . . . . . . . . . . . . . . . . . . . . . . . . . . . . . . . . . . . . . . . . . . . . . . . . . . . . . . . . . . . . .
. . . . . . . . . . . . . . . . . . . . . . . . . . . . . . . . . . . . . . . . . . . . . . . . . . . . . . . . . . . . . . . . . . . . . . . . . . . . . . . . . . . . . . . . . . . . . . . . . . . . . . . . . . . . . . . . . . . . . . . . . . . . . . . . . . . . . . . . . . . . . . . . . . . . . . . . . . . . . . . . . . . . . . . . . . . . . . . . . . . . . . . . . . . . . . . . . . . . . . . . . . . . . . . . . . . . . . . . . . . . . . . . . . . . . . . . . . . . . . . . . . . . . . . . . . . . . . . . . . . . . . . . . . . . . . . . . . . . . . . .
. . . . . . . . . . . . . . . . . . . . . . . . . . . . . . . . . . . . . . . . . . . . . . . . . . . . . . . . . . . . . . . . . . . . . . . . . . . . . . . . . . . . . . . . . . . . . . . . . . . . . . . . . . . . . . . . . . . . . . . . . . . . . . . . . . . . . . . . . . . . . . . . . . . . . . . . . . . . . . . . . . . . . . . . . . . . . . . . . . . . . . . . . . . . . . . . . . . . . . . . . . . . . . . . . . . . . . . . . . . . . . . . . . . . . . . . . . . . . . . . . . . . . . . . . . . . . . . . . . . . . . . . . . . . . . . . . . . . . . . .
. . . . . . . . . . . . . . . . . . . . . . . . . . . . . . . . . . . . . . . . . . . . . . . . . . . . . . . . . . . . . . . . . . . . . . . . . . . . . . . . . . . . . . . . . . . . . . . . . . . . . . . . . . . . . . . . . . . . . . . . . . . . . . . . . . . . . . . . . . . . . . . . . . . . . . . . . . . . . . . . . . . . . . . . . . . . . . . . . . . . . . . . . . . . . . . . . . . . . . . . . . . . . . . . . . . . . . . . . . . . . . . . . . . . . . . . . . . . . . . . . . . . . . . . . . . . . . . . . . . . . . . . . . . . . . . . . . . . . . . .
Table of Contents
CHAPTER 1. INTRODUCING V2V1.1. WHAT IS VIRT-V2V?1.2. ABOUT THIS GUIDE
1.2.1. Audience1.2.2. Red Hat Enterprise Virtualization
1.3. FURTHER READING
CHAPTER 2. INSTALLING VIRT-V2V
CHAPTER 3. CONVERTING VIRTUAL MACHINES TO RUN ON KVM MANAGED BY LIBVIRT3.1. INTRODUCTION3.2. PREPARING TO CONVERT A VIRTUAL MACHINE
3.2.1. Preparing to convert a virtual machine running Linux3.2.2. Preparing to convert a local Xen virtual machine3.2.3. Preparing to convert a virtual machine running Windows
3.3. CONVERTING A VIRTUAL MACHINE3.3.1. Converting a local virtual machine using virt-v2v3.3.2. Converting a remote KVM virtual machine3.3.3. Converting a local Xen virtual machine3.3.4. Converting a remote Xen virtual machine3.3.5. Converting a VMware ESX / ESX(i) virtual machine
3.3.5.1. Authenticating to the ESX / ESX(i) server3.3.5.2. Connecting to an ESX / ESX(i) server with an invalid certificate
3.3.6. Converting a virtual machine running Windows3.4. RUNNING CONVERTED VIRTUAL MACHINES
CHAPTER 4. CONVERTING VIRTUAL MACHINES TO RUN ON RED HAT ENTERPRISE VIRTUALIZATION4.1. ACCEPTABLE CONVERTED STORAGE OUTPUT FORMATS4.2. ATTACHING AN EXPORT STORAGE DOMAIN4.3. CONVERTING A VIRTUAL MACHINE
4.3.1. Preparing to convert a virtual machine4.3.1.1. Preparing to convert a virtual machine running Linux4.3.1.2. Preparing to convert a virtual machine running Windows4.3.1.3. Preparing to convert a local Xen virtual machine
4.3.2. Converting a virtual machine4.3.2.1. virt-v2v4.3.2.2. Converting a local Xen virtual machine4.3.2.3. Converting a remote Xen virtual machine4.3.2.4. Converting a local KVM virtual machine4.3.2.5. Converting a remote KVM virtual machine4.3.2.6. Converting a VMware ESX / ESX(i) virtual machine
4.3.3. Importing and running the converted virtual machine4.3.4. Scripting the v2v process4.3.5. Scripted bulk v2v process
CHAPTER 5. CONVERTING PHYSICAL MACHINES TO VIRTUAL MACHINES5.1. PREREQUISITES5.2. PREPARING TO CONVERT A PHYSICAL MACHINE
5.2.1. Install virt-v2v on a conversion server5.2.2. Enable root login over SSH5.2.3. Define a target profile in virt-v2v.conf5.2.4. Create the bootable media
445555
7
88911121213141415151616171717
181819
202122232525262627272829293032
35353636363738
Table of Contents
1
. . . . . . . . . . . . . . . . . . . . . . . . . . . . . . . . . . . . . . . . . . . . . . . . . . . . . . . . . . . . . . . . . . . . . . . . . . . . . . . . . . . . . . . . . . . . . . . . . . . . . . . . . . . . . . . . . . . . . . . . . . . . . . . . . . . . . . . . . . . . . . . . . . . . . . . . . . . . . . . . . . . . . . . . . . . . . . . . . . . . . . . . . . . . . . . . . . . . . . . . . . . . . . . . . . . . . . . . . . . . . . . . . . . . . . . . . . . . . . . . . . . . . . . . . . . . . . . . . . . . . . . . . . . . . . . . . . . . . . . .
. . . . . . . . . . . . . . . . . . . . . . . . . . . . . . . . . . . . . . . . . . . . . . . . . . . . . . . . . . . . . . . . . . . . . . . . . . . . . . . . . . . . . . . . . . . . . . . . . . . . . . . . . . . . . . . . . . . . . . . . . . . . . . . . . . . . . . . . . . . . . . . . . . . . . . . . . . . . . . . . . . . . . . . . . . . . . . . . . . . . . . . . . . . . . . . . . . . . . . . . . . . . . . . . . . . . . . . . . . . . . . . . . . . . . . . . . . . . . . . . . . . . . . . . . . . . . . . . . . . . . . . . . . . . . . . . . . . . . . . .
. . . . . . . . . . . . . . . . . . . . . . . . . . . . . . . . . . . . . . . . . . . . . . . . . . . . . . . . . . . . . . . . . . . . . . . . . . . . . . . . . . . . . . . . . . . . . . . . . . . . . . . . . . . . . . . . . . . . . . . . . . . . . . . . . . . . . . . . . . . . . . . . . . . . . . . . . . . . . . . . . . . . . . . . . . . . . . . . . . . . . . . . . . . . . . . . . . . . . . . . . . . . . . . . . . . . . . . . . . . . . . . . . . . . . . . . . . . . . . . . . . . . . . . . . . . . . . . . . . . . . . . . . . . . . . . . . . . . . . . .
. . . . . . . . . . . . . . . . . . . . . . . . . . . . . . . . . . . . . . . . . . . . . . . . . . . . . . . . . . . . . . . . . . . . . . . . . . . . . . . . . . . . . . . . . . . . . . . . . . . . . . . . . . . . . . . . . . . . . . . . . . . . . . . . . . . . . . . . . . . . . . . . . . . . . . . . . . . . . . . . . . . . . . . . . . . . . . . . . . . . . . . . . . . . . . . . . . . . . . . . . . . . . . . . . . . . . . . . . . . . . . . . . . . . . . . . . . . . . . . . . . . . . . . . . . . . . . . . . . . . . . . . . . . . . . . . . . . . . . . .
5.3. CONVERTING PHYSICAL MACHINES TO VIRTUAL MACHINES5.4. IMPORTING AND RUNNING CONVERTED VIRTUAL MACHINES ON TARGET HYPERVISORS
CHAPTER 6. DEBUGGING AND TROUBLESHOOTING6.1. DEBUGGING V2V CONVERSIONS6.2. DEBUGGING P2V CONVERSIONS6.3. KNOWN ISSUE WITH ISCSI/MPATH/SCSI STORAGE VOLUMES
CHAPTER 7. REFERENCES7.1. VIRT-V2V PARAMETERS7.2. CONFIGURATION CHANGES
7.2.1. Configuration changes for Linux virtual machines7.2.2. Configuration changes for Windows virtual machines
APPENDIX A. ADDITIONAL PROCEDURESA.1. CREATING BOOTABLE MEDIA
A.1.1. Create a P2V client boot CDA.1.2. Create a bootable P2V USB mediaA.1.3. Create a PXE boot image
APPENDIX B. REVISION HISTORY
3843
44444444
4545474849
5151515151
53
V2V Guide
2

Table of Contents
3
CHAPTER 1. INTRODUCING V2V
WARNING
The Red Hat Enterprise Linux 6 version of the virt-v2v utility has been deprecated.Users of Red Hat Enterprise Linux 6 are advised to create a Red Hat Enterprise 7virtual machine, and install virt-v2v in that virtual machine. The Red Hat EnterpriseLinux 7 version is fully supported and documented in virt-v2v Knowledgebasearticles.
V2V is an acronym for virtual to virtual, referring to the process of importing virtual machines fromone virtualization platform to another. Red Hat Enterprise Virtualization and Red Hat Enterprise Linuxare capable of performing V2V operations using the virt-v2v command.
1.1. WHAT IS VIRT-V2V?
The virt-v2v command converts virtual machines from a foreign hypervisor to run on KVM, managedby Red Hat Enterprise Virtualization or libvirt. virt-v2v can currently convert virtual machinesrunning Red Hat Enterprise Linux and Windows on Xen, KVM and VMware ESX / ESX(i) hypervisors. virt-v2v enables paravirtualized (virtio) drivers in the converted virtual machine if possible.
The following guest operating systems are supported by virt-v2v:
Supported guest operating systems:
Red Hat Enterprise Linux 3.9
Red Hat Enterprise Linux 4
Red Hat Enterprise Linux 5
Red Hat Enterprise Linux 6
Windows XP
Windows Vista
Windows 7
Windows Server 2003
Windows Server 2008
All minor releases of the above guest operating systems are supported by virt-v2v.
The following source hypervisors are supported by virt-v2v:
Supported source hypervisors:
V2V Guide
4
Unless otherwise specified, all minor releases of the following source hypervisors are supported by virt-v2v:
Xen — all versions released by Red Hat
KVM — all versions released by Red Hat
VMware ESX / ESX(i) — versions 3.5, 4.0, 4.1, 5.0, 5.1
1.2. ABOUT THIS GUIDE
This guide describes how to import virtual machines from foreign hypervisors to Red Hat EnterpriseVirtualization and KVM managed by libvirt.
1.2.1. Audience
This guide is intended for system administrators who manage a virtualized environment using Red HatEnterprise Virtualization or Red Hat Enterprise Linux. An advanced level of system administration,preferably including familiarity with virtual machine data center operations, is assumed. Thisdocument is not intended for beginners.
1.2.2. Red Hat Enterprise Virtualization
The Red Hat Enterprise Virtualization platform is a richly featured virtualization management solutionproviding fully integrated management across virtual machines. It is based on the leading open sourcevirtualization platform and provides superior technical capabilities. The platform offers scalability inthe management of large numbers of virtual machines.
1.3. FURTHER READING
Red Hat offers a wealth of documentation solutions across its various virtualization products.Coverage of Red Hat Enterprise Linux and its inbuilt virtualization products includes:
Red Hat Enterprise Linux — Virtualization Getting Started Guide: This guide provides anintroduction to virtualization concepts, advantages, and tools, and an overview of Red Hatvirtualization documentation and products.
Red Hat Enterprise Linux — Virtualization Host Configuration and Guest Installation Guide: Thisguide covers the installation of virtualization software and configuration of guest machines ona virtualization host.
Red Hat Enterprise Linux — Virtualization Administration Guide: This guide covers administrationof hosts, networking, storage, and device and guest management using either virt-manager orvirsh as primary configuration tools. This guide also includes a libvirt and QEMU reference, aswell as troubleshooting information.
Red Hat Enterprise Linux — Virtualization Security Guide: This guide provides an overview ofvirtualization security technologies provided by Red Hat. Also included are recommendationsfor securing hosts, guests, and shared infrastructure and resources in virtualizedenvironments.
Red Hat Enterprise Linux — Virtualization Tuning and Optimization Guide: This guide provides tips,tricks and suggestions for making full use of virtualization performance features and optionsfor your systems and guest virtual machines.
CHAPTER 1. INTRODUCING V2V
5
Red Hat Enterprise Linux — V2V Guide: This guide describes importing virtual machines fromKVM, Xen and VMware ESX/ESX(i) hypervisors to Red Hat Enterprise Virtualization and KVMmanaged by libvirt.
The Red Hat Enterprise Virtualization documentation suite provides information on installation,development of applications, configuration and usage of the Red Hat Enterprise Virtualization platformand its related products.
Red Hat Enterprise Virtualization — Installation Guide: This guide describes how to prepare for andset up a Red Hat Enterprise Virtualization environment, and how to upgrade a Red HatEnterprise Virtualization environment to the latest release. It also outlines how to set uphypervisors and perform initial configuration of a Red Hat Enterprise Virtualizationenvironment.
Red Hat Enterprise Virtualization — Administration Guide: This guide describes how to configureand administer a Red Hat Enterprise Virtualization environment after that environment hasbeen set up for the first time, including how to add hypervisors, storage domains, and externalproviders to the environment, how to manage resources such as virtual machines, virtual disks,and templates, and how to take and restore backups.
Red Hat Enterprise Virtualization — User Guide: This guide describes how to use the User Portal ofa Red Hat Enterprise Virtualization environment, including the functionality provided by theBasic and Extended tabs, how to create and work with virtual machines and templates, andhow to monitor resource usage.
Red Hat Enterprise Virtualization — Technical Guide: This guide describes how to use the RESTAPI, the Python and Java software development kits, and command-line tools specific to RedHat Enterprise Virtualization. It also outlines the underlying technical concepts behind Red HatEnterprise Virtualization.
Red Hat Enterprise Virtualization — Manager Release Notes: This guide contains information on theRed Hat Enterprise Virtualization Manager specific to the current release.
Red Hat Enterprise Virtualization — Technical Notes: This guide describes the changes that havebeen made between the current release and the previous release.
NOTE
All of the guides for these products are available at the Red Hat Customer Portal:https://access.redhat.com/documentation/en-US/
V2V Guide
6
CHAPTER 2. INSTALLING VIRT-V2Vvirt-v2v is run from a Red Hat Enterprise Linux 64-bit host system. virt-v2v must be installed onthe host.
Procedure 2.1. Installing virt-v2v
1. Subscribe to the virt-v2v channel on the Red Hat Customer Portalvirt-v2v is available on the Red Hat Customer Portal in the Red Hat Enterprise Linux Server (v.6 for 64-bit x86_64) or Red Hat Enterprise Linux Workstation (v.6 for x86_64) channel. Ensure the system is subscribed to the appropriate channelbefore installing virt-v2v.
NOTE
Red Hat Network Classic (RHN) has now been deprecated. Red Hat SubscriptionManager should now be used for registration tasks. For more information, seehttps://access.redhat.com/rhn-to-rhsm.
2. Install the prerequisites
If you are converting Windows virtual machines, you must install the libguestfs-winsupportand virtio-win packages. These packages provide support for NTFS and Windowsparavirtualized block and network drivers.
If you attempt to convert a virtual machine using NTFS without the libguestfs-winsupportpackage installed, the conversion will fail.
If you attempt to convert a virtual machine running Windows without the virtio-winpackage installed, the conversion will fail giving an error message concerning missing files.
The libguestfs-winsupport is available for Red Hat Enterprise Linux Server 6 in the Red Hat Enterprise Linux Server V2V Tools for Windows (v. 6) channel, while the virtio-win package is available in the Red Hat Enterprise Linux Server Supplementary (v. 6) channel. To install these packages, ensure that your system has the requiredpermissions to subscribe to both channels and run the following command as root:
# subscription-manager repos --enable rhel-6-server-v2vwin-1-rpms --enable rhel-6-server-supplementary-rpms
3. Install virt-v2v packageAs root, run the command:
yum install virt-v2v
virt-v2v is now installed and ready to use on on your system.
CHAPTER 2. INSTALLING VIRT-V2V
7
CHAPTER 3. CONVERTING VIRTUAL MACHINES TO RUN ONKVM MANAGED BY LIBVIRT
WARNING
The Red Hat Enterprise Linux 6 version of the virt-v2v utility has been deprecated.Users of Red Hat Enterprise Linux 6 are advised to create a Red Hat Enterprise 7virtual machine, and install virt-v2v in that virtual machine. The Red Hat EnterpriseLinux 7 version is fully supported and documented in virt-v2v Knowledgebasearticles.
virt-v2v can convert virtual machines to run on Red Hat Enterprise Linux, using KVM managed bylibvirt. Virtual machines can be converted from Xen, KVM, VMware ESX / ESX(i), and Hyper-Venvironments. The libvirt and virsh commands are documented in the Red Hat Enterprise LinuxVirtualization Administration Guide. You may also use the command man virsh for more information.
3.1. INTRODUCTION
The virt-v2v command converts virtual machines from a foreign hypervisor to run on KVM, managedby libvirt. The following guest operating systems are supported by virt-v2v:
Red Hat Enterprise Linux 3.9
Red Hat Enterprise Linux 4
Red Hat Enterprise Linux 5
Red Hat Enterprise Linux 6
Windows XP
Windows Vista
Windows 7
Windows Server 2003
Windows Server 2008
The following hypervisors are supported:
KVM
libvirt-managed Xen
VMware ESX / ESX(i) - versions 3.5, 4.0, 4.1, 5.0, 5.1
The virt-v2v command enables paravirtualized ( virtio) drivers in the converted guest, if possible.
V2V Guide
8
virt-v2v is available on Red Hat Customer Portal in the Red Hat Enterprise Linux Server (v.6 for 64-bit x86_64) or Red Hat Enterprise Linux Workstation (v.6 for x86_64) channel.
The virt-v2v tool requires root access to the host system.
Some of the new features for virt-v2v starting with Red Hat Enterprise Linux 6 are:
The -op and -osd command line options continue to be supported, but are deprecated infavor of -os. There is no deprecation warning when they are used.
The -of command line option allows specification of the file format to be used for targetstorage: raw or qcow2. This feature allows for the conversion of a virtual machine with rawstorage to qcow2 and vice versa.
The -oa command line option allows the allocation policy of the target storage to be specified:sparse or preallocated. This can be used to convert between sparse and preallocated.Underlying this change, sparse volumes are now supported.
The configuration file can now contain target profiles, which specify the storage location,output format and allocation policy for a target. This allows the user to specify --profile<foo> rather than -os<a> -op<b> -oa<oc>.
The conversion of Windows virtual machines to libvirt targets is supported.
Refer to the virt-v2v man page for further details on these and other features.
To install virt-v2v from the Red Hat Customer Portal, ensure the system is subscribed to theappropriate channel, then run:
# yum install virt-v2v
3.2. PREPARING TO CONVERT A VIRTUAL MACHINE
virt-v2v converts virtual machines from a foreign hypervisor to run on Red Hat Enterprise Linux,using KVM managed by libvirt. It automatically creates a libvirt domain for the converted virtualmachines.
CHAPTER 3. CONVERTING VIRTUAL MACHINES TO RUN ON KVM MANAGED BY LIBVIRT
9
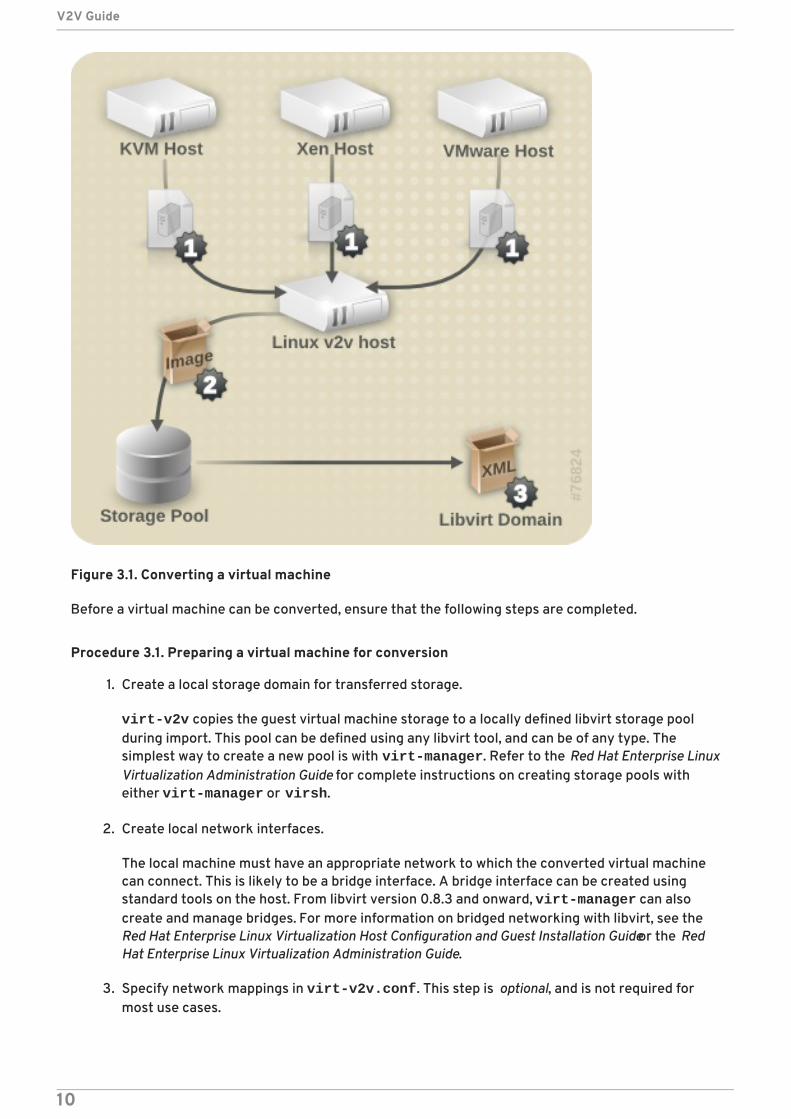
Figure 3.1. Converting a virtual machine
Before a virtual machine can be converted, ensure that the following steps are completed.
Procedure 3.1. Preparing a virtual machine for conversion
1. Create a local storage domain for transferred storage.
virt-v2v copies the guest virtual machine storage to a locally defined libvirt storage poolduring import. This pool can be defined using any libvirt tool, and can be of any type. Thesimplest way to create a new pool is with virt-manager. Refer to the Red Hat Enterprise LinuxVirtualization Administration Guide for complete instructions on creating storage pools witheither virt-manager or virsh.
2. Create local network interfaces.
The local machine must have an appropriate network to which the converted virtual machinecan connect. This is likely to be a bridge interface. A bridge interface can be created usingstandard tools on the host. From libvirt version 0.8.3 and onward, virt-manager can alsocreate and manage bridges. For more information on bridged networking with libvirt, see theRed Hat Enterprise Linux Virtualization Host Configuration and Guest Installation Guide or the RedHat Enterprise Linux Virtualization Administration Guide.
3. Specify network mappings in virt-v2v.conf. This step is optional, and is not required formost use cases.
V2V Guide
10
If your virtual machine has multiple network interfaces, /etc/virt-v2v.conf must beedited to specify the network mapping for all interfaces. You can specify an alternative virt-v2v.conf file with the -f parameter.
If your virtual machine only has a single network interface, it is simpler to use the --networkor --bridge parameters, rather than modifying virt-v2v.conf.
4. Create a profile for the conversion in virt-v2v.conf.
This step is optional. Profiles specify a conversion method, storage location, output format andallocation policy. When a profile is defined, it can be called using --profile rather thanindividually providing the -o, -os, -of and -oa parameters. See virt-v2v.conf(5) for details.
3.2.1. Preparing to convert a virtual machine running Linux
Before a virtual machine running Linux can be converted, ensure that the following steps arecompleted.
Procedure 3.2. Preparing to convert a virtual machine running Linux
1. Obtain the software.
As part of the conversion process, virt-v2v may install a new kernel and drivers on thevirtual machine. If the virtual machine being converted is registered to Red Hat SubscriptionManagement (RHSM), the required packages will be automatically downloaded. Forenvironments where Red Hat Subscription Management (RHSM) is not available, the virt-v2v.conf file references a list of RPMs used for this purpose. The RPMs relevant to yourvirtual machine must be downloaded manually from the Red Hat Customer Portal and madeavailable in the directory specified by the path-root configuration element, which by defaultis /var/lib/virt-v2v/software/. virt-v2v will display an error similar to Example 3.1,“Missing Package error” if the software it depends upon for a particular conversion is notavailable.
Example 3.1. Missing Package error
virt-v2v: Installation failed because the following files referenced in the configuration file are required, but missing:rhel/6/kernel-2.6.32-128.el6.x86_64.rpmrhel/6/ecryptfs-utils-82-6.el6.x86_64.rpmrhel/6/ecryptfs-utils-82-6.el6.i686.rpm
2. To obtain the relevant RPMs for your environment, repeat these steps for each missingpackage:
1. Log in to the Red Hat Customer Portal: https://access.redhat.com/.
2. In the Red Hat Customer Portal, select Downloads > Product Downloads > Red Hat Enterprise Linux.
3. Select the desired Product Variant, Version, and select the Packages tab. In the Filter field, type the package name exactly matching the one shown in the errormessage. For the example shown in Example 3.1, “Missing Package error”, the firstpackage is kernel-2.6.32-128.el6.x86_64
CHAPTER 3. CONVERTING VIRTUAL MACHINES TO RUN ON KVM MANAGED BY LIBVIRT
11
4. A list of packages displays. Select the package name identical to the one in the errormessage. This opens the details page, which contains a detailed description of the package.Alternatively, to download the most recent version of a package, select Download Latest next to the desired package.
5. Save the downloaded package to the appropriate directory in /var/lib/virt-v2v/software. For Red Hat Enterprise Linux 6, the directory is /var/lib/virt-v2v/software/rhel/6.
3.2.2. Preparing to convert a local Xen virtual machine
The following is required when converting virtual machines on a host which used to run Xen, but hasbeen updated to run KVM. It is not required when converting a Xen virtual machine imported directlyfrom a running libvirt/Xen instance.
Procedure 3.3. Preparing to convert a local Xen virtual machine
Obtain the XML for the virtual machine.
virt-v2v uses a libvirt domain description to determine the current configuration of thevirtual machine, including the location of its storage. Before starting the conversion, obtain theXML from the host running the virtual machine with the following command:
virsh dumpxml guest_name > guest_name.xml
This will require booting into a Xen kernel to obtain the XML, as libvirt needs to connect to arunning Xen hypervisor to obtain its metadata. The conversion process is optimized for KVM,so obtaining domain data while running a Xen kernel, then performing the conversion using aKVM kernel will be more efficient than running the conversion on a Xen kernel.
3.2.3. Preparing to convert a virtual machine running Windows
IMPORTANT
virt-v2v does not support conversion of the Windows Recovery Console. If a virtualmachine has a recovery console installed and VirtIO was enabled during conversion,attempting to boot the recovery console will result in a stop error.
Windows XP x86 does not support the Windows Recovery Console on VirtIO systems, sothere is no resolution to this. However, on Windows XP AMD64 and Windows 2003 (x86and AMD64), the recovery console can be reinstalled after conversion. The re-installation procedure is the same as the initial installation procedure. It is notnecessary to remove the recovery console first. Following re-installation, the recoveryconsole will work as intended.
Before a virtual machine running Windows can be converted, ensure that the following steps arecompleted.
1. Install the libguestfs-winsupport package on the host running virt-v2v. This packageprovides support for NTFS, which is used by many Windows systems. The libguestfs-winsupport package is provided by the RHEL V2VWIN (v. 6 for 64-bit x86_64)channel. Ensure your system is subscribed to this channel, then run the following command asroot:
V2V Guide
12
yum install libguestfs-winsupport
If you attempt to convert a virtual machine using NTFS without the libguestfs-winsupportpackage installed, the conversion will fail. An error message similar to Example 3.2, “Errormessage when converting a Windows virtual machine without libguestfs-winsupport installed”will be shown.
Example 3.2. Error message when converting a Windows virtual machine withoutlibguestfs-winsupport installed
No operating system could be detected inside this disk image.
This may be because the file is not a disk image, or is not a virtual machineimage, or because the OS type is not understood by virt-inspector.
If you feel this is an error, please file a bug report including as muchinformation about the disk image as possible.
2. Install the virtio-win package on the host running virt-v2v. This package providesparavirtualized block and network drivers for Windows guests. The virtio-win package isprovided by the RHEL Server Supplementary (v. 6 64-bit x86_64) channel. Ensureyour system is subscribed to this channel, then run the following command as root:
yum install virtio-win
If you attempt to convert a virtual machine running Windows without the virtio-win packageinstalled, the conversion will fail. An error message similar to Example 3.3, “Error messagewhen converting a Windows virtual machine without virtio-win installed” will be shown.
Example 3.3. Error message when converting a Windows virtual machine without virtio-win installed
virt-v2v: Installation failed because the following files referenced in the configuration file are required, but missing: /usr/share/virtio-win/drivers/i386/Win2008
NOTE
When virtual machines running Windows are converted for output to Red Hat EnterpriseVirtualization, post-processing of the virtual machine image will be performed by theRed Hat Enterprise Virtualization Manager to install updated drivers. See Section 7.2.2,“Configuration changes for Windows virtual machines” for details of the process. Thisstep will be omitted when virtual machines running Windows are converted for output tolibvirt.
3.3. CONVERTING A VIRTUAL MACHINE
CHAPTER 3. CONVERTING VIRTUAL MACHINES TO RUN ON KVM MANAGED BY LIBVIRT
13
Once you have prepared to convert the virtual machines, use virt-v2v to perform the actualconversions. This section provides the steps to convert the virtual machines, and the command syntaxfor virt-v2v.
Note that conversions are resource intensive processes that require copying the whole disk image fora virtual machine. In typical environments, converting a single virtual machine takes approximately 5-10 minutes. In Example 3.4, “Typical virt-v2v conversion time” a virtual machine with a single 8GB diskis copied over SSH on a 1GigE network on three-year-old consumer hardware:
Example 3.4. Typical virt-v2v conversion time
win2k3r2-pv-32.img: 100% [===========================================]D0h02m57svirt-v2v: win2k3r2-pv-32 configured with virtio drivers.
The size of the disk to be copied is the major factor in determining conversion time. For a virtualmachine on average hardware with a single disk of 20GB or less, a conversion usually takes less than10 minutes.
3.3.1. Converting a local virtual machine using virt-v2v
virt-v2v converts virtual machines from a foreign hypervisor to run on KVM, managed by libvirt. Thegeneral command syntax for converting machines to run on KVM, managed by libvirt is:
virt-v2v -i libvirtxml -op pool --bridge bridge_name guest_name.xmlvirt-v2v -op pool --network netname guest_namevirt-v2v -ic esx://esx.example.com/?no_verify=1 -op pool --bridge bridge_name guest_name
For a list of virt-v2v parameters, refer to Chapter 7, References.
3.3.2. Converting a remote KVM virtual machine
KVM virtual machines can be converted remotely using SSH. Ensure that the host running the virtualmachine is accessible using SSH.
To convert the virtual machine, run:
virt-v2v -ic qemu+ssh://[email protected]/system -op pool --bridge bridge_name guest_name
Where vmhost.example.com is the host running the virtual machine, pool is the local storage poolto hold the image, bridge_name is the name of a local network bridge to connect the converted virtualmachine's network to, and guest_name is the name of the Xen virtual machine.
You may also use the --network parameter to connect to a locally managed network if your virtualmachine only has a single network interface. If your virtual machine has multiple network interfaces,edit /etc/virt-v2v.conf to specify the network mapping for all interfaces.
If your virtual machine is Red Hat Enterprise Linux 4 or Red Hat Enterprise Linux 5 and uses a kernelwhich does not support the KVM VirtIO drivers, virt-v2v will attempt to install a new kernel during theconversion process. You can avoid this requirement by updating the kernel to a recent version of Red
V2V Guide
14

Hat Enterprise Linux 6 which supports VirtIO prior to conversion.
NOTE
When converting from KVM, virt-v2v requires that the image of the source virtualmachine exists within a storage pool. If the image is not currently in a storage pool, youmust create one.
3.3.3. Converting a local Xen virtual machine
Ensure that the guest virtual machine's XML is available locally, and that the storage referred to in theXML is available locally at the same paths.
To convert the virtual machine from an XML file, run:
virt-v2v -i libvirtxml -op pool --bridge bridge_name guest_name.xml
Where pool is the local storage pool to hold the image, bridge_name is the name of a local networkbridge to connect the converted virtual machine's network to, and guest_name.xml is the path to thevirtual machine's exported XML.
You may also use the --network parameter to connect to a locally managed network if your virtualmachine only has a single network interface. If your virtual machine has multiple network interfaces,edit /etc/virt-v2v.conf to specify the network mapping for all interfaces.
If your virtual machine uses a Xen paravirtualized kernel (it would be called something like kernel-xen or kernel-xenU), virt-v2v will attempt to install a new kernel during the conversion process.You can avoid this requirement by installing a regular kernel, which will not reference a hypervisor inits name, alongside the Xen kernel prior to conversion. You should not make this newly installed kernelyour default kernel, because Xen will not boot it. virt-v2v will make it the default during conversion.
NOTE
When converting from Xen, virt-v2v requires that the image of the source virtualmachine exists in a storage pool. If the image is not currently in a storage pool, you mustcreate one. Contact Red Hat Support for assistance creating an appropriate storagepool.
NOTE
Presently, there is a known issue with importing Citrix Xen virtual machines to run onKVM or Red Hat Enterprise Virtualization. For more information, seehttps://access.redhat.com/solutions/54076.
3.3.4. Converting a remote Xen virtual machine
Xen virtual machines can be converted remotely using SSH. Ensure that the host running the virtualmachine is accessible via SSH.
To convert the virtual machine, run:
virt-v2v -ic qemu+ssh://[email protected]/system -op pool --bridge bridge_name guest_name
CHAPTER 3. CONVERTING VIRTUAL MACHINES TO RUN ON KVM MANAGED BY LIBVIRT
15
Where vmhost.example.com is the host running the virtual machine, pool is the local storage poolto hold the image, bridge_name is the name of a local network bridge to connect the converted virtualmachine's network to, and guest_name is the name of the Xen virtual machine.
You may also use the --network parameter to connect to a locally managed network if your virtualmachine only has a single network interface. If your virtual machine has multiple network interfaces,edit /etc/virt-v2v.conf to specify the network mapping for all interfaces.
If your virtual machine uses a Xen paravirtualized kernel (it would be called something like kernel-xen or kernel-xenU) virt-v2v will attempt to install a new kernel during the conversion process.You can avoid this requirement by installing a regular kernel, which will not reference a hypervisor inits name, alongside the Xen kernel prior to conversion. You should not make this newly installed kernelyour default kernel, because Xen will not boot it. virt-v2v will make it the default during conversion.
NOTE
When converting from Xen, virt-v2v requires that the image of the source virtualmachine exists in a storage pool. If the image is not currently in a storage pool, you mustcreate one. Contact Red Hat Support for assistance creating an appropriate storagepool.
3.3.5. Converting a VMware ESX / ESX(i) virtual machine
IMPORTANT
When converting a Windows virtual machine from VMware ESX / ESX(i), ensure thatVMware Tools is not installed on the virtual machine. The VMware Tools must beuninstalled prior to the conversion process. If a virtual machine is converted with theVMware Tools installed, it will not function correctly.
Ensure that the virtual machine is stopped prior to running the v2v process.
To convert the virtual machine, run:
virt-v2v -ic esx://esx.example.com/ -op pool --bridge bridge_name guest_name
Where esx.example.com is the VMware ESX / ESX(i) server, pool is the local storage pool to holdthe image, bridge_name is the name of a local network bridge to connect the converted virtualmachine's network to, and guest_name is the name of the virtual machine.
You may also use the --network parameter to connect to a locally managed network if your virtualmachine only has a single network interface. If your virtual machine has multiple network interfaces,edit /etc/virt-v2v.conf to specify the network mapping for all interfaces.
3.3.5.1. Authenticating to the ESX / ESX(i) server
Connecting to the ESX / ESX(i) server will require authentication. virt-v2v supports passwordauthentication when connecting to ESX / ESX(i). It reads passwords from $HOME/.netrc. The formatof this file is described in the netrc(5) man page. An example entry is:
machine esx.example.com login root password s3cr3t
V2V Guide
16
NOTE
The .netrc file must have a permission mask of 0600 to be read correctly by virt-v2v.
3.3.5.2. Connecting to an ESX / ESX(i) server with an invalid certificate
In non-production environments, the ESX / ESX(i) server may have a non-valid certificate, for examplea self-signed certificate. In this case, certificate checking can be explicitly disabled by adding '?no_verify=1' to the connection URI as shown below:
... -ic esx://esx.example.com/?no_verify=1 ...
3.3.6. Converting a virtual machine running Windows
This example demonstrates converting a local (libvirt-managed) Xen virtual machine running Windowsfor output to Red Hat Enterprise Virtualization. Ensure that the virtual machine's XML is availablelocally, and that the storage referred to in the XML is available locally at the same paths.
To convert the guest virtual machine from an XML file, run:
virt-v2v -i libvirtxml -o rhev -osd storage.example.com:/exportdomain --network rhevm guest_name.xml
Where guest_name.xml is the path to the virtual machine's exported XML, and storage.example.com:/exportdomain is the export storage domain.
You may also use the --network parameter to connect to a locally managed network if your virtualmachine only has a single network interface. If your virtual machine has multiple network interfaces,edit /etc/virt-v2v.conf to specify the network mapping for all interfaces.
If your virtual machine uses a Xen paravirtualized kernel (it would be called something like kernel-xen or kernel-xenU), virt-v2v will attempt to install a new kernel during the conversion process.You can avoid this requirement by installing a regular kernel, which will not reference a hypervisor inits name, alongside the Xen kernel prior to conversion. You should not make this newly installed kernelyour default kernel, because Xen will not boot it. virt-v2v will make it the default during conversion.
3.4. RUNNING CONVERTED VIRTUAL MACHINES
On successful completion, virt-v2v will create a new libvirt domain for the converted virtualmachine with the same name as the original virtual machine. It can be started as usual using libvirttools, for example virt-manager.
NOTE
virt-v2v cannot currently reconfigure a virtual machine's network configuration. If theconverted virtual machine is not connected to the same subnet as the source, thevirtual machine's network configuration may have to be updated manually.
CHAPTER 3. CONVERTING VIRTUAL MACHINES TO RUN ON KVM MANAGED BY LIBVIRT
17
CHAPTER 4. CONVERTING VIRTUAL MACHINES TO RUN ONRED HAT ENTERPRISE VIRTUALIZATION
WARNING
The Red Hat Enterprise Linux 6 version of the virt-v2v utility has been deprecated.Users of Red Hat Enterprise Linux 6 are advised to create a Red Hat Enterprise 7virtual machine, and install virt-v2v in that virtual machine. The Red Hat EnterpriseLinux 7 version is fully supported and documented in virt-v2v Knowledgebasearticles.
virt-v2v can convert virtual machines to run on Red Hat Enterprise Virtualization. Virtual machinescan be converted from Xen, KVM and VMware ESX / ESX(i) environments. Before converting virtualmachines to run on Red Hat Enterprise Virtualization, you must attach an export storage domain to theRed Hat Enterprise Virtualization data center being used. Section 4.2, “Attaching an export storagedomain” explains the process of attaching an export storage domain. For more information on exportstorage domains, see the Red Hat Enterprise Virtualization Administration Guide.
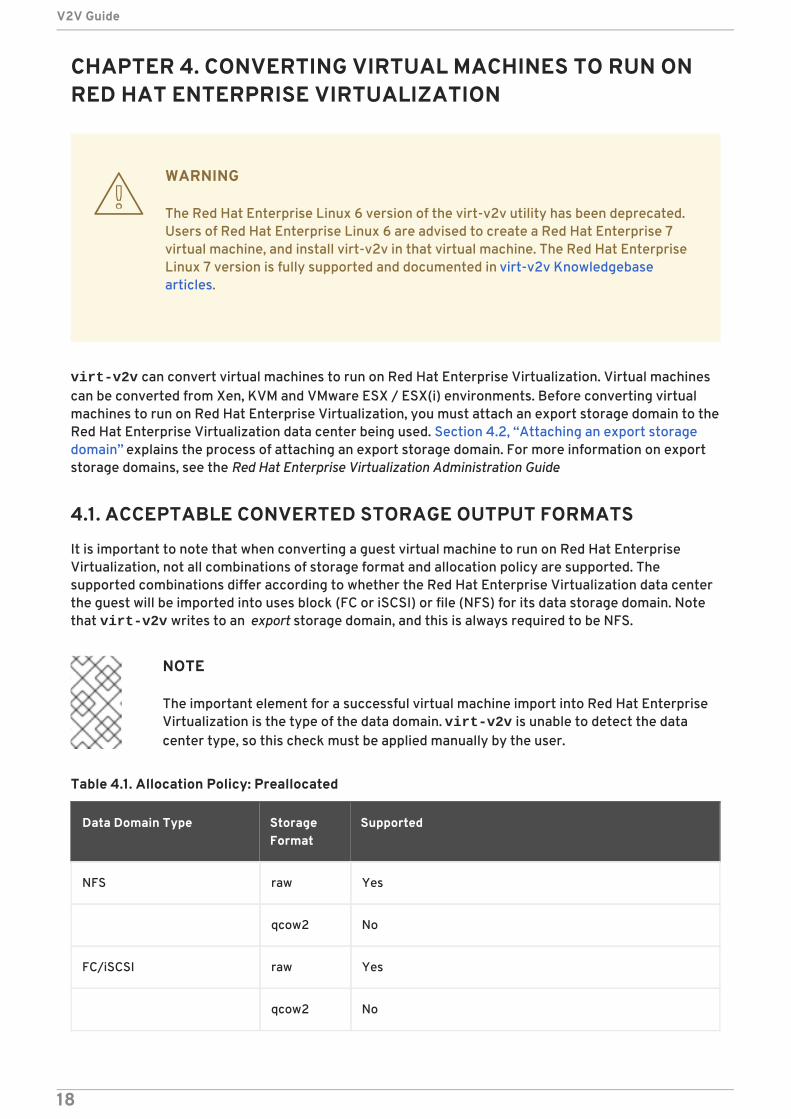
4.1. ACCEPTABLE CONVERTED STORAGE OUTPUT FORMATS
It is important to note that when converting a guest virtual machine to run on Red Hat EnterpriseVirtualization, not all combinations of storage format and allocation policy are supported. Thesupported combinations differ according to whether the Red Hat Enterprise Virtualization data centerthe guest will be imported into uses block (FC or iSCSI) or file (NFS) for its data storage domain. Notethat virt-v2v writes to an export storage domain, and this is always required to be NFS.
NOTE
The important element for a successful virtual machine import into Red Hat EnterpriseVirtualization is the type of the data domain. virt-v2v is unable to detect the datacenter type, so this check must be applied manually by the user.
Table 4.1. Allocation Policy: Preallocated
Data Domain Type StorageFormat
Supported
NFS raw Yes
qcow2 No
FC/iSCSI raw Yes
qcow2 No
V2V Guide
18
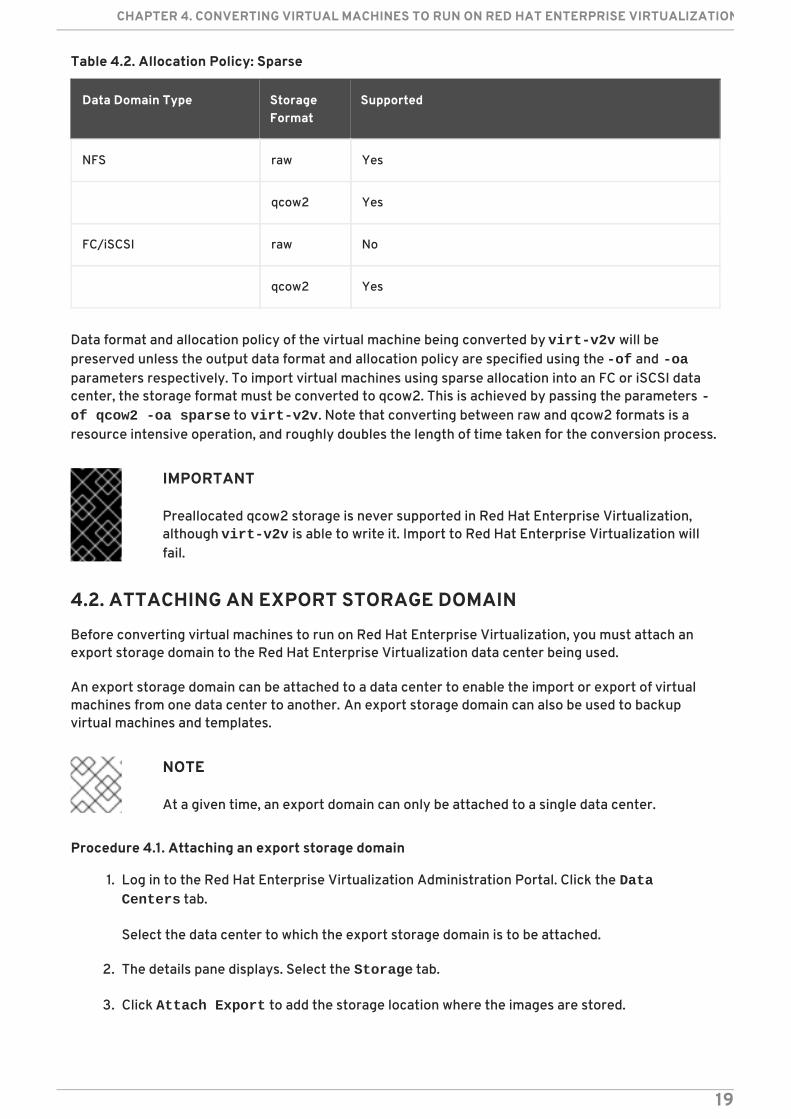
Table 4.2. Allocation Policy: Sparse
Data Domain Type StorageFormat
Supported
NFS raw Yes
qcow2 Yes
FC/iSCSI raw No
qcow2 Yes
Data format and allocation policy of the virtual machine being converted by virt-v2v will bepreserved unless the output data format and allocation policy are specified using the -of and -oaparameters respectively. To import virtual machines using sparse allocation into an FC or iSCSI datacenter, the storage format must be converted to qcow2. This is achieved by passing the parameters -of qcow2 -oa sparse to virt-v2v. Note that converting between raw and qcow2 formats is aresource intensive operation, and roughly doubles the length of time taken for the conversion process.
IMPORTANT
Preallocated qcow2 storage is never supported in Red Hat Enterprise Virtualization,although virt-v2v is able to write it. Import to Red Hat Enterprise Virtualization willfail.
4.2. ATTACHING AN EXPORT STORAGE DOMAIN
Before converting virtual machines to run on Red Hat Enterprise Virtualization, you must attach anexport storage domain to the Red Hat Enterprise Virtualization data center being used.
An export storage domain can be attached to a data center to enable the import or export of virtualmachines from one data center to another. An export storage domain can also be used to backupvirtual machines and templates.
NOTE
At a given time, an export domain can only be attached to a single data center.
Procedure 4.1. Attaching an export storage domain
1. Log in to the Red Hat Enterprise Virtualization Administration Portal. Click the Data Centers tab.
Select the data center to which the export storage domain is to be attached.
2. The details pane displays. Select the Storage tab.
3. Click Attach Export to add the storage location where the images are stored.
CHAPTER 4. CONVERTING VIRTUAL MACHINES TO RUN ON RED HAT ENTERPRISE VIRTUALIZATION
19
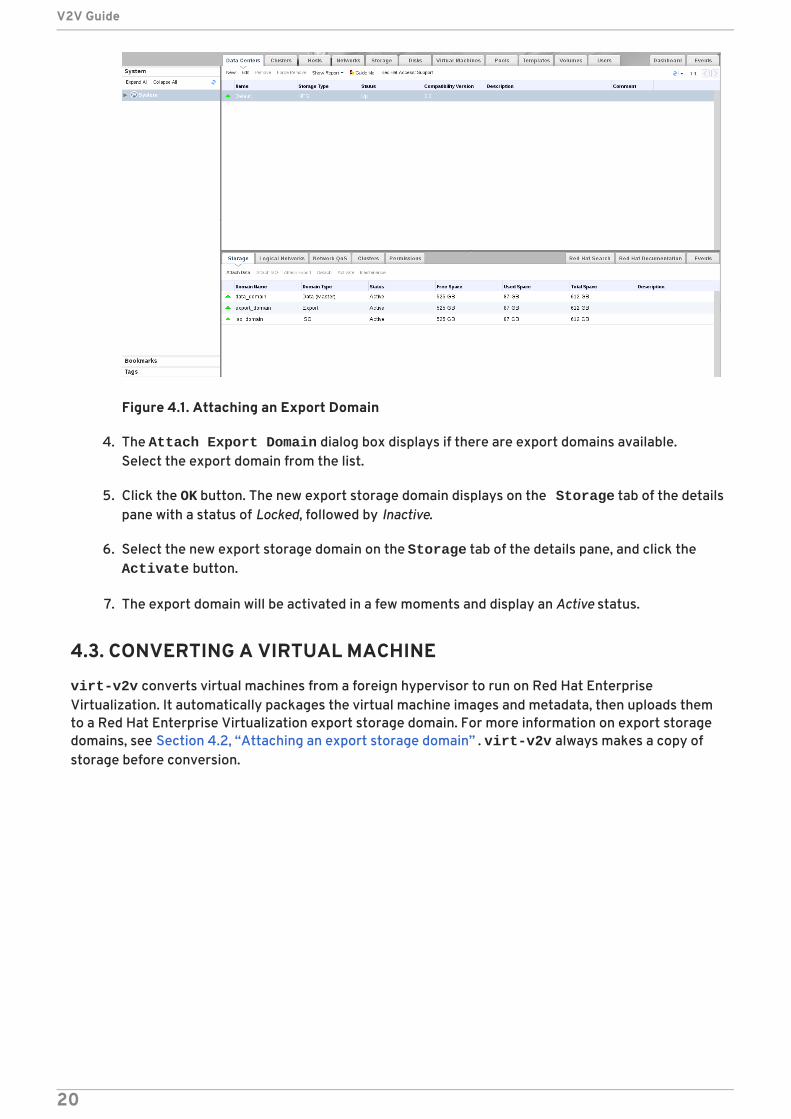
Figure 4.1. Attaching an Export Domain
4. The Attach Export Domain dialog box displays if there are export domains available.Select the export domain from the list.
5. Click the OK button. The new export storage domain displays on the Storage tab of the detailspane with a status of Locked, followed by Inactive.
6. Select the new export storage domain on the Storage tab of the details pane, and click the Activate button.
7. The export domain will be activated in a few moments and display an Active status.
4.3. CONVERTING A VIRTUAL MACHINE
virt-v2v converts virtual machines from a foreign hypervisor to run on Red Hat EnterpriseVirtualization. It automatically packages the virtual machine images and metadata, then uploads themto a Red Hat Enterprise Virtualization export storage domain. For more information on export storagedomains, see Section 4.2, “Attaching an export storage domain” . virt-v2v always makes a copy ofstorage before conversion.
V2V Guide
20
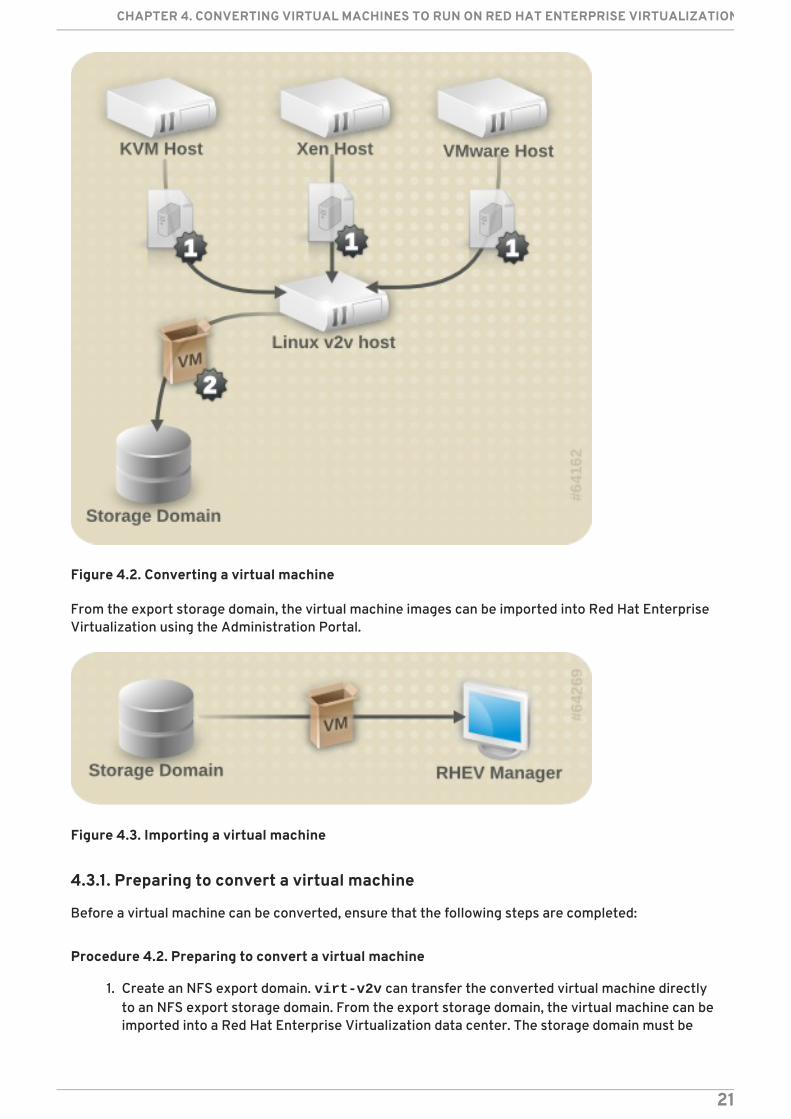
Figure 4.2. Converting a virtual machine
From the export storage domain, the virtual machine images can be imported into Red Hat EnterpriseVirtualization using the Administration Portal.
Figure 4.3. Importing a virtual machine
4.3.1. Preparing to convert a virtual machine
Before a virtual machine can be converted, ensure that the following steps are completed:
Procedure 4.2. Preparing to convert a virtual machine
1. Create an NFS export domain. virt-v2v can transfer the converted virtual machine directlyto an NFS export storage domain. From the export storage domain, the virtual machine can beimported into a Red Hat Enterprise Virtualization data center. The storage domain must be
CHAPTER 4. CONVERTING VIRTUAL MACHINES TO RUN ON RED HAT ENTERPRISE VIRTUALIZATION
21
mountable by the machine running virt-v2v. When exporting to a Red Hat EnterpriseVirtualization export domain, virt-v2v must run as root.
NOTE
The export storage domain is accessed as an NFS share. By default, Red HatEnterprise Linux 6 uses NFSv4, which does not require further configuration.However, for NFSv2 and NFSv3 clients, the rpcbind and nfslock servicesmust be running on the host used to run virt-v2v. The network must also beconfigured to allow NFS access to the storage server. For more details refer tothe Red Hat Enterprise Linux Storage Administration Guide.
2. Specify network mappings in virt-v2v.conf. This step is optional, and is not required formost use cases.
If your virtual machine has multiple network interfaces, /etc/virt-v2v.conf must beedited to specify the network mapping for all interfaces. You can specify an alternative virt-v2v.conf file with the -f parameter. If you are converting to a virtual machine for output toboth libvirt and Red Hat Enterprise Virtualization, separate virt-v2v.conf files should beused for each conversion. This is because a converted bridge will require differentconfiguration depending on the output type (libvirt or Red Hat Enterprise Virtualization).
If your virtual machine only has a single network interface, it is simpler to use the --networkor --bridge parameters, rather than modifying virt-v2v.conf.
3. Create a profile for the conversion in virt-v2v.conf. This step is optional. Profiles specify aconversion method, storage location, output format and allocation policy. When a profile isdefined, it can be called using --profile rather than individually providing the -o, -os, -ofand -oa parameters. See virt-v2v.conf(5) for details.
4.3.1.1. Preparing to convert a virtual machine running Linux
The following is required when converting virtual machines which run Linux, regardless of whichhypervisor they are being converted from.
Procedure 4.3. Preparing to convert a virtual machine running Linux
1. Obtain the software.
As part of the conversion process, virt-v2v may install a new kernel and drivers on thevirtual machine. If the virtual machine being converted is registered to Red Hat SubscriptionManagement (RHSM), the required packages will be automatically downloaded. Forenvironments where Red Hat Subscription Management (RHSM) is not available, the virt-v2v.conf file references a list of RPMs used for this purpose. The RPMs relevant to yourvirtual machine must be downloaded manually from the Red Hat Customer Portal and madeavailable in the directory specified by the path-root configuration element, which by defaultis /var/lib/virt-v2v/software/. virt-v2v will display an error similar to Example 3.1,“Missing Package error” if the software it depends upon for a particular conversion is notavailable.
2. To obtain the relevant RPMs for your environment, repeat these steps for each missingpackage:
1. Log in to the Red Hat Customer Portal: https://access.redhat.com/.
V2V Guide
22
2. In the Red Hat Customer Portal, select Downloads > Product Downloads > Red Hat Enterprise Linux.
3. Select the desired Product Variant, Version, and select the Packages tab. In the Filter field, type the package name exactly matching the one shown in the errormessage. For the example shown in Example 3.1, “Missing Package error”, the firstpackage is kernel-2.6.32-128.el6.x86_64
4. A list of packages displays. Select the package name identical to the one in the errormessage. This opens the details page, which contains a detailed description of the package.Alternatively, to download the most recent version of a package, select Download Latest next to the desired package.
5. Save the downloaded package to the appropriate directory in /var/lib/virt-v2v/software. For Red Hat Enterprise Linux 6, the directory is /var/lib/virt-v2v/software/rhel/6.
4.3.1.2. Preparing to convert a virtual machine running Windows
IMPORTANT
virt-v2v does not support conversion of the Windows Recovery Console. If a virtualmachine has a recovery console installed and VirtIO was enabled during conversion,attempting to boot the recovery console will result in a stop error.
Windows XP x86 does not support the Windows Recovery Console on VirtIO systems, sothere is no resolution to this. However, on Windows XP AMD64 and Windows 2003 (x86and AMD64), the recovery console can be reinstalled after conversion. The re-installation procedure is the same as the initial installation procedure. It is notnecessary to remove the recovery console first. Following re-installation, the recoveryconsole will work as intended.
IMPORTANT
When converting a virtual machine running Windows with multiple drives, for output toRed Hat Enterprise Virtualization, it is possible in certain circumstances that additionaldrives will not be displayed by default. Red Hat Enterprise Virtualization will always adda CD-ROM device to a converted virtual machine. If the virtual machine did not have aCD-ROM device before conversion, the new CD-ROM device may be assigned a driveletter which clashes with an existing drive on the virtual machine. This will render theexisting device inaccessible. The occluded disk device can still be accessed by manuallyassigning it a new drive letter. It is also possible to maintain previous drive letterassignment by manually changing the drive letter assigned to the new CD-ROM device,then rebooting the virtual machine.
The following is required when converting virtual machines running Windows, regardless of whichhypervisor they are being converted from. The conversion procedure depends on post-processing bythe Red Hat Enterprise Virtualization Manager for completion. See Section 7.2.2, “Configurationchanges for Windows virtual machines” for details of the process.
Procedure 4.4. Preparing to convert a virtual machine running Windows
CHAPTER 4. CONVERTING VIRTUAL MACHINES TO RUN ON RED HAT ENTERPRISE VIRTUALIZATION
23
Before a virtual machine running Windows can be converted, ensure that the following steps arecompleted.
1. Install the libguestfs-winsupport package on the host running virt-v2v.
This package provides support for NTFS, which is used by many Windows systems. Thelibguestfs-winsupport package is provided by the RHEL V2VWIN (v. 6 for 64-bit x86_64) channel. Ensure your system is subscribed to this channel, then run the followingcommand as root:
yum install libguestfs-winsupport
If you attempt to convert a virtual machine using NTFS without the libguestfs-winsupportpackage installed, the conversion will fail. An error message similar to Example 4.1, “Errormessage when converting a Windows virtual machine without libguestfs-winsupport installed”will be shown:
Example 4.1. Error message when converting a Windows virtual machine withoutlibguestfs-winsupport installed
No operating system could be detected inside this disk image.
This may be because the file is not a disk image, or is not a virtual machine image, or because the OS type is not understood by virt-inspector.
If you feel this is an error, please file a bug report including as muchinformation about the disk image as possible.
2. Install the virtio-win package on the host running virt-v2v.
This package provides paravirtualized block and network drivers for Windows guests. Thevirtio-win package is provided by the RHEL Server Supplementary (v. 6 64-bit x86_64) channel. Ensure your system is subscribed to this channel, then run the followingcommand as root:
yum install virtio-win
If you attempt to convert a virtual machine running Windows without the virtio-win packageinstalled, the conversion will fail. An error message similar to Example 3.3, “Error messagewhen converting a Windows virtual machine without virtio-win installed” will be shown.
3. Upload the guest tools ISO to the ISO Storage Domain.
Note that the guest tools ISO is not required for the conversion process to succeed. However,it is recommended for all Windows virtual machines running on Red Hat EnterpriseVirtualization. The Red Hat Enterprise Virtualization Manager installs Red Hat's Windowsdrivers on the guest virtual machine using the guest tools ISO after the virtual machines havebeen converted. See Section 7.2.2, “Configuration changes for Windows virtual machines” fordetails.
Locate and upload the guest tools ISO as follows:
V2V Guide
24
1. Locate the guest tools ISO.
The guest tools ISO is distributed using the Red Hat Customer Portal as rhev-guest-tools-iso.rpm, an RPM file installed on the Red Hat Enterprise Virtualization Manager.After installing the Red Hat Enterprise Virtualization Manager, the guest tools ISO can befound at /usr/share/rhev-guest-tools-iso/rhev-tools-setup.iso.
2. Upload the guest tools ISO.
Upload the guest tools ISO to the ISO Storage Domain using the ISO uploader.
Refer to the Red Hat Enterprise Virtualization Administration Guide for more information onuploading ISO files, and installing guest agents and drivers.
4.3.1.3. Preparing to convert a local Xen virtual machine
The following is required when converting virtual machines on a host which used to run Xen, but hasbeen updated to run KVM. It is not required when converting a Xen virtual machine imported directlyfrom a running libvirt/Xen instance.
Procedure 4.5. Preparing to convert a local Xen virtual machine
Obtain the XML for the virtual machine.
virt-v2v uses a libvirt domain description to determine the current configuration of thevirtual machine, including the location of its storage. Before starting the conversion, obtainthis from the host running the virtual machine with the following command:
virsh dumpxml guest_name > guest_name.xml
This will require booting into a Xen kernel to obtain the XML, as libvirt needs to connect to arunning Xen hypervisor to obtain its metadata. The conversion process is optimized for KVM,so obtaining domain data while running a Xen kernel, then performing the conversion using aKVM kernel will be more efficient than running the conversion on a Xen kernel.
4.3.2. Converting a virtual machine
Once you have prepared to convert the virtual machines, use virt-v2v to perform the actualconversions. This section provides the steps to convert the virtual machines, and the command syntaxfor virt-v2v.
Note that conversions are resource intensive processes that require copying the whole disk image fora virtual machine. In typical environments, converting a single virtual machine takes approximately 5-10 minutes. In Example 4.2, “Typical virt-v2v conversion time” a virtual machine with a single 8GB diskis copied over SSH on a 1GigE network on three-year-old consumer hardware:
Example 4.2. Typical virt-v2v conversion time
win2k3r2-pv-32.img: 100% [===========================================]D0h02m57svirt-v2v: win2k3r2-pv-32 configured with virtio drivers.
CHAPTER 4. CONVERTING VIRTUAL MACHINES TO RUN ON RED HAT ENTERPRISE VIRTUALIZATION
25
The size of the disk to be copied is the major factor in determining conversion time. For a virtualmachine on average hardware with a single disk of 20GB or less, a conversion usually takes less than10 minutes.
4.3.2.1. virt-v2v
virt-v2v converts virtual machines from a foreign hypervisor to run on Red Hat EnterpriseVirtualization. The general command syntax for converting machines to run on Red Hat EnterpriseVirtualization is:
virt-v2v -i libvirtxml -o rhev -os storage.example.com:/exportdomain --network rhevm guest_name.xmlvirt-v2v -o rhev -os storage.example.com:/exportdomain --network rhevm guest_namevirt-v2v -ic esx://esx.example.com/?no_verify=1 -o rhev -os storage.example.com:/exportdomain --network rhevm guest_name
A full specification of the parameters which can be used with virt-v2v is available in Section 7.1,“virt-v2v Parameters”.
IMPORTANT
Presently, virt-v2v does not support converting a virtual machine with more than fourIDE disks to Red Hat Enterprise Virtualization. Attempting to convert a virtual machinewith five or more disks will fail.
4.3.2.2. Converting a local Xen virtual machine
Ensure that the virtual machine's XML is available locally, and that the storage referred to in the XMLis available locally at the same paths.
To convert the virtual machine from an XML file, run:
virt-v2v -i libvirtxml -o rhev -os storage.example.com:/exportdomain --network rhevm guest_name.xml
Where storage.example.com:/exportdomain is the export storage domain, rhevm is the locallymanaged network to connect the converted virtual machine's network to, and guest_name.xml isthe path to the virtual machine's exported xml.
You may also use the --bridge parameter to connect to a locally managed network if your virtualmachine only has a single network interface. If your virtual machine has multiple network interfaces,edit /etc/virt-v2v.conf to specify the network mapping for all interfaces.
To convert the virtual machine from a running Xen hypervisor, run:
virt-v2v -ic xen:/// -o rhev -os storage.example.com:/exportdomain --network rhevm guest_name
Where storage.example.com:/exportdomain is the export storage domain, rhevm is the locallymanaged network to connect the converted virtual machine's network to, and guest_name is the nameof the Xen virtual machine.
You may also use the --bridge parameter to connect to a locally managed network if your virtual
V2V Guide
26
machine only has a single network interface. If your virtual machine has multiple network interfaces,edit /etc/virt-v2v.conf to specify the network mapping for all interfaces.
If your guest uses a Xen paravirtualized kernel (it would be called something like kernel-xen or kernel-xenU), virt-v2v will attempt to install a new kernel during the conversion process. You canavoid this requirement by installing a regular kernel, which will not reference a hypervisor in its name,alongside the Xen kernel prior to conversion. You should not make this newly installed kernel yourdefault kernel, because Xen will not boot it. virt-v2v will make it the default during conversion.
4.3.2.3. Converting a remote Xen virtual machine
Xen virtual machines can be converted remotely using SSH. Ensure that the host running the virtualmachine is accessible via SSH. Even on a guest with multiple disks, each virtual disk transfer requires aseparate SSH session.
IMPORTANT
It is recommended to set up SSH keys for authentication prior to the remote virtualmachine conversion. Otherwise, a user will be required to manually enter SSHcredentials for each guest disk being transferred. Failure to enter a password manuallyin the time after the transfer completes but before the SSH negotiation times out willcause virt-v2v to fail. This is especially important for large disks, as the disk transfercan take an unspecified length of time.
To convert the virtual machine, run:
virt-v2v -o rhev -ic xen+ssh://[email protected] -os storage.example.com:/exportdomain --network rhevm guest_name
Where vmhost.example.com is the host running the virtual machine, storage.example.com:/exportdomain is the export storage domain, rhevm is the locallymanaged network to connect the converted virtual machine's network to, and guest_name is the nameof the Xen virtual machine.
You may also use the --bridge parameter to connect to a locally managed network if your virtualmachine only has a single network interface. If your virtual machine has multiple network interfaces,edit /etc/virt-v2v.conf to specify the network mapping for all interfaces.
If your guest uses a Xen paravirtualized kernel (it would be called something like kernel-xen or kernel-xenU), virt-v2v will attempt to install a new kernel during the conversion process. You canavoid this requirement by installing a regular kernel, which will not reference a hypervisor in its name,alongside the Xen kernel prior to conversion. You should not make this newly installed kernel yourdefault kernel, because Xen will not boot it. virt-v2v will make it the default during conversion.
4.3.2.4. Converting a local KVM virtual machine
Use the following procedure to convert a local KVM virtual machine:
Procedure 4.6. Converting a local KVM virtual machine
1. Stop the virtual machine.
a. Ensure that the virtual machine is stopped prior to running the v2v process. If the virtualmachine is in a clustered Red Hat Enterprise Linux HA virtual machine environment, stop
CHAPTER 4. CONVERTING VIRTUAL MACHINES TO RUN ON RED HAT ENTERPRISE VIRTUALIZATION
27
and disable the virtual machine resource in cluster node using the command:
clusvcadm -d vm:<guest>
b. After stopping the virtual machine, run virsh define <path-to-guest.xml> to placethe stopped virtual machine under the control of libvirt. This command allows virt-v2vto recognize the virtual machine and enable it to be converted.
2. Convert the virtual machine.To convert the virtual machine, run:
virt-v2v -o rhev -os storage.example.com:/exportdomain --network rhevm guest_name
Where storage.example.com:/exportdomain is the export storage domain, rhevm is thelocally managed network to connect the converted virtual machine's network to, andguest_name is the name of the KVM virtual machine.
You may also use the --bridge parameter to connect to a locally managed network if yourvirtual machine only has a single network interface. If your virtual machine has multiplenetwork interfaces, edit /etc/virt-v2v.conf to specify the network mapping for allinterfaces.
4.3.2.5. Converting a remote KVM virtual machine
KVM virtual machines can be converted remotely via SSH. Ensure that the host running the virtualmachine is accessible via SSH, and that the virtual machine is stopped prior to running the v2vprocess. Even on a guest with multiple disks, each virtual disk transfer requires a separate SSH session.
IMPORTANT
It is recommended to set up SSH keys for authentication prior to the remote virtualmachine conversion. Otherwise, a user will be required to manually enter SSHcredentials for each guest disk being transferred. Failure to enter a password manuallyin the time after the transfer completes but before the SSH negotiation times out willcause virt-v2v to fail. This is especially important for large disks, as the disk transfercan take an unspecified length of time.
To convert the virtual machine, run:
virt-v2v -ic qemu+ssh://[email protected]/system -o rhev -os storage.example.com:/exportdomain --network rhevm guest_name
Where kvmhost.example.com is the host running the virtual machine, storage.example.com:/exportdomain is the export storage domain, rhevm is the locallymanaged network to connect the converted virtual machine's network to, and guest_name is the nameof the KVM virtual machine.
You may also use the --bridge parameter to connect to a locally managed network if your virtualmachine only has a single network interface. If your virtual machine has multiple network interfaces,edit /etc/virt-v2v.conf to specify the network mapping for all interfaces.
V2V Guide
28
4.3.2.6. Converting a VMware ESX / ESX(i) virtual machine
IMPORTANT
When converting a Windows virtual machine from VMware ESX / ESX(i), ensure thatVMware Tools is not installed on the virtual machine. The VMware Tools must beuninstalled prior to the conversion process. If a virtual machine is converted with theVMware Tools installed, it will not function correctly.
Ensure that the virtual machine is stopped prior to running the v2v process.
To convert the virtual machine, run:
virt-v2v -ic esx://esx.example.com/ -o rhev -os storage.example.com:/exportdomain --network rhevm guest_name
Where storage.example.com:/exportdomain is the export storage domain, rhevm is the locallymanaged network to connect the converted virtual machine's network to, and guest_name is the nameof the virtual machine.
You may also use the --bridge parameter to connect to a locally managed network if your virtualmachine only has a single network interface. If your virtual machine has multiple network interfaces,edit /etc/virt-v2v.conf to specify the network mapping for all interfaces.
Authenticating to the ESX / ESX(i) server
Connecting to the ESX / ESX(i) server will require authentication. virt-v2v supports passwordauthentication when connecting to ESX / ESX(i). It reads passwords from $HOME/.netrc. The formatof this file is described in netrc(5). An example entry is:
machine esx.example.com login root password s3cr3t
NOTE
The .netrc file must have a permission mask of 0600 to be read correctly by virt-v2v.
Connecting to an ESX / ESX(i) server with an invalid certificate
In non-production environments, the ESX / ESX(i) server may have a non-valid certificate, for examplea self-signed certificate. In this case, certificate checking can be explicitly disabled by adding ?no_verify=1 to the connection URI as shown below:
... -ic esx://esx.example.com/?no_verify=1 ...
4.3.3. Importing and running the converted virtual machine
On successful completion, virt-v2v will upload the exported virtual machine to the specified exportdomain. To import and run the converted virtual machine:
Procedure 4.7. Importing and running the converted virtual machine
CHAPTER 4. CONVERTING VIRTUAL MACHINES TO RUN ON RED HAT ENTERPRISE VIRTUALIZATION
29
1. In the Red Hat Enterprise Virtualization Administration Portal, select the export domain fromthe Storage tab. The export domain must have a status of Active.
2. Select the VM Import tab in the details pane to list the available virtual machines to import.
3. Select one or more virtual machines and click Import. The Import Virtual Machine(s)window will open.
4. In the drop-down menus, select the select the Default Storage Domain, Cluster, and Cluster Quota in the data center.
5. Select the Collapse Snapshots check box to remove snapshot restore points and includetemplates in template-based virtual machines. Click OK to import the virtual machines.
For more information on importing virtual machines, refer to the Red Hat Enterprise VirtualizationAdministration Guide.
Network configuration
virt-v2v cannot currently reconfigure a guest's network configuration. If the converted guest is notconnected to the same subnet as the source, the guest's network configuration may have to beupdated manually.
4.3.4. Scripting the v2v process
The entire v2v process can be scripted, enabling the automated batch processing of a large number ofvirtual machines. The process is broken up into two steps, which must be run on separate hosts.
Procedure 4.8. Scripting the v2v process
1. Use virt-v2v to convert the virtual machines and copy them to the export storage domain.This step must be run on a Linux host. The process is detailed in Section 4.3.2, “Converting avirtual machine”.
2. Once the conversion is complete, use the Red Hat Enterprise Virtualization AdministrationPortal to import the virtual machines from the export storage domain. This step must be runon the Red Hat Enterprise Virtualization Manager server.
For more information on importing a virtual machine with the Red Hat EnterpriseVirtualization Administration Portal, see the Red Hat Enterprise Virtualization AdministrationGuide.
V2V Guide
30
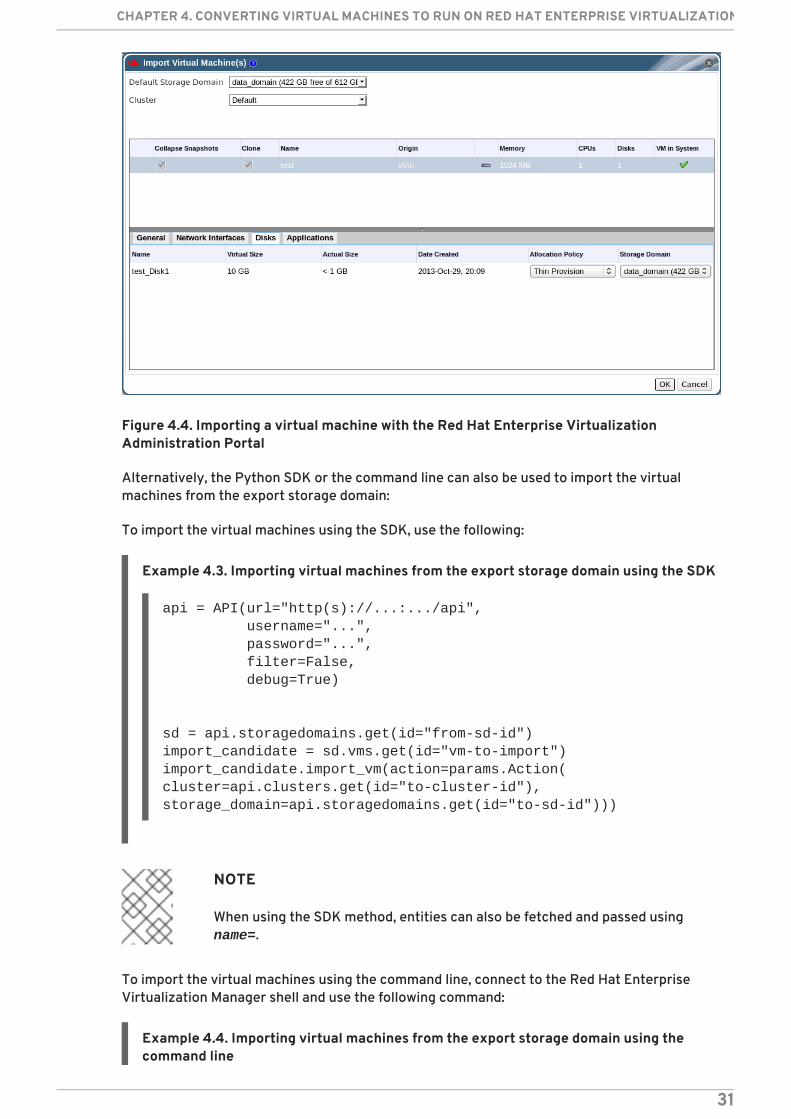
Figure 4.4. Importing a virtual machine with the Red Hat Enterprise VirtualizationAdministration Portal
Alternatively, the Python SDK or the command line can also be used to import the virtualmachines from the export storage domain:
To import the virtual machines using the SDK, use the following:
Example 4.3. Importing virtual machines from the export storage domain using the SDK
api = API(url="http(s)://...:.../api", username="...", password="...", filter=False, debug=True)
sd = api.storagedomains.get(id="from-sd-id")import_candidate = sd.vms.get(id="vm-to-import")import_candidate.import_vm(action=params.Action(cluster=api.clusters.get(id="to-cluster-id"),storage_domain=api.storagedomains.get(id="to-sd-id")))
NOTE
When using the SDK method, entities can also be fetched and passed using name=.
To import the virtual machines using the command line, connect to the Red Hat EnterpriseVirtualization Manager shell and use the following command:
Example 4.4. Importing virtual machines from the export storage domain using thecommand line
CHAPTER 4. CONVERTING VIRTUAL MACHINES TO RUN ON RED HAT ENTERPRISE VIRTUALIZATION
31
action vm "vm-to-import" import_vm --storagedomain-identifier "from-sd-id" --cluster-id "to-cluster-id" --storage_domain-id "to-sd-id"
NOTE
When using the command line method, entities can also be fetched and passedusing -name.
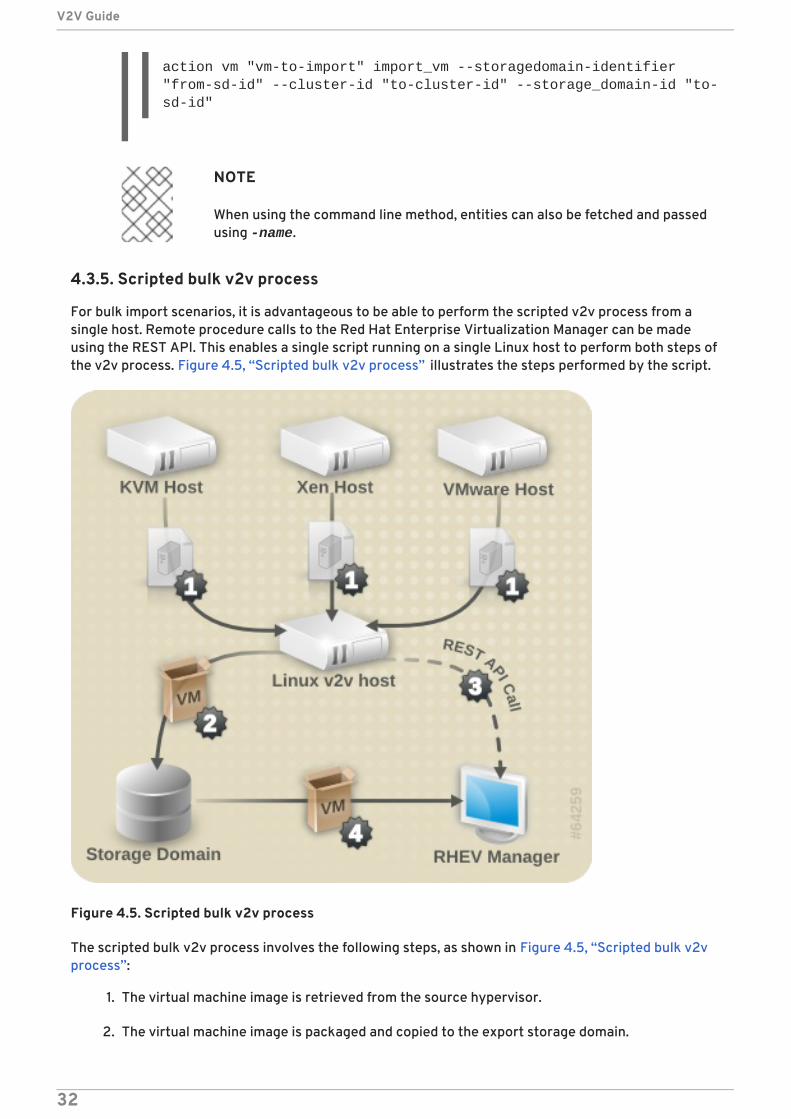
4.3.5. Scripted bulk v2v process
For bulk import scenarios, it is advantageous to be able to perform the scripted v2v process from asingle host. Remote procedure calls to the Red Hat Enterprise Virtualization Manager can be madeusing the REST API. This enables a single script running on a single Linux host to perform both steps ofthe v2v process. Figure 4.5, “Scripted bulk v2v process” illustrates the steps performed by the script.
Figure 4.5. Scripted bulk v2v process
The scripted bulk v2v process involves the following steps, as shown in Figure 4.5, “Scripted bulk v2vprocess”:
1. The virtual machine image is retrieved from the source hypervisor.
2. The virtual machine image is packaged and copied to the export storage domain.
V2V Guide
32
3. A remote procedure call is made to the Red Hat Enterprise Virtualization Manager, telling it toimport the virtual machine.
4. The Manager imports the virtual machine from the export storage domain.
To configure and run the scripted bulk v2v process:
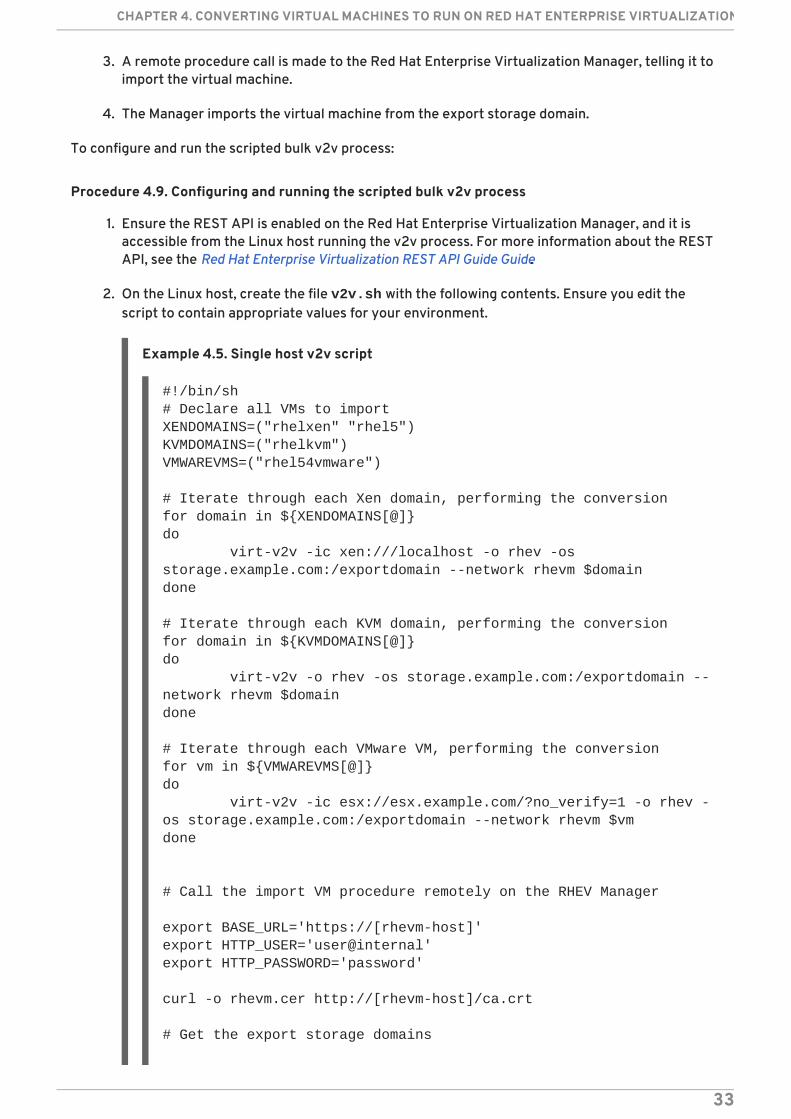
Procedure 4.9. Configuring and running the scripted bulk v2v process
1. Ensure the REST API is enabled on the Red Hat Enterprise Virtualization Manager, and it isaccessible from the Linux host running the v2v process. For more information about the RESTAPI, see the Red Hat Enterprise Virtualization REST API Guide Guide.
2. On the Linux host, create the file v2v.sh with the following contents. Ensure you edit thescript to contain appropriate values for your environment.
Example 4.5. Single host v2v script
#!/bin/sh# Declare all VMs to importXENDOMAINS=("rhelxen" "rhel5")KVMDOMAINS=("rhelkvm")VMWAREVMS=("rhel54vmware")
# Iterate through each Xen domain, performing the conversionfor domain in ${XENDOMAINS[@]}do virt-v2v -ic xen:///localhost -o rhev -os storage.example.com:/exportdomain --network rhevm $domaindone
# Iterate through each KVM domain, performing the conversionfor domain in ${KVMDOMAINS[@]}do virt-v2v -o rhev -os storage.example.com:/exportdomain --network rhevm $domaindone
# Iterate through each VMware VM, performing the conversionfor vm in ${VMWAREVMS[@]}do virt-v2v -ic esx://esx.example.com/?no_verify=1 -o rhev -os storage.example.com:/exportdomain --network rhevm $vmdone
# Call the import VM procedure remotely on the RHEV Manager
export BASE_URL='https://[rhevm-host]'export HTTP_USER='user@internal'export HTTP_PASSWORD='password'
curl -o rhevm.cer http://[rhevm-host]/ca.crt
# Get the export storage domains
CHAPTER 4. CONVERTING VIRTUAL MACHINES TO RUN ON RED HAT ENTERPRISE VIRTUALIZATION
33
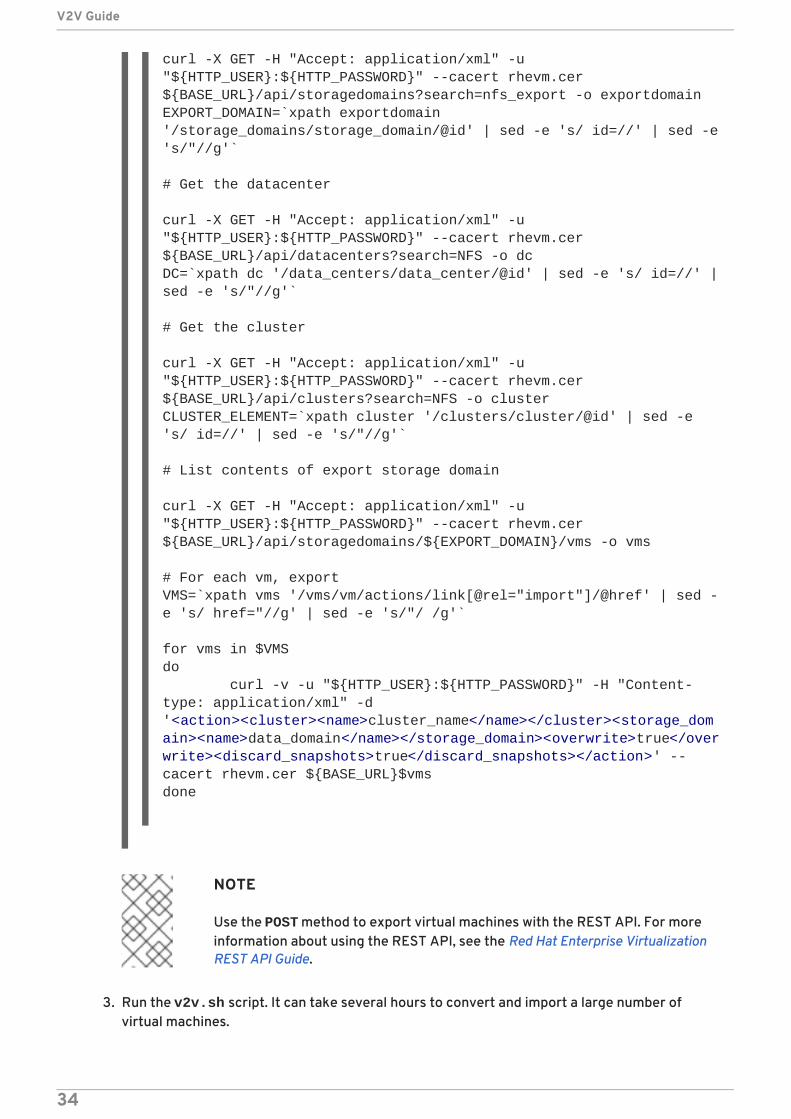
NOTE
Use the POST method to export virtual machines with the REST API. For moreinformation about using the REST API, see the Red Hat Enterprise VirtualizationREST API Guide.
3. Run the v2v.sh script. It can take several hours to convert and import a large number ofvirtual machines.
curl -X GET -H "Accept: application/xml" -u "${HTTP_USER}:${HTTP_PASSWORD}" --cacert rhevm.cer ${BASE_URL}/api/storagedomains?search=nfs_export -o exportdomainEXPORT_DOMAIN=`xpath exportdomain '/storage_domains/storage_domain/@id' | sed -e 's/ id=//' | sed -e 's/"//g'`
# Get the datacenter
curl -X GET -H "Accept: application/xml" -u "${HTTP_USER}:${HTTP_PASSWORD}" --cacert rhevm.cer ${BASE_URL}/api/datacenters?search=NFS -o dcDC=`xpath dc '/data_centers/data_center/@id' | sed -e 's/ id=//' | sed -e 's/"//g'`
# Get the cluster
curl -X GET -H "Accept: application/xml" -u "${HTTP_USER}:${HTTP_PASSWORD}" --cacert rhevm.cer ${BASE_URL}/api/clusters?search=NFS -o clusterCLUSTER_ELEMENT=`xpath cluster '/clusters/cluster/@id' | sed -e 's/ id=//' | sed -e 's/"//g'`
# List contents of export storage domain
curl -X GET -H "Accept: application/xml" -u "${HTTP_USER}:${HTTP_PASSWORD}" --cacert rhevm.cer ${BASE_URL}/api/storagedomains/${EXPORT_DOMAIN}/vms -o vms
# For each vm, exportVMS=`xpath vms '/vms/vm/actions/link[@rel="import"]/@href' | sed -e 's/ href="//g' | sed -e 's/"/ /g'`
for vms in $VMSdo curl -v -u "${HTTP_USER}:${HTTP_PASSWORD}" -H "Content-type: application/xml" -d '<action><cluster><name>cluster_name</name></cluster><storage_domain><name>data_domain</name></storage_domain><overwrite>true</overwrite><discard_snapshots>true</discard_snapshots></action>' --cacert rhevm.cer ${BASE_URL}$vmsdone
V2V Guide
34
CHAPTER 5. CONVERTING PHYSICAL MACHINES TO VIRTUALMACHINES
WARNING
The Red Hat Enterprise Linux 6 version of the virt-v2v utility has been deprecated.Users of Red Hat Enterprise Linux 6 are advised to create a Red Hat Enterprise 7virtual machine, and install virt-v2v in that virtual machine. The Red Hat EnterpriseLinux 7 version is fully supported and documented in virt-v2v Knowledgebasearticles.
Read this chapter for information about converting physical machines to virtual machines with the RedHat Physical-to-Virtual (P2V) solution, Virt P2V.
Virt P2V is comprised of both virt-p2v-server, included in the virt-v2v package, and the P2V client,available from the Red Hat Customer Portal as rhel-6.x-p2v.iso. rhel-6.x-p2v.iso is abootable disk image based on a customized Red Hat Enterprise Linux 6 image. Booting a machine fromrhel-6.x-p2v.iso and connecting to a V2V conversion server that has virt-v2v installed allowsdata from the physical machine to be uploaded to the conversion server and converted for use witheither Red Hat Enterprise Virtualization, or KVM managed by libvirt.
Note that the host must be running Red Hat Enterprise Linux 6. Other host configurations will notwork.
IMPORTANT
Adhere to the following rules. Failure to do so may cause the loss of data and diskmalfunction:
The Physical to Virtual (P2V) feature requires a Red Hat Enterprise Linux 6virtualization host with virt-v2v version 0.8.7 or later. You can check yourversion of virt-v2v by running $ rpm -q virt-v2v.
Note that you cannot convert to a Red Hat Enterprise Linux 5 conversionserver, or with a virt-v2v package previous to version 0.8.7-6.el6.
A number of operating systems can be converted from physical machines tovirtual machines, but be aware that there are known issues converting physicalmachines using software RAID. Red Hat Enterprise Linux 6 machines with afilesystem root on a software RAID md device may be converted to guest virtualmachines. Red Hat Enterprise Linux 4 and Red Hat Enterprise Linux 5 physicalmachines with their filesystem root on a software RAID md device cannot beconverted to virtual machines. There is currently no workaround available.
5.1. PREREQUISITES
For a physical machine to be converted using the P2V client, it must meet basic hardwarerequirements in order to successfully boot the P2V client:
CHAPTER 5. CONVERTING PHYSICAL MACHINES TO VIRTUAL MACHINES
35
Must be bootable from PXE, Optical Media (CD, DVD), or USB.
At least 512 MB of RAM.
An ethernet connection.
Console access (keyboard, video, mouse).
An operating system supported by virt-v2v:
Red Hat Enterprise Linux 3.9
Red Hat Enterprise Linux 4
Red Hat Enterprise Linux 5
Red Hat Enterprise Linux 6
Windows XP
Windows Vista
Windows 7
Windows Server 2003
Windows Server 2008
5.2. PREPARING TO CONVERT A PHYSICAL MACHINE
Before you use P2V, you must first prepare your conversion server and download and prepare therhel-6.x-p2v.iso boot media. For full instructions see the Red Hat Enterprise Linux Installation Guide.Note that there is one ISO image for both i386 and x86_64 architectures.
5.2.1. Install virt-v2v on a conversion server
A conversion server is any physical server running Red Hat Enterprise Linux 6 or higher with the virt-v2v package installed on it. To install virt-v2v follow the instructions in Chapter 2, Installing virt-v2v.virt-v2v version 0.8.7-6 or higher is required.
5.2.2. Enable root login over SSH
Now that virt-v2v is installed, the conversion server must be prepared to accept P2V clientconnections. The P2V client connects to the conversion server as root using SSH, so root login overSSH must be allowed on the conversion server.
Enable root login over SSH:
1. As root, edit the sshd_config file in /etc/ssh/sshd_config:
nano /etc/ssh/sshd_config
2. Add a line in the Authentication section of the file that says PermitRootLogin yes. This linemay already exist and be commented out with a "#". In this case, remove the "#".
V2V Guide
36
# Authentication:#LoginGraceTime 2mPermitRootLogin yes#StrictModes yes#MaxAuthTries 6#MaxSessions 10
3. Save the updated /etc/ssh/sshd_config file.
4. Restart the SSH server:
service sshd restart
You can now connect to the conversion server as root over SSH.
5.2.3. Define a target profile in virt-v2v.conf
Now that you are able to connect to the conversion server as root, it must be pre-configured withdetails about what to do with the virtual machine it creates. These details are given as a target profilein the /etc/virt-v2v.conf file on the conversion server.
Define a target profile in virt-v2v.conf:
1. As root, edit /etc/virt-v2v.conf:
nano /etc/virt-v2v.conf
2. Scroll to the end of the file. Before the final </virt-v2v>, add the following:
<profile name="myrhev"><method>rhev</method><storage format="raw" allocation="preallocated">nfs.share.com:/export1</storage><network type="default"><network type="network" name="rhevm"/></network></profile>
Where:
Profile Name is an arbitrary, descriptive target profile name.
Method is the destination hypervisor type (rhev or libvirt).
Storage Format is the output storage format, either raw or qcow2.
Allocation is the output allocation policy, either preallocated or sparse.
Network type specifies the network to which a network interface should be connectedwhen imported into Red Hat Enterprise Virtualization. The first network type entrycontains details about network configuration before conversion, the second network typeentry maps to an after conversion configuration. In the given example, any detectednetwork card is to be mapped to the managed network called rhevm.
CHAPTER 5. CONVERTING PHYSICAL MACHINES TO VIRTUAL MACHINES
37
IMPORTANT
The value associated with the <storage format> tag (in the above example"nfs.share.com:/export1") must match the value associated with the <method>tag. In this example, since the output method is "rhev", the value associatedwith storage must be an initialized NFS share. For the libvirt method, thestorage format value must be an initialized storage domain that exists locally onthe conversion server, for example "default".
You have created a target profile that defines what will happen to the virtual machine that results fromthis P2V conversion.
5.2.4. Create the bootable media
P2V uses bootable media to create a bootable image of the hard drive of a physical machine and send itto the conversion server for import into a hypervisor. You will need a Red Hat subscription to downloadthe rhel-6.x-p2v.iso ISO. Follow the instructions on preparing bootable media from the Red HatEnterprise Linux Installation Guide. Note that there is only one ISO image for both i386 and x86_64architectures.
The latest release of rhel-6.x-p2v.iso can be found athttps://rhn.redhat.com/rhn/channels/PackageList.do?filter_string=virt-p2v&cid=10508. The ISO filewill be installed in /usr/share/virt-p2v/.
Create the appropriate bootable media:
The rhel-6.x-p2v.iso file can be used three ways: as a bootable disk, a PXE boot image, and as abootable USB device.
Burn the ISO to a blank CD-ROM or DVD-ROM, and insert it into the disk drive of the physicalmachine that is to be converted. To boot properly from this boot media, some changes to BIOSsettings may be required to ensure that the optical disk drive is first in the boot order.
Use the ISO to create a bootable USB media. To boot properly from this boot media, somechanges to BIOS settings may be required to ensure that the USB device is first in the bootorder. In addition, some BIOSes do not support booting from USB media. The P2V client diskimage is approximately 100 MB, so the USB device must be large enough to hold the diskimage.
Prepare a PXE Boot image for your existing PXE server. To boot from PXE, some changes toBIOS settings may be required to ensure that the PXE boot is first in the boot order.
More information about creating boot media can be found in Appendix A, Additional procedures.
You have finished preparing and are now ready to move on to converting a physical machine to avirtual machine.
5.3. CONVERTING PHYSICAL MACHINES TO VIRTUAL MACHINES
By now you have prepared a conversion server and your chosen bootable media. Next you will boot theP2V client, connect to your conversion server, and convert your physical machine. The conversionprocess can take a long time, especially when large physical disks are being converted.
Procedure 5.1. Converting a physical machine to a virtual machine
V2V Guide
38
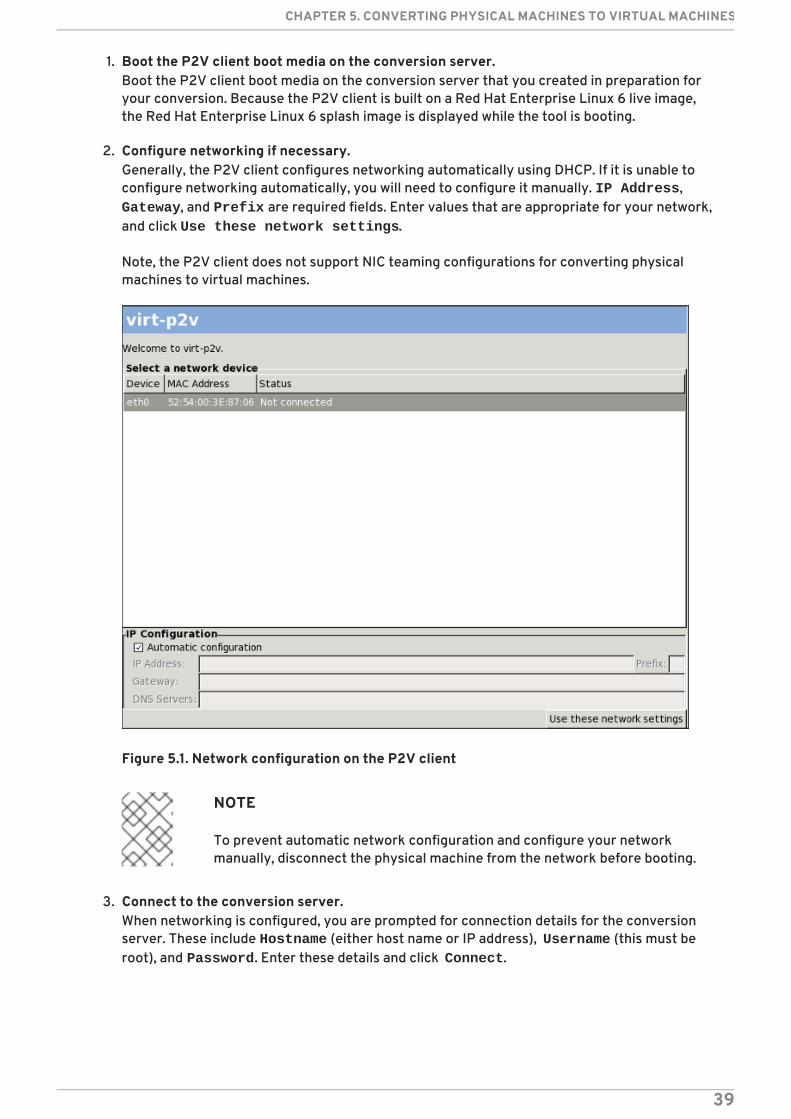
1. Boot the P2V client boot media on the conversion server.Boot the P2V client boot media on the conversion server that you created in preparation foryour conversion. Because the P2V client is built on a Red Hat Enterprise Linux 6 live image,the Red Hat Enterprise Linux 6 splash image is displayed while the tool is booting.
2. Configure networking if necessary.Generally, the P2V client configures networking automatically using DHCP. If it is unable toconfigure networking automatically, you will need to configure it manually. IP Address, Gateway, and Prefix are required fields. Enter values that are appropriate for your network,and click Use these network settings.
Note, the P2V client does not support NIC teaming configurations for converting physicalmachines to virtual machines.
Figure 5.1. Network configuration on the P2V client
NOTE
To prevent automatic network configuration and configure your networkmanually, disconnect the physical machine from the network before booting.
3. Connect to the conversion server.When networking is configured, you are prompted for connection details for the conversionserver. These include Hostname (either host name or IP address), Username (this must beroot), and Password. Enter these details and click Connect.
CHAPTER 5. CONVERTING PHYSICAL MACHINES TO VIRTUAL MACHINES
39
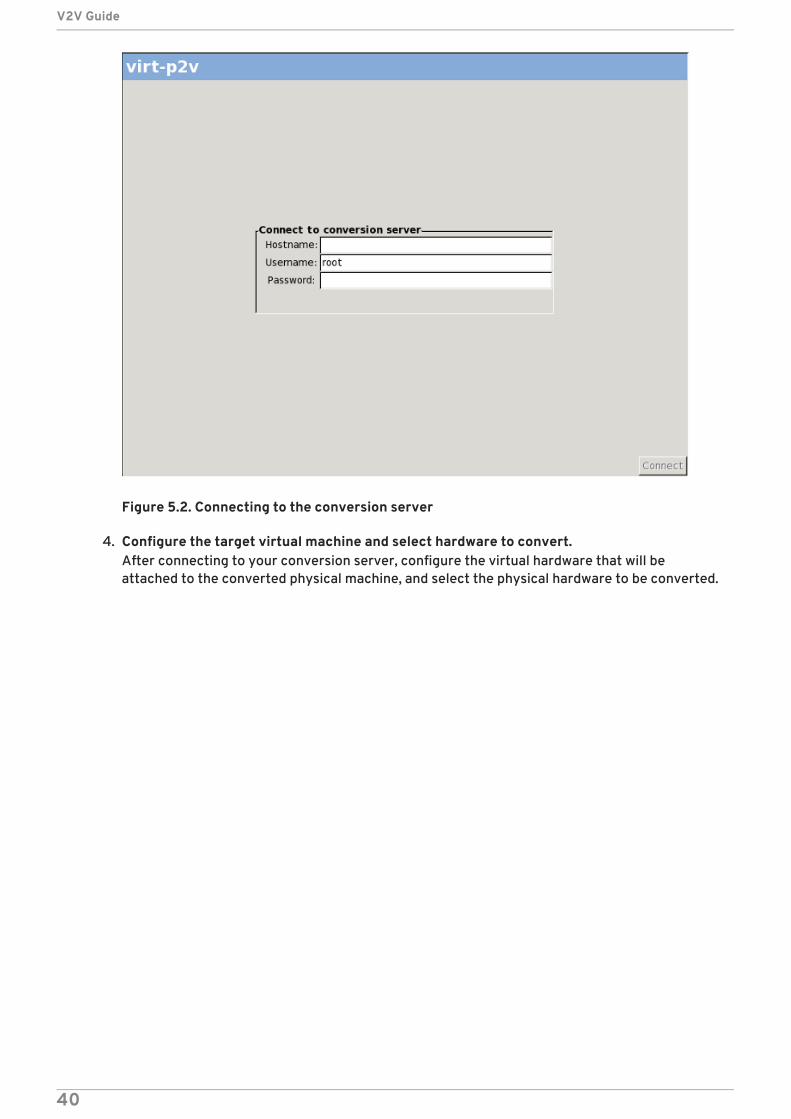
Figure 5.2. Connecting to the conversion server
4. Configure the target virtual machine and select hardware to convert.After connecting to your conversion server, configure the virtual hardware that will beattached to the converted physical machine, and select the physical hardware to be converted.
V2V Guide
40
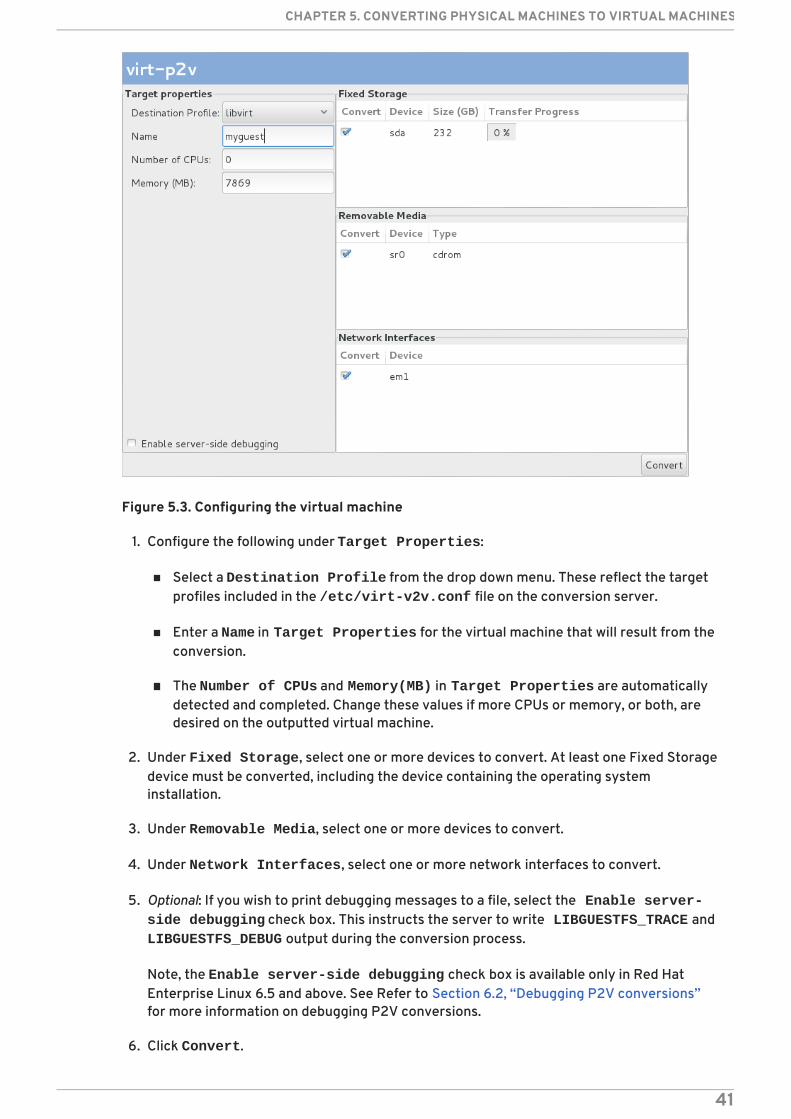
Figure 5.3. Configuring the virtual machine
1. Configure the following under Target Properties:
Select a Destination Profile from the drop down menu. These reflect the targetprofiles included in the /etc/virt-v2v.conf file on the conversion server.
Enter a Name in Target Properties for the virtual machine that will result from theconversion.
The Number of CPUs and Memory(MB) in Target Properties are automaticallydetected and completed. Change these values if more CPUs or memory, or both, aredesired on the outputted virtual machine.
2. Under Fixed Storage, select one or more devices to convert. At least one Fixed Storagedevice must be converted, including the device containing the operating systeminstallation.
3. Under Removable Media, select one or more devices to convert.
4. Under Network Interfaces, select one or more network interfaces to convert.
5. Optional: If you wish to print debugging messages to a file, select the Enable server-side debugging check box. This instructs the server to write LIBGUESTFS_TRACE and LIBGUESTFS_DEBUG output during the conversion process.
Note, the Enable server-side debugging check box is available only in Red HatEnterprise Linux 6.5 and above. See Refer to Section 6.2, “Debugging P2V conversions”for more information on debugging P2V conversions.
6. Click Convert.
CHAPTER 5. CONVERTING PHYSICAL MACHINES TO VIRTUAL MACHINES
41

Figure 5.4. Conversion in process
When the conversion is complete, a success message is displayed. You can shut down the physicalmachine.
Figure 5.5. Conversion successfully completed
V2V Guide
42
You have converted your physical machine into a virtual machine. You can now import and run it on ahypervisor.
5.4. IMPORTING AND RUNNING CONVERTED VIRTUAL MACHINES ONTARGET HYPERVISORS
Now that you have converted your physical machine to a virtual machine, it can be run on a hypervisor.
For information on running the converted physical machine as a virtual machine on Red Hat EnterpriseLinux using virt-manager, see:
Section 3.4, “Running converted virtual machines”
For information on importing and running the converted physical machine as a virtual machine in RedHat Enterprise Virtualization using the Red Hat Enterprise Virtualization Manager, see:
Section 4.3.3, “Importing and running the converted virtual machine”
CHAPTER 5. CONVERTING PHYSICAL MACHINES TO VIRTUAL MACHINES
43
CHAPTER 6. DEBUGGING AND TROUBLESHOOTING
6.1. DEBUGGING V2V CONVERSIONS
Problems encountered when attempting a V2V conversion can be more easily explained to engineersor support services if debugging messages are enabled when V2V is run.
Exporting the debugging messages increases the verbosity of the V2V process, causing virt-v2v toprint out messages as it runs. These messages will be displayed in the terminal from which virt-v2vis run.
Simple redirection can be used to print virt-v2v debug messages to a file. The conversion runsnormally like this:
virt-v2v -i libvirtxml -os pool --bridge bridge_name guest_name.xml
Instead, edit this command to export the debug messages to the virt-v2v.log file. To do this, prefixthe above command with the environment variables LIBGUESTFS_TRACE=1 LIBGUESTFS_DEBUG=1,and redirect the output to the virt-v2v.log file by adding ... 2>&1 | tee virt-v2v.log tothe end of the command.
LIBGUESTFS_TRACE=1 LIBGUESTFS_DEBUG=1 virt-v2v -i libvirtxml -os pool --bridge bridge_name guest_name.xml ... 2>&1 | tee virt-v2v.log
6.2. DEBUGGING P2V CONVERSIONS
Problems encountered during P2V conversion can be more easily explained to engineers or supportservices if debugging messages are enabled when running virt-p2v.
P2V debugging is available in Red Hat Enterprise Linux 6.5 and above.
To enable P2V debugging, select the Enable server-side debugging check box on the convertscreen in the virt-p2v client before clicking the Convert button.
This instructs the server to write LIBGUESTFS_TRACE and LIBGUESTFS_DEBUG output during the virt-p2v conversion process.
Refer to Chapter 5, Converting physical machines to virtual machines for instructions on using virt-p2v.
6.3. KNOWN ISSUE WITH ISCSI/MPATH/SCSI STORAGE VOLUMES
It is not possible at the moment with virt-v2v to convert a guest with a storage volume in a pool ofany of the following types:
iscsi
mpath
scsi
Converting such a guest results in a failed conversion. There is no workaround for this issue.
V2V Guide
44
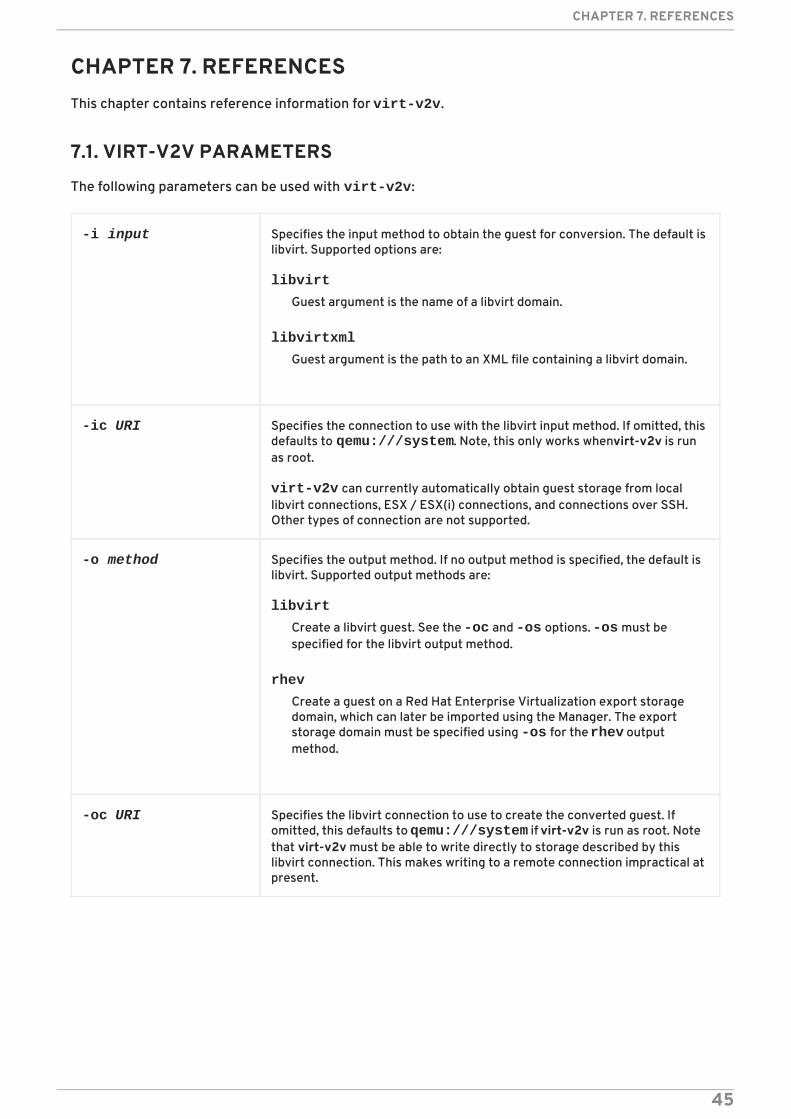
CHAPTER 7. REFERENCESThis chapter contains reference information for virt-v2v.
7.1. VIRT-V2V PARAMETERS
The following parameters can be used with virt-v2v:
-i input Specifies the input method to obtain the guest for conversion. The default islibvirt. Supported options are:
libvirt
Guest argument is the name of a libvirt domain.
libvirtxml
Guest argument is the path to an XML file containing a libvirt domain.
-ic URI Specifies the connection to use with the libvirt input method. If omitted, thisdefaults to qemu:///system. Note, this only works when virt-v2v is runas root.
virt-v2v can currently automatically obtain guest storage from locallibvirt connections, ESX / ESX(i) connections, and connections over SSH.Other types of connection are not supported.
-o method Specifies the output method. If no output method is specified, the default islibvirt. Supported output methods are:
libvirt
Create a libvirt guest. See the -oc and -os options. -os must bespecified for the libvirt output method.
rhev
Create a guest on a Red Hat Enterprise Virtualization export storagedomain, which can later be imported using the Manager. The exportstorage domain must be specified using -os for the rhev outputmethod.
-oc URI Specifies the libvirt connection to use to create the converted guest. Ifomitted, this defaults to qemu:///system if virt-v2v is run as root. Notethat virt-v2v must be able to write directly to storage described by thislibvirt connection. This makes writing to a remote connection impractical atpresent.
CHAPTER 7. REFERENCES
45
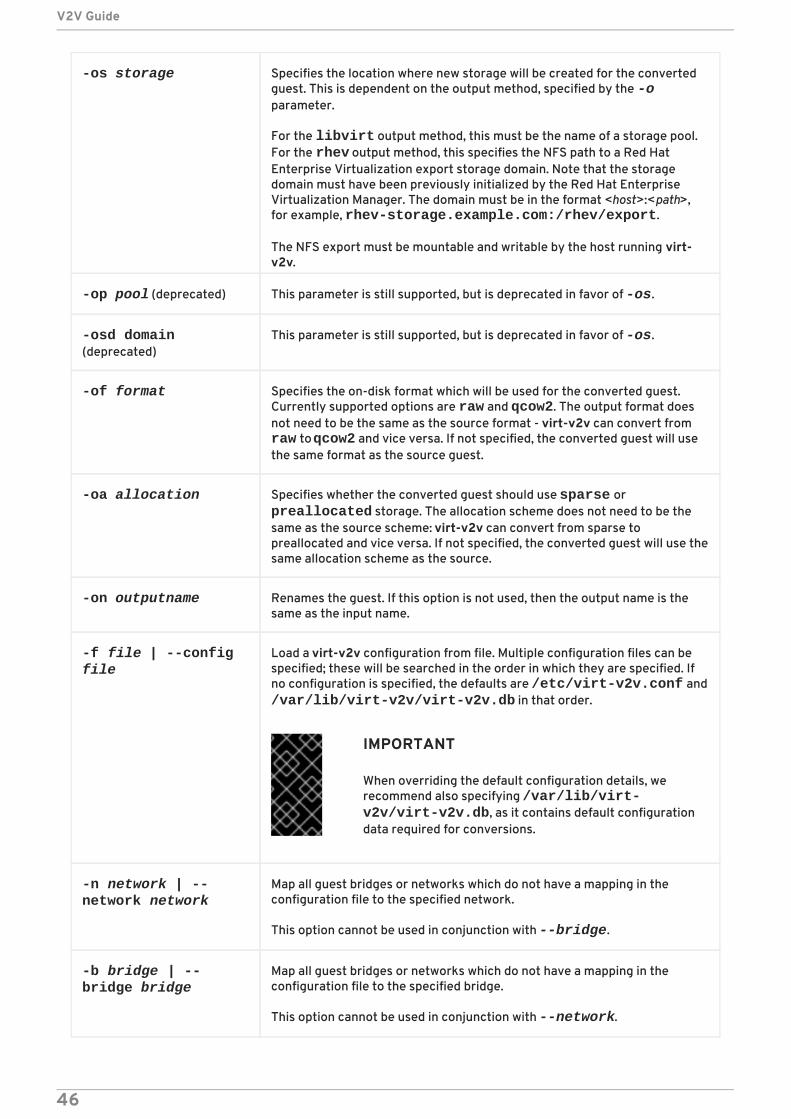
-os storage Specifies the location where new storage will be created for the convertedguest. This is dependent on the output method, specified by the -oparameter.
For the libvirt output method, this must be the name of a storage pool.For the rhev output method, this specifies the NFS path to a Red HatEnterprise Virtualization export storage domain. Note that the storagedomain must have been previously initialized by the Red Hat EnterpriseVirtualization Manager. The domain must be in the format <host>:<path>,for example, rhev-storage.example.com:/rhev/export.
The NFS export must be mountable and writable by the host running virt-v2v.
-op pool (deprecated) This parameter is still supported, but is deprecated in favor of -os.
-osd domain(deprecated)
This parameter is still supported, but is deprecated in favor of -os.
-of format Specifies the on-disk format which will be used for the converted guest.Currently supported options are raw and qcow2. The output format doesnot need to be the same as the source format - virt-v2v can convert from raw to qcow2 and vice versa. If not specified, the converted guest will usethe same format as the source guest.
-oa allocation Specifies whether the converted guest should use sparse or preallocated storage. The allocation scheme does not need to be thesame as the source scheme: virt-v2v can convert from sparse topreallocated and vice versa. If not specified, the converted guest will use thesame allocation scheme as the source.
-on outputname Renames the guest. If this option is not used, then the output name is thesame as the input name.
-f file | --config file
Load a virt-v2v configuration from file. Multiple configuration files can bespecified; these will be searched in the order in which they are specified. Ifno configuration is specified, the defaults are /etc/virt-v2v.conf and/var/lib/virt-v2v/virt-v2v.db in that order.
IMPORTANT
When overriding the default configuration details, werecommend also specifying /var/lib/virt-v2v/virt-v2v.db, as it contains default configurationdata required for conversions.
-n network | --network network
Map all guest bridges or networks which do not have a mapping in theconfiguration file to the specified network.
This option cannot be used in conjunction with --bridge.
-b bridge | --bridge bridge
Map all guest bridges or networks which do not have a mapping in theconfiguration file to the specified bridge.
This option cannot be used in conjunction with --network.
V2V Guide
46
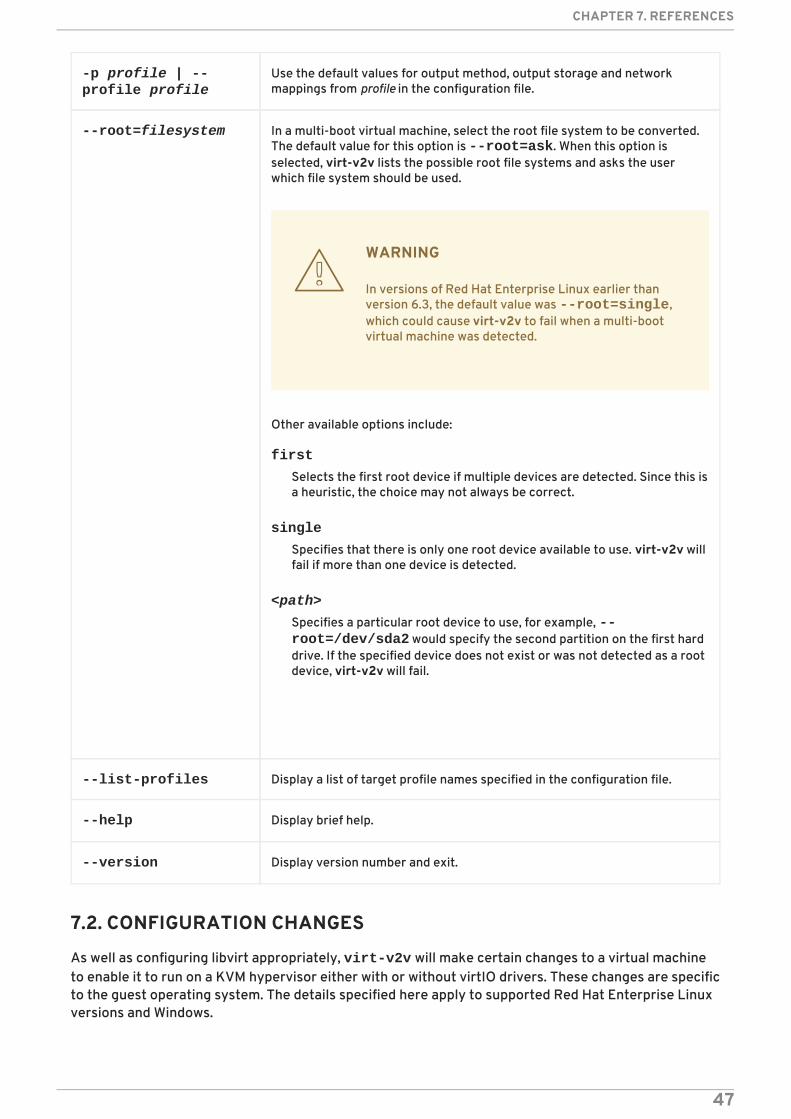
-p profile | --profile profile
Use the default values for output method, output storage and networkmappings from profile in the configuration file.
--root=filesystem In a multi-boot virtual machine, select the root file system to be converted.The default value for this option is --root=ask. When this option isselected, virt-v2v lists the possible root file systems and asks the userwhich file system should be used.
WARNING
In versions of Red Hat Enterprise Linux earlier thanversion 6.3, the default value was --root=single,which could cause virt-v2v to fail when a multi-bootvirtual machine was detected.
Other available options include:
first
Selects the first root device if multiple devices are detected. Since this isa heuristic, the choice may not always be correct.
single
Specifies that there is only one root device available to use. virt-v2v willfail if more than one device is detected.
<path>
Specifies a particular root device to use, for example, --root=/dev/sda2 would specify the second partition on the first harddrive. If the specified device does not exist or was not detected as a rootdevice, virt-v2v will fail.
--list-profiles Display a list of target profile names specified in the configuration file.
--help Display brief help.
--version Display version number and exit.
7.2. CONFIGURATION CHANGES
As well as configuring libvirt appropriately, virt-v2v will make certain changes to a virtual machineto enable it to run on a KVM hypervisor either with or without virtIO drivers. These changes are specificto the guest operating system. The details specified here apply to supported Red Hat Enterprise Linuxversions and Windows.
CHAPTER 7. REFERENCES
47
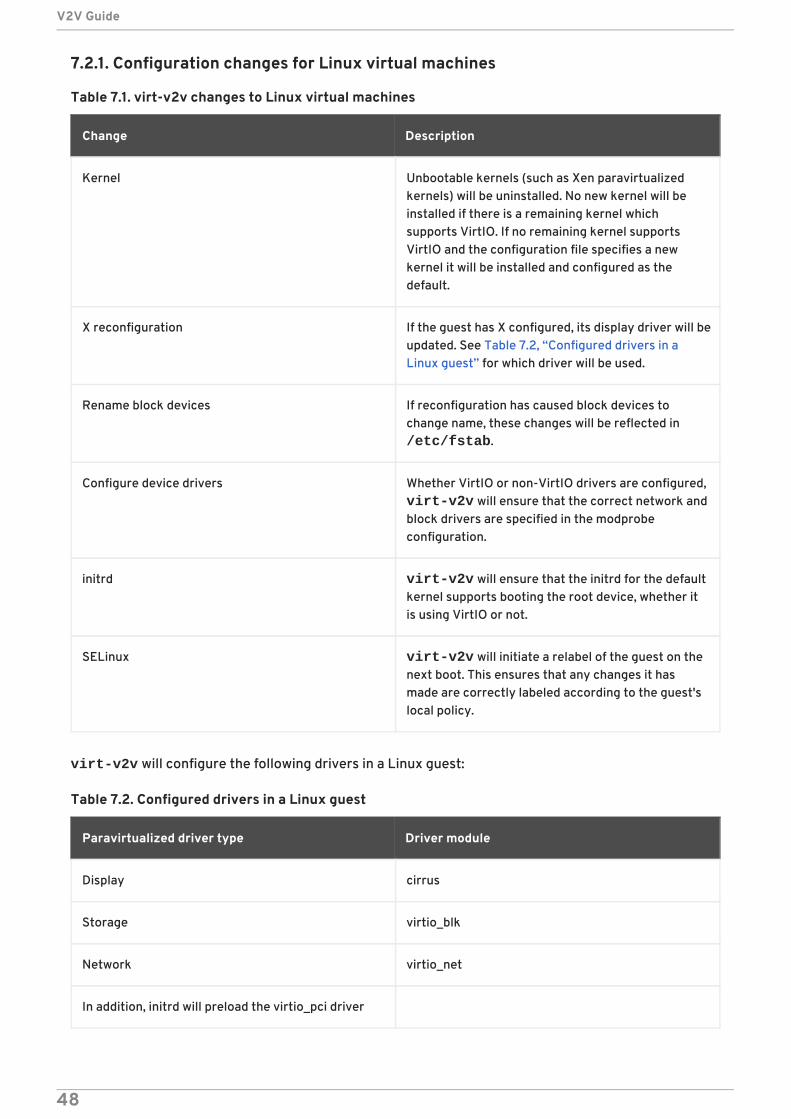
7.2.1. Configuration changes for Linux virtual machines
Table 7.1. virt-v2v changes to Linux virtual machines
Change Description
Kernel Unbootable kernels (such as Xen paravirtualizedkernels) will be uninstalled. No new kernel will beinstalled if there is a remaining kernel whichsupports VirtIO. If no remaining kernel supportsVirtIO and the configuration file specifies a newkernel it will be installed and configured as thedefault.
X reconfiguration If the guest has X configured, its display driver will beupdated. See Table 7.2, “Configured drivers in aLinux guest” for which driver will be used.
Rename block devices If reconfiguration has caused block devices tochange name, these changes will be reflected in /etc/fstab.
Configure device drivers Whether VirtIO or non-VirtIO drivers are configured, virt-v2v will ensure that the correct network andblock drivers are specified in the modprobeconfiguration.
initrd virt-v2v will ensure that the initrd for the defaultkernel supports booting the root device, whether itis using VirtIO or not.
SELinux virt-v2v will initiate a relabel of the guest on thenext boot. This ensures that any changes it hasmade are correctly labeled according to the guest'slocal policy.
virt-v2v will configure the following drivers in a Linux guest:
Table 7.2. Configured drivers in a Linux guest
Paravirtualized driver type Driver module
Display cirrus
Storage virtio_blk
Network virtio_net
In addition, initrd will preload the virtio_pci driver
V2V Guide
48
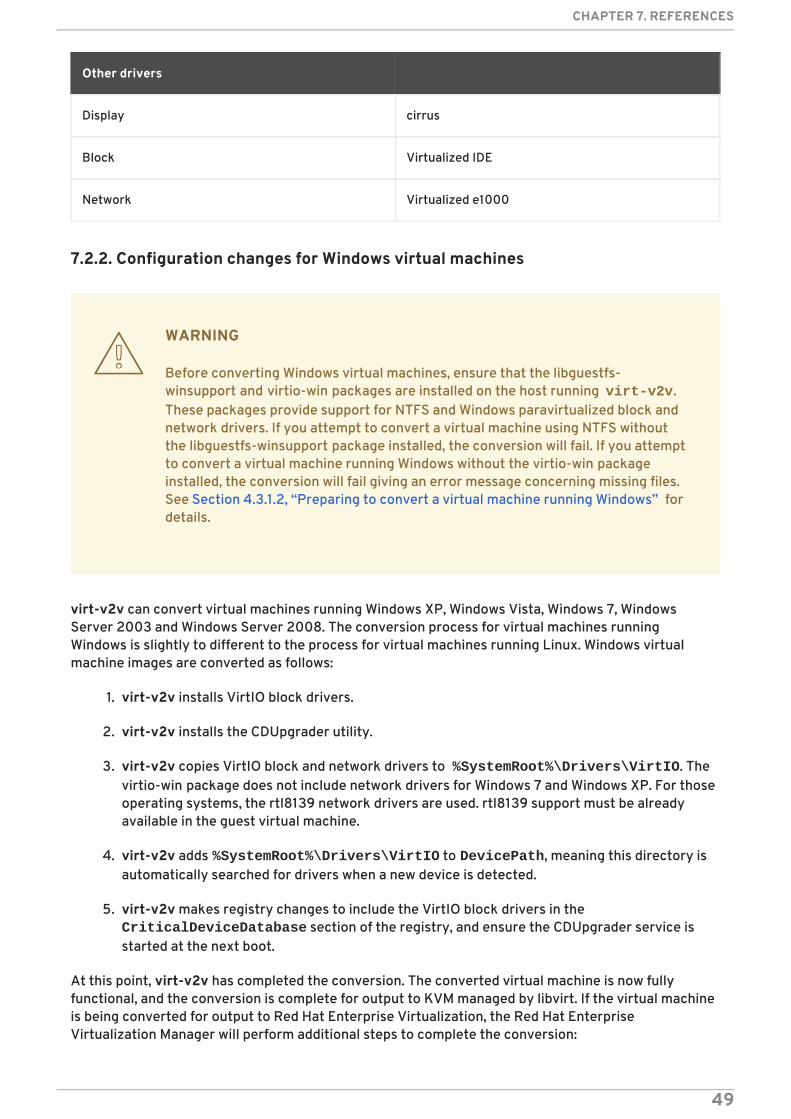
Other drivers
Display cirrus
Block Virtualized IDE
Network Virtualized e1000
7.2.2. Configuration changes for Windows virtual machines
WARNING
Before converting Windows virtual machines, ensure that the libguestfs-winsupport and virtio-win packages are installed on the host running virt-v2v.These packages provide support for NTFS and Windows paravirtualized block andnetwork drivers. If you attempt to convert a virtual machine using NTFS withoutthe libguestfs-winsupport package installed, the conversion will fail. If you attemptto convert a virtual machine running Windows without the virtio-win packageinstalled, the conversion will fail giving an error message concerning missing files.See Section 4.3.1.2, “Preparing to convert a virtual machine running Windows” fordetails.
virt-v2v can convert virtual machines running Windows XP, Windows Vista, Windows 7, WindowsServer 2003 and Windows Server 2008. The conversion process for virtual machines runningWindows is slightly to different to the process for virtual machines running Linux. Windows virtualmachine images are converted as follows:
1. virt-v2v installs VirtIO block drivers.
2. virt-v2v installs the CDUpgrader utility.
3. virt-v2v copies VirtIO block and network drivers to %SystemRoot%\Drivers\VirtIO. Thevirtio-win package does not include network drivers for Windows 7 and Windows XP. For thoseoperating systems, the rtl8139 network drivers are used. rtl8139 support must be alreadyavailable in the guest virtual machine.
4. virt-v2v adds %SystemRoot%\Drivers\VirtIO to DevicePath, meaning this directory isautomatically searched for drivers when a new device is detected.
5. virt-v2v makes registry changes to include the VirtIO block drivers in the CriticalDeviceDatabase section of the registry, and ensure the CDUpgrader service isstarted at the next boot.
At this point, virt-v2v has completed the conversion. The converted virtual machine is now fullyfunctional, and the conversion is complete for output to KVM managed by libvirt. If the virtual machineis being converted for output to Red Hat Enterprise Virtualization, the Red Hat EnterpriseVirtualization Manager will perform additional steps to complete the conversion:
CHAPTER 7. REFERENCES
49

1. The virtual machine is imported and run on the Manager. See the Red Hat EnterpriseVirtualization Administration Guide for details.
IMPORTANT
The first boot stage can take several minutes to run, and must not beinterrupted. It will run automatically without any administrator interventionother than starting the virtual machine. To ensure the process is notinterrupted, no user should log in to the virtual machine until it has quiesced.You can check for this in the Manager GUI.
2. If the guest tools ISO has been uploaded to the Manager, as detailed in Section 4.3.1.2,“Preparing to convert a virtual machine running Windows”, the Manager attaches the guesttools CD to the virtual machine.
3. CDUpgrader detects the guest tools ISO and installs all the VirtIO drivers from it, includingadditional tools that are not included in virtio-win. The VirtIO drivers are reinstalled if thedrivers in the guest tools ISO are newer than the ones previously installed from virtio-win. Thisensures that the tools are kept up to date.
V2V Guide
50
APPENDIX A. ADDITIONAL PROCEDURES
A.1. CREATING BOOTABLE MEDIA
The P2V Client can be booted from PXE boot, a bootable USB device, or optical media. Scripts forpreparing boot options are included with the rhel-6.x-p2v.iso ISO in the LiveOS directory.
A.1.1. Create a P2V client boot CD
The exact series of steps that produces a CD from an image file varies greatly from computer tocomputer, depending on the operating system and disc burning software installed. This proceduredescribes burning an ISO image to disk using Brasero which is included in Red Hat Enterprise Linux 6.
Make sure that your disc burning software is capable of burning discs from image files. Although this istrue of most disc burning software, exceptions exist.
1. Insert a blank, writable CD into your computer's CD or DVD burner.
2. Open the Applications menu, choose the Sound and Video sub-menu, and click BraseroDisk Burner.
3. Click the Burn Image button.
4. Click the Click here to select a disc image button.
5. Browse to the rhel-6.x-p2v.iso and select it for burning.
6. Click Burn.
Your BIOS may need to be changed to allow booting from your DVD/CD-ROM drive.
A.1.2. Create a bootable P2V USB media
1. As root, mount the rhel-6.x-p2v.iso:
mkdir /mnt/p2vmount
mount -o loop rhel-6.x-p2v.iso /mnt/p2vmount
2. Attach your USB device to the computer. For the livecd-iso-to-disk script to function, the USBfilesystem must be formatted vfat, ext[234] or btrfs.
3. From a terminal as root run the livecd-iso-to-disk script:
bash /mnt/p2vmount/LiveOS/livecd-iso-to-disk /PATH/TO/rhel-6.x-p2v.iso /dev/YOURUSBDEVICE
4. When the script finishes successfully, eject the USB device.
A.1.3. Create a PXE boot image
1. As root, mount the rhel-6.x-p2v.iso
APPENDIX A. ADDITIONAL PROCEDURES
51
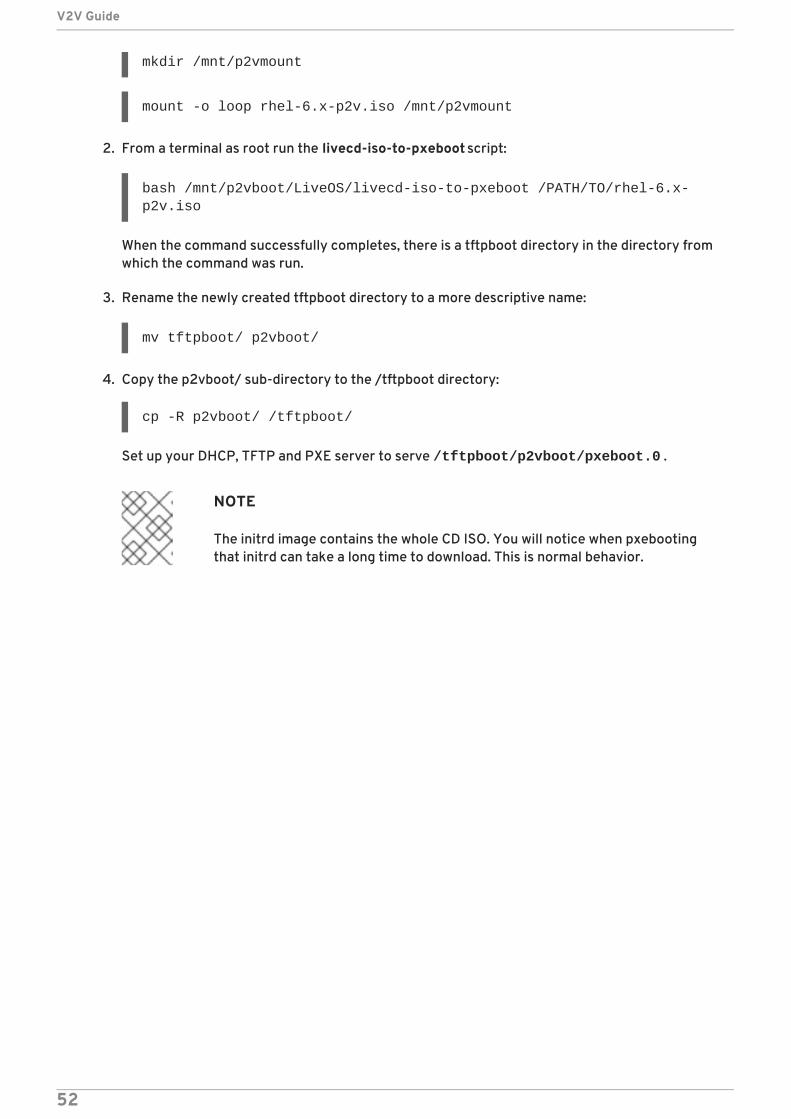
mkdir /mnt/p2vmount
mount -o loop rhel-6.x-p2v.iso /mnt/p2vmount
2. From a terminal as root run the livecd-iso-to-pxeboot script:
bash /mnt/p2vboot/LiveOS/livecd-iso-to-pxeboot /PATH/TO/rhel-6.x-p2v.iso
When the command successfully completes, there is a tftpboot directory in the directory fromwhich the command was run.
3. Rename the newly created tftpboot directory to a more descriptive name:
mv tftpboot/ p2vboot/
4. Copy the p2vboot/ sub-directory to the /tftpboot directory:
cp -R p2vboot/ /tftpboot/
Set up your DHCP, TFTP and PXE server to serve /tftpboot/p2vboot/pxeboot.0 .
NOTE
The initrd image contains the whole CD ISO. You will notice when pxebootingthat initrd can take a long time to download. This is normal behavior.
V2V Guide
52
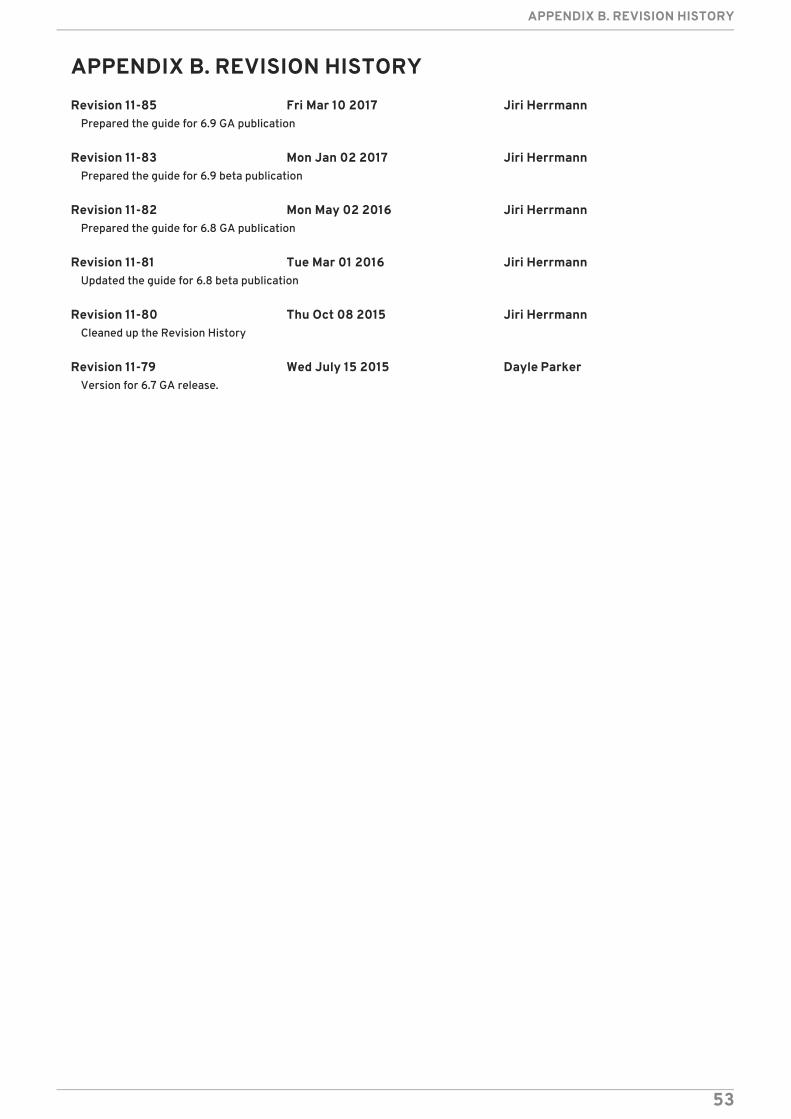
APPENDIX B. REVISION HISTORY
Revision 11-85 Fri Mar 10 2017 Jiri HerrmannPrepared the guide for 6.9 GA publication
Revision 11-83 Mon Jan 02 2017 Jiri HerrmannPrepared the guide for 6.9 beta publication
Revision 11-82 Mon May 02 2016 Jiri HerrmannPrepared the guide for 6.8 GA publication
Revision 11-81 Tue Mar 01 2016 Jiri HerrmannUpdated the guide for 6.8 beta publication
Revision 11-80 Thu Oct 08 2015 Jiri HerrmannCleaned up the Revision History
Revision 11-79 Wed July 15 2015 Dayle ParkerVersion for 6.7 GA release.
APPENDIX B. REVISION HISTORY
53


