129
A Gentoo Linux Advanced Reference Architecture Sven Vermeulen

A Gentoo Linux AdvancedReference Architecture
Sven Vermeulen

A Gentoo Linux Advanced Reference ArchitectureSven VermeulenCopyright © 2012-2014 Sven Vermeulen
Abstract
The book "A Gentoo Linux Advanced Reference Architecture" is meant as a resource displaying the powerfulfeatures of many free software solutions that are supported on top of Gentoo Linux. It is a deep-dive approach inmany aspects related to processes, supportability, maintainability based on Gentoo Linux system deployments.
Unlike the existing, per-application documents that exist on the Internet (and which are a valuable resource to getinto the gory details of many applications) and the per-distribution guides that provide information on using thatparticular distribution, this book will focus more on architecturing IT infrastructure for medium-sized enterprises.Smaller enterprises might find the reference architecture here too expensive or large - however, many servicesdescribed in the book can be slimmed down into a smaller deployment as well.
It is seriously recommended to have a good grasp of what Gentoo Linux is to start with. The other online resource("Linux Sea") can be a good introduction to Gentoo Linux, but that might not be sufficient to appreciate the detailand organization of this book.
This book will progress rather slowly (compared to the initial development of "Linux Sea" as its content will bewritten down as I teach myself the technologies mentioned within. When the development of this book started,knowledge about the technical services described later is still limited, and the book will be used as a sort-of progressreport by the author. Call it offsite knowledge storage ;-)
The version you are reading currently is v0.22 and has been generated on 2014/01/01.
You are free to share (copy, distribute and transmit) the work as well as remix (adapt) the work under the conditions of the Creative CommonsAttribution Noncommercial Share Alike 2.0 license, available at http://creativecommons.org/licenses/by-nc-sa/2.0/be/deed.en

iii
Table of Contents1. Infrastructure Architecturing for Free Software ............................................................... 1
Introduction ......................................................................................................... 1Architecture frameworks ................................................................................ 1Reference architecture for infrastructure ............................................................ 2
Designing a reference architecture ........................................................................... 2The process ................................................................................................. 2Logical design .............................................................................................. 4
About this book .................................................................................................... 62. Platform selection ...................................................................................................... 7
Gentoo Linux ....................................................................................................... 7Basic OS - the requirements ................................................................................... 8
Services ....................................................................................................... 8Access management services ........................................................................... 9Monitoring services ....................................................................................... 9Backup services .......................................................................................... 10Configuration management ............................................................................ 10Compliance management .............................................................................. 10Distributed resource management ................................................................... 10
Architecture ........................................................................................................ 10Flows and feeds .......................................................................................... 12Administration ............................................................................................ 13Monitoring ................................................................................................. 14Operations .................................................................................................. 15Users ......................................................................................................... 15Security ..................................................................................................... 15
Pluggable Authentication Modules ......................................................................... 17Principles behind PAM ................................................................................ 17How PAM works ........................................................................................ 17Managing PAM configuration ....................................................................... 18Configuring PAM on the system .................................................................... 19Learning more about PAM ............................................................................ 20
Gentoo Hardened ................................................................................................ 20PaX .......................................................................................................... 21PIE/PIC/SSP ............................................................................................... 21Checking PaX and PIE/PIC/SSP results ........................................................... 22SELinux as MAC ........................................................................................ 23grSecurity kernel improvements ..................................................................... 24Using IMA and EVM .................................................................................. 24
OpenSSH ........................................................................................................... 24Key management ......................................................................................... 24Securing OpenSSH ...................................................................................... 25Using DNS SSHFP fields ............................................................................. 25
Logging and auditing ........................................................................................... 25System logging ........................................................................................... 25Auditing .................................................................................................... 27
Privilege escalation through sudo ........................................................................... 28Centralized sudoers file ................................................................................ 29
Resources .......................................................................................................... 293. The environment at large .......................................................................................... 30
Structuring the environment .................................................................................. 30Multi-tenancy ............................................................................................. 30SLA groups ................................................................................................ 32Architectural positioning ............................................................................... 32Categories .................................................................................................. 33
Resources .......................................................................................................... 35
A Gentoo Linux AdvancedReference Architecture
iv
4. DNS services .......................................................................................................... 36DNS ................................................................................................................. 36Architecture ........................................................................................................ 37
Flows and feeds .......................................................................................... 37Administration ............................................................................................ 38Monitoring ................................................................................................. 39Operations .................................................................................................. 41Users ......................................................................................................... 41Security ..................................................................................................... 41
BIND ................................................................................................................ 45From records to views ................................................................................. 45Deployment and uses ................................................................................... 47Using bind ................................................................................................. 50Logging ..................................................................................................... 52
Resources .......................................................................................................... 525. DHCP services ........................................................................................................ 54
DHCP ............................................................................................................... 54Bootstrap Protocol ....................................................................................... 54Various DHCP options ................................................................................. 55
Architecture ........................................................................................................ 55Flows and feeds .......................................................................................... 56Administration ............................................................................................ 56Monitoring ................................................................................................. 57Operations .................................................................................................. 58Users ......................................................................................................... 60Security ..................................................................................................... 60
ISC DHCP ......................................................................................................... 60Installation and configuration ........................................................................ 60Logging ..................................................................................................... 62
Resources .......................................................................................................... 626. Certificates and PKI ................................................................................................. 63
Why it is needed ................................................................................................. 63How do certificates work .............................................................................. 63Certificates in organizations .......................................................................... 65CA service providers ................................................................................... 67Certificate management protocols ................................................................... 67
Architecture ........................................................................................................ 67Flows and feeds .......................................................................................... 67Administration ............................................................................................ 68Monitoring ................................................................................................. 68Operations .................................................................................................. 68Users ......................................................................................................... 68Security ..................................................................................................... 69
OpenSSL as CA .................................................................................................. 69Setting up the CA ....................................................................................... 69Daily handling ............................................................................................ 72Scripted approach ........................................................................................ 73
Mail service ....................................................................................................... 74Fetchmail ................................................................................................... 74Procmail .................................................................................................... 74
7. High Available File Server ........................................................................................ 76Introduction ........................................................................................................ 76NFS v4 ............................................................................................................. 76
Architecture ................................................................................................ 76Installation ................................................................................................. 77Configuration .............................................................................................. 78
Disaster Recovery Setup ....................................................................................... 78Architectures .............................................................................................. 79

A Gentoo Linux AdvancedReference Architecture
v
Simple replication ....................................................................................... 80DRBD and Heartbeat ................................................................................... 82
Resources .......................................................................................................... 858. A Gentoo build server .............................................................................................. 86
Introduction ........................................................................................................ 86Building a build server ......................................................................................... 86
Setup build host .......................................................................................... 87Enabling the web server ............................................................................... 90
Resources .......................................................................................................... 919. Database Server ...................................................................................................... 92
Introduction ........................................................................................................ 92PostgreSQL ........................................................................................................ 92
Architecture ................................................................................................ 92Deployment and uses ................................................................................... 95
MySQL ............................................................................................................. 96Architecture ................................................................................................ 96Deployment and uses ................................................................................... 96User management ........................................................................................ 97
Resources .......................................................................................................... 9710. Mail Server ........................................................................................................... 98
Introduction ........................................................................................................ 98Postfix ............................................................................................................... 98
Architecture ................................................................................................ 98Installation ................................................................................................. 99Managing Postfix ...................................................................................... 100Scaling Postfix .......................................................................................... 100
11. Configuration management with git and Puppet ......................................................... 102Introduction ...................................................................................................... 102
Central configuration management, or federated? ............................................. 102About Puppet ............................................................................................ 103About Git ................................................................................................. 105
Git with gitolite ................................................................................................. 105Architecture .............................................................................................. 105Using gitolite ............................................................................................ 106
Puppet ............................................................................................................. 107Architecture .............................................................................................. 107Setting up puppet master ............................................................................. 109Setting up puppet clients ............................................................................. 112Working with Puppet ................................................................................. 113The power of Puppets definitions ................................................................. 114
Resources ......................................................................................................... 11612. Virtualization with KVM ....................................................................................... 117
Introduction ...................................................................................................... 117Virtualization using KVM ................................................................................... 117
Why virtualize .......................................................................................... 117Architecture .............................................................................................. 118Deployment and uses ................................................................................. 120
Offline operations .............................................................................................. 121Bare metal recovery (snapshot backups) ......................................................... 121Integrity validation (offline AIDE scans) ........................................................ 121
Index ....................................................................................................................... 122

vi
List of Figures2.1. Services for an operating system platform ................................................................... 92.2. Components for operating system platform ................................................................ 112.3. Backup (cannot be more simpler than this ;-) .............................................................. 122.4. Log flows from server to central log server ................................................................ 132.5. Operating system administration .............................................................................. 142.6. Operating system monitoring ................................................................................... 152.7. Running compliance (and inventory) validation .......................................................... 162.8. Schematic representation of PAM ............................................................................ 182.9. Syslog mode of operations ...................................................................................... 262.10. Audit operations .................................................................................................. 283.1. Multi-tenant setup ................................................................................................. 313.2. SLA group structure .............................................................................................. 323.3. Architectural positioning ......................................................................................... 333.4. Example categorization for end user devices, internal workstations ................................. 344.1. DNS services ....................................................................................................... 364.2. Simple DNS architecture ........................................................................................ 374.3. Flows and feeds .................................................................................................... 384.4. BIND administration .............................................................................................. 394.5. BIND monitoring .................................................................................................. 404.6. Standard operation usage of BIND ........................................................................... 414.7. DNSSEC overview ................................................................................................ 435.1. Standard DHCP flow ............................................................................................. 545.2. Standard HA architecture for DHCP ......................................................................... 565.3. Administering DHCPd ........................................................................................... 575.4. Operational flows and activities on DHCP service ....................................................... 596.1. Certificates and CAs in a nutshell ............................................................................ 656.2. Flows and feeds for the CA server ........................................................................... 676.3. Operations on a CA server ...................................................................................... 686.4. User definitions for CA operations ........................................................................... 697.1. NFSv3 versus NFSv4 ............................................................................................. 767.2. Alternative HA setup using DRBD and Heartbeat ....................................................... 807.3. HTree in a simple example ..................................................................................... 819.1. Load balanced setup .............................................................................................. 929.2. Backup architecture for a PostgreSQL setup ............................................................... 939.3. Standby setups ...................................................................................................... 949.4. Internal architecture for PostgreSQL ......................................................................... 9510.1. High-level architecture for Postfix .......................................................................... 9811.1. Overview for configuration management ................................................................ 10211.2. Git and gitolite flows .......................................................................................... 10511.3. Gitolite administration ........................................................................................ 10611.4. Flows towards and from puppet ............................................................................ 10811.5. Puppet administration ......................................................................................... 10811.6. Regular operations of puppet ............................................................................... 109

1
Chapter 1. InfrastructureArchitecturing for Free Software
IntroductionWhen dealing with larger environments, IT infrastructure architecture will be voiced as a commonterm. It is the "art" of capturing organizational requirements, translating them into well definedservices, creating building blocks that adhere to the functional and non-functional requirements,integrating those building blocks in a larger deployment design and finally translating this into physicaldeployments on your infrastructure. For small deployments (a few servers) this is probably not reallybeneficial to do so intensively - most administrators in such cases do the entire architecturing in theirhead. Because of the small scale, this is perfectly doable, although there is something to say aboutproperly documenting it anyhow.
Larger scale deployments (several hundreds servers, possibly even thousands which might also bedeployed across multiple sites) are more of a concern here, usually because the requirements putinto the architecture by the organization are more broadly defined and focus on things such asmaintainability or manageability, enhanced security, ... These requirements are often written downinto process-like approaches on how to deal with your infrastructure, because that improves the qualityof activities done on your infrastructure and provides a way to streamline hand over of activities orjobs within the organization.
When dealing with large-scale free software deployments, this is not different. Within the next fewsections, we will elaborate on how to match requirements and which processes you need to look at.
Architecture frameworksMany IT infrastructure architecture frameworks exist. When you are working for a large enterprise,these frameworks will most likely be translated into the companies internal architecture framework.Small and medium-sized enterprises usually do not invest that much in managing their owninfrastructure architecture framework and instead work with online published and managedframeworks as good (or as bad) as they can.
A well-known framework is CObIT [https://www.isaca.org/Pages/default.aspx], which is an acronymfor Control Objectives for IT. CObIT dives into the requirements and deliverables of an ITorganization, based on the business requirements of the organization and the processes involved inmanaging IT infrastructure. When reading through CObIT, it might seem very difficult to implement,but that's ok. Most of the time, organizations gradually grow into the objectives. Trying to implementthe objectives immediately will not work. But having a good read through the framework allows youto investigate and prepare a good "path" towards a more process-like, mature IT organization. Still,most organizations that want to have a high degree of CObIT implementation will be large. Medium-sized organizations might want to keep CObIT as a valuable resource to see how they can mature,without going into the full deployment of CObIT in the organization.
When processes come around the corner, ITIL [http://www.itil-officialsite.com/home/home.aspx]is most likely the resource for process maturity. It talks about how IT services should beorganized and which services you need to take care of in order to provide mature and qualitativeservices towards your (internal) business. The practices talk about financial management (contracts,licenses, chargeback, ...), service level management (allowed changes, production and non-production environments, handling incidents and questions, ...), security management (includingcentral authentication and authorization, auditing services, ...), configuration management and more.Knowing what ITIL wants to achieve and which services it defines is very important to grow towardsa larger enterprise, because those services need to be consider and deployed. However, unlike CObIT,which is fairly technical driven, ITIL stays on a higher abstraction level.

Infrastructure Architecturingfor Free Software
2
Security management is too often seen as a mandatory component that removes flexibility fromthe organization. This is not true. When properly done, security means to have a high degree ofmanageability across the organization. Security is more than just authentication and authorization,it strives on automation (which improves the time-to-market and reduces possible human errors),standardization (which lowers total cost of ownership), advanced log management (includingaccountability, but also very important for quality assurance and incident handling) and more. TheISO/IEC 27000 [https://en.wikipedia.org/wiki/ISO/IEC_27000-series] standard focuses on the high-level scope of information security management and introduces the starting point for many othersecurity-related standards.
Another interesting resource is TOGAF [http://www.togaf.info/], The Open Group ArchitectureFramework. TOGAF focuses more on service design and how information flows and is managedthrough those services. It also helps to design the process of architecturing itself, providing valuableinformation about architecture lifecycle, planning, and more.
Yet all this is often still quite too high-level or abstract to work with. If so, then please read on, becausethat is what this book will (also) help with!
Reference architecture for infrastructureTo make the various processes and methods described in the architecture frameworks more tangible,a reference architecture can be documented.
A reference architecture shows how to potentially design infrastructure, working with known softwareservices (like Apache for web services, OpenLDAP for directory services, etc.) and managementcomponents (like Puppet for configuration management). This is more in line with what many readersexpect and know, because those are the technologies known and are often deployed already. Manyvendors that have a huge portfolio of software and server services have their reference architecturesas well, which is often used by administrators as a first resource reference to their own infrastructure.
Microsoft has the Infrastructure Planning and Design series [http://technet.microsoft.com/en-us/library/cc196387.aspx] in which it describes implementations of its various services, such as ActiveDirectory (for the central management of it all), DirectAccess (for simplified yet secure VPN-likeimplementations, SQL Server for databases, etc.)
Oracle uses its IT Strategies [http://www.oracle.com/goto/itstrategies] series to describe its OracleReference Architecture, a suggestion on how to deal with the various Oracle products and integratethem in the organization.
RedHat uses a different approach, describing reference architectures [https://www.redhat.com/resourcelibrary/reference-architectures/] for specific products within the RedHat Enterprise Linuxdistribution.
By describing such a reference architecture, administrators can understand why various processesexist and how they can make life easier for engineers and administrators as well as provide valuablefor the organization as a whole. For many IT service delivery companies, their suggested referencearchitecture is both a sales pitch (to describe the maturity and integration of their services) as well asa check point for their own development departments (is our offering sufficient and necessary).
Throughout the rest of this book, a reference architecture will be designed, with primary focus onthe components used, the reason for these components and possible process implementations that arerelated to it.
Designing a reference architectureThe process
The focus of designing a reference architecture is to be able to display quickly how all needed servicesare deployed, integrated and managed. In very high terms, it boils down to the following steps.

Infrastructure Architecturingfor Free Software
3
1. Capture the requirements
2. Make a logical design
3. Translate the design in infrastructure implementation details
4. Go do it
These steps are simply put the order of doing things; the hardest part though lays in the beginning.
Capturing the requirements
Generally speaking, there are two types of requirements:
• Functional requirements, describing the features, functions, security, capabilities and more of theorganizations' needs
• Non-functional requirements, which are more about the service level agreements (performance,availability, reliability, ...), support requirements
Functional requirements can be thought of in terms like
• What does the organization want to get?
• Which security requirements are there (most often based on legal or compliance requirements)
• Which financial requirements are being presented
The non-functional requirements can be thought of through the FURPS(+) acronym. The F is coveredalready (which stands for Functional), but the other letters in the acronym give a nice overview ofnon-functional requirements that might exist: Usability, Reliability, Performance, Supportability. The+ in the acronym focuses on additional process-driven requirements, such as design requirements("you need to use a relational database"), implementation requirement ("you need to code it inPython"), interface requirement ("you need to use SOAP for communication across services"),physical requirements ("the service must run in a colocation center") or progress requirement ("youmust use a lean-IT approach with visual progress boards").
Capturing requirements from the organization is one of the most tough (but most important) tasks inany design exercise. Properly evaluating and documenting the requirements, as well as their priority(for which you can use the MoSCoW [http://www.coleyconsulting.co.uk/moscow.htm] approach -Must/Should/Could/Won't - which was originally made for software development but can be usedin other requirement exercises as well) and who asked for it (stakeholders). Although you can goextremely far in this (asking hundreds of questions), be sure to take a pragmatic approach and informthe stakeholders about possible consequences too (like the cost and time-to-market influence ofadditional requirements). Using an iterative production approach (where a first set of requirements iscaptured, a design is made after which some sort of storyboard approach is used to describe to theorganization how the design looks like) will give the organization time to react or give their ideas (oradditional requirements).
Make a logical design
A logical design visualizes and describes a solution without going into the details of theimplementation. The idea of logical designs is that they can be modularized them, designing onecomponent after another, and using building blocks to give a high-level overview of the solutionyou are designing. This high-level design allows tracking of the architecture whereas the componentslogical design documents go into the details of a single building block.
When a logical design is made, try to keep the implementation details out of it. Details such as IPaddresses, number of parallel instances, memory details, ... are not needed in order to track and managethe architecture. These implementation details go into the later stage.
Infrastructure Architecturingfor Free Software
4
Infrastructure implementation details
The implementation details are then used as a sort-of handover process between designing thearchitecture and implementing it. Whereas the logical design can be reused in other projects orsometimes even other organizations, the implementation details are more about how it all works in aspecific infrastructure deployment. Overview of instances, IP addresses, functional accounts in use,location of files and certificates, etc. are all implementation details that are important to manageproperly (and will often be managed through a configuration management database) but not that vitalin understanding the architecture by itself.
Go do it
Only when these implementation details are known as well can the infrastructure be really created.
Logical designWhereas requirements capturing is the most important, the logical design is where architects startwriting and documenting how the architecture looks like, translating the requirements in services (oreven immediately into technologies). In this book a lightweight logical design method will be usedto describe why decisions are made in the reference architecture. There will not be full logical designdocuments (that would be a bit overkill for now, especially since it is just a fictional company) but themethods and structures used can help in the quest to find out what a larger organization might want.
A lightweight logical design document starts off with (a subset of) requirements that is used duringthe design and which influences the decisions made. Alongside the requirements a design might alsoinclude assumptions, although it is recommended to remove assumptions before it is too late - afterall, every assumption that isn't validated is a risk for a design.
Next, the logical design itself is made, for which the FAMOUS abbreviation is introduced:
• Feeds and flows that are important for the design
This information provides insight in the occasional data transports that occur towards the system.This might be the shipping of the database backup file towards a remote location, the flow of logentries that are sent to a central log server, an incoming daily snapshot of configuration settingsthat need to be loaded in an LDAP, etc. By properly documenting these feeds and flows, it is mucheasier to find possible attention points (storage volume requirements, network traffic shaping needs,heavy I/O timeframes, ...) that need to be tackled.
In many cases, integration-requirements can also be found from this. A flow of log entries towards acentral log server will help in documenting the log structure & communication standard that mightbe wanted in an organization. An incoming configuration file will need to adhere to a certain formatin order to make automation possible.
• Administration of the components
In many cases, administration is often forgotten to be designed. Yet the administration ofcomponents is an important aspect since it is often (flawed) administration that is causingvulnerabilities or exploits. The more administrative accesses that are noticed, the more "attackvectors" exist that might be exploitable. By properly designing the administration of thecomponents, it is much more likely to find a good method that is both secure as well as supportedby the administration team.
• Monitoring of the components
Monitoring is more than having a cronjob checking if a process is still running. A design is neededto see what to verify periodically (and how frequent) as well as the consequences when certainevents occur. So next to process monitoring (and perhaps automatically restarting the process), also

Infrastructure Architecturingfor Free Software
5
consider resource monitoring (file system capacity, memory pressure, network I/O) and servicemonitoring (automatic processes that perform end-to-end tests on services).
• Operational flows (runtime behavior)
Designing the operational flow is less about the (integration) architecture, but more aboutunderstanding what the service is actually doing. Usually, this information can be found on theproducts' project page (or vendor), but it never hurts to verify this and draw it to understand it.
An example operational flow could be the high-level working of Apache (with a master processbound to port 80, but that is dispatching work to child processes when a request has entered). Thesechild processes have multiple worker threads that handle requests one-at-a-time. If a request is fora CGI resource, Apache either forks and launches the CGI command, or it uses FastCGI towardsa running instance, etc.
The operational flows also show which actors are involved and how they connect/interact with theservice.
• User management
Many services delegate user management to another service. Be it direct LDAP access, orauthentication through SASL or any other method: properly designing and documenting how usermanagement for the service is done helps to figure out potential improvements as well as integrationaspects of the service. Don't forget to think about the internal authentication & authorization aswell: does the service offer role-based access? Which roles are needed? What are the rights andprivileges that these roles should have?
• Security details
Finally, there is the design of particular security requirements. Based on the earlier design flows,check if these need firewall capabilities (or host filters), encryption (when working with sensitivebusiness data), certain audit requirements that need to be taken care of, gateways that need to beimplemented that offer additional filtering or even request rewrites, etc.
After this logical design, write down further details about the design that are less about the componentsand more about how they will or could be used. For this we use the FASTCARD abbreviation:
• Financial information
If the service has particular licensing restrictions, document how the license works. Is it core-based?User-based? Instance-based? If allowed, document what the cost is of this license as that helps todecide on the usability (and evolution) of the service. Document how to map contracts towards thecomponent.
• Aftermath (future development or evolution)
The design is most likely either not finished, or is based on the short-term resources availablewhereas more evolutions are still in sight. For instance, an LDAP can be documented using a master/slave approach, knowing very well that a master/master situation might be in scope later. Documentthe changes thought to be needed or will be done in the future.
• Selection criteria
The service probably can serve multiple requests (or types of requests). In many cases, it is best toprovide a decision chart or decision table to help administrators and engineers decide if the designfits their needs. For instance, for a web server, the decision table might provide input as to whenSSL encryption is needed, when SSL encryption with client certificate validation is needed, etc. Fora database, include if (and when) encryption or compression is needed, and so forth.
• Technology lifecycle
Infrastructure Architecturingfor Free Software
6
If the project or vendor has described it, document how long this particular version will last. If thereis a support contract with a particular vendor, verify if this contract deals with upgrades as well.
• Communication of changes
Who are the stakeholders that need to be modified when the design changes
• Affiliated standards
Which standards, policies, guidelines, ... do users, analysts or other roles need to specifically lookat when they work with or integrate with this component
• Residual risks
Issues that cannot be solved by the logical design by itself and thus need to be taken care ofduring integration or through other means. For instance, if a service does not offer SSL/TLSencryption upon accessing it, a residual risk regarding plain-text network communication shouldbe documented.
• Documentation
Overview of resources that are interesting to look at
By documenting these two aspects, all information needed about one building block or architecture isreadily available. This information should be kept alive during the lifecycle of the components withinthe architecture. Don't worry if the acronyms are currently too illogical - they will become more clearwhile looking at the example designs that are described further down the book.
About this bookThe rest of this book will focus on various IT infrastructure domains, and describe how this domaincan be implemented using free software.
1. Chapters will start with an introduction about the domain and the choice made in the chapter.
2. Next, it will describe the requirements taken into account while designing the reference architectureand the approach taken to tackle these requirements.
3. Then the architecture (logical design) is drafted for the requirements.
4. Finally, as the architecture mentions some new technologies, these technologies are described ina bit more detail.

7
Chapter 2. Platform selection
Gentoo LinuxWithin the reference architecture, Gentoo Linux is the standard. Standardization on a single platformallows organizations to keep the cost sufficiently low, but also offers the advantage that these solutionsmight be specific for the platform, rather than having to look for solutions that must support a multitudeof platforms. Of course, the choice of picking Gentoo Linux here might seem weird - why not CentOS(as that has a possible commercial backing towards RedHat Enterprise Linux when needed)?
• First of all - the author is a Gentoo Linux developer. Its the distribution he know the best.
But in light of a (fictional) company, it might also be because its current (fictional) engineers areall Gentoo Linux developers, or because it has ties with regional Gentoo Linux supporting services.In light of many organizations, when there is choice between Linux distributions, one thing toconsider is which distribution the engineers are most likely to work with. Alright, asking them willprobably result in some heavy fighting to see which distribution is best (perhaps the Condorcetmethod [https://en.wikipedia.org/wiki/Condorcet_method] can be used to find the best selection),but picking a distribution the engineers are less eager to support will result in bad administrationanyhow.
• The reason to use CentOS (RHEL) could be to have certified hosting of certain products whichare only supported on RHEL (or similar). However, because the focus here is to use free softwaresolutions, this is no requirement. But it is understandable that companies that do run proprietarysoftware choose a distribution that is supported by their vendors.
• Gentoo Linux offers a fairly flexible approach on supported features. Thanks to a good balance ofUSE flags, servers and services can be installed that offer just those services that are needed, withoutany additional dependencies or features that need to be disabled (in order to secure the services)anyhow. This leads to somewhat better performance, but also to a saving in storage requirements,patching frequency, etc. Gentoo is also quite fast in adopting new technologies, which might helpthe business stand out against the other competitors.
• Gentoo uses rolling upgrades. That might not seem like a good way in enterprises, but it is. Ifan organization is doing things right, it is already distributing and rolling out patches and minorupgrades regularly. With Gentoo, this process is a bit more intrusive (as it might contain largerchanges as well) but because the administrators are used to it, it is very much under control.As a result, whereas other organizations have to schedule large (expensive and time-consuming)upgrades every 3 to 5 years, Gentoo just moves along...
• Gentoo has a subproject called Gentoo Hardened who strives to provide, implement and supportsecurity-improving patches on the base system. This project has always been a fore-runner insecurity-related risk mitigation strategies.
Of course, because this book is called "A Gentoo Linux Advanced Reference Architecture", it wouldbe weird to have it talk about another distribution, wouldn't it?
Now, the selection of Gentoo Linux also has a few challenges up its sleeve.
• Gentoo Linux is primarily a source-based distribution, which is frequently frowned upon in theenterprise market. Weirdly enough, enterprises don't find it strange that their development andoperational teams keep on building frameworks and tools themselves because of lack of good tools.This is exactly where Gentoo Linux outshines the others: it offers many tools out-of-the-box tosupport every possible requirement.
To reduce the impact of its source-only stigma, a chapter in this book is dedicated to the use of buildservers and binhost support for improved manageability.

Platform selection
8
• Because of its source-based nature, it also provides all the tools for malicious users to build exploitson the server itself.
It is fairly easy to hide the compiler or at least have some group-based access control on it. Butregardless of that - the moment a malicious user has (shell) access to a system, the system is screwedanyhow. It is fairly easy to transfer files (even full applications) towards the system then.
To reduce possible impact here, a Mandatory Access Control system should be used which isolatesprocesses and even users, confining them to just what they need to get their job done.
As architecture, focusing only on the x86_64 architecture (amd64) is beneficial, partially because itis the widest known in the Gentoo Linux development community, but also because its hardware iswidely available and sufficiently cheap. It is also a processor architecture that is constantly evolvingand has many vendors working on it (less monopolizing strategies) which makes it a better platformfor consumers in my opinion.
That being said, this might be a good time to use a no-multilib approach in Gentoo Linux. Systemsneed to be fully x86_64 driven, partially for standardization as well, but also to make debugging easier.The fewer special cases that need to be thought about, the faster problems can be resolved. Generallythough, this gives little (to no) additional advantage towards a multilib profile.
Basic OS - the requirementsWhen positioning an operating system platform such as Gentoo Linux, quite a few aspects alreadyneed to be considered in its design. It isn't sufficient to just create an image (or installation procedure)and be done with it. Basic services on operating systems need to be considered, such as backup/restoreroutines, updates & upgrades, etc. Most of the infrastructure needed to accomplish all that will betalked about further.
Services
When managing multiple servers, some sort of centralized services are needed. This doesn't require adaemon/server architecture for all services though, as will be seen later on.

Platform selection
9
Figure 2.1. Services for an operating system platform
The mentioned services on the above drawing are quite basic services, which will need to be properlymanaged in order to get a well functioning environment.
Access management servicesAccess management services include:
• Authentication (is the user indeed that user)
• Authorization (is that user allowed to do the requested activity)
• Auditing (what do we need to keep track of the users' actions)
In Gentoo Linux, the most probable component for authenticating users on the operating system levelis OpenSSH. But in order to properly provide access services, not only the OpenSSH daemon itself islooked on, but also the centralized access management services (which will be OpenLDAP based).
Authorization on the operating system level is handled through the Linux DAC (Discretionary AccessControl) and MAC (Mandatory Access Control) services. The DAC support is the most well-known.For MAC, we can use SELinux (Security Enhanced Linux).
Monitoring servicesMonitoring services are used, not really to be informed when a service is down, but rather to quicklyidentify what is causing a service failure.
Service failures, like "I cannot resolve IP addresses" or "The web site is not reachable" are difficult todebug when lacking monitoring. Proper monitoring implementations allow to get an idea of the entirestate of the architecture and its individual components. If monitoring sais that the web server processes

Platform selection
10
are running and that remote web site retrieval agents are still pulling in site details, then there is mostlikely an issue with the connectivity between the client and the site (such as potential proxy servers oreven networking or firewalls). On the other hand, if the monitoring shows that a web gateway daemonis not responsive, it is fairly easy to handle the problem as it is quite obvious where the problem lies.
Backup services
Although backups are not important, being able to restore stuff is - hence the need for backups ;-)
Even on regular servers, backups will be important to support fast recovery from human errorsor application malpractices. Users, including administrators, make mistakes. Being able to quicklyrecover from deleted files or modifications will save hours of work later.
Configuration management
In order to properly update/upgrade the systems, as well as configure it to match the needs of theorganization, some configuration management approach is needed. Whereas smaller deploymentscan be perfectly managed manually, decent configuration management allows to quickly deploy newsystems, reconfigure systems when needed, support testing of configuration changes, etc.
Compliance management
In order for a system to be and remain secure, it is important to be able to validate configurations(compliance validation) as well as be able to scan systems for potential vulnerabilities and create aninventory of installed software. In this reference architecture, SCAP (Security Content AutomationProtocol) services will be used supported through OpenSCAP.
Distributed resource management
In order to support automation tasks across multiple systems, JobScheduler services are used. Thisallows to combine tasks to automate more complex activities across systems.
ArchitectureIn this reference architecture, the given services will be filled in with the following components.

Platform selection
11
Figure 2.2. Components for operating system platform
The activities involved with those components are described in the next few sections.

Platform selection
12
Flows and feedsA regular system has the following data flows enabled:
1. Backup data is sent to the backup environment; the volumes of backups can be quite large, so takecare to schedule backups during proper time windows.
2. Logging data is sent towards a central log server, or a log collector.
Backup data
Backups can be quite large, and thus take a lot of network bandwidth. Depending on the backupmethod, it might also have performance impact on the server.
For these reasons, it is recommended that backups are scheduled outside the important activitywindows.
Figure 2.3. Backup (cannot be more simpler than this ;-)
Often, full backups taken every day are not optimal. Most backup solutions support full backup,differential backup (changes since last full or differential) and incremental backup (changes since lastbackup, regardless of type). The backup scheme then decides what to backup when, optimizing thebackup volumes while keeping restore durations in mind.
• Taking full backups every time requires large volumes, but restore of the data is rather quick (asno other backup set needs to be consulted).
• Taking a single full backup and then incremental backups requires small volumes (except for thefirst full of course), but restore of the data will take some time as potentially all incremental backupsets need to be consulted
A possible backup scheme would be to
• take a full backup on Saturday night
• take a differential backup on Tuesday night
• take incremental backups on the other dates

Platform selection
13
Also, keep in mind how long backups need to be retained. Backups might want to be kept for 1 month(around 4 full backups + remainder), but it might also be interesting to keep the first full backup ofevery month for an entire year, and the first full of each year (almost) eternally. It all depends on theretention requirements and pricing concerns (lots of backups requires lots of storage).
Logging data
Logging data is usually sent from the system logger (syslog) towards a central server. A central serveris used as this allows to correlate events from multiple systems, as well as keep log managementcentral.
Figure 2.4. Log flows from server to central log server
The system logger receives its events from the /dev/log socket (well, there are a few other sourcesas well, but /dev/log is the most prominent one) from the various daemons. The local system loggeris then configured to send the data to the central log server, and depending on the administrators'needs, locally as well.
If local logs are needed, make sure that the logs are properly rotated (using logrotate and a regularcron job).
Administration
To administer the system (and the components hosted on it), OpenSSH (for access to the system) andPuppet (for managing configuration settings) are used.

Platform selection
14
Figure 2.5. Operating system administration
Standard operator/administrator access to the operating system is handled through the SSH secureshell. The OpenSSH daemon will be configured to use a central user repository for its authenticationof users. This allows administrators to, for instance, change their password on a single system andensure that the new password is then in use for all other systems as well. The SSH client is configuredto download SSH fingerprints from the DNS server in case of a first-time connection to the server.
The configuration management will be handled through Puppet, whose configuration repository willbe managed through a version-controlled system and pulled from the systems.
Monitoring
Systems (and the components and services that are hosted further) will be monitored through Icinga.

Platform selection
15
Figure 2.6. Operating system monitoring
The Icinga agent supports various plugins that allow to monitor various aspects of the operating systemand the services that run on it. The results of each "query" is then sent to the central Icinga database.The monitoring web interface, which is discussed later, interacts with the database to visually representthe state of the environment.
OperationsConsidering this is a regular platform (with no additional services on yet), there is no specificoperations defined yet.
UsersFor the user management on a Linux system, a central LDAP service for the end user accounts (andadministrator accounts) is used. The functional accounts though (the Linux users under which daemonsrun) are defined locally. This ensures that there is no dependency on the network or LDAP for thoseservices. However, for security reasons, it is important that these users cannot be used to interactivelylog on to the system.
The root account, which should only be directly used in case of real emergencies, should have a verycomplex password managed by a secured password management application.
End users are made part of one or more groups. These groups define the SELinux user assigned tothem, and thus the rights they have on the system (even if they need root rights, their actions will belimited to those tasks needed for their role).
SecurityAdditional services on the server are
• compliance validation using openscap
• inventory assessment using openscap
• auditing through the Linux auditd daemon (and sent through the system logger for immediatetransport)
• host-based firewall using iptables (and managed through Puppet)

Platform selection
16
• integrity validation of critical files
Compliance validation
To support a central compliance validation method, we use a local SCAP scanner (openscap) andcentrally manage the configurations and results. This is implemented in a tool called pmcs (Poor ManCentral SCAP).
Figure 2.7. Running compliance (and inventory) validation
The communication between the central server and the local server is HTTP(S) based.
Inventory management
As SCAP content is used to do inventory assessment, pmcs is used here as well.
Auditing
Auditing on Linux systems is usually done through the Linux audit subsystem. The audit daemon canbe configured to provide auditing functionalities on various OS calls, and most security consciousservices are well able to integrate with auditd.
The important part still need to be covered is to send the audit events to a central server. The systemlogger is leveraged for this, and auditd configured to dispatch audit events to the local syslog.
Host-based firewall
A host-based firewall will assist in reducing the attack space towards the server, ensuring that network-reachable services are only accessed from (more or less) trusted locations.
Managing host-based firewall rules can be complex. We use the Puppet configuration managementservices to automatically provide the necessary firewall rules automatically.

Platform selection
17
Integrity validation of critical files
Critical files on the system are also checked for (possibly unwanted) manipulations. AIDE (AdvancedIntrusion Detection Environment) can be used for this.
In order to do offline scanning (so that malicious software inside the host cannot meddle with theintegrity validation scans) snapshotting is used on storage level and scanning is done on the hypervisor.
Pluggable Authentication ModulesAuthentication management (part of access management) on a Linux server can be handled by PAM(Pluggable Authentication Modules). With PAM, services do not need to provide authenticationservices themselves. Instead, they rely on the PAM modules available on the system. Each servicecan use a different PAM configuration if it wants, although most of the time authentication is handledsimilarly across services. By calling PAM modules, services can support two-factor authenticationout-of-the-box, immediately use centralized authentication repositories and more.
PAM provides a flexible, modular architecture for the following services:
• Authentication management, to verify if a user is who it says it is
• Account management, to check if that users' password has expired or if the user is allowed to accessthis particular service
• Session management, to execute certain tasks on logon or logoff of a user (auditing, mounting offile systems, ...)
• Password management, offering an interface for password resets and the like
Principles behind PAMWhen working with PAM, administrators quickly find out what the principles are that PAM workswith.
The first one is back-end independence. Applications that are PAM-aware do not need to incorporateany logic to deal with back-ends such as databases, LDAP service, password files, WS-Securityenabled web services or other back-ends that have not been invented yet. By using PAM, applicationssegregate the back-end integration logic from their own. All they need to do is call PAM functions.
Another principle is configuration independence. Administrators do not need to learn how to configuredozens of different applications on how to interact with an LDAP server for authentication. Instead,they use the same configuration structure provided by PAM.
The final principle, which is part of the PAM name, is its pluggable architecture. When new back-endsneed to be integrated, all the administrator has to do is to install the library for this back-end (by placingit in the right directory on the system) and configure this module (most of the modules use a singleconfiguration file). From that point onward, the module is usable for applications. Administrators canconfigure the authentication to use this back-end and usually just need to restart the application.
How PAM worksApplications that want to use PAM link with the PAM library (libpam) and call the necessary functionsthat reflect the above services. Other than that, the application does not need to implement any specificfeatures for these services, as it is all handled by PAM. So when a user wants to authenticate itselfagainst, say, a web application, then this web application calls PAM (passing on the user id and perhapspassword or challenge) and checks the PAM return to see if the user is authenticated and allowedaccess to the application. It is PAMs task underlyingly to see where to authenticate against (such asa central database or LDAP server).

Platform selection
18
Figure 2.8. Schematic representation of PAM
The strength of PAM is that everyone can build PAM modules to integrate with any PAM-enabledservice or application. If a company releases a new service for authentication, all it needs to do isprovide a PAM module that interacts with its service, and then all software that uses PAM can workwith this service immediately: no need to rebuild or enhance those software titles.
Managing PAM configurationPAM configuration files are stored in /etc/pam.d and are named after the service for which theconfiguration applies. As the service name used by an application is often application-specific, youwill need to consult the application documentation to know which service name it uses in PAM.
Important
As the PAM configuration file defines how to authenticate users, it is extremely importantthat these files are very difficult to tamper with. It is recommended to audit changes on thesefiles, perform integrity validation, keep backups and more.
Next to the configuration files, we also have the PAM modules themselves inside /lib/securityor /lib64/security. These locations are often forgotten by administrators to keep track of, eventhough these locations are equally important as the configuration files. If an attacker can overwritemodules or substitute them with his own, then he also might have full control over the authenticationresults of the application.

Platform selection
19
Important
As the PAM libraries are the heart of the authentication steps and methods, it too is extremelyimportant to make it very difficult to tamper with. Again, auditing, integrity validation andbackups are seriously recommended.
The PAM configuration files are provided on a per-application basis, although one applicationconfiguration file can refer to other configuration file(s) to use the same authentication steps. Let'slook at a PAM configuration file for an unnamed service:
auth required pam_env.soauth required pam_ldap.so
account required pam_ldap.so
password required pam_ldap.so
session optional pam_loginuid.sosession required pam_selinux.so closesession required pam_env.sosession required pam_log.so level=auditsession required pam_selinux.so open multiplesession optional pam_mail.so
Notice that the configuration file is structured in the four service domains that PAM supports:authentication, account management, password management and session management.
Each of the sections in the configuration file calls one or more PAM modules. For instance,pam_env.so sets the environment variable which can be used by subsequent modules. The returncode provided by the PAM module, together with the control directive (required or optional in theabove example), allow PAM to decide how to proceed.
required The provided PAM module must succeed in order for the entire service (such asauthentication) to succeed. If a PAM module fails, other PAM modules are stillcalled upon (even though it is already certain that the service itself will be denied).
requisite The provided PAM module must succeed in order for the entire service to succeed.Unlike required, if the PAM module fails, control is immediately handed back andthe service itself is denied.
sufficient If the provided PAM module succeeds, then the entire service is granted. Theremainder of the PAM modules is not checked. If however the PAM module fails,then the remainder of the PAM modules is handled and the failure of this particularPAM module is ignored.
optional The success or failure of this particular PAM module is only important if it is theonly module in the stack.
Chaining of modules allows for multiple authentications to be done, multiple tasks to be performedupon creating a session and more.
Configuring PAM on the systemIn order to connect the authentication of a system to a central LDAP server, the following lines needto be added in the /etc/pam.d/system-auth file (don't replace the file, just add the lines):
auth sufficient pam_ldap.so use_first_passaccount sufficient pam_ldap.sopassword sufficient pam_ldap.so use_authtok use_first_passsession optional pam_ldap.so

Platform selection
20
Also install the sys-auth/pam_ldap (and sys-auth/nss_ldap) packages.
A second step is to configure pam_ldap.so. For /etc/ldap.conf, the following template canbe used. Make sure to substitute the domain information with the one used in the environment:
suffix "dc=genfic,dc=com"
bind_policy softbind_timelimit 2ldap_version 3nss_base_group ou=Group,dc=genfic,dc=comnss_base_hosts ou=Hosts,dc=genfic,dc=comnss_base_passwd ou=People,dc=genfic,dc=comnss_base_shadow ou=People,dc=genfic,dc=compam_filter objectclass=posixAccountpam_login_attribute uidpam_member_attribute memberuidpam_password exopscope onetimelimit 2uri ldap://ldap.genfic.com/ ldap://ldap1.genfic.com ldap://ldap2.genfic.com
Secondly, /etc/openldap/ldap.conf needs to be available on all systems too:
BASE dc=genfic, dc=comURI ldap://ldap.genfic.com:389/ ldap://ldap1.genfic.com:389/ ldap://ldap2.genfic.com:389/TLS_REQCERT allowTIMELIMIT 2
Finally, edit /etc/nsswitch.conf so that other services can also use the LDAP server (next tocentral authentication):
passwd: files ldapgroup: files ldapshadow: files ldap
Learning more about PAMMost, if not all PAM modules have their own dedicated manual page.
$ man pam_env
Other information is easily available on the Internet, including:
• the Linux PAM project at http://www.linux-pam.org/
• the PAM System Administration Guide at http://linux-pam.org/Linux-PAM-html/Linux-PAM_SAG.html
Gentoo HardenedTo increase security of the deployments, all systems in this reference architecture will use a GentooHardened deployment. Within the Gentoo Linux community, Gentoo Hardened is a project thatoversees the research, implementation and maintenance of security-oriented projects in Gentoo Linux.It focuses on delivering viable security strategies for high stability production environments and istherefor absolutely suitable for this reference architecture.
Within this book's scope, all services are implemented on a Gentoo Hardened deployment with thefollowing security measures in place:
• PaX

Platform selection
21
• PIE/PIC/SSP
• SELinux as MAC
• grSecurity kernel improvements
The installation of a Gentoo Hardened system is similar to a regular Gentoo Linux one. All necessaryinformation can be found on the Gentoo Hardened project page.
PaXThe PaX project (part of grSecurity) aims to update the Linux kernel with defense mechanisms [http://pax.grsecurity.net/docs/pax.txt] against exploitation of software bugs that allow an attacker access tothe software's address space (memory). By exploiting this access, a malicious user could introduceor execute arbitrary code, execute existing code without the applications' intended behavior, or withdifferent data than expected.
One of the defence mechanisms introduced is NOEXEC. With this enabled, memory pages of anapplication cannot be marked writeable and executable. So either a memory page contains applicationcode, but cannot be modified (kernel enforced), or it contains data and cannot be executed (kernelenforced). The enforcement methods used are beyond the scope of this book, but are described online[http://pax.grsecurity.net/docs/noexec.txt]. Enforcing NOEXEC does have potential consequences:some applications do not work when PaX enforces this behavior. Because of this, PaX allowsadministrators to toggle the enforcement on a per-binary basis. For more information about this, seethe Hardened Gentoo PaX Quickstart document (see resources at the end of this chapter). Note thatthis also requires PIE/PIC built code (see later).
Another mechanism used is ASLR, or Address Space Layout Randomization. This thwarts attacks thatneed advance knowledge of addresses (for instance through observation of previous runs). With ASLRenabled, the address space is randomized for each application, which makes it much more difficult toguess where a certain code (or data) portion is loaded, and as such attacks will be much more difficultto execute succesfully. This requires the code to be PIE built.
To enable PaX, the hardened-sources kernel in Gentoo Linux needs to be installed and configuredaccording to the instructions found on the Hardened Gentoo PaX Quickstart document. Also installpaxctl.
# emerge hardened-sources# emerge paxctl
PIE/PIC/SSPThe given abbreviations describe how source code is built into binary, executable code.
PIC (Position Independent Code) is used for shared libraries to support the fact that they are loadedin memory dynamically (and without prior knowledge to the addresses). Whereas older methodsuse load-time relocation (where address pointers are all rewritten the moment the code is loadedin memory), PIC uses a higher abstraction of indirection towards data and function references. Bybuilding shared objects with PIC, relocations in the text segment in memory (which contains theapplication code) are not needed anymore. As such, these pages can be marked as non-writeable.
To find out if there are libraries that still support text relocations, install the pax-utils package andscan the libraries for text relocations:
# emerge pax-utils$ scanelf -lpqtTEXTREL /opt/Citrix/ICAClient/libctxssl.so
In the above example, the libctxssl.so file is not built with PIC and as such could be more vulnerableto attacks as its code-containing memory pages might not be marked as non-writeable.

Platform selection
22
With PIE (Position Independent Executables) enabled, executables are built in a fashion similar toshared objects: their base address can be relocated and as such, PaX' ASLR method can be put in effectto randomize the address in use. An application binary that is PIE-built will show up as a shared objectfile rather than an executable file when checking its ELF header
$ readelf -h /bin/ls | grep Type Type: DYN (Shared object file)
$ readelf -h /opt/Citrix/ICAClient/wfcmgr.bin | grep Type Type: EXEC (Executable file)
SSP finally stands for Stack Smashing Protection. Its purpose is to add in additional buffers aftermemory allocations (for variables and such) which contain a cryptographic marker (often called thecanary). When an overflow occurs, this marker is also overwritten (after all, that's how overflowswork). When a function would return, this marker is first checked to see if it is still valid. If not, thenan overflow has occurred and the application is stopped abruptly.
Checking PaX and PIE/PIC/SSP resultsIf the state of the system needs to be verified after applying the security measures identified earlier,install paxtest and run it. The application supports two modes: kiddie and blackhat. The blackhattest gives the worst-case scenario back whereas the kiddie-mode runs tests that are more like theones script-kiddies would run. The paxtest application simulates certain attacks and presents plausibleresults to the reader.
A full explanation on the tests ran can be found in the /usr/share/doc/paxtest-*/READMEfile.
# emerge paxtest# paxtest blackhat
PaXtest - Copyright(c) 2003,2004 by Peter Busser <[email protected]>Released under the GNU Public Licence version 2 or later
Writing output to paxtest.logIt may take a while for the tests to completeTest results:PaXtest - Copyright(c) 2003,2004 by Peter Busser <[email protected]>Released under the GNU Public Licence version 2 or later
Mode: blackhatLinux hpl 3.1.6-hardened #1 SMP PREEMPT Tue Dec 27 13:49:05 CET 2011 \ x86_64 Intel(R) Core(TM) i5 CPU M 430 @ 2.27GHz GenuineIntel GNU/Linux
Executable anonymous mapping : KilledExecutable bss : KilledExecutable data : KilledExecutable heap : KilledExecutable stack : KilledExecutable shared library bss : KilledExecutable shared library data : Killed...Writable text segments : Killed
These tests will try to write data and then execute it. The tests do this in different locations to verifyif the memory protection measures are working. Killed means that it works as the attempt is stopped.
Executable anonymous mapping (mprotect) : KilledExecutable bss (mprotect) : KilledExecutable data (mprotect) : Killed

Platform selection
23
Executable heap (mprotect) : KilledExecutable stack (mprotect) : KilledExecutable shared library bss (mprotect) : KilledExecutable shared library data (mprotect): Killed
These are virtually the same tests as before, but now the application first tries to reset or change theprotection bits on the pages using mprotect.
Anonymous mapping randomisation test : 33 bits (guessed)Heap randomisation test (ET_EXEC) : 13 bits (guessed)Heap randomisation test (PIE) : 40 bits (guessed)Main executable randomisation (ET_EXEC) : No randomisationMain executable randomisation (PIE) : 32 bits (guessed)Shared library randomisation test : 33 bits (guessed)Stack randomisation test (SEGMEXEC) : 40 bits (guessed)Stack randomisation test (PAGEEXEC) : 40 bits (guessed)
The randomisation tests try to find out which level of randomisation is put in place. Althoughrandomisation by itself does not offer protection, it obscures the view malicious users have on thememory structures. The higher the randomisation, the better. On Gentoo Hardened, (almost) allbinaries are PIE.
Return to function (strcpy) : paxtest: return address \ contains a NULL byte.Return to function (memcpy) : VulnerableReturn to function (strcpy, PIE) : paxtest: return address \ contains a NULL byte.Return to function (memcpy, PIE) : Vulnerable
These types of attacks are very difficult to thwart by kernel protection measures only. The author ofthe paxtest application has put those in because he can, even though he knows PaX does not protectagainst them. In effect, he tries to show users that PaX is not an all-safe method and that additionalsecurity layers are still important.
SELinux as MACWith a MAC (Mandatory Access Control), the system administrator can control which accesses areallowed and which not, and can enforce that the user cannot override this. Regular access patterns inLinux are discretionary, so the user can define this himself. In this book, SELinux is used as the MACsystem. Another supported MAC in Gentoo Hardened is grSecurity's RBAC model.
Installing and configuring Hardened Gentoo with SELinux is described in the Gentoo SELinuxhandbook. It is seriously recommended to read through this resource a few times, as SELinux is notjust about enabling a feature - it is a change in the security model and requires experience with it.
The SELinux strict policy (so no unconfined domains) is used for regular services, or MCS (withoutunconfined domains) when multi-tenancy support is needed.
$ id -Zstaff_u:staff_r:staff_t
# sestatusSELinux status: enabledSELinuxfs mount: /selinuxSELinux root directory: /etc/selinuxLoaded policy name: strictCurrent mode: enforcingMode from config file: enforcingPolicy MLS status: disabledPolicy deny_unknown status: denied

Platform selection
24
Max kernel policy version: 26
grSecurity kernel improvementsNext to the previously mentioned grSecurity updates, grSecurity also adds in additional kernelprotection measures. This includes additional hardening on chroot jails (to make it a lot more difficultto break out of a chroot) and file system abuse (like getting information from pseudo-filesystems toimprove attacks).
For more information on enabling grSecurity, see the Gentoo grSecurity v2 Guide.
Using IMA and EVMAnother set of security subsystems available in recent Linux kernels are the Integrity MeasurementArchitecture and Extended Verification Modules subsystems.
With IMA, the integrity of files is validated (checksum or digital signature) against the recorded valuein the extended attribute of that file. If the integrity matches, then the system allows to read (and if itisn't a digital signature, even modify) the file. If the checksum doesn't match, then the access to thefile is prohibited.
EVM then ensures that the extended attributes of the file are not tampered with (as it stores the securityinformation from IMA as well as SELinux information). This is accomplished using a HMAC valueor a digital signature of the security related extended attributes. Because of the use of cryptographicmethods, offline tampering of this data is not that simple - the attacker needs access to the key usedby the HMAC or even the private key used for generating the signatures.
For more information on enabling IMA/EVM, see the Gentoo Integrity subproject documentation.
OpenSSHOpenSSH is the most popular secure shell daemon available, and is free software. For remotelymanaging Linux systems, we will use OpenSSH, but this also requires OpenSSH to be set up correctly(and securely).
Key managementProviding secure shells requires keys. In case of an SSH session, a handshake between the client andserver occurs. During this handshake, key information is exchanged.
The server keys are stored in /etc/ssh and are usually generated by the system when OpenSSHis started for the first time.
ssh_host_key This file provides the SSH version 1 (protocol version) RSA private key.SSH version 1 is considered insecure so should no longer be used.
ssh_host_dsa_key This file provides the SSH version 2 DSA private key. DSA (DigitalSignature Algorithm) is a standard for creating digital signatures; everySSH client will support this.
ssh_host_ecdsa_key This file provides the SSH version 2 ECDSA private key. ECDSA(Elliptic Curve DSA) is a recent addition; not all SSH clients support ityet (although the SSH client provided by OpenSSH of course does)
ssh_host_rsa_key This file provides the SSH versino 2 RSA private key. RSA is a marketstandard and thus also very well supported.
SSH also supports client certificates, a popular method for offering a more secure remote shell, aspasswords can be leaked easily (or remembered by the wrong people) whereas SSH keys are a bit moredifficult to memorize ;-) Recent OpenSSH versions also support chaining authentication methods.

Platform selection
25
Securing OpenSSHThere are a few guides available online to secure OpenSSH. Basically, these will recommend to
• disable remote root logon
• enable public key authentication
• enable authentication chaining (first requires public key authentication, then password)
• disable protocol version 1
• enable PAM
Using DNS SSHFP fieldsWhen an SSH client connects to an unknown server, it (depending on the configuration) will warnusers about the server. It presents the SSH finger print (a checksum on the key) to the user, asking theuser to validate that the key is indeed correct. This is needed to prevent a MITM (Man In the Middle)attack. Of course, most users do not check this (and some administrators would not even know howto check it themselves).
# ssh-keygen -l -f /etc/ssh/ssh_host_ecdsa_key256 a1:0b:dd:5b:d0:38:ec:a2:26:fa:c1:74:06:fb:9c:c2 root@hpl (ECDSA)
To simplify this while remaining secure, we can add the SSH finger print data in the DNS records forthe server (in an SSHFP field). The SSH client can then be configured to automatically trust the SSHfingerprint data in the DNS record (and to make it more secure - only when the records are signedproperly through DNSSEC).
The SSHFP record can be generated using ssh-keygen:
# ssh-keygen -r hpl -f /etc/ssh/ssh_host_dsa_keyhpl IN SSHFP 2 1 68da815fa78336cbaf69eacad7b5c9ebf67f518
Logging and auditingTo handle auditing, the Linux audit daemon needs to be configured to send its audit events towardsthe central system logger, which is configured to forward these events as soon as possible to a centrallog server.
System loggingThe syslog protocol is an IETF standard described in RFC5424 [https://tools.ietf.org/html/rfc5424].It offers a standard protocol for submitting log events across services. A log event is labeled with twoimportant codes: the facility and the severity.
The facility defines what service the origin is of a log event. The supported facilities are:
auth security and authorization messages
authpriv security and authorization messages
daemon system daemons
cron system scheduler messages
ftp FTP daemon
lpr printing messages
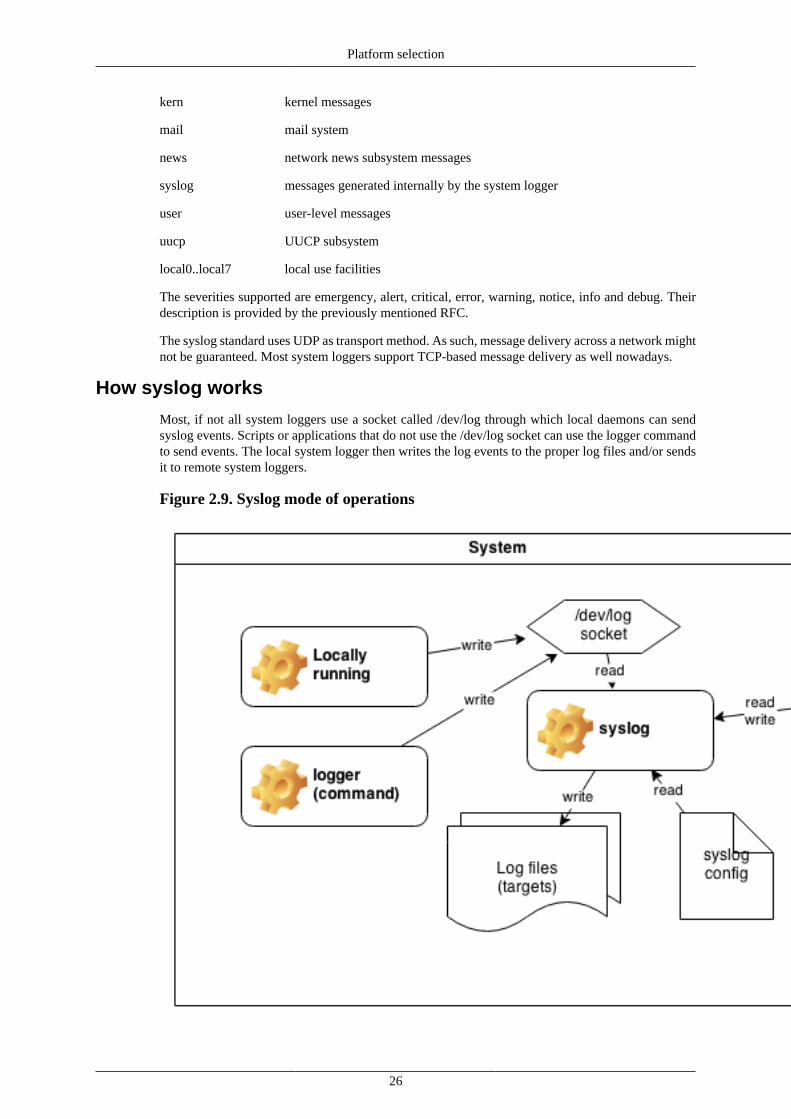
Platform selection
26
kern kernel messages
mail mail system
news network news subsystem messages
syslog messages generated internally by the system logger
user user-level messages
uucp UUCP subsystem
local0..local7 local use facilities
The severities supported are emergency, alert, critical, error, warning, notice, info and debug. Theirdescription is provided by the previously mentioned RFC.
The syslog standard uses UDP as transport method. As such, message delivery across a network mightnot be guaranteed. Most system loggers support TCP-based message delivery as well nowadays.
How syslog works
Most, if not all system loggers use a socket called /dev/log through which local daemons can sendsyslog events. Scripts or applications that do not use the /dev/log socket can use the logger commandto send events. The local system logger then writes the log events to the proper log files and/or sendsit to remote system loggers.
Figure 2.9. Syslog mode of operations

Platform selection
27
System loggers can also be configured to receive syslog events from remote sources.
Balabit Syslog NG
Balabit's syslog-ng (provided through the app-admin/syslog-ng package) allows sending syslog eventsto a remote TCP-bound system logger through the following destination directive:
destination myloghost { tcp("10.5.2.10" port(514));};
Similarly, to have it receive syslog events, the following source directive can be used:
source src { tcp(port(514) keep-alive(yes));};
rSyslog
To enable TCP syslog transmission on rsyslog (provided through the app-admin/rsyslog package):
$RuleSet remote*.* @@10.5.2.10:514
To enable it to receive syslog events:
$ModLoad imtcp$InputTCPServerBindRuleset remote$InputTCPServerRun 514
Auditing
Linux audit daemon interacts with the audit subsystem in the Linux kernel, and stores audit informationin the necessary audit log files. The audit daemon can also dispatch audit events to other systems,including remote audit daemons.
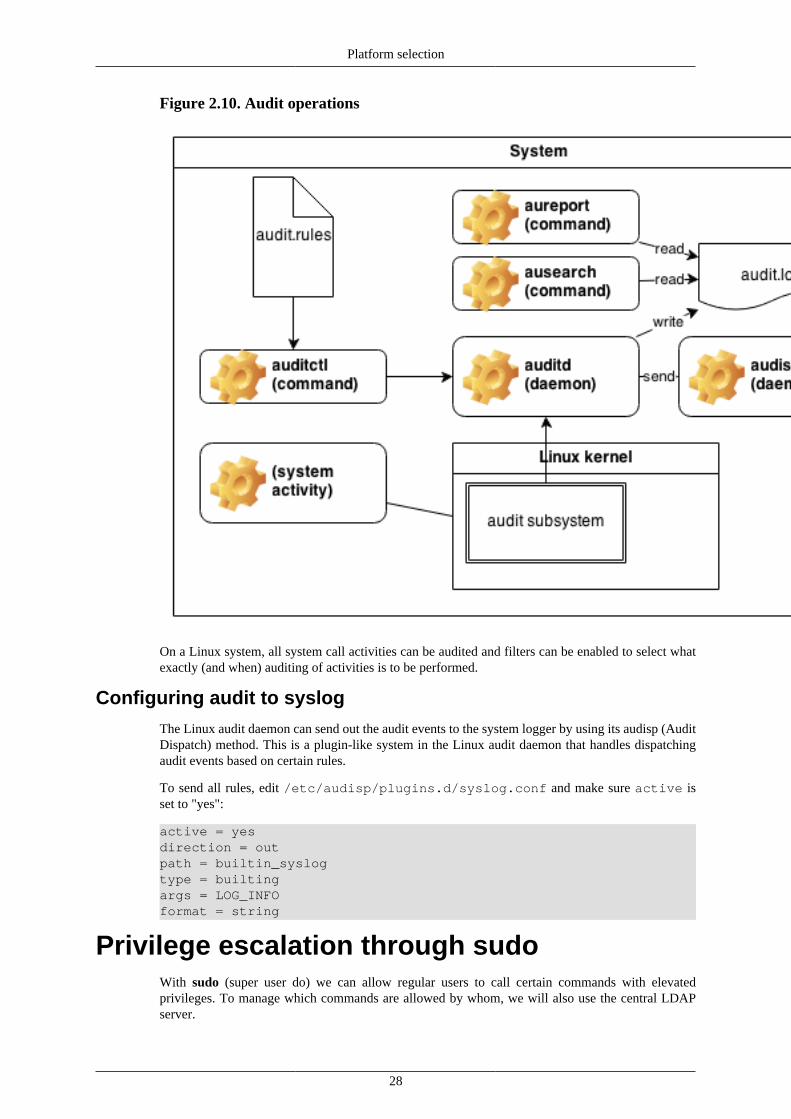
Platform selection
28
Figure 2.10. Audit operations
On a Linux system, all system call activities can be audited and filters can be enabled to select whatexactly (and when) auditing of activities is to be performed.
Configuring audit to syslog
The Linux audit daemon can send out the audit events to the system logger by using its audisp (AuditDispatch) method. This is a plugin-like system in the Linux audit daemon that handles dispatchingaudit events based on certain rules.
To send all rules, edit /etc/audisp/plugins.d/syslog.conf and make sure active isset to "yes":
active = yesdirection = outpath = builtin_syslogtype = builtingargs = LOG_INFOformat = string
Privilege escalation through sudoWith sudo (super user do) we can allow regular users to call certain commands with elevatedprivileges. To manage which commands are allowed by whom, we will also use the central LDAPserver.

Platform selection
29
Centralized sudoers fileTODO
ResourcesFor more information about the topics in this chapter, more information is available at the followingresources...
Gentoo Hardened:
• Hardened Gentoo PaX Quickstart [http://www.gentoo.org/proj/en/hardened/pax-quickstart.xml](Gentoo Linux)
• Gentoo Hardened project page [http://hardened.gentoo.org] (Gentoo Linux)
• Position Independent Code [http://eli.thegreenplace.net/2011/11/03/position-independent-code-pic-in-shared-libraries/] in shared libraries
• Introduction to Position Independent Code [http://www.gentoo.org/proj/en/hardened/pic-guide.xml] (Gentoo Linux)
• Position Independent Executables [http://blog.fpmurphy.com/2008/06/position-independent-executables.html]
• Gentoo SELinux Handbook [http://www.gentoo.org/proj/en/hardened/selinux/selinux-handbook.xml] (Gentoo Linux)
• Gentoo grSecurity v2 Guide [http://www.gentoo.org/proj/en/hardened/grsecurity.xml] (GentooLinux)
• Gentoo Hardened Integrity subproject [http://www.gentoo.org/proj/en/hardened/integrity] (GentooLinux)
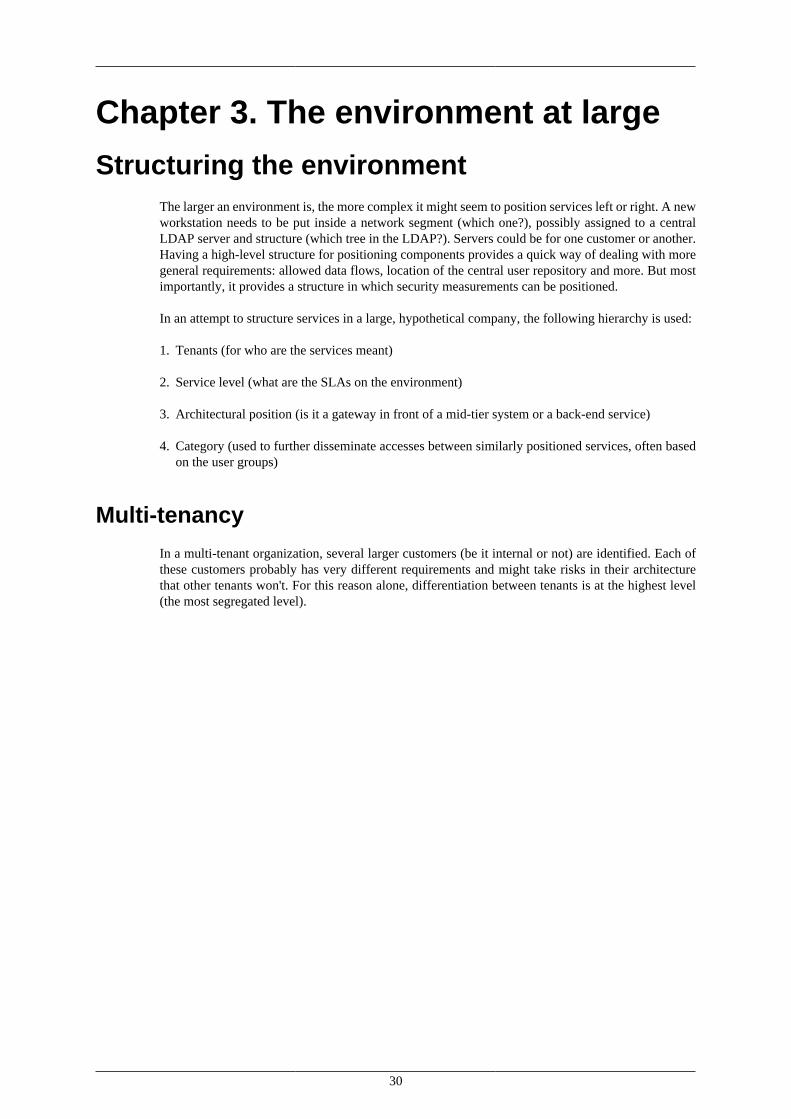
30
Chapter 3. The environment at large
Structuring the environmentThe larger an environment is, the more complex it might seem to position services left or right. A newworkstation needs to be put inside a network segment (which one?), possibly assigned to a centralLDAP server and structure (which tree in the LDAP?). Servers could be for one customer or another.Having a high-level structure for positioning components provides a quick way of dealing with moregeneral requirements: allowed data flows, location of the central user repository and more. But mostimportantly, it provides a structure in which security measurements can be positioned.
In an attempt to structure services in a large, hypothetical company, the following hierarchy is used:
1. Tenants (for who are the services meant)
2. Service level (what are the SLAs on the environment)
3. Architectural position (is it a gateway in front of a mid-tier system or a back-end service)
4. Category (used to further disseminate accesses between similarly positioned services, often basedon the user groups)
Multi-tenancy
In a multi-tenant organization, several larger customers (be it internal or not) are identified. Each ofthese customers probably has very different requirements and might take risks in their architecturethat other tenants won't. For this reason alone, differentiation between tenants is at the highest level(the most segregated level).
The environment at large
31
Figure 3.1. Multi-tenant setup
The most important part here is that anything used within a tenant that might be shared across tenants(such as user ids for administration) is pushed to the tenant, never used directly from the tenanthub. This provides a clean, modular approach to handling tenants. When a tenant wants to leave theorganization, the data flow is stopped and the tenant can continue with its internal architecture (withlittle to no immediate adaptations). When a new tenant enters the organization, data is pushed andconverted towards that tenants' internal services.
Communication between the tenants directly should be done through the external gateways as it isseen as B2B (Business to Business) communication.

The environment at large
32
SLA groups
Larger environments will have different SLA groups. Those could be called "production","preproduction", "testing" and "sandbox" for instance. Smaller organizations might have just two, oreven one SLA group.
Figure 3.2. SLA group structure
The segregation between the SLA groups not only makes proper service level agreements possible onthe various services, but also controls communication flows between these SLA groups.
For instance, communication of data between production and pre-production might be possible, buthas to be governed through the proper gateways or control points. In the above figure, the SLA groupsare layered so direct communication between production and sandbox should not be possible unlessthrough the three gateway levels. However, that is definitely not a mandatory setup.
To properly design such SLA groups, make sure communication flows in either direction (which notonly includes synchronous communication, but also file transfers and such) are properly documentedand checked.
Architectural positioning
The next differentiator is the architectural positioning. This gives a high-level overview of the variousIT services provided by an organization.

The environment at large
33
Figure 3.3. Architectural positioning
At this level, specific data flows are already denied (for instance, direct access from DMZ to theprocessing block). Communication between blocks will still be managed through the next level, whichis the categorization.
Note
Certain flows will also depend on the SLA group. For instance, it might be possible thatinternet access (towards DMZ) will only be allowed for sandbox and production. And thatcommunication to/from mid tier blocks are only allowed within the same SLA group.
Categories
Finally, categories allow for proper flow and communication management between individual blocks.Let's consider end user device communication:

The environment at large
34
Figure 3.4. Example categorization for end user devices, internal workstations
Blocks are not mutually exclusive. For instance, an employees workstation can be both in the networkadministration and infrastructure administration block if it is multi-homed.
Categories are often made based on the users accessing a system. For instance, for mid tierapplication servers, we could have categories for Internet disclosed applications, internal applications,authenticated customer applications, business-to-business (B2B) applications, etc. Segregationbetween those categories helps reduce the risk involved with a potential breach.
Once categories on all architecture blocks are known, then a good IP map, with firewall rules andsegmentation can be defined.

The environment at large
35
Resources

36
Chapter 4. DNS services
DNSSo with the structure (and thus network/IP map) in place the first component up is DNS.
DNS, or Domain Name System, allows resources on the network to be reachable through a human-readable name rather than an obscure ID that is useful for computers and routers. To support human-readable names, a DNS service is positioned which helps in translating these domain names onto IPaddresses and vice versa. But next to the name resolving, DNS infrastructure is also positioned forvarious other purposes.
Figure 4.1. DNS services
For instance, a mail client can interact with the DNS server of a domain to find out where to send e-mails to that are meant for that domain. This information is stored in the MX records of that domain.Recently, standards are emerging to counter e-mail spoofing, like SPF (Sender Policy Framework)and DKIM (DomainKey Identified Mail). In case of SPF, a DNS record tells whoever asks it which(IP) addresses are allowed to be sending e-mail that seems to originate from its domain. Mail serverswill then check this record to see if an incoming e-mail indeed comes from this location and if not,can reject the e-mail. DKIM on the other hand uses digital signatures in the mail itself, where the mailservers then check the signature based on the public key that is stored in a DNS record of the domainthat the mail seems to originate from.
Another example of a service offered by DNS is documenting the SSH finger print of servers. SSHfingerprints are cryptographic hashes of the public key (and some additional information about it) usedby the SSH service of a particular server. This fingerprint can then be added to the DNS server, andusers that connect to an SSH server can verify if the fingerprint they receive is indeed the one expectedto be from that server. If not, then they might be connecting to a malicious server.
Having a well performing DNS architecture is extremely important as many services will rely on DNSto know how to contact other resources: although it is perfectly possible to use IP-only configurations,this is a lot less flexible and less transparent - and with IPv6 this will become even more difficult.Because of that, DNS must definitely be high available. Depending on the size and use, DNS cachingdaemons can be positioned across the network.
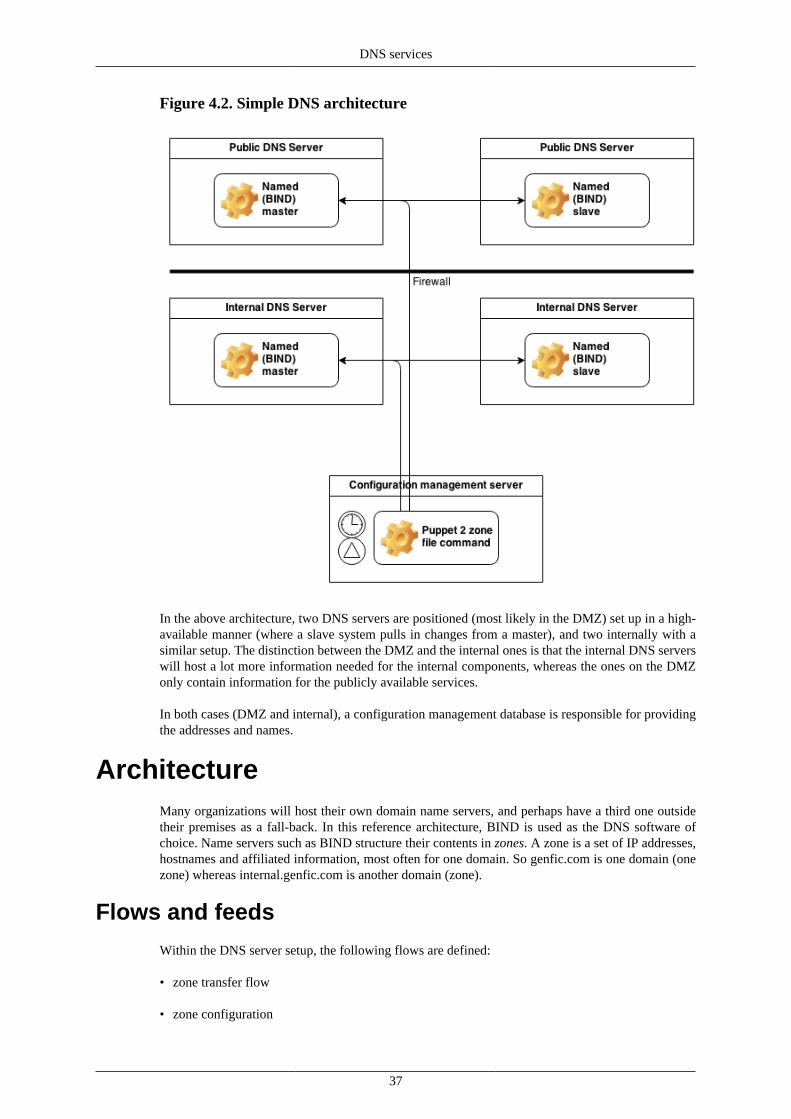
DNS services
37
Figure 4.2. Simple DNS architecture
In the above architecture, two DNS servers are positioned (most likely in the DMZ) set up in a high-available manner (where a slave system pulls in changes from a master), and two internally with asimilar setup. The distinction between the DMZ and the internal ones is that the internal DNS serverswill host a lot more information needed for the internal components, whereas the ones on the DMZonly contain information for the publicly available services.
In both cases (DMZ and internal), a configuration management database is responsible for providingthe addresses and names.
ArchitectureMany organizations will host their own domain name servers, and perhaps have a third one outsidetheir premises as a fall-back. In this reference architecture, BIND is used as the DNS software ofchoice. Name servers such as BIND structure their contents in zones. A zone is a set of IP addresses,hostnames and affiliated information, most often for one domain. So genfic.com is one domain (onezone) whereas internal.genfic.com is another domain (zone).
Flows and feeds
Within the DNS server setup, the following flows are defined:
• zone transfer flow
• zone configuration

DNS services
38
Figure 4.3. Flows and feeds
Zone transfer flow
The zone transfers are to update the slave(s).
Zone configuration
Updates on the zones themselves are triggered through the configuration management service, wherenew (or to be deleted) zones are created and then uploaded towards the name server.
Administration
Administration of the DNS server is done through the configuration management service (Puppet) andmanual operations (SSH).

DNS services
39
Figure 4.4. BIND administration
The configuration for the server (and BIND) is first pulled from the configuration managementrepository (through a git pull, most likely scheduled or triggered by the administrator) after whichthe (re)configuration of BIND is done. This results in updates on the named.conf file. The rndccommand is used to interact with the named daemon itself.
MonitoringThe monitors for BIND should do at least the following checks:
• See if the processes are running (and bound on a reachable interface)
• See if there are any errors mentioned in the logs
• See if the named server returns proper records (check on various types, DNSSEC info, etc.)

DNS services
40
• See if the serial of the master and slave is the same
Figure 4.5. BIND monitoring
Process running and bound to the right interface
Checking if processes are running is a primitive check, but quite important to troubleshoot potentialfailures. The check should also include validation that the processes are bound on reachable interfaces- a named daemon that only runs on localhost is not reachable through the network.
Errors in logs
Validate that there are no errors in the logs, and assign proper procedures when certain, well-knownerrors occur.
Record retrieval
On a remote system, dig can be used to retrieve a set of records and validate that the return value iscorrect (and perhaps also within the time boundaries).
Serial validation
The serial (which is the version of the zone files) should be the same on the master and slave. If thisis not the case, the monitor should check with the previous state (master and slave are allowed to benot synchronized for a very short while) and if that previous state was also showing differences inserial version, then an alert should be raised that the zone transfer between master and slave is mostlikely not working.

DNS services
41
OperationsWhen running, BIND is a fairly simple daemon from an architectural point of view.
Figure 4.6. Standard operation usage of BIND
Network-wise, it interacts with two other services: other BIND servers (for zone transfers) and withstandard clients (for querying the DNS records).
On the system, the interaction is mainly with the system logger (over a socket). The resources that thenamed daemon uses are its configuration (and cryptographic keys if applicable) and its zone files.
UsersDNS services are, by default, anonymous services. Some access controls are often placed to restrictwho can (from a network point of view) query the DNS service or send/receive data from (in case ofpull requests/zone transfers), and more tight access controls (like shared keys) can be used to furtherauthenticate such activities. However, real "users" are not known in the BIND setup.
That being said, the SELinux policy for BIND does provide an administrative interface, supporting thedefinition of roles that are allowed to administer a BIND environment without granting those users fulladministrative access on the system. The interface is called bind_admin and takes two arguments:the user domain allowed access and its role.
bind_admin(<userdomain>, <userrole>)
SecurityDNS services are widely available and are a high-profile target for hackers and malicious persons ororganizations. If someone could change the DNS records for a domain, then it can have users visitdifferent sites (which are made to look like the official site) which might allow the perpetrator to getaccess to authentication credentials, confidential information and more. He only needs to modify theIP address replies that the DNS server would give and have them point to its own website. This iscalled DNS hijacking, and does not only introduce the risk of "spoofed websites", but also changesin e-mail flows (for instance, the malicious user changes the MX records to point to his own e-mailserver so he can watch and even modify e-mail communication to the official domain).
To provide some level of protection against these threats, a number of security changes arerecommended:
• If the registrar supports DNSSEC, then enable DNSSEC on the zones as well. With DNSSEC, theresource records in the zone are digitally signed (by private keys) and that key is signed by theparent domain (hence the need for the registrar and higher-level domains to support it too).

DNS services
42
This provides some additional protection against DNS hijacking, although it is not perfect (endusers must use DNSSEC for their lookups and should have a valid trusted keystore containing theroot DNS server keys).
• Enable SPF (Sender Policy Framework) so that mail servers who receive an e-mail that is supposedto be sent by the official locations (or someone within the environment), then the mail server cancheck the origin address against the SPF records in the DNS to validate if they match or not.
• Enable DKIM (DomainKey Identified Mail) to sign outgoing e-mails and provide the DKIM publickey in the DNS records so DKIM-supporting mail servers can validate the signatures.
• Enable DMARC (Domain-based Message Authentication, Reporting and Conformance) to receivereports on how mails from that domain are treated, as well as identify which protective measuresthe domain takes
DNSSEC
The DNSSEC structure adds in a number of DNS records that help with the authentication of the DNSdata, as well as verification of the integrity of this data. This protects the DNS records from bothhijacking as well as tampering.

DNS services
43
Figure 4.7. DNSSEC overview
The idea is that a record (in the example the record for www.genfic.com) has its various types signed.In the example, two types are provided (A and AAAA), each of these has its own signature in an RRSIG(Resource Record Signature) field. The RRSIG fields are digital signatures made with a private keycalled the ZSK (Zone Signing Key) of which the public key part is available in the zone, in a DNSKEY(DNS public Key) field. This field is also signed by a private key called the KSK (Key Signing Key)also available in a DNSKEY field in the zone.
Now, to verify that the KSK public key is the proper key, it is also signed with the KSK private key, butalso by the zone signing key of the parent domain (in our example, the .com zone). This domain has aDS (Delegation Signer) field in the genfic.com zone record, which contains a hash of the genfic.comKSK public key (the field itself), and this hash is signed through the parent zone RRSIG field.

DNS services
44
In the drawing NSEC (Next Secure) fields are also shown. This "chains" multiple secure records witheach other, providing a way for requestors to make sure a record really does not exist (upon retrievalof a nonexisting record, the DNS server replies with data pointing out that between records 1 and 2,there is no record for the requested one).
Next to NSEC, it is also possible to use NSEC3. NSEC3 covers one of the possible security holesthat NSEC provides: malicious people can "walk" across all the NSECs to get a view of the entirezone. For fully public zones, this is not an issue, but many DNS servers want only to expose a few ofthe records in a zone, and NSEC requires that all records are public. With NSEC3 (DNSSEC HashedAuthenticated Denial of Existence) not the record name itself (like "www") but a hashed value of itis used. This prevents "walking" over the entire zone, while still providing validation that records do(or don't) exist.
SPF - Sender Policy Framework
In SMTP (Simple Mail Transfer Protocol) mail clients need to pass on information about the mailthey are sending. It starts with the HELO (or EHLO) statements, telling the mail server who the clientsystem is, followed by information whom the mail is from (MAIL FROM) and to who the mail shouldbe sent (RCPT TO):
220 mail.internal.genfic.com> HELO relay.internal.genfic.com250 relay.internal.genfic.com Hello relay.internal.genfic.com [10.24.2.3], pleased to meet you> MAIL FROM: <[email protected]>250 [email protected]... Sendor ok> RCPT TO: <[email protected]>250 [email protected]... Recipient ok (will queue)> DATA354 Enter mail, end with "." on a line by itself...
A first check that mail servers (should) do is validate that the fully qualified hostname provided throughthe HELO (or EHLO) commands really comes from that host. If it doesn't, then it is possibly a fakemail. But other than that, there are little checks done to see if the mail is truly sent from and to thosemail boxes.
With SPF mail servers will do one or two more checks:
• the mail server will first check if the host (as provided by the HELO/EHLO) is allowed to sendmails, and
• the mail server will then check if this host is allowed to send mail for the given domain (as providedby the MAIL FROM)
For this to happen, specific fields are added to the host record:
.genfic.com. IN SPF "v=spf1 mx a -all"
.genfic.com. MX 10 relay.internal.genfic.com
relay.internal.genfic.com IN SPF "v=spf1 ip4:10.24.2.3 a -all"relay.internal.genfic.com A 10.24.2.3
The SPF records can be read as:
• Mails sent for the genfic.com domain are allowed to be sent from any system that is defined as anMX record; all others are denied
• The relay.internal.genfic.com system is allowed to send mail (as long as it is really this system,with IP 10.24.2.3).

DNS services
45
DKIM
DKIM (DomainKeys Identified Mail) uses cryptographic signatures on the e-mail (and importantheaders of the e-mail) to provide authenticity on the mail. Mail servers that use DKIM will sign theoutgoing e-mails with a private key (whose public component can be obtained through DNS, on the<hostname>._domainkey.<domain> TXT record). Receiving mail servers can then validatethat the mail they receive, if it has a DKIM signature, has not been tampered with along the way.
A mail can have DKIM signatures of non-authorative domains though (domains that are not relatedto the mail). An extension on DKIM, called ADSP (Author Domain Signing Practices) provides asignature that is authenticated through the same domain as the mail says it is from. If ADSP is used,then an additional TXT record exists that informs recipients of this. Recipients should check this fieldto see if they should find a proper DKIM signature (from that domain) or not.
This TXT record is for _adsp._domainkey.<domain>.
DMARC
DMARC (Domain-based Message Authentication, Reporting and Conformance) is used to informother systems how to treat non-conformance (if mails are not according to the SPF requests, or DKIMsignatures are missing, or...). This information is available through the _dmarc.<domain> recordand uses tags (similar to SPF).
.genfic.com TXT "v=DMARC1 p=quarantine pct=20 rua=mailto:[email protected] sp=r aspf=r"
The above record tells other parties that:
• If mails fail the DKIM/SPF checks (generally called the DMARC checks), then 20% of those mailsshould be quarantined. Daily reports are sent to [email protected]
• The policy for subdomains (sp) is relaxed
• The alignment mode for SPF (aspf) is related
BINDOn the Internet, Berkeleys Internet Name Domain (BIND) server is the most popular DNS server todate. It has been plagued by its set of security issues, but is still very well supported on Gentoo (andother) platforms. The software was originally developed at Berkeley in the early 80s in an open sourcemodel. Since 2010, the software is maintained by the Internet Systems Consortium.
Because it has such a large history, it has also seen quite a few updates and even rewrites. The currentmajor version (BIND 9) is a rewrite that was tailored to answer the various secrity-related concerns thatcame from earlier versions. Sadly, even BIND 9 has seen its set of security vulnerabilities. Althougha new major is in the making (BIND 10) it is not made generally available for production use yet.
From records to viewsFor DNS, the smallest set of information it returns is called a record. Records are grouped together indomains, and domains are grouped in zones. Within a record, there are 6 fields (including the name ofthe record and the type). In the next few sections, the syntax as used by BIND is described althoughthe concepts are the same for other DNS servers.
Record structure
When an IP address for a host name is declared, this actually maps on a DNS record:
www IN A 192.168.0.2

DNS services
46
This record states that, within the domain that this record is a part of, that 'www.<domain>' resolvesto 192.168.0.2. Type type of the record here is A. An IPv6 address would result in a AAAA record.
mail IN AAAA 2001:db8:10::1
For the same host, there can be multiple records as long as they are of a different type (and don't makethe definitions ambiguous).
www IN A 192.168.0.2 IN AAAA 2001:db8:10::1
There are many record types available (and more are being defined every few years). For instance:
• CNAME which says that the given host name is an alias for another record
• LOC provides location information for servers
• SSHFP gives the SSH finger print information for a server
etc...
Domains
Multiple records are combined within a domain.
; Comments are prepended with a semi-colon$TTL 24h ; If records do not hold TTL information themselves, use this as default$ORIGIN internal.genfic.com. ; Domain that is defined here@ 1D IN SOA ns1.internal.genfic.com. hostmaster.genfic.com. ( 2013020401 ; serial 3H ; refresh 15 ; retry 1w ; expire 3h ; minimum ) IN NS ns1.internal.genfic.com. ; in the domain
In the above example, the @ sign is shorthand for the domain ($ORIGIN).
The first record in the domain declaration is the SOA record, and after this record there is an NS record.
Zone
One (or more) domains (and their affiliated records) are stored in a zone file. A zone is a specificspace within the global Domain Name System that is managed (administered) by a single authority.Other DNS servers might also serve the same zone, but they will not be marked as the authoritativeDNS service for that zone.
View
A view is not DNS specific, but a feature that many DNS servers offer. A view uses different zone filesdepending on the requestor. For instance, a DNS server might serve both Internet-originating requestsas well as internal requests. Internet-originating requests thus need to receive the Internet-facing IPaddresses as replies, but internal requests can use internal IP addresses.
public-host$ dig +short @ns1.genfic.com www.genfic.com A123.45.67.89intern-host$ dig +short @ns1.genfic.com www.genfic.com A10.152.20.12

DNS services
47
Deployment and usesConfiguring BIND on Gentoo Linux is fairly similar as configuring BIND on other platforms. Thereare plenty of good and elaborate resources on BIND configuration on the Internet, some of which arementioned at the end of this chapter.
Installing bind
First, install net-dns/bind. An overview of the USE flags used here is shown as well as output of theequery command.
# equery u bind[ Legend : U - final flag setting for installation][ : I - package is installed with flag ][ Colors : set, unset ] * Found these USE flags for net-dns/bind-9.9.2_p1: U I - - berkdb : Adds support for sys-libs/db (Berkeley DB for MySQL) + + caps : Use Linux capabilities library to control privilege + + dlz : Enables dynamic loaded zones, 3rd party extension - - doc : Adds extra documentation (API, Javadoc, etc). It is recommended \ to enable per package instead of globally - - filter-aaaa : Enable filtering of AAAA records over IPv4 - - geoip : Add geoip support for country and city lookup based on IPs - - gost : Enables gost OpenSSL engine support - - gssapi : Enable gssapi support - - idn : Enable support for Internationalized Domain Names + + ipv6 : Adds support for IP version 6 - - ldap : Adds LDAP support (Lightweight Directory Access Protocol) - - mysql : Adds mySQL Database support - - odbc : Adds ODBC Support (Open DataBase Connectivity) - - postgres : Adds support for the postgresql database - - python : Adds optional support/bindings for the Python language - - rpz : Enable response policy rewriting (rpz) - - rrl : Response Rate Limiting (RRL) - Experimental - - sdb-ldap : Enables ldap-sdb backend + + ssl : Adds support for Secure Socket Layer connections - - static-libs : Build static libraries + + threads : Adds threads support for various packages. Usually pthreads + + urandom : Use /dev/urandom instead of /dev/random + + xml : Add support for XML files
# emerge net-dns/bind net-dns/bind-tools# rc-update add named default
Initial configuration
The configuration below is meant for a master DNS server.
Start with /etc/bind/named.conf:
options { directory "/var/bind"; pid-file "/var/run/named/named.pid"; statistics-file "/var/run/named/named.stats"; listen-on { 127.0.0.1; }; listen-on-v6 { 2001:db8:81:21::ac:98ad:5fe1; }; allow-query { any; };

DNS services
48
zone-statistics yes; allow-transfer { 2001:db8:81:22::ae:6b01:e3d8; }; notify yes; recursion no; version "[nope]";};
# Access to DNS for local addresses (i.e. genfic-owned)view "local" { match-clients { 2001:db8:81::/48; }; recursion yes; zone "genfic.com" { type master; file "pri/com.genfic"; }; zone "1.8.0.0.8.b.d.0.1.0.0.2.ip6.arpa" { type master; file "pri/1.8.0.0.8.b.d.0.1.0.0.2.ip6.arpa"; };};
That's it. The configuration will have this installation work as the master DNS server and will(only) accept DNS requests from IPv6 addresses within the defined IP range. For these requests, thepri/com.genfic file is used (which is the "zone" file that will contain the DNS records) andpri/1.8.0.0.8.b.d.0.1.0.0.2.ip6.arpa for the reverse lookups.
The name of the reverse lookup is fairly difficult to work with by people. For this reason, create asymbolic link that makes this a lot easier:
# ln -s 1.8.0.0.8.b.d.0.1.0.0.2.ip6.arpa genfic.com.inv
This way, <domain>.inv is a symbolic link pointing to the reverse lookup zone definition.
For the slave server, the setup is fairly similar:
• do not set the allow-transfer though. It is a slave server.
• set the type of the zone's to "slave" instead and add in masters{ 2001:db8:81:21::ac:98ad:5fe1; } to each zone. That will tell BIND what the masterof this particular zone is.
• on the slave, set the named_write_master_zones SELinux boolean to "on" so that thenamed_t domain can write to the cache location.
Finally, set the initial zone files for the organization.
# cat /var/bind/pri/com.genfic$TTL 1h ;$ORIGIN genfic.com.@ IN SOA ns.genfic.com. ns.genfic.com. ( 2012041101 1d 2h 4w 1h )
IN NS ns.genfic.com. IN NS ns2.genfic.com. IN MX 10 mail.genfic.com. IN MX 20 mail2.genfic.com.

DNS services
49
genfic.com. IN AAAA 2001:db8:81:80::dd:13ed:c49e;ns IN AAAA 2001:db8:81:21::ac:98ad:5fe1;ns2 IN AAAA 2001:db8:81:22::ae:6b01:e3d8;www IN CNAME genfic.com.;mail IN AAAA 2001:db8:81:21::b0:0738:8ad5;mail2 IN AAAA 2001:db8:81:22::50:5e9f:e569;; (...)
# cat /var/bind/pri/com.genfic.inv$TTL 1h ;@ IN SOA 1.8.0.0.8.b.d.0.1.0.0.2.ip6.arpa ns.genfic.com. ( 2012041101 1d 2h 4w 1h )
IN NS ns.genfic.com. IN NS ns2.genfic.com.
$ORIGIN 1.8.0.0.8.b.d.0.1.0.0.2.ip6.arpa.
1.e.f.5.d.a.8.9.c.a.0.0.0.0.0.0.1.2.0.0 IN PTR ns.genfic.com.8.d.3.e.1.0.b.6.e.a.0.0.0.0.0.0.2.2.0.0 IN PTR ns2.genfic.com.; (...)
With the configuration done, start the named daemon.
# run_init rc-service named start
Hardening zone transfers
The BIND system can get additional hardening by introducing transaction signatures (TSIG). To do so,create a shared secret (key) with dnssec-keygen. The generated key is then added to the named.conffile like so:
# dnssec-keygen -a HMAC-MD5 -b 128 -n HOST secundary# cat Ksecundary.*.keysecundary. IN KEY 512 3 157 d8fhe2frgY24WFedx348==
(... In named.conf ...)key secundary { algorithm hmac-md5; secret "d8fhe2frgY24WFedx348=="; };
(... In named.conf's zone definition ...)allow-update { key secundary; };
In the slave's configuration, add in an entry for the master and refer to this key as well.
(... In named.conf ...)key secundary { algorithm hmac-md5; secret "d8fhe2frgY24WFedx348=="; };server 2001:db8:81:21::ac:98ad:5fe1 { keys { secundary; }; };
It is not possible to use the TSIG together with an IP address list though, so either use the keys or useIP addresses (or use the keys and define local firewall rules).
Hardening DNS records (DNSSEC)
To use DNSSEC, first create two keypairs. One is the KSK (Key Signing Key) and is a long-termkeypair. It will be used to sign the ZSKs (Zone Signing Keys) used for the zones. ZSKs are used to

DNS services
50
sign most DNS records, whereas the KSK is used to sign the ZSK. It is also the KSK which is signedby the "higher-level" domain.
# cd /var/named/chroot/etc/bind# mkdir keys && cd keys# dnssec-keygen -a RSASHA256 -b 2048 -3 genfic.com# dnssec-keygen -a RSASHA256 -b 2048 -3 -fk genfic.com# chown -R named:named .
Next, update the BIND configuration to use these keys. Below is an updated named.conf file withhighlights where changes were made:
options { directory "/var/bind"; pid-file "/var/run/named/named.pid"; statistics-file "/var/run/named/named.stats"; listen-on { 127.0.0.1; }; listen-on-v6 { 2001:db8:81:21::ac:98ad:5fe1; }; allow-query { any; }; zone-statistics yes; allow-transfer { 2001:db8:81:22::ae:6b01:e3d8; }; notify yes; recursion no; version "[nope]"; dnssec-validation yes; dnssec-lookaside auto; dnssec-enable yes; key-directory "/etc/bind/keys"; allow-new-zones yes;};view "local" { match-clients { 2001:db8:81::/48; }; recursion yes; zone "genfic.com" { type master; file "pri/genfic.com"; inline-signing yes; auto-dnssec maintain; }; zone "1.8.0.0.8.b.d.0.1.0.0.2.ip6.arpa" { type master; file "pri/genfic.com.inv"; inline-signing yes; auto-dnssec maintain; };};
include "/etc/bind/bind.keys";
Make sure that the named daemon has write access to the zone files (both through the SELinuxnamed_write_masters_zone boolean as well as regular Linux permissions) as it will save thesigned records next to the regular file.
With these changes made, restarting the named daemon enables DNSSEC support.
Using bindThe bind server is started and managed through its init script.

DNS services
51
# run_init rc-service named start
Validating configurations
The installed utilities can help troubleshoot configuration issues.
The named-checkconf tool will verify the syntax of the named.conf file and report any issues itfinds.
With named-checkzone, the syntax of the zone files can be validated.
Checking named results
A good tool to query name servers (to make sure they function correctly) is dig.
To see if the name server is up and running:
# ping6 -n -c 1 ns.genfic.com
If the host resolves (locally) and replies, then at least the local network is working. Now query thename server itself, asking for the IP address of mail.genfic.com:
# dig @ns.genfic.com mail.genfic.com AAAA
To get a reverse lookup, use -n -x:
# dig -x 2001:db8:81:22::ae:6b01:e3d8 @ns.genfic.com
If the output of dig is not needed, but just the answer, add in "+short".
# dig mail.genfic.com AAAA @ns.genfic.com +short2001:db8:81:21:0:b0:738:8ad5
Sending DNSSEC DS Records to the parent domain
When the DNS service provides DNSSEC, the Delegation Signer information should be uploaded tothe parent domain service. This DS record will then be stored in the parent zone, and thus get its owndigital signature so clients can check the validity of the key. To push the DS records, generate thoseusing dnssec-dsfromkey against the KSK:
# grep key-signing *.keyK1.8.0.0.8.b.d.0.1.0.0.2.ip6.arpa.+008+41569.key:; This is a key-signing key, \ keyid 41569, for 1.8.0.0.8.b.d.0.1.0.0.2.ip6.arpa.Kgenfic.com.+008+51397.key:; This is a key-signing key, keyid 51397, for \ genfic.com# dnssec-dsfromkey Kgenfic.com.+008+51397.keygenfic.com. IN DS 51397 8 1 B23D4D54B971A2A835A31B2B1AF24AB43E2C8EA2genfic.com. IN DS 51397 8 2 323F009E2B952F3247DC78BA85AA38A9C798B5FE129A78935CCC4686 \ C5F02A14
These records (the first is a SHA1 checksum of the DNSKEY and owner information, the secondone a SHA256 checksum of the same data) can now be submitted to the registrar. Some support anautomated way to handle this, others still require to send it manually. Just make sure it is sent securely- not that the information is private, but if the registrar doesn't take proper measures to make sure it isan authoritative figure handing over the DS records, then the entire idea of a secure DNS falls down.
Refreshing DNSSEC Zone Signing Keys
While creating the keys, dnssec-keygen supports timing information to allow for proper roll-overof the zone signing keys. This information includes a publication date (when will the new key be

DNS services
52
published in the DNS records, even if the key is not used yet), activation date (when will the newkey be used to sign records), inactivation date and deletion date. When refreshing the zone keys, theDS records do not need to be resubmitted (as those are made against the key-signing key, not zone-signing key).
When made available, run rndc loadkeys genfic.com to reload the keys for the genfic.com domain.
What if the key signing keys are refreshed? In that case, send over the new DS records to the parentdomain. It is better to do double-signing when refreshing KSK versus using roll-over periods for ZSK,as the KSK only signs one record (the DNSKEY one) whereas the ZSK signs many more records.Double-signing would increase the amount of records immensely in case of the ZSK.
Pushing changes
Changes to BIND can be pushed using the nsupdate application. Make sure the system from whichit is run has the proper rights in BIND (through the allow-update directive). Once set up though,it can be used to create the feed from, for instance, a configuration management database.
$ cat changes.txtserver 2001:db8:81:21::ac:98ad:5fe1 53update add mail2.internal.genfic.com 3600 AAAA 2001:db8:81:22::50:5e9f:e569$ nsupdate ./changes.txt
LoggingIn case of DNS services, the following events should probably be logged:
• queries made against the DNS server (timestamp, source address, query itself) and the answers given
• modifications made on the configuration (timestamp, source address, modification)
Whereas the logging of the queries can be done in local log files, modifications need to be sent to aremote location (and might be stored locally too) for audit purposes.
Configuring logging
BIND by default will log through the system logger. This allows to store the logging informationwhere needed, perhaps even moving the data towards other systems.
However, BIND does not log queries immediately - it needs to be told to do so through the querylogcommand:
# rndc querylog
Once enabled, queries will appear in the system log like so:
Dec 17 09:15:30 ns named[3721]: client 2001:db8:81:21:0:ac:98ad:5fe1#48818 \ (mail.genfic.com): view local: query: mail.genfic.com IN AAAA +ED \ (2001:db8:81:21:0:ac:98ad:5fe1)Dec 17 09:16:07 ns named[3721]: client 2001:db8:81:21:0:ac:98ad:5fe1#54273 \ (ns2.genfic.com): view local: query: ns2.genfic.com IN AAAA +ED \ (2001:db8:81:21:0:ac:98ad:5fe1)
In the above case, the queries came from the same client (one with IPv6 address ending in :5fe1) andthe client wanted to know the IPv6 addresses of mail.genfic.com and ns2.genfic.com.
ResourcesIP addresses, segmentation and IPv6:

DNS services
53
• Design Secure Network Segmentation Approach [http://www.sans.org/reading_room/whitepapers/hsoffice/design-secure-network-segmentation-approach_1645], article on SANS
• IPv6 Addressing [http://ipv6.com/articles/general/IPv6-Addressing.htm] (IPv6.com)
On ISC BIND:
• BIND [http://en.gentoo-wiki.com/wiki/BIND] (Gentoo-wiki.com)
• DNS BIND Zone Transfers and Updates [http://www.zytrax.com/books/dns/ch7/xfer.html](Zytrax.com); this is part of a bigger and interesting reference on BIND9 on Linux/Unix systems.
• Transaction Signatures Configuration [http://www.cyberciti.biz/faq/unix-linux-bind-named-configuring-tsig/] (Cyberciti.biz)
• CISecurity BIND Benchmark [http://benchmarks.cisecurity.org/en-us/?route=downloads.show.single.bind.200] (CISecurity.org)
• DNSSEC validation with dig [http://backreference.org/2010/11/17/dnssec-verification-with-dig/](backreference.org)
• DNSSEC HOWTO [https://www.nlnetlabs.nl/publications/dnssec_howto/] (nlnetlabs.nl)

54
Chapter 5. DHCP services
DHCPDHCP stands for Dynamic Host Configuration Protocol and is the de-facto standard for dynamic IPallocation. The basic premise is that a client, who does not know what IP address it has (or shouldhave), asks it to the DHCP server. The flow used is shown in the next figure.
Figure 5.1. Standard DHCP flow
Initially, the client does not know where the server is, so it broadcasts the DHCP discover requeston the entire subnet. Network administrators will configure the routers on each subnet to forward theDHCP related messages to the proper server (actually enable a DHCP relay function in the router -forwarding alone is not sufficient), or can deploy DHCP Relay services in the subnet separate fromthe router.
DHCP has a few advanced usages as well though.
Bootstrap Protocol
The Bootstrap Protocol (BOOTP) allows for a client to obtain not only IP address information, butalso images that the client should download and boot. Unlike DHCP itself, which is usually triggeredwhen the operating system on the client has already booted, BOOTP is meant to be executed beforean operating system is loaded. Historically, BOOTP was created for diskless systems, but this featureis still used often.
One of the situations where BOOTP can come in handy is to create bare metal backups of desktops. Bydefault, the DHCP/BOOTP server does not pass any information back, and all desktops or workstationsget no reply to the BOOTP requests and thus boot further into their operating system. But when a bare

DHCP services
55
metal backup (or restore) needs to be executed, the administrator toggles the BOOTP server. When theworkstation reboots, it now receives the necessary information from the BOOTP server, downloadsan autonomous operating system image (such as a Linux OS with imaging software on it, such asPartImage) and performs the backup (or restore) operation that the administrator has configured.
After backing up the file, the workstation is rebooted and the BOOTP server becomes silent again,allowing the workstation to continue to boot regularly.
Various DHCP options
DHCP servers can pass on additional options to the clients, which are used to configure other serviceson the client. These options have unique integer as identifiers.
Most of these options are to point the client to other centralized services, such as the syslog server touse (28), NTP Server (47-49), mail server (69) and more. If both server and clients are fully controlledby the organization, additional custom options can be used to configure systems further.
ArchitectureThe basic setup shown further uses a high-available architecture where the DHCP services keep trackof the leases granted to the systems, as well as balance free IP addresses between the two DHCPservers. This allows, if a network split occurs, that each DHCP service can act independently as ithas its own pool of free IP addresses, and has knowledge of the lease state of all currently assignedaddresses.

DHCP services
56
Figure 5.2. Standard HA architecture for DHCP
Important
Make sure that the two DHCP servers have their time synchronized, so the use of an NTPservice for both systems is seriously recommended.
Flows and feeds
No flows or feeds are identified as of yet.
Administration
To administer DHCPd, a configuration management tool (puppet) is used to update configurations.Regular operations on the DHCP daemon (stopping/starting) is done through the standard Unixservices.

DHCP services
57
Figure 5.3. Administering DHCPd
MonitoringTo monitor DHCP operations, log events need to be captured. This allows the monitoring infrastructureto follow up on the IP pool balance.
On regular times, the following log entries will be shown with the current balancing information:
Oct 24 09:33:21 src <at> intranet dhcpd: pool 8124898 total 759 free 238 backup 266 lts -14Oct 24 09:33:32 src <at> intranet dhcpd: pool 8124898 total 759 free 237 backup 266 lts -14
In the above example, from a pool with currently 759 IP addresses, 237 are not assigned and "owned"by the server while the backup server has 266 IP addresses free. The lts parameter (which stands for"leases to send") tells that the system is to receive 14 leases (negative number) in order to balancethe available IP addresses.

DHCP services
58
Other monitoring is of course
Operations
In standard operation mode, the DHCP daemon receives requests and updates from DHCP relayservices (or directly from servers in the same subnet). Any activity is logged through the system logger,who forwards the events to the log server for further processing.
An NTP service is explicitly mentioned on the drawing as time synchronisation is very important forthe fail-over setup of the DHCP service.

DHCP services
59
Figure 5.4. Operational flows and activities on DHCP service

DHCP services
60
UsersThe DHCP daemon is an anonymous service; no users are defined beyond the administrators (onoperating system level).
SecurityISC DHCP is a popular components, so exploits are not that hard to find against older versions.
Make sure that the DHCP service is running on the latest patch level, and is properly hardened.
ISC DHCPWhen you have systems that require dynamically allocated IP addresses, you will need a DHCPservice.
Installation and configurationThe installation and configuration of DHCP is fairly simple and, similar to BIND, uses flat files forits configuration.
Installation
First install the DHCP server.
# emerge dhcp
Do the same on the relay servers.
Next, edit /etc/conf.d/dhcpd to configure the DHCP daemon to use IPv6.
# cat /etc/conf.d/dhcpdDHCPD_OPTS="-6"
Master DHCP server
On the master DHCP server, configure the /etc/dhcp/dhcpd.conf file similar to the following:
# cat /etc/dhcp/dhcpd.confddns-update-style interim;
authorative;
default-lease-time 600;max-lease-time 7200;
server-identifier adhcpp.internal.genfic.com;failover peer "dhcp-ha" { primary; split 128; mclt 3600; address 2001:db8:81:e2::fe12; # This server port 519; peer address 2001:db8:81:e4::822f; # Secondary server peer port 519; max-response-delay 60; max-unacked-updates 10;

DHCP services
61
load balance max seconds 3;};
# Shared part
subnet6 2001:db8:81:e2::/64 { range6 2001:db8:81:e2::f00 2001:db8:81:e2::fff; option dhcp6.name-servers 2001:db8:81:21::ac:98ad:5fe1, \ 2001:db8:81:22::ae:6b01:e3d8; option dhcp6.domain-search "workstation.internal.genfic.com";}
subnet6 2001:db8:81:21::/64 { # Empty but must be declared so DHCPd starts}
It is also possible to have the DHCP server provide a fixed IP address to a system based on its MACaddress. This is handled through the host parameter:
group { use-host-decl-names on;
host la00010 { hardware ethernet "e8:0c:11:31:9f:0b"; fixed-address la00010.workstation.internal.genfic.com; option host-name "la00010"; }}
Finally, start the service and register it to automatically start during boot.
# rc-update add dhcpd default# rc-service dhcpd start
On the secondary server, the failover part of the configuration would look like so:
server-identifier adhcps.internal.genfic.com;failover peer "dhcp-ha" { secondary; address 2001:db8:81:e4::822f; # This server port 519; peer address 2001:db8:81:e2::fe12; # Primary server peer port 519; max-response-delay 60; max-unacked-updates 10; load balance max seconds 3;};
The remainder of the configuration file is the same as on the master.
Relay services
To configure a relay service, edit /etc/conf.d/dhcrelay and set the DHCRELAY_OPTSaccordingly.
# cat /etc/conf.d/dhcrelayDHCRELAY_OPTS="-6 -l eth0 -u 2001:db8:81:21::f4:3303:40f4%eth0 -u \ 2001:db8:81:22::5f:3853:fe78%eth0"
Also edit /etc/init.d/dhcrelay as it forces two options that are only valid for IPv4:

DHCP services
62
# vim /etc/init.d/dhcrelay(... 1. look for $(printf " -i %s" ${IFACE}) and delete it ...)(... 2. look for DHCRELAY_SERVERS and remove it ...)(... End result should be something like:)start-stop-daemon --start --exec /usr/sbin/dhcrelay \ -- -q ${DHCRELAY_OPTS}
Then start up the relay service and make sure it starts at boot time as well.
# rc-update add dhcrelay default# rc-service dhcrelay start
LoggingFor the DHCP service, log entries are sent to the system logger.
ResourcesOn ISC DHCP:
• High-available DHCP with failover [http://www.madboa.com/geek/dhcp-failover/] (IPv4 only)(Madboa.com)

63
Chapter 6. Certificates and PKIWhy it is needed
Now that some of the basic network services have been installed, it is time to look at certificatemanagement.
Certificates are used to either authenticate people or clients to a service, or to support encryption ofdata sent across the network. For small networks, administrators usually create self-signed certificates,but the problem with self-signed certificates is that every client that wants to communicate with aservice using a self-signed certificate needs to include this certificate in its trust store, and that theowner of the certificate usually does not keep track of when the certificate is about to expire.
How do certificates workAssume there are two parties (Alice and Bob are the two names often used in encryption fields) willingto communicate with each other over a secured, encrypted channel. They generally need to use anencryption key which only those two parties know. Once they have such an encryption key, they canuse it to communicate with each other securely:
• because they are the only two with the key, others cannot decrypt the information being sent betweenthe two
• because no-one else has the key, each of those parties is certain that information received from theother one is indeed from the other party (as it would otherwise not be properly encrypted)
• if the data stream also contains time stamp information (or challenge information) the parties canalso ascertain that the information is "fresh" and not resent from a previous communication betweenthe two
The major difficulty comes from getting a "shared" encryption key without having to send it over the(clear) network so that a malicious person (Carol or Charles, let's use the gender-neutral "Chris" ;-)cannot obtain it.
Symmetric keys
Most secure communication uses a symmetric key, often called a session key.
A symmetric key is an encryption key which is used for encryption and decryption. In the previousexample of a secure communication, the symmetric key is the secret encryption key that the two parties(and only those two parties) should have a hold off. Such a symmetric key is usually used with analgorithm that is fairly simple (and thus has good performance) in regard of encryption and decryption.
This good performance requirement is needed because it will be used to encrypt and decrypt all trafficsent between the two services, which can be a fair amount of data. If the encryption and decryptionalgorithms used would be very CPU intensive, the communication would be far too slow (or use toomany resources on the systems).
A way to get both parties to know a common, secret key is to each use a secret set of algorithms (orknown algorithms with secret data sets) which have the property that, whatever order is used to applythe algorithms, the result is always the same. Extremely simple examples are addition or multiplication,but far more complex ones exist as well. A non-mathematical example would be to add in coloredpaint to a pre-agreed color: if you first add in blue and then red, or first red and then blue, the resultis always the same.
In the (very simple) case of addition, both Alice and Bob have a secret and will exchange the resultsof their algorithms:
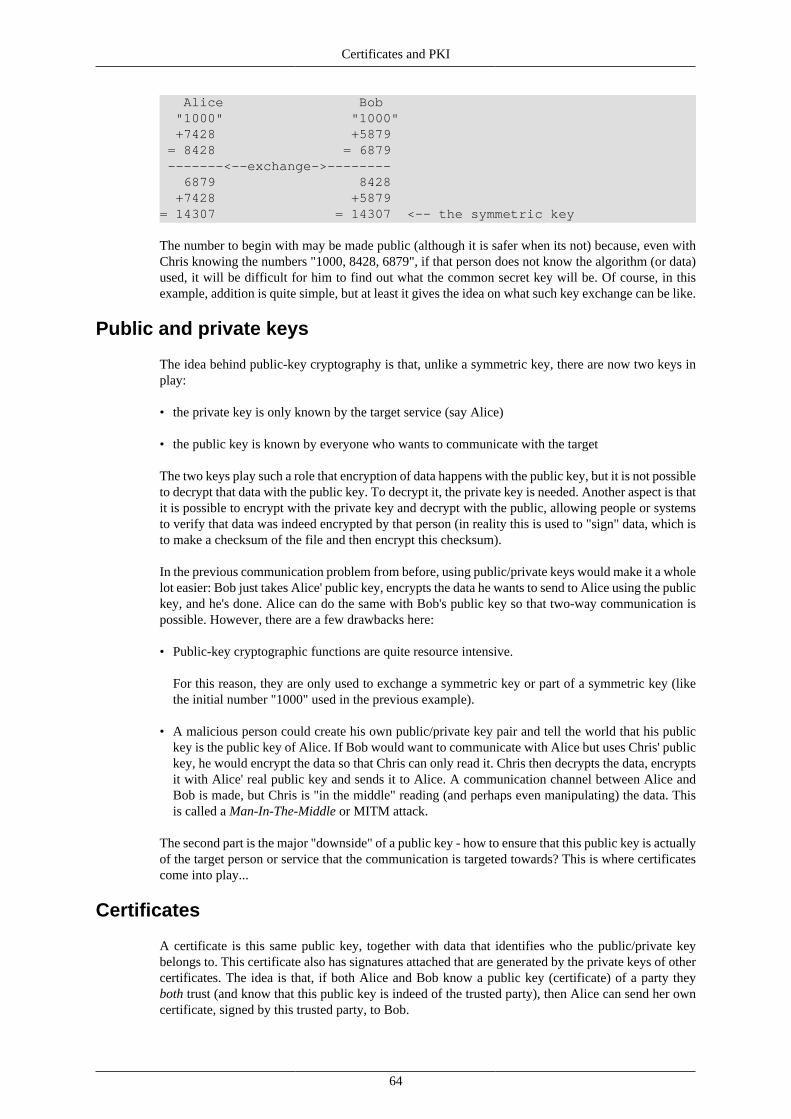
Certificates and PKI
64
Alice Bob "1000" "1000" +7428 +5879 = 8428 = 6879 -------<--exchange->-------- 6879 8428 +7428 +5879= 14307 = 14307 <-- the symmetric key
The number to begin with may be made public (although it is safer when its not) because, even withChris knowing the numbers "1000, 8428, 6879", if that person does not know the algorithm (or data)used, it will be difficult for him to find out what the common secret key will be. Of course, in thisexample, addition is quite simple, but at least it gives the idea on what such key exchange can be like.
Public and private keys
The idea behind public-key cryptography is that, unlike a symmetric key, there are now two keys inplay:
• the private key is only known by the target service (say Alice)
• the public key is known by everyone who wants to communicate with the target
The two keys play such a role that encryption of data happens with the public key, but it is not possibleto decrypt that data with the public key. To decrypt it, the private key is needed. Another aspect is thatit is possible to encrypt with the private key and decrypt with the public, allowing people or systemsto verify that data was indeed encrypted by that person (in reality this is used to "sign" data, which isto make a checksum of the file and then encrypt this checksum).
In the previous communication problem from before, using public/private keys would make it a wholelot easier: Bob just takes Alice' public key, encrypts the data he wants to send to Alice using the publickey, and he's done. Alice can do the same with Bob's public key so that two-way communication ispossible. However, there are a few drawbacks here:
• Public-key cryptographic functions are quite resource intensive.
For this reason, they are only used to exchange a symmetric key or part of a symmetric key (likethe initial number "1000" used in the previous example).
• A malicious person could create his own public/private key pair and tell the world that his publickey is the public key of Alice. If Bob would want to communicate with Alice but uses Chris' publickey, he would encrypt the data so that Chris can only read it. Chris then decrypts the data, encryptsit with Alice' real public key and sends it to Alice. A communication channel between Alice andBob is made, but Chris is "in the middle" reading (and perhaps even manipulating) the data. Thisis called a Man-In-The-Middle or MITM attack.
The second part is the major "downside" of a public key - how to ensure that this public key is actuallyof the target person or service that the communication is targeted towards? This is where certificatescome into play...
Certificates
A certificate is this same public key, together with data that identifies who the public/private keybelongs to. This certificate also has signatures attached that are generated by the private keys of othercertificates. The idea is that, if both Alice and Bob know a public key (certificate) of a party theyboth trust (and know that this public key is indeed of the trusted party), then Alice can send her owncertificate, signed by this trusted party, to Bob.

Certificates and PKI
65
Figure 6.1. Certificates and CAs in a nutshell
Bob then validates the signature on this certificate (using the public key he has of the trusted party). Ifthe signature indeed pans out, then Bob verifies if the certificate isn't in the list of revoked certificates(which is managed by the Certificate Authority). If that isn't the case, then Bob knows that thecertificate he got is indeed from Alice (because the trusted party says so) and of which the private keyis not known to be lost or stolen (otherwise it would have been mentioned in the revocation list).
The list of certificates that are trusted (the certificates of the Certificate Authority) are stored in a truststore.
A malicious person now has a more difficult task. If a wrong certificate is generated, then the trustedparty will probably not sign it. As a result, Chris cannot "fake" a certificate because both Alice andBob will check the signature of the certificate and the certificate revocation list before they agree thatit is a valid certificate.
Certificates in organizations
In a larger organization or network, certificates play an important role. Many servers use SSL (orTLS) encryption. In this case, the client connects to the server and receives that servers' certificateinformation. The client validates this certificate with the keys he has of trusted "authorative" actors. Ifthe certificate is valid, then the client knows he is communicating with the correct service. Some magicoccurs then to generate a session key only the client and the server know (isearch on the internet for "sslhandshake pre-master" for the details on this) so they can then use symmetric encryption algorithmsfor the rest of the communication.
If self-signed certificates would be used, then all the clients should have the public keys of all thesesystems in their own list of trusted keys (the trust store), which is a nightmare to manage. Andif this would be managed, why not just keep the symmetric keys then and do not use public keyinfrastructure... It is also possible to have the clients accept self-signed certificates, but then thesesystems are vulnerable for MITM attacks.
Certificates and PKI
66
This is where good certificate management comes into play. Serious organizations need a way to"sign" certificates used in the architecture with a single key (or very limited set of keys) and distributethis (trusted) public key to all the clients. The trust store of these clients is then much smaller.
The service that signs certificates is called the Certificate Authority or CA. Often, a chain of keys isused: a top key called the Root CA which is extremely heavily protected and is used to sign a smallset of subkeys or signing keys. These signing keys are then used to sign the certificates. Often, thesesigning keys have a different purpose (keys for signing certificates that will be used for code signing,keys for signing certificates that will be used for authenticating people or clients, keys for signingcertificates that will be used for internet-facing services, etc.)
Problems with Certificate Authorities
On the Internet, many popular CA services exist, like CACert.org, Verizon, Geotrust, and more. Allthese companies try to become this "trusted party" that others seek and offer signing services: they willsign certificates you create (some of them even generate public/private key pairs if you want). Theseservices try to protect their own keys and only sign certificates from customers they can validate areproper customers (with correct identities).
Although this seems like a valid model, it does have its flaws:
• Such popular services are more likely target for hackers and crackers. Once their keys arecompromised, their public keys should be removed from all trust stores (or, if proper validationof keys against a revocation list is implemented, have these keys available in the revocation list).However, that also means that all certificates used for services that are signed by these companieswill effectively stop working as the clients will not trust the certificates anymore.
• These services have a financial incentive to sign certificates. If they do not do proper validation ofthe certificate requests they get (because "volume" might be more important to them than integrity),they might sign a certificate from a malicious person (who is pretending to be a valid customer).
• The more of these keys that are in the clients' trust store, the more chance that a malicious certificateis seen by the client as valid.
The latter is important to remember. Assume that the clients' trust store has 100 certificates that it"trusts", even though the organization only uses a single one. If a malicious user creates a certificatethat identifies itself as one of your services and gets it signed by one of those 100 CAs, then the clientswill trust the connection if it uses this (malicious) certificate (because it is signed with one of thetrusted keys).
Keeping a lid on CAs
To keep the risk sufficiently low that a malicious certificate is being used, find a CA that is trustedfully, and keep the trust store limited to that CA.
And who else to trust better than yourself ;-)
By using management software for certificates internally, many important activities can be handledwithout having to seek for and pay a large CA vendor:
• Create a CA store
• Sign requests of certificate requests that users have sent in
• Revoke certificates (or at least, signatures made on certificates) for end user certificates that shouldnot be trusted anymore (for instance because they have been compromised)
• Have users create a certificate (in case they don't have the proper tools on their systems, althoughit is not recommend to generate private and public keys on a remote server)
• Have users submit a certificate signing request to the system for processing, and then download thesigned certificate from the site

Certificates and PKI
67
CA service providersIf managing a private CA is seen as a bit too difficult, one can also opt to use an online CA serviceprovider. There are many paid-for service providers as well as free ones. Regardless of the providerchosen, make sure that the internal certificates are only signed by a root certificate authority that isspecific to this environment, and that the provider does not sign certificate requests by others with theroot CA trusted internally.
For this reason, be careful which service provider to choose, and make a clear distinction betweencertificates that will be used internally (not exposed to others) and those that are facing externalenvironments.
Certificate management protocolsThe Online Certificate Status Protocol (OCSP) is a simple protocol that clients can use to checkif a certificate is still valid, without needing to (re)download the Certificate Revocation List (CRL)over and over again and parsing the list. An advantage is that you don't need to expose "all the badcertificates" that you know of (which might be a sort of information leakage) and that clients don'tneed to parse the CRL themselves (as it is now handled on a server level).
ArchitectureTo provide a private CA, openssl will be used as the main interface. The system itself should of coursebe very secure, with an absolute minimum of users having access to the system (and even those usersshould not have direct access to the private key). A mail-driven system is used to allow users to requestsigning of their certificates; the certificate signing requests are stored in a folder where one of thecertificate administrators can then sign the requests and send them back to the client.
Also, an OCSP daemon will be running to provide the necessary revocation validation.
Flows and feedsIn the next picture, the two main flows are shown: the OCSP (to check the validity of a certificate)and mail (with certificate signing request).
Figure 6.2. Flows and feeds for the CA server

Certificates and PKI
68
Administration
Administration-wise, all actions are handled through logons on the system. The usual configurationmanagement services apply (such as using Puppet for general system administration).
Monitoring
An important aspect in the setup is auditing. All CA activities should be properly audited, as well asoperating system activities.
Operations
Figure 6.3. Operations on a CA server
Users
Three roles are identified for CA operations.

Certificates and PKI
69
Figure 6.4. User definitions for CA operations
The first one is the regular system administrator. His job is to keep the system available and hasprivileged access to the system. However, the mandatory access control system in place prevents theadmin from (easily) reaching the private key(s) used by the CA software.
The CA admin has no system privileges, but is allowed to call and interact with the CA tools. TheCA admin can generate new private keys & certificates, sign certificates, etc. However, he too cannotreach the private keys.
The security admin has a few system privileges, but most importantly has the ability to update theMAC policy and read the private keys. The role is not involved in the daily operations though.
SecurityThe mandatory access control in place (SELinux) prevents direct access to the private key. Of course,next to the MAC policy, other security requirements should be in place as well, such as limited roleassignment (only a few people in the organization should be security admin), proper physical securityof the system, etc.
OpenSSL as CAAs CA management software, the presented architecture uses the command line interface of openssl.Although more user friendly interfaces seem to exist, they are either not properly maintained or verydifficult to manage in the long term.
The OpenSSL stack is a very common, well maintained library for handling encryption and encryption-related functions, including certificate handling. Most, if not all Linux/Unix systems have it installed.
Setting up the CA

Certificates and PKI
70
Setting the defaults
The default settings for using OpenSSL are stored in the /etc/ssl/openssl.cnf file. Belowshows a few changes suggested when dealing with CA certificates.
[CA_default]dir = ./genficCAdefault_days = 7305 # 20 years
[req]default_bits = 2048
Setting up the root CA
The root CA is the top-level key, which will be "ultimately trusted". If an HSM device would be used,then this key would be stored in the HSM device itself and never leave. But in case this isn't possible,create a root CA as follows:
# cd /etc/ssl/private# openssl genrsa -des3 -out root-genfic.key 2048
This generates root-genfic.key, which is the private key and will be used as the root key.
Next, create a certificate from this key. In the example, a 20-year lifespan is used. The shorter thelifespan, the faster there is a need to refresh the key stores within the (entire) organization, which canbe a costly activity. However, the longer the period, the more time malicious persons have to get tothe key before a new one is generated.
# openssl req -new -x509 -days 7205 -key root-genfic.key -out root-genfic.crtCountry Name (2 letter code) [AU]:BEState or Province Name (full name) [Some-State]:AntwerpLocality Name (eg, city) []:MechelenOrganization Name (eg, company) [Internet Widgits Pty Ltd]:Gentoo Fictional, Inc.Organizational Unit Name (eg, section) []:Common Name (e.g. server FQDN or YOUR name) []:GenFic Root CAEmail Address []:
This provides the root-genfic.crt file, which is the certificate (public key of the key pair createdbefore, together with identity information and key information). To view the certificate in its glory,use openssl x509:
# openssl x509 -noout -text -in root-genfic.crt
Finally, create the certificate revocation list (which is empty for now):
# mkdir genficCA# touch genficCA/index.txt# echo 01 > genficCA/crlnumber# openssl ca -gencrl -crldays 365 -keyfile root-genfic.key -cert root-genfic.crt \ -out root-genfic.crl
Now put all files in the location(s) as defined in openssl.cnf.
Multilevel (or hierarchical) certificate authorities
In many environments, the root key itself isn't used to sign "end" user (or system) certificates: ahierarchy is established to support a more flexible approach on certificates. Often, this hierarchy is toreflect the use of the certificates (end user certificates, system certificates) and, if the organization hasmultiple companies, these companies often have an intermediate certificate authority. In this example,

Certificates and PKI
71
a simple hierarchy is used: below the root certificate, two signing certificates are used: one for endusers and one for systems.
root CA+- user CA`- system CA
The root certificate (created above) will be stored offline (not reachable through the network, andpreferably in a shut down state or on a HSM device) together with the certificates created for the userand system CA's. This is needed in case these certificates need to be revoked, since the process ofrevoking a certificate (see later) requires the certificate.
To support the two additional CA's, edit openssl.cnf accordingly. Add sections for each CAto support - copy the "[ CA_default ]" settings and edit the directory and other settings wherenecessary. For instance, call them CA_root, CA_user and CA_system to identify the differentcertificate authorities.
Then, create the keys:
# openssl genrsa -des3 -out user-genfic.key 2048# openssl genrsa -des3 -out system-genfic.key 2048
Next, create certificate requests. Unlike the root CA, these will not be signed with the same key, butrather with the root CA key.
# openssl req -new -days 1095 -key user-genfic.key -out user-genfic.csr# openssl req -new -days 1109 -key system-genfic.key -out system-genfic.csr
If the command asks for a challenge password, leave that empty. The purpose of the challengepassword is that, if the certificate is to be revoked, the challenge password needs to be given againas well. This gives some assurance that rogue administrators can't revoke certificates that they don'town, but as we will store the root key offline (rather than keep it available as a service) revocation ofthe certificates requires (physical) access to the keys anyhow.
The .csr files (Certificate Signing Request) contain the public key of the key pair generated, as wellas identity information. Based on the CSR, the root CA will sign and create a certificate:
# openssl ca -name CA_root -days 1095 -extensions v3_ca -out system-genfic.crt \ -infiles system-genfic.csr# openssl ca -name CA_root -days 1109 -extensions v3_ca -out user-genfic.crt \ -infiles user-genfic.csr
Notice that there are different validation periods for the certificates given. This is to support the(plausible) management activities that result when certificates are suddenly expired. If the organization"forgets" that the certificates expire, their user certificates will expire first, and two weeks later thesystem certificates. Not only will this allow the continued servicing of the various systems while theuser CA certificate is being updated, but will also allow the organization to prepare for the system CAupdate in time (since they now have 14 days as they "noticed" that the user CA certificate was expiredand now have time until the system CA certificate expires).
When the certificate signing requests are handled, the genficCA/newcerts directory contains thetwo certificates. This allows for the CA to revoke the certificates when needed.
Finally, copy the signed certificates and prepare the directory structure for the two certificateauthorities as well.
# mkdir genficSystemCA# cd genficSystemCA# touch index.txt# echo 01 > serial# echo 01 > crlnumber

Certificates and PKI
72
# mkdir newcerts crl private# mv ../system-genfic.key private/
Protecting the root CA
As mentioned before, it is good practice to protect the root CA. This can be done by handling thesystem as a separate, offline system (no network connection) although, with the other CAs in place,there is little reason for the root CA to be permanently "available". In other words, it is fine to moveit to some offline medium (and even print it out) and store this in a (very) safe location. For instanceput it on a flash disk (or tape) and put it in a safe (or even better, two flash disks in two safes).
Starting the OCSP Server
OpenSSL has an internal OCSP daemon that can be used to provide OCSP services internally.
One way to start it is in a screen session:
$ screen -S ocsp-server$ cd /etc/ssl/private/genficUserCA$ openssl ocsp -index index.txt -CA user-genfic.crt \ -rsigner user-genfic.crt -rkey private/user-genfic.key \ -port 80Waiting for OCSP client connections..
This way, the OCSP daemon will listen on port 80 and within the screen session called ocsp-server.
If the administrator ever needs to get to this screen session, he can run "screen -x ocsp-server" andhe's attached to the session again.
Of course, an init script for this can be created as well (instead of using screen).
Daily handlingWith the certificate authority files in place, let's look at the daily operational tasks involved withcertificates.
User certificates
A user certificate is used by a person to identify himself towards services. Such certificates can beused to authenticate a user for operating system access, but a more common use of user certificates isaccess towards websites: the user has a key (and certificate) loaded in the browser (or to some storethat the browser has access to, in case the key itself is on a smartcard or other HSM) and sites thatwant the user to identify the user can ask for the user certificate.
A user can create his own key using the following openssl command, and its accompanying certificatesigning request:
# openssl req -newkey rsa:2048 -keyout amber.key -out amber.req
The signing request (.req) is sent to the certificate authority, which then validates and signs the request,generating a signed certificate:
# openssl ca -name CA_user -days 396 -out amber.crt -infiles amber.req
This generates a certificate that is valid for 13 months.
System certificates
System certificates are created similarly to the user certificates, but depending on the system that usesit, the key might not be encrypted (-nodes). Encrypting a private key is a useful measure to protectthe keys more (especially user keys are best used with encryption or on a HSM device with password

Certificates and PKI
73
protection since they are in many cases "mobile"), but not all hosts that need a system certificate candeal with encrypted keys.
# openssl req -newkey rsa:2048 -nodes -keyout w03443ad.key -out w03443ad.req
It is a good practice to use, as e-mail address, the e-mail address of the requestee (or a "shared" e-mailaddress that is known to remain fixed throughout the lifetime of the system). This information is usedlater to send e-mails regarding expiration dates or other important news.
# openssl ca -name CA_system -days 3650 -out w03443ad.crt -infiles w03443ad.req
Listing certificate expirations
To list the expiration date(s) of the certificates signed by a CA, iterate over the files in the newcertslocation, showing the subject and its expiration date:
# openssl x509 -noout -subject -enddate -in 01.pem
Revoking a certificate
Suppose a user reports that his or her private key is lost (or even worse, compromised).
First, find this users' (signed) certificate. Look at the index.txt file within the CA directory to find outwhat number the certificate has, and then use this number for the revocation:
# grep amber genficUserCA/index.txtV ... 23 unknown /C=BE/.../CN=Amber McStone/emailAddress=...# openssl ca -name CA_user -revoke genficUserCA/newcerts/23.pem
As a result, the database is now updated, showing that the certificate itself is revoked. Next, publishthe new certificate revocation list:
# openssl ca -name CA_user -gencrl -out genficUserCA/crl/user-genfic.crl
The resulting certificate revocation list then needs to be published where all users can find it.
Scripted approachDirectly using openssl is prone to errors or to the use of different parameters that might lead toconfusion later. It is advised to use a script or tool that simplifies this.
certcli.sh <command> [<options>] <value>
Command can be one of: -r, --create-root Create a root CA key named <value> -c, --create-child Create a child CA key named <value> -s, --sign-request Sign a certificate request (<value> is input) -R, --create-request Create a key and signing request named <value>.req -x, --revoke Revoke the key matching <value>
Options can be one of: -p, --parent <parent> Use <parent> as the parent key value -o, --output <file> Save resulting file as <file> -v, --valid <days> Number of days that the certificate is valid
For instance, first a root key pair is created, valid for 20 years:
$ sudo certcli.sh -r genfic -v 7300
Next, child key pairs are created - one for system certificates and one for user certificates. Both arevalid for 10 years:

Certificates and PKI
74
$ sudo certcli.sh -p genfic -c genfic-system -v 3650$ sudo certcli.sh -p genfic -c genfic-user -v 3650
New certificates (and key pairs) for systems can be generated from the script itself (by creating a keyand signing request, and then signing):
$ sudo certcli.sh -R /var/db/ca/self/myhostname$ sudo certcli.sh -p genfic-system -s /var/db/ca/self/myhostname.req -o /var/db/ca/self/myhostname.crt
Revoking certificates can be done easily as well:
$ sudo certcli.sh -p genfic-system -x myhostname.internal.genfic.com
SELinux security
With a scripted approach, the certcli.sh script itself can be protected by SELinux mandatory accesscontrol policies, where the policy is designed such that:
• no-one except the security administrator can access the private keys generated
• no-one except the security administrator can update SELinux policies
• no-one except the security administrator can relabel scripts to the ca_cli_t domain (used forcertcli.sh) or relabel files from the private key type (ca_private_key_t)
• system administrators have no direct access to memory or disk devices
Mail serviceTo pull in the certificate signing requests through e-mail, configure fetchmail to pull in the mails, andprocmail to handle the attachments (extract them from the mail and store them in a specific directory).
FetchmailThe fetchmail daemon is provided by the net-mail/fetchmail package. Once installed, create a Linuxsystem user (say "csrpull") with a configuration file similar to the following as ~/.fetchmailrc:
set daemon 60
poll imap.internal.genfic.com protocol IMAP with option interval 1: user "[email protected]" is csrpull here password 'thisIsOneHellOfAPassword' keep ssl mda "/usr/bin/procmail -d %T"
Once created, make sure it is only readable by the csrpull user itself:
$ chmod 0600 /home/csrpull/.fetchmailrc
Finally, start the fetchmail daemon. Don't forget to add it to the default runlevel too.
# run_init rc-service fetchmail start# rc-update add fetchmail default
ProcmailFrom fetchmail, mails that are pulled in will be sent towards procmail, so configure procmail toautomatically extract the certificate signing request files from the mails and drop them in the proper

Certificates and PKI
75
directory (like /home/csrpull/requests). Create a .procmailrc file in the csrpull home directorywith the following content:
CSR_DROP_DIR=$HOME/requests:0c* ^To: [email protected]| munpack -q -C "$CSR_DROP_DIR"
These rules can be made as powerful as necessary. For instance, if the requests don't need to be signedmanually, a procmail recipe can be created that calls the proper script which, after extracting therequest, signs it automatically and sends it back to the sender (or to the address set in the certificateitself).
With this file in place, fetchmail will automatically forward any mails received towards the procmailrecipe, which will then extract the attachment(s) into the requests folder.

76
Chapter 7. High Available File ServerIntroduction
For some applications or services, you will need a high available file server. Although clustering filesystems exist (like OCFS and GFS), in this chapter, we focus on providing a high-available, securefile server based on NFS v4.
Users that are interested in providing network file systems across a heterogenous network of Unix,Linux and Windows systems might want to read about Samba instead.
NFS v4NFS stands for Network File System and is a well-known distributed file system in Unix/Linux. NFS(and its versions, like NFSv2, NFSv3 and NFSv4) are open standards and defined in various RFCs. Itprovides an easy, integrated way for sharing files between Unix/Linux systems as systems that haveaccess to NFS mounts see them as part of the (local) file system tree. In other words, /home can verywell be an NFS-provided, remote mount rather than a locally mounted file system.
ArchitectureNFS at first might seem a bit difficult to master. In the past (NFSv3 and earlier), this might have beentrue, but with NFSv4, its architecture has become greatly simplified, especially when you use TCPrather than UDP.
Figure 7.1. NFSv3 versus NFSv4
When you used NFS v3, next to the NFS daemon (nfsd), the following services need to run as well:
• rpcbind, which is responsible for dynamically assigning ports for RPC services. The NFS servertells the rpcbind daemon on which address it is listening and which RPC program numbers it isprepared to serve. A client connects to the rpcbind daemon and informs it about the RPC programnumber the client wants to connect with. The rpcbind daemon then replies with the address thatNFS listens on.
It is the rpcbind daemon which is responsible for handling access control (through the tcp wrappersinterface - using the /etc/hosts.allow and hosts.deny files) - for the service "rpcbind".Note though that this access control is then applied to all RPC-enabled services, not only NFS.
• rpc.mountd implements the NFS mount protocol and exposes itself as an RPC service as well. Aclient issues a MOUNT request to the rpc.mountd daemon, which checks its list of exported filesystems and access controls to see if the client can mount the requested directory. Access controlscan both be mentioned within the list of exported file systems as well as through rpc.mountd' tcpwrappers support (for the service "mountd").

High Available File Server
77
• rpc.lockd supports file locking on NFS, so that concurrent access to the same resource can bestreamlined.
• rpc.statd interacts with the rpc.lockd daemon and provides crash and recovery for the lockingservices.
With NFSv4, mount and locking services have been integrated in the NFS daemon itself. Therpc.mountd daemon is still needed to handle the exports, but is not involved with networkcommunication anymore (in other words, the client connects directly with the NFS daemon).
Although the high-level architecture is greatly simplified (and especially for the NFS client, sinceall accesses are now done through the NFS daemon), other daemons are being introduced to furtherenhance the functionalities offered by NFSv4.
Important
The Linux-NFS software we use in this architecture still requires the NFSv3 daemons to runon the server even when running NFSv4 only.
ID Mapping
The first daemon is rpc.idmapd, which is responsible for translating user and group IDs to names andvice-versa. It runs on both the server and client so that communication between the two can use usernames (rather than possibly mismatching user IDs).
Kerberos support
The second daemon (well, actually set of daemons) is rpc.gssd (client) and rpc.svcgssd (server).These daemons are responsible for handling the kerberos authentication mechanism for NFS.
InstallationOn both server as well as clients you will need to install the necessary supporting tools (and perhapskernel settings).
Server-side installation
On the server, first make sure that the following kernel configuration settings are at least met:
CONFIG_NFS_FS=yCONFIG_NFSD_V4=yCONFIG_NFSD_V4_ACL=y
Next install the NFS server (which is provided through the nfs-utils package) while making sure thatUSE="ipv6 nfsv4 nfsv41" are at least set
# emerge nfs-utils
Edit /etc/conf.d/nfs and set the OPTS_RPC_MOUNTD and OPTS_RPC_NFSD parametersto enable NFSv4 and disable NFSv3 and NFSv2 support:
OPTS_RPC_MOUNTD="-V 4 -N 3 -N 2"OPTS_RPC_NFSD="-N 2 -N 3"
I had to create the following directories as well since SELinux wouldn't allow the init script to createthose for me:
# mkdir /var/lib/nfs/{v4root,v4recovery,rpc_pipefs}

High Available File Server
78
Edit /etc/idmapd.conf and set the domain name (this setting should be the same on client andserver).
# vim /etc/idmapd.conf[General]Domain = internal.genfic.com
You can then start the NFS service.
# run_init rc-service nfs start
Client-side installation
On the clients, make sure that the following kernel configuration settings are at least met:
CONFIG_NFS_FS=yCONFIG_NFS_V4=yCONFIG_NFS_V4_ACL=y
Next, install the NFS utilities while making sure that USE="ipv6 nfsv4 nfsv41" are at least set:
# emerge nfs-utils
Edit /etc/idmapd.conf and set the domain name (this setting should be the same on client and server).
# vim /etc/idmapd.conf[General]Domain = internal.genfic.com
Finally, start the rpc.statd and rpc.idmapd daemons:
# run_init rc-service rpc.statd start# run_init rc-service rpc.idmapd start
ConfigurationMost NFS configuration is handled through the /etc/exports file.
Shared file systems in /etc/exports
To share file systems (or file structures) through NFS, you need to edit the /etc/exports file.Below is a first example for an exported packages directory:
/srv/nfs 2001:db8:81:e2:0:26b5:365b:5072/48(rw,fsid=0,no_subtree_check,no_root_squash,sync)/srv/nfs/gentoo/packages 2001:db8:81:e2:0:26b5:365b:5072/48(rw,sync,no_subtree_check,no_root_squash)
The first one contains the fsid=0 parameter. This one is important, as it tells NFSv4 what the root isof the file systems that it exports. In our case, that is /srv/nfs. A client will then mount file systemsrelative to this root location (so mount gentoo/packages, not srv/nfs/gentoo/packages).
If you get problems with NFS mounts, make sure to double/triple/quadruple-check the exports file.NFS is not good at logging things, but I have found I always mess up my exports rather thanmisconfigure daemons or so.
Disaster Recovery SetupFor our NFS server, I will first discuss a high availability setup based on the virtualization setup, butwith an additional layer in case of a disaster: replication towards a remote location. Now, in some

High Available File Server
79
organizations, disaster recovery requirements might be so high that the organization doesn't want anydata loss. For the NFS service, I assume that a (small amount of) data loss is acceptable so that wecan use asynchronous replication techniques. This provides us with a simple architecture, manageableand with less impact on distance (synchronous replication has impact on performance) and number ofparticipating nodes (synchronous replication is often only between two nodes).
Next, an alternative architecture will be suggested where high availability is handled differently (andwhich can be used for disaster recovery as well), giving you enough ideas on the setup of your ownhighly available NFS architecture.
Architectures
Simple setup
In the simple setup, the high-available NFS within one location is regularly synchronised with a high-available NFS on a different location. The term "regularly" here can be looked at as frequent as youwant: be it time-based scheduled (every hour, run rsync to synchronize changes from one system toanother) or change-based - the idea is that after a while, the secundary system is synchronized withthe primary one.
The setup of a time-based scheduled approach is simply scheduling the following command regularly(assuming the /srv/data location is where the NFS-disclosed files are at).
rsync -auq /srv/data remote-system:/srv/data
Using a more change-based approach requires a bit more scripting, but nothing unmanageable. Itbasically uses the inotifywait tool to notify the system when changes have been made on the files,and then trigger rsync when needed. For low-volume systems, this works pretty well, but largerdeployments will find the overhead of the rsync commands too much.
Dedicated NFS with DRBD and Heartbeat
Another setup for a high available NFS is the popular NFS/DRDB/Heartbeat combination. This is aninteresting architecture to look at if the virtualization platform used has too much overhead on theperformance of the NFS system (you have the overhead of the virtualization layer, the logical volumelayer, DRDB, again logical volume layer). In this case, DRBD is used to synchronize the storagewhile heartbeat is used to ensure the proper "node" in the setup is up and running (and if one node isunreachable, the other one can take over).

High Available File Server
80
Figure 7.2. Alternative HA setup using DRBD and Heartbeat
Simple replication
Using rsync, we can introduce simple replication between hosts. However, there is a bit more to it tolook at then just run rsync...
Tuning file system performance - dir_index
First of all, you definitely want to tune your file system performance. Running rsync against a locationwith several thousand of files means that rsync will need to stat() each and every file. As a result, youwill have peak I/O loads while rsync is preparing its replication, so it makes sense to optimize thefile system for this. One of the optimizations you might want to consider is to use dir_index enabledfile systems.
When the file system (ext3 or ext4) uses dir_index (ext4 uses this by default), lookup operations onthe file system uses hashed b-trees to speed up the operation. This algorithm has a huge influence onthe time needed to list directory content. Let's take a quick (overly simplified and thus also incorrect)view at the approach.

High Available File Server
81
Figure 7.3. HTree in a simple example
In the above drawing, the left side shows a regular, linear structure: the top block represents thedirectory, which holds the references (numbers) of the files. The files themselves are stored in theblocks with the capital letter (which includes metadata of the file, such as modification time - whichis used by rsync to find the files it needs to replicate). The small letters contain some informationabout the file (which is for instance the file name). In the right side, you see a possible example ofan HTree (hashed b-tree).
So how does this work? Let's assume you need to traverse all files (what rsync does) and check themodification times. How many "steps" would this take?
• In the left example (ext2), the code first gets the overview of file identifications. It starts at thebeginning of the top block, finds one reference to a file (1), then after it looks where the informationabout the second file is at. Because the name of a file ("a" in this case) is not of a fixed width, thereference to the file (1) also contains the offset where the next file is at. So the code jumps to thesecond file (2), and so on. At the end, the code returns "1, 2, 5, 7, 8, 12, 19 and 21" and has done7 jumps to do so (from 1 to 2, from 2 to 5, ...)
Next, the code wants to get the modification time of each of those files. So for the first file (1) itlooks at its address and goes to the file. Then, it wants to do the same for the second file, but sinceit only has the number (2) and not the reference to the file, it repeats the process: read (1), jump,read (2) and look at file. To get the information about the last file, it does a sequence similar to"read 1, jump, read 2, jump, read 5, jump, ..., read 21, look at file". At the end, this took 36 jumps.In total, the code used 43 jumps.
• In the right example (using HTrees), the code gets the references first. The list of references (similarto the numbers in the left code) use fixed structures so within a node, no jumps are needed. Sostarting from the top node [c;f] it takes 3 jumps (one to [a;b], one to [d;e] and one to [g;h]) to getan overview of all references.
Next, the code again wants to get the modification time of each of those files. So for the first file(A) it reads the top node, finds that "a" is less than "c" so goes to the first node lower. There, it findsthe reference to A. So for file A it took 2 jumps. Same for file B. File c is referred in the top node,so only takes one jump, etc. At the end, this took 14 jumps, or in total 17 jumps.
So even for this very simple example (with just 8 files) the difference is 43 jumps (random-ish readson the disk) versus 17 jumps. This is, what in algorithm terms, is O(n^2) versus O(nlog(n)) speed: the"order" of the first example goes with n^2 whereas the second one is n.log(n) - "order" here meansthat the impact (number of jumps in our case) goes up the same way as the given formula - it doesn'tgive the exact number of jumps. For very large sets of files, this gives a very huge difference (100^2= 10'000 whereas 100*log(100) = 200, and 1000^2 = 1'000'000 whereas 1000*log(1000) = 3000).
Hence the speed difference.

High Available File Server
82
If you haven't set dir_index while creating the file systems, you can use tune2fs to set it.
# tune2fs -O dir_index /dev/vda1# umount /dev/vda1# fsck -Df /dev/vda1
Tuning rsync
Next, take a look at how you want to use rsync. If the replication is on a high-speed network, youprobably want to disable the rsync delta algorithm (where rsync tries to look for changes in a file,rather than just replicate the entire, modified file), especially if the files are relatively small:
# rsync -auq --whole-file <source> <targethost>:<targetlocation>
If the data is easily compressable, you might want to enable the compression in rsync:
# rsync -auq --compress <source> <targethost>:<targetlocation>
If you trust the network, you might want to use standard rsync operation rather than SSH. This willnot perform the SSH handshake nor encrypt the data transfer so has a better transfer rate (but it doesrequire the rsync daemon to run on the target if you push, or on the source if you pull):
# rsync -auq <source> rsync://<targethost>/<targetlocation>
Rsync for just the changed files
If the load on the system is low (but the number of files is very high), you can use inotifywait to presentthe list of changes that are occurring live. For each change that occurred, rsync can then be invokedto copy the file (or its delta's) to the remote system:
inotifywait -e close_wait -r -m --format '%w%f' <source> | while read filedo rsync -auq $file <targethost>:<targetlocation>/$filedone
This is however a bit hackish and most likely not sufficiently scalable for larger workloads. I mentionit here though to show the flexibility of Linux.
DRBD and HeartbeatIf you however require the use of the different approach (DRBD and heartbeat), a bit more work (andmost importantly, knowledge) is needed.
Installation
First, install drbd, drbd-kernel and heartbeat.
# emerge drbd drbd-kernel heartbeat
So far for the easy stuff ;-)
Configuring DRBD
Now let's first configure the DRBD replication. In /etc/drbd.d/nfs-disk.res (on both systems - you canpick your own file name, but keep the .res extension), configure the replication as such:
global { usage-count yes;

High Available File Server
83
}
common { syncer { rate 100M; }}
resource r0 { protocol A; handlers { pri-on-incon-degr "echo o > /proc/sysrq-trigger ; halt -f"; pri-lost-after-sb "echo o > /proc/sysrq-trigger ; halt -f"; local-io-error "echo o > /proc/sysrq-trigger ; halt -f"; }
startup { degr-wfc-timeout 120; }
disk { on-io-error detach; }
net { }
syncer { rate 100M; al-extents 257; }
on nfs_p { device /dev/drbd0; disk /dev/sdb1; address nfs_p:7788; meta-disk /dev/sdc1[0]; }
on nfs_s { device /dev/drbd0; disk /dev/sdb1; address nfs_s:7788; meta-disk /dev/sdc1[0]; }}
What we do here is to define the replication resource (r0) and use protocol A (which, in DRBD'sterms, means asynchronous replication - use C if you want synchronous replication). On the hosts(with hostnames nfs_p for the primary, and nfs_s for the secundary) the /dev/sdb1 partition is managedby DRBD, and /dev/sdc1 is used to store the DRBD meta-data.
Next, create the managed device on both systems:
# drbdadm create-md r0# drbdadm up all
You can see the state of the DRBD setup in /proc/drbd. At this point, on both systems it should showtheir resource be in secundary mode, so enable it on one side:
# drbdsetup /dev/drbd0 primary -o
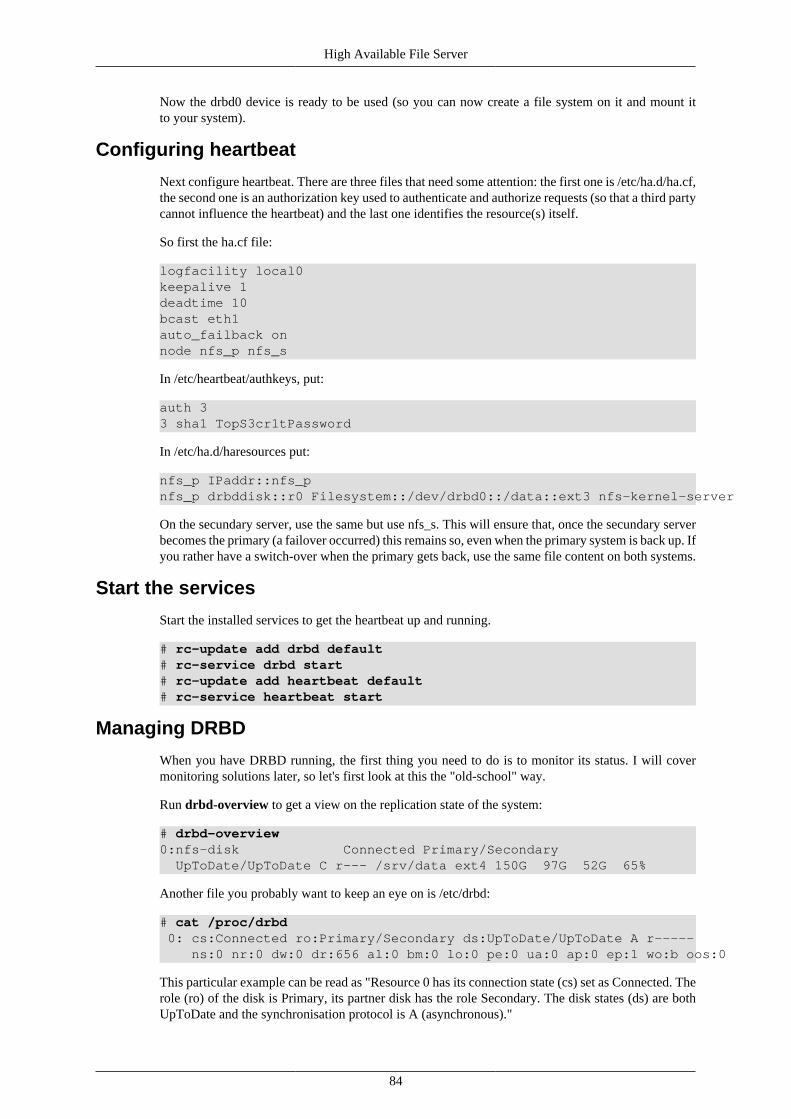
High Available File Server
84
Now the drbd0 device is ready to be used (so you can now create a file system on it and mount itto your system).
Configuring heartbeat
Next configure heartbeat. There are three files that need some attention: the first one is /etc/ha.d/ha.cf,the second one is an authorization key used to authenticate and authorize requests (so that a third partycannot influence the heartbeat) and the last one identifies the resource(s) itself.
So first the ha.cf file:
logfacility local0keepalive 1deadtime 10bcast eth1auto_failback onnode nfs_p nfs_s
In /etc/heartbeat/authkeys, put:
auth 33 sha1 TopS3cr1tPassword
In /etc/ha.d/haresources put:
nfs_p IPaddr::nfs_pnfs_p drbddisk::r0 Filesystem::/dev/drbd0::/data::ext3 nfs-kernel-server
On the secundary server, use the same but use nfs_s. This will ensure that, once the secundary serverbecomes the primary (a failover occurred) this remains so, even when the primary system is back up. Ifyou rather have a switch-over when the primary gets back, use the same file content on both systems.
Start the services
Start the installed services to get the heartbeat up and running.
# rc-update add drbd default# rc-service drbd start# rc-update add heartbeat default# rc-service heartbeat start
Managing DRBD
When you have DRBD running, the first thing you need to do is to monitor its status. I will covermonitoring solutions later, so let's first look at this the "old-school" way.
Run drbd-overview to get a view on the replication state of the system:
# drbd-overview0:nfs-disk Connected Primary/Secondary UpToDate/UpToDate C r--- /srv/data ext4 150G 97G 52G 65%
Another file you probably want to keep an eye on is /etc/drbd:
# cat /proc/drbd 0: cs:Connected ro:Primary/Secondary ds:UpToDate/UpToDate A r----- ns:0 nr:0 dw:0 dr:656 al:0 bm:0 lo:0 pe:0 ua:0 ap:0 ep:1 wo:b oos:0
This particular example can be read as "Resource 0 has its connection state (cs) set as Connected. Therole (ro) of the disk is Primary, its partner disk has the role Secondary. The disk states (ds) are bothUpToDate and the synchronisation protocol is A (asynchronous)."

High Available File Server
85
The "r-----" shows the I/O flags of the resource (more details in the DRBD user guide) whereas thenext line gives a general overview of the various performance indicators.
If you need to manually bring down (or up) one or more resources, use the drbdadm command:
# drbdadm down nfs-disk
Split brain
A split brain is something you definitely want to avoid, but need to train on. A split brain occurs whenboth sides of the synchronisation have believed they are the primary disk (i.e. the other side has failedand, while the primary disk remains active, the secundary disk invoked a fail-over and became active).A DRBD split brain will be detected by DRBD itself when both resources can "see" each other again.When this occurs, the replication is immediately stopped, one disk will be in StandAlone connectionstate while the other will be in either StandAlone or in WFConnection (WF = Waiting For).
Although you can configure DRBD to automatically resolve a split brain, it is important to understandthat this always involves sacrificing one of the nodes: changes made on the node that gets sacrificedwill be lost. In our NFS case, you will need to check where heartbeat had the NFS service running. Ifthe NFS service remained running on the primary node (nfs_p) then sacrifice the secundary one.
$ ssh nfs_p cat /proc/drbd0: cs:Standalone st:Primary/Secondary ds:UpToDate/Unknown C r---$ ssh nfs_s cat /proc/drbd0: cs:WFConnection:Primary/Secondary ds:UpToDate/Unknown C r---
Assuming that heartbeat left the NFS service running on the primary node, we can now sacrifice thesecondary and reset the synchronisation.
$ ssh nfs_s sudo rc-service heartbeat stop* Stopping heartbeat... [ ok ]$ ssh nfs_p sudo rc-service heartbeat stop* Stopping heartbeat... [ ok ]
Now log on to the secundary node (nfs_s), explicitly mark it as a secundary one, reset its state andreconnect:
# drbdadm secondary nfs-disk# drbdadm disconnect nfs-disk# drbdadm -- --discard-my-data connect nfs-disk
Now log on to the primary node (nfs_p) and connect the resource again.
# drbdadm connect nfs-disk
Restart the heartbeat service and you should be all set again.
ResourcesNFS
• Network File System version 4 protocol [https://tools.ietf.org/html/rfc3530] (RFC 3530 onIETF.org)
• Network File System version 4.1 protocol [https://tools.ietf.org/html/rfc5661] (RFC 5661 onIETF.org)
DRBD
• DRBD Users Guide [http://www.drbd.org/users-guide/] (on drbd.org)

86
Chapter 8. A Gentoo build serverIntroduction
To support multiple Gentoo Linux hosts, we will be creating a build server. But just having one serverbuild packages isn't sufficient - we need to be able to
• have separate build environments based on a number of different "templates" that will be used inour architecture.
Because of Gentoo's flexibility, we will have systems that have different USE flags, CFLAGS orother settings. All these settings however need to be constant for the build service to work well.If deviations are small, it is possible to use the majority of the build server and still use localcompilations, but in our architecture, we will assume that the build server offers the binaries for allsystems and that systems by themselves usually do not need to build code themselves.
• support phased builds across the architecture
Our architecture supports both production and non-production systems. The non-productionsystems are used to stage updates and validate changes before pushing them to production (this forquality assurance as well as a better service availability). This does mean that we need to be able to"fix" the repositories once we deem them stable enough, and then work on a new one.
• provide access to stable tree
Any client that wishes to use the build server will need access to that build servers' portage tree andoverlays (if applicable). As the tree is only needed in case of updates, there is little point in havingthis tree available on the clients at all times.
• limit host access to authorized systems
We want to limit access to the built packages to authorized systems only. This both to prevent"production" systems to accidentally take in non-production data, as well as ensure that only systemswe manage ourselves are accessing the system. By using host-based authorizations, we can alsofollow up on systems more easily (such as logging).
and this is just a subset of the requirements that are involved in the build server.
When you make a simple build server design, you immediately see that a multitude of othercomponents are needed. These include
• a DNS server to offer round-robin access to the build servers
• a certificate server to support management of certificates in the organization
• a high-available NFS server to host the built packages on
• a scheduler to execute builds
Some of these have been discussed already, others can be integrated nicely afterwards.
Building a build serverSetting up a build server requires building the server. It comes to no surprise that we will not bebenefiting from a build server initially here, but once the build infrastructure is set up, we might beable to use the existing build results (which will be stored on the NFS server) to recreate the buildinfrastructure.

A Gentoo build server
87
Setup build hostThe build host is most likely a dedicated (i.e. non-virtualized) system because it will be very CPUand memory hungry and can use all the resources it can have. As a result though, it means that ourbuild host(s) should be set up in a multi-active setup. Each buildhost then runs a web server (likelighttpd) which hosts the built package locations as the document root of the virtual hosts. To supportthe multiple build profiles, we will use different IP-based virtual hosts and control access to themthrough a certificate-based access list to only allow authorized hosts to download packages from theserver. I opt to use web-based disclosure of packages instead of network mounts as they offer morecontrol, easier logging, etc.
The build server itself will use a simple configuration scheme and a few scripts that are either triggeredmanually or scheduled centrally. These scripts will pull in the necessary changes (be it updates inoverlays or in the main portage tree) and do full system builds. The resulting packages will be storedin NFS-mounted locations (where the NFS server is set up high available).
Build profile configuration
Let's first start with the build profile configuration. We will use catalyst, Gentoo's release managementtool that is used to generate the weekly releases. With some tweaks, it can be easily used to supportour build server.
Our build setup will do something akin to the following:
Daily:+- Fetch new portage tree snapshot+- For each build profile: +- Put snapshot in <storedir>/snapshots +- Build stage3 (using catalyst) `- Build grp (using catalyst)
Weekly (and before daily): `- For each build profile `- Update spec file to now point to most recent stage3
The setup will assume that a working stage3 tarball already exists and is made for further use. If thatis not the case, you will need to get a fresh stage3 first and put it in <storedir>/builds. Fromthat point onwards, this stage3 is reused for the new stage3. Binary packages are kept as those will beused for the binary host later. The grp build (which stands for Gentoo Reference Platform) will thenbuild the remainder of binary packages.
So let's first install catalyst.
# emerge catalyst
Next, we make an initial configuration for catalyst. One set of configuration files matches one buildprofile, so you'll need to repeat the next steps for each build profile you want to support. We'll start withthe generic catalyst configuration, use /srv/build as the base directory for all related activitiesunder which each build profile will have its top level. In the next example, where you see "basic_bp",it is the name of this build profile.
# mkdir -p /srv/build/basic_bp/{portage,portage_settings,snapshot_cache,\ catalyst_store}# cd /etc/catalyst# cat catalyst-basic_bp.confdigests="sha512"contents="auto"distdir="/usr/portage/distfiles"envscript="/etc/catalyst/catalystrc"
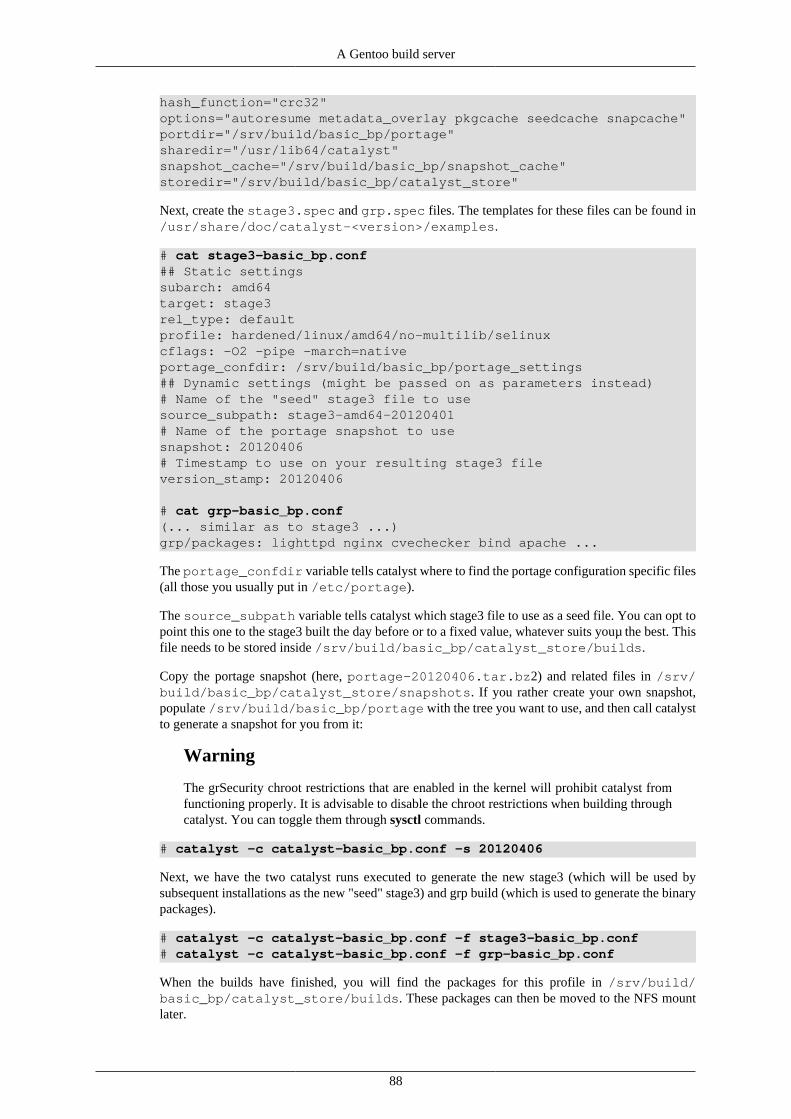
A Gentoo build server
88
hash_function="crc32"options="autoresume metadata_overlay pkgcache seedcache snapcache"portdir="/srv/build/basic_bp/portage"sharedir="/usr/lib64/catalyst"snapshot_cache="/srv/build/basic_bp/snapshot_cache"storedir="/srv/build/basic_bp/catalyst_store"
Next, create the stage3.spec and grp.spec files. The templates for these files can be found in/usr/share/doc/catalyst-<version>/examples.
# cat stage3-basic_bp.conf## Static settingssubarch: amd64target: stage3rel_type: defaultprofile: hardened/linux/amd64/no-multilib/selinuxcflags: -O2 -pipe -march=nativeportage_confdir: /srv/build/basic_bp/portage_settings## Dynamic settings (might be passed on as parameters instead)# Name of the "seed" stage3 file to usesource_subpath: stage3-amd64-20120401# Name of the portage snapshot to usesnapshot: 20120406# Timestamp to use on your resulting stage3 fileversion_stamp: 20120406
# cat grp-basic_bp.conf(... similar as to stage3 ...)grp/packages: lighttpd nginx cvechecker bind apache ...
The portage_confdir variable tells catalyst where to find the portage configuration specific files(all those you usually put in /etc/portage).
The source_subpath variable tells catalyst which stage3 file to use as a seed file. You can opt topoint this one to the stage3 built the day before or to a fixed value, whatever suits youµ the best. Thisfile needs to be stored inside /srv/build/basic_bp/catalyst_store/builds.
Copy the portage snapshot (here, portage-20120406.tar.bz2) and related files in /srv/build/basic_bp/catalyst_store/snapshots. If you rather create your own snapshot,populate /srv/build/basic_bp/portage with the tree you want to use, and then call catalystto generate a snapshot for you from it:
Warning
The grSecurity chroot restrictions that are enabled in the kernel will prohibit catalyst fromfunctioning properly. It is advisable to disable the chroot restrictions when building throughcatalyst. You can toggle them through sysctl commands.
# catalyst -c catalyst-basic_bp.conf -s 20120406
Next, we have the two catalyst runs executed to generate the new stage3 (which will be used bysubsequent installations as the new "seed" stage3) and grp build (which is used to generate the binarypackages).
# catalyst -c catalyst-basic_bp.conf -f stage3-basic_bp.conf# catalyst -c catalyst-basic_bp.conf -f grp-basic_bp.conf
When the builds have finished, you will find the packages for this profile in /srv/build/basic_bp/catalyst_store/builds. These packages can then be moved to the NFS mountlater.

A Gentoo build server
89
Automating the builds
To automate the build process, remove the date-specific parameters and instead pass them on asparameters, like so:
# catalyst -c catalyst-basic_bp.conf -f stage3-basic_bp.conf \ -C version_stamp=20120406
Next, if the grp build finishes succesfully as well, we can use rsync to:
1. synchronize the binary packages from /srv/build/basic_bp/catalyst_store/packages/default/stage3-amd64-<version_stamp> to the NFS mount for thisparticular profile, as well as rsync the portage tree used (as these two need to be synchronized).
2. copy the portage tree snapshot to the NFS mount for this particular profile, while signing it tosupport GPG-validated web-rsyncs.
3. rsync the content of the portage_confdir location to the NFS mount
The combination of these three allow us to easily update clients:
1. Update /etc/portage (locally) using the stored portage_confdir settings
2. Update the local portage tree using emerge-webrsync (with GPG validation)
3. Update the system, using the binaries created by the build server
4. Update the eix catalogue
The following two scripts support this in one go (fairly small scripts - modify to your liking) althoughwe will be using a different method for updating the systems later.
# cat autobuild#!/bin/sh
# Build ProfileBP="basic_bp"# Time StampTS="$(date +%Y%m%d)"# Build DirectoryBD="/srv/build/${BP}"# Packages DirectoryPD="${BD}/catalyst_store/packages/default/stage3-${TS}"
catalyst -c /etc/catalyst/catalyst-${BP}.conf \ -f /etc/catalyst/stage3-${BP}.conf \ -C version_stamp=${TS} || exit 1catalyst -c /etc/catalyst/catalyst-${BP}.conf \ -f /etc/catalyst/grp-${BP}.conf \ -C version_stamp=${TS} || exit 2rsync -avug ${PD}/ /nfs/${BP}/packages || exit 3cp ${BD}/catalyst_store/builds/portage-${TS}.tar.bz2 /nfs/${BP}/snapshots || exit 4gpg --armor --sign \ --output /nfs/${BP}/snapshots/portage-${TS}.tar.bz2.gpg \ /nfs/${BP}/snapshots/portage-${TS}.tar.bz2 || exit 5tar cvjf ${BD}/portage_settings /nfs/${BP}/portage_settings-${TS}.tar.bz2 || exit 6
# cat autoupdate#!/bin/sh

A Gentoo build server
90
# Build ProfileBP="basic_bp"# EditionED="testing"# Time Stamp to useTS="$1"
wget https://${BP}-${ED}.builds.genfic.com/${BP}/${ED}/portage_settings-${TS}.tar.bz2tar xvjf -C /etc/portage portage_settings-${TS}.tar.bz2restorecon -R /etc/portageemerge-webrsync --revert=${TS}emerge -uDNg worldeix-update
Promoting editions
The automated builds will do daily packaging for the "testing" edition. Once in a while though, youwill want to make a snapshot of it and promote it to production. Most of these activities will be doneon the NFS server though (we will be using LVM snapshots). The clients still connect to the buildservers for their binaries (although this is not mandatory - you can host other web servers with the samemount points elsewhere to remove the stress of the build servers) but "poll" in the snapshot location(by using a different edition).
Enabling the web serverWe will be using lighttpd as the web server of choice for the build server. The purpose of the webserver is to disclose the end result of the builds towards the clients.
Installing and configuring lighttpd
First install lighttpd:
# emerge lighttpd
Next, configure the web server with the sublocations you want to use. We will be using IP-based virtualhosts because we will be using SSL-based authentication and access control. Since SSL handshakesoccur before the HTTP headers are sent, we cannot use name-based virtual hosts. The downside is thatyou will need additional IP addresses to support each build target:
build-basic.internal.genfic.com (IP1)build-basic.testing.internal.genfic.com (IP2)build-ldap.internal.genfic.com (IP3)build-ldap.testing.internal.genfic.com (IP4)
These aliases are used for the packages (and tree) for the build profiles "basic" and "ldap" (you cangenerate as many as you want). Each build profile has two "editions", one is called testing (and containsthe daily generated ones), the other production (which is the tested one). You might create a "snapshot"edition as well, to prepare for a new production build.
# cat lighttpd.confvar.log_root = "/var/log/lighttpd"var.server_root = "/var/www/localhost"var.state_dir = "/var/run/lighttpd"
server.use-ipv6 = "enable"server.username = "lighttpd"server.groupname = "lighttpd"server.document-root = server_root + "/htdocs"
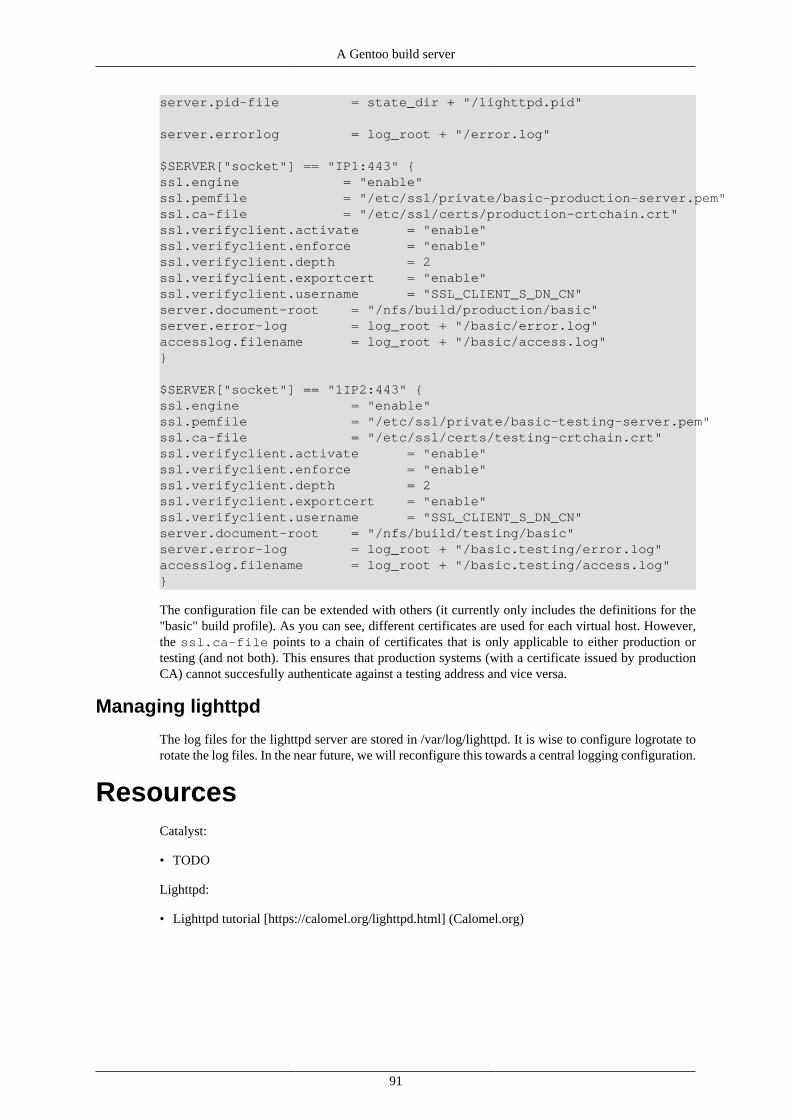
A Gentoo build server
91
server.pid-file = state_dir + "/lighttpd.pid"
server.errorlog = log_root + "/error.log"
$SERVER["socket"] == "IP1:443" {ssl.engine = "enable"ssl.pemfile = "/etc/ssl/private/basic-production-server.pem"ssl.ca-file = "/etc/ssl/certs/production-crtchain.crt"ssl.verifyclient.activate = "enable"ssl.verifyclient.enforce = "enable"ssl.verifyclient.depth = 2ssl.verifyclient.exportcert = "enable"ssl.verifyclient.username = "SSL_CLIENT_S_DN_CN"server.document-root = "/nfs/build/production/basic"server.error-log = log_root + "/basic/error.log"accesslog.filename = log_root + "/basic/access.log"}
$SERVER["socket"] == "1IP2:443" {ssl.engine = "enable"ssl.pemfile = "/etc/ssl/private/basic-testing-server.pem"ssl.ca-file = "/etc/ssl/certs/testing-crtchain.crt"ssl.verifyclient.activate = "enable"ssl.verifyclient.enforce = "enable"ssl.verifyclient.depth = 2ssl.verifyclient.exportcert = "enable"ssl.verifyclient.username = "SSL_CLIENT_S_DN_CN"server.document-root = "/nfs/build/testing/basic"server.error-log = log_root + "/basic.testing/error.log"accesslog.filename = log_root + "/basic.testing/access.log"}
The configuration file can be extended with others (it currently only includes the definitions for the"basic" build profile). As you can see, different certificates are used for each virtual host. However,the ssl.ca-file points to a chain of certificates that is only applicable to either production ortesting (and not both). This ensures that production systems (with a certificate issued by productionCA) cannot succesfully authenticate against a testing address and vice versa.
Managing lighttpd
The log files for the lighttpd server are stored in /var/log/lighttpd. It is wise to configure logrotate torotate the log files. In the near future, we will reconfigure this towards a central logging configuration.
ResourcesCatalyst:
• TODO
Lighttpd:
• Lighttpd tutorial [https://calomel.org/lighttpd.html] (Calomel.org)

92
Chapter 9. Database Server
IntroductionDatabases are a prime subject for storing structured data. Be it as a backend for an LDAP system orDNS system, or as a structured storage for user data, or your most vital company secrets - databasesoffer a standardized method for storing and retrieving data. Thanks to wide driver support, many toolscan interact with several database types (Oracle, SQL Server, PostgreSQL, MySQL, ...).
Databases are often, from an operating system point of view, not all that complicated: a few processesand some files are accessed. However, internally, this is an entire different story. Databases are aworld by itself - you will need trained professionals to properly manage your database systems (DBAs,DataBase Administrators) who know the internals of the database product and can tune the databaseto react swiftly to the requests launched against it.
In this section, we focus on the setup of PostgreSQL and MySQL.
PostgreSQLAlthough (somewhat) less popular than MySQL, the PostgreSQL database is in the author's (humble)opinion a more stable and successful database platform. It is gaining momentum with vendors and hascommercial backing by several companies - just in case you are in dire need for paying for software ;-)
Architecture
Basically, postgresql is an almost monolithic system from a Unix/Linux point of view: not that manyprocesses are involved. Of course, internally, that is a completely different thing.
Let's first look at how we would position the database in the reference architecture used in this book.
Figure 9.1. Load balanced setup
What we are aiming for is a high-available PostgreSQL solution: two (or more) PostgreSQL databasesof which one is a master (we are not going to look for multi-master setups, even though they do exist)

Database Server
93
and where at least one target is synchronously replicated towards. The synchronous replication isneeded to ensure that, in case of system failure, the standby database already holds the last successfulcommit and can be made master easily.
In front of the database setup, a load balancer is placed which has two main functions:
• distribute read-only queries to the standby systems as well, lowering the load on the master database
• provide seamless fail-over towards the standby database so applications do not notice the (short)interruption on the database service
To accomplish this, we will set up two PostgreSQL systems with hot standby, and a pgpool loadbalancer in front of it.
Feeds and flows - backup
There are two main flows identified in our architecture: backup and replication. Let's first take a lookat the backup on.
Backups should be stored somewhere outside the direct vicinity of the database (different site even).We will use the pg_rman application and use an NFS mount to place the backup catalog (metadataabout backups) and backed up files.
Figure 9.2. Backup architecture for a PostgreSQL setup
Feeds and flows - Replication
Next to the backup/restore, we also define standby databases. In this case, the needed WAL logs(translation logs of PostgreSQL) are shipped towards the standby systems.

Database Server
94
Figure 9.3. Standby setups
In the depicted scenario, a standby server is receiving the archive logs and, depending of the type ofstandby,
• waits (keeps logs on the file system) until the standby is started (for instance due to a fail-over), or
• immediately applies the received WAL logs
If a standby waits, it is called a warm standby. If it immediately applies the received WAL logs,it is a hot standby. In case of a hot standby, the database is also open for read-only access. Thereare also methods for creating multi-master PostgreSQL clusters. In our presented architecture, the hotstandby even has to signal to the master that it has received and applied the log before the commit isreturned as successful to the client.
Of course, if you do not need this kind of protection on the database, it is best left disabled as it incursa performance penalty.
Administration
PostgreSQL administration is mostly done using the psql command and related pg_* commands.
Monitoring
When monitoring PostgreSQL, we should focus on process monitoring and log file monitoring.

Database Server
95
Operations
When you are responsible for managing PostgreSQL systems, then you will need to understand theinternal architecture of PostgreSQL.
Figure 9.4. Internal architecture for PostgreSQL
The master postgres server process listens on the PostgreSQL port, waiting for incoming connections.Any incoming connection is first checked against the settings in the Host Based Access configurationfile (pg_hba.conf). Only if this list allows the connection will it go through towards the postgresdatabase, where the rights granted to the user then define what access is allowed.
User management
PostgreSQL supports a wide number of authentication methods, including PAM support (PluggableAuthentication Modules), GSSAPI (including the Kerberos one), RADIUS, LDAP, etc. However, itis important to know that this is only regarding authentication, not authorization. In other words, youstill need to create the roles (users) in the PostgreSQL server and grant them whatever they need.
Central user management in this case ensures that, if a person leaves the organization, his accountcan be immediately removed (or locked) so that authenticating as this user against the databases isno longer possible. However, you will still need a method for cleaning up the role definitions in thedatabases.
Security
Deployment and uses
Manual installation of the database server
We start by installing the dev-db/postgresql-server package on the system.

Database Server
96
# emerge dev-db/postgresql-server
Next, edit the /etc/conf.d/postgresql-9.1 file to accommodate the settings of the cluster.
PGDATA="/etc/postgresql-9.1"DATA_DIR="/var/lib/postgresql/9.1/data"PG_INITDB_OPTS="--locale=en_US.UTF-8"
Now, create the cluster: temporarily assign a password to the postgres user (it will be asked during theconfiguration), and afterwards lock the account again.
# passwd postgres# emerge --config dev-db/postgresql-server:9.1# passwd -l postgres# restorecon -Rv /var/lib/postgresql/9.1/data
To secure the cluster, we need to edit its configuration files before starting.
Let's first make sure that we can connect to the database remotely too (by default, it only works locally).Edit the postgresql.conf file (in /etc/postgresql-9.1) and set the listen_addresses to theinterface(s) you want the database to be reachable on.
listen_addresses=::1 2001:db8:81::204:de89:3312
Next, edit pg_hba.conf to allow remote connections for IPv6:
host all all 2001:db8:81::1/96 md5
Start the cluster and set the admin password:
# rc-service postgresql-9.1 start# psql -U postgrespostgres=# \passwordpostgres=# \q
With the password set, change the method in pg_hba.conf for the local (socket-based) connectionsfrom trust to password and reload the service
# rc-service postgresql-9.1 reload
MySQLThe MySQL database platform is a very popular database, especially for web-based applications.Many software titles support MySQL as a database backend natively, so it makes sense to providesupport for MySQL in our reference architecture as well.
Architecture
Deployment and usesThe initial setup of MySQL on Gentoo is a breeze. Install the dev-db/mysql package on your systemand you're good to go. Next, make sure that the following entries are set in your /etc/mysql/my.cnf file:
• local-infile=0 (in the [mysqld] section) to disable loading data from a local file from within MySQL
Furthermore, secure the environment through the following actions:
• Look in all users' home directories for a file called .mysql_history, and remove it. Next, create asymlink to /dev/null called .mysql_history. This is because the history file contains the history ofall commands executed, which can include sensitive information.

Database Server
97
Now, create the initial database with mysql_install_db and start the database:
# rc-service mysql start
Then, call mysql_secure_installation to properly secure the database further.
User managementCurrently, MySQL uses internal tables for managing user accounts. Work is on the way to supportother authentication services, like LDAP, using the MySQL plugin support. But for now, let's stickwith the internal user tables.
For database users, I always tend to make distinction between (personal) accounts and (functional)application accounts.
• Personal accounts are tied to a single person, and might even have DBA (or at least more) privileges
• Functional application accounts are tied to an application server (or set of servers) and are used toaccess the database data
Making the distinction is pretty much for security reasons, but also because functional accounts mightbe better off with a different authentication approach.
Authentication methods
By default, MySQL uses password-based authentication (with the hashes of the database stored in themysql.user table). The field is a SHA1 checksum of the binary representation of the SHA1 checksumof the password. For instance, if the password is "password", then you can generate the hash from thecommand line as follows:
$ echo -n password | openssl dgst -sha1 -binary | sha1sum
Or you can use the mysql function:
mysql> SELECT PASSWORD('password');
Knowing how the hash works also allows you to manage the hashes remotely if you want.
ResourcesFor more information, many excellent resources are available on the wide Internet.
• pg_rman [https://code.google.com/p/pg-rman/], the backup/restore utility used in this chapter

98
Chapter 10. Mail ServerIntroduction
Most organizations have internal mail servers or even an entire mail infrastructure. This is notsurprising, as much of todays' communication is done over electronic mail systems. In this chapter,we'll look at the postfix mail infrastructure, covering a few common cases such as internal mail,external mail gateways, virtual domains and more.
PostfixThe postfix mail infrastructure is a popular open source mail daemon. It supports a wide area ofconfigurations, including database-backends, mail filtering, advanced authentication schemes andmore.
ArchitectureThe Postfix architecture looks like so:
Figure 10.1. High-level architecture for Postfix
This is purely for the postfix mail server (managing incoming and outgoing e-mails). In most cases,you want the e-mails to be "disclosed" so that users do not (need to) log on to the machine to read

Mail Server
99
their e-mails. Later in this chapter, we will use the Courier-IMAP mail server to provide access tothe mail boxes.
InstallationThe installation of Postfix is quite easy: emerge postfix and you're almost completely set. There area few settings worth mentioning from the start though.
Install the postfix mailer daemon, and then go to the /etc/postfix location and edit the main.cf file. Inthe examples below, I always put the full content, but you can safely use variables as well, so:
myorigin = genfic.commydestination = genfic.com
is the same as
myorigin = genfic.commydestination = $myorigin
myorigin - What does Postfix use for outgoing mails?
When locally delivered mails (i.e. mails that originate from the local system) are handed over to thepostfix infrastructure, Postfix will rewrite the origination of the mails to become "user@$myorigin".In most cases, you want to have myorigin set to the domain for which you are sending out e-mails.
myorigin = genfic.com
mydestination - What does Postfix accept to deliver locally?
An e-mail that is received by Postfix is validated against the mydestination parameter to see if the mailneeds to be forwarded further (relayed) or delivered locally.
mydestination = genfic.com
mynetworks - From which locations does Postfix accept mails tobe routed further?
E-mails received from the networks identified in mynetworks are accepted to be routed by thisPostfix daemon. Mails that originate from elsewhere are handled by the relay_domains parameter.You definitely want to have mynetworks set to the networks for which you accept mails:
mynetworks = ::1 2001:db8:81::1/80
relay_domains - For which other domains does Postfix act as arelay server?
E-mails that are not meant to be delivered locally will be checked against the relay_domains parameterto see if Postfix is allowed to route them further or not. By explicitly making this variable empty, wetell Postfix it should not route e-mails that are not meant for him explicitly.
relay_domains =
relayhost - Through which server will Postfix send out e-mails?
If the relayhost parameter is set, Postfix will send all outgoing e-mails through this server. When unset,Postfix will send outgoing e-mails directly to the destination server (as seen through the MX DNSrecords). By surrounding the target with brackets ([...]) Postfix will not perform an MX record lookupfor the given destination.

Mail Server
100
relayhost = [mail-out.internal.genfic.com]
Managing PostfixWhen Postfix is configured, the real work starts. Administering a mail infrastructure is about capacitymanagement, queue management, integration support (with filters, anti-virus scanning, ...), scalabilityand more. Mail administration is not to be misunderstood: it is an entire IT field of its own. In thischapter, we'll take a look at only a few of these aspects...
Standard operations
Regular operations, being the stop, start and reload of the configuration, are best done through theservice script:
# /etc/init.d/postfix stop|start|reload
This will ensure proper transitioning (SELinux-wise) and, thanks to the dependency support withinthe init scripts, it will also handle potential depending services. For instance, if an anti-virus scanningservice requires postfix to be running, then bringing postfix down will first bring the anti-virusscanning service down and then postfix. If you would do this through the postfix command itself, theanti-virus scanning service will remain running which might cause headaches in the future (or justthrow many errors/events).
Queue management
As can be seen from the architecture overview, Postfix uses a number of internal queues for processinge-mails. Physically, you will find these queues as directories inside /var/spool/postfix, together withquite a few others (of which some of them we'll encounter later). However, managing these queues isnot done at the file level, but through the postqueue and postsuper commands.
Generally, as a Postfix administrator, you want the incoming / active queues to be processed swiftly(as those are the queues where incoming or outgoing messages live until they are handled) and thedeferred queue to be monitored (this is where mails that couldn't be delivered for now live until theyexpire). You can look at the deferred queue using postqueue:
# postqueue -p-Queue ID- -Size- --Arrival Time-- --Sender/Recipient--13A383C42 4522 Tue Aug 22 00:02:33 MAILER-DAEMON(connect to smtp.trefolka.com[12.34.56.78]: Connection timed out)[email protected]
If needed, you can delete this e-mail:
# postsuper -d 13A383C42
However, if you rather put those e-mails on hold, you can move them to the hold queue. This isa specific operator queue where postfix doesn't look at (except when told through the postsupercommands) so that operators can temporarily move them to the hold queue, and later put them back("requeued") on the active one:
# postsuper -h ALL...# postsuper -r ALL
Scaling PostfixA single system is also a single point of failure. Building a mail infrastructure that is redundant isprobably your best bet, and if done properly, it also provides proper scale-out (multiple systems)

Mail Server
101
possibilities for your architecture. But it also requires a good idea of how the architecture should looklike.
Consider, for instance, the use of a remote backup mail infrastructure - if your own data center orcomputer room is down, then mails will not be delivered to your system. If you do not configure abackup mail server available in a different location, mails might get lost (they will be deferred forsome time in the queue's of the sender, but will eventually time-out). An available backup mail serverwill ensure that mails get queued there (with a potentially much larger timeout value) giving you timeto get back on your feet within your data center or computer room (or even initiate a contingency foryour users to access their e-mails outside).
For a high available mail service, I will be using a high-available file server (which is discussed priorin this book) to which the postfix systems have access to, and setup a Courier-IMAP infrastructure(also high-available) to access the mailboxes for the users.
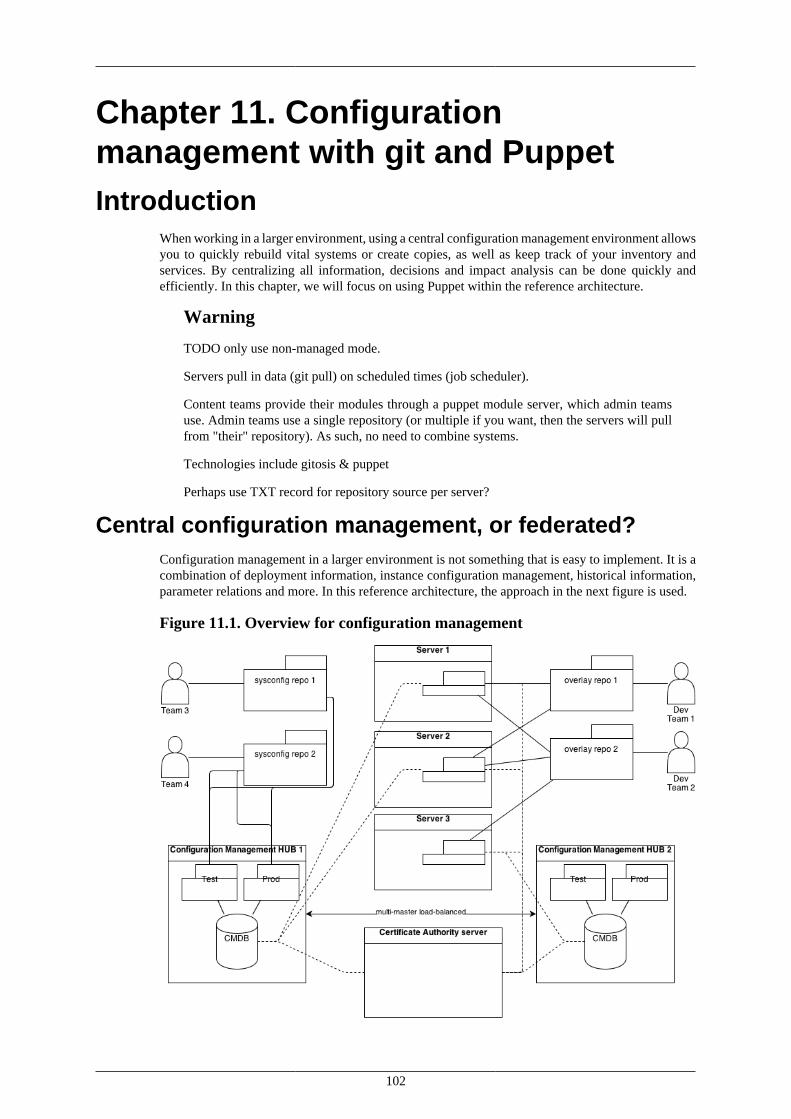
102
Chapter 11. Configurationmanagement with git and PuppetIntroduction
When working in a larger environment, using a central configuration management environment allowsyou to quickly rebuild vital systems or create copies, as well as keep track of your inventory andservices. By centralizing all information, decisions and impact analysis can be done quickly andefficiently. In this chapter, we will focus on using Puppet within the reference architecture.
Warning
TODO only use non-managed mode.
Servers pull in data (git pull) on scheduled times (job scheduler).
Content teams provide their modules through a puppet module server, which admin teamsuse. Admin teams use a single repository (or multiple if you want, then the servers will pullfrom "their" repository). As such, no need to combine systems.
Technologies include gitosis & puppet
Perhaps use TXT record for repository source per server?
Central configuration management, or federated?Configuration management in a larger environment is not something that is easy to implement. It is acombination of deployment information, instance configuration management, historical information,parameter relations and more. In this reference architecture, the approach in the next figure is used.
Figure 11.1. Overview for configuration management

Configuration managementwith git and Puppet
103
In this example, one team could be responsible for JBoss application server components (packages,documentation, third line support) but not have the responsibility for installing and managing JBossAS. In this situation, this team delivers and manages their components, including an overlay (eitherfor the team or shared with others). The system administrators configure their systems to add thisparticular overlay as well as configure their systems to properly set up JBoss AS by instantiating themodules developed by the first team on the systems.
Federated repositories
First of all, the reference architecture uses a federated repository approach. Teams with their ownresponsibility use their own repositories (and managed in the way that is most efficient for thoseteams). On the figure, there are two "types" of teams represented, but this is only an example:
• development teams, who are responsible for providing the necessary packages, documentationand more. In case of a Gentoo-only installation environment, those teams will manage overlays(structured sets of ebuilds) for their components.
• infrastructural teams, who are responsible for the infrastructure servers themselves. These teamsmanage their servers in their own repositories, which are checkout out on the configurationmanagement hubs. With the use of proper branch names, the configuration management hubs cancheckout testing branches and production branches for use on the target systems.
The use of federated repositories allows each team to work on their components in the most flexiblemanner. It also allows a reasonable access control on the various components: team 4 might not begranted write access on the system configuration for team 3 but can still read it (for its own internaltesting), or perhaps even not read it at all.
High-available hubs
The configuration management HUBs are set up in a high-available manner. Because they only containcheckouts of the repositories (and do not act as the master repositories themselves) we can easily scalethis architecture. In the picture it is shown as a multi-master (i.e. each HUB manages servers), load-balanced setup. However, other architectures can easily be implemented, such as a HUB for one site(data center) and a HUB for another site (another data center).
The hubs contain the CMDB information needed for deployment. In our reference architecture, thiswill be Puppet.
Version controlled or not
In many organizations, changes on systems should be version controlled. By using version controlrepositories (such as Git) this is implemented automatically, but raises another question: how can teamsfix a particular setting for one environment? This requirement has to be taken up with the specificsolutions (such as Puppet and Git).
About PuppetPuppet is a free software configuration management tool, written in Ruby and developed under thewings of the Puppet Labs company.
The idea behind Puppet is that administrators describe how a system should look like, and Puppet willdevise the strategy to configure the system up to that point. This removes the cludge of re-inventingthe order of actions as this is handled by Puppet. The declarative state of a system can also be appliedto other systems easily, making it a breeze to create copies of existing systems.
Puppet definition structure
The strength of Puppet lays within its definitions. You have modules that help you define the state ofa particular resource (or set of resources), including default values that fit your needs, and you have
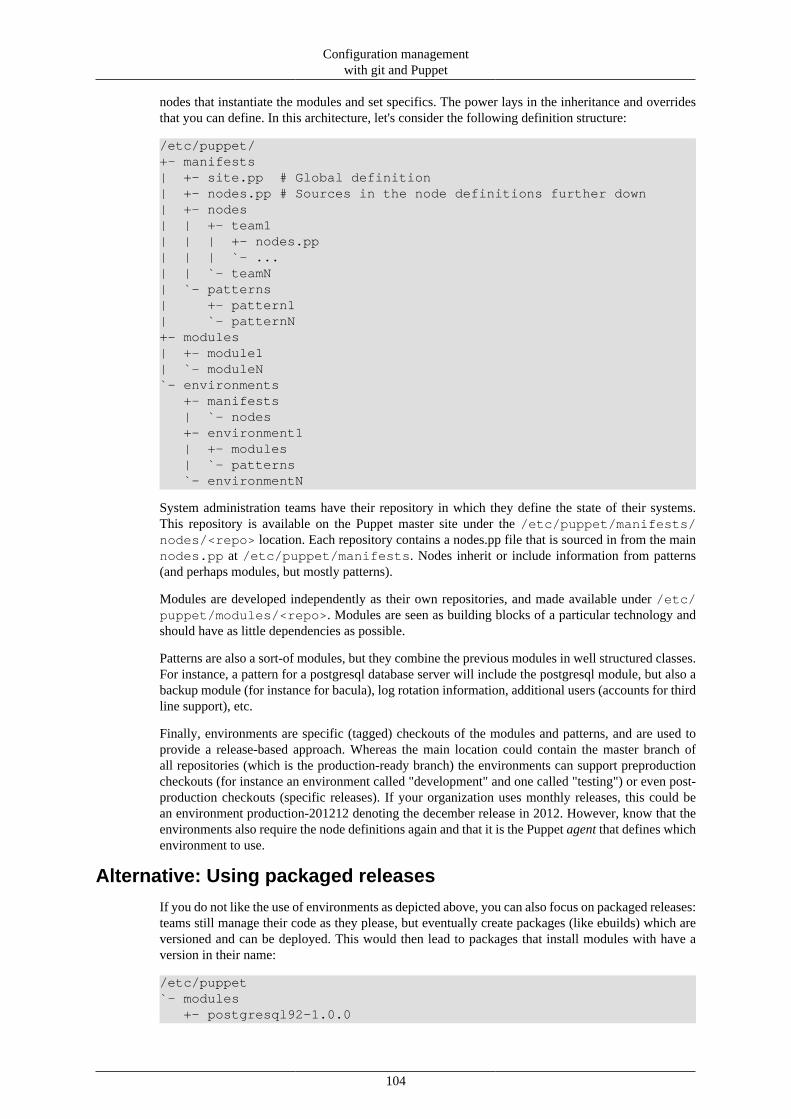
Configuration managementwith git and Puppet
104
nodes that instantiate the modules and set specifics. The power lays in the inheritance and overridesthat you can define. In this architecture, let's consider the following definition structure:
/etc/puppet/+- manifests| +- site.pp # Global definition | +- nodes.pp # Sources in the node definitions further down| +- nodes| | +- team1| | | +- nodes.pp| | | `- ...| | `- teamN| `- patterns| +- pattern1| `- patternN+- modules| +- module1| `- moduleN`- environments +- manifests | `- nodes +- environment1 | +- modules | `- patterns `- environmentN
System administration teams have their repository in which they define the state of their systems.This repository is available on the Puppet master site under the /etc/puppet/manifests/nodes/<repo> location. Each repository contains a nodes.pp file that is sourced in from the mainnodes.pp at /etc/puppet/manifests. Nodes inherit or include information from patterns(and perhaps modules, but mostly patterns).
Modules are developed independently as their own repositories, and made available under /etc/puppet/modules/<repo>. Modules are seen as building blocks of a particular technology andshould have as little dependencies as possible.
Patterns are also a sort-of modules, but they combine the previous modules in well structured classes.For instance, a pattern for a postgresql database server will include the postgresql module, but also abackup module (for instance for bacula), log rotation information, additional users (accounts for thirdline support), etc.
Finally, environments are specific (tagged) checkouts of the modules and patterns, and are used toprovide a release-based approach. Whereas the main location could contain the master branch ofall repositories (which is the production-ready branch) the environments can support preproductioncheckouts (for instance an environment called "development" and one called "testing") or even post-production checkouts (specific releases). If your organization uses monthly releases, this could bean environment production-201212 denoting the december release in 2012. However, know that theenvironments also require the node definitions again and that it is the Puppet agent that defines whichenvironment to use.
Alternative: Using packaged releases
If you do not like the use of environments as depicted above, you can also focus on packaged releases:teams still manage their code as they please, but eventually create packages (like ebuilds) which areversioned and can be deployed. This would then lead to packages that install modules with have aversion in their name:
/etc/puppet`- modules +- postgresql92-1.0.0

Configuration managementwith git and Puppet
105
`- postgresql92-1.0.2
Other packages (like those providing the patterns) then depend on the correct versions. Thanks todependency support in Gentoo, when no patterns (or nodes) are installed anymore that depend on aparticular version, it will be cleaned from the environment. And thanks to SLOT support, multipledeployments of the same package with different versions is supported as well.
In this reference architecture, I will not persue this method - I find it a broken solution for a brokensituation: in your architecture, fixing versions leads to outdated systems and slowly progressinginformation architecture. By leveraging environments, this problem is less prominent.
About GitGit is a distributed revision control system where developers have a full repository on theirworkstation, pushing changes to a remote origin location where others can then pull the changes from.
The use of Git is popular in the free software world as it has proven itself fruitful for distributeddevelopment (such as with the Linux kernel), which is perfect in our reference architecture.
Git with gitoliteGit by itself is a fairly modest versioning system. It doesn't support access controls out-of-the-box,instead relying on the abilities of other systems (such as those used to provide access to git, like theaccess control systems of the Linux operating system) to provide this important security feature.
To make access controls easier to implement, as well as the management of the git repositories, varioussoftware titles have emerged. In this section, I'll focus on the gitolite software, which provides internalaccess controls (without needing to provide accounts on Linux operating system level) with SSH keys.
ArchitectureGitolite uses a single operating system user, and abstracts access towards the git repositories itmanages. Access towards git is done through SSH.
Because git provides every developer with its own, full repository, we will not setup a high availablearchitecture for git. Instead, we'll rely on its distributed model (and of course frequent backups).
Flows
Only one flow is identified, which is the backup.
Figure 11.2. Git and gitolite flows

Configuration managementwith git and Puppet
106
Administration
Gitolite itself is managed through a git repository of its own. Only when things are awkwardly failingon that level as well will you need SSH access to the server.
Figure 11.3. Gitolite administration
Monitoring
To monitor git, we'll use a testing repository on the system and a remote git commit. This allows us tomake sure that the service is running and available, and might even be updated with some performancemetrics (for instance, the time that a push of a small change takes).
Operations
Regular operations is the same as with the administration: users connect to the git server through git(and SSH).
Users
Users are managed through the gitolite repository.
Security
The secure access towards the repositories is handled by gitolite (through the configuration in thegitolite administration repository) and SSH.
Using gitolite
Installing & configuring gitolite
Installing gitolite in Gentoo is a breeze (just like with the majority of other distributions).
# emerge dev-vcs/gitolite
Next, copy the SSH key of the administrator(s) somewhere on the system, and then have the followingcommand ran as the git user (you can use "su -u git -c" or "sudo -H -u git" for this), where /path/to/admin.pub is the public SSH key of the administrator:
git $ gl-setup /path/to/admin.pub

Configuration managementwith git and Puppet
107
The configuration file of gitolite will be shown. In it, you can configure gitolite.
For instance:
• set $REPO_UMASK to 0027 to ensure the repositories are not readable (and especially not writeable)by other users on the git server
Finally, have the administrator check out the gitolite administrative repository on his (client) system.
$ git clone [email protected]:gitolite-admin.git
Managing users
Users are managed through their public SSH keys. Once you obtained a public SSH key for a user,commit it into the keydir/ location (inside the gitolite-admin repository) named after the user (likekeydir/username.pub). The filename itself is used to identify the users. If a user needs to beremoved, remove the key from the directory and push the changes to the administration repository.The changes will take effect immediately.
Managing repositories
To create a new repository, edit the conf/gitolite.conf file and add in (or remove) the repository,and identify the user or users that are allowed access to the repository. If you remove a repositoryconfiguration, you'll need to remove the repository from the Linux host itself as well (which isn't donethrough the gitolite-admin repository).
For instance, a snippet for a repository "puppet-was" in which the users john, dalia (both admins),jacob and eden have access to:
repo puppet-was RW+ = john dalia RW = jacob R = eden
The gitolite documentation referred to at the end of this chapter has more information about the syntaxand the abilities, including group support in gitolite.
PuppetThe puppet master hosts the configuration entries for your environment and manages the puppetclients' authentication (through certificates).
Architecture
The puppet architecture is fairly simple, which is also one of its strengths.
Flows
The following diagram shows the flows/feeds that interact with the puppet processes.
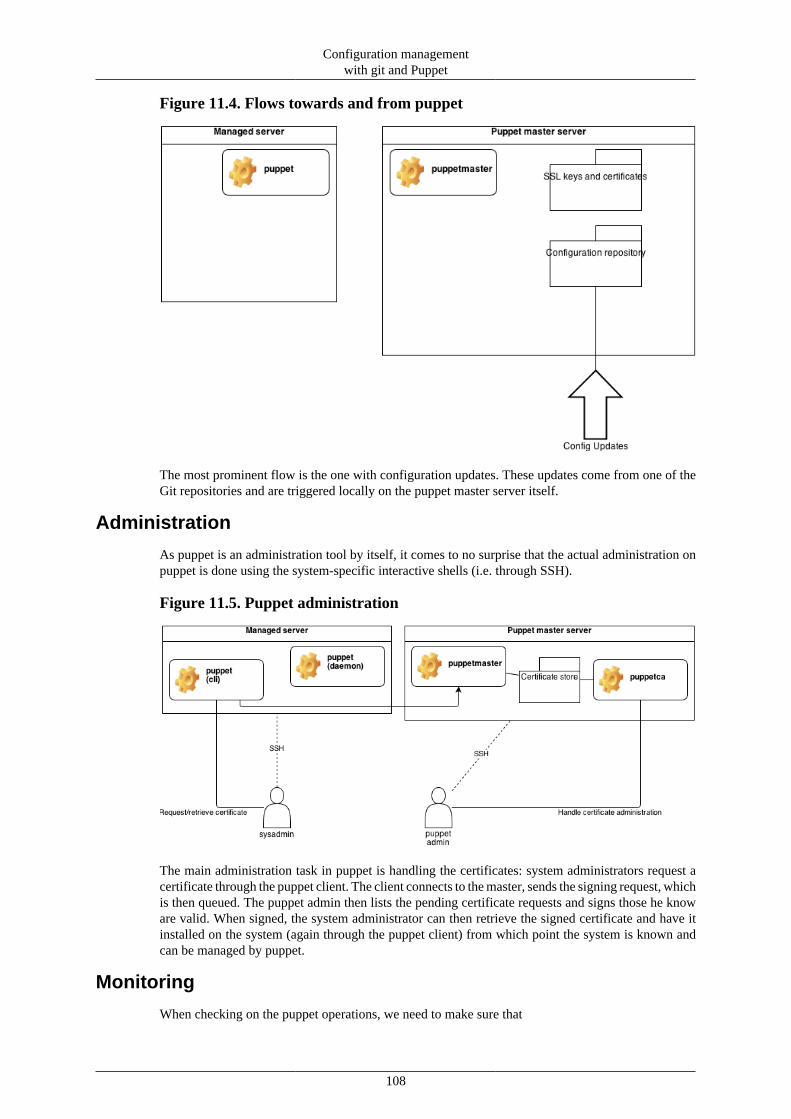
Configuration managementwith git and Puppet
108
Figure 11.4. Flows towards and from puppet
The most prominent flow is the one with configuration updates. These updates come from one of theGit repositories and are triggered locally on the puppet master server itself.
Administration
As puppet is an administration tool by itself, it comes to no surprise that the actual administration onpuppet is done using the system-specific interactive shells (i.e. through SSH).
Figure 11.5. Puppet administration
The main administration task in puppet is handling the certificates: system administrators request acertificate through the puppet client. The client connects to the master, sends the signing request, whichis then queued. The puppet admin then lists the pending certificate requests and signs those he knoware valid. When signed, the system administrator can then retrieve the signed certificate and have itinstalled on the system (again through the puppet client) from which point the system is known andcan be managed by puppet.
Monitoring
When checking on the puppet operations, we need to make sure that

Configuration managementwith git and Puppet
109
• the puppet agent is running (or scheduled to run)
• the puppet agent ran within the last xx minutes (depending on the frequency of the data gathering)
• the puppet agent did not fail
We might also want to include a check that says that n consecutive polls might not perform changesevery time (in other words, the configuration has to be stable after n-1 requests).
Operations
During regular operations, the puppet agent frequently connects to the puppet master, sends all his"facts" (the state of the current system) from which the puppetmaster then devises how to update thesystem to match the configuration the system should be in.
Figure 11.6. Regular operations of puppet
The activities are, by default, triggered from the agent. It is possible (and we will do so later) toconfigure the agent to also listen for incoming connections from the puppet master. This allowsadministrators to push changes to systems without waiting for the agents to connect to the master.
User management
Puppet does not have specific user management features in it. If you want separate roles, you willneed to do so through the file access control mechanisms on the puppet master and/or through therepositories that you use as the configuration repository.
Security
Make sure that no resources can be accessed through Puppet that are otherwise not accessible byunauthorized people. As Puppet includes a (web-based) file server, we need to configure it properly sothat unauthorized access is not possible. Luckily, this is the default behavior with a Puppet installation.
Setting up puppet master
Installing puppet master
The puppet master and puppet client itself are both provided through the app-admin/puppet package.
# equery u puppet[ Legend : U - final flag setting for installation][ : I - package is installed with flag ][ Colors : set, unset ] * Found these USE flags for app-admin/puppet-2.7.18: U I
Configuration managementwith git and Puppet
110
+ + augeas : Enable augeas support - - diff : Enable diff support - - doc : Adds extra documentation (API, Javadoc, etc). It is \ recommended to enable per package instead of globally - - emacs : Adds support for GNU Emacs - - ldap : Adds LDAP support (Lightweight Directory Access Protocol) - - minimal : Install a very minimal build (disables, for example, \ plugins, fonts, most drivers, non-critical features) - - rrdtool : Enable rrdtool support + + ruby_targets_ruby18 : Build with MRI Ruby 1.8.x - - shadow : Enable shadow support - - sqlite3 : Adds support for sqlite3 - embedded sql database - - test : Workaround to pull in packages needed to run with \ FEATURES=test. Portage-2.1.2 handles this internally, \ so don't set it in make.conf/package.use anymore - - vim-syntax : Pulls in related vim syntax scripts - - xemacs : Add support for XEmacs
# emerge app-admin/puppet
Next, edit /etc/puppet/puppet.conf and add the following to enable puppetmaster to bindon IPv6:
[master] bindaddress="::"
You can then start the puppet master service.
# run_init rc-service puppetmaster start
Configuring as CA
One puppet master needs to be configured as the certificate authority, responsible for handing out andmanaging the certificates of the various puppet clients.
# cat /etc/puppet/puppet.conf[main] logdir=/var/log/puppet rundir=/var/run/puppet ssldir=$vardir/ssl[master] bindaddress="::"
Configuring as (non-CA) Hub
The remainder of puppet masters need to be configured as a HUB; for these systems, disable CAfunctionality:
# cat /etc/puppet/puppet.conf[main] logdir=/var/log/puppet rundir=/var/run/puppet ca_server=puppet-ca.internal.genfic.com[master] bindaddress="::" ca=false
Make sure no ssl directory is available.

Configuration managementwith git and Puppet
111
# rm -rf $(puppet master --configprint ssldir)
Next, request a certificate from the CA for this master. In the --dns_alt_names parameter, specifyall possible hostnames (fully qualified and not) that agents might use to connect to this particularmaster.
# puppet agent --test --dns_alt_names \ "puppetmaster1.internal.genfic.com,puppet,puppet.internal.genfic.com"
Then, on the CA server, sign the request:
# puppet cert list# puppet cert sign <new master cert>
Finally, retrieve the signed certificate back on the HUB:
# puppet agent --test
Repeat these steps for every HUB you want to use. You can implement round-robin loadbalancing by using a round-robin DNS address allocation for the master hostname (such aspuppet.internal.genfic.com).
Configuring repositories
As per our initial example, we will need to pull from the repositories. Assuming that the git repositoriesare available at git.internal.genfic.com, we could do the following:
# cd /etc/puppet/# git clone git://git.internal.genfic.com/puppet/manifests.git# git clone git://git.internal.genfic.com/puppet/modules.git# git clone git://git.internal.genfic.com/puppet/patterns.git
Of course, you can use nested repositories as well. For instance, if you have several administrationteams, then inside the manifests repository a directory nodes would be available that is ignored bygit (through the .gitignore file). As a result, anything inside that directory is not managed by themanifests.git project. So what we do is pull in the repositories of the various teams:
# cd /etc/puppet/manifests/nodes# git clone git://git.internal.genfic.com/teams/team1.git# git clone git://git.internal.genfic.com/teams/team2.git
With the environments, a similar setup is used, but once cloned we check out a specific branch. Forinstance, for development environment, this would be the development branch:
# cd /etc/puppet/environments# git clone --branch development git://git.internal.genfic.com/puppet/patterns.git
Because we just pull in changes as they come along, mastership of the data is within the git repositories.Given proper policies in place, you can easily have a simple script available that is invoked by cronto update the various repositories.
Adding additional modules
Puppet supports downloading and installing additional puppet modules from the Puppet forge location.To do so, you can use puppet module install <name>. For instance, to install the inkling/postgresqlmodule:
# puppet module install inkling/postgresqlPreparing to install into /etc/puppet/modules ...Downloading from http://forge.puppetlabs.com ...

Configuration managementwith git and Puppet
112
Installing -- do not interrupt .../etc/puppet/modules### inkling-postgresql (v0.3.0) ### puppetlabs-firewall (v0.0.4) ### puppetlabs-stdlib (v3.2.0)
If you setup environments, you can even have a particular version of a module installed inside a specificenvironment by specifying it through --environment <yourenv>.
Setting up puppet clients
Installing puppet client
The puppet client, just like the master, is provided by the app-admin/puppet package. During theinstallation, portage will also install augeas, which is a tool that abstracts configuration syntax andallows simple, automated changes on configuration files. Once installed, you can start the puppet clientservice:
# run_init rc-service puppet start
When started, the puppet client will try to connect to the server with hostname puppet. If the puppetmaster is hosted on a server with a different hostname, edit the /etc/puppet/puppet.conf fileand add in a server= entry inside the [agent] section. As we are using a load-balanced setup, weneed to set a dedicated location for the certificate handling of the clients - only one server can act asthe certificate authority. We can point to this server using the ca_server parameter:
# cat /etc/puppet/puppet.conf[main] logdir=/var/log/puppet rundir=/var/run/puppet ssldir=$vardir/ssl
[agent] classfile=$vardir/classes.txt localconfig=$vardir/localconfig listen=true ca_server=puppet-ca.internal.genfic.com
You probably notice we also added the listen=true directive. This allows the puppetmaster to connectto the puppet clients as well (by default, the puppet clients connect to the master themselves). Thiscan be interesting if you want to push changes to particular systems without waiting for the standardrefresh period.
Now tell the client to create a certificate and send the signing request to the puppet master:
# puppet agent --test
On the puppet master, the certificate request is now pending. You can see the list of certificates withpuppet cert --list. Sign the certificate if you know it is indeed a valid request.
# puppet cert list "pg_db1.internal.genfic.com" (23:A5:2F:99:65:60:12:32:00:CA:FE:7F:35:2F:E2:3A)# puppet cert sign "pg_db1.internal.genfic.com"notice: Signed certificate request for pg_db1.internal.genfic.comnotice: Removing file Puppet::SSL::CertificateRequest pg_db1.internal.genfic.com at '/var/lib/puppet/ssl/ca/requests/pg_db1.internal.genfic.com.pem'
Once the request is signed, you can retrieve the certificate using the puppet agent command again.
# puppet agent

Configuration managementwith git and Puppet
113
Configuring access
The SELinux policy loaded does not, by default, allow puppet to manage each and every file on thesystem. If you want this, you need to enable the puppet_manage_all_files boolean.
Working with Puppet
Learning the facts
When you are on a puppet-managed system, you can run facter to get an overview of all the facts thatit found on the system. For instance, to get information on addresses:
# facter | grep addressipaddress => 192.168.100.152ipaddress6 => 2001:db8:81:22:0:d8:e8fc:a2dcmacaddress => 36:5b:94:e1:eb:0e
Not using daemon
If you do not want to use the puppet (client) daemon, you can run puppet from cron easily. Just havepuppet agent ran with the frequency you need.
Not using a puppet master
You can even use Puppet without a puppet master. In that case, the local system will need access to theconfiguration repository (which can be a read-only NFS mount or a local checkout of a repository).
In such a situation, you run puppet apply:
# puppet apply --modulepath /path/to/modules /path/to/manifests/site.pp
If you want more information of all changes that are made, you can ask puppet to log (using -llogfile) or print it out on screen more (using --verbose).
Requesting an immediate check and update
You can ask the puppet (client) daemon to immediately check with the puppet master by sending aSIGUSR1 signal to the daemon (restarting the daemon also works).
# pkill -SIGUSR1 puppetd
If your puppet daemons are running with the "listen=true" setting, then you can tell the puppet mastertoo to connect to the daemon and trigger an immediate check using the "kick" feature:
# puppet kick pg_db1.internal.genfic.com
Logging
Puppet logs its activities by default through the system logger.
# tail -f /var/log/syslogpuppet-master[4946]: Compiled catalog for puppet.internal.genfic.com in \ environment production in 0.10 secondspuppet-agent[6195]: (/Stage[main]/Portage/File[make.conf]/content) content \ changed '{md5}be84feffe82bc2a37ffc721d892ef06a' to '{md5}5050fba3458f8eb120562db10834e0f1'puppet-agent[6195]: Finished catalog run in 0.34 seconds

Configuration managementwith git and Puppet
114
The power of Puppets definitionsAs I said before, puppets power comes from the ability of describing the state of a system, and lettingPuppet decide how to reach that state. In this section, I give you an overview of how that is achieved.Note however that this is far from a crash course on Puppet - there are good resources for that online,and Puppet truly warrants an entire book on itself.
The site.pp file
The first file is puppet's manifests/site.pp file. This file is read by Puppet and thus acts asthe starting point for all definitions. A basic definition for our architecture would be to include thepatterns and the nodes:
import "patterns/*.pp"import "nodes/*.pp"
A pattern file
Note
Patterns are specific to our Puppet implementation; the terminology is not used in Puppetby itself.
In a pattern file, we declare the settings as if it was a sort of "template" node for a particular service.You could have patterns for regular systems, for databases, for web application servers, for hardened/stripped servers, etc. The idea is that these patterns are then applied on the particular nodes, allowingfor simple and default installations (for instance image-driven) to be quickly transformed into properdeployments.
A pattern described further is just an example for a "general" state. You can build on top of this one,build other patterns that include from this one, etc. Really, patterns just apply wherever you think reuseis good and the setup is somewhat complex (if it was a single thing, it would become a module).
Such a pattern file starts from the next, simple layout (for instance for manifests/patterns/general.pp):
class general { # Include your content here}
Let's first include some modules (basic building blocks) - something we'll cover later:
# Manage our /etc/hosts fileinclude hosts# setup portage settingsinclude myportage
Next, we want to make sure that an eix cache (database) is available on the system. If not, then Puppetmight fail to install software itself as it relies on the eix database:
exec { "create_eix_cache": command => "/usr/bin/eix-update", creates => "/var/cache/eix/portage.eix",}
In the above example, Puppet will look at the creates parameter, see that it would create the /var/cache/eix/portage.eix file, and then checks on the system if that file exists. If not, then the commandreferenced by the command parameter will be executed by Puppet.

Configuration managementwith git and Puppet
115
Let's also say that SSH must be installed (on Gentoo this is by default, but you never know a wiseguydeleted it) and the service must be running. This could be declared as follows:
package { ssh: ensure => installed, require => Exec['create_eix_cache'],}
service { sshd: ensure => running, require => [ File['/etc/ssh/sshd_config'], Package[ssh] ],}
Here, Puppet gets to know that before it can ensure the sshd service is running, the /etc/ssh/sshd_configfile must be available (this does mean we need to declare something later that provides this file) andthe package as well. And for the package to be installed, Puppet knows it first needs to check if ourpreviously created eix-command has ran.
The possibilities are almost endless. You can handle mount information too, like so:
mount { "/usr/portage/packages": ensure => mounted, device => "nfs_server.internal.genfic.com:gentoo/packages", atboot => true, fstype => "nfs4", options => "soft,timeo=30",}
With this setting, Puppet will update the /etc/fstab file and then invoke the mount command.
A node file
When a pattern is made, we can create a node (which is the term used for a target machine that ismanaged by Puppet).
In a simple form, this could be:
node 'pg1_db.internal.genfic.com' { include p_database}
Here, we just declared that the node with hostname pg1_db.internal.genfic.com uses the patterndefinition in p_database.pp. Of course, we could extend this further by including more information.And the real power comes when the pattern uses certain settings (through variables) which are thenset on the node level.
A module file
Modules are the building blocks of a Puppet-managed environment. They provide managementfeatures for a single, specific technology.
Say you need to manage a postgresql database, then you can search for (and use) a Puppet modulefor postgresql.
# puppet module search postgresqlSearching http://forge.puppetlabs.com ...NAME DESCRIPTION
Configuration managementwith git and Puppet
116
camptocamp-pgconf A defined type to manage entries in Postgresql's configuration fileinkling-postgresql NOTE: Transfer of Ownershipakumria-postgresql Manage and install Postgresql databases and usersKrisBuytaert-postgres Puppet Postgres modulepuppetlabs-postgresql Transferred from Inkling
# puppet module install puppetlabs-postgresqlPreparing to install into /etc/puppet/modules ...Downloading from http://forge.puppetlabs.com ...Installing -- do not interrupt .../etc/puppet/modules### puppetlabs-postgresql (v1.0.0) ### puppetlabs-firewall (v0.0.4) ### puppetlabs-stdlib (v2.6.0)
You can manage your own, internal forge site where modules can be downloaded from as well.
When you have a module available, you can start using it similar as we did before. On the http://forge.puppetlabs.com site you will also find usage examples for each module.
ResourcesA humble list of excellent online resources.
For git and gitolite:
• gitolite documentation [http://sitaramc.github.com/gitolite/master-toc.html] (github.com)
For puppet:
• Puppet Cookbook [http://www.puppetcookbook.com/] (puppetcookbook.com)

117
Chapter 12. Virtualization with KVMIntroduction
TODO
Virtualization using KVMWhen possible, we will use virtualization. As virtualization platform, we will choose KVM as it offersmany interesting features (both for development as well as larger enterprise usability) and is quitepopular in the Linux development (and user) community. Other virtualization techniques that can beused are Xen or Virtualbox. Within Gentoo Linux, KVM is a popular and much-used virtualizationtechnology.
Why virtualizeVirtualization has been around for quite some time. Early mainframe installations already had a sortof isolation that is not far off from virtualization nowadays. However, virtualization is not just amainframe concept anymore - most larger enterprises are already fully working on the virtualizationof their stacks. Products like VMWare have popularized virtualization in the enterprise, and otherhypervisors like KVM, VirtualBox, Xen and more are trying to get a piece of the cacke.
To help administrators manage the virtual guests that are running on dozens of hosts, frameworks haveemerged that lift some of the management tasks to a higher level. These frameworks offer automatedgeneration of new guests, simplified configuration of the instances, remote management of guests.Some of them even support maintenance activities, such as moving guests from one host to another,or monitor the resource consumption of guests to find a good balance between running guests andavailable hosts.
In Gentoo, many of these virtualization frameworks are supported.
The first one is app-emulation/libvirt and is RedHat's virtualization management platform. Thehypervisor systems run the libvirt daemon which manages the virtual guests as well as storageand other settings, and the administrator remotely connects to the various hypervisor systemsthrough the app-emulation/virt-manager application. It has support for SELinux through itss(ecure)Virt(ualization) feature. To do so, it does require the MCS SELinux policy. Libvirt is alsobeing used by many other frameworks (like oVirt, Archipel, Abiquo and more).
Another one that is gaining momentum is app-emulation/ganeti and is backed by Google. It is foremosta command-line driven method but is well capable of handling dozens and dozens of hypervisorsystems. It supports simplified fail-over on top of DRBD and makes an abstraction of the runninghosts versus the guests. It bundles a set of hosts (which it calls nodes) in logical groups called clusters.The guests (instances) are then spread across the nodes in the cluster, and the administrator managesthe cluster remotely.
Using virtualization has a whole set of advantages of which I'll try to mention a few in the nextparagraphs. I will use the term host when talking about the host operating system (the one running ordirectly managing the hypervisor software) and guest for the virtualized operating system instances(that are running on the host).
High Availability
In a virtualized environment, guests can be quickly restarted when needed. The host is still up andrunning, so rebooting a system is a matter of restarting a process. This has the advantage that cachingand other performance measures taken by the hypervisor are still available, which makes bootup timesof guests quite fast.

Virtualization with KVM
118
But even in case of host downtime, given the right architecture, guests can be quickly started up again.By providing a hardware abstraction in the virtualization layer, these technologies are able to start aguest on a different hardware environment (even with different hardware, although there are limitsto this - the most obvious one being that the new hardware must support the same architecture andvirtualization). Many virtualization solutions can host guest storage (the guests' disks) in image fileswhich can be made highly available through high-performance NFS shares, cluster file system orstorage synchronisation. If the host crashes, the guest storage is quickly made available on a differenthost and the guest is restarted.
Resource optimization
For most organizations, virtualization is one of the most effective ways to optimize resources in theirdata rooms. Regular Unix/Windows servers generally consume lots of power, cooling and floor spacewhile still only offering 15% (or less) of actual resource consumption (CPU cycles). 85% of the time,the system is literally doing nothing but waiting. With virtualization, you can have resources utilizedbetter, going towards a healthy 80% while still allowing room for sudden resource burst demands.
Flexible change management
The virtualization layer also offers a way to do flexible change management. Because guests are nowmore tangible, it is easier to make snapshots of entire guests, copy them around, upgrade one instanceand, if necessary, roll back to the previous snapshot - all this in just a few minutes or less. You can'tdo this with dedicated installations.
"Secure" isolation
In a security-sensitive environment, isolation is a very important concept. It ensures that a systemor service can only access those resources it needs to, while disallowing (and even hiding) the otherresources. Virtualization allows architects to design the system so that it runs in its own operatingsystem, so from the viewpoint of the service, it has access to those resources it needs, but sees noother. On the host layer, the guests can then be properly isolated so they cannot influence each other.
Having separate operating systems is often seen as a thorough implementation of "isolation". Yes, thereare a lot of other means to isolate services. Still, running a service in a virtualized operating system isnot the summum of isolation. Breaking out of KVM [http://blog.nelhage.com/2011/08/breaking-out-of-kvm/] has been done in the past, and will most likely happen again. Other virtualization have seentheir share of security vulnerabilities to this level as well.
Simplified backup/restore
For many organizations, a bare-metal backup/restore routine is much more resource hungry thanregular file-based backup/restore. By using virtualization, bare-metal backup/restore of the guests isa breeze, as it is now back a matter of working with files (and processes). Ok, the name "bare-metal"might not work anymore here - and you'll still need to backup your hypervisor. But if your hypervisor(host) installation is very standardized, this is much faster and easier than before.
Fast deployment
By leveraging the use of guest images, it is easy to create a single image and then use it as a mastertemplate for other instances. Need a web serving cluster? Set up on, replicate and boot. Need a fewmore during high load? Replicate and boot a few more. It becomes just that easy.
ArchitectureTo support the various advantages of virtualization mentioned earlier, we will need to take these intoaccount in the architecture. For instance, high availability requires that the storage, on which the guestsare running, is quickly (or even continuously) available on other systems so these can take over (orquickly boot) the guests.
Virtualization with KVM
119
The underlying storage platform we focus on is Ceph, and will be discussed in a later chapter.
Also, we will opt for regular KVM running inside screen sessions. The screen sessions allow us toeasily manage KVM monitor commands. The console itself will be launched through VNC sessions.The sessions will by default not be started (as to not consume memory and resources) but can be startedthrough the KVM monitor when needed.
All the other aspects of the hypervisor level are the same as what we will have with our regularoperating system design (which is defined further down). This is because at the hypervisor level, wewill use Gentoo Linux as well. The flexibility of the operating system allows us to easily managemultiple guests in a secure manner (hence the secure containers displayed in the above picture). Wewill cover these secure containers later.
Administration
Managing the guests entails the following use cases:
• IMACD operations on the guest
• Operate a guest (stop, start, restart)
The regular IMACD operations are based on image management. Basic (master) guest images aremanaged elsewhere, and eventually published on a file server. The hosts, when needed, copy over thismaster image to the local file system. When a guest needs to be instantiated, it either uses a copy ofthis file (long-term guest) or a copy-on-write (short-term guest) stored in the proper directory afterwhich it is launched.
Similarly, removal of guests entails shutdown of the guest and removal of the image from the system.All this is easily scriptable.
Monitoring
Monitoring guests will be integrated in the monitoring component later. Basically, we want to benotified if a guest is not running anymore but should (process monitoring), or if a guest is notresponsive anymore (ping reply monitoring).
Security
We mentioned secure containers before, so let's describe this bit in more detail.
What we want to accomplish is that the virtual guests cannot interfere with each other. This is bothpermission-wise (for which we will use SELinux) as well as resources (for which we will use Linuxcgroups).
Permissions will be governed through SELinux' categories. The guests all run inside a SELinux domainalready, so that vulnerabilities within the Qemu emulator (the user-space part of the hypervisor) cannotinfluence the host itself. However, if they all run inside the same SELinux domain, then they couldinfluence each other. So what we will do is run each of them within a particular SELinux category,and make sure that their images also have this category assigned.
Resources are governed through Linux cgroups, allowing administrators to put restrictions on variousresources such as CPU, I/O, network usage, etc. On a hypervisor level, we want to support guests withdifferentiated resource requirements:
• guaranteed resources (so the CPU shares and memory shares are assigned immediately)
• prioritized resources (so the CPU shares and memory shared are, when needed, preferably assignedto members of this group)
• shared resources (the rest ;-)

Virtualization with KVM
120
Deployment and usesLet's make all this a bit more tangible and look at how this would be accomplished.
File system structure
Each host uses the same file system structure (standard) so that you can move images from one systemto another without changing your underlying procedures. Let's say the images are stored in /srv/virt using the following structure:
/sr/virt+- pending+- base`- guests +- hostname1 | +- rootfs.img | +- otherfs.img | +- settings.conf | `- computed.conf +- hostname2 `- ...
The pending location is where base image copies are placed first. Images in that directory are stillin process of being transferred, or have been interrupted somewhere along. Once a copy is complete,the image will be moved from the pending to the base location. Guests then use copies (of copy-on-write) images from the base images, although this is of course not mandatory - new empty images canbe created as well for other purposes. The base images allow you to quickly setup particular systemsor prepared file systems for other purposes.
The settings.conf file contains the information related to the guest. This includes MAC addressinformation, guest image information (and options on how to attach them), etc. It is also wise to makethis file easily manageable by both humans (so don't use special syntax) and tools (so don't use humanlanguage). The other configuration file, computed.conf, contains settings specific for running thisguest on this host and is generated and updated by the scripts we use to manage the virtual images.
## Example settings.confHOSTNAME=pg1DOMAINNAME=internal.genfic.comMAC_ADDRESS=00:11:22:33:44:b3VLAN=8CPU=kvm64SMP_DEFAULT=2 # Dual CPUMEM_DEFAULT=1536 # 1.5 Gbyte of memoryRESOURCES=guaranteed # for cgroup management
IMAGES=IMAGE1,IMAGE2IMAGE1=/srv/virt/guests/pg1/rootfs.img,if=virtio,cache=writebackIMAGE2=/srv/virt/guests/pg1/postgresdb.img,if=virtio,cache=writeback
## Example computed.confGDB=disabledVNC_ADDRESS=vhost4-mgmtVNC_PORT=14 # real port is 5914SMP=2MEM=2048 # 2 Gbyte of memorySTATE=runningSELINUX_CATEGORY=12CGROUP=guests/dedicated/pg1

Virtualization with KVM
121
Interacting with KVM monitors
The KVM monitor (actually Qemu/KVM monitor) allows administrators to manage the virtual guestspecifics, such as hot-adding (or removing) devices, taking snapshots, etc. As we placed the KVMmonitor on the standard output within screen, all the admin has to do (after logging in) is to attach tothe monitor of the right virtual guest.
$ screen -lsThere are screens on: 4872.kvm-pg1 (Detached) 5229.kvm-www1 (Detached) 14920.kvm-www2 (Detached)$ screen -x kvm-pg1(qemu)
Offline operations
Bare metal recovery (snapshot backups)
Integrity validation (offline AIDE scans)

122
IndexAADSP, 45ASLR, 21Author Domain Signing Practices, 45
BBOOTP, 54Bootstrap Protocol, 54
CCA, 66catalyst, 87certificate, 63certificate authority, 66Certificate Revocation List, 67CObIT, 1CRL, 67
DDAC, 9Delegation Signer, 43DHCP, 54Discretionary Access Control, 9DKIM, 36DMARC, 45DNS, 36DNSKEY, 43DNSSEC, 41DNSSEC Hashed Authenticated Denial of Existence,44Domain Name System, 36DomainKey Identified Mail, 36DS, 43DSA, 24
EECSDA, 24EVM, 24exports, 78
Ffacter, 113FURPS, 3
Ggitolite, 105
IIMA, 24ISO/IEC 27000, 2ITIL, 1
KKey Signing Key, 43KSK, 43
MMAC, 9, 23man-in-the-middle, 64Mandatory Access Control, 9, 23MITM, 25MITM attack, 64MoSCoW, 3
Nnamed.conf, 39, 47Next Secure, 44NOEXEC, 21NSEC, 44NSEC3, 44nsupdate, 52
OOCSP, 67Online Certificate Status Protocol, 67
PPAM, 17PaX, 21paxctl, 21pg_hba.conf, 95PIC, 21PIE, 22Pluggable Authentication Modules, 17pmcs, 16psql, 94public-key cryptography, 64
Rrequirements, 3Resource Record Signature, 43rndc, 39rpc.gssd, 77rpc.idmapd, 77rpc.lockd, 77rpc.mountd, 76rpc.statd, 77rpc.svcgssd, 77rpcbind, 76RRSIG, 43
SSCAP, 10SELinux, 9, 23Sender Policy Framework, 36, 44Simple Mail Transfer Protocol, 44SMTP, 44SPF, 36, 44

Index
123
SSP, 22syslog, 13
Ttext relocation, 21TOGAF, 2trust store, 65TSIG, 49
VVMWare, 117
ZZone Signing Key, 43zones, 37ZSK, 43


