REFRIGERATED AIR DRYER SERVICE MANUAL DIGI-PRO CONTROLLER WARRANTY NOTICE Failure to follow the instructions and procedures in this manual or misuse of this equipment will VOID any warranty.
Transcript
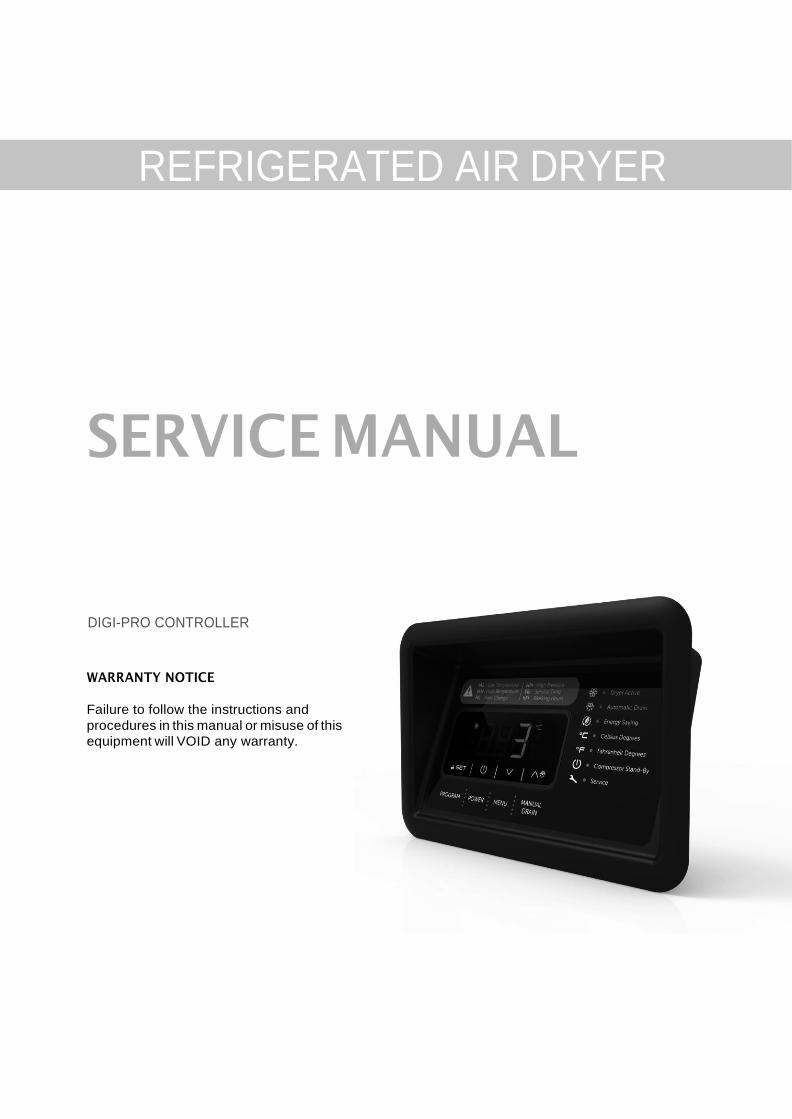
REFRIGERATED AIR DRYER
SERVICE MANUAL
DIGI-PRO CONTROLLER
WARRANTY NOTICE
Failure to follow the instructions and
procedures in this manual or misuse of this
equipment will VOID any warranty.
Page 2
1. USER INTERFACE
During normal operation the display shows the evaporation temperature.
1.1. Showing machine status
1. To disable the Key Lock: Press and hold SET for 4 seconds
2. Press and hold the DOWN arrow for 4 seconds: the display will show Pb1.
3. Press and release the UP or DOWN arrows to select the setting you want to view:
- Pb1 heat exchanger probe
- hSE running hours for unit
- rhS reset running hours for unit
- hFI running hours for filter
- rhF reset running hours for filter
- rFI reset filter alarm
4. To reset the value, press and release SET, press and release the UP arrow to set
149 for rhF and rFI
171 for rhS
Then press and release SET: the display will show “- - -“ flashing for 4 seconds.
2. OPERATION
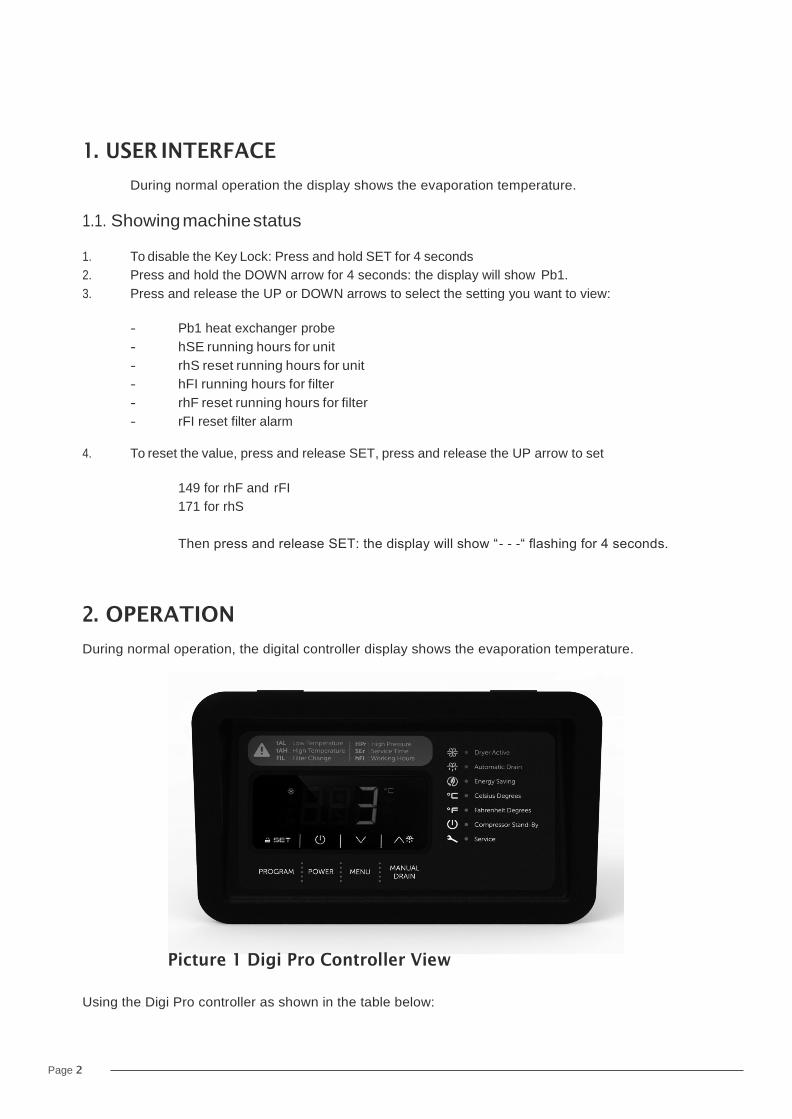
During normal operation, the digital controller display shows the evaporation temperature.
Picture 1 Digi Pro Controller View
Using the Digi Pro controller as shown in the table below:
Page 3
2.1 Menu Buttons
PROGRAM
POWER
To modify the parameters, press and release SET. This should be
used by service team
This button is used for starting and stopping the dryer. Press and
hold for 4 seconds to start or stop.
MENU
MANUAL DRAIN
These buttons are used to navigate between screens and adjust
values.
This button is used for manual control of the drain output. Press
and hold for 4 seconds to drain manually.
Please contact service when an alarm/warning occurs.
2.2 Mode Display
DRYER ACTIVE MODE
AUTOMATIC DRAIN MODE
ENERGY SAVING MODE
CELSIUS UNIT MODE
FAHRENHEIT UNIT MODE
COMPRESSOR STANDBY MODE
SERVICE MODE
This mark indicates that the dryer is in an active state and
drying.
Shows if the drain system is activated.
Shows if the energy saving mode is activated
Indicates that Celsius temperature is selected.
Indicates that Fahrenheit temperature is selected.
This mode shows that the dryer is ready for drying operation.
This mode shows that the dryer has reached service time.
Page 4
2.3 Alarm Display
Alarms / warnings are displayed on the digital screen. This means the dryer is not working
under normal operating conditions or conditions which are outside the range of set
values.
Alarm Code Alarm Description Reason for Alarm
tAL Low Temperature Alarm Refrigerant line temperature is lower than specified set values
tAH High Temperature Alarm Refrigerant line temperature is higher than specified set values
FIL Filter Change Alarm Filter element needs to be replaced
SEr General Service Alarm General service time of the dryer
HPr High Pressure Alarm Refrigerant line pressure is higher than specified set values
Pr1 Temperature Probe Alarm Temperature sensor is faulty.
hFI Running Hours Alarm The dryer running hours allowed has been reached.
Please contact service if an alarm/warning occurs.
3. ALARMS
3.1 Alarm Output
- if a low temperature alarm occurs ( the display shows the code “tAL”)
- if a high temperature alarm occurs (the display shows the code “tAH”)
- if the filter needs changed (the display shows the code “FIL”)
- if a high pressure alarm occurs (the display shows the code”HP or HPr”)
- if a compressor or fan condenser alarm occurs (the display shows the code “COH or CSd”)
- if the compressor exceeds the running hours allowed ( the display shows the code “SEr” and the
service LED lights up.)
- if the filter element exceeds the running hours allowed ( the display shows the code “FIL” and the
service LED lights up.)
3.2 Device / Compressor Running Hours for SEr
Parameter sets to record the device running hours or the compressor running hours. When the
running hours overtakes the hours, the display shows the code “SEr” alternated to the temperature read
by the heat exchanger, LED service is lit and the device works normally. To show/cancel the compressor
running hours have a look at chapter 1 “USER INTERFACE” (labels hSE and rHS).
Page 5
3.3. Device/compressor runtime for FIL
Parameter sets to record the device runtime or the compressor runtime. When the runtime reaches set
limit, the display shows the code “FIL” replacing the temperature read by the heat exchanger, service
LED is lit and the device works normally. To show/cancel the compressor runtime have a look at chapter
1 “USER INTERFACE” (labels hSE and rHS).
3.4. Input change filter
The activation of this input triggers the display showing the code “FIL” alternated to the temperature
read by the heat exchanger, LED service is lit and the device works normally. Restoring the normal
operation works the same way as cancelling the filter runtime (look for label rFI)
3.5. High Pressure alarm
During this alarm the compressor is switched off.
3.6. Condenser Fan
If one output is configured as condenser fan, parameters are relevant, as follows.
If just one of the input terminal pairs, 11-10 or 9-10, is configured as fan activation, the input
activation also activates the output.
If the input terminal pair 11-10 is configured as condenser probe, the fan will be switched on
when the compressor is switched on; as soon as the compressor switches off, the fan keeps in being
switched on for the time F1, then it works according to temperature F0 (the fan switches off when the
temperature falls below the temperature F0 and switches on when the temperature rises above F0 +
2°C/4°F.
If the condenser probe is in error, the fan is switched on if the compressor is switched on and is
switched off if the compressor is switched off (in this last case the fan is switched off with the delay F1
since the compressor switches off).
If the input terminal pair 11-10 is configured as condenser fan and the input terminal pair 9-10 is
configured as fan activation, input terminal pair 11-10 has priority over the input terminal pair 9-10.
If no input is configured to manage the fan, this is switched on if the compressor is switched on,
and switched off if the compressor is switched off (in this last case the fan is switched off with the delay
F1 since the compressor switches off).
In case of COH and CSd alarm the fan is switched on; the fan LED shows the status of the
output.
3.7. Drain Test
Press and hold button UP 4 s: the relay will be turned on as long the button is pressed.
When the button is released the valve restores its cyclical operation.
Page 6
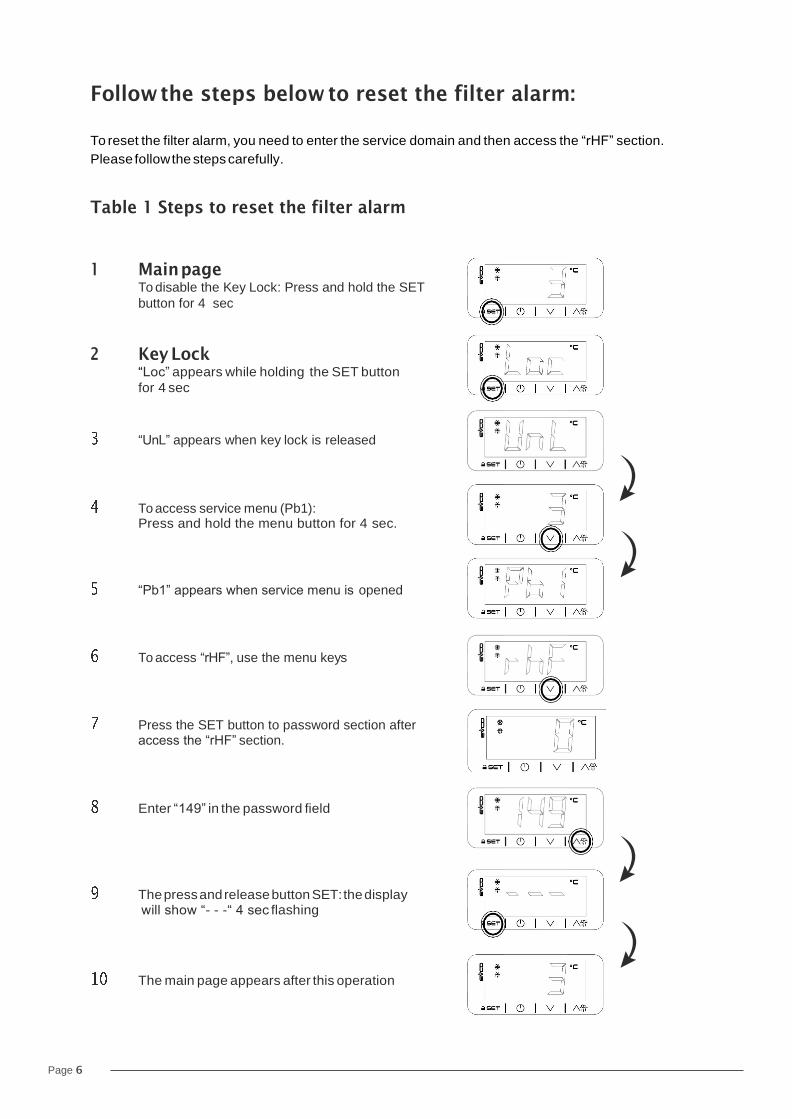
Follow the steps below to reset the filter alarm:
To reset the filter alarm, you need to enter the service domain and then access the “rHF” section.
Please follow the steps carefully.
Table 1 Steps to reset the filter alarm
1 Main page
To disable the Key Lock: Press and hold the SET
button for 4 sec
2 Key Lock
“Loc” appears while holding the SET button
for 4 sec
“UnL” appears when key lock is released
To access service menu (Pb1): Press and hold the menu button for 4 sec.
“Pb1” appears when service menu is opened
To access “rHF”, use the menu keys
Press the SET button to password section after
access the “rHF” section.
Enter “149” in the password field
The press and release button SET: the display will show “- - -“ 4 sec flashing
The main page appears after this operation
Page 7
Follow the steps below to reset the service alarm:
To reset the service alarm, you need to enter the service domain and then access the “rHS” section.
Please follow the steps carefully.
Table 2 Steps to reset the service alarm
1 Main page
To disable the Key Lock: Press and hold the SET
button for 4 sec
2 Key Lock
“Loc” appears while holding the SET button
for 4 sec
“UnL” appears when key lock is released
To access service menu (Pb1):
Press and hold the menu button for 4 sec.
“Pb1” appears when service menu is opened.
To access “rhS”, use the menu keys
Press the SET button to password section after access the “rHF” section.
Enter “171” in the password field
The press and release button SET: the display will show “- - -“ 4 sec flashing
The main page appears after this operation
Page 8
4. PARAMETERS
The controller includes parameters for controlling the dryer, such as temperature Set-points,
time and operating hours. These parameters are used and changed only by the manufacturer.
Please contact the manufacturer if you have a need to change these parameters. The
manufacturer will provide a key to change the parameter settings if necessary. The programming
key changes some of the parameter settings of the controller not otherwise allowed. The
manufacturer reserves the right to deny access to some parameters.
4.1. Programming Key Description
Table 3 Programming key function buttons
Port Meaning
1 USB port
2 Not used
3 Enter Button
4 Clone Button
5 Signal LED
6 Connector
4.2. Use of the Programming Key
The programming key can be used with the controllers in the “DigiPro” series; Which is called
“loading”. The loading takes 5 s at most; If the LED signal is not a flashing, the procedure will not be
completed (or the LED will not flash).
The loading is allowed on the condition that the program on the key and that on the controller
are the same; If this condition is not true, the programming key will signal that the procedure has not
been completed successfully (or the LED is flashing to show red light for 1 s).
The programming key does not have its own power supply and must be powered using the USB
port; A USB / male Micro-B USB cable (referred to as “USB cable”) is a USB port that can be plugged into
a USB port.
Page 9
Picture 3 Programming key USB connector
Page
10
Warnings;
• make sure about that the device operating conditions,
• do not operate on the controller terminal blocks using electrical or pneumatic screw drivers,
• if the controller has fixed screw connection terminal blocks, never screw the screw connectors to
connect the programming key,
• if the device was taken from a cold to a warm place, humidity could condense inside; wait for about
an hour before powering it,
• for repairs and information regarding the device contact the EVCO sales network,
Follow the Steps Below to Use Programming Key:
Make sure the controller is not powered.
If the controller has removable screw connection terminal blocks, unscrew at the maximum opening the screw connectors of the analog and digital inputs of the controller terminal block and remove possible cables previously wired.
Put to the bottom the connector of the programming key in the connectors of the analog and digital inputs of the controller terminal block paying attention the terminal on the left of the programming key connector coincides with the common terminal of the controller analog and digital inputs.
If the controller has removable screw connection terminal blocks, screw the screw connectors of the analog and digital inputs of the controller terminal block moderating the clamping the most possible.
Connect one end of the USB cable to the USB port of the programming key.
Connect the other end of the USB cable to the USB port of the Personal Computer (or to the USB port of the USB power supply; in this case also put the plug of the USB power supply in a socket).
press and release the programming button of the programming key: the signal LED shows red light flashing a few seconds, after which shows green light firmly 1 s.
Disconnect the ends of the USB cable.
If the controller has fixed screw connection terminal blocks, remove the programming key; if the controller has removable screw connection terminal blocks, remove the controller terminal block.
12 11 10
Picture 4 Digi Pro controller and programming key connection
Page 11
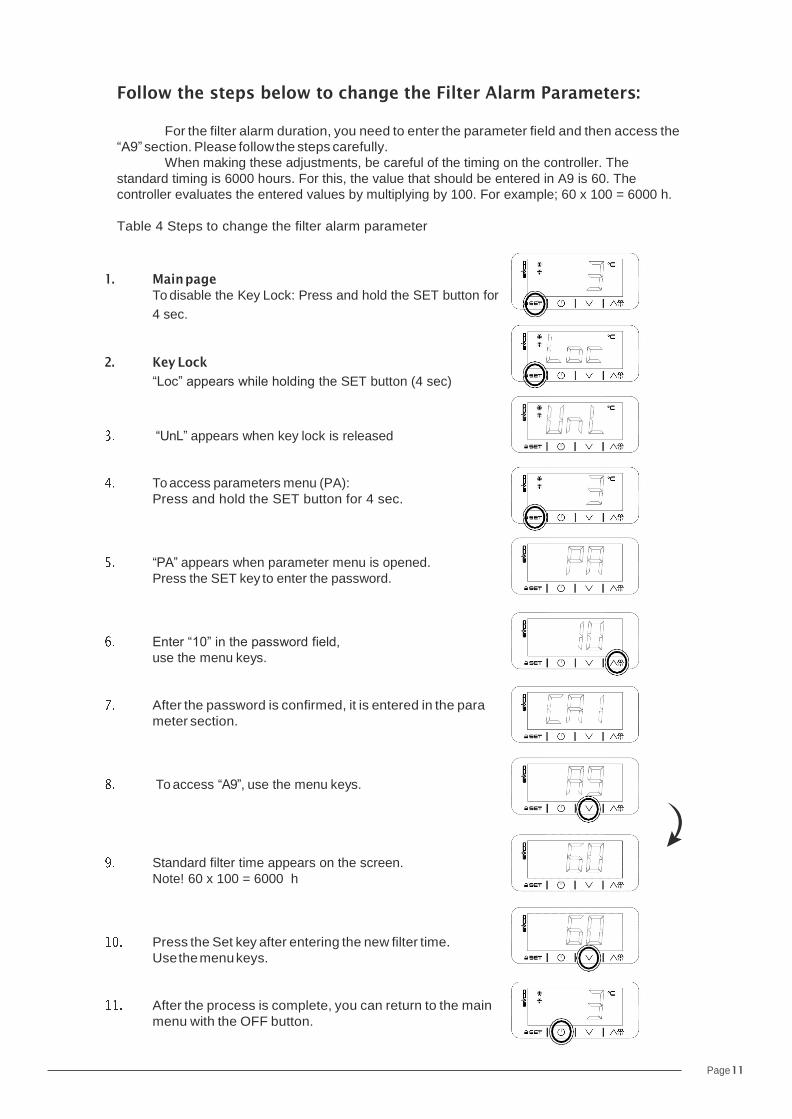
Follow the steps below to change the Filter Alarm Parameters:
For the filter alarm duration, you need to enter the parameter field and then access the
“A9” section. Please follow the steps carefully.
When making these adjustments, be careful of the timing on the controller. The
standard timing is 6000 hours. For this, the value that should be entered in A9 is 60. The
controller evaluates the entered values by multiplying by 100. For example; 60 x 100 = 6000 h.
Table 4 Steps to change the filter alarm parameter
1. Main page
To disable the Key Lock: Press and hold the SET button for
4 sec.
2. Key Lock
“Loc” appears while holding the SET button (4 sec)
“UnL” appears when key lock is released
To access parameters menu (PA):
Press and hold the SET button for 4 sec.
“PA” appears when parameter menu is opened.
Press the SET key to enter the password.
Enter “10” in the password field,
use the menu keys.
After the password is confirmed, it is entered in the para
meter section.
To access “A9”, use the menu keys.
Standard filter time appears on the screen.
Note! 60 x 100 = 6000 h
Press the Set key after entering the new filter time.
Use the menu keys.
After the process is complete, you can return to the main
menu with the OFF button.
Page 10
Follow the steps below to change the Drain Time Parameters:
For the drain times it is necessary to enter the parameter field and then access the sections “u2”
and “u3”. Please follow the steps carefully.
Note that when these values are changed, the time of evacuation closed time is in minutes and
the time of evacuation opened time is in seconds.
Table 5 Steps to change the Drain time parameters
1. Main page
To disable the Key Lock: Press and hold the SET button for 4 sec.
2. Key Lock
“Loc” appears while holding the SET button (4 sec)
“UnL” appears when key lock is released
To access parameters menu (PA):
Press and hold the SET button for 4 sec.
“PA” appears when parameter menu is opened.
Press the SET key to enter the password.
Enter “10” in the password field, use the menu keys.
After the password is confirmed, it is entered in the
parameter section.
To access “u2”, use the menu keys.
Press the SET button to enter the parameter.
This value is the drain system’s on-time. Standard time is 5
seconds. Please enter the new time , then press the SET
button.
To access “u3”, use the menu keys.
Press the SET button to enter the parameter. Use the menu keys.
This value is the drain system’s off-time.
Standard time is 4 minutes.
Please enter the new time , then press the SET button.
After the process is complete, you can return to the main
menu with the off button.
Page 11
5. ELECTRICAL CONNECTION
EV3B23* and EV3B33* have the same electrical connection; EV3B23 relay K1 is rated 16 A,