156
www.kindermorgan.com Regional Training/Workshop

www.kindermorgan.com
Regional Training/Workshop
2
Contents
How to Login
Contracts Data
Capacity Release Offers and Bids
Hands on Practice Session
Recall/Reput
Hands on Practice Session
Agency
Hands on Practice Session
3
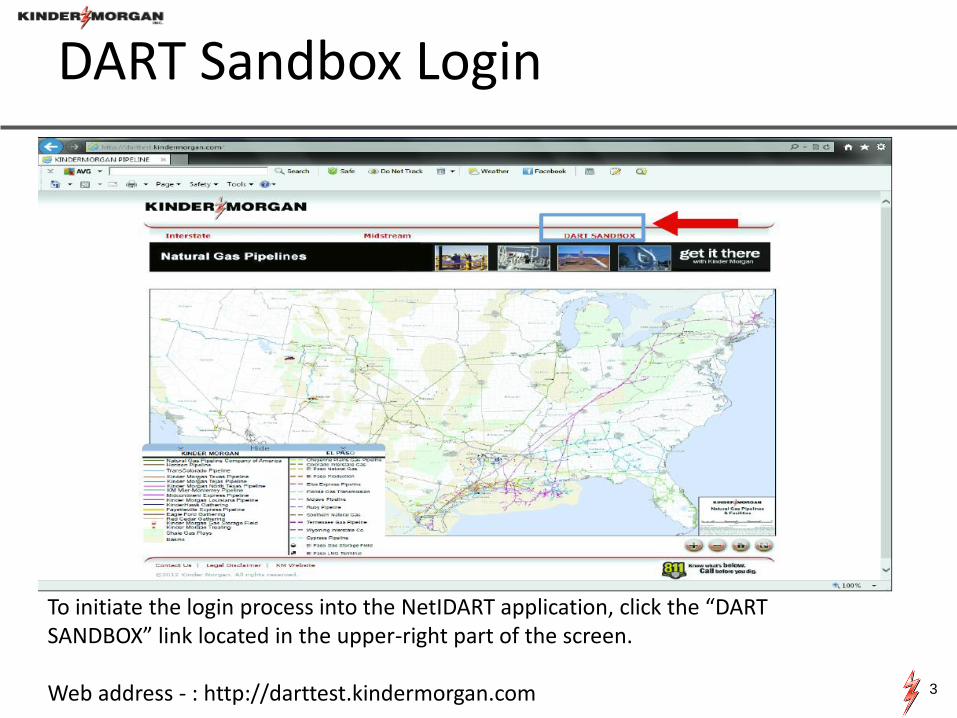
DART Sandbox Login
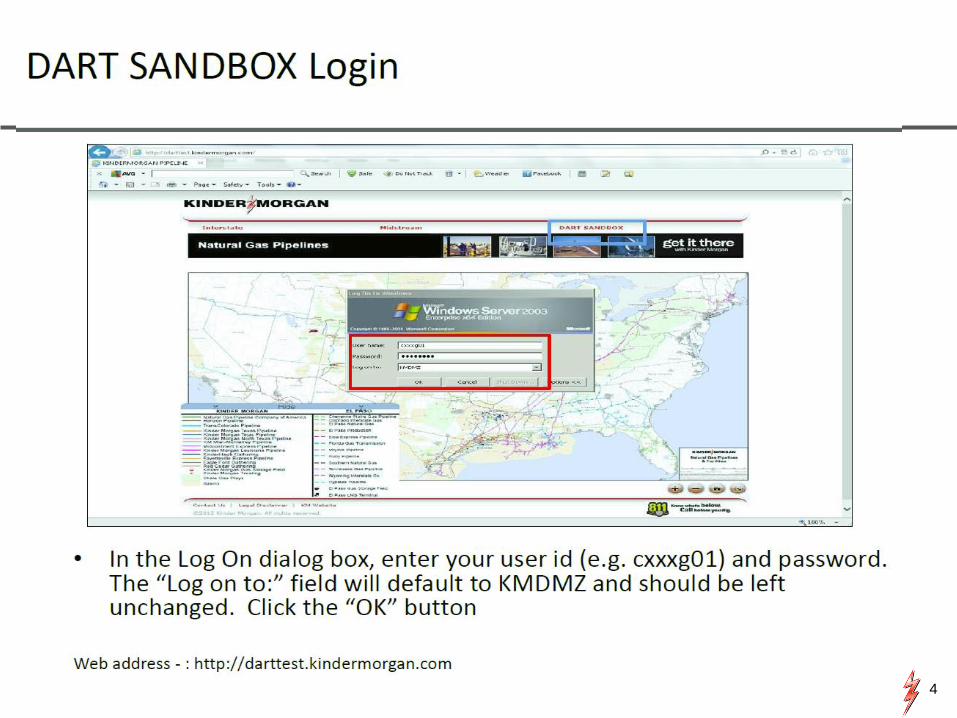
To initiate the login process into the NetIDART application, click the “DART SANDBOX” link located in the upper-right part of the screen. Web address - : http://darttest.kindermorgan.com
4

www.kindermorgan.com

Contract Changes
Service Requester Prop Location Prop BEA ANA
Legacy Contract Number 33xxxxxx 41xxxxxx 21xxxxxx 61xxxxxx
Manual Contract Execution
GID (Global Identification Number)
PIN (Point Identification Number) 800078 892265
Converted Contract Number 33xxxxxx-TF1CIG 41xxxxxx-FT1WIC 21xxxxxx-FT1CPG 61xxxxxx-FT1RBY
New Contract Numbers 210410-FT1CIG
Electronic Contract Execution
DART Xpress
6
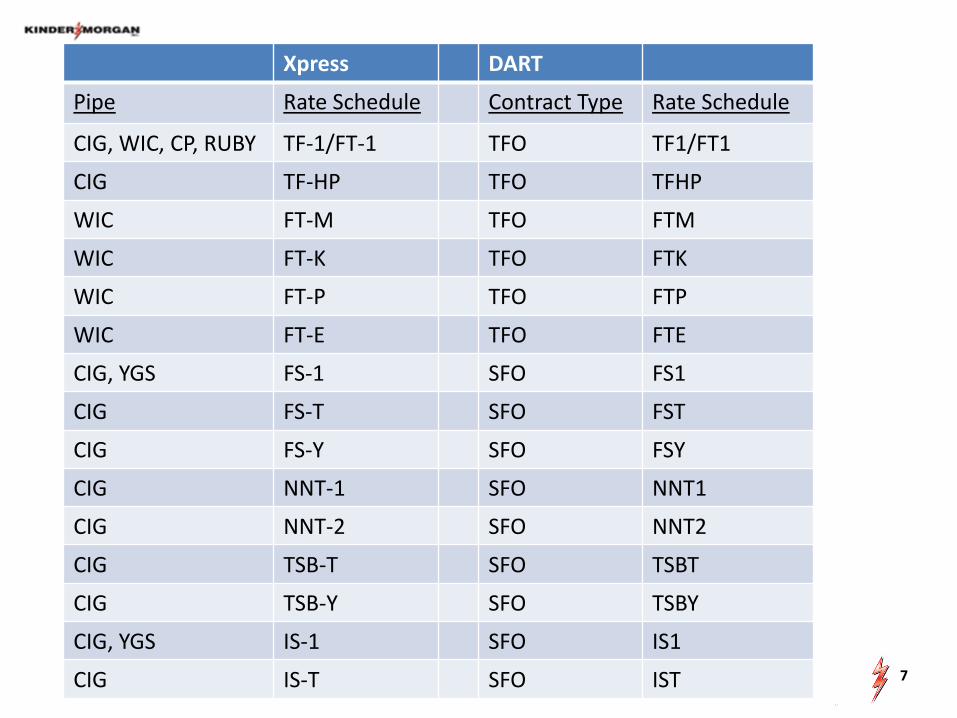
Xpress DART
Pipe Rate Schedule Contract Type Rate Schedule
CIG, WIC, CP, RUBY TF-1/FT-1 TFO TF1/FT1
CIG TF-HP TFO TFHP
WIC FT-M TFO FTM
WIC FT-K TFO FTK
WIC FT-P TFO FTP
WIC FT-E TFO FTE
CIG, YGS FS-1 SFO FS1
CIG FS-T SFO FST
CIG FS-Y SFO FSY
CIG NNT-1 SFO NNT1
CIG NNT-2 SFO NNT2
CIG TSB-T SFO TSBT
CIG TSB-Y SFO TSBY
CIG, YGS IS-1 SFO IS1
CIG IS-T SFO IST 7
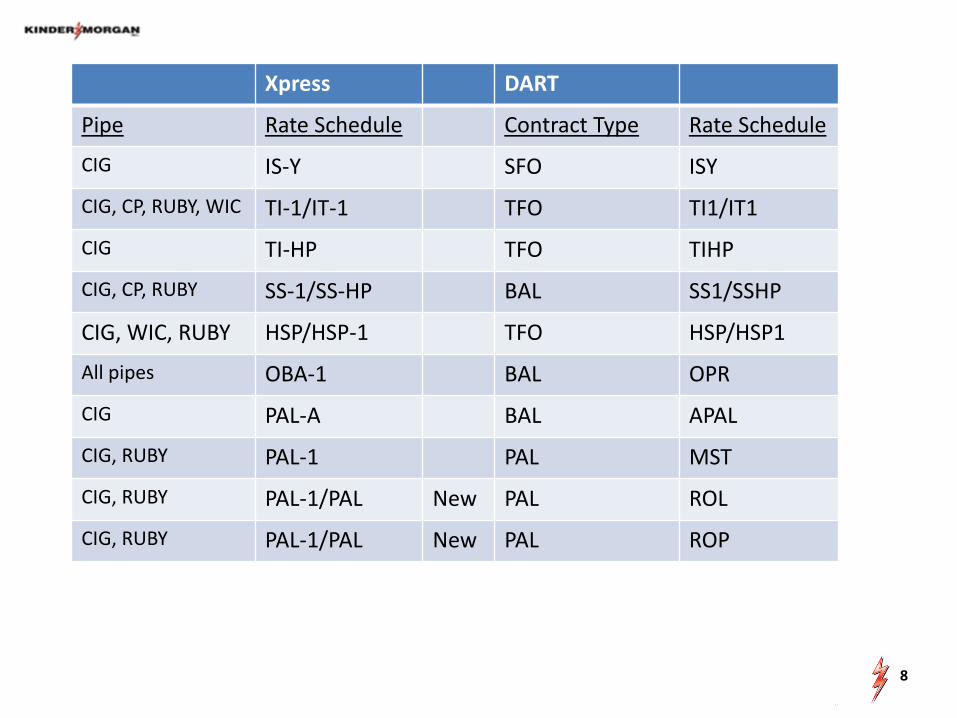
Xpress DART
Pipe Rate Schedule Contract Type Rate Schedule
CIG IS-Y SFO ISY
CIG, CP, RUBY, WIC TI-1/IT-1 TFO TI1/IT1
CIG TI-HP TFO TIHP
CIG, CP, RUBY SS-1/SS-HP BAL SS1/SSHP
CIG, WIC, RUBY HSP/HSP-1 TFO HSP/HSP1
All pipes OBA-1 BAL OPR
CIG PAL-A BAL APAL
CIG, RUBY PAL-1 PAL MST
CIG, RUBY PAL-1/PAL New PAL ROL
CIG, RUBY PAL-1/PAL New PAL ROP
8
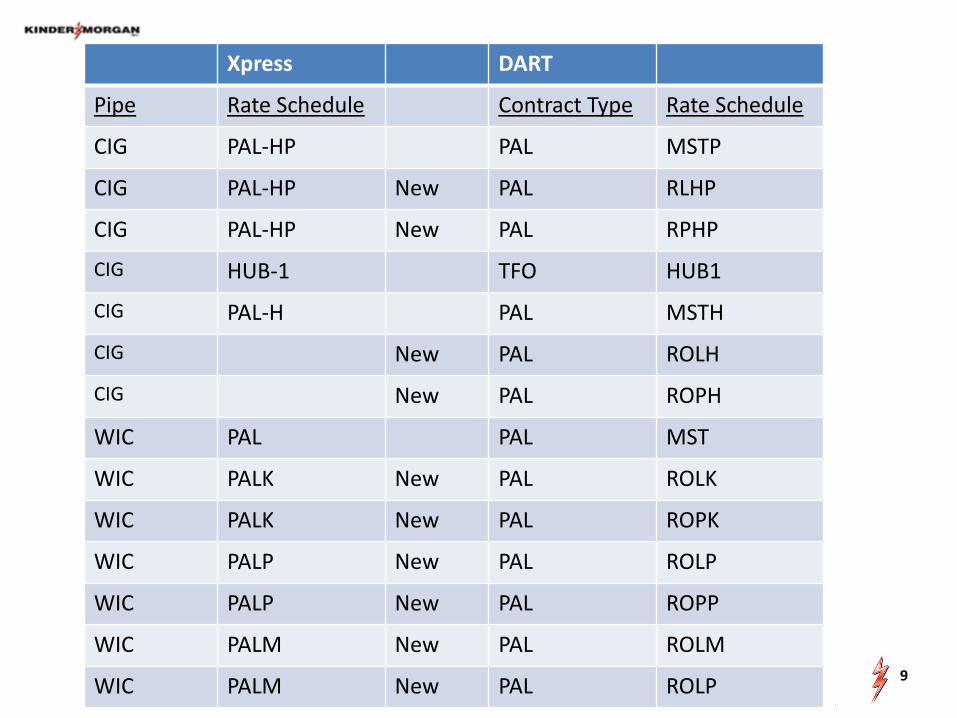
Xpress DART
Pipe Rate Schedule Contract Type Rate Schedule
CIG PAL-HP PAL MSTP
CIG PAL-HP New PAL RLHP
CIG PAL-HP New PAL RPHP
CIG HUB-1 TFO HUB1
CIG PAL-H PAL MSTH
CIG New PAL ROLH
CIG New PAL ROPH
WIC PAL PAL MST
WIC PALK New PAL ROLK
WIC PALK New PAL ROPK
WIC PALP New PAL ROLP
WIC PALP New PAL ROPP
WIC PALM New PAL ROLM
WIC PALM New PAL ROLP 9
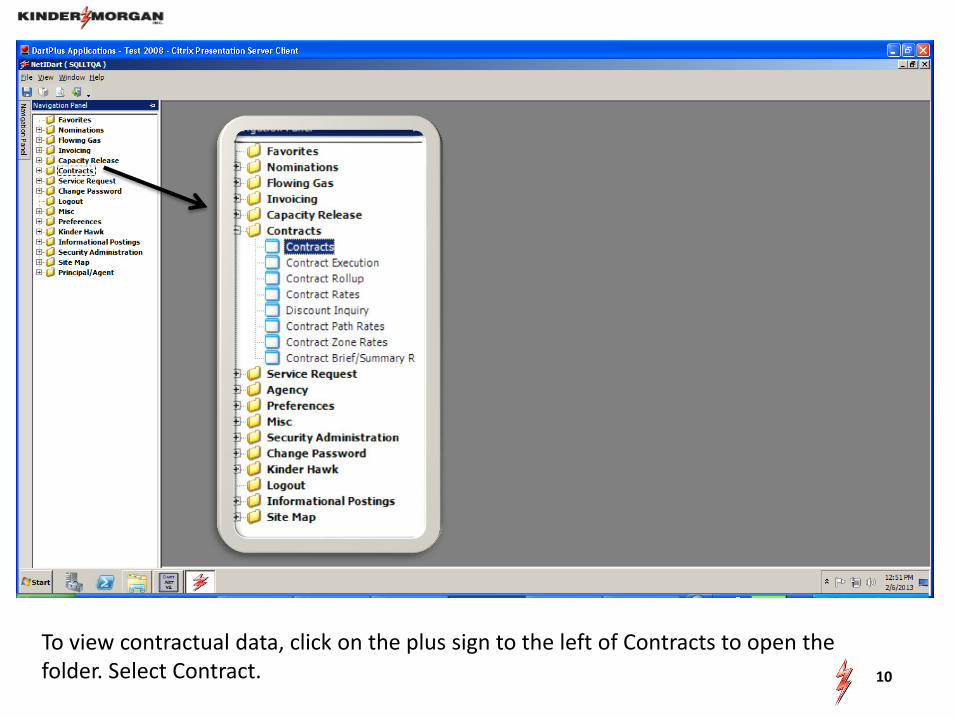
To view contractual data, click on the plus sign to the left of Contracts to open the folder. Select Contract. 10
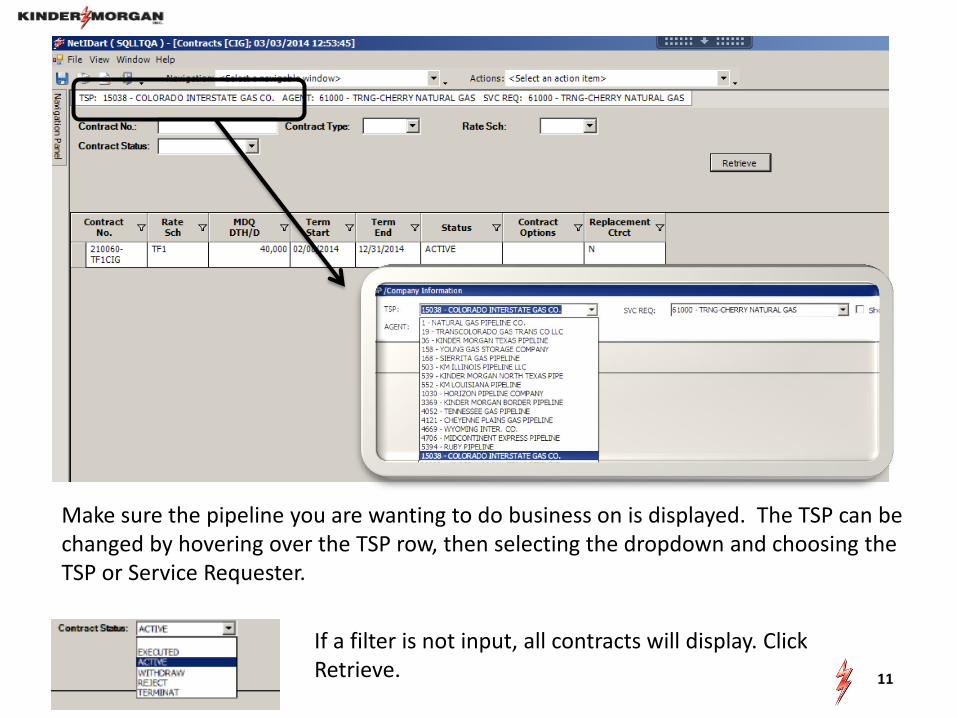
If a filter is not input, all contracts will display. Click Retrieve.
Make sure the pipeline you are wanting to do business on is displayed. The TSP can be changed by hovering over the TSP row, then selecting the dropdown and choosing the TSP or Service Requester.
11

To filter data on the grid, click on the funnel next to the column heading and select the filter criteria. In this example, there is only one rate schedule to select. If there is more than one rate schedule to choose from, then select the one you would like to see.
12

Highlight a contract and right click to see the type of information available to view for the selected contract.
13
14
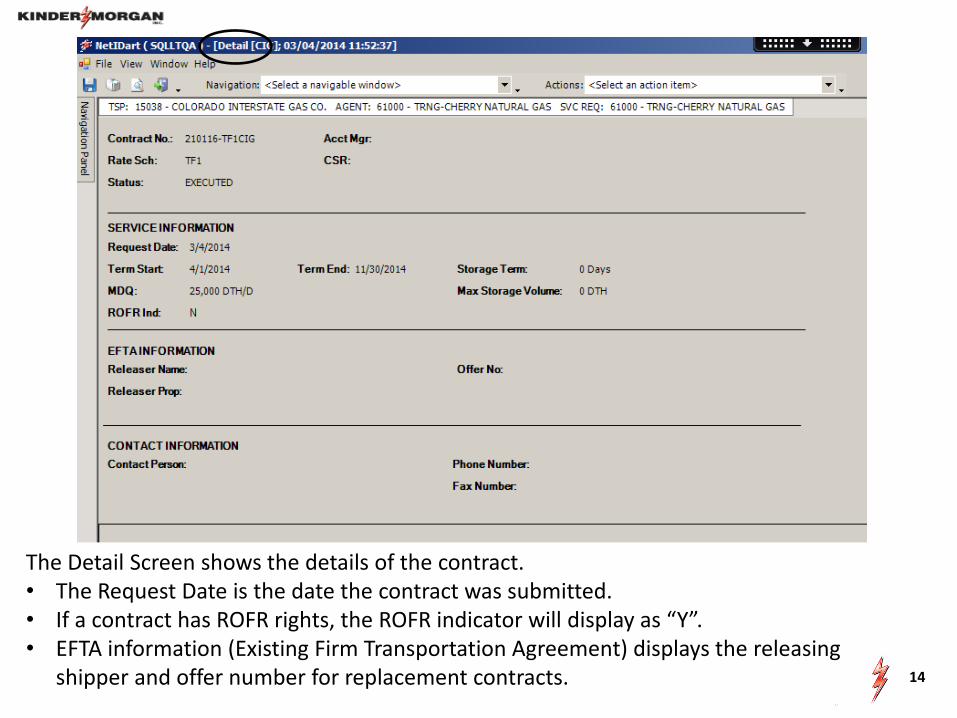
The Detail Screen shows the details of the contract. • The Request Date is the date the contract was submitted. • If a contract has ROFR rights, the ROFR indicator will display as “Y”. • EFTA information (Existing Firm Transportation Agreement) displays the releasing
shipper and offer number for replacement contracts.
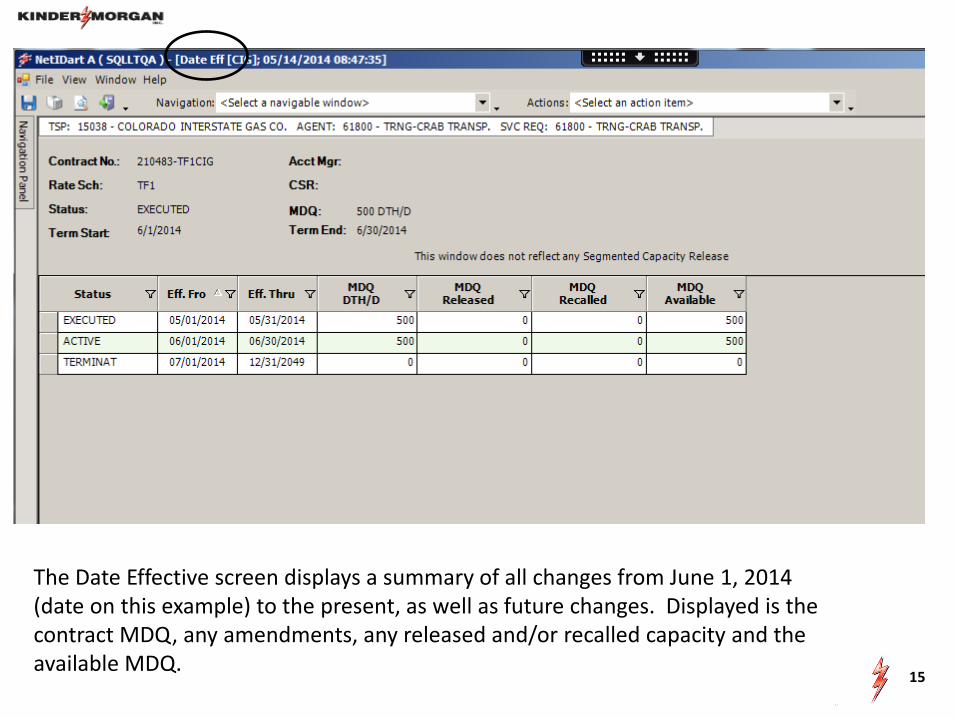
The Date Effective screen displays a summary of all changes from June 1, 2014 (date on this example) to the present, as well as future changes. Displayed is the contract MDQ, any amendments, any released and/or recalled capacity and the available MDQ.
15
16
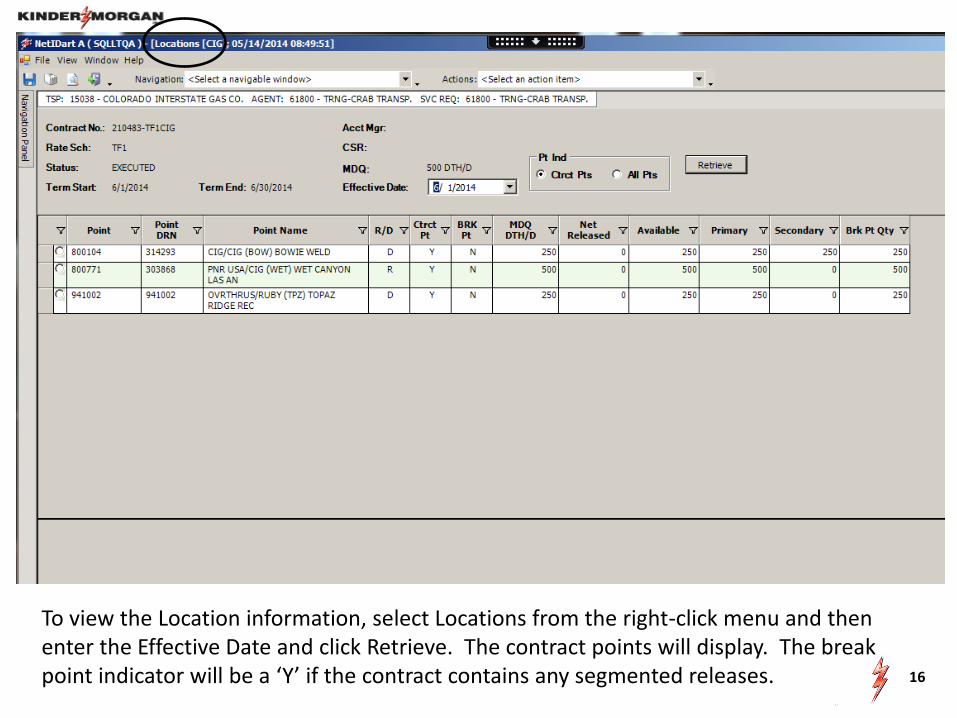
To view the Location information, select Locations from the right-click menu and then enter the Effective Date and click Retrieve. The contract points will display. The break point indicator will be a ‘Y’ if the contract contains any segmented releases.
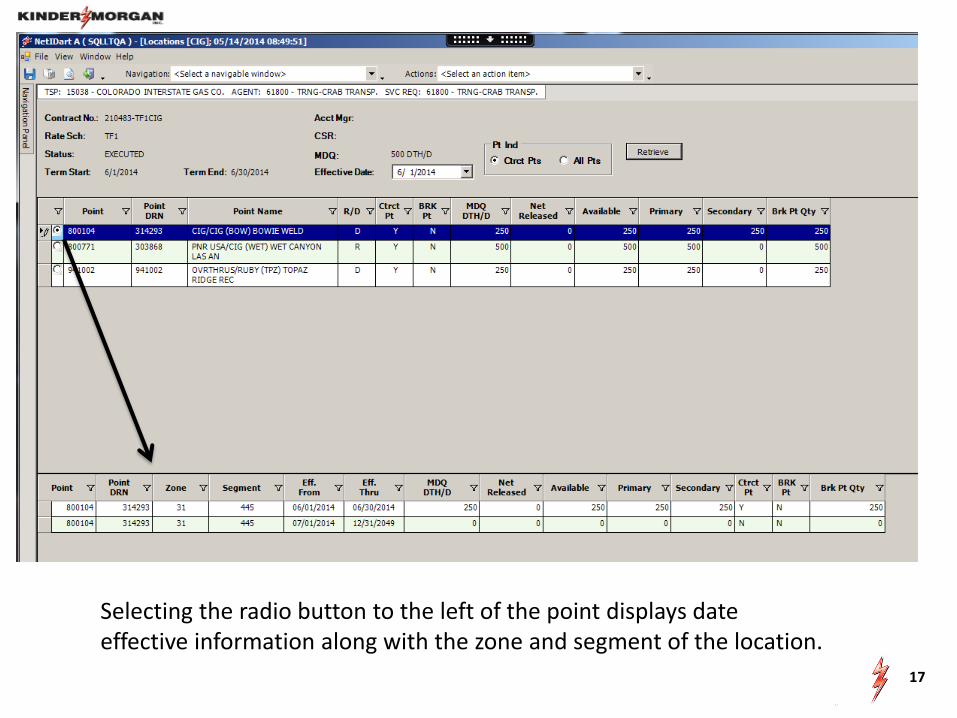
Selecting the radio button to the left of the point displays date effective information along with the zone and segment of the location. 17

18
The zone information on the contract is displayed.
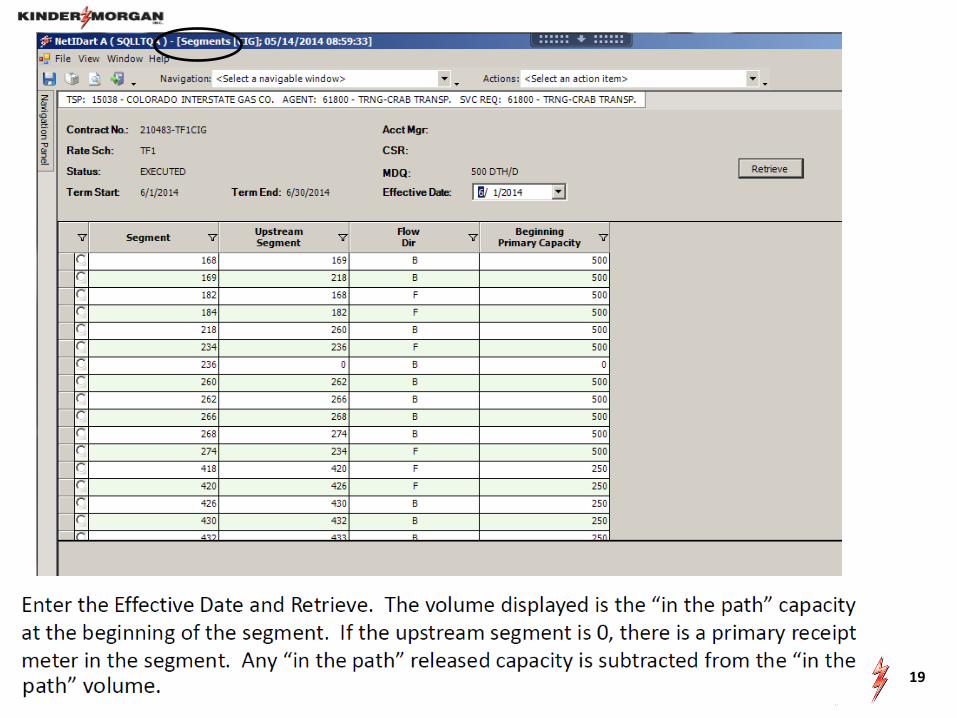
19

20

Capacity Rights assist you in locating a point within a segment. It is especially useful if you have more than one point in a segment to identify which point is upstream of another.
21

22 Select Contract Zone Rates to view the max tariff rates and the discount rates for a specific contract.
23
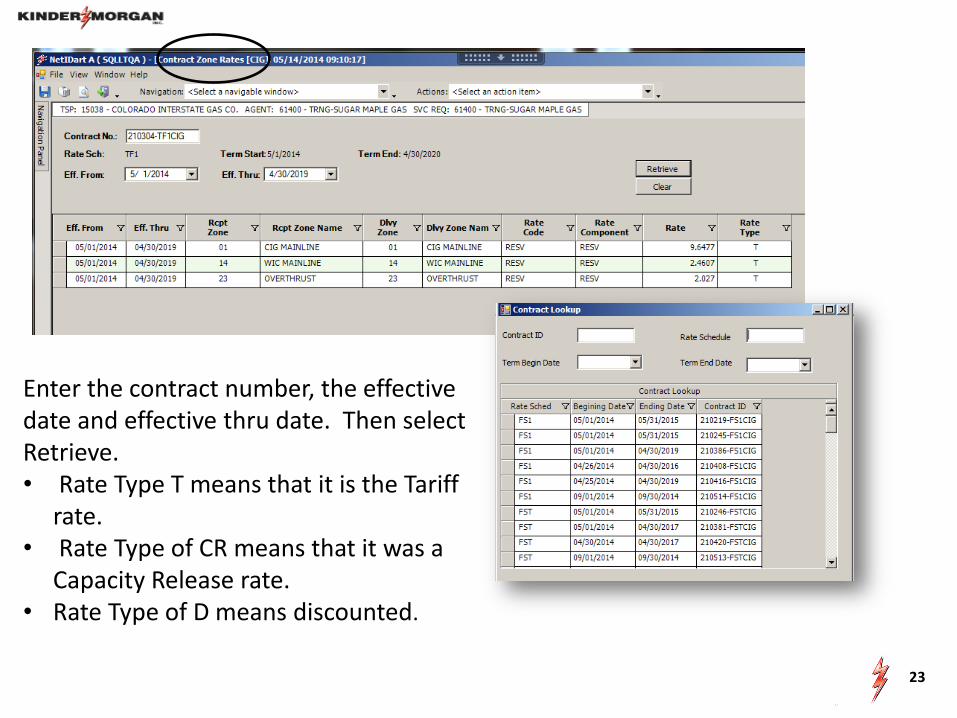
Enter the contract number, the effective date and effective thru date. Then select Retrieve. • Rate Type T means that it is the Tariff
rate. • Rate Type of CR means that it was a
Capacity Release rate. • Rate Type of D means discounted.
24
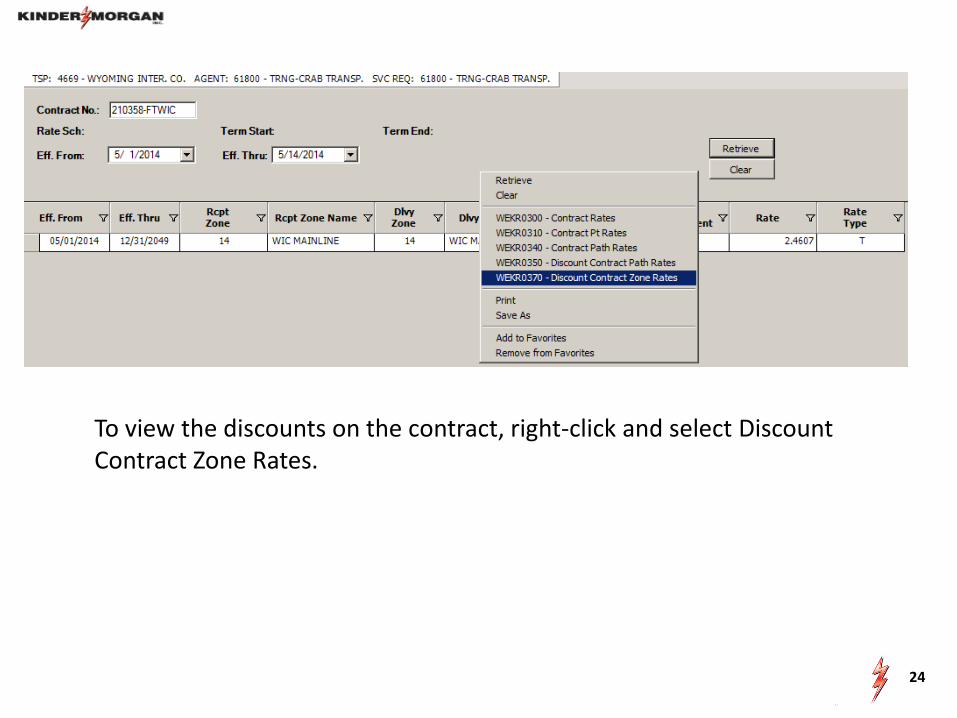
To view the discounts on the contract, right-click and select Discount Contract Zone Rates.
25
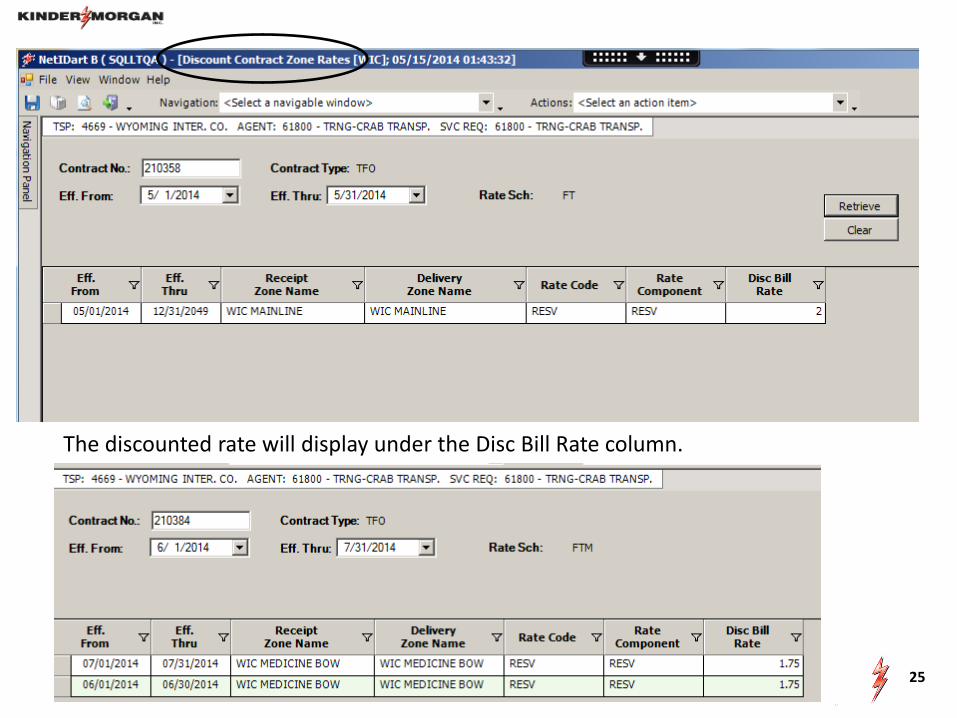
The discounted rate will display under the Disc Bill Rate column.

26
Contract Execution

27
Select Agreement to display the agreement. Click Execute to execute the contract. The User must have Contract Execution rights in order to execute.
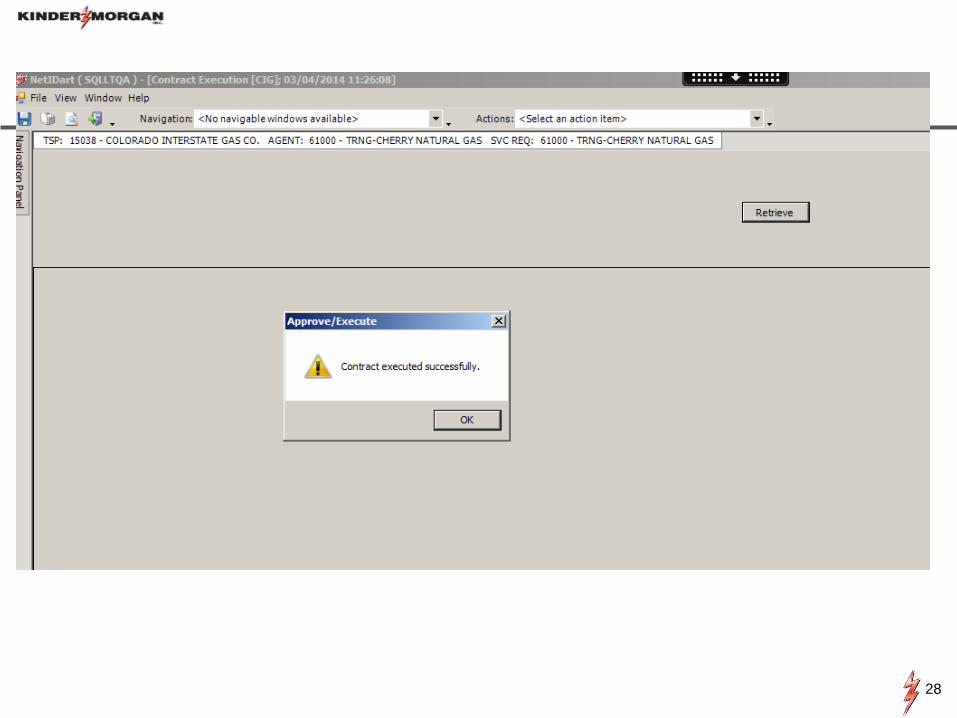
28

www.kindermorgan.com
30
Capacity Release
Changes
How to……
Create an Offer
Copy an Offer
Confirm a Bid
Create a Bid
Recall/Reput
31
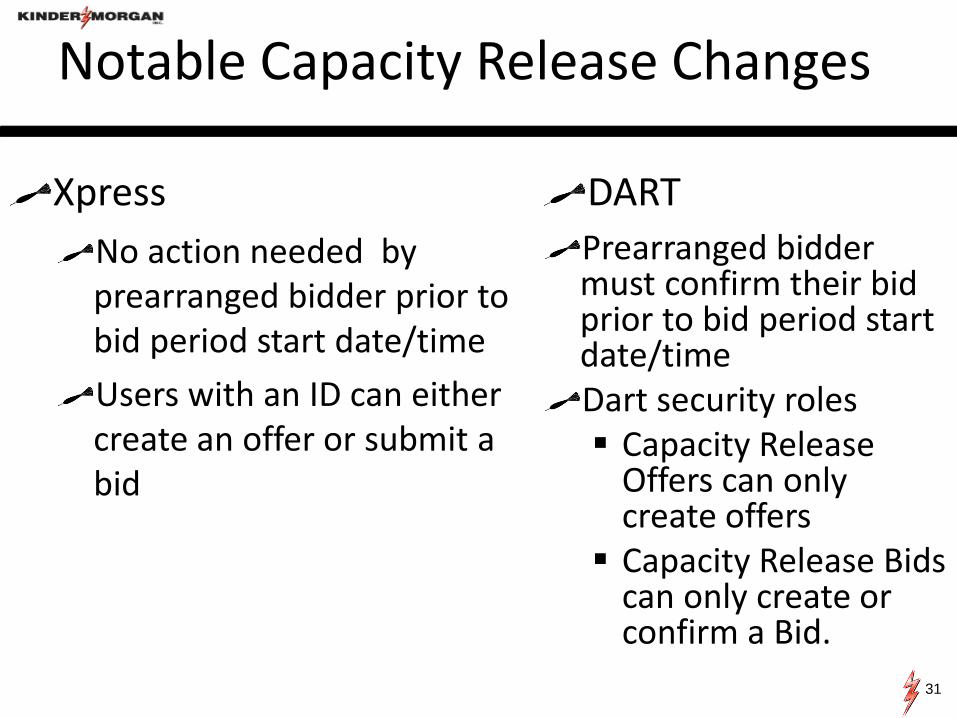
Notable Capacity Release Changes
No action needed by prearranged bidder prior to bid period start date/time
Users with an ID can either create an offer or submit a bid
Xpress DART
Prearranged bidder must confirm their bid prior to bid period start date/time Dart security roles Capacity Release
Offers can only create offers
Capacity Release Bids can only create or confirm a Bid.
32
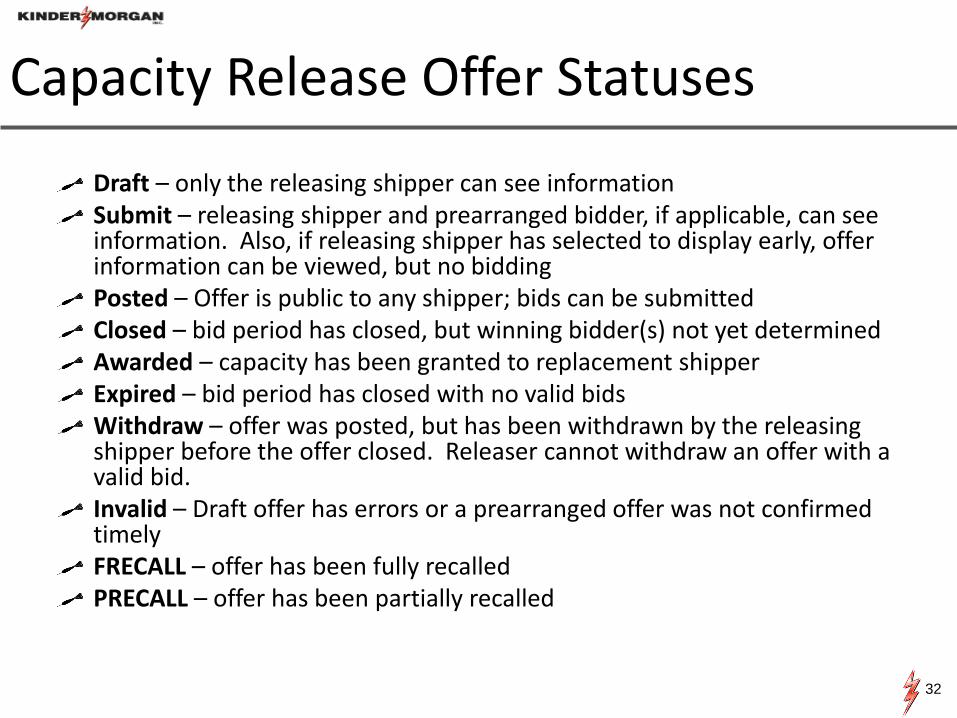
Capacity Release Offer Statuses
Draft – only the releasing shipper can see information Submit – releasing shipper and prearranged bidder, if applicable, can see information. Also, if releasing shipper has selected to display early, offer information can be viewed, but no bidding Posted – Offer is public to any shipper; bids can be submitted Closed – bid period has closed, but winning bidder(s) not yet determined Awarded – capacity has been granted to replacement shipper Expired – bid period has closed with no valid bids Withdraw – offer was posted, but has been withdrawn by the releasing shipper before the offer closed. Releaser cannot withdraw an offer with a valid bid. Invalid – Draft offer has errors or a prearranged offer was not confirmed timely FRECALL – offer has been fully recalled PRECALL – offer has been partially recalled
33
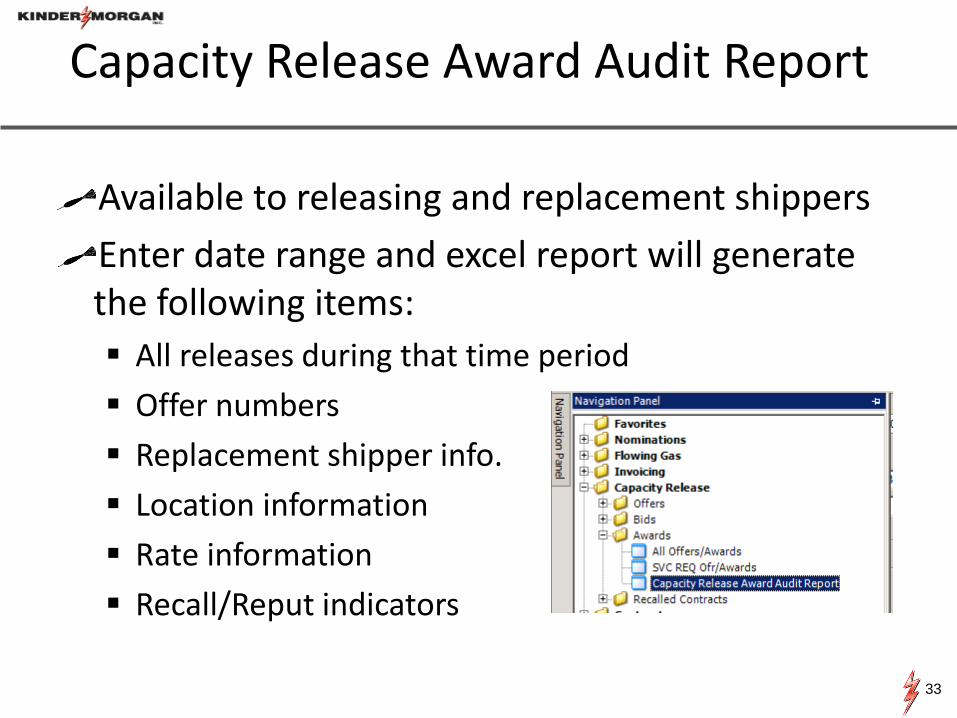
Capacity Release Award Audit Report
Available to releasing and replacement shippers
Enter date range and excel report will generate the following items:
All releases during that time period
Offer numbers
Replacement shipper info.
Location information
Rate information
Recall/Reput indicators

www.kindermorgan.com

35
From the Navigation Panel, expand the Capacity Release and Offers folder, and select Create Offer.
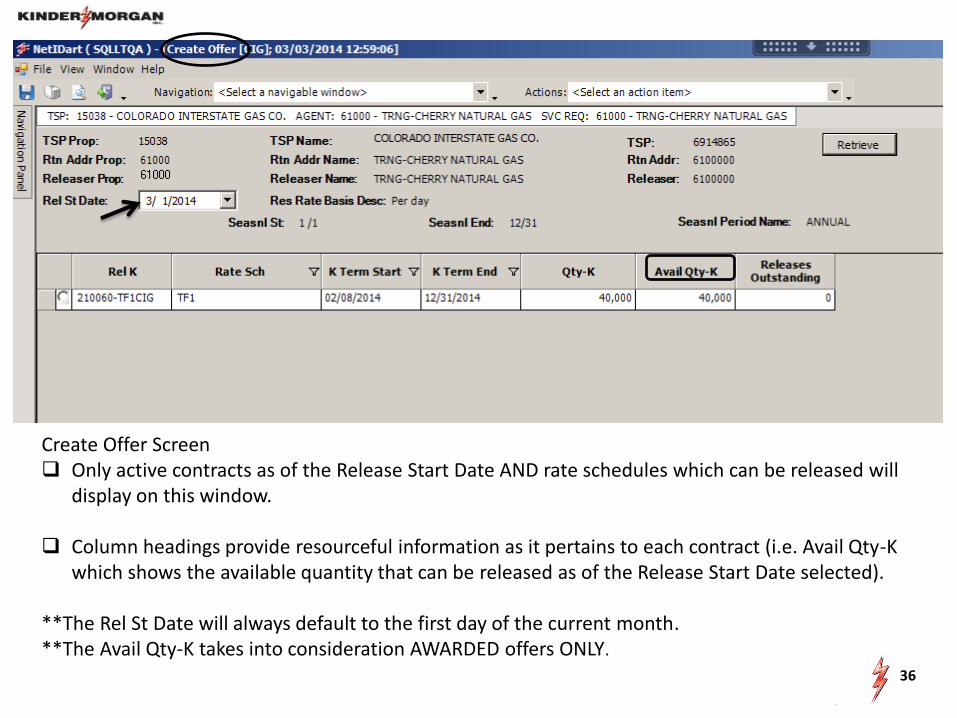
Create Offer Screen Only active contracts as of the Release Start Date AND rate schedules which can be released will
display on this window. Column headings provide resourceful information as it pertains to each contract (i.e. Avail Qty-K
which shows the available quantity that can be released as of the Release Start Date selected). **The Rel St Date will always default to the first day of the current month. **The Avail Qty-K takes into consideration AWARDED offers ONLY. 36

37
Choose the radio button of the contract you want to release from. Right click, and select “Create New Offer”.

The Offer number is shown in the header. Section 1
The Logon Contact info populates the information attached to the user’s logon ID credentials. Enter the Rel Contact, Phone and Fax as well as complete any other blank fields. Or, under
Business Preferences (refer to General Navigation and Contract Inquiry WebEx), you can add a Primary Rel Contact so this info. will auto-populate.
38
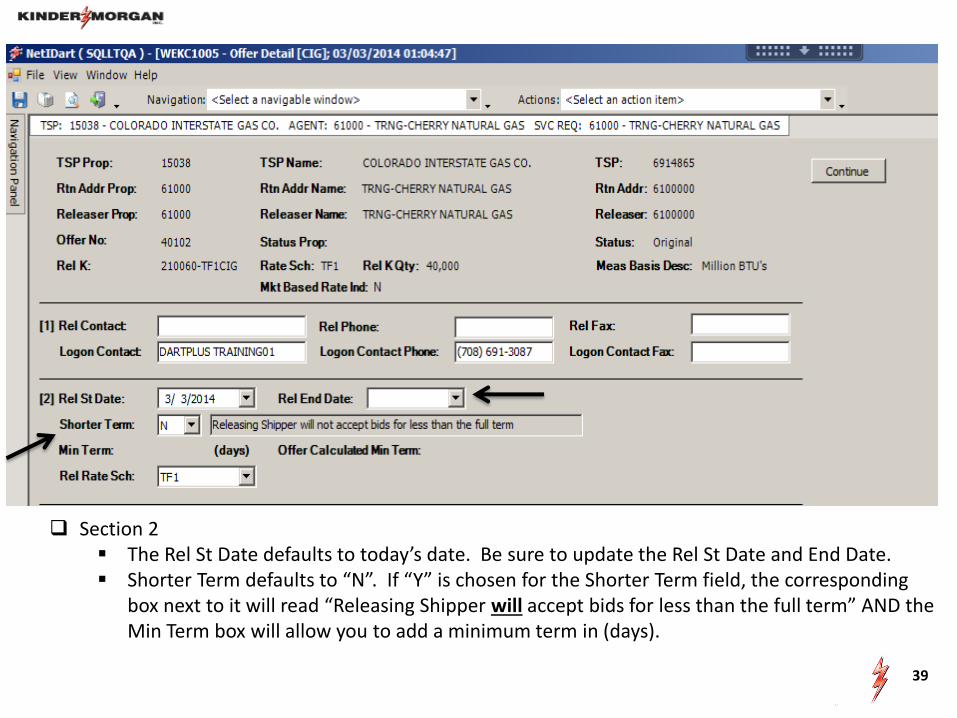
Section 2 The Rel St Date defaults to today’s date. Be sure to update the Rel St Date and End Date. Shorter Term defaults to “N”. If “Y” is chosen for the Shorter Term field, the corresponding
box next to it will read “Releasing Shipper will accept bids for less than the full term” AND the Min Term box will allow you to add a minimum term in (days).
39

Section 3 Review and edit as necessary. Note: The default Max Offer Qty-K is 100. Be sure to enter the desired quantity to be
released.
No default. Have to choose.
40
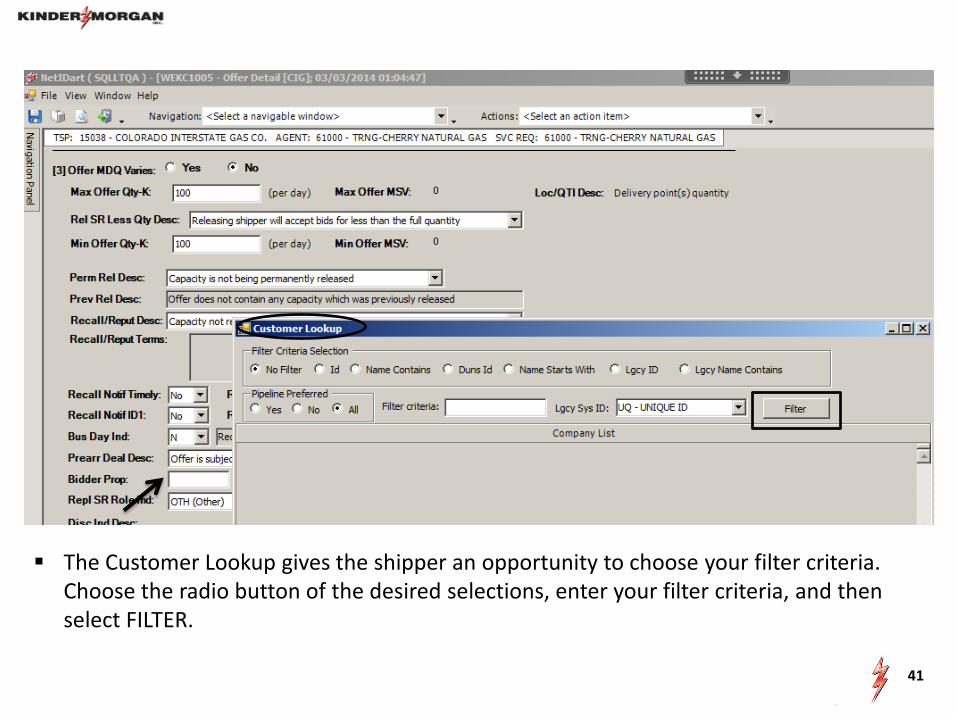
The Customer Lookup gives the shipper an opportunity to choose your filter criteria. Choose the radio button of the desired selections, enter your filter criteria, and then select FILTER.
41
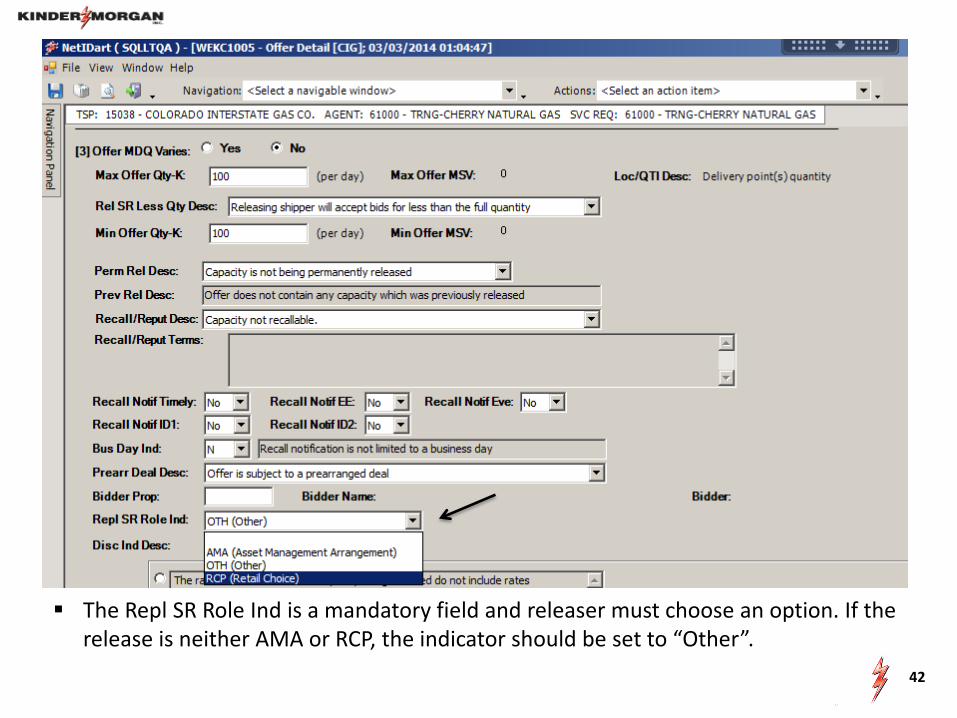
The Repl SR Role Ind is a mandatory field and releaser must choose an option. If the release is neither AMA or RCP, the indicator should be set to “Other”.
42

Choose the accurate Discount Indicator Description.
43
Replacement Shipper
Releasing Shipper
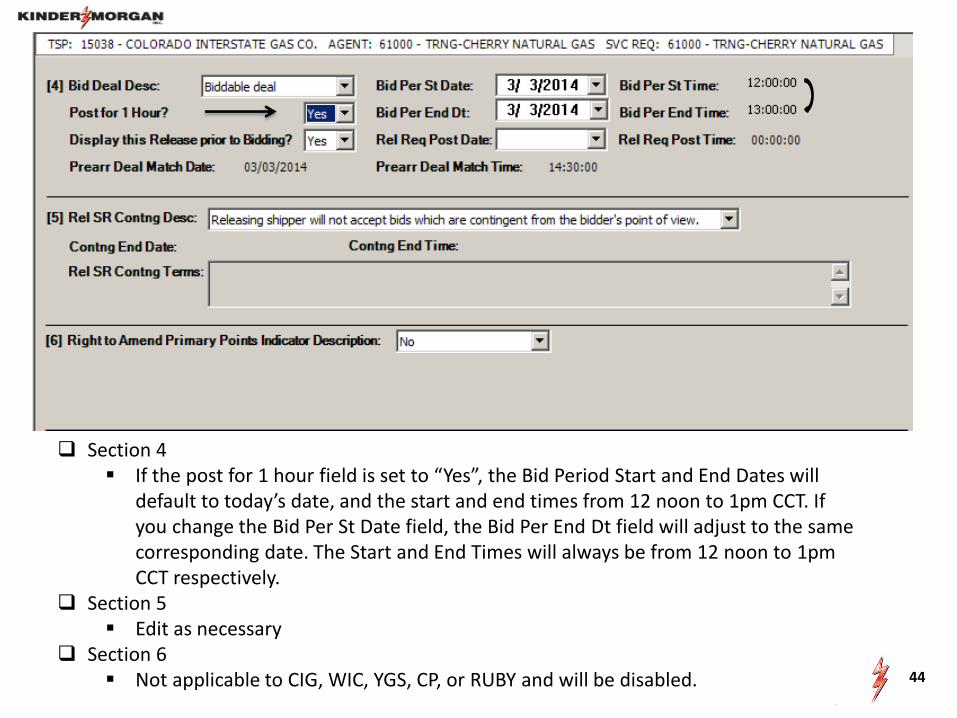
Section 4 If the post for 1 hour field is set to “Yes”, the Bid Period Start and End Dates will
default to today’s date, and the start and end times from 12 noon to 1pm CCT. If you change the Bid Per St Date field, the Bid Per End Dt field will adjust to the same corresponding date. The Start and End Times will always be from 12 noon to 1pm CCT respectively.
Section 5 Edit as necessary
Section 6 Not applicable to CIG, WIC, YGS, CP, or RUBY and will be disabled. 44

Bid basis descriptions in detail
Section 7
45
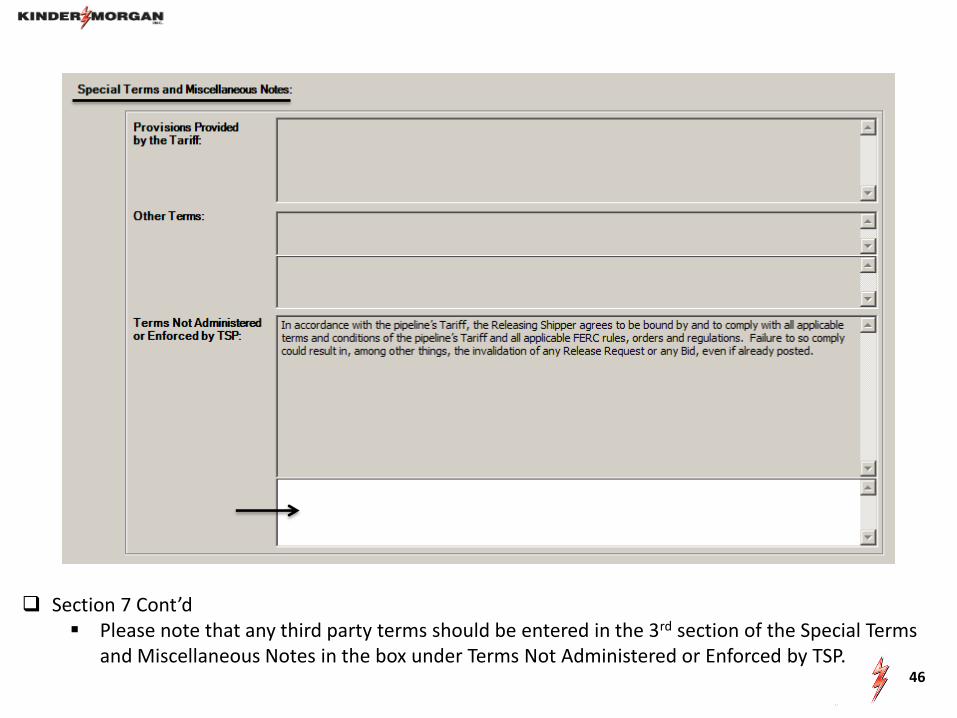
Section 7 Cont’d Please note that any third party terms should be entered in the 3rd section of the Special Terms
and Miscellaneous Notes in the box under Terms Not Administered or Enforced by TSP. 46

Section 8 If marketing is requested, the releaser must contact their Account Manager to make this request.
Section 9 (If Applicable) Enter AMA terms. Section 10 (If Applicable) Enter Storage Conditions. After completing the Offer Detail, right click and select Continue. A message stating that the Offer detail has been saved will appear. Click OK and it will take you to the Offer Locations screen.
47

Offer Locations Screen Varying Quantity = NO Enter the quantity to be released in the Max Offer Qty-Loc column. (The Avail Prim Qty- Loc displays the available primary capacity that can be released at that location, based upon the release start and end dates).
48

To release from a secondary point, right click and select Sec Locations.
49
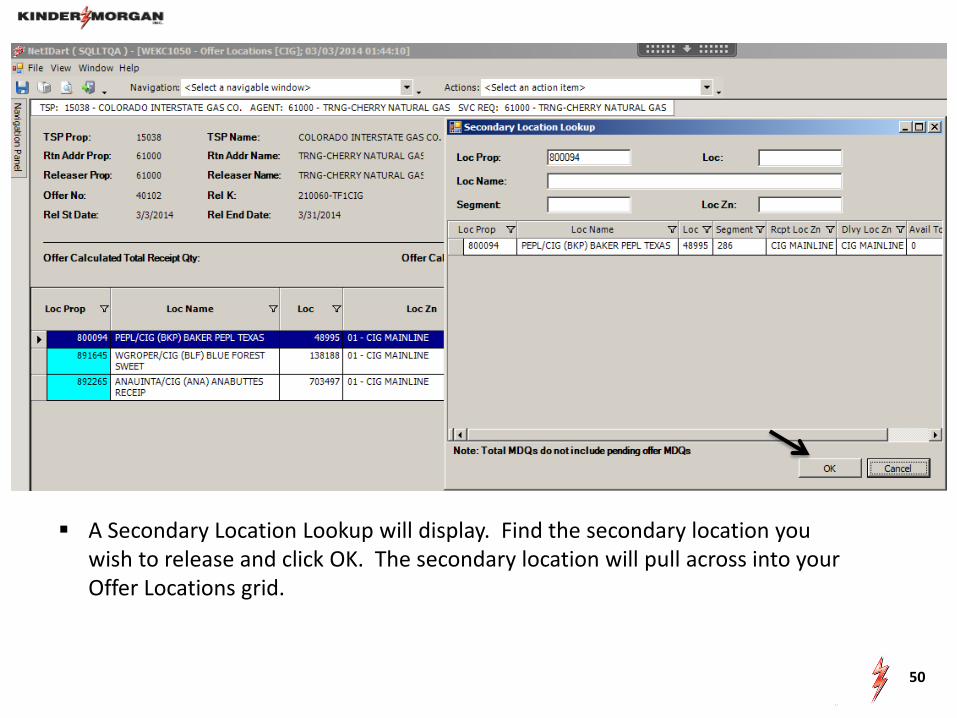
A Secondary Location Lookup will display. Find the secondary location you wish to release and click OK. The secondary location will pull across into your Offer Locations grid.
50
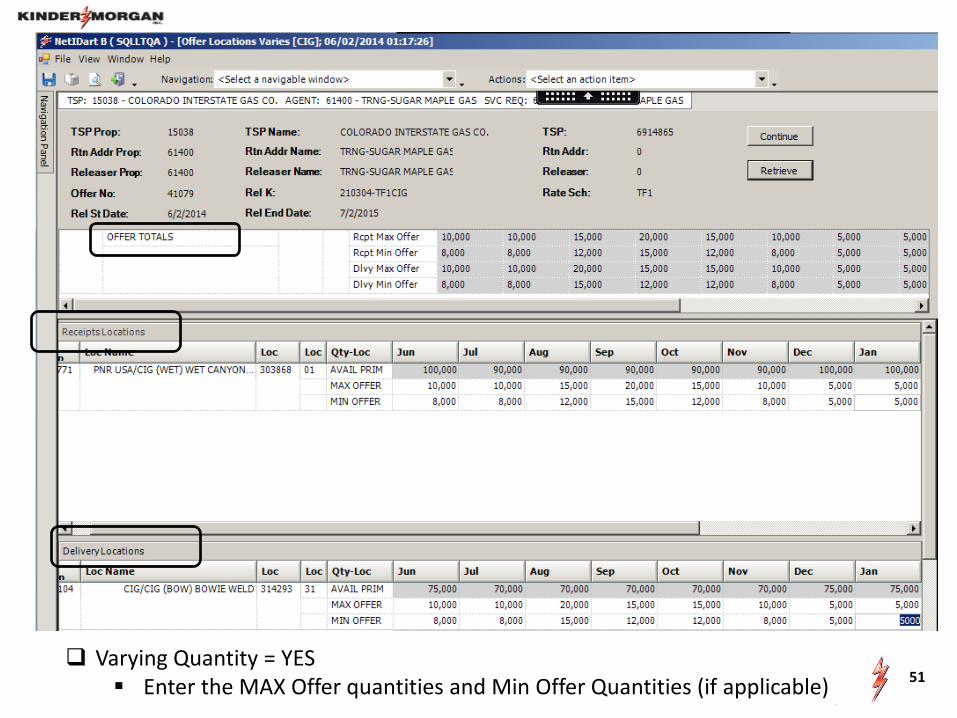
51 Varying Quantity = YES
Enter the MAX Offer quantities and Min Offer Quantities (if applicable)

Offer Rates Screen Please note: The Minimum Acceptable Rate is a DAILY rate similar to Xpress. Additionally, the Max Trf
Rate Column displays the daily max tariff rate for your reference. The calculation for the monthly rate is indicated in the middle section above. DART will automatically calculate the monthly bid rate after the daily rate is entered and saved.
The system calculated monthly rates can be seen on the Bid Detail screen.
Choose Disclosed for the Min Acpt Rate to be viewable by bidders
52
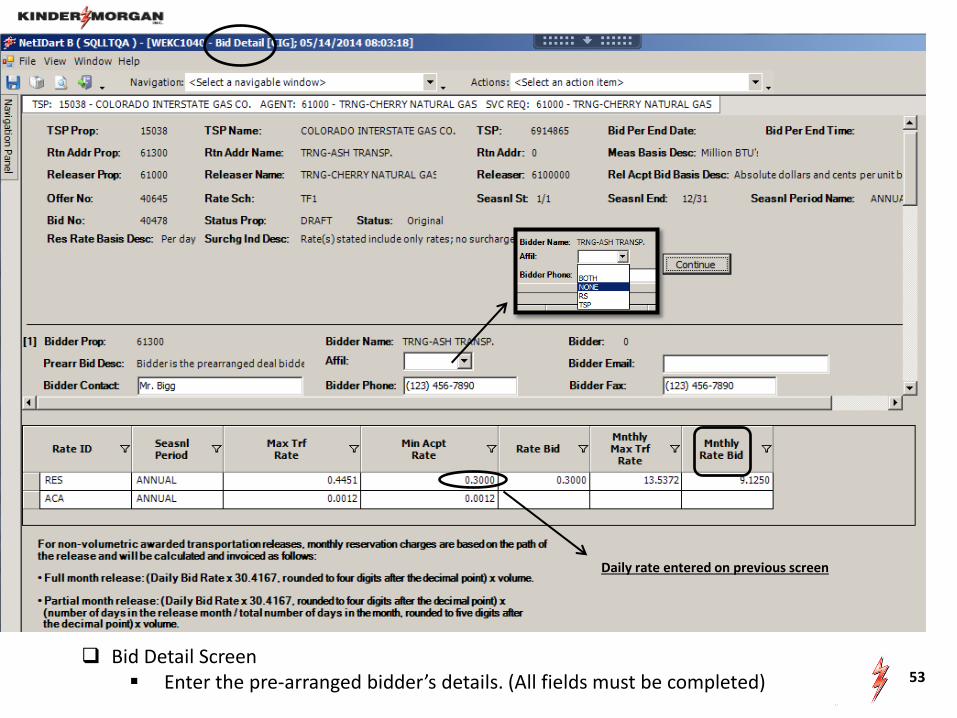
Daily rate entered on previous screen
Bid Detail Screen Enter the pre-arranged bidder’s details. (All fields must be completed) 53
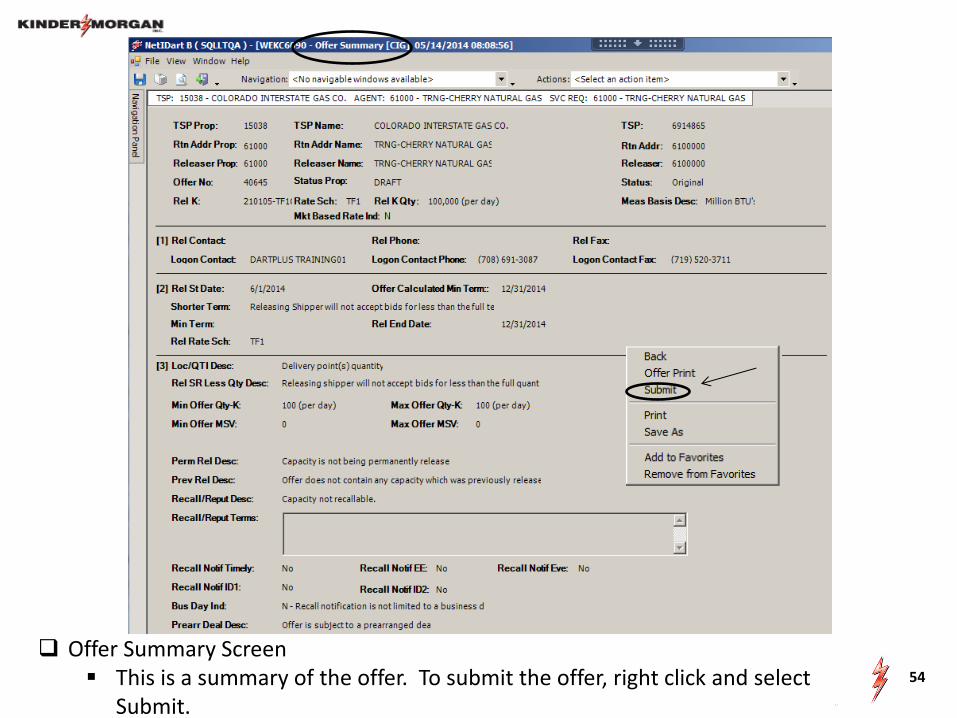
Offer Summary Screen This is a summary of the offer. To submit the offer, right click and select
Submit.
54

If the offer has any errors, you will get a pop-up message indicating the offer is invalid. Also there will be an error message at the bottom in red.
Click the “OK” button and it will take you to the Review/Withdraw Offer screen. 55

To view the error(s), highlight the row. Right click, and select Offer Errors.
56

Once you’ve read the error message(s), select the “X” button in the top right corner to close out of the Offer Errors screen. This will take you back to the Review/Withdraw Offer screen so you can navigate to make corrections.
57
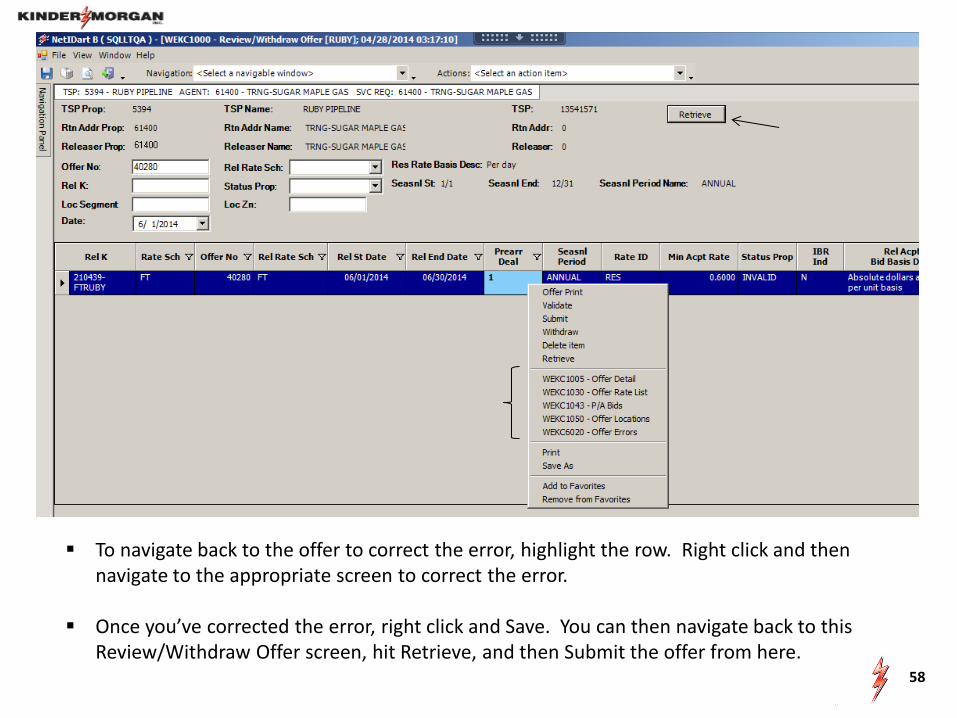
To navigate back to the offer to correct the error, highlight the row. Right click and then navigate to the appropriate screen to correct the error.
Once you’ve corrected the error, right click and Save. You can then navigate back to this
Review/Withdraw Offer screen, hit Retrieve, and then Submit the offer from here. 58

If there are no validation errors, the Offer Status will show Submit. After a pre-arranged offer is submitted, an email notification will be sent to the pre-
arranged bidder notifying them that an offer has been created that requires them to confirm their pre-arranged bid.
59

www.kindermorgan.com
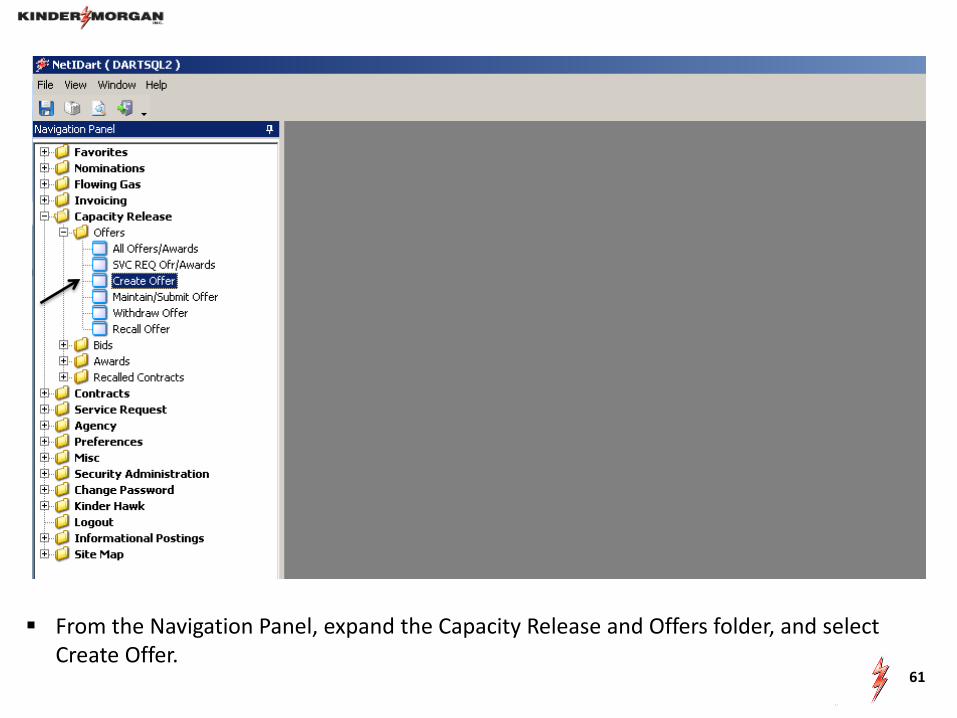
From the Navigation Panel, expand the Capacity Release and Offers folder, and select Create Offer.
61
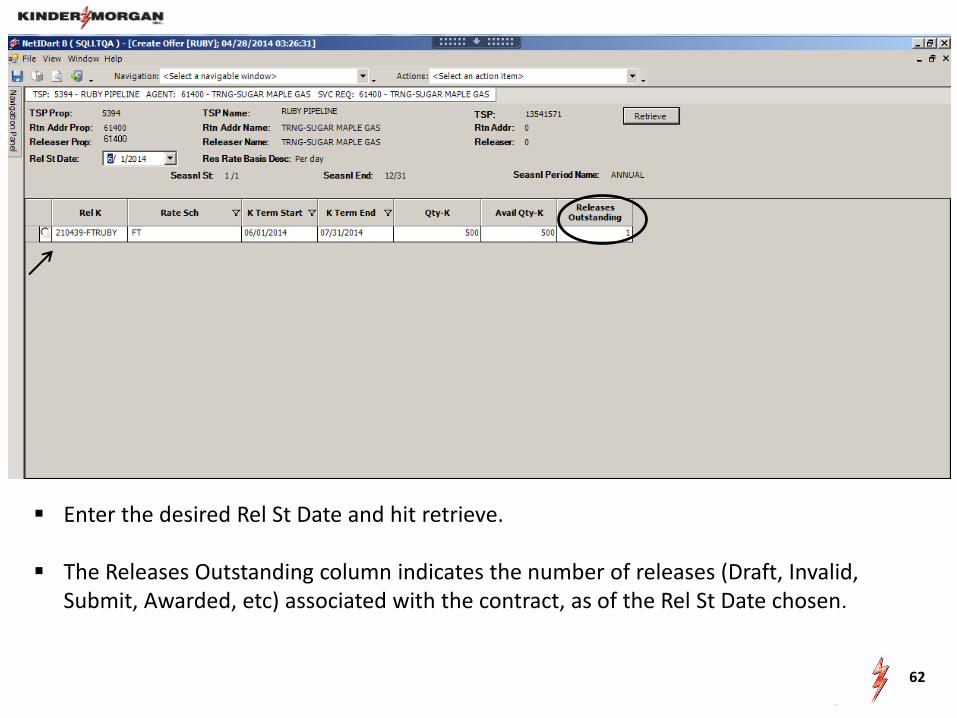
Enter the desired Rel St Date and hit retrieve. The Releases Outstanding column indicates the number of releases (Draft, Invalid,
Submit, Awarded, etc) associated with the contract, as of the Rel St Date chosen.
62
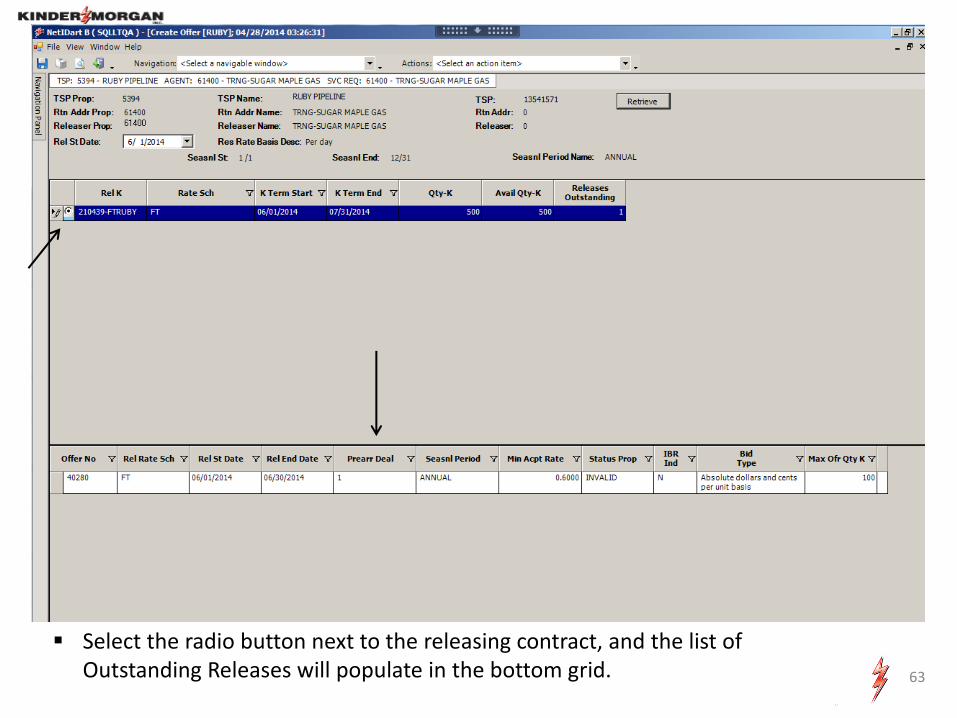
Select the radio button next to the releasing contract, and the list of Outstanding Releases will populate in the bottom grid.
63

To copy one of these offers, highlight the offer. Right click, and select Copy Existing Offer.
64

Copy Existing Offer Screen A list of the same offers from the Create Offer Screen will display (The Rel
K and Date can be edited from this screen) Highlight the offer you wish to copy. Right click and select Copy Offer. You will then be asked if you want to copy the rates. Select Yes or No.
65

You will get a pop-up message letting you know the copy was successful. Select OK, and you will get a pop-up with the new offer number and you will be
taken to the Offer Detail screen.
66

www.kindermorgan.com
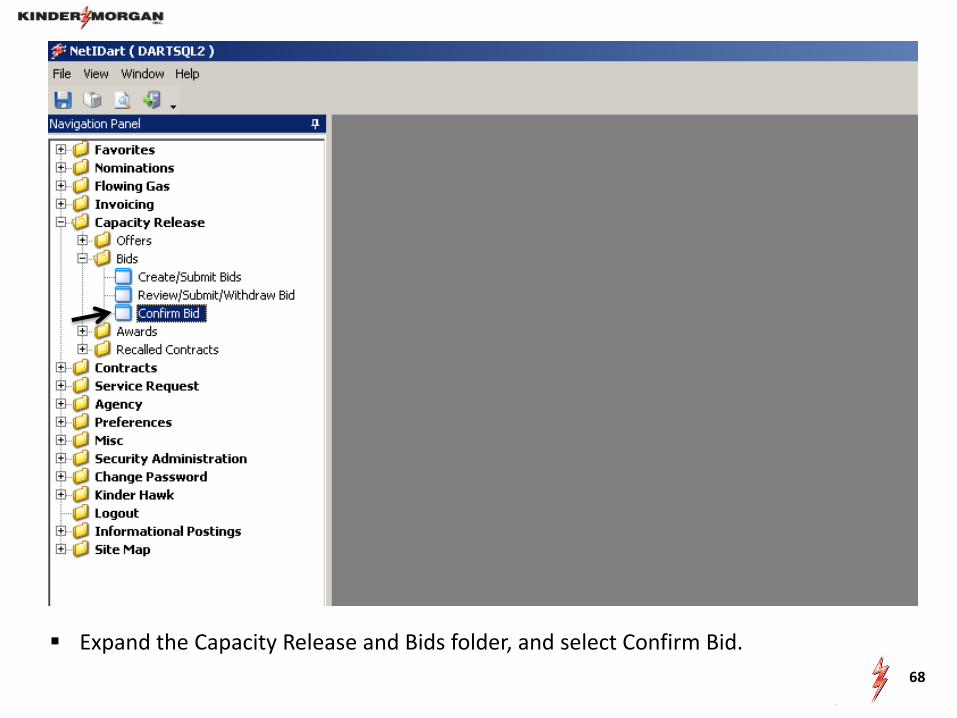
Expand the Capacity Release and Bids folder, and select Confirm Bid.
68
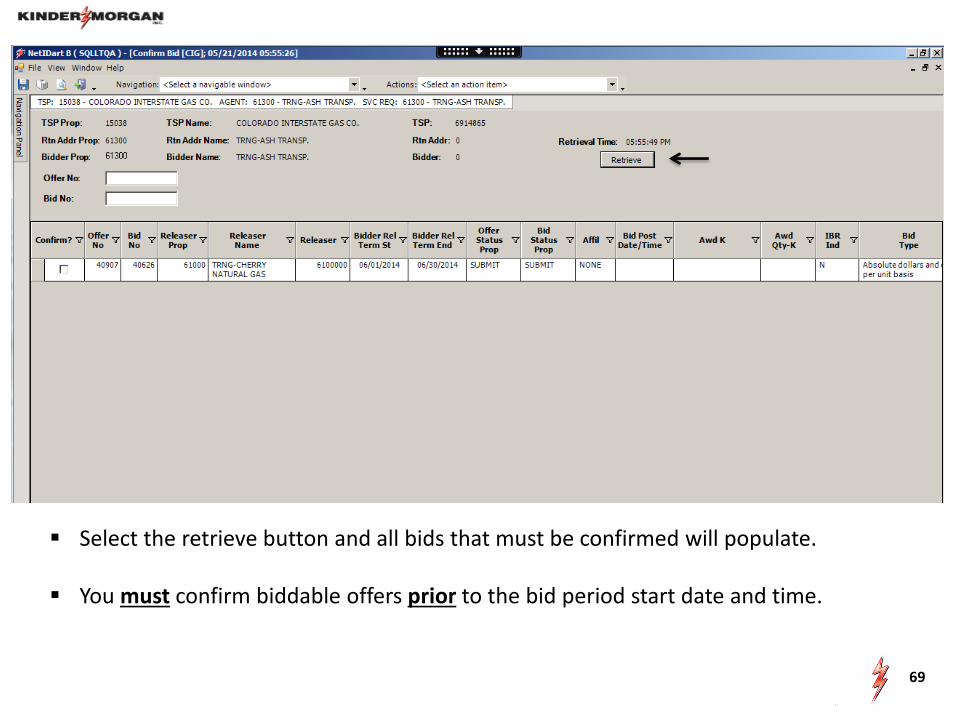
Select the retrieve button and all bids that must be confirmed will populate. You must confirm biddable offers prior to the bid period start date and time.
69

Bid Detail – review rate information / edit bidder contact Offer Information – review offer details / can navigate to Offer Segments to view contractual path of release
Select the Confirm check box to highlight the row, right click and select Confirm. Can confirm more than one bid at a time
70
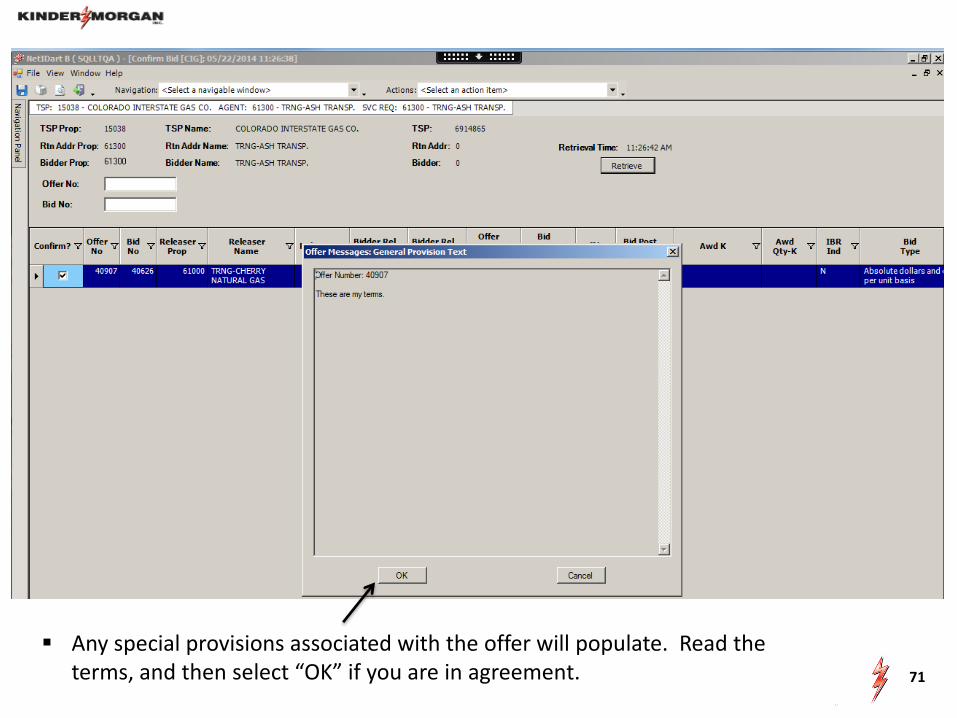
Any special provisions associated with the offer will populate. Read the terms, and then select “OK” if you are in agreement. 71
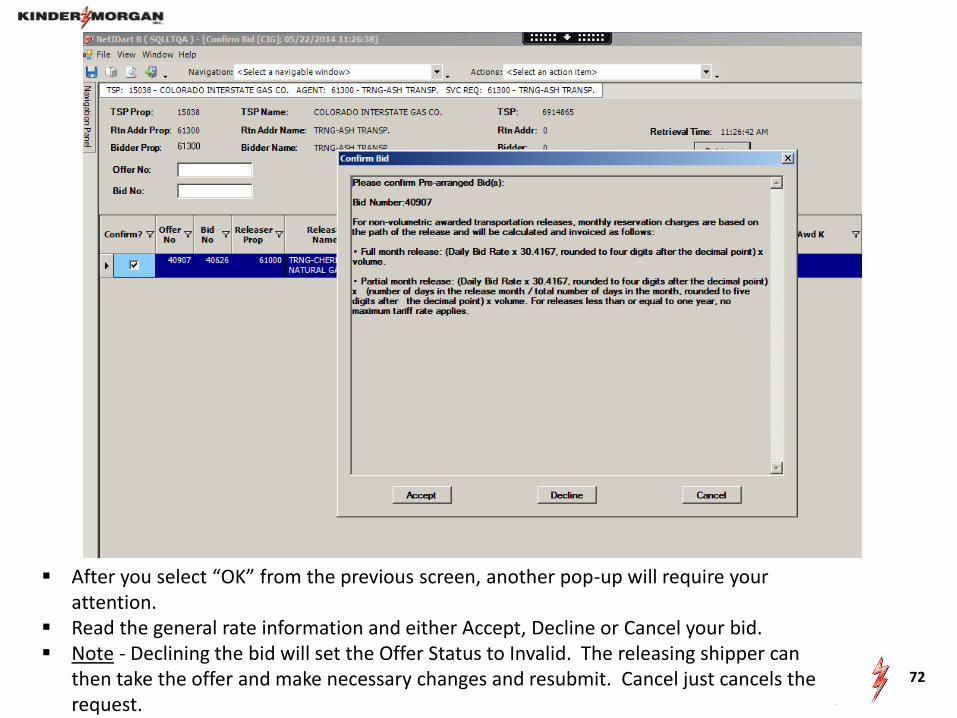
After you select “OK” from the previous screen, another pop-up will require your attention.
Read the general rate information and either Accept, Decline or Cancel your bid. Note - Declining the bid will set the Offer Status to Invalid. The releasing shipper can
then take the offer and make necessary changes and resubmit. Cancel just cancels the request.
72
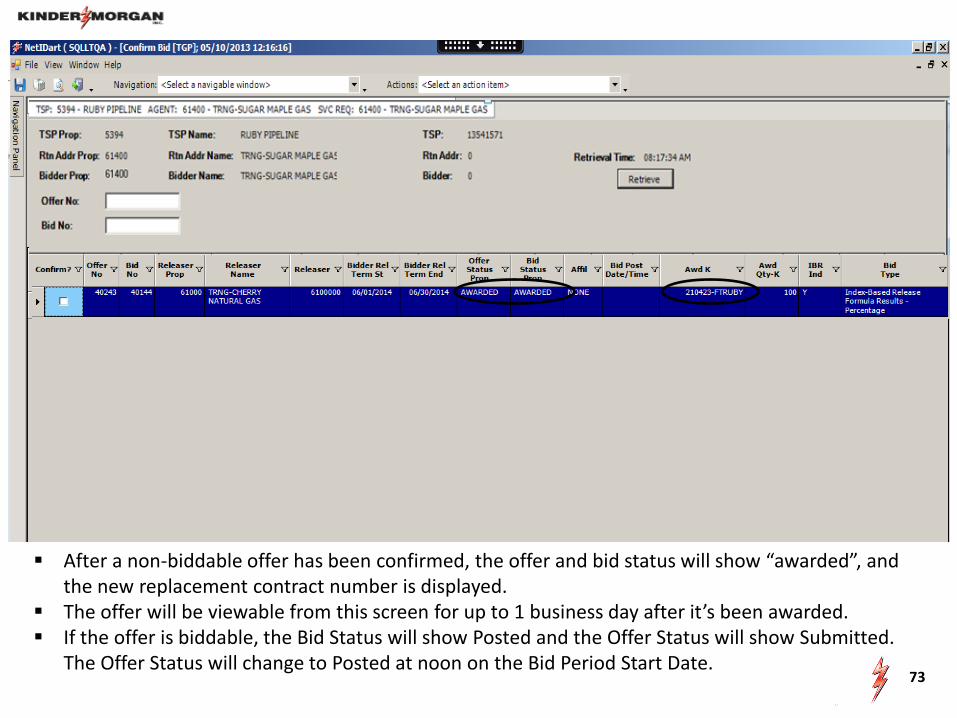
After a non-biddable offer has been confirmed, the offer and bid status will show “awarded”, and the new replacement contract number is displayed.
The offer will be viewable from this screen for up to 1 business day after it’s been awarded. If the offer is biddable, the Bid Status will show Posted and the Offer Status will show Submitted.
The Offer Status will change to Posted at noon on the Bid Period Start Date. 73

www.kindermorgan.com
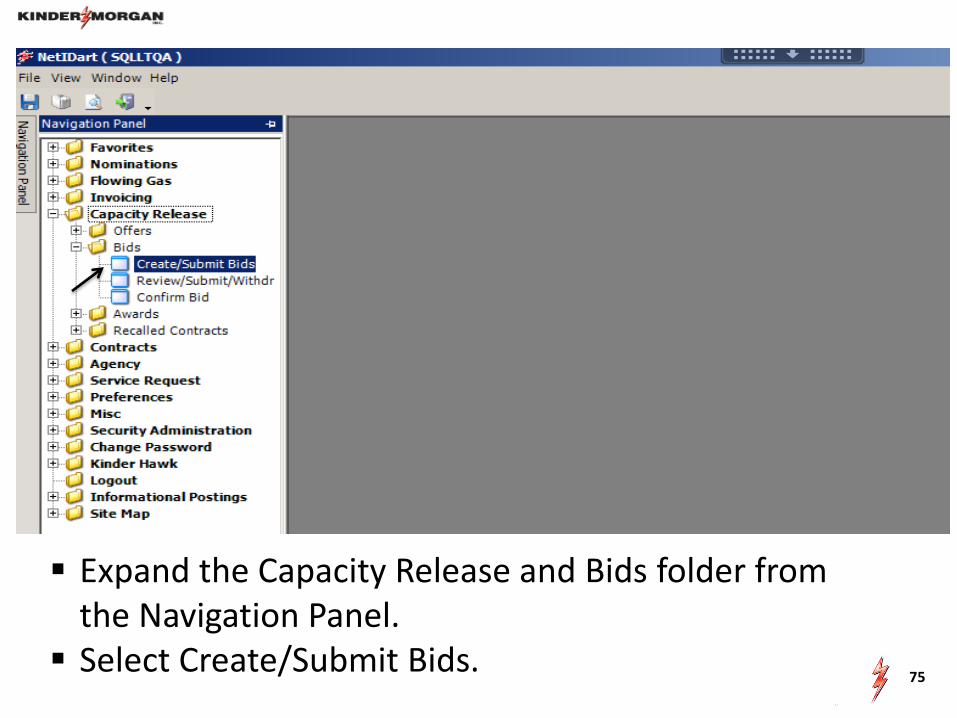
Expand the Capacity Release and Bids folder from the Navigation Panel.
Select Create/Submit Bids. 75

Click the “Retrieve” button and all offers currently posted for bidding will populate.
76
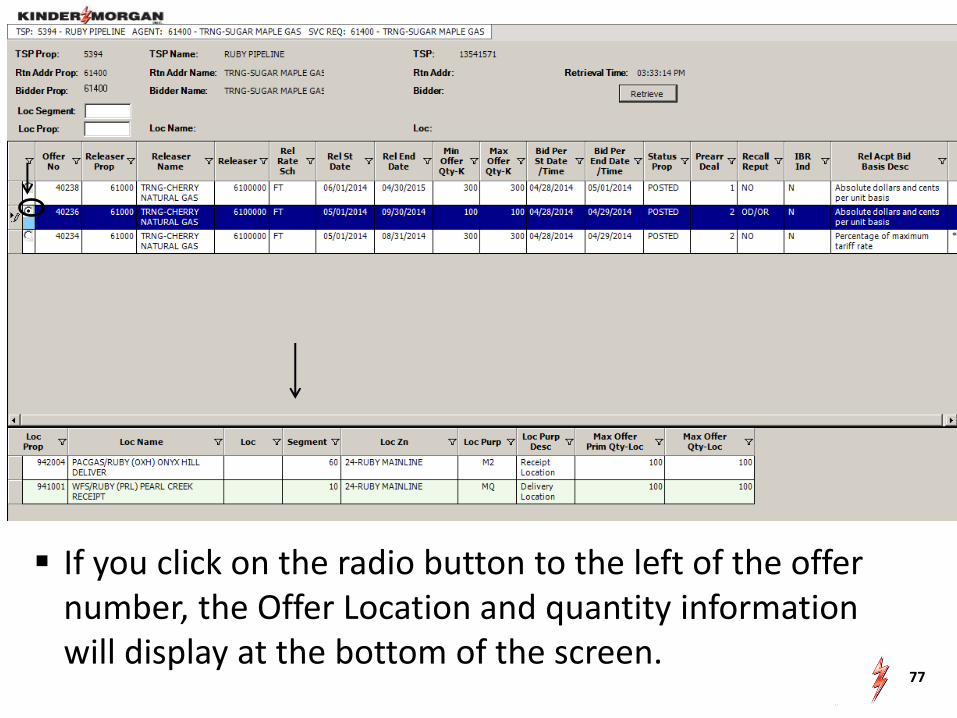
If you click on the radio button to the left of the offer number, the Offer Location and quantity information will display at the bottom of the screen.
77
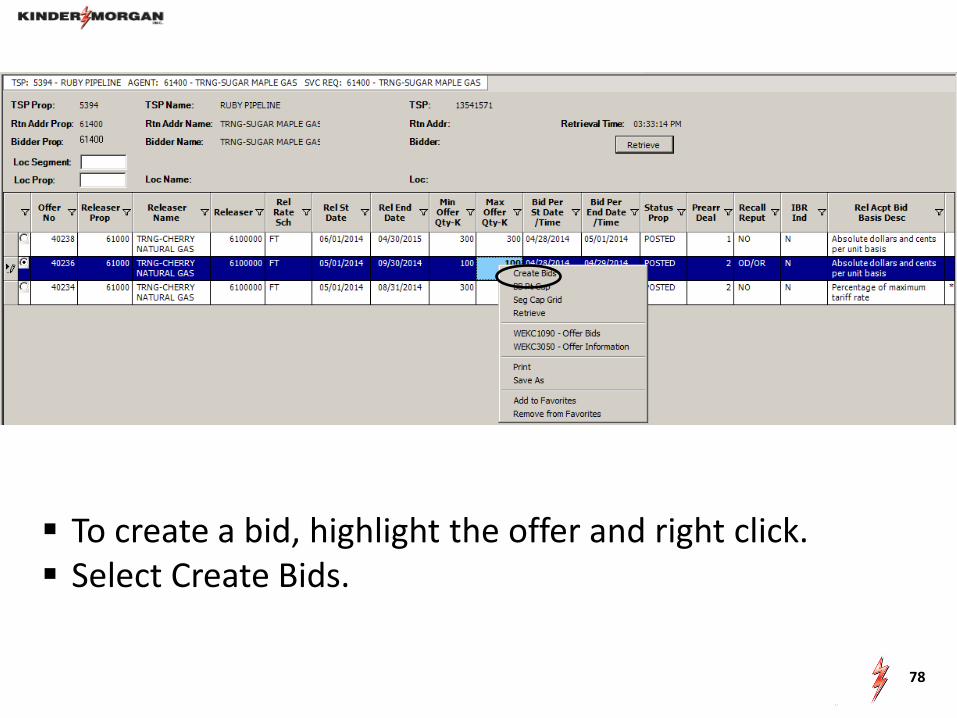
To create a bid, highlight the offer and right click. Select Create Bids.
78
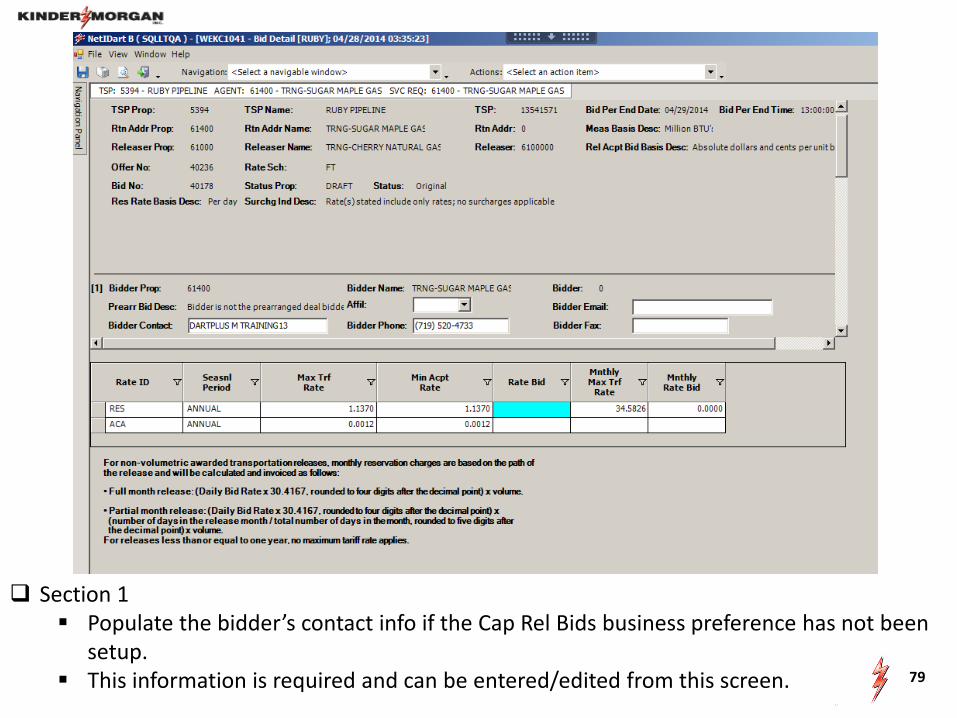
Section 1 Populate the bidder’s contact info if the Cap Rel Bids business preference has not been
setup. This information is required and can be entered/edited from this screen. 79
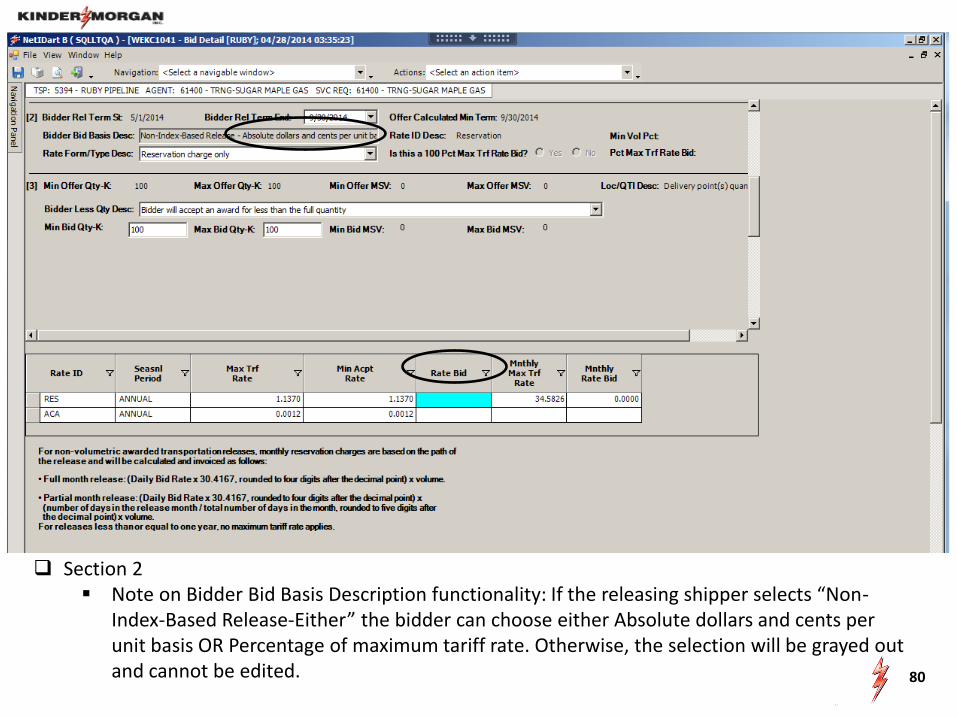
Section 2 Note on Bidder Bid Basis Description functionality: If the releasing shipper selects “Non-
Index-Based Release-Either” the bidder can choose either Absolute dollars and cents per unit basis OR Percentage of maximum tariff rate. Otherwise, the selection will be grayed out and cannot be edited.
80
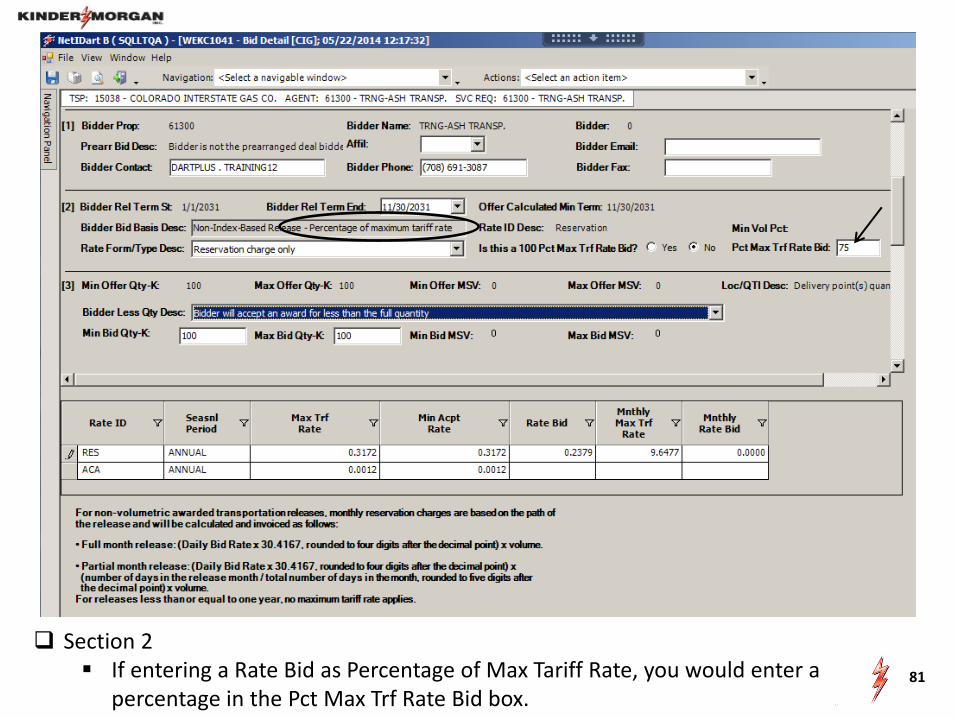
Section 2 If entering a Rate Bid as Percentage of Max Tariff Rate, you would enter a
percentage in the Pct Max Trf Rate Bid box. 81
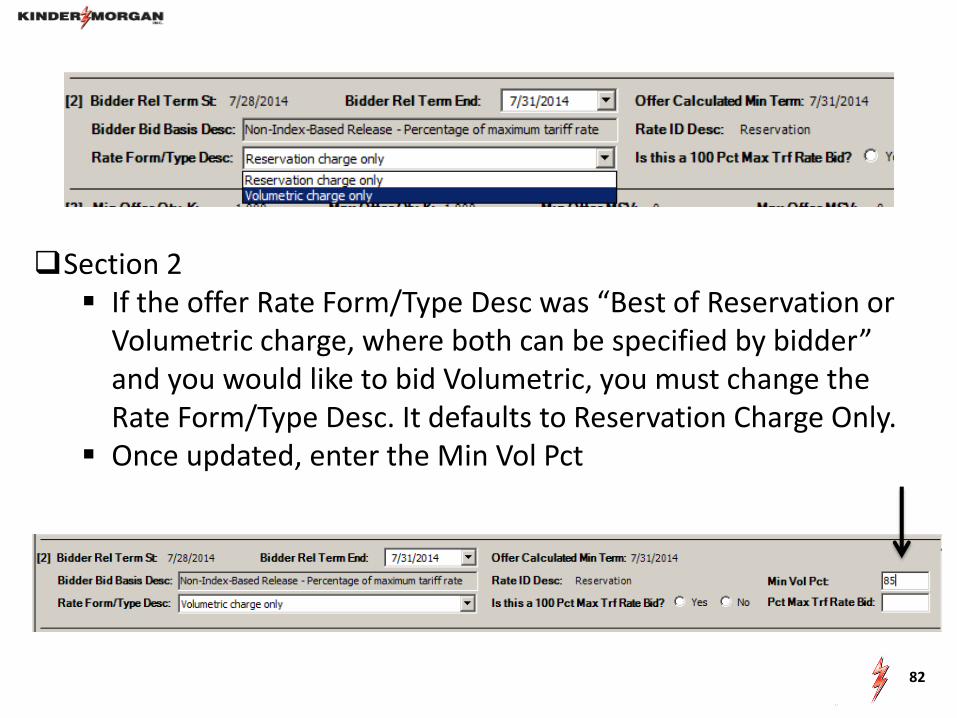
Section 2 If the offer Rate Form/Type Desc was “Best of Reservation or
Volumetric charge, where both can be specified by bidder” and you would like to bid Volumetric, you must change the Rate Form/Type Desc. It defaults to Reservation Charge Only.
Once updated, enter the Min Vol Pct
82
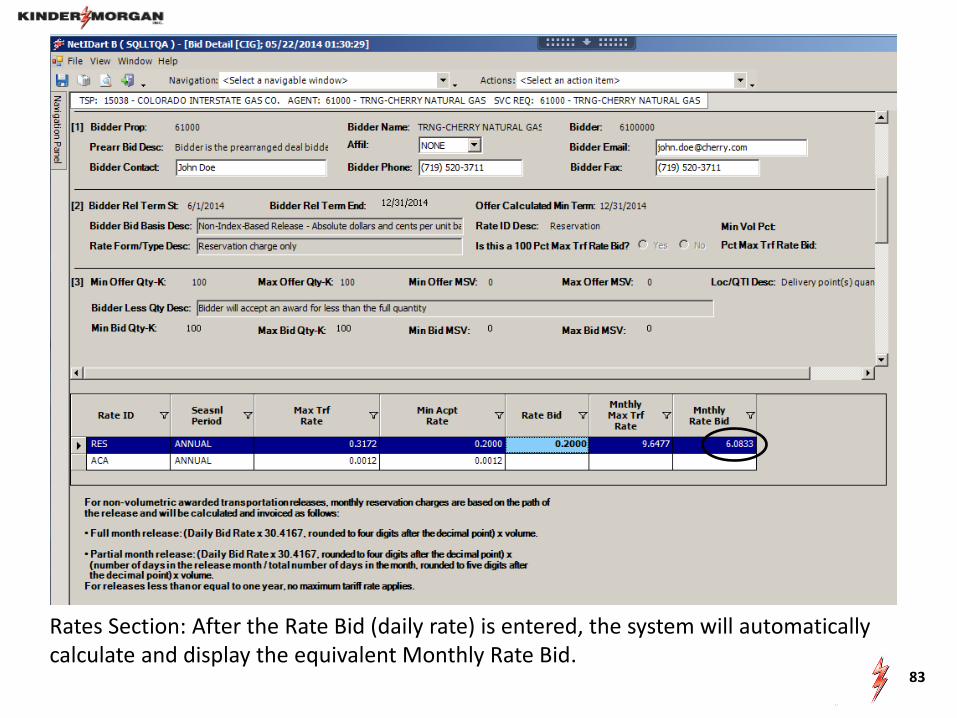
Rates Section: After the Rate Bid (daily rate) is entered, the system will automatically calculate and display the equivalent Monthly Rate Bid.
83

Once all of the information has been entered, right click and select Save. Select Credit Validation.
84

Successful credit validation message
85
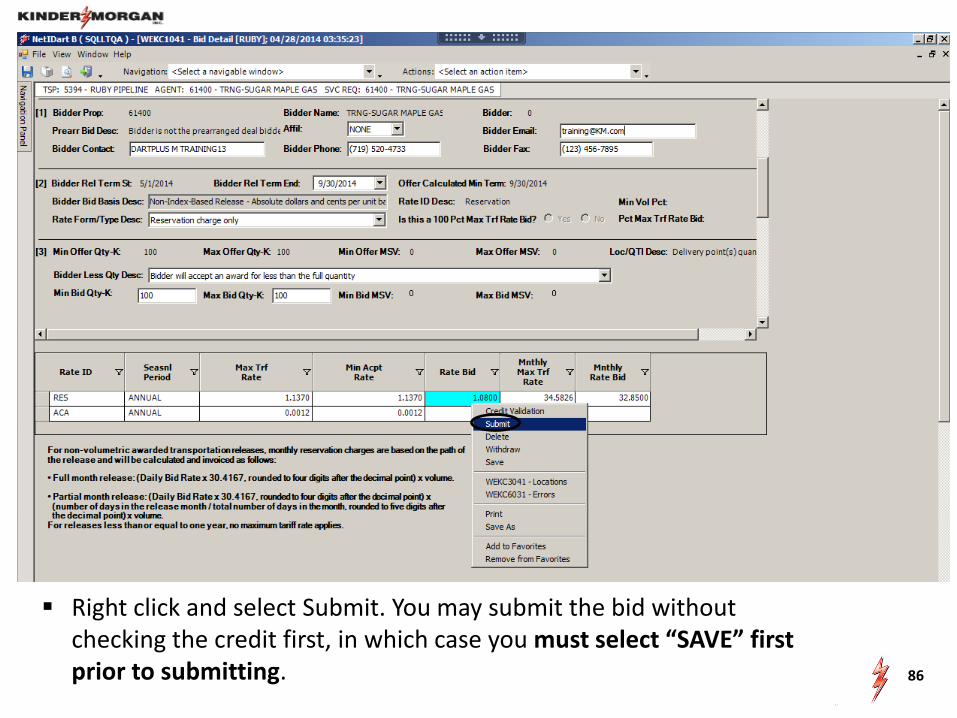
Right click and select Submit. You may submit the bid without checking the credit first, in which case you must select “SAVE” first prior to submitting. 86
87
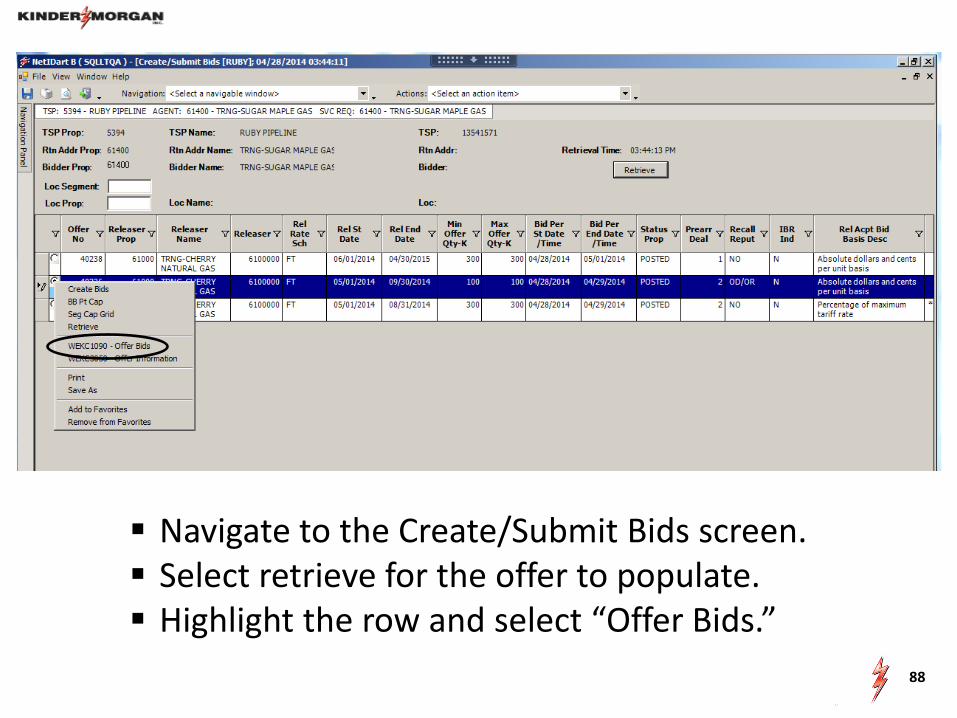
Navigate to the Create/Submit Bids screen. Select retrieve for the offer to populate. Highlight the row and select “Offer Bids.”
88
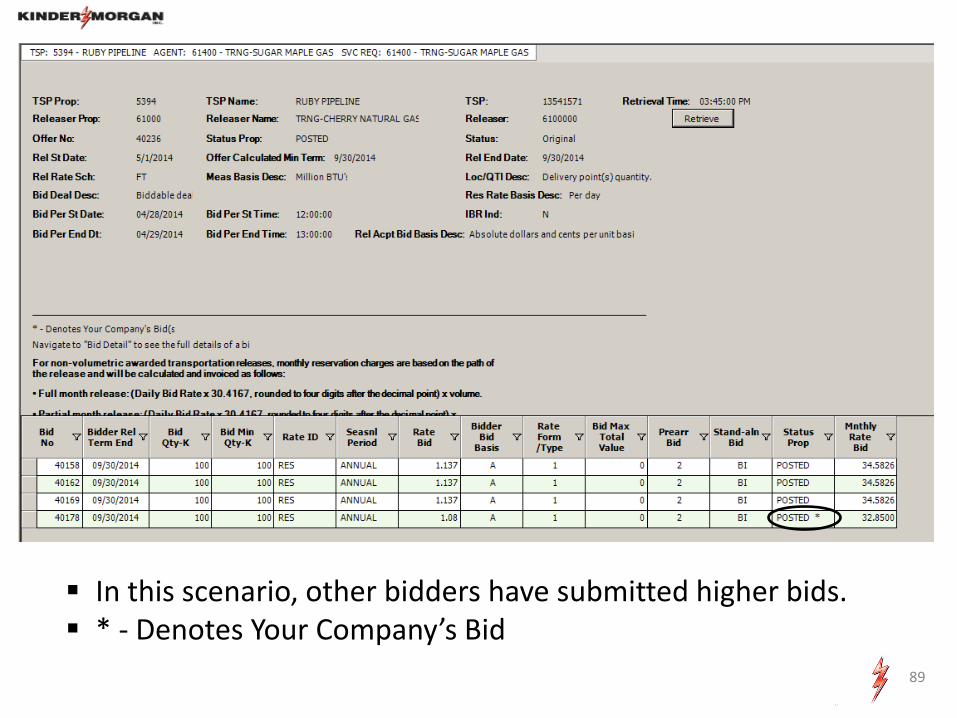
In this scenario, other bidders have submitted higher bids. * - Denotes Your Company’s Bid
89
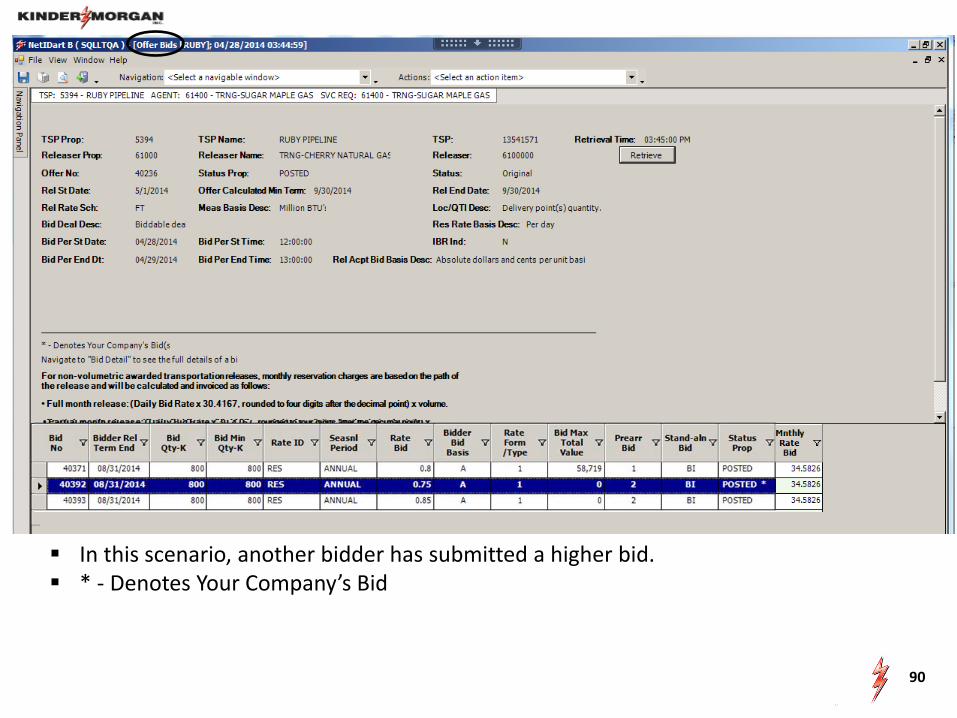
In this scenario, another bidder has submitted a higher bid. * - Denotes Your Company’s Bid
90

www.kindermorgan.com

During the bid period, you can submit a higher bid, but you first have to withdraw your initial bid. • In this example, someone has posted a higher bid rate than Sugar Maple.
To bid a higher rate, Sugar Maple must withdraw its initial bid first. 92

If you try to submit a higher bid without first withdrawing your initial bid, you will get an error message.
93
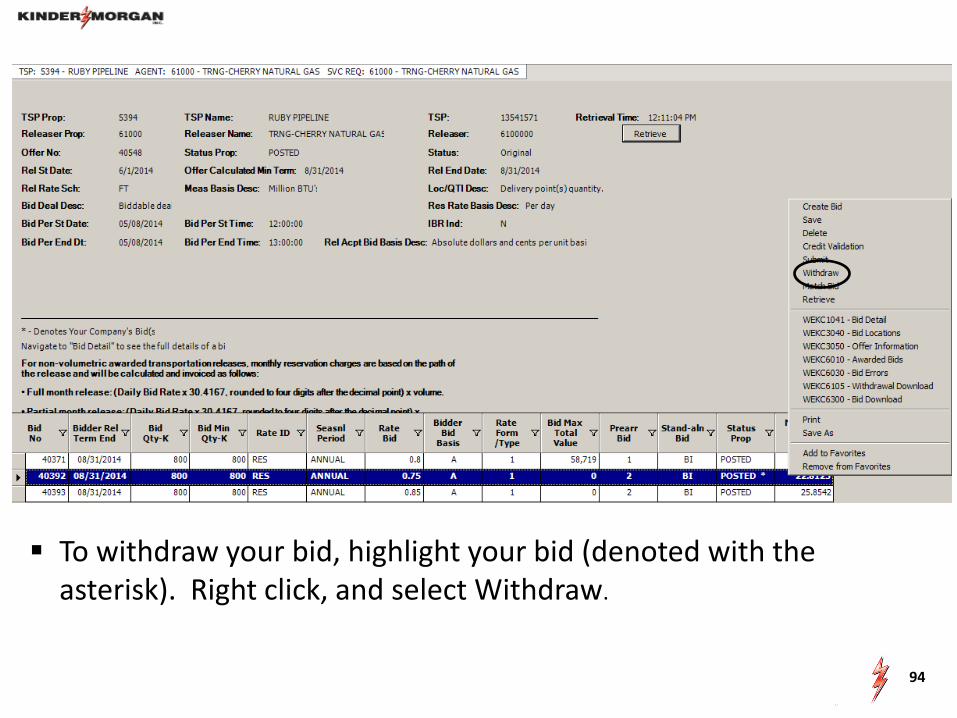
To withdraw your bid, highlight your bid (denoted with the asterisk). Right click, and select Withdraw.
94
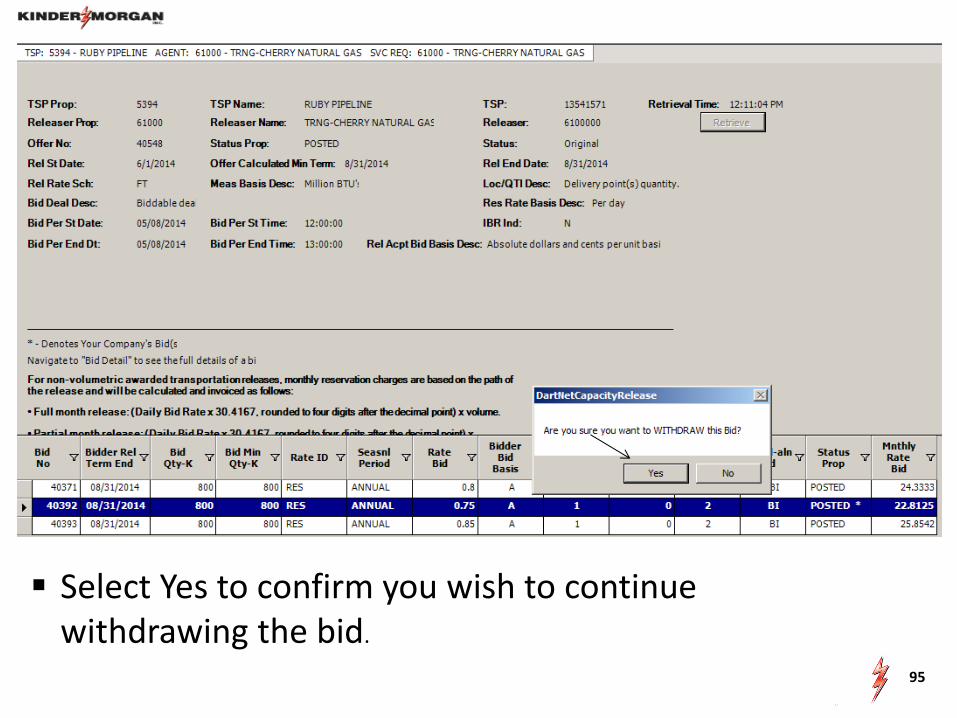
Select Yes to confirm you wish to continue withdrawing the bid.
95
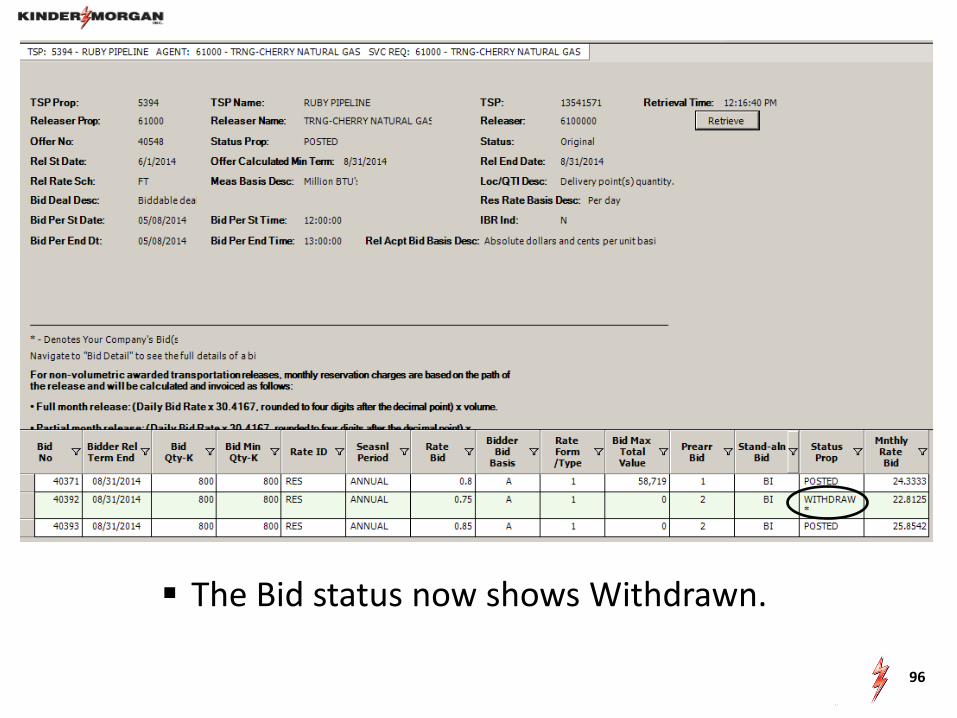
The Bid status now shows Withdrawn.
96
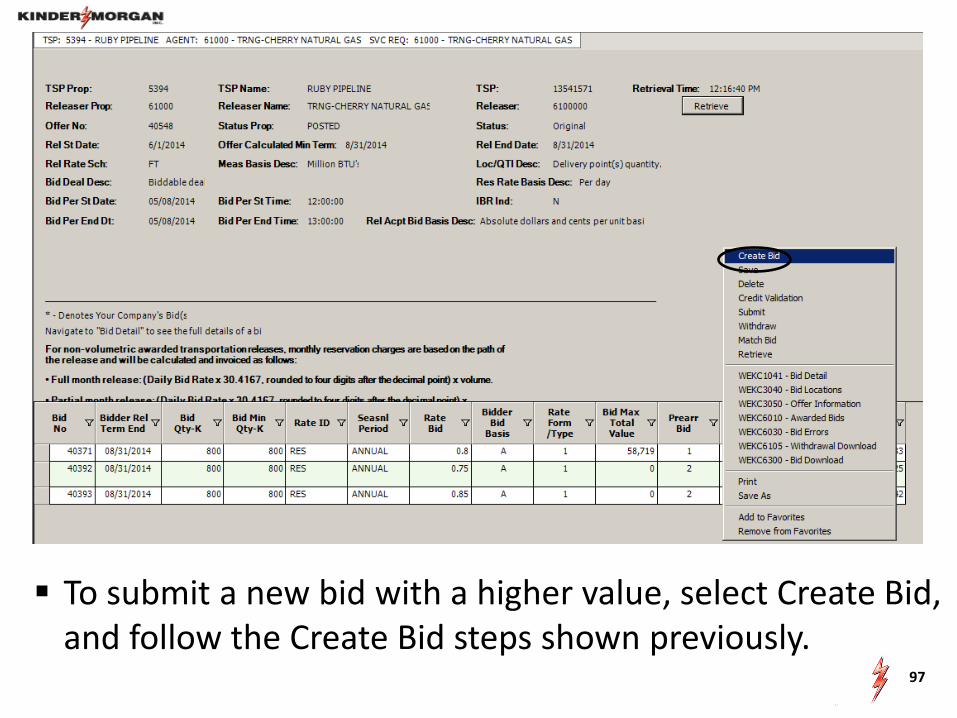
To submit a new bid with a higher value, select Create Bid, and follow the Create Bid steps shown previously.
97
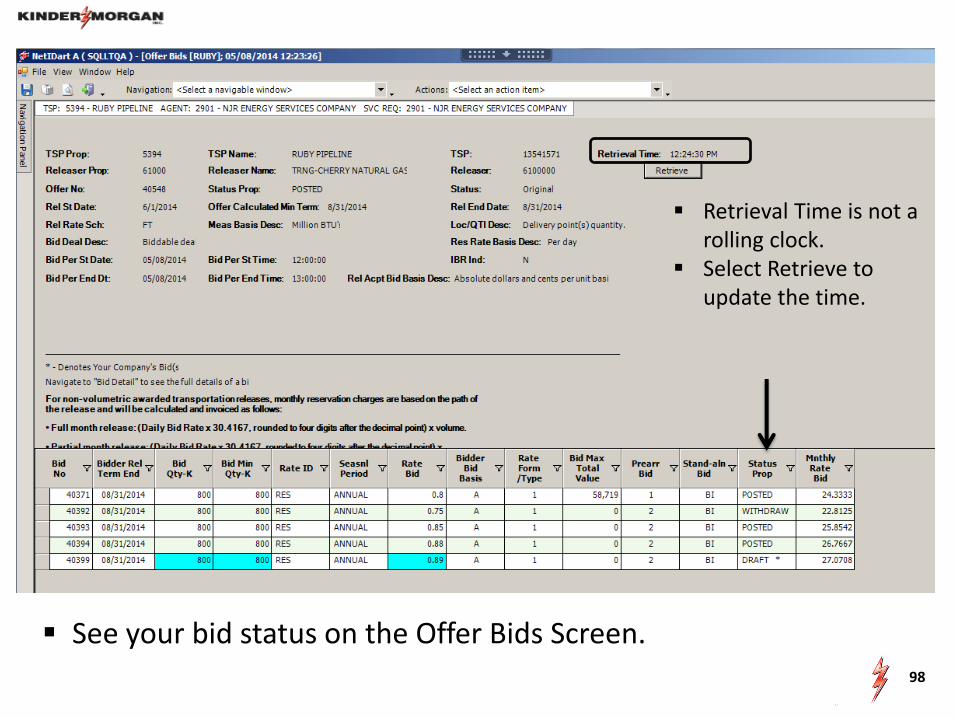
Retrieval Time is not a rolling clock.
Select Retrieve to update the time.
See your bid status on the Offer Bids Screen. 98

Higher Bid has been submitted and posted. 99

www.kindermorgan.com
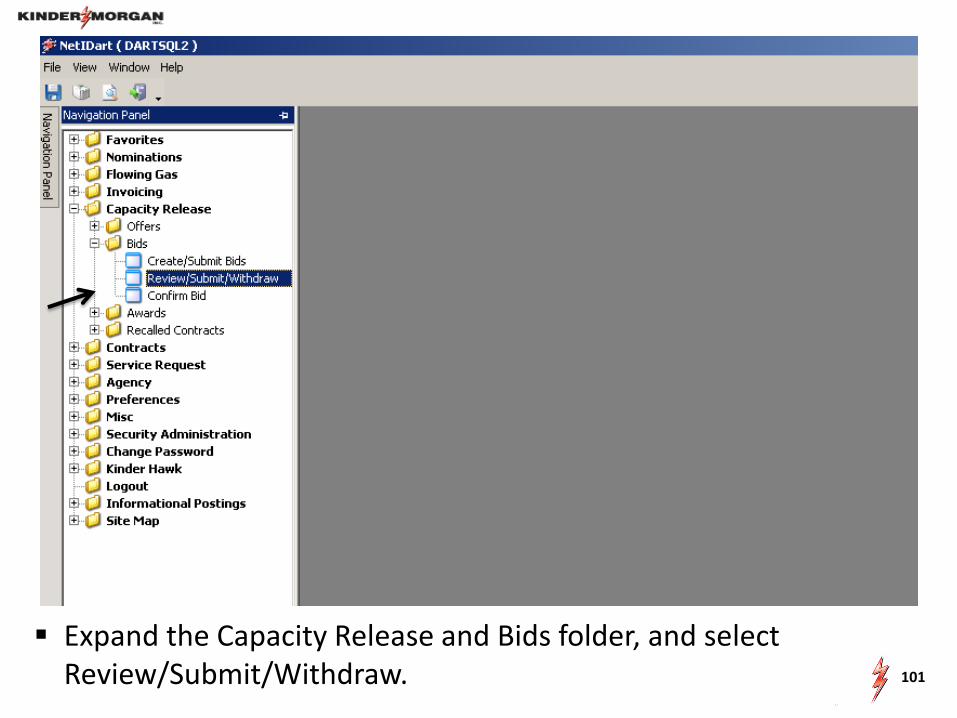
Expand the Capacity Release and Bids folder, and select Review/Submit/Withdraw. 101
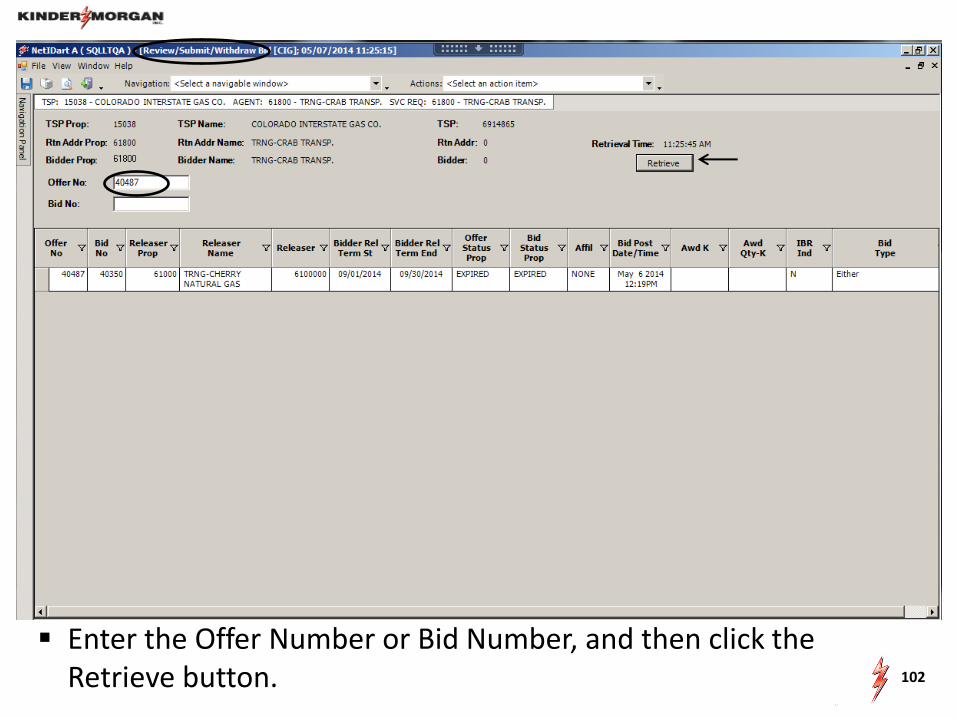
Enter the Offer Number or Bid Number, and then click the Retrieve button. 102

Highlight the offer. Right click, and select Offer Bids. 103
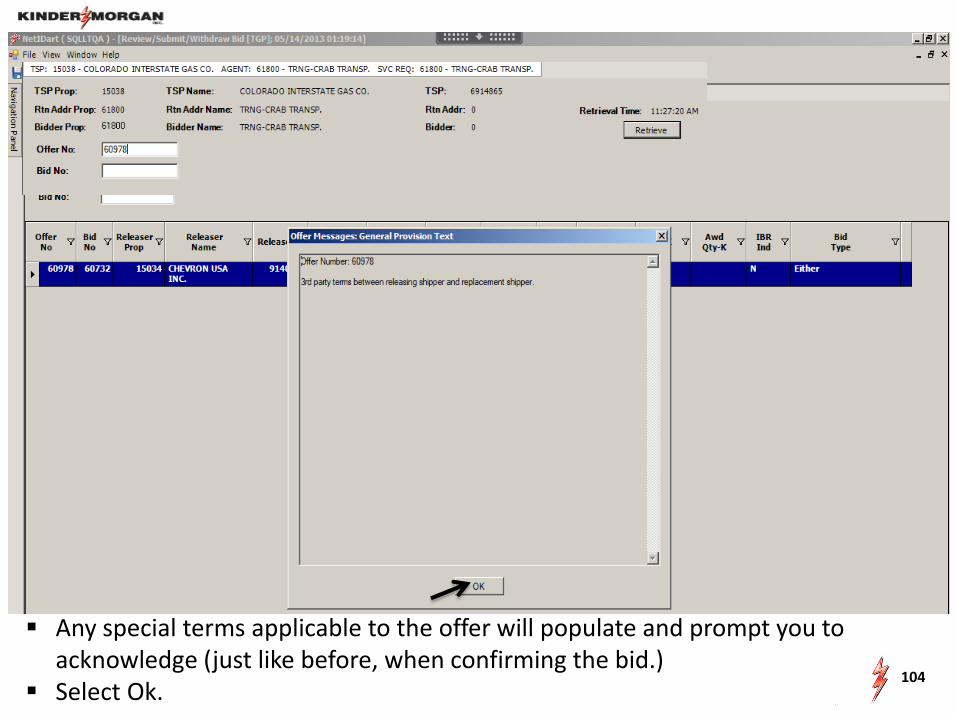
Any special terms applicable to the offer will populate and prompt you to acknowledge (just like before, when confirming the bid.)
Select Ok. 104
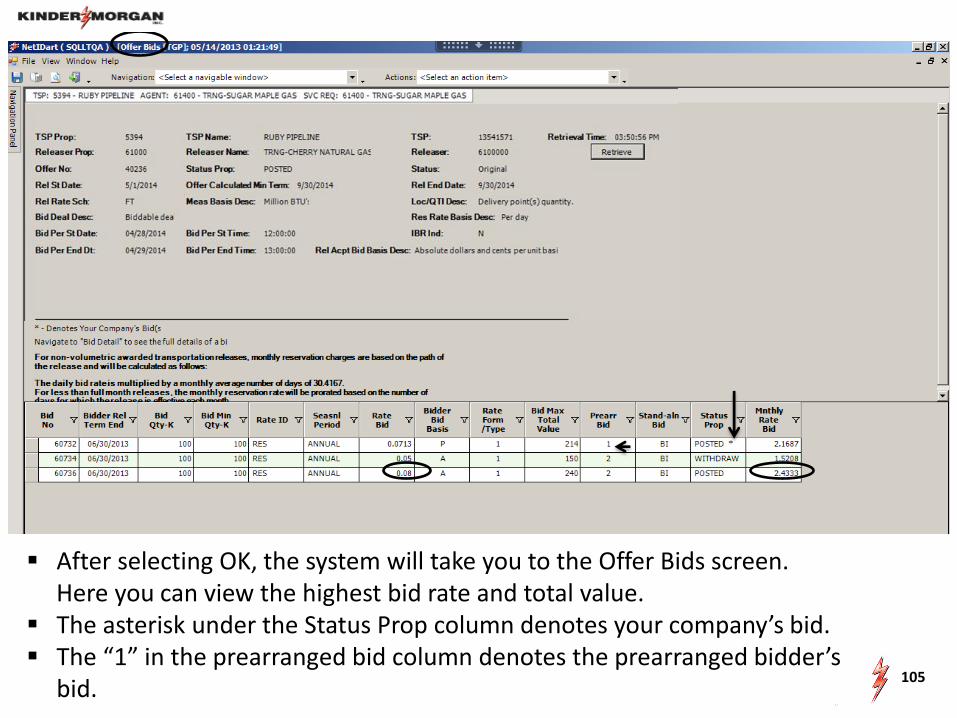
After selecting OK, the system will take you to the Offer Bids screen. Here you can view the highest bid rate and total value. The asterisk under the Status Prop column denotes your company’s bid. The “1” in the prearranged bid column denotes the prearranged bidder’s
bid. 105
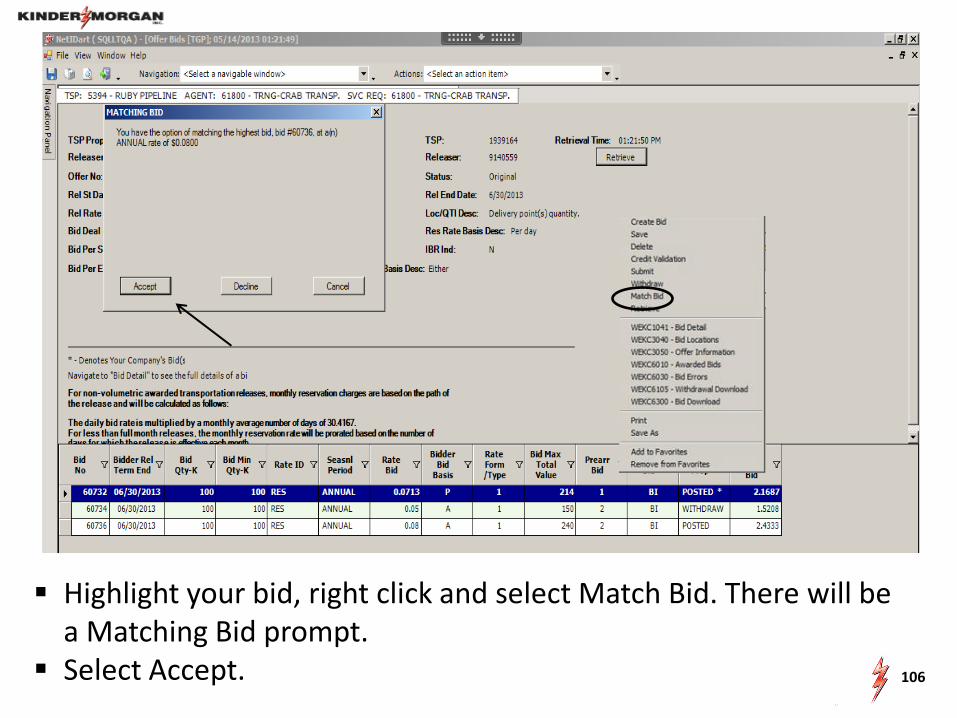
Highlight your bid, right click and select Match Bid. There will be a Matching Bid prompt.
Select Accept. 106
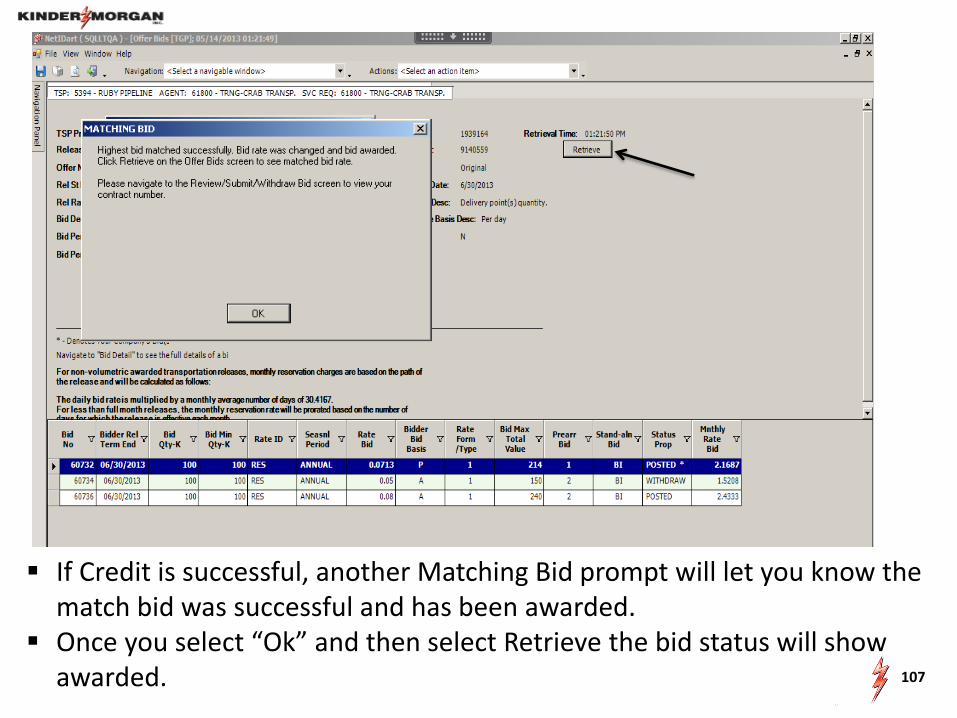
If Credit is successful, another Matching Bid prompt will let you know the match bid was successful and has been awarded.
Once you select “Ok” and then select Retrieve the bid status will show awarded. 107
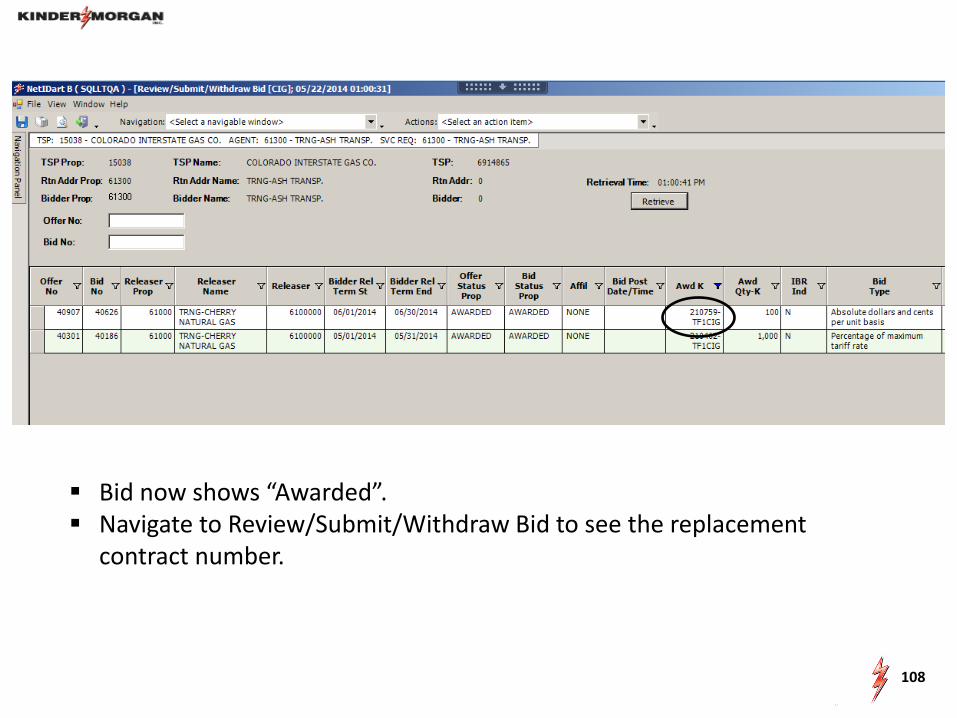
Bid now shows “Awarded”. Navigate to Review/Submit/Withdraw Bid to see the replacement
contract number.
108

109
Workshop Session • Practice creating and copying offers Prearranged / Nonbiddable / Recall with
Reput Prearranged with the party next to you if
they want to practice confirming bids Recallable and reputable so that you can
practice recall/reput Nonbiddable so the offers will award right
away • Practice confirming and creating bids

110
Recall/Reput
Changes
Full / Partial / Location Recall
How to…..
Create a Recall/Reput
View Recall Records
111
Full / Partial / Location Recall
A full recall must be for the total quantity that’s available to recall and for the remainder of the term. A partial recall is a recall for less than the remaining term, if the releasing shipper has reput rights. A partial recall can also be for less than the total quantity that’s available to recall. If the release contained more than 1 receipt or delivery
location, then a partial recall will prorate the recalled quantity across all of the locations.
A location recall (type of partial recall) allows the releasing shipper to specify certain locations and quantities to recall
www.kindermorgan.com
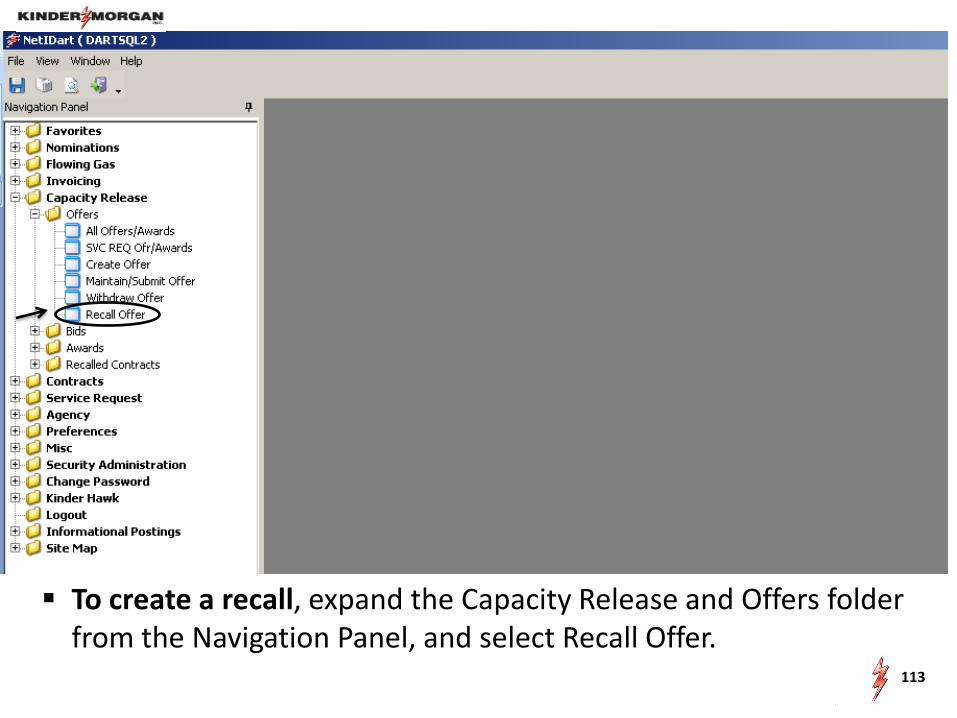
To create a recall, expand the Capacity Release and Offers folder from the Navigation Panel, and select Recall Offer.
113
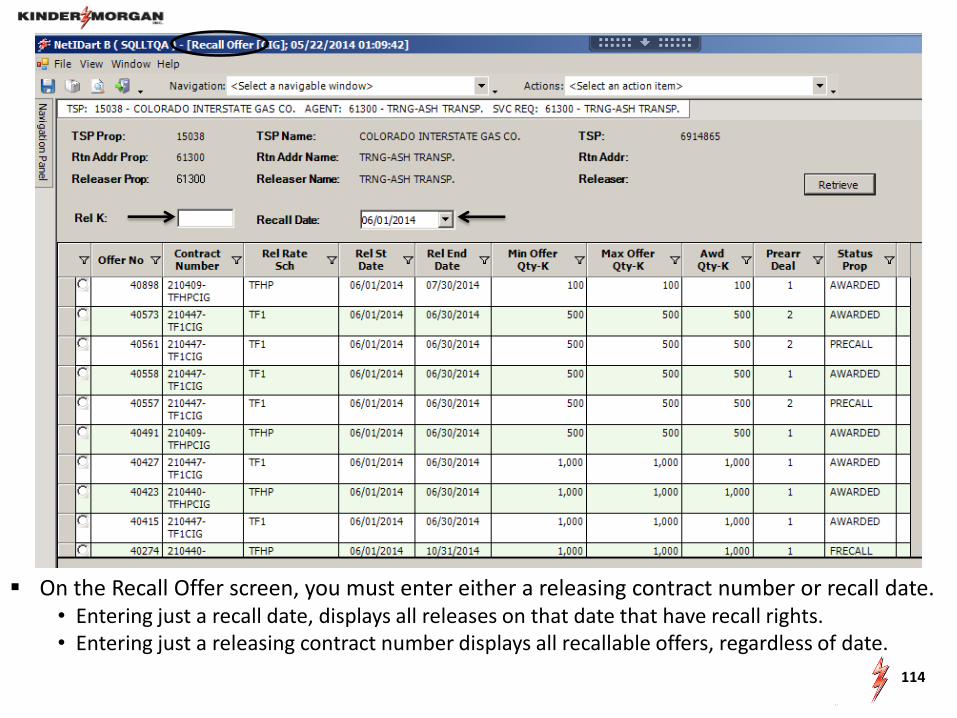
On the Recall Offer screen, you must enter either a releasing contract number or recall date. • Entering just a recall date, displays all releases on that date that have recall rights. • Entering just a releasing contract number displays all recallable offers, regardless of date.
114
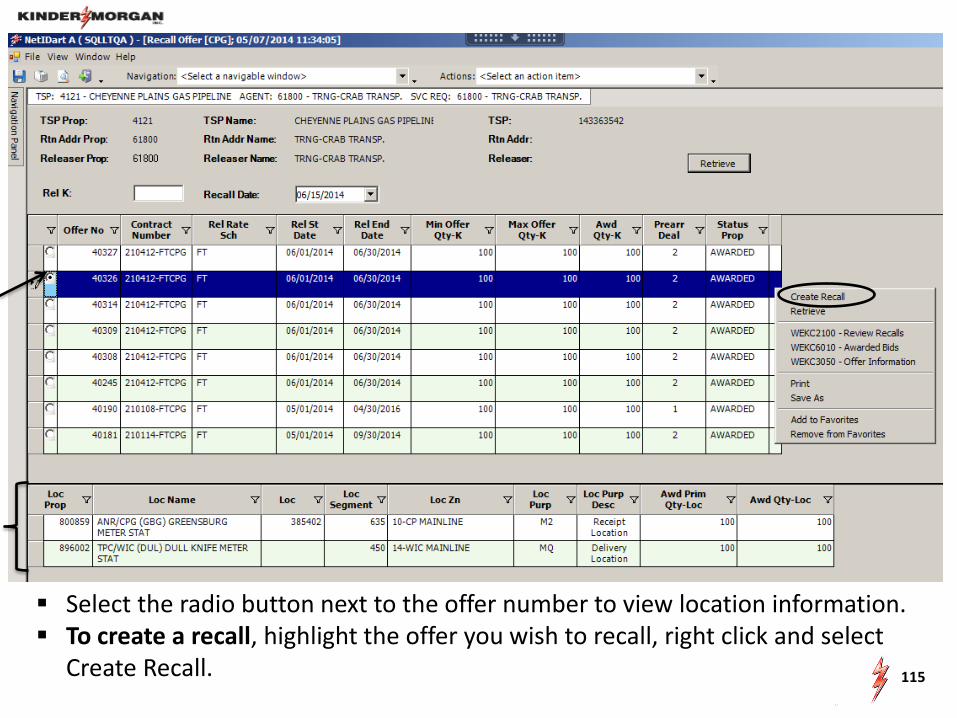
Select the radio button next to the offer number to view location information. To create a recall, highlight the offer you wish to recall, right click and select
Create Recall. 115
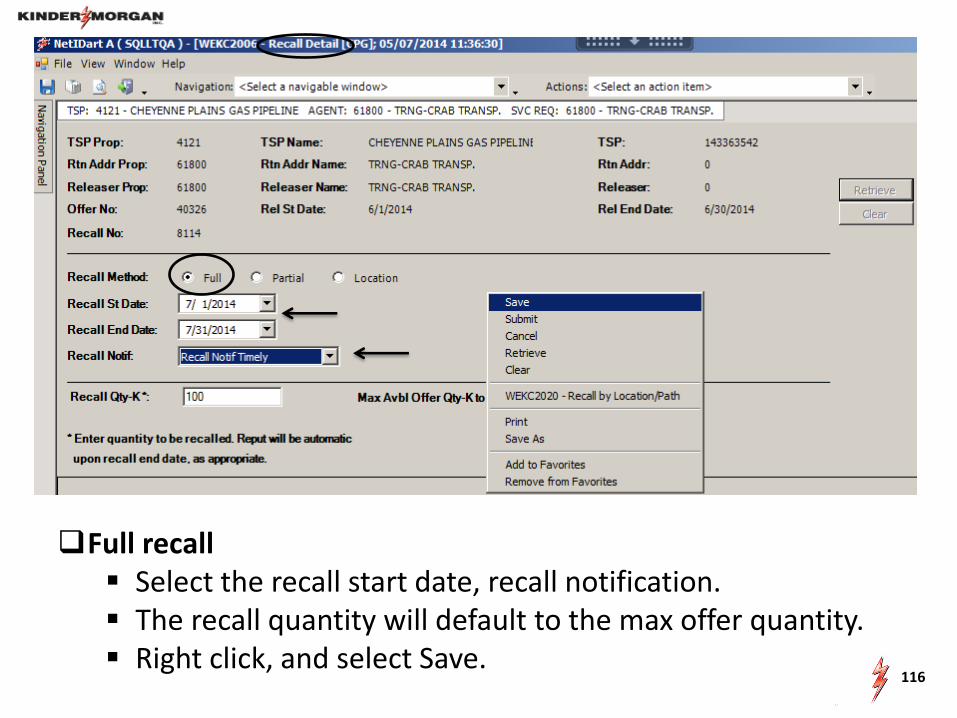
Full recall Select the recall start date, recall notification. The recall quantity will default to the max offer quantity. Right click, and select Save.
116
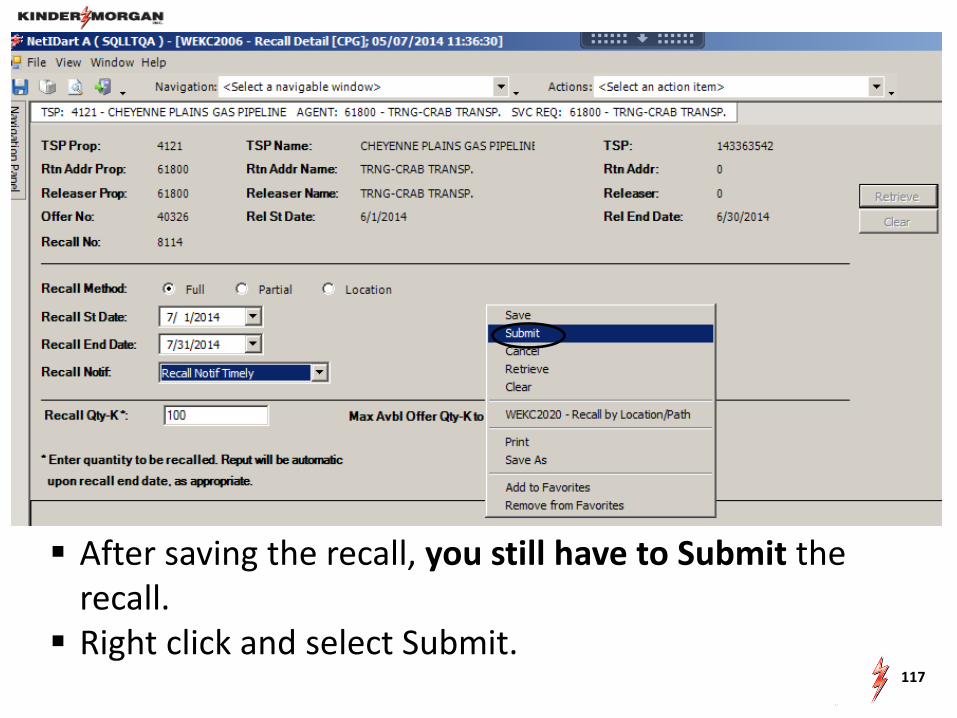
After saving the recall, you still have to Submit the recall.
Right click and select Submit. 117
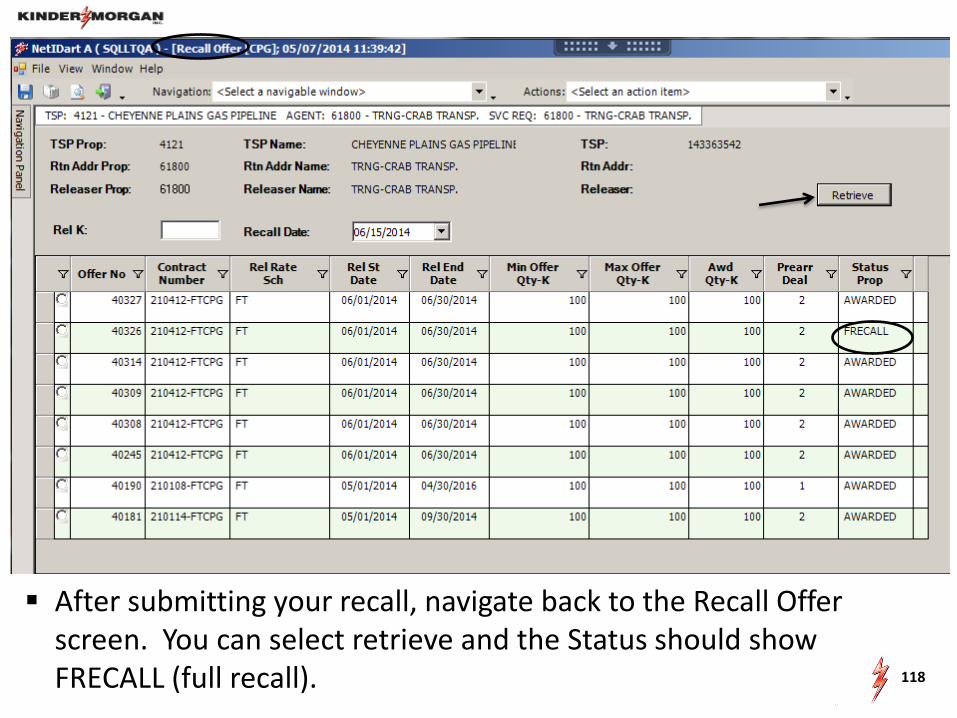
After submitting your recall, navigate back to the Recall Offer screen. You can select retrieve and the Status should show FRECALL (full recall). 118
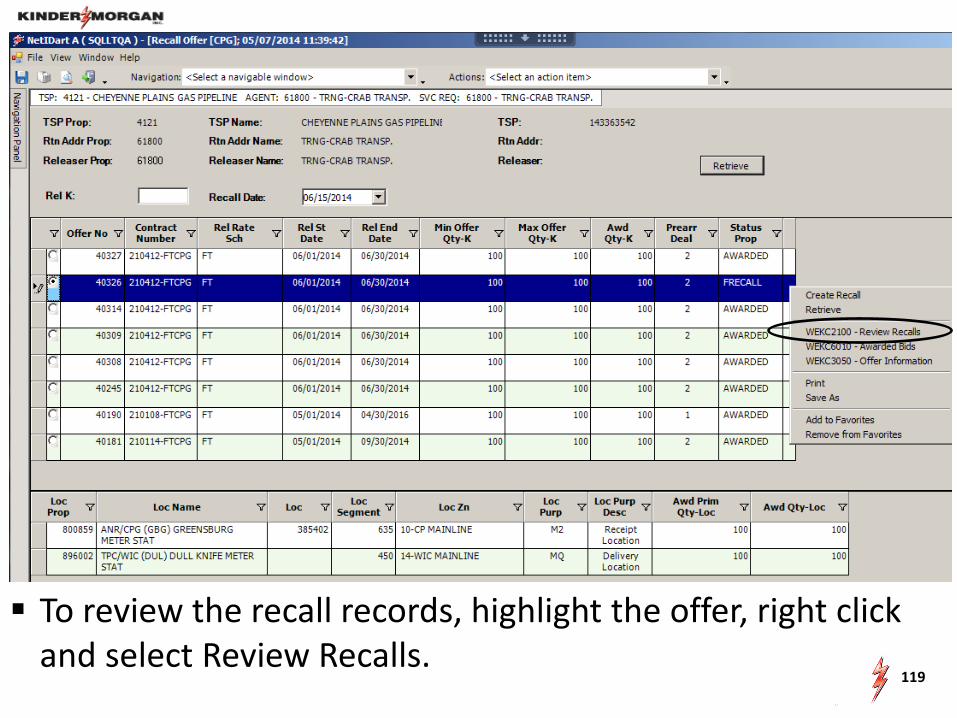
To review the recall records, highlight the offer, right click and select Review Recalls.
119
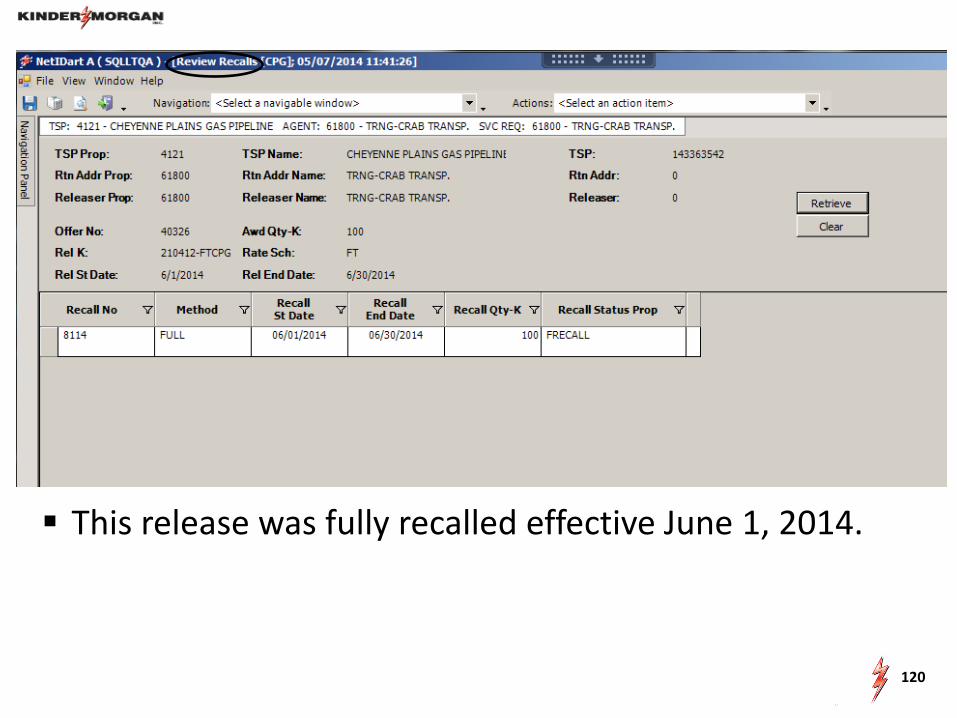
This release was fully recalled effective June 1, 2014.
120
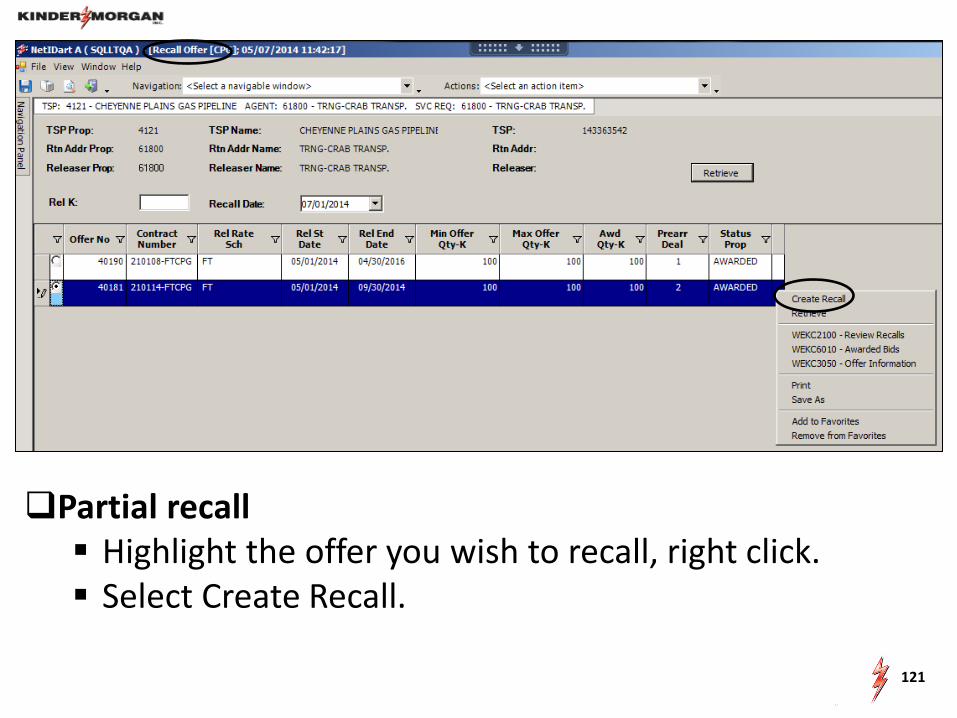
Partial recall Highlight the offer you wish to recall, right click. Select Create Recall.
121
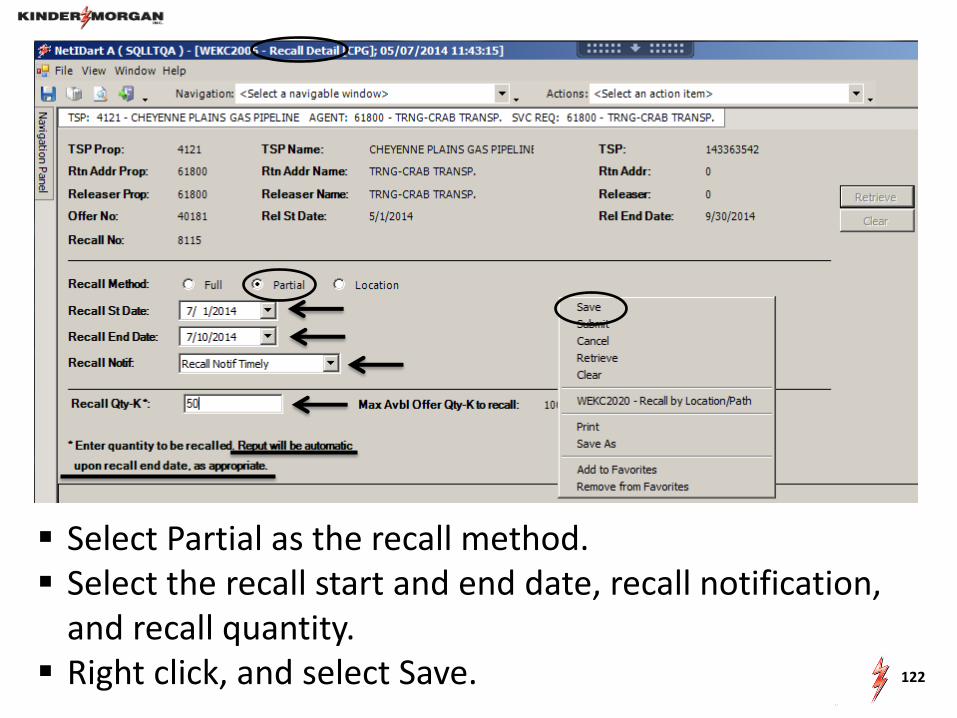
Select Partial as the recall method. Select the recall start and end date, recall notification,
and recall quantity. Right click, and select Save.
122
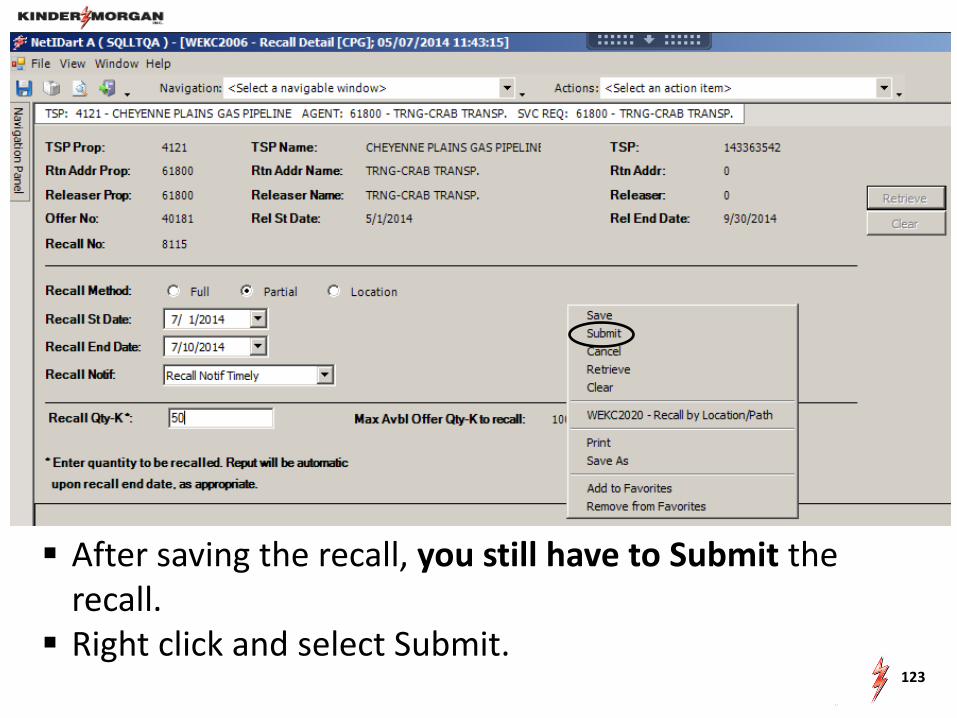
After saving the recall, you still have to Submit the recall.
Right click and select Submit. 123
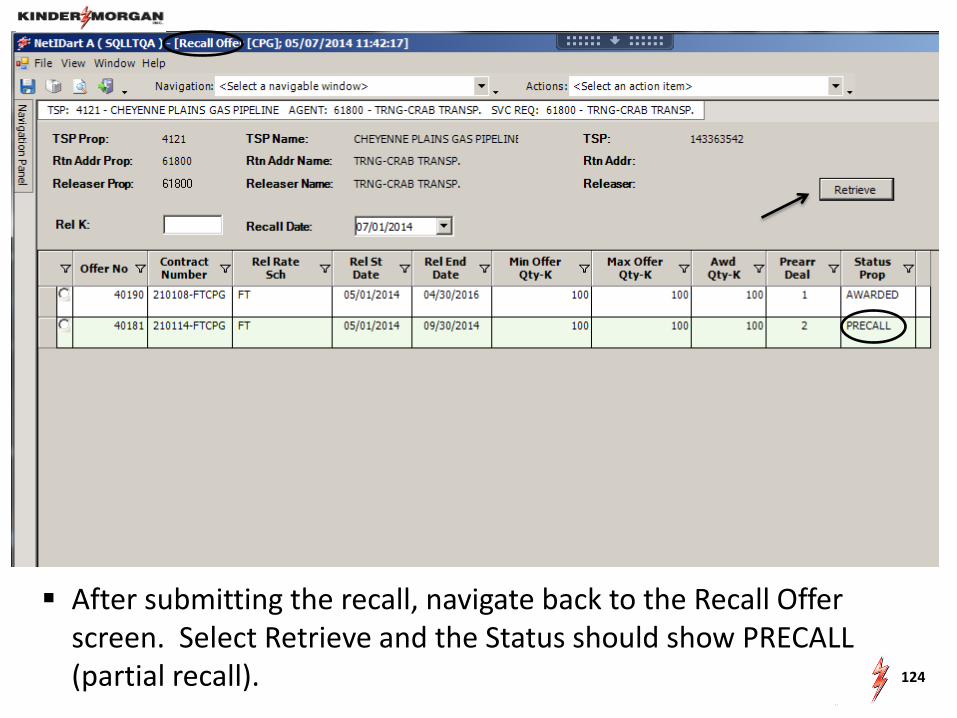
After submitting the recall, navigate back to the Recall Offer screen. Select Retrieve and the Status should show PRECALL (partial recall).
124
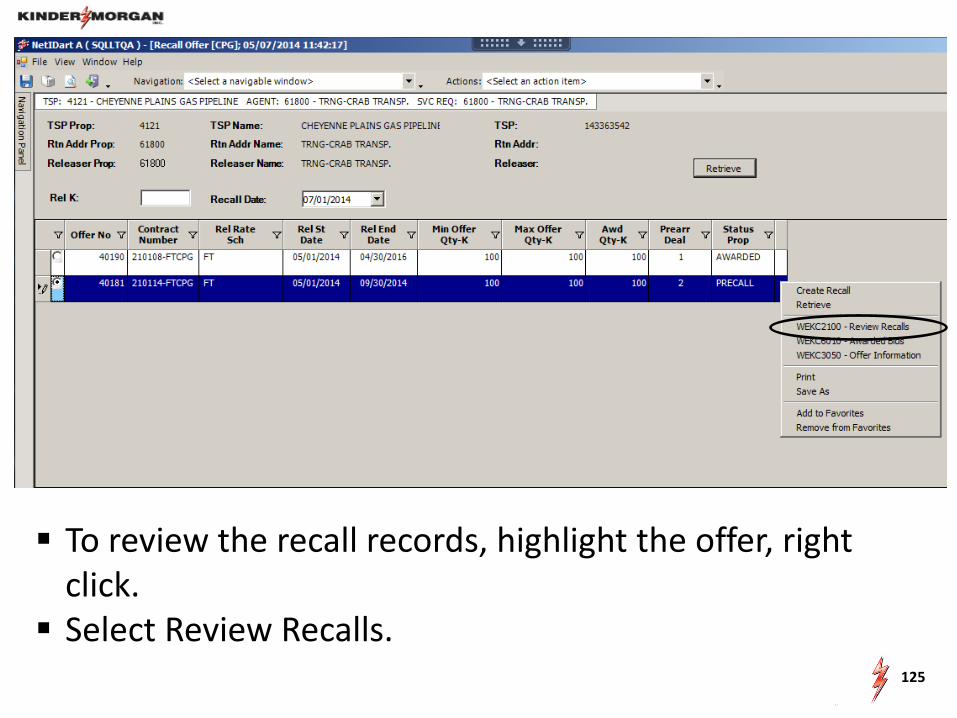
To review the recall records, highlight the offer, right click.
Select Review Recalls.
125
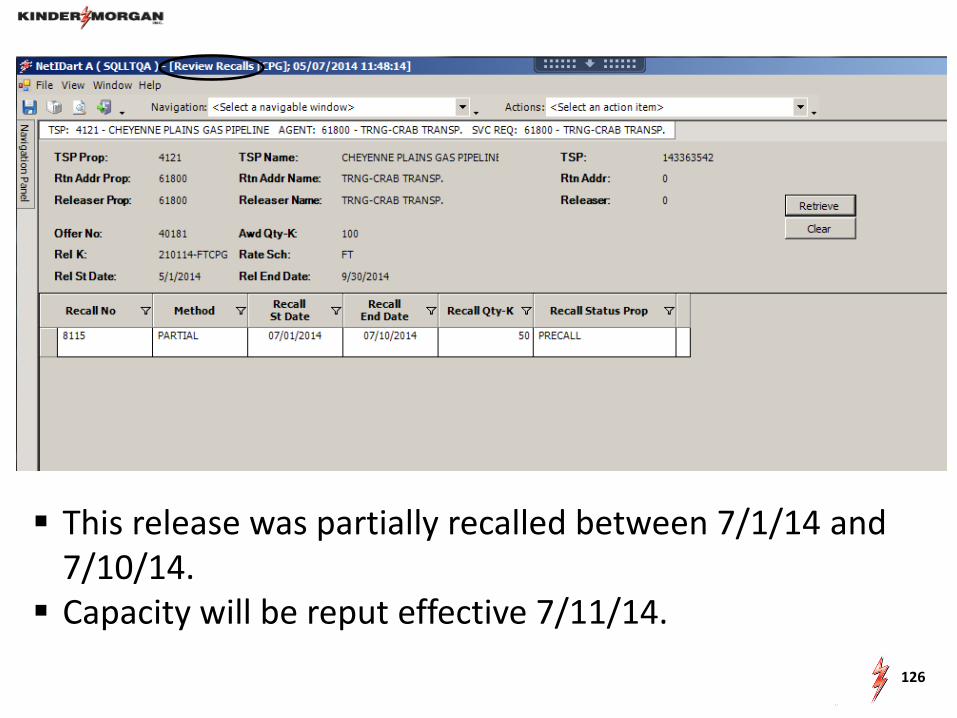
This release was partially recalled between 7/1/14 and 7/10/14.
Capacity will be reput effective 7/11/14.
126

Location recall Highlight the offer you wish to recall, right click Select Create Recall
127
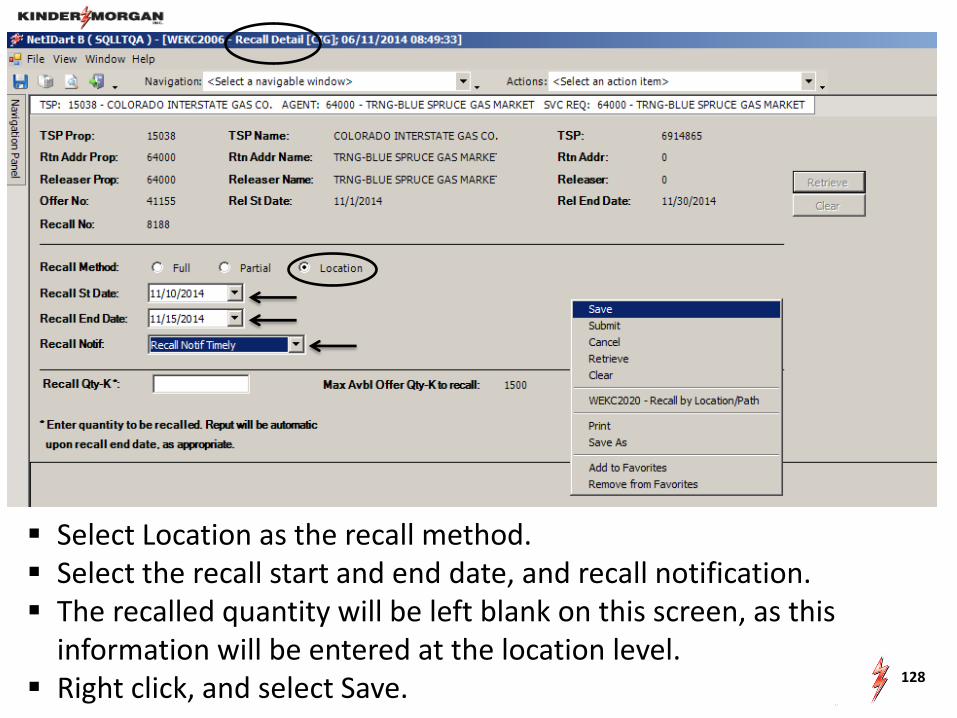
Select Location as the recall method. Select the recall start and end date, and recall notification. The recalled quantity will be left blank on this screen, as this
information will be entered at the location level. Right click, and select Save.
128
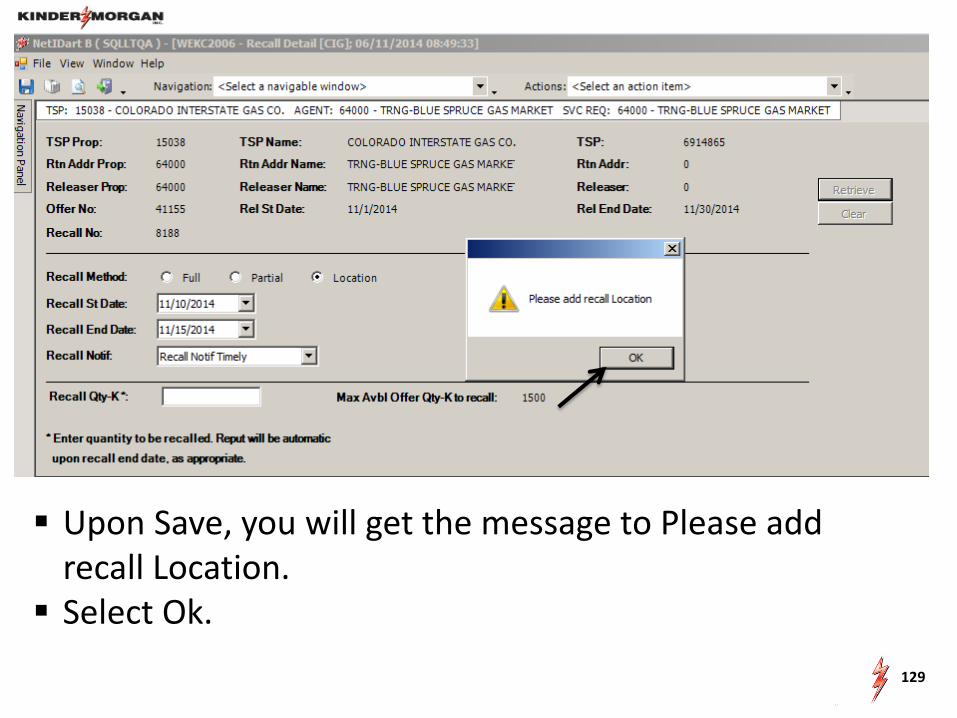
Upon Save, you will get the message to Please add recall Location.
Select Ok.
129
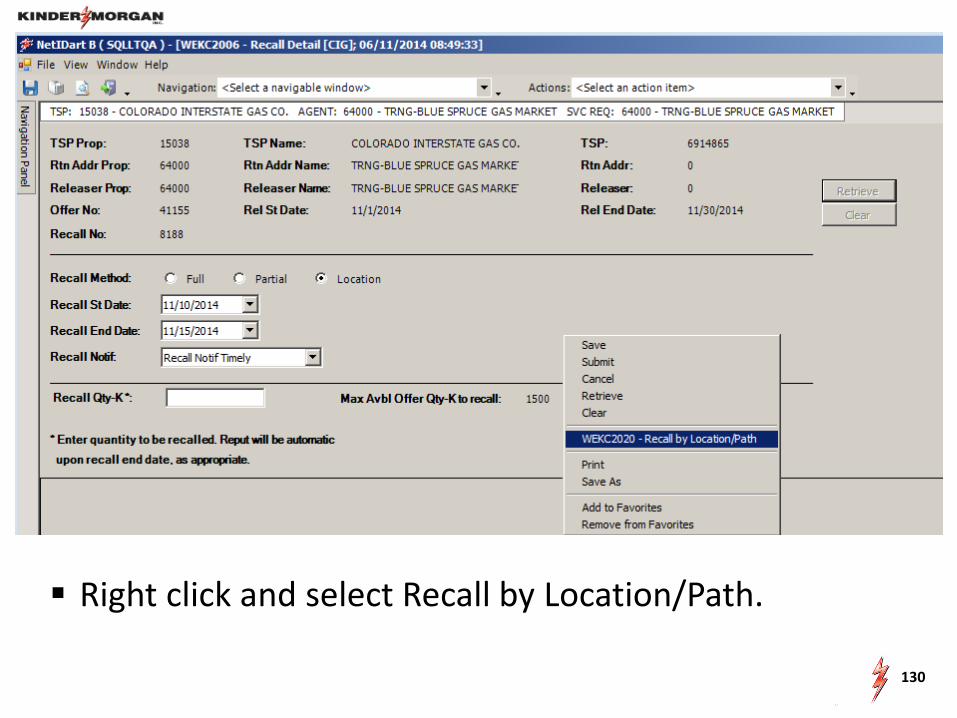
Right click and select Recall by Location/Path.
130

Enter the quantity you wish to recall in the Recall Qty-Loc column.
Right click and select Save. 131
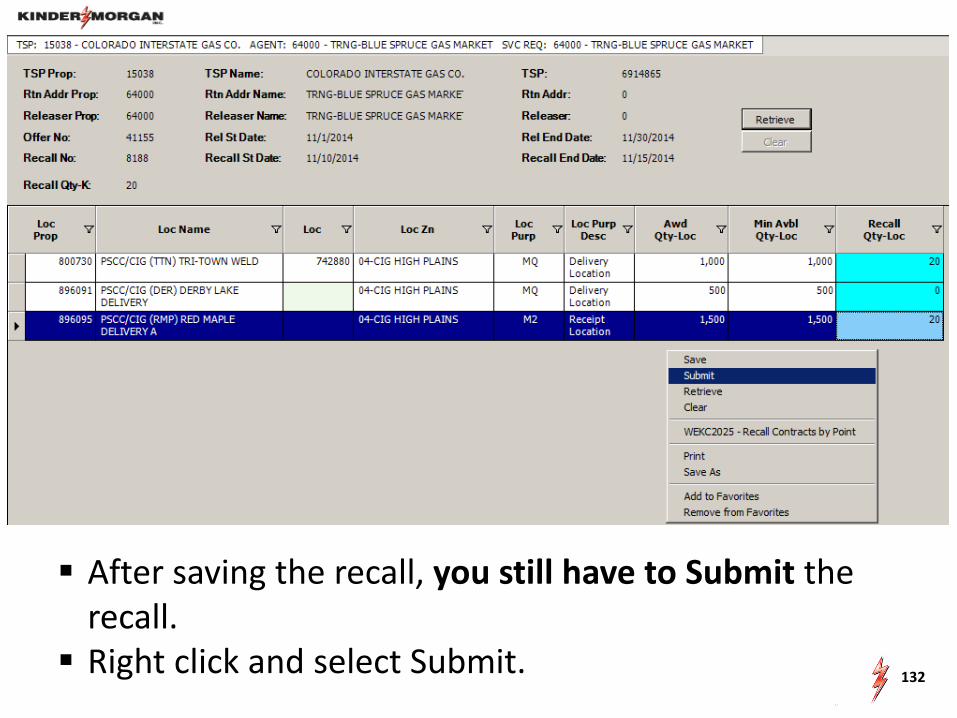
After saving the recall, you still have to Submit the recall.
Right click and select Submit.
132
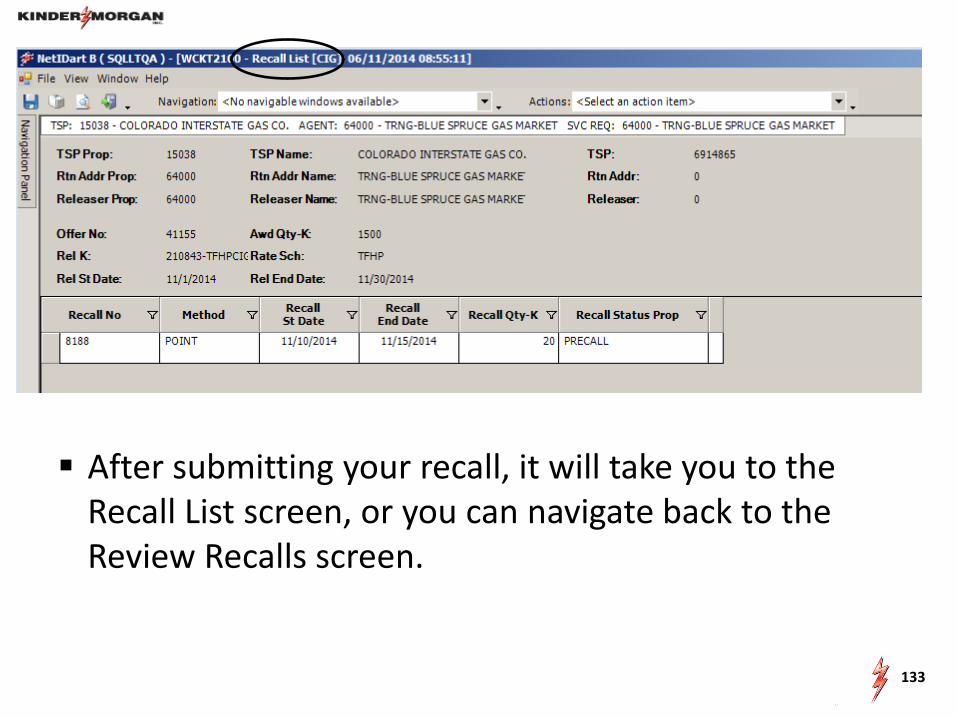
After submitting your recall, it will take you to the Recall List screen, or you can navigate back to the Review Recalls screen.
133

134
Workshop Session
• Creating recalls • Reviewing the recall records

www.kindermorgan.com
136
Agency
• Changes to Agency • How to View your Agency Information • How to Request and Approve an
Agency Agreement • How to add functions
137
Changes to Agency • CIG, WIC, CP, YGS, and RUBY will not be a party to the Agency Agreement. The Agency Agreement is between the Principal and the Agent. • Agent or Principal may create an agency agreement. • Users with Contract Request or Contract Execution security roles can create an agency agreement. • Agencies must begin on the first day of the month. • Agencies must have an End Date. For existing agency agreements that were not previously end dated in Xpress, we’ll put an end date of 9/30/19. • Principal retains update rights. • Confirmations may be point specific. • All functions are production date effective. An end date of a release may go beyond the end date of the agency. • Overlapping agencies are allowed for all functions except Nominations, Invoice and Confirmation. • To change functions on an Agency Agreement, the old Agency Agreement must be terminated and a new Agency Agreement must be entered into with the function changes. • User can copy an existing agreement.

138
Agency
• How to View Agency Information
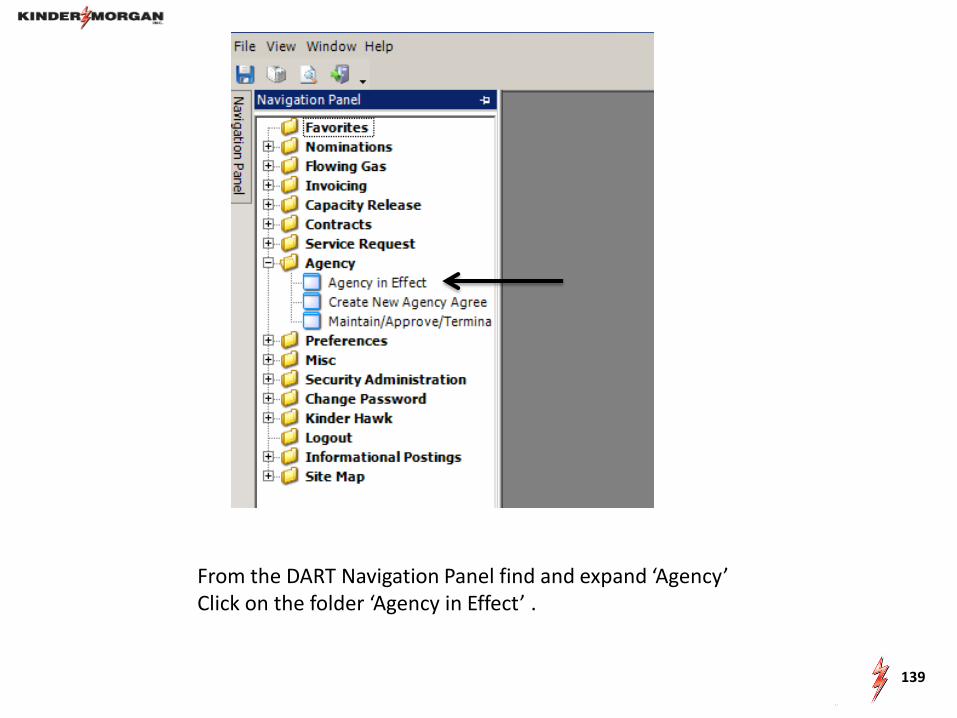
From the DART Navigation Panel find and expand ‘Agency’ Click on the folder ‘Agency in Effect’ .
139

Click on the white TSP/Agent strip and change TSP to pipeline needed, if necessary.
140
141
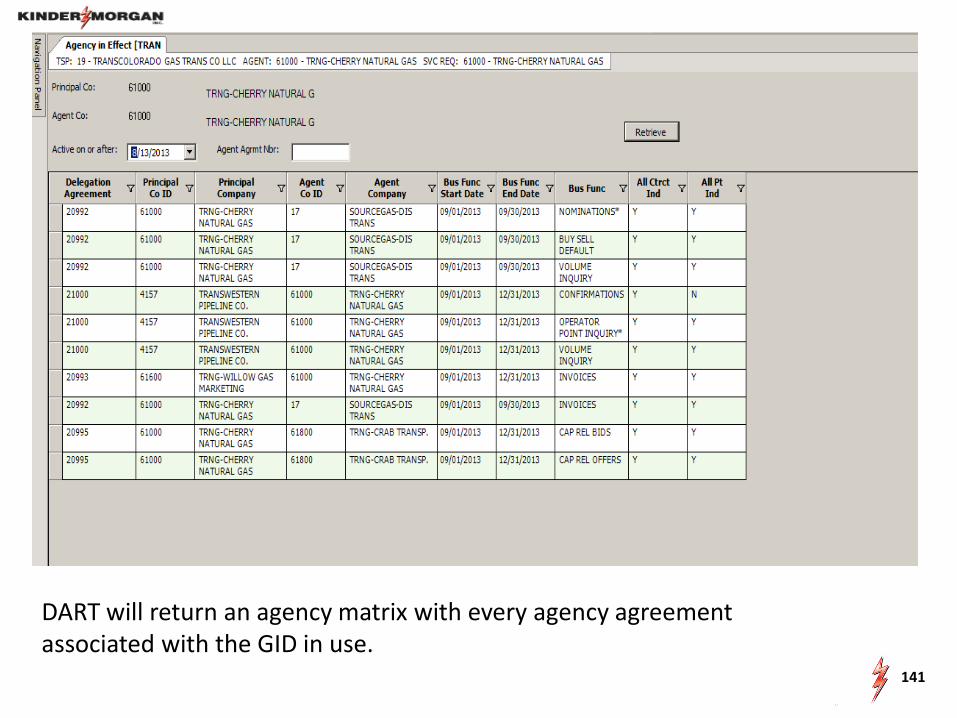
DART will return an agency matrix with every agency agreement associated with the GID in use.
142
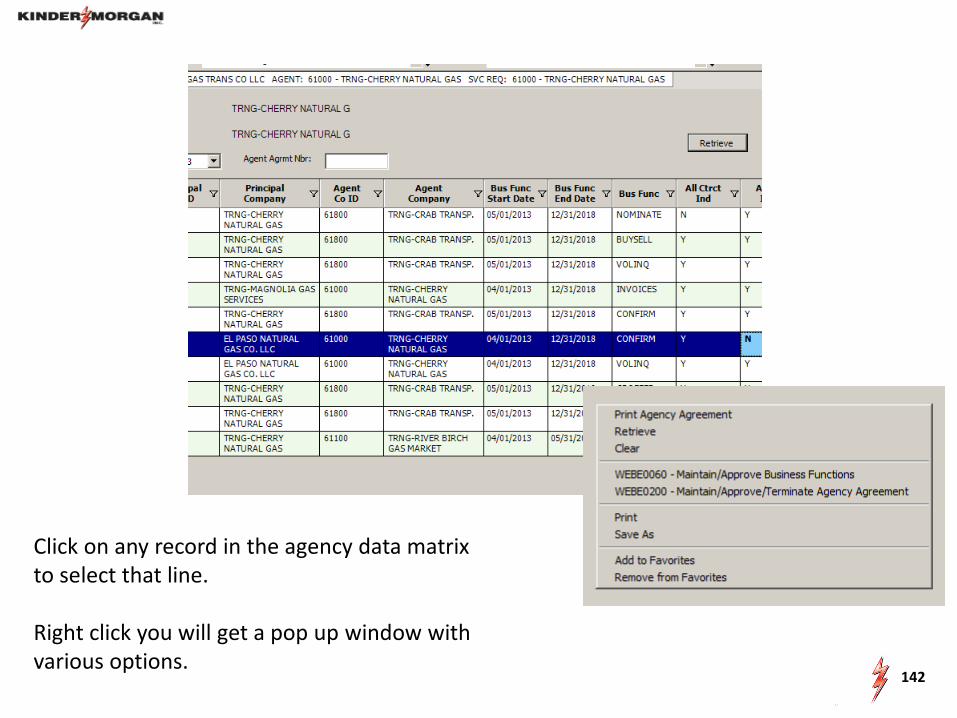
Click on any record in the agency data matrix to select that line. Right click you will get a pop up window with various options.
143
Agency
• How to Request and Approve an Agency Agreement
• How to add functions

From the Navigation Panel, select Create New Agency Agreement.
144
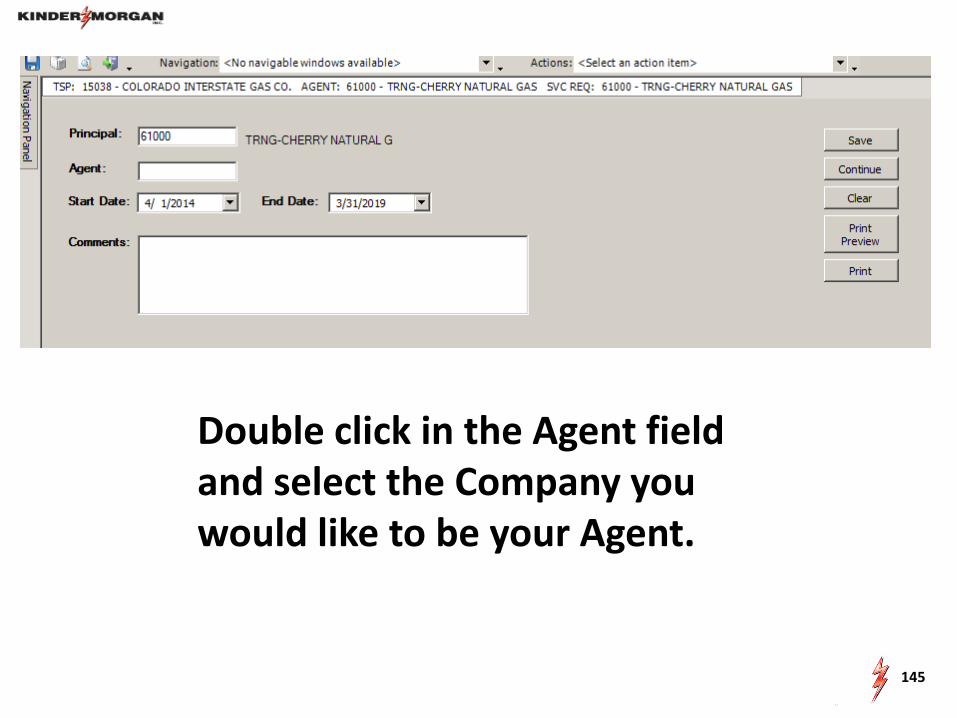
Double click in the Agent field and select the Company you would like to be your Agent.
145

Once the Agent has been selected, click Save then Continue.
146
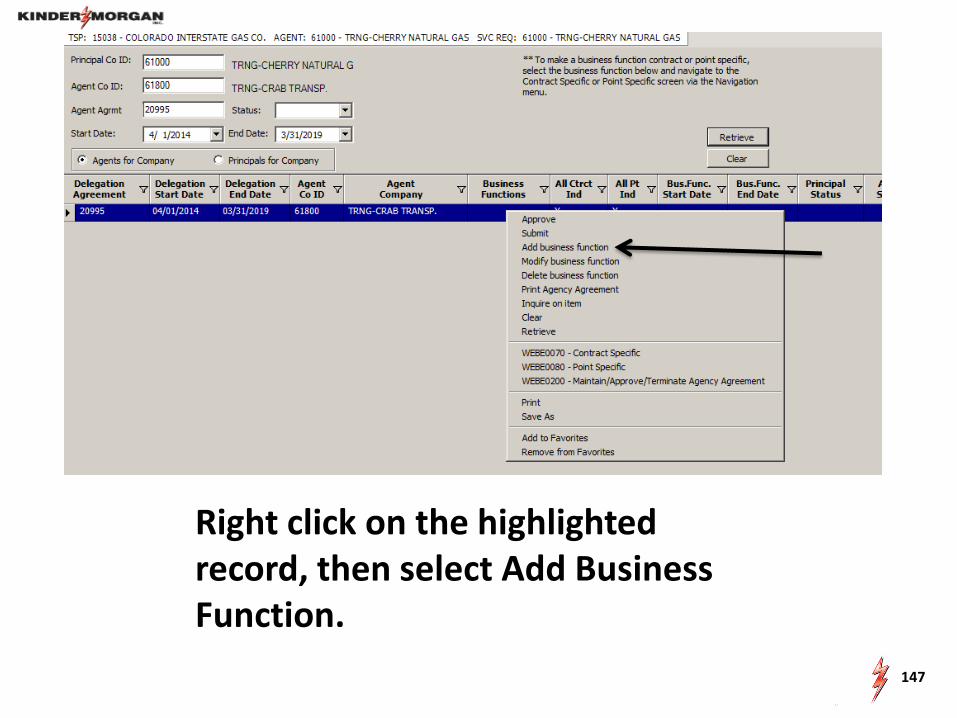
Right click on the highlighted record, then select Add Business Function.
147

Select the business functions you would like the Agent to perform on your behalf, then select Save.
148
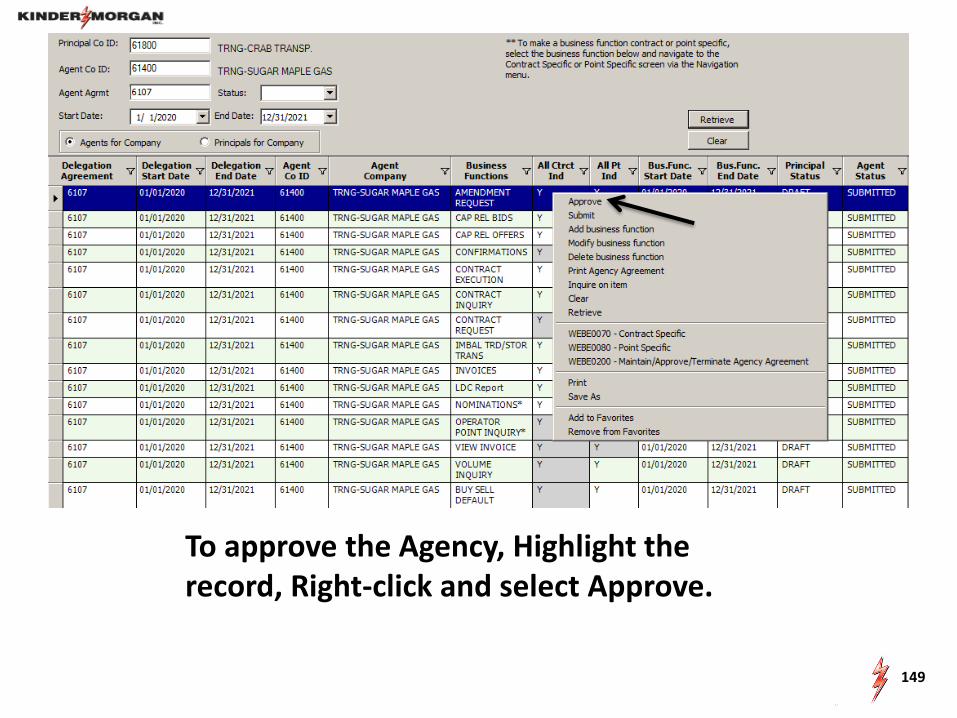
To approve the Agency, Highlight the record, Right-click and select Approve.
149
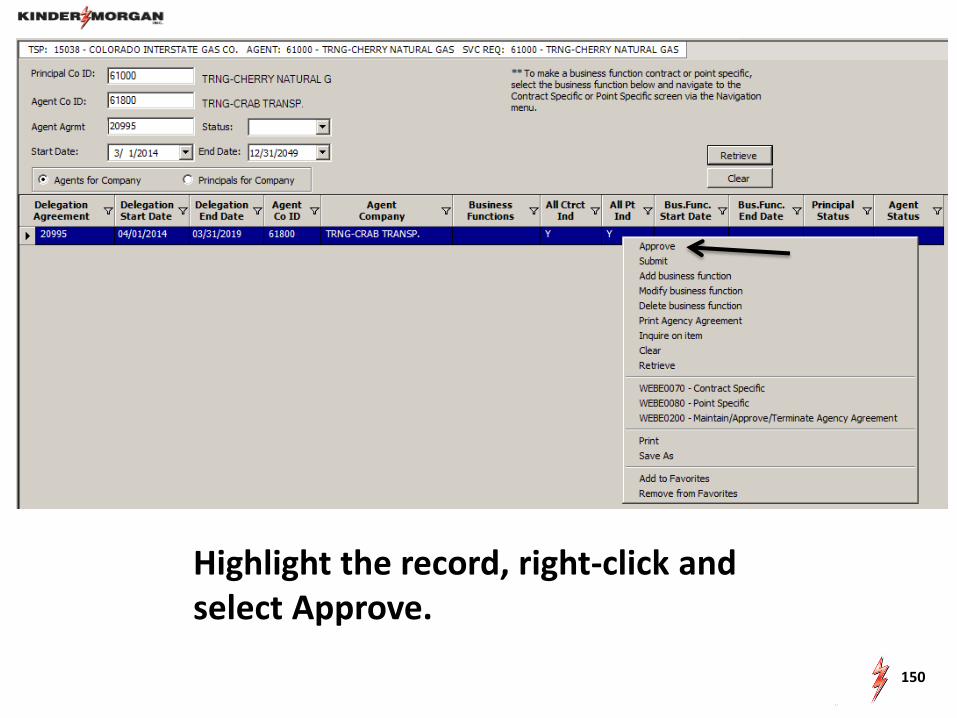
Highlight the record, right-click and select Approve.
150

Select Yes – An agency agreement word document will populate on the screen .
151
When finished reviewing, select the x in the top right hand corner.

Select Ok.
152

Notice the Principal Status updates to Approved. The Agent will need to complete the same steps.
153
What do you do if your Principal does not have access to Dart?
1. Fill out the agency requirements in Dart, approve your Agent Status.
2. When the word document appears, print it and send it to the principal.
3. Once they have signed it, they can send it to Contract Administration or back to you to send to us.
4. Once received, Contract Administration will approve on their behalf.
154
155
Workshop Session
• Review Agency Information • Request an Agency

Thank You! We appreciate your
business!
Contact us: [email protected]
Sherry Saunders (Mgr) 719.520.3711
Tonie Stephens 719.520.4847 Celeste Aragon 719.520.4853
156


