238
Upgrade Guide September 10, 2019 | Version 9.5.411.4 For the most recent version of this document, visit our documentation website .
Upgrade GuideSeptember 10, 2019 | Version 9.5.411.4
For the most recent version of this document, visit our documentation website.
UpgradeGuide 2
Table of Contents1 Relativity upgrade 13
1.1 Addressing custom solutions pre-upgrade 13
1.2 Addressing custom scripts that trigger imaging jobs 13
1.3 Required pre-upgrade steps for all Relativity versions 13
1.3.1 Obtain credentials for service and database accounts 14
1.3.2 Review system and other requirements 14
1.3.3 Apply a trusted certificate for the Analytics server 14
1.3.4 Back up your Relativity environment 14
1.3.5 Reboot machines with Windows updates 15
1.3.6 Download the Relativity installer 15
1.4 8.1, 8.2, or 9.x to 9.5 upgrade workflow 15
1.5 8.0 to 9.5 upgrade workflow 16
1.6 7.x to 9.5 upgrade workflow 16
1.7 6.x to 9.5 upgrade workflow 16
2 Upgrade considerations for Relativity 9.5 17
2.1 9.x to 9.5 Relativity updates 17
2.1.1 Agent service 18
Analytics 18
2.1.2 Applications 21
2.1.3 Audit 21
2.1.4 Authentication 24
2.1.5 Conversion 25
Data Grid 25
2.1.6 Database schema updates 26
ECA and Investigation 26
Fields 27
2.1.7 File share 27
Foreign key removal 27
2.1.8 IIS 27
UpgradeGuide 3
Imaging 29
2.1.9 Installation of a certificate on the database server 31
2.1.10 Instance settings 31
2.1.11 Processing/Invariant 31
2.1.12 Network load balancing 36
2.1.13 New UI framework 36
Production 37
2.1.14 Relativity admin and service account email addresses 38
2.1.15 Relativity Desktop Client (RDC) 39
2.1.16 Relativity installer updates 39
2.1.17 Relativity Processing Console 40
2.1.18 Relativity service bus 40
2.1.19 Required certificates for Relativity 41
2.1.20 Scripts 41
2.1.21 Searching 41
2.1.22 Service Host Manager HTTPS configuration 41
2.1.23 System requirements 41
2.1.24 Telemetry 41
2.1.25 Viewer (ActiveX) 42
2.1.26 Viewer (ActiveX and HTML) 42
2.1.27 Windows or Integrated Windows authentication 43
2.1.28 Windows Service Bus 1.1 with TLS 1.2 Support 44
2.1.29 Workers 46
2.1.30 Worker manager queue 46
2.1.31 Worker manager server 47
2.1.32 Workspace upgrade queue 47
2.2 8.x to 9.5 Relativity updates 47
Agents 48
2.2.1 Agent service 49
Analytics 49
2.2.2 Applications 51
UpgradeGuide 4
2.2.3 Audit 51
2.2.4 Authentication 51
2.2.5 Conversion 52
Data Grid 52
2.2.6 Database schema updates 52
ECA and Investigation 53
Fields 53
2.2.7 File share 53
Foreign key removal 53
2.2.8 IIS 54
Imaging 55
2.2.9 Installation of a certificate on the database server 57
2.2.10 Instance settings 57
2.2.11 Processing/Invariant 57
2.2.12 Network load balancing 62
2.2.13 New UI framework 62
Production 62
2.2.14 Relativity admin and service account email addresses 64
2.2.15 Relativity Desktop Client (RDC) 64
2.2.16 Relativity installer updates 64
2.2.17 Relativity Processing Console 65
2.2.18 Relativity service bus 66
2.2.19 Required certificates for Relativity 66
2.2.20 Scripts 67
2.2.21 Searching 67
2.2.22 Service Host Manager HTTPS configuration 67
2.2.23 System requirements 67
2.2.24 Telemetry 67
2.2.25 Viewer (ActiveX) 67
2.2.26 Viewer (ActiveX and HTML) 68
2.2.27 Windows or Integrated Windows authentication 69
UpgradeGuide 5
2.2.28 Windows Service Bus 1.1 with TLS 1.2 Support 69
2.2.29 Workers 72
2.2.30 Worker manager queue 72
2.2.31 Worker manager server 72
2.2.32 Workspace upgrade queue 72
2.2.33 Conversion 73
Data Grid 73
2.2.34 Database schema 73
Document table trigger removal 74
2.2.35 File share 74
Foreign key removal 74
2.2.36 IIS 74
Imaging 75
2.2.37 Imaging sets 77
2.2.38 Installation of a certificate on the database server 77
2.2.39 Processing/Invariant 77
2.2.40 New UI framework 82
2.2.41 Processing 82
Production 83
2.2.42 Relativity service bus 84
2.2.43 Required certificates for Relativity 84
2.2.44 Scripts 84
2.2.45 Searching 84
Servers 85
2.2.46 Service Host Manager HTTPS configuration 85
Structured Analytics 85
2.2.47 System requirements 85
2.2.48 Telemetry 85
2.2.49 Viewer (ActiveX) 86
2.2.50 Viewer (ActiveX and HTML) 86
2.2.51 Windows or Integrated Windows authentication 87
UpgradeGuide 6
2.2.52 Workers 87
2.2.53 Worker manager queue 88
2.2.54 Worker manager server 88
2.2.55 Workspace upgrade queue 88
Viewer 88
2.2.56 Workers 89
2.2.57 Worker manager server 89
Workspace Upgrade Queue 89
Workspaces 89
2.2.58 Windows or Integrated Windows authentication 89
2.3 7.x to 9.5 Relativity updates 90
2.3.1 Agent service 91
Analytics 91
2.3.2 Applications 93
2.3.3 Audit 94
2.3.4 Authentication 94
2.3.5 Conversion 94
Data Grid 95
2.3.6 Database schema updates 95
ECA and Investigation 95
Fields 96
2.3.7 File share 96
Foreign key removal 96
2.3.8 IIS 97
Imaging 98
2.3.9 Installation of a certificate on the database server 100
2.3.10 Instance settings 100
2.3.11 Processing/Invariant 100
2.3.12 Network load balancing 104
2.3.13 New UI framework 104
Production 105
UpgradeGuide 7
2.3.14 Relativity admin and service account email addresses 106
2.3.15 Relativity Desktop Client (RDC) 107
2.3.16 Relativity installer updates 107
2.3.17 Relativity Processing Console 108
2.3.18 Relativity service bus 108
2.3.19 Required certificates for Relativity 109
2.3.20 Scripts 109
2.3.21 Searching 109
2.3.22 Service Host Manager HTTPS configuration 109
2.3.23 System requirements 109
2.3.24 Telemetry 109
2.3.25 Viewer (ActiveX) 110
2.3.26 Viewer (ActiveX and HTML) 110
2.3.27 Windows or Integrated Windows authentication 111
2.3.28 Windows Service Bus 1.1 with TLS 1.2 Support 111
2.3.29 Workers 114
2.3.30 Worker manager queue 114
2.3.31 Worker manager server 114
2.3.32 Workspace upgrade queue 114
2.3.33 Conversion 115
2.3.34 Database schema 115
dtSearch index considerations 115
2.3.35 File share 116
Foreign key removal 116
Imaging 117
2.3.36 Installation of a certificate on the database server 118
2.3.37 IIS 118
Processing/Invariant 119
License Relativity and Processing 124
2.3.38 New UI framework 124
Production 125
UpgradeGuide 8
RAR upgrade notes 125
2.3.39 Relativity service bus 126
2.3.40 Required certificates for Relativity 126
Viewer 126
2.3.41 Searching 127
2.3.42 Scripts 127
2.3.43 System requirements 127
2.3.44 Viewer (ActiveX) 127
2.3.45 Configure the viewer drawing delay 127
Upgrade custom applications or code 128
2.3.46 Windows or Integrated Windows authentication 128
2.3.47 Workers 128
2.3.48 Worker manager server 128
2.4 6.x to 9.5 Relativity updates 129
2.4.1 Agent service 130
2.4.2 Analytics 130
2.4.3 Applications 132
2.4.4 Audit 132
2.4.5 Authentication 133
2.4.6 Conversion 133
Data Grid 133
2.4.7 Database schema updates 134
2.4.8 Document Table Trigger removal considerations 134
2.4.9 dtSearch index considerations 134
ECA and Investigation 135
Fields 135
2.4.10 File share 135
Foreign key removal 135
2.4.11 IIS 136
Imaging 137
2.4.12 Installation of a certificate on the database server 139
UpgradeGuide 9
2.4.13 Instance settings 139
2.4.14 License Relativity 139
2.4.15 Processing/Invariant 139
2.4.16 Network load balancing 143
2.4.17 New UI framework 143
Production 144
2.4.18 Pre-installation steps for web servers 146
2.4.19 Relativity admin and service account email addresses 146
2.4.20 Relativity Desktop Client (RDC) 147
2.4.21 Relativity installer updates 147
2.4.22 Relativity Processing Console 148
2.4.23 Relativity service bus 148
2.4.24 Required certificates for Relativity 149
2.4.25 Scripts 149
2.4.26 Searching 149
2.4.27 Service Host Manager HTTPS configuration 149
2.4.28 System requirements 149
2.4.29 Telemetry 149
2.4.30 Upgrade agents and other components 150
2.4.31 Viewer 150
2.4.32 Viewer (ActiveX) 150
2.4.33 Viewer (ActiveX and HTML) 150
2.4.34 Windows or Integrated Windows authentication 151
2.4.35 Windows Service Bus 1.1 with TLS 1.2 Support 152
2.4.36 Workers 154
2.4.37 Worker manager queue 154
2.4.38 Worker manager server 155
2.4.39 Workspace upgrade queue 155
3 Configuring your conversion agents 156
3.1 Conversion agent considerations 156
3.2 Re-purposing a conversion worker as a conversion agent 156
UpgradeGuide 10
3.3 Adding conversion agents to an environment with no dedicated conversion workers 157
3.3.1 Adding a conversion agent to an existing server 157
3.3.2 Allocate additional hardware to host a new agent server 157
4 Upgrading your SQL Server 159
4.1 Primary SQL Server upgrade 159
4.2 Distributed SQL Server upgrade 163
5 Removing RabbitMQ 166
5.1 Deleting Data Grid agents 166
5.2 Deleting empty processing queues 166
5.3 Uninstalling RabbitMQ Server and Erlang OTP 166
5.4 Closing ports on the Queue Server 167
6 Upgrading your Relativity service bus 168
6.1 Relativity service bus upgrade 168
6.2 Setting properties in the RelativityResponse.txt file 169
6.2.1 Feature selection 169
6.2.2 Common properties 169
6.3 Verifying database table updates for multiple hosts 170
6.4 Troubleshooting the service bus installation 171
7 Upgrading your agent server 172
7.1 Agent server upgrade 172
7.2 Service Host Manager HTTPS configuration 174
8 Upgrading your web server 175
8.1 Web server upgrade 175
8.2 Verifying the machine key settings on the IIS 177
8.3 Upgrading a web server configured for mixed authentication with AD 179
8.4 Service Host Manager HTTPS configuration 180
8.5 SignalR 180
9 Upgrading Relativity to .NET 4.6.2. 182
9.1 All servers 182
9.2 Client machines 182
9.3 Relativity applications 183
UpgradeGuide 11
9.3.1 Backward-compatible applications 183
9.3.2 Custom applications built with the Relativity SDK 183
9.4 Development environment 183
10 Upgrading a worker manager server installation 184
10.1 Upgrade considerations for Relativity 9.5.253.62 184
10.1.1 Hosting Invariant Kepler services in HTTPS 186
10.2 Upgrade considerations for Relativity 9.5.133.118 187
10.3 Upgrade considerations for Relativity 9.5.41.87 188
10.4 Upgrade exceptions 188
10.5 Installing Microsoft Visual C++ Redistributable Packages 188
10.6 Upgrading the Invariant Database and Queue Manager 189
11 Upgrading workspaces 190
11.1 Monitoring upgrades with the Workspace Upgrade queue 190
11.1.1 Populating the Workspace Upgrade queue 191
11.1.2 Workspace Upgrade queue columns 192
11.1.3 Upgrade statuses descriptions 193
11.2 Editing upgrade priority and order for a workspace 193
11.3 Troubleshooting upgrades 194
11.3.1 Viewing upgrade errors 195
11.3.2 Canceling or retrying workspace upgrades 197
12 Upgrading or installing your Analytics server 198
12.1 Installing / Upgrading Relativity Analytics 198
12.1.1 Installing Analytics for the first time to Relativity 9.5.133.118 and above 199
12.1.2 Installing Analytics for the first time to Relativity 9.5.89.76 or prior 204
12.1.3 Upgrading from Relativity 9.3.362.9 (CAAT 3.19) and above 207
12.1.4 Upgrading from Relativity 9.3.332.21 (CAAT 3.17) or prior 211
12.2 Updating the default SSL/TLS certificate 217
12.2.1 Overview of how to update the SSL / TLS certificate 218
12.2.2 1) Deleting the default, unsigned certificate 218
12.2.3 2) Creating a self-signed certificate (no trusted certificate) - optional step 219
12.2.4 3) Importing a certificate (trusted or self-signed) 221
UpgradeGuide 12
12.2.5 4) Verifying the Analytics server in Relativity 223
12.3 Disabling TLS 1.0 and 1.1 (optional) 224
12.4 Installing Analytics server when SQL Server uses SSL encryption 225
12.4.1 Install a SQL Server certificate in the Analytics server KeyStore 225
12.4.2 Use the CN property of a SQL Server certificate in Relativity 226
12.5 Changing the REST password 226
12.6 Uninstalling the Relativity Analytics server 227
13 Upgrading Data Grid 228
13.1 Finding the Elasticsearch version 228
13.2 Upgrading from Elasticsearch 2.1.2 to 2.3.3.x 229
13.3 Preparing the environment for upgrade 229
13.4 Running the upgrade script 230
13.5 Verifying the upgrade 230
13.6 Running a manual upgrade 231
13.6.1 Upgrading a node 232
13.6.2 Verifying the upgrade 235
13.7 Resetting the Shield or Head password 236
UpgradeGuide 13
1 Relativity upgradeUse the following workflows to upgrade your current Relativity installation to Relativity 9.5. To begin yourupgrade process, address custom solutions and scripts before downloading the Relativity installer. Onceyou complete the workflow specific to your upgrade path, we recommend completing the post-installationverification tests post-upgrade to confirm that your environment has been upgraded properly.
As a best practice, we recommend preparing for your upgrade process by using the Pre-UpgradeChecklist. You can use this document to discuss an upgrade strategy for your current installation ofRelativity with the Client Services team ([email protected]) .
If you are installing Relativity for the first time, contact the Client Services team ([email protected])for additional information. You may also want to review the information on the Relativity installation pageon the Relativity 9.5 Documentation site.
1.1 Addressing custom solutions pre-upgradeThe Solution Snapshot application helps you identify compatibility issues with custom applications in yourenvironment so you can resolve them prior to upgrade. Using the Solution Snapshot application, you canview a list of the applications currently installed in your Application Library and review the applicationowner's recommendation for upgrade. For more information, see the Solution Snapshot documentation.
1.2 Addressing custom scripts that trigger imaging jobsIf you plan on upgrading Relativity and you use custom scripts that programmatically trigger imaging jobsin your current Relativity environment, those scripts will no longer work after you upgrade.
This is because the components that those custom scripts rely upon no longer exist due to the changesmade to the imaging framework, which are listed below. The imaging operations performed by thesecustom scripts aren't accounted for in the KCD Snapshot Solution script.
n The Imaging Set Manager and Worker agents have been deprecated.
n The Imaging Set Queue table has been deprecated.
n The Imaging API now submits an imaging job directly to Invariant (worker manager server).
Before you upgrade to Relativity 9.5, contact Client Services at [email protected] for instructions onhow to adjust your custom scripts.
1.3 Required pre-upgrade steps for all Relativity versionsBefore you begin your upgrade, you must complete the following pre-upgrade steps.
Required pre-upgrade steps for all Relativity versionsComplete the following steps and verify you have the necessary information required for all upgrades ofRelativity. Depending on your upgrade path, you may have additional configuration or other tasks toperform specific to the version of Relativity you're installing.
Make sure you have the appropriate system admin permissions in Relativity before beginning theupgrade. . For more information, see Managing security on the Relativity 9 Documentation site.
UpgradeGuide 14
Confirm that jobs aren't running in any of the queues. If the agents are running, they may attempt to run ajob against a database that doesn't have an upgraded schema and cause serious errors in your Relativityenvironment.
1.3.1 Obtain credentials for service and database accountsTo upgrade Relativity, you need credentials for the following accounts:
n Relativity Service account (WindowsWorkgroup/Domain account) - Run the Relativity upgradelogged in as the Relativity Service account. This account must have local Administrator permissionson the target server, and SQL sysadmin role privileges on the SQL Server.
n EDDSDBO account (SQL account)
Note: Do not begin the upgrade process until you obtain the credentials for these accounts. They arerequired when you run the installer.
1.3.2 Review system and other requirementsConfirm that your environment is configured with the prerequisites before you begin upgrading Relativity.See the following documents for more information:
n Relativity System Requirements - Includes software and hardware requirements for servers, data-bases, and other components of a Relativity installation.
n Relativity Workstation Configuration guide - Includes information about setting up workstations forusers and viewer installation instructions.
n Relativity Environment optimization guide - Includes best practices for maintaining and optimizing aRelativity environment.
n Upgrade path instructions - Contain detailed information about requirements for your specificupgrade path.
1.3.3 Apply a trusted certificate for the Analytics serverAs of Relativity 9.5, a trusted certificate is required for all HTTPS traffic, including the internal traffic for theAnalytics server. We recommend placing the certificate and testing it prior to the day of the upgrade toRelativity 9.5.
See Pre-upgrade: Update the default SSL/TLS certificate for CAAT® for more information.
1.3.4 Back up your Relativity environmentBack up your SQL databases and your Relativity IIS websites before you begin the upgrade process. Youshould also back up both the structured analytics sets and analytics indexes before your upgrade toensure that there is no data loss. This may take a while so it's recommended to run analytics backupseither during the week of or the week prior to your upgrade. Usually this data does not change daily, so thishelps to mitigate any data loss.
UpgradeGuide 15
1.3.5 Reboot machines with Windows updatesAfter installing Windows updates, reboot your machines before attempting to install Relativity. Completethis step to ensure that all Relativity components are properly installed. Incomplete Windows updates locksystem files, which may cause silent failures and prevent the proper installation of Relativity components.
1.3.6 Download the Relativity installerTo receive the correct Relativity installer package for your upgrade workflow contact the Client Servicesteam ([email protected]).
1.4 8.1, 8.2, or 9.x to 9.5 upgrade workflowUse the following workflow when upgrading from Relativity 8.1 or 8.2 to Relativity 9.5.
Note: Never upgrade your Relativity version while there are jobs of any type currently in progress inyour environment. Doing this leads to inaccurate results when you attempt to finish those jobs after yourupgrade is complete. This is especially important for imaging and processing jobs.
Note: Beginning in Relativity 9.4.254.2, processing to Data Grid no longer requires the RabbitMQserver. You must remove the RabbitMQ from your Relativity environment before installing RelativityService Bus server. For more information, see Removing RabbitMQ on page 166.
Note: Before you upgrade, verify that you meet all requirements outlined in the Pre-installation guide.
1. Stop all agent services.
2. Stop the IIS.
3. Run the Relativity installer on your Primary SQL Server to upgrade the EDDS database and installthe required library applications. You can't access your Relativity environment until you completethis step. Depending on what version you're upgrading from, this process may start automaticallyafter the installer is finished running. See Upgrading your SQL Server on page 159.
4. Run the Relativity installer on all distributed SQL servers if present. See Distributed SQL Serverupgrade on page 163.
5. Install the Relativity service bus server. Ensure that the Relativity service bus server is a node in theService Bus for Windows Server farm. See Upgrading your Relativity service bus on page 168
Note: You can find additional information in Troubleshooting the service bus installation onpage 171. For general troubleshooting information, see the Relativity Service Bus guide.
6. Run the Relativity installer on the Agent server. See Upgrading your agent server on page 172.
7. Run the Relativity installer on the Web server. See Upgrading your web server on page 175.
8. Restart the IIS.
9. (Optional) Log in to Relativity and click theWorkspace Upgrade queue. Set the priority or order onthe workspaces as necessary. You can monitor your workspaces in the Workspace Upgradequeue. See Upgrading workspaces on page 190.
UpgradeGuide 16
Note: After you run the installer on at least one agent server, the system begins upgradingindividual workspaces. You can now log in to Relativity to monitor workspace upgrades via theWorkspace Upgrade queue.
10. Upgrade your worker manager server. For more information, see the Worker Manager ServerInstallation guide.
Note: If this is your first upgrade to Relativity 9.5, you must upgrade any worker servers afterupgrading your worker manager server.
11. Upgrade Relativity Analytics. See Upgrading or installing your Analytics server on page 198.
1.5 8.0 to 9.5 upgrade workflowPlease contact the Client Services team ([email protected]) for more information on upgrading your8.0 Relativity environment to Relativity 9.5.
1.6 7.x to 9.5 upgrade workflowPlease contact the Client Services team ([email protected]) for more information on upgrading your7.x Relativity environment to Relativity 9.5.
1.7 6.x to 9.5 upgrade workflowPlease contact the Client Services team ([email protected]) for more information on upgrading your6.x Relativity environment to Relativity 9.5.
UpgradeGuide 17
2 Upgrade considerations for Relativity 9.5This page explains some of the key changes in Relativity 9.5 that you should be aware of beforeupgrading.
In order to upgrade to or install Relativity 9.5, you MUST complete new pre-installation steps. You nowneed to install Service Bus for Windows Service 1.1 BEFORE installing or upgrading to Relativity 9.5.Formore information, see the Pre-Installation guide.Refer to this page to learn more about changes in your environment from a previous version of Relativityto Relativity 9.5.
2.1 9.x to 9.5 Relativity updatesLearn more about the changes that occur to your Relativity 9.x environment after you upgrade to Relativity9.5.
9.x to 9.5 Relativity updatesn Agent service
n Analytics on the next page
n Applications on page 21
n Audit on page 21
n Authentication on page 24
n Conversion
n Data Grid on page 25
n Database schema
n ECA and Investigation
n Fields on page 27
n File share
n Foreign key removal on page 27
n IIS on page 27
n Imaging on page 29
n Instance settings on page 31
n Installation of a certificate on the database server on page 31
n Processing/Invariant
n Network load balancing on page 36
n NewUI framework on page 36
n Production on page 37
n Relativity admin and service account email addresses on page 38
UpgradeGuide 18
n Relativity Desktop Client (RDC) on page 39
n Relativity installer updates on page 39
n Relativity service bus on page 40
n Required certificates for Relativity on page 41
n Scripts
n Searching on page 41
n Service Host Manager HTTPS configuration on page 41
n System requirements on page 41
n Telemetry
n Viewer (ActiveX) on page 42
n Viewer (ActiveX and HTML) on page 42
n Windows or Integrated Windows authentication on page 43
n Windows Service Bus 1.1 with TLS 1.2 Support on page 44
n Workers
n Worker manager queue on page 46
n Worker manager server
n Workspace upgrade queue on page 47
2.1.1 Agent serviceAll Windows services now have Recovery Properties. If the Agent service should ever crash due to anunhandled exception, it recovers and immediately restarts.
AnalyticsIf you're upgrading to Relativity 9.5 from a version earlier than 9.2, note that the Textual Near DuplicateIdentification algorithm is in place with the following benefits:
n The new algorithm greatly improved performance for both large and complex data sets.
n With the new algorithm you can scale your Analytics server by adding CPU cores and RAM in orderto achieve faster performance.
Prior to Relativity 9.2, scaling environments did not impact performance. Without scaling past eight cores,you should experience performance comparable to pre-Relativity 9.2 on most data sets. The Textual NearDuplicate Identification algorithm in Relativity 9.2 uses different, more efficient methods to obtain similarresults. However, results may differ slightly from pre-Relativity 9.2 results if a Full Analysis is run against apreexisting structured analytics set. If you need preexisting results use an Incremental Analysis instead.The incremental analysis keeps the pre-Relativity 9.2 results for all preexisting documents, but the newlyadded documents use the new algorithm to match with existing groups.
UpgradeGuide 19
Updating the default SSL/TLS certificate for the Content AnalystYou must update the default SSL/TLS certificate on your Analytics server because Relativity requires acertificate signed by a trusted certificate authority (CA). By default, the CAAT service runs over anuntrusted SSL/TLS certificate. For more information, see Updating the default SSL/TLS certificate onpage 217.
2.1.1.1 Updating RestUriForCAAT instance settingAs part of upgrading (post-upgrade), you must have a valid URL value entered for the RestUriForCAATinstance setting. This is the FQDNURL to the web server hosting your Kepler services (e.g.,https://client.domain.name/Relativity.REST/API).
2.1.1.2 New Analytics installerStarting with Relativity 9.5.133.118, the Relativity Analytics engine installer now uses a response file toinstall Analytics on a server. You can use the installer for new installations and upgrades. The responsefile installer replaces the setup wizard for the Analytics server. See Installing Analytics.
Note: If you are upgrading from Relativity 9.3.332.21 (CAAT 3.17) or lower, first run the Relativity9.3.362.9 or 9.4 Analytics server installer using the instructions at Running the Relativity Analyticsinstaller for versions previous to Relativity 9.5.133.118. Contact Support for this installer. After this step,then run the Relativity 9.5 response file-based installer.
2.1.1.3 Analytics index enhancementsStarting with Relativity 9.5.196.102, Analytics indexes are now RDO's. There are a few considerations withthis update:
n You will no longer get shell indexes when importing an application that contains saved searcheswith Analytics search index conditions. Instead, the saved search will have the analytics conditionstripped from it. A new index can be created, and a new condition can be manually associated withthe saved search.
n Indexes will no longer have the default saved searches available to set as the training and search-able set sources. For legacy indexes that are upgraded, the saved search must be set when editingthe index. If you do not set the searches, you will only be able to build and activate / deactivate theindex (provided it was already populated with the default searches)
n After the upgrade, you will no longer have the option to preserve cluster multiple choice and coher-ence score fields when deleting the cluster set. They will always be deleted.
n OCR and GoWord filter support has been deprecated from Analytics Indexes. On subsequent pop-ulations after upgrading, any OCR or GoWord filter set on the Analytics profile will no longer beapplied. If the legacy index was populated with these filters, migrated to an RDO, and then rebuilt oractivated, the filters still apply (they are set on population).
n When you upgrade, the Analytics Core install event handlers will create a new RDO for each exist-ing index and a new RDO for each existing cluster set. These new object types and instances inher-its permissions from their analogous source objects. For example:
o Analytics Index RDO workspace permissions are copied from Search Index workspace per-missions
o Analytics Index RDO instance permissions are copied from Search Index instance per-missions
UpgradeGuide 20
o Cluster Set RDO workspace permissions are copied from Search Index workspace per-missions
o Cluster Set RDO instance permissions are copied from the multiple choice cluster field's itemlevel permissions
2.1.1.4 Email thread visualizationUsers must have the Analytics application installed in the workspace, and the Email Author Date IDmustbe present for the emails. The Email Author Date ID is only available for emails run through a full analysisusing structured analytics in Relativity 9.5.41.87 and above. The email thread visualization pane will notwork for email threads from previous versions unless a full analysis is run against the structured analyticsset containing the emails after upgrading to Relativity 9.5.41.87 or higher.
2.1.1.5 Multiple structured analytic set resultsBeginning in Relativity 9.5.196.102, you can easily store the results for multiple structured analytics setsand set up views that capture the email threading or repeated content identification results of thoseoperations.
Consider the following:
n We recommend you set new relational fields (e.g., Destination Email Thread Group, DestinationEmail Duplicate ID, and Destination Textual Near Duplicate Group) when creating new structuredanalytics sets for email threading or textual near duplicate identification to allow you to easily set upviews that make use of a relational field for each of these sets.
n Upon upgrade, the email thread group, duplicate spare group, and textual near duplicate group rela-tional views display just the Control Number and Edit columns. To display the old fields, you mustunlock the application and update those views. If you run Structured Analytics with the existingapplication relational fields, the relational views will only show the Control Number and Editcolumns. A way to avoid this is by creating and mapping your own relational fields before run time.Then, you can create your own relational view and map that to the custom relational fields.
Note: This upgrade consideration has been addressed in Relativity 9.5.253.62. If you areupgrading to Relativity 9.5.253.62, disregard this item.
n Upon upgrade, email threading and textual near duplicate results are written to new results fieldsthat is only created upon running a Structured Analytics Set. These fields can't be manually createdbefore running the set. This means that it's not possible to create any views, searches, layouts, etc.that reference these fields prior to completing a set. Additionally, views and searches which ref-erence these newly created fields don't carry over on workspace creation because Structured Ana-lytics Sets don't carry over.
Note: This upgrade consideration impacts any Relativity templates that reference the legacyStructured Analytics results fields.
n Upon upgrade, previous inclusive information may change when performing an incremental ana-lysis on an existing email threading set due to the newly created structured Analytics results fields.
UpgradeGuide 21
2.1.2 ApplicationsThe Solution Snapshot application helps you identify compatibility issues with custom applications in yourenvironment so you can resolve them prior to upgrade. Using the Solution Snapshot application, you canview a list of the applications currently installed in your Application Library and review the applicationowner's recommendation for upgrade. For more information, see the Solution Snapshot documentation.
2.1.3 AuditUpon upgrade to Relativity 9.5.292.12, the Audit application is now available at the instance level to reporton admin-level audits. You must have Elasticsearch installed and configured to use the Audit tab. If youdon't have Elasticsearch installed, you can hide this tab. For more information, see the Data Grid guide.
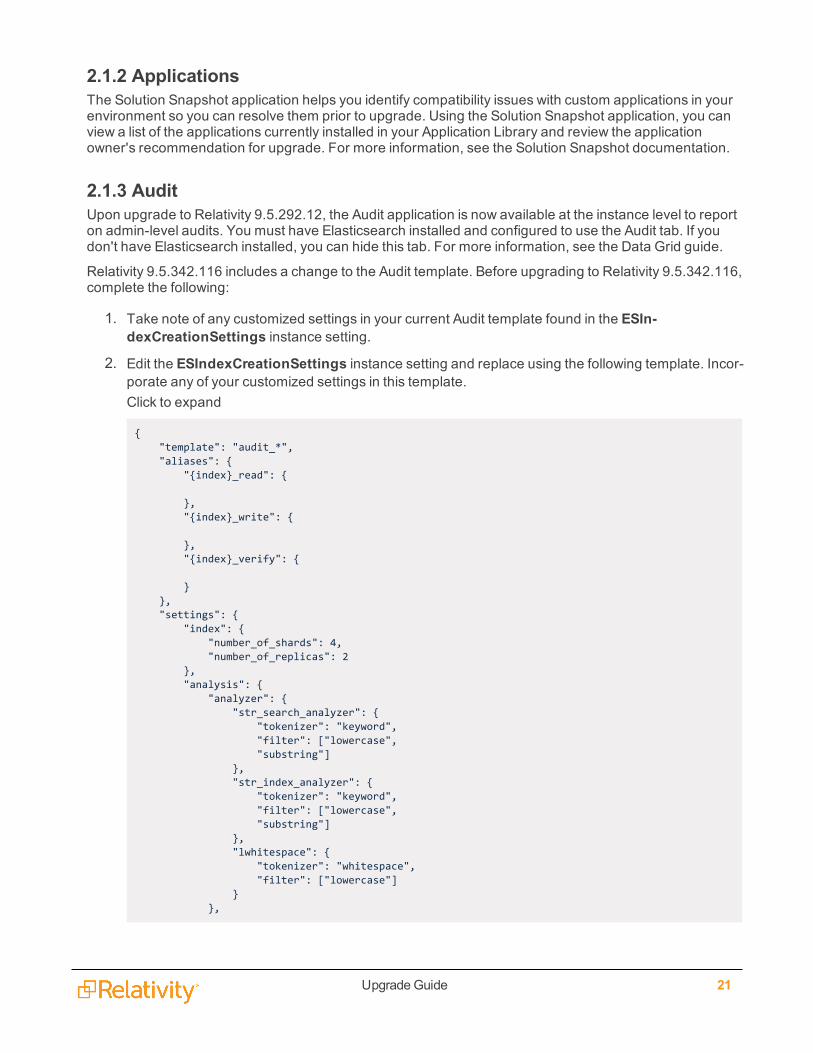
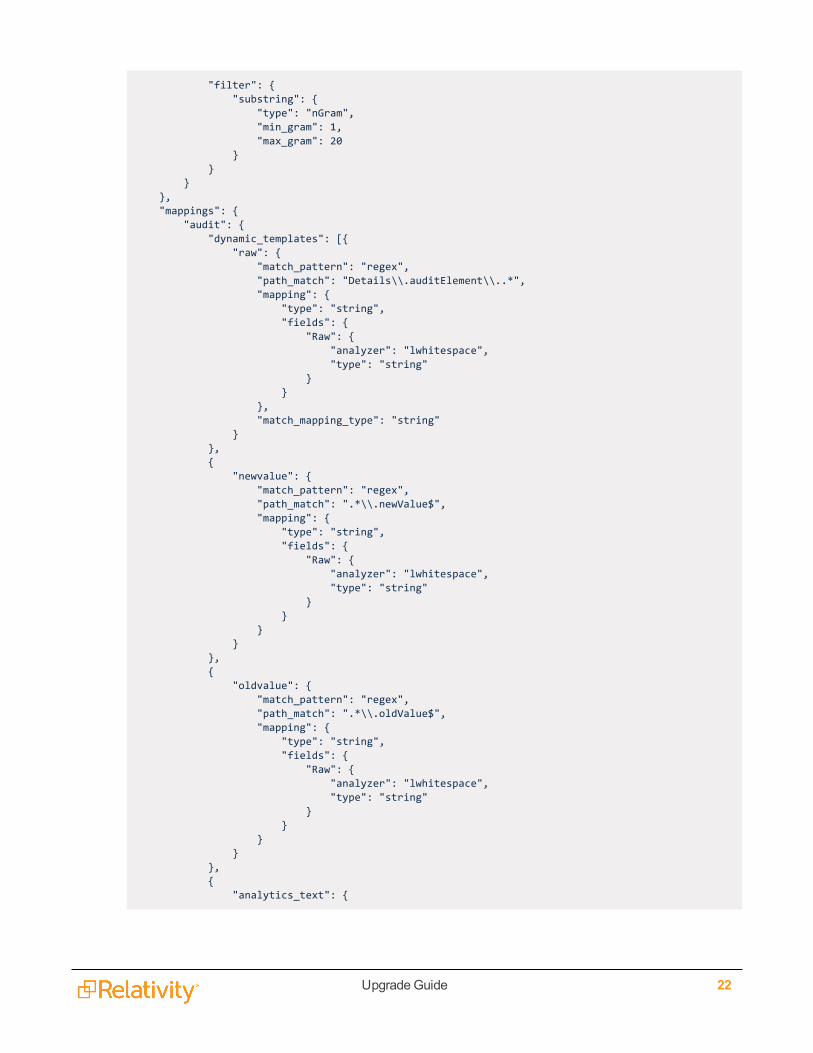
Relativity 9.5.342.116 includes a change to the Audit template. Before upgrading to Relativity 9.5.342.116,complete the following:
1. Take note of any customized settings in your current Audit template found in the ESIn-dexCreationSettings instance setting.
2. Edit the ESIndexCreationSettings instance setting and replace using the following template. Incor-porate any of your customized settings in this template.Click to expand
{"template": "audit_*","aliases": {
"{index}_read": {
},"{index}_write": {
},"{index}_verify": {
}},"settings": {
"index": {"number_of_shards": 4,"number_of_replicas": 2
},"analysis": {
"analyzer": {"str_search_analyzer": {
"tokenizer": "keyword","filter": ["lowercase","substring"]
},"str_index_analyzer": {
"tokenizer": "keyword","filter": ["lowercase","substring"]
},"lwhitespace": {
"tokenizer": "whitespace","filter": ["lowercase"]
}},
UpgradeGuide 22
"filter": {"substring": {
"type": "nGram","min_gram": 1,"max_gram": 20
}}
}},"mappings": {
"audit": {"dynamic_templates": [{
"raw": {"match_pattern": "regex","path_match": "Details\\.auditElement\\..*","mapping": {
"type": "string","fields": {
"Raw": {"analyzer": "lwhitespace","type": "string"
}}
},"match_mapping_type": "string"
}},{
"newvalue": {"match_pattern": "regex","path_match": ".*\\.newValue$","mapping": {
"type": "string","fields": {
"Raw": {"analyzer": "lwhitespace","type": "string"
}}
}}
},{
"oldvalue": {"match_pattern": "regex","path_match": ".*\\.oldValue$","mapping": {
"type": "string","fields": {
"Raw": {"analyzer": "lwhitespace","type": "string"
}}
}}
},{
"analytics_text": {
UpgradeGuide 23
"match_pattern": "regex","path_match": ".*\\.#text$","mapping": {
"type": "string","fields": {
"Raw": {"analyzer": "lwhitespace","type": "string"
}}
}}
}],"_timestamp": {
"enabled": true},"_size": {
"enabled": true},"properties": {
"ActionName": {"type": "string","index": "not_analyzed"
},"UserName": {
"type": "string","index": "not_analyzed"
},"TimeStamp": {
"format": "strict_date_optional_time||epoch_millis","type": "date"
},"Details.auditElement.field.@id": {
"type": "keyword"}
}}
}}
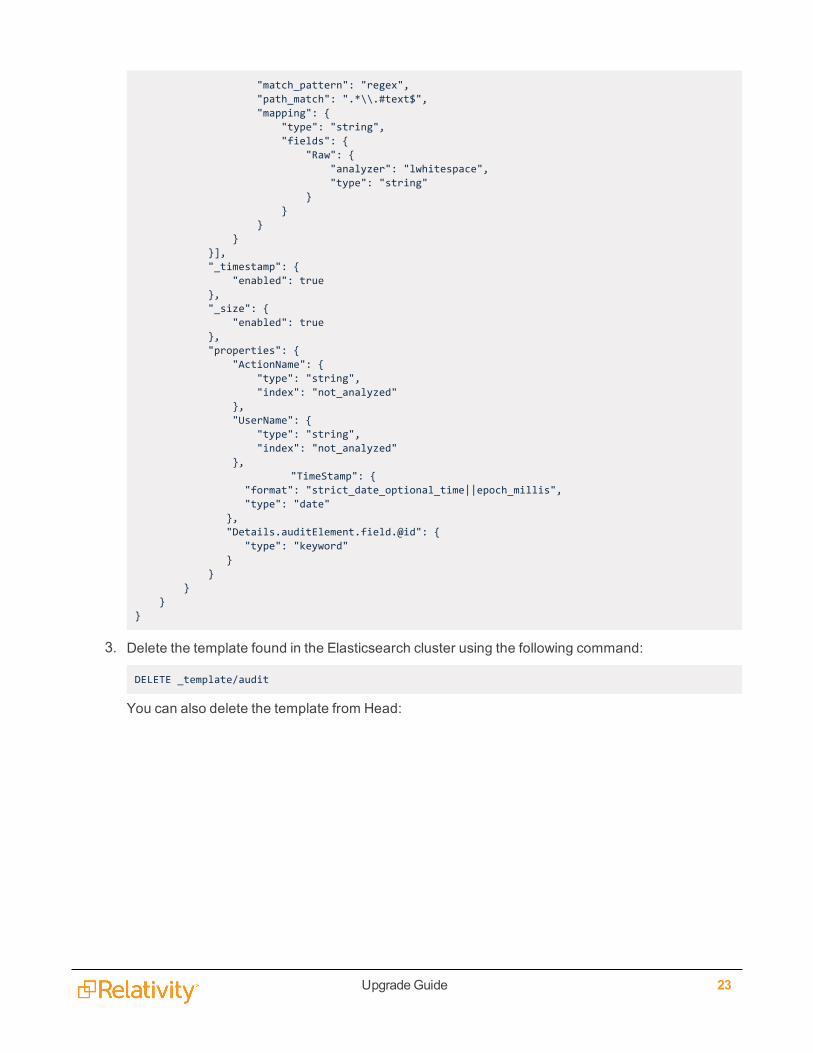
3. Delete the template found in the Elasticsearch cluster using the following command:
DELETE _template/audit
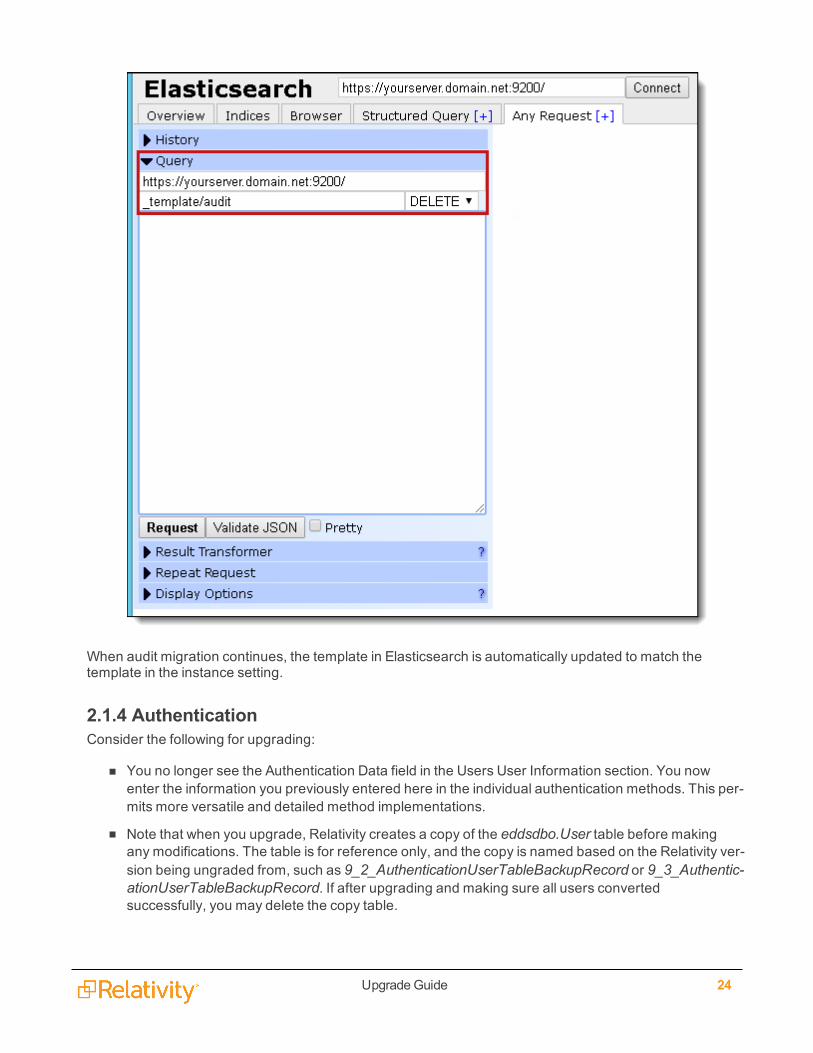
You can also delete the template from Head:
UpgradeGuide 24
When audit migration continues, the template in Elasticsearch is automatically updated to match thetemplate in the instance setting.
2.1.4 AuthenticationConsider the following for upgrading:
n You no longer see the Authentication Data field in the Users User Information section. You nowenter the information you previously entered here in the individual authentication methods. This per-mits more versatile and detailed method implementations.
n Note that when you upgrade, Relativity creates a copy of the eddsdbo.User table before makingany modifications. The table is for reference only, and the copy is named based on the Relativity ver-sion being ungraded from, such as 9_2_AuthenticationUserTableBackupRecord or 9_3_Authentic-ationUserTableBackupRecord. If after upgrading and making sure all users convertedsuccessfully, you may delete the copy table.
UpgradeGuide 25
n Use the Authentication Profile system to enable only the protocols you need in an environment. Insome cases the upgrade process may enable more protocols than you want. This is due to the pars-ing rules for the AuthenticationData column. Specifically, if you are using Active Directory or ClientCertificate authentications in your environment, the upgrade process may also enable IntegratedAuthentication. If you don't want the Integrated Authentication, you can remove that provider fromthe Authentication Profile after upgrade.
2.1.4.1 User and authentication object permissionsA number of new objects have been introduced, such as Authentication Provider Type, AuthenticationProvider, and Login Method. Upon upgrading to Relativity 9.5, permissions are as follows:
n A user, who has the permissions to view the user objects before an upgrade, post upgrade can viewusers, authentication provider types, authentication providers, and login methods.
n A user, who has the permissions to edit (or delete, a higher level of permission than edit) the userobjects before an upgrade, post upgrade can edit users and login methods. They can also viewauthentication provider types, and authentication providers.
n After upgrade only users in the System Administrators group will have access to view and editOAuth2Client objects.
2.1.5 ConversionConversion occurs on dedicated conversion agents instead of Invariant workers. You must configureconversion agents to ensure document conversion works properly in Relativity 9.5. Your agent serversshould also have one conversion complete agent. For more information, see Configuring your conversionagents.
2.1.5.1 Complete Conversion AgentWrites to cache documents converted by the Conversion Agent and notifies the Relativity front end whenconversion jobs are ready. This agent is created after a new Relativity installation. Upon upgrade, youmust created the agent manually. We do not recommend putting this agent on the Conversion Agentserver, as that server should be dedicated to the Conversion Agent, not the Conversion Complete Agent.
This agent was released in Relativity 9.5.370.136and is required where DVS is installed. See .
Data Gridn If your environment uses Data Grid, you must also upgrade to Data Grid 2.3.3.58 or above when
upgrading to Relativity 9.5. For more information, see Upgrading Data Grid.
n Relativity 9.5 introduces the Data Grid Ingestion Management tab to manually retry or cancel DataGrid write requests that failed as a result of infrastructure problems. This feature includes a newagent, the Data Grid Worker Agent, that must be installed and configured upon upgrade. There isalso a new instance setting, IngestionTemporaryFileCacheLocation. For more information, see theData Grid guide.
n You no longer need to install the DataGridRESTService on the Analytics server to integrate Relativ-ity Analytics with Relativity Data Grid. If you are upgrading to Relativity 9.5, uninstall theDataGridRESTService from your Analytics server(s). For more information, see Uninstalling the
UpgradeGuide 26
Relativity Data Grid service. We also recommend uninstalling the client node from the Analyticsserver if that server is only dedicated to Analytics in order to free up resources.
n The Instance Settings table and corresponding Relativity tab now includes the AuditDeleteBatchSize and AuditMigrateBatchSize instance settings to specify deletion and migration batch sizes forData Grid for Audit.
For more information, see the Relativity Data Grid guide
2.1.6 Database schema updatesA number of EDDS and Workspace database tables have been changed, added, or removed toaccommodate new functionality in Relativity. For more information, see Database schema updates forRelativity 9.5 in the Relativity Community.
2.1.6.1 Deprecated support for EDDSResource databaseWe have now deprecated the EDDSResource database. Any custom code that writes to theEDDSResource database is subject to breaking changes in future releases.
If you have implemented any custom code that writes to the EDDSResource database, update it as soonpossible to ensure proper functionality of your applications.
Tables formerly created in this database are now added to the workspace database associated with aspecific operation under the new [Resource] schema. The EDDS and all case databases now include thisnew [Resource] schema. It is used for short-lived scratch tables that used to exist on the EDDSResourcedatabase. Additionally, table names haven’t been modified.
Note: Mass Operation handlers that reference tables in this database won’t function properly. Youneed to update these handlers to reference the new location under the workspace database with the[Resource] schema qualifier.
ECA and InvestigationThe ECA and Investigation and Field Catalog applications are now synchronized, which means that whenyou install the ECA and Investigation application, Relativity automatically maps all of the ECA fields tothose 127 corresponding processing fields found in the Field Catalog. For a list of these fields, see theProcessing User Guide.
Note the following details:
n A number of processing fields were renamed in the Field Catalog. Renamed fields will cause nam-ing conflicts.You can address these conflicts through the standard application framework, which isto either rename the fields or modify their mapping. If you previously processed data into a field thatwas renamed, you will have the same data in two different fields. You can address this through aMass Replace operation on the affected fields.
n The All Custodians field was renamed to All Custodians_Script in the ECA and Investigationapplication. The All Custodians_Script field is a long text field and acts as a another piece ofmetadata for de-duplicated documents. You should select the new All Custodians_Script field whenrunning the Update Duplicate Status script, as this will ensure that no de-duplicated documentsmake it into review.
UpgradeGuide 27
Fields
2.1.6.2 Allow HTML fieldsAny existing fields with the Allow HTML value set to Yes, you must set the new instance settingSanitizeHTMLOutput to False in order to add HTML alerts and links when a user opens a document forreview.
2.1.7 File shareBeginning in Relativity 9.5.219.30, file share choices are now file share resource server objects. Uponupgrade, all file share choices are mapped to resource servers. For more information, see the Adminguide.
Foreign key removalIn order to improve the performance and usability of document deletion in Relativity, we've removed theforeign keys from the Document and non-system RDO database tables. This includes artifact, singleobject, and multi-object table relationships. Doing this resolves the previous issues involved with globallylocking the Artifact and other tables for the entire duration of a deletion job, which could be lengthy andcould subsequently delay document review. As a result of removing these foreign keys, the delete processwill execute without applying a global lock, and thus no longer interrupts document review in Relativity.
There are three classifications of foreign keys, all of which are affected by this change:
n Keys from the object (Document or RDO) table to the Artifact table.
n Keys on the object table that go to a single object field.
n Keys on multi-object relational f-tables. An f-table stores the link between the objects that are con-nected by a multi-object field in Relativity. In this way, the only columns in an f-table are those thatstore the Artifact ID's of the objects that are linked to each other by that field.
Note: System objects aren't subject to foreign key removal. If the Document object has a foreignkey to the Folder object, that foreign key will remain because Folder is a system object.
2.1.8 IIS
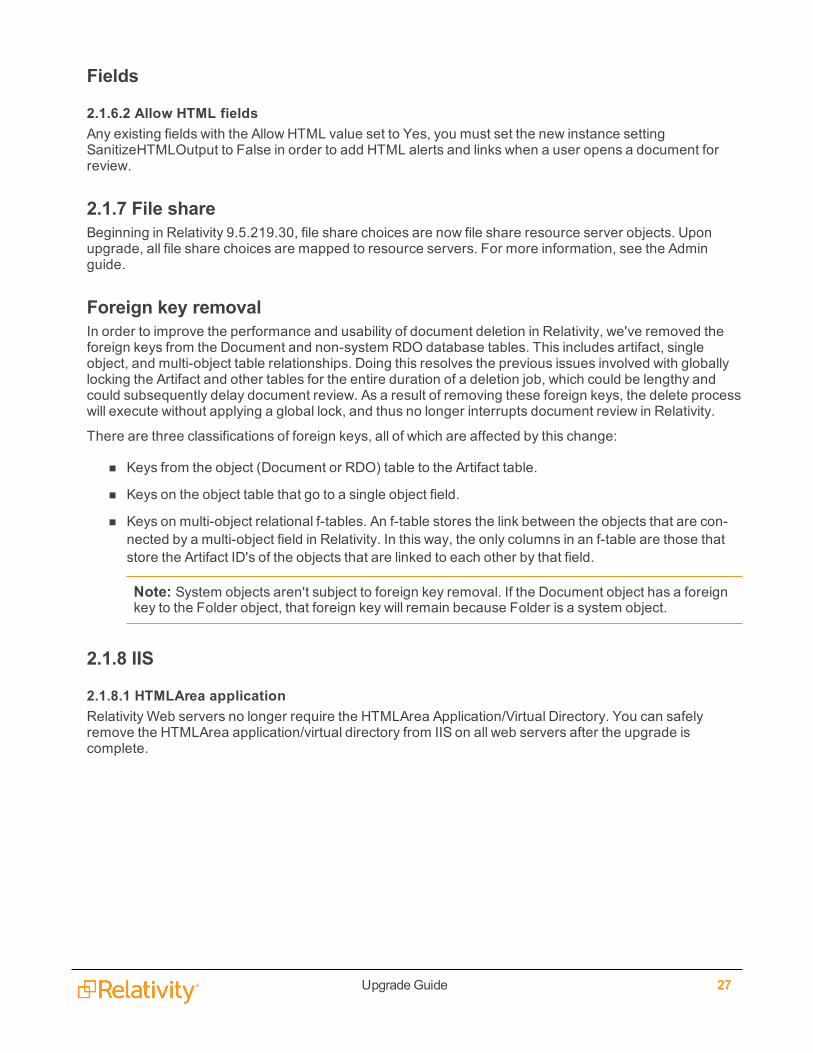
2.1.8.1 HTMLArea applicationRelativity Web servers no longer require the HTMLArea Application/Virtual Directory. You can safelyremove the HTMLArea application/virtual directory from IIS on all web servers after the upgrade iscomplete.
UpgradeGuide 28
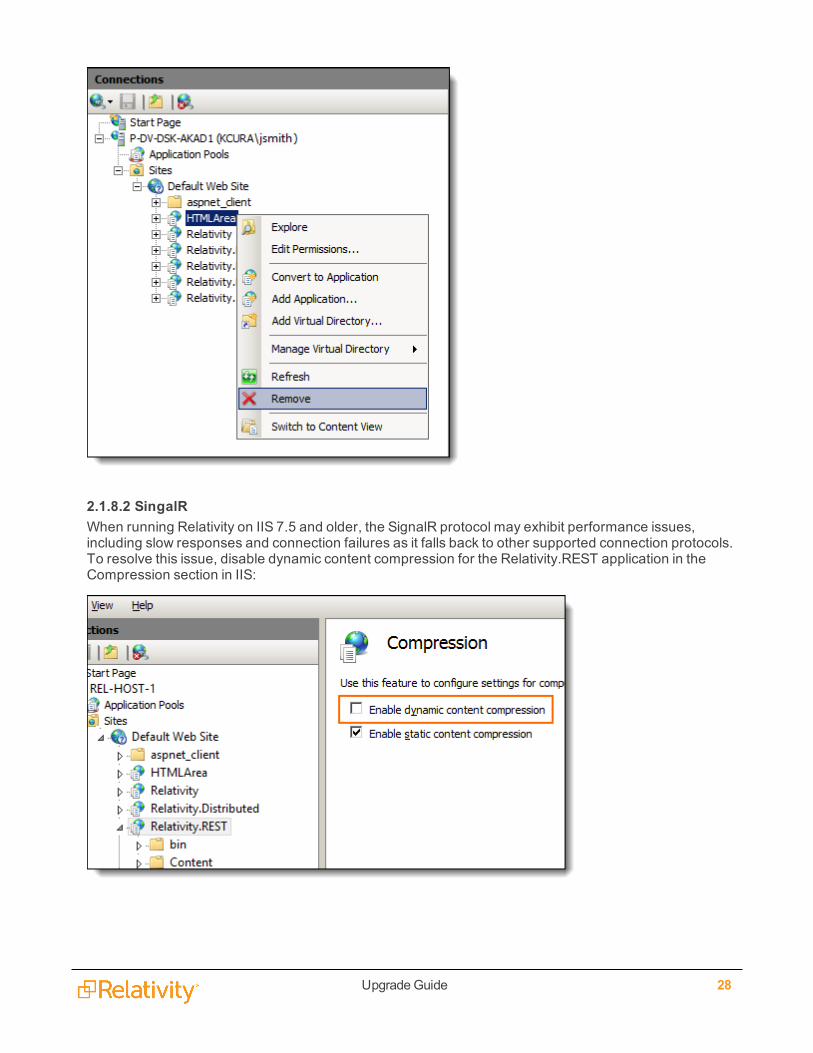
2.1.8.2 SingalRWhen running Relativity on IIS 7.5 and older, the SignalR protocol may exhibit performance issues,including slow responses and connection failures as it falls back to other supported connection protocols.To resolve this issue, disable dynamic content compression for the Relativity.REST application in theCompression section in IIS:

UpgradeGuide 29
You can also add the following property to the system.webServer section of the Relativity.RESTweb.config file:
<urlCompression doDynamicCompression="false" />
This change will improve SignalR performance on older versions of IIS.
ImagingBeginning in Relativity 9.5.370.136, the following changes have been made to imaging and should benoted prior to upgrade:
n The Imaging Response Agent is required to run any imaging job in your environment. This agent isresponsible for properly picking up imagine set, mass imaging and image-on-the-fly messages fromService Bus (as published by the workers) and directing them to the proper finalization logic inRelativity. For initial installations of Relativity 9.5.370.136, an Imaging Response Agent is auto-matically installed and enabled in your environment. If you're upgrading to Relativity 9.5.370.136 orif at any point you need to install an additional agent, you need to do so manually. For details, seethe Imaging guide.
n The following imaging-related instance settings changes were made:
Instance setting Description Change
DocumentLimitForMassImaging The maximum number of documents that can be sub-mitted for the Mass Imaging action. If a user attempts tomass image and the number of documents selectedexceeds this value, a warning appears to prevent the userfrom performing this action to suggest creating an ImagingSet as best practice.
Added
ImagingBatchSize Determines the maximum number of documents to submitfor imaging at a time.
Added
MaxImagingResponseThreads The maximum number of threads for each ImagingResponse Agent. If this is 0 or less, defaults to Agentserver processor count * 2. Our recommendation is 1 Ima-ging Response Agent thread per 8 Imaging Workerthreads at a minimum.
Added
ImagingCompleteMaxThreads This was removed in accordance with the addition of theMaxImagingResponseThreads instance setting.
Removed
Beginning in Relativity 9.5.342.116, the Imaging Request Agent is required to run any imaging job in yourenvironment. This agent is responsible for performing background tasks when any imaging request issubmitted via mass imaging, image on the fly, or imaging set.
For initial installations of Relativity 9.5.342.116, an Imaging Request Agent is automatically installed andenabled in your environment. If you're upgrading to Relativity 9.5.342.116 or if at any point you need toinstall an additional agent, you need to do so manually.

UpgradeGuide 30
For more information, see the Imaging guide.
Existing imaging profiles received the following updates based on their imaging method when upgradingto Relativity 9.5:
If your environment is set up for native imaging, the following changes occur upon upgrade:
n Relativity renames the default imaging profile to Native Default.
n The imaging method is set to Native for all current imaging profiles including Native Default.
n Relativity creates a new basic default imaging profile with the following settings:o Imaging Method: Basico Basic Image Output Quality (DPI): 300o Basic Image Format: TIFFo Basic Image Height: Original Setting
n For any imaging set with an imaging method set to Basic, the following changes occur:o The imaging profile previously linked to the imaging set is copied.
o Relativity sets the imaging method for the copied profile to Basic.
o The copied basic imaging profile is linked to the imaging set and Basic is prepended to theprofile name.
If your environment is not set up for native imaging, the following changes occur upon upgrade toRelativity 9.5:

UpgradeGuide 31
n Relativity renames the default imaging profile to Basic Default.
n The imaging method is set to basic for all current imaging profiles including Basic Default.
2.1.9 Installation of a certificate on the database serverA certificate called RelativityIdentityCertificate is added to the EDDS database on your primary databaseduring a first time installation or an upgrade. The authentication framework uses the thumbprint of thecertificate to sign identity tokens, which are JSONweb tokens (JWTs). The IdentityCertificateThumbprintinstance setting stores the thumbprint associated with your certificate. For more information, see Instancesetting values on the Relativity 9.5 Documentation site.
You also have the option to use your own authentication token-signing certificate. For more information,see Optionally configure an authentication token-signing certificate on the Pre-installation page in theRelativity 9.5 Documentation site.
For a clustered environment, you need to export a copy of your RelativityIdentityCertificate from theprimary database server, and install the certificate to each database server hosting the EDDS. See thefollowing instructions for more information:
n Import or export certificates and private keys at https://technet.microsoft.com/en-us/lib-rary/cc754329(v=ws.11).aspx.
n Optionally configure an authentication token-signing certificate on the Pre-installation page in theRelativity 9.5 Documentation site - These instructions describe the process for configuring your owncustom token-signing certificate, but you can follow these basic steps to install Relativ-ityIdentityCertificate to each database server in a distributed environment.
2.1.10 Instance settingsIf upgrading to Relativity 9.5 from a version prior to 9.3, note that configuration table values are nowreferred to as instance settings. Upon upgrade, configuration table values convert to instance settings.Likewise, the eddsdbo.Configuration table becomes the eddsdbo.InstanceSetting table in SQL Server.
Note: If a new 9.5 install or upgrade fails, a back up table, edds.Configuration_backup, exists as arecord of all the instance settings in SQL. Do not use this table for any purpose other than a record in theevent of an install/upgrade failure.
2.1.10.1 Backwards compatibilityFor any existing applications that reference the pre-9.5 EDDS.Configuration table, a SQL view,Configuration, exists to act as a layer on top of the Instance Setting table.
This view contains the same columns as the old Configuration table and you can use it to examine theinformation as it was pre-Relativity 9.5.
2.1.11 Processing/InvariantTo improve performance of worker processes, beginning in Relativity 9.5.411.4, the default value of theLongRunningJobTimeout entry in the AppSettings table is now 180,000 milliseconds (30 minutes).
Beginning in Relativity 9.5.342.116, ICS/VCF files are deduplicated not as emails but as loose files basedon the SHA256 hash. Since the system now considers these loose files, Relativity is no longer capturingthe email-specific metadata that it used to get as a result of ICS/VCF files going through the system's email

UpgradeGuide 32
handler. For a detailed list of all the metadata values populated for ICS and VCF files, see the Processinguser guide.
Beginning in Relativity 9.5.309.48, the database installation component has been removed from theInvariant installer. Accordingly, note the following considerations:
n There is no longer a database install log, and all of the log files that used to be found there are nowfound in the queue manager log file.
n The queue manager installation is now responsible for creating the database.
n The queue manager now communicates with the database upgrader to update all databases duringan Invariant upgrade.
n The database directory that was deployed during the installation is no longer needed, so there willno longer be a database directory deployed on the database server.
n The database component no longer holds registry entries; all registry entries that aren't duplicatesare now on the queue manager machine.
n If you previously installed the Invariant database component on its own machine, it's highly recom-mended that you uninstall the database before upgrading to Relativity 9.5.309.48. If you uninstallthe database after upgrading, you'll delete all Invariant files from the Invariant network share.
n There is a new installation log file called UninstallLegacyDatabasePackage.log, which appears onlyonce after an upgrade to Relativity 9.5.309.48.
For more information, see Installing the worker manager server.
Beginning in Relativity 9.5.292.12, the following infrastructure changes have been made to processingand should be noted prior to upgrade:
n ProcessingMaxPublishSubJobCountPerSQLServer - the new default value of this instance settingis 7. For information on configuring this setting, see the Processing User Guide.
n ProcessingMaxPublishSubJobCountPerWorkspace - the new default value of this instance settingis 3. For information on configuring this setting, see the Processing User Guide.
n Microsoft Project is no longer a required application to install for Invariant. Processing or Imaging aproject file when it is not installed will result in a detailed error.
n Microsoft Visio is no longer a required application to install for Invariant. Processing or Imaging avisio file when it is not installed will result in a detailed error.
n The default value of the WorkerFileCheckTimespanInMinutes entry in the AppSettings table haschanged from 2 to 15 (minutes) to reduce how often the Queue Manager needs to check the fileshare for changes.
Beginning in Relativity 9.5.253.62, the following changes have been made to processing and should benoted prior to upgrade:
n You can now host Invariant Kepler services in HTTPS if you install a certificate on the queue man-ager. Note that the default port for the Invariant Kepler services is 8092. For details, see EnablingHTTPS for Invariant Kepler Services.
UpgradeGuide 33
n The Service Bus certificate generation key is required on the queue manager and worker servers aspart of the connection between Invariant and Service Bus. For more information see The Pre-install-ation Guide in the Pre-installation topic.
n Invariant stores are now deleted automatically when the Relativity workspaces associated withthem are deleted. For more information, see The Relativity Processing Console Guide.
n Publish is no longer a single long-running process and instead is a distributed process that is brokenup into separate jobs, which leads to more stability by removing this single point of failure and allow-ing the distribution of work across multiple workers. These changes enable publish to operate moreconsistently like the other processing job types in the worker manager server, where batches ofdata are processed for a specific amount of time before completing each transactional job and mov-ing on. Note the upgrade-relevant details regarding distributed publish:
o The following instance settings have been added to facilitate the work of distributed publish.l ProcessingMaxPublishSubJobCountPerRelativitySQLServer - the maximum numberof publish jobs per Relativity SQL server that may be worked on in parallel.
l You can't allocate more jobs per workspace than what is allowed per SQLserver. This means that if this value is set to be lower than the value for theMaxPublishJobCountPerRelativitySQLServer instance setting, then Relativityonly allows the maximum of jobs per SQL server.
l The default value is 7. Leaving this setting at its default value will result inincreased throughput; however, we recommend contacting Support before youupgrade for guidance on what value will be most beneficial to you based on yourenvironment setup.
l This updates on a 30-second interval.
l If you change the default value, note that setting it too high could result in webserver, SQL server, or BCP/file server issues. In addition, other jobs in Relativitythat use worker threads may see a performance decrease, such discovery orimaging. If you set it too low, publish speeds may be lower than expected.
l ProcessingMaxPublishSubJobCountPerWorkspace- the maximum number of publishjobs per workspace that may be worked on in parallel.
l You can't allocate more jobs per workspace than what is allowed per SQLserver. This means that if this value is set to be higher than the value for theMaxPublishJobCountPerRelativitySQLServer instance setting, then Relativityonly allows the maximum of jobs per SQL server. For example, if you have aworkspace limit of 4 and a server limit of 8 and all of your workspaces are on thesame SQL server, you will have at most 8 publish sub jobs running concurrently.
l The default value is 3. Leaving this setting at its default value will result inincreased throughput; however, we recommend contacting Support before youupgrade for guidance on what value will be most beneficial to you based on yourenvironment setup.
l This updates on a 30-second interval.
UpgradeGuide 34
l If you change the default value, note that setting it too high could result in webserver, SQL server, or BCP/file server issues. In addition, other jobs in Relativitythat use worker threads may see a performance decrease, such discovery orimaging. If you set it too low, publish speeds may be lower than expected.
o The ProcessingExportMaxThreads instance setting has been deprecated in accordancewith the addition of the ProcessingMaxPublishSubJobCountPerWorkspace and Pro-cessingMaxPublishSubJobCountPerRelativitySQLServer instance settings, which facilitatethe work of distributed publish.
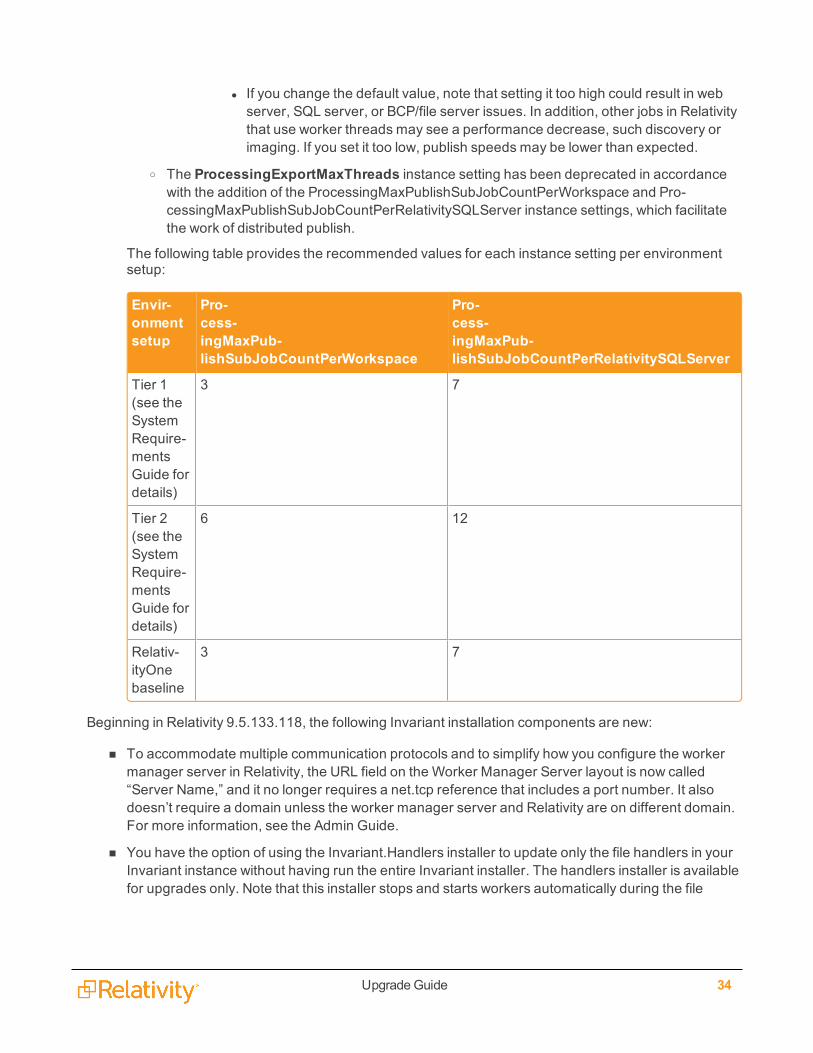
The following table provides the recommended values for each instance setting per environmentsetup:
Envir-onmentsetup
Pro-cess-ingMaxPub-lishSubJobCountPerWorkspace
Pro-cess-ingMaxPub-lishSubJobCountPerRelativitySQLServer
Tier 1(see theSystemRequire-mentsGuide fordetails)
3 7
Tier 2(see theSystemRequire-mentsGuide fordetails)
6 12
Relativ-ityOnebaseline
3 7
Beginning in Relativity 9.5.133.118, the following Invariant installation components are new:
n To accommodate multiple communication protocols and to simplify how you configure the workermanager server in Relativity, the URL field on the Worker Manager Server layout is now called“Server Name,” and it no longer requires a net.tcp reference that includes a port number. It alsodoesn’t require a domain unless the worker manager server and Relativity are on different domain.For more information, see the Admin Guide.
n You have the option of using the Invariant.Handlers installer to update only the file handlers in yourInvariant instance without having run the entire Invariant installer. The handlers installer is availablefor upgrades only. Note that this installer stops and starts workers automatically during the file
UpgradeGuide 35
syncing process, which means that no manual worker stoppage is required. For more information,see the Processing installation guide.
Note: A full upgrade to Relativity 9.5.133.118 is required before you can use the handlersinstaller to upgrade to a newer set of handlers. Going forward, you won't be required to upgradeyour Relativity version in order to use the handlers installer.
The following changes were made to the worker manager server installation process beginning inRelativity 9.5.41.87 and should be noted prior to upgrading:
n Each Invariant component has a machine-specific encryption for its connection strings. These arenow found in a folder called LocalSettings, rather than the previous Settings folder, which holdsother config files. The installer now automatically creates the workers’ connection strings, and theyare no longer created in the network share. Note that you will still see a placeholder folder on the net-work share that doesn’t contain any data.
n There is a new parameter in the Invariant response file called DATABASEINSTALLPATH, which isthe local folder where the Invariant.DBUpdater.exe, Invariant.NIST.InstallUtility.exe, and Invari-ant.Deployment.exe utilities were automatically installed during database installation. These threeexecutables have been moved out of the network share to the local machine where the database isinstalled.
n After the database and queue manager upgrades are complete, you must run the Invariant installeron all workers. This is only applicable for upgrades from Relativity 9.4.398.62 (December 21, 2016)or lower to the full release of Relativity 9.5 (January 25, 2017) and above, meaning all monthlyproduct updates of 9.5. If you're performing a fresh installation of Relativity 9.5, you will need to runthe installer on each Worker Manager and Worker server; however, any subsequent upgrade willonly require you to run the installer from the Worker Manager server, which will upgrade all workerservers automatically, thus eliminating the need to run the installer on each server individually.
You can configure the number of concurrent threads dedicated to OCR, which can mitigate CPUbottlenecks. This is possible through the following changes:
n The MaxConversionThreads column has been removed from the Invariant.dbo.Workstations table,as it was longer in use since conversion became a separate service.
n The Invariant.dbo.Workstations table now includes a MaxOcrThreads column, which stores thenumber of concurrent threads that are allowed to perform an OCR job at a single time. A value of “0”means unlimited, and any other value limits to that number. The default and recommended value is0. You should only change this value if the Worker CPU is at 100%, and a performance degradationduring text extraction.
The following changes were made to the Invariant installation process:
n The Invariant.DBUodater.exe upgrades both the main Invariant database and RPC stores. It alsohandles Relativity stores by setting the stores to Pending, which tells the Workspace UpgradeWorker agent to pick them up and execute scripts on them. It also produces a detailed XML log file,which gets created in the install directory and provides information on what happened during thedatabase upgrade.
n The IDENTITYSERVERURL setting is new in the Invariant response file. This is where you enter theidentity server of the environment used for RPC authentication.
UpgradeGuide 36
The following processing changes may impact your upgrade experience:
n When you change the URL for the queue manager, you're required to perform an IIS reset on theRelativity server in order to clear the cache.
n You no longer map processing fields through the processing profile. You nowmap through a newSource field on the Field layout, which takes you to a catalog containing the most common fieldsthat are discovered during processing. Note the following details regarding this change:
o Relativity provides 46 new processing fields, in addition to the 81 fields previously provided,bringing the total number of fields that are available to map to 127.
o The processing profile no longer contains the Processing Fields associative object list view.
o If you don't install the Processing application, Relativity still allows you to map fields as long asyou've added the worker manager server to the resource pool.
o Relativity transfers any fields mapped in the processing profile named "Default" to the fieldmapping table. If the name of the original Default profile has been changed, that profile is stillused. If you haven't mapped any fields on the Default profile in 9.3, and one or more other pro-files do have fields mapped, Relativity doesn't automatically transfer fields when you upgradeto 9.5.
n You can now install Microsoft Office 2013 on your worker servers; however, due to a performancedegradation in text extraction when using Office 2013, we recommend that you continue to useOffice 2010 with Relativity 9.5. When you upgrade from Office 2010 to 2013, it's recommended thatyou uninstall 2010 and then install 2013. If you don't uninstall 2010 prior to installing 2013, you mayneed to do a repair on 2013 in order to get it working properly.
n If you are upgrading from Relativity 9.3 (or a lower version) to 9.5 you may be required to manuallyinstall Visual C++ redistributable packages on the worker servers before running the Invariantupgrade. For details, see the Worker Manager Server Installation Guide.
n The WebAPI setting in IIS is now set to Anonymous Authentication by default and is no longer set toWindows Authentication. You must keep this set to Anonymous Authentication in order to publishdocuments to a workspace using the worker manager server.
Processing to Data Grid no longer requires the RabbitMQ server. To remove RabbitMQ from yourRelativity environment, see Removing RabbitMQ.
2.1.12 Network load balancingIf you are using cookie-persisted load balancing configurations for Relativity 9.5.162.111 and higher, youmust update theWebClientRequiredCookies instance setting to include the name of the load balancercookie for the ActiveX viewer.
2.1.13 New UI frameworkIf you need to disable the new UI framework for the Document list, click Switch to Classic UI from theuser drop-down within a workspace. For help using the classic interface, refer to the 9.3 documentationwhich documents both interfaces side-by-side. For more information, see Navigation in the Admin guide.
When using the new UI framework, the following Relativity features have been enhanced:
UpgradeGuide 37
n Cluster visualization
n Dashboards
n Document list and tabs throughout Relativity
n Pivot
n Sampling
n Search panel and search browser
ProductionThe following section discusses the changes to the Production application on upgrade from Relativity 9.xto Relativity 9.3+. Certain upgrade changes only affect upgrades from Relativity 9.1 or 9.2 to Relativity 9.5,and the changes are clearly marked with the affected versions.
Beginning in Relativity 9.3+ you can choose to upgrade only your Production application using a RAP file.
General Production upgrade considerations:
n An upgrade from Relativity 9.x to 9.5 can fail if the workspace you're upgrading already contains aRelativity field with the name Production. You must rename this field.
n An upgrade from Relativity 9.2 and below to 9.5 can fail if the workspace you're upgrading alreadycontains a Relativity dynamic object with the name Production Placeholder. You must rename thisobject.
n An upgrade from Relativity 9.1 to 9.5 can fail if the workspace you're upgrading already contains aRelativity dynamic object with the name Production Data Source.
n An upgrade from Relativity 9.2 and below to 9.5 can fail if the workspace you're upgrading alreadycontains a Relativity dynamic object with the name Relativity Color Map. You must rename thisobject.
n An upgrade from Relativity 9.2 and below to 9.5 can fail if the workspace you're upgrading alreadycontains a Relativity dynamic object with the name Field Catalog. You must rename this object.
n If you have a full-text index populating the production upgrade stops. Try upgrading again once thefull-text index is finished populating.
n Relativity deduces the First Bates Value and Last Bates Value for all imported and upgraded pro-ductions.
n If you upgrade from Relativity 9.2 to Relativity 9.5 and you were previously using the ProductionTracker application, review the Production Tracker 9.5 considerations PDF in the Relativity Com-munity.
n Beginning in 9.5.162.111, Productions includes an upgrade step to migrate data from the oldProductionInformation schema to the new schema introduced in 9.5.162.111.
Changes to agents and objects:
n The Relativity.Core agents for production and branding are upgraded to ADS Deployed agents. TheRelativity.Core agents for production and branding are not available in a Relativity 9.5 environment.
UpgradeGuide 38
n The Markup Set table is converted to the Markup Set dynamic object.
n The Production Object table is converted to the Production dynamic object.
Changes to pre-existing Productions:
n Any staged or errored productions in an environment are set to a status of New and you mustrestage the production before running.
n Productions migrated from Relativity 9.1 and 9.2 receive a legacy placeholder stating, "No TiffIncluded For This Record."
n Productions migrated from Relativity 9.1 to Relativity 9.5 have a data source created containing theproduction documents for each produced and errored production.
n If any produced productions contain native files with their Bates numbers previously stored in theDocument table, the Bates numbers for the native files are moved to the Production object, and maynot reflect actual Bates values if those values were overwritten.
n The Production Error field no longer exists on the Production object.
n If you upgrade from an earlier version of Relativity 9.3 and your custom placeholders containsquare brackets, you may see an error the next time you run the production or re-save the customplaceholder. To correct the error, escape the square brackets using a blackslash and re-run the pro-duction.
Changes to Production fields and views:
n On upgrade from 9.2 the Produced Documents field exists in the environment, but the field is notpopulated.
n The production document view no longer exists.
n The multi-object field Produced Documents is replaced with the Production Information RDO whenupgrading from Relativity 9.2. The field is not deleted from the workspace, but is disassociated fromthe production application.
n On upgrade from 9.x to 9.5 the Add Image Placeholder field changes to Use Image Placeholder. Ifthe Add Image Placeholder field was set to No, it updates to Never Use Placeholders. If the AddImage Placeholder field was set to Yes, it updates to Always Use Image Placeholders.
Changes to Production permissions:
n Users with full permissions to the Production object prior to upgrading to Relativity 9.3 do not auto-matically gain permissions to the new Production Data Source object, unless they also have theManage Object Types permission under Admin Operations. Users need rights to the new Pro-duction Data Source object to add or edit production data sources after upgrading to Relativity 9.3+.
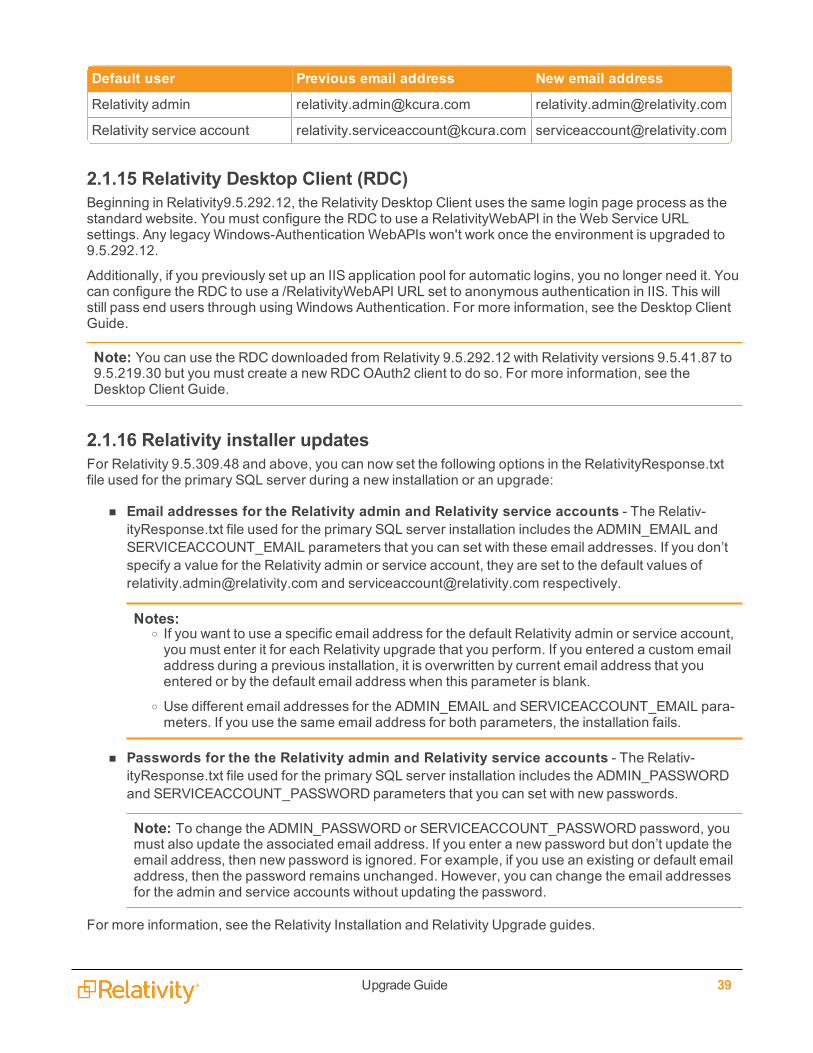
2.1.14 Relativity admin and service account email addressesRelativity includes the Relativity admin and service account users by default. With the Relativity9.5.342.116, the default email addresses for these accounts have been updated as follows:
UpgradeGuide 39
Default user Previous email address New email address
Relativity admin [email protected] [email protected]
Relativity service account [email protected] [email protected]
2.1.15 Relativity Desktop Client (RDC)Beginning in Relativity9.5.292.12, the Relativity Desktop Client uses the same login page process as thestandard website. You must configure the RDC to use a RelativityWebAPI in the Web Service URLsettings. Any legacyWindows-Authentication WebAPIs won't work once the environment is upgraded to9.5.292.12.
Additionally, if you previously set up an IIS application pool for automatic logins, you no longer need it. Youcan configure the RDC to use a /RelativityWebAPI URL set to anonymous authentication in IIS. This willstill pass end users through using Windows Authentication. For more information, see the Desktop ClientGuide.
Note: You can use the RDC downloaded from Relativity 9.5.292.12 with Relativity versions 9.5.41.87 to9.5.219.30 but you must create a new RDCOAuth2 client to do so. For more information, see theDesktop Client Guide.
2.1.16 Relativity installer updatesFor Relativity 9.5.309.48 and above, you can now set the following options in the RelativityResponse.txtfile used for the primary SQL server during a new installation or an upgrade:
n Email addresses for the Relativity admin and Relativity service accounts - The Relativ-ityResponse.txt file used for the primary SQL server installation includes the ADMIN_EMAIL andSERVICEACCOUNT_EMAIL parameters that you can set with these email addresses. If you don’tspecify a value for the Relativity admin or service account, they are set to the default values [email protected] and [email protected] respectively.
Notes:o If you want to use a specific email address for the default Relativity admin or service account,you must enter it for each Relativity upgrade that you perform. If you entered a custom emailaddress during a previous installation, it is overwritten by current email address that youentered or by the default email address when this parameter is blank.
o Use different email addresses for the ADMIN_EMAIL and SERVICEACCOUNT_EMAIL para-meters. If you use the same email address for both parameters, the installation fails.
n Passwords for the the Relativity admin and Relativity service accounts - The Relativ-ityResponse.txt file used for the primary SQL server installation includes the ADMIN_PASSWORDand SERVICEACCOUNT_PASSWORD parameters that you can set with new passwords.
Note: To change the ADMIN_PASSWORD or SERVICEACCOUNT_PASSWORD password, youmust also update the associated email address. If you enter a new password but don’t update theemail address, then new password is ignored. For example, if you use an existing or default emailaddress, then the password remains unchanged. However, you can change the email addressesfor the admin and service accounts without updating the password.
For more information, see the Relativity Installation and Relativity Upgrade guides.

UpgradeGuide 40
2.1.17 Relativity Processing ConsoleBeginning in Relativity 9.5, the RPC installer has been reconfigured to request that you enter databasecredentials, which it will then validate to create a working connection string.
Specifically, the installer includes a new window in which you'll enter the following:
n Invariant SQL Server name with an optional port number
n Relativity SQL Server name with an optional port number
n EDDSDBO password
2.1.18 Relativity service busThe Relativity 9.5 infrastructure now includes a new component called the Relativity service bus. Thiscomponent uses Service Bus for Windows Service as its underlying framework. Before you upgradeRelativity, you must now install Service Bus for Windows Server on a server or VM that is accessiblethroughout your Relativity instance. You must then configure a Service Bus for Windows Server farm inyour environment. For information about prerequisites, see Service Bus for Windows Server in the Pre-Installation guide.If you have a proxy server or firewall setup in the environment, you must allowcommunication to the FQDN of the Windows Service Bus server from the servers you are installing theRelativity Service Bus or else the installer will fail to upgrade the server.
After installing Service Bus for Windows Server, you can upgrade your primary SQL Server. You can theninstall the Relativity service bus by running the upgrade installer on the machine where you installedService Bus for Windows Server. Finally, follow the standard instructions for upgrading other Relativitycomponents. For more information, see the Relativity Service Bus guide.
UpgradeGuide 41
2.1.19 Required certificates for RelativityRelativity 9.5 now verifies that all HTTPS services running in your environment have a trusted certificate.You need to verify the certificates to components of your Relativity installation running HTTPS services toavoid error messages and insecure-connection icons. For more information, see Required certificates forRelativity in the Pre-installation guide.
We recommend placing the new Analytics server certificate and testing it prior to the day of the upgrade toRelativity 9.3. For more information, see Pre-upgrade: Update the default SSL/TLS certificate for CAAT®in the Upgrading or installing your Analytics server section.
2.1.20 Scriptsn You must enable the AllowAddOrEditScripts instance setting in order for users to create or edit
scripts. This setting enables or disables the ability to create and edit scripts for all users, includingsystem admins. For more information, AllowAddOrEditScripts in the instance setting guide.
n Beginning in 9.5.196.102, the Set extracted text size script is no longer available in the RelativityScript Library. If you have this script installed in a workspace, it is removed upon upgrade. You canuse the Set long text size mass operation in place of this script.
2.1.21 SearchingUpon upgrade to 9.5.133.118, Relativity interprets straight quotes and curly quotes in searching the same.Previously, if you searched using curly quotes in a long text field using the CONTAINS filter, Relativitysearched for the quote itself instead of grouping terms together. Now, Relativity groups terms betweendouble quotes together regardless of the quote type. This may mean the number of results in yoursearches may change.
2.1.22 Service Host Manager HTTPS configurationService Host Manager runs Relativity services on all web and agent servers in your environment. Theservices are used by applications like Production and Processing on. If your web and agent servers mustbe set up for HTTPS access, special setup is required for Service Host Manager.
For more information, see Service Host Manager on the Relativity 9.5 Documentation site.
2.1.23 System requirementsn Windows Server 2008 R2 (64-bit) is no longer compatible with 9.5. Relativity 9.5 is only compatible
with Windows Server 2008 R2 (64-bit) w Service Pack 1.
n As of August 31, 2017, we no longer support Internet Explore (IE) 10. Please upgrade to a com-patible version of IE 11.
2.1.24 TelemetryAfter you install Relativity 9.5, complete the steps to enable telemetry in your environment. Telemetryallows you to collect metrics for performance, usage, and billing. For more information, see Telemetry onthe Relativity 9.5 Documentation site.
UpgradeGuide 42
Note: Failure to transmit telemetry billing data to Relativity causes Relativity access to be disabled afterseven (7) days. Telemetry lockout is similar to Case Statistics Manager lockout. If your security setupdoesn't allow access to public internet, contact Relativity support to configure offline-billing.
2.1.25 Viewer (ActiveX)Beginning in Relativity 9.5.196.102, you must install Microsoft .NET 4.6.2 on all of the machines that needaccess to the ActiveX viewer. You must also install the new ActiveX viewer installation kit, which includesthe Visual C++ 2015 redistributable, from the Workspace Details tab. You can't use the Relativity9.5.196.102 viewer with earlier versions of Relativity. Also, earlier versions of the ActiveX viewer aren'tcompatible with Relativity 9.5.196.102.For more information, see Legacy viewer installation in theworkstation configuration guide.
Note: If you have a client machine that accesses multiple instances of Relativity that require differentversions of the ActiveX viewer, the corresponding ActiveX viewers must be installed. To ensure properviewer functionality, you must close their browsers before they switch from one version to the next.
2.1.26 Viewer (ActiveX and HTML)Beginning in 9.5.309.48the following Viewer changes were made: The default instance setting calledHideDownloadNativeFileRadioButton disables the native file radio button in the document viewer toolbar.This setting hides the Native radio button regardless if you have permission to download documents ornot. If you have the right permissions, click the file icon next to the document identifier in the viewer todownload the native file to your device.
For users who haven't upgraded their Relativity version since the general release of Relativity 9.2, notethat, beginning in the Relativity 9.2.337.3 - September 30, 2015 product update, the following isapplicable.
When viewing documents with an .HTM, .HTML, or .XML extension in Native mode, the viewer displaysthe raw file markup instead of rendering the content.
You can control this option with the TreatHtmlAndXmlAsText instance setting, which is set to True bydefault. When set to True, this prevents JavaScript from executing when viewing these documents in theNative mode in the viewer. See the Instance Setting Guide to learn more about this new value.
Pre the Relativity 9.2.337.3 - September 30, 2015 product update:

UpgradeGuide 43
As of the Relativity 9.2.337.3 - September 30, 2015 product update:
2.1.27 Windows or Integrated Windows authenticationIf your Relativity installation currently usesWindows authentication or Integrated Windows authentication,you must set the UseWindowsAuthentication instance setting to True after upgrading your environment.For more information, see the Instance setting guide on the Relativity 9.5 Documentation site.
UpgradeGuide 44
You may want to configure your environment so that some servers use Windows authentication, whileothers don't use it. In this case, you need to add another row for this instance setting to the Instancesetting table, update the machine name in this new row, and then set the value to True or False based onthe Windows authentication requirements for the server.
In addition, you can set the WindowsAuthIpRange instance setting, which specifies a group of IPaddresses that Relativity uses to validate the address of the user during login. If a request originates froman IP address added to the WindowsAuthIpRange instance setting, the server usesWindowsAuthentication to log the user in to Relativity. Relativity uses forms authentication to log in the user, whenthe IP address is outside the specified range. For more information, see Instance settings on the Relativity9.5 Documentation site.
2.1.28 Windows Service Bus 1.1 with TLS 1.2 SupportYou can upgrade your Service Bus for Windows Server to use Transport Layer Security (TLS) 1.2. Formore information, see Add support for TLS 1.1 and TLS 1.2 on Service Bus for Windows Server 1.1(https://support.microsoft.com/en-us/help/4077554/add-support-for-tls-1-1-and-tls-1-2-on-service-bus-for-windows-server).
2.1.28.1 Prerequisites for Service Bus 1.1 with TLS 1.2 Support
n Verify that .NET 4.6.2 is installed in your environment. You must install .NET 4.6.2 before you beginupgrading to Service Bus 1.1 with TLS 1.2. This service bus upgrade requires .NET 4.6.2. For moreinformation, see Upgrading Relativity to .NET 4.6.2.
n Verify that you are running Windows Server 2012 or Windows Server 2012 R2, and Microsoft SQLServer 2012. If your environment, doesn't meet these requirements, see Workarounds for ServiceBus 1.1 with TLS 1.2 on the next page.
2.1.28.2 Upgrading to Service Bus 1.1 with TLS 1.2 SupportUse the following steps to upgrade to Service Bus 1.1 with TLS 1.2 Support:
1. Remove all servers from the farm. For more information, see Leaving a Farm (https://msdn.-microsoft.com/en-us/library/dn441430.aspx) on the Microsoft site.
2. Uninstall Service Bus for Windows 1.1 CU1. For more information, see Removing the Service Busfor Windows Server from a Node in a Farm in Uninstalling (https://msdn.microsoft.com/en-us/lib-rary/dn441431.aspx) on the Microsoft site.
3. Uninstall Microsoft Azure Surface Fabric 1.0.
4. Upgrade the SQL Server to support TLS 1.2. For more information, see TLS 1.2 support forMicrosoft SQL Server (https://support.microsoft.com/en-us/help/3135244/tls-1-2-support-for-microsoft-sql-server) on the Microsoft site.
5. Delete the following folder from your server, if it exists on it:
C:\Program Files\Service Bus
6. Install Service Bus for Windows Server 1.1 with TLS 1.2 support by using the WebPI. For moreinformation about WebPI, see the Pre-Installation guide.

UpgradeGuide 45
7. Run the Invoke-SBFarmUpgrade cmdlet. Open Service Bus PowerShell and run these commands:
$mycert=ConvertTo-SecureString -string myPassword -force -AsPlainTextInvoke-SBFarmUpgrade -SBFarmDBConnectionString 'Data Source=localhost\sqlexpress;Initial Cata-log=SbManagementDB;Integrated Security=True' -CertificateAutoGenerationKey $mycert
Notes:n myPasswordmust be the certificate generation key from when you set up the service busfarm originally. If you do not have this key, you will need to reinstall the service bus fromscratch. Relativity doesn't store anything in the service bus databases permanently, sothere’s no risk of data loss.
n localhost\sqlexpressmust be replaced with the target SQL server that holds the servicebus databases.
See the following confirmation message:
8. Rejoin all servers to the farm. For more information, see the Pre-installation Guide.
2.1.28.3 Workarounds for Service Bus 1.1 with TLS 1.2If your Relativity environment doesn't meet the recommendations provided by Microsoft for upgrading toService Bus 1.1 with TLS 1.2 Support, you may want to consider a workaround. This section discussescurrent Microsoft recommendations and possible workarounds.
Microsoft recommends using Windows Server 2012 or Windows Server 2012 R2, and Microsoft SQLServer 2012 with the Service Bus 1.1 with TLS 1.2 Support update. As of February 5, 2018, Relativity hastested the Service Bus TLS 1.2 update with Relativity 9.5 using the following platform combinations:
n Windows Server 2012 and SQL Server 2012
n Windows Server 2012 R2 and SQL Server 2016
n Windows Server 2016 and SQL Server 2014
n Windows Server 2016 and SQL Server 2016
While we aren't aware of any issues on these platforms, we request that you are cautious when deployingthe Service Bus 1.1 with TLS 1.2 Support update. Relativity can't guarantee compatibility outside ofMicrosoft’s official support matrix. Future updates from Microsoft may impact the stability of yourinfrastructure if you aren't running the service bus on a supported OS and SQL platform.
In this case, you may want to consider one of the workarounds provided in the following sections.
Apply TLS registry settingsYou can use the server registry settings to control turning off TLS 1.0 and 1.1 for internet traffic to IIS.Windows offers the following groups of TLS settings:
UpgradeGuide 46
n Client communication - determines which TLS protocols are used for outbound connections fromthe server that is traffic to the service bus server.
n Server communication - determines which TLS protocols can be accepted that is from internettraffic to IIS.
The registry settings for these TLS protocols are located under the following key prefix:
HKLM:\SYSTEM\CurrentControlSet\Control\SecurityProviders\SCHANNEL\Protocols
For information about the registry keys and testing your environment after applying them, see Disablingcryptographic protocols for PCI compliance (focused on SSL 3.0 and TLS 1.0) blog post athttps://www.johnlouros.com/blog/disabling-cryptographic-protocols-for-pci-compliance.
You can also use the IISCrypto tool to configure TLS protocols. Clear the Set Client Side Protocolscheckbox when using IISCrypto to configure your web servers. IISCrypto uses the Windows registry keyslisted above to control the available TLS protocols.
Note: For server communication, you must keep TLS 1.0 and 1.1 enabled on the server whereWindows service bus is installed. This approach can't be used in smaller environments where the webserver and the service bus are installed on the same VM. We recommend installing the service bus onits own dedicated VM if you want to control TLS settings using registry keys.
Use a load balancerIf your primary use of TLS 1.2 would be for internet-facing traffic, you may want to consider using a loadbalancer. Relativity server traffic may be a lower concern in these cases. By placing a load balancer (suchas an F5 or NGINX) in front of Relativity, you can restrict all web traffic to TLS 1.2. Many load balancersprovide you with options to choose which TLS protocols that run on the network.
2.1.29 WorkersThe LongRunningJobTimeout setting enables Invariant to terminate some stuck jobs. Specifically, thisvalue determines the amount of time (in milliseconds) that a worker will work on a job before Invariantterminates that job. The default value is 180,000 milliseconds (30 minutes).
You may want to adjust this value if you have large documents that need additional time for processing, orif you need a shorter feedback loop. If you need to adjust this value, you can manually go into theAppSettings table and increase it accordingly. Previously, Invariant workers could get into a state in whichthey no longer reported progress and no longer completed work, which then required manual interventionto terminate those processes. When Invariant uses the LongRunningJobTimeout setting to stop a job,Relativity provides an error message to the processing user informing them that the timeout limit wasreached.
The Conversion Threads in Use column no longer appears on the Worker Status tab. Additionally, on theworker server page, you can no longer designate a worker for conversion work. To configure yourenvironment for conversion, see Configuring your conversion agents.
2.1.30 Worker manager queueRevisions in the queue manager code have led to the following enhancements:
n A reduction in the volume of connections to the SQL Server
n A reduction in lock waits and thread pool waits
UpgradeGuide 47
n A general increase in queue parallelism
n A reduction in the number of queries per second hitting the SQL Server
There is no reduction or change in actual queue functionality as a result of these changes. Likewise, theuser experience with the queue manager hasn't changed, with the exception of potential performanceincreases, depending on the size of your environment.
2.1.31 Worker manager serverDocument conversion no longer occurs on the worker manager server. You cannot modify the priority ofthe following conversion jobs on the worker manager server: Pre-convert, Conversion on-the-fly, Massconversion, and Conversion. Instead, you must install Service Bus for Windows Server and configureconversion agents. For more information, see Configuring your conversion agents on page 156.
The Worker manager page no longer displays the following conversion fields: pre-convert, conversion on-the-fly, mass conversion, and conversion.
Beginning in Relativity 9.5.133.118, the URL field on the Worker Manager Server is now called ServerName and displays the fully-qualified server name as the location of the Invariant API on the server.
2.1.32 Workspace upgrade queueThe Workspace Upgrade Queue includes the following columns:
n Store Upgrade Status - the status of the upgrade of the Invariant store, as completed by the Work-space Upgrade Worker agent. The possible values in this column are the same as for the work-space upgrade. This field is empty if you don't have Processing installed.
n Current Store Version - the version of Invariant you are upgrading to.
2.2 8.x to 9.5 Relativity updatesLearn more about the changes to your Relativity 8.x environment after you upgrade to Relativity 9.5.
8.x to 9.5 Relativity updatesn Agents on the next page
n Agent service
n Analytics on page 49
n Applications on page 51
n Audit on page 51
n Authentication on page 24
n Conversion
n Data Grid on page 73
n Database schema
n Document table trigger removal on page 74
n File share on page 74
UpgradeGuide 48
n Foreign key removal on page 74
n IIS on page 74
n Imaging on page 75
n Imaging sets on page 77
n Installation of a certificate on the database server on page 77
n Processing/Invariant
n Network load balancing on page 62
n NewUI framework on page 82
n Upgrade considerations for Relativity 9.5 on page 17
n Production on page 83
n Relativity admin and service account email addresses on page 64
n Relativity Desktop Client (RDC) on page 64
n Relativity installer updates on page 64
n Relativity service bus on page 84
n Required certificates for Relativity on page 84
n Scripts
n Searching on page 84
n Servers on page 85
n Service Host Manager HTTPS configuration on page 85
n Structured Analytics on page 85
n System requirements on page 85
n Telemetry on page 85
n Viewer on page 88
n Upgrade considerations for Relativity 9.5 on page 17
n Windows or Integrated Windows authentication on page 89
n Windows Service Bus 1.1 with TLS 1.2 Support on page 69
n Workers
n Worker manager server
n Workspaces on page 89
n Workspace Upgrade Queue on page 89
AgentsWith the introduction of the new viewer, the following agents have been removed in Relativity 9.5:
UpgradeGuide 49
n Imaging set manager
n Imaging worker
The work of processing, document conversion, imaging set, image-on-the-fly, and mass imaging jobs areperformed by workers, which you can add in the Servers tab. For more information, see the Serverssection of the Relativity Admin Guide.
2.2.1 Agent serviceAll Windows services now have Recovery Properties. If the Agent service should ever crash due to anunhandled exception, it recovers and immediately restarts.
Analytics
2.2.1.1 New Analytics installerStarting with Relativity 9.5.133.118, the Relativity Analytics engine installer now uses a response file toinstall Analytics on a server. You can use the installer for new installations and upgrades. The responsefile installer replaces the setup wizard for the Analytics server. See Installing Analytics.
Note: If you are upgrading from Relativity 9.3.332.21 (CAAT 3.17) or lower, first run the Relativity9.3.362.9 or 9.4 Analytics server installer using the instructions at Running the Relativity Analyticsinstaller for versions previous to Relativity 9.5.133.118. Contact Support for this installer. After this step,then run the Relativity 9.5 response file-based installer.
Updating the default SSL/TLS certificate for the Content AnalystYou must update the default SSL/TLS certificate on your Analytics server because Relativity requires acertificate signed by a trusted certificate authority (CA). By default, the CAAT service runs over anuntrusted SSL/TLS certificate. For more information, see Updating the default SSL/TLS certificate onpage 217.
2.2.1.2 Updating RestUriForCAAT instance settingAs part of upgrading (post-upgrade), you must have a valid URL value entered for the RestUriForCAATinstance setting. This is the FQDNURL to the web server hosting your Kepler services (e.g.,https://client.domain.name/Relativity.REST/API).
2.2.1.3 Analytics index enhancementsStarting with Relativity 9.5.196.102, Analytics indexes are now RDO's. There are a few considerations withthis update:
n Indexes will no longer have the default saved searches available to set as the training and search-able set sources. For legacy indexes that are upgraded, the saved search must be set when editingthe index. If you do not set the searches, you will only be able to build and activate / deactivate theindex (provided it was already populated with the default searches)
n After the upgrade, you will no longer have the option to preserve cluster multiple choice and coher-ence score fields when deleting the cluster set. They will always be deleted.
n OCR and GoWord filter support has been deprecated from Analytics Indexes. On subsequent pop-ulations after upgrading, any OCR or GoWord filter set on the Analytics profile will no longer be
UpgradeGuide 50
applied. If the legacy index was populated with these filters, migrated to an RDO, and then rebuilt oractivated, the filters still apply (they are set on population).
n When you upgrade, the Analytics Core install event handlers will create a new RDO for each exist-ing index and a new RDO for each existing cluster set. These new object types and instances inher-its permissions from their analogous source objects. For example:
o Analytics Index RDO workspace permissions are copied from Search Index workspace per-missions
o Analytics Index RDO instance permissions are copied from Search Index instance per-missions
o Cluster Set RDO workspace permissions are copied from Search Index workspace per-missions
o Cluster Set RDO instance permissions are copied from the multiple choice cluster field's itemlevel permissions
2.2.1.4 Email thread visualizationUsers must have the Analytics application installed in the workspace, and the Email Author Date IDmustbe present for the emails. The Email Author Date ID is only available for emails run through a full analysisusing structured analytics in Relativity 9.5.41.87 and above. The email thread visualization pane will notwork for email threads from previous versions unless a full analysis is run against the structured analyticsset containing the emails after upgrading to Relativity 9.5.41.87 or higher.
2.2.1.5 Multiple structured analytic set resultsBeginning in Relativity 9.5.196.102, you can easily store the results for multiple structured analytics setsand set up views that capture the email threading or repeated content identification results of thoseoperations.
Consider the following:
n We recommend you set new relational fields (e.g., Destination Email Thread Group, DestinationEmail Duplicate ID, and Destination Textual Near Duplicate Group) when creating new structuredanalytics sets for email threading or textual near duplicate identification to allow you to easily set upviews that make use of a relational field for each of these sets.
n Upon upgrade, the email thread group, duplicate spare group, and textual near duplicate group rela-tional views display just the Control Number and Edit columns. To display the old fields, you mustunlock the application and update those views. If you run Structured Analytics with the existingapplication relational fields, the relational views will only show the Control Number and Editcolumns. A way to avoid this is by creating and mapping your own relational fields before run time.Then, you can create your own relational view and map that to the custom relational fields.
Note: This upgrade consideration has been addressed in Relativity 9.5.253.62. If you areupgrading to Relativity 9.5.253.62, disregard this item.
n Upon upgrade, email threading and textual near duplicate results are written to new results fieldsthat is only created upon running a Structured Analytics Set. These fields can't be manually createdbefore running the set. This means that it's not possible to create any views, searches, layouts, etc.that reference these fields prior to completing a set. Additionally, views and searches which
UpgradeGuide 51
reference these newly created fields don't carry over on workspace creation because StructuredAnalytics Sets don't carry over.
Note: This upgrade consideration impacts any Relativity templates that reference the legacyStructured Analytics results fields.
n Upon upgrade, previous inclusive information may change when performing an incremental ana-lysis on an existing email threading set due to the newly created structured Analytics results fields.
2.2.2 ApplicationsThe Solution Snapshot application helps you identify compatibility issues with custom applications in yourenvironment so you can resolve them prior to upgrade. Using the Solution Snapshot application, you canview a list of the applications currently installed in your Application Library and review the applicationowner's recommendation for upgrade. For more information, see the Solution Snapshot documentation.
2.2.3 AuditUpon upgrade, the Audit application is now available at the instance level to report on admin-level audits.You must have Elasticsearch installed and configured to use the Audit tab. If you don't have Elasticsearchinstalled, you can hide this tab. For more information, see the Data Grid guide.
2.2.4 AuthenticationConsider the following for upgrading:
n You no longer see the Authentication Data field in the Users User Information section. You nowenter the information you previously entered here in the individual authentication methods. This per-mits more versatile and detailed method implementations.
n Note that when you upgrade, Relativity creates a copy of the eddsdbo.User table before makingany modifications. The table is for reference only, and the copy is named based on the Relativity ver-sion being ungraded from, such as 9_2_AuthenticationUserTableBackupRecord or 9_3_Authentic-ationUserTableBackupRecord. If after upgrading and making sure all users convertedsuccessfully, you may delete the copy table.
n Use the Authentication Profile system to enable only the protocols you need in an environment. Insome cases the upgrade process may enable more protocols than you want. This is due to the pars-ing rules for the AuthenticationData column. Specifically, if you are using Active Directory or ClientCertificate authentications in your environment, the upgrade process may also enable IntegratedAuthentication. If you don't want the Integrated Authentication, you can remove that provider fromthe Authentication Profile after upgrade.
2.2.4.1 User and authentication object permissionsA number of new objects have been introduced, such as Authentication Provider Type, AuthenticationProvider, and Login Method. Upon upgrading to Relativity 9.5, permissions are as follows:
n A user, who has the permissions to view the user objects before an upgrade, post upgrade can viewusers, authentication provider types, authentication providers, and login methods.
UpgradeGuide 52
n A user, who has the permissions to edit (or delete, a higher level of permission than edit) the userobjects before an upgrade, post upgrade can edit users and login methods. They can also viewauthentication provider types, and authentication providers.
n After upgrade only users in the System Administrators group will have access to view and editOAuth2Client objects.
2.2.5 ConversionConversion occurs on dedicated conversion agents instead of Invariant workers. You must configureconversion agents to ensure document conversion works properly in Relativity 9.5. Your agent serversshould also have one conversion complete agent. For more information, see Configuring your conversionagents.
Data Gridn If your environment uses Data Grid, you must also upgrade to Data Grid 2.3.3.58 or above when
upgrading to Relativity 9.5. For more information, see Upgrading Data Grid.
n Relativity 9.5 introduces the Data Grid Ingestion Management tab to manually retry or cancel DataGrid write requests that failed as a result of infrastructure problems. This feature includes a newagent, the Data Grid Worker Agent, that must be installed and configured upon upgrade. There isalso a new instance setting, IngestionTemporaryFileCacheLocation. For more information, see theData Grid guide.
n You no longer need to install the DataGridRESTService on the Analytics server to integrate Relativ-ity Analytics with Relativity Data Grid. If you are upgrading to Relativity 9.5, uninstall theDataGridRESTService from your Analytics server(s). For more information, see Uninstalling theRelativity Data Grid service. We also recommend uninstalling the client node from the Analyticsserver if that server is only dedicated to Analytics in order to free up resources.
n The Instance Settings table and corresponding Relativity tab now includes the AuditDeleteBatchSize and AuditMigrateBatchSize instance settings to specify deletion and migration batch sizes forData Grid for Audit.
For more information, see the Relativity Data Grid guide
2.2.6 Database schema updatesA number of EDDS and Workspace database tables have been changed, added, or removed toaccommodate new functionality in Relativity. For more information, see Database schema updates forRelativity 9.5 in the Relativity Community.
2.2.6.1 Deprecated support for EDDSResource databaseWe have now deprecated the EDDSResource database. Any custom code that writes to theEDDSResource database is subject to breaking changes in future releases.
If you have implemented any custom code that writes to the EDDSResource database, update it as soonpossible to ensure proper functionality of your applications.
Tables formerly created in this database are now added to the workspace database associated with aspecific operation under the new [Resource] schema. The EDDS and all case databases now include this
UpgradeGuide 53
new [Resource] schema. It is used for short-lived scratch tables that used to exist on the EDDSResourcedatabase. Additionally, table names haven’t been modified.
Note: Mass Operation handlers that reference tables in this database won’t function properly. Youneed to update these handlers to reference the new location under the workspace database with the[Resource] schema qualifier.
ECA and InvestigationThe ECA and Investigation and Field Catalog applications are now synchronized, which means that whenyou install the ECA and Investigation application, Relativity automatically maps all of the ECA fields tothose 127 corresponding processing fields found in the Field Catalog. For a list of these fields, see theProcessing User Guide.
Note the following details:
n A number of processing fields were renamed in the Field Catalog. Renamed fields will cause nam-ing conflicts.You can address these conflicts through the standard application framework, which isto either rename the fields or modify their mapping. If you previously processed data into a field thatwas renamed, you will have the same data in two different fields. You can address this through aMass Replace operation on the affected fields.
n The All Custodians field was renamed to All Custodians_Script in the ECA and Investigationapplication. The All Custodians_Script field is a long text field and acts as a another piece ofmetadata for de-duplicated documents. You should select the new All Custodians_Script field whenrunning the Update Duplicate Status script, as this will ensure that no de-duplicated documentsmake it into review.
Fields
2.2.6.2 Allow HTML fieldsAny existing fields with the Allow HTML value set to Yes, you must set the new instance settingSanitizeHTMLOutput to False in order to add HTML alerts and links when a user opens a document forreview.
2.2.7 File shareBeginning in Relativity 9.5.219.30, file share choices are now file share resource server objects. Uponupgrade, all file share choices are mapped to resource servers. For more information, see the Adminguide.
Foreign key removalIn order to improve the performance and usability of document deletion in Relativity, we've removed theforeign keys from the Document and non-system RDO database tables. This includes artifact, singleobject, and multi-object table relationships. Doing this resolves the previous issues involved with globallylocking the Artifact and other tables for the entire duration of a deletion job, which could be lengthy andcould subsequently delay document review. As a result of removing these foreign keys, the delete processwill execute without applying a global lock, and thus no longer interrupts document review in Relativity.
There are three classifications of foreign keys, all of which are affected by this change:
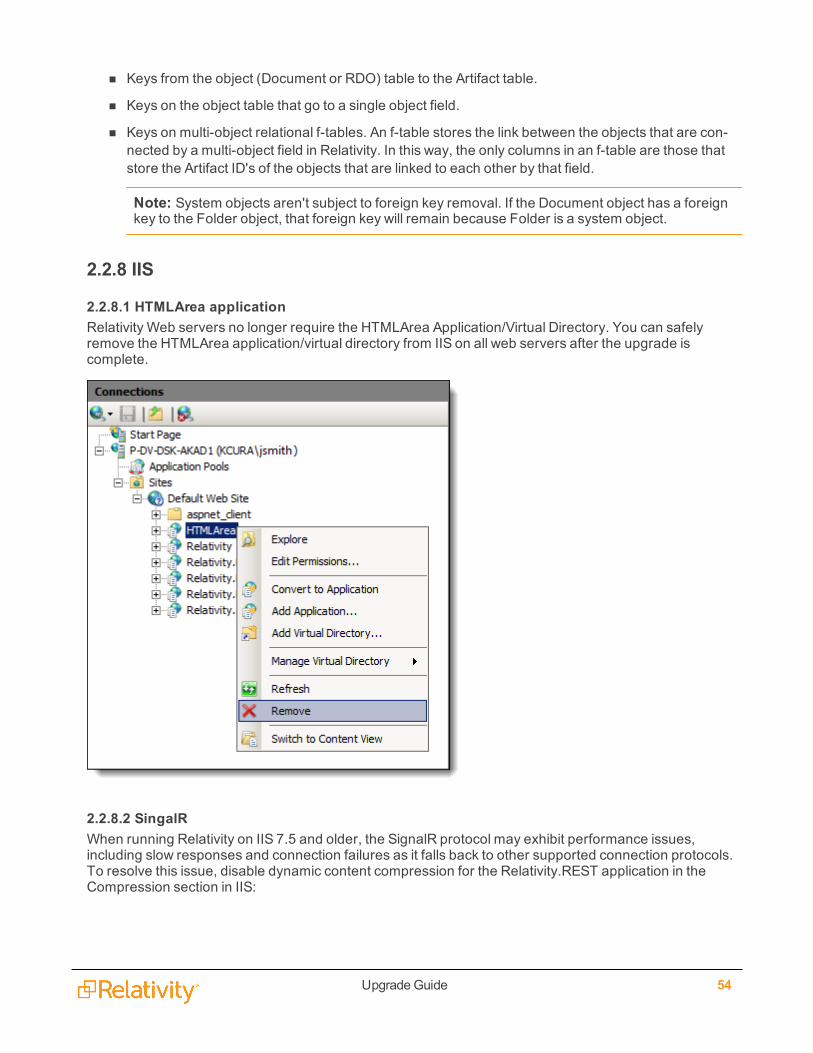
UpgradeGuide 54
n Keys from the object (Document or RDO) table to the Artifact table.
n Keys on the object table that go to a single object field.
n Keys on multi-object relational f-tables. An f-table stores the link between the objects that are con-nected by a multi-object field in Relativity. In this way, the only columns in an f-table are those thatstore the Artifact ID's of the objects that are linked to each other by that field.
Note: System objects aren't subject to foreign key removal. If the Document object has a foreignkey to the Folder object, that foreign key will remain because Folder is a system object.
2.2.8 IIS
2.2.8.1 HTMLArea applicationRelativity Web servers no longer require the HTMLArea Application/Virtual Directory. You can safelyremove the HTMLArea application/virtual directory from IIS on all web servers after the upgrade iscomplete.
2.2.8.2 SingalRWhen running Relativity on IIS 7.5 and older, the SignalR protocol may exhibit performance issues,including slow responses and connection failures as it falls back to other supported connection protocols.To resolve this issue, disable dynamic content compression for the Relativity.REST application in theCompression section in IIS:

UpgradeGuide 55
You can also add the following property to the system.webServer section of the Relativity.RESTweb.config file:
<urlCompression doDynamicCompression="false" />
This change will improve SignalR performance on older versions of IIS.
ImagingBeginning in Relativity 9.5.342.116, the Imaging Request Agent is required to run any imaging job in yourenvironment. This agent is responsible for performing background tasks when any imaging request issubmitted via mass imaging, image on the fly, or imaging set.
For initial installations of Relativity 9.5.342.116, an Imaging Request Agent is automatically installed andenabled in your environment. If you're upgrading to Relativity 9.5.342.116 or if at any point you need toinstall an additional agent, you need to do so manually.

UpgradeGuide 56
For more information, see the Imaging guide.
Existing imaging profiles received the following updates based on their imaging method when upgradingto Relativity 9.5:
If your environment is set up for native imaging, the following changes occur upon upgrade:
n Relativity renames the default imaging profile to Native Default.
n The imaging method is set to Native for all current imaging profiles including Native Default.
n Relativity creates a new basic default imaging profile with the following settings:o Imaging Method: Basico Basic Image Output Quality (DPI): 300o Basic Image Format: TIFFo Basic Image Height: Original Setting
n For any imaging set with an imaging method set to Basic, the following changes occur:o The imaging profile previously linked to the imaging set is copied.
o Relativity sets the imaging method for the copied profile to Basic.
o The copied basic imaging profile is linked to the imaging set and Basic is prepended to theprofile name.
If your environment is not set up for native imaging, the following changes occur upon upgrade toRelativity 9.5:
UpgradeGuide 57
n Relativity renames the default imaging profile to Basic Default.
n The imaging method is set to basic for all current imaging profiles including Basic Default.
2.2.9 Installation of a certificate on the database serverA certificate called RelativityIdentityCertificate is added to the EDDS database on your primary databaseduring a first time installation or an upgrade. The authentication framework uses the thumbprint of thecertificate to sign identity tokens, which are JSONweb tokens (JWTs). The IdentityCertificateThumbprintinstance setting stores the thumbprint associated with your certificate. For more information, see Instancesetting values on the Relativity 9.5 Documentation site.
You also have the option to use your own authentication token-signing certificate. For more information,see Optionally configure an authentication token-signing certificate on the Pre-installation page in theRelativity 9.5 Documentation site.
For a clustered environment, you need to export a copy of your RelativityIdentityCertificate from theprimary database server, and install the certificate to each database server hosting the EDDS. See thefollowing instructions for more information:
n Import or export certificates and private keys at https://technet.microsoft.com/en-us/lib-rary/cc754329(v=ws.11).aspx.
n Optionally configure an authentication token-signing certificate on the Pre-installation page in theRelativity 9.5 Documentation site - These instructions describe the process for configuring your owncustom token-signing certificate, but you can follow these basic steps to install Relativ-ityIdentityCertificate to each database server in a distributed environment.
2.2.10 Instance settingsIf upgrading to Relativity 9.5 from a version prior to 9.3, note that configuration table values are nowreferred to as instance settings. Upon upgrade, configuration table values convert to instance settings.Likewise, the eddsdbo.Configuration table becomes the eddsdbo.InstanceSetting table in SQL Server.
Note: If a new 9.5 install or upgrade fails, a back up table, edds.Configuration_backup, exists as arecord of all the instance settings in SQL. Do not use this table for any purpose other than a record in theevent of an install/upgrade failure.
2.2.10.1 Backwards compatibilityFor any existing applications that reference the pre-9.5 EDDS.Configuration table, a SQL view,Configuration, exists to act as a layer on top of the Instance Setting table.
This view contains the same columns as the old Configuration table and you can use it to examine theinformation as it was pre-Relativity 9.5.
2.2.11 Processing/InvariantBeginning in Relativity 9.5.309.48, the database installation component has been removed from theInvariant installer. Accordingly, note the following considerations:
n There is no longer a database install log, and all of the log files that used to be found there are nowfound in the queue manager log file.
n The queue manager installation is now responsible for creating the database.
UpgradeGuide 58
n The queue manager now communicates with the database upgrader to update all databases duringan Invariant upgrade.
n The database directory that was deployed during the installation is no longer needed, so there willno longer be a database directory deployed on the database server.
n The database component no longer holds registry entries; all registry entries that aren't duplicatesare now on the queue manager machine.
n If you previously installed the Invariant database component on its own machine, it's highly recom-mended that you uninstall the database before upgrading to Relativity 9.5.309.48. If you uninstallthe database after upgrading, you'll delete all Invariant files from the Invariant network share.
n There is a new installation log file called UninstallLegacyDatabasePackage.log, which appears onlyonce after an upgrade to Relativity 9.5.309.48.
Beginning in Relativity 9.5.253.62, the following changes have been made to processing and should benoted prior to upgrade:
n You can now host Invariant Kepler services in HTTPS if you install a certificate on the queue man-ager. Note that the default port for the Invariant Kepler services is 8092. For details, see EnablingHTTPS for Invariant Kepler Services.
n The Service Bus certificate generation key is required on the queue manager and worker servers aspart of the connection between Invariant and Service Bus. For more information see The Pre-install-ation Guide in the Pre-installation topic.
n Invariant stores are now deleted automatically when the Relativity workspaces associated withthem are deleted. For more information, see The Relativity Processing Console Guide.
n Publish is no longer a single long-running process and instead is a distributed process that is brokenup into separate jobs, which leads to more stability by removing this single point of failure and allow-ing the distribution of work across multiple workers. These changes enable publish to operate moreconsistently like the other processing job types in the worker manager server, where batches ofdata are processed for a specific amount of time before completing each transactional job and mov-ing on. Note the upgrade-relevant details regarding distributed publish:
o The following instance settings have been added to facilitate the work of distributed publish.l ProcessingMaxPublishSubJobCountPerRelativitySQLServer - the maximum numberof publish jobs per Relativity SQL server that may be worked on in parallel.
l You can't allocate more jobs per workspace than what is allowed per SQLserver. This means that if this value is set to be lower than the value for theMaxPublishJobCountPerRelativitySQLServer instance setting, then Relativityonly allows the maximum of jobs per SQL server.
l The default value is 7. Leaving this setting at its default value will result inincreased throughput; however, we recommend contacting Support before youupgrade for guidance on what value will be most beneficial to you based on yourenvironment setup.
l This updates on a 30-second interval.
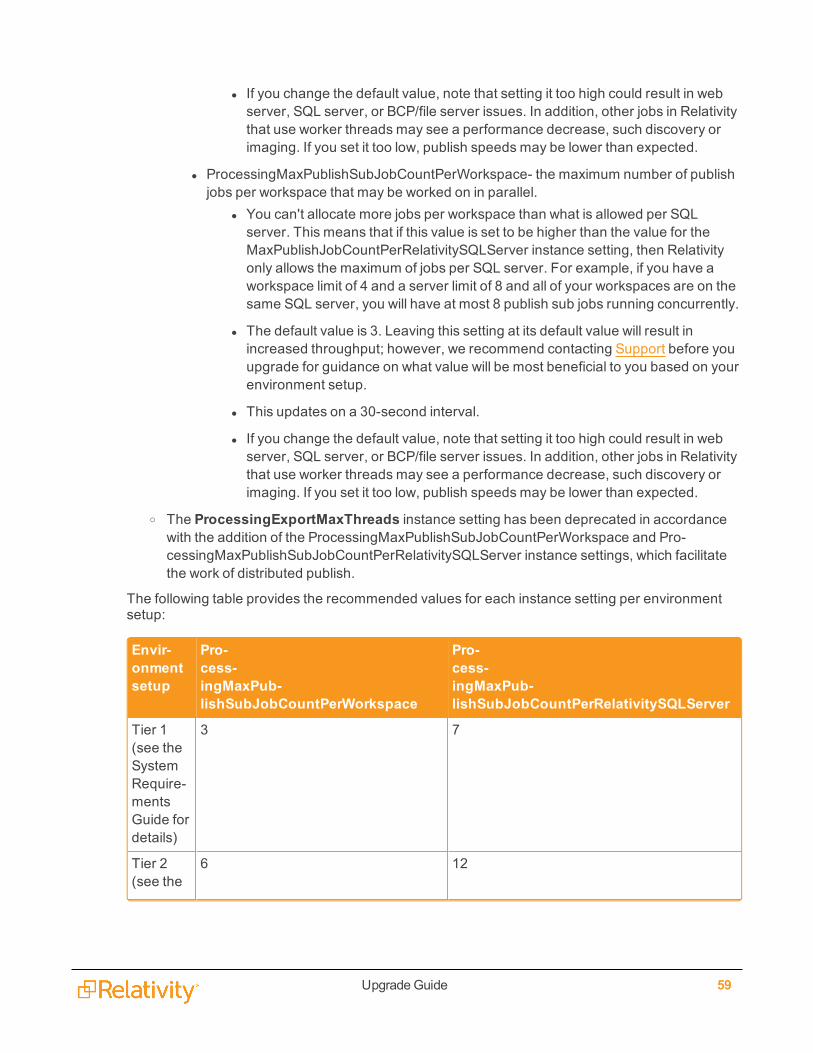
UpgradeGuide 59
l If you change the default value, note that setting it too high could result in webserver, SQL server, or BCP/file server issues. In addition, other jobs in Relativitythat use worker threads may see a performance decrease, such discovery orimaging. If you set it too low, publish speeds may be lower than expected.
l ProcessingMaxPublishSubJobCountPerWorkspace- the maximum number of publishjobs per workspace that may be worked on in parallel.
l You can't allocate more jobs per workspace than what is allowed per SQLserver. This means that if this value is set to be higher than the value for theMaxPublishJobCountPerRelativitySQLServer instance setting, then Relativityonly allows the maximum of jobs per SQL server. For example, if you have aworkspace limit of 4 and a server limit of 8 and all of your workspaces are on thesame SQL server, you will have at most 8 publish sub jobs running concurrently.
l The default value is 3. Leaving this setting at its default value will result inincreased throughput; however, we recommend contacting Support before youupgrade for guidance on what value will be most beneficial to you based on yourenvironment setup.
l This updates on a 30-second interval.
l If you change the default value, note that setting it too high could result in webserver, SQL server, or BCP/file server issues. In addition, other jobs in Relativitythat use worker threads may see a performance decrease, such discovery orimaging. If you set it too low, publish speeds may be lower than expected.
o The ProcessingExportMaxThreads instance setting has been deprecated in accordancewith the addition of the ProcessingMaxPublishSubJobCountPerWorkspace and Pro-cessingMaxPublishSubJobCountPerRelativitySQLServer instance settings, which facilitatethe work of distributed publish.
The following table provides the recommended values for each instance setting per environmentsetup:
Envir-onmentsetup
Pro-cess-ingMaxPub-lishSubJobCountPerWorkspace
Pro-cess-ingMaxPub-lishSubJobCountPerRelativitySQLServer
Tier 1(see theSystemRequire-mentsGuide fordetails)
3 7
Tier 2(see the
6 12
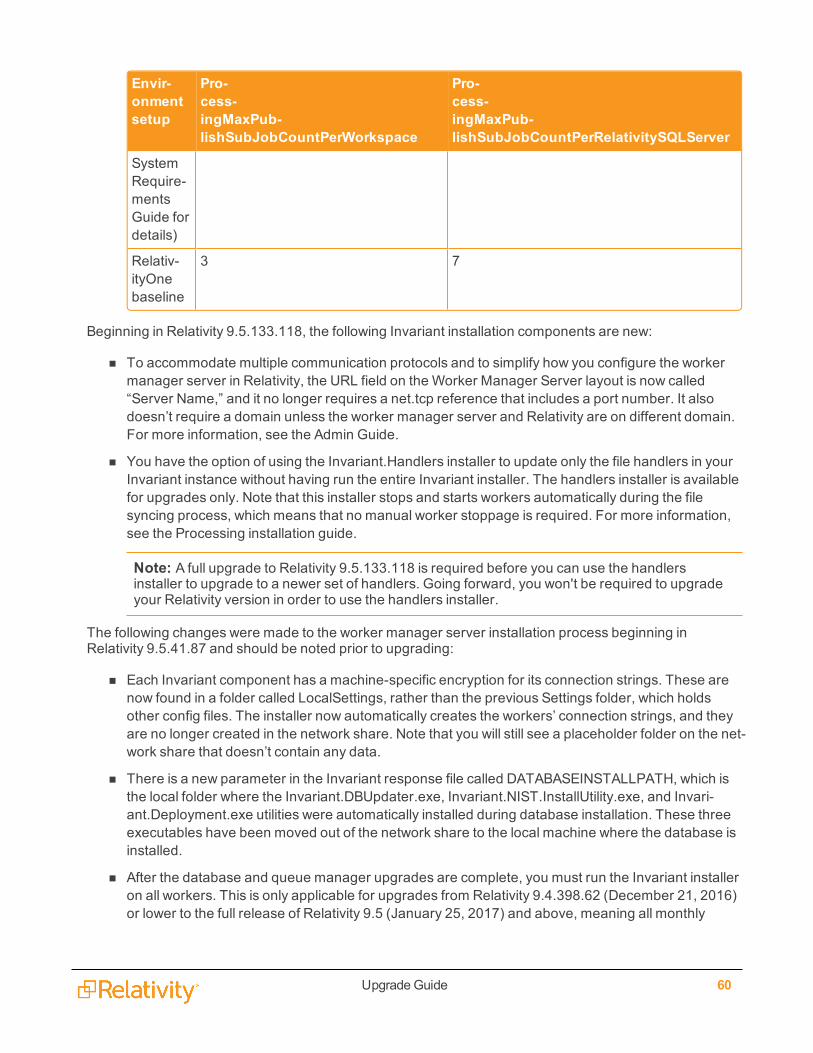
UpgradeGuide 60
Envir-onmentsetup
Pro-cess-ingMaxPub-lishSubJobCountPerWorkspace
Pro-cess-ingMaxPub-lishSubJobCountPerRelativitySQLServer
SystemRequire-mentsGuide fordetails)
Relativ-ityOnebaseline
3 7
Beginning in Relativity 9.5.133.118, the following Invariant installation components are new:
n To accommodate multiple communication protocols and to simplify how you configure the workermanager server in Relativity, the URL field on the Worker Manager Server layout is now called“Server Name,” and it no longer requires a net.tcp reference that includes a port number. It alsodoesn’t require a domain unless the worker manager server and Relativity are on different domain.For more information, see the Admin Guide.
n You have the option of using the Invariant.Handlers installer to update only the file handlers in yourInvariant instance without having run the entire Invariant installer. The handlers installer is availablefor upgrades only. Note that this installer stops and starts workers automatically during the filesyncing process, which means that no manual worker stoppage is required. For more information,see the Processing installation guide.
Note: A full upgrade to Relativity 9.5.133.118 is required before you can use the handlersinstaller to upgrade to a newer set of handlers. Going forward, you won't be required to upgradeyour Relativity version in order to use the handlers installer.
The following changes were made to the worker manager server installation process beginning inRelativity 9.5.41.87 and should be noted prior to upgrading:
n Each Invariant component has a machine-specific encryption for its connection strings. These arenow found in a folder called LocalSettings, rather than the previous Settings folder, which holdsother config files. The installer now automatically creates the workers’ connection strings, and theyare no longer created in the network share. Note that you will still see a placeholder folder on the net-work share that doesn’t contain any data.
n There is a new parameter in the Invariant response file called DATABASEINSTALLPATH, which isthe local folder where the Invariant.DBUpdater.exe, Invariant.NIST.InstallUtility.exe, and Invari-ant.Deployment.exe utilities were automatically installed during database installation. These threeexecutables have been moved out of the network share to the local machine where the database isinstalled.
n After the database and queue manager upgrades are complete, you must run the Invariant installeron all workers. This is only applicable for upgrades from Relativity 9.4.398.62 (December 21, 2016)or lower to the full release of Relativity 9.5 (January 25, 2017) and above, meaning all monthly
UpgradeGuide 61
product updates of 9.5. If you're performing a fresh installation of Relativity 9.5, you will need to runthe installer on each Worker Manager and Worker server; however, any subsequent upgrade willonly require you to run the installer from the Worker Manager server, which will upgrade all workerservers automatically, thus eliminating the need to run the installer on each server individually.
You can configure the number of concurrent threads dedicated to OCR, which can mitigate CPUbottlenecks. This is possible through the following changes:
n The MaxConversionThreads column has been removed from the Invariant.dbo.Workstations table,as it was longer in use since conversion became a separate service.
n The Invariant.dbo.Workstations table now includes a MaxOcrThreads column, which stores thenumber of concurrent threads that are allowed to perform an OCR job at a single time. A value of “0”means unlimited, and any other value limits to that number. The default and recommended value is0. You should only change this value if the Worker CPU is at 100%, and a performance degradationduring text extraction.
The following changes were made to the Invariant installation process:
n The Invariant.DBUodater.exe upgrades both the main Invariant database and RPC stores. It alsohandles Relativity stores by setting the stores to Pending, which tells the Workspace UpgradeWorker agent to pick them up and execute scripts on them. It also produces a detailed XML log file,which gets created in the install directory and provides information on what happened during thedatabase upgrade.
n The IDENTITYSERVERURL setting is new in the Invariant response file. This is where you enter theidentity server of the environment used for RPC authentication.
The following processing changes may impact your upgrade experience:
n When you change the URL for the queue manager, you're required to perform an IIS reset on theRelativity server in order to clear the cache.
n You no longer map processing fields through the processing profile. You nowmap through a newSource field on the Field layout, which takes you to a catalog containing the most common fieldsthat are discovered during processing. Note the following details regarding this change:
o Relativity provides 46 new processing fields, in addition to the 81 fields previously provided,bringing the total number of fields that are available to map to 127.
o The processing profile no longer contains the Processing Fields associative object list view.
o If you don't install the Processing application, Relativity still allows you to map fields as long asyou've added the worker manager server to the resource pool.
o Relativity transfers any fields mapped in the processing profile named "Default" to the fieldmapping table. If the name of the original Default profile has been changed, that profile is stillused. If you haven't mapped any fields on the Default profile in 9.3, and one or more other pro-files do have fields mapped, Relativity doesn't automatically transfer fields when you upgradeto 9.5.
n You can now install Microsoft Office 2013 on your worker servers; however, due to a performancedegradation in text extraction when using Office 2013, we recommend that you continue to useOffice 2010 with Relativity 9.5. When you upgrade from Office 2010 to 2013, it's recommended that
UpgradeGuide 62
you uninstall 2010 and then install 2013. If you don't uninstall 2010 prior to installing 2013, you mayneed to do a repair on 2013 in order to get it working properly.
n If you are upgrading from Relativity 9.3 (or a lower version) to 9.5 you may be required to manuallyinstall Visual C++ redistributable packages on the worker servers before running the Invariantupgrade. For details, see the Worker Manager Server Installation Guide.
n The WebAPI setting in IIS is now set to Anonymous Authentication by default and is no longer set toWindows Authentication. You must keep this set to Anonymous Authentication in order to publishdocuments to a workspace using the worker manager server.
Processing to Data Grid no longer requires the RabbitMQ server. To remove RabbitMQ from yourRelativity environment, see Removing RabbitMQ.
2.2.12 Network load balancingIf you are using cookie-persisted load balancing configurations for Relativity 9.5.162.111 and higher, youmust update theWebClientRequiredCookies instance setting to include the name of the load balancercookie for the ActiveX viewer.
2.2.13 New UI frameworkIf you need to disable the new UI framework for the Document list, click Switch to Classic UI from theuser drop-down within a workspace. For help using the classic interface, refer to the 9.3 documentationwhich documents both interfaces side-by-side. For more information, see Navigation in the Admin guide.
When using the new UI framework, the following Relativity features have been enhanced:
n Cluster visualization
n Dashboards
n Document list and tabs throughout Relativity
n Pivot
n Sampling
n Search panel and search browser
ProductionThe following section discusses the changes to the Production application on upgrade from Relativity 9.xto Relativity 9.3+. Certain upgrade changes only affect upgrades from Relativity 9.1 or 9.2 to Relativity 9.5,and the changes are clearly marked with the affected versions.
Beginning in Relativity 9.3+ you can choose to upgrade only your Production application using a RAP file.
General Production upgrade considerations:
n An upgrade from Relativity 9.x to 9.5 can fail if the workspace you're upgrading already contains aRelativity field with the name Production. You must rename this field.
n An upgrade from Relativity 9.2 and below to 9.5 can fail if the workspace you're upgrading alreadycontains a Relativity dynamic object with the name Production Placeholder. You must rename thisobject.
UpgradeGuide 63
n An upgrade from Relativity 9.1 to 9.5 can fail if the workspace you're upgrading already contains aRelativity dynamic object with the name Production Data Source.
n An upgrade from Relativity 9.2 and below to 9.5 can fail if the workspace you're upgrading alreadycontains a Relativity dynamic object with the name Relativity Color Map. You must rename thisobject.
n An upgrade from Relativity 9.2 and below to 9.5 can fail if the workspace you're upgrading alreadycontains a Relativity dynamic object with the name Field Catalog. You must rename this object.
n If you have a full-text index populating the production upgrade stops. Try upgrading again once thefull-text index is finished populating.
n Relativity deduces the First Bates Value and Last Bates Value for all imported and upgraded pro-ductions.
n If you upgrade from Relativity 9.2 to Relativity 9.5 and you were previously using the ProductionTracker application, review the Production Tracker 9.5 considerations PDF in the Relativity Com-munity.
n Beginning in 9.5.162.111, Productions includes an upgrade step to migrate data from the oldProductionInformation schema to the new schema introduced in 9.5.162.111.
Changes to agents and objects:
n The Relativity.Core agents for production and branding are upgraded to ADS Deployed agents. TheRelativity.Core agents for production and branding are not available in a Relativity 9.5 environment.
n The Markup Set table is converted to the Markup Set dynamic object.
n The Production Object table is converted to the Production dynamic object.
Changes to pre-existing Productions:
n Any staged or errored productions in an environment are set to a status of New and you mustrestage the production before running.
n Productions migrated from Relativity 9.1 and 9.2 receive a legacy placeholder stating, "No TiffIncluded For This Record."
n Productions migrated from Relativity 9.1 to Relativity 9.5 have a data source created containing theproduction documents for each produced and errored production.
n If any produced productions contain native files with their Bates numbers previously stored in theDocument table, the Bates numbers for the native files are moved to the Production object, and maynot reflect actual Bates values if those values were overwritten.
n The Production Error field no longer exists on the Production object.
n If you upgrade from an earlier version of Relativity 9.3 and your custom placeholders containsquare brackets, you may see an error the next time you run the production or re-save the customplaceholder. To correct the error, escape the square brackets using a blackslash and re-run the pro-duction.
Changes to Production fields and views:
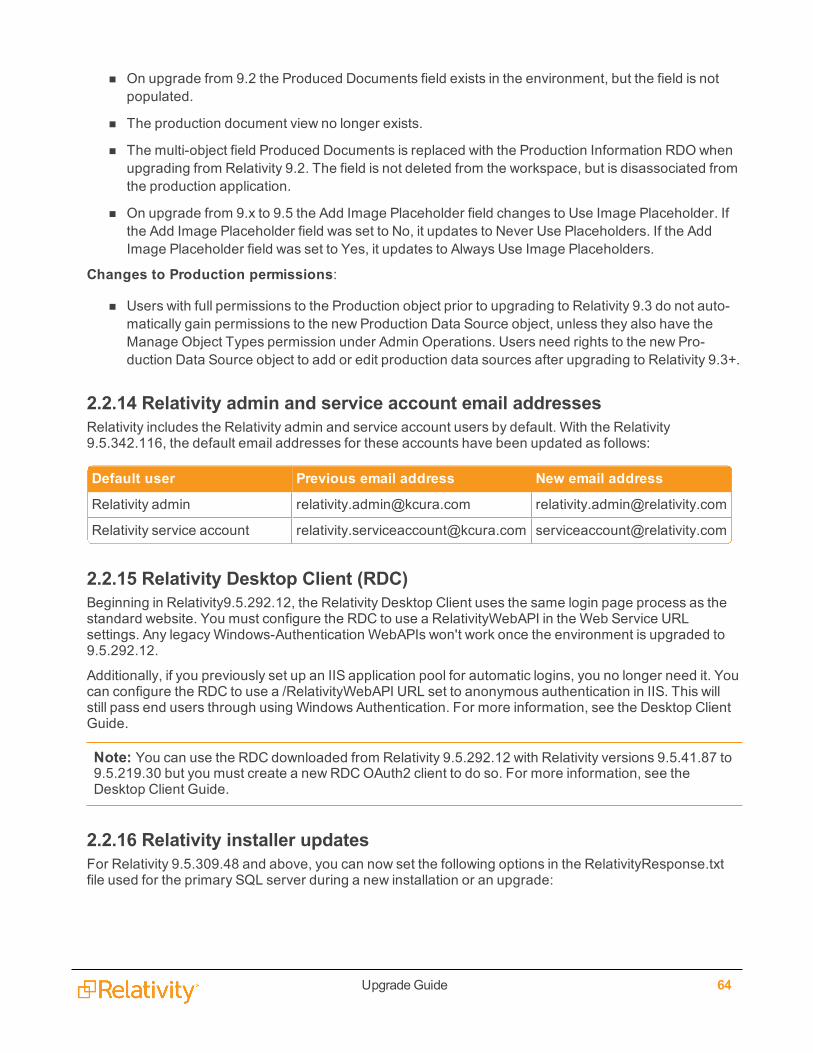
UpgradeGuide 64
n On upgrade from 9.2 the Produced Documents field exists in the environment, but the field is notpopulated.
n The production document view no longer exists.
n The multi-object field Produced Documents is replaced with the Production Information RDO whenupgrading from Relativity 9.2. The field is not deleted from the workspace, but is disassociated fromthe production application.
n On upgrade from 9.x to 9.5 the Add Image Placeholder field changes to Use Image Placeholder. Ifthe Add Image Placeholder field was set to No, it updates to Never Use Placeholders. If the AddImage Placeholder field was set to Yes, it updates to Always Use Image Placeholders.
Changes to Production permissions:
n Users with full permissions to the Production object prior to upgrading to Relativity 9.3 do not auto-matically gain permissions to the new Production Data Source object, unless they also have theManage Object Types permission under Admin Operations. Users need rights to the new Pro-duction Data Source object to add or edit production data sources after upgrading to Relativity 9.3+.
2.2.14 Relativity admin and service account email addressesRelativity includes the Relativity admin and service account users by default. With the Relativity9.5.342.116, the default email addresses for these accounts have been updated as follows:
Default user Previous email address New email address
Relativity admin [email protected] [email protected]
Relativity service account [email protected] [email protected]
2.2.15 Relativity Desktop Client (RDC)Beginning in Relativity9.5.292.12, the Relativity Desktop Client uses the same login page process as thestandard website. You must configure the RDC to use a RelativityWebAPI in the Web Service URLsettings. Any legacyWindows-Authentication WebAPIs won't work once the environment is upgraded to9.5.292.12.
Additionally, if you previously set up an IIS application pool for automatic logins, you no longer need it. Youcan configure the RDC to use a /RelativityWebAPI URL set to anonymous authentication in IIS. This willstill pass end users through using Windows Authentication. For more information, see the Desktop ClientGuide.
Note: You can use the RDC downloaded from Relativity 9.5.292.12 with Relativity versions 9.5.41.87 to9.5.219.30 but you must create a new RDCOAuth2 client to do so. For more information, see theDesktop Client Guide.
2.2.16 Relativity installer updatesFor Relativity 9.5.309.48 and above, you can now set the following options in the RelativityResponse.txtfile used for the primary SQL server during a new installation or an upgrade:
UpgradeGuide 65
n Email addresses for the Relativity admin and Relativity service accounts - The Relativ-ityResponse.txt file used for the primary SQL server installation includes the ADMIN_EMAIL andSERVICEACCOUNT_EMAIL parameters that you can set with these email addresses. If you don’tspecify a value for the Relativity admin or service account, they are set to the default values [email protected] and [email protected] respectively.
Notes:o If you want to use a specific email address for the default Relativity admin or service account,you must enter it for each Relativity upgrade that you perform. If you entered a custom emailaddress during a previous installation, it is overwritten by current email address that youentered or by the default email address when this parameter is blank.
o Use different email addresses for the ADMIN_EMAIL and SERVICEACCOUNT_EMAIL para-meters. If you use the same email address for both parameters, the installation fails.
n Passwords for the the Relativity admin and Relativity service accounts - The Relativ-ityResponse.txt file used for the primary SQL server installation includes the ADMIN_PASSWORDand SERVICEACCOUNT_PASSWORD parameters that you can set with new passwords.
Note: To change the ADMIN_PASSWORD or SERVICEACCOUNT_PASSWORD password, youmust also update the associated email address. If you enter a new password but don’t update theemail address, then new password is ignored. For example, if you use an existing or default emailaddress, then the password remains unchanged. However, you can change the email addressesfor the admin and service accounts without updating the password.
For more information, see the Relativity Installation and Relativity Upgrade guides.
2.2.17 Relativity Processing ConsoleBeginning in Relativity 9.5, the RPC installer has been reconfigured to request that you enter databasecredentials, which it will then validate to create a working connection string.
Specifically, the installer includes a new window in which you'll enter the following:
n Invariant SQL Server name with an optional port number
n Relativity SQL Server name with an optional port number

UpgradeGuide 66
n EDDSDBO password
2.2.18 Relativity service busThe Relativity 9.5 infrastructure now includes a new component called the Relativity service bus. Thiscomponent uses Service Bus for Windows Service as its underlying framework. Before you upgradeRelativity, you must now install Service Bus for Windows Server on a server or VM that is accessiblethroughout your Relativity instance. You must then configure a Service Bus for Windows Server farm inyour environment. For information about prerequisites, see Service Bus for Windows Server in the Pre-Installation guide.If you have a proxy server or firewall setup in the environment, you must allowcommunication to the FQDN of the Windows Service Bus server from the servers you are installing theRelativity Service Bus or else the installer will fail to upgrade the server.
After installing Service Bus for Windows Server, you can upgrade your primary SQL Server. You can theninstall the Relativity service bus by running the upgrade installer on the machine where you installedService Bus for Windows Server. Finally, follow the standard instructions for upgrading other Relativitycomponents. For more information, see the Relativity Service Bus guide.
2.2.19 Required certificates for RelativityRelativity 9.5 now verifies that all HTTPS services running in your environment have a trusted certificate.You need to verify the certificates to components of your Relativity installation running HTTPS services toavoid error messages and insecure-connection icons. For more information, see Required certificates forRelativity in the Pre-installation guide.
UpgradeGuide 67
We recommend placing the new Analytics server certificate and testing it prior to the day of the upgrade toRelativity 9.3. For more information, see Pre-upgrade: Update the default SSL/TLS certificate for CAAT®in the Upgrading or installing your Analytics server section.
2.2.20 Scriptsn You must enable the AllowAddOrEditScripts instance setting in order for users to create or edit
scripts. This setting enables or disables the ability to create and edit scripts for all users, includingsystem admins. For more information, AllowAddOrEditScripts in the instance setting guide.
n Beginning in 9.5.196.102, the Set extracted text size script is no longer available in the RelativityScript Library. If you have this script installed in a workspace, it is removed upon upgrade. You canuse the Set long text size mass operation in place of this script.
2.2.21 SearchingUpon upgrade to 9.5.133.118, Relativity interprets straight quotes and curly quotes in searching the same.Previously, if you searched using curly quotes in a long text field using the CONTAINS filter, Relativitysearched for the quote itself instead of grouping terms together. Now, Relativity groups terms betweendouble quotes together regardless of the quote type. This may mean the number of results in yoursearches may change.
2.2.22 Service Host Manager HTTPS configurationService Host Manager runs Relativity services on all web and agent servers in your environment. Theservices are used by applications like Production and Processing on. If your web and agent servers mustbe set up for HTTPS access, special setup is required for Service Host Manager.
For more information, see Service Host Manager on the Relativity 9.5 Documentation site.
2.2.23 System requirementsn Windows Server 2008 R2 (64-bit) is no longer compatible with 9.5. Relativity 9.5 is only compatible
with Windows Server 2008 R2 (64-bit) w Service Pack 1.
n As of Relativity 9.5.292.12, we no longer support Internet Explore (IE) 10. Please upgrade to a com-patible version of IE 11.
2.2.24 TelemetryAfter you install Relativity 9.5, complete the steps to enable telemetry in your environment. Telemetryallows you to collect metrics for performance, usage, and billing. For more information, see Telemetry onthe Relativity 9.5 Documentation site.
Note: Failure to transmit telemetry billing data to Relativity causes Relativity access to be disabled afterseven (7) days. Telemetry lockout is similar to Case Statistics Manager lockout. If your security setupdoesn't allow access to public internet, contact Relativity support to configure offline-billing.
2.2.25 Viewer (ActiveX)Beginning in Relativity 9.5.196.102, you must install Microsoft .NET 4.6.2 on all of the machines that needaccess to the ActiveX viewer. You must also install the new ActiveX viewer installation kit, which includes

UpgradeGuide 68
the Visual C++ 2015 redistributable, from the Workspace Details tab. You can't use the Relativity9.5.196.102 viewer with earlier versions of Relativity. Also, earlier versions of the ActiveX viewer aren'tcompatible with Relativity 9.5.196.102.For more information, see Legacy viewer installation in theworkstation configuration guide.
Note: If you have a client machine that accesses multiple instances of Relativity that require differentversions of the ActiveX viewer, the corresponding ActiveX viewers must be installed. To ensure properviewer functionality, you must close their browsers before they switch from one version to the next.
2.2.26 Viewer (ActiveX and HTML)Beginning in 9.5.309.48, the following Viewer changes were made: The default instance setting calledHideDownloadNativeFileRadioButton disables the native file radio button in the document viewer toolbar.This setting hides the Native radio button regardless if you have permission to download documents ornot. If you have the right permissions, click the file icon next to the document identifier in the viewer todownload the native file to your device.
For users who haven't upgraded their Relativity version since the general release of Relativity 9.2, notethat, beginning in the Relativity 9.2.337.3 - September 30, 2015 product update, the following isapplicable.
When viewing documents with an .HTM, .HTML, or .XML extension in Native mode, the viewer displaysthe raw file markup instead of rendering the content.
You can control this option with the TreatHtmlAndXmlAsText instance setting, which is set to True bydefault. When set to True, this prevents JavaScript from executing when viewing these documents in theNative mode in the viewer. See the Instance Setting Guide to learn more about this new value.
Pre the Relativity 9.2.337.3 - September 30, 2015 product update:
As of the Relativity 9.2.337.3 - September 30, 2015 product update:
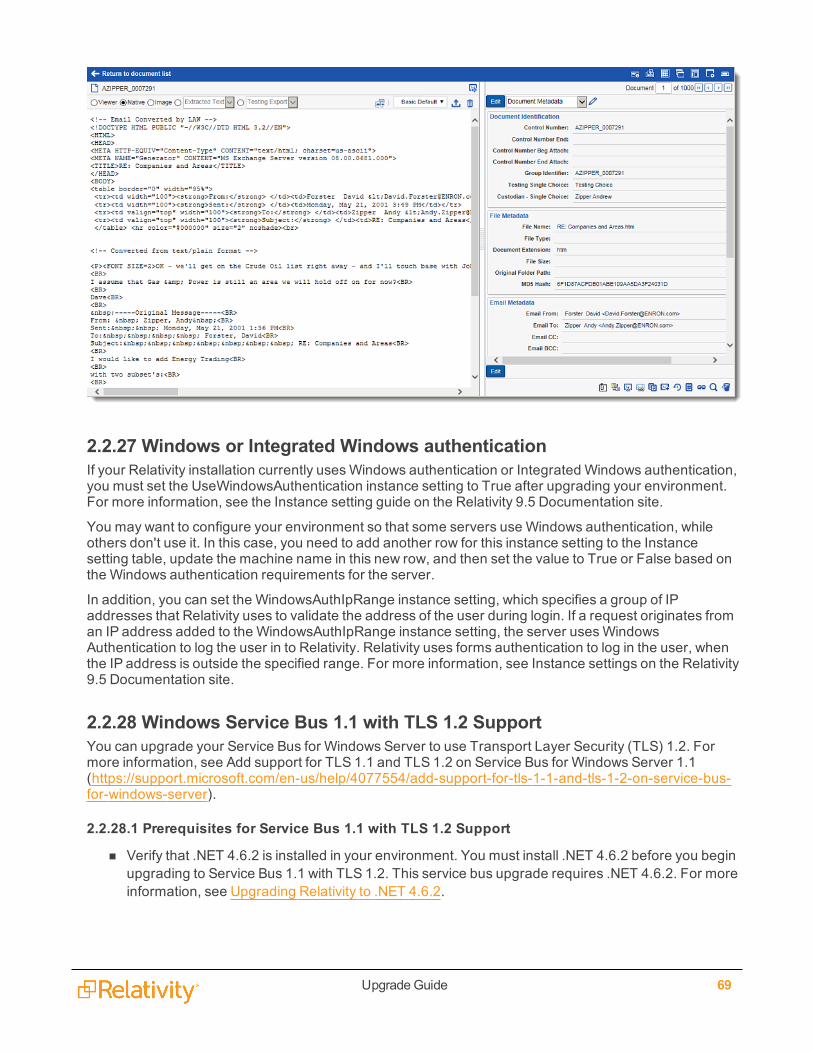
UpgradeGuide 69
2.2.27 Windows or Integrated Windows authenticationIf your Relativity installation currently usesWindows authentication or Integrated Windows authentication,you must set the UseWindowsAuthentication instance setting to True after upgrading your environment.For more information, see the Instance setting guide on the Relativity 9.5 Documentation site.
You may want to configure your environment so that some servers use Windows authentication, whileothers don't use it. In this case, you need to add another row for this instance setting to the Instancesetting table, update the machine name in this new row, and then set the value to True or False based onthe Windows authentication requirements for the server.
In addition, you can set the WindowsAuthIpRange instance setting, which specifies a group of IPaddresses that Relativity uses to validate the address of the user during login. If a request originates froman IP address added to the WindowsAuthIpRange instance setting, the server usesWindowsAuthentication to log the user in to Relativity. Relativity uses forms authentication to log in the user, whenthe IP address is outside the specified range. For more information, see Instance settings on the Relativity9.5 Documentation site.
2.2.28 Windows Service Bus 1.1 with TLS 1.2 SupportYou can upgrade your Service Bus for Windows Server to use Transport Layer Security (TLS) 1.2. Formore information, see Add support for TLS 1.1 and TLS 1.2 on Service Bus for Windows Server 1.1(https://support.microsoft.com/en-us/help/4077554/add-support-for-tls-1-1-and-tls-1-2-on-service-bus-for-windows-server).
2.2.28.1 Prerequisites for Service Bus 1.1 with TLS 1.2 Support
n Verify that .NET 4.6.2 is installed in your environment. You must install .NET 4.6.2 before you beginupgrading to Service Bus 1.1 with TLS 1.2. This service bus upgrade requires .NET 4.6.2. For moreinformation, see Upgrading Relativity to .NET 4.6.2.
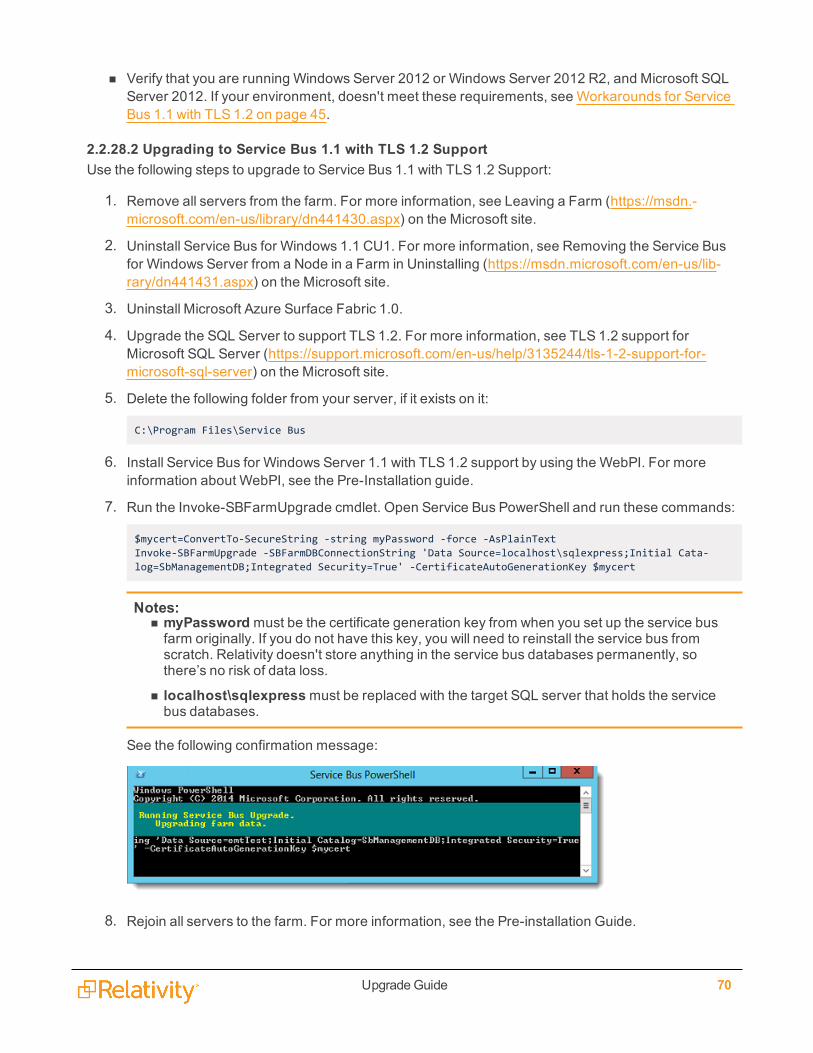
UpgradeGuide 70
n Verify that you are running Windows Server 2012 or Windows Server 2012 R2, and Microsoft SQLServer 2012. If your environment, doesn't meet these requirements, see Workarounds for ServiceBus 1.1 with TLS 1.2 on page 45.
2.2.28.2 Upgrading to Service Bus 1.1 with TLS 1.2 SupportUse the following steps to upgrade to Service Bus 1.1 with TLS 1.2 Support:
1. Remove all servers from the farm. For more information, see Leaving a Farm (https://msdn.-microsoft.com/en-us/library/dn441430.aspx) on the Microsoft site.
2. Uninstall Service Bus for Windows 1.1 CU1. For more information, see Removing the Service Busfor Windows Server from a Node in a Farm in Uninstalling (https://msdn.microsoft.com/en-us/lib-rary/dn441431.aspx) on the Microsoft site.
3. Uninstall Microsoft Azure Surface Fabric 1.0.
4. Upgrade the SQL Server to support TLS 1.2. For more information, see TLS 1.2 support forMicrosoft SQL Server (https://support.microsoft.com/en-us/help/3135244/tls-1-2-support-for-microsoft-sql-server) on the Microsoft site.
5. Delete the following folder from your server, if it exists on it:
C:\Program Files\Service Bus
6. Install Service Bus for Windows Server 1.1 with TLS 1.2 support by using the WebPI. For moreinformation about WebPI, see the Pre-Installation guide.
7. Run the Invoke-SBFarmUpgrade cmdlet. Open Service Bus PowerShell and run these commands:
$mycert=ConvertTo-SecureString -string myPassword -force -AsPlainTextInvoke-SBFarmUpgrade -SBFarmDBConnectionString 'Data Source=localhost\sqlexpress;Initial Cata-log=SbManagementDB;Integrated Security=True' -CertificateAutoGenerationKey $mycert
Notes:n myPasswordmust be the certificate generation key from when you set up the service busfarm originally. If you do not have this key, you will need to reinstall the service bus fromscratch. Relativity doesn't store anything in the service bus databases permanently, sothere’s no risk of data loss.
n localhost\sqlexpressmust be replaced with the target SQL server that holds the servicebus databases.
See the following confirmation message:
8. Rejoin all servers to the farm. For more information, see the Pre-installation Guide.
UpgradeGuide 71
2.2.28.3 Workarounds for Service Bus 1.1 with TLS 1.2If your Relativity environment doesn't meet the recommendations provided by Microsoft for upgrading toService Bus 1.1 with TLS 1.2 Support, you may want to consider a workaround. This section discussescurrent Microsoft recommendations and possible workarounds.
Microsoft recommends using Windows Server 2012 or Windows Server 2012 R2, and Microsoft SQLServer 2012 with the Service Bus 1.1 with TLS 1.2 Support update. As of February 5, 2018, Relativity hastested the Service Bus TLS 1.2 update with Relativity 9.5 using the following platform combinations:
n Windows Server 2012 and SQL Server 2012
n Windows Server 2012 R2 and SQL Server 2016
n Windows Server 2016 and SQL Server 2014
n Windows Server 2016 and SQL Server 2016
While we aren't aware of any issues on these platforms, we request that you are cautious when deployingthe Service Bus 1.1 with TLS 1.2 Support update. Relativity can't guarantee compatibility outside ofMicrosoft’s official support matrix. Future updates from Microsoft may impact the stability of yourinfrastructure if you aren't running the service bus on a supported OS and SQL platform.
In this case, you may want to consider one of the workarounds provided in the following sections.
Apply TLS registry settingsYou can use the server registry settings to control turning off TLS 1.0 and 1.1 for internet traffic to IIS.Windows offers the following groups of TLS settings:
n Client communication - determines which TLS protocols are used for outbound connections fromthe server that is traffic to the service bus server.
n Server communication - determines which TLS protocols can be accepted that is from internettraffic to IIS.
The registry settings for these TLS protocols are located under the following key prefix:
HKLM:\SYSTEM\CurrentControlSet\Control\SecurityProviders\SCHANNEL\Protocols
For information about the registry keys and testing your environment after applying them, see Disablingcryptographic protocols for PCI compliance (focused on SSL 3.0 and TLS 1.0) blog post athttps://www.johnlouros.com/blog/disabling-cryptographic-protocols-for-pci-compliance.
You can also use the IISCrypto tool to configure TLS protocols. Clear the Set Client Side Protocolscheckbox when using IISCrypto to configure your web servers. IISCrypto uses the Windows registry keyslisted above to control the available TLS protocols.
Note: For server communication, you must keep TLS 1.0 and 1.1 enabled on the server whereWindows service bus is installed. This approach can't be used in smaller environments where the webserver and the service bus are installed on the same VM. We recommend installing the service bus onits own dedicated VM if you want to control TLS settings using registry keys.
Use a load balancerIf your primary use of TLS 1.2 would be for internet-facing traffic, you may want to consider using a loadbalancer. Relativity server traffic may be a lower concern in these cases. By placing a load balancer (such
UpgradeGuide 72
as an F5 or NGINX) in front of Relativity, you can restrict all web traffic to TLS 1.2. Many load balancersprovide you with options to choose which TLS protocols that run on the network.
2.2.29 WorkersThe LongRunningJobTimeout setting enables Invariant to terminate some stuck jobs. Specifically, thisvalue determines the amount of time (in milliseconds) that a worker will work on a job before Invariantterminates that job. The default value is 180,000 milliseconds (30 minutes).
You may want to adjust this value if you have large documents that need additional time for processing, orif you need a shorter feedback loop. If you need to adjust this value, you can manually go into theAppSettings table and increase it accordingly. Previously, Invariant workers could get into a state in whichthey no longer reported progress and no longer completed work, which then required manual interventionto terminate those processes. When Invariant uses the LongRunningJobTimeout setting to stop a job,Relativity provides an error message to the processing user informing them that the timeout limit wasreached.
The Conversion Threads in Use column no longer appears on the Worker Status tab. Additionally, on theworker server page, you can no longer designate a worker for conversion work. To configure yourenvironment for conversion, see Configuring your conversion agents.
2.2.30 Worker manager queueRevisions in the queue manager code have led to the following enhancements:
n A reduction in the volume of connections to the SQL Server
n A reduction in lock waits and thread pool waits
n A general increase in queue parallelism
n A reduction in the number of queries per second hitting the SQL Server
There is no reduction or change in actual queue functionality as a result of these changes. Likewise, theuser experience with the queue manager hasn't changed, with the exception of potential performanceincreases, depending on the size of your environment.
2.2.31 Worker manager serverDocument conversion no longer occurs on the worker manager server. You cannot modify the priority ofthe following conversion jobs on the worker manager server: Pre-convert, Conversion on-the-fly, Massconversion, and Conversion. Instead, you must install Service Bus for Windows Server and configureconversion agents. For more information, see Configuring your conversion agents on page 156.
The Worker manager page no longer displays the following conversion fields: pre-convert, conversion on-the-fly, mass conversion, and conversion.
Beginning in Relativity 9.5.133.118, the URL field on the Worker Manager Server is now called ServerName and displays the fully-qualified server name as the location of the Invariant API on the server.
2.2.32 Workspace upgrade queueThe Workspace Upgrade Queue includes the following columns:
n Store Upgrade Status - the status of the upgrade of the Invariant store, as completed by the Work-space Upgrade Worker agent. The possible values in this column are the same as for the
UpgradeGuide 73
workspace upgrade. This field is empty if you don't have Processing installed.
n Current Store Version - the version of Invariant you are upgrading to.
2.2.33 ConversionConversion occurs on dedicated conversion agents instead of Invariant workers. You must configureconversion agents to ensure document conversion works properly in Relativity 9.5. Your agent serversshould also have one conversion complete agent. For more information, see Configuring your conversionagents.
Data Gridn If your environment uses Data Grid, you must also upgrade to Data Grid 2.3.3.58 or above when
upgrading to Relativity 9.5. For more information, see Upgrading Data Grid.
n Relativity 9.5 introduces the Data Grid Ingestion Management tab to manually retry or cancel DataGrid write requests that failed as a result of infrastructure problems. This feature includes a newagent, the Data Grid Worker Agent, that must be installed and configured upon upgrade. There isalso a new instance setting, IngestionTemporaryFileCacheLocation. For more information, see theData Grid guide.
n You no longer need to install the DataGridRESTService on the Analytics server to integrate Relativ-ity Analytics with Relativity Data Grid. If you are upgrading to Relativity 9.5, uninstall theDataGridRESTService from your Analytics server(s). For more information, see Uninstalling theRelativity Data Grid service. We also recommend uninstalling the client node from the Analyticsserver if that server is only dedicated to Analytics in order to free up resources.
n The Instance Settings table and corresponding Relativity tab now includes the AuditDeleteBatchSize and AuditMigrateBatchSize instance settings to specify deletion and migration batch sizes forData Grid for Audit.
For more information, see the Relativity Data Grid guide
2.2.34 Database schemaA number of EDDS and Workspace database tables have been changed, added, or removed toaccommodate new functionality in Relativity. For more information, see Database schema updates forRelativity 9.5 in the Relativity Community.
2.2.34.1 Deprecated support for EDDSResource databaseWe have now deprecated the EDDSResource database. Any custom code that writes to theEDDSResource database is subject to breaking changes in future releases.
If you have implemented any custom code that writes to the EDDSResource database, update it as soonpossible to ensure proper functionality of your applications.
Tables formerly created in this database are now added to the workspace database associated with aspecific operation under the new [Resource] schema. The EDDS and all case databases now include thisnew [Resource] schema. It is used for short-lived scratch tables that used to exist on the EDDSResourcedatabase. Additionally, table names haven’t been modified.
UpgradeGuide 74
Note: Mass Operation handlers that reference tables in this database won’t function properly. Youneed to update these handlers to reference the new location under the workspace database with the[Resource] schema qualifier.
Document table trigger removalIf you're upgrading from Relativity 8.1, note that 8.1 included enhancements that may affect certain areasof your existing environment when you upgrade. Improvements to the database schema make Relativityrun faster in 9 than in previous versions. If your environment contains custom-developed functionality thatinvolves the RelationalIndex_X tables or explicitly uses the RI_X columns in the Document tables, thenyou should refer to the Document table trigger removal documentation.
2.2.35 File shareBeginning in Relativity 9.5.219.30, file share choices are now file share resource server objects. Uponupgrade, all file share choices are mapped to resource servers. For more information, see the Adminguide.
Foreign key removalIn order to improve the performance and usability of document deletion in Relativity, we've removed theforeign keys from the Document and non-system RDO database tables. This includes artifact, singleobject, and multi-object table relationships. Doing this resolves the previous issues involved with globallylocking the Artifact and other tables for the entire duration of a deletion job, which could be lengthy andcould subsequently delay document review. As a result of removing these foreign keys, the delete processwill execute without applying a global lock, and thus no longer interrupts document review in Relativity.
There are three classifications of foreign keys, all of which are affected by this change:
n Keys from the object (Document or RDO) table to the Artifact table.
n Keys on the object table that go to a single object field.
n Keys on multi-object relational f-tables. An f-table stores the link between the objects that are con-nected by a multi-object field in Relativity. In this way, the only columns in an f-table are those thatstore the Artifact ID's of the objects that are linked to each other by that field.
Note: System objects aren't subject to foreign key removal. If the Document object has a foreignkey to the Folder object, that foreign key will remain because Folder is a system object.
2.2.36 IISRelativity Web servers no longer require the HTMLArea Application/Virtual Directory. You can safelyremove the HTMLArea Application/Virtual Directory from IIS on all web servers after the upgrade iscomplete.
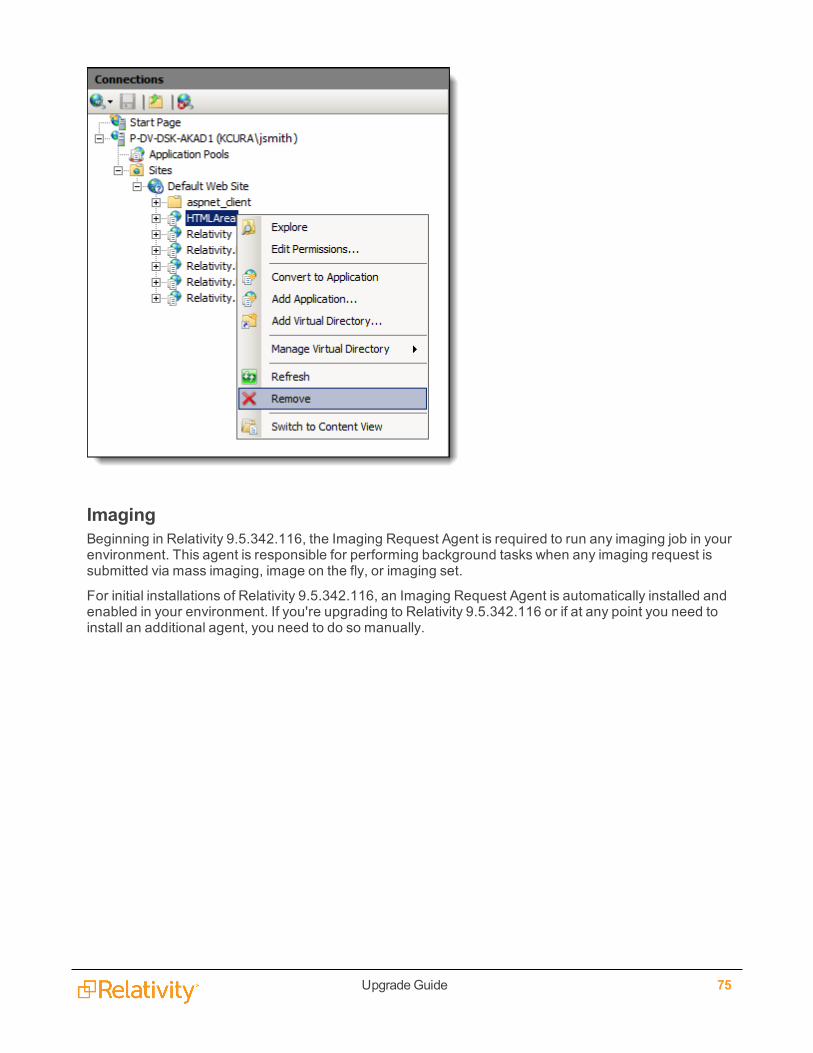
UpgradeGuide 75
ImagingBeginning in Relativity 9.5.342.116, the Imaging Request Agent is required to run any imaging job in yourenvironment. This agent is responsible for performing background tasks when any imaging request issubmitted via mass imaging, image on the fly, or imaging set.
For initial installations of Relativity 9.5.342.116, an Imaging Request Agent is automatically installed andenabled in your environment. If you're upgrading to Relativity 9.5.342.116 or if at any point you need toinstall an additional agent, you need to do so manually.

UpgradeGuide 76
For more information, see the Imaging guide.
Existing imaging profiles received updates based on their imaging method when upgrading to Relativity9.5. If your environment is set up for native imaging, the following changes occur upon upgrade:
n Relativity renames the default imaging profile to Native Default.
n The imaging method is set to Native for all current imaging profiles including Native Default.
n Relativity creates a new Basic Default imaging profile with the following settings:o Imaging Method: Basico Basic Image Output Quality (DPI): 300o Basic Image Format: TIFFo Basic Image Height: Original Setting
n For any imaging set with it an imaging method set to Basic, the following changes occur:o The imaging profile the imaging set was linked to is copied.
o Relativity sets the copied profile's imaging method is set to Basic.
o The copied profile is prepended with Basic to the profile name.
If your environment is not set up for native imaging, the following changes occur upon upgrade toRelativity 9.5:
n Relativity renames the default imaging profile to Basic Default.
n The imaging method is set to Basic for all current imaging profiles including Basic Default.
UpgradeGuide 77
2.2.37 Imaging setsIf you upgrade to Relativity 9.5 and your environment contains imaging sets with errors, the Retry errorsbutton on the Imaging Set console is disabled, and you won't be able to retry those errors in Relativity 9.5.You will, however, be able to re-run the imaging set that contains the errors after you upgrade to Relativity9.5.
For more information, see the Imaging section of the Relativity Admin Guide.
2.2.38 Installation of a certificate on the database serverA certificate called RelativityIdentityCertificate is added to the EDDS database on your primary databaseduring a first time installation or an upgrade. The authentication framework uses the thumbprint of thecertificate to sign identity tokens, which are JSONweb tokens (JWTs). The IdentityCertificateThumbprintinstance setting stores the thumbprint associated with your certificate. For more information, see Instancesetting values on the Relativity 9.5 Documentation site.
You also have the option to use your own authentication token-signing certificate. For more information,see Optionally configure an authentication token-signing certificate on the Pre-installation page in theRelativity 9.5 Documentation site.
For a clustered environment, you need to export a copy of your RelativityIdentityCertificate from theprimary database server, and install the certificate to each database server hosting the EDDS. See thefollowing instructions for more information:
n Import or export certificates and private keys at https://technet.microsoft.com/en-us/lib-rary/cc754329(v=ws.11).aspx.
n Optionally configure an authentication token-signing certificate on the Pre-installation page in theRelativity 9.5 Documentation site - These instructions describe the process for configuring your owncustom token-signing certificate, but you can follow these basic steps to install Relativ-ityIdentityCertificate to each database server in a distributed environment.
2.2.39 Processing/InvariantBeginning in Relativity 9.5.309.48, the database installation component has been removed from theInvariant installer. Accordingly, note the following considerations:
n There is no longer a database install log, and all of the log files that used to be found there are nowfound in the queue manager log file.
n The queue manager installation is now responsible for creating the database.
n The queue manager now communicates with the database upgrader to update all databases duringan Invariant upgrade.
n The database directory that was deployed during the installation is no longer needed, so there willno longer be a database directory deployed on the database server.
n The database component no longer holds registry entries; all registry entries that aren't duplicatesare now on the queue manager machine.
n If you previously installed the Invariant database component on its own machine, it's highly recom-mended that you uninstall the database before upgrading to Relativity 9.5.309.48. If you uninstallthe database after upgrading, you'll delete all Invariant files from the Invariant network share.
UpgradeGuide 78
n There is a new installation log file called UninstallLegacyDatabasePackage.log, which appears onlyonce after an upgrade to Relativity 9.5.309.48.
Beginning in Relativity 9.5.292.12, the following infrastructure changes have been made to processingand should be noted prior to upgrade:
n ProcessingMaxPublishSubJobCountPerSQLServer - the new default value of this instance settingis 7. For information on configuring this setting, see the Processing User Guide.
n ProcessingMaxPublishSubJobCountPerWorkspace - the new default value of this instance settingis 3. For information on configuring this setting, see the Processing User Guide.
n Microsoft Project is no longer a required application to install for Invariant. Processing or Imaging aproject file when it is not installed will result in a detailed error.
n Microsoft Visio is no longer a required application to install for Invariant. Processing or Imaging avisio file when it is not installed will result in a detailed error.
n The default value of the WorkerFileCheckTimespanInMinutes entry in the AppSettings table haschanged from 2 to 15 (minutes) to reduce how often the Queue Manager needs to check the fileshare for changes.
Beginning in Relativity 9.5.253.62, the following changes have been made to processing and should benoted prior to upgrade:
n You can now host Invariant Kepler services in HTTPS if you install a certificate on the queue man-ager. Note that the default port for the Invariant Kepler services is 8092. For details, see EnablingHTTPS for Invariant Kepler Services.
n The Service Bus certificate generation key is required on the queue manager and worker servers aspart of the connection between Invariant and Service Bus. For more information see The Pre-install-ation Guide in the Pre-installation topic.
n Invariant stores are now deleted automatically when the Relativity workspaces associated withthem are deleted. For more information, see The Relativity Processing Console Guide.
n Publish is no longer a single long-running process and instead is a distributed process that is brokenup into separate jobs, which leads to more stability by removing this single point of failure and allow-ing the distribution of work across multiple workers. These changes enable publish to operate moreconsistently like the other processing job types in the worker manager server, where batches ofdata are processed for a specific amount of time before completing each transactional job and mov-ing on. Note the upgrade-relevant details regarding distributed publish:
o The following instance settings have been added to facilitate the work of distributed publish.l ProcessingMaxPublishSubJobCountPerRelativitySQLServer - the maximum numberof publish jobs per Relativity SQL server that may be worked on in parallel.
l You can't allocate more jobs per workspace than what is allowed per SQLserver. This means that if this value is set to be lower than the value for theMaxPublishJobCountPerRelativitySQLServer instance setting, then Relativityonly allows the maximum of jobs per SQL server.
l The default value is 7. Leaving this setting at its default value will result inincreased throughput; however, we recommend contacting Support before you
UpgradeGuide 79
upgrade for guidance on what value will be most beneficial to you based on yourenvironment setup.
l This updates on a 30-second interval.
l If you change the default value, note that setting it too high could result in webserver, SQL server, or BCP/file server issues. In addition, other jobs in Relativitythat use worker threads may see a performance decrease, such discovery orimaging. If you set it too low, publish speeds may be lower than expected.
l ProcessingMaxPublishSubJobCountPerWorkspace- the maximum number of publishjobs per workspace that may be worked on in parallel.
l You can't allocate more jobs per workspace than what is allowed per SQLserver. This means that if this value is set to be higher than the value for theMaxPublishJobCountPerRelativitySQLServer instance setting, then Relativityonly allows the maximum of jobs per SQL server. For example, if you have aworkspace limit of 4 and a server limit of 8 and all of your workspaces are on thesame SQL server, you will have at most 8 publish sub jobs running concurrently.
l The default value is 3. Leaving this setting at its default value will result inincreased throughput; however, we recommend contacting Support before youupgrade for guidance on what value will be most beneficial to you based on yourenvironment setup.
l This updates on a 30-second interval.
l If you change the default value, note that setting it too high could result in webserver, SQL server, or BCP/file server issues. In addition, other jobs in Relativitythat use worker threads may see a performance decrease, such discovery orimaging. If you set it too low, publish speeds may be lower than expected.
o The ProcessingExportMaxThreads instance setting has been deprecated in accordancewith the addition of the ProcessingMaxPublishSubJobCountPerWorkspace and Pro-cessingMaxPublishSubJobCountPerRelativitySQLServer instance settings, which facilitatethe work of distributed publish.
The following table provides the recommended values for each instance setting per environmentsetup:
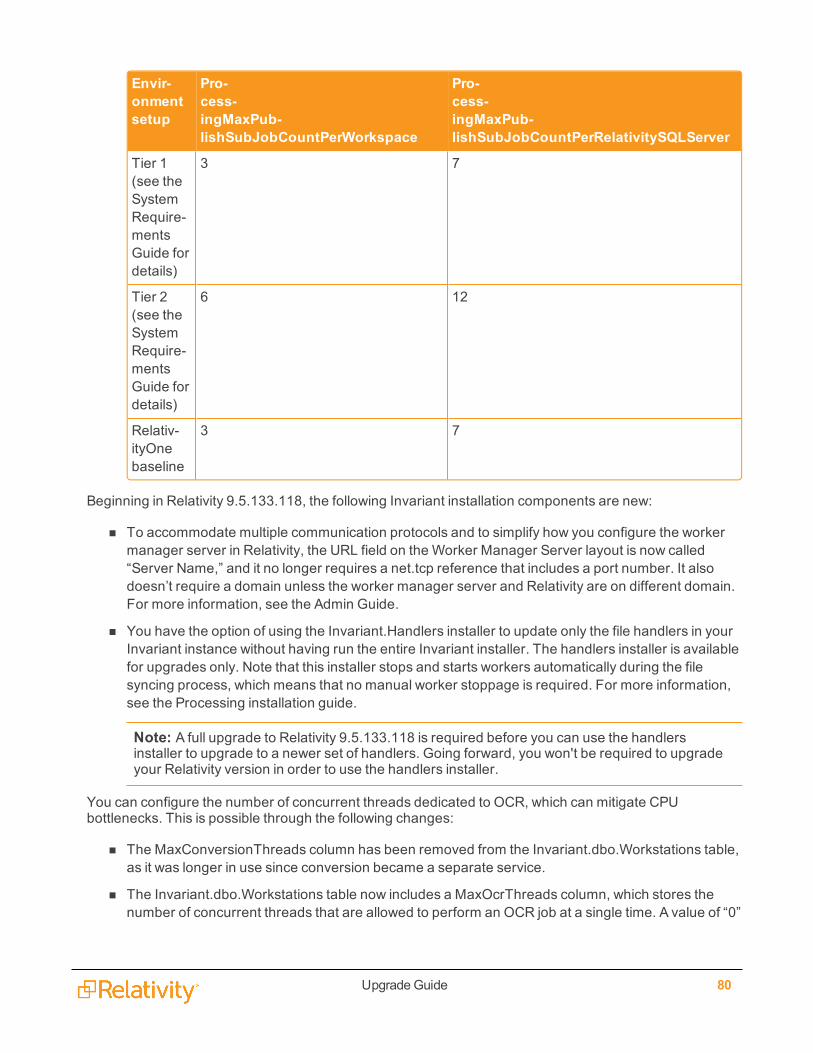
UpgradeGuide 80
Envir-onmentsetup
Pro-cess-ingMaxPub-lishSubJobCountPerWorkspace
Pro-cess-ingMaxPub-lishSubJobCountPerRelativitySQLServer
Tier 1(see theSystemRequire-mentsGuide fordetails)
3 7
Tier 2(see theSystemRequire-mentsGuide fordetails)
6 12
Relativ-ityOnebaseline
3 7
Beginning in Relativity 9.5.133.118, the following Invariant installation components are new:
n To accommodate multiple communication protocols and to simplify how you configure the workermanager server in Relativity, the URL field on the Worker Manager Server layout is now called“Server Name,” and it no longer requires a net.tcp reference that includes a port number. It alsodoesn’t require a domain unless the worker manager server and Relativity are on different domain.For more information, see the Admin Guide.
n You have the option of using the Invariant.Handlers installer to update only the file handlers in yourInvariant instance without having run the entire Invariant installer. The handlers installer is availablefor upgrades only. Note that this installer stops and starts workers automatically during the filesyncing process, which means that no manual worker stoppage is required. For more information,see the Processing installation guide.
Note: A full upgrade to Relativity 9.5.133.118 is required before you can use the handlersinstaller to upgrade to a newer set of handlers. Going forward, you won't be required to upgradeyour Relativity version in order to use the handlers installer.
You can configure the number of concurrent threads dedicated to OCR, which can mitigate CPUbottlenecks. This is possible through the following changes:
n The MaxConversionThreads column has been removed from the Invariant.dbo.Workstations table,as it was longer in use since conversion became a separate service.
n The Invariant.dbo.Workstations table now includes a MaxOcrThreads column, which stores thenumber of concurrent threads that are allowed to perform an OCR job at a single time. A value of “0”
UpgradeGuide 81
means unlimited, and any other value limits to that number. The default and recommended value is0. You should only change this value if the Worker CPU is at 100%, and a performance degradationduring text extraction.
The following changes were made to the Invariant installation process:
n The Invariant.DBUodater.exe upgrades both the main Invariant database and RPC stores. It alsohandles Relativity stores by setting the stores to Pending, which tells the Workspace UpgradeWorker agent to pick them up and execute scripts on them. It also produces a detailed XML log file,which gets created in the install directory and provides information on what happened during thedatabase upgrade.
n The IDENTITYSERVERURL setting is new in the Invariant response file. This is where you enter theidentity server of the environment used for RPC authentication.
The following changes were made to the worker manager server installation process beginning inRelativity 9.5.41.87 and should be noted prior to upgrading:
n Each Invariant component has a machine-specific encryption for its connection strings. These arenow found in a folder called LocalSettings, rather than the previous Settings folder, which holdsother config files. The installer now automatically creates the workers’ connection strings, and theyare no longer created in the network share. Note that you will still see a placeholder folder on the net-work share that doesn’t contain any data.
n There is a new parameter in the Invariant response file called DATABASEINSTALLPATH, which isthe local folder where the Invariant.DBUpdater.exe, Invariant.NIST.InstallUtility.exe, and Invari-ant.Deployment.exe utilities were automatically installed during database installation. These threeexecutables have been moved out of the network share to the local machine where the database isinstalled.
n After the database and queue manager upgrades are complete, you must run the Invariant installeron all workers. This is only applicable for upgrades from Relativity 9.4.398.62 (December 21, 2016)or lower to the full release of Relativity 9.5 (January 25, 2017) and above, meaning all monthlyproduct updates of 9.5. If you're performing a fresh installation of Relativity 9.5, you will need to runthe installer on each Worker Manager and Worker server; however, any subsequent upgrade willonly require you to run the installer from the Worker Manager server, which will upgrade all workerservers automatically, thus eliminating the need to run the installer on each server individually.
The following processing changes may impact your upgrade experience:
n When you change the URL for the queue manager, you're required to perform an IIS reset on theRelativity server in order to clear the cache.
n You no longer map processing fields through the processing profile. You nowmap through a newSource field on the Field layout, which takes you to a catalog containing the most common fieldsthat are discovered during processing. Note the following details regarding this change:
o Relativity provides 46 new processing fields, in addition to the 81 fields previously provided,bringing the total number of fields that are available to map to 127.
o The processing profile no longer contains the Processing Fields associative object list view.
o If you don't install the Processing application, Relativity still allows you to map fields as long asyou've added the worker manager server to the resource pool.
UpgradeGuide 82
o Relativity transfers any fields mapped in the processing profile named "Default" to the fieldmapping table. If the name of the original Default profile has been changed, that profile is stillused. If you haven't mapped any fields on the Default profile in 9.3, and one or more other pro-files do have fields mapped, Relativity doesn't automatically transfer fields when you upgradeto 9.5.
n You can now install Microsoft Office 2013 on your worker servers; however, due to a performancedegradation in text extraction when using Office 2013, we recommend that you continue to useOffice 2010 with Relativity 9.5. When you upgrade from Office 2010 to 2013, it's recommended thatyou uninstall 2010 and then install 2013. If you don't uninstall 2010 prior to installing 2013, you mayneed to do a repair on 2013 in order to get it working properly.
n If you are upgrading from Relativity 9.3 (or a lower version) to 9.5 you may be required to manuallyinstall Visual C++ redistributable packages on the worker servers before running the Invariantupgrade. For details, see the Worker Manager Server Installation Guide.
n The WebAPI setting in IIS is now set to Anonymous Authentication by default and is no longer set toWindows Authentication. You must keep this set to Anonymous Authentication in order to publishdocuments to a workspace using the worker manager server.
Processing to Data Grid no longer requires the RabbitMQ server. To remove RabbitMQ from yourRelativity environment, see Removing RabbitMQ.
2.2.40 New UI frameworkA new UI framework is turned on by default. If you need to disable the new UI framework for the Documentlist, click Switch to Classic UI from the user drop-down within a workspace. For help using the classicinterface, refer to the 9.3 documentation which documents both interfaces side-by-side. For moreinformation, see Navigation in the Admin guide.
When using the new UI framework, the following Relativity features have been enhanced:
n Cluster visualization
n Dashboards
n Document list and tabs throughout Relativity
n Pivot
n Sampling
n Search panel and search browser
2.2.41 ProcessingThe following infrastructure items are new to processing in Relativity 9.3:
n Processing now uses Invariant 4.3.
n The WebAPI setting in IIS is now set to Anonymous Authentication by default and is no longer set toWindows Authentication. You must keep this set to Anonymous Authentication in order to publish
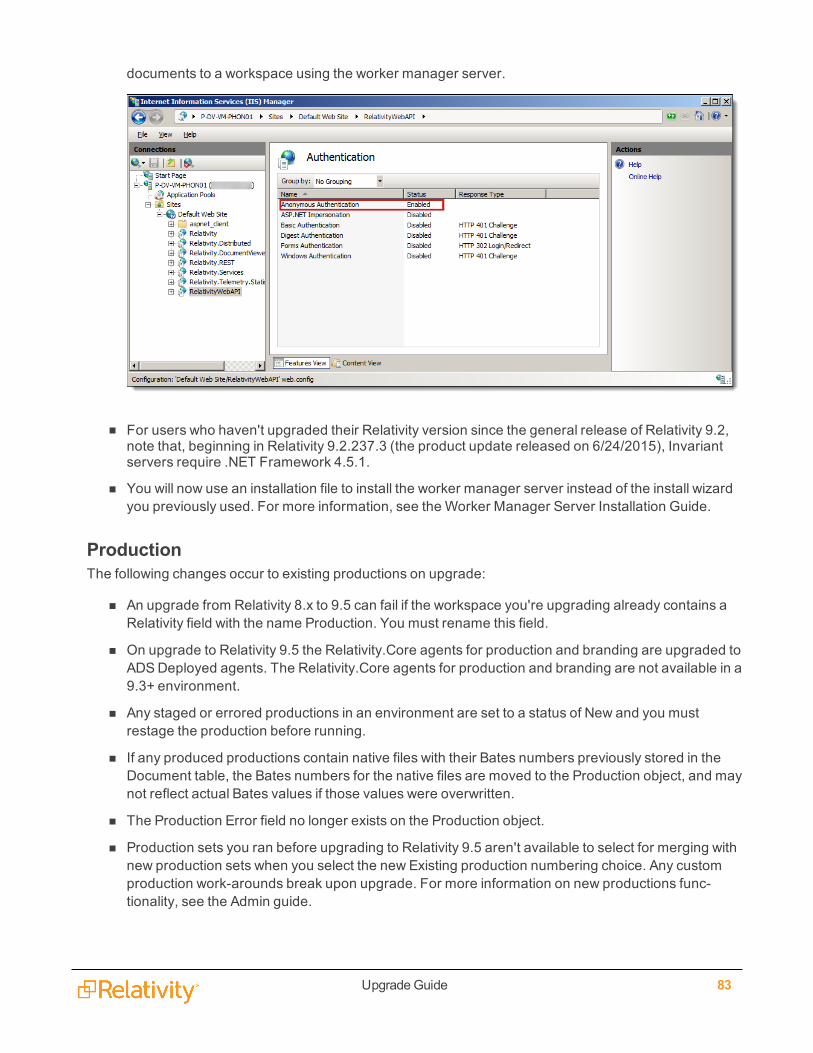
UpgradeGuide 83
documents to a workspace using the worker manager server.
n For users who haven't upgraded their Relativity version since the general release of Relativity 9.2,note that, beginning in Relativity 9.2.237.3 (the product update released on 6/24/2015), Invariantservers require .NET Framework 4.5.1.
n You will now use an installation file to install the worker manager server instead of the install wizardyou previously used. For more information, see the Worker Manager Server Installation Guide.
ProductionThe following changes occur to existing productions on upgrade:
n An upgrade from Relativity 8.x to 9.5 can fail if the workspace you're upgrading already contains aRelativity field with the name Production. You must rename this field.
n On upgrade to Relativity 9.5 the Relativity.Core agents for production and branding are upgraded toADS Deployed agents. The Relativity.Core agents for production and branding are not available in a9.3+ environment.
n Any staged or errored productions in an environment are set to a status of New and you mustrestage the production before running.
n If any produced productions contain native files with their Bates numbers previously stored in theDocument table, the Bates numbers for the native files are moved to the Production object, and maynot reflect actual Bates values if those values were overwritten.
n The Production Error field no longer exists on the Production object.
n Production sets you ran before upgrading to Relativity 9.5 aren't available to select for merging withnew production sets when you select the new Existing production numbering choice. Any customproduction work-arounds break upon upgrade. For more information on new productions func-tionality, see the Admin guide.
UpgradeGuide 84
n Users with full permissions to the Production object prior to upgrading to Relativity 9.3 do not auto-matically gain permissions to the new Production Data Source object, unless they also have theManage Object Types permission under Admin Operations. Users need rights to the new Pro-duction Data Source object to add or edit production data sources after upgrading to Relativity 9.3+.
n Any preexisting production fields are converted to a production data source upon upgrade.
n If you upgrade from Relativity 9.2 to Relativity 9.5 and you were previously using the ProductionTracker application, review the Production Tracker 9.5 considerations PDF in the Relativity Com-munity.
n Beginning in 9.5.162.111, Productions includes an upgrade step to migrate data from the oldProductionInformation schema to the new schema introduced in 9.5.162.111.
2.2.42 Relativity service busThe Relativity 9.5 infrastructure now includes a new component called the Relativity service bus. Thiscomponent uses Service Bus for Windows Service as its underlying framework. Before you upgradeRelativity, you must now install Service Bus for Windows Server on a server or VM that is accessiblethroughout your Relativity instance. You must then configure a Service Bus for Windows Server farm inyour environment. For information about prerequisites, see Service Bus for Windows Server in the Pre-Installation guide.If you have a proxy server or firewall setup in the environment, you must allowcommunication to the FQDN of the Windows Service Bus server from the servers you are installing theRelativity Service Bus or else the installer will fail to upgrade the server.
After installing Service Bus for Windows Server, you can upgrade your primary SQL Server. You can theninstall the Relativity service bus by running the upgrade installer on the machine where you installedService Bus for Windows Server. Finally, follow the standard instructions for upgrading other Relativitycomponents. For more information, see the Relativity Service Bus guide.
2.2.43 Required certificates for RelativityRelativity 9.5 now verifies that all HTTPS services running in your environment have a trusted certificate.You may need to install additional certificates to components of your Relativity installation running HTTPSservices to avoid error messages and insecure-connection icons. For more information, see the Pre-installation Guide.
2.2.44 Scriptsn Creating or editing scripts is controlled by the AllowAddOrEditScripts instance setting. You must
enable this instance setting to give users the ability to create or edit scripts within a workspace. Formore information, seeAllowAddOrEditScripts in the instance setting guide.
n Beginning in 9.5.196.102, the Set extracted text size script is no longer available in the RelativityScript Library. If you have this script installed in a workspace, it is removed upon upgrade. You canuse the Set long text size mass operation in place of this script.
2.2.45 SearchingUpon upgrade to 9.5.133.118, Relativity interprets straight quotes and curly quotes in searching the same.Previously, if you searched using curly quotes in a long text field using the CONTAINS filter, Relativitysearched for the quote itself instead of grouping terms together. Now, Relativity groups terms between

UpgradeGuide 85
double quotes together regardless of the quote type. This may mean the number of results in yoursearches may change.
ServersThere are a number of new server types installed automatically with Relativity 9.5:
n Worker manager server - this uses workers to perform imaging, conversion, and all phases of pro-cessing, including inventory, discovery, and publish. This is a required component of Relativity 9.5.If you are not licensed for processing, then the worker manager server only handles document con-version and imaging. For more information, see Worker manager server installation doc-umentation.
n Worker - this is the machine a worker manager server uses to complete imaging, document con-version, and processing jobs. Workers are designed to centralize and streamline some of the jobsthat used to be performed exclusively by agents. When you add a worker manager server to yourRelativity environment, you specify the workers that you want that worker manager server to gov-ern. Thus, it's impossible to add workers without adding a worker manager server. For more inform-ation, see the Servers section of the Relativity Admin Guide.
n Cache location server - this temporarily stores natives, images, productions, and other file typesthe viewer uses. Add cache location servers to the resource pools that are associated with work-spaces. You must provide a valid UNC path for the location of your cache. For more information,see the Servers section of the Relativity Admin Guide..
2.2.46 Service Host Manager HTTPS configurationService Host Manager runs Relativity services on all web and agent servers in your environment. Theservices are used by applications like Production and Processing on. If your web and agent servers mustbe set up for HTTPS access, special setup is required for Service Host Manager.
For more information, see Service Host Manager on the Relativity 9.5 Documentation site.
Structured AnalyticsIf upgrading to Relativity 9.5 from a version prior to 8.2, Relativity automatically updates the Minimumsimilarity percentage value for Structured Analytics textual near duplicate identification to the newminimum value of 80 if it is currently set between 70-79. See Creating a structured analytics set in theAnalytics Guide.
2.2.47 System requirementsn Windows Server 2008 R2 (64-bit) is no longer compatible with 9.5. Relativity 9.5 is only compatible
with Windows Server 2008 R2 (64-bit) w Service Pack 1.
n As of August 31, 2017, we no longer support Internet Explore (IE) 10. Please upgrade to a com-patible version of IE 11.
2.2.48 TelemetryAfter you install Relativity 9.5, complete the steps to enable telemetry in your environment. Telemetryallows you to collect metrics for performance, usage, and billing. For more information, see Telemetry on
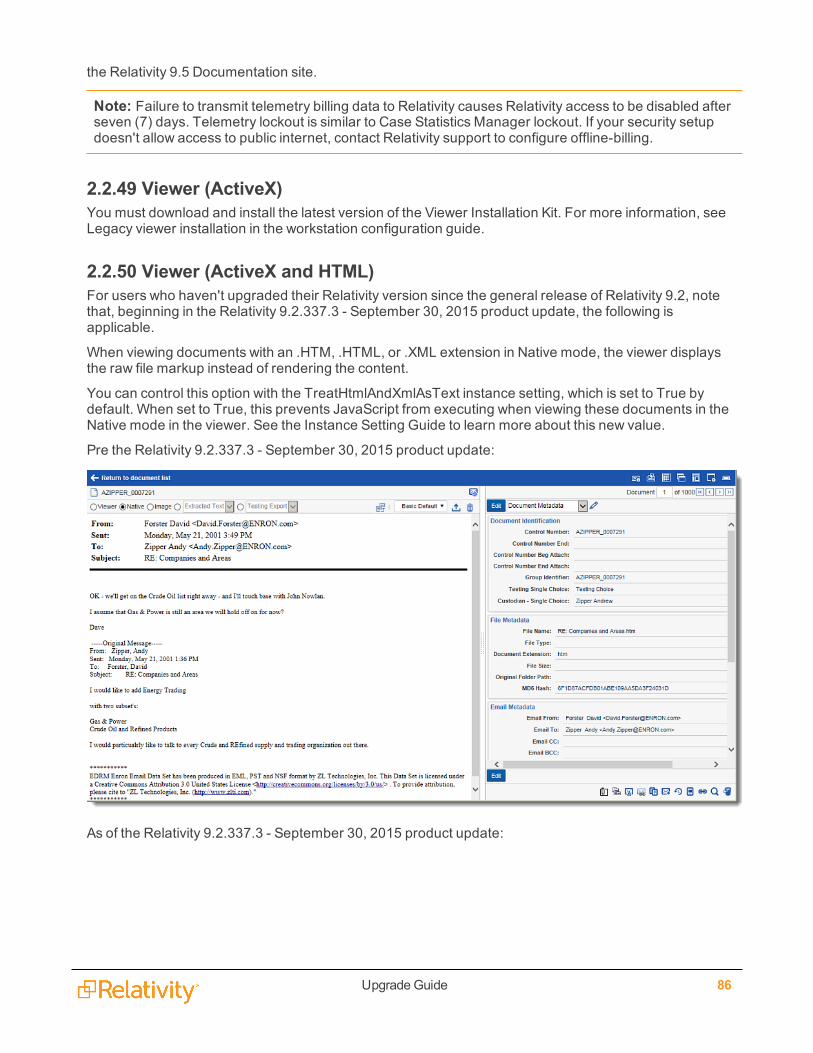
UpgradeGuide 86
the Relativity 9.5 Documentation site.
Note: Failure to transmit telemetry billing data to Relativity causes Relativity access to be disabled afterseven (7) days. Telemetry lockout is similar to Case Statistics Manager lockout. If your security setupdoesn't allow access to public internet, contact Relativity support to configure offline-billing.
2.2.49 Viewer (ActiveX)You must download and install the latest version of the Viewer Installation Kit. For more information, seeLegacy viewer installation in the workstation configuration guide.
2.2.50 Viewer (ActiveX and HTML)For users who haven't upgraded their Relativity version since the general release of Relativity 9.2, notethat, beginning in the Relativity 9.2.337.3 - September 30, 2015 product update, the following isapplicable.
When viewing documents with an .HTM, .HTML, or .XML extension in Native mode, the viewer displaysthe raw file markup instead of rendering the content.
You can control this option with the TreatHtmlAndXmlAsText instance setting, which is set to True bydefault. When set to True, this prevents JavaScript from executing when viewing these documents in theNative mode in the viewer. See the Instance Setting Guide to learn more about this new value.
Pre the Relativity 9.2.337.3 - September 30, 2015 product update:
As of the Relativity 9.2.337.3 - September 30, 2015 product update:
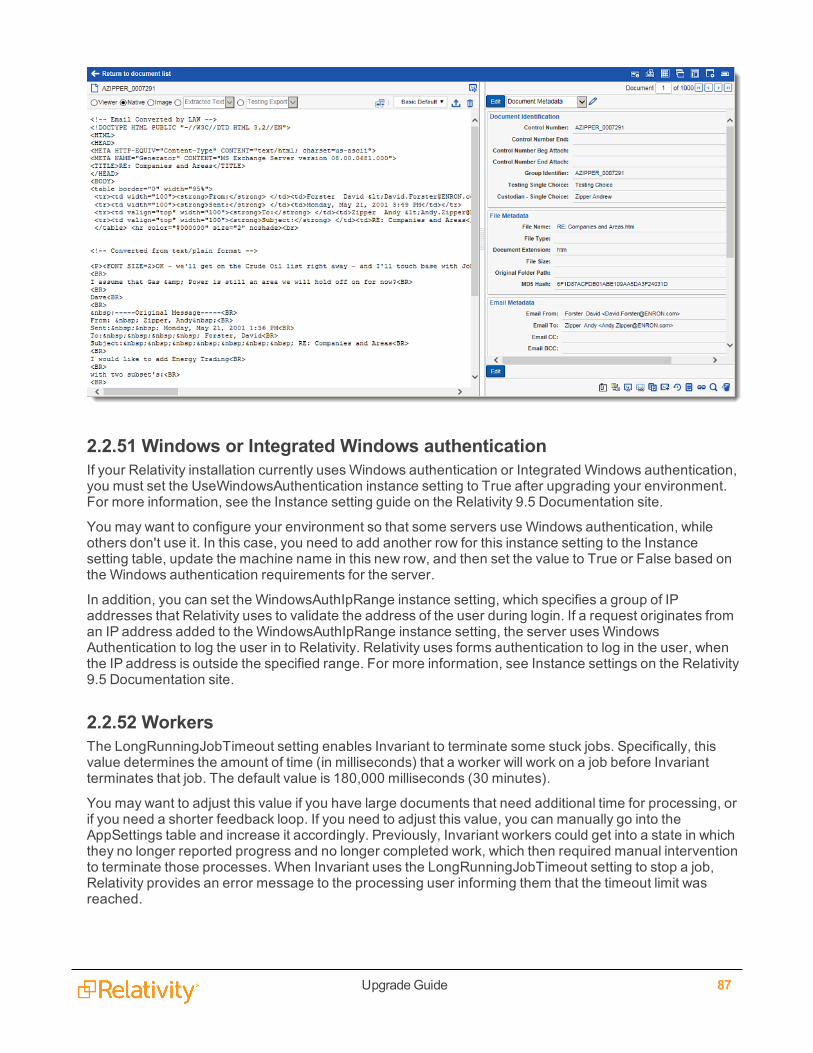
UpgradeGuide 87
2.2.51 Windows or Integrated Windows authenticationIf your Relativity installation currently usesWindows authentication or Integrated Windows authentication,you must set the UseWindowsAuthentication instance setting to True after upgrading your environment.For more information, see the Instance setting guide on the Relativity 9.5 Documentation site.
You may want to configure your environment so that some servers use Windows authentication, whileothers don't use it. In this case, you need to add another row for this instance setting to the Instancesetting table, update the machine name in this new row, and then set the value to True or False based onthe Windows authentication requirements for the server.
In addition, you can set the WindowsAuthIpRange instance setting, which specifies a group of IPaddresses that Relativity uses to validate the address of the user during login. If a request originates froman IP address added to the WindowsAuthIpRange instance setting, the server usesWindowsAuthentication to log the user in to Relativity. Relativity uses forms authentication to log in the user, whenthe IP address is outside the specified range. For more information, see Instance settings on the Relativity9.5 Documentation site.
2.2.52 WorkersThe LongRunningJobTimeout setting enables Invariant to terminate some stuck jobs. Specifically, thisvalue determines the amount of time (in milliseconds) that a worker will work on a job before Invariantterminates that job. The default value is 180,000 milliseconds (30 minutes).
You may want to adjust this value if you have large documents that need additional time for processing, orif you need a shorter feedback loop. If you need to adjust this value, you can manually go into theAppSettings table and increase it accordingly. Previously, Invariant workers could get into a state in whichthey no longer reported progress and no longer completed work, which then required manual interventionto terminate those processes. When Invariant uses the LongRunningJobTimeout setting to stop a job,Relativity provides an error message to the processing user informing them that the timeout limit wasreached.
UpgradeGuide 88
The Conversion Threads in Use column no longer appears on the Worker Status tab. Additionally, on theworker server page, you can no longer designate a worker for conversion work. To configure yourenvironment for conversion, see Configuring your conversion agents.
2.2.53 Worker manager queueRevisions in the queue manager code have led to the following enhancements:
n A reduction in the volume of connections to the SQL Server
n A reduction in lock waits and thread pool waits
n A general increase in queue parallelism
n A reduction in the number of queries per second hitting the SQL Server
There is no reduction or change in actual queue functionality as a result of these changes. Likewise, theuser experience with the queue manager hasn't changed, with the exception of potential performanceincreases, depending on the size of your environment.
2.2.54 Worker manager serverDocument conversion no longer occurs on the worker manager server. You cannot modify the priority ofthe following conversion jobs on the worker manager server: Pre-convert, Conversion on-the-fly, Massconversion, and Conversion. Instead, you must install Service Bus for Windows Server and configureconversion agents. For more information, see Configuring your conversion agents on page 156.
The Worker manager page no longer displays the following conversion fields: pre-convert, conversion on-the-fly, mass conversion, and conversion.
Beginning in Relativity 9.5.133.118, the URL field on the Worker Manager Server is now called ServerName and displays the fully-qualified server name as the location of the Invariant API on the server.
2.2.55 Workspace upgrade queueThe Workspace Upgrade Queue includes the following columns:
n Store Upgrade Status - the status of the upgrade of the Invariant store, as completed by the Work-space Upgrade Worker agent. The possible values in this column are the same as for the work-space upgrade. This field is empty if you don't have Processing installed.
n Current Store Version - the version of Invariant you are upgrading to.
ViewerThe document viewer has been dramatically improved and you are no longer required to download orinstall any browser plug-ins in order to review documents in this new viewer. In addition, there are somefunctionality enhancements available in the new viewer. For more information, see the Viewer section ofthe Relativity Admin Guide.
Beginning in Relativity 9.5.196.102, you must install Microsoft .NET 4.6.2 on all of the machines that needaccess to the ActiveX viewer. You must also install the new ActiveX viewer installation kit, which includesthe Visual C++ 2015 redistributable, from the Workspace Details tab. You can't use the Relativity9.5.196.102 viewer with earlier versions of Relativity. Also, earlier versions of the ActiveX viewer aren'tcompatible with Relativity 9.5.196.102.For more information, see Legacy viewer installation in theworkstation configuration guide.
UpgradeGuide 89
Note: If you have a client machine that accesses multiple instances of Relativity that require differentversions of the ActiveX viewer, the corresponding ActiveX viewers must be installed. To ensure properviewer functionality, you must close their browsers before they switch from one version to the next.
2.2.56 WorkersThe Conversion Threads in Use column no longer appears on the Worker Status tab. Additionally, on theworker server page, you can no longer designate a worker for conversion work. To configure yourenvironment for conversion, see Configuring your conversion agents.
2.2.57 Worker manager serverDocument conversion no longer occurs on the worker manager server. You cannot modify the priority ofthe following conversion jobs on the worker manager server: Pre-convert, Conversion on-the-fly, MassConversion, and Conversion. Instead, you must install Service Bus for Windows Server and configureconversion agents. For more information, see Configuring your conversion agents on page 156.
The Worker manager page no longer displays the following conversion fields: pre-convert, conversion on-the-fly, mass conversion, and conversion.
Beginning in Relativity 9.5.133.118, the URL field on the Worker Manager Server is now called ServerName and displays the fully-qualified server name as the location of the Invariant API on the server.
Workspace Upgrade QueueThe Workspace Upgrade Queue includes the following columns:
n Store Upgrade Status - the status of the upgrade of the Invariant store, as completed by the Work-space Upgrade Worker agent. The possible values in this column are the same as for the work-space upgrade. This field is empty if you don't have Processing installed.
n Current Store Version - the version of Invariant you are upgrading to.
WorkspacesWorkspaces include a new required field called Default Cache Location. The default cache location is aUNC path to the location on your network where the natives, images, productions, and other file typesused by the viewer are temporarily stored. You can select any one of the cache locations included in theresource pool chosen for the workspace. For more information, see the Workspaces section of theRelativity Admin Guide.
2.2.58 Windows or Integrated Windows authenticationIf your Relativity installation currently usesWindows authentication or Integrated Windows authentication,you must set the UseWindowsAuthentication instance setting to True after upgrading your environment.For more information, see the Instance setting guide on the Relativity 9.5 Documentation site.
You may want to configure your environment so that some servers use Windows authentication, whileothers don't use it. In this case, you need to add another row for this instance setting to the Instancesetting table, update the machine name in this new row, and then set the value to True or False based onthe Windows authentication requirements for the server.
In addition, you can set the WindowsAuthIpRange instance setting, which specifies a group of IPaddresses that Relativity uses to validate the address of the user during login. If a request originates from
UpgradeGuide 90
an IP address added to the WindowsAuthIpRange instance setting, the server usesWindowsAuthentication to log the user in to Relativity. Relativity uses forms authentication to log in the user, whenthe IP address is outside the specified range. For more information, see Instance settings on the Relativity9.5 Documentation site.
2.3 7.x to 9.5 Relativity updatesLearn more about the changes to your Relativity 7.x environment after you upgrade to Relativity 9.5. Thissection also includes post-upgrade processes you'll need to follow.
7.x to 9.5 Relativity updatesn Agent service
n Analytics on the next page
n Applications
n Audit on page 94
n Authentication on page 24
n Conversion
n Database schema
n dtSearch index considerations on page 115
n File share on page 116
n Foreign key removal on page 116
n IIS on page 118
n Imaging on page 117
n Installation of a certificate on the database server on page 118
n Processing/Invariant
n License Relativity and Processing on page 124
n Network load balancing on page 104
n NewUI framework on page 124
n Production on page 125
n RAR upgrade notes on page 125
n Relativity admin and service account email addresses on page 106
n Relativity Desktop Client (RDC) on page 107
n Relativity installer updates on page 107
n Relativity service bus on page 126
n Required certificates for Relativity on page 126
n Scripts
UpgradeGuide 91
n Searching on page 127
n System requirements on page 127
n Windows or Integrated Windows authentication on page 128
n Windows Service Bus 1.1 with TLS 1.2 Support on page 111
n Viewer on page 126
n Viewer (ActiveX) on page 127
n Upgrade custom applications or code on page 128
n Workers
n Worker manager server
n Workspace Upgrade Queue
2.3.1 Agent serviceAll Windows services now have Recovery Properties. If the Agent service should ever crash due to anunhandled exception, it recovers and immediately restarts.
AnalyticsRelativity 9.3 includes a Textual Near Duplicate Identification algorithm with the following benefits:
n The new algorithm can greatly improve performance for both large and complex data sets.
n With the new algorithm you can scale your Analytics server by adding CPU cores and RAM in orderto achieve faster performance.
Prior to Relativity 9.3, scaling environments did not impact performance. Without scaling past 8 cores, youshould experience performance comparable to pre-9.3 on most data sets. The Textual Near DuplicateIdentification algorithm in Relativity 9.3 uses different, more efficient methods to obtain similar results.However, results may differ slightly from pre-9.3 results if a Full Analysis is run against a preexistingstructured analytics set. If you need preexisting results use an Incremental Analysis instead. Theincremental analysis keeps the pre-9.3 results for all preexisting documents, but the newly addeddocuments use the new algorithm to match with existing groups.
Note the following when upgrading to Relativity 9.5:
n In the Relativity Applications Library, the Analytics application contains the structured data analyticsfunctionality, and the Analytics Core application contains Analytics profiles, repeated content fil-ters, and Analytics categorization sets.
Note: On upgrade to Relativity 9.5, you can choose whether or not to include the Analyticsapplication (structured data analytics). The Analytics Core application deploys automatically.
n Beginning in Relativity 8, Primary Language Identification (PLI) is no longer supported. As a result,you don't have to import PLI data into Relativity or set up a search index or categorization set to usePLI anymore. Instead, you can use the language identification operation when creating a StructuredData Analytics set.
n Content Analyst 3.14 is required to use Analytics in Relativity 9.5.
UpgradeGuide 92
See the Analytics Guide for more information on Language Identification.
2.3.1.1 New Analytics installerStarting with Relativity 9.5.133.118, the Relativity Analytics engine installer now uses a response file toinstall Analytics on a server. You can use the installer for new installations and upgrades. The responsefile installer replaces the setup wizard for the Analytics server. See Installing Analytics.
Note: If you are upgrading from Relativity 9.3.332.21 (CAAT 3.17) or lower, first run the Relativity9.3.362.9 or 9.4 Analytics server installer using the instructions at Running the Relativity Analyticsinstaller for versions previous to Relativity 9.5.133.118. Contact Support for this installer. After this step,then run the Relativity 9.5 response file-based installer.
Updating the default SSL/TLS certificate for the Content AnalystYou must update the default SSL/TLS certificate on your Analytics server because Relativity requires acertificate signed by a trusted certificate authority (CA). By default, the CAAT service runs over anuntrusted SSL/TLS certificate. For more information, see Updating the default SSL/TLS certificate onpage 217.
2.3.1.2 Updating RestUriForCAAT instance settingAs part of upgrading (post-upgrade), you must have a valid URL value entered for the RestUriForCAATinstance setting. This is the FQDNURL to the web server hosting your Kepler services (e.g.,https://client.domain.name/Relativity.REST/API).
2.3.1.3 Analytics index enhancementsStarting with Relativity 9.5.196.102, Analytics indexes are now RDO's. There are a few considerations withthis update:
n Indexes will no longer have the default saved searches available to set as the training and search-able set sources. For legacy indexes that are upgraded, the saved search must be set when editingthe index. If you do not set the searches, you will only be able to build and activate / deactivate theindex (provided it was already populated with the default searches)
n After the upgrade, you will no longer have the option to preserve cluster multiple choice and coher-ence score fields when deleting the cluster set. They will always be deleted.
n OCR and GoWord filter support has been deprecated from Analytics Indexes. On subsequent pop-ulations after upgrading, any OCR or GoWord filter set on the Analytics profile will no longer beapplied. If the legacy index was populated with these filters, migrated to an RDO, and then rebuilt oractivated, the filters still apply (they are set on population).
n When you upgrade, the Analytics Core install event handlers will create a new RDO for each exist-ing index and a new RDO for each existing cluster set. These new object types and instances inher-its permissions from their analogous source objects. For example:
o Analytics Index RDO workspace permissions are copied from Search Index workspace per-missions
o Analytics Index RDO instance permissions are copied from Search Index instance per-missions
o Cluster Set RDO workspace permissions are copied from Search Index workspace per-missions
UpgradeGuide 93
o Cluster Set RDO instance permissions are copied from the multiple choice cluster field's itemlevel permissions
2.3.1.4 Email thread visualizationUsers must have the Analytics application installed in the workspace, and the Email Author Date IDmustbe present for the emails. The Email Author Date ID is only available for emails run through a full analysisusing structured analytics in Relativity 9.5.41.87 and above. The email thread visualization pane will notwork for email threads from previous versions unless a full analysis is run against the structured analyticsset containing the emails after upgrading to Relativity 9.5.41.87 or higher.
2.3.1.5 Multiple structured analytic set resultsBeginning in Relativity 9.5.196.102, you can easily store the results for multiple structured analytics setsand set up views that capture the email threading or repeated content identification results of thoseoperations.
Consider the following:
n We recommend you set new relational fields (e.g., Destination Email Thread Group, DestinationEmail Duplicate ID, and Destination Textual Near Duplicate Group) when creating new structuredanalytics sets for email threading or textual near duplicate identification to allow you to easily set upviews that make use of a relational field for each of these sets.
n Upon upgrade, the email thread group, duplicate spare group, and textual near duplicate group rela-tional views display just the Control Number and Edit columns. To display the old fields, you mustunlock the application and update those views. If you run Structured Analytics with the existingapplication relational fields, the relational views will only show the Control Number and Editcolumns. A way to avoid this is by creating and mapping your own relational fields before run time.Then, you can create your own relational view and map that to the custom relational fields.
Note: This upgrade consideration has been addressed in Relativity 9.5.253.62. If you areupgrading to Relativity 9.5.253.62, disregard this item.
n Upon upgrade, email threading and textual near duplicate results are written to new results fieldsthat is only created upon running a Structured Analytics Set. These fields can't be manually createdbefore running the set. This means that it's not possible to create any views, searches, layouts, etc.that reference these fields prior to completing a set. Additionally, views and searches which ref-erence these newly created fields don't carry over on workspace creation because Structured Ana-lytics Sets don't carry over.
Note: This upgrade consideration impacts any Relativity templates that reference the legacyStructured Analytics results fields.
n Upon upgrade, previous inclusive information may change when performing an incremental ana-lysis on an existing email threading set due to the newly created structured Analytics results fields.
2.3.2 ApplicationsThe Solution Snapshot application helps you identify compatibility issues with custom applications in yourenvironment so you can resolve them prior to upgrade. Using the Solution Snapshot application, you can
UpgradeGuide 94
view a list of the applications currently installed in your Application Library and review the applicationowner's recommendation for upgrade. For more information, see the Solution Snapshot documentation.
2.3.3 AuditUpon upgrade, the Audit application is now available at the instance level to report on admin-level audits.You must have Elasticsearch installed and configured to use the Audit tab. If you don't have Elasticsearchinstalled, you can hide this tab. For more information, see the Data Grid guide.
2.3.4 AuthenticationConsider the following for upgrading:
n You no longer see the Authentication Data field in the Users User Information section. You nowenter the information you previously entered here in the individual authentication methods. This per-mits more versatile and detailed method implementations.
n Note that when you upgrade, Relativity creates a copy of the eddsdbo.User table before makingany modifications. The table is for reference only, and the copy is named based on the Relativity ver-sion being ungraded from, such as 9_2_AuthenticationUserTableBackupRecord or 9_3_Authentic-ationUserTableBackupRecord. If after upgrading and making sure all users convertedsuccessfully, you may delete the copy table.
n Use the Authentication Profile system to enable only the protocols you need in an environment. Insome cases the upgrade process may enable more protocols than you want. This is due to the pars-ing rules for the AuthenticationData column. Specifically, if you are using Active Directory or ClientCertificate authentications in your environment, the upgrade process may also enable IntegratedAuthentication. If you don't want the Integrated Authentication, you can remove that provider fromthe Authentication Profile after upgrade.
2.3.4.1 User and authentication object permissionsA number of new objects have been introduced, such as Authentication Provider Type, AuthenticationProvider, and Login Method. Upon upgrading to Relativity 9.5, permissions are as follows:
n A user, who has the permissions to view the user objects before an upgrade, post upgrade can viewusers, authentication provider types, authentication providers, and login methods.
n A user, who has the permissions to edit (or delete, a higher level of permission than edit) the userobjects before an upgrade, post upgrade can edit users and login methods. They can also viewauthentication provider types, and authentication providers.
n After upgrade only users in the System Administrators group will have access to view and editOAuth2Client objects.
2.3.5 ConversionConversion occurs on dedicated conversion agents instead of Invariant workers. You must configureconversion agents to ensure document conversion works properly in Relativity 9.5. Your agent serversshould also have one conversion complete agent. For more information, see Configuring your conversionagents.
UpgradeGuide 95
Data Gridn If your environment uses Data Grid, you must also upgrade to Data Grid 2.3.3.58 or above when
upgrading to Relativity 9.5. For more information, see Upgrading Data Grid.
n Relativity 9.5 introduces the Data Grid Ingestion Management tab to manually retry or cancel DataGrid write requests that failed as a result of infrastructure problems. This feature includes a newagent, the Data Grid Worker Agent, that must be installed and configured upon upgrade. There isalso a new instance setting, IngestionTemporaryFileCacheLocation. For more information, see theData Grid guide.
n You no longer need to install the DataGridRESTService on the Analytics server to integrate Relativ-ity Analytics with Relativity Data Grid. If you are upgrading to Relativity 9.5, uninstall theDataGridRESTService from your Analytics server(s). For more information, see Uninstalling theRelativity Data Grid service. We also recommend uninstalling the client node from the Analyticsserver if that server is only dedicated to Analytics in order to free up resources.
n The Instance Settings table and corresponding Relativity tab now includes the AuditDeleteBatchSize and AuditMigrateBatchSize instance settings to specify deletion and migration batch sizes forData Grid for Audit.
For more information, see the Relativity Data Grid guide
2.3.6 Database schema updatesA number of EDDS and Workspace database tables have been changed, added, or removed toaccommodate new functionality in Relativity. For more information, see Database schema updates forRelativity 9.5 in the Relativity Community.
2.3.6.1 Deprecated support for EDDSResource databaseWe have now deprecated the EDDSResource database. Any custom code that writes to theEDDSResource database is subject to breaking changes in future releases.
If you have implemented any custom code that writes to the EDDSResource database, update it as soonpossible to ensure proper functionality of your applications.
Tables formerly created in this database are now added to the workspace database associated with aspecific operation under the new [Resource] schema. The EDDS and all case databases now include thisnew [Resource] schema. It is used for short-lived scratch tables that used to exist on the EDDSResourcedatabase. Additionally, table names haven’t been modified.
Note: Mass Operation handlers that reference tables in this database won’t function properly. Youneed to update these handlers to reference the new location under the workspace database with the[Resource] schema qualifier.
ECA and InvestigationThe ECA and Investigation and Field Catalog applications are now synchronized, which means that whenyou install the ECA and Investigation application, Relativity automatically maps all of the ECA fields tothose 127 corresponding processing fields found in the Field Catalog. For a list of these fields, see theProcessing User Guide.
Note the following details:
UpgradeGuide 96
n A number of processing fields were renamed in the Field Catalog. Renamed fields will cause nam-ing conflicts.You can address these conflicts through the standard application framework, which isto either rename the fields or modify their mapping. If you previously processed data into a field thatwas renamed, you will have the same data in two different fields. You can address this through aMass Replace operation on the affected fields.
n The All Custodians field was renamed to All Custodians_Script in the ECA and Investigationapplication. The All Custodians_Script field is a long text field and acts as a another piece ofmetadata for de-duplicated documents. You should select the new All Custodians_Script field whenrunning the Update Duplicate Status script, as this will ensure that no de-duplicated documentsmake it into review.
Fields
2.3.6.2 Allow HTML fieldsAny existing fields with the Allow HTML value set to Yes, you must set the new instance settingSanitizeHTMLOutput to False in order to add HTML alerts and links when a user opens a document forreview.
2.3.7 File shareBeginning in Relativity 9.5.219.30, file share choices are now file share resource server objects. Uponupgrade, all file share choices are mapped to resource servers. For more information, see the Adminguide.
Foreign key removalIn order to improve the performance and usability of document deletion in Relativity, we've removed theforeign keys from the Document and non-system RDO database tables. This includes artifact, singleobject, and multi-object table relationships. Doing this resolves the previous issues involved with globallylocking the Artifact and other tables for the entire duration of a deletion job, which could be lengthy andcould subsequently delay document review. As a result of removing these foreign keys, the delete processwill execute without applying a global lock, and thus no longer interrupts document review in Relativity.
There are three classifications of foreign keys, all of which are affected by this change:
n Keys from the object (Document or RDO) table to the Artifact table.
n Keys on the object table that go to a single object field.
n Keys on multi-object relational f-tables. An f-table stores the link between the objects that are con-nected by a multi-object field in Relativity. In this way, the only columns in an f-table are those thatstore the Artifact ID's of the objects that are linked to each other by that field.
Note: System objects aren't subject to foreign key removal. If the Document object has a foreignkey to the Folder object, that foreign key will remain because Folder is a system object.
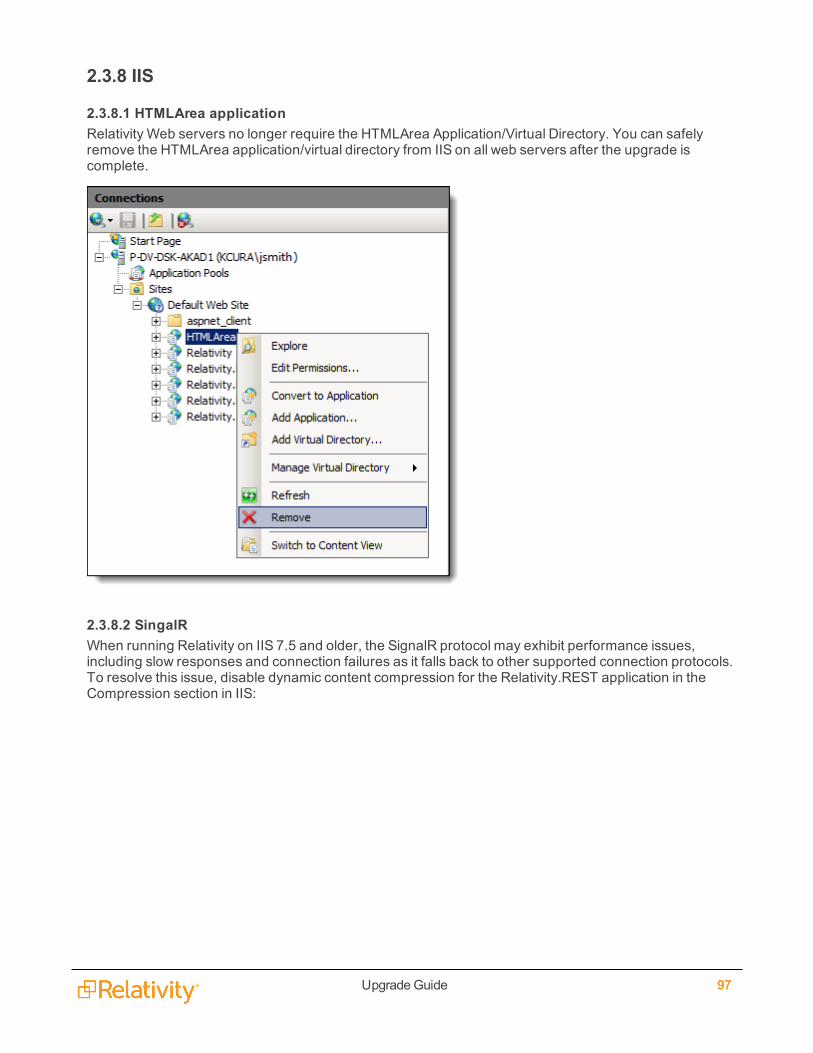
UpgradeGuide 97
2.3.8 IIS
2.3.8.1 HTMLArea applicationRelativity Web servers no longer require the HTMLArea Application/Virtual Directory. You can safelyremove the HTMLArea application/virtual directory from IIS on all web servers after the upgrade iscomplete.
2.3.8.2 SingalRWhen running Relativity on IIS 7.5 and older, the SignalR protocol may exhibit performance issues,including slow responses and connection failures as it falls back to other supported connection protocols.To resolve this issue, disable dynamic content compression for the Relativity.REST application in theCompression section in IIS:
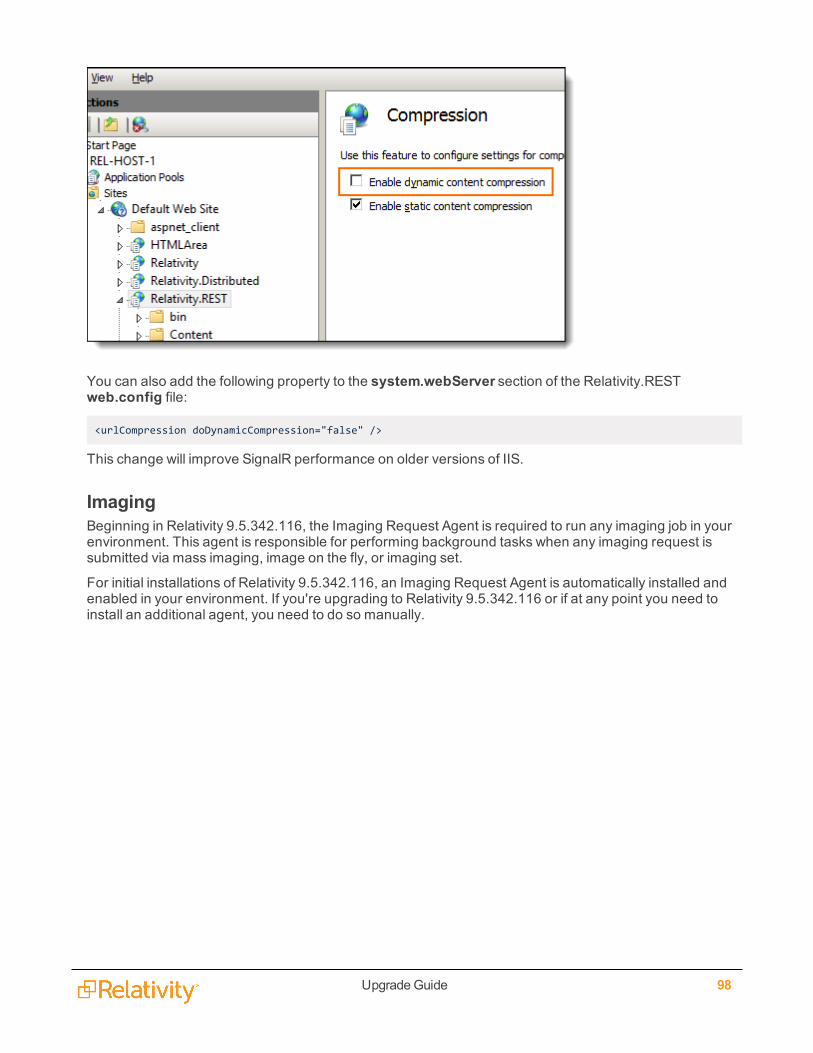
UpgradeGuide 98
You can also add the following property to the system.webServer section of the Relativity.RESTweb.config file:
<urlCompression doDynamicCompression="false" />
This change will improve SignalR performance on older versions of IIS.
ImagingBeginning in Relativity 9.5.342.116, the Imaging Request Agent is required to run any imaging job in yourenvironment. This agent is responsible for performing background tasks when any imaging request issubmitted via mass imaging, image on the fly, or imaging set.
For initial installations of Relativity 9.5.342.116, an Imaging Request Agent is automatically installed andenabled in your environment. If you're upgrading to Relativity 9.5.342.116 or if at any point you need toinstall an additional agent, you need to do so manually.
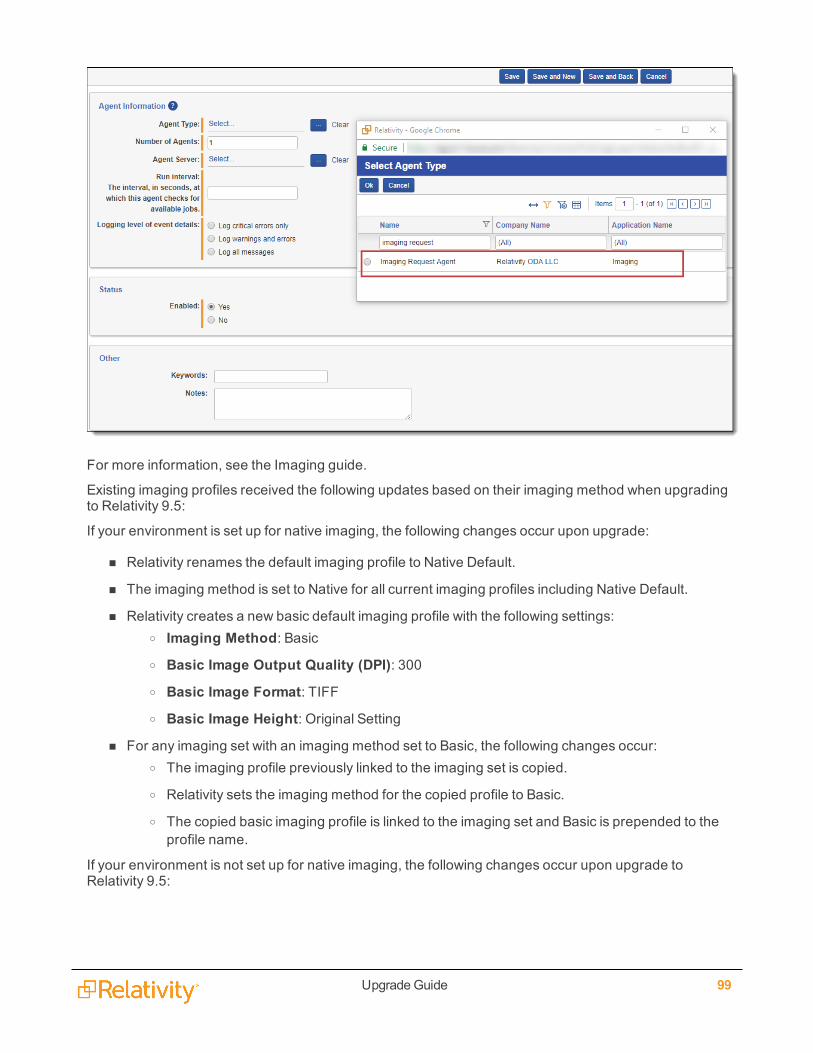
UpgradeGuide 99
For more information, see the Imaging guide.
Existing imaging profiles received the following updates based on their imaging method when upgradingto Relativity 9.5:
If your environment is set up for native imaging, the following changes occur upon upgrade:
n Relativity renames the default imaging profile to Native Default.
n The imaging method is set to Native for all current imaging profiles including Native Default.
n Relativity creates a new basic default imaging profile with the following settings:o Imaging Method: Basico Basic Image Output Quality (DPI): 300o Basic Image Format: TIFFo Basic Image Height: Original Setting
n For any imaging set with an imaging method set to Basic, the following changes occur:o The imaging profile previously linked to the imaging set is copied.
o Relativity sets the imaging method for the copied profile to Basic.
o The copied basic imaging profile is linked to the imaging set and Basic is prepended to theprofile name.
If your environment is not set up for native imaging, the following changes occur upon upgrade toRelativity 9.5:
UpgradeGuide 100
n Relativity renames the default imaging profile to Basic Default.
n The imaging method is set to basic for all current imaging profiles including Basic Default.
2.3.9 Installation of a certificate on the database serverA certificate called RelativityIdentityCertificate is added to the EDDS database on your primary databaseduring a first time installation or an upgrade. The authentication framework uses the thumbprint of thecertificate to sign identity tokens, which are JSONweb tokens (JWTs). The IdentityCertificateThumbprintinstance setting stores the thumbprint associated with your certificate. For more information, see Instancesetting values on the Relativity 9.5 Documentation site.
You also have the option to use your own authentication token-signing certificate. For more information,see Optionally configure an authentication token-signing certificate on the Pre-installation page in theRelativity 9.5 Documentation site.
For a clustered environment, you need to export a copy of your RelativityIdentityCertificate from theprimary database server, and install the certificate to each database server hosting the EDDS. See thefollowing instructions for more information:
n Import or export certificates and private keys at https://technet.microsoft.com/en-us/lib-rary/cc754329(v=ws.11).aspx.
n Optionally configure an authentication token-signing certificate on the Pre-installation page in theRelativity 9.5 Documentation site - These instructions describe the process for configuring your owncustom token-signing certificate, but you can follow these basic steps to install Relativ-ityIdentityCertificate to each database server in a distributed environment.
2.3.10 Instance settingsIf upgrading to Relativity 9.5 from a version prior to 9.3, note that configuration table values are nowreferred to as instance settings. Upon upgrade, configuration table values convert to instance settings.Likewise, the eddsdbo.Configuration table becomes the eddsdbo.InstanceSetting table in SQL Server.
Note: If a new 9.5 install or upgrade fails, a back up table, edds.Configuration_backup, exists as arecord of all the instance settings in SQL. Do not use this table for any purpose other than a record in theevent of an install/upgrade failure.
2.3.10.1 Backwards compatibilityFor any existing applications that reference the pre-9.5 EDDS.Configuration table, a SQL view,Configuration, exists to act as a layer on top of the Instance Setting table.
This view contains the same columns as the old Configuration table and you can use it to examine theinformation as it was pre-Relativity 9.5.
2.3.11 Processing/InvariantBeginning in Relativity 9.5.253.62, the following changes have been made to processing and should benoted prior to upgrade:
n You can now host Invariant Kepler services in HTTPS if you install a certificate on the queue man-ager. Note that the default port for the Invariant Kepler services is 8092. For details, see EnablingHTTPS for Invariant Kepler Services.
UpgradeGuide 101
n The Service Bus certificate generation key is required on the queue manager and worker servers aspart of the connection between Invariant and Service Bus. For more information see The Pre-install-ation Guide in the Pre-installation topic.
n Invariant stores are now deleted automatically when the Relativity workspaces associated withthem are deleted. For more information, see The Relativity Processing Console Guide.
n Publish is no longer a single long-running process and instead is a distributed process that is brokenup into separate jobs, which leads to more stability by removing this single point of failure and allow-ing the distribution of work across multiple workers. These changes enable publish to operate moreconsistently like the other processing job types in the worker manager server, where batches ofdata are processed for a specific amount of time before completing each transactional job and mov-ing on. Note the upgrade-relevant details regarding distributed publish:
o The following instance settings have been added to facilitate the work of distributed publish.l ProcessingMaxPublishSubJobCountPerRelativitySQLServer - the maximum numberof publish jobs per Relativity SQL server that may be worked on in parallel.
l You can't allocate more jobs per workspace than what is allowed per SQLserver. This means that if this value is set to be lower than the value for theMaxPublishJobCountPerRelativitySQLServer instance setting, then Relativityonly allows the maximum of jobs per SQL server.
l The default value is 7. Leaving this setting at its default value will result inincreased throughput; however, we recommend contacting Support before youupgrade for guidance on what value will be most beneficial to you based on yourenvironment setup.
l This updates on a 30-second interval.
l If you change the default value, note that setting it too high could result in webserver, SQL server, or BCP/file server issues. In addition, other jobs in Relativitythat use worker threads may see a performance decrease, such discovery orimaging. If you set it too low, publish speeds may be lower than expected.
l ProcessingMaxPublishSubJobCountPerWorkspace- the maximum number of publishjobs per workspace that may be worked on in parallel.
l You can't allocate more jobs per workspace than what is allowed per SQLserver. This means that if this value is set to be higher than the value for theMaxPublishJobCountPerRelativitySQLServer instance setting, then Relativityonly allows the maximum of jobs per SQL server. For example, if you have aworkspace limit of 4 and a server limit of 8 and all of your workspaces are on thesame SQL server, you will have at most 8 publish sub jobs running concurrently.
l The default value is 3. Leaving this setting at its default value will result inincreased throughput; however, we recommend contacting Support before youupgrade for guidance on what value will be most beneficial to you based on yourenvironment setup.
l This updates on a 30-second interval.

UpgradeGuide 102
l If you change the default value, note that setting it too high could result in webserver, SQL server, or BCP/file server issues. In addition, other jobs in Relativitythat use worker threads may see a performance decrease, such discovery orimaging. If you set it too low, publish speeds may be lower than expected.
o The ProcessingExportMaxThreads instance setting has been deprecated in accordancewith the addition of the ProcessingMaxPublishSubJobCountPerWorkspace and Pro-cessingMaxPublishSubJobCountPerRelativitySQLServer instance settings, which facilitatethe work of distributed publish.
The following table provides the recommended values for each instance setting per environmentsetup:
Envir-onmentsetup
Pro-cess-ingMaxPub-lishSubJobCountPerWorkspace
Pro-cess-ingMaxPub-lishSubJobCountPerRelativitySQLServer
Tier 1(see theSystemRequire-mentsGuide fordetails)
3 7
Tier 2(see theSystemRequire-mentsGuide fordetails)
6 12
Relativ-ityOnebaseline
3 7
Beginning in Relativity 9.5.133.118, the following Invariant installation components are new:
n To accommodate multiple communication protocols and to simplify how you configure the workermanager server in Relativity, the URL field on the Worker Manager Server layout is now called“Server Name,” and it no longer requires a net.tcp reference that includes a port number. It alsodoesn’t require a domain unless the worker manager server and Relativity are on different domain.For more information, see the Admin Guide.
n You have the option of using the Invariant.Handlers installer to update only the file handlers in yourInvariant instance without having run the entire Invariant installer. The handlers installer is availablefor upgrades only. Note that this installer stops and starts workers automatically during the file

UpgradeGuide 103
syncing process, which means that no manual worker stoppage is required. For more information,see the Processing installation guide.
Note: A full upgrade to Relativity 9.5.133.118 is required before you can use the handlersinstaller to upgrade to a newer set of handlers. Going forward, you won't be required to upgradeyour Relativity version in order to use the handlers installer.
The following changes were made to the worker manager server installation process beginning inRelativity 9.5.41.87 and should be noted prior to upgrading:
n Each Invariant component has a machine-specific encryption for its connection strings. These arenow found in a folder called LocalSettings, rather than the previous Settings folder, which holdsother config files. The installer now automatically creates the workers’ connection strings, and theyare no longer created in the network share. Note that you will still see a placeholder folder on the net-work share that doesn’t contain any data.
n There is a new parameter in the Invariant response file called DATABASEINSTALLPATH, which isthe local folder where the Invariant.DBUpdater.exe, Invariant.NIST.InstallUtility.exe, and Invari-ant.Deployment.exe utilities were automatically installed during database installation. These threeexecutables have been moved out of the network share to the local machine where the database isinstalled.
n After the database and queue manager upgrades are complete, you must run the Invariant installeron all workers. This is only applicable for upgrades from Relativity 9.4.398.62 (December 21, 2016)or lower to the full release of Relativity 9.5 (January 25, 2017) and above, meaning all monthlyproduct updates of 9.5. If you're performing a fresh installation of Relativity 9.5, you will need to runthe installer on each Worker Manager and Worker server; however, any subsequent upgrade willonly require you to run the installer from the Worker Manager server, which will upgrade all workerservers automatically, thus eliminating the need to run the installer on each server individually.
You can configure the number of concurrent threads dedicated to OCR, which can mitigate CPUbottlenecks. This is possible through the following changes:
n The MaxConversionThreads column has been removed from the Invariant.dbo.Workstations table,as it was longer in use since conversion became a separate service.
n The Invariant.dbo.Workstations table now includes a MaxOcrThreads column, which stores thenumber of concurrent threads that are allowed to perform an OCR job at a single time. A value of “0”means unlimited, and any other value limits to that number. The default and recommended value is0. You should only change this value if the Worker CPU is at 100%, and a performance degradationduring text extraction.
The following changes were made to the Invariant installation process:
n The Invariant.DBUodater.exe upgrades both the main Invariant database and RPC stores. It alsohandles Relativity stores by setting the stores to Pending, which tells the Workspace UpgradeWorker agent to pick them up and execute scripts on them. It also produces a detailed XML log file,which gets created in the install directory and provides information on what happened during thedatabase upgrade.
n The IDENTITYSERVERURL setting is new in the Invariant response file. This is where you enter theidentity server of the environment used for RPC authentication.

UpgradeGuide 104
The following processing changes may impact your upgrade experience:
n When you change the URL for the queue manager, you're required to perform an IIS reset on theRelativity server in order to clear the cache.
n You no longer map processing fields through the processing profile. You nowmap through a newSource field on the Field layout, which takes you to a catalog containing the most common fieldsthat are discovered during processing. Note the following details regarding this change:
o Relativity provides 46 new processing fields, in addition to the 81 fields previously provided,bringing the total number of fields that are available to map to 127.
o The processing profile no longer contains the Processing Fields associative object list view.
o If you don't install the Processing application, Relativity still allows you to map fields as long asyou've added the worker manager server to the resource pool.
o Relativity transfers any fields mapped in the processing profile named "Default" to the fieldmapping table. If the name of the original Default profile has been changed, that profile is stillused. If you haven't mapped any fields on the Default profile in 9.3, and one or more other pro-files do have fields mapped, Relativity doesn't automatically transfer fields when you upgradeto 9.5.
n You can now install Microsoft Office 2013 on your worker servers; however, due to a performancedegradation in text extraction when using Office 2013, we recommend that you continue to useOffice 2010 with Relativity 9.5. When you upgrade from Office 2010 to 2013, it's recommended thatyou uninstall 2010 and then install 2013. If you don't uninstall 2010 prior to installing 2013, you mayneed to do a repair on 2013 in order to get it working properly.
n If you are upgrading from Relativity 9.3 (or a lower version) to 9.5 you may be required to manuallyinstall Visual C++ redistributable packages on the worker servers before running the Invariantupgrade. For details, see the Worker Manager Server Installation Guide.
n The WebAPI setting in IIS is now set to Anonymous Authentication by default and is no longer set toWindows Authentication. You must keep this set to Anonymous Authentication in order to publishdocuments to a workspace using the worker manager server.
Processing to Data Grid no longer requires the RabbitMQ server. To remove RabbitMQ from yourRelativity environment, see Removing RabbitMQ.
2.3.12 Network load balancingIf you are using cookie-persisted load balancing configurations for Relativity 9.5.162.111 and higher, youmust update theWebClientRequiredCookies instance setting to include the name of the load balancercookie for the ActiveX viewer.
2.3.13 New UI frameworkIf you need to disable the new UI framework for the Document list, click Switch to Classic UI from theuser drop-down within a workspace. For help using the classic interface, refer to the 9.3 documentationwhich documents both interfaces side-by-side. For more information, see Navigation in the Admin guide.
When using the new UI framework, the following Relativity features have been enhanced:
UpgradeGuide 105
n Cluster visualization
n Dashboards
n Document list and tabs throughout Relativity
n Pivot
n Sampling
n Search panel and search browser
ProductionThe following section discusses the changes to the Production application on upgrade from Relativity 9.xto Relativity 9.3+. Certain upgrade changes only affect upgrades from Relativity 9.1 or 9.2 to Relativity 9.5,and the changes are clearly marked with the affected versions.
Beginning in Relativity 9.3+ you can choose to upgrade only your Production application using a RAP file.
General Production upgrade considerations:
n An upgrade from Relativity 9.x to 9.5 can fail if the workspace you're upgrading already contains aRelativity field with the name Production. You must rename this field.
n An upgrade from Relativity 9.2 and below to 9.5 can fail if the workspace you're upgrading alreadycontains a Relativity dynamic object with the name Production Placeholder. You must rename thisobject.
n An upgrade from Relativity 9.1 to 9.5 can fail if the workspace you're upgrading already contains aRelativity dynamic object with the name Production Data Source.
n An upgrade from Relativity 9.2 and below to 9.5 can fail if the workspace you're upgrading alreadycontains a Relativity dynamic object with the name Relativity Color Map. You must rename thisobject.
n An upgrade from Relativity 9.2 and below to 9.5 can fail if the workspace you're upgrading alreadycontains a Relativity dynamic object with the name Field Catalog. You must rename this object.
n If you have a full-text index populating the production upgrade stops. Try upgrading again once thefull-text index is finished populating.
n Relativity deduces the First Bates Value and Last Bates Value for all imported and upgraded pro-ductions.
n If you upgrade from Relativity 9.2 to Relativity 9.5 and you were previously using the ProductionTracker application, review the Production Tracker 9.5 considerations PDF in the Relativity Com-munity.
n Beginning in 9.5.162.111, Productions includes an upgrade step to migrate data from the oldProductionInformation schema to the new schema introduced in 9.5.162.111.
Changes to agents and objects:
n The Relativity.Core agents for production and branding are upgraded to ADS Deployed agents. TheRelativity.Core agents for production and branding are not available in a Relativity 9.5 environment.

UpgradeGuide 106
n The Markup Set table is converted to the Markup Set dynamic object.
n The Production Object table is converted to the Production dynamic object.
Changes to pre-existing Productions:
n Any staged or errored productions in an environment are set to a status of New and you mustrestage the production before running.
n Productions migrated from Relativity 9.1 and 9.2 receive a legacy placeholder stating, "No TiffIncluded For This Record."
n Productions migrated from Relativity 9.1 to Relativity 9.5 have a data source created containing theproduction documents for each produced and errored production.
n If any produced productions contain native files with their Bates numbers previously stored in theDocument table, the Bates numbers for the native files are moved to the Production object, and maynot reflect actual Bates values if those values were overwritten.
n The Production Error field no longer exists on the Production object.
n If you upgrade from an earlier version of Relativity 9.3 and your custom placeholders containsquare brackets, you may see an error the next time you run the production or re-save the customplaceholder. To correct the error, escape the square brackets using a blackslash and re-run the pro-duction.
Changes to Production fields and views:
n On upgrade from 9.2 the Produced Documents field exists in the environment, but the field is notpopulated.
n The production document view no longer exists.
n The multi-object field Produced Documents is replaced with the Production Information RDO whenupgrading from Relativity 9.2. The field is not deleted from the workspace, but is disassociated fromthe production application.
n On upgrade from 9.x to 9.5 the Add Image Placeholder field changes to Use Image Placeholder. Ifthe Add Image Placeholder field was set to No, it updates to Never Use Placeholders. If the AddImage Placeholder field was set to Yes, it updates to Always Use Image Placeholders.
Changes to Production permissions:
n Users with full permissions to the Production object prior to upgrading to Relativity 9.3 do not auto-matically gain permissions to the new Production Data Source object, unless they also have theManage Object Types permission under Admin Operations. Users need rights to the new Pro-duction Data Source object to add or edit production data sources after upgrading to Relativity 9.3+.
2.3.14 Relativity admin and service account email addressesRelativity includes the Relativity admin and service account users by default. With the Relativity9.5.342.116, the default email addresses for these accounts have been updated as follows:
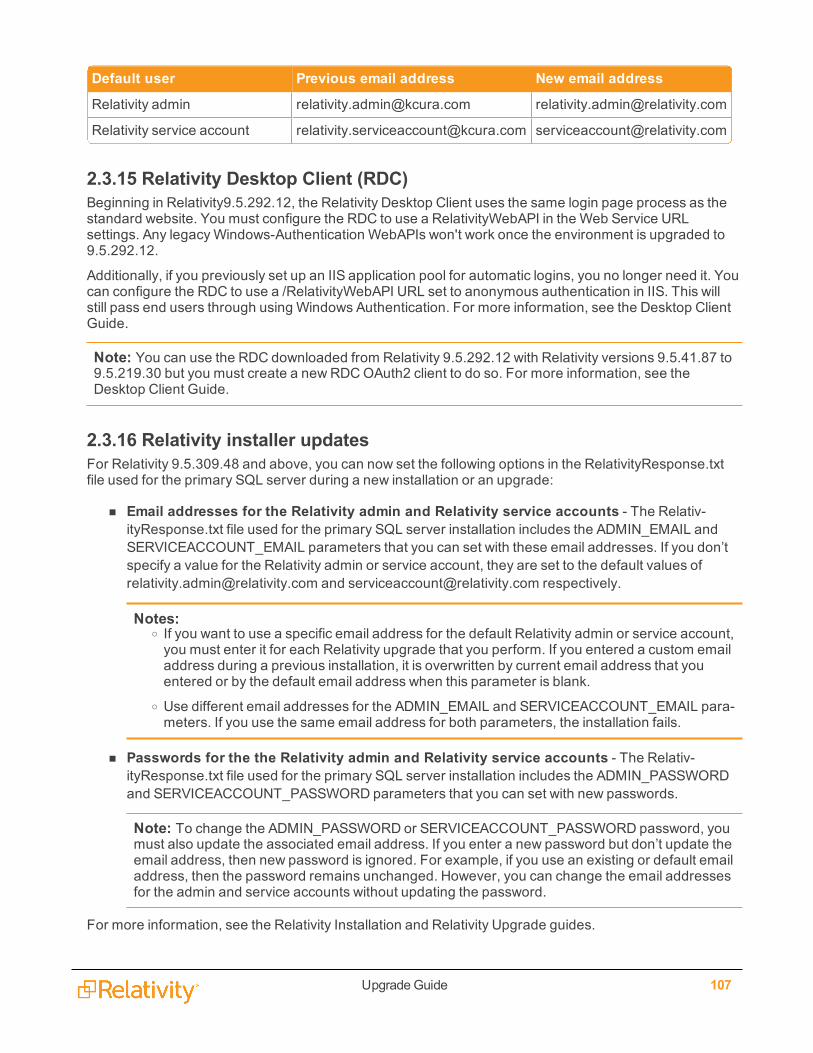
UpgradeGuide 107
Default user Previous email address New email address
Relativity admin [email protected] [email protected]
Relativity service account [email protected] [email protected]
2.3.15 Relativity Desktop Client (RDC)Beginning in Relativity9.5.292.12, the Relativity Desktop Client uses the same login page process as thestandard website. You must configure the RDC to use a RelativityWebAPI in the Web Service URLsettings. Any legacyWindows-Authentication WebAPIs won't work once the environment is upgraded to9.5.292.12.
Additionally, if you previously set up an IIS application pool for automatic logins, you no longer need it. Youcan configure the RDC to use a /RelativityWebAPI URL set to anonymous authentication in IIS. This willstill pass end users through using Windows Authentication. For more information, see the Desktop ClientGuide.
Note: You can use the RDC downloaded from Relativity 9.5.292.12 with Relativity versions 9.5.41.87 to9.5.219.30 but you must create a new RDCOAuth2 client to do so. For more information, see theDesktop Client Guide.
2.3.16 Relativity installer updatesFor Relativity 9.5.309.48 and above, you can now set the following options in the RelativityResponse.txtfile used for the primary SQL server during a new installation or an upgrade:
n Email addresses for the Relativity admin and Relativity service accounts - The Relativ-ityResponse.txt file used for the primary SQL server installation includes the ADMIN_EMAIL andSERVICEACCOUNT_EMAIL parameters that you can set with these email addresses. If you don’tspecify a value for the Relativity admin or service account, they are set to the default values [email protected] and [email protected] respectively.
Notes:o If you want to use a specific email address for the default Relativity admin or service account,you must enter it for each Relativity upgrade that you perform. If you entered a custom emailaddress during a previous installation, it is overwritten by current email address that youentered or by the default email address when this parameter is blank.
o Use different email addresses for the ADMIN_EMAIL and SERVICEACCOUNT_EMAIL para-meters. If you use the same email address for both parameters, the installation fails.
n Passwords for the the Relativity admin and Relativity service accounts - The Relativ-ityResponse.txt file used for the primary SQL server installation includes the ADMIN_PASSWORDand SERVICEACCOUNT_PASSWORD parameters that you can set with new passwords.
Note: To change the ADMIN_PASSWORD or SERVICEACCOUNT_PASSWORD password, youmust also update the associated email address. If you enter a new password but don’t update theemail address, then new password is ignored. For example, if you use an existing or default emailaddress, then the password remains unchanged. However, you can change the email addressesfor the admin and service accounts without updating the password.
For more information, see the Relativity Installation and Relativity Upgrade guides.

UpgradeGuide 108
2.3.17 Relativity Processing ConsoleBeginning in Relativity 9.5, the RPC installer has been reconfigured to request that you enter databasecredentials, which it will then validate to create a working connection string.
Specifically, the installer includes a new window in which you'll enter the following:
n Invariant SQL Server name with an optional port number
n Relativity SQL Server name with an optional port number
n EDDSDBO password
2.3.18 Relativity service busThe Relativity 9.5 infrastructure now includes a new component called the Relativity service bus. Thiscomponent uses Service Bus for Windows Service as its underlying framework. Before you upgradeRelativity, you must now install Service Bus for Windows Server on a server or VM that is accessiblethroughout your Relativity instance. You must then configure a Service Bus for Windows Server farm inyour environment. For information about prerequisites, see Service Bus for Windows Server in the Pre-Installation guide.If you have a proxy server or firewall setup in the environment, you must allowcommunication to the FQDN of the Windows Service Bus server from the servers you are installing theRelativity Service Bus or else the installer will fail to upgrade the server.
After installing Service Bus for Windows Server, you can upgrade your primary SQL Server. You can theninstall the Relativity service bus by running the upgrade installer on the machine where you installedService Bus for Windows Server. Finally, follow the standard instructions for upgrading other Relativitycomponents. For more information, see the Relativity Service Bus guide.
UpgradeGuide 109
2.3.19 Required certificates for RelativityRelativity 9.5 now verifies that all HTTPS services running in your environment have a trusted certificate.You need to verify the certificates to components of your Relativity installation running HTTPS services toavoid error messages and insecure-connection icons. For more information, see Required certificates forRelativity in the Pre-installation guide.
We recommend placing the new Analytics server certificate and testing it prior to the day of the upgrade toRelativity 9.3. For more information, see Pre-upgrade: Update the default SSL/TLS certificate for CAAT®in the Upgrading or installing your Analytics server section.
2.3.20 Scriptsn You must enable the AllowAddOrEditScripts instance setting in order for users to create or edit
scripts. This setting enables or disables the ability to create and edit scripts for all users, includingsystem admins. For more information, AllowAddOrEditScripts in the instance setting guide.
n Beginning in 9.5.196.102, the Set extracted text size script is no longer available in the RelativityScript Library. If you have this script installed in a workspace, it is removed upon upgrade. You canuse the Set long text size mass operation in place of this script.
2.3.21 SearchingUpon upgrade to 9.5.133.118, Relativity interprets straight quotes and curly quotes in searching the same.Previously, if you searched using curly quotes in a long text field using the CONTAINS filter, Relativitysearched for the quote itself instead of grouping terms together. Now, Relativity groups terms betweendouble quotes together regardless of the quote type. This may mean the number of results in yoursearches may change.
2.3.22 Service Host Manager HTTPS configurationService Host Manager runs Relativity services on all web and agent servers in your environment. Theservices are used by applications like Production and Processing on. If your web and agent servers mustbe set up for HTTPS access, special setup is required for Service Host Manager.
For more information, see Service Host Manager on the Relativity 9.5 Documentation site.
2.3.23 System requirementsn Windows Server 2008 R2 (64-bit) is no longer compatible with 9.5. Relativity 9.5 is only compatible
with Windows Server 2008 R2 (64-bit) w Service Pack 1.
n As of Relativity 9.5.292.12, we no longer support Internet Explore (IE) 10. Please upgrade to a com-patible version of IE 11.
2.3.24 TelemetryAfter you install Relativity 9.5, complete the steps to enable telemetry in your environment. Telemetryallows you to collect metrics for performance, usage, and billing. For more information, see Telemetry onthe Relativity 9.5 Documentation site.
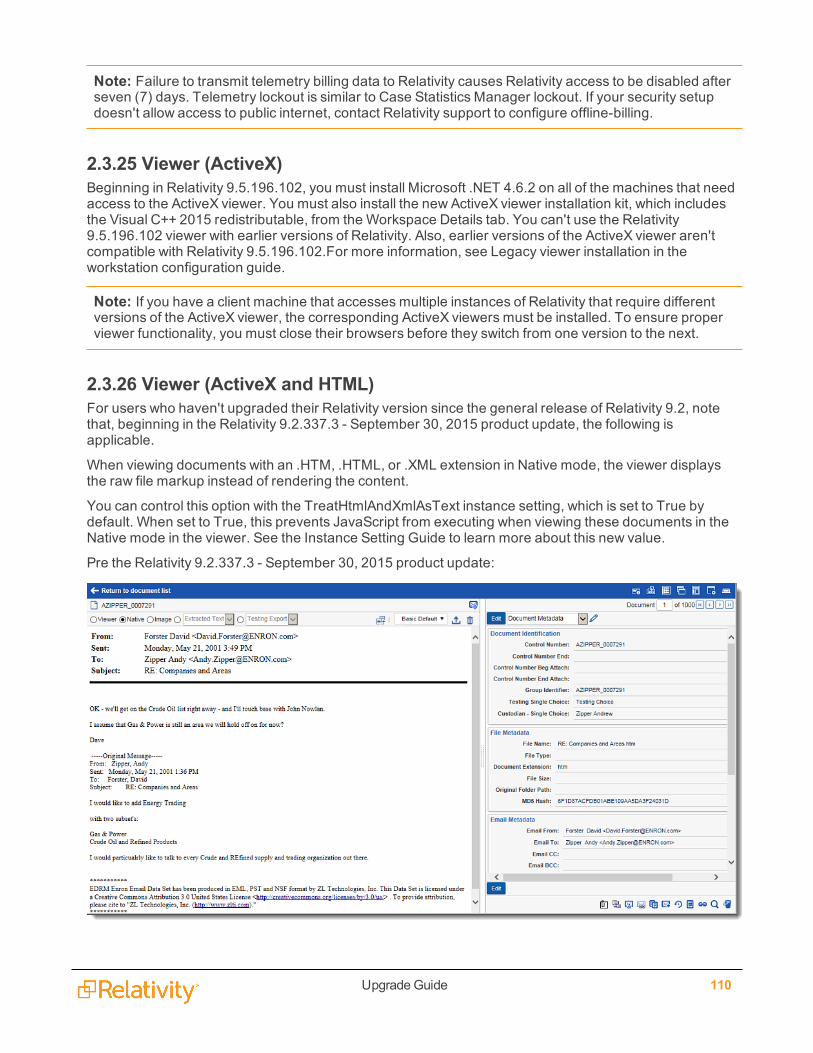
UpgradeGuide 110
Note: Failure to transmit telemetry billing data to Relativity causes Relativity access to be disabled afterseven (7) days. Telemetry lockout is similar to Case Statistics Manager lockout. If your security setupdoesn't allow access to public internet, contact Relativity support to configure offline-billing.
2.3.25 Viewer (ActiveX)Beginning in Relativity 9.5.196.102, you must install Microsoft .NET 4.6.2 on all of the machines that needaccess to the ActiveX viewer. You must also install the new ActiveX viewer installation kit, which includesthe Visual C++ 2015 redistributable, from the Workspace Details tab. You can't use the Relativity9.5.196.102 viewer with earlier versions of Relativity. Also, earlier versions of the ActiveX viewer aren'tcompatible with Relativity 9.5.196.102.For more information, see Legacy viewer installation in theworkstation configuration guide.
Note: If you have a client machine that accesses multiple instances of Relativity that require differentversions of the ActiveX viewer, the corresponding ActiveX viewers must be installed. To ensure properviewer functionality, you must close their browsers before they switch from one version to the next.
2.3.26 Viewer (ActiveX and HTML)For users who haven't upgraded their Relativity version since the general release of Relativity 9.2, notethat, beginning in the Relativity 9.2.337.3 - September 30, 2015 product update, the following isapplicable.
When viewing documents with an .HTM, .HTML, or .XML extension in Native mode, the viewer displaysthe raw file markup instead of rendering the content.
You can control this option with the TreatHtmlAndXmlAsText instance setting, which is set to True bydefault. When set to True, this prevents JavaScript from executing when viewing these documents in theNative mode in the viewer. See the Instance Setting Guide to learn more about this new value.
Pre the Relativity 9.2.337.3 - September 30, 2015 product update:
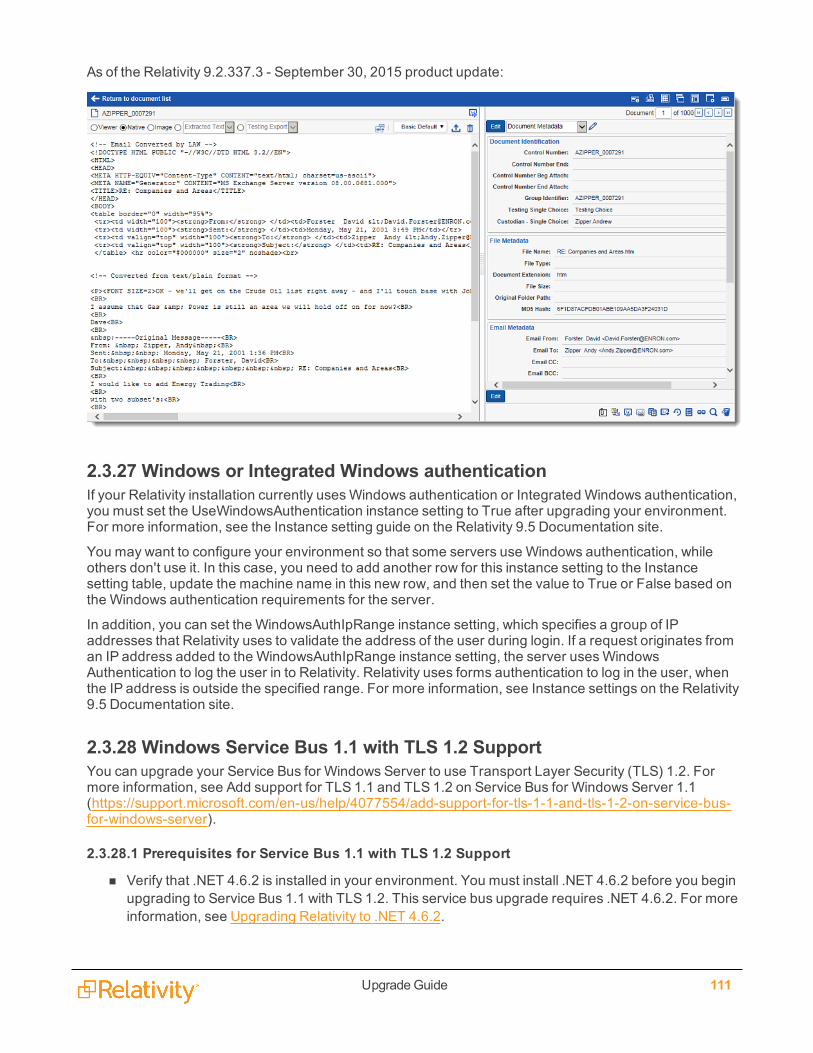
UpgradeGuide 111
As of the Relativity 9.2.337.3 - September 30, 2015 product update:
2.3.27 Windows or Integrated Windows authenticationIf your Relativity installation currently usesWindows authentication or Integrated Windows authentication,you must set the UseWindowsAuthentication instance setting to True after upgrading your environment.For more information, see the Instance setting guide on the Relativity 9.5 Documentation site.
You may want to configure your environment so that some servers use Windows authentication, whileothers don't use it. In this case, you need to add another row for this instance setting to the Instancesetting table, update the machine name in this new row, and then set the value to True or False based onthe Windows authentication requirements for the server.
In addition, you can set the WindowsAuthIpRange instance setting, which specifies a group of IPaddresses that Relativity uses to validate the address of the user during login. If a request originates froman IP address added to the WindowsAuthIpRange instance setting, the server usesWindowsAuthentication to log the user in to Relativity. Relativity uses forms authentication to log in the user, whenthe IP address is outside the specified range. For more information, see Instance settings on the Relativity9.5 Documentation site.
2.3.28 Windows Service Bus 1.1 with TLS 1.2 SupportYou can upgrade your Service Bus for Windows Server to use Transport Layer Security (TLS) 1.2. Formore information, see Add support for TLS 1.1 and TLS 1.2 on Service Bus for Windows Server 1.1(https://support.microsoft.com/en-us/help/4077554/add-support-for-tls-1-1-and-tls-1-2-on-service-bus-for-windows-server).
2.3.28.1 Prerequisites for Service Bus 1.1 with TLS 1.2 Support
n Verify that .NET 4.6.2 is installed in your environment. You must install .NET 4.6.2 before you beginupgrading to Service Bus 1.1 with TLS 1.2. This service bus upgrade requires .NET 4.6.2. For moreinformation, see Upgrading Relativity to .NET 4.6.2.

UpgradeGuide 112
n Verify that you are running Windows Server 2012 or Windows Server 2012 R2, and Microsoft SQLServer 2012. If your environment, doesn't meet these requirements, see Workarounds for ServiceBus 1.1 with TLS 1.2 on page 45.
2.3.28.2 Upgrading to Service Bus 1.1 with TLS 1.2 SupportUse the following steps to upgrade to Service Bus 1.1 with TLS 1.2 Support:
1. Remove all servers from the farm. For more information, see Leaving a Farm (https://msdn.-microsoft.com/en-us/library/dn441430.aspx) on the Microsoft site.
2. Uninstall Service Bus for Windows 1.1 CU1. For more information, see Removing the Service Busfor Windows Server from a Node in a Farm in Uninstalling (https://msdn.microsoft.com/en-us/lib-rary/dn441431.aspx) on the Microsoft site.
3. Uninstall Microsoft Azure Surface Fabric 1.0.
4. Upgrade the SQL Server to support TLS 1.2. For more information, see TLS 1.2 support forMicrosoft SQL Server (https://support.microsoft.com/en-us/help/3135244/tls-1-2-support-for-microsoft-sql-server) on the Microsoft site.
5. Delete the following folder from your server, if it exists on it:
C:\Program Files\Service Bus
6. Install Service Bus for Windows Server 1.1 with TLS 1.2 support by using the WebPI. For moreinformation about WebPI, see the Pre-Installation guide.
7. Run the Invoke-SBFarmUpgrade cmdlet. Open Service Bus PowerShell and run these commands:
$mycert=ConvertTo-SecureString -string myPassword -force -AsPlainTextInvoke-SBFarmUpgrade -SBFarmDBConnectionString 'Data Source=localhost\sqlexpress;Initial Cata-log=SbManagementDB;Integrated Security=True' -CertificateAutoGenerationKey $mycert
Notes:n myPasswordmust be the certificate generation key from when you set up the service busfarm originally. If you do not have this key, you will need to reinstall the service bus fromscratch. Relativity doesn't store anything in the service bus databases permanently, sothere’s no risk of data loss.
n localhost\sqlexpressmust be replaced with the target SQL server that holds the servicebus databases.
See the following confirmation message:
8. Rejoin all servers to the farm. For more information, see the Pre-installation Guide.

UpgradeGuide 113
2.3.28.3 Workarounds for Service Bus 1.1 with TLS 1.2If your Relativity environment doesn't meet the recommendations provided by Microsoft for upgrading toService Bus 1.1 with TLS 1.2 Support, you may want to consider a workaround. This section discussescurrent Microsoft recommendations and possible workarounds.
Microsoft recommends using Windows Server 2012 or Windows Server 2012 R2, and Microsoft SQLServer 2012 with the Service Bus 1.1 with TLS 1.2 Support update. As of February 5, 2018, Relativity hastested the Service Bus TLS 1.2 update with Relativity 9.5 using the following platform combinations:
n Windows Server 2012 and SQL Server 2012
n Windows Server 2012 R2 and SQL Server 2016
n Windows Server 2016 and SQL Server 2014
n Windows Server 2016 and SQL Server 2016
While we aren't aware of any issues on these platforms, we request that you are cautious when deployingthe Service Bus 1.1 with TLS 1.2 Support update. Relativity can't guarantee compatibility outside ofMicrosoft’s official support matrix. Future updates from Microsoft may impact the stability of yourinfrastructure if you aren't running the service bus on a supported OS and SQL platform.
In this case, you may want to consider one of the workarounds provided in the following sections.
Apply TLS registry settingsYou can use the server registry settings to control turning off TLS 1.0 and 1.1 for internet traffic to IIS.Windows offers the following groups of TLS settings:
n Client communication - determines which TLS protocols are used for outbound connections fromthe server that is traffic to the service bus server.
n Server communication - determines which TLS protocols can be accepted that is from internettraffic to IIS.
The registry settings for these TLS protocols are located under the following key prefix:
HKLM:\SYSTEM\CurrentControlSet\Control\SecurityProviders\SCHANNEL\Protocols
For information about the registry keys and testing your environment after applying them, see Disablingcryptographic protocols for PCI compliance (focused on SSL 3.0 and TLS 1.0) blog post athttps://www.johnlouros.com/blog/disabling-cryptographic-protocols-for-pci-compliance.
You can also use the IISCrypto tool to configure TLS protocols. Clear the Set Client Side Protocolscheckbox when using IISCrypto to configure your web servers. IISCrypto uses the Windows registry keyslisted above to control the available TLS protocols.
Note: For server communication, you must keep TLS 1.0 and 1.1 enabled on the server whereWindows service bus is installed. This approach can't be used in smaller environments where the webserver and the service bus are installed on the same VM. We recommend installing the service bus onits own dedicated VM if you want to control TLS settings using registry keys.
Use a load balancerIf your primary use of TLS 1.2 would be for internet-facing traffic, you may want to consider using a loadbalancer. Relativity server traffic may be a lower concern in these cases. By placing a load balancer (such
UpgradeGuide 114
as an F5 or NGINX) in front of Relativity, you can restrict all web traffic to TLS 1.2. Many load balancersprovide you with options to choose which TLS protocols that run on the network.
2.3.29 WorkersThe LongRunningJobTimeout setting enables Invariant to terminate some stuck jobs. Specifically, thisvalue determines the amount of time (in milliseconds) that a worker will work on a job before Invariantterminates that job. The default value is 180,000 milliseconds (30 minutes).
You may want to adjust this value if you have large documents that need additional time for processing, orif you need a shorter feedback loop. If you need to adjust this value, you can manually go into theAppSettings table and increase it accordingly. Previously, Invariant workers could get into a state in whichthey no longer reported progress and no longer completed work, which then required manual interventionto terminate those processes. When Invariant uses the LongRunningJobTimeout setting to stop a job,Relativity provides an error message to the processing user informing them that the timeout limit wasreached.
The Conversion Threads in Use column no longer appears on the Worker Status tab. Additionally, on theworker server page, you can no longer designate a worker for conversion work. To configure yourenvironment for conversion, see Configuring your conversion agents.
2.3.30 Worker manager queueRevisions in the queue manager code have led to the following enhancements:
n A reduction in the volume of connections to the SQL Server
n A reduction in lock waits and thread pool waits
n A general increase in queue parallelism
n A reduction in the number of queries per second hitting the SQL Server
There is no reduction or change in actual queue functionality as a result of these changes. Likewise, theuser experience with the queue manager hasn't changed, with the exception of potential performanceincreases, depending on the size of your environment.
2.3.31 Worker manager serverDocument conversion no longer occurs on the worker manager server. You cannot modify the priority ofthe following conversion jobs on the worker manager server: Pre-convert, Conversion on-the-fly, Massconversion, and Conversion. Instead, you must install Service Bus for Windows Server and configureconversion agents. For more information, see Configuring your conversion agents on page 156.
The Worker manager page no longer displays the following conversion fields: pre-convert, conversion on-the-fly, mass conversion, and conversion.
Beginning in Relativity 9.5.133.118, the URL field on the Worker Manager Server is now called ServerName and displays the fully-qualified server name as the location of the Invariant API on the server.
2.3.32 Workspace upgrade queueThe Workspace Upgrade Queue includes the following columns:
n Store Upgrade Status - the status of the upgrade of the Invariant store, as completed by the Work-space Upgrade Worker agent. The possible values in this column are the same as for the
UpgradeGuide 115
workspace upgrade. This field is empty if you don't have Processing installed.
n Current Store Version - the version of Invariant you are upgrading to.
2.3.33 ConversionConversion occurs on dedicated conversion agents instead of Invariant workers. You must configureconversion agents to ensure document conversion works properly in Relativity 9.5. Your agent serversshould also have one conversion complete agent. For more information, see Configuring your conversionagents.
2.3.34 Database schemaA number of EDDS and Workspace database tables have been changed, added, or removed toaccommodate new functionality in Relativity. For more information, see Database schema updates forRelativity 9.5 in the Relativity Community.
2.3.34.1 Deprecated support for EDDSResource databaseWe have now deprecated the EDDSResource database. Any custom code that writes to theEDDSResource database is subject to breaking changes in future releases.
If you have implemented any custom code that writes to the EDDSResource database, update it as soonpossible to ensure proper functionality of your applications.
Tables formerly created in this database are now added to the workspace database associated with aspecific operation under the new [Resource] schema. The EDDS and all case databases now include thisnew [Resource] schema. It is used for short-lived scratch tables that used to exist on the EDDSResourcedatabase. Additionally, table names haven’t been modified.
Note: Mass Operation handlers that reference tables in this database won’t function properly. Youneed to update these handlers to reference the new location under the workspace database with the[Resource] schema qualifier.
dtSearch index considerationsThere is a new paradigm to configuring and building dtSearch indexes. Keep these items in mind aboutyour indexes after you upgrade:
n For indexes built in Relativity 5.9 or below, you must perform a Full Build for them to work normally.
n Any active indexes built in Relativity 6.2 or above continue work normally.
n After upgrading, you must initially perform a full build of a dtSearch index before you are able to runincremental builds. You can then perform incremental builds, which follow the new paradigm.
n For indexes that are in progress or in an error state when you upgrade, you must perform a FullBuild.
n Indexes with document level errors continue to work normally.
Adding dtSearches as choices to resource poolsWhen upgrading from Relativity 7.x, you need to create a choices with paths to your dtSearch repositories,and then add these choices to the appropriate resource pools.
UpgradeGuide 116
Use the following procedure to add dtSearches to resource pools:
1. Log in to Relativity.
2. From Home, click the Choices tab.
3. ClickNew Choice.
4. In the Field option, select dtSearch Index Share Location.
5. In the Name option, enter the UNC path to the dtSearch repository that is shared with the RelativityServices Account. The share must give this account read and write permissions.
6. Click Save.
7. Click the Resource Pools tab.
8. Click on the name of the resource pool where you want to add the dtSearch choice.
9. On the details view, locate the dtSearch Index Share Locations section.
10. ClickAdd to display the Select dtSearch Index Share Locations dialog.
11. Select the checkbox for your dtSearch Index Share Location and clickOK. The details view now dis-plays this share location in the dtSearch Index Share Locations section.
2.3.35 File shareBeginning in Relativity 9.5.219.30, file share choices are now file share resource server objects. Uponupgrade, all file share choices are mapped to resource servers. For more information, see the Adminguide.
Foreign key removalIn order to improve the performance and usability of document deletion in Relativity, we've removed theforeign keys from the Document and non-system RDO database tables. This includes artifact, singleobject, and multi-object table relationships. Doing this resolves the previous issues involved with globallylocking the Artifact and other tables for the entire duration of a deletion job, which could be lengthy andcould subsequently delay document review. As a result of removing these foreign keys, the delete processwill execute without applying a global lock, and thus no longer interrupts document review in Relativity.
There are three classifications of foreign keys, all of which are affected by this change:
n Keys from the object (Document or RDO) table to the Artifact table.
n Keys on the object table that go to a single object field.
n Keys on multi-object relational f-tables. An f-table stores the link between the objects that are con-nected by a multi-object field in Relativity. In this way, the only columns in an f-table are those thatstore the Artifact ID's of the objects that are linked to each other by that field.
Note: System objects aren't subject to foreign key removal. If the Document object has a foreignkey to the Folder object, that foreign key will remain because Folder is a system object.
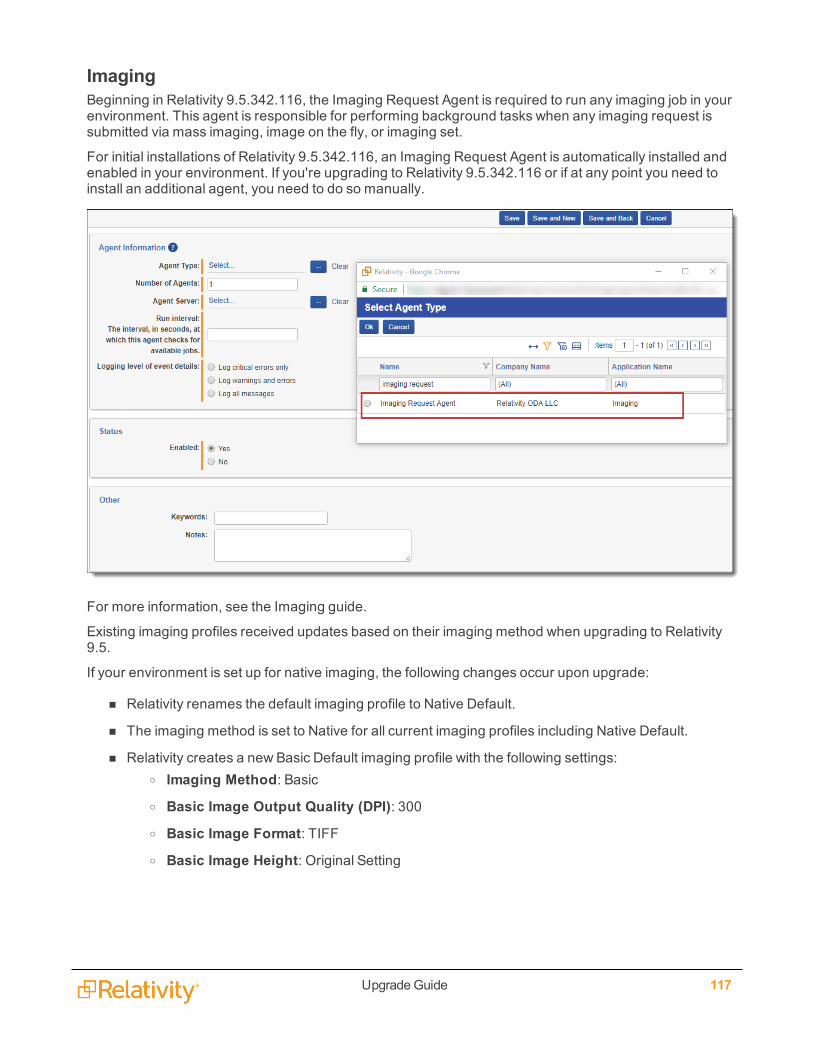
UpgradeGuide 117
ImagingBeginning in Relativity 9.5.342.116, the Imaging Request Agent is required to run any imaging job in yourenvironment. This agent is responsible for performing background tasks when any imaging request issubmitted via mass imaging, image on the fly, or imaging set.
For initial installations of Relativity 9.5.342.116, an Imaging Request Agent is automatically installed andenabled in your environment. If you're upgrading to Relativity 9.5.342.116 or if at any point you need toinstall an additional agent, you need to do so manually.
For more information, see the Imaging guide.
Existing imaging profiles received updates based on their imaging method when upgrading to Relativity9.5.
If your environment is set up for native imaging, the following changes occur upon upgrade:
n Relativity renames the default imaging profile to Native Default.
n The imaging method is set to Native for all current imaging profiles including Native Default.
n Relativity creates a new Basic Default imaging profile with the following settings:o Imaging Method: Basico Basic Image Output Quality (DPI): 300o Basic Image Format: TIFFo Basic Image Height: Original Setting
UpgradeGuide 118
n For any imaging set with it an imaging method set to Basic, the following changes occur:o The imaging profile the imaging set was linked to is copied.
o Relativity sets the copied profile's imaging method is set to Basic.
o The copied profile is prepended with Basic to the profile name.
If your environment is not set up for native imaging, the following changes occur upon upgrade toRelativity 9.5:
n Relativity renames the default imaging profile to Basic Default.
n The imaging method is set to Basic for all current imaging profiles including Basic Default.
2.3.36 Installation of a certificate on the database serverA certificate called RelativityIdentityCertificate is added to the EDDS database on your primary databaseduring a first time installation or an upgrade. The authentication framework uses the thumbprint of thecertificate to sign identity tokens, which are JSONweb tokens (JWTs). The IdentityCertificateThumbprintinstance setting stores the thumbprint associated with your certificate. For more information, see Instancesetting values on the Relativity 9.5 Documentation site.
You also have the option to use your own authentication token-signing certificate. For more information,see Optionally configure an authentication token-signing certificate on the Pre-installation page in theRelativity 9.5 Documentation site.
For a clustered environment, you need to export a copy of your RelativityIdentityCertificate from theprimary database server, and install the certificate to each database server hosting the EDDS. See thefollowing instructions for more information:
n Import or export certificates and private keys at https://technet.microsoft.com/en-us/lib-rary/cc754329(v=ws.11).aspx.
n Optionally configure an authentication token-signing certificate on the Pre-installation page in theRelativity 9.5 Documentation site - These instructions describe the process for configuring your owncustom token-signing certificate, but you can follow these basic steps to install Relativ-ityIdentityCertificate to each database server in a distributed environment.
2.3.37 IISRelativity Web servers no longer require the HTMLArea Application/Virtual Directory. You can safelyremove the HTMLArea Application/Virtual Directory from IIS on all web servers after the upgrade iscomplete.
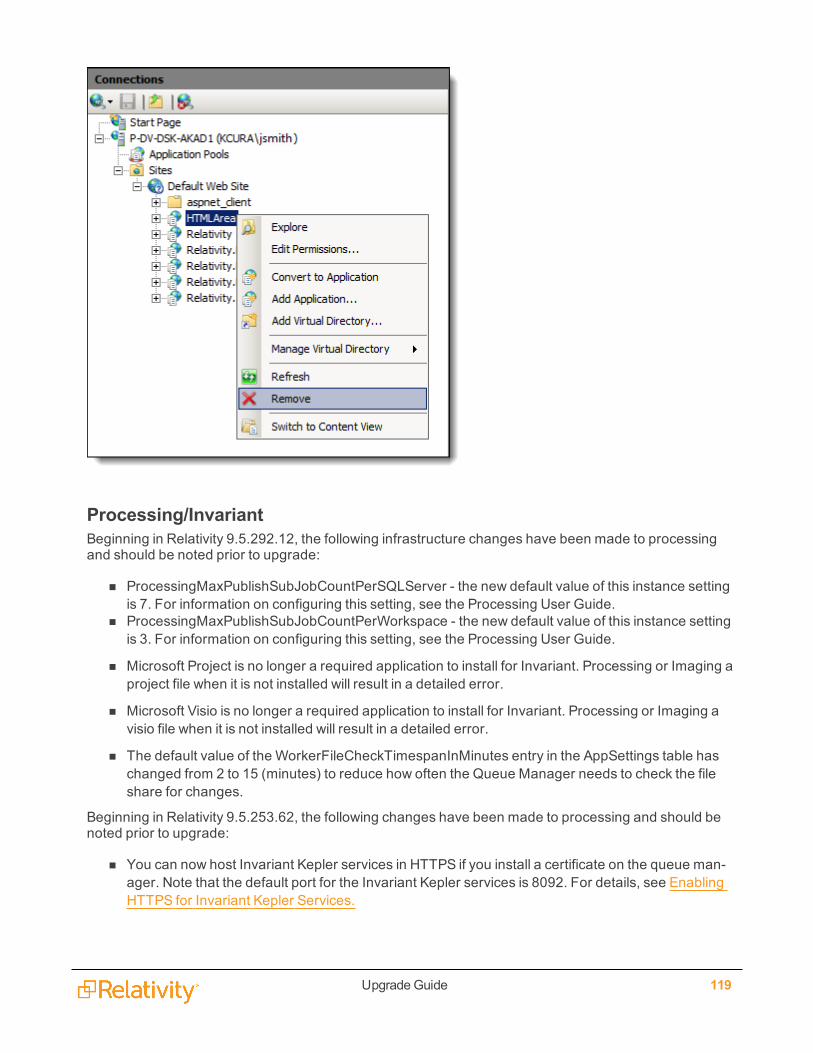
UpgradeGuide 119
Processing/InvariantBeginning in Relativity 9.5.292.12, the following infrastructure changes have been made to processingand should be noted prior to upgrade:
n ProcessingMaxPublishSubJobCountPerSQLServer - the new default value of this instance settingis 7. For information on configuring this setting, see the Processing User Guide.
n ProcessingMaxPublishSubJobCountPerWorkspace - the new default value of this instance settingis 3. For information on configuring this setting, see the Processing User Guide.
n Microsoft Project is no longer a required application to install for Invariant. Processing or Imaging aproject file when it is not installed will result in a detailed error.
n Microsoft Visio is no longer a required application to install for Invariant. Processing or Imaging avisio file when it is not installed will result in a detailed error.
n The default value of the WorkerFileCheckTimespanInMinutes entry in the AppSettings table haschanged from 2 to 15 (minutes) to reduce how often the Queue Manager needs to check the fileshare for changes.
Beginning in Relativity 9.5.253.62, the following changes have been made to processing and should benoted prior to upgrade:
n You can now host Invariant Kepler services in HTTPS if you install a certificate on the queue man-ager. Note that the default port for the Invariant Kepler services is 8092. For details, see EnablingHTTPS for Invariant Kepler Services.

UpgradeGuide 120
n The Service Bus certificate generation key is required on the queue manager and worker servers aspart of the connection between Invariant and Service Bus. For more information see The Pre-install-ation Guide in the Pre-installation topic.
n Invariant stores are now deleted automatically when the Relativity workspaces associated withthem are deleted. For more information, see The Relativity Processing Console Guide.
n Publish is no longer a single long-running process and instead is a distributed process that is brokenup into separate jobs, which leads to more stability by removing this single point of failure and allow-ing the distribution of work across multiple workers. These changes enable publish to operate moreconsistently like the other processing job types in the worker manager server, where batches ofdata are processed for a specific amount of time before completing each transactional job and mov-ing on. Note the upgrade-relevant details regarding distributed publish:
o The following instance settings have been added to facilitate the work of distributed publish.l ProcessingMaxPublishSubJobCountPerRelativitySQLServer - the maximum numberof publish jobs per Relativity SQL server that may be worked on in parallel.
l You can't allocate more jobs per workspace than what is allowed per SQLserver. This means that if this value is set to be lower than the value for theMaxPublishJobCountPerRelativitySQLServer instance setting, then Relativityonly allows the maximum of jobs per SQL server.
l The default value is 7. Leaving this setting at its default value will result inincreased throughput; however, we recommend contacting Support before youupgrade for guidance on what value will be most beneficial to you based on yourenvironment setup.
l This updates on a 30-second interval.
l If you change the default value, note that setting it too high could result in webserver, SQL server, or BCP/file server issues. In addition, other jobs in Relativitythat use worker threads may see a performance decrease, such discovery orimaging. If you set it too low, publish speeds may be lower than expected.
l ProcessingMaxPublishSubJobCountPerWorkspace- the maximum number of publishjobs per workspace that may be worked on in parallel.
l You can't allocate more jobs per workspace than what is allowed per SQLserver. This means that if this value is set to be higher than the value for theMaxPublishJobCountPerRelativitySQLServer instance setting, then Relativityonly allows the maximum of jobs per SQL server. For example, if you have aworkspace limit of 4 and a server limit of 8 and all of your workspaces are on thesame SQL server, you will have at most 8 publish sub jobs running concurrently.
l The default value is 3. Leaving this setting at its default value will result inincreased throughput; however, we recommend contacting Support before youupgrade for guidance on what value will be most beneficial to you based on yourenvironment setup.
l This updates on a 30-second interval.

UpgradeGuide 121
l If you change the default value, note that setting it too high could result in webserver, SQL server, or BCP/file server issues. In addition, other jobs in Relativitythat use worker threads may see a performance decrease, such discovery orimaging. If you set it too low, publish speeds may be lower than expected.
o The ProcessingExportMaxThreads instance setting has been deprecated in accordancewith the addition of the ProcessingMaxPublishSubJobCountPerWorkspace and Pro-cessingMaxPublishSubJobCountPerRelativitySQLServer instance settings, which facilitatethe work of distributed publish.
The following table provides the recommended values for each instance setting per environmentsetup:
Envir-onmentsetup
Pro-cess-ingMaxPub-lishSubJobCountPerWorkspace
Pro-cess-ingMaxPub-lishSubJobCountPerRelativitySQLServer
Tier 1(see theSystemRequire-mentsGuide fordetails)
3 7
Tier 2(see theSystemRequire-mentsGuide fordetails)
6 12
Relativ-ityOnebaseline
3 7
Beginning in Relativity 9.5.133.118, the following Invariant installation components are new:
n To accommodate multiple communication protocols and to simplify how you configure the workermanager server in Relativity, the URL field on the Worker Manager Server layout is now called“Server Name,” and it no longer requires a net.tcp reference that includes a port number. It alsodoesn’t require a domain unless the worker manager server and Relativity are on different domain.For more information, see the Admin Guide.
n You have the option of using the Invariant.Handlers installer to update only the file handlers in yourInvariant instance without having run the entire Invariant installer. The handlers installer is availablefor upgrades only. Note that this installer stops and starts workers automatically during the file
UpgradeGuide 122
syncing process, which means that no manual worker stoppage is required. For more information,see the Processing installation guide.
Note: A full upgrade to Relativity 9.5.133.118 is required before you can use the handlersinstaller to upgrade to a newer set of handlers. Going forward, you won't be required to upgradeyour Relativity version in order to use the handlers installer.
You can configure the number of concurrent threads dedicated to OCR, which can mitigate CPUbottlenecks. This is possible through the following changes:
n The MaxConversionThreads column has been removed from the Invariant.dbo.Workstations table,as it was longer in use since conversion became a separate service.
n The Invariant.dbo.Workstations table now includes a MaxOcrThreads column, which stores thenumber of concurrent threads that are allowed to perform an OCR job at a single time. A value of “0”means unlimited, and any other value limits to that number. The default and recommended value is0. You should only change this value if the Worker CPU is at 100%, and a performance degradationduring text extraction.
The following changes were made to the worker manager server installation process beginning inRelativity 9.5.41.87 and should be noted prior to upgrading:
n Each Invariant component has a machine-specific encryption for its connection strings. These arenow found in a folder called LocalSettings, rather than the previous Settings folder, which holdsother config files. The installer now automatically creates the workers’ connection strings, and theyare no longer created in the network share. Note that you will still see a placeholder folder on the net-work share that doesn’t contain any data.
n There is a new parameter in the Invariant response file called DATABASEINSTALLPATH, which isthe local folder where the Invariant.DBUpdater.exe, Invariant.NIST.InstallUtility.exe, and Invari-ant.Deployment.exe utilities were automatically installed during database installation. These threeexecutables have been moved out of the network share to the local machine where the database isinstalled.
n After the database and queue manager upgrades are complete, you must run the Invariant installeron all workers. This is only applicable for upgrades from Relativity 9.4.398.62 (December 21, 2016)or lower to the full release of Relativity 9.5 (January 25, 2017) and above, meaning all monthlyproduct updates of 9.5. If you're performing a fresh installation of Relativity 9.5, you will need to runthe installer on each Worker Manager and Worker server; however, any subsequent upgrade willonly require you to run the installer from the Worker Manager server, which will upgrade all workerservers automatically, thus eliminating the need to run the installer on each server individually.
The following processing changes may impact your upgrade experience:
n When you change the URL for the queue manager, you're required to perform an IIS reset on theRelativity server in order to clear the cache.
n You no longer map processing fields through the processing profile. You nowmap through a newSource field on the Field layout, which takes you to a catalog containing the most common fieldsthat are discovered during processing. Note the following details regarding this change:
o Relativity provides 46 new processing fields, in addition to the 81 fields previously provided,bringing the total number of fields that are available to map to 127.

UpgradeGuide 123
o The processing profile no longer contains the Processing Fields associative object list view.
o If you don't install the Processing application, Relativity still allows you to map fields as long asyou've added the worker manager server to the resource pool.
o Relativity transfers any fields mapped in the processing profile named "Default" to the fieldmapping table. If the name of the original Default profile has been changed, that profile is stillused. If you haven't mapped any fields on the Default profile in 9.3, and one or more other pro-files do have fields mapped, Relativity doesn't automatically transfer fields when you upgradeto 9.5.
n You can now install Microsoft Office 2013 on your worker servers; however, due to a performancedegradation in text extraction when using Office 2013, we recommend that you continue to useOffice 2010 with Relativity 9.5. When you upgrade from Office 2010 to 2013, it's recommended thatyou uninstall 2010 and then install 2013. If you don't uninstall 2010 prior to installing 2013, you mayneed to do a repair on 2013 in order to get it working properly.
n If you are upgrading from Relativity 9.3 (or a lower version) to 9.5 you may be required to manuallyinstall Visual C++ redistributable packages on the worker servers before running the Invariantupgrade. For details, see the Worker Manager Server Installation Guide.
n The WebAPI setting in IIS is now set to Anonymous Authentication by default and is no longer set toWindows Authentication. You must keep this set to Anonymous Authentication in order to publishdocuments to a workspace using the worker manager server.
Processing to Data Grid no longer requires the RabbitMQ server. To remove RabbitMQ from yourRelativity environment, see Removing RabbitMQ.
When upgrading the Processing application from 7.5 to Relativity 9.5, we strongly recommend that youfirst complete any outstanding processing sets in 7.5 before upgrading. However, note the following if youperform an upgrade and outstanding processing sets exist in 7.5:
n All documents published in 7.5 will retain the 7.5 document numbering format of nine digits.
n All documents published or republished in Relativity 9.5 will have the new 10 digit document num-bering format. This new format extends to the Attachment Document ID, Parent Document ID, andGroup ID fields.
n Documents republished in Relativity 9.5 could potentially be duplicated with the new document num-bering format.
n Reference fields such as the Attachment Document ID, Parent Document ID, and Group ID on doc-uments republished in Relativity 8 may not accurately reference the correct documents.
Specific versions of Invariant are exclusively compatible with specific versions of Relativity. For thisreason, don't attempt to upgrade Invariant independent of Relativity, as doing so will result in significantissues. For example, don't upgrade from Invariant 3.3, which is supported by Relativity 8.2, to Invariant 4.0without also upgrading to Relativity 9.0. The following table breaks down which versions of Invariant aresupported by which versions of Relativity:
Invariant version Relativity version
Invariant 3.0 Relativity 7.5
Invariant 3.1 Relativity 8.0
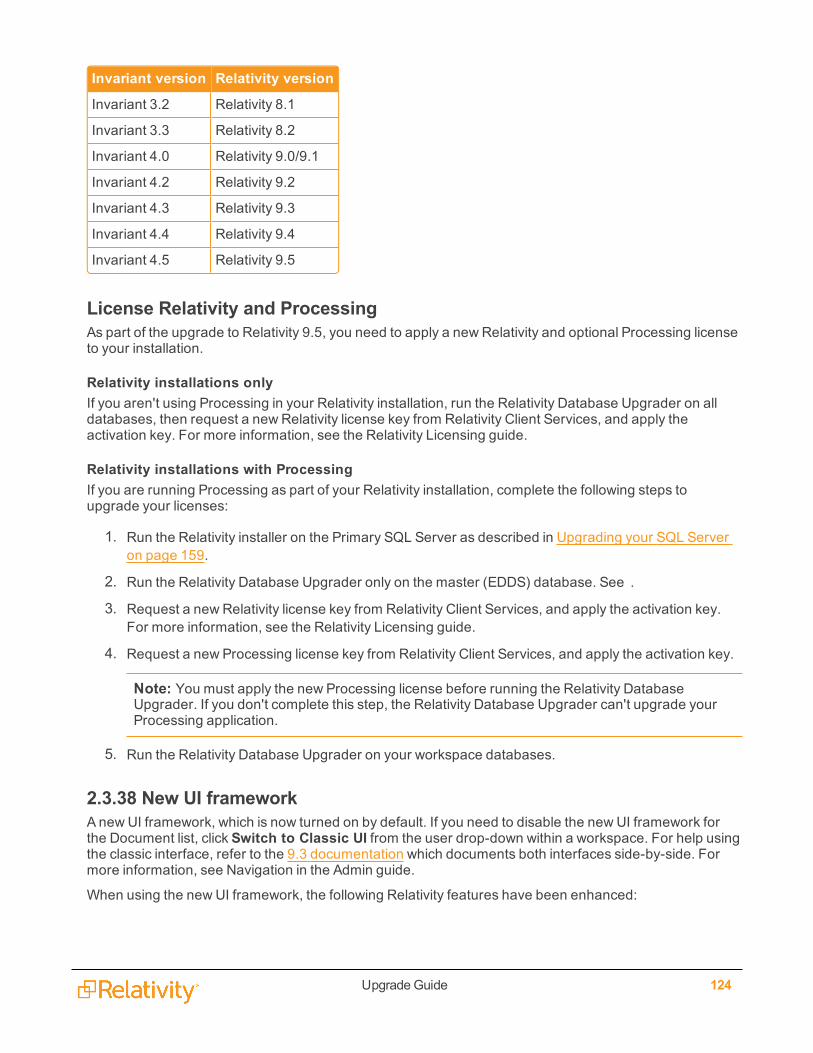
UpgradeGuide 124
Invariant version Relativity version
Invariant 3.2 Relativity 8.1
Invariant 3.3 Relativity 8.2
Invariant 4.0 Relativity 9.0/9.1
Invariant 4.2 Relativity 9.2
Invariant 4.3 Relativity 9.3
Invariant 4.4 Relativity 9.4
Invariant 4.5 Relativity 9.5
License Relativity and ProcessingAs part of the upgrade to Relativity 9.5, you need to apply a new Relativity and optional Processing licenseto your installation.
Relativity installations onlyIf you aren't using Processing in your Relativity installation, run the Relativity Database Upgrader on alldatabases, then request a new Relativity license key from Relativity Client Services, and apply theactivation key. For more information, see the Relativity Licensing guide.
Relativity installations with ProcessingIf you are running Processing as part of your Relativity installation, complete the following steps toupgrade your licenses:
1. Run the Relativity installer on the Primary SQL Server as described in Upgrading your SQL Serveron page 159.
2. Run the Relativity Database Upgrader only on the master (EDDS) database. See .
3. Request a new Relativity license key from Relativity Client Services, and apply the activation key.For more information, see the Relativity Licensing guide.
4. Request a new Processing license key from Relativity Client Services, and apply the activation key.
Note: You must apply the new Processing license before running the Relativity DatabaseUpgrader. If you don't complete this step, the Relativity Database Upgrader can't upgrade yourProcessing application.
5. Run the Relativity Database Upgrader on your workspace databases.
2.3.38 New UI frameworkA new UI framework, which is now turned on by default. If you need to disable the new UI framework forthe Document list, click Switch to Classic UI from the user drop-down within a workspace. For help usingthe classic interface, refer to the 9.3 documentation which documents both interfaces side-by-side. Formore information, see Navigation in the Admin guide.
When using the new UI framework, the following Relativity features have been enhanced:
UpgradeGuide 125
n Cluster visualization
n Dashboards
n Document list and tabs throughout Relativity
n Pivot
n Sampling
n Search panel and search browser
ProductionThe following changes occur to existing productions on upgrade:
n The Relativity.Core agents for production and branding are upgraded to ADS Deployed agents. TheRelativity.Core agents for production and branding are not available in a 9.3+ environment.
n Any staged or errored productions in an environment are set to a status of New and you mustrestage the production before running.
n If any produced productions contain native files with their Bates numbers previously stored in theDocument table, the Bates numbers for the native files are moved to the Production object, and maynot reflect actual Bates values if those values were overwritten.
n The Production Error field no longer exists on the Production object.
n Production sets you ran before upgrading to Relativity 9.5 aren't available to select for merging withnew production sets when you select the new Existing production numbering choice. Any customproduction work-arounds break upon upgrade. For more information on new productions func-tionality, see the Admin guide.
n Users with full permissions to the Production object prior to upgrading to Relativity 9.3 do not auto-matically gain permissions to the new Production Data Source object, unless they also have theManage Object Types permission under Admin Operations. Users need rights to the new Pro-duction Data Source object to add or edit production data sources after upgrading to Relativity 9.3+.
n Any preexisting production fields are converted to a production data source upon upgrade.
n If you upgrade from Relativity 7.x to Relativity 9.5 and you were previously using the ProductionTracker application, review the Production Tracker 9.5 considerations PDF in the Relativity Com-munity.
n Beginning in 9.5.162.111, Productions includes an upgrade step to migrate data from the oldProductionInformation schema to the new schema introduced in 9.5.162.111.
n An upgrade from Relativity 9.x to 9.5 can fail if the workspace you're upgrading already contains aRelativity field with the name Production. You must rename this field.
RAR upgrade notesYou can upgrade an Assisted Review project while review is in progress for a round or between rounds.No work is required to ensure that Assisted Review operates properly in Relativity 9.5 before or after you
UpgradeGuide 126
upgrade Assisted Review from Relativity 7.5; however, it may be helpful to note the following tasks thatRelativity automatically completes when you upgrade Assisted Review. Relativity:
n Gives old rounds a round type value of 7.5.
n Creates an Assisted Review saved searches folder if it didn't already exist.
n Creates a project-specific saved searches folder.
n Copies the project saved search to the new folder and creates four saved searches if categorizationhas already occurred.
n Sets all issues to a Medium Importance level.
n Replaces the Net Change graph in the Round Summary with Volatility. Note that it will take severalrounds to generate volatility information; for example, if you upgrade prior to starting the fourthround, volatility displays in the report after you finish the fifth round.
Note: When upgrading from version 7.5 to 9, every project that is currently active (in the middle of around) will receive an error until you set the positive choice for designation.
2.3.39 Relativity service busThe Relativity 9.5 infrastructure now includes a new component called the Relativity service bus. Thiscomponent uses Service Bus for Windows Service as its underlying framework. Before you upgradeRelativity, you must now install Service Bus for Windows Server on a server or VM that is accessiblethroughout your Relativity instance. You must then configure a Service Bus for Windows Server farm inyour environment. For information about prerequisites, see Service Bus for Windows Server in the Pre-Installation guide.If you have a proxy server or firewall setup in the environment, you must allowcommunication to the FQDN of the Windows Service Bus server from the servers you are installing theRelativity Service Bus or else the installer will fail to upgrade the server.
After installing Service Bus for Windows Server, you can upgrade your primary SQL Server. You can theninstall the Relativity service bus by running the upgrade installer on the machine where you installedService Bus for Windows Server. Finally, follow the standard instructions for upgrading other Relativitycomponents. For more information, see the Relativity Service Bus guide.
2.3.40 Required certificates for RelativityRelativity 9.5 now verifies that all HTTPS services running in your environment have a trusted certificate.You may need to install additional certificates to components of your Relativity installation running HTTPSservices to avoid error messages and insecure-connection icons. For more information, see the Pre-installation Guide.
ViewerRelativity 9.5 uses Oracle Outside In version 2016.2. When you upgrade to Relativity 9.5, you can installthe new version of the viewer using the steps described in the Workspace Configuration guide. Previousversions of the viewer aren't upgraded, but you can run two versions of the viewer concurrently, so there'sno need to uninstall previous versions.
UpgradeGuide 127
2.3.41 SearchingUpon upgrade to 9.5.133.118, Relativity interprets straight quotes and curly quotes in searching the same.Previously, if you searched using curly quotes in a long text field using the CONTAINS filter, Relativitysearched for the quote itself instead of grouping terms together. Now, Relativity groups terms betweendouble quotes together regardless of the quote type. This may mean the number of results in yoursearches may change.
2.3.42 Scriptsn Creating or editing scripts is controlled by the AllowAddOrEditScripts instance setting. You must
enable this instance setting to give users the ability to create or edit scripts within a workspace. Formore information, see AllowAddOrEditScripts in the instance settings guide.
n Beginning in 9.5.196.102, the Set extracted text size script is no longer available in the RelativityScript Library. If you have this script installed in a workspace, it is removed upon upgrade. You canuse the Set long text size mass operation in place of this script.
2.3.43 System requirementsn Windows Server 2008 R2 (64-bit) is no longer compatible with 9.5. Relativity 9.5 is only compatible
with Windows Server 2008 R2 (64-bit) w Service Pack 1.
n As of August 31, 2017, we no longer support Internet Explore (IE) 10. Please upgrade to a com-patible version of IE 11.
2.3.44 Viewer (ActiveX)Beginning in Relativity 9.5.196.102, you must install Microsoft .NET 4.6.2 on all of the machines that needaccess to the ActiveX viewer. You must also install the new ActiveX viewer installation kit, which includesthe Visual C++ 2015 redistributable, from the Workspace Details tab. You can't use the Relativity9.5.196.102 viewer with earlier versions of Relativity. Also, earlier versions of the ActiveX viewer aren'tcompatible with Relativity 9.5.196.102.For more information, see Legacy viewer installation in theworkstation configuration guide.
Note: If you have a client machine that accesses multiple instances of Relativity that require differentversions of the ActiveX viewer, the corresponding ActiveX viewers must be installed. To ensure properviewer functionality, you must close their browsers before they switch from one version to the next.
2.3.45 Configure the viewer drawing delayIf you anticipate multiple users using the same machine at the same time to perform a review, you can usea registry value to establish a drawing delay in the image viewer. This is only recommended when thestandard refresh rate causes CPU utilization issues,which should only occur in a Citrix environment.
This value represents the number of milliseconds between calls to redraw the screen. In previous versionsof Relativity, the image viewer behaved as though this value were set to 250. Increasing this value willreduce CPU usage when creating and/or modifying redactions and highlights, but it will also result in achoppier experience.
Changes to this value are not reflected in real-time, so you'll have to reload the image viewer for changesto take effect.
To configure the drawing delay, perform the following steps:
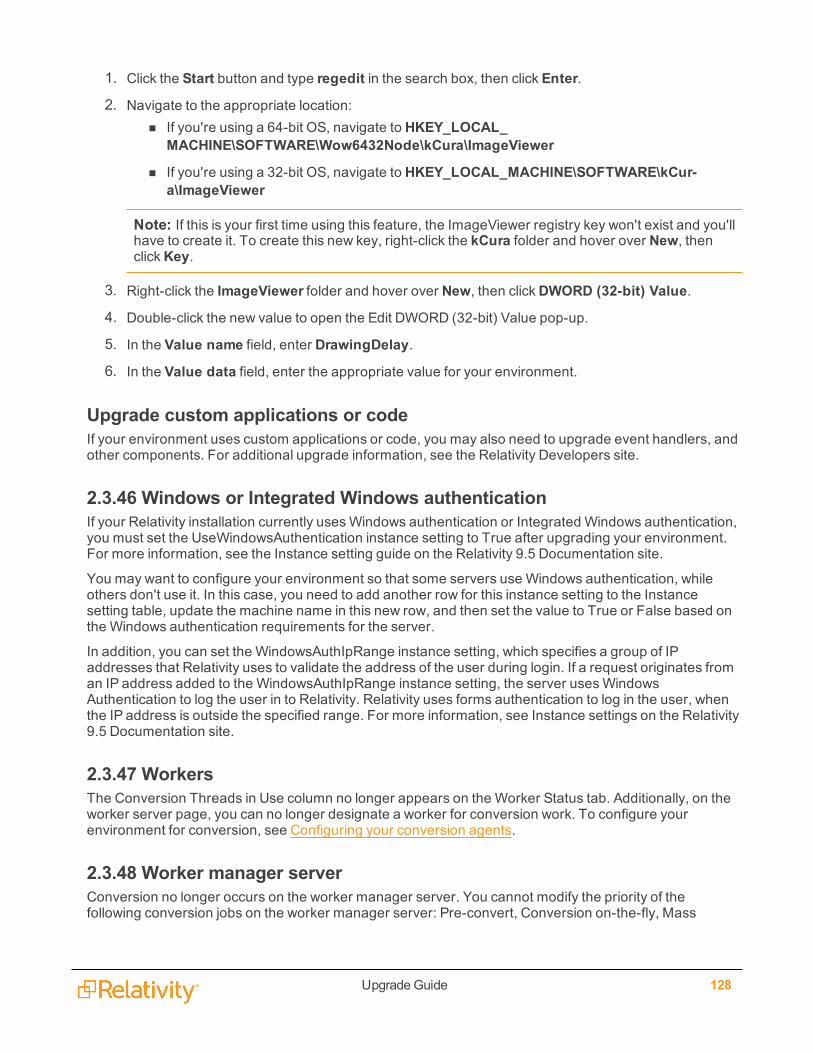
UpgradeGuide 128
1. Click the Start button and type regedit in the search box, then click Enter.
2. Navigate to the appropriate location:n If you're using a 64-bit OS, navigate to HKEY_LOCAL_
MACHINE\SOFTWARE\Wow6432Node\kCura\ImageViewer
n If you're using a 32-bit OS, navigate to HKEY_LOCAL_MACHINE\SOFTWARE\kCur-a\ImageViewer
Note: If this is your first time using this feature, the ImageViewer registry key won't exist and you'llhave to create it. To create this new key, right-click the kCura folder and hover over New, thenclickKey.
3. Right-click the ImageViewer folder and hover over New, then clickDWORD (32-bit) Value.
4. Double-click the new value to open the Edit DWORD (32-bit) Value pop-up.
5. In the Value name field, enter DrawingDelay.
6. In the Value data field, enter the appropriate value for your environment.
Upgrade custom applications or codeIf your environment uses custom applications or code, you may also need to upgrade event handlers, andother components. For additional upgrade information, see the Relativity Developers site.
2.3.46 Windows or Integrated Windows authenticationIf your Relativity installation currently usesWindows authentication or Integrated Windows authentication,you must set the UseWindowsAuthentication instance setting to True after upgrading your environment.For more information, see the Instance setting guide on the Relativity 9.5 Documentation site.
You may want to configure your environment so that some servers use Windows authentication, whileothers don't use it. In this case, you need to add another row for this instance setting to the Instancesetting table, update the machine name in this new row, and then set the value to True or False based onthe Windows authentication requirements for the server.
In addition, you can set the WindowsAuthIpRange instance setting, which specifies a group of IPaddresses that Relativity uses to validate the address of the user during login. If a request originates froman IP address added to the WindowsAuthIpRange instance setting, the server usesWindowsAuthentication to log the user in to Relativity. Relativity uses forms authentication to log in the user, whenthe IP address is outside the specified range. For more information, see Instance settings on the Relativity9.5 Documentation site.
2.3.47 WorkersThe Conversion Threads in Use column no longer appears on the Worker Status tab. Additionally, on theworker server page, you can no longer designate a worker for conversion work. To configure yourenvironment for conversion, see Configuring your conversion agents.
2.3.48 Worker manager serverConversion no longer occurs on the worker manager server. You cannot modify the priority of thefollowing conversion jobs on the worker manager server: Pre-convert, Conversion on-the-fly, Mass
UpgradeGuide 129
Conversion, and Conversion. Instead, you must install Service Bus for Windows Server and configureconversion agents. For more information, see Configuring your conversion agents on page 156.
The Worker manager page no longer displays the following conversion fields: pre-convert, conversion on-the-fly, mass conversion, and conversion.
2.4 6.x to 9.5 Relativity updatesLearn more about the changes to your Relativity 6.x environment after you upgrade to Relativity 9.5. Thissection also includes post-upgrade processes you'll need to follow.
6.x to 9.5 Relativity updatesn Agent service
n Analytics on the next page
n Applications
n Audit on page 132
n Authentication on page 24
n Conversion
n Database schema
n dtSearch index considerations on page 134
n Document Table Trigger removal considerations on page 134
n File share on page 27
n Upgrade considerations for Relativity 9.5 on page 17
n Upgrade considerations for Relativity 9.5 on page 17
n Upgrade considerations for Relativity 9.5 on page 17
n Upgrade considerations for Relativity 9.5 on page 17
n License Relativity on page 139
n Network load balancing on page 143
n Upgrade considerations for Relativity 9.5 on page 17
n Pre-installation steps for web servers on page 146
n Upgrade considerations for Relativity 9.5 on page 17
n Relativity admin and service account email addresses on page 146
n Relativity Desktop Client (RDC) on page 147
n Relativity installer updates on page 147
n Upgrade considerations for Relativity 9.5 on page 17
n Upgrade considerations for Relativity 9.5 on page 17
n Scripts
UpgradeGuide 130
n Upgrade considerations for Relativity 9.5 on page 17
n Upgrade considerations for Relativity 9.5 on page 17
n Viewer on page 150
n Upgrade considerations for Relativity 9.5 on page 17
n Upgrade considerations for Relativity 9.5 on page 17
n Windows Service Bus 1.1 with TLS 1.2 Support on page 44
n Windows Service Bus 1.1 with TLS 1.2 Support on page 152
n Workers
n Worker manager server
2.4.1 Agent serviceAll Windows services now have Recovery Properties. If the Agent service should ever crash due to anunhandled exception, it recovers and immediately restarts.
2.4.2 AnalyticsRelativity 9.3 introduces a new Textual Near Duplicate Identification algorithm with the following benefits:
n The new algorithm can greatly improve performance for both large and complex data sets.
n With the new algorithm you can scale your Analytics server by adding CPU cores and RAM in orderto achieve faster performance.
Prior to Relativity 9.3, scaling environments did not impact performance. Without scaling past 8 cores, youshould experience performance comparable to pre-9.3 on most data sets. The Textual Near DuplicateIdentification algorithm in Relativity 9.3 uses different, more efficient methods to obtain similar results.However, results may differ slightly from pre-9.3 results if a Full Analysis is run against a preexistingstructured analytics set. If you need preexisting results use an Incremental Analysis instead. Theincremental analysis keeps the pre-9.3 results for all preexisting documents, but the newly addeddocuments use the new algorithm to match with existing groups.
Updating the default SSL/TLS certificate for the Content AnalystYou must update the default SSL/TLS certificate on your Analytics server because Relativity requires acertificate signed by a trusted certificate authority (CA). By default, the CAAT service runs over anuntrusted SSL/TLS certificate. For more information, see Updating the default SSL/TLS certificate onpage 217.
2.4.2.1 Updating RestUriForCAAT instance settingAs part of upgrading (post-upgrade), you must have a valid URL value entered for the RestUriForCAATinstance setting. This is the FQDNURL to the web server hosting your Kepler services (e.g.,https://client.domain.name/Relativity.REST/API).
2.4.2.2 Upgrading/installing Relativity Analytics 9.5An install or upgrade of Relativity Analytics 9.5 is required for Relativity 9.5. To install Relativity Analytics9.5, you must run the Relativity Analytics Server Setup wizard after installing or upgrading your Relativityinstance.
UpgradeGuide 131
When you run the Relativity Analytics Server Setup wizard, the wizard automatically:
n Installs the CAAT service
n Deploys the Relativity library files
n Configures the java heap size (set by default to half of RAM)
n Allows you to set an index path on new install, thus eliminating the need to manually set the locationof indexes
n Sets the CAAT Windows service to log in as the Relativity Service Account
Note: If you are upgrading from Relativity 9.3.332.21 (CAAT 3.17) or lower, first run the Relativity9.3.362.9 or 9.4 Analytics server installer using the instructions at Running the Relativity Analyticsinstaller for versions previous to Relativity 9.5.133.118. Contact Support for this installer. After this step,then run the Relativity 9.5 response file-based installer.
2.4.2.3 Analytics index enhancementsStarting with Relativity 9.5.196.102, Analytics indexes are now RDO's. There are a few considerations withthis update:
n Indexes will no longer have the default saved searches available to set as the training and search-able set sources. For legacy indexes that are upgraded, the saved search must be set when editingthe index. If you do not set the searches, you will only be able to build and activate / deactivate theindex (provided it was already populated with the default searches)
n After the upgrade, you will no longer have the option to preserve cluster multiple choice and coher-ence score fields when deleting the cluster set. They will always be deleted.
n OCR and GoWord filter support has been deprecated from Analytics Indexes. On subsequent pop-ulations after upgrading, any OCR or GoWord filter set on the Analytics profile will no longer beapplied. If the legacy index was populated with these filters, migrated to an RDO, and then rebuilt oractivated, the filters still apply (they are set on population).
n When you upgrade, the Analytics Core install event handlers will create a new RDO for each exist-ing index and a new RDO for each existing cluster set. These new object types and instances inher-its permissions from their analogous source objects. For example:
o Analytics Index RDO workspace permissions are copied from Search Index workspace per-missions
o Analytics Index RDO instance permissions are copied from Search Index instance per-missions
o Cluster Set RDO workspace permissions are copied from Search Index workspace per-missions
o Cluster Set RDO instance permissions are copied from the multiple choice cluster field's itemlevel permissions
2.4.2.4 Email thread visualizationUsers must have the Analytics application installed in the workspace, and the Email Author Date IDmustbe present for the emails. The Email Author Date ID is only available for emails run through a full analysis
UpgradeGuide 132
using structured analytics in Relativity 9.5.41.87 and above. The email thread visualization pane will notwork for email threads from previous versions unless a full analysis is run against the structured analyticsset containing the emails after upgrading to Relativity 9.5.41.87 or higher.
2.4.2.5 Multiple structured analytic set resultsBeginning in Relativity 9.5.196.102, you can easily store the results for multiple structured analytics setsand set up views that capture the email threading or repeated content identification results of thoseoperations.
Consider the following:
n We recommend you set new relational fields (e.g., Destination Email Thread Group, DestinationEmail Duplicate ID, and Destination Textual Near Duplicate Group) when creating new structuredanalytics sets for email threading or textual near duplicate identification to allow you to easily set upviews that make use of a relational field for each of these sets.
n Upon upgrade, the email thread group, duplicate spare group, and textual near duplicate group rela-tional views display just the Control Number and Edit columns. To display the old fields, you mustunlock the application and update those views. If you run Structured Analytics with the existingapplication relational fields, the relational views will only show the Control Number and Editcolumns. A way to avoid this is by creating and mapping your own relational fields before run time.Then, you can create your own relational view and map that to the custom relational fields.
Note: This upgrade consideration has been addressed in Relativity 9.5.253.62. If you areupgrading to Relativity 9.5.253.62, disregard this item.
n Upon upgrade, email threading and textual near duplicate results are written to new results fieldsthat is only created upon running a Structured Analytics Set. These fields can't be manually createdbefore running the set. This means that it's not possible to create any views, searches, layouts, etc.that reference these fields prior to completing a set. Additionally, views and searches which ref-erence these newly created fields don't carry over on workspace creation because Structured Ana-lytics Sets don't carry over.
Note: This upgrade consideration impacts any Relativity templates that reference the legacyStructured Analytics results fields.
n Upon upgrade, previous inclusive information may change when performing an incremental ana-lysis on an existing email threading set due to the newly created structured Analytics results fields.
2.4.3 ApplicationsThe Solution Snapshot application helps you identify compatibility issues with custom applications in yourenvironment so you can resolve them prior to upgrade. Using the Solution Snapshot application, you canview a list of the applications currently installed in your Application Library and review the applicationowner's recommendation for upgrade. For more information, see the Solution Snapshot documentation.
2.4.4 AuditUpon upgrade, the Audit application is now available at the instance level to report on admin-level audits.You must have Elasticsearch installed and configured to use the Audit tab. If you don't have Elasticsearchinstalled, you can hide this tab. For more information, see the Data Grid guide.
UpgradeGuide 133
2.4.5 AuthenticationConsider the following for upgrading:
n You no longer see the Authentication Data field in the Users User Information section. You nowenter the information you previously entered here in the individual authentication methods. This per-mits more versatile and detailed method implementations.
n Note that when you upgrade, Relativity creates a copy of the eddsdbo.User table before makingany modifications. The table is for reference only, and the copy is named based on the Relativity ver-sion being ungraded from, such as 9_2_AuthenticationUserTableBackupRecord or 9_3_Authentic-ationUserTableBackupRecord. If after upgrading and making sure all users convertedsuccessfully, you may delete the copy table.
n Use the Authentication Profile system to enable only the protocols you need in an environment. Insome cases the upgrade process may enable more protocols than you want. This is due to the pars-ing rules for the AuthenticationData column. Specifically, if you are using Active Directory or ClientCertificate authentications in your environment, the upgrade process may also enable IntegratedAuthentication. If you don't want the Integrated Authentication, you can remove that provider fromthe Authentication Profile after upgrade.
2.4.5.1 User and authentication object permissionsA number of new objects have been introduced, such as Authentication Provider Type, AuthenticationProvider, and Login Method. Upon upgrading to Relativity 9.5, permissions are as follows:
n A user, who has the permissions to view the user objects before an upgrade, post upgrade can viewusers, authentication provider types, authentication providers, and login methods.
n A user, who has the permissions to edit (or delete, a higher level of permission than edit) the userobjects before an upgrade, post upgrade can edit users and login methods. They can also viewauthentication provider types, and authentication providers.
n After upgrade only users in the System Administrators group will have access to view and editOAuth2Client objects.
2.4.6 ConversionConversion occurs on dedicated conversion agents instead of Invariant workers. You must configureconversion agents to ensure document conversion works properly in Relativity 9.5. Your agent serversshould also have one conversion complete agent. For more information, see Configuring your conversionagents.
Data Gridn If your environment uses Data Grid, you must also upgrade to Data Grid 2.3.3.58 or above when
upgrading to Relativity 9.5. For more information, see Upgrading Data Grid.
n Relativity 9.5 introduces the Data Grid Ingestion Management tab to manually retry or cancel DataGrid write requests that failed as a result of infrastructure problems. This feature includes a newagent, the Data Grid Worker Agent, that must be installed and configured upon upgrade. There isalso a new instance setting, IngestionTemporaryFileCacheLocation. For more information, see theData Grid guide.
UpgradeGuide 134
n You no longer need to install the DataGridRESTService on the Analytics server to integrate Relativ-ity Analytics with Relativity Data Grid. If you are upgrading to Relativity 9.5, uninstall theDataGridRESTService from your Analytics server(s). For more information, see Uninstalling theRelativity Data Grid service. We also recommend uninstalling the client node from the Analyticsserver if that server is only dedicated to Analytics in order to free up resources.
n The Instance Settings table and corresponding Relativity tab now includes the AuditDeleteBatchSize and AuditMigrateBatchSize instance settings to specify deletion and migration batch sizes forData Grid for Audit.
For more information, see the Relativity Data Grid guide
2.4.7 Database schema updatesA number of EDDS and Workspace database tables have been changed, added, or removed toaccommodate new functionality in Relativity. For more information, see Database schema updates forRelativity 9.5 in the Relativity Community.
2.4.7.1 Deprecated support for EDDSResource databaseWe have now deprecated the EDDSResource database. Any custom code that writes to theEDDSResource database is subject to breaking changes in future releases.
If you have implemented any custom code that writes to the EDDSResource database, update it as soonpossible to ensure proper functionality of your applications.
Tables formerly created in this database are now added to the workspace database associated with aspecific operation under the new [Resource] schema. The EDDS and all case databases now include thisnew [Resource] schema. It is used for short-lived scratch tables that used to exist on the EDDSResourcedatabase. Additionally, table names haven’t been modified.
Note: Mass Operation handlers that reference tables in this database won’t function properly. Youneed to update these handlers to reference the new location under the workspace database with the[Resource] schema qualifier.
2.4.8 Document Table Trigger removal considerationsRelativity 9.0 includes enhancements that may affect certain areas of your existing environment when youupgrade. Improvements to the database schema make Relativity run faster in 8.1 than in previousversions. If your environment contains custom-developed functionality that involves the RelationalIndex_Xtables or explicitly uses the RI_X columns in the Document tables, then you should refer to the Documenttable trigger removal documentation
2.4.9 dtSearch index considerationsThere is a new paradigm to configuring and building dtSearch indexes. Keep these items in mind aboutyour indexes after you upgrade:
n For indexes built in Relativity 5.9 or below, you must perform a Full Build for them to work normally.
n Any active indexes built in Relativity 6.2 or above continue work normally.
n After upgrading, you must initially perform a full build of a dtSearch index before you are able to runincremental builds. You can then perform incremental builds, which follow the new paradigm.
UpgradeGuide 135
n For indexes that are in progress or in an error state when you upgrade, you must perform a FullBuild.
n Indexes with document level errors continue to work normally.
ECA and InvestigationThe ECA and Investigation and Field Catalog applications are now synchronized, which means that whenyou install the ECA and Investigation application, Relativity automatically maps all of the ECA fields tothose 127 corresponding processing fields found in the Field Catalog. For a list of these fields, see theProcessing User Guide.
Note the following details:
n A number of processing fields were renamed in the Field Catalog. Renamed fields will cause nam-ing conflicts.You can address these conflicts through the standard application framework, which isto either rename the fields or modify their mapping. If you previously processed data into a field thatwas renamed, you will have the same data in two different fields. You can address this through aMass Replace operation on the affected fields.
n The All Custodians field was renamed to All Custodians_Script in the ECA and Investigationapplication. The All Custodians_Script field is a long text field and acts as a another piece ofmetadata for de-duplicated documents. You should select the new All Custodians_Script field whenrunning the Update Duplicate Status script, as this will ensure that no de-duplicated documentsmake it into review.
Fields
2.4.9.1 Allow HTML fieldsAny existing fields with the Allow HTML value set to Yes, you must set the new instance settingSanitizeHTMLOutput to False in order to add HTML alerts and links when a user opens a document forreview.
2.4.10 File shareBeginning in Relativity 9.5.219.30, file share choices are now file share resource server objects. Uponupgrade, all file share choices are mapped to resource servers. For more information, see the Adminguide.
Foreign key removalIn order to improve the performance and usability of document deletion in Relativity, we've removed theforeign keys from the Document and non-system RDO database tables. This includes artifact, singleobject, and multi-object table relationships. Doing this resolves the previous issues involved with globallylocking the Artifact and other tables for the entire duration of a deletion job, which could be lengthy andcould subsequently delay document review. As a result of removing these foreign keys, the delete processwill execute without applying a global lock, and thus no longer interrupts document review in Relativity.
There are three classifications of foreign keys, all of which are affected by this change:
n Keys from the object (Document or RDO) table to the Artifact table.
n Keys on the object table that go to a single object field.
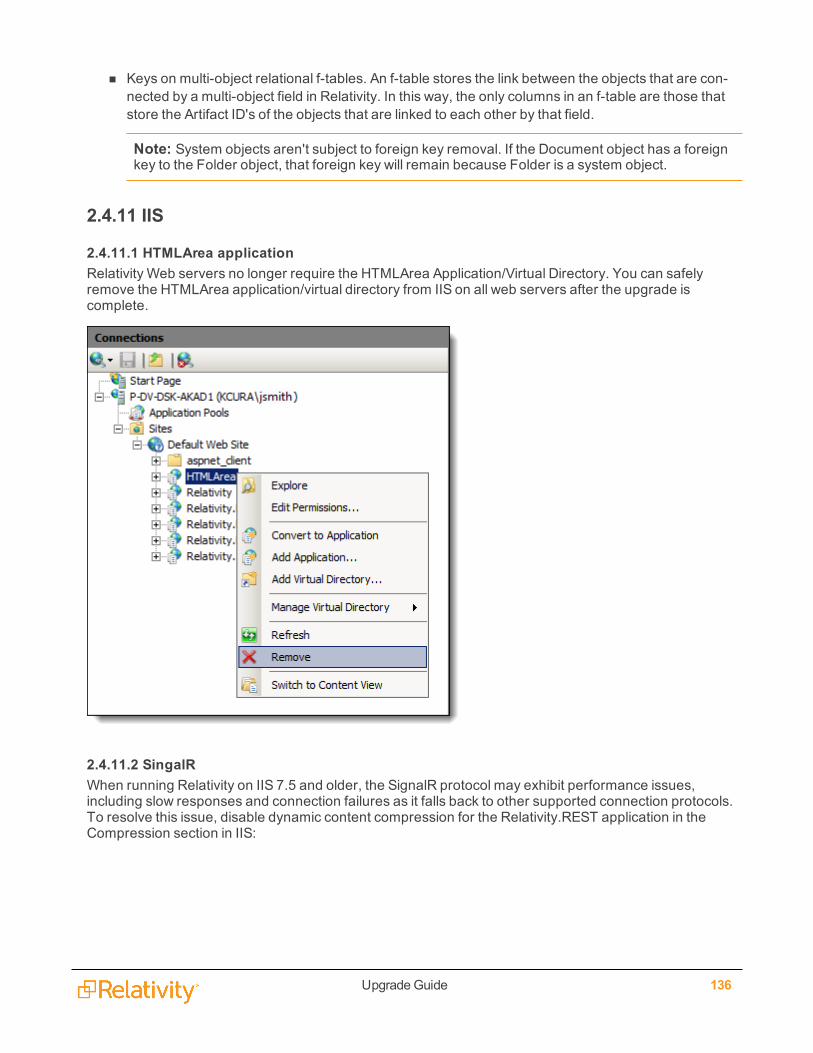
UpgradeGuide 136
n Keys on multi-object relational f-tables. An f-table stores the link between the objects that are con-nected by a multi-object field in Relativity. In this way, the only columns in an f-table are those thatstore the Artifact ID's of the objects that are linked to each other by that field.
Note: System objects aren't subject to foreign key removal. If the Document object has a foreignkey to the Folder object, that foreign key will remain because Folder is a system object.
2.4.11 IIS
2.4.11.1 HTMLArea applicationRelativity Web servers no longer require the HTMLArea Application/Virtual Directory. You can safelyremove the HTMLArea application/virtual directory from IIS on all web servers after the upgrade iscomplete.
2.4.11.2 SingalRWhen running Relativity on IIS 7.5 and older, the SignalR protocol may exhibit performance issues,including slow responses and connection failures as it falls back to other supported connection protocols.To resolve this issue, disable dynamic content compression for the Relativity.REST application in theCompression section in IIS:
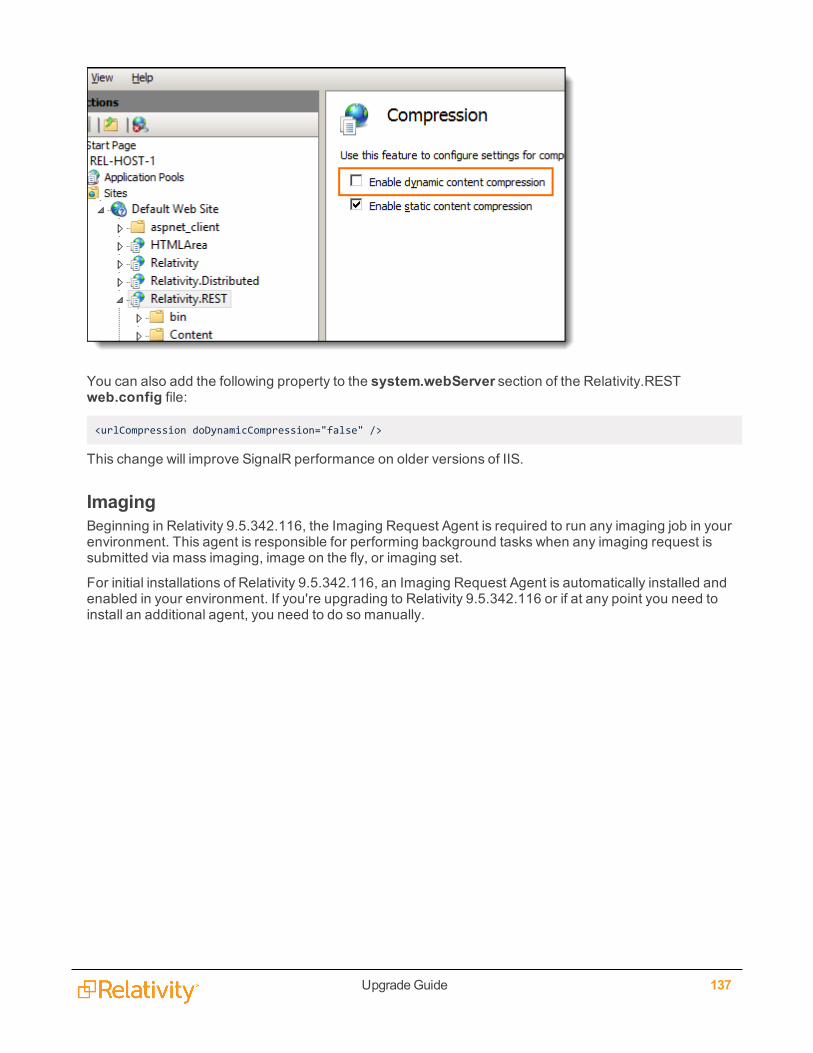
UpgradeGuide 137
You can also add the following property to the system.webServer section of the Relativity.RESTweb.config file:
<urlCompression doDynamicCompression="false" />
This change will improve SignalR performance on older versions of IIS.
ImagingBeginning in Relativity 9.5.342.116, the Imaging Request Agent is required to run any imaging job in yourenvironment. This agent is responsible for performing background tasks when any imaging request issubmitted via mass imaging, image on the fly, or imaging set.
For initial installations of Relativity 9.5.342.116, an Imaging Request Agent is automatically installed andenabled in your environment. If you're upgrading to Relativity 9.5.342.116 or if at any point you need toinstall an additional agent, you need to do so manually.
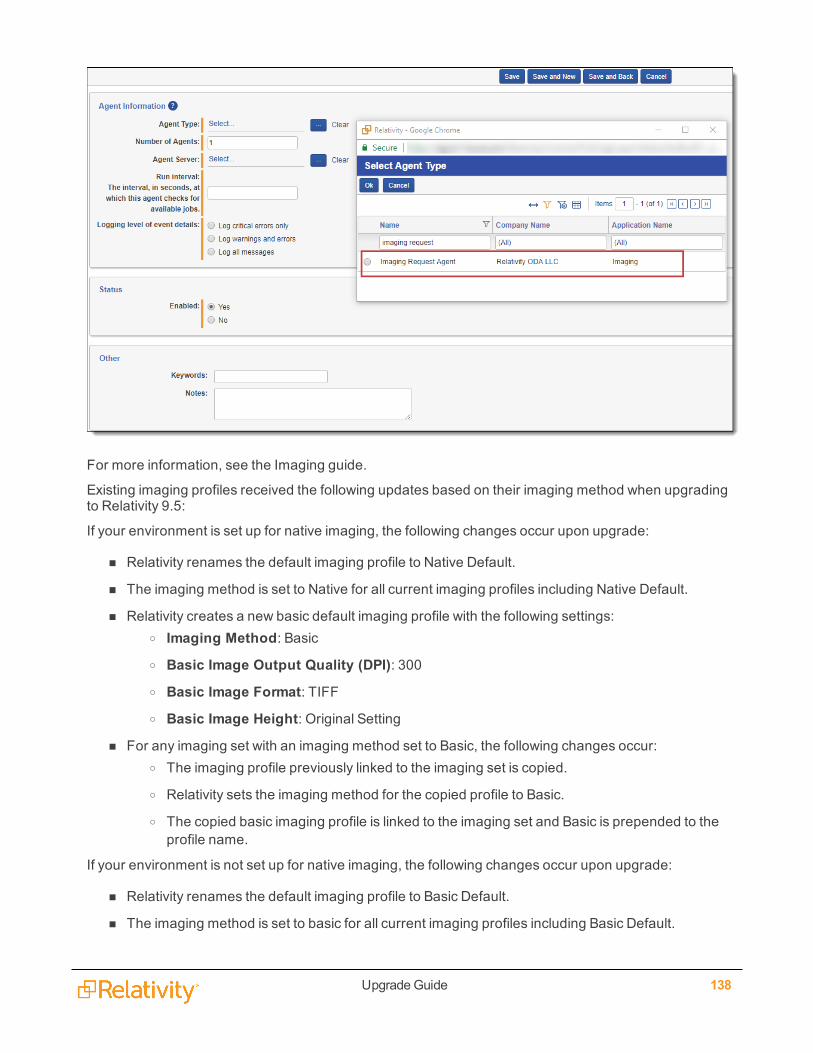
UpgradeGuide 138
For more information, see the Imaging guide.
Existing imaging profiles received the following updates based on their imaging method when upgradingto Relativity 9.5:
If your environment is set up for native imaging, the following changes occur upon upgrade:
n Relativity renames the default imaging profile to Native Default.
n The imaging method is set to Native for all current imaging profiles including Native Default.
n Relativity creates a new basic default imaging profile with the following settings:o Imaging Method: Basico Basic Image Output Quality (DPI): 300o Basic Image Format: TIFFo Basic Image Height: Original Setting
n For any imaging set with an imaging method set to Basic, the following changes occur:o The imaging profile previously linked to the imaging set is copied.
o Relativity sets the imaging method for the copied profile to Basic.
o The copied basic imaging profile is linked to the imaging set and Basic is prepended to theprofile name.
If your environment is not set up for native imaging, the following changes occur upon upgrade:
n Relativity renames the default imaging profile to Basic Default.
n The imaging method is set to basic for all current imaging profiles including Basic Default.
UpgradeGuide 139
2.4.12 Installation of a certificate on the database serverA certificate called RelativityIdentityCertificate is added to the EDDS database on your primary databaseduring a first time installation or an upgrade. The authentication framework uses the thumbprint of thecertificate to sign identity tokens, which are JSONweb tokens (JWTs). The IdentityCertificateThumbprintinstance setting stores the thumbprint associated with your certificate. For more information, see Instancesetting values on the Relativity 9.5 Documentation site.
You also have the option to use your own authentication token-signing certificate. For more information,see Optionally configure an authentication token-signing certificate on the Pre-installation page in theRelativity 9.5 Documentation site.
For a clustered environment, you need to export a copy of your RelativityIdentityCertificate from theprimary database server, and install the certificate to each database server hosting the EDDS. See thefollowing instructions for more information:
n Import or export certificates and private keys at https://technet.microsoft.com/en-us/lib-rary/cc754329(v=ws.11).aspx.
n Optionally configure an authentication token-signing certificate on the Pre-installation page in theRelativity 9.5 Documentation site - These instructions describe the process for configuring your owncustom token-signing certificate, but you can follow these basic steps to install Relativ-ityIdentityCertificate to each database server in a distributed environment.
2.4.13 Instance settingsIf upgrading to Relativity 9.5 from a version prior to 9.3, note that configuration table values are nowreferred to as instance settings. Upon upgrade, configuration table values convert to instance settings.Likewise, the eddsdbo.Configuration table becomes the eddsdbo.InstanceSetting table in SQL Server.
Note: If a new 9.5 install or upgrade fails, a back up table, edds.Configuration_backup, exists as arecord of all the instance settings in SQL. Do not use this table for any purpose other than a record in theevent of an install/upgrade failure.
2.4.13.1 Backwards compatibilityFor any existing applications that reference the pre-9.5 EDDS.Configuration table, a SQL view,Configuration, exists to act as a layer on top of the Instance Setting table.
This view contains the same columns as the old Configuration table and you can use it to examine theinformation as it was pre-Relativity 9.5.
2.4.14 License RelativityAs part of the upgrade to Relativity 9.5, you need to apply a new Relativity license to your installation. RunProcuro on all databases, and then request a new Relativity license key from Client Services, and applythe activation key. For more information, see the Relativity Licensing guide.
2.4.15 Processing/InvariantBeginning in Relativity 9.5.253.62, the following changes have been made to processing and should benoted prior to upgrade:
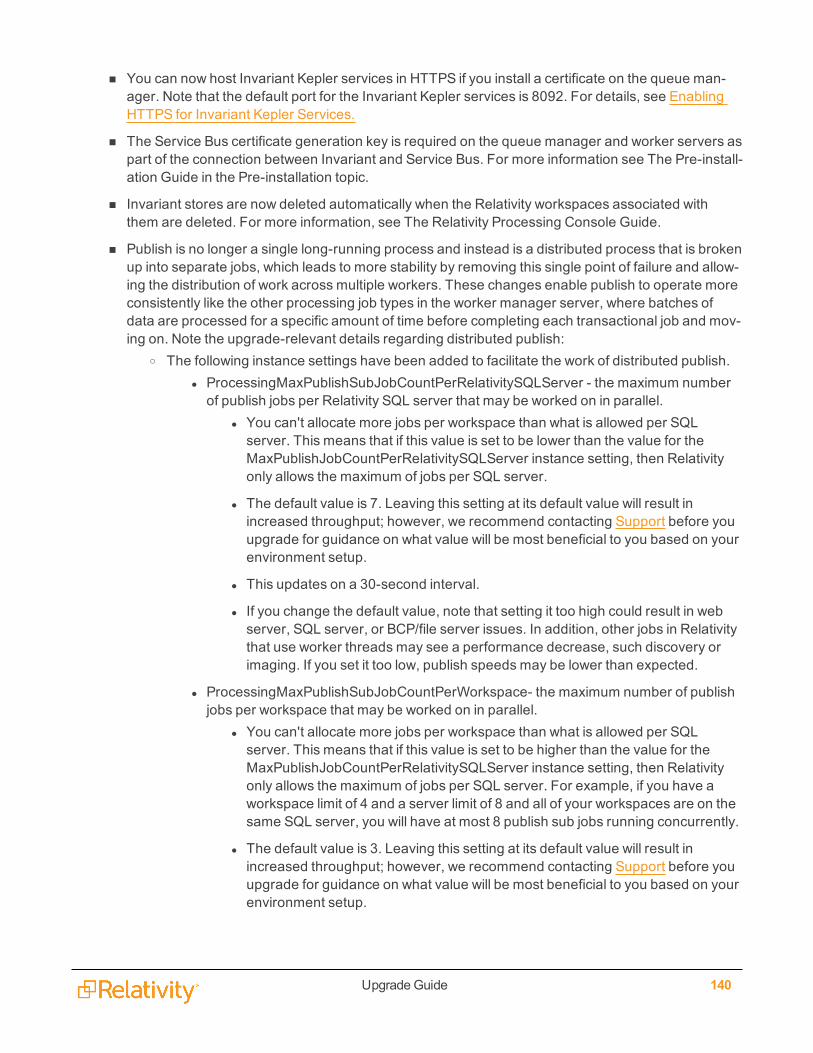
UpgradeGuide 140
n You can now host Invariant Kepler services in HTTPS if you install a certificate on the queue man-ager. Note that the default port for the Invariant Kepler services is 8092. For details, see EnablingHTTPS for Invariant Kepler Services.
n The Service Bus certificate generation key is required on the queue manager and worker servers aspart of the connection between Invariant and Service Bus. For more information see The Pre-install-ation Guide in the Pre-installation topic.
n Invariant stores are now deleted automatically when the Relativity workspaces associated withthem are deleted. For more information, see The Relativity Processing Console Guide.
n Publish is no longer a single long-running process and instead is a distributed process that is brokenup into separate jobs, which leads to more stability by removing this single point of failure and allow-ing the distribution of work across multiple workers. These changes enable publish to operate moreconsistently like the other processing job types in the worker manager server, where batches ofdata are processed for a specific amount of time before completing each transactional job and mov-ing on. Note the upgrade-relevant details regarding distributed publish:
o The following instance settings have been added to facilitate the work of distributed publish.l ProcessingMaxPublishSubJobCountPerRelativitySQLServer - the maximum numberof publish jobs per Relativity SQL server that may be worked on in parallel.
l You can't allocate more jobs per workspace than what is allowed per SQLserver. This means that if this value is set to be lower than the value for theMaxPublishJobCountPerRelativitySQLServer instance setting, then Relativityonly allows the maximum of jobs per SQL server.
l The default value is 7. Leaving this setting at its default value will result inincreased throughput; however, we recommend contacting Support before youupgrade for guidance on what value will be most beneficial to you based on yourenvironment setup.
l This updates on a 30-second interval.
l If you change the default value, note that setting it too high could result in webserver, SQL server, or BCP/file server issues. In addition, other jobs in Relativitythat use worker threads may see a performance decrease, such discovery orimaging. If you set it too low, publish speeds may be lower than expected.
l ProcessingMaxPublishSubJobCountPerWorkspace- the maximum number of publishjobs per workspace that may be worked on in parallel.
l You can't allocate more jobs per workspace than what is allowed per SQLserver. This means that if this value is set to be higher than the value for theMaxPublishJobCountPerRelativitySQLServer instance setting, then Relativityonly allows the maximum of jobs per SQL server. For example, if you have aworkspace limit of 4 and a server limit of 8 and all of your workspaces are on thesame SQL server, you will have at most 8 publish sub jobs running concurrently.
l The default value is 3. Leaving this setting at its default value will result inincreased throughput; however, we recommend contacting Support before youupgrade for guidance on what value will be most beneficial to you based on yourenvironment setup.
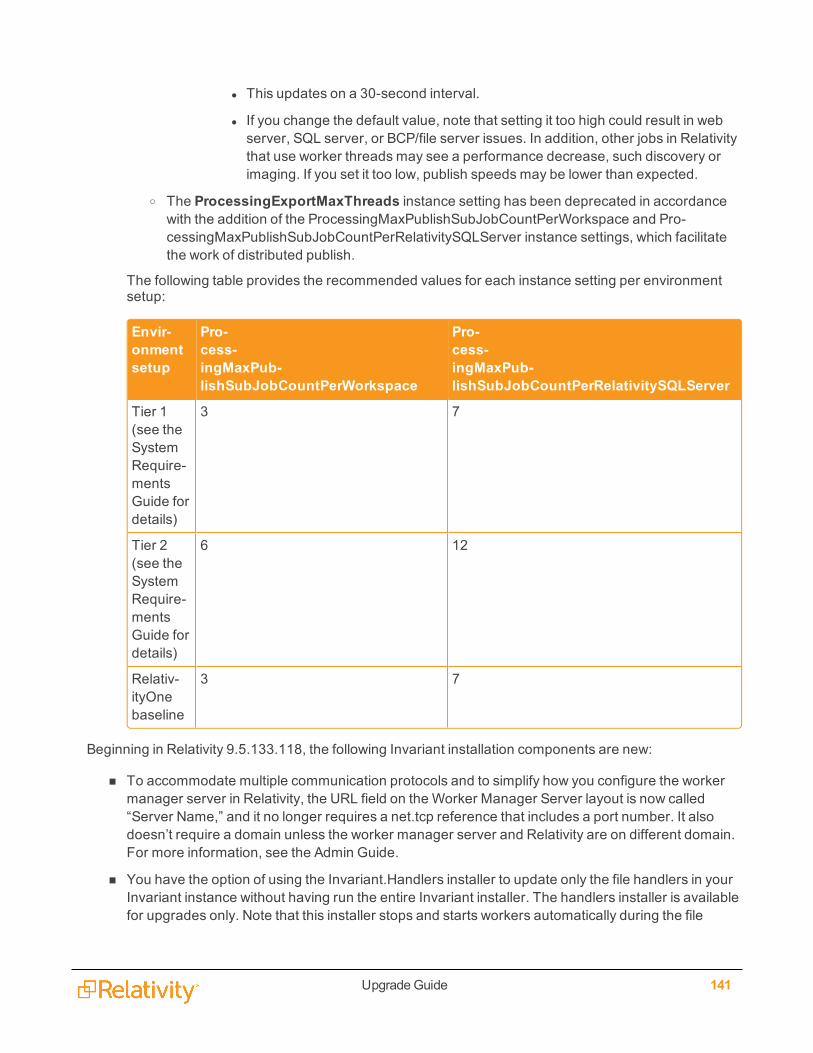
UpgradeGuide 141
l This updates on a 30-second interval.
l If you change the default value, note that setting it too high could result in webserver, SQL server, or BCP/file server issues. In addition, other jobs in Relativitythat use worker threads may see a performance decrease, such discovery orimaging. If you set it too low, publish speeds may be lower than expected.
o The ProcessingExportMaxThreads instance setting has been deprecated in accordancewith the addition of the ProcessingMaxPublishSubJobCountPerWorkspace and Pro-cessingMaxPublishSubJobCountPerRelativitySQLServer instance settings, which facilitatethe work of distributed publish.
The following table provides the recommended values for each instance setting per environmentsetup:
Envir-onmentsetup
Pro-cess-ingMaxPub-lishSubJobCountPerWorkspace
Pro-cess-ingMaxPub-lishSubJobCountPerRelativitySQLServer
Tier 1(see theSystemRequire-mentsGuide fordetails)
3 7
Tier 2(see theSystemRequire-mentsGuide fordetails)
6 12
Relativ-ityOnebaseline
3 7
Beginning in Relativity 9.5.133.118, the following Invariant installation components are new:
n To accommodate multiple communication protocols and to simplify how you configure the workermanager server in Relativity, the URL field on the Worker Manager Server layout is now called“Server Name,” and it no longer requires a net.tcp reference that includes a port number. It alsodoesn’t require a domain unless the worker manager server and Relativity are on different domain.For more information, see the Admin Guide.
n You have the option of using the Invariant.Handlers installer to update only the file handlers in yourInvariant instance without having run the entire Invariant installer. The handlers installer is availablefor upgrades only. Note that this installer stops and starts workers automatically during the file

UpgradeGuide 142
syncing process, which means that no manual worker stoppage is required. For more information,see the Processing installation guide.
Note: A full upgrade to Relativity 9.5.133.118 is required before you can use the handlersinstaller to upgrade to a newer set of handlers. Going forward, you won't be required to upgradeyour Relativity version in order to use the handlers installer.
The following changes were made to the worker manager server installation process beginning inRelativity 9.5.41.87 and should be noted prior to upgrading:
n Each Invariant component has a machine-specific encryption for its connection strings. These arenow found in a folder called LocalSettings, rather than the previous Settings folder, which holdsother config files. The installer now automatically creates the workers’ connection strings, and theyare no longer created in the network share. Note that you will still see a placeholder folder on the net-work share that doesn’t contain any data.
n There is a new parameter in the Invariant response file called DATABASEINSTALLPATH, which isthe local folder where the Invariant.DBUpdater.exe, Invariant.NIST.InstallUtility.exe, and Invari-ant.Deployment.exe utilities were automatically installed during database installation. These threeexecutables have been moved out of the network share to the local machine where the database isinstalled.
n After the database and queue manager upgrades are complete, you must run the Invariant installeron all workers. This is only applicable for upgrades from Relativity 9.4.398.62 (December 21, 2016)or lower to the full release of Relativity 9.5 (January 25, 2017) and above, meaning all monthlyproduct updates of 9.5. If you're performing a fresh installation of Relativity 9.5, you will need to runthe installer on each Worker Manager and Worker server; however, any subsequent upgrade willonly require you to run the installer from the Worker Manager server, which will upgrade all workerservers automatically, thus eliminating the need to run the installer on each server individually.
You can configure the number of concurrent threads dedicated to OCR, which can mitigate CPUbottlenecks. This is possible through the following changes:
n The MaxConversionThreads column has been removed from the Invariant.dbo.Workstations table,as it was longer in use since conversion became a separate service.
n The Invariant.dbo.Workstations table now includes a MaxOcrThreads column, which stores thenumber of concurrent threads that are allowed to perform an OCR job at a single time. A value of “0”means unlimited, and any other value limits to that number. The default and recommended value is0. You should only change this value if the Worker CPU is at 100%, and a performance degradationduring text extraction.
The following changes were made to the Invariant installation process:
n The Invariant.DBUodater.exe upgrades both the main Invariant database and RPC stores. It alsohandles Relativity stores by setting the stores to Pending, which tells the Workspace UpgradeWorker agent to pick them up and execute scripts on them. It also produces a detailed XML log file,which gets created in the install directory and provides information on what happened during thedatabase upgrade.
n The IDENTITYSERVERURL setting is new in the Invariant response file. This is where you enter theidentity server of the environment used for RPC authentication.

UpgradeGuide 143
The following processing changes may impact your upgrade experience:
n When you change the URL for the queue manager, you're required to perform an IIS reset on theRelativity server in order to clear the cache.
n You no longer map processing fields through the processing profile. You nowmap through a newSource field on the Field layout, which takes you to a catalog containing the most common fieldsthat are discovered during processing. Note the following details regarding this change:
o Relativity provides 46 new processing fields, in addition to the 81 fields previously provided,bringing the total number of fields that are available to map to 127.
o The processing profile no longer contains the Processing Fields associative object list view.
o If you don't install the Processing application, Relativity still allows you to map fields as long asyou've added the worker manager server to the resource pool.
o Relativity transfers any fields mapped in the processing profile named "Default" to the fieldmapping table. If the name of the original Default profile has been changed, that profile is stillused. If you haven't mapped any fields on the Default profile in 9.3, and one or more other pro-files do have fields mapped, Relativity doesn't automatically transfer fields when you upgradeto 9.5.
n You can now install Microsoft Office 2013 on your worker servers; however, due to a performancedegradation in text extraction when using Office 2013, we recommend that you continue to useOffice 2010 with Relativity 9.5. When you upgrade from Office 2010 to 2013, it's recommended thatyou uninstall 2010 and then install 2013. If you don't uninstall 2010 prior to installing 2013, you mayneed to do a repair on 2013 in order to get it working properly.
n If you are upgrading from Relativity 9.3 (or a lower version) to 9.5 you may be required to manuallyinstall Visual C++ redistributable packages on the worker servers before running the Invariantupgrade. For details, see the Worker Manager Server Installation Guide.
n The WebAPI setting in IIS is now set to Anonymous Authentication by default and is no longer set toWindows Authentication. You must keep this set to Anonymous Authentication in order to publishdocuments to a workspace using the worker manager server.
Processing to Data Grid no longer requires the RabbitMQ server. To remove RabbitMQ from yourRelativity environment, see Removing RabbitMQ.
2.4.16 Network load balancingIf you are using cookie-persisted load balancing configurations for Relativity 9.5.162.111 and higher, youmust update theWebClientRequiredCookies instance setting to include the name of the load balancercookie for the ActiveX viewer.
2.4.17 New UI frameworkIf you need to disable the new UI framework for the Document list, click Switch to Classic UI from theuser drop-down within a workspace. For help using the classic interface, refer to the 9.3 documentationwhich documents both interfaces side-by-side. For more information, see Navigation in the Admin guide.
When using the new UI framework, the following Relativity features have been enhanced:
UpgradeGuide 144
n Cluster visualization
n Dashboards
n Document list and tabs throughout Relativity
n Pivot
n Sampling
n Search panel and search browser
ProductionThe following changes occur to existing productions on upgrade:
n The Relativity.Core agents for production and branding are upgraded to ADS Deployed agents. TheRelativity.Core agents for production and branding are not available in a 9.3+ environment.
n Any staged or errored productions in an environment are set to a status of New and you mustrestage the production before running.
n If any produced productions contain native files with their Bates numbers previously stored in theDocument table, the Bates numbers for the native files are moved to the Production object, and maynot reflect actual Bates values if those values were overwritten.
n The Production Error field no longer exists on the Production object.
n Production sets you ran before upgrading to Relativity 9.5 aren't available to select for merging withnew production sets when you select the new Existing production numbering choice. Any customproduction work-arounds break upon upgrade. For more information on new productions func-tionality, see the Admin guide.
n Users with full permissions to the Production object prior to upgrading to Relativity 9.3 do not auto-matically gain permissions to the new Production Data Source object, unless they also have theManage Object Types permission under Admin Operations. Users need rights to the new Pro-duction Data Source object to add or edit production data sources after upgrading to Relativity 9.3+.
n Any preexisting production fields are converted to a production data source upon upgrade.
n If you upgrade from Relativity 6.x to Relativity 9.5 and you were previously using the ProductionTracker application, review the Production Tracker 9.5 considerations PDF in the Relativity Com-munity.
n Beginning in 9.5.162.111, Productions includes an upgrade step to migrate data from the oldProductionInformation schema to the new schema introduced in 9.5.162.111.
n An upgrade from Relativity 9.x to 9.5 can fail if the workspace you're upgrading already contains aRelativity field with the name Production. You must rename this field.
The following section discusses the changes to the Production application on upgrade from Relativity 9.xto Relativity 9.3+. Certain upgrade changes only affect upgrades from Relativity 9.1 or 9.2 to Relativity 9.5,and the changes are clearly marked with the affected versions.
Beginning in Relativity 9.3+ you can choose to upgrade only your Production application using a RAP file.
General Production upgrade considerations:
UpgradeGuide 145
n An upgrade from Relativity 9.x to 9.5 can fail if the workspace you're upgrading already contains aRelativity field with the name Production. You must rename this field.
n An upgrade from Relativity 9.2 and below to 9.5 can fail if the workspace you're upgrading alreadycontains a Relativity dynamic object with the name Production Placeholder. You must rename thisobject.
n An upgrade from Relativity 9.1 to 9.5 can fail if the workspace you're upgrading already contains aRelativity dynamic object with the name Production Data Source.
n An upgrade from Relativity 9.2 and below to 9.5 can fail if the workspace you're upgrading alreadycontains a Relativity dynamic object with the name Relativity Color Map. You must rename thisobject.
n An upgrade from Relativity 9.2 and below to 9.5 can fail if the workspace you're upgrading alreadycontains a Relativity dynamic object with the name Field Catalog. You must rename this object.
n If you have a full-text index populating the production upgrade stops. Try upgrading again once thefull-text index is finished populating.
n Relativity deduces the First Bates Value and Last Bates Value for all imported and upgraded pro-ductions.
n If you upgrade from Relativity 9.2 to Relativity 9.5 and you were previously using the ProductionTracker application, review the Production Tracker 9.5 considerations PDF in the Relativity Com-munity.
n Beginning in 9.5.162.111, Productions includes an upgrade step to migrate data from the oldProductionInformation schema to the new schema introduced in 9.5.162.111.
Changes to agents and objects:
n The Relativity.Core agents for production and branding are upgraded to ADS Deployed agents. TheRelativity.Core agents for production and branding are not available in a Relativity 9.5 environment.
n The Markup Set table is converted to the Markup Set dynamic object.
n The Production Object table is converted to the Production dynamic object.
Changes to pre-existing Productions:
n Any staged or errored productions in an environment are set to a status of New and you mustrestage the production before running.
n Productions migrated from Relativity 9.1 and 9.2 receive a legacy placeholder stating, "No TiffIncluded For This Record."
n Productions migrated from Relativity 9.1 to Relativity 9.5 have a data source created containing theproduction documents for each produced and errored production.
n If any produced productions contain native files with their Bates numbers previously stored in theDocument table, the Bates numbers for the native files are moved to the Production object, and maynot reflect actual Bates values if those values were overwritten.
n The Production Error field no longer exists on the Production object.
UpgradeGuide 146
n If you upgrade from an earlier version of Relativity 9.3 and your custom placeholders containsquare brackets, you may see an error the next time you run the production or re-save the customplaceholder. To correct the error, escape the square brackets using a blackslash and re-run the pro-duction.
Changes to Production fields and views:
n On upgrade from 9.2 the Produced Documents field exists in the environment, but the field is notpopulated.
n The production document view no longer exists.
n The multi-object field Produced Documents is replaced with the Production Information RDO whenupgrading from Relativity 9.2. The field is not deleted from the workspace, but is disassociated fromthe production application.
n On upgrade from 9.x to 9.5 the Add Image Placeholder field changes to Use Image Placeholder. Ifthe Add Image Placeholder field was set to No, it updates to Never Use Placeholders. If the AddImage Placeholder field was set to Yes, it updates to Always Use Image Placeholders.
Changes to Production permissions:
n Users with full permissions to the Production object prior to upgrading to Relativity 9.3 do not auto-matically gain permissions to the new Production Data Source object, unless they also have theManage Object Types permission under Admin Operations. Users need rights to the new Pro-duction Data Source object to add or edit production data sources after upgrading to Relativity 9.3+.
2.4.18 Pre-installation steps for web serversThis section describes pre-installation steps that are required for upgrading Relativity 6.x installations.They must be completed on all web servers before installing Relativity 9.5.
Setting IIS optionsUse these instructions to update IIS settings and other configuration options for environments runningWindows Server 2008 or higher with IIS 7.5. These updates must be made on all web servers in yourRelativity installation.
1. Install .NET Framework 4.0 on all web servers.
2. Configure the Legacy Unhandled Exception Policy on all web servers.a. Browse to the following directory on your web server: C:\Win-
dows\Microsoft.NET\Framework64\v4.0.30319\
b. Open the Aspnet.config file in a text editor.
c. Locate the tag <legacyUnhandledExceptionPolicy>. Set the enabled attribute to true.
d. Save the changes to the file.
2.4.19 Relativity admin and service account email addressesRelativity includes the Relativity admin and service account users by default. With the Relativity9.5.342.116, the default email addresses for these accounts have been updated as follows:

UpgradeGuide 147
Default user Previous email address New email address
Relativity admin [email protected] [email protected]
Relativity service account [email protected] [email protected]
2.4.20 Relativity Desktop Client (RDC)Beginning in Relativity9.5.292.12, the Relativity Desktop Client uses the same login page process as thestandard website. You must configure the RDC to use a RelativityWebAPI in the Web Service URLsettings. Any legacyWindows-Authentication WebAPIs won't work once the environment is upgraded to9.5.292.12.
Additionally, if you previously set up an IIS application pool for automatic logins, you no longer need it. Youcan configure the RDC to use a /RelativityWebAPI URL set to anonymous authentication in IIS. This willstill pass end users through using Windows Authentication. For more information, see the Desktop ClientGuide.
Note: You can use the RDC downloaded from Relativity 9.5.292.12 with Relativity versions 9.5.41.87 to9.5.219.30 but you must create a new RDCOAuth2 client to do so. For more information, see theDesktop Client Guide.
2.4.21 Relativity installer updatesFor Relativity 9.5.309.48 and above, you can now set the following options in the RelativityResponse.txtfile used for the primary SQL server during a new installation or an upgrade:
n Email addresses for the Relativity admin and Relativity service accounts - The Relativ-ityResponse.txt file used for the primary SQL server installation includes the ADMIN_EMAIL andSERVICEACCOUNT_EMAIL parameters that you can set with these email addresses. If you don’tspecify a value for the Relativity admin or service account, they are set to the default values [email protected] and [email protected] respectively.
Notes:o If you want to use a specific email address for the default Relativity admin or service account,you must enter it for each Relativity upgrade that you perform. If you entered a custom emailaddress during a previous installation, it is overwritten by current email address that youentered or by the default email address when this parameter is blank.
o Use different email addresses for the ADMIN_EMAIL and SERVICEACCOUNT_EMAIL para-meters. If you use the same email address for both parameters, the installation fails.
n Passwords for the the Relativity admin and Relativity service accounts - The Relativ-ityResponse.txt file used for the primary SQL server installation includes the ADMIN_PASSWORDand SERVICEACCOUNT_PASSWORD parameters that you can set with new passwords.
Note: To change the ADMIN_PASSWORD or SERVICEACCOUNT_PASSWORD password, youmust also update the associated email address. If you enter a new password but don’t update theemail address, then new password is ignored. For example, if you use an existing or default emailaddress, then the password remains unchanged. However, you can change the email addressesfor the admin and service accounts without updating the password.
For more information, see the Relativity Installation and Relativity Upgrade guides.
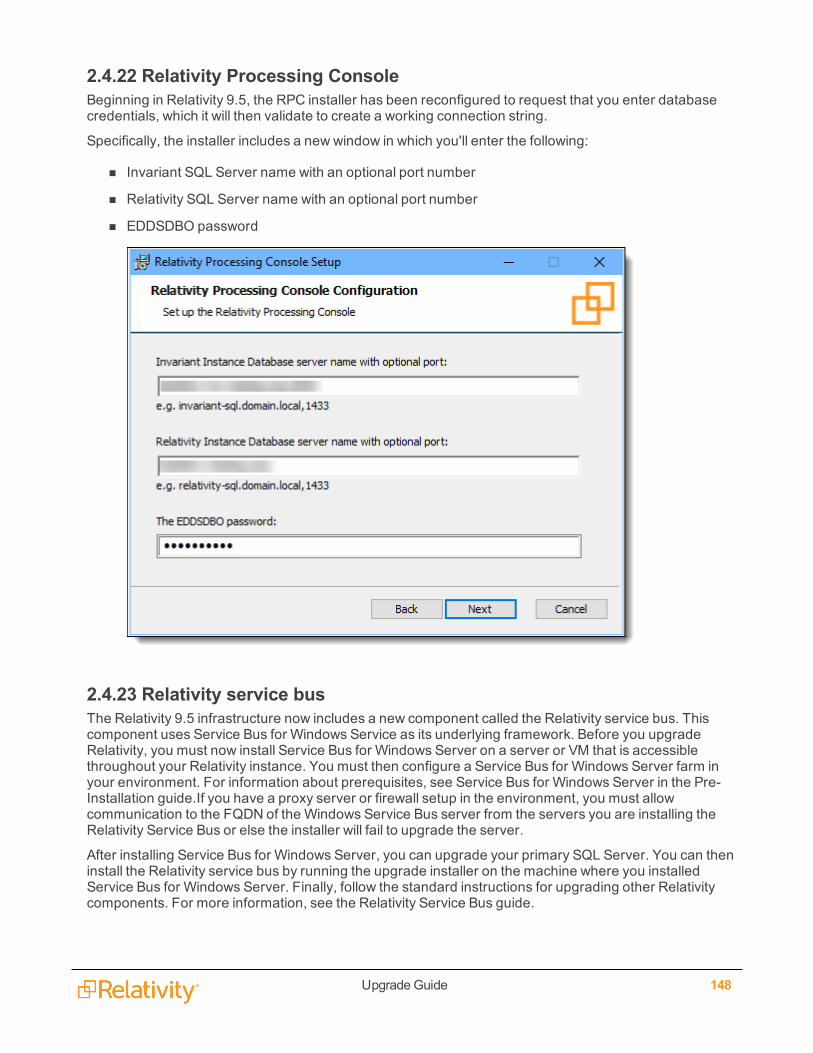
UpgradeGuide 148
2.4.22 Relativity Processing ConsoleBeginning in Relativity 9.5, the RPC installer has been reconfigured to request that you enter databasecredentials, which it will then validate to create a working connection string.
Specifically, the installer includes a new window in which you'll enter the following:
n Invariant SQL Server name with an optional port number
n Relativity SQL Server name with an optional port number
n EDDSDBO password
2.4.23 Relativity service busThe Relativity 9.5 infrastructure now includes a new component called the Relativity service bus. Thiscomponent uses Service Bus for Windows Service as its underlying framework. Before you upgradeRelativity, you must now install Service Bus for Windows Server on a server or VM that is accessiblethroughout your Relativity instance. You must then configure a Service Bus for Windows Server farm inyour environment. For information about prerequisites, see Service Bus for Windows Server in the Pre-Installation guide.If you have a proxy server or firewall setup in the environment, you must allowcommunication to the FQDN of the Windows Service Bus server from the servers you are installing theRelativity Service Bus or else the installer will fail to upgrade the server.
After installing Service Bus for Windows Server, you can upgrade your primary SQL Server. You can theninstall the Relativity service bus by running the upgrade installer on the machine where you installedService Bus for Windows Server. Finally, follow the standard instructions for upgrading other Relativitycomponents. For more information, see the Relativity Service Bus guide.

UpgradeGuide 149
2.4.24 Required certificates for RelativityRelativity 9.5 now verifies that all HTTPS services running in your environment have a trusted certificate.You need to verify the certificates to components of your Relativity installation running HTTPS services toavoid error messages and insecure-connection icons. For more information, see Required certificates forRelativity in the Pre-installation guide.
We recommend placing the new Analytics server certificate and testing it prior to the day of the upgrade toRelativity 9.3. For more information, see Pre-upgrade: Update the default SSL/TLS certificate for CAAT®in the Upgrading or installing your Analytics server section.
2.4.25 Scriptsn You must enable the AllowAddOrEditScripts instance setting in order for users to create or edit
scripts. This setting enables or disables the ability to create and edit scripts for all users, includingsystem admins. For more information, AllowAddOrEditScripts in the instance setting guide.
n Beginning in 9.5.196.102, the Set extracted text size script is no longer available in the RelativityScript Library. If you have this script installed in a workspace, it is removed upon upgrade. You canuse the Set long text size mass operation in place of this script.
2.4.26 SearchingUpon upgrade to 9.5.133.118, Relativity interprets straight quotes and curly quotes in searching the same.Previously, if you searched using curly quotes in a long text field using the CONTAINS filter, Relativitysearched for the quote itself instead of grouping terms together. Now, Relativity groups terms betweendouble quotes together regardless of the quote type. This may mean the number of results in yoursearches may change.
2.4.27 Service Host Manager HTTPS configurationService Host Manager runs Relativity services on all web and agent servers in your environment. Theservices are used by applications like Production and Processing on. If your web and agent servers mustbe set up for HTTPS access, special setup is required for Service Host Manager.
For more information, see Service Host Manager on the Relativity 9.5 Documentation site.
2.4.28 System requirementsn Windows Server 2008 R2 (64-bit) is no longer compatible with 9.5. Relativity 9.5 is only compatible
with Windows Server 2008 R2 (64-bit) w Service Pack 1.
n As of Relativity 9.5.292.12, we no longer support Internet Explore (IE) 10. Please upgrade to a com-patible version of IE 11.
2.4.29 TelemetryAfter you install Relativity 9.5, complete the steps to enable telemetry in your environment. Telemetryallows you to collect metrics for performance, usage, and billing. For more information, see Telemetry onthe Relativity 9.5 Documentation site.
UpgradeGuide 150
Note: Failure to transmit telemetry billing data to Relativity causes Relativity access to be disabled afterseven (7) days. Telemetry lockout is similar to Case Statistics Manager lockout. If your security setupdoesn't allow access to public internet, contact Relativity support to configure offline-billing.
2.4.30 Upgrade agents and other componentsConfirm that your environment has all the required agents and other software components added in priorversions. For more information, see the Relativity Upgrade Guide v6.10 in the Relativity Community.
If your environment uses custom applications, you may also need to upgrade event handlers, and othercomponents. For more upgrade information, see the Relativity 9.5 Developers site.
Note: For information about recompiling syncs, contact the Client Services team([email protected])
2.4.31 ViewerRelativity uses Oracle Outside In version 2016.2. When you upgrade to Relativity 9.5, you can install thenew version of the viewer using the steps described in the Workspace Configuration guide. Any previousversions of the viewer aren't upgraded, but you can run two versions of the viewer concurrently, so there'sno need to uninstall previous versions.
2.4.32 Viewer (ActiveX)Beginning in Relativity 9.5.196.102, you must install Microsoft .NET 4.6.2 on all of the machines that needaccess to the ActiveX viewer. You must also install the new ActiveX viewer installation kit, which includesthe Visual C++ 2015 redistributable, from the Workspace Details tab. You can't use the Relativity9.5.196.102 viewer with earlier versions of Relativity. Also, earlier versions of the ActiveX viewer aren'tcompatible with Relativity 9.5.196.102.For more information, see Legacy viewer installation in theworkstation configuration guide.
Note: If you have a client machine that accesses multiple instances of Relativity that require differentversions of the ActiveX viewer, the corresponding ActiveX viewers must be installed. To ensure properviewer functionality, you must close their browsers before they switch from one version to the next.
2.4.33 Viewer (ActiveX and HTML)For users who haven't upgraded their Relativity version since the general release of Relativity 9.2, notethat, beginning in the Relativity 9.2.337.3 - September 30, 2015 product update, the following isapplicable.
When viewing documents with an .HTM, .HTML, or .XML extension in Native mode, the viewer displaysthe raw file markup instead of rendering the content.
You can control this option with the TreatHtmlAndXmlAsText instance setting, which is set to True bydefault. When set to True, this prevents JavaScript from executing when viewing these documents in theNative mode in the viewer. See the Instance Setting Guide to learn more about this new value.
Pre the Relativity 9.2.337.3 - September 30, 2015 product update:
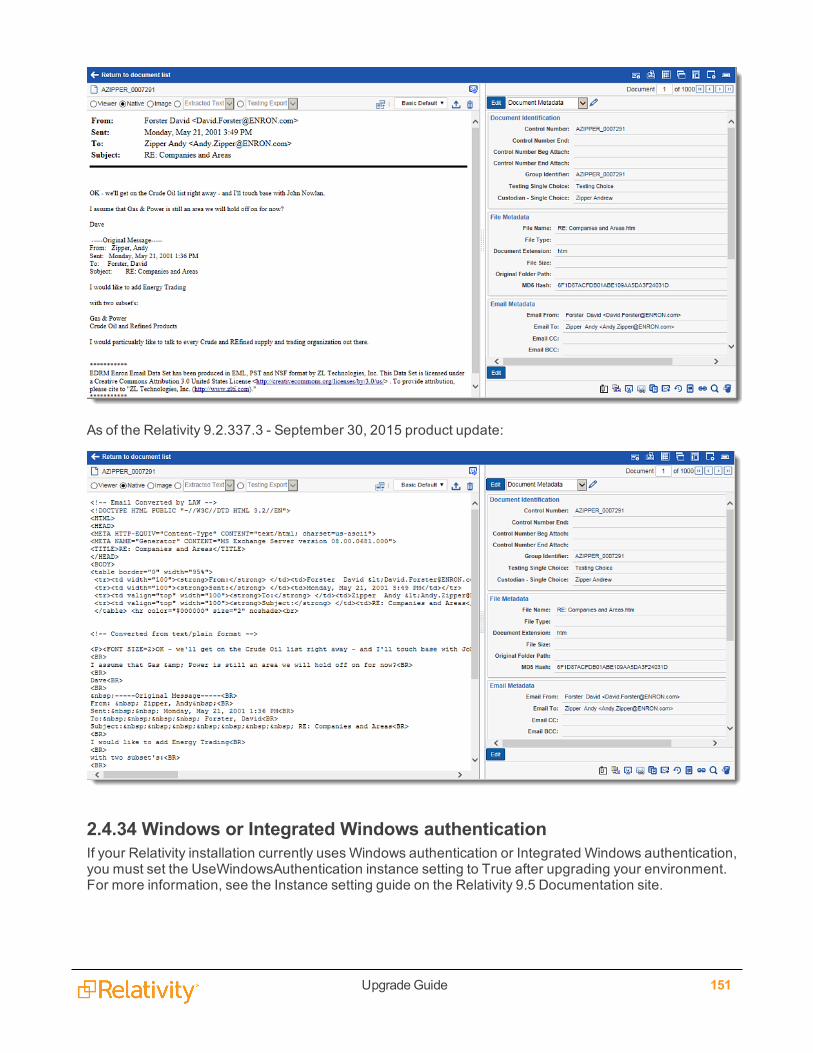
UpgradeGuide 151
As of the Relativity 9.2.337.3 - September 30, 2015 product update:
2.4.34 Windows or Integrated Windows authenticationIf your Relativity installation currently usesWindows authentication or Integrated Windows authentication,you must set the UseWindowsAuthentication instance setting to True after upgrading your environment.For more information, see the Instance setting guide on the Relativity 9.5 Documentation site.
UpgradeGuide 152
You may want to configure your environment so that some servers use Windows authentication, whileothers don't use it. In this case, you need to add another row for this instance setting to the Instancesetting table, update the machine name in this new row, and then set the value to True or False based onthe Windows authentication requirements for the server.
In addition, you can set the WindowsAuthIpRange instance setting, which specifies a group of IPaddresses that Relativity uses to validate the address of the user during login. If a request originates froman IP address added to the WindowsAuthIpRange instance setting, the server usesWindowsAuthentication to log the user in to Relativity. Relativity uses forms authentication to log in the user, whenthe IP address is outside the specified range. For more information, see Instance settings on the Relativity9.5 Documentation site.
2.4.35 Windows Service Bus 1.1 with TLS 1.2 SupportYou can upgrade your Service Bus for Windows Server to use Transport Layer Security (TLS) 1.2. Formore information, see Add support for TLS 1.1 and TLS 1.2 on Service Bus for Windows Server 1.1(https://support.microsoft.com/en-us/help/4077554/add-support-for-tls-1-1-and-tls-1-2-on-service-bus-for-windows-server).
2.4.35.1 Prerequisites for Service Bus 1.1 with TLS 1.2 Support
n Verify that .NET 4.6.2 is installed in your environment. You must install .NET 4.6.2 before you beginupgrading to Service Bus 1.1 with TLS 1.2. This service bus upgrade requires .NET 4.6.2. For moreinformation, see Upgrading Relativity to .NET 4.6.2.
n Verify that you are running Windows Server 2012 or Windows Server 2012 R2, and Microsoft SQLServer 2012. If your environment, doesn't meet these requirements, see Workarounds for ServiceBus 1.1 with TLS 1.2 on page 45.
2.4.35.2 Upgrading to Service Bus 1.1 with TLS 1.2 SupportUse the following steps to upgrade to Service Bus 1.1 with TLS 1.2 Support:
1. Remove all servers from the farm. For more information, see Leaving a Farm (https://msdn.-microsoft.com/en-us/library/dn441430.aspx) on the Microsoft site.
2. Uninstall Service Bus for Windows 1.1 CU1. For more information, see Removing the Service Busfor Windows Server from a Node in a Farm in Uninstalling (https://msdn.microsoft.com/en-us/lib-rary/dn441431.aspx) on the Microsoft site.
3. Uninstall Microsoft Azure Surface Fabric 1.0.
4. Upgrade the SQL Server to support TLS 1.2. For more information, see TLS 1.2 support forMicrosoft SQL Server (https://support.microsoft.com/en-us/help/3135244/tls-1-2-support-for-microsoft-sql-server) on the Microsoft site.
5. Delete the following folder from your server, if it exists on it:
C:\Program Files\Service Bus
6. Install Service Bus for Windows Server 1.1 with TLS 1.2 support by using the WebPI. For moreinformation about WebPI, see the Pre-Installation guide.
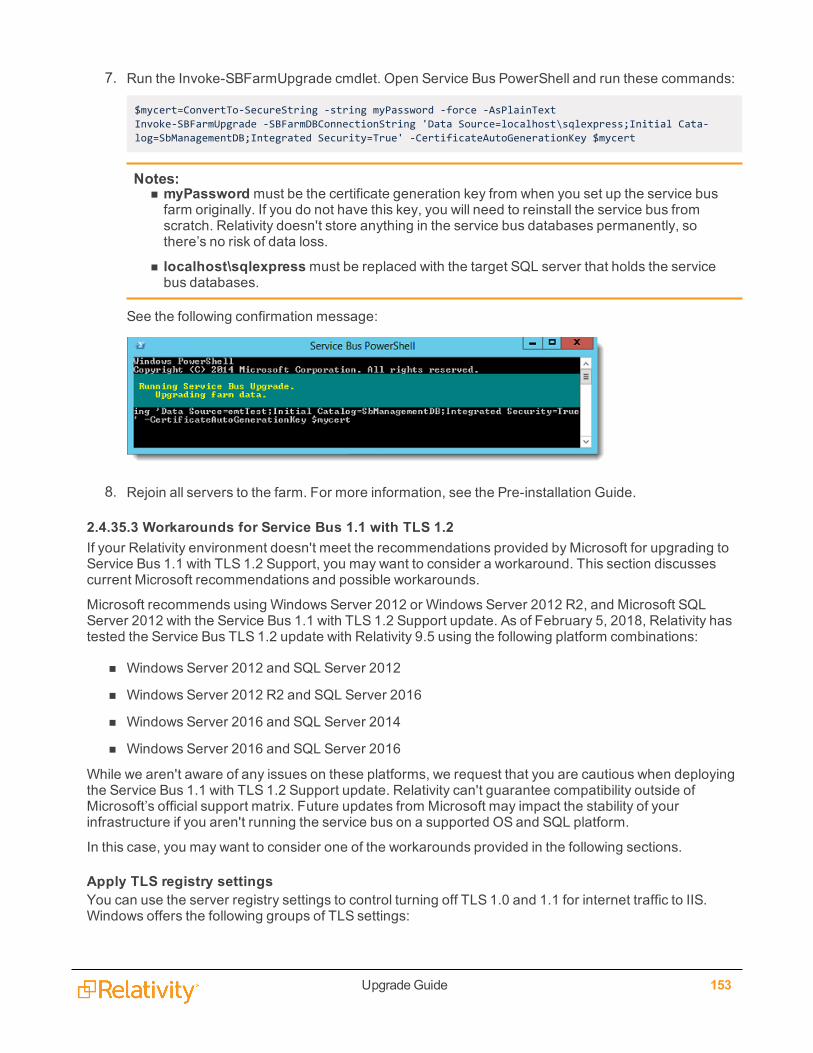
UpgradeGuide 153
7. Run the Invoke-SBFarmUpgrade cmdlet. Open Service Bus PowerShell and run these commands:
$mycert=ConvertTo-SecureString -string myPassword -force -AsPlainTextInvoke-SBFarmUpgrade -SBFarmDBConnectionString 'Data Source=localhost\sqlexpress;Initial Cata-log=SbManagementDB;Integrated Security=True' -CertificateAutoGenerationKey $mycert
Notes:n myPasswordmust be the certificate generation key from when you set up the service busfarm originally. If you do not have this key, you will need to reinstall the service bus fromscratch. Relativity doesn't store anything in the service bus databases permanently, sothere’s no risk of data loss.
n localhost\sqlexpressmust be replaced with the target SQL server that holds the servicebus databases.
See the following confirmation message:
8. Rejoin all servers to the farm. For more information, see the Pre-installation Guide.
2.4.35.3 Workarounds for Service Bus 1.1 with TLS 1.2If your Relativity environment doesn't meet the recommendations provided by Microsoft for upgrading toService Bus 1.1 with TLS 1.2 Support, you may want to consider a workaround. This section discussescurrent Microsoft recommendations and possible workarounds.
Microsoft recommends using Windows Server 2012 or Windows Server 2012 R2, and Microsoft SQLServer 2012 with the Service Bus 1.1 with TLS 1.2 Support update. As of February 5, 2018, Relativity hastested the Service Bus TLS 1.2 update with Relativity 9.5 using the following platform combinations:
n Windows Server 2012 and SQL Server 2012
n Windows Server 2012 R2 and SQL Server 2016
n Windows Server 2016 and SQL Server 2014
n Windows Server 2016 and SQL Server 2016
While we aren't aware of any issues on these platforms, we request that you are cautious when deployingthe Service Bus 1.1 with TLS 1.2 Support update. Relativity can't guarantee compatibility outside ofMicrosoft’s official support matrix. Future updates from Microsoft may impact the stability of yourinfrastructure if you aren't running the service bus on a supported OS and SQL platform.
In this case, you may want to consider one of the workarounds provided in the following sections.
Apply TLS registry settingsYou can use the server registry settings to control turning off TLS 1.0 and 1.1 for internet traffic to IIS.Windows offers the following groups of TLS settings:
UpgradeGuide 154
n Client communication - determines which TLS protocols are used for outbound connections fromthe server that is traffic to the service bus server.
n Server communication - determines which TLS protocols can be accepted that is from internettraffic to IIS.
The registry settings for these TLS protocols are located under the following key prefix:
HKLM:\SYSTEM\CurrentControlSet\Control\SecurityProviders\SCHANNEL\Protocols
For information about the registry keys and testing your environment after applying them, see Disablingcryptographic protocols for PCI compliance (focused on SSL 3.0 and TLS 1.0) blog post athttps://www.johnlouros.com/blog/disabling-cryptographic-protocols-for-pci-compliance.
You can also use the IISCrypto tool to configure TLS protocols. Clear the Set Client Side Protocolscheckbox when using IISCrypto to configure your web servers. IISCrypto uses the Windows registry keyslisted above to control the available TLS protocols.
Note: For server communication, you must keep TLS 1.0 and 1.1 enabled on the server whereWindows service bus is installed. This approach can't be used in smaller environments where the webserver and the service bus are installed on the same VM. We recommend installing the service bus onits own dedicated VM if you want to control TLS settings using registry keys.
Use a load balancerIf your primary use of TLS 1.2 would be for internet-facing traffic, you may want to consider using a loadbalancer. Relativity server traffic may be a lower concern in these cases. By placing a load balancer (suchas an F5 or NGINX) in front of Relativity, you can restrict all web traffic to TLS 1.2. Many load balancersprovide you with options to choose which TLS protocols that run on the network.
2.4.36 WorkersThe LongRunningJobTimeout setting enables Invariant to terminate some stuck jobs. Specifically, thisvalue determines the amount of time (in milliseconds) that a worker will work on a job before Invariantterminates that job. The default value is 180,000 milliseconds (30 minutes).
You may want to adjust this value if you have large documents that need additional time for processing, orif you need a shorter feedback loop. If you need to adjust this value, you can manually go into theAppSettings table and increase it accordingly. Previously, Invariant workers could get into a state in whichthey no longer reported progress and no longer completed work, which then required manual interventionto terminate those processes. When Invariant uses the LongRunningJobTimeout setting to stop a job,Relativity provides an error message to the processing user informing them that the timeout limit wasreached.
The Conversion Threads in Use column no longer appears on the Worker Status tab. Additionally, on theworker server page, you can no longer designate a worker for conversion work. To configure yourenvironment for conversion, see Configuring your conversion agents.
2.4.37 Worker manager queueRevisions in the queue manager code have led to the following enhancements:
n A reduction in the volume of connections to the SQL Server
n A reduction in lock waits and thread pool waits
UpgradeGuide 155
n A general increase in queue parallelism
n A reduction in the number of queries per second hitting the SQL Server
There is no reduction or change in actual queue functionality as a result of these changes. Likewise, theuser experience with the queue manager hasn't changed, with the exception of potential performanceincreases, depending on the size of your environment.
2.4.38 Worker manager serverDocument conversion no longer occurs on the worker manager server. You cannot modify the priority ofthe following conversion jobs on the worker manager server: Pre-convert, Conversion on-the-fly, Massconversion, and Conversion. Instead, you must install Service Bus for Windows Server and configureconversion agents. For more information, see Configuring your conversion agents on the next page.
The Worker manager page no longer displays the following conversion fields: pre-convert, conversion on-the-fly, mass conversion, and conversion.
Beginning in Relativity 9.5.133.118, the URL field on the Worker Manager Server is now called ServerName and displays the fully-qualified server name as the location of the Invariant API on the server.
2.4.39 Workspace upgrade queueThe Workspace Upgrade Queue includes the following columns:
n Store Upgrade Status - the status of the upgrade of the Invariant store, as completed by the Work-space Upgrade Worker agent. The possible values in this column are the same as for the work-space upgrade. This field is empty if you don't have Processing installed.
n Current Store Version - the version of Invariant you are upgrading to.
UpgradeGuide 156
3 Configuring your conversion agentsWhen you convert a document in Relativity, that conversion job is performed by a dedicated conversionagent.
Relativity 9.5 uses Service Bus for Windows Server to submit conversion jobs and communicate with yourdesignated conversion agents. You must install Service Bus for Windows Server before you run yourupgrade to Relativity 9.5. For more information, see Installing Service Bus for Windows Server in the Pre-Installation guide.
If you have dedicated conversion workers, it's recommended that you re-purpose the dedicated workersas agent servers with a single conversion agent. For more information, see Re-purposing a conversionworker as a conversion agent.
If you have a Tier 1 or similar environment that doesn't have any Invariant workers dedicated solely toconversion, you can add a conversion agent to an existing agent server. Or you can allocate newhardware dedicated to conversion. For more information, see Adding conversion agents to anenvironment with no dedicated conversion workers.
3.1 Conversion agent considerationsConsider the following about conversion agents when installing or upgrading to Relativity 9.5:
n On a new installation of Relativity 9.5, Relativity automatically creates one conversion agent andadds it to the default secondary agent server. You should then add the agent server to the appro-priate resource pool. For more information, see Resource pools in the Admin guide.
n On upgrade to Relativity 9.5, you must add the Service Bus agent server to the appropriateresource pool. Then, manually create the conversion agents using a new agent type of Conversionagent. For more information, see the Agents guide.
3.2 Re-purposing a conversion worker as a conversion agentIf you have existing Invariant workers that Relativity uses solely for conversion, you can re-purpose yourhardware to support conversion agents.
Note: If your worker server handles more than just conversion jobs, do not follow these steps. You stillneed Invariant workers for other jobs such as Processing, Imaging, and Save as PDF.
To re-purpose a conversion worker as a conversion agent, perform the following steps:
Note: These steps are only required if you're upgrading from Relativity 9.3 or lower, since conversionwas performed by a worker in those versions, and only if your worker was designated for conversion.
1. Ensure Service Bus for Windows server is installed in the environment.
2. Uninstall Invariant on the server via Windows Control Panel Add/Remove Programs. Doing this unin-stalls existing Invariant applications.
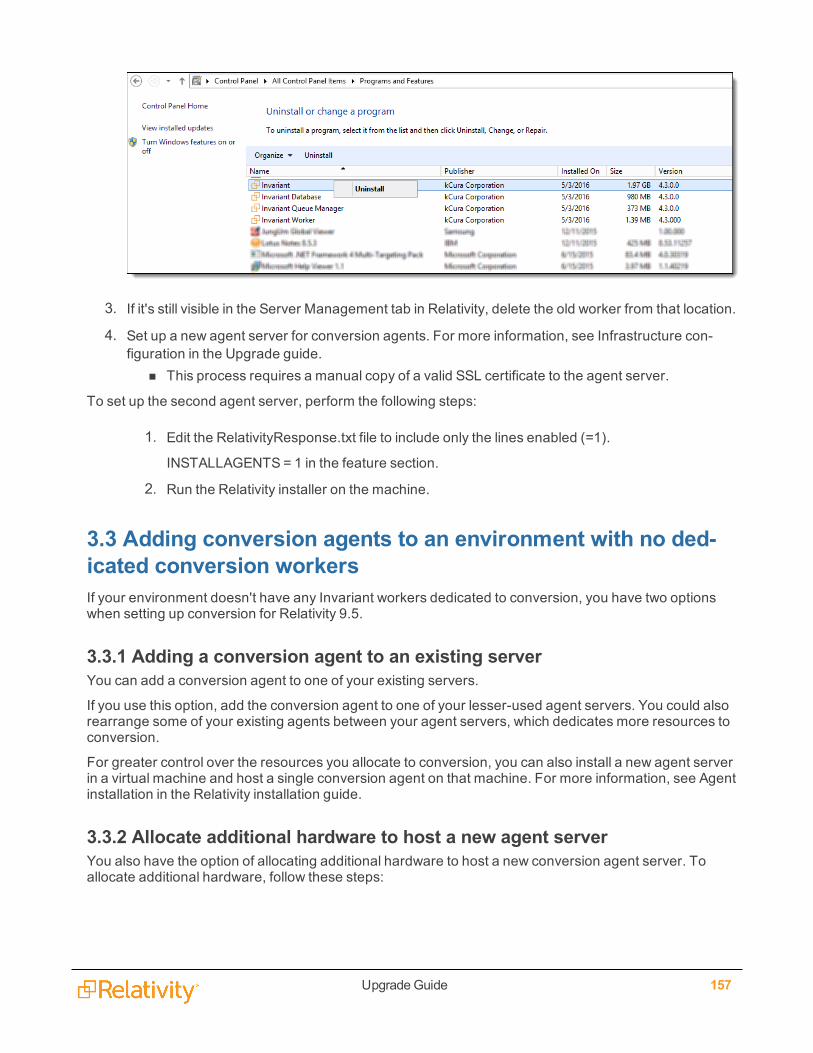
UpgradeGuide 157
3. If it's still visible in the Server Management tab in Relativity, delete the old worker from that location.
4. Set up a new agent server for conversion agents. For more information, see Infrastructure con-figuration in the Upgrade guide.
n This process requires a manual copy of a valid SSL certificate to the agent server.
To set up the second agent server, perform the following steps:
1. Edit the RelativityResponse.txt file to include only the lines enabled (=1).
INSTALLAGENTS = 1 in the feature section.
2. Run the Relativity installer on the machine.
3.3 Adding conversion agents to an environment with no ded-icated conversion workersIf your environment doesn't have any Invariant workers dedicated to conversion, you have two optionswhen setting up conversion for Relativity 9.5.
3.3.1 Adding a conversion agent to an existing serverYou can add a conversion agent to one of your existing servers.
If you use this option, add the conversion agent to one of your lesser-used agent servers. You could alsorearrange some of your existing agents between your agent servers, which dedicates more resources toconversion.
For greater control over the resources you allocate to conversion, you can also install a new agent serverin a virtual machine and host a single conversion agent on that machine. For more information, see Agentinstallation in the Relativity installation guide.
3.3.2 Allocate additional hardware to host a new agent serverYou also have the option of allocating additional hardware to host a new conversion agent server. Toallocate additional hardware, follow these steps:

UpgradeGuide 158
1. Ensure that Service Bus for Windows Server is installed in the environment.
2. Set up a new, secondary agent server for conversion agents. For more information, see Infra-structure configuration in the Upgrade guide.
To set up a secondary agent server, perform the following steps:
1. Ensure that Service Bus for Windows Server is installed in the environment.
2. Edit the RelativityResponse.txt file to include only the lines enabled (=1).
INSTALLAGENTS = 1 in the feature section.
3. Run the Relativity installer on the machine. For more information, see Agent installation in theRelativity installation guide.
Note: Service Bus for Windows Server is only required for the first agent running conversion jobs.
UpgradeGuide 159
4 Upgrading your SQL ServerFollow these steps to upgrade your primary SQL Server. Before you follow the steps below, you must havecompleted the required pre-upgrade steps for all Relativity versions. For more information, see Pre-installation Guide.
Note: This page also contains steps for upgrading a distributed SQL Server. You must upgrade yourprimary SQL Server before proceeding with these upgrades.
4.1 Primary SQL Server upgradeThe master database called the EDDS resides on the primary SQL Server. You must update the primarydatabase before upgrading any other feature. Additionally, you must install or upgrade the Relativityservice bus. You can then run the web and agent server installations in parallel.
Save the following files to the root directory of any server contributing to the Relativity environment:
n Relativity.exe - The executable file that installs Relativity components determined by the valuesentered in the RelativityResponse.txt file.
Notes:o You must save Relativity.exe on a drive local to the server. Running Relativity.exe from ashared location results in upgrade or installation failure.
o The Relativity.exe file does not open a user interface. Use Install.bat to proceed with install-ation.
n Install.bat - The code that prompts Relativity.exe to proceed with the installation process. You mustedit line 11 of the Install.bat file with the exact name of the Relativity installation file.
start /wait "" "INSERT EXACT NAME OF RELATIVITY INSTALLATION FILE" /log InstallLog.txt /re-sponsefilepath=RelativityResponse.txt
Notes:o You may need to run this file from an elevated command line prompt to avoid permissionissues.
o You must surround the name of the Relativity installation file with quotation marks.
n RelativityResponse.txt - The text file that determines which components Relativity.exe installs,uninstalls, or upgrades on the server.
Note: Every line in the RelativityResponse.txt file that starts with ### is a comment and meant toprovide instruction.
Open the RelativityResponse.txt file in a text editor and edit the parameters as follows to upgradeRelativity on the machine that serves the role of the primary SQL Server:
UpgradeGuide 160
4.1.0.1 Common properties
n INSTALLPRIMARYDATABASE - Set this value to one.
INSTALLPRIMARYDATABASE=1
n INSTALLDISTRIBUTEDDATABASE - Verify that this value is set to zero. You can't store the dis-tributed database on the same machine as the primary database.
INSTALLDISTRIBUTEDDATABASE=0
n INSTALLDIR - Enter the installation directory. This is the target directory for all files related to thelocal installation. This path must be local to the machine and accessible by the server. You must useASCII characters for this path.
INSTALLDIR=C:\Program Files\kCura Corporation\Relativity
n PRIMARYSQLINSTANCE - Enter the primary SQL instance. If you are installing to a cluster, specifythe cluster and instance name. If you are installing to a named instance, specify the server andinstance name. All features require this input.
PRIMARYSQLINSTANCE=ML12
n EDDSDBOPASSWORD - Enter the EDDSDBO password.
EDDSDBOPASSWORD=MySecretPassword
n SERVICEUSERNAME - Enter the service username. The Windows login must already exist.
SERVICEUSERNAME=example\exampleusername
n SERVICEPASSWORD - Enter the Service password.
SERVICEPASSWORD=MySecretPassword
n USEWINAUTH - Set the value to one to use Windows authentication for the SQL Server.
USEWINAUTH=1
Note: If the USEWINAUTH value is set to one, then the user running the installer must be a SQLsysadmin, and any values entered for SQLUSERNAME and SQLPASSWORD are ignored.
n SQLUSERNAME - Enter the SQL username if you want to use SQL Server login authentication.
SQLUSERNAME=mySqlUserName
Note: This value is ignored if USEWINAUTH is set to one.
n SQLPASSWORD - Enter the SQL password if you want to use SQL Server login authentication.
SQLPASSWORD=myPassword

UpgradeGuide 161
Note: This value is ignored if USEWINAUTH is set to one.
4.1.0.2 Primary database properties
n DEFAULTFILEREPOSITORY - Enter the default file repository. This path must be a shared folderto which both the user running the installer and the Relativity Service Account have read and writepermissions.
DEFAULTFILEREPOSITORY=\\yourmachine\FileShare
n EDDSFILESHARE - Enter the EDDS fileshare path. This path must be a shared folder to which boththe user running the installer and the Relativity Service Account have read and write permissions.
EDDSFILESHARE=\\yourmachine\Fileshare
n CACHELOCATION - A valid UNC path for the viewer cache location. The installer ignores this valueduring an upgrade. It only uses this value on a new installation of Relativity. This parameter is avail-able in Relativity 9.5.292.12 and above. For more information, see the Relativity Installation guide.
CACHELOCATION=\\yourmachine\ViewerCache
n DTSEARCHINDEXPATH - Enter the dtSearch index. This path must be a shared folder to whichboth the user running the installer and the Relativity Service Account have read and write per-missions.
DTSEARCHINDEXPATH=\\yourmachine\dtSearch
n RELATIVITYINSTANCENAME - Enter the Relativity instance name. Only set this value during afirst-time installation. The installer ignores this value on upgrade.
RELATIVITYINSTANCENAME=My Relativity Instance
n ADMIN_EMAIL - Enter the email address that you want to use for the default Relativity adminaccount. If you don't specify an email address, the installer uses the default value of [email protected]. This parameter is available for 9.5.342.116 and above.
n SERVICEACCOUNT_EMAIL - Enter the email address that you want to use for the default Relativityservice account. If you don't specify an email address, the installer uses the default value of [email protected]. This parameter is available for 9.5.342.116 and above.
Notes:o If you want to use a specific email address for the default Relativity admin or service account,you must enter it for each Relativity upgrade that you perform. If you entered a custom emailaddress during a previous installation, it is overwritten by current email address that youentered or by the default email address when this parameter is blank.
o Use different email addresses for the ADMIN_EMAIL and SERVICEACCOUNT_EMAIL para-meters. If you use the same email address for both parameters, the installation fails.
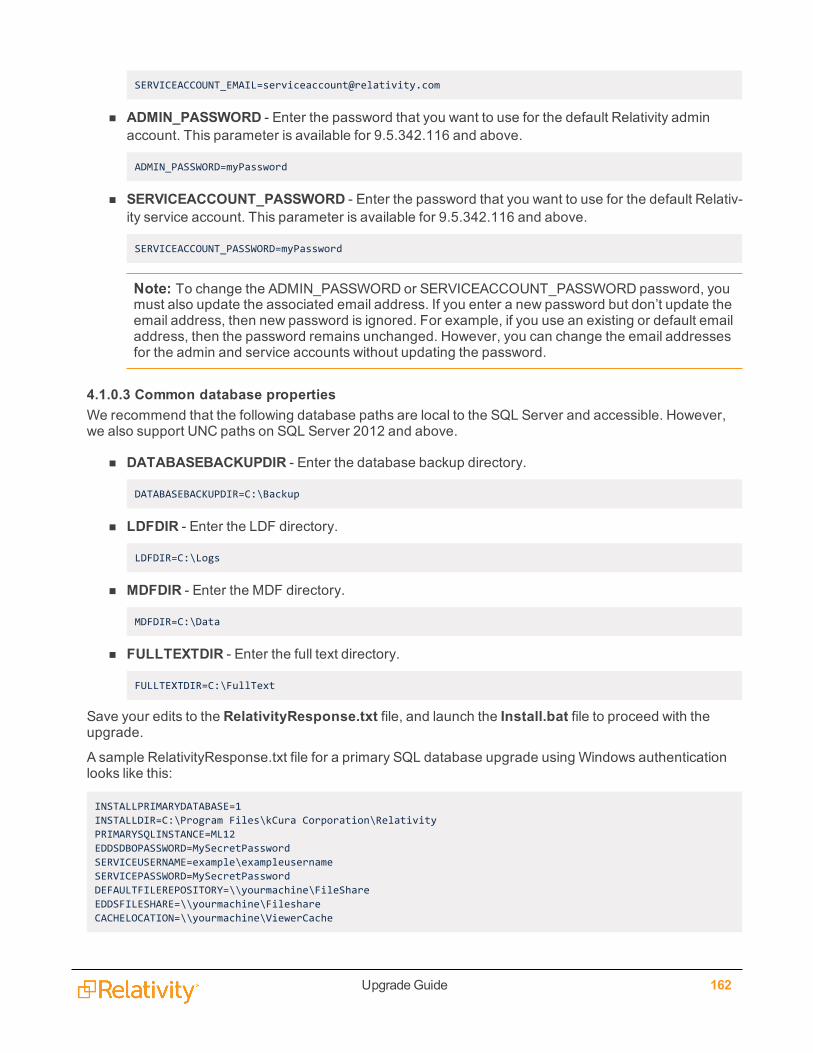
UpgradeGuide 162
n ADMIN_PASSWORD - Enter the password that you want to use for the default Relativity adminaccount. This parameter is available for 9.5.342.116 and above.
ADMIN_PASSWORD=myPassword
n SERVICEACCOUNT_PASSWORD - Enter the password that you want to use for the default Relativ-ity service account. This parameter is available for 9.5.342.116 and above.
SERVICEACCOUNT_PASSWORD=myPassword
Note: To change the ADMIN_PASSWORD or SERVICEACCOUNT_PASSWORD password, youmust also update the associated email address. If you enter a new password but don’t update theemail address, then new password is ignored. For example, if you use an existing or default emailaddress, then the password remains unchanged. However, you can change the email addressesfor the admin and service accounts without updating the password.
4.1.0.3 Common database propertiesWe recommend that the following database paths are local to the SQL Server and accessible. However,we also support UNC paths on SQL Server 2012 and above.
n DATABASEBACKUPDIR - Enter the database backup directory.
DATABASEBACKUPDIR=C:\Backup
n LDFDIR - Enter the LDF directory.
LDFDIR=C:\Logs
n MDFDIR - Enter the MDF directory.
MDFDIR=C:\Data
n FULLTEXTDIR - Enter the full text directory.
FULLTEXTDIR=C:\FullText
Save your edits to the RelativityResponse.txt file, and launch the Install.bat file to proceed with theupgrade.
A sample RelativityResponse.txt file for a primary SQL database upgrade using Windows authenticationlooks like this:
INSTALLPRIMARYDATABASE=1INSTALLDIR=C:\Program Files\kCura Corporation\RelativityPRIMARYSQLINSTANCE=ML12EDDSDBOPASSWORD=MySecretPasswordSERVICEUSERNAME=example\exampleusernameSERVICEPASSWORD=MySecretPasswordDEFAULTFILEREPOSITORY=\\yourmachine\FileShareEDDSFILESHARE=\\yourmachine\FileshareCACHELOCATION=\\yourmachine\ViewerCache
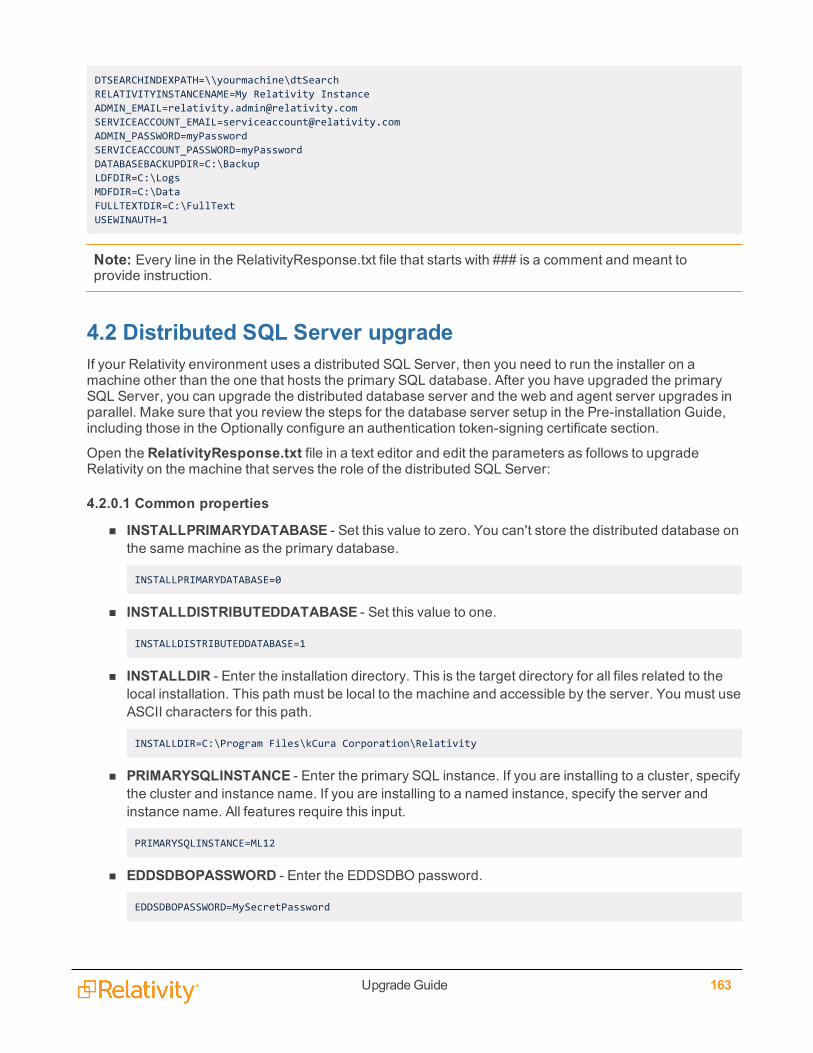
UpgradeGuide 163
DTSEARCHINDEXPATH=\\yourmachine\dtSearchRELATIVITYINSTANCENAME=My Relativity InstanceADMIN_EMAIL=relativity.admin@relativity.comSERVICEACCOUNT_EMAIL=serviceaccount@relativity.comADMIN_PASSWORD=myPasswordSERVICEACCOUNT_PASSWORD=myPasswordDATABASEBACKUPDIR=C:\BackupLDFDIR=C:\LogsMDFDIR=C:\DataFULLTEXTDIR=C:\FullTextUSEWINAUTH=1
Note: Every line in the RelativityResponse.txt file that starts with ### is a comment and meant toprovide instruction.
4.2 Distributed SQL Server upgradeIf your Relativity environment uses a distributed SQL Server, then you need to run the installer on amachine other than the one that hosts the primary SQL database. After you have upgraded the primarySQL Server, you can upgrade the distributed database server and the web and agent server upgrades inparallel. Make sure that you review the steps for the database server setup in the Pre-installation Guide,including those in the Optionally configure an authentication token-signing certificate section.
Open the RelativityResponse.txt file in a text editor and edit the parameters as follows to upgradeRelativity on the machine that serves the role of the distributed SQL Server:
4.2.0.1 Common properties
n INSTALLPRIMARYDATABASE - Set this value to zero. You can't store the distributed database onthe same machine as the primary database.
INSTALLPRIMARYDATABASE=0
n INSTALLDISTRIBUTEDDATABASE - Set this value to one.
INSTALLDISTRIBUTEDDATABASE=1
n INSTALLDIR - Enter the installation directory. This is the target directory for all files related to thelocal installation. This path must be local to the machine and accessible by the server. You must useASCII characters for this path.
INSTALLDIR=C:\Program Files\kCura Corporation\Relativity
n PRIMARYSQLINSTANCE - Enter the primary SQL instance. If you are installing to a cluster, specifythe cluster and instance name. If you are installing to a named instance, specify the server andinstance name. All features require this input.
PRIMARYSQLINSTANCE=ML12
n EDDSDBOPASSWORD - Enter the EDDSDBO password.
EDDSDBOPASSWORD=MySecretPassword
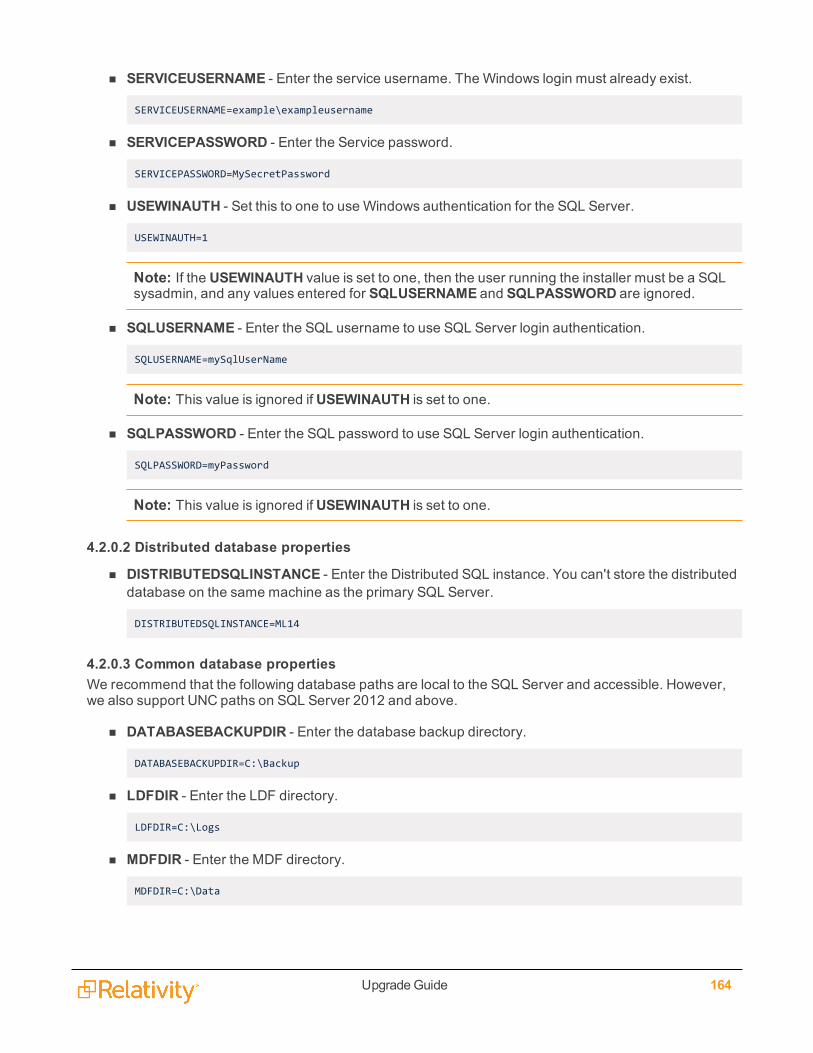
UpgradeGuide 164
n SERVICEUSERNAME - Enter the service username. The Windows login must already exist.
SERVICEUSERNAME=example\exampleusername
n SERVICEPASSWORD - Enter the Service password.
SERVICEPASSWORD=MySecretPassword
n USEWINAUTH - Set this to one to use Windows authentication for the SQL Server.
USEWINAUTH=1
Note: If the USEWINAUTH value is set to one, then the user running the installer must be a SQLsysadmin, and any values entered for SQLUSERNAME and SQLPASSWORD are ignored.
n SQLUSERNAME - Enter the SQL username to use SQL Server login authentication.
SQLUSERNAME=mySqlUserName
Note: This value is ignored if USEWINAUTH is set to one.
n SQLPASSWORD - Enter the SQL password to use SQL Server login authentication.
SQLPASSWORD=myPassword
Note: This value is ignored if USEWINAUTH is set to one.
4.2.0.2 Distributed database properties
n DISTRIBUTEDSQLINSTANCE - Enter the Distributed SQL instance. You can't store the distributeddatabase on the same machine as the primary SQL Server.
DISTRIBUTEDSQLINSTANCE=ML14
4.2.0.3 Common database propertiesWe recommend that the following database paths are local to the SQL Server and accessible. However,we also support UNC paths on SQL Server 2012 and above.
n DATABASEBACKUPDIR - Enter the database backup directory.
DATABASEBACKUPDIR=C:\Backup
n LDFDIR - Enter the LDF directory.
LDFDIR=C:\Logs
n MDFDIR - Enter the MDF directory.
MDFDIR=C:\Data
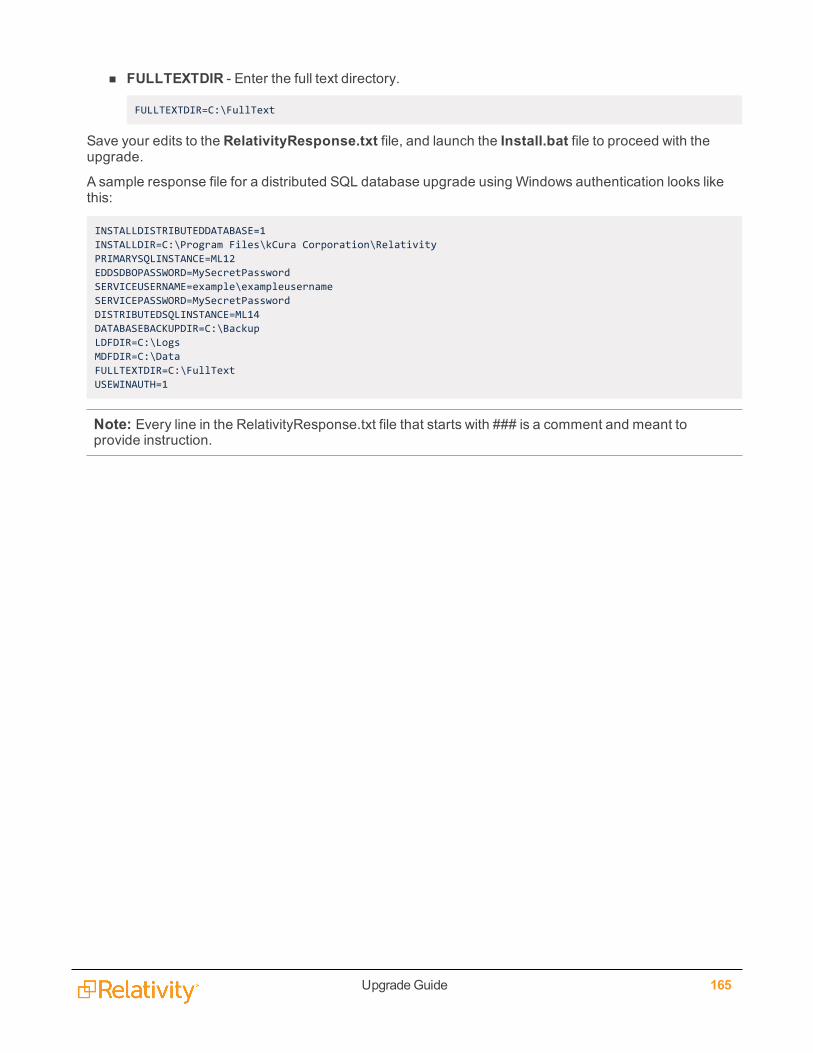
UpgradeGuide 165
n FULLTEXTDIR - Enter the full text directory.
FULLTEXTDIR=C:\FullText
Save your edits to the RelativityResponse.txt file, and launch the Install.bat file to proceed with theupgrade.
A sample response file for a distributed SQL database upgrade using Windows authentication looks likethis:
INSTALLDISTRIBUTEDDATABASE=1INSTALLDIR=C:\Program Files\kCura Corporation\RelativityPRIMARYSQLINSTANCE=ML12EDDSDBOPASSWORD=MySecretPasswordSERVICEUSERNAME=example\exampleusernameSERVICEPASSWORD=MySecretPasswordDISTRIBUTEDSQLINSTANCE=ML14DATABASEBACKUPDIR=C:\BackupLDFDIR=C:\LogsMDFDIR=C:\DataFULLTEXTDIR=C:\FullTextUSEWINAUTH=1
Note: Every line in the RelativityResponse.txt file that starts with ### is a comment and meant toprovide instruction.
UpgradeGuide 166
5 Removing RabbitMQBeginning in Relativity 9.4.254.2, processing to Data Grid no longer requires RabbitMQ. To removeRabbitMQ from your Relativity environment, follow the steps below.
5.1 Deleting Data Grid agentsYou can delete the following Data Grid agents as of Relativity 9.4.254.2:
n Data Grid Error Queue Manager
n Data Grid Install Queue Manager
n Data Grid Process Queue Manager
n Data Grid Status Queue Manager
n Data Grid Verify Queue Manager
To delete one or more agents using the mass operation menu, complete the following steps.
1. From Home, select the Agents tab.
2. Select the agents you want to delete, and then select Delete from the drop-down menu.
3. ClickGo to flag the agents for deletion from your environment.
When the Agent Manager Windows Service runs, any agents marked for deletion are checked to see ifthey're executing a job. If an agent marked for deletion is executing a job, then it's not deleted. The AgentManager service will continue to check the agent at five-second intervals, and when the agent is finishedexecuting its job, it is deleted. For more information on managing agents, see the Agents Guide.
5.2 Deleting empty processing queuesTo delete empty processing queues, complete the following steps:
1. Ensure there are no Relativity Processing jobs running.
2. Run the following script using Windows Powershell to delete empty queues.
$cred = Get-Credentialiwr -ContentType 'application/json' -Method Get -Credential $cred 'http://-localhost:15672/api/queues' | % {
ConvertFrom-Json $_.Content } | % { $_ } | ? { $_.messages -eq 0} | % {iwr -method DELETE -Credential $cred -uri $("http://localhost:15672/api/queues/{0}/{1}" -f
[System.Web.HttpUtility]::UrlEncode($_.vhost), $_.name)}
3. Ensure there are no queues leftover. If there are any remaining queues, contact the Client Servicesteam.
5.3 Uninstalling RabbitMQ Server and Erlang OTPTo uninstall RabbitMQ and Erlang:
UpgradeGuide 167
1. Open the Control Panel.
2. Select Uninstall a program.
3. Right-click RabbitMQ Server, and then clickUninstall.
4. Repeat steps 1-3 to uninstall Erlang OTP 18.
5. Delete the installation directories for RabbitMQ:
Get-ChildItem c:\ -Force -Include *Rabbit* -Recurse | foreach ($_) {Remove-Item $_.fullname -whatif}
Note: This script will delete all files related to RabbitMQ on C:\. If you are using RabbitMQ foranything else in your infrastructure, you must modify this script.
n Remove -whatif when ready to run.
n Delete C:\Users\relativityserviceaccount\AppData\Roaming\RabbitMQ.
6. Delete the installation directories for Erlang OTP 18:
Get-ChildItem c:\ -Force -Include *erlang* -Recurse | foreach ($_) {Remove-Item $_.fullname -whatif}
Note: This script will delete all files related to Erlang on C:\. If you are using Erlang for anythingelse in your infrastructure, you must modify this script.
n Remove -whatif when ready to run.
n Delete the file C:\Windows\.erlang.cookie and C:\User-s\relativityserviceaccount\.erlang.cookie.
7. Restart your machine.
5.4 Closing ports on the Queue ServerClose the following ports on the queue server:
n 15672
UpgradeGuide 168
6 Upgrading your Relativity service busTo upgrade the Relativity service bus, you run the installer on a machine where it is already installed, orwhere the Service Bus for Windows Server is installed. You must include the Relativity service bus serveras a node in the Service Bus for Windows Server farm. For more information, see the Pre-Installationguide.
When you perform an upgrade, the Relativity installer saves information about the about the farm to theprimary SQL Server database. It also performs setup tasks on farm, so that Relativity can connect to theservice bus.
6.1 Relativity service bus upgradeThe Relativity service bus supports messaging between application components. Before installing orupgrading the Relativity service bus, upgrade the primary SQL Server. For more information, see theRelativity Service Bus guide.
Contact Relativity Client Services to get a copy of the Relativity installer.
Save the following files to the root directory of any server contributing to the Relativity environment:
n Relativity.exe - The executable file that installs Relativity components determined by the valuesentered in the RelativityResponse.txt file.
Notes:o You must save Relativity.exe on a drive local to the server. Running Relativity.exe from ashared location results in upgrade or installation failure.
o The Relativity.exe file does not open a user interface. Use Install.bat to proceed with install-ation.
n Install.bat - The code that prompts Relativity.exe to proceed with the installation process. You mustedit line 11 of the Install.bat file with the exact name of the Relativity installation file.
start /wait "" "INSERT EXACT NAME OF RELATIVITY INSTALLATION FILE" /log InstallLog.txt /re-sponsefilepath=RelativityResponse.txt
Notes:o You may need to run this file from an elevated command line prompt to avoid permissionissues.
o You must surround the name of the Relativity installation file with quotation marks.
n RelativityResponse.txt - The text file that determines which components Relativity.exe installs,uninstalls, or upgrades on the server.
Note: Every line in the RelativityResponse.txt file that starts with ### is a comment and meant toprovide instruction.
UpgradeGuide 169
6.2 Setting properties in the RelativityResponse.txt fileOpen the RelativityResponse.txt file in a text editor and edit the properties as follows to install Relativityon the machine that serves the role of the service bus server:
6.2.1 Feature selectionn INSTALLSERVICEBUS - Set this value to one to install the Relativity service bus.
INSTALLSERVICEBUS=1
Note: If the service bus server is already installed on this machine and theINSTALLSERVICEBUS property is set to zero, the installer removes the previously existingservice bus server.
6.2.2 Common propertiesn INSTALLDIR - Enter the installation directory. This is the target directory for all files related to the
local installation. This path must be local to the machine and accessible by the server. You must useASCII characters for this path.
INSTALLDIR=C:\Program Files\kCura Corporation\Relativity
n PRIMARYSQLINSTANCE - Enter the primary SQL instance. If you are installing to a cluster, specifythe cluster and instance name. If you are installing to a named instance, specify the server andinstance name. All features require this input.
PRIMARYSQLINSTANCE=ML12
n EDDSDBOPASSWORD - Enter the EDDSDBO password.
EDDSDBOPASSWORD=MySecretPassword
n SERVICEUSERNAME - Enter the service username. The Windows login must already exist.
SERVICEUSERNAME=example\exampleusername
n SERVICEPASSWORD - Enter the service password.
SERVICEPASSWORD=MySecretPassword
n USEWINAUTH - Set this to 1 to use Windows authentication for the SQL Server.
USEWINAUTH=1
Note: If the USEWINAUTH value is set to one, then the user running the installer must be a SQLsysadmin, and any values entered for SQLUSERNAME and SQLPASSWORD are ignored.
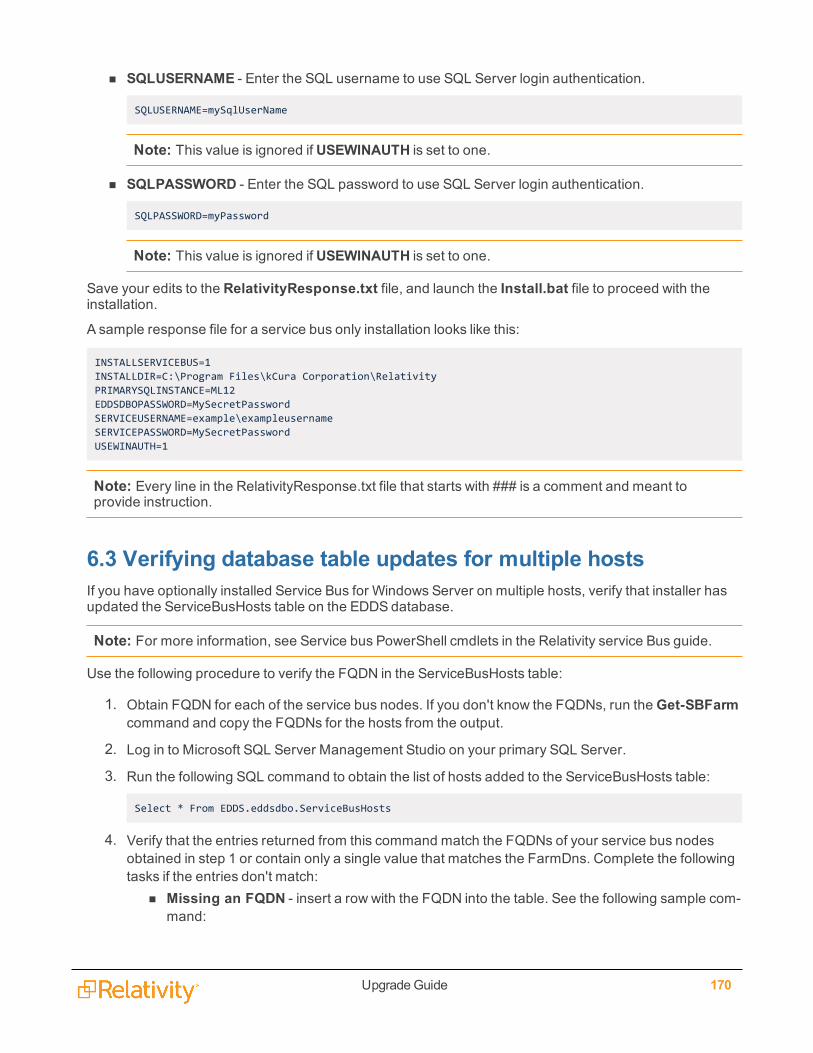
UpgradeGuide 170
n SQLUSERNAME - Enter the SQL username to use SQL Server login authentication.
SQLUSERNAME=mySqlUserName
Note: This value is ignored if USEWINAUTH is set to one.
n SQLPASSWORD - Enter the SQL password to use SQL Server login authentication.
SQLPASSWORD=myPassword
Note: This value is ignored if USEWINAUTH is set to one.
Save your edits to the RelativityResponse.txt file, and launch the Install.bat file to proceed with theinstallation.
A sample response file for a service bus only installation looks like this:
INSTALLSERVICEBUS=1INSTALLDIR=C:\Program Files\kCura Corporation\RelativityPRIMARYSQLINSTANCE=ML12EDDSDBOPASSWORD=MySecretPasswordSERVICEUSERNAME=example\exampleusernameSERVICEPASSWORD=MySecretPasswordUSEWINAUTH=1
Note: Every line in the RelativityResponse.txt file that starts with ### is a comment and meant toprovide instruction.
6.3 Verifying database table updates for multiple hostsIf you have optionally installed Service Bus for Windows Server on multiple hosts, verify that installer hasupdated the ServiceBusHosts table on the EDDS database.
Note: For more information, see Service bus PowerShell cmdlets in the Relativity service Bus guide.
Use the following procedure to verify the FQDN in the ServiceBusHosts table:
1. Obtain FQDN for each of the service bus nodes. If you don't know the FQDNs, run theGet-SBFarmcommand and copy the FQDNs for the hosts from the output.
2. Log in to Microsoft SQL Server Management Studio on your primary SQL Server.
3. Run the following SQL command to obtain the list of hosts added to the ServiceBusHosts table:
Select * From EDDS.eddsdbo.ServiceBusHosts
4. Verify that the entries returned from this command match the FQDNs of your service bus nodesobtained in step 1 or contain only a single value that matches the FarmDns. Complete the followingtasks if the entries don't match:
n Missing an FQDN - insert a row with the FQDN into the table. See the following sample com-mand:
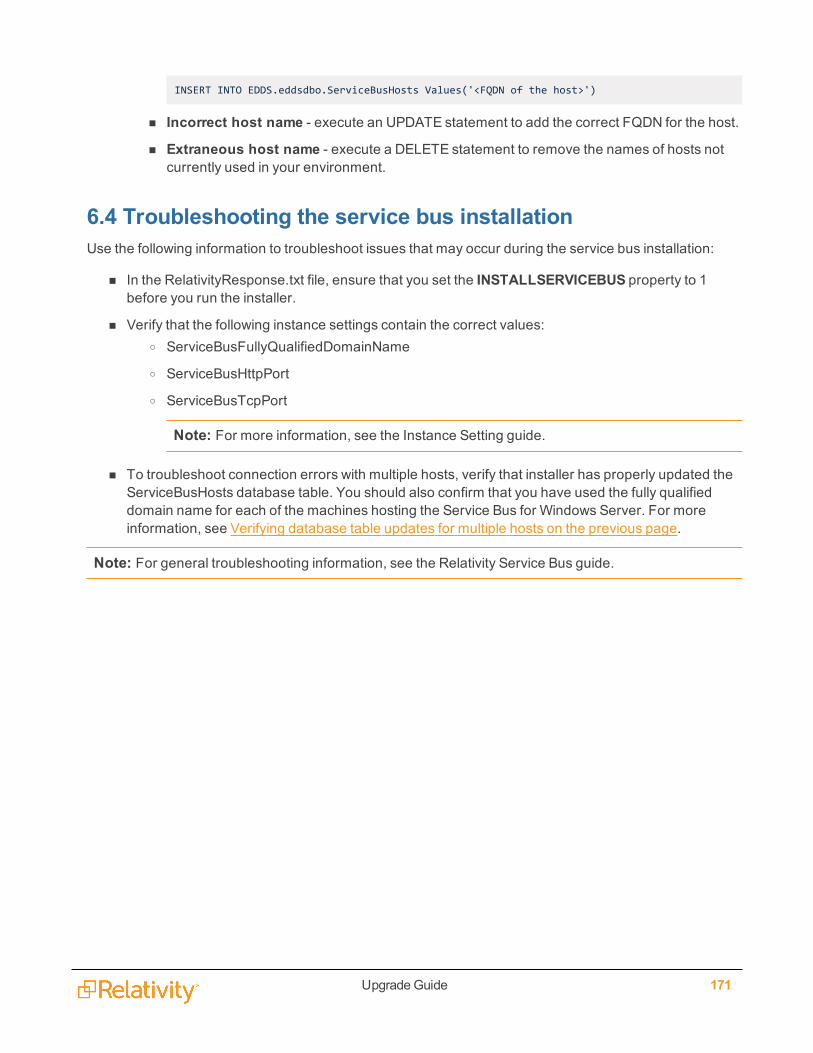
UpgradeGuide 171
INSERT INTO EDDS.eddsdbo.ServiceBusHosts Values('<FQDN of the host>')
n Incorrect host name - execute an UPDATE statement to add the correct FQDN for the host.
n Extraneous host name - execute a DELETE statement to remove the names of hosts notcurrently used in your environment.
6.4 Troubleshooting the service bus installationUse the following information to troubleshoot issues that may occur during the service bus installation:
n In the RelativityResponse.txt file, ensure that you set the INSTALLSERVICEBUS property to 1before you run the installer.
n Verify that the following instance settings contain the correct values:o ServiceBusFullyQualifiedDomainName
o ServiceBusHttpPort
o ServiceBusTcpPort
Note: For more information, see the Instance Setting guide.
n To troubleshoot connection errors with multiple hosts, verify that installer has properly updated theServiceBusHosts database table. You should also confirm that you have used the fully qualifieddomain name for each of the machines hosting the Service Bus for Windows Server. For moreinformation, see Verifying database table updates for multiple hosts on the previous page.
Note: For general troubleshooting information, see the Relativity Service Bus guide.
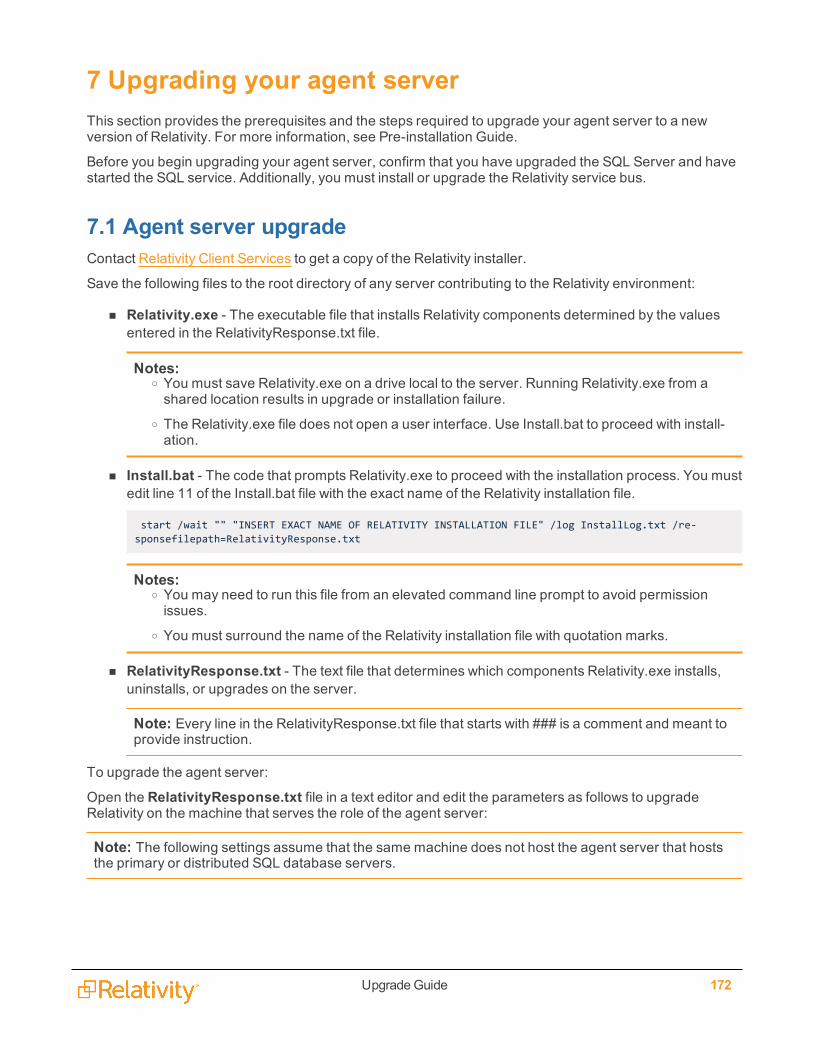
UpgradeGuide 172
7 Upgrading your agent serverThis section provides the prerequisites and the steps required to upgrade your agent server to a newversion of Relativity. For more information, see Pre-installation Guide.
Before you begin upgrading your agent server, confirm that you have upgraded the SQL Server and havestarted the SQL service. Additionally, you must install or upgrade the Relativity service bus.
7.1 Agent server upgradeContact Relativity Client Services to get a copy of the Relativity installer.
Save the following files to the root directory of any server contributing to the Relativity environment:
n Relativity.exe - The executable file that installs Relativity components determined by the valuesentered in the RelativityResponse.txt file.
Notes:o You must save Relativity.exe on a drive local to the server. Running Relativity.exe from ashared location results in upgrade or installation failure.
o The Relativity.exe file does not open a user interface. Use Install.bat to proceed with install-ation.
n Install.bat - The code that prompts Relativity.exe to proceed with the installation process. You mustedit line 11 of the Install.bat file with the exact name of the Relativity installation file.
start /wait "" "INSERT EXACT NAME OF RELATIVITY INSTALLATION FILE" /log InstallLog.txt /re-sponsefilepath=RelativityResponse.txt
Notes:o You may need to run this file from an elevated command line prompt to avoid permissionissues.
o You must surround the name of the Relativity installation file with quotation marks.
n RelativityResponse.txt - The text file that determines which components Relativity.exe installs,uninstalls, or upgrades on the server.
Note: Every line in the RelativityResponse.txt file that starts with ### is a comment and meant toprovide instruction.
To upgrade the agent server:
Open the RelativityResponse.txt file in a text editor and edit the parameters as follows to upgradeRelativity on the machine that serves the role of the agent server:
Note: The following settings assume that the same machine does not host the agent server that hoststhe primary or distributed SQL database servers.
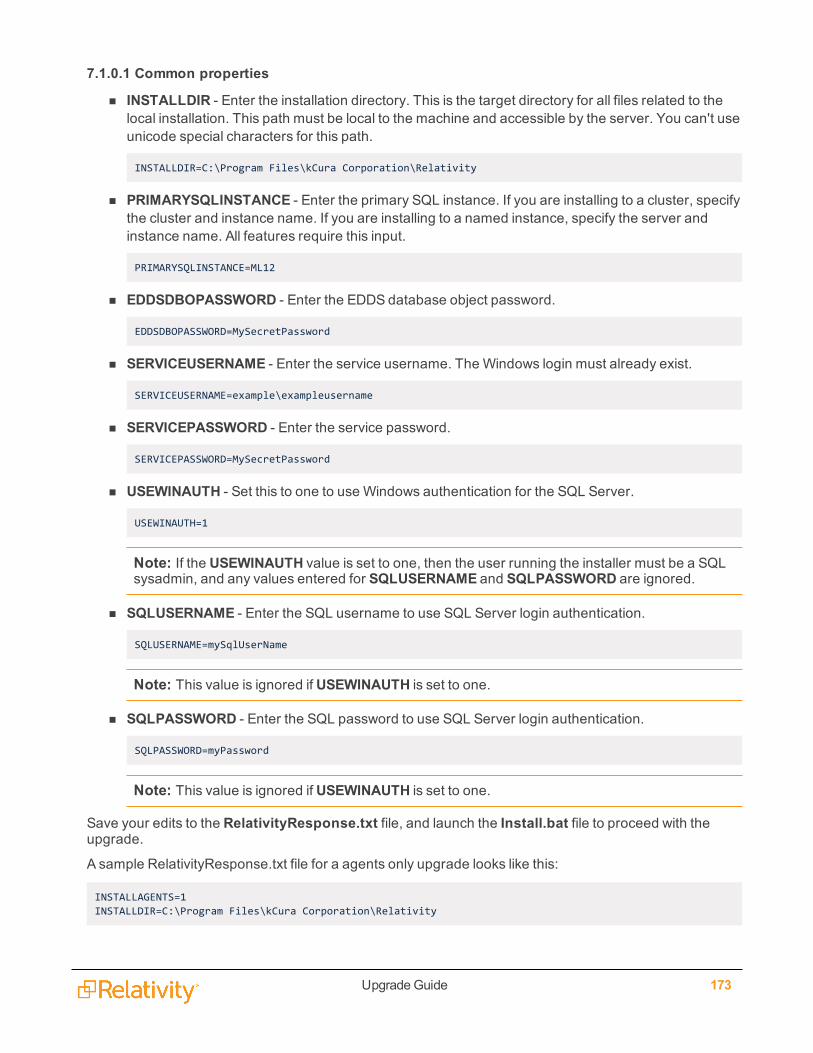
UpgradeGuide 173
7.1.0.1 Common properties
n INSTALLDIR - Enter the installation directory. This is the target directory for all files related to thelocal installation. This path must be local to the machine and accessible by the server. You can't useunicode special characters for this path.
INSTALLDIR=C:\Program Files\kCura Corporation\Relativity
n PRIMARYSQLINSTANCE - Enter the primary SQL instance. If you are installing to a cluster, specifythe cluster and instance name. If you are installing to a named instance, specify the server andinstance name. All features require this input.
PRIMARYSQLINSTANCE=ML12
n EDDSDBOPASSWORD - Enter the EDDS database object password.
EDDSDBOPASSWORD=MySecretPassword
n SERVICEUSERNAME - Enter the service username. The Windows login must already exist.
SERVICEUSERNAME=example\exampleusername
n SERVICEPASSWORD - Enter the service password.
SERVICEPASSWORD=MySecretPassword
n USEWINAUTH - Set this to one to use Windows authentication for the SQL Server.
USEWINAUTH=1
Note: If the USEWINAUTH value is set to one, then the user running the installer must be a SQLsysadmin, and any values entered for SQLUSERNAME and SQLPASSWORD are ignored.
n SQLUSERNAME - Enter the SQL username to use SQL Server login authentication.
SQLUSERNAME=mySqlUserName
Note: This value is ignored if USEWINAUTH is set to one.
n SQLPASSWORD - Enter the SQL password to use SQL Server login authentication.
SQLPASSWORD=myPassword
Note: This value is ignored if USEWINAUTH is set to one.
Save your edits to the RelativityResponse.txt file, and launch the Install.bat file to proceed with theupgrade.
A sample RelativityResponse.txt file for a agents only upgrade looks like this:
INSTALLAGENTS=1INSTALLDIR=C:\Program Files\kCura Corporation\Relativity
UpgradeGuide 174
PRIMARYSQLINSTANCE=ML12EDDSDBOPASSWORD=MySecretPasswordSERVICEUSERNAME=example\exampleusernameSERVICEPASSWORD=MySecretPassword
Note: Every line in the RelativityResponse.txt file that starts with ### is a comment and meant toprovide instruction.
7.2 Service Host Manager HTTPS configurationService Host Manager runs Relativity services on all web and agent servers in your environment. Theservices are used by applications like Production and Processing on. If your web and agent servers mustbe set up for HTTPS access, special setup is required for Service Host Manager.
For more information, see Service Host Manager on the Relativity 9.5 Documentation site.
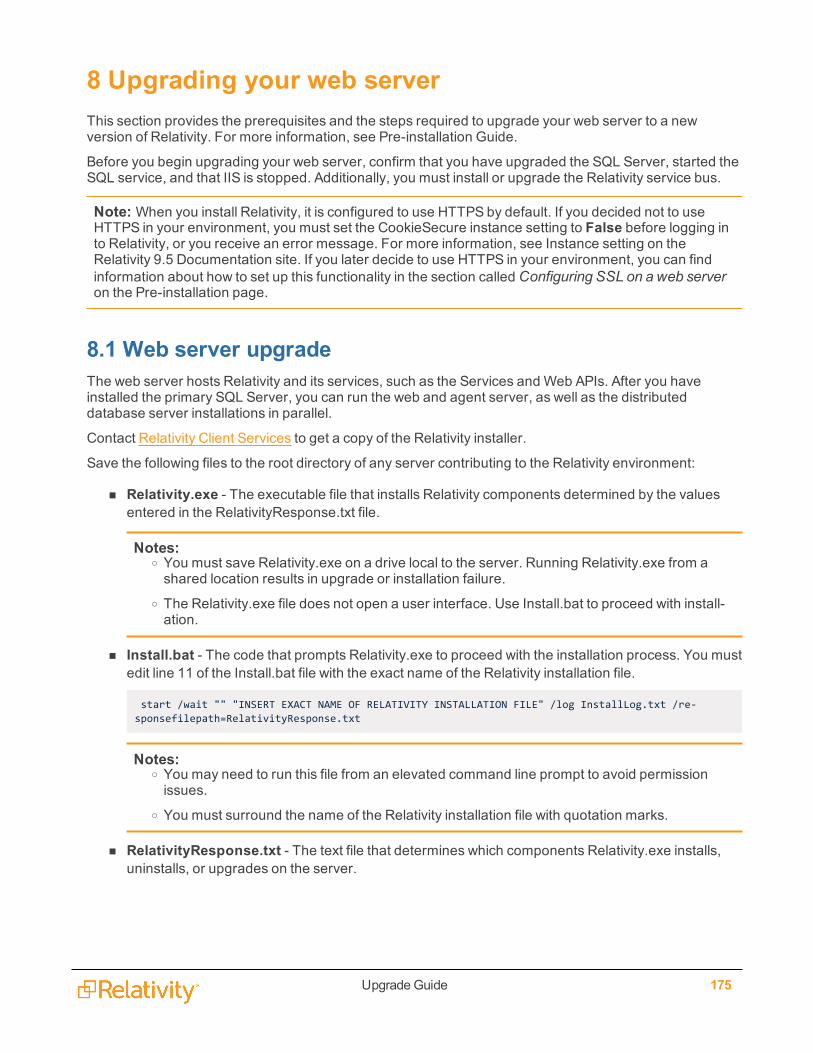
UpgradeGuide 175
8 Upgrading your web serverThis section provides the prerequisites and the steps required to upgrade your web server to a newversion of Relativity. For more information, see Pre-installation Guide.
Before you begin upgrading your web server, confirm that you have upgraded the SQL Server, started theSQL service, and that IIS is stopped. Additionally, you must install or upgrade the Relativity service bus.
Note: When you install Relativity, it is configured to use HTTPS by default. If you decided not to useHTTPS in your environment, you must set the CookieSecure instance setting to False before logging into Relativity, or you receive an error message. For more information, see Instance setting on theRelativity 9.5 Documentation site. If you later decide to use HTTPS in your environment, you can findinformation about how to set up this functionality in the section called Configuring SSL on a web serveron the Pre-installation page.
8.1 Web server upgradeThe web server hosts Relativity and its services, such as the Services and Web APIs. After you haveinstalled the primary SQL Server, you can run the web and agent server, as well as the distributeddatabase server installations in parallel.
Contact Relativity Client Services to get a copy of the Relativity installer.
Save the following files to the root directory of any server contributing to the Relativity environment:
n Relativity.exe - The executable file that installs Relativity components determined by the valuesentered in the RelativityResponse.txt file.
Notes:o You must save Relativity.exe on a drive local to the server. Running Relativity.exe from ashared location results in upgrade or installation failure.
o The Relativity.exe file does not open a user interface. Use Install.bat to proceed with install-ation.
n Install.bat - The code that prompts Relativity.exe to proceed with the installation process. You mustedit line 11 of the Install.bat file with the exact name of the Relativity installation file.
start /wait "" "INSERT EXACT NAME OF RELATIVITY INSTALLATION FILE" /log InstallLog.txt /re-sponsefilepath=RelativityResponse.txt
Notes:o You may need to run this file from an elevated command line prompt to avoid permissionissues.
o You must surround the name of the Relativity installation file with quotation marks.
n RelativityResponse.txt - The text file that determines which components Relativity.exe installs,uninstalls, or upgrades on the server.
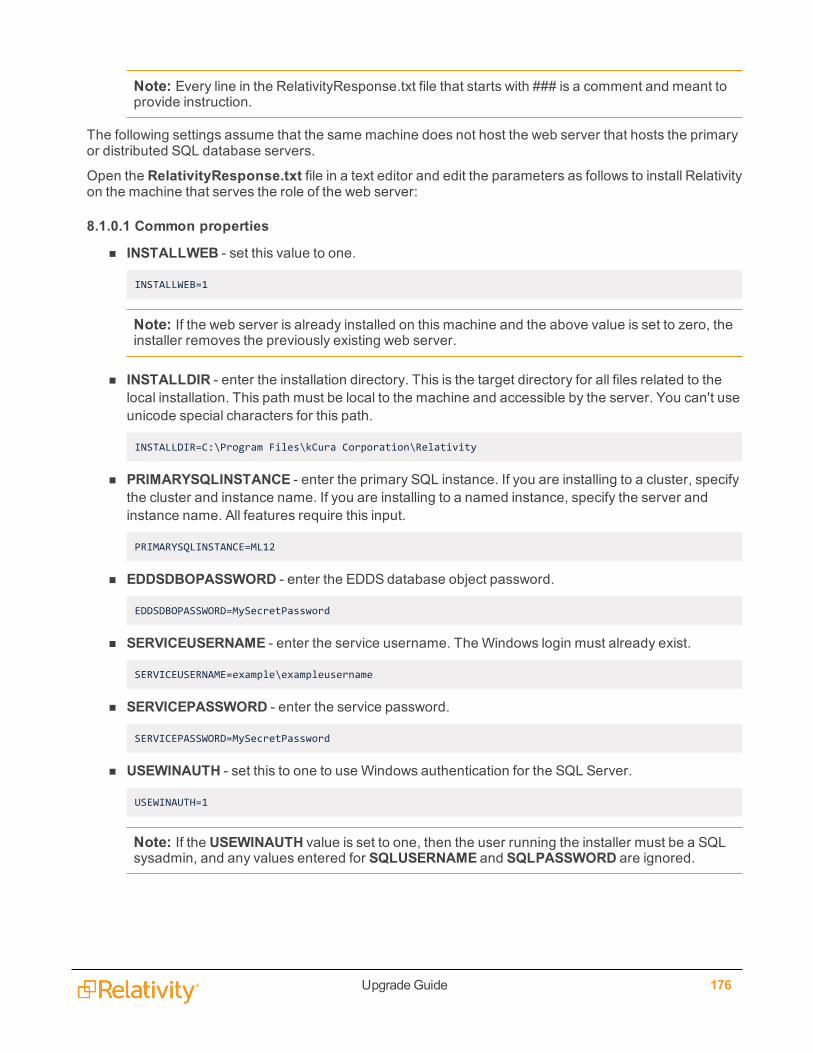
UpgradeGuide 176
Note: Every line in the RelativityResponse.txt file that starts with ### is a comment and meant toprovide instruction.
The following settings assume that the same machine does not host the web server that hosts the primaryor distributed SQL database servers.
Open the RelativityResponse.txt file in a text editor and edit the parameters as follows to install Relativityon the machine that serves the role of the web server:
8.1.0.1 Common properties
n INSTALLWEB - set this value to one.
INSTALLWEB=1
Note: If the web server is already installed on this machine and the above value is set to zero, theinstaller removes the previously existing web server.
n INSTALLDIR - enter the installation directory. This is the target directory for all files related to thelocal installation. This path must be local to the machine and accessible by the server. You can't useunicode special characters for this path.
INSTALLDIR=C:\Program Files\kCura Corporation\Relativity
n PRIMARYSQLINSTANCE - enter the primary SQL instance. If you are installing to a cluster, specifythe cluster and instance name. If you are installing to a named instance, specify the server andinstance name. All features require this input.
PRIMARYSQLINSTANCE=ML12
n EDDSDBOPASSWORD - enter the EDDS database object password.
EDDSDBOPASSWORD=MySecretPassword
n SERVICEUSERNAME - enter the service username. The Windows login must already exist.
SERVICEUSERNAME=example\exampleusername
n SERVICEPASSWORD - enter the service password.
SERVICEPASSWORD=MySecretPassword
n USEWINAUTH - set this to one to use Windows authentication for the SQL Server.
USEWINAUTH=1
Note: If the USEWINAUTH value is set to one, then the user running the installer must be a SQLsysadmin, and any values entered for SQLUSERNAME and SQLPASSWORD are ignored.
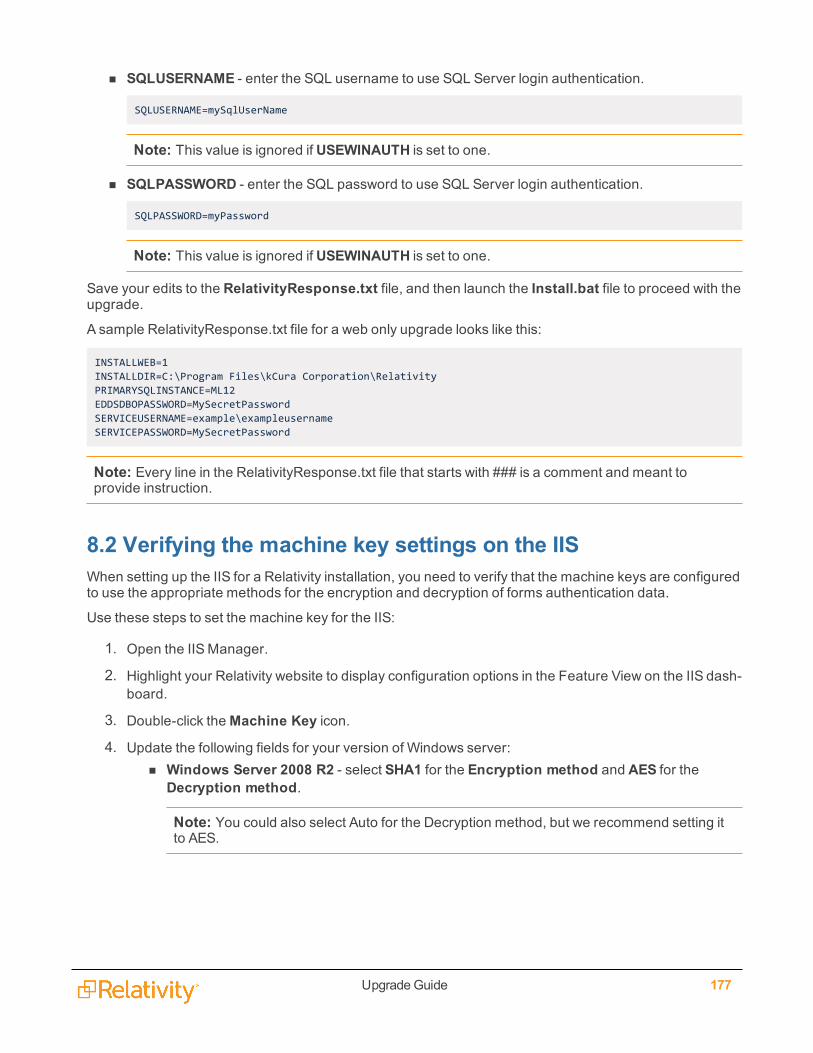
UpgradeGuide 177
n SQLUSERNAME - enter the SQL username to use SQL Server login authentication.
SQLUSERNAME=mySqlUserName
Note: This value is ignored if USEWINAUTH is set to one.
n SQLPASSWORD - enter the SQL password to use SQL Server login authentication.
SQLPASSWORD=myPassword
Note: This value is ignored if USEWINAUTH is set to one.
Save your edits to the RelativityResponse.txt file, and then launch the Install.bat file to proceed with theupgrade.
A sample RelativityResponse.txt file for a web only upgrade looks like this:
INSTALLWEB=1INSTALLDIR=C:\Program Files\kCura Corporation\RelativityPRIMARYSQLINSTANCE=ML12EDDSDBOPASSWORD=MySecretPasswordSERVICEUSERNAME=example\exampleusernameSERVICEPASSWORD=MySecretPassword
Note: Every line in the RelativityResponse.txt file that starts with ### is a comment and meant toprovide instruction.
8.2 Verifying the machine key settings on the IISWhen setting up the IIS for a Relativity installation, you need to verify that the machine keys are configuredto use the appropriate methods for the encryption and decryption of forms authentication data.
Use these steps to set the machine key for the IIS:
1. Open the IISManager.
2. Highlight your Relativity website to display configuration options in the Feature View on the IIS dash-board.
3. Double-click theMachine Key icon.
4. Update the following fields for your version of Windows server:n Windows Server 2008 R2 - select SHA1 for the Encryption method and AES for the
Decryption method.
Note: You could also select Auto for the Decryption method, but we recommend setting itto AES.
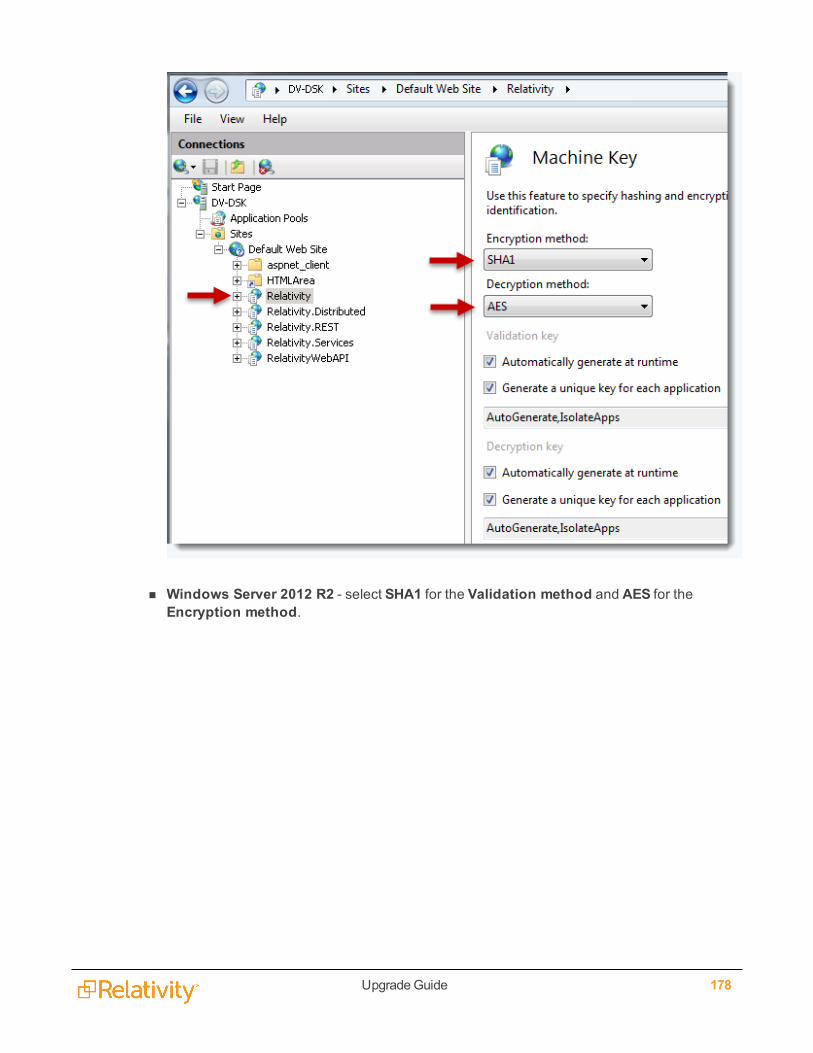
UpgradeGuide 178
n Windows Server 2012 R2 - select SHA1 for the Validation method and AES for theEncryption method.
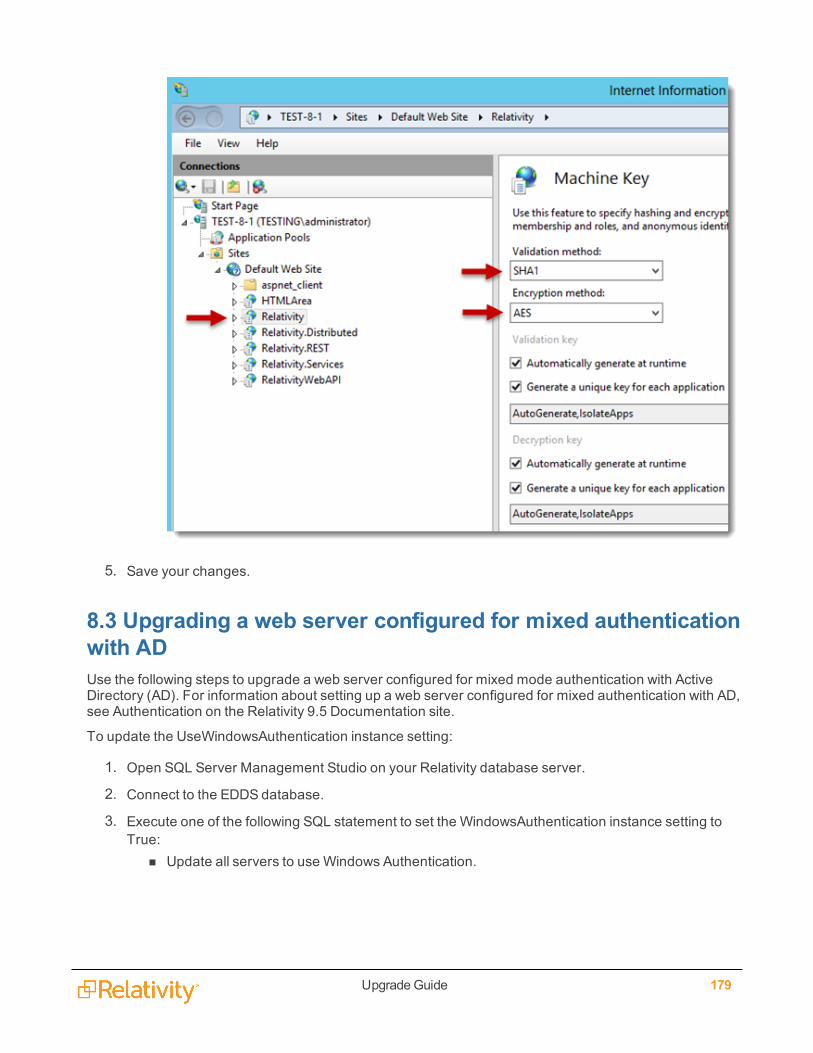
UpgradeGuide 179
5. Save your changes.
8.3 Upgrading a web server configured for mixed authenticationwith ADUse the following steps to upgrade a web server configured for mixed mode authentication with ActiveDirectory (AD). For information about setting up a web server configured for mixed authentication with AD,see Authentication on the Relativity 9.5 Documentation site.
To update the UseWindowsAuthentication instance setting:
1. Open SQL Server Management Studio on your Relativity database server.
2. Connect to the EDDS database.
3. Execute one of the following SQL statement to set the WindowsAuthentication instance setting toTrue:
n Update all servers to use Windows Authentication.
UpgradeGuide 180
UPDATE EDDS.eddsdbo.InstanceSetting SETvalue = 'True' WHEREName = 'UseWindowsAuthentication'
n Update a specific server to use Windows Authentication. Replace YourServerName in theWHERE clause to the name of your machine, which you want to configure for WindowsAuthentication. You only need the machine name if you want to set this setting per server.
UPDATE EDDS.eddsdbo.InstanceSetting SETvalue = 'True' WHEREName = 'UseWindowsAuthentication' and MachineName = 'YourServerName'
n Add a new row to the instance setting table for each additional machine that you need toenable AD authentication. Use this option when you want AD enabled on multiple web serv-ers in your Relativity environment, but not on all of them. You need to execute the followingSQL statement with the name of the additional machine, which you want to configure for Win-dows Authentication. Replace YourSecondServerName with the name of that machine.
INSERT INTO EDDS.eddsdbo.InstanceSettingVALUES ('Relativ-ity.Authentication','UseWindowsAuthentication','True','YourSecondServerName','Determineswhether Relativity uses Windows Authentication. Set this value False if you want to disableWinAuth. Set it to True if you want to enable WinAuth and require the user to log in toRelativity from the current machine.')
8.4 Service Host Manager HTTPS configurationService Host Manager runs Relativity services on all web and agent servers in your environment. Theservices are used by applications like Production and Processing on. If your web and agent servers mustbe set up for HTTPS access, special setup is required for Service Host Manager.
For more information, see Service Host Manager on the Relativity 9.5 Documentation site.
8.5 SignalRWhen running Relativity on IIS 7.5 and older, the SignalR protocol may exhibit performance issues,including slow responses and connection failures as it falls back to other supported connection protocols.To resolve this issue, disable dynamic content compression for the Relativity.REST application in theCompression section in IIS:
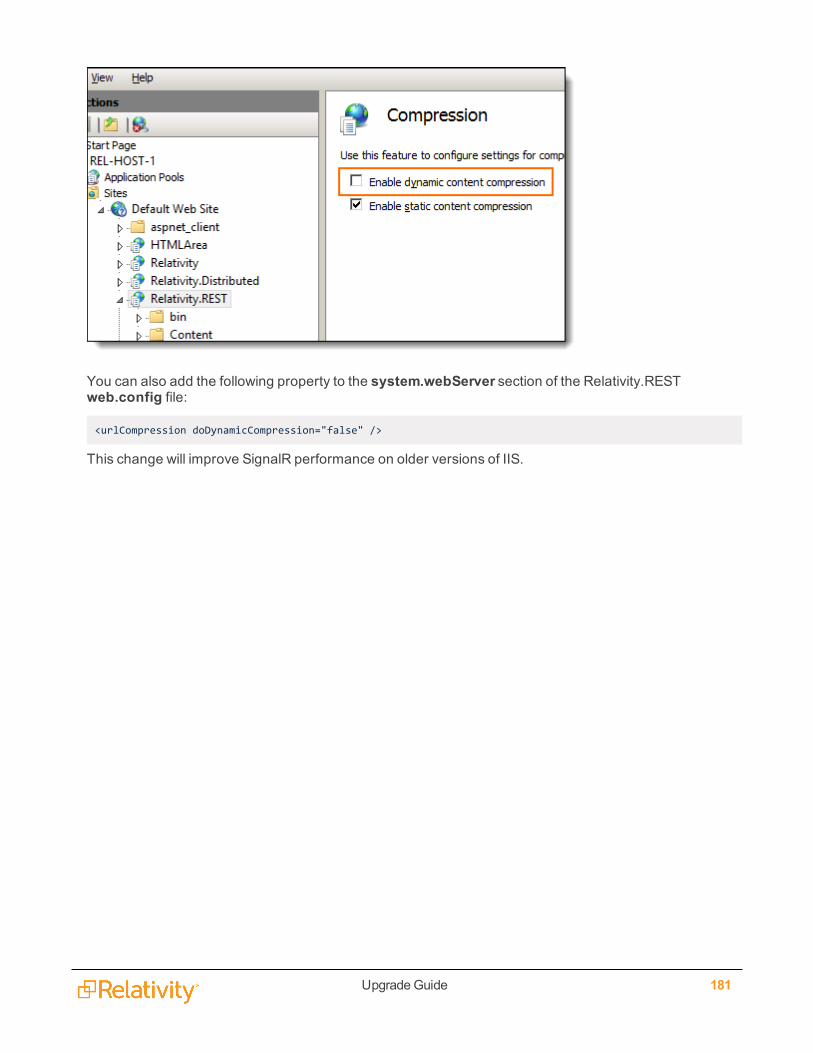
UpgradeGuide 181
You can also add the following property to the system.webServer section of the Relativity.RESTweb.config file:
<urlCompression doDynamicCompression="false" />
This change will improve SignalR performance on older versions of IIS.
UpgradeGuide 182
9 Upgrading Relativity to .NET 4.6.2.As of Relativity 9.5.196.102, you must upgrade your Relativity environment to .NET 4.6.2. The updatesmust be applied to Relativity servers and client machines.
Note: Existing custom applications are backward-compatible with Relativity 9.5.196.102 and do notneed to be recompiled, but you must upgrade your development environment to use the latest versionsof Relativity SDKs.
9.1 All serversPerform these steps on all servers in your Relativity environment:
1. Download the .NET 4.6.2 installer from https://www.microsoft.com/en-us/-download/details.aspx?id=53344.The downloaded file name isNDP462-KB3151800-x86-x64-AllOS-ENU.exe.
2. Run the NDP462-KB3151800-x86-x64-AllOS-ENU.exe executable and follow the instructions inthe installation wizard.
3. Turn off applications when prompted by the installation wizard.
4. Restart the server on completion.
9.2 Client machinesPerform these steps on all systems running Relativity and Invariant client applications (ActiveX viewer,Relativity Desktop Client, and Relativity Processing Console):
1. If you don't have the Microsoft Visual C++ 2015 Redistributable already installed, download it fromhttps://www.microsoft.com/en-us/download/details.aspx?id=53840.The download provides both32- and 64-bit options. Select an executable depending on your system word size.
2. Run the Microsoft Visual C++ 2015 Redistributable executable and follow the instructions in theinstallation wizard.
3. Download the .NET 4.6.2 installer from https://www.microsoft.com/en-us/-download/details.aspx?id=53344.The downloaded file name isNDP462-KB3151800-x86-x64-AllOS-ENU.exe.
4. Run the NDP462-KB3151800-x86-x64-AllOS-ENU.exe executable and follow the instructions inthe installation wizard.
5. Turn off applications when prompted by the installation wizard.
6. Restart the machine on completion.
7. Download and install the latest versions of ActiveX viewer, RDC, and RPC.
UpgradeGuide 183
9.3 Relativity applications
9.3.1 Backward-compatible applicationsGoing forward, regardless of current Relativity version, if you install new .NET 4.6.2-based versions ofbackward-compatible Relativity applications, you must upgrade your environment to .NET 4.6.2 asdescribed above.
Backward-compatible applications include Data Grid, ARM, Relativity User Import, etc.
9.3.2 Custom applications built with the Relativity SDKCustom applications that Relativity does not own or maintain can continue to target their current .NETversion and will work in the new .NET 4.6.2-based Relativity. You can continue developing with olderversions of the Relativity SDKs if you don't need the new features in latest version.
To develop using the latest Relativity SDK, you must update the applications' projects to target .NET 4.6.2.The developers must also update their environment to the .NET 4.6.2 Developer Pack as describedbelow.
9.4 Development environmentIf you develop custom Relativity application, you must update your development environment to use thelatest version of the SDK:
1. Download the Microsoft .NET Framework 4.6.2 Developer Pack from https://www.-microsoft.com/en-us/download/details.aspx?id=53321. The file name isNDP462-DevPack-KB3151934-ENU.exe.
2. Run the NDP462-DevPack-KB3151934-ENU.exe executable and follow the instructions in theinstallation wizard.
3. Turn off applications when prompted by the installation wizard.
4. Restart the machine on completion.
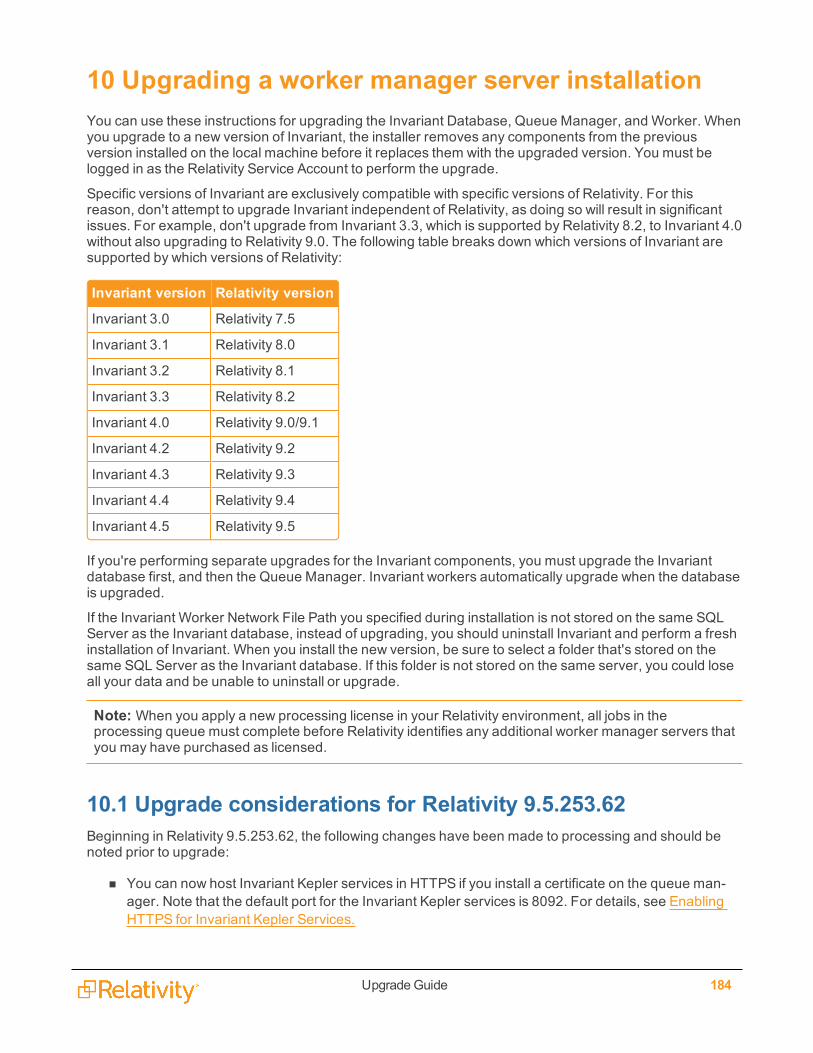
UpgradeGuide 184
10 Upgrading a worker manager server installationYou can use these instructions for upgrading the Invariant Database, Queue Manager, and Worker. Whenyou upgrade to a new version of Invariant, the installer removes any components from the previousversion installed on the local machine before it replaces them with the upgraded version. You must belogged in as the Relativity Service Account to perform the upgrade.
Specific versions of Invariant are exclusively compatible with specific versions of Relativity. For thisreason, don't attempt to upgrade Invariant independent of Relativity, as doing so will result in significantissues. For example, don't upgrade from Invariant 3.3, which is supported by Relativity 8.2, to Invariant 4.0without also upgrading to Relativity 9.0. The following table breaks down which versions of Invariant aresupported by which versions of Relativity:
Invariant version Relativity version
Invariant 3.0 Relativity 7.5
Invariant 3.1 Relativity 8.0
Invariant 3.2 Relativity 8.1
Invariant 3.3 Relativity 8.2
Invariant 4.0 Relativity 9.0/9.1
Invariant 4.2 Relativity 9.2
Invariant 4.3 Relativity 9.3
Invariant 4.4 Relativity 9.4
Invariant 4.5 Relativity 9.5
If you're performing separate upgrades for the Invariant components, you must upgrade the Invariantdatabase first, and then the Queue Manager. Invariant workers automatically upgrade when the databaseis upgraded.
If the Invariant Worker Network File Path you specified during installation is not stored on the same SQLServer as the Invariant database, instead of upgrading, you should uninstall Invariant and perform a freshinstallation of Invariant. When you install the new version, be sure to select a folder that's stored on thesame SQL Server as the Invariant database. If this folder is not stored on the same server, you could loseall your data and be unable to uninstall or upgrade.
Note: When you apply a new processing license in your Relativity environment, all jobs in theprocessing queue must complete before Relativity identifies any additional worker manager servers thatyou may have purchased as licensed.
10.1 Upgrade considerations for Relativity 9.5.253.62Beginning in Relativity 9.5.253.62, the following changes have been made to processing and should benoted prior to upgrade:
n You can now host Invariant Kepler services in HTTPS if you install a certificate on the queue man-ager. Note that the default port for the Invariant Kepler services is 8092. For details, see EnablingHTTPS for Invariant Kepler Services.
UpgradeGuide 185
n The Service Bus certificate generation key is required on the queue manager and worker servers aspart of the connection between Invariant and Service Bus. For more information see The Pre-install-ation Guide in the Pre-installation topic.
n Invariant stores are now deleted automatically when the Relativity workspaces associated withthem are deleted. For more information, see The Relativity Processing Console Guide.
n Publish is no longer a single long-running process and instead is a distributed process that is brokenup into separate jobs, which leads to more stability by removing this single point of failure and allow-ing the distribution of work across multiple workers. These changes enable publish to operate moreconsistently like the other processing job types in the worker manager server, where batches ofdata are processed for a specific amount of time before completing each transactional job and mov-ing on. Note the upgrade-relevant details regarding distributed publish:
o The following instance settings have been added to facilitate the work of distributed publish.l ProcessingMaxPublishSubJobCountPerRelativitySQLServer - the maximum numberof publish jobs per Relativity SQL server that may be worked on in parallel.
l You can't allocate more jobs per workspace than what is allowed per SQLserver. This means that if this value is set to be lower than the value for theMaxPublishJobCountPerRelativitySQLServer instance setting, then Relativityonly allows the maximum of jobs per SQL server.
l The default value is 7. Leaving this setting at its default value will result inincreased throughput; however, we recommend contacting Support before youupgrade for guidance on what value will be most beneficial to you based on yourenvironment setup.
l This updates on a 30-second interval.
l If you change the default value, note that setting it too high could result in webserver, SQL server, or BCP/file server issues. In addition, other jobs in Relativitythat use worker threads may see a performance decrease, such discovery orimaging. If you set it too low, publish speeds may be lower than expected.
l ProcessingMaxPublishSubJobCountPerWorkspace- the maximum number of publishjobs per workspace that may be worked on in parallel.
l You can't allocate more jobs per workspace than what is allowed per SQLserver. This means that if this value is set to be higher than the value for theMaxPublishJobCountPerRelativitySQLServer instance setting, then Relativityonly allows the maximum of jobs per SQL server. For example, if you have aworkspace limit of 4 and a server limit of 8 and all of your workspaces are on thesame SQL server, you will have at most 8 publish sub jobs running concurrently.
l The default value is 3. Leaving this setting at its default value will result inincreased throughput; however, we recommend contacting Support before youupgrade for guidance on what value will be most beneficial to you based on yourenvironment setup.
l This updates on a 30-second interval.
l If you change the default value, note that setting it too high could result in webserver, SQL server, or BCP/file server issues. In addition, other jobs in Relativity

UpgradeGuide 186
that use worker threads may see a performance decrease, such discovery orimaging. If you set it too low, publish speeds may be lower than expected.
o The ProcessingExportMaxThreads instance setting has been deprecated in accordancewith the addition of the ProcessingMaxPublishSubJobCountPerWorkspace and Pro-cessingMaxPublishSubJobCountPerRelativitySQLServer instance settings, which facilitatethe work of distributed publish.
The following table provides the recommended values for each instance setting per environmentsetup:
Envir-onmentsetup
Pro-cess-ingMaxPub-lishSubJobCountPerWorkspace
Pro-cess-ingMaxPub-lishSubJobCountPerRelativitySQLServer
Tier 1(see theSystemRequire-mentsGuide fordetails)
3 7
Tier 2(see theSystemRequire-mentsGuide fordetails)
6 12
Relativ-ityOnebaseline
3 7
10.1.1 Hosting Invariant Kepler services in HTTPSBeginning in Relativity 9.5.253.62, if you want to host Invariant Kepler services in HTTPS, you mustcomplete the following steps:
1. Set the EnforceHttps instance setting to On. This will ensure that the QueueManager serviceattempts to start the Kepler Services in HTTPS after you create the self-signed certificate.
2. Create a self-signed certificate on the QueueManager with the following specifications. See the Pre-installation Guide for the instructions for creating a self-signed certificate in PowerShell.
n Install the certificate to both the Personal and Trusted Root Certification Authorities certificatestores for the Computer Account on the Queue Manager server.
n The port that the certificate is bound to is specified in the C:\Program Files\kCura Cor-

UpgradeGuide 187
poration\Invariant\QueueManager\Settings\appSettings.config under the ApiPort value.
n The default port for the Invariant Kepler services is 8092.
3. Restart the Queue Manager.
Upon initialization, the Queue Manager attempts to automatically configure HTTPS and select thecertificate, assuming that the EnforceHTTPS is set to On. Specifically, the Queue Manager does thefollowing:
n It opens the Personal store for the Computer Account and look for an exact host name match. Thehost name comes from the fully qualified domain name of the QM server.
n If there is no exact host name match, it queries the store for all valid certificates and use the one withthe largest encryption key.
n If there are no valid certificates, it looks for a wildcard certificate that would work.
n If there are no valid wildcard certificates and the scheme is set to HTTPS, it logs an exception.
To override the default automatic certificate selection behavior, add the SslCertificateThumbprint instancesetting for the server to explicitly specify the certificate to use.
n Name – SslCertificateThumbprint
n Section – kCura.Service.ServiceHost
n MachineName - the machine name entered in the Invariant AppSettings table. When Relativitysearches for the existence of the thumbprint setting, it looks up the machine name in the InvariantAppSettings table (where Category = "QueueManager" and the SubCategory = NULL) and looks forthe thumbprint instance setting for this particular machine name.
n Value – the thumbprint of the certificate for SSL bindings. For instructions on retrieving the thum-bprint, see https://msdn.microsoft.com/en-us/library/ms734695(v=vs.110).aspx.
o Make sure to copy the Thumbprint certificate field when retrieving the thumbprint value (it'seasy to confuse with the Serial number field).
o The thumbprint value must not include spaces (when you copy-paste it from the Windows cer-tificate form, it does includes spaces).
o You must also remove the leading space because it contains an illegal character that can't bematched when the certificate is retrieved from the store. You likely have different certificatesfor different machines. To configure the certificate for HTTPS bindings for each machine, usethe MachineName field of the instance setting.
10.2 Upgrade considerations for Relativity 9.5.133.118Beginning in Relativity 9.5.133.118, you can use the Invariant.Handlers installer to update only the filehandlers in your Invariant instance without having run the entire installer. Note that this is available forupgrades only. For details, see the Worker Manager Installation guide.
UpgradeGuide 188
10.3 Upgrade considerations for Relativity 9.5.41.87The following changes were made to the worker manager server installation process beginning inRelativity 9.5.41.87 and should be noted prior to upgrading:
n Each Invariant component has a machine-specific encryption for its connection strings. These arenow found in a folder called LocalSettings, rather than the previous Settings folder, which holdsother config files. The installer now automatically creates the workers’ connection strings, and theyare no longer created in the network share. Note that you will still see a placeholder folder on the net-work share that doesn’t contain any data.
n There is a new parameter in the Invariant response file called DATABASEINSTALLPATH, which isthe local folder where the Invariant.DBUpdater.exe, Invariant.NIST.InstallUtility.exe, and Invari-ant.Deployment.exe utilities were automatically installed during database installation. These threeexecutables have been moved out of the network share to the local machine where the database isinstalled.
n After the database and queue manager upgrades are complete, you must run the Invariant installeron all workers. This is only applicable for upgrades from Relativity 9.4.398.62 (December 21, 2016)or lower to the full release of Relativity 9.5 (January 25, 2017) and above, meaning all monthlyproduct updates of 9.5. If you're performing a fresh installation of Relativity 9.5, you will need to runthe installer on each Worker Manager and Worker server; however, any subsequent upgrade willonly require you to run the installer from the Worker Manager server, which will upgrade all workerservers automatically, thus eliminating the need to run the installer on each server individually.
10.4 Upgrade exceptionsFor upgrades from Relativity 8.0/Invariant 3.1 or lower, you must first manually install the required.NET 4.5 on all of your pre-existing Invariant Database, Queue Manager, and Worker machines beforerunning the installer. Similarly, you must install the required Microsoft Visual C++ Redistributable on all ofyour pre-existing Worker machines before running the installer.
The 3.2 and above installers only validate whether .NET 4.5 is installed; they don't install the software. Forbrand newWorker installations, the installer verifies that .NET 4.5 is installed. Installing a newWorker willautomatically install MSVisual C++ 2012 for you.
For upgrades fromRelativity 7.3/Invariant 2.0, you must first upgrade to a later Invariant version (2.1,3.0, 3.1, 3.2, or 3.3) before you upgrade to Invariant 4.0.
10.5 Installing Microsoft Visual C++ Redistributable PackagesThe following table breaks down which versions of Microsoft Visual C++ are required for which versions ofRelativity/Invariant. Note that you’re required to install each version of Microsoft Visual C++ only if you’reupgrading to the Relativity/Invariant version listed and not if you’re installing it for the first time.
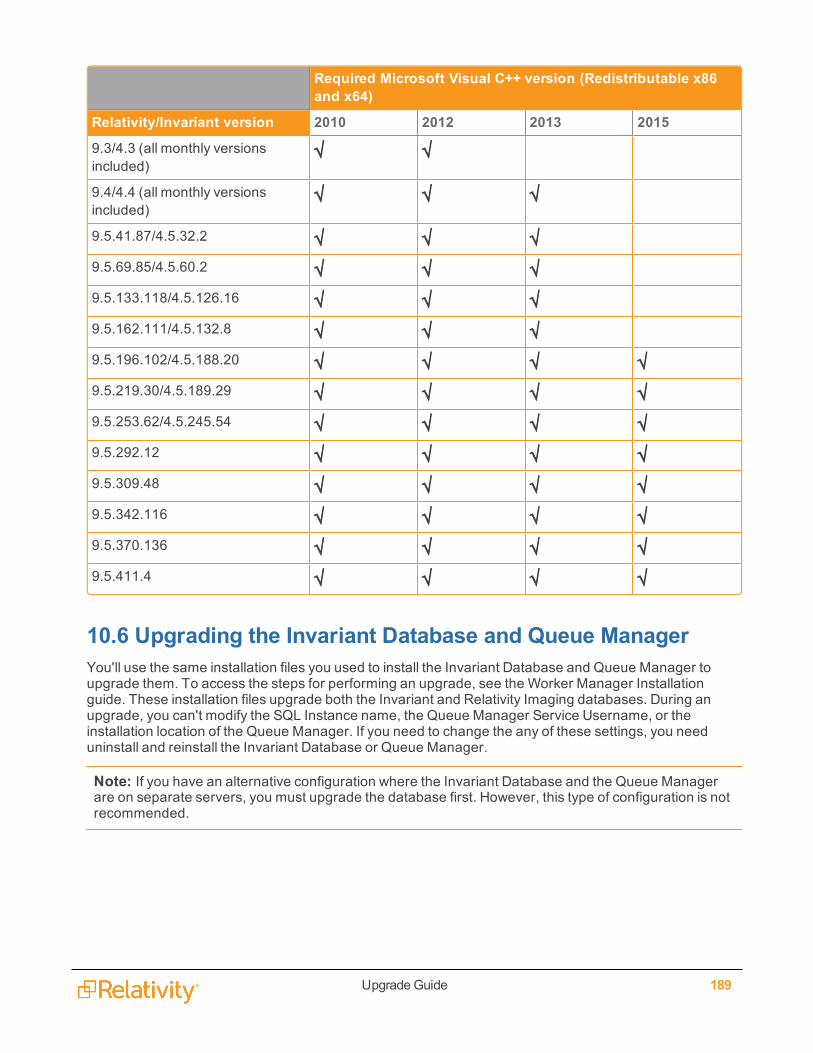
UpgradeGuide 189
Required Microsoft Visual C++ version (Redistributable x86and x64)
Relativity/Invariant version 2010 2012 2013 2015
9.3/4.3 (all monthly versionsincluded)
√ √
9.4/4.4 (all monthly versionsincluded)
√ √ √
9.5.41.87/4.5.32.2 √ √ √9.5.69.85/4.5.60.2 √ √ √9.5.133.118/4.5.126.16 √ √ √9.5.162.111/4.5.132.8 √ √ √9.5.196.102/4.5.188.20 √ √ √ √9.5.219.30/4.5.189.29 √ √ √ √9.5.253.62/4.5.245.54 √ √ √ √9.5.292.12 √ √ √ √9.5.309.48 √ √ √ √9.5.342.116 √ √ √ √9.5.370.136 √ √ √ √9.5.411.4 √ √ √ √
10.6 Upgrading the Invariant Database and Queue ManagerYou'll use the same installation files you used to install the Invariant Database and Queue Manager toupgrade them. To access the steps for performing an upgrade, see the Worker Manager Installationguide. These installation files upgrade both the Invariant and Relativity Imaging databases. During anupgrade, you can't modify the SQL Instance name, the Queue Manager Service Username, or theinstallation location of the Queue Manager. If you need to change the any of these settings, you needuninstall and reinstall the Invariant Database or Queue Manager.
Note: If you have an alternative configuration where the Invariant Database and the Queue Managerare on separate servers, you must upgrade the database first. However, this type of configuration is notrecommended.
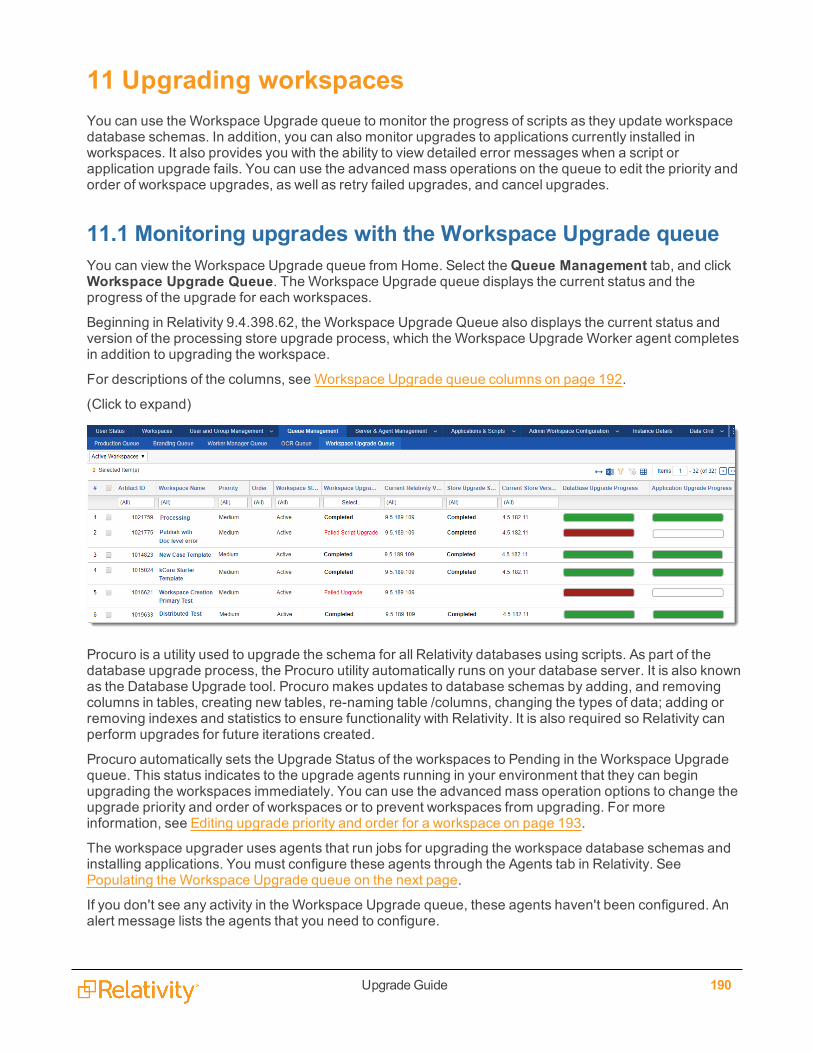
UpgradeGuide 190
11 Upgrading workspacesYou can use the Workspace Upgrade queue to monitor the progress of scripts as they update workspacedatabase schemas. In addition, you can also monitor upgrades to applications currently installed inworkspaces. It also provides you with the ability to view detailed error messages when a script orapplication upgrade fails. You can use the advanced mass operations on the queue to edit the priority andorder of workspace upgrades, as well as retry failed upgrades, and cancel upgrades.
11.1 Monitoring upgrades with the Workspace Upgrade queueYou can view the Workspace Upgrade queue from Home. Select theQueue Management tab, and clickWorkspace Upgrade Queue. The Workspace Upgrade queue displays the current status and theprogress of the upgrade for each workspaces.
Beginning in Relativity 9.4.398.62, the Workspace Upgrade Queue also displays the current status andversion of the processing store upgrade process, which the Workspace Upgrade Worker agent completesin addition to upgrading the workspace.
For descriptions of the columns, see Workspace Upgrade queue columns on page 192.
(Click to expand)
Procuro is a utility used to upgrade the schema for all Relativity databases using scripts. As part of thedatabase upgrade process, the Procuro utility automatically runs on your database server. It is also knownas the Database Upgrade tool. Procuro makes updates to database schemas by adding, and removingcolumns in tables, creating new tables, re-naming table /columns, changing the types of data; adding orremoving indexes and statistics to ensure functionality with Relativity. It is also required so Relativity canperform upgrades for future iterations created.
Procuro automatically sets the Upgrade Status of the workspaces to Pending in the Workspace Upgradequeue. This status indicates to the upgrade agents running in your environment that they can beginupgrading the workspaces immediately. You can use the advanced mass operation options to change theupgrade priority and order of workspaces or to prevent workspaces from upgrading. For moreinformation, see Editing upgrade priority and order for a workspace on page 193.
The workspace upgrader uses agents that run jobs for upgrading the workspace database schemas andinstalling applications. You must configure these agents through the Agents tab in Relativity. SeePopulating the Workspace Upgrade queue on the next page.
If you don't see any activity in the Workspace Upgrade queue, these agents haven't been configured. Analert message lists the agents that you need to configure.
UpgradeGuide 191
For configuration information, see Running the Relativity installer and Agents on the Relativity 9.5Documentation site.
11.1.1 Populating the Workspace Upgrade queueThe Workspace Upgrade queue continually populates with status information by the upgrade agents asthey run scripts to update workspace databases and installed applications. The following agents run thescripts and the application upgrades:
n Workspace Upgrade Worker - picks up pending jobs in the queue for script updates.
Note: On an SQL Server profile, you can edit theWorkspace Upgrade Limit field, whichcontrols the number of agents accessing the server during an upgrade. The setting entered inthis field can’t exceed the setting in theGlobalWorkspaceUpgradeLimit instance setting value.If you enter a number that exceeds this instance setting value, an error occurs that cancels yourupdate. For more information, see Instance setting values and Upgrading workspaces.
n Workspace Upgrade Manager - queues applications required for installation in workspaces.
n Application Installation Manage- installs required applications to workspaces.
For more information about agents, see Agents on the Relativity9.5 Documentation site.
During a Relativity upgrade, the agents complete the following tasks and then update the statusesdisplayed on the Workspace Upgrade queue:
1. Set upgrade status to Pending. Procuro runs and sets the status on workspaces in the Work-space Upgrade queue to Pending.
2. Pick up pending jobs. The Workspace Upgrade Worker sees a pending job in the queue, picks itup, and begins upgrading the workspace.
3. Run upgrade scripts. The Workspace Upgrade Worker sets the status of the workspace toUpgrading scripts and runs the SQL scripts to update the workspace database schema. When thescripts complete, the upgrade status on the workspace is set to Pending Application Upgrade.
4. Set upgrade status to Upgrading Applications. The Workspace Upgrade Manager queuesapplications required for installation in workspaces in the Application Install table, and it sets theupgrade status to Upgrading Applications.
5. Install applications. The Application Installation Manager installs the required applications.
6. Complete installation.When the application upgrades have installed successfully, the WorkspaceUpgrade Manager checks the application status, and then sets the status of the workspace to Com-pleted.
During an Invariant upgrade, the agents complete the following tasks and then update the statusesdisplayed on the Workspace Upgrade queue:
1. Set store upgrade status to Pending.The Invariant.DBUpdater runs and sets the store status onworkspaces in the Workspace Upgrade queue to Pending.
2. Pick up pending store upgrade jobs. The Workspace Upgrade Worker sees a pending storeupgrade job in the queue, picks it up, and begins upgrading the store.
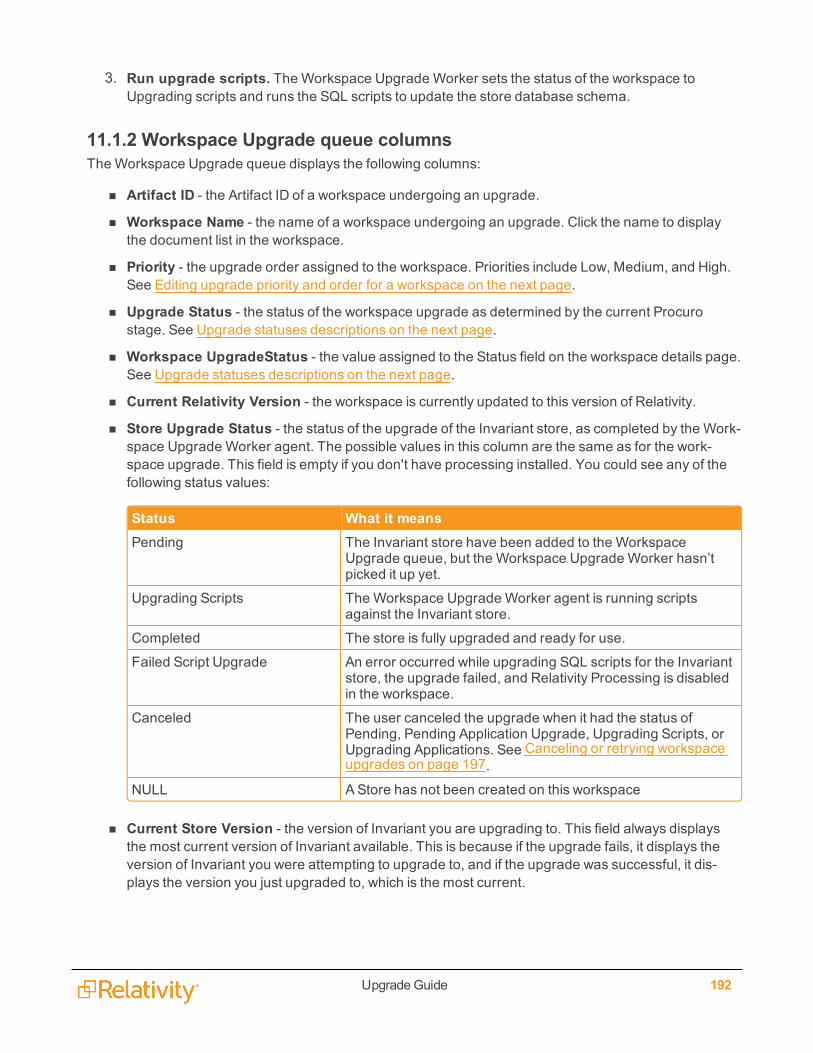
UpgradeGuide 192
3. Run upgrade scripts. The Workspace Upgrade Worker sets the status of the workspace toUpgrading scripts and runs the SQL scripts to update the store database schema.
11.1.2 Workspace Upgrade queue columnsThe Workspace Upgrade queue displays the following columns:
n Artifact ID - the Artifact ID of a workspace undergoing an upgrade.
n Workspace Name - the name of a workspace undergoing an upgrade. Click the name to displaythe document list in the workspace.
n Priority - the upgrade order assigned to the workspace. Priorities include Low, Medium, and High.See Editing upgrade priority and order for a workspace on the next page.
n Upgrade Status - the status of the workspace upgrade as determined by the current Procurostage. See Upgrade statuses descriptions on the next page.
n Workspace UpgradeStatus - the value assigned to the Status field on the workspace details page.See Upgrade statuses descriptions on the next page.
n Current Relativity Version - the workspace is currently updated to this version of Relativity.
n Store Upgrade Status - the status of the upgrade of the Invariant store, as completed by the Work-space Upgrade Worker agent. The possible values in this column are the same as for the work-space upgrade. This field is empty if you don't have processing installed. You could see any of thefollowing status values:
Status What it meansPending The Invariant store have been added to the Workspace
Upgrade queue, but the Workspace Upgrade Worker hasn’tpicked it up yet.
Upgrading Scripts The Workspace Upgrade Worker agent is running scriptsagainst the Invariant store.
Completed The store is fully upgraded and ready for use.
Failed Script Upgrade An error occurred while upgrading SQL scripts for the Invariantstore, the upgrade failed, and Relativity Processing is disabledin the workspace.
Canceled The user canceled the upgrade when it had the status ofPending, Pending Application Upgrade, Upgrading Scripts, orUpgrading Applications. See Canceling or retrying workspaceupgrades on page 197.
NULL AStore has not been created on this workspace
n Current Store Version - the version of Invariant you are upgrading to. This field always displaysthe most current version of Invariant available. This is because if the upgrade fails, it displays theversion of Invariant you were attempting to upgrade to, and if the upgrade was successful, it dis-plays the version you just upgraded to, which is the most current.
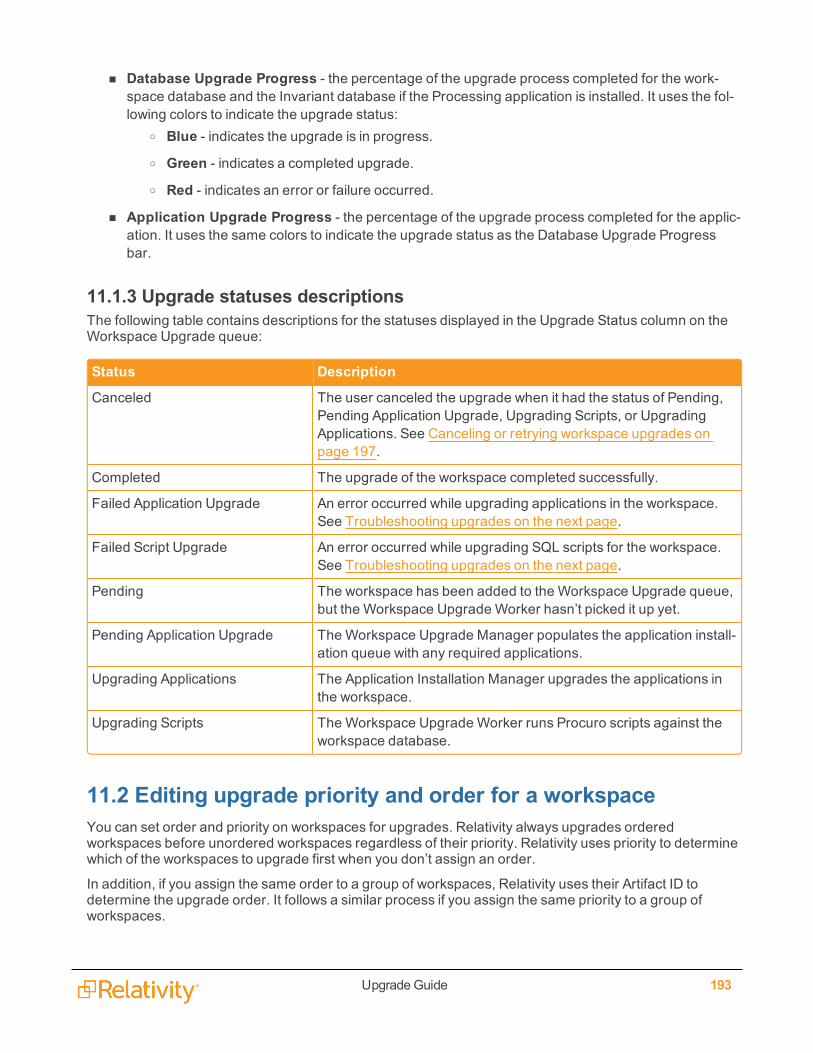
UpgradeGuide 193
n Database Upgrade Progress - the percentage of the upgrade process completed for the work-space database and the Invariant database if the Processing application is installed. It uses the fol-lowing colors to indicate the upgrade status:
o Blue - indicates the upgrade is in progress.o Green - indicates a completed upgrade.o Red - indicates an error or failure occurred.
n Application Upgrade Progress - the percentage of the upgrade process completed for the applic-ation. It uses the same colors to indicate the upgrade status as the Database Upgrade Progressbar.
11.1.3 Upgrade statuses descriptionsThe following table contains descriptions for the statuses displayed in the Upgrade Status column on theWorkspace Upgrade queue:
Status Description
Canceled The user canceled the upgrade when it had the status of Pending,Pending Application Upgrade, Upgrading Scripts, or UpgradingApplications. See Canceling or retrying workspace upgrades onpage 197.
Completed The upgrade of the workspace completed successfully.
Failed Application Upgrade An error occurred while upgrading applications in the workspace.See Troubleshooting upgrades on the next page.
Failed Script Upgrade An error occurred while upgrading SQL scripts for the workspace.See Troubleshooting upgrades on the next page.
Pending The workspace has been added to the Workspace Upgrade queue,but the Workspace Upgrade Worker hasn’t picked it up yet.
Pending Application Upgrade The Workspace Upgrade Manager populates the application install-ation queue with any required applications.
Upgrading Applications The Application Installation Manager upgrades the applications inthe workspace.
Upgrading Scripts The Workspace Upgrade Worker runs Procuro scripts against theworkspace database.
11.2 Editing upgrade priority and order for a workspaceYou can set order and priority on workspaces for upgrades. Relativity always upgrades orderedworkspaces before unordered workspaces regardless of their priority. Relativity uses priority to determinewhich of the workspaces to upgrade first when you don’t assign an order.
In addition, if you assign the same order to a group of workspaces, Relativity uses their Artifact ID todetermine the upgrade order. It follows a similar process if you assign the same priority to a group ofworkspaces.
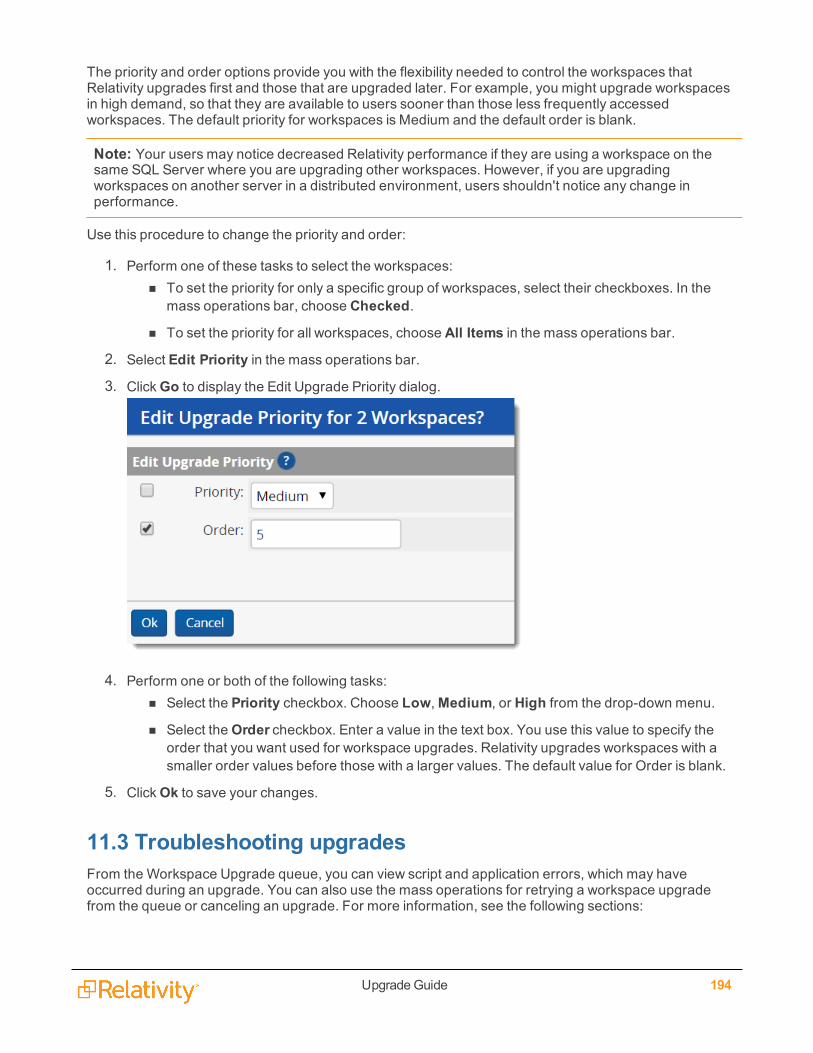
UpgradeGuide 194
The priority and order options provide you with the flexibility needed to control the workspaces thatRelativity upgrades first and those that are upgraded later. For example, you might upgrade workspacesin high demand, so that they are available to users sooner than those less frequently accessedworkspaces. The default priority for workspaces is Medium and the default order is blank.
Note: Your users may notice decreased Relativity performance if they are using a workspace on thesame SQL Server where you are upgrading other workspaces. However, if you are upgradingworkspaces on another server in a distributed environment, users shouldn't notice any change inperformance.
Use this procedure to change the priority and order:
1. Perform one of these tasks to select the workspaces:n To set the priority for only a specific group of workspaces, select their checkboxes. In the
mass operations bar, choose Checked.
n To set the priority for all workspaces, choose All Items in the mass operations bar.
2. Select Edit Priority in the mass operations bar.
3. ClickGo to display the Edit Upgrade Priority dialog.
4. Perform one or both of the following tasks:n Select the Priority checkbox. Choose Low,Medium, or High from the drop-down menu.
n Select theOrder checkbox. Enter a value in the text box. You use this value to specify theorder that you want used for workspace upgrades. Relativity upgrades workspaces with asmaller order values before those with a larger values. The default value for Order is blank.
5. ClickOk to save your changes.
11.3 Troubleshooting upgradesFrom the Workspace Upgrade queue, you can view script and application errors, which may haveoccurred during an upgrade. You can also use the mass operations for retrying a workspace upgradefrom the queue or canceling an upgrade. For more information, see the following sections:
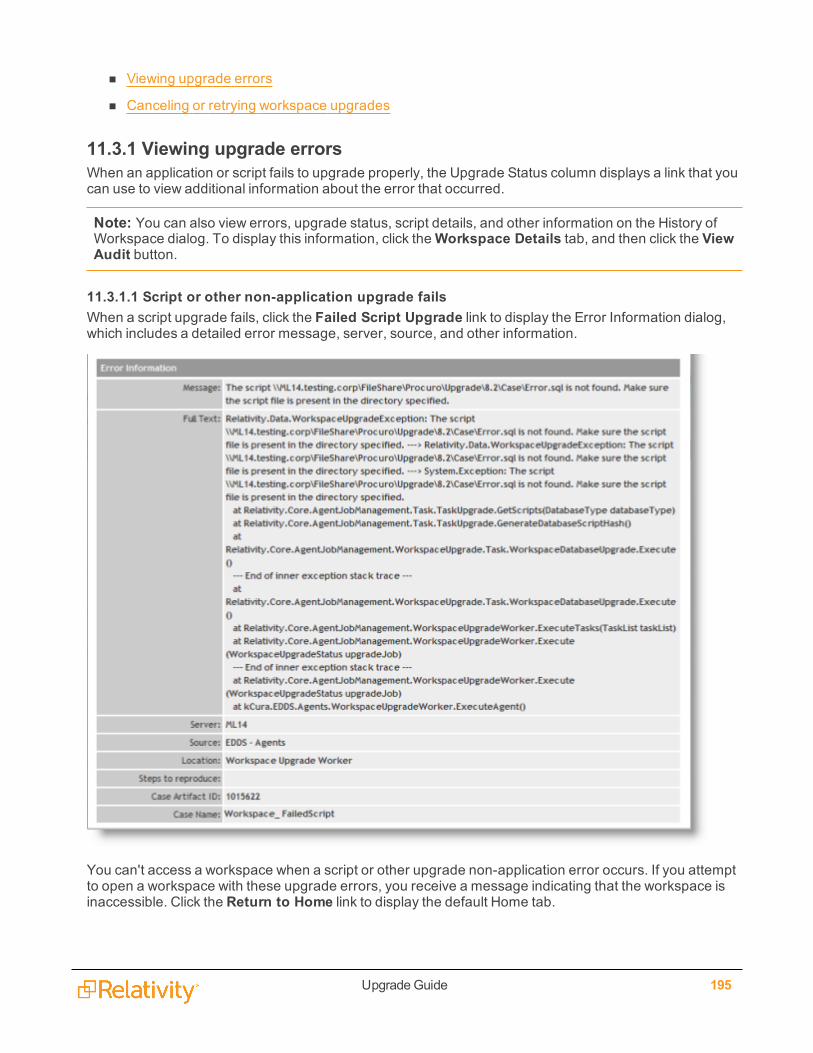
UpgradeGuide 195
n Viewing upgrade errors
n Canceling or retrying workspace upgrades
11.3.1 Viewing upgrade errorsWhen an application or script fails to upgrade properly, the Upgrade Status column displays a link that youcan use to view additional information about the error that occurred.
Note: You can also view errors, upgrade status, script details, and other information on the History ofWorkspace dialog. To display this information, click theWorkspace Details tab, and then click the ViewAudit button.
11.3.1.1 Script or other non-application upgrade failsWhen a script upgrade fails, click the Failed Script Upgrade link to display the Error Information dialog,which includes a detailed error message, server, source, and other information.
You can't access a workspace when a script or other upgrade non-application error occurs. If you attemptto open a workspace with these upgrade errors, you receive a message indicating that the workspace isinaccessible. Click the Return to Home link to display the default Home tab.
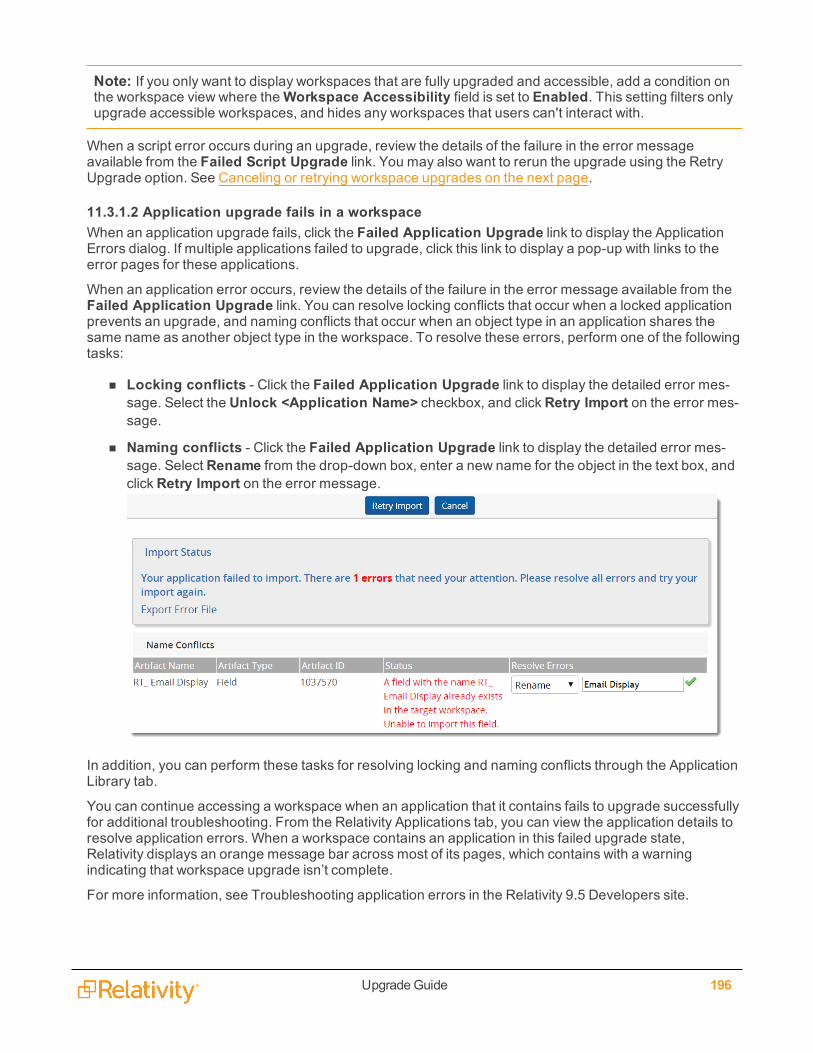
UpgradeGuide 196
Note: If you only want to display workspaces that are fully upgraded and accessible, add a condition onthe workspace view where theWorkspace Accessibility field is set to Enabled. This setting filters onlyupgrade accessible workspaces, and hides any workspaces that users can't interact with.
When a script error occurs during an upgrade, review the details of the failure in the error messageavailable from the Failed Script Upgrade link. You may also want to rerun the upgrade using the RetryUpgrade option. See Canceling or retrying workspace upgrades on the next page.
11.3.1.2 Application upgrade fails in a workspaceWhen an application upgrade fails, click the Failed Application Upgrade link to display the ApplicationErrors dialog. If multiple applications failed to upgrade, click this link to display a pop-up with links to theerror pages for these applications.
When an application error occurs, review the details of the failure in the error message available from theFailed Application Upgrade link. You can resolve locking conflicts that occur when a locked applicationprevents an upgrade, and naming conflicts that occur when an object type in an application shares thesame name as another object type in the workspace. To resolve these errors, perform one of the followingtasks:
n Locking conflicts - Click the Failed Application Upgrade link to display the detailed error mes-sage. Select the Unlock <Application Name> checkbox, and clickRetry Import on the error mes-sage.
n Naming conflicts - Click the Failed Application Upgrade link to display the detailed error mes-sage. Select Rename from the drop-down box, enter a new name for the object in the text box, andclickRetry Import on the error message.
In addition, you can perform these tasks for resolving locking and naming conflicts through the ApplicationLibrary tab.
You can continue accessing a workspace when an application that it contains fails to upgrade successfullyfor additional troubleshooting. From the Relativity Applications tab, you can view the application details toresolve application errors. When a workspace contains an application in this failed upgrade state,Relativity displays an orange message bar across most of its pages, which contains with a warningindicating that workspace upgrade isn’t complete.
For more information, see Troubleshooting application errors in the Relativity 9.5 Developers site.
UpgradeGuide 197
11.3.2 Canceling or retrying workspace upgradesYou can cancel an upgrade job on a workspace or retry an upgrade job as necessary. After you cancel ajob, the workspace remains in a partially upgraded state so it is no longer accessible. You must attempt tocomplete a successful upgrade in order to access the workspace.
Use this procedure to cancel or retry an upgrade job:
1. Perform one of these tasks to select the workspaces:n To retry or cancel the upgrade jobs for only a specific group of workspaces, select their check-
boxes. In the mass operations bar, choose Checked.
n To retry or cancel the upgrade jobs for all workspaces, choose All Items in the mass oper-ations bar.
2. Select Retry Upgrade or Cancel Upgrade in the mass operations bar.
3. ClickGo to display a confirmation dialog.
4. ClickOK if you want to continue with your selected action.
UpgradeGuide 198
12 Upgrading or installing your Analytics server
Note: Make sure you review the Analytics upgrade considerations before upgrading Analytics. Formore information, see Upgrade considerations for Relativity 9.5 on page 17.
An upgrade of your Analytics server is required for Relativity 9.5. Follow these steps to upgrade youranalytics server(s). Before upgrading the Analytics server(s), make sure you've completed the stepscontained in the following sections:
1. Install or upgrade your Relativity instance by performing the required steps.
2. Perform a See Analytics server setup in the Pre-Installation Guide.
This topic contains the following sections:
n Installing / Upgrading Relativity Analytics belowo Installing Analytics for the first time to Relativity 9.5.133.118 and above on the next page
o Installing Analytics for the first time to Relativity 9.5.89.76 or prior on page 204
o Upgrading from Relativity 9.3.362.9 (CAAT 3.19) and above on page 207
o Upgrading from Relativity 9.3.332.21 (CAAT 3.17) or prior on page 211
n Updating the default SSL/TLS certificate on page 217
n Disabling TLS 1.0 and 1.1 (optional) on page 224
n Installing Analytics server when SQL Server uses SSL encryption on page 225
n Changing the REST password on page 226
n Uninstalling the Relativity Analytics server on page 227
12.1 Installing / Upgrading Relativity AnalyticsYou need the following items in order to successfully run the Relativity Analytics upgrade or installation:
n The primary database server instance name and corresponding EDDSDBO password. If your SQLServer uses SSL encryption, see Installing Analytics server when SQL Server uses SSL encryptionon page 225 before beginning the Analytics server installation.
n The Relativity Service Account username and password.
n All SQL Servers must be active and accessible at the time of the installation.
n A self-signed or a trusted SSL certificate with the certificate's private key is required by RelativityAnalytics. If you do not have a SSL certificate, see Updating the default SSL/TLS certificate onpage 217. We do not recommend self-signed certificates.

UpgradeGuide 199
Notes:n Before attempting an upgrade, stop all Relativity Analytics engine processes (i.e., ensure that allJava and Postgres processes are stopped). In versions previous to 9.5.133.118, the Windows Ser-vice will be called Content Analyst CAAT. In Relativity 9.5.133.118 and higher, the service will becalled Relativity Analytics Engine. After you do this, back up the CAAT install directory and theCAAT data directory. If something goes wrong with the upgrade, this will greatly reduce any down-time spent to fix the problem.
n The Analytics Index Share houses all of your Analytics data for a particular Analytics server, and itcan grow to be very large. We have found that NTFS file systems work for small environments, butif you anticipate running sets of 10 million or more documents through your Analytics Engine, youshould use a file system that supports larger files such as exFAT or ReFS. We do not have a recom-mendation for either file system, so you must determine which is the better fit for you.
This section contains the following content:
n Installing Analytics for the first time to Relativity 9.5.133.118 and above below
n Installing Analytics for the first time to Relativity 9.5.89.76 or prior on page 204
n Upgrading from Relativity 9.3.362.9 (CAAT 3.19) and above on page 207
n Upgrading from Relativity 9.3.332.21 (CAAT 3.17) or prior on page 211
12.1.1 Installing Analytics for the first time to Relativity 9.5.133.118 andabove
12.1.1.1 Setting properties in the response-file.properties file (Relativity 9.5.133.118 and above)Before new installations, unzip the Analytics package and open the response-file.properties file in a texteditor. Complete the belowCommon Properties settings in the input file.
Note: For first time installs, all settings are considered and you must specify all response file values.Check to make sure the provided default works with your environment.
The following are available properties in the response-file.properties file:
caat.install-dirIn former versions of the installer, this was called “Analytics Server folder.” This is the path to the foldercontaining the Analytics installation files. This value is required for upgrades.
n We recommend using the default folder of C:\CAAT (or C:\ContentAnalyst for a legacy installation).
n This path must be absolute, and it can’t contain spaces or invalid characters.
n If the installer can't find or access the location you specify, it installs the application to the defaultC:\CAAT folder.
A forward slash ( / ) or a double back slash ( \\ ) should be used as a path separator, rather than a singleback slash, as shown in the examples below.
caat.install-dir=C:/CAATcaat.install-dir=C:\\CAAT
UpgradeGuide 200
Note: Spaces cannot be present within the file path.
caat.license-fileThis is the file path to the license key file that will be installed to run the Analytics engine. Keep the defaultof caat-license.jar. This value is required for upgrades.
caat.license-file=caat-license.jar
caat.http-portIn former versions of the installer, this was called “Analytics Server Port Number.” This is the HTTP port tobe used for requests to the Analytics engine. The HTTP port will default to 8080 for new installations, butyou can configure a different port number. For upgrades, the value entered will only be used to ensurethat the CAAT server is not running on that port.
caat.http-port=8080
caat.upgrade-nowSet this option to true. This value is required for upgrades.
caat.upgrade-now=true
caat.as-windows-serviceThis option should be set to true. Please note that this option is ignored upon upgrade.
caat.as-windows-service=true
caat.windows-service-nameThis is the Windows service name. The service name will default to Relativity Analytics Engine if a servicename is not provided. Please note that the service name will not change upon an upgrade, and this valueis ignored upon upgrade.
caat.windows-service-name=Relativity Analytics Engine
caat.single-data-dirIn former versions of the installer, this was called “Analytics Index Directory.” The Analytics data directorymust also be created before installing Relativity Analytics. A forward slash ( / ) or a double back slash ( \\ )should be used as a path separator, rather than a single back slash, as shown in the examples below.
This is the directory where indexes and structured analytics sets are stored on disk.
n We recommend that you not keep the index directory on the C: drive due to the size requirements.
n We recommend you use locally-attached storage referenced by a drive letter, i.e. E:\CAATindexes,rather than a UNC path. For more information, see Index directory requirements in the Environmentoptimization guide.
n Do not create a local drive map to a UNC. For example, do not open \\servername\CAAT1 and mapit to drive Z:. This is because drive mappings are specific to each Windows user and may not beavailable to the Relativity Service Account.
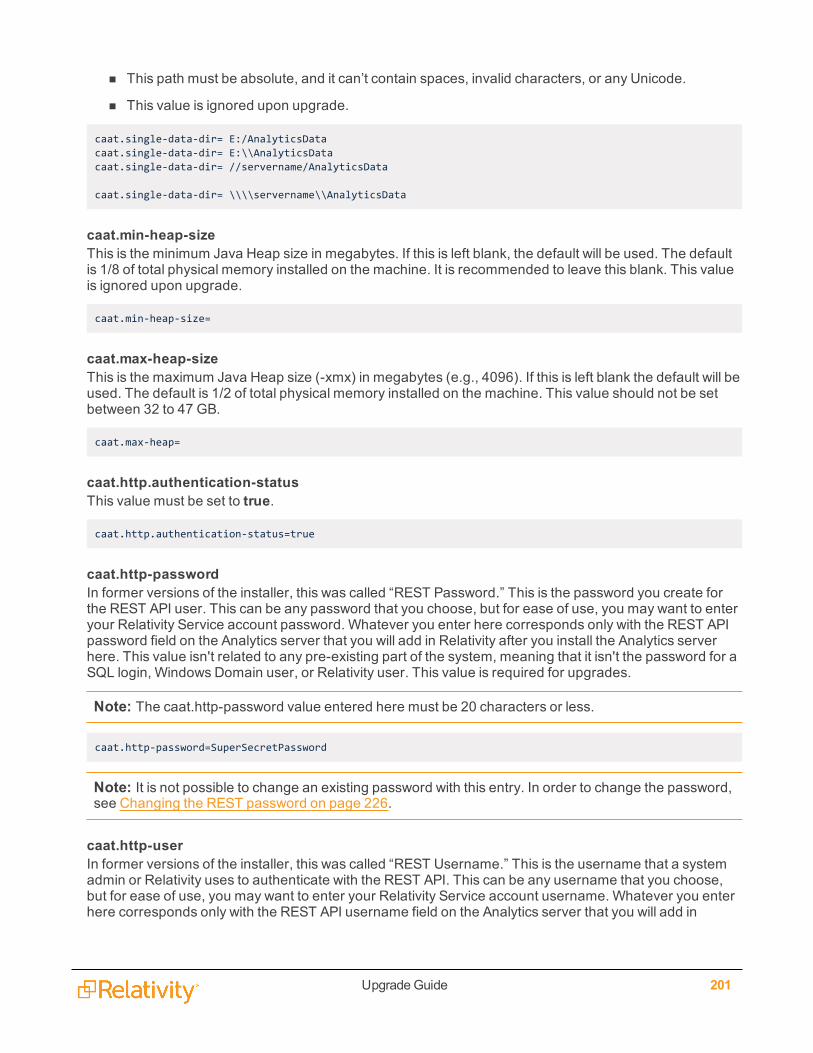
UpgradeGuide 201
n This path must be absolute, and it can’t contain spaces, invalid characters, or any Unicode.
n This value is ignored upon upgrade.
caat.single-data-dir= E:/AnalyticsDatacaat.single-data-dir= E:\\AnalyticsDatacaat.single-data-dir= //servername/AnalyticsData
caat.single-data-dir= \\\\servername\\AnalyticsData
caat.min-heap-sizeThis is the minimum Java Heap size in megabytes. If this is left blank, the default will be used. The defaultis 1/8 of total physical memory installed on the machine. It is recommended to leave this blank. This valueis ignored upon upgrade.
caat.min-heap-size=
caat.max-heap-sizeThis is the maximum Java Heap size (-xmx) in megabytes (e.g., 4096). If this is left blank the default will beused. The default is 1/2 of total physical memory installed on the machine. This value should not be setbetween 32 to 47 GB.
caat.max-heap=
caat.http.authentication-statusThis value must be set to true.
caat.http.authentication-status=true
caat.http-passwordIn former versions of the installer, this was called “REST Password.” This is the password you create forthe REST API user. This can be any password that you choose, but for ease of use, you may want to enteryour Relativity Service account password. Whatever you enter here corresponds only with the REST APIpassword field on the Analytics server that you will add in Relativity after you install the Analytics serverhere. This value isn't related to any pre-existing part of the system, meaning that it isn't the password for aSQL login, Windows Domain user, or Relativity user. This value is required for upgrades.
Note: The caat.http-password value entered here must be 20 characters or less.
caat.http-password=SuperSecretPassword
Note: It is not possible to change an existing password with this entry. In order to change the password,see Changing the REST password on page 226.
caat.http-userIn former versions of the installer, this was called “REST Username.” This is the username that a systemadmin or Relativity uses to authenticate with the REST API. This can be any username that you choose,but for ease of use, you may want to enter your Relativity Service account username. Whatever you enterhere corresponds only with the REST API username field on the Analytics server that you will add in
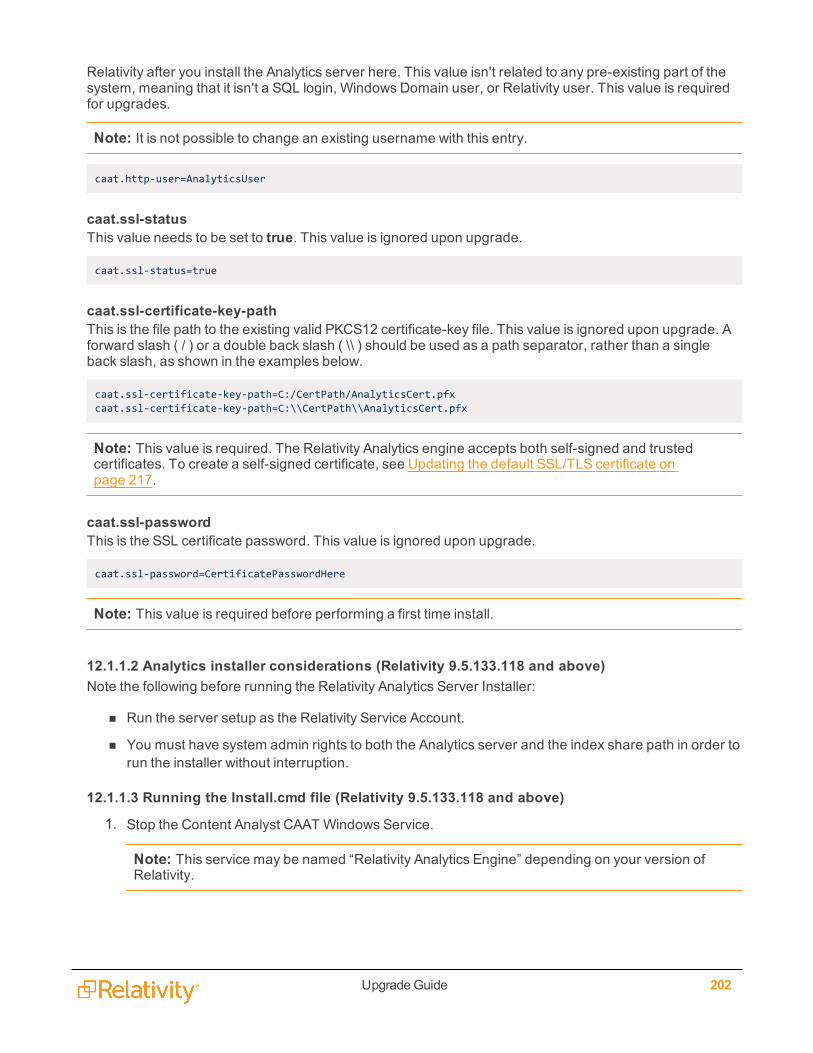
UpgradeGuide 202
Relativity after you install the Analytics server here. This value isn't related to any pre-existing part of thesystem, meaning that it isn't a SQL login, Windows Domain user, or Relativity user. This value is requiredfor upgrades.
Note: It is not possible to change an existing username with this entry.
caat.http-user=AnalyticsUser
caat.ssl-statusThis value needs to be set to true. This value is ignored upon upgrade.
caat.ssl-status=true
caat.ssl-certificate-key-pathThis is the file path to the existing valid PKCS12 certificate-key file. This value is ignored upon upgrade. Aforward slash ( / ) or a double back slash ( \\ ) should be used as a path separator, rather than a singleback slash, as shown in the examples below.
caat.ssl-certificate-key-path=C:/CertPath/AnalyticsCert.pfxcaat.ssl-certificate-key-path=C:\\CertPath\\AnalyticsCert.pfx
Note: This value is required. The Relativity Analytics engine accepts both self-signed and trustedcertificates. To create a self-signed certificate, see Updating the default SSL/TLS certificate onpage 217.
caat.ssl-passwordThis is the SSL certificate password. This value is ignored upon upgrade.
caat.ssl-password=CertificatePasswordHere
Note: This value is required before performing a first time install.
12.1.1.2 Analytics installer considerations (Relativity 9.5.133.118 and above)Note the following before running the Relativity Analytics Server Installer:
n Run the server setup as the Relativity Service Account.
n You must have system admin rights to both the Analytics server and the index share path in order torun the installer without interruption.
12.1.1.3 Running the Install.cmd file (Relativity 9.5.133.118 and above)
1. Stop the Content Analyst CAAT Windows Service.
Note: This service may be named “Relativity Analytics Engine” depending on your version ofRelativity.
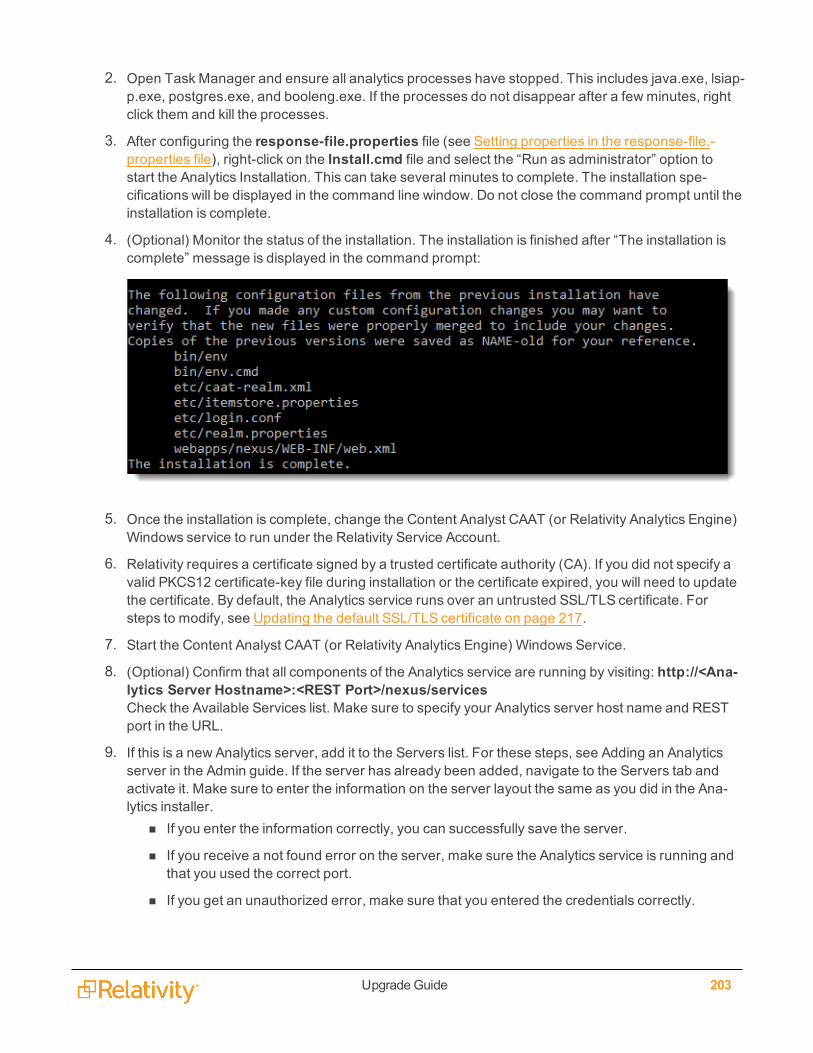
UpgradeGuide 203
2. Open Task Manager and ensure all analytics processes have stopped. This includes java.exe, lsiap-p.exe, postgres.exe, and booleng.exe. If the processes do not disappear after a fewminutes, rightclick them and kill the processes.
3. After configuring the response-file.properties file (see Setting properties in the response-file.-properties file), right-click on the Install.cmd file and select the “Run as administrator” option tostart the Analytics Installation. This can take several minutes to complete. The installation spe-cifications will be displayed in the command line window. Do not close the command prompt until theinstallation is complete.
4. (Optional) Monitor the status of the installation. The installation is finished after “The installation iscomplete” message is displayed in the command prompt:
5. Once the installation is complete, change the Content Analyst CAAT (or Relativity Analytics Engine)Windows service to run under the Relativity Service Account.
6. Relativity requires a certificate signed by a trusted certificate authority (CA). If you did not specify avalid PKCS12 certificate-key file during installation or the certificate expired, you will need to updatethe certificate. By default, the Analytics service runs over an untrusted SSL/TLS certificate. Forsteps to modify, see Updating the default SSL/TLS certificate on page 217.
7. Start the Content Analyst CAAT (or Relativity Analytics Engine) Windows Service.
8. (Optional) Confirm that all components of the Analytics service are running by visiting: http://<Ana-lytics Server Hostname>:<REST Port>/nexus/servicesCheck the Available Services list. Make sure to specify your Analytics server host name and RESTport in the URL.
9. If this is a new Analytics server, add it to the Servers list. For these steps, see Adding an Analyticsserver in the Admin guide. If the server has already been added, navigate to the Servers tab andactivate it. Make sure to enter the information on the server layout the same as you did in the Ana-lytics installer.
n If you enter the information correctly, you can successfully save the server.
n If you receive a not found error on the server, make sure the Analytics service is running andthat you used the correct port.
n If you get an unauthorized error, make sure that you entered the credentials correctly.
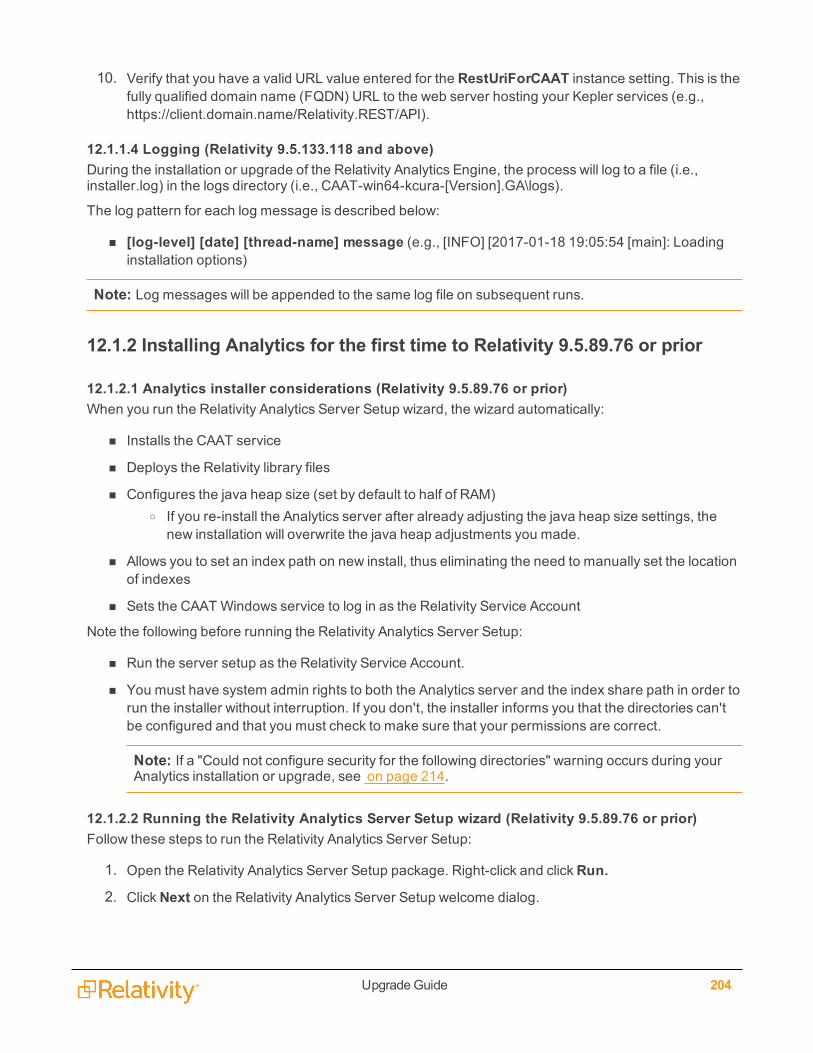
UpgradeGuide 204
10. Verify that you have a valid URL value entered for the RestUriForCAAT instance setting. This is thefully qualified domain name (FQDN) URL to the web server hosting your Kepler services (e.g.,https://client.domain.name/Relativity.REST/API).
12.1.1.4 Logging (Relativity 9.5.133.118 and above)During the installation or upgrade of the Relativity Analytics Engine, the process will log to a file (i.e.,installer.log) in the logs directory (i.e., CAAT-win64-kcura-[Version].GA\logs).
The log pattern for each log message is described below:
n [log-level] [date] [thread-name] message (e.g., [INFO] [2017-01-18 19:05:54 [main]: Loadinginstallation options)
Note: Log messages will be appended to the same log file on subsequent runs.
12.1.2 Installing Analytics for the first time to Relativity 9.5.89.76 or prior
12.1.2.1 Analytics installer considerations (Relativity 9.5.89.76 or prior)When you run the Relativity Analytics Server Setup wizard, the wizard automatically:
n Installs the CAAT service
n Deploys the Relativity library files
n Configures the java heap size (set by default to half of RAM)o If you re-install the Analytics server after already adjusting the java heap size settings, the
new installation will overwrite the java heap adjustments you made.
n Allows you to set an index path on new install, thus eliminating the need to manually set the locationof indexes
n Sets the CAAT Windows service to log in as the Relativity Service Account
Note the following before running the Relativity Analytics Server Setup:
n Run the server setup as the Relativity Service Account.
n You must have system admin rights to both the Analytics server and the index share path in order torun the installer without interruption. If you don't, the installer informs you that the directories can'tbe configured and that you must check to make sure that your permissions are correct.
Note: If a "Could not configure security for the following directories" warning occurs during yourAnalytics installation or upgrade, see on page 214.
12.1.2.2 Running the Relativity Analytics Server Setup wizard (Relativity 9.5.89.76 or prior)Follow these steps to run the Relativity Analytics Server Setup:
1. Open the Relativity Analytics Server Setup package. Right-click and clickRun.
2. ClickNext on the Relativity Analytics Server Setup welcome dialog.
UpgradeGuide 205
3. Enter values for the following Primary Database Server Configuration fields and clickNext:n Primary Database Server Instance - the primary database server to which you want to
install the Content Analyst service. The value you enter must match the Name value recordedon the Servers tab in Relativity.
n EDDSDBO Password - the password to the EDDSDBO account of the primary database. Ifyou change the password to your primary database server instance, you must re-run theRelativity Analytics Server Setup wizard.
n Relativity Service Account - the service account of the Relativity instance that is using thisinstallation of Content Analyst. You must use the following format for the service accountname: <domain>\<user>.
n Relativity Service Account Password - the password for the Relativity instance.
4. Enter values for the following REST API configuration fields, and then clickNext. These values mustmatch those of the corresponding fields on the Analytics server object in Relativity. For more inform-ation, see Servers in the Admin Guide.
n REST Port - the port that the REST API will use via https. By default, this setting uses port8443.
n REST Username - the username that a system admin or Relativity uses to authenticate withthe REST API. This can be any username that you choose, but for ease of use, you may wantto enter your Relativity Service account username. Whatever you enter here correspondsonly with the REST API username field on the Analytics server that you will add in Relativityafter you install the Analytics server here. This value isn't related to any pre-existing part ofthe system, meaning that it isn't a SQL login, Windows Domain user, or Relativity user.
n REST Password - the password you create for the REST API user. This can be anypassword that you choose, but for ease of use, you may want to enter your Relativity Serviceaccount password. Whatever you enter here corresponds only with the REST API passwordfield on the Analytics server that you will add in Relativity after you install the Analytics serverhere. This value isn't related to any pre-existing part of the system, meaning that it isn't thepassword for a SQL login, Windows Domain user, or Relativity user.
n Confirm REST Password - retype the password you created for the REST API user.
5. Check, edit, or enter the values for the following RelativityAnalytics Server Installation fields,and then click Install. These are automatically populated and are editable only if there is no existinginstallation of Content Analyst. If there is an existing installation of Content Analyst that has a non-default service name, Relativity isn't able to detect that installation. Thus, you must enter the correctvalues for these fields to successfully upgrade your installation of CAAT:
n Analytics Server folder - the path to the folder containing the Analytics installation files.o We recommend using the default folder of C:\CAAT (or C:\ContentAnalyst for a legacy
installation).
o This path must be absolute, and it can’t contain spaces or invalid characters.
o If the installer can't find or access the location you specify, it installs the application tothe default C:\CAAT folder.
UpgradeGuide 206
n Analytics Server Service Name - the Windows service name of the Analytics instance. Werecommend leaving this as the default value. This can't contain any invalid characters and itcan't exceed 80 characters.
n Analytics Server Port Number - the port number of the Analytics server. The default port is8080, but you can configure a different port number.
n Analytics Index Directory - the directory where indexes and structured analytics sets arestored on disk.
o We recommend that you not keep the index directory on the C: drive due to the sizerequirements.
o We recommend you use locally-attached storage referenced by a drive letter, i.e.E:\CAATindexes, rather than a UNC path. For more information, see Index directoryrequirements.
o Do not create a local drive map to a UNC. For example, do not open \\server-name\CAAT1 and map it to drive Z:. This is because drive mappings are specific toeach Windows user and may not be available to the Relativity Service Account.
o This path must be absolute, and it can’t contain spaces, invalid characters, or anyUnicode.
o Always use the installer to make changes to your Analytics configuration, including theindex directory. If you need to specify a new folder path, see Moving Analytics indexesand structured analytics sets in the Admin Guide.
n Postpone upgrading data elements until accessed at runtime - When this is checked,structured analytics data is not upgraded until it's accessed for the first time (recommended).When this is unchecked, structured analytics data is upgraded as part of the overall CAATupgrade process (this may cause the upgrade to take a much longer time).
Note: If using a UNC path for the Analytics Server Folder and (Optional) Analytics IndexShare Folder fields, the path must point to a Windows server directory.
When you first click Install, Relativity unzips the Analytics installer. This can take several minutes tocomplete.
6. (Optional) Monitor the status of the installation. You don't have to click next once this process is com-plete.
7. (Optional) Note the installation specifications in the command line window. Do not close this duringinstallation. It closes automatically when installation is complete and the final step of the wizardappears.
8. Click Finish to complete the installation.
9. Relativity 9.3 and above requires a certificate signed by a trusted certificate authority (CA). Bydefault, the CAAT service runs over an untrusted SSL/TLS certificate. For steps to modify, seeUpdating the default SSL/TLS certificate on page 217.
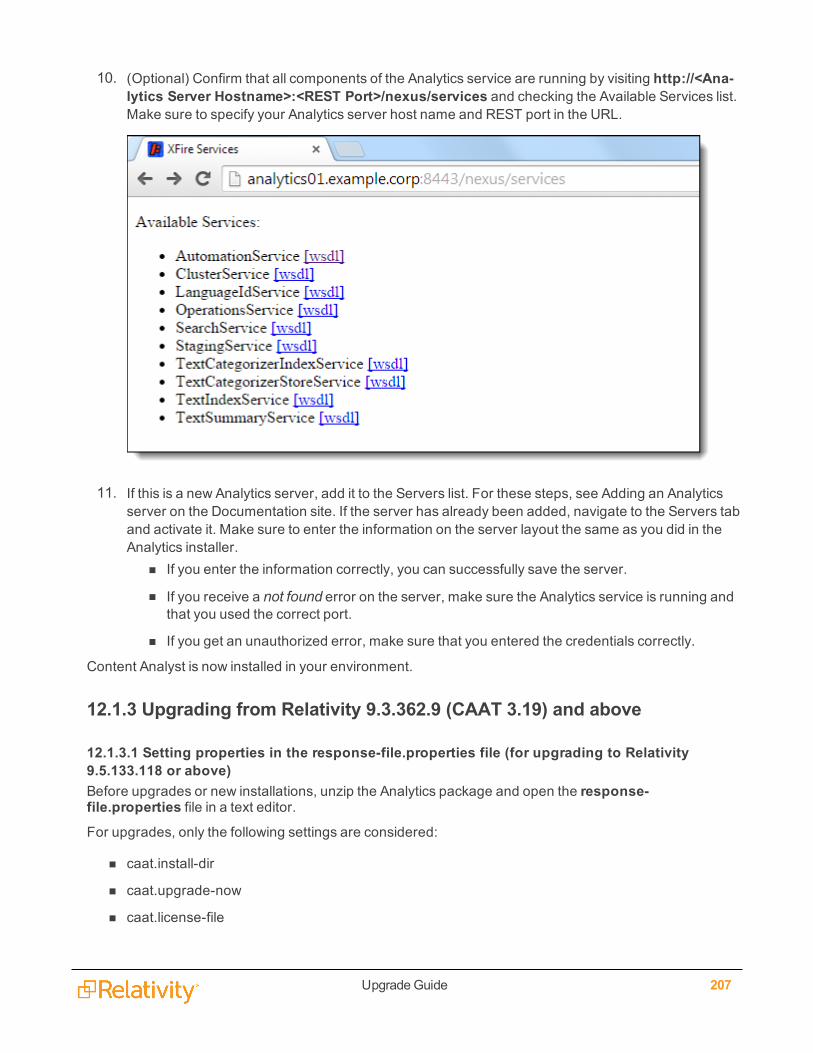
UpgradeGuide 207
10. (Optional) Confirm that all components of the Analytics service are running by visiting http://<Ana-lytics Server Hostname>:<REST Port>/nexus/services and checking the Available Services list.Make sure to specify your Analytics server host name and REST port in the URL.
11. If this is a new Analytics server, add it to the Servers list. For these steps, see Adding an Analyticsserver on the Documentation site. If the server has already been added, navigate to the Servers taband activate it. Make sure to enter the information on the server layout the same as you did in theAnalytics installer.
n If you enter the information correctly, you can successfully save the server.
n If you receive a not found error on the server, make sure the Analytics service is running andthat you used the correct port.
n If you get an unauthorized error, make sure that you entered the credentials correctly.
Content Analyst is now installed in your environment.
12.1.3 Upgrading from Relativity 9.3.362.9 (CAAT 3.19) and above
12.1.3.1 Setting properties in the response-file.properties file (for upgrading to Relativity9.5.133.118 or above)Before upgrades or new installations, unzip the Analytics package and open the response-file.properties file in a text editor.For upgrades, only the following settings are considered:
n caat.install-dir
n caat.upgrade-now
n caat.license-file
UpgradeGuide 208
n caat.http-user
n caat.http-password
For a complete list of settings and descriptions, see Installing Analytics for the first time to Relativity9.5.133.118 and above on page 199.
Complete the following Common Properties settings in the input file.
caat.install-dirIn former versions of the installer, this was called “Analytics Server folder.” This is the path to the foldercontaining the Analytics installation files. This value is required for upgrades.
n We recommend using the default folder of C:\CAAT (or C:\ContentAnalyst for a legacy installation).
n This path must be absolute, and it can’t contain spaces or invalid characters.
n If the installer can't find or access the location you specify, it installs the application to the defaultC:\CAAT folder.
A forward slash ( / ) or a double back slash ( \\ ) should be used as a path separator, rather than a singleback slash, as shown in the examples below.
caat.install-dir=C:/CAATcaat.install-dir=C:\\CAAT
Note: Spaces cannot be present within the file path.
caat.upgrade-nowSet this option to true. This value is required for upgrades.
caat.upgrade-now=true
caat.license-fileThis is the file path to the license key file that will be installed to run the Analytics engine. Keep the defaultof caat-license.jar. This value is required for upgrades.
caat.license-file=caat-license.jar
caat.http-userIn former versions of the installer, this was called “REST Username.” This is the username that a systemadmin or Relativity uses to authenticate with the REST API. This can be any username that you choose,but for ease of use, you may want to enter your Relativity Service account username. Whatever you enterhere corresponds only with the REST API username field on the Analytics server that you will add inRelativity after you install the Analytics server here. This value isn't related to any pre-existing part of thesystem, meaning that it isn't a SQL login, Windows Domain user, or Relativity user. This value is requiredfor upgrades.
Note: It is not possible to change an existing username with this entry.
caat.http-user=AnalyticsUser
UpgradeGuide 209
caat.http-passwordIn former versions of the installer, this was called “REST Password.” This is the password you create forthe REST API user. This can be any password that you choose, but for ease of use, you may want to enteryour Relativity Service account password. Whatever you enter here corresponds only with the REST APIpassword field on the Analytics server that you will add in Relativity after you install the Analytics serverhere. This value isn't related to any pre-existing part of the system, meaning that it isn't the password for aSQL login, Windows Domain user, or Relativity user. This value is required for upgrades.
Note: The caat.http-password value entered here must be 20 characters or less.
caat.http-password=SuperSecretPassword
Note: It is not possible to change an existing password with this entry. In order to change the password,see Changing the REST password on page 226.
12.1.3.2 Analytics installer considerations (for upgrading to Relativity 9.5.133.118 or above)Note the following before running the Relativity Analytics Server Installer:
n Run the server setup as the Relativity Service Account.
n You must have system admin rights to both the Analytics server and the index share path in order torun the installer without interruption.
12.1.3.3 Running the Install.cmd file (Relativity 9.5.133.118 or above)
1. Stop the Content Analyst CAAT Windows Service.
Note: This service may be named “Relativity Analytics Engine” depending on your version ofRelativity.
2. Open Task Manager and ensure all analytics processes have stopped. This includes java.exe, lsiap-p.exe, postgres.exe, and booleng.exe. If the processes do not disappear after a fewminutes, rightclick them and kill the processes.
3. After configuring the response-file.properties file (see Setting properties in the response-file.-properties file), right-click on the Install.cmd file and select the “Run as administrator” option tostart the Analytics Installation. This can take several minutes to complete. The installation spe-cifications will be displayed in the command line window. Do not close the command prompt until theinstallation is complete.
4. (Optional) Monitor the status of the installation. The installation is finished after “The installation is
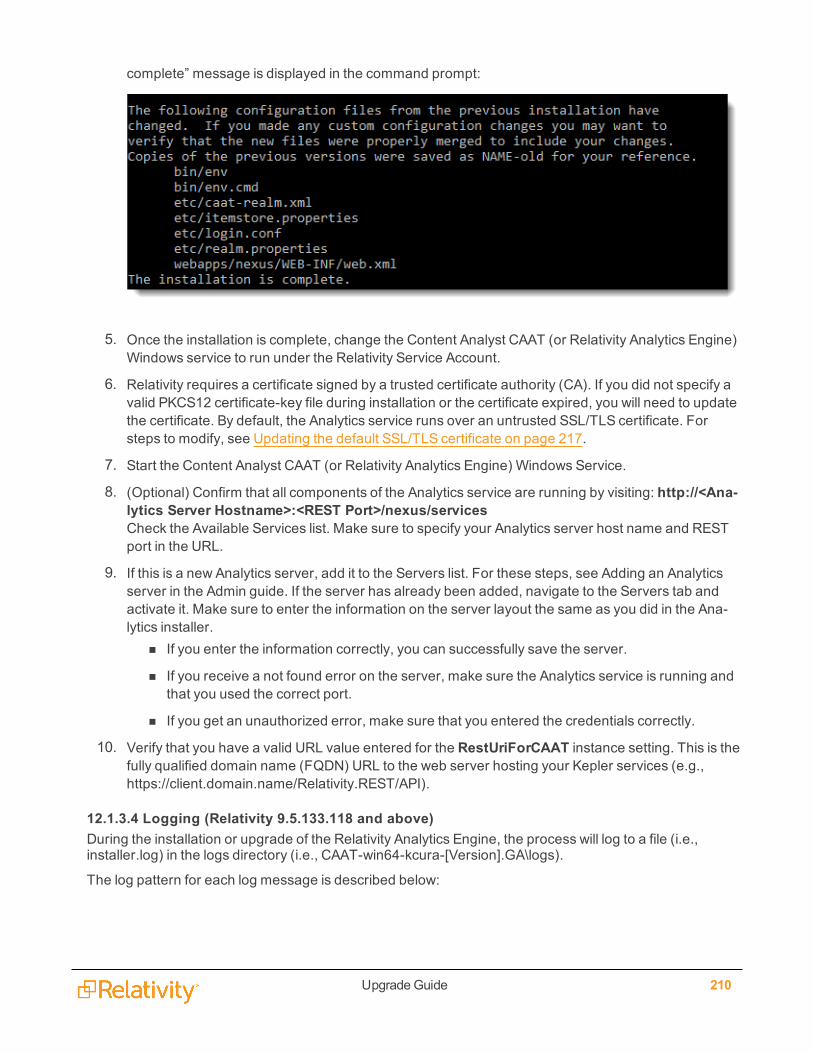
UpgradeGuide 210
complete” message is displayed in the command prompt:
5. Once the installation is complete, change the Content Analyst CAAT (or Relativity Analytics Engine)Windows service to run under the Relativity Service Account.
6. Relativity requires a certificate signed by a trusted certificate authority (CA). If you did not specify avalid PKCS12 certificate-key file during installation or the certificate expired, you will need to updatethe certificate. By default, the Analytics service runs over an untrusted SSL/TLS certificate. Forsteps to modify, see Updating the default SSL/TLS certificate on page 217.
7. Start the Content Analyst CAAT (or Relativity Analytics Engine) Windows Service.
8. (Optional) Confirm that all components of the Analytics service are running by visiting: http://<Ana-lytics Server Hostname>:<REST Port>/nexus/servicesCheck the Available Services list. Make sure to specify your Analytics server host name and RESTport in the URL.
9. If this is a new Analytics server, add it to the Servers list. For these steps, see Adding an Analyticsserver in the Admin guide. If the server has already been added, navigate to the Servers tab andactivate it. Make sure to enter the information on the server layout the same as you did in the Ana-lytics installer.
n If you enter the information correctly, you can successfully save the server.
n If you receive a not found error on the server, make sure the Analytics service is running andthat you used the correct port.
n If you get an unauthorized error, make sure that you entered the credentials correctly.
10. Verify that you have a valid URL value entered for the RestUriForCAAT instance setting. This is thefully qualified domain name (FQDN) URL to the web server hosting your Kepler services (e.g.,https://client.domain.name/Relativity.REST/API).
12.1.3.4 Logging (Relativity 9.5.133.118 and above)During the installation or upgrade of the Relativity Analytics Engine, the process will log to a file (i.e.,installer.log) in the logs directory (i.e., CAAT-win64-kcura-[Version].GA\logs).
The log pattern for each log message is described below:
UpgradeGuide 211
n [log-level] [date] [thread-name] message (e.g., [INFO] [2017-01-18 19:05:54 [main]: Loadinginstallation options)
Note: Log messages will be appended to the same log file on subsequent runs.
12.1.4 Upgrading from Relativity 9.3.332.21 (CAAT 3.17) or prior
Note: If you are upgrading from Relativity 9.3.332.21 (CAAT 3.17) or lower, first run the Relativity9.3.362.9 or 9.4 Analytics server installer using the below instructions. Contact Support for this installer.After installation, run the response file-based installer (see Upgrading from Relativity 9.3.362.9 (CAAT3.19) and above on page 207).
12.1.4.1 Analytics installer considerations (for upgrading to Relativity 9.5.89.76 or prior)When you run the Relativity Analytics Server Setup wizard, the wizard automatically:
n Installs the CAAT service
n Deploys the Relativity library files
n Configures the java heap size (set by default to half of RAM)o If you re-install the Analytics server after already adjusting the java heap size settings, the
new installation will overwrite the java heap adjustments you made.
n Allows you to set an index path on new install, thus eliminating the need to manually set the locationof indexes
n Sets the CAAT Windows service to log in as the Relativity Service Account
Note the following before running the Relativity Analytics Server Setup:
n Run the server setup as the Relativity Service Account.
n You must have system admin rights to both the Analytics server and the index share path in order torun the installer without interruption. If you don't, the installer informs you that the directories can'tbe configured and that you must check to make sure that your permissions are correct.
Note: If a "Could not configure security for the following directories" warning occurs during yourAnalytics installation or upgrade, see on page 214.
12.1.4.2 Running the Relativity Analytics Server Setup wizard (Relativity 9.5.89.76 or prior)Follow these steps to run the Relativity Analytics Server Setup:
1. Open the Relativity Analytics Server Setup package. Right-click and clickRun.
2. ClickNext on the Relativity Analytics Server Setup welcome dialog.
3. Enter values for the following Primary Database Server Configuration fields and clickNext:n Primary Database Server Instance - the primary database server to which you want to
install the Content Analyst service. The value you enter must match the Name value recordedon the Servers tab in Relativity.
UpgradeGuide 212
n EDDSDBO Password - the password to the EDDSDBO account of the primary database. Ifyou change the password to your primary database server instance, you must re-run theRelativity Analytics Server Setup wizard.
n Relativity Service Account - the service account of the Relativity instance that is using thisinstallation of Content Analyst. You must use the following format for the service accountname: <domain>\<user>.
n Relativity Service Account Password - the password for the Relativity instance.
4. Enter values for the following REST API configuration fields, and then clickNext. These values mustmatch those of the corresponding fields on the Analytics server object in Relativity. For more inform-ation, see Servers in the Admin Guide.
n REST Port - the port that the REST API will use via https. By default, this setting uses port8443.
n REST Username - the username that a system admin or Relativity uses to authenticate withthe REST API. This can be any username that you choose, but for ease of use, you may wantto enter your Relativity Service account username. Whatever you enter here correspondsonly with the REST API username field on the Analytics server that you will add in Relativityafter you install the Analytics server here. This value isn't related to any pre-existing part ofthe system, meaning that it isn't a SQL login, Windows Domain user, or Relativity user.
n REST Password - the password you create for the REST API user. This can be anypassword that you choose, but for ease of use, you may want to enter your Relativity Serviceaccount password. Whatever you enter here corresponds only with the REST API passwordfield on the Analytics server that you will add in Relativity after you install the Analytics serverhere. This value isn't related to any pre-existing part of the system, meaning that it isn't thepassword for a SQL login, Windows Domain user, or Relativity user.
n Confirm REST Password - retype the password you created for the REST API user.
5. Check, edit, or enter the values for the following RelativityAnalytics Server Installation fields,and then click Install. These are automatically populated and are editable only if there is no existinginstallation of Content Analyst. If there is an existing installation of Content Analyst that has a non-default service name, Relativity isn't able to detect that installation. Thus, you must enter the correctvalues for these fields to successfully upgrade your installation of CAAT:
n Analytics Server folder - the path to the folder containing the Analytics installation files.o We recommend using the default folder of C:\CAAT (or C:\ContentAnalyst for a legacy
installation).
o This path must be absolute, and it can’t contain spaces or invalid characters.
o If the installer can't find or access the location you specify, it installs the application tothe default C:\CAAT folder.
n Analytics Server Service Name - the Windows service name of the Analytics instance. Werecommend leaving this as the default value. This can't contain any invalid characters and itcan't exceed 80 characters.
n Analytics Server Port Number - the port number of the Analytics server. The default port is8080, but you can configure a different port number.
UpgradeGuide 213
n Analytics Index Directory - the directory where indexes and structured analytics sets arestored on disk.
o We recommend that you not keep the index directory on the C: drive due to the sizerequirements.
o We recommend you use locally-attached storage referenced by a drive letter, i.e.E:\CAATindexes, rather than a UNC path. For more information, see Index directoryrequirements.
o Do not create a local drive map to a UNC. For example, do not open \\server-name\CAAT1 and map it to drive Z:. This is because drive mappings are specific toeach Windows user and may not be available to the Relativity Service Account.
o This path must be absolute, and it can’t contain spaces, invalid characters, or anyUnicode.
o Always use the installer to make changes to your Analytics configuration, including theindex directory. If you need to specify a new folder path, see Moving Analytics indexesand structured analytics sets in the Admin Guide.
n Postpone upgrading data elements until accessed at runtime - When this is checked,structured analytics data is not upgraded until it's accessed for the first time (recommended).When this is unchecked, structured analytics data is upgraded as part of the overall CAATupgrade process (this may cause the upgrade to take a much longer time).
Note: If using a UNC path for the Analytics Server Folder and (Optional) Analytics IndexShare Folder fields, the path must point to a Windows server directory.
When you first click Install, Relativity unzips the Analytics installer. This can take several minutes tocomplete.
6. (Optional) Monitor the status of the installation. You don't have to click next once this process is com-plete.
7. (Optional) Note the installation specifications in the command line window. Do not close this duringinstallation. It closes automatically when installation is complete and the final step of the wizardappears.
8. Click Finish to complete the installation.
9. Relativity 9.3 and above requires a certificate signed by a trusted certificate authority (CA). Bydefault, the CAAT service runs over an untrusted SSL/TLS certificate. For steps to modify, seeUpdating the default SSL/TLS certificate on page 217.
10. (Optional) Confirm that all components of the Analytics service are running by visiting http://<Ana-lytics Server Hostname>:<REST Port>/nexus/services and checking the Available Services list.Make sure to specify your Analytics server host name and REST port in the URL.
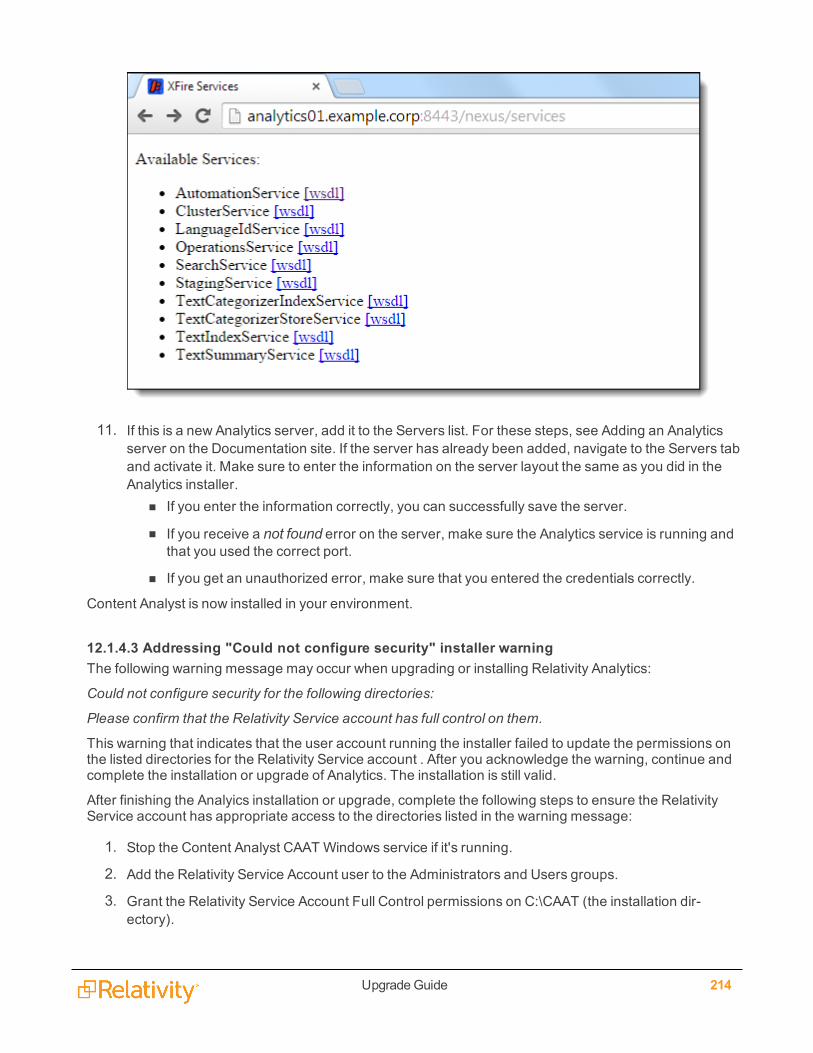
UpgradeGuide 214
11. If this is a new Analytics server, add it to the Servers list. For these steps, see Adding an Analyticsserver on the Documentation site. If the server has already been added, navigate to the Servers taband activate it. Make sure to enter the information on the server layout the same as you did in theAnalytics installer.
n If you enter the information correctly, you can successfully save the server.
n If you receive a not found error on the server, make sure the Analytics service is running andthat you used the correct port.
n If you get an unauthorized error, make sure that you entered the credentials correctly.
Content Analyst is now installed in your environment.
12.1.4.3 Addressing "Could not configure security" installer warningThe following warning message may occur when upgrading or installing Relativity Analytics:
Could not configure security for the following directories:
Please confirm that the Relativity Service account has full control on them.
This warning that indicates that the user account running the installer failed to update the permissions onthe listed directories for the Relativity Service account . After you acknowledge the warning, continue andcomplete the installation or upgrade of Analytics. The installation is still valid.
After finishing the Analyics installation or upgrade, complete the following steps to ensure the RelativityService account has appropriate access to the directories listed in the warning message:
1. Stop the Content Analyst CAAT Windows service if it's running.
2. Add the Relativity Service Account user to the Administrators and Users groups.
3. Grant the Relativity Service Account Full Control permissions on C:\CAAT (the installation dir-ectory).
UpgradeGuide 215
4. Grant the Users group Full Control permissions on C:\CAAT\pgsql\data.
5. If the installation contains a C:\CAAT\data-default folder, grant the Users group Full Control per-missions on this folder.
6. If the index directory is different from the default (i.e. on another drive or share), ensure the Relativ-ity Service Account has Full Control permissions on the index directory.
7. Restart the Analytics server after updating the user and group permissions.
8. Verify the Relativity Service Account is running the CAAT Content Analyst Windows Service.
12.1.4.4 Upgrading clusters for CAAT 3.17.2 and higher from Relativity 9.1 or prior
Note: The instructions in this section are only necessary when upgrading from Relativity 9.1 or below.
Relativity 9.2.271.9 installs CAAT 3.17.2 which includes clustering performance improvements. You mustupgrade your existing clusters if they were created using a version of CAAT previous to 3.17.2.
To upgrade your clusters, use one of the following upgrade methods:
n Run Create Cluster Upgrade Jobs script below
n Upgrade clusters on the fly on page 217
Run Create Cluster Upgrade Jobs scriptComplete the following steps to automate the cluster set upgrade process by creating upgrade jobs forone workspace or all workspaces using the Create Cluster Upgrade jobs script:
1. Navigate to Home.
2. Click the Relativity Script Library tab.
3. Locate and click the Create Cluster Upgrade Jobs script.
4. ClickRun Script.
5. Select the workspace that contains the clusters you want to upgrade from theWorkspace Namedrop-down menu or select <All Workspaces> to upgrade all clusters in all of your workspaces.

UpgradeGuide 216
6. ClickRun followed byOK.
7. Close the Create Cluster Upgrade Jobs script dialog.
Cluster upgrade jobs added by the Create Cluster Upgrade Jobs script are managed by the ClusterUpgrade Worker agent. See the Agents guide for more information regarding the Cluster Upgrade Workeragent.See the Admin Guide for additional details regarding the Create Cluster Upgrade Jobs script andscript results.
Monitor cluster upgrade jobsThe Monitor Cluster Upgrade Jobs script checks and reports the status of all Analytics cluster upgradejobs added using the Create Cluster Upgrade Jobs script.
Complete the following steps to view a count of clusters that are upgraded and not upgraded byworkspace:
1. Navigate to Home.
2. Click the Relativity Script Library tab.
3. Locate and click theMonitor Cluster Upgrade Jobs script.
4. ClickRun Script.
5. ClickRun. With theMonitor Cluster Upgrade Jobs dialog still open, clickRun again to refresh thelist.
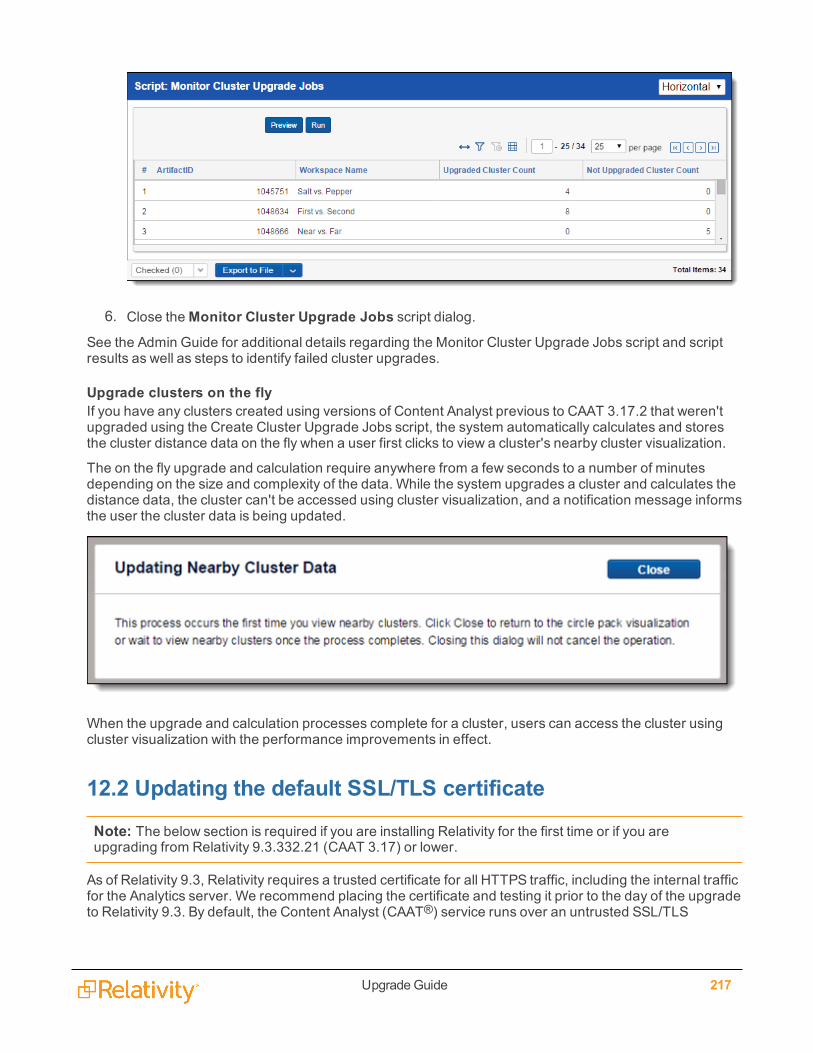
UpgradeGuide 217
6. Close theMonitor Cluster Upgrade Jobs script dialog.
See the Admin Guide for additional details regarding the Monitor Cluster Upgrade Jobs script and scriptresults as well as steps to identify failed cluster upgrades.
Upgrade clusters on the flyIf you have any clusters created using versions of Content Analyst previous to CAAT 3.17.2 that weren'tupgraded using the Create Cluster Upgrade Jobs script, the system automatically calculates and storesthe cluster distance data on the fly when a user first clicks to view a cluster's nearby cluster visualization.
The on the fly upgrade and calculation require anywhere from a few seconds to a number of minutesdepending on the size and complexity of the data. While the system upgrades a cluster and calculates thedistance data, the cluster can't be accessed using cluster visualization, and a notification message informsthe user the cluster data is being updated.
When the upgrade and calculation processes complete for a cluster, users can access the cluster usingcluster visualization with the performance improvements in effect.
12.2 Updating the default SSL/TLS certificate
Note: The below section is required if you are installing Relativity for the first time or if you areupgrading from Relativity 9.3.332.21 (CAAT 3.17) or lower.
As of Relativity 9.3, Relativity requires a trusted certificate for all HTTPS traffic, including the internal trafficfor the Analytics server. We recommend placing the certificate and testing it prior to the day of the upgradeto Relativity 9.3. By default, the Content Analyst (CAAT®) service runs over an untrusted SSL/TLS
UpgradeGuide 218
certificate. There are several options for getting a trusted certificate in place. You most likely already havea certificate for your externally facing web servers. However, it’s likely that the domain name for thatcertificate doesn’t match the internal fully qualified domain name (FQDN) of the Analytics server(s). If itDOESmatch, you may use the same certificate currently on your web server.
For example, if the external certificate is *company.com but your domain is *.company.corp, then this doesnot match and cannot be used. If it does not, we strongly recommend purchasing one from a trustedcertificate authority and placing it on the Analytics server before the upgrade. If you choose not topurchase a certificate, it is possible to use a self-signed certificate as a temporary measure. Should youchoose to do this, we recommend using the fully qualified domain name when creating the self-signedcertificate so that it can be swapped for a real certificate from a trusted authority later on.
To check the fully qualified domain name (FQDN) of the Analytics server:
1. Open the Control Panel.
2. Navigate to Control Panel\System and Security\System.
3. Under the Computer name section, find the entry for Full Computer Name.
4. If you have an existing certificate, verify that it matches the FQDN of the Analytics server.n If it does not, you must either purchase a new certificate or generate a self-signed certificate.
12.2.1 Overview of how to update the SSL / TLS certificatePerform the following steps to use a certificate. The detailed substeps under each major step are outlinedin the section below.
1. Delete the default, unsigned certificate.
2. If you have a trusted certificate (that uses the FQDN), proceed directly to step 3 (importing a cer-tificate). Otherwise, Create a self-signed certificate first before proceeding to step 3.
Note: It is recommended that you use a certificate from a trusted authority (if possible). Forworkgroup environments, a self-signed certificate is necessary.
3. Import a certificate (trusted or self-signed) that uses the FQDN.
4. Verify the Analytics server in Relativity.
12.2.2 1) Deleting the default, unsigned certificateComplete the following steps to delete the default, unsigned certificate:
Note: Replace the jdk1.8.0_144 noted in the instructions for the sections below with the relevantRevision Number of the Java Virtual Machine for the SSL / TLS certificate command lines (if you areusing a version prior to 9.5.196.102). This value is found in the naming of the CAAT install directory.
1. Log in to the analytics server as the Relativity Service Account.
2. Open a command prompt window.
3. View a list of all certificates in the keystore by running the following command:<PathToKeystore> - this is the file path to the keystore. To find this path, open start.ini and look forthe jetty.keystore value.
UpgradeGuide 219
C:\CAAT\jdk1.8.0_144\bin\keytool.exe -list -keystore C:\CAAT\etc\ssl\server.keystore -v
Note: These commands assume that the CAAT installation directory is C:\CAAT. They may needto be modified to account for differing installation drive letters or installation folder names.
4. You will be prompted to enter a keystore password. The default password is caat4me. Type thisinto the command prompt and then hit Enter.
Note: The password will not appear on the screen while typing.
5. Take note of the certificate(s) listed in the keystore. The alias name for the default CAAT® cer-tificate to be deleted is contentanalyst.
6. To delete the default CAAT certificate, run the following command:<PathToKeystore> - this is the file path to the keystore. To find this path, open start.ini and look forthe jetty.keystore value.
C:\CAAT\jdk1.8.0_144\bin\keytool.exe -delete -keystore <<PathToKeystore>> -alias contentanalyst
12.2.3 2) Creating a self-signed certificate (no trusted certificate) - optionalstepComplete the following steps to create a self-signed certificate in Powershell:
1. Copy the internal fully qualified domain name (FQDN) of the Analytics server(s) in a text file for uselater in this process. You can determine this value by running the following command in a commandprompt window on your Analytics server:
echo %COMPUTERNAME%.%USERDNSDOMAIN%
2. Run PowerShell as an administrator.
3. Create your self-signed certificate in PowerShell using the following command (replace <<host-name>> with the output of the command from step 1):
New-SelfSignedCertificate -certstorelocation cert:\localmachine\my -dnsname <<hostname>>
Running that command will add the self-signed certificate to the local certificate store and generatea thumbprint (e.g., CE0976529B02DE058C9CB2C0E64AD79DAFB18CF4).
4. Copy the thumbprint for use later.
5. In the PowerShell window, enter the following command to populate a variable with a passwordyou'll use when exporting the certificate from the local certificate store (replace <<password>> witha password of your choice):
$pwd = ConvertTo-SecureString -String "<<password>>" -Force -AsPlainText
6. Export the certificate from the local certificate store to a directory of your choosing accessible to thekeystore (replace <<thumbrint>> with the output of the command in step 4 and replace <<pfxcert-filepath>> with the destination filepath for the pfx certificate that will be generated):

UpgradeGuide 220
Export-PfxCertificate -cert cert:\localMachine\my\<<thumbprint>> -FilePath <<pfxcert-file-path\filename.pfx>> -Password $pwd
Example:
Export-PfxCertificate -cert cert:\localMachine\my\D660E83A0E84653F27C3D1A9BDFFB6258392E92E -FilePath c:\selfsigned.pfx -Password $pwd
Note: Note: Do not export the cert as a *.cer file. A *.cer file does not include the certificate’sprivate key and will not work in CAAT.
7. If this is an upgrade, import the self-signed certificate into the keystore. See Importing a certificate(trusted or self-signed) for more information. If this is a new installation, update the response.-properties file as follows:
n caat.ssl-certificate-key-path - use the certificate you generated in Powershell in step 3.
n caat.ssl-password - use the <<password>> value you generated in step 5.
Note: In some cases, you may have a security policy in pace that prevents the export of the cert'sprivate key. CAAT must have the certificate's private key in order for SSL to function. You musteither override your security policy or generate a new SSL certificate with a new private key andexport this new certificate and private key.
Complete the following steps to create a self-signed certificate in command prompt:
Note: Replace the jdk1.8.0_144 noted in the instructions for the sections below with the relevantRevision Number of the Java Virtual Machine for the SSL / TLS certificate command lines (if you areusing a version prior to 9.5.196.102). This value is found in the naming of the CAAT install directory.
1. Run the following command from the Analytics server:<PathToKeystore> - this is the file path to the keystore. To find this path, open start.ini and look forthe jetty.keystore value.
C:\CAAT\jdk1.8.0_25\bin\keytool.exe -genkey -keyalg RSA -alias selfsigned -keystore <<PathToKey-store>> -storepass caat4me -validity 360 -keysize 2048
2. You will be prompted several times. Enter the FQDN of the Analytics server for all prompts exceptthe last, which is just the country abbreviation.
3. Use the same keypass as the keystore when prompted. You can either hit return or type incaat4me.
4. Export the certificate using the following command:
C:\CAAT\jdk1.8.0_25\bin\keytool.exe -export -alias selfsigned -file C:\selfsigned.crt -keystoreC:\CAAT\etc\ssl\server.keystore
5. Restart the Content Analyst CAAT windows service.
6. Import the certificate to the Trusted Root of the following servers:n Analytics servers
n Agent servers
UpgradeGuide 221
n Primary and distributed SQL servers
n Web servers
To do so, complete the following:
a. Navigate to the endpoint for the CAAT certificate (https://<server-name.FQDN>:8443/nexus/r1/).
b. Awarning will appear indicating there is a problem with the website’s security certificate. Click"continue to this website (not recommended)".
c. Upon clicking continue, you will be prompted to enter your REST account credentials.
d. Click on the certificate error in the address bar.
e. Click View Certificates.
f. Click Install Certificate.
g. Import the certificate to either the Current User or Local Machine store location.
h. Select "Place all certificates in the following store" and browse for "Trusted Root CertificationAuthorities".
i. Click Finish.
j. Test that the import was successful by navigating to the REST site again.
k. Repeat this process for each server listed above.
7. Proceed to 4) Verifying the Analytics server in Relativity on page 223.
12.2.4 3) Importing a certificate (trusted or self-signed)The certificate you import must be a PKCS12 certificate with the certs private key.
When you have a valid certificate (trusted or self-signed) matching the FQDN of the analytics server,complete the following steps to import it to the keystore:
Note: Replace the jdk1.8.0_144 noted in the instructions for the sections below with the relevantRevision Number of the Java Virtual Machine for the SSL / TLS certificate command lines (if you areusing a version prior to 9.5.196.102). This value is found in the naming of the CAAT install directory.
1. Run the following command, replacing <Certificate>with the file path, name, and extension of thecertificate (i.e., C:\folder\RelativityCert.pfx) and replace <CertPassword> and <Destin-ationPassword> with the relevant passwords.
n <CertPassword> - this is the password of the certificate. (For a self-signed certificate, thispassword was set when exporting the cert from the local certificate store. For a trusted cer-tificate, this must be provided to you by the CA or your IT admins.)
n <DestinationPassword> - this is a value you are setting now, it will be used while modifyingstart.ini in step 4.
n <PathToKeystore> - this is the file path to the keystore. To find this path, open start.ini andlook for the jetty.keystore value.

UpgradeGuide 222
Note: If you are upgrading from a version before Relativity 9.5, you may find the start.inifile in the following folder: C:\CAAT\start.d\ssl.ini .
C:\CAAT\jdk1.8.0_144\bin\keytool.exe -importkeystore -srckeystore <<Certificate>> -srcstorepass<<CertPassword>> -srcstoretype pkcs12 -destkeystore <<PathToKeystore>> -destkeypass<<DestinationsPassword>> -deststoretype JKS
2. When prompted for the keystore password, enter it again.
Note: . The default password for the keystore is caat4me. The password for the certificate mustmatch the password for the keystore. The password will not appear on the screen while typing.
3. Verify that the certificate is in the keystore by running the following command to list the certificates:
C:\CAAT\jdk1.8.0_144\bin\keytool.exe -list -keystore C:\CAAT\etc\ssl\server.keystore -v
4. Modify the start.ini file as detailed below (C:\CAAT\start.ini).
Note: If you are upgrading from a version before Relativity 9.5, you may find the start.ini file in thefollowing folder: C:\CAAT\start.d\ssl.ini .
a. Ensure that --module=ssl is uncommented
b. Ensure that jetty.keystore and jetty.truststorematch the keystore path specified in step 1.
c. Ensure that the following Jetty passwords match the value set in step 1 while importing thecert into the keystore
n jetty.keystore.password
n jetty.keymanager.password
n jetty.truststore.password
Note: Optional: For instructions on how to change and obfuscate the default Jettypasswords, refer to the Relativity Community.
5. Restart the Content Analyst CAAT windows service.
Note: The endpoint for the CAAT certificate is https://<servername.FQDN>:8443/nexus/r1/.
6. Test the certificate by opening a browser from the Analytics server and at least one other server andnavigating to the endpoint above. You should not get a certificate error when navigating to the URL.
UpgradeGuide 223
7. Depending on whether you have a trusted certificate or a self-signed certificate, proceed as follows:n If you are using a trusted certificate , you can proceed directly to Verifying the Analytics server
in Relativity.
n If you are using a self-signed certificate, proceed to step 8.
8. If you have imported a self-signed certificate, import the certificate to the Trusted Root of thefollowing additional servers:
n Analytics servers
n Agent servers
n Primary and distributed SQL servers
n Web servers
To do so, follow these instructions:a. Navigate to the endpoint for the CAAT certificate
(https://<servername.FQDN>:8443/nexus/r1/).b. Awarning will appear indicating there is a problem with the website’s security certificate. Click
"continue to this website (not recommended)".
Upon clicking continue, you will be prompted to enter your REST account credentials.
c. Click on the certificate error in the address bar.
d. Click View Certificates.
e. Click Install Certificate….
f. Import the certificate to either the Current User or Local Machine store location.
g. Select "Place all certificates in the following store" and browse for "Trusted Root CertificationAuthorities".
h. Click Finish.
i. Test that the import was successful by navigating to the REST site again.
j. Repeat this process for each server listed above.
9. Proceed to Verifying the Analytics server in Relativity.:
12.2.5 4) Verifying the Analytics server in RelativityVerify in Relativity that the Analytics server URL uses the FQDN and not the server name or IP address.Navigate to the Servers tab, and check the URL of the Analytics server. If it does not contain the FQDN,then follow these steps:
1. Verify that you have a valid URL value entered for the RestUriForCAAT instance setting. This is theFQDNURL to the web server hosting your Kepler services (e.g., https://cli-ent.domain.name/Relativity.REST/API).
2. Add a new Analytics server from the Servers tab in Relativity. See Adding an Analytics server in theAdmin Guide for more information.When entering the URL:
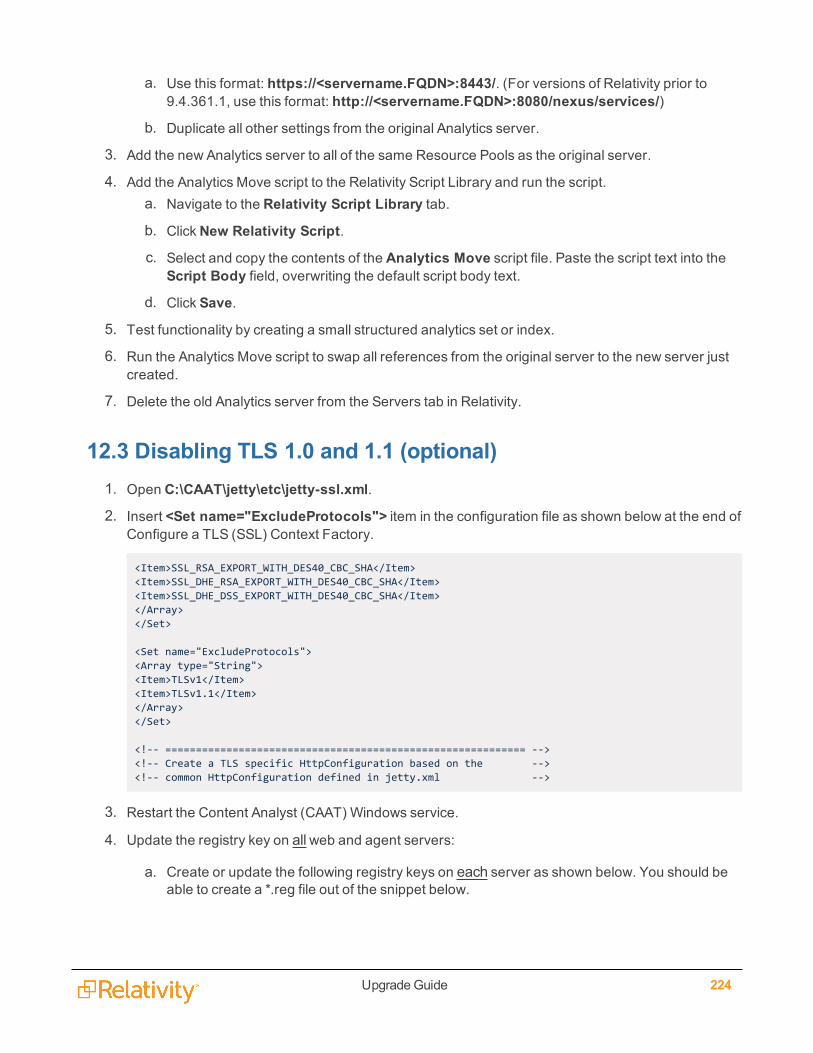
UpgradeGuide 224
a. Use this format: https://<servername.FQDN>:8443/. (For versions of Relativity prior to9.4.361.1, use this format: http://<servername.FQDN>:8080/nexus/services/)
b. Duplicate all other settings from the original Analytics server.
3. Add the new Analytics server to all of the same Resource Pools as the original server.
4. Add the Analytics Move script to the Relativity Script Library and run the script.a. Navigate to the Relativity Script Library tab.
b. ClickNew Relativity Script.
c. Select and copy the contents of the Analytics Move script file. Paste the script text into theScript Body field, overwriting the default script body text.
d. Click Save.
5. Test functionality by creating a small structured analytics set or index.
6. Run the Analytics Move script to swap all references from the original server to the new server justcreated.
7. Delete the old Analytics server from the Servers tab in Relativity.
12.3 Disabling TLS 1.0 and 1.1 (optional)1. Open C:\CAAT\jetty\etc\jetty-ssl.xml.
2. Insert <Set name="ExcludeProtocols"> item in the configuration file as shown below at the end ofConfigure a TLS (SSL) Context Factory.
<Item>SSL_RSA_EXPORT_WITH_DES40_CBC_SHA</Item><Item>SSL_DHE_RSA_EXPORT_WITH_DES40_CBC_SHA</Item><Item>SSL_DHE_DSS_EXPORT_WITH_DES40_CBC_SHA</Item></Array></Set>
<Set name="ExcludeProtocols"><Array type="String"><Item>TLSv1</Item><Item>TLSv1.1</Item></Array></Set>
<!-- =========================================================== --><!-- Create a TLS specific HttpConfiguration based on the --><!-- common HttpConfiguration defined in jetty.xml -->
3. Restart the Content Analyst (CAAT) Windows service.
4. Update the registry key on allweb and agent servers:
a. Create or update the following registry keys on each server as shown below. You should beable to create a *.reg file out of the snippet below.
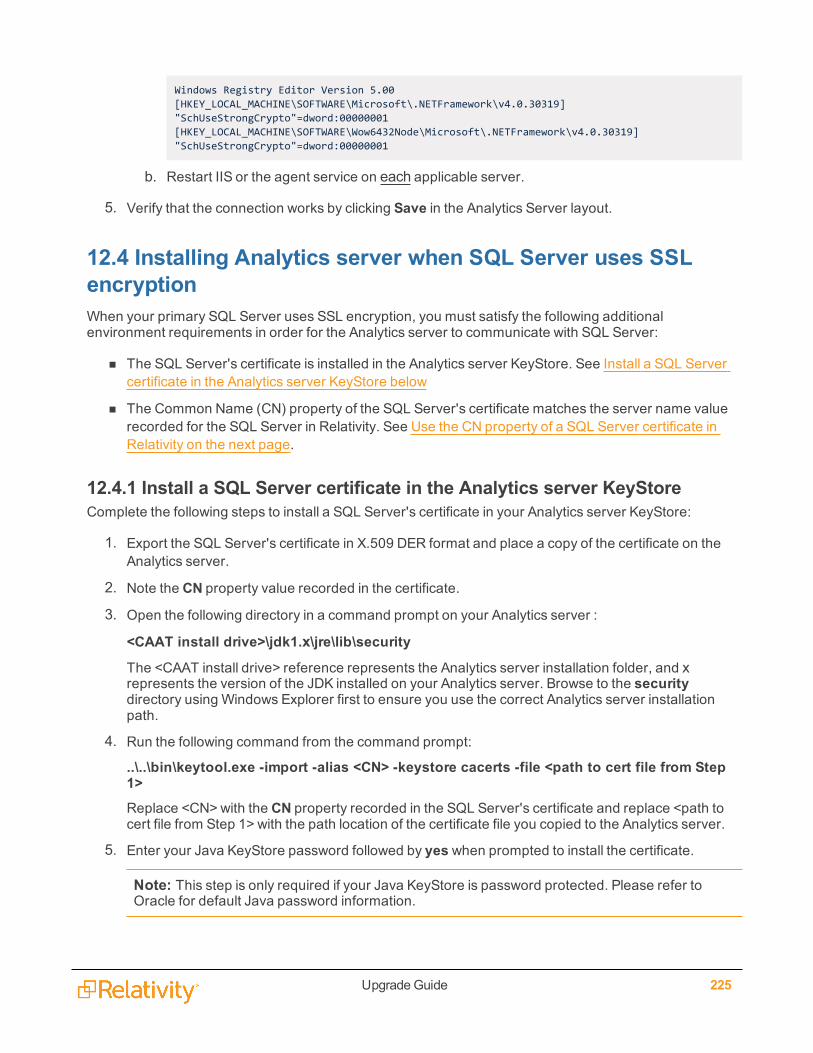
UpgradeGuide 225
Windows Registry Editor Version 5.00[HKEY_LOCAL_MACHINE\SOFTWARE\Microsoft\.NETFramework\v4.0.30319]"SchUseStrongCrypto"=dword:00000001[HKEY_LOCAL_MACHINE\SOFTWARE\Wow6432Node\Microsoft\.NETFramework\v4.0.30319]"SchUseStrongCrypto"=dword:00000001
b. Restart IIS or the agent service on each applicable server.
5. Verify that the connection works by clicking Save in the Analytics Server layout.
12.4 Installing Analytics server when SQL Server uses SSLencryptionWhen your primary SQL Server uses SSL encryption, you must satisfy the following additionalenvironment requirements in order for the Analytics server to communicate with SQL Server:
n The SQL Server's certificate is installed in the Analytics server KeyStore. See Install a SQL Servercertificate in the Analytics server KeyStore below
n The Common Name (CN) property of the SQL Server's certificate matches the server name valuerecorded for the SQL Server in Relativity. See Use the CN property of a SQL Server certificate inRelativity on the next page.
12.4.1 Install a SQL Server certificate in the Analytics server KeyStoreComplete the following steps to install a SQL Server's certificate in your Analytics server KeyStore:
1. Export the SQL Server's certificate in X.509 DER format and place a copy of the certificate on theAnalytics server.
2. Note the CN property value recorded in the certificate.
3. Open the following directory in a command prompt on your Analytics server :
<CAAT install drive>\jdk1.x\jre\lib\securityThe <CAAT install drive> reference represents the Analytics server installation folder, and xrepresents the version of the JDK installed on your Analytics server. Browse to the securitydirectory using Windows Explorer first to ensure you use the correct Analytics server installationpath.
4. Run the following command from the command prompt:
..\..\bin\keytool.exe -import -alias <CN> -keystore cacerts -file <path to cert file from Step1>Replace <CN>with the CN property recorded in the SQL Server's certificate and replace <path tocert file from Step 1> with the path location of the certificate file you copied to the Analytics server.
5. Enter your Java KeyStore password followed by yes when prompted to install the certificate.
Note: This step is only required if your Java KeyStore is password protected. Please refer toOracle for default Java password information.
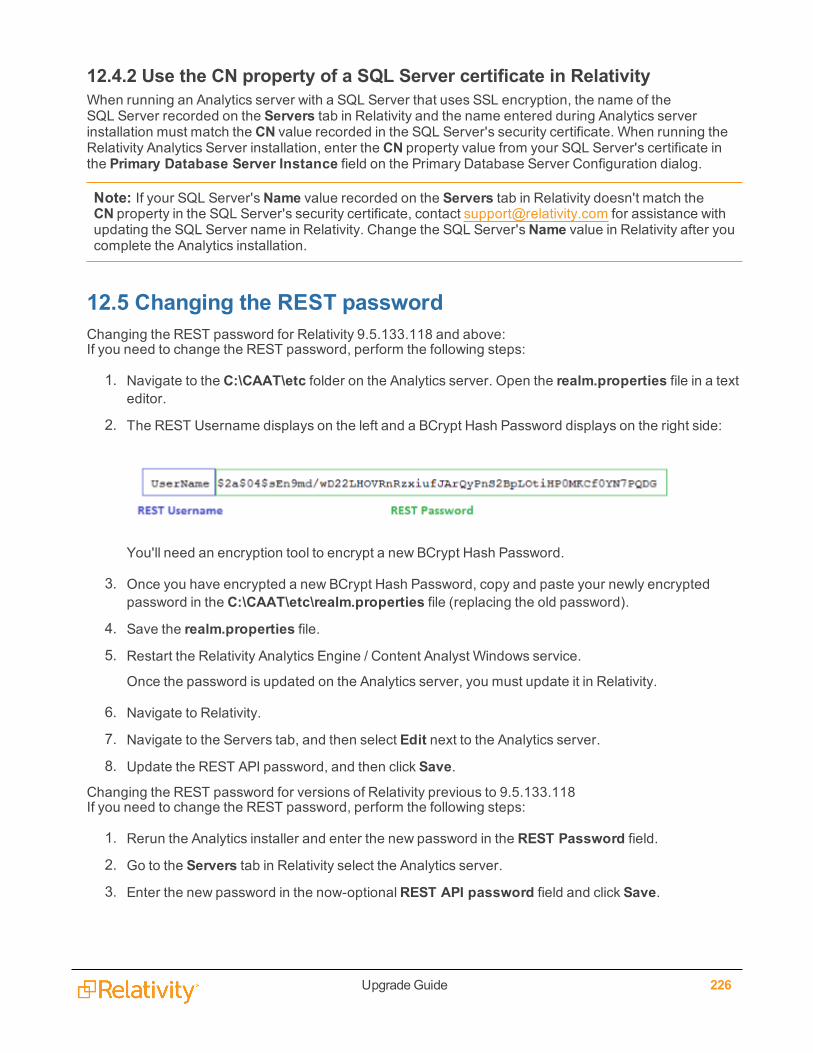
UpgradeGuide 226
12.4.2 Use the CN property of a SQL Server certificate in RelativityWhen running an Analytics server with a SQL Server that uses SSL encryption, the name of theSQL Server recorded on the Servers tab in Relativity and the name entered during Analytics serverinstallation must match the CN value recorded in the SQL Server's security certificate. When running theRelativity Analytics Server installation, enter the CN property value from your SQL Server's certificate inthe Primary Database Server Instance field on the Primary Database Server Configuration dialog.
Note: If your SQL Server'sName value recorded on the Servers tab in Relativity doesn't match theCN property in the SQL Server's security certificate, contact [email protected] for assistance withupdating the SQL Server name in Relativity. Change the SQL Server'sName value in Relativity after youcomplete the Analytics installation.
12.5 Changing the REST passwordChanging the REST password for Relativity 9.5.133.118 and above:If you need to change the REST password, perform the following steps:
1. Navigate to the C:\CAAT\etc folder on the Analytics server. Open the realm.properties file in a texteditor.
2. The REST Username displays on the left and a BCrypt Hash Password displays on the right side:
You'll need an encryption tool to encrypt a new BCrypt Hash Password.
3. Once you have encrypted a new BCrypt Hash Password, copy and paste your newly encryptedpassword in the C:\CAAT\etc\realm.properties file (replacing the old password).
4. Save the realm.properties file.
5. Restart the Relativity Analytics Engine / Content Analyst Windows service.
Once the password is updated on the Analytics server, you must update it in Relativity.
6. Navigate to Relativity.
7. Navigate to the Servers tab, and then select Edit next to the Analytics server.
8. Update the REST API password, and then click Save.
Changing the REST password for versions of Relativity previous to 9.5.133.118If you need to change the REST password, perform the following steps:
1. Rerun the Analytics installer and enter the new password in the REST Password field.
2. Go to the Servers tab in Relativity select the Analytics server.
3. Enter the new password in the now-optionalREST API password field and click Save.
UpgradeGuide 227
12.6 Uninstalling the Relativity Analytics serverWe don't recommend uninstalling the Relativity Analytics Server application for any reason as it causesdata loss. If you uninstall the Relativity Analytics Server application from the analytics server, all structuredanalytics sets created in Relativity 8.2 and higher can't be used with another installation. There is no wayto merge a previous Relativity Analytics Server installation with a new installation. As a result, structuredanalytics sets created in Relativity 8.2 and higher become unusable.
You shouldn't uninstall the application from the server unless you're certain you won't use the server forAnalytics functionality in the future, and you understand that uninstalling Relativity Analytics rendersstructured analytics sets created in Relativity 8.2 and higher unusable.
If you still need to uninstall the Relativity Analytics components from the server, complete the followingsteps:
Uninstall Relativity Analytics for Relativity 9.5.133.118 and newer:1. Open Windows Services and stop the Content Analyst CAAT or Relativity Analytics Engine Windows
service if it is running.
2. Open Task Manager, and check to see if Java is running. If it is, right click it, and then select Endprocess tree.
3. Navigate to the Analytics directory (e.g., C:\CAAT).
4. Run the C:\CAAT\bin\unregisterWinService.cmd file as an Administrator to unregister the Win-dows service.
5. If desired, delete the Analytics installation directory (e.g., C:\CAAT) and the index directory asso-ciated with Analytics.
Note: Any structured analytics sets created in Relativity 8.2 and above are no longer usable.
Uninstall Relativity Analytics for Relativity 9.5.89.76 and prior:1. Click your Startmenu.
2. Select Add or remove programs.
3. Right-click on Relativity Analytics Server and select Uninstall.
Uninstalling the Relativity Analytics server automatically:
n Removes the version key from the registry
n Unregisters the Windows Service
Note: When you uninstall Relativity Analytics server, the indexes aren't deleted. However, anystructured analytics sets created in Relativity 8.2 and higher are no longer usable.
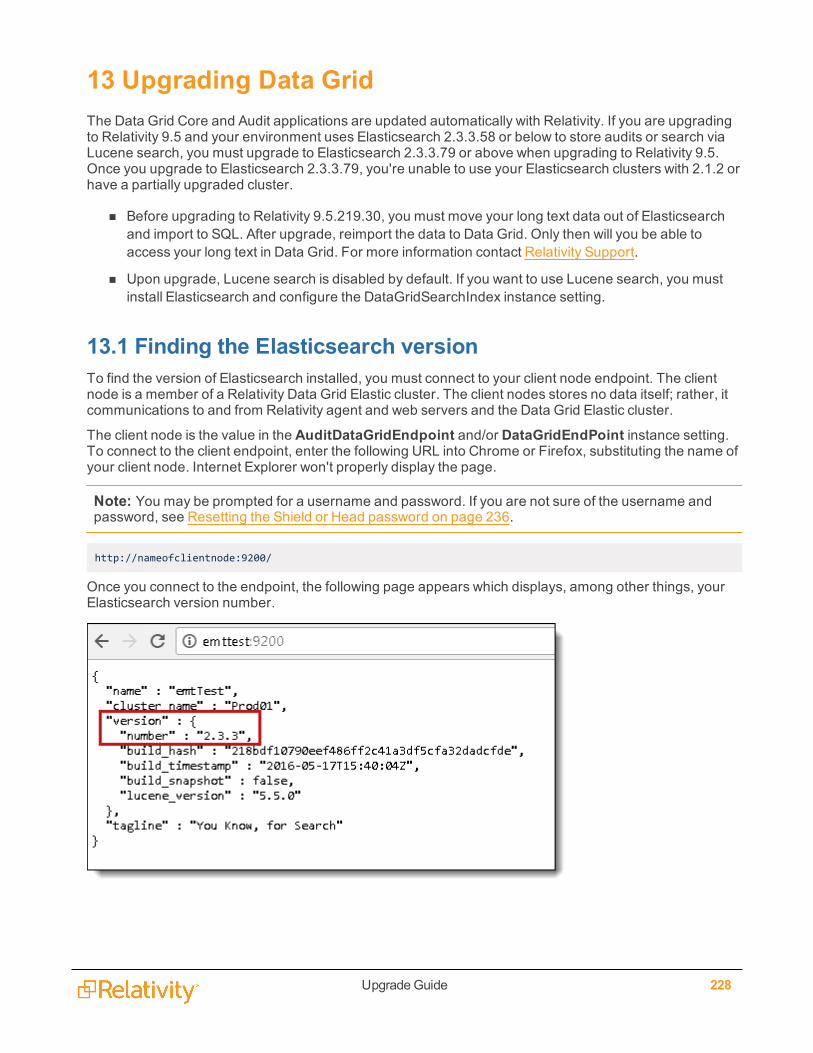
UpgradeGuide 228
13 Upgrading Data GridThe Data Grid Core and Audit applications are updated automatically with Relativity. If you are upgradingto Relativity 9.5 and your environment uses Elasticsearch 2.3.3.58 or below to store audits or search viaLucene search, you must upgrade to Elasticsearch 2.3.3.79 or above when upgrading to Relativity 9.5.Once you upgrade to Elasticsearch 2.3.3.79, you're unable to use your Elasticsearch clusters with 2.1.2 orhave a partially upgraded cluster.
n Before upgrading to Relativity 9.5.219.30, you must move your long text data out of Elasticsearchand import to SQL. After upgrade, reimport the data to Data Grid. Only then will you be able toaccess your long text in Data Grid. For more information contact Relativity Support.
n Upon upgrade, Lucene search is disabled by default. If you want to use Lucene search, you mustinstall Elasticsearch and configure the DataGridSearchIndex instance setting.
13.1 Finding the Elasticsearch versionTo find the version of Elasticsearch installed, you must connect to your client node endpoint. The clientnode is a member of a Relativity Data Grid Elastic cluster. The client nodes stores no data itself; rather, itcommunications to and from Relativity agent and web servers and the Data Grid Elastic cluster.
The client node is the value in the AuditDataGridEndpoint and/or DataGridEndPoint instance setting.To connect to the client endpoint, enter the following URL into Chrome or Firefox, substituting the name ofyour client node. Internet Explorer won't properly display the page.
Note: You may be prompted for a username and password. If you are not sure of the username andpassword, see Resetting the Shield or Head password on page 236.
http://nameofclientnode:9200/
Once you connect to the endpoint, the following page appears which displays, among other things, yourElasticsearch version number.
UpgradeGuide 229
13.2 Upgrading from Elasticsearch 2.1.2 to 2.3.3.xIf your environment uses Elasticsearch to store audits or search via Lucene search, you must upgrade toElasticsearch 2.3.3.58 or above when upgrading to Relativity 9.5. Once you upgrade to Data Grid 2.3.3.x,you're unable to use your Data Grid clusters with 2.1.2 or have a partially upgraded cluster.
In order to upgrade Elasticsearch from 2.1.2 to 2.3.3.x, complete the following workflow:
Click to expand instructions for upgrading Elasticsearch.If your environment uses Elasticsearch, you must also upgrade to Elasticsearch 2.3.3.58 or above whenupgrading to Relativity 9.5. Once you upgrade to Elasticsearch 2.3.3.x, you're unable to use yourElasticsearch clusters with 2.1.2 or have a partially upgraded cluster.
In order to upgrade Elasticsearch from 2.1.2 to 2.3.3.x, complete the following workflow:
n Prepare the environment for upgrade. For more information, see Preparing the environment forupgrade below.
n Run the upgrade script on data, master, and client nodes in that order. For more information, seeRunning the upgrade script on the next page.
n Verify your upgrade completed successfully. For more information, see Verifying the upgrade onthe next page.
If you want to manually upgrade Elasticsearch, see Running a manual upgrade on page 231.
13.3 Preparing the environment for upgradeBefore upgrading Elasticsearch, perform the following:
n Ensure that the Elasticsearch service is running under a user account that has access to SQLServer, and specifically has read, write, and bulk permissions for all workspace databases.
n Verify that no reads or writes to Elasticsearch occur during the upgrade process.
n Disable all Audit migration and deletion agents.
n Disable all Text migration and deletion agents.
n Verify that all imports or publishing from Processing have stopped.
n Save a backup of the current lib and bin folders from any node and the data folder from the masternode to mitigate the risk in possible restoration. Don’t save the backup files to the installer folder.
n If you are also upgrading Java versions, open the command prompt and run the following com-mand. This example assumes you are upgrading to Java 8 Update 45 (64-bit). Edit the version num-ber appropriately.
SETX /M KCURA_JAVA_HOME "C:\Program Files\java\jdk1.8.0_45"
n Disable shard allocation:o Run the following command in Sense to turn off re-balancing and set the cluster to persistent.
The persistent state ensures that re-balancing stays off when the cluster restarts.
UpgradeGuide 230
PUT _cluster/settings{"persistent":{"cluster.routing.allocation.enable": "none"}}
o Run the following command to perform a synced flush:
POST /_flush/synced
13.4 Running the upgrade script
Note: If you run the script on Powershell versions earlier than 5.1, the script displays an error duringback up but will continue with the upgrade.
Extract the contents of the upgrade package, and make sure the following files are in the folder:
n datagrid-2.3.3.58-install.zip
n elasticupgrade.ps1
n upgrade.psd1
You must run the upgrade script on each node. We recommend the following order when upgrading yournodes:
1. Data nodes
2. Master nodes
3. Client nodes
To upgrade a node, complete the following:
1. Open the upgrade.psd1 file in a text editor. Update the following configurations:n UpgradeFile - enter the file path to the upgrade package.
n CurrentPath - enter the current location of the installed Elasticsearch service.
n Url - enter the URL of the local machine's Elastic endpoint.
n UserName - (optional) enter the service user name that has access to SQL.
n Password - (optional) enter the password for the server user.
2. Run elasticupgrade.ps1.
13.5 Verifying the upgradeAfter you upgrade all of the nodes on your cluster, complete the following on the cluster to complete theupgrade:
UpgradeGuide 231
1. Run the following command in Sense:
GET /_nodes/jvm?filter_path=**.jvm.gc_collectors
Ensure the result shows "ParNew", "ConcurrentMarkSweep".
2. Enable shard allocation to rebalance the cluster:
PUT _cluster/settings{"persistent":{"cluster.routing.allocation.enable": "all"}}
You can monitor the indexes by running the following in Sense:
GET _cat/recovery?&v
3. Verify the cluster status by running the following command in Sense.
GET _cat/health
Once the cluster is GREEN, your node restart is complete.
If the cluster status remains RED for an extended period, run the following in Sense to identify whichindexes are RED:
GET _cat/recovery?&v
Note: If you are using Kibana, ensure your version of Kibana is compatible with your version ofElasticsearch.
Note: With Shield on by default, other plugins like Marvel or Head are not supported. In order to useyour other plugins, you need to provide the Kibana server with credentials so it can access the .kibanaindex and monitor the cluster. See the Relativity Data Grid guide for more information.
13.6 Running a manual upgradeClick to expand instructions on how to run a manual Elasticsearch upgradeIn order to upgrade Elasticsearch from 2.1.2 to 2.3.3.x, complete the following workflow:
n Prepare the environment for upgrade. For more information, see Preparing the environment forupgrade on page 229.
n Upgrade your data, master, and client nodes in that order. For more information, see Upgrading anode on the next page.
n Verify your upgrade completed successfully. For more information, see Verifying the upgrade onpage 235.
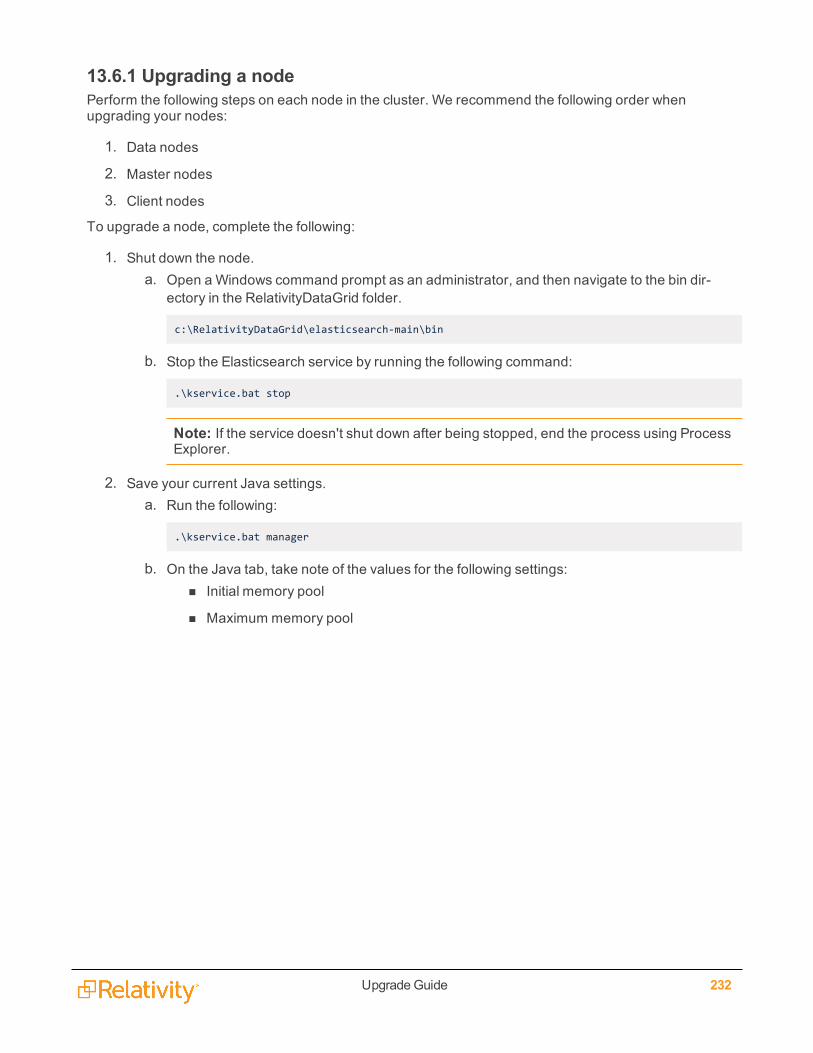
UpgradeGuide 232
13.6.1 Upgrading a nodePerform the following steps on each node in the cluster. We recommend the following order whenupgrading your nodes:
1. Data nodes
2. Master nodes
3. Client nodes
To upgrade a node, complete the following:
1. Shut down the node.a. Open a Windows command prompt as an administrator, and then navigate to the bin dir-
ectory in the RelativityDataGrid folder.
c:\RelativityDataGrid\elasticsearch-main\bin
b. Stop the Elasticsearch service by running the following command:
.\kservice.bat stop
Note: If the service doesn't shut down after being stopped, end the process using ProcessExplorer.
2. Save your current Java settings.a. Run the following:
.\kservice.bat manager
b. On the Java tab, take note of the values for the following settings:n Initial memory pool
n Maximum memory pool
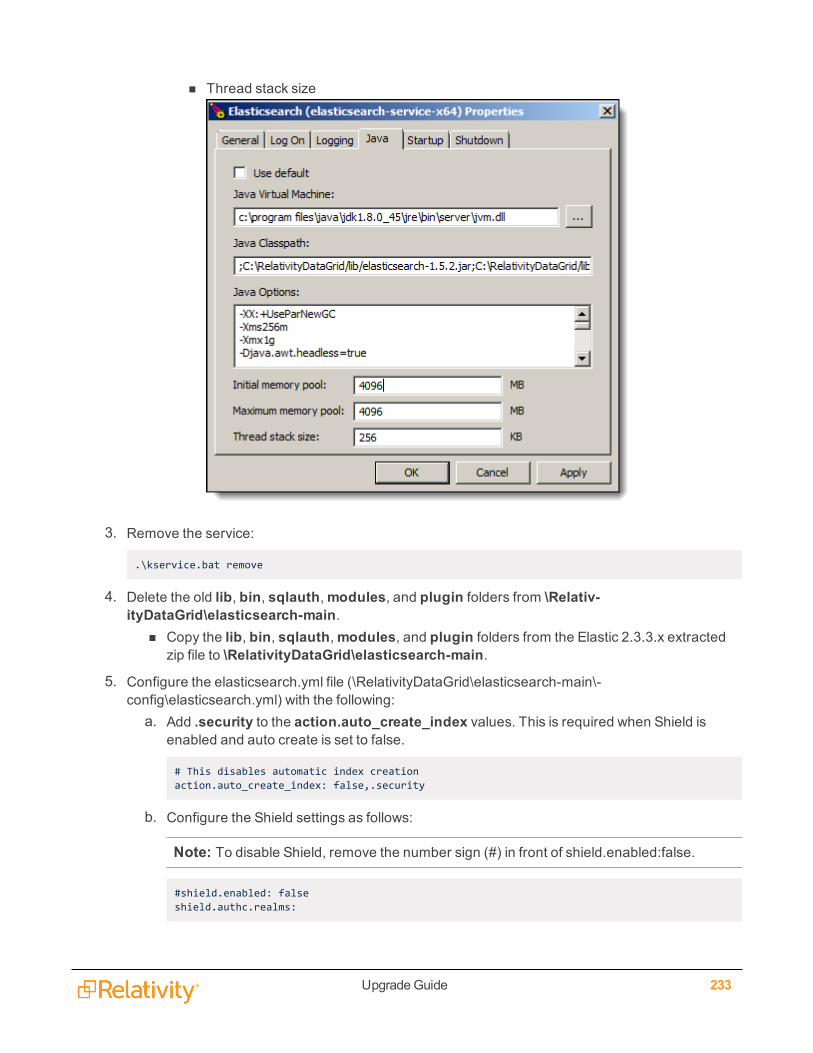
UpgradeGuide 233
n Thread stack size
3. Remove the service:
.\kservice.bat remove
4. Delete the old lib, bin, sqlauth,modules, and plugin folders from \Relativ-ityDataGrid\elasticsearch-main.
n Copy the lib, bin, sqlauth,modules, and plugin folders from the Elastic 2.3.3.x extractedzip file to \RelativityDataGrid\elasticsearch-main.
5. Configure the elasticsearch.yml file (\RelativityDataGrid\elasticsearch-main\-config\elasticsearch.yml) with the following:
a. Add .security to the action.auto_create_index values. This is required when Shield isenabled and auto create is set to false.
# This disables automatic index creationaction.auto_create_index: false,.security
b. Configure the Shield settings as follows:
Note: To disable Shield, remove the number sign (#) in front of shield.enabled:false.
#shield.enabled: falseshield.authc.realms:
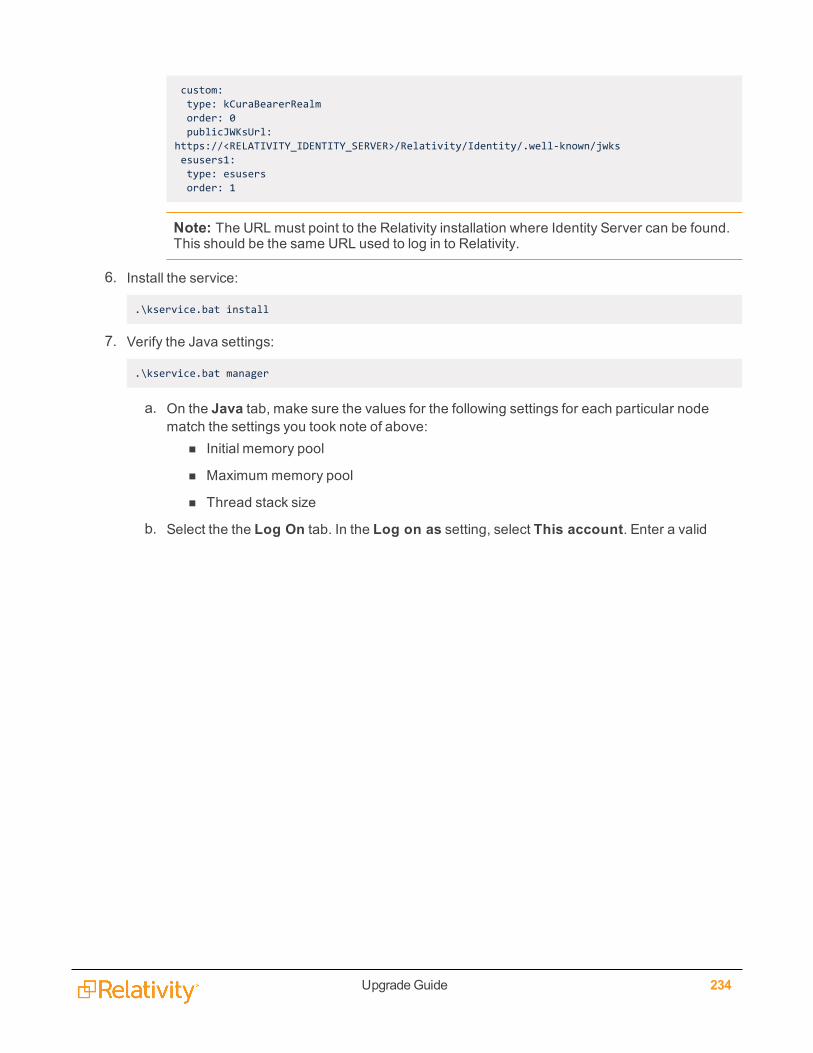
UpgradeGuide 234
custom:type: kCuraBearerRealmorder: 0publicJWKsUrl:
https://<RELATIVITY_IDENTITY_SERVER>/Relativity/Identity/.well-known/jwksesusers1:type: esusersorder: 1
Note: The URL must point to the Relativity installation where Identity Server can be found.This should be the same URL used to log in to Relativity.
6. Install the service:
.\kservice.bat install
7. Verify the Java settings:
.\kservice.bat manager
a. On the Java tab, make sure the values for the following settings for each particular nodematch the settings you took note of above:
n Initial memory pool
n Maximum memory pool
n Thread stack size
b. Select the the Log On tab. In the Log on as setting, select This account. Enter a valid
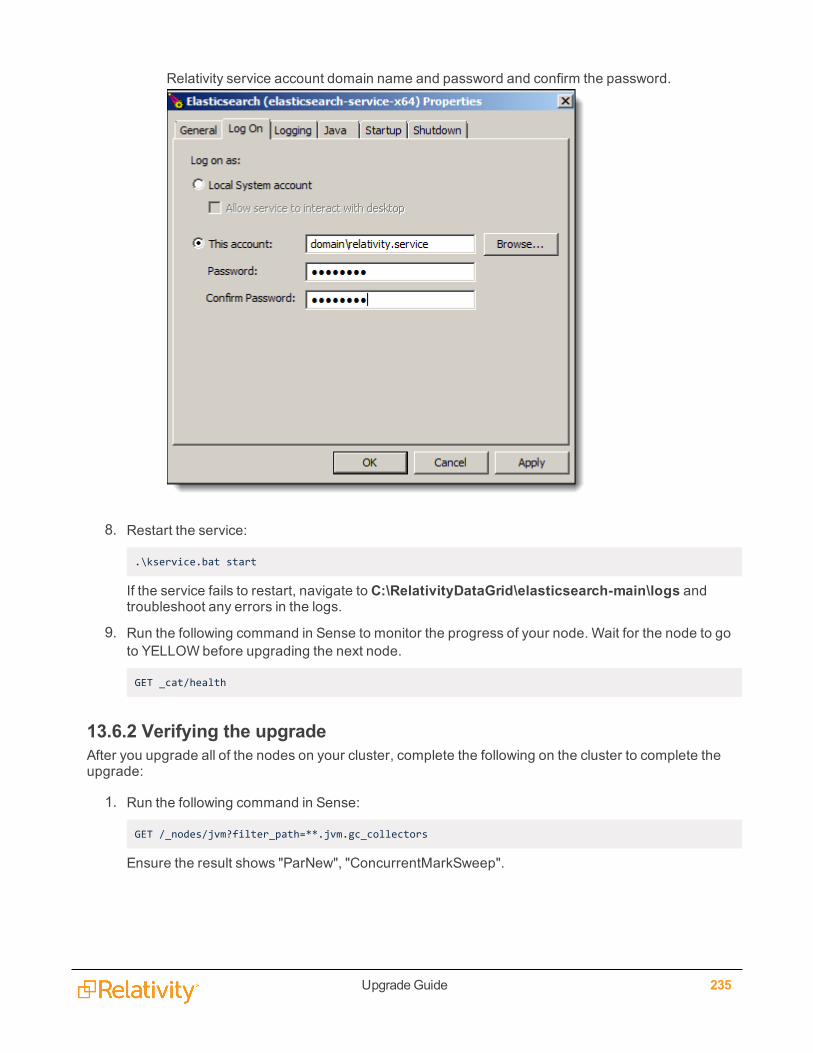
UpgradeGuide 235
Relativity service account domain name and password and confirm the password.
8. Restart the service:
.\kservice.bat start
If the service fails to restart, navigate to C:\RelativityDataGrid\elasticsearch-main\logs andtroubleshoot any errors in the logs.
9. Run the following command in Sense to monitor the progress of your node. Wait for the node to goto YELLOWbefore upgrading the next node.
GET _cat/health
13.6.2 Verifying the upgradeAfter you upgrade all of the nodes on your cluster, complete the following on the cluster to complete theupgrade:
1. Run the following command in Sense:
GET /_nodes/jvm?filter_path=**.jvm.gc_collectors
Ensure the result shows "ParNew", "ConcurrentMarkSweep".
UpgradeGuide 236
2. Enable shard allocation to rebalance the cluster:
PUT _cluster/settings{"persistent":{"cluster.routing.allocation.enable": "all"}}
You can monitor the indexes by running the following in Sense:
GET _cat/recovery?&v
3. Verify the cluster status by running the following command in Sense.
GET _cat/health
Once the cluster is GREEN, your node restart is complete.
If the cluster status remains RED for an extended period, run the following in Sense to identify whichindexes are RED:
GET _cat/recovery?&v
Note: If you are using Kibana, ensure your version of Kibana is compatible with your version ofElasticsearch.
Note: With Shield on by default, other plugins like Marvel or Head are not supported. In order to useyour other plugins, you need to provide the Kibana server with credentials so it can access the .kibanaindex and monitor the cluster. See the Relativity Data Grid guide for more information.
13.7 Resetting the Shield or Head passwordWhen navigating to Head or Sense on any node, you may be prompted for a username and password. Ifyou are unsure of the password, or if the password is not set, you can use the esusers tool in the shieldfolder. This tool can list users, change passwords, and create REST users on the node. The tool is node-specific, meaning you create a user and password only on that node.
1. Run PowerShell as an administrator, and then navigate to C:\RelativityDataGrid\elasticsearch-main\bin\shield.
2. Enter the following command to list the users on the node.
.\esusers list
3. If no user exists, create a user using the following command.
.\esusers passwd esadmin -p password123 -r admin
Note: This example creates a new user, esadmin, with the password password123 and the roleof admin. Substitute the user name and password for the user you want to create.
UpgradeGuide 237
4. To change the password on the node, use the following command:
.\esusers passwd esadmin -p newpasswordhere
UpgradeGuide 238
Proprietary RightsThis documentation (“Documentation”) and the software to which it relates (“Software”) belongs toRelativity ODA LLC and/or Relativity’s third party software vendors. Relativity grants written licenseagreements which contain restrictions. All parties accessing the Documentation or Software must: respectproprietary rights of Relativity and third parties; comply with your organization’s license agreement,including but not limited to license restrictions on use, copying, modifications, reverse engineering, andderivative products; and refrain from any misuse or misappropriation of this Documentation or Software inwhole or in part. The Software and Documentation is protected by the Copyright Act of 1976, asamended, and the Software code is protected by the Illinois Trade Secrets Act. Violations can involvesubstantial civil liabilities, exemplary damages, and criminal penalties, including fines and possibleimprisonment.©2019. Relativity ODA LLC. All rights reserved. Relativity® is a registered trademark of RelativityODA LLC.


