Page 1
Relay Scheme Design Using Microprocessor Relays
A report to the
System Protection Subcommittee of the
Power System Relay Committee of
the IEEE Power & Energy Society
Prepared by working group C16
June 2014
Abstract
This paper is intended to supplement to the existing 1999 relay trip circuit design paper to address
the use microprocessor relays. The report will exclude ac voltage and current inputs, GOOSE,
internals of relays, and IRIG and communication issues. It will include signaling between protective
elements such as relays, breakers, etc. primarily as it applies to trip and control circuits.
Members of the working group
Raaluca Lascu – chair Tony Seegers – vice-chair
Brian Boysen Alla Deronja
Kevin Donahoe Robert Frye
Gene Henneberg Rich Hunt
Don Lukach Bruce Mackie
Cristian Paduraru Don Sevcik
Jim O’Brien Adi Mulawarman
Michael Stojak Michael Thompson
Rich Young Don Sevcik
Past members:
Ken Birt Ken Behrendt
Angela Higdon Vajira Pathirana
Page 2
C-16 Working Group June 2014
Relay Scheme Design Using Microprocessor Relays
A Supplement to Relay Trip Circuit Design by IEEE PSRC 1999
2
Table of Contents
1 Introduction ........................................................................................................................................... 4
1.1 Common Issues ........................................................................................................................................ 5
1.1.1 Circuit Considerations....................................................................................................................... 5
1.1.2 Relay Contact Ratings ....................................................................................................................... 5
1.1.3 Separate CT & VT Circuits ................................................................................................................. 7
1.2 Changes to Relay Trip Circuit Design Due to Microprocessor Relays ...................................................... 7
1.2.1 Trip Circuit Design ............................................................................................................................. 7
2 General Scheme Design .......................................................................................................................... 9
2.1 Multifunction Relays ................................................................................................................................ 9
2.2 Applying Multiple Output Contacts ....................................................................................................... 10
2.3 Integration, Separation, and Redundancy ............................................................................................. 11
2.4 Power Supply Considerations ................................................................................................................ 13
2.4.1 Power Supply Circuit Overcurrent Design ..................................................................................... 14
2.4.2 Battery Load Creep ........................................................................................................................ 14
2.4.3 Battery System Grounding Considerations .................................................................................... 14
2.5 Particular Changes in Circuit Functionality ............................................................................................ 15
2.5.1 Choice of Contact ........................................................................................................................... 16
2.5.2 Auxiliary Relays, Diodes, Timers .................................................................................................... 16
2.5.3 Trip Circuit Monitors ....................................................................................................................... 17
2.5.4 Breaker Failure Initiate .................................................................................................................. 18
2.5.5 Sneak Circuit Elimination ............................................................................................................... 18
2.5.6 Direct Trip of circuit Breakers ......................................................................................................... 20
2.5.7 Dual Relays Tripping one Circuit Breaker ...................................................................................... 21
2.5.8 Dual Trio Coils ................................................................................................................................ 22
2.5.9 Dual Breaker Schemes ................................................................................................................... 26
2.5.10 Lockout Function ......................................................................................................................... 27
2.5.11 Breaker Control Switch ................................................................................................................. 29
2.5.12 Remote I/O ................................................................................................................................... 30
3 Targeting and Additional Post Trip Indications ..................................................................................... 31
Page 3
C-16 Working Group June 2014
Relay Scheme Design Using Microprocessor Relays
A Supplement to Relay Trip Circuit Design by IEEE PSRC 1999
3
3.1 Targets ................................................................................................................................................... 31
3.2 Virtual Targets ........................................................................................................................................ 31
3.3 Sequence of Events Records .................................................................................................................. 32
3.4 Oscillography ......................................................................................................................................... 32
4 SCADA Functions ................................................................................................................................... 33
4.1 Control ................................................................................................................................................... 33
4.1.1 Breaker Control .............................................................................................................................. 33
4.2 Metering ................................................................................................................................................ 35
4.3 Monitoring ............................................................................................................................................. 35
4.4 Additional Monitoring ........................................................................................................................... 35
4.4.1 Battery Voltage Monitoring ............................................................................................................ 35
4.4.2 Breaker Monitoring ........................................................................................................................ 35
5 Maintainability/Testing ......................................................................................................................... 36
5.1 Multifunction Integration Considerations ............................................................................................. 36
5.2 Test Switches ......................................................................................................................................... 37
5.3 Expandability.......................................................................................................................................... 38
5.4 Power Up/ Power Down Considerations ............................................................................................... 38
5.4.1 Logic States, Output States ............................................................................................................. 38
5.4.2 Network Considerations ................................................................................................................. 38
5.5 Functional Testing .................................................................................................................................. 39
5.6 Frequency of Testing vs. Self-Check Alarming ....................................................................................... 39
6 Documentation ..................................................................................................................................... 40
6.1 Single Line Diagrams .............................................................................................................................. 40
6.2 Logic ....................................................................................................................................................... 40
6.3 Intra-Substation and Inter-Substation Communications ....................................................................... 41
6.4 Operating Instructions ........................................................................................................................... 41
6.5 Operator Alarms .................................................................................................................................... 42
7 Training ................................................................................................................................................. 42
8 Lessons Learned .................................................................................................................................... 42
REFERENCES ...................................................................................................................................................... 43
Page 4
C-16 Working Group June 2014
Relay Scheme Design Using Microprocessor Relays
A Supplement to Relay Trip Circuit Design by IEEE PSRC 1999
4
1 Introduction
Microprocessor based relays have been replacing electromechanical and solid state technology
relays for several years. This newer technology includes the added features and capabilities that
improve reliability by replacing multiple relays and reducing hardwired connections with internal
logic. In addition, this logic can be programmed to perform functions that adapt to current system
conditions.
Communication capabilities allow for remote access to the microprocessor relay for various control
and information functions. Retrievable files such as settings, sequence of event records,
oscillographic data, and fault location can be stamped with high-accuracy synchronized time for
easier analysis of disturbances.
The microprocessor relays no longer simply mimic the functions of the electromechanical relays.
Thus the name multifunction relay has emerged to describe them. In addition to the protective
functions and output contacts, there are other features built into multifunction relays that enhance
the protection. These include forms of programmable logic control, (also known as input/output
logic, ladder logic, and similar terms), multiple settings, setting groups, and even adaptive settings
[1], [2]. Some example of uses of these for distribution applications are winter/summer settings,
load related, or storm related temporary automatic reclosing sequence settings. For additional
protection, breaker failure and breaker restrike detection are just a couple of examples of functions
used. [3], [4].
Platforms for the multifunction relay have been offered where the basic building block of the relay
defines the general construction. Additional I/O boards and options with various firmware further
define specific functionality of the relay for a given application.
Wiring from one relay to another presents various restrictions and concerns including added costs
and complexity. By consolidating various functions within the multifunction relay, panel wiring,
the number of panels, and the size of the control house can all be reduced.
The multifunction relay can also reduce or eliminate the need for auxiliary relays, which historically
have contributed to misoperations due to failed coils, contacts, or inadequate wiring connections. A
single input of a multifunction relay might be mapped to several outputs, which in turn could be
wired or communicated to adjacent relays via protection protocols.
Microprocessor relays have built-in self-diagnostics logic to monitor the health of the relay which
may include diagnostics of I/O hardware. This provides for almost complete monitoring of the
relay health, except the output contacts [1], [2]. By combining this self-monitoring with other
internal logic, such as loss of potential and/or loss of current detection, the user can have a very
good indicator of the health of the relay and the protection scheme. Metering functions provide a
continuous check of the analog inputs. Event reports are also used to check the relay’s performance.
A combination of relay alarm and output contacts can be wired into local annunciator points or
passed to a supervisory control and data acquisition (SCADA) system for remote monitoring for
prompt indication of a relay problem. This early warning helps reduce relay misoperations and
Page 5
C-16 Working Group June 2014
Relay Scheme Design Using Microprocessor Relays
A Supplement to Relay Trip Circuit Design by IEEE PSRC 1999
5
failures to operate. Complete monitoring of a relay and the associated relay scheme helps to reduce
maintenance costs because the time between routine maintenance can be extended.
1.1 Common Issues
While much has changed, microprocessor relays have not changed everything about circuit design.
1.1.1 Circuit Considerations
Applying these microprocessor relays requires consideration of several factors:
A. How many functions are needed?
B. How many functions fit in one relay?
C. How many relays do I need?
D. If one relay fails, is there another device that provides backup or redundant functions?
E. If there is a dc system malfunction, how does it affect the protection?
F. If there is a protective relay malfunction, how does it affect the dc system?
G. Does either (E) or (F) cause a failure that prevents the protective device from operating the
designated breaker, lockout relay, etc?
H. What are the best ways to meet requirements for protection redundancy?
1.1.2 Relay Contact Ratings
Output or tripping contacts must be rated to carry all currents and voltages applied to the device
circuit. Contacts of auxiliary relays and microprocessor relay outputs typically have separate ratings
for the various conditions that they may be subjected to. The following list is an example.
Current make rating
Continuous current carry rating
1 second current rating
Current break rating
Maximum voltage rating
Pickup time
Dropout time
One of the leading causes of failure of microprocessor relays is burned and failed output contacts
due to switching inductive dc current greater than their rating. This rating, known as the L/R Rating,
is a measure of the output contact’s ability to interrupt an inductive load. Each relay output contact
is furnished with an L/R rating. It is given by the following equation:
L/R rating = Load Inductance / (Load Resistance + Cable Resistance to Load), where:
Page 6
C-16 Working Group June 2014
Relay Scheme Design Using Microprocessor Relays
A Supplement to Relay Trip Circuit Design by IEEE PSRC 1999
6
L/R rating is given in s
Load inductance is in H
Load and Cable resistances are in Ω
To determine whether a given contact can interrupt an inductive load, the calculated L/R value is
compared to the published data in the microprocessor relay’s specifications.
A common error is to simply program an output contact to follow a Boolean logic variable inside
the relay without consideration of whether it needs to be sealed in. When applying microprocessor
relays, it is important to ensure that the programmable logic is designed such that the output
contacts are controlled by appropriate seal-in logic or minimum duration timers or are rated to break
the current in the circuit they are switching.
It is also important to consider some devices may have a mix of trip rated output contacts (30A
Make) and lighter duty signaling contacts that are only rated for asserting low energy logic inputs
on annunciators, RTUs, and other I/O modules. The contact ratings should be checked to ensure
they are appropriate for the application. See section 2.5.1 for more discussion on choice of output
contacts.
Another factor that drives the design of output relay contacts used in microprocessor relays is speed
of operation. There is an inherent operating time beginning with the relay algorithms making a trip
decision and ending when the output contact makes the trip circuit. The time for the relay to make a
trip decision is governed by the method of operation, the fault detected, element settings, built-in
security delay, intentional delays, filtering, etc. The typical output contact closing time is in the
range of 3 to 8 milliseconds. To obtain this high speed, the physical contacts, current carrying
conductors, and armature tend to be relatively small for low inertia and with relatively short travel
distance (low open clearance).
Various manufacturers have developed ways to prevent microprocessor relay output contacts from
being damaged when opening with dc current flowing. The following is a list of typical methods. In
many cases, a combination of these methods may be used.
Use of a minimum trip duration timer. This strategy assumes that by waiting a time greater
than the typical tripping time, the dc current will have been interrupted by the time the timer
expires and the contact opens.
Use of seal-in logic that unlatches based upon monitoring the status of a separate 52A
contact wired to an input on the relay. This strategy assumes that, if the 52A contact wired
to the relay opens, then the 52A contact in the trip circuit has also opened, interrupting the
dc current.
Use of seal-in logic that unlatches based upon monitoring the current in the primary circuit.
This strategy assumes that, if the primary current clears, then the mechanism operated and
the 52A contact in the trip circuit has also opened, interrupting the dc current.
Direct monitoring of the dc current flowing in the output contact. This strategy emulates the
old target and seal-in auxiliary relay but uses digital logic to seal in the output contact until
the dc current has been interrupted.
Page 7
C-16 Working Group June 2014
Relay Scheme Design Using Microprocessor Relays
A Supplement to Relay Trip Circuit Design by IEEE PSRC 1999
7
Use of a hybrid circuit contact that is rated to interrupt the dc current. Hybrid output contacts
use a solid-state electronic circuit in parallel with the metallic output contacts. When the
metallic contact opens, the dc current continues to flow through a transistor until the
contacts part far enough to establish adequate dielectric strength. At this point, the transistor
turns off and the inductive energy is dissipated in an MOV and no arcing occurs on the
metallic contacts. This strategy assumes that, if the minimum trip duration timer and/or
seal-in logic fails to prevent premature opening of the contact, then no damage will occur.
Leakage Current:
Microprocessor relay manufacturers frequently provide output contacts that have special
characteristics such as high current ratings or high speed ratings. These special contacts are usually
a conventional air insulated contact with a solid state electronic device in parallel with it.
Occasionally the solid state electronic device tends to “leak” small amounts of current that can be
high enough to assert digital inputs of other relays connected to the special output. When special
outputs are called for, the caution should be exercised to examine the circuits and consult the
microprocessor relay’s design specifications to ensure problems are avoided with unintentionally
asserted digital inputs.
1.1.3 Separate CT & VT Circuits
The principle of providing separate the CT and VT circuits to different relays for redundancy
remains valid when the microprocessor relays are utilized, even more so since, typically, the
identical protective functions are programmed in two or more redundant protective relaying
packages.
The need for dedicated CT circuits for differential zones has changed. The differential current can
be summed inside the relay. The various zone boundary CTs can be isolated from each other. This
all, coupled with the inherent low burden of microprocessor relays, aids in the flexibility of doing
more protection and control functions with fewer CTs.
1.2 Changes to Relay Trip Circuit Design Due to Microprocessor Relays
Although the capabilities of programmable logic and multiple inputs and outputs have
enabled microprocessor relays to be used to modernize and simplify a variety of classical
protection and control schemes, many of the relay trip circuit design practices that engineers
and designers followed in the component relay days are still valid today.
1.2.1 Trip Circuit Design
Microprocessor based relays offer built-in functions that can simplify trip circuit design and
improve reliability when compared to traditional schemes using component style relays.
Historically, protection and control schemes used component style electromechanical and solid-state
relays. These relays generally require internal auxiliary devices in the circuit breaker trip circuit to
provide targeting and to seal in around delicate, non-trip-rated relay contacts. They also require
external auxiliary relays to initiate breaker failure timers and automatic reclosing for protective
relay trips. Isolation (or steering) diodes are also required in the trip circuit to segregate manual and
Page 8
C-16 Working Group June 2014
Relay Scheme Design Using Microprocessor Relays
A Supplement to Relay Trip Circuit Design by IEEE PSRC 1999
8
SCADA initiated tripping from the protective relay trips when it is desirable to prevent breaker
failure initiation and automatic reclosing for manual and SCADA trips. Figure 1.2.1.1 shows a
typical breaker trip circuit design using component style electromechanical relays.
G R
52b
01/T
SI-1
TSI-1
PR-1
TSI-2
PR-2
SI-2
86/BF
52a
TC-1
62X/2
BFI
62X/1
79 I 62X 2/Z2
2/Z2
Station
Battery
Voltage
(+)
(-)
G = Green breaker status light
R = Red breaker status light
TC-1 = Breaker trip coil 1
2/Z2 = Zone 2 timer and associated output contact
62X = Auxiliary timer
PR = Protective relay trip contact
SI = Seal-in contact
TSI = Trip seal-in auxiliary relay coil
01/T = Manual control switch trip contact
86/BF = Breaker failure lockout contact
52a = Breaker auxiliary form “a” contact
52b = Breaker auxiliary form “b” contact
BFI = Breaker Failure initiate
79 I = Auto reclose initiate
Figure 1.2.1.1 Typical breaker trip circuit design
using electromechanical protective and auxiliary relays and timers.
The multiple isolated output contacts available in microprocessor relays can be used to trip multiple
breakers directly without introducing an additional trip time delay from dc auxiliary tripping relays.
Direct tripping of the breakers ensures that the individual breaker trip circuits are isolated from one
another and limits the total trip current drawn through any single contact to the individual breaker
trip coil current. Figure 1.2.1.2 shows a typical breaker trip circuit design using a multifunction
microprocessor based relay.
Page 9
C-16 Working Group June 2014
Relay Scheme Design Using Microprocessor Relays
A Supplement to Relay Trip Circuit Design by IEEE PSRC 1999
9
IN1 IN2
52a
01/T
TRIP/
OUT1
86/BF
52a
TC-1
BFI*/
OUT4
External
BF Relay
79 I*/
OUT5
External
79 Relay
Station
Battery
Voltage
(+)
(-)
TRIP*/
OUT2
CLOSE/
OUT3
External
BFI
External
79 I
IN4IN3
IN1 = Breaker status input
IN2 = Trip circuit monitor input (optional)
TC-1 = Breaker trip coil 1
TC-2 = Breaker trip coil 2
CC = Breaker close coil
OUT1 = Protective relay trip contact
OUT2 = Protective relay trip contact (* if second trip coil present)
OUT3 = Protective relay close contact (manual or autoreclosing)
OUT4 = Protective relay breaker fail initiate contact (*if external BF relay present)
OUT5 = Protective relay reclose initiate output (*if external 79 relay present)
01/T = Manual control switch trip contact
52a = Breaker auxiliary form “a” contact
86/BF = Breaker failure lockout contact
BFI = Breaker Failure initiate
79 I = Auto reclose initiate
Integral to microprocessor
based relay
TC-2 CC
Figure 1.2.1.2 Typical breaker trip circuit design
using a microprocessor based relay.
2 General Scheme Design
2.1 Multifunction Relays
Microprocessor technology has led to the development of digital relays, which have essentially
replaced electromechanical and solid-state devices in power system protection for new installations.
Practically, each element of the electric power system such as a bus, transformer, generator, or
power line may be protected utilizing a single microprocessor multifunction relay (although more
than one relay is typically employed to provide a level of backup or redundancy and flexibility for
periodic testing). The programmable logic of the digital relay allows its customization for unique
and special applications.
Page 10
C-16 Working Group June 2014
Relay Scheme Design Using Microprocessor Relays
A Supplement to Relay Trip Circuit Design by IEEE PSRC 1999
10
Since the protection logic is now internal to the relay, the unit is connected in the control circuit via
its binary inputs. The inputs provide status of other elements of the power system such as a circuit
breaker. The output contacts are connected to trip or block from operating other power system
elements or control circuit components. The relay is also connected to a power supply source and its
analog inputs are connected to the protected element’s voltages and currents.
Schematically, the relay is represented as a box with connections to its power supply and other
devices. The relay’s internal logic is not shown, but typically appears in the relay setting
documentation or by logic diagrams. Thus, the schematic drawings are greatly simplified, in
contrast with electromechanical and solid-state relay diagrams. Many times the logic is shown
instead on the one-line, separately on the schematic, or on a specific logic drawing.
2.2 Applying Multiple Output Contacts
Electromechanical and solid state relays typically have a limited number of output contacts, so for
applications, such as breaker failure trips or bus protection trips, contact multiplying auxiliary
(device 94) or lockout relays (device 86) are required to facilitate multi-breaker tripping (and
lockout if required).
Microprocessor based relays generally have more output contacts than are required for basic single
breaker trip and close functions and most can also be equipped with additional output contacts by
adding input/output boards. The additional contacts can be used to provide direct tripping to
multiple breakers or perform ancillary functions. Multiple isolated output contacts also eliminate the
concern about tripping separate breaker trip coils or separate breakers that are supplied from
different battery systems. In the past, this often required the use of diodes to maintain isolation
between dc battery systems and separately fused dc circuits when electromechanical or solid state
relays were used.
Direct breaker tripping also eliminates the delay incurred by an intermediate contact multiplying or
lockout relay, thereby reducing the time to interrupt a fault. This may be advantageous where total
fault interrupting time must be reduced to preserve power system stability or near critical customer
loads that are sensitive to momentary voltage disturbances.
A lockout relay may also be used to provide redundant tripping, and to effect breaker lockout where
desired, or additional microprocessor based relay output contacts can be used to effect the lockout
function (blocking breaker close) as well as tripping the breakers. This can be accomplished by
using inverted trip logic (e.g., NOT TRIP) to hold a contact closed in the breaker close circuit until
the relay trip logic asserts, at which time the contact(s) connected in the breaker close circuit(s) will
open, preventing automatic or manual closing until the relay contact is again closed. Latching or
seal-in logic in the microprocessor based relay can be used to maintain the open contact until some
control action is used to reset the latch in a manner similar to resetting a lockout relay.
Alternatively, normally closed relay contacts can be connected in the breaker close circuit to affect
the lockout function simply by applying the trip logic with a latching or seal-in function. When
designing a lockout blocking function using microprocessor relays, the design should take into
consideration what is desired for a failsafe condition. Is it desired that the contact be closed during
Page 11
C-16 Working Group June 2014
Relay Scheme Design Using Microprocessor Relays
A Supplement to Relay Trip Circuit Design by IEEE PSRC 1999
11
relay failure (contact held open by TRIP) allowing permissive or be open during relay failure
(contact held closed by NOT TRIP) preventing a close.
Further tripping speed improvement can be accomplished by using high-speed solid state relay
contacts in place of, or in addition to, standard electromechanical contact outputs. Multifunction
microprocessor based relays can have one or more output contacts programmed with the OR
combination of multiple protective relay elements to effect tripping one or more breakers or breaker
trip coils. Testing the individual protective relay elements can create a challenge, as described later
in section 5 of this document. When available, spare output contacts can be programmed with
individual protective relay elements to isolate the individual functions for testing, eliminating the
undesirable practice of changing relay settings to test the relay. Taking this one step further, these
output contacts could be individually wired to the breaker trip circuit to provide individual
protective element trip functions, providing both improved trip circuit dependability as well as
improved ease of testing. This may be not the best approach to take because it has drawbacks such
as additional wiring, more logic programming, and potential confusion for field personnel.
2.3 Integration, Separation and Redundancy
Many microprocessor based relays perform multiple protection functions. For example, a single
digital relay may perform current differential, distance, overcurrent, automatic reclosing and
breaker failure functions, all applicable for complete transmission line protection. Likewise, a single
relay may perform current differential, overcurrent, and over-excitation functions that constitute the
majority of functions typically applied for transformer protection. Each of these protection
applications would require multiple electromechanical or solid state relays and different relay
models for each protection application.
Having multiple protection functions integrated into a single digital relay has significant
advantages, including reduced panel space, reduced wiring, and reduced cost. In addition, some
protection functions are available in modern microprocessor based relays that were not available
with older relay technologies. Multiple functions combined with programmable logic make it
possible to use one relay for multiple protection applications. Having multiple protection functions
in a single relay may simplify setting the relay and may speed up testing and maintenance.
However, integration has its disadvantages. The primary disadvantage is that a microprocessor
based relay failure, or taking the relay out of service for testing, disables all of its protection
functions. Likewise, a common measurement or algorithm error, or a setting mistake, may adversely
affect multiple protection functions. Locating traditional backup protection and control functions,
such as breaker failure and automatic reclose in the same relay with the main protection functions
also presents a challenge should the single relay unit fail or be out of service for testing. A
protection engineer must therefore decide how to make the most efficient use of the functions
available without degrading the overall protection and control scheme reliability. Separating critical
functions into separate physical relay units may be required to optimize scheme performance and
reliability.
Applying redundant multifunction relays to duplicate critical protection functions offers an
alternative to separating critical functions into separate physical relay units. This overcomes the
Page 12
C-16 Working Group June 2014
Relay Scheme Design Using Microprocessor Relays
A Supplement to Relay Trip Circuit Design by IEEE PSRC 1999
12
disadvantage that disabling a critical protection function by a relay failure, or taking a relay out of
service for testing created. It is also economically feasible to consider installing redundant
multifunction relays, considering the overall cost savings associated with their use.
The question is then how to apply multiple relays to perform redundant functions. Are both relays
allowed to perform the same function? This would seem reasonable and desirable for tripping, but
may not be desirable with control functions like automatic reclosing. If not, how are the functions
shared between multiple relays? Does each relay know if the other is in service? If one relay is
disabled, does the other relay enable functions lost by the disabled relay? In most cases,
interconnection between relays, either through hardwired connections or communication links, can
be applied to share status information. In this way, the relays can independently perform critical
tripping functions, and at the same time share control functions that are better performed only by
one relay. This approach has some disadvantages such as extra wiring, more logic programming,
and extra sequence of event recordings.
In order to apply redundancy, the simplest option is to apply two identical multifunction relays of
the same manufacturer. The benefits are increased dependability and cost-saving design, setting,
commissioning, and maintenance because of the commonality between the two relays. Once
familiar with one relay, there is virtually no additional training required for the second relay.
However, there are risks associated with utilizing the same relays for redundancy. Applying
redundant microprocessor based relays that share a common hardware platform and identical
firmware raises a concern about common mode failure. There is a possibility that a single problem
could disable both relays at the same time. The probability of common mode failure can be
evaluated by examining the failure rates of individual relay components. For example, in
microprocessor based relays, some hardware components that play a major role in the relay’s
performance are the power supply, central processing unit, control inputs, and control outputs.
Firmware can also be a source of common mode failure if a coding error or omission causes the
relay to perform incorrectly for a unique set of conditions presented to both relays at the same time.
Vendors or 3rd party testing firms can be a good source of information to evaluate the probability of
common mode failure. In most cases, the probability of a common mode failure internal in two
identical relays is probably quite low relative to all of the other possible external causes of
protection scheme failures, such as human error, substation batteries, breaker mechanisms, and
wiring that may not be redundant.
Typical methods to reduce the probability of common mode failure to the lowest possible level
include:
- Apply relays from different manufacturers that have similar or identical protection functions - Apply different relay models from the same manufacturer that have similar or identical protection
functions - Apply relays with different protection principles
Utilizing relays from two different manufacturers virtually eliminates the concern about common
mode failures, and should reduce the likelihood of a common setting error. However, this comes at
Page 13
C-16 Working Group June 2014
Relay Scheme Design Using Microprocessor Relays
A Supplement to Relay Trip Circuit Design by IEEE PSRC 1999
13
the cost of more complex design and more expensive engineering and maintenance, and additional
training, all of which can reduce reliability by increasing the likelihood of human error.
One compromise is to utilize two dissimilar relay models from the same manufacturer that employ
different design and construction, having different hardware and firmware. While this approach
may somewhat complicate the design and setting of the relays, the expectation is that the relays
from the same manufacturer will offer sufficient commonality of terminology, setting philosophy
and format, hardware and software interface, etc., to provide efficiencies with relay settings,
commissioning, maintenance and training. At the same time, this technique should minimize the
risk of common mode hardware or firmware failures and duplicating incorrect settings.
Pure redundancy requires two identical, yet completely independent schemes. Virtual redundancy is
less restrictive in that the schemes do not need to be identical, but they still must be independent.
Applying two different protection schemes with different, yet complementary operating principles
can provide virtual redundancy. As an example, for transmission line protection, applying a
directional comparison pilot scheme and a line current differential scheme with independent relays
and communications offer two complimentary methods to provide fast tripping over 100% of the
protected line. Likewise, for bus protection, high impedance and low impedance current differential
schemes can be applied to provide two independent methods to provide high speed tripping that
complement each other.
It is also important to recognize that it may not be necessary or desirable to use all the protection
functions available in a single microprocessor based relay. Simple schemes are often the most
reliable. However, anyone who interacts with the relay must be aware of unused functions to
prevent inadvertently setting unused elements, or, worse yet, applying logic elements associated
with unused functions that may have default, or otherwise improper settings. This can lead to
undesired operations or the relay may fail to respond when it is expected to operate.
2.4 Power Supply Considerations
All microprocessor relays have power supplies to transform the station voltage into suitable
processor and control voltages for the internal electronics of the relay. The power supplies
generally draw only a few volt-amperes of load from the supply. Therefore, they do not add
significant load to the station power system.
Thoughtful consideration should be given to the source from which the power supply voltage is to
be obtained. Most utilities use the station or plant battery. It is generally designed to supply a
reliable source that is resistant to transients and is relatively immune to system disturbances.
Another choice for power supply voltage is to use the station service supply especially if the battery
is not available. Due to the fact that these voltages can reflect the system voltages during fault
conditions i.e. drop to zero or drop to some value below the power supply threshold, these sources
should not be considered for relays performing protective functions. However, relays that perform
strictly control functions have been successfully applied using the station service or voltage
transformers as a source i.e. capacitor bank control relays.
Page 14
C-16 Working Group June 2014
Relay Scheme Design Using Microprocessor Relays
A Supplement to Relay Trip Circuit Design by IEEE PSRC 1999
14
2.4.1 Power Supply Circuit Overcurrent Design
When designing the power supply connections from the dc system to a microprocessor relay,
attention should be given to protecting the dc system from short circuits in the conductors to the
relay or in the relay itself. The trip circuit design in this regard to microprocessor relays does not
appreciably differ from the electromechanical schemes.
2.4.2 Battery Load Creep
Microprocessor relays add load to the station battery due to the use of continuously energized
digital inputs and their own energy requirements. This affects the battery design load curve. In
substations or power plants where microprocessor relays are replacing electromechanical relays, it
should be considered that as more new relays are added, the continuous load on the battery and
charger will gradually increase or “creep”. The net result is that the once adequate station battery
and/or battery charger may now not meet the original design criteria. This is further complicated by
the addition of other electronics in conjunction with microprocessor relay additions such as digital
meters and digital communication equipment connected to the protection battery.
2.4.3 Battery System Grounding Considerations
Battery systems are generally grounded at a single point through resistors to establish a known
reference voltage between positive, negative, and ground. Battery chargers may include this
circuitry internally, or external resistors or lamps may be used as shown below in Figure 2.4.3.1.
Whether balanced resistors are used to establish equal voltage above and below ground potential, or
if unbalanced resistors are used to offset the ground reference, monitoring the dc rail-to-ground
voltage is a common way to detect extraneous battery grounds. Resistance values are generally
chosen to limit the current drain to several milliamps or less.
43/CS 52A1 Trip1
Relay
(Partial)
TC-1
130 Vdc
(+)
(-)
R1 (or
Lamp 1)
R2 (or
Lamp 2)
C1
C2
Fuse
Fuse
IN 1 IN 2
52a
Figure 2.4.3.1 Portion of a typical dc battery system and relay connections
Page 15
C-16 Working Group June 2014
Relay Scheme Design Using Microprocessor Relays
A Supplement to Relay Trip Circuit Design by IEEE PSRC 1999
15
In Figure 2.4.3.1, capacitors C1 and C2 represent stray capacitance of the dc circuitry, surge
capacitance, and power supplies. Under normal conditions, the voltage across each capacitance is
one half battery voltage.
The first extraneous ground does not impair the battery system. However, it is important to detect
and alarm on the first extraneous ground because the second ground could completely short the
battery system. dc battery system ground detection is relatively easy to accomplish by monitoring
the voltages between ground and the positive and negative rails. A shift in these voltages indicates
an extraneous battery system ground. A relatively simple technique uses two microprocessor based
relay inputs that are rated for the battery system voltage, but will not assert at one half battery
voltage or less. This scheme is shown in the partial dc schematic in Figure 2.4.3.2.
R1 (or
Lamp 1)
IN 3
C1
13
0 V
dc
R2 (or
Lamp 2)C2
Fuse +DC Bus
Fuse–DC Bus
IN 4
DC
Ground
Detector
Figure 2.4.3.2 Simple dc ground detection scheme using relay inputs
In this scheme, the normal dc voltage across each input, IN3 and IN4 is balanced at one half battery
voltage. Neither input will be picked up. A ground on the positive dc bus rail will cause the voltage
on input IN 4 to collapse to zero, and the voltage on input IN 3 will rise to full battery voltage,
causing input IN 3 to assert. Conversely, a ground on the negative dc bus rail will cause input IN 4
to assert. Logic in the relay can be used to create a dc ground alarm and indicate whether the ground
is on the positive or negative dc bus rail.
It is important to note that in the microprocessor relay, the current drawn by the relay inputs (Opto-
isolated inputs) when energized is very low. Therefore, the input threshold voltage or possibly the
setting has to be verified to make sure a dc ground fault in the protection scheme could not trigger
the inputs.
2.5 Particular Changes in Circuit Functionality
The goal in any change to relay trip circuits should be to maintain the performance while taking
advantage of microprocessor relays. The original 1999 report [6] described in detail many different
relay trip circuit configurations. This section of the report will highlight some of these
Page 16
C-16 Working Group June 2014
Relay Scheme Design Using Microprocessor Relays
A Supplement to Relay Trip Circuit Design by IEEE PSRC 1999
16
configurations, and illustrate possible methods to integrate microprocessor relays into these
configurations.
2.5.1 Choice of Contacts
The choice of relay contacts to use for trip circuit design is directly dependent on the capabilities of
the relay itself, and the intended application. Relay output contacts intended to directly energize
breaker trip coils and close coils need to have a make and carry rating and continuous carry ratings
to handle the current draw of the coils. If the relay output contacts do not have sufficient ratings for
the circuit breaker they are controlling, they must trip through an auxiliary relay that can handle the
current draw. Most microprocessor relays will have numerous contacts that are adequate for most
tripping applications. Some microprocessor relays have “trip rated” contacts and “signaling”
contacts. The signaling contacts have a lower carry rating, and are intended to send signals to other
devices, such as other relays, or to control auxiliary relays.
Microprocessor relays always have electromechanical output contacts that are themselves simple
relays. These are very reliable and have a typical operating time between 3ms to 8ms. This
operating time must be accounted for when determining actual clearing times for fault conditions.
Some microprocessor relays also have solid-state output contacts for applications where high-speed
tripping is desirable. Solid-state outputs will have a typical operating time of 100 microseconds.
Solid-state outputs may be polarity sensitive, so special care must be taken in terms of wiring.
The standard relay output contact is a Form-A, normally open contact. When energized, such as by
a protection trip, this contact will close. Some relays may provide Form-B, normally closed
contacts, or Form-A contacts that can be converted to Form-B contacts. When energized, these
contacts will open. Form-B contacts are often used as fail-safe trip contacts (tripping on the loss of
relay power). Once again, for tripping purposes, Form-B contacts must be rated for the current draw
of the circuit breaker trip or close coil. Of particular concern for a Form-B contact may be the break
capability of the contact. See section 1.1.2 for discussion of contact ratings and contact seal-in
requirements. Some relays also provide Form-C contacts, which have both a Form-A and Form-B
contact in parallel. These may be used for tripping, for signaling, or for fail-safe applications, and
the same requirements for trip rating still hold when used for tripping applications.
Latching output contacts are bi-stable contacts that are either open or closed, and will remain in that
state until explicitly controlled by the relay logic and configuration. Latching output contacts are
available in some models of microprocessor relays. The intent of a latching output contact is to
replicate an external, electromechanical latching relay. It will be used either to open a circuit to
prevent breaker operation (most commonly, opening the close circuit of the breaker) or to hold a
trip (or other) signal permanently. Latching output contacts are not normally used to trip or close a
circuit breaker directly, but are normally used to permit or block a control circuit.
2.5.2 Auxiliary Relays, Diodes, Timers
In conventional protection schemes especially when electro mechanical type protection is used,
auxiliary relays, timers, and diodes are frequently used in the wide range of applications.
Page 17
C-16 Working Group June 2014
Relay Scheme Design Using Microprocessor Relays
A Supplement to Relay Trip Circuit Design by IEEE PSRC 1999
17
These elements are used to interface the output and input commands from, and to the relays, to
build the logic for trip or interlock purposes, for selective trip matrix, for the trip (94) and lockout
(86) units, to monitor and signaling the status and operation of the protection relays. The
conventional scheme which is built in this way often requires a fair amount of internal panel or rack
wiring to connect various elements of the scheme together, while protection systems designed with
microprocessor based protection relays potentially could be built without any timers, auxiliary
relays or diodes. The amount of internal schematic wiring is significantly reduced, which also
reduces the hardware checkout of the protection scheme in comparison to a conventional scheme.
2.5.3 Trip Circuit Monitors
For successful operation of a protection system, healthiness of the trip circuit is extremely critical.
An undetected discontinuity in the trip circuit could result in a failure to trip. This may lead to
remote backup or breaker failure protection clearing the fault. Trip circuit monitoring schemes are
utilized for continuous supervision of breaker trip circuits to detect possible wiring damage, loose
terminal screws, poorly crimped terminal wiring, circuit breaker coil open circuit conditions and
loss of supply to the trip circuit. The intention is to detect possible breaker trip circuit failures as
early as possible and provide an alarm to the system operators.
Trip circuit monitoring can be performed either using a standalone trip circuit supervision relay or
through the microprocessor based protection relay itself. The standalone trip circuit supervision
relays provide reliable supervision of the complete trip circuit and are capable of supervising the
circuit breaker in both open and closed states. However, such a scheme could mean additional cost
and additional wiring. Microprocessor based relays can be designed to provide trip circuit
monitoring with minimal additional cost and wiring.
Figure 2.5.3.1 shows an example of a trip coil monitoring scheme implemented in a microprocessor
based relay using two digital inputs and internal relay logic. Input 01 monitors trip circuit continuity
and will drop out should the trip circuit lose continuity while the circuit breaker is closed. Input 02
monitors a 52b contact. If an access to the point in the circuit between the circuit breaker internal
52a contact and the trip coil is available, then Input 02 can be connected as shown in the alternate
connection which allows the scheme also to detect an open trip coil circuit when the breaker is
open. If this access is not available, then Input 02 is only used to prevent the trip coil monitor from
alarming when the circuit breaker is open; this configuration does not detect an open trip coil circuit
when the breaker is open. Internal relay logic uses these inputs to determine trip coil alarm status.
A time delay will have to be introduced to the relay logic in such a scheme to prevent erroneous
pickup of the logic during the transition of circuit breaker states. In addition to trip coil circuit
monitoring, this scheme will also detect a loss of control power to the trip coil.
A 52a contact should not be used in place of the 52b contact in this scheme. Adding “NOT 52a” to
the logic does not assert the alarm in the case of a blown trip circuit fuse. If a 52a must be used in
this case, it should be whetted from a different dc source.
It is important to be aware that trip coil monitor leakage may be the source of a sneak circuit. This
leakage may cause inputs or contacts of other devices to assert or seal in. This should be considered
when designing the scheme. More information on contact leakage can be found in section 1.12.
Page 18
C-16 Working Group June 2014
Relay Scheme Design Using Microprocessor Relays
A Supplement to Relay Trip Circuit Design by IEEE PSRC 1999
18
+
52a 52b
-
TCM
Sense
Relay
Trip52b
Sense
Alternate
Connection
15
cyc
0
cyc
Trip
Circuit
Failed
Input
01
Trip
Coil
Input
02
Input 01
Input 02
Figure 2.5.3.1 Example 1 using two inputs and internal logic
2.5.4 Breaker Failure Initiate
In a microprocessor based relay design, the breaker failure initiate signal potentially could be
simplified so that the breaker failure initiate signal for all protection elements activated in the
primary relay could be summarized (logical or gate) and sent to the breaker failure relay as one
signal. Also, if the breaker failure function is located inside the microprocessor relay, this could be
an internal signal only. In either case, the circuitry gets simplified by the reduction of external
hardware elements used.
Regarding the latched type command for breaker failure initiate signal, if it is preferred, the initiate
signal should follow the protective element status prior to the sealed-in or latched TRIP output. As
discussed in the previous section, a breaker fail circuit may be initiated due to leakage current
through a trip coil monitoring circuit. This again must be carefully considered during design.
2.5.5 Sneak Circuit Elimination
Sneak circuits are the unintended design flaws that can result in serious consequences. The sneak
circuit may manifest itself immediately or remain hidden for years until the correct set of
circumstances occurs. Sneak circuits can also be found in mechanical, pneumatic, software, and
digital “circuits.” The four types of sneak circuits or sneak conditions as they are referred to are
described below:
Page 19
C-16 Working Group June 2014
Relay Scheme Design Using Microprocessor Relays
A Supplement to Relay Trip Circuit Design by IEEE PSRC 1999
19
1) Sneak Path (also called a Sneak Circuit) – an unexplained path along which current, energy, or
logical sequence flows in an unintended direction [1] [5].
2) Sneak Timing – events occurring in an unexpected or conflicting sequence [5].
3) Sneak Label – incorrect or imprecise labeling of system functions (e.g., system inputs, controls,
displays, and buses) that may cause an operator to apply an incorrect stimulus to the system[5].
4) Sneak Indication – Ambiguous or false displays of system operating conditions that may cause
the operator to take an undesired action [5].
To begin to eliminate digital sneak circuits in microprocessor relays, it must first be understood
how, and in what order, the relay processes the programmable logic. Since every element and logic
bit in the relay cannot be scanned and processed simultaneously, the relay will have some type of
specific scanning order. This information is usually found in the relay instruction manual, but it
may be necessary to refer to the factory for this information. As an example, one manufacturer’s
programmable logic controller processes its logic top-to-bottom and left-to-right one rung at a time
based on the logic ladder diagram. Knowing and understanding the processing order is particularly
important in designing trouble free, high speed or race controlled circuits such as automatic
reclosing.
The most common method of eliminating sneak circuits in the utility industry is to perform a
systematic inspection of the digital logic and the connected relay logic. This consists of conducting
lab or field testing of the system to perform its intended function under all circumstances and will
not perform any unintended actions. In the checking for sneak circuits in this type of evaluation, it
is customary for fuses, molded case circuit breakers, and circuit disconnect points to act as switches.
Circuit disconnect points would be test switches (such as PK type blocks, FT switches, and the
like), wire disconnect points on the back of relays or in wiring harnesses, sliding link terminal
blocks, or other disconnect points that may tend to change the flow of current.
The systematic inspection is the most basic method and has the tendency to overlook potential
sneak circuits. As electric utility microprocessor relay schemes become more complex, a
Topographic Approach to sneak circuit analysis should be considered. This is the method used by
NASA, DOD, aircraft manufacturers, and others to evaluate complex digital, software, and circuit
systems. Further information concerning Topographic Sneak Circuit Analysis can be found in
reference [5].
Microprocessor relays when interfaced with the electrical control circuit world can create or
become part of external sneak circuits. Digital inputs on typical microprocessor relays draw only 3-
5mA of current. A circuit containing a relay coil or a switchboard indicating light can be
configured to assert the relay’s digital input due to a blown fuse or misaligned switch. Likewise,
the paralleling of multiple digital inputs on a relay could easily unintentionally seal in the coil of an
external control relay.
Some microprocessor control devices use thyristor based output “contacts.” These outputs are not
“air” contacts in the usual sense. Rather, they are a gated silicon controlled rectifier or other
Page 20
C-16 Working Group June 2014
Relay Scheme Design Using Microprocessor Relays
A Supplement to Relay Trip Circuit Design by IEEE PSRC 1999
20
electronic device that is used to perform the function of an output contact. These outputs can act
as a switch in one direction of current flow and a diode in the other direction. The external circuit
and microprocessor relay interface should be carefully studied to ensure that a current reversal due
to a blown fuse or other event will not cause undesired consequences as a result of current flowing
backwards through an “open” output contact.
Despite efforts to prevent the occurrence of sneak logic, they can occur. However, the detailed
sequence of events records (SER) and oscillographic recording capabilities of microprocessor relays
can be used to help find and correct any logic errors.
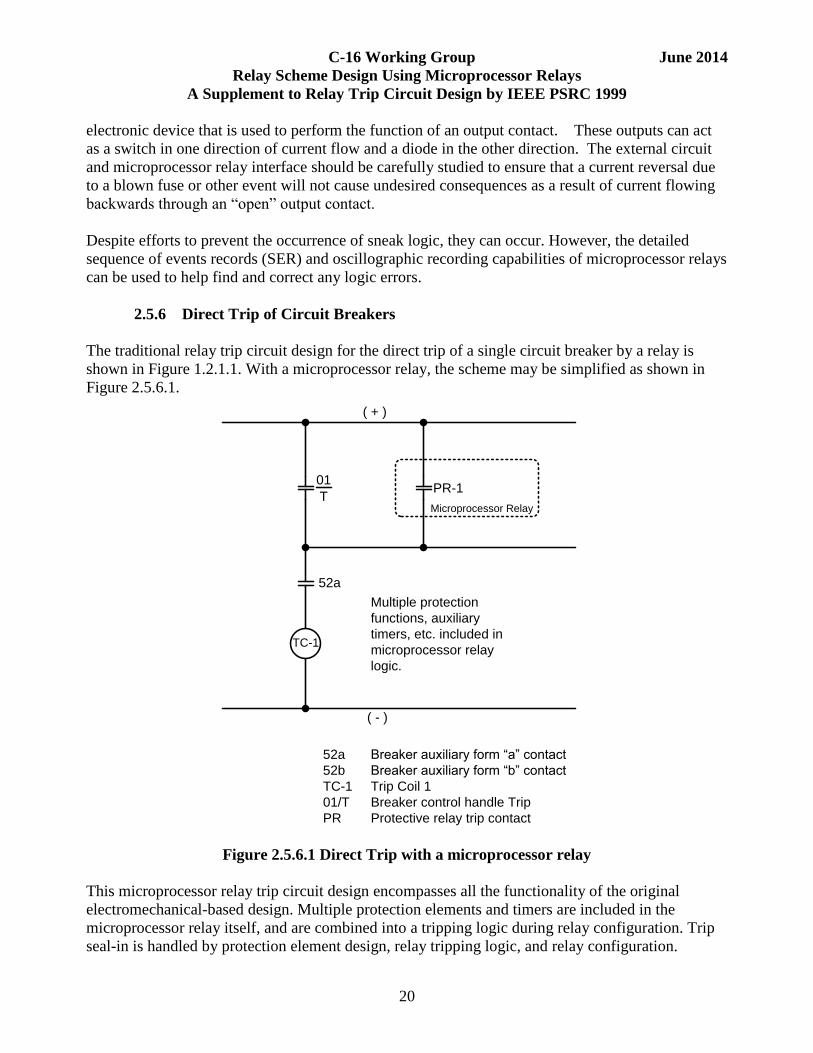
2.5.6 Direct Trip of Circuit Breakers
The traditional relay trip circuit design for the direct trip of a single circuit breaker by a relay is
shown in Figure 1.2.1.1. With a microprocessor relay, the scheme may be simplified as shown in
Figure 2.5.6.1.
Microprocessor Relay
TC-1
52a
PR-101
T
( - )
( + )
Multiple protection
functions, auxiliary
timers, etc. included in
microprocessor relay
logic.
52a
52b
TC-1
01/T
PR
Breaker auxiliary form “a” contact
Breaker auxiliary form “b” contact
Trip Coil 1
Breaker control handle Trip
Protective relay trip contact
Figure 2.5.6.1 Direct Trip with a microprocessor relay
This microprocessor relay trip circuit design encompasses all the functionality of the original
electromechanical-based design. Multiple protection elements and timers are included in the
microprocessor relay itself, and are combined into a tripping logic during relay configuration. Trip
seal-in is handled by protection element design, relay tripping logic, and relay configuration.
Page 21
C-16 Working Group June 2014
Relay Scheme Design Using Microprocessor Relays
A Supplement to Relay Trip Circuit Design by IEEE PSRC 1999
21
Signals from additional relays that impact tripping, such as breaker failure trips, permissive or
blocking signals can be wired into digital inputs into a relay as illustrated in Figure 2.5.6.2 or
transmitted via digital communications. Signals to additional relays such as breaker failure trip can
be sent via output contacts, or via digital communications.
Microprocessor Relay
86
BF
Digital
Input
( + )
( - )
Figure 2.5.6.2 Hardwired external breaker failure trip signal
2.5.7 Dual Relays Tripping One Circuit Breaker
A common application of protective relays is to have multiple protective relays trip the same circuit
breaker as depicted in figure 2.5.7. These relays may be redundant relays for the same zone of
protection, or relays tripping the same circuit breaker for overlapping zones of protection. In this
case, breaker trip contacts from both relays are wired in parallel to trip the circuit breaker. It is
important for each relay to have a breaker trip contact, as opposed to using one relay as the main
breaker trip, to ensure a breaker trip signal is activated if any microprocessor relay calls for a trip,
even if the parallel relay is not functioning.
Page 22
C-16 Working Group June 2014
Relay Scheme Design Using Microprocessor Relays
A Supplement to Relay Trip Circuit Design by IEEE PSRC 1999
22
Microprocessor Relay Microprocessor Relay
TC-1
52a
PR-1 PR-201
T
( - )
( + )
Multiple protection
functions, auxiliary
timers, etc. included in
microprocessor relay
logic.
52a
52b
TC-1
01/T
PR
86/BF
Breaker auxiliary form “a” contact
Breaker auxiliary form “b” contact
Trip Coil 1
Breaker control handle Trip
Protective relay trip contact
Remote breaker failure trip via lockout relay
86
BF
Figure 2.5.7 Direct tripping with dual relays
As with the direct trip example of 2.5.6.1, multiple protection elements, timers, and seal-in are part
of the relay design and relay configuration. Once again, trip coil monitoring and breaker status are
implemented in each relay using breaker auxiliary contacts, relay contact inputs, and relay
configuration. The PR contacts for each relay are “trip rated” contacts.
This trip circuit design shows a contact from an external relay to implement a breaker failure trip of
the circuit breaker. This is another possible method. As in the previous direct trip example, it is also
possible to wire a breaker failure trip signal to each of the microprocessor relays, or to transmit the
breaker failure trip signal to each of the relays using digital communications.
This example design uses common fusing for the breaker trip contacts of both relays. If the relay
tripping contacts are fused separately, this circuit will require the use of a tripping diode (located
after the PR-2 contact) to prevent sneak circuits.
2.5.8 Dual Trip Coils
Many circuit breakers, especially circuit breakers used for high voltage transmission, have dual trip
coils to ensure reliable tripping of the circuit breaker during faults. This section describes some
examples of relay trip circuits for dual breaker trip coils. As in the previous examples, the same
Page 23
C-16 Working Group June 2014
Relay Scheme Design Using Microprocessor Relays
A Supplement to Relay Trip Circuit Design by IEEE PSRC 1999
23
arrangements for relay logic, output contact rating, trip coil monitoring, breaker status indication,
and signaling between relays apply.
The first dual breaker trip coil relay trip circuit uses one relay to trip both circuit breaker coils
simultaneously, as in Figure 2.5.8.1. This design is not commonly used, but it is available. The
advantage to this design is simply duplicate relay output contacts and duplicate breaker trip coils. If
one of the relay output contacts were to fail, the other contact would still operate and clear the
breaker. Note that each circuit breaker trip coil is separately fused.
TC-1
52a
PR-1a01
T
( - )
( + )
Microprocessor
Relay
( + )
( - )
TC-2
52a
PR-1b
Protection logic trips
both circuit breaker
coils simultaneously.
52a
TC-1
TC-2
01/T
PR
Breaker auxiliary form “a” contact
Trip Coil 1
Trip Coil 2
Breaker control handle Trip
Protective relay trip contact
Figure 2.5.8.1 Dual trip coils, one relay
A more common method to take advantage of dual breaker trip coils is to have separate relays
(normally redundant relays for the same zone of protection) activate the separate trip coils, as in
Figure 2.5.8.2. Once again, the trip coils must be fused separately. Each relay acts independently,
and activates a different trip coil, to trip the circuit breaker. This provides a complete redundant
tripping solution for the circuit breaker.
Page 24
C-16 Working Group June 2014
Relay Scheme Design Using Microprocessor Relays
A Supplement to Relay Trip Circuit Design by IEEE PSRC 1999
24
TC-1
52a
PR-101
T
( - )
( + )
Microprocessor Relay
TC-2
52a
PR-2
( - )
( + )
Microprocessor Relay
Separate relays trip
separate circuit
breaker trip coils.
52a
52b
TC-1
TC-2
01/T
PR
Breaker auxiliary form “a” contact
Breaker auxiliary form “b” contact
Trip Coil 1
Trip Coil 2
Breaker control handle Trip
Protective relay trip contact Figure 2.5.8.2 Dual trip coils, dual relays
A different version of a dual trip coil relay trip circuit is to use one of the breaker trip coils to trip
from one protection, and the second breaker trip coil for a time-delayed or backup trip. In this
method, one protection scheme energizes the first breaker trip coil. Backup or time-delayed
protection from the second relay scheme energizes the second breaker trip coil, in case the first
breaker trip coil fails to operate. One common variation of this scheme as shown in Figure 2.5.8.3 is
to have the breaker failure initiate signal re-trip the breaker using the second breaker trip coil to
attempt to provide high-speed clearing and prevent a wider breaker failure operation.
Page 25
C-16 Working Group June 2014
Relay Scheme Design Using Microprocessor Relays
A Supplement to Relay Trip Circuit Design by IEEE PSRC 1999
25
TC-1
52a
PR-1a
01
T
( - )
( + )
( + )
( - )
TC-2
52a
BFR
BFR retrips TC-1 on
breaker failure initiate.
PR-1b trips TC-2 on
backup trip
Microprocessor
Relay
52a
TC-1
TC-2
01/T
PR
PR-1b
BFR
Breaker auxiliary form “a” contact
Trip Coil 1
Trip Coil 2
Breaker control handle Trip
Protective relay trip contact
Protective relay backup trip contact
Breaker failure retrip contact
PR-1b
Figure 2.5.8.3 Dual trip coils with breaker re-trip
The dual breaker trip coil / dual relay scheme of Figure 2.5.8.2 provides redundancy for breaker
trips, in that each relay will energize an independent trip coil. The likelihood of one relay failing to
operate, and the other breaker trip coil failing to operate, is very low. However, with microprocessor
relays, configuring multiple output contacts to operate for the same event is simple. It is then
possible to have dual microprocessor relays assert both breaker trip coils for relay operations as
shown in Figure 2.5.8.4. The advantage here is complete redundancy at the cost of increased circuit
complexity. Both relays assert both trip coils simultaneously Cross tripping dual relays to both trip
coils was more common when using electromechanical relay technology because there was more
chance of hidden failures.
Page 26
C-16 Working Group June 2014
Relay Scheme Design Using Microprocessor Relays
A Supplement to Relay Trip Circuit Design by IEEE PSRC 1999
26
TC-1
52a
PR-1a01
T
( - )
( + )
Microprocessor
Relay
( + )
( - )
TC-2
52a
PR-2aPR-1b
Cross-tripping of
circuit breaker trip
coils from redundant
relays.
PR-2bMicroprocessor
Relay
52a
52b
TC-1
TC-2
PR
Breaker auxiliary form “a” contact
Breaker auxiliary form “b” contact
Trip Coil 1
Trip Coil 2
Protective relay trip contacts
Figure 2.5.8.4 Dual trip coils, relay cross-tripping
An important consideration with dual trip coils is the possibility of a common magnetic flux path to
both trip coils. Where such a situation exists and both trip coils are energized simultaneously but
with opposite voltage polarity, the action of the trip mechanism is defeated and the breaker is unable
to trip. This also applies to the dual trip-free coils of breakers so equipped.
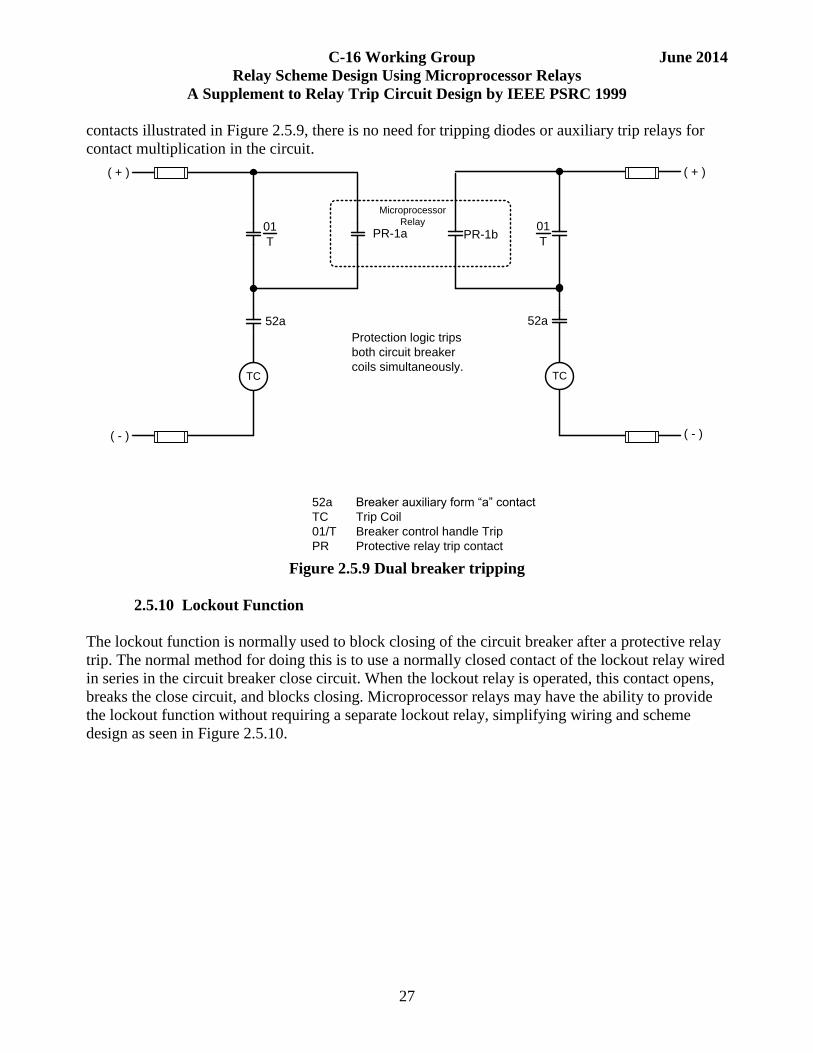
2.5.9 Dual Breaker Schemes
Dual circuit breaker schemes, or more correctly, relays that trip more than one circuit breaker or
device, are commonly used on transmission systems. These applications include breaker-and-a-half
bus, ring bus, and double bus double breaker arrangements.
In designing relay trip circuits where one relay is tripping more than one breaker, there are always
considerations regarding adequate margin for the minimum voltage to trip the breaker(s), and
making sure that dc cables are sized to limit the voltage drop to an acceptable value even when all
the breakers must be tripped simultaneously. Beyond these general concerns, there are significant
challenges with electromechanical relays, when only one relay output must trip more than one
circuit breaker. However, with a microprocessor relay, the same trip command can be assigned to
multiple output contacts to trip multiple breakers. With the separately fused trip coils and output
Page 27
C-16 Working Group June 2014
Relay Scheme Design Using Microprocessor Relays
A Supplement to Relay Trip Circuit Design by IEEE PSRC 1999
27
contacts illustrated in Figure 2.5.9, there is no need for tripping diodes or auxiliary trip relays for
contact multiplication in the circuit.
TC
52a
01
T
( + )
TC
52a
PR-1a01
T
( - )
( + )
Microprocessor
Relay
PR-1b
Protection logic trips
both circuit breaker
coils simultaneously.
( - )
52a
TC
01/T
PR
Breaker auxiliary form “a” contact
Trip Coil
Breaker control handle Trip
Protective relay trip contact
Figure 2.5.9 Dual breaker tripping
2.5.10 Lockout Function
The lockout function is normally used to block closing of the circuit breaker after a protective relay
trip. The normal method for doing this is to use a normally closed contact of the lockout relay wired
in series in the circuit breaker close circuit. When the lockout relay is operated, this contact opens,
breaks the close circuit, and blocks closing. Microprocessor relays may have the ability to provide
the lockout function without requiring a separate lockout relay, simplifying wiring and scheme
design as seen in Figure 2.5.10.
Page 28
C-16 Working Group June 2014
Relay Scheme Design Using Microprocessor Relays
A Supplement to Relay Trip Circuit Design by IEEE PSRC 1999
28
CC
52b
( + )
TC
52a
PR-1a01
T
( - )
( + )
Microprocessor
Relay PR-1b
PR-LO is lockout
contact contained in
relay. Can be bistable
relay (ideal),
controlled through
logic.
( - )
PR-LO
52a
TC
CC
01/T
PR
PR-LO
Breaker auxiliary form “a” contact
Trip Coil
Close Coil
Breaker control handle Trip
Protective relay trip or close contact
Protective relay lockout contact
Figure 2.5.10 Lockout function
There are three different methods to implement the lockout function in a microprocessor relay,
depending on the capability of the relay. The first method is mechanical lockout, where relay logic
holds a normally open contact closed during normal operations. When the lockout operates, relay
logic releases the normally open contact. This contact will revert to its de-energized state when the
relay loses control power or otherwise fails.
The second method is an electronic lockout in a microprocessor relay that has bistable latching
output relays. In this case, the latching output relay is latched open or closed, and only changes state
on an explicit logic command from the microprocessor relay logic.
The consideration between the two methods is the desired fail-safe condition. If the microprocessor
relay loses control power, is it more desirable to always permit closing, always block closing, or
permit or block closing based on the last relay state.
The third method is when the local and remote SCADA manual close control commands all go
through relay logic. In this method, the lockout function can be implemented by adding logic to the
relay close output contact for “AND NOT LTnn” where LTnn is a software lockout latch in relay
logic.
Page 29
C-16 Working Group June 2014
Relay Scheme Design Using Microprocessor Relays
A Supplement to Relay Trip Circuit Design by IEEE PSRC 1999
29
Another consideration when implementing the lockout function in microprocessor relays is that of
field operations. The traditional method is an electromechanical lockout relay with an indication
flag and a reset handle. Any operator can quickly check the state of the lockout relay (operated or
non-operated), and reset the lockout relay using the handle. If the lockout function and lockout
contacts are distributed among microprocessor relays, a method for indicating lockout status and
resetting the lockout contacts must be developed. This indication may be a control switch (that is
wired to contact inputs on individual microprocessor relays), or it may be LEDs and pushbuttons on
the relays. This may also require the use of digital communications.
2.5.11 Breaker Control Switch
The use of microprocessor relays also impacts relay trip circuit design as it relates to circuit breaker
control handles. Circuit breaker control handles have normally been wired directly to the circuit
breaker trip coil, and with supervision, directly to the circuit breaker close coil. It is possible to
eliminate the breaker control handle in lieu of pushbuttons or other controls on the microprocessor
relay. This allows the supervision of opening and closing of the circuit breaker using relay logic and
SCADA. Careful consideration must be given to control handle wiring to permit desirable circuit
breaker operations.
CC
52b
( + )
TC
52a
PR-1a01
T
( - )
( + )
Microprocessor
Relay
PR-1b
PR-1b closes circuit
breaker. Relay logic
includes control
handle supervision.
( - )
Microprocessor Relay
01
C
Digital
Input
( + )
( - )
52a
TC
CC
01/T
01/C
PR-xx
Breaker auxiliary form “a” contact
Trip Coil
Close Coil
Breaker control handle Trip
Breaker control handle Close
Protective relay output contacts Figure 2.5.11 Breaker control switch logic
The control handle wiring of Figure 2.5.11 is designed for safety and reliability. In this case, the
breaker control handle trip contact is wired in parallel with the relay outputs to the breaker trip coil.
This allows a local operator to always trip the circuit breaker, even in emergency conditions, and
even when the relay is not energized. Wiring the breaker control handle contact to a digital input on
the relay, or using a relay pushbutton, means breaker trips are not available when the relay is not
powered. However, some relay models have dedicated breaker control pushbuttons that operate
independently of the relay control power, and replicate the functionality described in Figure 2.5.11.
Page 30
C-16 Working Group June 2014
Relay Scheme Design Using Microprocessor Relays
A Supplement to Relay Trip Circuit Design by IEEE PSRC 1999
30
The breaker control handle close contact is wired to a contact input of the relay. This ensures that
breaker closing is supervised by a local/remote switch, permission from SCADA, hot line tag,
synchrocheck, virtual lockout, or any other condition. This also prevents the breaker from being
closed if the protective relay is not energized.
2.5.12 Remote I/O
Microprocessor relays also permit the use of remote I/O which places output contacts and contact
inputs in a device separate from the relay. Some form of digital communications is used between
the relay and remote I/O device to send control commands to operate output contacts, and to send
the status of equipment through contact inputs from the remote I/O device to the relay. A typical
scheme is shown in Figure 2.5.12.
CC
52b
( + )
TC
52a
RIO-1
( - )
( + )
Remote I/O
RIO-2
Wiring is identical
using RIO. Only
difference is
communications to
relay.
( - )
RIO-LO
52a
TC
CC
RIO
RIO-LO
Breaker auxiliary form “a” contact
Trip Coil
Close Coil
Remote I/O output contact
Remote I/O lockout contact
Microprocessor Relay
Figure 2.5.12 Trip circuit using remote I/O
Using remote I/O is similar to using a microprocessor relay in terms of trip circuit design. The
major difference is that a remote I/O device will be used for every circuit breaker. Every device that
needs to control the circuit breaker, or know the circuit breaker status, must communicate to the
Page 31
C-16 Working Group June 2014
Relay Scheme Design Using Microprocessor Relays
A Supplement to Relay Trip Circuit Design by IEEE PSRC 1999
31
remote I/O device. There must be consideration of the impact of remote I/O and communications on
the reliability of tripping, on operating speed, and on deterministic response to tripping commands.
3 Targeting and Additional Post Trip Indications
With microprocessor based technology, the need for sealing in tripping contacts is still present.
However, the mechanisms used are quite different than for electromechanical technology. In
addition to simple targets, microprocessor technology can provide much more detailed information
for determining the cause of a trip.
3.1 Targets
Simple targets still serve a valuable function to ensure that operators and first responders have ready
access to the cause of a trip without having to connect the relay to a computer and/or navigate an
electronic display. It is important to evaluate the fixed or programmable targeting functions of the
microprocessor relay being applied relative to the tripping functions that are being used in the
application.
In microprocessor relays, targets are usually indicated via an LED or LCD HMI interface on the
front of the relay. Presently, most of the relay displays are user programmable to easily convey
information to operations personnel, technicians, and engineers.
Sophisticated techniques are often used by manufacturers to help make the number of targets
manageable. For example, a four zone phase and ground distance protection scheme has 4*6=24
measuring elements. This can be consolidated to 8 targets (four zone targets plus A, B, C, and G
phase indications). The target indications are provided by selection algorithms instead of simply
recording the elements that are asserted at time of trip.
The microprocessor relay can also be used for adding time reference for targets that come from
electromechanical relays by wiring auxiliary contacts from the electromechanical relay outputs into
the microprocessor relay inputs.
Resetting the target can be done via a button in the front of the relay or via remote SCADA or local
HMI control if necessary. Typically, there will be two kinds of resets:
- Self-reset usually is used for alarm indications. The target clears without requiring another
signal as soon as the initiating condition that causes the operation goes away.
- Latching is used for transient events such as faults. The target remains latched after the
initiating condition that caused the operation goes away until acknowledged or reset.
3.2 Virtual Targets
One difficulty to consider when applying microprocessor relays is that sometimes there are more
tripping functions in use than available LEDs. Another concern may be that the user has
programmed some special tripping function that is not covered by the built-in targeting function of
the relay. In these cases, the user needs to consider supplementing the fixed or user programmable
Page 32
C-16 Working Group June 2014
Relay Scheme Design Using Microprocessor Relays
A Supplement to Relay Trip Circuit Design by IEEE PSRC 1999
32
target LEDs and LCD HMI indications with additional indications. These may be referred to as
virtual targets.
An example of a virtual target is to program the message display feature on the LCD HMI of the
relay to display an element name when it initiates the trip. These display messages should be
latched until acknowledged or reset similar to the latching feature for the normal target functions of
the relay. Another way is to program additional contacts to light up an annunciator panel window to
indicate the cause of the trip.
One difficulty with using virtual targets is how to call an operator’s attention to these alternative
indications. The solution can be a matter of training operators where to look; or, placing a sign next
to the relay to indicate where to look; or lighting a panel light when an element trip is being shown
on the alternative target display.
Alternatively, if the additional target indications are made available via a remote SCADA or HMI
display, it may not be necessary to program a means to display these supplemental virtual targets at
the relay panel.
3.3 Sequence of Events Records
Microprocessor relays have the benefit of providing additional functions such as sequence of events
records and oscillography records with very little additional cost. An events report can contain
status change of many items along with a time stamp to the nearest millisecond or better. Data such
as relay power-up, protective relay element pickup and dropout, settings group changes, input and
output changes of state, and alarm changes of state can be recorded in these reports.
Sequence of event and oscillography records give much better target info and show the full
evolvement of a fault which was not possible with the older electromechanical relays. External
devices can be connected to the relay either through inputs or communication ports. Thus,
additional external devices can be added into the relay SER functionality.
The elements that trigger the events recorded in a microprocessor relay are often user
programmable. For example, protective elements, inputs, and relay logic bits can be used to trigger
the event recorder upon their change of state. A trip output from the relay also usually triggers the
event recorder.
Sequence of events records are useful during the testing phase as well as after the relay has been
placed in service. The sequence of events report contains the exact sequence and timing of each
event recorded by the relay making it possible to verify correct tripping times occurred, the proper
protective elements operated, the pilot scheme functioned correctly with proper timing, and the
automatic reclosing functioned correctly. This information can reveal trouble spots in a design
scheme or relay settings, and it can reveal why a relay misoperated.
3.4 Oscillography
Page 33
C-16 Working Group June 2014
Relay Scheme Design Using Microprocessor Relays
A Supplement to Relay Trip Circuit Design by IEEE PSRC 1999
33
Oscillography records can vary in duration from cycles to seconds. In addition to the current and
voltage waveforms captured, the digital channels recorded during a trip event can be very helpful in
getting to root cause of operations. The information is presented in a graphical format that is often
easier for analysis than the time stamped sequence of events record format. In many cases, nearly
all of the logic bits inside the relay are made available in the oscillography recording. In other cases,
the user must program which logic bits are included. The digital channel settings should always be
reviewed the and not simply left at default to ensure that all bits associated with functions being
used in the application are included for post fault root cause analysis.
The oscillography information can be obtained directly from the protective relay unlike its
electromechanical counterpart where the recording device was other equipment.
The oscillography recorded during an actual fault can be uploaded into a power system simulator
for analysis and future end to end relay testing. It can also be used in power system modeling
software to run simulations and verify relay settings.
4 SCADA Functions
SCADA provides the means for utilities to control and monitor many substations from one or more
control centers. SCADA systems traditionally use separate devices from protective relays to control
circuit breakers. However, microprocessor-based relays can be incorporated into SCADA systems
to reduce the number of hardware components required for control, and to simplify the wiring and
control circuits of breakers.
4.1 Control
SCADA control at the substation level is provided through an RTU or gateway that issues open and
close commands to circuit breakers, motor-operated switches, and other devices. The traditional
system uses an RTU or other central intelligent device to operate dedicated output contacts on I/O
hardware that may be directly integrated to the RTU or distributed through dedicated (and normally
proprietary) communications..
Microprocessor-based relays can act as the I/O hardware for the SCADA system. RTUs or gateways
can issue SCADA commands to protective relays using industry standard communications
protocols. This communications may be through serial communications, an Ethernet network,
through communications gateways, or other media as required
4.1.1 Breaker Control
SCADA control of circuit breakers has different operational requirements than that of protection.
SCADA control is normally built around the concept of “select before operate”, or the need to
ensure that the control point is available and safe to control before actually operating the circuit
breaker. The “select” command is intended to reserve the control point, which prevents any other
device, including protective relays, from operating the control point, and therefore, from operating
the breaker. This two-step process also is intended to prevent unintended operation of a breaker.
With traditional RTU-based SCADA systems, the select-before-operate control did not interfere
Page 34
C-16 Working Group June 2014
Relay Scheme Design Using Microprocessor Relays
A Supplement to Relay Trip Circuit Design by IEEE PSRC 1999
34
with protection. The SCADA contact from an RTU and the protective relay contact are connected in
parallel to the breaker trip or close coils.
Traditional RTU-based SCADA systems provide their own I/O with their own output contacts.
These output contacts may require interposing relays to provide the current rating necessary to
operate circuit breaker trip and close coils. Integrating microprocessor-based protective relays into
the SCADA system can simplify circuit breaker wiring, as the need for interposing relays is
removed. The resulting SCADA system changes from a hardware-specific design to a software
design. SCADA commands need only be incorporated into the relay output contact logic. However,
it is important to recognize that SCADA control, if select-before-operate is implemented, and
implemented properly, will require separate output contacts from protection for breaker open and
breaker close.
Including protective relays as part of the SCADA control system requires that the relay recognize
utility SCADA control requirements, including local/remote control. The relay must be able to
properly recognize local/remote control commands from control switches, SCADA masters, and
similar sources. As with traditional designs, it is important to ensure the automatic reclosing
function of the circuit breaker is disabled when the SCADA trip is activated. There are several
methods to handle this in microprocessor-based relays. One method is to use the automatic reclose
initiate signal from the breaker status to be a protective trip only feature. In this method only
protective trips would initiate the automatic reclosing feature and therefore the SCADA trip would
not activate the automatic reclosing feature. Another method is to include the SCADA trip protocol
point as an input in the automatic reclosing lock-out equation. If the SCADA trip and the automatic
reclose function reside in the same relay, then this application is very simple. If they are in separate
relays, then the design will need to ensure these signals are handled properly whether they are hard-
wired or communicated relay to relay. Since these schemes are software based, extensive testing of
the schemes is a necessity to ensure proper operation.
The SCADA close feature has similar considerations when moving from traditional designs to a
microprocessor-based design. The SCADA close function must be supervised by lockout relays,
synchrocheck elements, and control switches to ensure the breaker was not closed improperly.
With traditional RTU-based SCADA systems, this supervision is performed by hardwired contact
logic. When integrating microprocessor-based relays into the SCADA system, this supervision can
be implemented in the relay itself via programmable logic. .
Another control issue regarding circuit breaker control via SCADA is the enabling and disabling of
the automatic reclose function. If there is a SCADA connection to the microprocessor-based relay
that handles the automatic reclosing function, then a SCADA command to the relay can disable or
enable the automatic reclosing feature of the relay.
The change of the SCADA system design when incorporating microprocessor-based relays as part
of the system can lead to unforeseen issues. Protective relays are not necessarily designed as
SCADA control devices, and may require additional configuration to achieve the functionality
desired for SCADA. Great care should be taken when designing the revised scheme to ensure the
actual operation of the scheme matches the desired operation.
Page 35
C-16 Working Group June 2014
Relay Scheme Design Using Microprocessor Relays
A Supplement to Relay Trip Circuit Design by IEEE PSRC 1999
35
4.2 Metering
SCADA metering is another task that has been made easier with microprocessor relays by
eliminating independent meters and transducers. The currents and voltages that are used for the
protection features can be monitored and sent to the control center via SCADA. The microprocessor
does not require adjustment since the signals remain digital; however there is still a need to verify
calibration.
In addition to the common metering quantities such as current and voltage, the microprocessor relay
also allows for the metering of other quantities that required additional equipment to measure in the
past. These special quantities include frequency and battery voltage.
4.3 Monitoring
The monitoring of various points in the substation is also more convenient with microprocessor
relays. In designs with microprocessor relays, the points needed to be monitored can be wired into
the input contacts of the relay. In these cases, additional wiring to the RTU is not needed. Once the
point is wired into the relay, then the input contact can have its protocol location mapped to
SCADA so it can be monitored.
Serial interfaces, including EIA-232, EIA-485, and fiber optic paths can be used to allow external
devices to communicate serially with the microprocessor relay. This increased capability allows
enhance communications to local and remote locations.
4.4 Additional Monitoring
Monitoring or targeting loss of dc source to a specific tripping circuit is important because without
it, the intended tripping action from that circuit will not happen. Making a decision on whether
monitoring should be done on each circuit or not depends on the design of the tripping scheme.
4.4.1 Battery Voltage Monitoring
Battery systems are critical to the proper performance of protection and control schemes.
Microprocessor based relays are typically powered from the same battery system and are often able
to measure the battery system voltage. Monitoring battery voltage during breaker tripping and
closing, which are high stress periods for battery systems, can often provide a good indication of
battery health. Excessive voltage drop can indicate an impending battery failure. High voltage can
indicate a battery charger problem. Excessive ac ripple can also indicate a battery charger problem.
Unequal dc rail (plus and minus) to ground voltage on center-grounded battery systems can indicate
an extraneous battery ground.
Microprocessor based relays can provide alarms for abnormal battery system conditions. They can
also use the battery condition to supervise protection and control functions, such as automatic
reclosing. See Section 2.5.3.
4.4.2 Breaker Monitoring
Page 36
C-16 Working Group June 2014
Relay Scheme Design Using Microprocessor Relays
A Supplement to Relay Trip Circuit Design by IEEE PSRC 1999
36
The breaker signals that are required to be monitored can be directly wired to the digital inputs of
the microprocessor based relays. Once these signals are connected, the status of the input signals
can be provided to the SCADA system through the communication between the relays and the
SCADA system. Some of these signals, such as the breaker auxiliary contacts, are often used in
protective relay applications and therefore additional wiring to a separate device such as an RTU
will not be required.
5 Maintainability/Testing
Single-function relays were straightforward to test; multifunction relays are more challenging. The
additional functionality can distort the results and cause confusion while testing, especially if
testability is not considered early in the scheme design. Further, the ease of testing with modern test
sets can actually create unwarranted confidence in the results.
5.1 Multifunction Integration Considerations
Before any testing begins, the type of testing should be considered. Acceptance, commission, and
scheduled testing are all different, have different requirements and are performed for different
reasons. Acceptance testing is typically focused on a single relay and completed when the relay is
received from the manufacturer. Commission testing is the most common type of testing performed
by utilities and is often done just prior to the relay going into service. This type of testing may also
involve functional testing.
In testing a microprocessor relay, it is advantageous to first test the metering functions. This action
ensures the inputs are properly wired and the relay is properly configured for the correct potential
and current ratios. Once the metering is checked, testing of the protective elements can be
performed, usually one at a time. Methods vary on how to configure a relay to allow testing
without disturbing protection settings. One method is to program an independent output to each
element, such as Output 7 to a time overcurrent element and Output 8 to a Zone 2 ground element.
If the application is simple, the relay may contain enough spare contacts. The disadvantage with
this method is that most of the time suitable spare contacts are not available and the relay settings
likely have to be modified during the testing process. Also, the actual outputs that perform the trip
function, and the elements that input into the trip equation need to be tested to confirm
functionality.
Another method is to use, if available, the multifunction relay’s built-in event recording and
sequence-of-event capability. These features of the relay, along with pre-defined tests can be used
to target certain trip elements. The advantage of this method is the protection settings need not be
changed. The disadvantage is being sure the trip element of interest’s response is not disturbed by
other elements that might respond to the same test input.
Regardless of which method is used, it is critical that the “As-left settings” match the “As-found
settings.” The testing procedures need to include steps and text as a reminder of this critical need.
Page 37
C-16 Working Group June 2014
Relay Scheme Design Using Microprocessor Relays
A Supplement to Relay Trip Circuit Design by IEEE PSRC 1999
37
Functional testing verifies the trip path from external inputs, through the relay, and to outputs, such
as the circuit breaker. Many a relay has passed element testing and been put into service, only to
discover later that the trip circuit itself was not configured properly, or the scheme design was just
wrong. For pilot schemes, satellite end-to-end functional testing provides the opportunity to not
only test the local trip path, but to confirm pilot equipment operability, such as carrier time delays,
signal levels, ancillary equipment operation, etc. Functional testing is further described in section
5.5.
5.2 Test Switches
Electromechanical relays were usually single function devices with fixed trip output terminals. For
example terminals 1 and 10 would be the trip function. Most contained built-in test switches or
paddles that could be removed for isolation. The electromechanical relays that did not have these
features were either hard wired directly to other devices or wired to a separate test device. Styles of
test devices varied among manufactures, but were all installed to allow adequate and safe testing.
Microprocessor relays are typically not simple one-function devices with built-in test switches.
Many relays are utilized in cross-functional groups like line protection, breaker failure, and
automatic reclosing in the same relay with programmable outputs. Functions formerly built in
discrete relay logic are now contained within the single device or devices with established
communication paths. However, test switches as applied to a microprocessor relay are
fundamentally no different than their predecessors.
Test switches are functional devices used to isolate the external sources to a relay. With this
concept, the device can be a traditional physical switch on the panel, a slide-link terminal block, or
a physical test switch wired to an input and used to block communication trip outputs, or possibly a
software enabled block within the logic. All of the different methods have advantages and
disadvantages and depend on several factors, such as panel space, utility practice, safety, etc. The
use of external devices is not new. However, how test switches are configured with the usage of
microprocessor relays is new and can cause problems for the trip circuit design.
Panel density has increased with the advent of microprocessor relays. What formerly took two or
more panels will now fit into a single panel. The electromechanical relays generally contained large
studs where the microprocessor relays have smaller terminals or even plug-type connectors. What
used to be easy to “clip-on” test leads to a relay’s terminals is now more difficult. Another issue is
that with the unlimited ability to configure the microprocessor relays, the manner that the test
switches are connected may impact functional groups. For example, a typical electromechanical
relay would have a single switch, probably in the case. This switch was “assigned” to a single
function. The microprocessor relay may be configured with multiple outputs performing trip
functions including breaker fail outputs. If a shared test switch is used for these trips, then
unintended system impacts could occur during testing.
Overall, what formerly worked for an electromechanical scheme may not work for a microprocessor
scheme. It must be assured a new design maintains the ability to adequately test, and that testing
can be performed appropriately when changing to a microprocessor scheme.
Page 38
C-16 Working Group June 2014
Relay Scheme Design Using Microprocessor Relays
A Supplement to Relay Trip Circuit Design by IEEE PSRC 1999
38
In a fully automated design, microprocessor relay logic will use very few or no test switches.
However, the maintainability and testing of the scheme need to be part of the design. It is useful to
maintain the idea of test switches but not in a physical sense but in a virtual sense. A virtual test
switch can be part of the logic of each trip/close Boolean equation allowing for testing the function
without taking the relay out of service. A consistent practice will be needed to avoid complexity.
Another factor that needs to be considered is the amount of logic that the microprocessor can
handle. There may be a limit of Boolean variable, control bits that are available in the relay. Thus,
the ability to use virtual test switches may be reduced. A good design feature is to display the bit
status that will be on the incoming and outgoing sides of the virtual switch in addition to the switch
status itself. Proper documentation of the logic diagram is very important for maintenance and
testing.
Procedures or labels are needed to clarify to an operator that a single microprocessor relay are now
doing multifunction targeting thus turning off a malfunctioned relay may in fact turn off not just one
protection function but many. Conversely, it must be understood that injecting test currents and
voltages in a microprocessor relay is going to affect all the functions and elements in that relay.
5.3 Expandability
Electromechanical relays were usually installed in a punched-out designed panel. Changes were
difficult and usually required cutting new holes for the additional relays. Recent relay design
provides for such things as a 19” rack design. Physical additions are easier as spare plates, affixed
with screws, are replaced with additional relays.
The microprocessor relays are complex and usually have many more functions that are ever
enabled. They are inherently expandable. For example, take an existing electromechanical step-
distance two-zone scheme that needed to be upgraded to a carrier based four-zone scheme. With an
electromechanical scheme, additional relays and possibly a new panel would be needed. With an
existing microprocessor scheme, most of the changes are software settings within existing relays
and any additional equipment such as carrier would probably fit into the rack-type panel with little
modification.
5.4 Power Up / Power Down Considerations
5.4.1 Logic States, Output States
It is important to know the status of the Boolean bit during power loss. There are two types of
memory that are used to store this type of information. A volatile type reset to a preset value thus
not maintaining the last state received by the device. A non-volatile type will remember the last
state received by the device. The security vs. dependability requirements of trip/close or block
trip/close help determine which is required.
5.4.2 Network Consideration
The power up/down status of the relay device is not the only one affecting the logic. In some
designs where the relays are communicating to each other a high traffic condition may cause
Page 39
C-16 Working Group June 2014
Relay Scheme Design Using Microprocessor Relays
A Supplement to Relay Trip Circuit Design by IEEE PSRC 1999
39
consideration communication failure. The temporary loss of the network will prevent data being
passed between devices or cause additional delay. Most of communication protocol used on this
physical layer of the network has a detection method that can be used to indicate that the
network/message quality has been lost. The same consideration for power up/down can be applied
here.
5.5 Functional testing
Functional testing is a broad subject and is applied differently by different utilities. For the
purposes of this report, functional testing is defined as the testing required to verify the entire trip
path, including the trip logic.
The electromechanical relays were usually single function devices that were combined with other
relays to form logical tripping schemes. Relay logic was discrete and depicted as such on
schematics. The level of understanding by engineers and field personnel developed over decades of
usage. The microprocessor relays changed all that when the discrete logic was replaced in a single
relay. What was easy to follow changed to a “black box”.
The requirement for functional testing remains the same. The change is that the logic design needs
to be clearly conveyed to anybody that needs to know it and also needs to include testability within
the design. This requires knowledge of how functional testing is performed and for the craft in how
to interpret the logic. For example, if the test physically blocks the directional unit contacts of an
electromechanical overcurrent relay, the same directional blocking function would need to be
considered in the microprocessor scheme, especially if the logic is contained in software.
Drawings, settings, and testing philosophies vary widely. The functional design of the logic needs
to be clearly communicated and the functional testing defined so that it can be adequately
performed.
5.6 Frequency of Testing vs. Self-Check Alarming
Electromechanical relays tend to drift out of calibration and require periodic adjustment. When
microprocessor relays are out of calibration, they cannot be adjusted. This usually indicates a
failure in the relay. Many of their failures tend to be catastrophic, that is, some function within
them just quits working. They typically have self-diagnostics built in and will alarm on such
failures. However, it is good to remember self-diagnostics cannot check everything. Self-
diagnostics are limited to the digital realm. They cannot check the analog input circuitry, that is, the
CT and PT inputs. They also cannot check the health of the output contacts. The analog inputs can
be checked by comparing the meter output to another source. And the output contacts can,
somewhat, be checked by reviewing event reports (somewhat because the event report will not help
if the physical contacts are burned out). Therefore, regular maintenance is still required. Once a
relay is commissioned and put in service, some utilities are choosing to only test relays if the relay
configuration changes or the relay’s self-check alarm asserts. They assume more frequent testing
has few benefits and many negatives. Others require testing on a regular schedule but generally
perform fewer and simpler tests than during the initial commissioning. The testing interval is
usually much longer than for older electromechanical relays. The time required to perform the test
Page 40
C-16 Working Group June 2014
Relay Scheme Design Using Microprocessor Relays
A Supplement to Relay Trip Circuit Design by IEEE PSRC 1999
40
are much shorter since no calibrations can be made. Testing requires time and effort, and there is a
risk that changes to the relay will accidently be introduced that result in later problems.
Firmware control is an important consideration relative to testing frequency since firmware updates
are often at the mercy of the testing interval. Manufacturers update firmware to resolve bugs in the
previous version and to add additional functionality and features. A utility may not choose to keep
relays updated with the latest firmware and may not even track what version of firmware is on a
relay. Critical updates need to be communicated differently than evolutionary updates, perhaps via
a Product Advisory Letter (PAL), to trigger a special maintenance check.
Finally, with an extended testing interval, good records and reference material have become even
more critical. Manufacturer’s reference material needs to be updated per new manuals or
addendums as functionality and features are added to relays via firmware changes.
6 Documentation
6.1 Single Line Diagrams
The meter/relay single line diagram’s purpose is to provide a summary view of the overall
protection and controls scheme for a substation on a single diagram or set of diagrams. In the past,
nearly all of the single function devices were shown on the single line diagram so it was easy to
determine the protection and control functions that were installed and how they were connected.
Today, many single line diagrams only show a multifunction relay with no indication of which
protection and control functions are programmed to be served by which device. To make matters
worse, some diagrams use device code 11, multifunction device, to identify these devices so it is not
even possible to determine what their primary function is. C37.2, IEEE Standard for Electrical
Power System Device Function Numbers, Acronyms and Contact Designations includes
Informative Annex A which describes methods such as the list box method for documenting the
protection and control functions of multifunction devices on single line diagrams. There are
ongoing efforts to improve single line diagrams with the goal to provide the same level of detail as
was previously available for protection and controls schemes implemented with single function
devices.
6.2 Logic
Some of the logic is user programmable while other parts are static. With the use of a combination
of relay inputs and outputs, the logic can be programmed to mimic legacy hard wired schemes; in
effect, duplicating the operation of such schemes within the relay itself. Logic within the relay
consists of variables, timers and latches from which functionality is programmed via combinations
of these elements using the conventional Boolean logic gates: AND, OR, NOT etc… Internal
“hardwired” logic exists to create certain protective element functions which are usually designed to
provide a primary function for which the relay was created. Since variables can have many
combinations of elements defining their state, there is a need to document the logic scheme in a
manner which allows for ease of use and understanding. In some microprocessor relays, variables
are grouped and stored by function type, such as: Timer1, Timer2, Timer3 or Latch1, Latch2,
Page 41
C-16 Working Group June 2014
Relay Scheme Design Using Microprocessor Relays
A Supplement to Relay Trip Circuit Design by IEEE PSRC 1999
41
Latch3. In other relays, specific timers may be assigned to function with certain other elements, and
are grouped and stored together with those elements, such as: Phase OC 1, Phase Timer1 or Latch1,
Latch1 Timer. Due to this fact, it could be difficult to see the overall function that is being
constructed logically within the relay by just viewing the settings report. Documenting this data in
the form of logic diagrams provides a clear method of representing the operation of the various
schemes logically constructed within the relay. In essence, what was once represented by series and
parallel combinations of open and closed contacts, coils, resistors, lights and diodes on an
elementary diagram is now represented as a combination of logic elements on a logic diagram.
Although elementary diagrams are still needed to diagram the wired schematics connecting
microprocessor relay inputs and outputs, the logic diagram is necessary to completely describe the
functions of the microprocessor relay in the scheme.
6.3 Intra-Substation and Inter-Substation Communications
Scheme design utilizing microprocessor relays frequently includes relay to relay communication
such as an IEC61850 substation scheme or a transmission line pilot protection scheme. Having a
full understanding of the scheme would include an understanding of that relay to relay
communication. Tables and logic diagrams showing this communicated I/O should be a standard
supplement to normal documentation of physical I/O.
Drawing details must show how the communications are accomplished and to what other devices
the communications are being made. For intra-sub communications this can be a part of referencing
circuits from one drawing to another within the substation. Inter-sub communications can be more
difficult to reference since the remote substation might be owned by another entity. In this case, as
much detail specifying the remote substation relay as possible could be included in the drawings.
A description of the scheme can be included in station operating instructions to further document
how the scheme functions. This can be helpful in the case where communication engineering and
substation engineering are separate entities and their design drawings aren’t fully integrated.
6.4 Operating Instructions
Operating instructions are usually provided to those who will be operating specific equipment and
its associated protection and control schemes. With the advent of the use of microprocessor based
relaying, many control functions have been incorporated in the devices. Since the device is
monitoring system analog data such as voltages and currents, local users may need instructions on
how to access the data via the front panel of the devices in order to verify switching. Often,
pushbuttons available on the relays will be programmed to take the place of functional switches
eliminating the available “visible operation” that a device such as an isolation switch provided.
Users will have to rely on cutout status indication from lights or front panel display messages to
determine that a certain operation was performed properly. Those operating from remote locations
with access to a SCADA data view may not see much difference in their displays or how they
operate for control, but they may see new alarms associated with the devices and possibly more data
since there is often more calculated data available from these devices. One significant change in
remote operations occurs in how operators will need to respond to issues involving microprocessor
devices such as the relay fail alarm. Since many functions may be programmed in the single device,
Page 42
C-16 Working Group June 2014
Relay Scheme Design Using Microprocessor Relays
A Supplement to Relay Trip Circuit Design by IEEE PSRC 1999
42
instructions need to describe what protections and controls have been affected and what actions to
take to minimize the risk of undesirable events. Since microprocessor relays perform multiple
protective functions, describing the targeting for the different types of operations will need to be
addressed.
6.5 Operator Alarms
The microprocessor relays have the capability to provide operator information such as breaker
status, breaker alarms, communications alarms, etc. The relay settings contain the alarm
information: however, the settings probably aren’t available to the operator or if they are there
might not be sufficient comments for the operator to know. A complete listing of the alarms
available within each relay should be included in the documentation for station operation so the
operator can know what to expect from each relay.
7 Training
The deployment of microprocessor relays has not diminished the importance of training. Training
is a critical aspect in the success of any microprocessor relay design scheme. The more complex
the scheme, the more training may be required. The advantage of a complex scheme versus the
amount of training that scheme may require needs to be weighed. The type of training may cover
different aspects than the electromechanical relaying design such as software and computer based
testing tools, and different symbols on schematic diagrams. Training may also be required of
different utility personnel than in the past such as planning and communication groups depending
on the application of the respective relaying scheme.
8 Lessons Learned
The change from electromechanical to microprocessor relays has resulted in many benefits and
created some new problems. From the viewpoint of this report, the microprocessor relays have
greatly simplified trip circuit design and provided for the addition of several useful functions.
These new devices with their multiple definable inputs and outputs have virtually eliminated the
need for auxiliary devices and steering diodes. The sensitivity of target functions have been
eliminated. However, newer targeting techniques are more virtual in nature and not directly
associated with the energized trip path. The much simpler external wiring has helped to eliminate
external sneak circuits and made the eventual replacement of devices much faster and easier.
Among the added features are the inclusion of continuous trip coil monitoring with alarm capability
and the ability to add additional alarms for breakers, system changes, and for the relay itself.
Some of the potential problems created include adequate representation of internal logic, the testing
of internal logic, added burden to station batteries, and the need for increased redundancy. Testing
requirements must be modified to adequately prove the design. It can be very tempting to overuse
features and functionality within the device and in the process create more problems. The best
engineered designs are those that are the simplest and most robust ones that ultimately achieve the
most reliability.
Page 43
C-16 Working Group June 2014
Relay Scheme Design Using Microprocessor Relays
A Supplement to Relay Trip Circuit Design by IEEE PSRC 1999
43
REFERENCES
1. Sachdev M. et. al., “Understanding Microprocessor Based Technology Applied To
Relaying” Report to the IEEE Power System Relay Committee http://www.pes-psrc.org/ 2004
2. IEEE Tutorial Course, Microprocessor Relays and Protection Systems, 88EH0269-1-PWR-
1987
3. Pickett, B., Signo-Diaz M., Baker, A., Schaefer, J., Meinardi, J.- FPL (Florida Power &
Light Co), Kasztenny, B., Voloh, I.- General Electric- Multilin Depew,A., Wolete, J.- Potomac
Electric Power Co; “Restrike and Breaker Failure Conditions for Circuit Breakers Connecting
Capacitor Banks” TAMU 2008 Protective Relay Conference and Ga Tech Protective Relay
Conference.
4. Pickett, B. et. al. “Reducing Outage Durations Through Improved Protection and
Autorestoration in Distribution Substations.” Report to the IEEE Power System Relay Committee
http://www.pes-psrc.org/ 2009
5. American Institute of Aeronautics & Astronautics (AIAA) S-102-2-5:2009, Performance-
based Sneak Circuit Analysis (sca) Requirements.
6 Dawson, D. et. al. “Relay Trip Circuit Design “ IEEE Special Publication http://www.pes-
psrc.org/ 1999
7 Ward, S. et. al. “Redundancy Considerations for Protective Relaying” Report to the IEEE
Power System Relay Committee http://www.pes-psrc.org/ 2010
8 Chano, S. et. al. “Ancillary Protective and Control Functions Common to Multiple
Protective Relays” Report to the IEEE Power System Relay Committee http://www.pes-psrc.org/
2009