25
RePaper eInk Development Board for ARM + GNU/Linux Created by Sean Moss-Pultz Last updated on 2016-11-02 05:30:06 PM UTC

RePaper eInk Development Board for ARM + GNU/LinuxCreated by Sean Moss-Pultz
Last updated on 2016-11-02 05:30:06 PM UTC

23556789
91010
1212
151516
18181818
19202021222323
252525
Guide Contents
Guide ContentsOverviewAssembly and WiringAttach the Display
Open the SocketInsert the Flex ConnectorClose the SocketRemove the protective film
Attach the Breakout CableLocate Pin 1Insert the cable
Wiring the Raspberry PiConnections:
Wiring the BeagleBone BlackInsert the header segmentsConnections:
Driver and ExamplesCompiling
Raspberry PiBeagleBone Black
EPD fusePython Demo Programs - directory "demo"
Drawing DemoImage demoTwitter DemoPartial DemoCounter Demo
FAQRaspberry PiBeagleBone Black
© Adafruit Industries https://learn.adafruit.com/repaper-eink-development-board-arm-linux-raspberry-pi-beagle-bone-black
Page 2 of 25

Overview
Now you can add eInk displays to your favorite single-board Linux computers! This tutorialwill show you how to wire and run the RePaper eInk displays in the Adafruit shop on aRaspberry Pi or BBB
The RePaper development boards from Pervasive Displays come with a driver board that ispowered from 3V and has level shifting on all the I/O pins so it can be used with 5Vmicrocontrollers such as the Arduino. The PCB also has a lot of driver circuitry required tokeep the display running smoothly such a temperature sensor, FLASH memory and ZIFsocket. All signals are broken out to a 20 male socket header on the left. A 20 pinsocket/socket cable is included to make wiring easier and there's also some extra-longheader so you can plug these wires into a header or a breadboard.
The displays are available in 1.44", 2" and 2.7" diagonal sizes with resolutions of 128x96,200x96 and 264x176 pixels. These are intended for use as small dynamic signage ingrocery stores since a barcode displayed on it can be scanned by a laser barcode-reader.The display does not require any power to keep the image and will stay 'on' without anypower connection for many days before slowly fading. Of course, its also daylight readableand is very high contrast. This makes it excellent for data-logging applications, outdoordisplays, or any other ultra-low power usages
RePaper/PDI have provided a suite of example code for Raspberry Pi and BeagleBoneBlack.
© Adafruit Industries https://learn.adafruit.com/repaper-eink-development-board-arm-linux-raspberry-pi-beagle-bone-black
Page 3 of 25

© Adafruit Industries https://learn.adafruit.com/repaper-eink-development-board-arm-linux-raspberry-pi-beagle-bone-black
Page 4 of 25

Assembly and WiringThe eInk development board comes completely assembled. All you need to do is attach theeInk display and the breakout cable.
Attach the Display
© Adafruit Industries https://learn.adafruit.com/repaper-eink-development-board-arm-linux-raspberry-pi-beagle-bone-black
Page 5 of 25
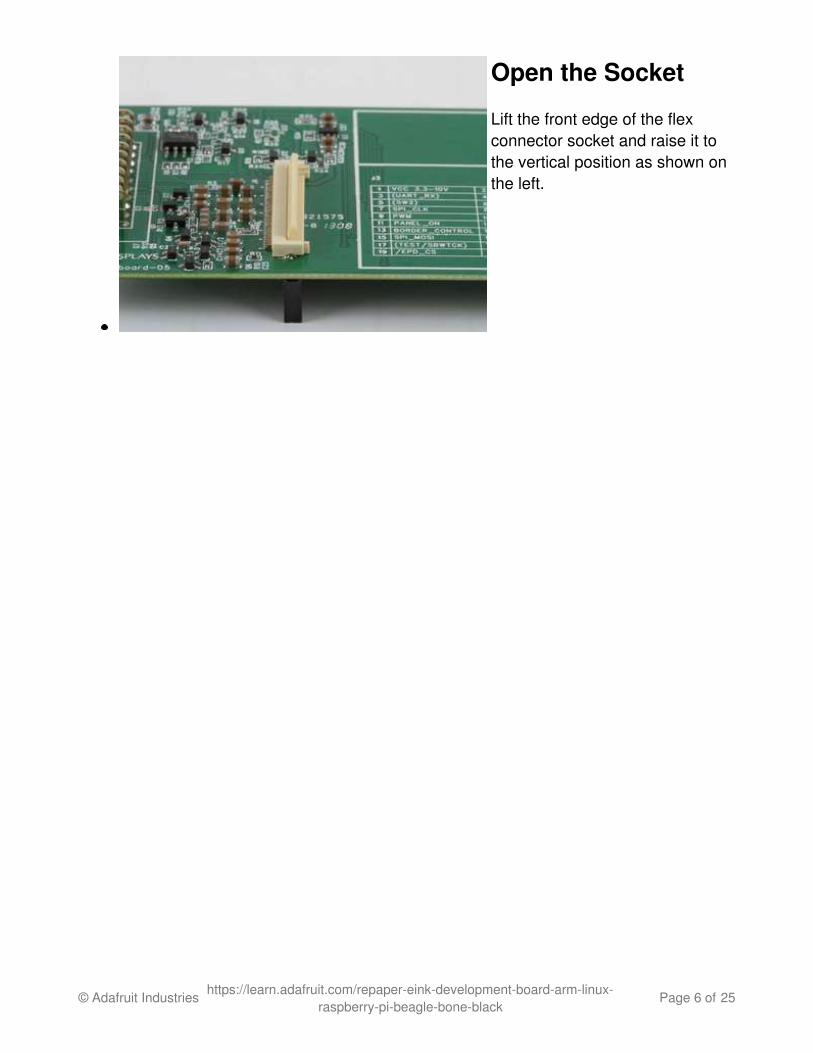
Open the Socket
Lift the front edge of the flexconnector socket and raise it tothe vertical position as shown onthe left.
© Adafruit Industries https://learn.adafruit.com/repaper-eink-development-board-arm-linux-raspberry-pi-beagle-bone-black
Page 6 of 25

Insert the FlexConnector
Gently slide the flex connector(contact side down) into thesocket.
Make sure that the display isaligned with the outline on thesilkscreen.
© Adafruit Industries https://learn.adafruit.com/repaper-eink-development-board-arm-linux-raspberry-pi-beagle-bone-black
Page 7 of 25

Close the Socket
Gently push the socket closed tolock the flex connector in place.
© Adafruit Industries https://learn.adafruit.com/repaper-eink-development-board-arm-linux-raspberry-pi-beagle-bone-black
Page 8 of 25

Remove theprotective film
Lift the white tab and gently peelback the protective film from thedisplay.
Use care when handling the assembled development board. The display is attached onlyby the flex connector, and this can be damaged by excessive force. If desired, a small pieceof tape can be used to stabilize the display on the board.
Attach the Breakout Cable
© Adafruit Industries https://learn.adafruit.com/repaper-eink-development-board-arm-linux-raspberry-pi-beagle-bone-black
Page 9 of 25
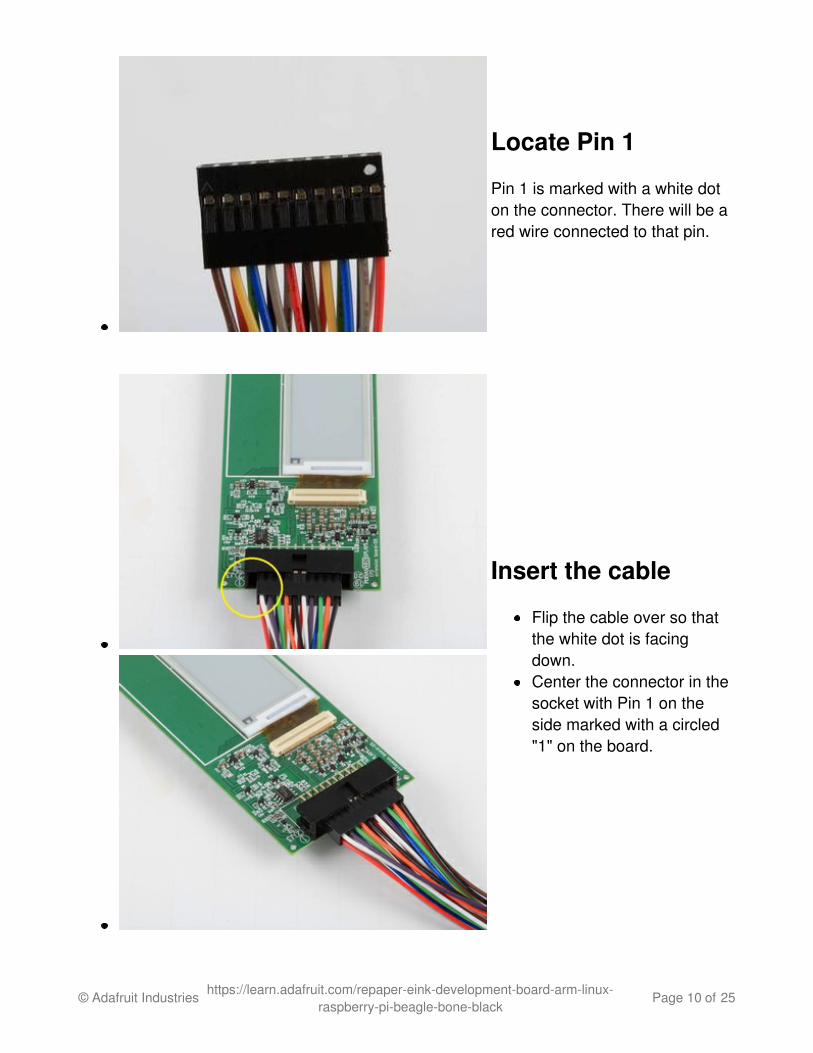
Locate Pin 1
Pin 1 is marked with a white doton the connector. There will be ared wire connected to that pin.
Insert the cable
Flip the cable over so thatthe white dot is facingdown.Center the connector in thesocket with Pin 1 on theside marked with a circled"1" on the board.
© Adafruit Industries https://learn.adafruit.com/repaper-eink-development-board-arm-linux-raspberry-pi-beagle-bone-black
Page 10 of 25

Be sure to center the connector in the socket. The socket is wider than the connector andthe display will not work if you plug it in off-center.
© Adafruit Industries https://learn.adafruit.com/repaper-eink-development-board-arm-linux-raspberry-pi-beagle-bone-black
Page 11 of 25
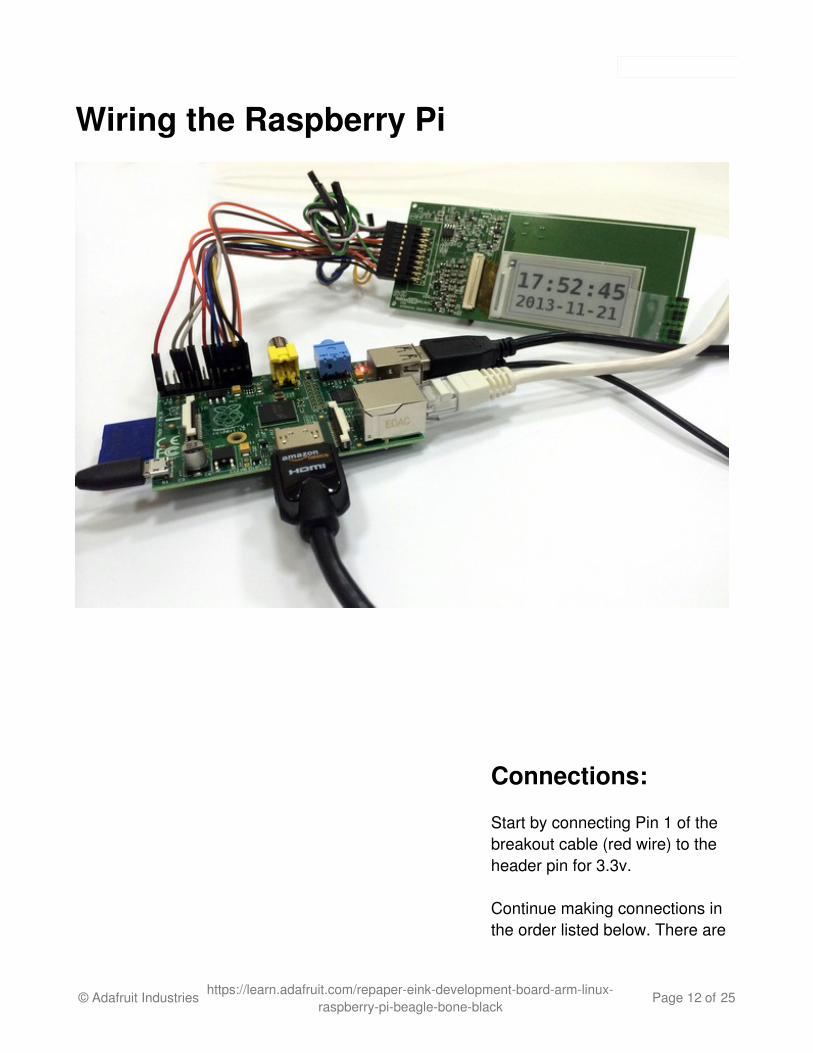
Wiring the Raspberry Pi
Connections:
Start by connecting Pin 1 of thebreakout cable (red wire) to theheader pin for 3.3v.
Continue making connections inthe order listed below. There are
© Adafruit Industries https://learn.adafruit.com/repaper-eink-development-board-arm-linux-raspberry-pi-beagle-bone-black
Page 12 of 25

duplicate wire colors, so don'tmix them up!
Make connections to:
(Red #1) -> P1-01 (Green #6) -> not used (extADC required)(Yellow #7) -> P1-23 (Orange #8) -> P1-22 (Brown #9) -> P1-12 (Black #10) -> P1-18 (Red #11) -> P1-16 (White #12) -> P1-10 (Grey #13) -> P1-08 (Purple #14) -> P1-21 (Blue #15) -> P1-19 (Orange #18) -> P1-26 (Brown #19) -> P1-24 (Black #20) -> P1-25
© Adafruit Industries https://learn.adafruit.com/repaper-eink-development-board-arm-linux-raspberry-pi-beagle-bone-black
Page 13 of 25

Now you are done wiring and ready to test the display!
© Adafruit Industries https://learn.adafruit.com/repaper-eink-development-board-arm-linux-raspberry-pi-beagle-bone-black
Page 14 of 25

Wiring the BeagleBone Black
Insert the headersegments
Insert the double-sided maleheader sections into theBeagleBone's headers. You canuse both sides to create a nicestand for the display.
© Adafruit Industries https://learn.adafruit.com/repaper-eink-development-board-arm-linux-raspberry-pi-beagle-bone-black
Page 15 of 25

Connections:
Start by connecting Pin 1 of thebreakout cable (red wire) to theheader pin for 3.3v.
Continue making connections inthe order listed below. There areduplicate wire colors, so don'tmix them up!
Make connections to:
(Red #1) -> P9-03(Green #6) -> -?- P9-39(not yet)(Yellow #7) -> P9-22(Orange #8) -> P9-27(Brown #9) -> P9-14(Black #10) -> P9-26(Red #11) -> P9-12(White #12) -> P9-23(Grey #13) -> P9-15(Purple #14) -> P9-21(Blue #15) -> P9-18(Orange #18) -> - Vcc P9-04(Brown #19) -> P9-17(Black #20) -> P9-01
© Adafruit Industries https://learn.adafruit.com/repaper-eink-development-board-arm-linux-raspberry-pi-beagle-bone-black
Page 16 of 25

Now you are done wiring and ready to test the display!
© Adafruit Industries https://learn.adafruit.com/repaper-eink-development-board-arm-linux-raspberry-pi-beagle-bone-black
Page 17 of 25

Driver and Examples
CompilingThese test programs should compile with no additional libraries, but the EPD driver needsthe fuse development library installed. And a few examples make us of the Python ImagingLibrary (PIL)
Raspberry Pi
sudo apt-get install libfuse-dev python-imaging
# For the Twitter Demosudo apt-get install python-setuptools sudo easy_install pip
git clone https://github.com/repaper/gratis.gitcd gratis/PlatformWithOSmake rpisudo make rpi-install
BeagleBone Black
© Adafruit Industries https://learn.adafruit.com/repaper-eink-development-board-arm-linux-raspberry-pi-beagle-bone-black
Page 18 of 25

sudo opkg install libfuse-dev python-imaging
# For the Twitter demoopkg install python-pip python-setuptools
# Extra item for BeagleBone# The program uses device tree files to access the GPIOsgit clone https://github.com/nomel/beaglebone.gitcp -p beaglebone/gpio-header/generated/gpio-P9.* /lib/firmware
git clone https://github.com/repaper/gratis.gitcd gratis/PlatformWithOSmake bbsudo make bb-install
EPD fuseThis allows the display to be represented as a virtual directory of files, which are:
File Read/Write Description-------- ----------- ---------------------------------version Read Only The driver version numberpanel Read Only String describing the panel and giving its pixel width and heightcurrent Read Only Binary image that matches the currently displayed image (big endian)display Read Write Image being assembled for next display (big endian)temperature Read Write Set this to the current temperature in Celsiuscommand Write Only Execute display operationBE Directory Big endian version of current and displayLE Directory Little endian version of current and display
Command Byte Description-------- ----- --------------------------------'C' 0x43 Clear the EPD, set `current` to all zeros, `display` is not affected'U' 0x5A Erase `current` from EPD, output `display` to EPD, copy display to `current`
Notes:
The default bit ordering for the display is big endian i.e. the top left pixel is the value0x80 in the first byte.The `BE` directory is the same as the root `current` and `display`.The `LE` directory `current` and `display` reference the top left pixel as 0x01in thefirst byte.The `current_inverse` and `display_inverse` represent black as zero (0) and white as
© Adafruit Industries https://learn.adafruit.com/repaper-eink-development-board-arm-linux-raspberry-pi-beagle-bone-black
Page 19 of 25
one (1) while those item without the suffix represent the display's natural coding(0=>white, 1=>black)The particular combination of `BE/display_inverse` is used in the Python EPD demosince it fits better with the Imaging library used.
Set Panel Size in FUSE Configuration
cat /etc/default/epd-fuse
Expected Output:
# Default settings for epd-fuse file is sourced by /bin/sh from# /etc/init.d/epd-fuse
# Options to pass to epd_fuse#EPD_MOUNTPOINT=/dev/epd#EPD_SIZE=2.0#EPD_OPTS=
Note: All the configurations are commented out and represent the default settings. If yourpanel is NOT the 2.0", then you must change this configuration.
How to edit the configuration file:
sudo nano /etc/default/epd-fuse
Uncomment the EPD_SIZE and change the value to your panel size (either 2.7 or 1.44).Save and exit.Start the Driver
sudo service epd-fuse startcat /dev/epd/panel
Expected Output for a 2.7" panel:
EPD 2.7 264x176
Python Demo Programs - directory"demo"
Drawing Demo
Draw some lines, graphics and text:
python demo/DrawDemo.py
© Adafruit Industries https://learn.adafruit.com/repaper-eink-development-board-arm-linux-raspberry-pi-beagle-bone-black
Page 20 of 25

Nothing happening on the screen? You may have a "COG 2" version of the display. Seethe FAQ page!
Image demo
Accepts a lists of image files on the command line.Converts them to grey scale to ensure formats like PNG, JPEG and GIF will work.Inverts the image since the E-Ink panel is reverse (i.e. black on white).Converts image to single bit (PIL "1" mode).Display the middle of the image (using crop function).Delay.Display the re-sized image.Delay before fetching next file.
Note: if scratch is installed on the system, the following commands will show some cartoonanimals. The images when re-sized will be distorted if the aspect ration of the originalimage is not the same as the display.
python demo/ImageDemo.py /usr/share/scratch/Media/Costumes/Animals/cat*python demo/ImageDemo.py /usr/share/scratch/Media/Costumes/Animals/d*.png
© Adafruit Industries https://learn.adafruit.com/repaper-eink-development-board-arm-linux-raspberry-pi-beagle-bone-black
Page 21 of 25
Twitter Demo
Setup easy_install and use it to get pip, then use pip to get tweepy. Copy the sampleconfiguration an edit to include your authentication information. Rather than using the basicauthentication it is better to set up a Twitter App and generate a token for this. The tokengeneration is quick athttps://dev.twitter.com/ (http://adafru.it/d2C).
After creating the App, just click the button to create an access token.
Use Ctrl-C to stop this program.
sudo pip install tweepy
# setup the configcp demo/tweepy_auth.py-SAMPLE demo/tweepy_auth.py
# *** edit the confignano demo/tweepy_auth.py
# run the demo (this watches for linux)python demo/TwitterDemo.py linux
© Adafruit Industries https://learn.adafruit.com/repaper-eink-development-board-arm-linux-raspberry-pi-beagle-bone-black
Page 22 of 25

Partial Demo
Display random overlapping rectangles using partial update. First argument is number ofrectangle to generate before updating the EPD, second number is the number of frames todisplay before the program exits.
python demo/PartialDemo.py 3 20
Counter Demo
Display a 4 digit hex counter uses partial update to only change the updated digits. This will
© Adafruit Industries https://learn.adafruit.com/repaper-eink-development-board-arm-linux-raspberry-pi-beagle-bone-black
Page 23 of 25

look somewhat strange as the display inversion will make the counter appear to go througha sequence like: 0000 0001 0000 0001 ...delay... 0001 0002 0001 0002
Use Ctrl-C to stop this program.
python demo/CounterDemo.py 3 20
© Adafruit Industries https://learn.adafruit.com/repaper-eink-development-board-arm-linux-raspberry-pi-beagle-bone-black
Page 24 of 25

FAQEverything compiled correctly, but I get no activity on the screenThe default driver compile is for a COG 1 (Computer On Glass, version 1). Your RePaperscreen may be a COG 2.You can check this my carefully lifting the display and looking on the back of it. Look for abarcode starting with "TEM" or "VEM". If the seventh character of the barcode is 'B', then you have a COG 2. Follow theseinstructions for building the driver:
Raspberry Pi
make rpi-cleanmake COG_VERSION=V2 rpisudo make COG_VERSION=V2 rpi-installsudo reboot
After reboot make sure it is showing a "COG 2"
% cat /dev/epd/panelEPD 2.7 264x176 COG 2% echo C > /dev/epd/command
BeagleBone Black
make bb-cleanmake COG_VERSION=V2 bbmake COG_VERSION=V2 bb-installreboot
I can't get the eInk Display service to start on my Pi
See https://forums.adafruit.com/viewtopic.php?f=22&t=105673 (http://adafru.it/djF) for apossible fix!
© Adafruit Industries Last Updated: 2016-11-02 05:30:05 PM UTC Page 25 of 25


