Page 1
INDUSTRIAL TRAINING REPORT
AALL--FFEELLAAIIJJ PPLLAASSTTIICCSS
BY
BBIIBBIINN KK BBAABBYY
Final Year B.Tech
(Mechanical Engineering)
2013-14
DEPARTMENT OF MECHANICAL ENGINEERING
SAINTGITS COLLEGE OF ENGINEERING Kottukulam Hills, Pathamuttom P .O, Kottayam 686532, Kerala.
Tel : +91-481-2436169, 0481-2436170, Fax : 0481-2430349
E-mail : [email protected] , Website : www.saintgits.org
Page 2
ACKNOWLEDGEMENT
I would like to begin by expressing my whole heated gratitude to God the Almighty for being
the light in my journey to complete this Industrial training with satisfaction.
I am highly grateful to Mr Fredy Fernandes, Production Manager for his valuable guidance,
Mr Ravi for enriching me about the working of the factory and to all the supervisors and staff
for taking their valuable time to explain the various processes
Page 3
CONTENTS
SERIAL NO. TITLE PAGE NO.
1 Raw Materials 1
1.1 Polypropylene (PP) 1
1.2 High Density Polyethylene
(HDPE) 1
1.3 Polystyrene (Ps) 1
2 Process Layout 2
3 Blending 3
3.1 What Is Blending? 3
3.2 Why Blend? 3
3.3 Blenders Used 4
4 Injection Molding 5
4.1 Introduction 5
4.2 Process And Equipment 5
4.3 Cycle For Injection 7
4.4 The Mold 8
4.5 Injection Molding Machines 9
5 Blow Molding 11
6 Factory Layout 13
7 Screen Printing 14
8 Safety Precaution
16
Page 4
1
CHAPTER 1
1 RAW MATERIAL
1.1. Polypropylene (PP)
Also known as polypropene is a thermoplastic polymer used in a wide variety of applications
including, plastic parts and reusable containers of various types.
Features
Food Contact Acceptable, Good Impact Resistance, Good Stiffness, High Flow, High Impact
Resistance, High Stiffness, Resistant to Fatigue
Polypropylene is most commonly used for plastic moldings, wherein it is injected into a mold
while molten, forming complex shapes at relatively low cost and high volume; examples include
bottle tops, bottles, and fittings.
1.2. High Density Polyethylene (HDPE)
High-density polyethylene (HDPE) or polyethylene high-density (PEHD) is a polyethylene
thermoplastic made from petroleum.
Known for its large strength to density ratio, HDPE is commonly used in the production of plastic
bottles, and corrosion-resistant piping . HDPE is commonly recycled.
Features
It’s stronger than standard polyethylene, Acts as an effective barrier against moisture, Resists
insects, rot and other chemicals, It is easily recyclable
The two main grades:
Injection Grade and Blow Grade
1.3. Polystyrene (PS)
Polystyrene (PS) is a synthetic aromatic polymer made from the monomer styrene, a liquid
petrochemical.
As a thermoplastic polymer, polystyrene is in a solid (glassy) state at room temperature but flows if
heated above about 100 °C, its glass transition temperature. It becomes rigid again when cooled
Features
Polystyrene can be rigid or foamed, general purpose polystyrene is clear, hard and brittle,
Polystyrene can be naturally transparent, but can be colored with colorants
The two main grades :
High Impact Polystyrene (HIP) and b. Styrene Acrylonitrile (SAN) Plastic
Page 5
2
CHAPTER 2
PROCESS LAYOUT
BLENDING
PROCESS MACHINING
PACKING/STORAGE
LOADING FOR DISPATCH
EXPORT
Page 6
3
CHAPTER 3
3 BLENDING
3.1 What is blending?
Blending is an efficient, thorough and automated way to combine material ingredients, in pre-
determined proportions, and then mix them together in preparation for the production of plastic
parts or products. Materials to be blended may be metered into the blend by quantity (volumetric
blending) or by weight (gravimetric blending).
3.2 Why Blend?
Every processor has a choice in how to feed material to their process in order to produce saleable
product with the characteristics they require.
In the past, most processors purchased materials that were pre-compounded into specialized pellets
to produce the specific colour and properties that they needed. It was a very simple process then, to
simply feed these customized compounds into their process. However, the cost of these custom
compounds was significantly higher than the cost of the individual raw ingredients. In addition,
since many processors changed the material, the colour and the characteristics of the products they
produced, keeping quantities of all the uniquely compounded materials they processed created an
inventory nightmare.
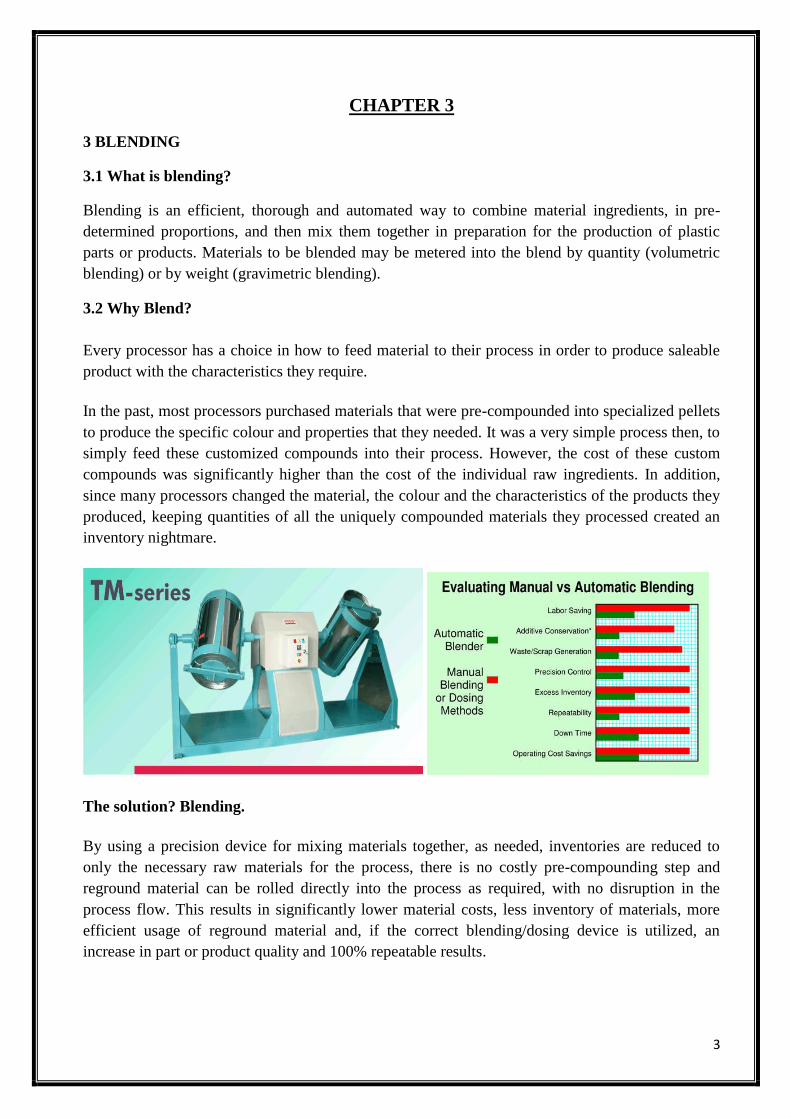
The solution? Blending.
By using a precision device for mixing materials together, as needed, inventories are reduced to
only the necessary raw materials for the process, there is no costly pre-compounding step and
reground material can be rolled directly into the process as required, with no disruption in the
process flow. This results in significantly lower material costs, less inventory of materials, more
efficient usage of reground material and, if the correct blending/dosing device is utilized, an
increase in part or product quality and 100% repeatable results.
Page 7
4
3.3 BLENDERS USED AL – FELAIJ PLASTICS.
The Blenders used here have two Slow rotating drum, that makes the product slide down gently on
the smooth internal walls, performing a mixing effect.
The blenders here are used for mixing the Colour with the raw material.
It is also used to add materials to raw material to increase strength.
Each container has a capacity of about 100kg, 4 Bags(Each of 25 kg)
1 and half cup of colouring material is added
The compound added – Colour and additive master batches - EMKOLOR
The drums are rotated till its mixed thoroughly.
Page 8
5
CHAPTER 4
4.1 INJECTION MOLDING
Injection molding is a process in which a polymer is heated to a highly plastic state and forced to
flow under high pressure into a mold cavity, where it solidifies. The molded part, called a molding,
is then removed from the cavity. The process produces discrete components that are almost always
net shape. The production cycle time is typically in the range 10 to 30 seconds, although cycles of
one minute or longer are not uncommon. Complex and intricate shapes are possible with injection
molding. The challenge in these cases is to design and fabricate a mold whose cavity is the same
geometry as the part and which also allows for part removal. Part size can range from about 50 g (2
oz) up to about 25 kg (more than 50 lb).
4.2 PROCESS AND EQUIPMENT
Equipment for injection molding evolved from metal die casting.
An injection molding machine consists of two principal components:
(1) The plastic injection unit and, (2) The mold clamping unit.
The injection unit is much like an extruder. It consists of a barrel that is fed from one end by a
hopper containing a supply of plastic pellets. Inside the barrel is a screw whose operation surpasses
that of an extruder screw in the following respect: in addition to turning for mixing and heating the
polymer, it also acts as a ram which rapidly moves forward to inject molten plastic into the mold. A
nonreturn valve mounted near the tip of the screw prevents the melt from flowing backward along
the screw threads. Later in the moulding cycle the ram retracts to its former position. Because of its
dual action, it is called a reciprocating screw. To summarize, the functions of the injection unit are
to melt and homogenize the polymer, and then inject it into the mold cavity
The melting of the polymer in the injection system is obtained by zones of electric heaters
surrounding the barrel containing a supply of plastic pellets. The temperature in each zone is set
according to the requirement in the Temperature controller or Pyrometer. Each zone is provided
with a Thermocouple that sends electric signals to the temperature controller. The temperature
controller then controls an electromagnet that’s used to open or close the contactor that is
connected to the Electric heater in each zone.
Each zone is represented as HN, H1, H2, H3, H4, etc.
Page 9
6
The clamping unit is concerned with the operation of the mold. Its functions are to:
(1) Hold the two halves of the mold in proper alignment with each other;
(2) Keep the mold closed during injection by applying a clamping force sufficient to resist the
injection force; and
(3) Open and close the mold at the appropriate times in the molding cycle.
The clamping unit consists of two platens, a fixed platen and a movable platen, and a mechanism
for translating the latter. The mechanism is basically a power press that is operated by hydraulic
piston or mechanical toggle devices of various types
Page 10
7
4.3 CYCLE FOR INJECTION
The cycle for injection molding of a thermoplastic polymer proceeds in the following sequence. Let
us pick up the action with the mold open and the machine ready to start a new molding:
(1) Mold is closed and clamped.
(2) A shot of melt, which has been brought to the right temperature and viscosity by heating and by
the mechanical working of the screw, is injected under high pressure into the mold cavity. The
plastic cools and begins to solidify when it encounters the cold surface of the mold. Ram pressure
is maintained to pack additional melt into the cavity to compensate for contraction during cooling.
(3) The screw is rotated and retracted with the nonreturn valve open to permit fresh polymer to
flow into the forward portion of the barrel. Meanwhile, the polymer in the mold has completely
solidified.
(4) The mold is opened, and the part is ejected and removed.
Page 11
8
4.4 THE MOLD
The mold is the special tool in injection molding; it is custom-designed and fabricated for the given
part to be produced. When the production run for that part is finished, the mold is replaced with a
new mold for the next part.
Two-Plate Mold. The conventional two-plate mold consists of two halves fastened to the two
platens of the molding machine's clamping unit. When the clamping unit is opened, the two mold
halves open, as shown in (b). The most obvious feature of the mold is the cavity, which is usually
formed by removing metal from the mating surfaces of the two halves. Molds can contain a single
cavity or multiple cavities to produce more than one part in a single shot. The figure shows a mold
with two cavities. The parting surfaces (or parting line in a cross-sectional view of the mold) are
where the mold opens to remove the part(s).
In addition to the cavity, there are other features of the mold that serve indispensable functions
during the molding cycle. A mold must have a distribution channel through which the polymer
melt flows from the nozzle of the injection barrel into the mold cavity. The distribution channel
consists of (1) a sprue, which leads from the nozzle into the mold; (2) runners, which lead from
the sprue to the cavity (or cavities); and (3) gates that constrict the flow of plastic into the cavity.
There are one or more gates for each cavity in the mold.
An Ejection system is needed to eject the molded part from the cavity at the end of the molding
cycle. Ejector pins built into the moving half of the mold usually accomplish this function. The
cavity is divided between the two mold halves in such a way that the natural shrinkage of the
molding causes the part to stick to the moving half. When the mold opens, the ejector pins push the
part out of the mold cavity.
A cooling system is required for the mold. This consists of an external pump connected to
passageways in the mold, through which water is circulated to remove heat from the hot plastic.
Air must be evacuated from the mold cavity as the polymer rushes in. Much of the air passes
through the small ejector pin clearances in the mold. In addition, narrow air vents are often
machined into the parting surface; only about 0.03 mm (0.001 in.) deep and 12 to 25 mm (0.5 to
1.0 in.) wide, these channels permit air to escape to the outside but are too small for the viscous
polymer melt to flow through.
Page 12
9
4.5 INJECTION MOLDING MACHINES :
Injection molding machines differ in both injection unit and clamping unit. The name of the
injection molding machine is generally based on the type of injection unit used.
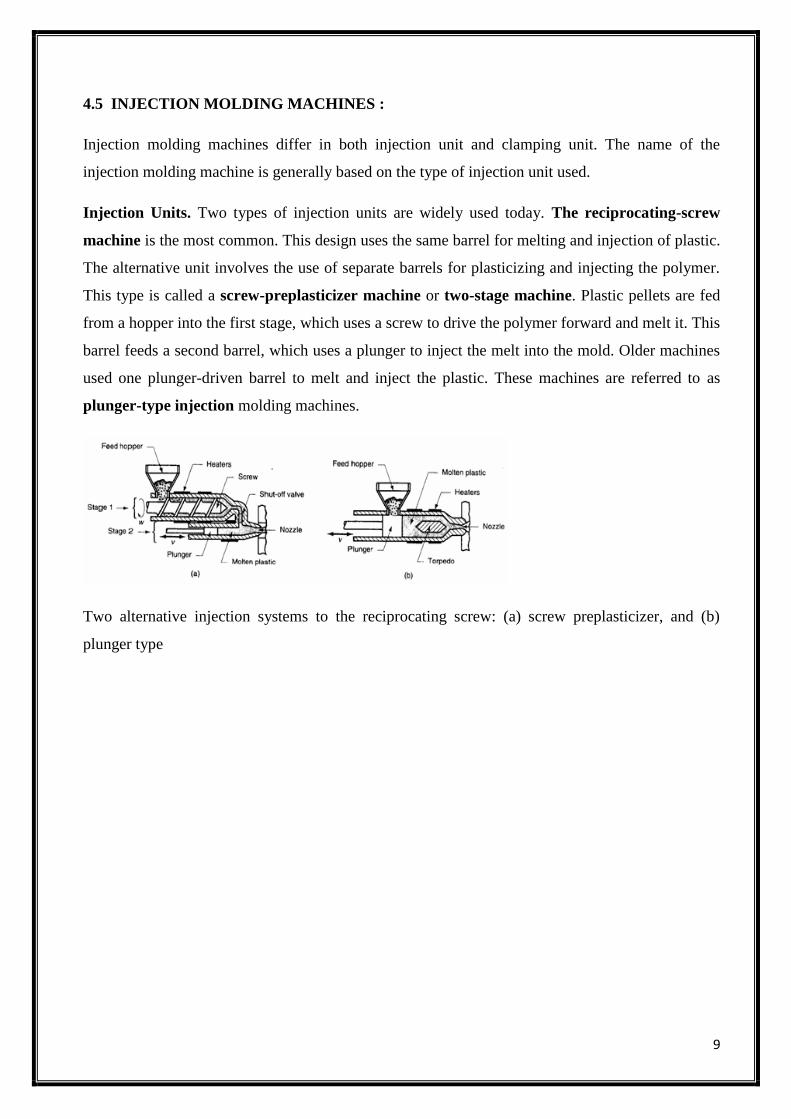
Injection Units. Two types of injection units are widely used today. The reciprocating-screw
machine is the most common. This design uses the same barrel for melting and injection of plastic.
The alternative unit involves the use of separate barrels for plasticizing and injecting the polymer.
This type is called a screw-preplasticizer machine or two-stage machine. Plastic pellets are fed
from a hopper into the first stage, which uses a screw to drive the polymer forward and melt it. This
barrel feeds a second barrel, which uses a plunger to inject the melt into the mold. Older machines
used one plunger-driven barrel to melt and inject the plastic. These machines are referred to as
plunger-type injection molding machines.
Two alternative injection systems to the reciprocating screw: (a) screw preplasticizer, and (b)
plunger type
Page 13
10
Clamping Units. Clamping designs are of three types: toggle, hydraulic, and hydro- mechanical.
Toggle clamps include various designs. An actuator moves the crosshead forward, extending the
toggle links to push the moving platen toward a closed position. At the beginning of the movement,
mechanical advantage is low and speed is high; but near the end of the stroke, the reverse is true.
Thus, toggle clamps provide both high speed and high force at different points in the cycle when
they are desirable. They are actuated either by hydraulic cylinders or ball screws driven by electric
motors. Toggle-clamp units seem most suited to relatively low-tonnage machines. Two clamping
designs:
(a) one possible toggle clamp design (1) open and (2) closed; and (b) hydraulic clamping (1) open
and (2) closed. Tie rods used to guide moving platens not shown.
Hydraulic clamps are used on higher-tonnage injection-molding machines, typically in the range
1300 to 8900 kN (150 to 1000 tons). These units are also more flexible than toggle clamps in terms
of setting the tonnage at given positions during the stroke. Hydro-mechanical clamps are
designed for large tonnages, usually above 8900 kN (1000 tons); they operate by (1) using
hydraulic cylinders to rapidly move the mold toward closing position, (2) locking the position by
mechanical means, and (3) using high pressure hydraulic cylinders to finally close the mold and
build tonnage.
Page 14
11
CHAPTER 5
BLOW MOLDING
Blow molding is a molding process in which air pressure is used to inflate soft plastic into a mold
cavity. It is an important industrial process for making one-piece hollow plastic parts with thin
walls, such as bottles and similar containers. Since many of these items are used for consumer
beverages for mass markets, production is typically organized for very high quantities. The
technology is borrowed from the glass industry with which plastics compete in the disposable or
recyclable bottle market.
Blow molding is accomplished in two steps: (1) fabrication of a starting tube of molten plastic,
called a parison (same as in glass-blowing);the material has a MFI – 4(Melt Flow Index) and (2)
inflation of the tube to the desired final shape. Forming the parison is accomplished by either of
two processes: extrusion or injection molding.
Extrusion Blow Molding. This form of blow molding consists of the cycle illustrated below. In
most cases, the process is organized as a very high production operation for making plastic bottles.
The sequence is automated and usually integrated with downstream operations such as bottle filling
and labelling. It is usually a requirement that the blown container be rigid, and rigidity depends on
wall thickness among other factors.
Extrusion blow molding: (1) extrusion of parison; (2) parison is pinches at the top and sealed at the
bottom around a metal blow pin as the two halves of the mold come together; (3) the tube is
inflated so that it takes the shape of the mold cavity; and (4) mold is opened to remove the
solidified part.
Page 15
12
Materials and Products. Blow molding is limited to thermoplastics. Polyethylene is the polymer
most commonly used for blow molding; in particular, high density and high molecular weight
polyethylene (HDPE and HMWPE). In comparing their properties with those of low density PE
given the requirement for stiffness in the final product, it is more economical to use these more
expensive materials because the container walls can be made thinner. Other blow moldings are
made of polypropylene (PP), polyvinylchloride (PVC), and polyethylene terephthalate.
Disposable containers for packaging liquid consumer goods constitute the major share of products
made by blow molding; but they are not the only products. Other items include large shipping
drums (55 gallon) for liquids and powders, large storage tanks (2000 gallon), automotive gasoline
tanks, toys, and hulls for sail boards and small boats. In the latter case, two boat hulls are made in a
single blow molding and subsequently cut into two open hulls
Page 16
13
CHAPTER 6
FACTORY LAYOUT
Page 17
14
CHAPTER 7
SCREEN PRINTING
Screen printing is used to print the required advertisement or images on the plastic bottles
depending on the requirements of the customer. Two types of paints are mainly used in this
process:
Page 18
15
1. UV paint and 2. Normal paint
The different steps that are used in screen printing on bottles are:
1. Preparation of screen
- The screen which is made of a special type of cloth material called Silco and is attached to a
wooden frame using CSP FRAME ADHESIVE , 2- COMPONENT.
- The screen shampoo 711 is used for cleaning the screen
- A DUAL CURE EMULSION UR 720 HV is used to coat the screen, three times outside and two
times inside .
2. A negative image is placed on a light source.
3. The screen with the coating is placed on the Negative image over the light source for 4 minutes.
4. The image is then formed on the screen and is then mounted on the machine for printing.
5. The bottles to be printed are fed into a storage compartment.
6. They then pass through a conveyer section and are arranged in lines.
7. A laser and Photo sensor that is used for the correct alignment of the bottles before printing.
8. Air section plugs is used to turns the bottle depending upon the signal given by the laser and
photo sensor.
9. The bottles pass through a gas heater that is used to heat the bottles before the screen printing so
that the paint sticks on properly.
10. The first brush is used to accumulate the paint and the other brush to print it on the bottles.
11. The bottles are brought into UV chamber and exposed to UV Radiation.
12. The bottles are the packed and stored.
Page 19
16
CHAPTER 8
SAFETY PRECAUTION
1. Always contact machine builder before altering electrical or hydraulic system.
2. Do not operate the machine unless thoroughly instructed on safety rules and operation.
3. When working on machine for other than molding operations shaft of motor and turn disconnects to
“OFF” position.
4. DANGER- Do not operate with guard removed.
5. High Voltage before servicing turn off and lock main power disconnect and all circuits powered by
an external source. Do not modify electric or hydraulic circuits unless authorized buy manufacturer.
This machine may be under remote control. Earth ground the machine and electric power before
turning on power.
6. Additional guards, ventilation system and other safety equipment may be required. The employer
must add guarding to provide protection from potential pinch points created by injectors, cores and
other mold components.
7. WARNING FOR INJECTION MOLDING:
Rotating screw – don’t operate with hopper removed or put hand or feet into opening.
High pressure molten material , stand clear and wear protective gear when purging and servicing
injector system.
High voltage, high temperature, shutoff power when working on covers chamber bands and wiring.
Operating and service personnel must:
Always: Read and obey all instructions on the machine and in the user’s manual.
Always: Wear approved safety glasses or face shield safety shoes, and any other personnel protective
equipment specified by your employer.
Always: Stop the machine before making adjustments, cleaning the part drop area or any other area,
performing maintenance or service, or if you suspect a malfunction.
Always: Open the operator’s gate before reaching into the machine or to remove molded part or runners.
Never: Operate or service the machine if affected by alcohol, drugs or other substances or conditions
which decreases alertness or judgment.
Never: Reach over , under or around guards while the machine is in operation.
Never: Wear a ring or other jeweler necktie, or loose fitting clothing, or a long unrestrained hair style.
Never: Climb on machine.
Never: Operate the machine unless all operation instructions are understood and all guards, interlocks,
covers, safety devices or circuits and protective components are in place and functioning properly.
Don’t remove or Disfigure any instruction plates. Failure to follow these instructions may result in
serious personal injuries.