24
Republic of Kenya Ministry of Health ODK TECHNICAL USER GUIDE
Republic of Kenya
Ministry of Health
ODK TECHNICAL USER GUIDE
Contents 1. Introduction ..................................................................................................................... 3
2. ODK components used to collect Verbal Autopsy data ................................................... 3
2.1. ODK Aggregate ....................................................................................................... 4
2.2. Accessing ODK Aggregate ...................................................................................... 5
2.3. Site Administration ................................................................................................... 7
2.3.1. Adding Users ........................................................................................................ 7
2.3.2. XLSForm .............................................................................................................. 8
2.3.3. Upload a Form to your ODK Aggregate Instance .................................................. 8
2.3.4. Delete a Form from your ODK Aggregate instance ............................................... 9
2.3.5. Viewing Your Form Submissions .........................................................................10
2.3.6. Other Form Management Tasks ..........................................................................10
2.3.7. Exporting Data from ODK Aggregate as CSV ......................................................11
2.3.8. Setting up User Access Lists and Admin Settings ................................................11
2.4. ODK BRIEFCASE .................................................................................................. 13
2.4.1. Using ODK Briefcase to pull data from Aggregate ...............................................14
2.4.2. Using ODK Briefcase to export data ....................................................................17
2.5. ODK COLLECT ..................................................................................................... 19
2.5.1. Changing server settings .....................................................................................19
2.5.2. Downloading forms from server ...........................................................................20
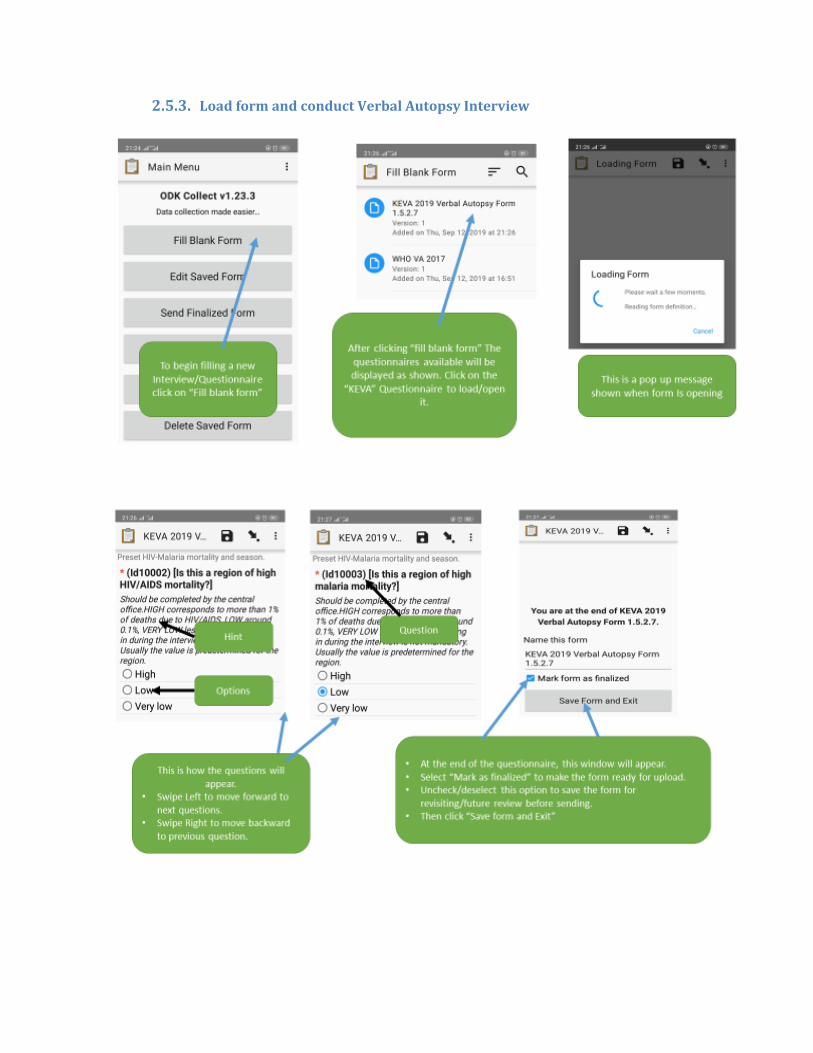
2.5.3. Load form and conduct Verbal Autopsy Interview ................................................21

1. Introduction
Open Data Kit (ODK, https://getodk.org/) is a suite of open source tools for electronic data
collection.
The core components of the suite are:
ODK Collect, an Android app that is used for data collection using forms (i.e.
questionnaires).
ODK Aggregate, a back-end server for data storage and analysis.
ODK Central, a back-end server that will replace ODK Aggregate in the future
ODK Build, a drag-and-drop form design tool.
ODK XLSForm, an Excel-based (works offline) form designer.
ODK XLSForm converter (offline/online) tool to simplify the creation of forms. Forms
designed with Excel can be converted to XForms for use with ODK tools.
ODK Briefcase, a desktop tool that pulls/pushes and exports data from
Aggregate/Central and Collect.
2. ODK components used to collect Verbal Autopsy data
For Verbal Autopsy (VA), the ODK components used for data collection are:
- ODK Aggregate
- ODK Collect
- ODK Briefcase
The questionnaire itself has been implemented using ODK XLSForm and can be downloaded for
local adaptation from the WHO website
(https://www.who.int/healthinfo/statistics/verbalautopsystandards/en/).
Users may add questions but under no circumstances should questions be removed from the
list since removal may interfere with cause of death assignment. The new questions added
besides not being analyzed by the algorithms, should also not have conditions that affect the
core questions so to avoid causing bias during COD assignment.
The following sections contain a detailed explanation of the ODK components used and the
instructions for installing and configuring these to implement VA data collection. The below
further outlines the integration of the use of the ODK tools in combination with the openVA
pipeline (http://openva.net/ ) to run automated VA coding algorithms and integration to DHIS2
VA program.
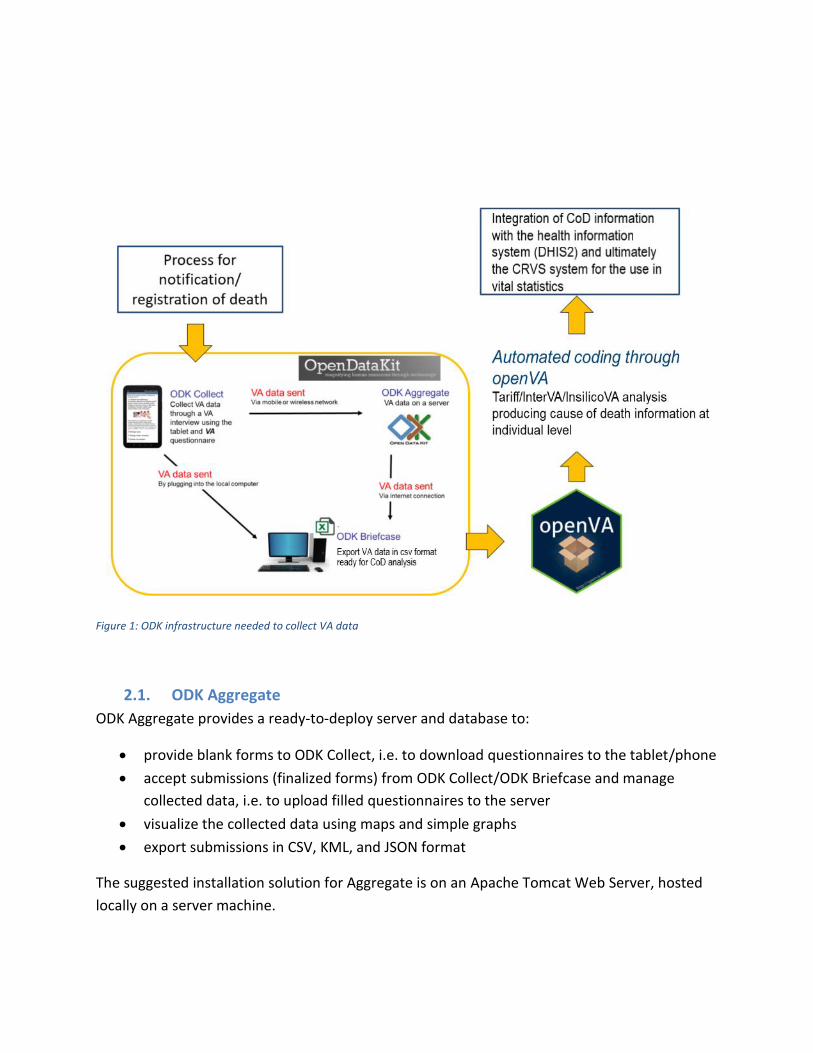
Figure 1: ODK infrastructure needed to collect VA data
2.1. ODK Aggregate
ODK Aggregate provides a ready-to-deploy server and database to:
provide blank forms to ODK Collect, i.e. to download questionnaires to the tablet/phone
accept submissions (finalized forms) from ODK Collect/ODK Briefcase and manage
collected data, i.e. to upload filled questionnaires to the server
visualize the collected data using maps and simple graphs
export submissions in CSV, KML, and JSON format
The suggested installation solution for Aggregate is on an Apache Tomcat Web Server, hosted
locally on a server machine.
ODK Aggregate also provides the possibility to be installed on cloud servers, and this could be
an option for test or pilot phases. DigitalOcean is an alternative but has a monthly fee.
To get detailed information on how to install ODK Aggregate on your local server (Windows,
macOS or Ubuntu) or on a cloud hosted server please read the instruction available on the following
link: ODK Aggregate installation
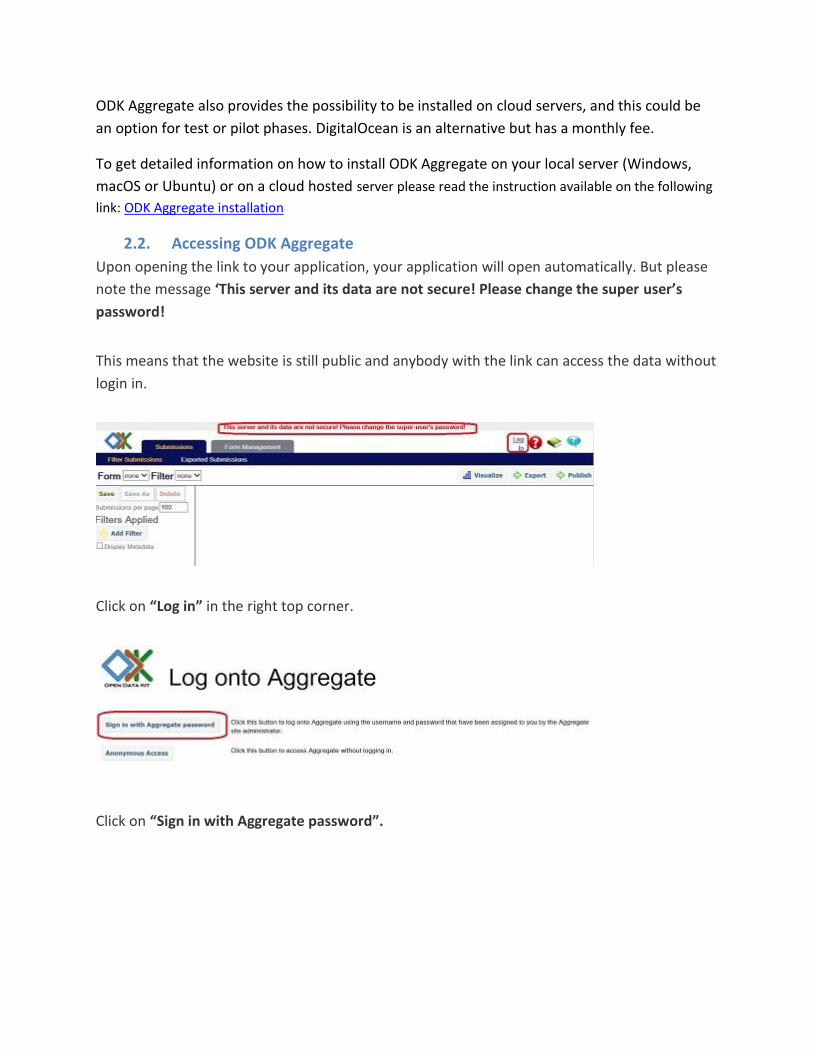
2.2. Accessing ODK Aggregate
Upon opening the link to your application, your application will open automatically. But please
note the message ‘This server and its data are not secure! Please change the super user’s
password!
This means that the website is still public and anybody with the link can access the data without
login in.
Click on “Log in” in the right top corner.
Click on “Sign in with Aggregate password”.
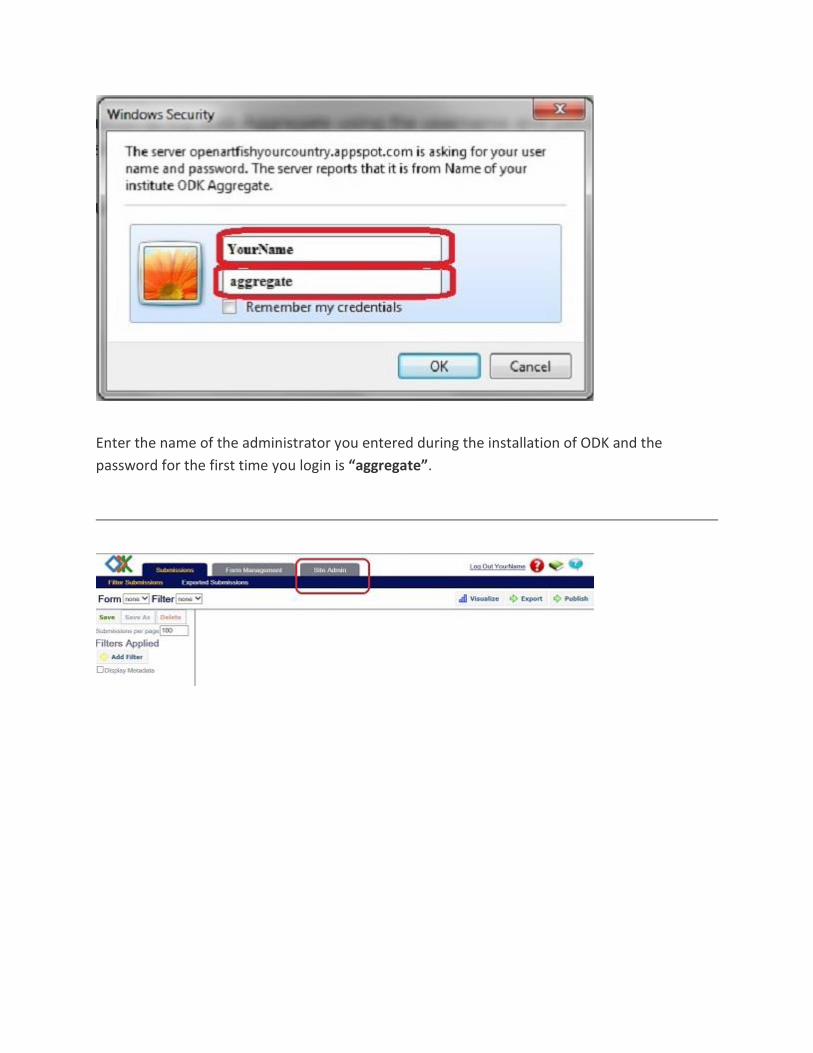
Enter the name of the administrator you entered during the installation of ODK and the
password for the first time you login is “aggregate”.
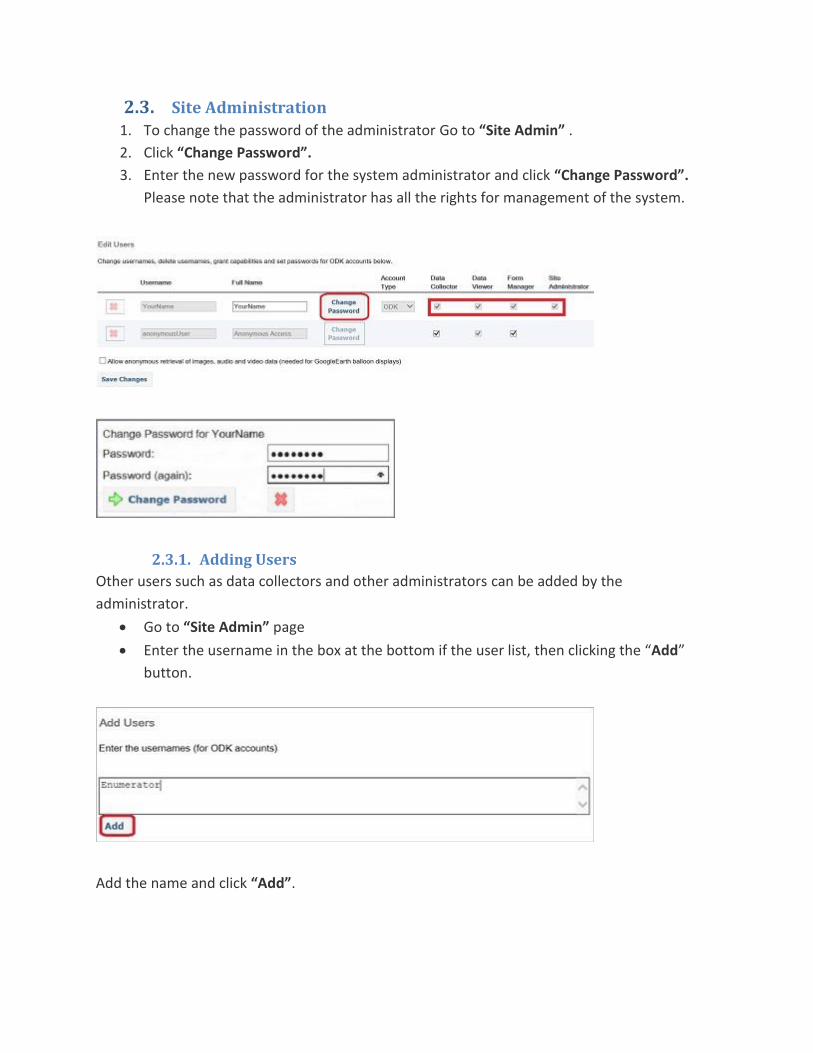
2.3. Site Administration 1. To change the password of the administrator Go to “Site Admin” .
2. Click “Change Password”.
3. Enter the new password for the system administrator and click “Change Password”.
Please note that the administrator has all the rights for management of the system.
2.3.1. Adding Users
Other users such as data collectors and other administrators can be added by the
administrator.
Go to “Site Admin” page
Enter the username in the box at the bottom if the user list, then clicking the “Add”
button.
Add the name and click “Add”.
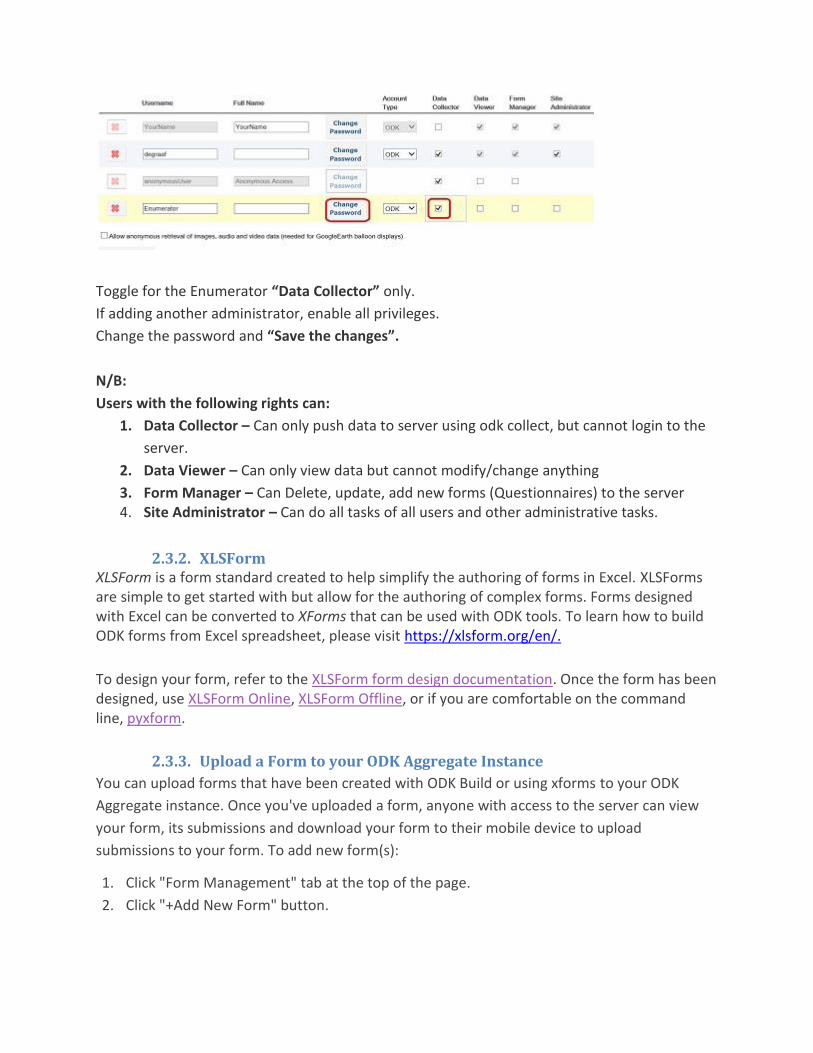
Toggle for the Enumerator “Data Collector” only.
If adding another administrator, enable all privileges.
Change the password and “Save the changes”.
N/B:
Users with the following rights can:
1. Data Collector – Can only push data to server using odk collect, but cannot login to the
server.
2. Data Viewer – Can only view data but cannot modify/change anything
3. Form Manager – Can Delete, update, add new forms (Questionnaires) to the server 4. Site Administrator – Can do all tasks of all users and other administrative tasks.
2.3.2. XLSForm XLSForm is a form standard created to help simplify the authoring of forms in Excel. XLSForms are simple to get started with but allow for the authoring of complex forms. Forms designed with Excel can be converted to XForms that can be used with ODK tools. To learn how to build ODK forms from Excel spreadsheet, please visit https://xlsform.org/en/.
To design your form, refer to the XLSForm form design documentation. Once the form has been designed, use XLSForm Online, XLSForm Offline, or if you are comfortable on the command line, pyxform.
2.3.3. Upload a Form to your ODK Aggregate Instance
You can upload forms that have been created with ODK Build or using xforms to your ODK
Aggregate instance. Once you've uploaded a form, anyone with access to the server can view
your form, its submissions and download your form to their mobile device to upload
submissions to your form. To add new form(s):
1. Click "Form Management" tab at the top of the page.
2. Click "+Add New Form" button.
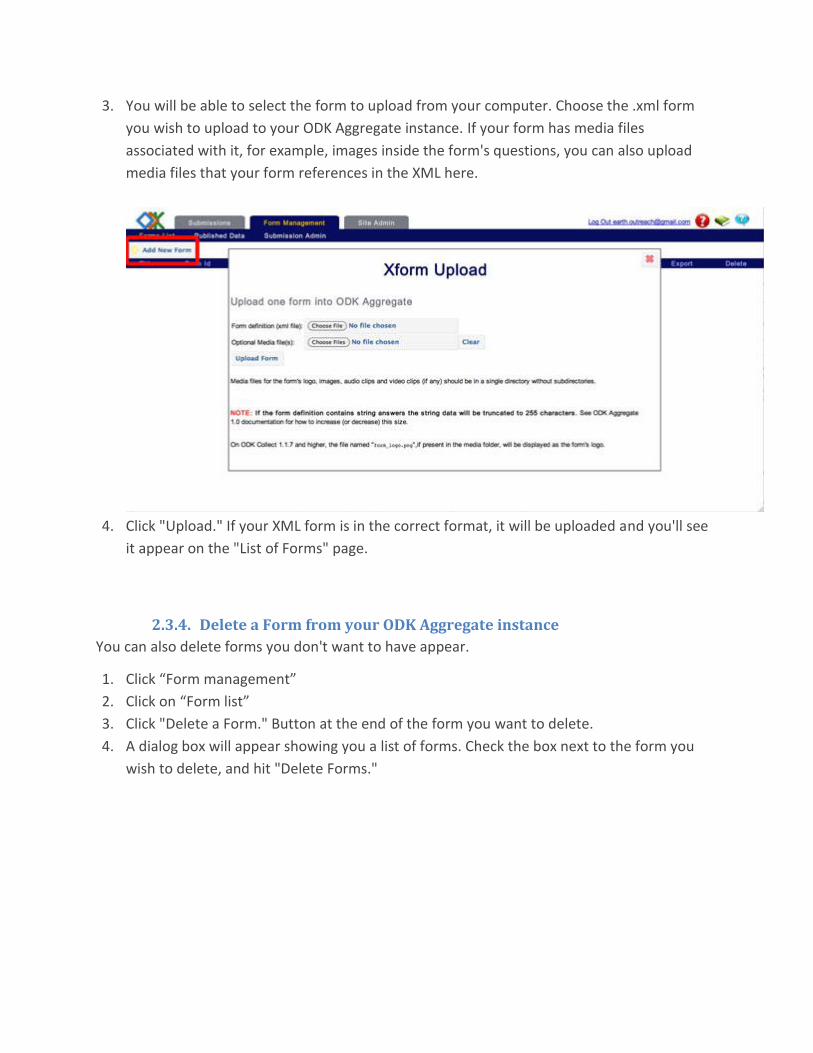
3. You will be able to select the form to upload from your computer. Choose the .xml form
you wish to upload to your ODK Aggregate instance. If your form has media files
associated with it, for example, images inside the form's questions, you can also upload
media files that your form references in the XML here.
4. Click "Upload." If your XML form is in the correct format, it will be uploaded and you'll see
it appear on the "List of Forms" page.
2.3.4. Delete a Form from your ODK Aggregate instance
You can also delete forms you don't want to have appear.
1. Click “Form management”
2. Click on “Form list”
3. Click "Delete a Form." Button at the end of the form you want to delete.
4. A dialog box will appear showing you a list of forms. Check the box next to the form you
wish to delete, and hit "Delete Forms."
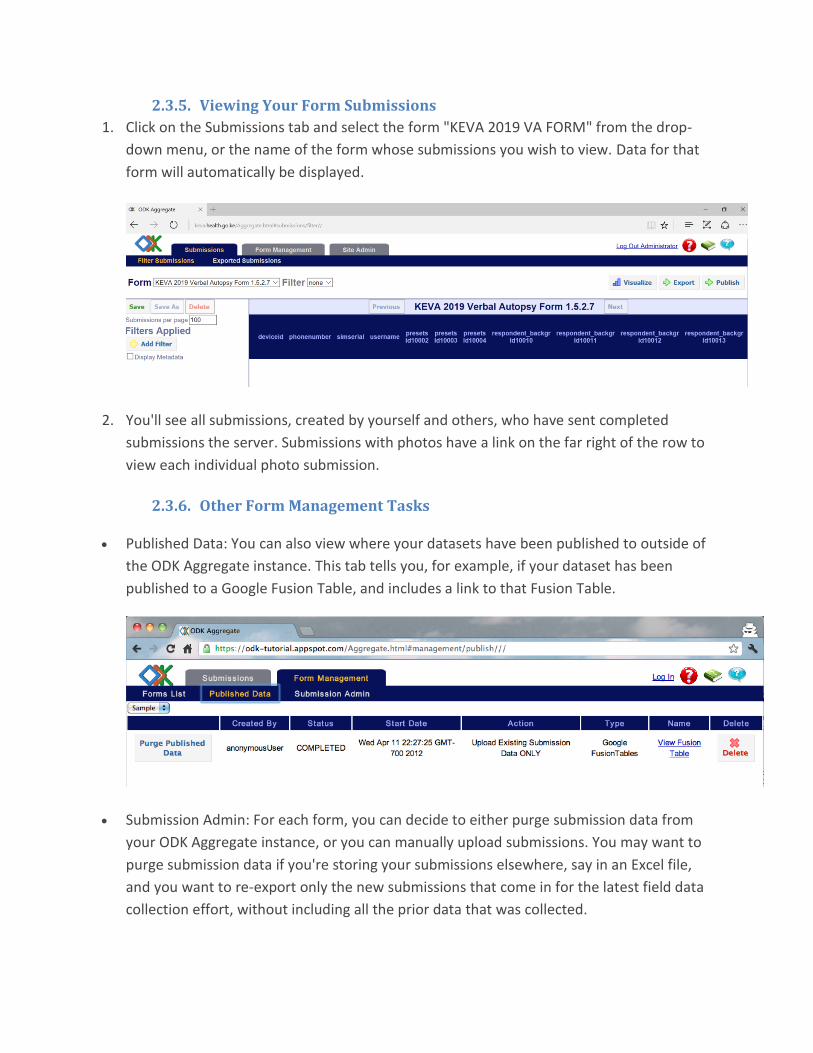
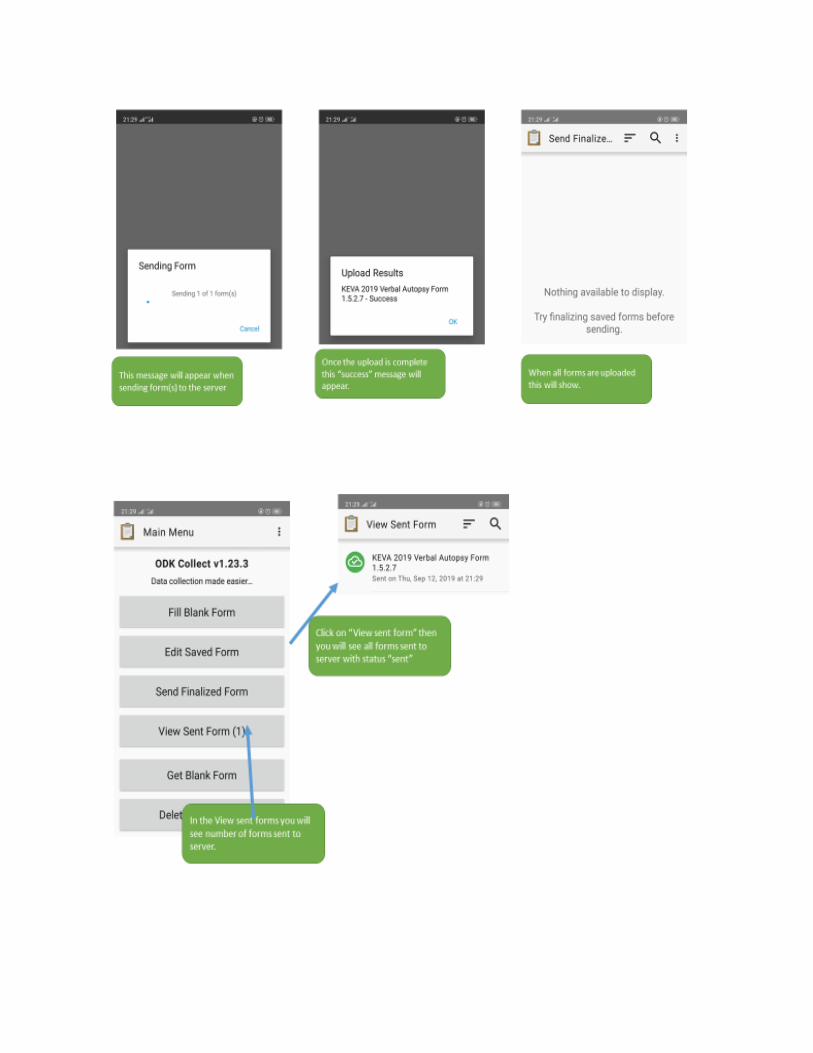
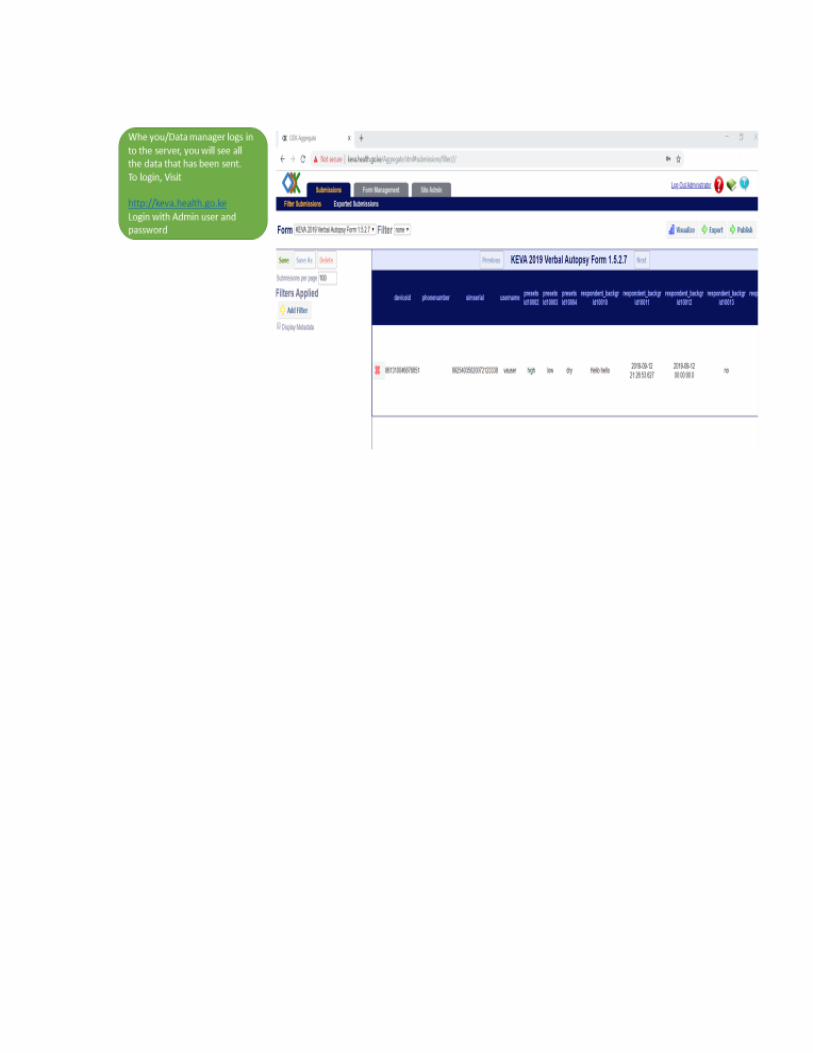
2.3.5. Viewing Your Form Submissions
1. Click on the Submissions tab and select the form "KEVA 2019 VA FORM" from the drop-
down menu, or the name of the form whose submissions you wish to view. Data for that
form will automatically be displayed.
2. You'll see all submissions, created by yourself and others, who have sent completed
submissions the server. Submissions with photos have a link on the far right of the row to
view each individual photo submission.
2.3.6. Other Form Management Tasks
Published Data: You can also view where your datasets have been published to outside of
the ODK Aggregate instance. This tab tells you, for example, if your dataset has been
published to a Google Fusion Table, and includes a link to that Fusion Table.
Submission Admin: For each form, you can decide to either purge submission data from
your ODK Aggregate instance, or you can manually upload submissions. You may want to
purge submission data if you're storing your submissions elsewhere, say in an Excel file,
and you want to re-export only the new submissions that come in for the latest field data
collection effort, without including all the prior data that was collected.
2.3.7. Exporting Data from ODK Aggregate as CSV
ODK Aggregate allows you to easily export your data as a .csv file. You might be interested in
this functionality if you want to import your data on other servers or in other applications like
Google Spreadsheets or Microsoft Excel.
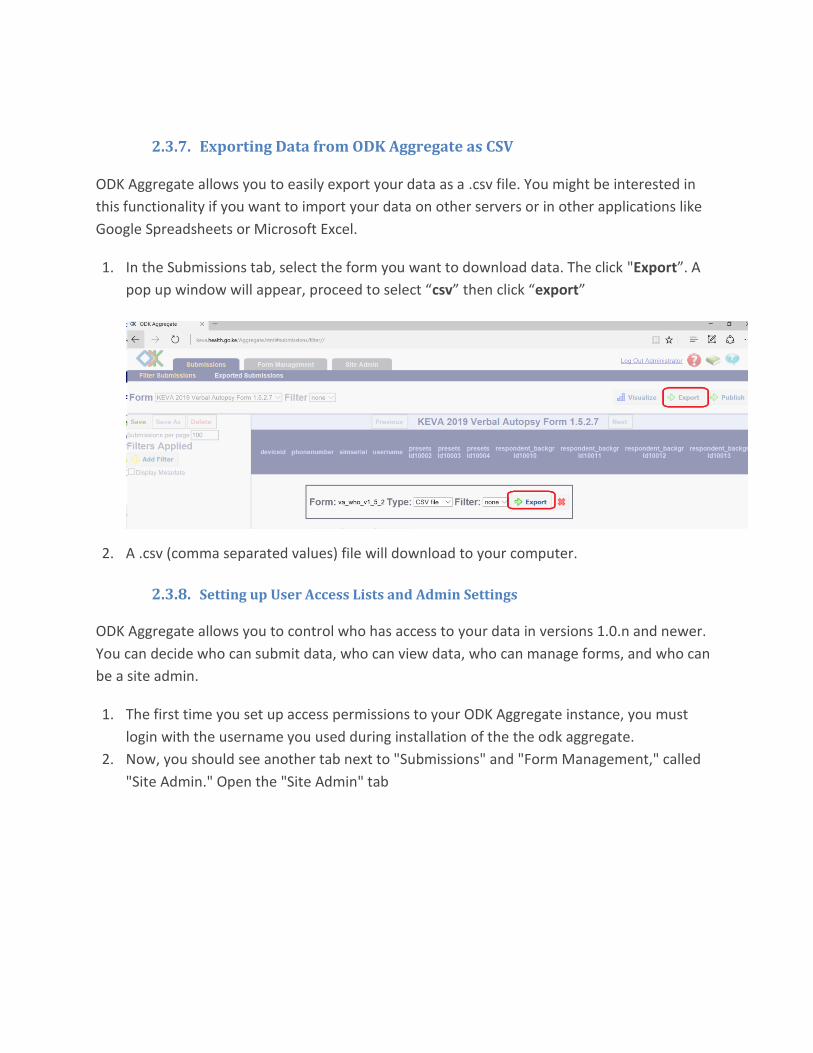
1. In the Submissions tab, select the form you want to download data. The click "Export”. A
pop up window will appear, proceed to select “csv” then click “export”
2. A .csv (comma separated values) file will download to your computer.
2.3.8. Setting up User Access Lists and Admin Settings
ODK Aggregate allows you to control who has access to your data in versions 1.0.n and newer.
You can decide who can submit data, who can view data, who can manage forms, and who can
be a site admin.
1. The first time you set up access permissions to your ODK Aggregate instance, you must
login with the username you used during installation of the the odk aggregate.
2. Now, you should see another tab next to "Submissions" and "Form Management," called
"Site Admin." Open the "Site Admin" tab
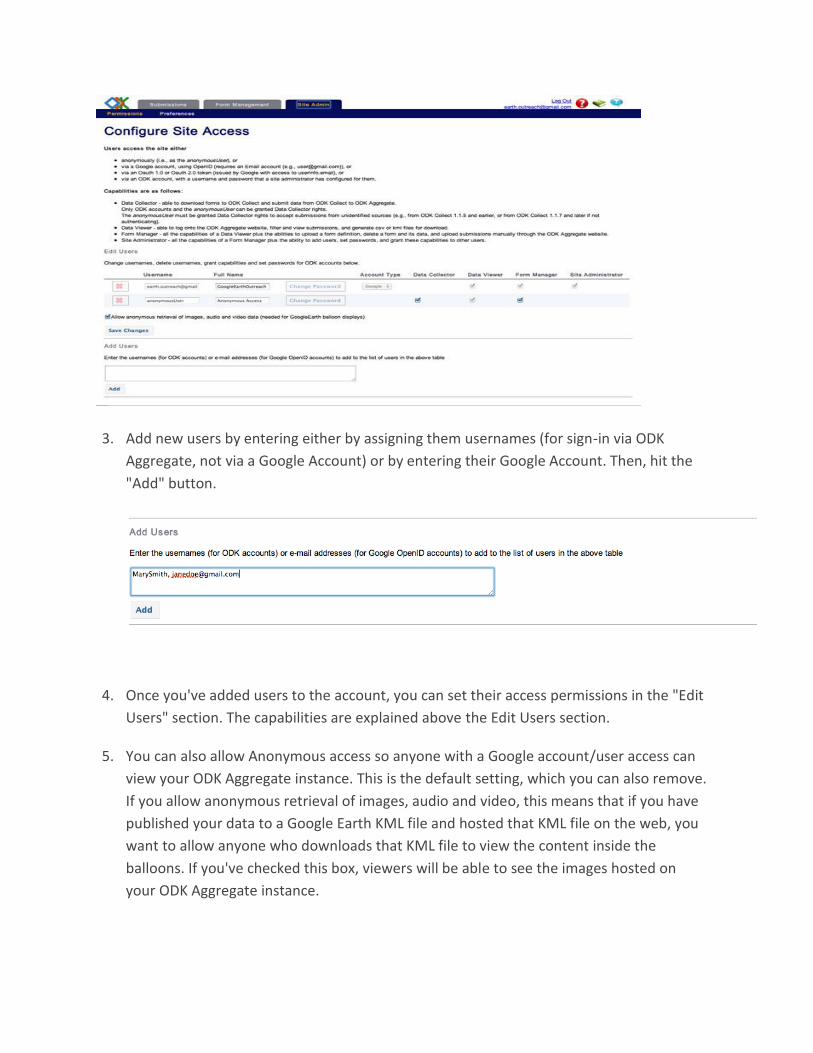
3. Add new users by entering either by assigning them usernames (for sign-in via ODK
Aggregate, not via a Google Account) or by entering their Google Account. Then, hit the
"Add" button.
4. Once you've added users to the account, you can set their access permissions in the "Edit
Users" section. The capabilities are explained above the Edit Users section.
5. You can also allow Anonymous access so anyone with a Google account/user access can
view your ODK Aggregate instance. This is the default setting, which you can also remove.
If you allow anonymous retrieval of images, audio and video, this means that if you have
published your data to a Google Earth KML file and hosted that KML file on the web, you
want to allow anyone who downloads that KML file to view the content inside the
balloons. If you've checked this box, viewers will be able to see the images hosted on
your ODK Aggregate instance.

2.4. ODK BRIEFCASE
Download latest ODK briefcase from https://github.com/getodk/briefcase/releases/
and when download is done double click open it.
Specify the location of the ODK storage area on your computer this will create the ODK
Briefcase Storage folder which will hold all the blank forms and finalized forms.
For example, we kept it to H:\CharsaddaData. It will automatically create a subfolder
named ‘ODK Briefcase Storage’ there
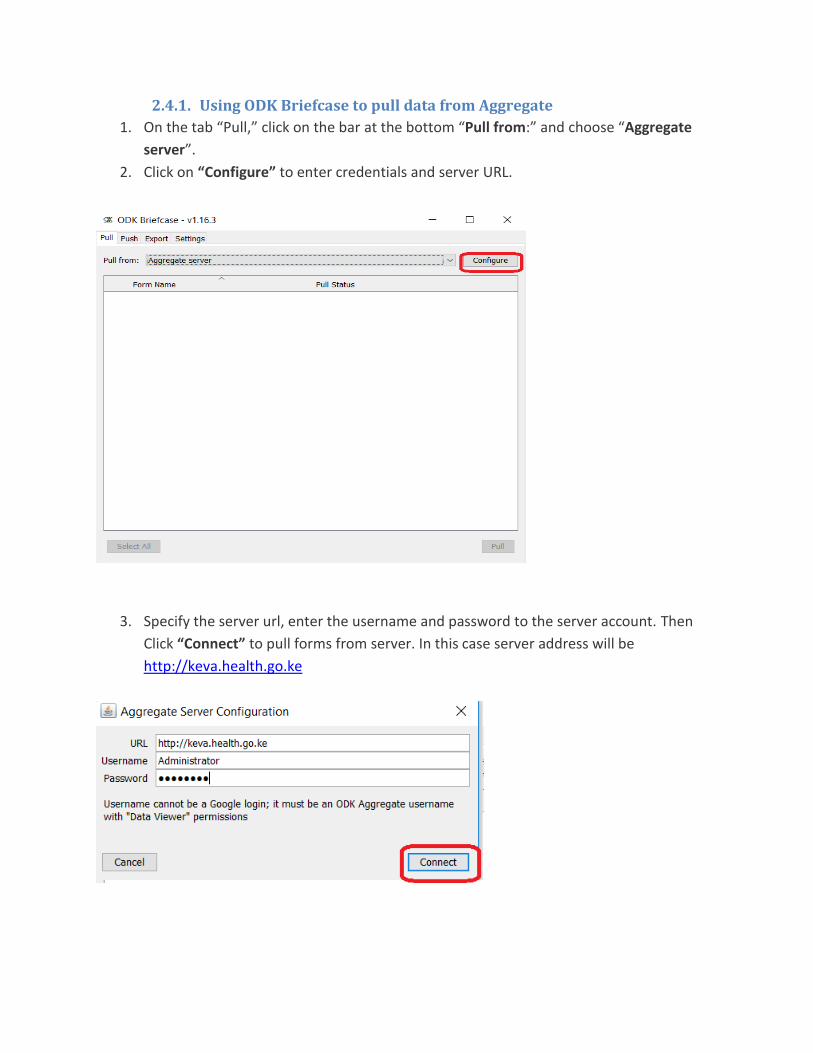
2.4.1. Using ODK Briefcase to pull data from Aggregate
1. On the tab “Pull,” click on the bar at the bottom “Pull from:” and choose “Aggregate
server”.
2. Click on “Configure” to enter credentials and server URL.
3. Specify the server url, enter the username and password to the server account. Then
Click “Connect” to pull forms from server. In this case server address will be
http://keva.health.go.ke

4. In the main screen, find the form you want to download and tick on the check box to
the left of it. In this case “KEVA 2019….”
5. Click “Pull” button at bottom right of page. It will start fetching the form and you will be
able to see the progress. ODK Briefcase automatically see if any form is already
downloaded in the given folder. In that case it will quickly go through those forms and
will fetch only the new records.
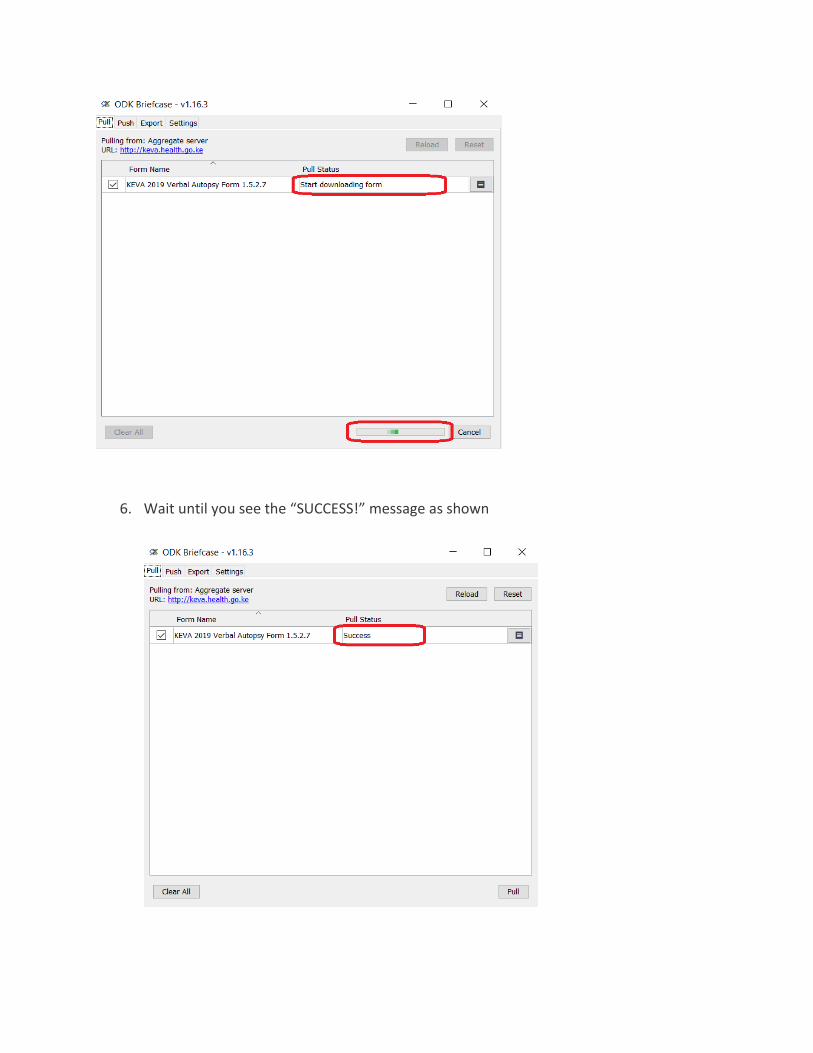
6. Wait until you see the “SUCCESS!” message as shown

2.4.2. Using ODK Briefcase to export data
1. Go to “Export” tab. Click on “Edit default configuration” to select folder to export data
to. The select the form you want to export its data. The click “Export” button.
2. Click “Export” button on the bottom-most right of the application. This will load quickly
and will give you the same “Exported xx submissions!” message. This means export is
complete


2.5. ODK COLLECT
2.5.1. Changing server settings
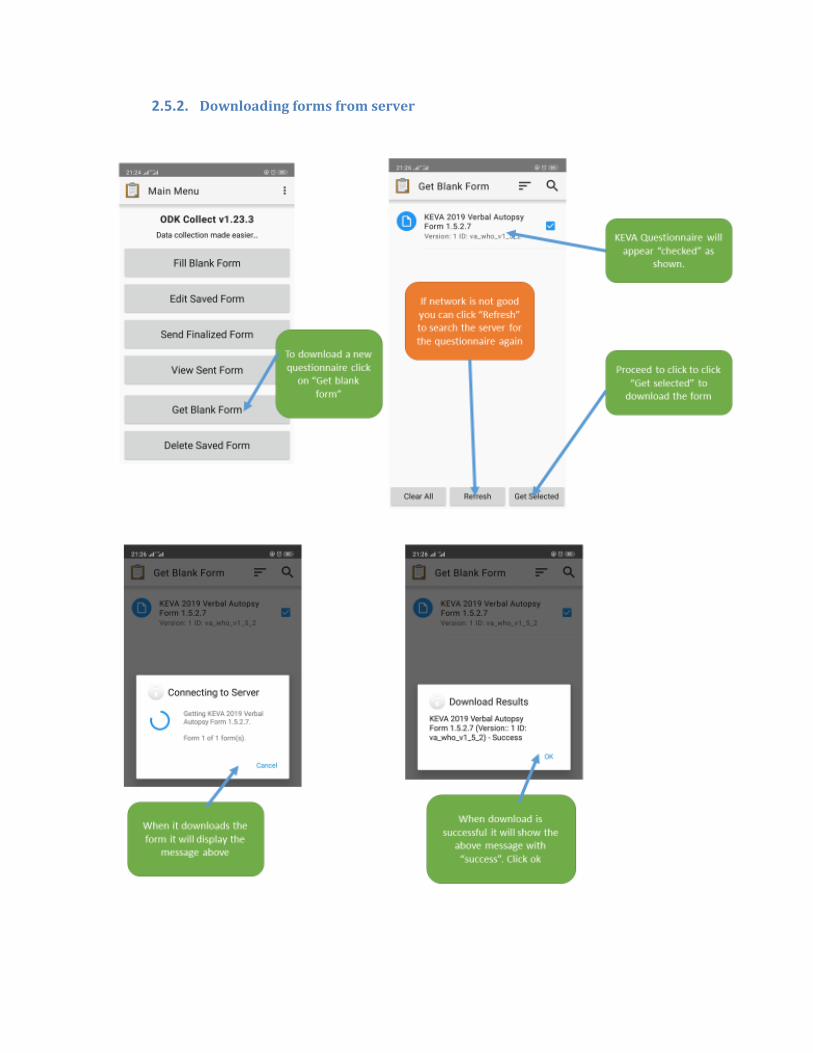
2.5.2. Downloading forms from server
2.5.3. Load form and conduct Verbal Autopsy Interview