48
Dark Forests Dark Forests levels 1 till 15
| Date post: | 03-Aug-2015 |
| Category: |
Entertainment & Humor |
| Upload: | aderik |
| View: | 457 times |
| Download: | 0 times |

Dark Forests
Dark Forests levels 1 till 15

Defeating the Dark Forests
Depending on the experience of your knight, your troops will be hit a certain number of times, till either you or they are defeated. The more experienced your knight is, the fewer rounds will be needed to defeat a dark forest. USE HIGH LEVEL KNIGHTS OR USE LOWER TO LEVEL UP THE KNIGHTS SKILL POINTS FAST
The strength of your own troops has less meaning than your knight's experience. Do NOT send large numbers of strong units against low & HIGH level dark forests, especially not Siege , SpellCasters or rare troops.
For fast results I have based this tutorial on scouts. They are quick & cheap to train, easy to replace and most players have a lot of them.. You can also revive a chunk again via the apothecary.
The ONLY ( Buff) battle stats working in the Dark Forests are:
DEFENSE ATTACK LIFE Ore Guardian Troop Attack Buff ■ Dark Forests make no use of Range and Speed whatsoever or other battle buff / debuff stats. ■ Battle starts with all troops at range 0 to each other.

However the 3 base battle stats that are used, Life ( 250) , Defense (5000) , Attack (1000) , can be enhanced via TR to reach the caps. But we can influence the ATTACK stats of troops even more via Ore Guardian Troop Attack Buff.
All below tests / attacks were done from a Fey city with ;
Empowered Iron Blessing & Blood Lust Blessing + Ore Guardian
1 ) No TR with item boosts
2 ) TR MAX Defense/Attack/ Life with item boosts
3 ) TR Max + Ore Guardian Troop Buff with item boosts
4 ) TR Max + Ore Guardian Troop Buff with item boosts

1 2 3 4
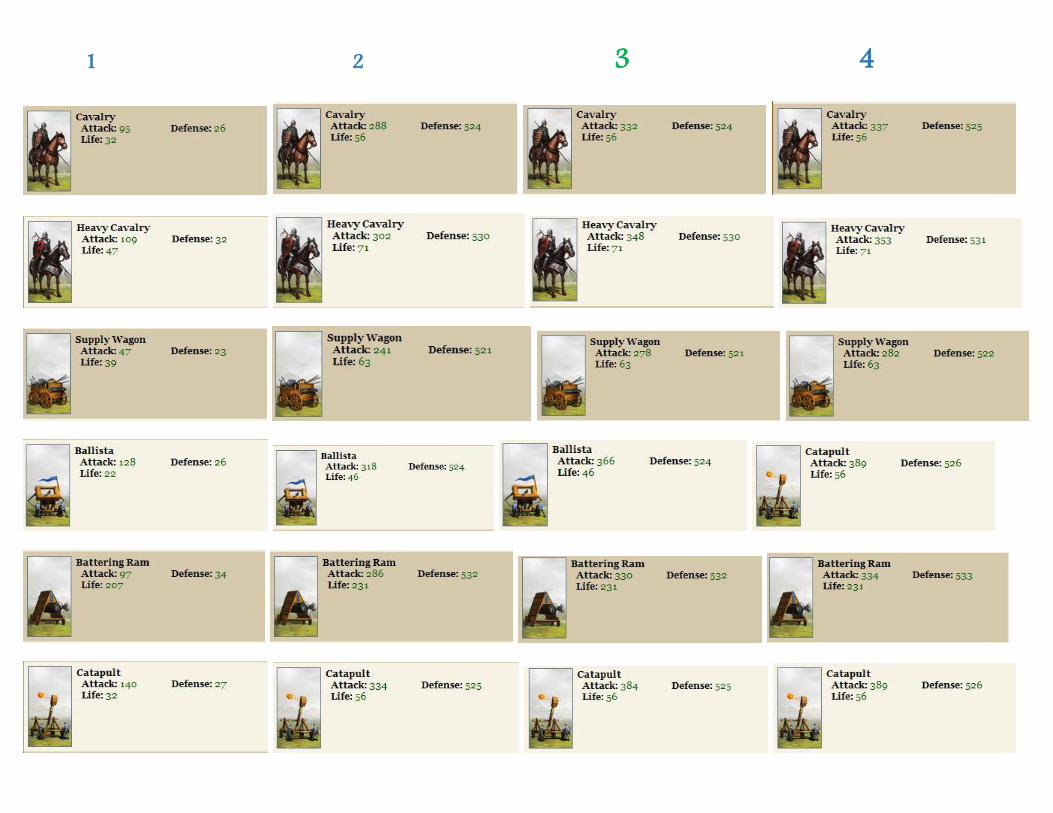
1 2 3 4
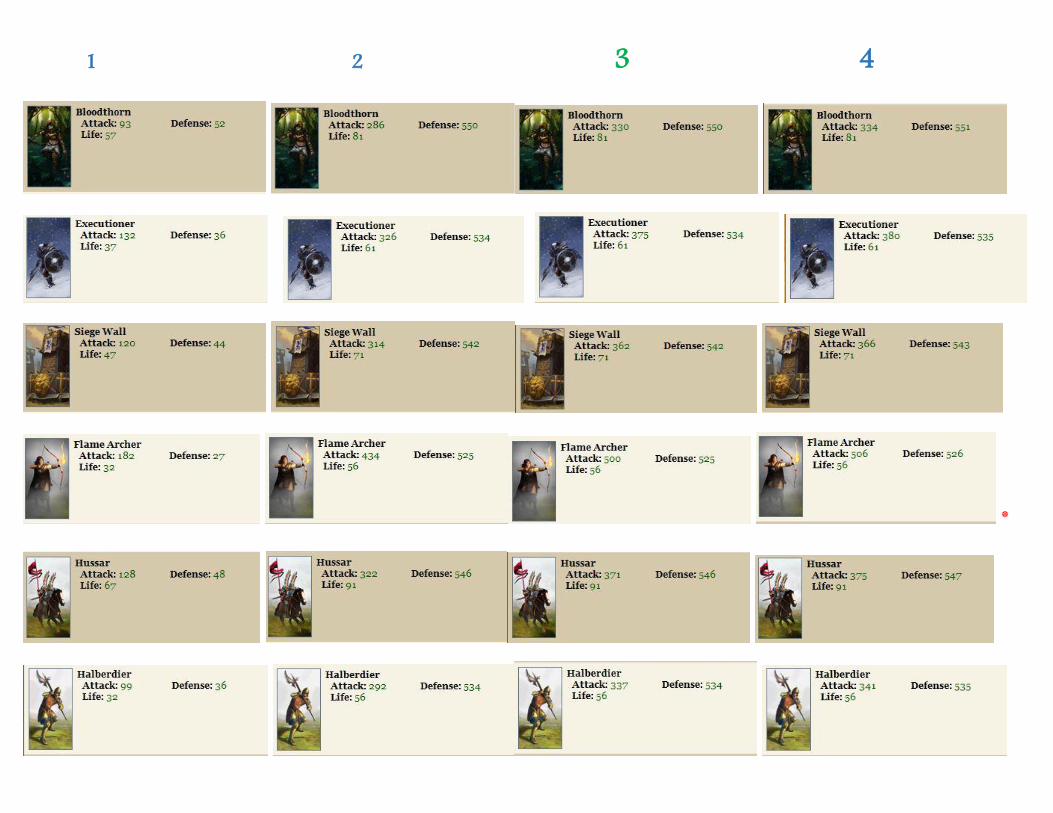
1 2 3 4
*

1 2 3 4

When you check Row 4 , you see that Flame Archers have the highest attack stats.
Row 3 , with Item boost 20/20/10 is the most common used item boosts, ( I have it on 24/7.)
You see that the ATTACK stats have INCREASED higher with the Ore Guardian Troop Attack Buff in Row 3

You can also equip the banner " Bonus vs Dark Forest. It enhances the 3 stats on the troops you use to defeat the DF if for example you are low on the 3 needed stats, Life , Attack, Defense ,. So equip in your TR, as much LIFE and DEFENSE and ATTACK . ( Compensate with Bonus vs DF) You also want to equip Chance to find items (General stat) or the Chance to find items in Dark Forests ( Specific stat). If you are in a hurry ( who isn’t ), applying a March Speed Card helps to cut march times to DF's. This preset as described above is now an ideal Dark Forest Preset.
Don’t Forget to squeeze in a card with Aetherstone Cap or a jewel with Aetherstone Cap so you can / could hold 6 million Aetherstones. Be carefull when switching TR’s , you may lose the Aetherstones over cap.

The stats used in this tutorial are these : ( I Only Put a few cards in an empty preset)
■ An effort was made to use MAX ATTACK , LIFE , DEFENSE., The TR Preset was further enhanced with Ore Guardian Troop Attack Buff.
■ Cavalry and Heavy cavalry are also efficient against Dark Forests, as well as having a faster marching speed, but I Prefer SCOUTS. They are fast, cheap, easy to train.
■ Have not seen a benefit of sacrificing troops via Fey city , The Sac stats do not show up in reports

■ Attacking DF's with the new troops as the main force, like executioner, siegewall, flame archers , hussars, onagers etc, is costly and no huge benefits.
■ SpellCasters have NO Effect in Dark Forests, SpellPower does not work.
The Dark Forest Defenders,

Wanderer of Din
This is a melee unit, comparable to militiamen ■ ATTACK : 20 ■ DEFENSE: 10 ■ LIFE : 70 ■ The Support Troop fought valiantly against the Wanderer of Din ■ The Militiaman fought valiantly against the Wanderer of Din ■ The Scout fought valiantly against the Wanderer of Din ■ The Pikeman fought valiantly against the Wanderer of Din ■ The Swordsman fought valiantly against the Wanderer of Din ■ The Supply Wagon fought valiantly against the Wanderer of Din ■ ■ The Archer gained a significant upper hand against the Wanderer of Din ■ ■ ■ The Ballista dominated against the Wanderer of Din ■ The Cavalry struggled against the Wanderer of Din ■ The Heavy Cavalry struggled against the Wanderer of Din ■ The Ram struggled against the Wanderer of Din ■ The Catapult struggled against the Wanderer of Din
Vulnerable to : Ballistae& scouts

Blade of Netzekt
This is a mounted unit, comparable to cavalry ■ ATTACK : 95 ■ DEFENSE: 16 ■ LIFE : 250 ■ The Support Troop fought valiantly against the Blade of Netzekt ■ The Scout fought valiantly against the Blade of Netzekt ■ The Supply Wagon fought valiantly against the Blade of Netzekt ■ The Cavalry fought valiantly against the Blade of Netzekt ■ The Heavy Cavalry fought valiantly against the Blade of Netzekt ■ ■ The Militiaman gained a significant upper hand against the Blade of Netzekt ■ ■ The Pikeman gained a significant upper hand against the Blade of Netzekt ■ ■ ■ The Swordsman dominated against the Blade of Netzekt ■ The Archer struggled against the Blade of Netzekt ■ The Ballista struggled against the Blade of Netzekt ■ The Ram struggled against the Blade of Netzekt ■ The Catapult struggled against the Blade of Netzekt
Vulnerable to :Pikemen or militia and swords & scouts

THE ARM OF GEVRAH
This is a ranged unit, comparable to archers ■ ATTACK : 80 ■ DEFENSE: 21 ■ LIFE : 600 ■ The Support Troop fought valiantly against the Arm of Gevrah ■ The Militiaman fought valiantly against the Arm of Gevrah ■ The Scout fought valiantly against the Arm of Gevrah ■ The Pikeman fought valiantly against the Arm of Gevrah ■ The Swordsman fought valiantly against the Arm of Gevrah ■ The Archer fought valiantly against the Arm of Gevrah ■ The Supply Wagon fought valiantly against the Arm of Gevrah ■ The Cavalry fought valiantly against the Arm of Gevrah ■ The Heavy Cavalry fought valiantly against the Arm of Gevrah ■ The Ballista fought valiantly against the Arm of Gevrah ■ The Ram fought valiantly against the Arm of Gevrah ■ The Catapult fought valiantly against the Arm of Gevrah
Vulnerable to : Heavy Cavalry or Militia & scouts

The Priest of Yeshod
This is a specialist unit, somewhat comparable to supply wagons ■ ATTACK : 60 ■ DEFENSE: 32 ■ LIFE : 1200 ■ The Support Troop fought valiantly against the The Priest of Yeshod ■ The Scout fought valiantly against the The Priest of Yeshod ■ The Archer fought valiantly against the The Priest of Yeshod ■ The Supply Wagon fought valiantly against the The Priest of Yeshod ■ The Ballista fought valiantly against the The Priest of Yeshod ■ ■ The Cavalry gained a significant upper hand against the The Priest of Yeshod ■ ■ ■ The Heavy Cavalry dominated against the The Priest of Yeshod ■ The Militiaman struggled against the The Priest of Yeshod ■ The Pikeman struggled against the The Priest of Yeshod ■ The Swordsman struggled against the The Priest of Yeshod ■ The Ram struggled against the The Priest of Yeshod ■ The Catapult struggled against the The Priest of Yeshod
Vulnerable to : Heavy Cavalry or cavalry & scouts

Sahereen Hound
This is a mounted unit, comparable to cavalry ■ ATTACK : 400 ■ DEFENSE: 27 ■ LIFE : 2000 ■ The Support Troop fought valiantly against the The Sahareen Hound ■ The Scout fought valiantly against the The Sahareen Hound ■ The Supply Wagon fought valiantly against the The Sahareen Hound ■ The Cavalry fought valiantly against the The Sahareen Hound ■ The Heavy Cavalry fought valiantly against the The Sahareen Hound ■ ■ The Militiaman gained a significant upper hand against the The Sahareen Hound ■ ■ The Pikeman gained a significant upper hand against the The Sahareen Hound ■ ■ ■ The Swordsman dominated against the The Sahareen Hound ■ The Archer was no match against the The Sahareen Hound ■ The Ballista was no match against the The Sahareen Hound ■ The Ram was no match against the The Sahareen Hound ■ The Catapult was no match against the The Sahareen Hound
Vulnerable to : Swordsmen, pikemen, Militiamen & scouts

Remez Banshee
This is a ranged unit, comparable to ballistas ■ ATTACK : 750 ■ DEFENSE: 36 ■ LIFE : 4200 ■ The Support Troop fought valiantly against the The Remez Banshee ■ The Scout fought valiantly against the The Remez Banshee ■ The Archer fought valiantly against the The Remez Banshee ■ The Supply Wagon fought valiantly against the The Remez Banshee ■ The Ballista fought valiantly against the The Remez Banshee ■ ■ The Cavalry gained a significant upper hand against the The Remez Banshee ■ ■ ■ The Heavy Cavalry dominated against the The Remez Banshee ■ The Militiaman struggled against the The Remez Banshee ■ The Pikeman was no match against the The Remez Banshee ■ The Swordsman was no match against the The Remez Banshee ■ The Ram was no match against the The Remez Banshee ■ The catapult was no match against the The Remez Banshee
Vulnerable to : Heavy Cavalry, Cavalry & scouts

Son of Ysbadden
This is a melee unit, comparable to very strong swordsmen ■ ATTACK : 2000 ■ DEFENSE: 40 ■ LIFE : 5000 ■ The Support Troop fought valiantly against the Son of Ysbadden ■ The Militiamen fought valiantly against the Son of Ysbadden ■ The Scout fought valiantly against the Son of Ysbadden ■ The Pikeman fought valiantly against the Son of Ysbadden ■ The Swordsman fought valiantly against the Son of Ysbadden ■ The Archer fought valiantly against the Son of Ysbadden ■ The Supplywagon fought valiantly against the Son of Ysbadden ■ ■ The Archer gained a significant upper hand against the Son of Ysbadden ■ ■ The Cavalry gained a significant upper hand against the Son of Ysbadden ■ ■ ■ The Heavy Cavalry dominated against the Son of Ysbadden ■ The Ram was no match against the Son of Ysbadden ■ The catapult was no match against the Son of Ysbadden
Vulnerable to : Ballistae, archers & scouts

Atzmus Rider
This is a mounted unit, comparable to heavy cavalry ■ ATTACK : 3500 ■ DEFENSE: 36 ■ LIFE : 4200 ■ The Support Troop fought valiantly against the Atzmus Rider ■ The Scout fought valiantly against the Atzmus Rider ■ The Supplywagon fought valiantly against the Atzmus Rider ■ The Cavalry fought valiantly against the Atzmus Rider ■ The Heavy Cavalry fought valiantly against the Atzmus Rider ■ ■ The Militiaman gained a significant upper hand against the Atzmus Rider ■ ■ The Pikeman gained a significant upper hand against the Atzmus Rider ■ ■ ■ The Swordsmen dominated against the Atzmus Rider ■ The Ballista was no match against the Atzmus Rider ■ The catapult was no match against the Atzmus Rider ■ ■ The archer was crushed against the Atzmus Rider ■ ■ The Ram was crushed against the Atzmus Rider
Vulnerable to : Swordsmen, Militia, Pikemen & scouts

Sidhe Scorpion
This is a ranged unit, comparable to catapults ■ ATTACK : 7500 ■ DEFENSE: 32 ■ LIFE : 7500 ■ The Support Troop fought valiantly against the Sidhe Scorpion ■ The Scout fought valiantly against the Sidhe Scorpion ■ The Archer fought valiantly against the Sidhe Scorpion ■ The Supply wagon fought valiantly against the Sidhe Scorpion ■ The Ballista fought valiantly against the Sidhe Scorpion ■ ■ The Cavalry gained a significant upper hand against the Sidhe Scorpion ■ ■ ■ The Heavy Cavalry dominated against the Sidhe Scorpion ■ ■ The Militiaman was crushed against the Sidhe Scorpion ■ ■ The Pikemen was crushed against the Sidhe Scorpion ■ ■ The Swordsmen was crushed against the Sidhe Scorpion ■ ■ The Ram was crushed against the Sidhe Scorpion ■ ■ The Catapult was crushed against the Sidhe Scorpion
Vulnerable to : Heavy Cavalry , Cavalry & scouts

Sidhe Templar This is a melee unit, with a lot more attack and life than swordsmen ■ ATTACK : 9400 ■ DEFENSE: 48 ■ LIFE : 8500 ■ The Support Troop fought valiantly against the Sidhe Templar ■ The Militiaman fought valiantly against the Sidhe Templar ■ The Scout fought valiantly against the Sidhe Templar ■ The Pikemen fought valiantly against the Sidhe Templar ■ The Swordsmen fought valiantly against the Sidhe Templar ■ The Supply wagon fought valiantly against the Sidhe Templar ■ ■ The archer gained a significant upper hand against the Sidhe Templar ■ ■ ■ The Ballista dominated against the Sidhe Templar ■ The Heavy Cavalry was no match against the Sidhe Templar ■ ■ The Cavalry was crushed against the Sidhe Templar ■ ■ The Ram was crushed against the Sidhe Templar ■ ■ The Catapult was crushed against the Sidhe Templar
Vulnerable to : Ballistas, archers & scouts

Defeating a Level 1 Dark Forest The following is the "cheapest" & “fastest” setup, for any distances & depending on your RP : · 900.000 scouts · 990.000 scouts

Defeating a Level 2 Dark Forest The following is the "cheapest" & “fastest” setup, for any distances & depending on your RP : · 900.000 scouts · 990.000 scouts

Defeating a Level 3 Dark Forest The following is the "cheapest" & “fastest” setup, for any distances & depending on your RP : · 900.000 scouts · 990.000 scouts

Defeating a Level 4 Dark Forest The following is the "cheapest" & “fastest” setup, for any distances & depending on your RP : · 900.000 scouts · 990.000 scouts

Defeating a Level 5 Dark Forest The following is the "cheapest" & “fastest” setup, for any distances & depending on your RP : · 900.000 scouts · 990.000 scouts

Defeating a Level 6 Dark Forest The following is the "cheapest" & “fastest” setup, for any distances & depending on your RP : · 900.000 scouts · 990.000 scouts
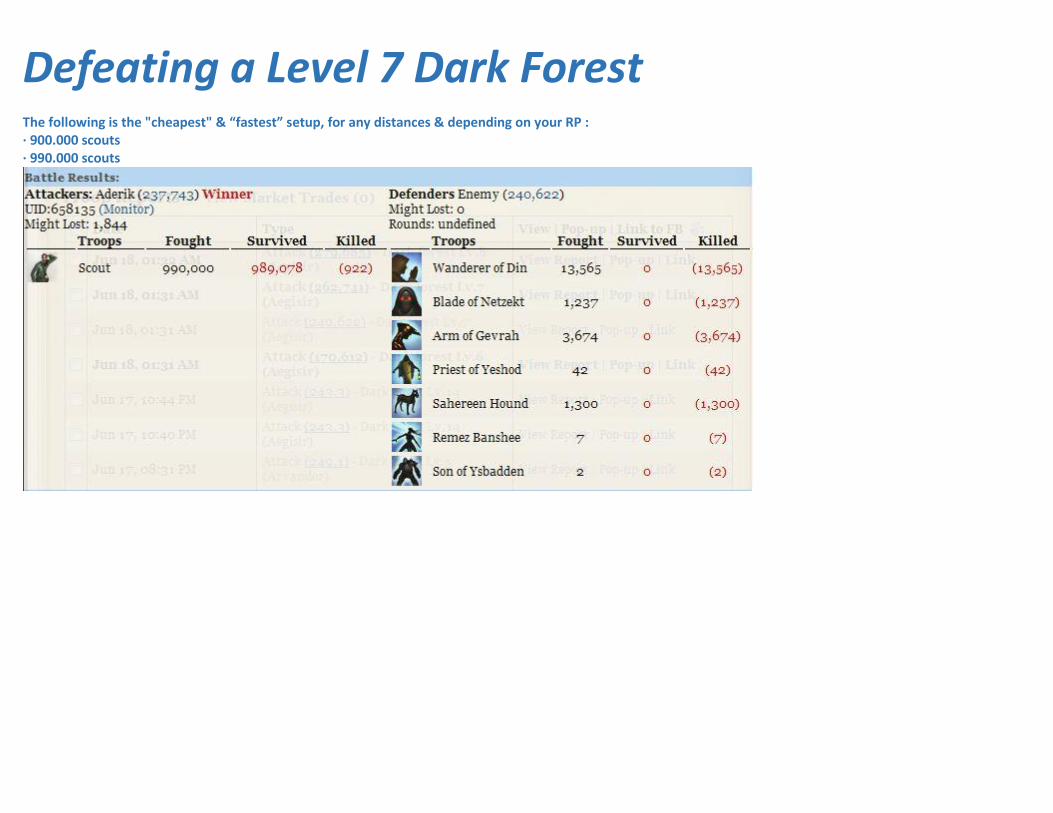
Defeating a Level 7 Dark Forest The following is the "cheapest" & “fastest” setup, for any distances & depending on your RP : · 900.000 scouts · 990.000 scouts

Defeating a Level 8 Dark Forest The following is the "cheapest" & “fastest” setup, for any distances & depending on your RP : · 900.000 scouts · 990.000 scouts

Defeating a Level 9 Dark Forest The following is the "cheapest" & “fastest” setup, for any distances & depending on your RP : · 900.000 scouts · 990.000 scouts

Defeating a Level 10 Dark Forest The following is the "cheapest" & “fastest” setup, for any distances & depending on your RP : · 900.000 scouts · 990.000 scouts

Defeating a Level 11 Dark Forest The following is the "cheapest" & “fastest” setup, for any distances & depending on your RP : · 900.000 scouts · 990.000 scouts

Defeating a Level 12 Dark Forest The following is the "cheapest" & “fastest” setup, for any distances & depending on your RP : · 900.000 scouts · 990.000 scouts

Defeating a Level 13 Dark Forest The following is the "cheapest" & “fastest” setup, for any distances & depending on your RP : · 900.000 scouts · 990.000 scouts

Defeating a Level 14 Dark Forest The following is the "cheapest" & “fastest” setup, for any distances & depending on your RP : · 900.000 scouts · 990.000 scouts
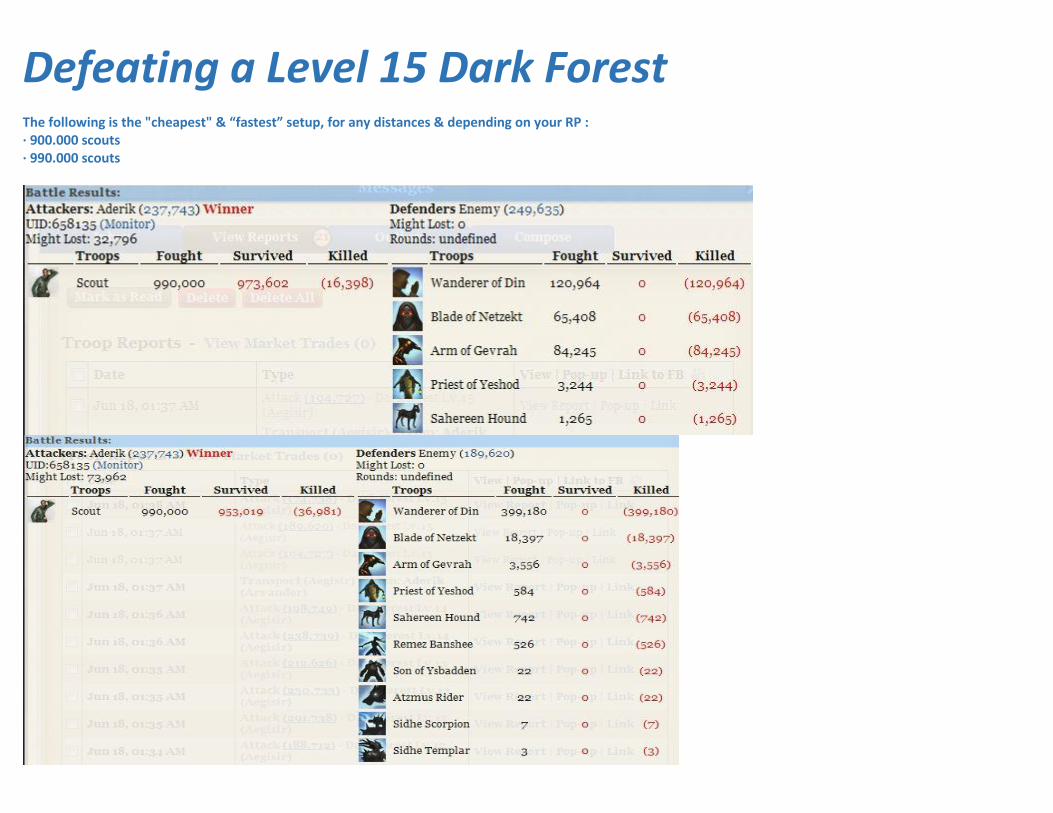
Defeating a Level 15 Dark Forest The following is the "cheapest" & “fastest” setup, for any distances & depending on your RP : · 900.000 scouts · 990.000 scouts


Various Information
■ Level 1-15 bogs randomly become level 1-15 dark forests. ■ Dark forests (and bogs) change about every six hours. It takes some time for the changeover to complete for all the provinces in the domain. During this time, dark forests may not appear to be what they show on the map. If the dark forest in question is becoming a bog, you will get the "cannot perform action" message. Consider this message as a warning that dark forests are in the midst of a changeover. ■ Dark forests can be scouted and they can be attacked. ■ If a dark forest wins a battle, it still remains where it is. ( max 10 rounds of battle) ■ The troops that were killed will not return.(duh) ■ Each time a dark forest is defeated, it disappears. ■ Once in a while (Every 6 hours), new dark forests reappear in new places all over the domain , to replace those that have been defeated. ■ Be careful if you hit dark forests during this period of regeneration, as they may regenerate as a higher level than before. ■ An error message saying "Cannot perform this action on target location" is a sign of this regeneration being in progress. ■ If you do not get a report from attacking a dark forest, the forest most probably isn't there anymore, but has reverted back to a bog.

■ Since defeated forests disappear, you can defeat any one dark forest only once.
STATS courtesy F89

Experience Points (XP) When attacking Dark Forests , results are better with a higher knight's experience level. And each time you defeat a dark forest successfully , your knight will gain more Experience Points:
Lvl 1 Dark Forest: +3,000 XP Lvl 2 Dark Forest: +6,000 XP Lvl 3 Dark Forest: +12,000 XP Lvl 4 Dark Forest: +24,000 XP Lvl l5 Dark Forest: +48,000 XP Lvl 6 Dark Forest: +96,000 XP Lvl 7 Dark Forest: +192,000 XP Lvl 8 Dark Forest: +384,000 XP Lvl 9 Dark Forest: +768,000 XP Lvl 10 Dark Forest: +1,536,000 XP
Have not calculated yet for levels 11-15
Refresh after defeating a dark forest in order to be able to assign these new experience points.
Gold

You will collect a fixed amount of gold from defeating a dark forest:
Lv 1 Dark Forest: 1,150 gold Lv 2 Dark Forest: 2,300 gold Lv 3 Dark Forest: 4,600 gold Lv 4 Dark Forest: 9,200 gold Lv 5 Dark Forest: 18,400 gold Lv 6 Dark Forest: 36,800 gold Lv 7 Dark Forest: 73,600 gold Lv 8 Dark Forest: 147,200 gold Lv 9 Dark Forest: 294,400 gold Lv 10 Dark Forest: 588,800 gold Lv 11 Dark Forest: 682,562 gold Lv 12 Dark Forest: 739,440 gold Lv 13 Dark Forest: 796,320 gold Lv 14 Dark Forest: 910,080 gold Lv 15 Dark Forest: 1,137,600 gold
Aetherstones You will collect a fixed amount of astones from defeating a dark forest:
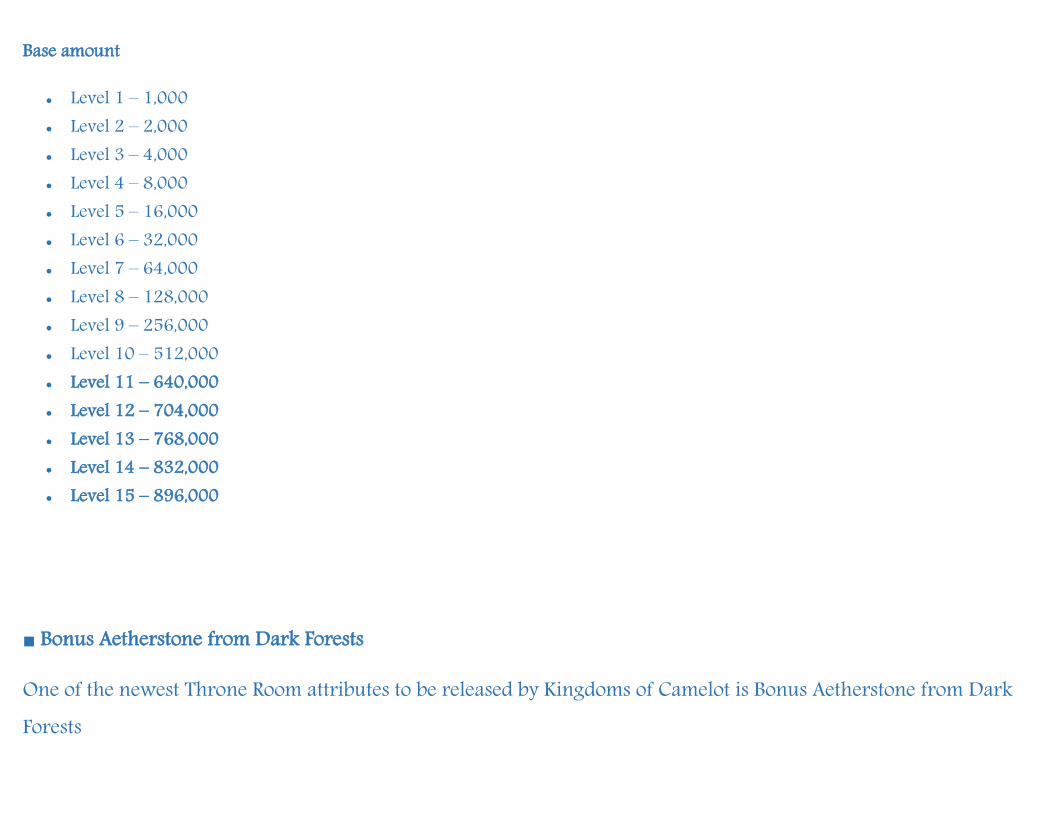
Base amount
Level 1 – 1,000 Level 2 – 2,000 Level 3 – 4,000 Level 4 – 8,000 Level 5 – 16,000 Level 6 – 32,000 Level 7 – 64,000 Level 8 – 128,000 Level 9 – 256,000 Level 10 – 512,000 Level 11 – 640,000 Level 12 – 704,000 Level 13 – 768,000 Level 14 – 832,000 Level 15 – 896,000
■ Bonus Aetherstone from Dark Forests
One of the newest Throne Room attributes to be released by Kingdoms of Camelot is Bonus Aetherstone from Dark Forests

Info: Cap: 100% Items Found on: Minstrel Advisor , Castellan’s Table
Equip these cards to increase the yield, you get more astones from 1 hit, compared to hitting without these cards
■ You may find additional goodies in the dark Forests, that can be used in the fey Spire for crafting items OR that can be used straight away , as is. Like reinforced bags, barkskin etc.
Your gain could be like the example below:

In battle, your forces found a Keterstone x 4 In battle, your forces found a Renaming Celebration x 4 In battle, your forces found a Potion of Mist x 3 In battle, your forces found a Flax Wing x 8 In battle, your forces found a Tiferstone x 4 In battle, your forces found a Lodestone x 11 In battle, your forces found a Animal Hide x 4 In battle, your forces found a Bloodstone x 9 In battle, your forces found a 100,000 Stone x 5 In battle, your forces found a 100,000 Wood x 3 In battle, your forces found a Ohrstone x 6 In battle, your forces found a 100,000 Ore x 2

TROUBLESHOOTING: Green map :
Issues with the map often occur as a result of excessive calls to the map function in a short period, resulting in the server to stop updating the map. bot functions that call the map function are search and dark forest search. In particular, the dark forest search re-performs a search when
1) the dark forest count reaches zero,
2) a refresh occurs in the middle of a search, or
3) after the reset search interval elapses. With everyone hitting dark forests, it would not be surprising for the dark forest count to quickly go to zero. In such circumstances, leaving the auto dark forest off for a while will help fix map issues.

When Dark Forests are not being attacked:
Here are some typical things people forget to check when their Dark Forests aren't marching as they think they should: 1. Are there any DF's available currently? They only spawn every 6 hours, so it could be that there are none available at the moment. Do a search using the Bot search function to find out if there are any DF's on the map. 2. Do you have enough troops in your city to fill your marches? Troops are killed with each DF attack, so it could be your troop count has been depleted and you need to send more to replenish your troop count. Also, you might have inadvertently set your auto-reassign to move your DF'ing troops out of your city, check your auto-reassign setup. 3. Do you have knights in your city? You might have inadvertently marched your knights out of your city, when reassigning troops. Check to see that you have knights. 4. Are your knights below the maximum combat level (or above the minimum) you have set in Dark Forest options? If you have assigned all your knights' experience points, be sure to change your maximum combat skill accordingly.

And if you have finished upgrading your knights to maximum combat skill and have sent new knights to your city, be sure you change the minimum combat level setting. 5. Is your rally point march size big enough to accommodate the troop waves you have set up? You might have had Throne Room march size equipped when you set up your troop counts, and unequipped it since then. Make sure your troop counts don't exceed your maximum march size. 6. Have you reached the aetherstone cap you have set in Dark Forest options? If you have more aetherstone in your city than the cap you have set, your auto DF won't work. Double-check also that you have entered for instance 2000000 and not 200000. ( 999999 the max is perfect)
To conclude :
You have been seeing now examples of how you can defeat dark forests trough all levels.
YOU decide what you want to use, whether that is Militia or Cavalry or Scouts or Rainbow style waves.
This is just to help you on your way and give you some ideas and guidance.
Remember due to to the way Dark forests are setup, there will always be losses, sometimes more then other waves and sometimes less.
Happy hunting :)


