88
RFID DEMO APPLICATIONS User Guide 72E-160038-05
| Date post: | 03-Dec-2018 |
| Category: |
Documents |
| Upload: | truongphuc |
| View: | 216 times |
| Download: | 0 times |

RFID DEMO APPLICATIONS
User Guide
72E-160038-05

RFID DEMO APPLICATIONSUSER GUIDE
72E-160038-05Revision A
December 2017

Copyright© 2017 ZIH Corp. and/or its affiliates. All rights reserved. ZEBRA and the stylized Zebra head are trademarks of ZIH Corp., registered in many jurisdictions worldwide. All other trademarks are the property of their respective owners.
COPYRIGHTS & TRADEMARKS: For complete copyright and trademark information, go to www.zebra.com/copyright.
WARRANTY: For complete warranty information, go to www.zebra.com/warranty.
END USER LICENSE AGREEMENT: For complete EULA information, go to www.zebra.com/eula.
For Australia OnlyFor Australia Only. This warranty is given by Zebra Technologies Asia Pacific Pte. Ltd., 71 Robinson Road, #05-02/03, Singapore 068895, Singapore. Our goods come with guarantees that cannot be excluded under the Australia Consumer Law. You are entitled to a replacement or refund for a major failure and compensation for any other reasonably foreseeable loss or damage. You are also entitled to have the goods repaired or replaced if the goods fail to be of acceptable quality and the failure does not amount to a major failure.
Zebra Technologies Corporation Australia’s limited warranty above is in addition to any rights and remedies you may have under the Australian Consumer Law. If you have any queries, please call Zebra Technologies Corporation at +65 6858 0722. You may also visit our website: www.zebra.com for the most updated warranty terms.
Terms of Use• Proprietary Statement
This manual contains proprietary information of Zebra Technologies Corporation and its subsidiaries (“Zebra Technologies”). It is intended solely for the information and use of parties operating and maintaining the equipment described herein. Such proprietary information may not be used, reproduced, or disclosed to any other parties for any other purpose without the express, written permission of Zebra Technologies.
• Product ImprovementsContinuous improvement of products is a policy of Zebra Technologies. All specifications and designs are subject to change without notice.
• Liability DisclaimerZebra Technologies takes steps to ensure that its published Engineering specifications and manuals are correct; however, errors do occur. Zebra Technologies reserves the right to correct any such errors and disclaims liability resulting therefrom.
• Limitation of Liability
In no event shall Zebra Technologies or anyone else involved in the creation, production, or delivery of the accompanying product (including hardware and software) be liable for any damages whatsoever (including, without limitation, consequential damages including loss of business profits, business interruption, or loss of business information) arising out of the use of, the results of use of, or inability to use such product, even if Zebra Technologies has been advised of the possibility of such damages. Some jurisdictions do not allow the exclusion or limitation of incidental or consequential damages, so the above limitation or exclusion may not apply to you.
3
Revision HistoryChanges to the original guide are listed below:
Change Date Description
-01 Rev A 5/2012 Initial release
-02 Rev A 2/2014 Add features and update figures in PowerSession chapter.
-03 Rev A 4/2015 Zebra Re-branding
-04 Rev A 3/2017 Add FX7500; removed references to the Registration window in chapters 4 and 5.
-05 Rev A 12/2017 Add FX9600
4
Table of Contents
Copyright ......................................................................................................................................... 3For Australia Only ..................................................................................................................... 3
Terms of Use ................................................................................................................................... 3Revision History .............................................................................................................................. 4
About This GuideIntroduction ............................................................................................................................................8Chapter Descriptions .............................................................................................................................8Notational Conventions......................................................................................................................... 9Related Documents ...............................................................................................................................9Service Information ............................................................................................................................. 10
Getting StartedIntroduction ................................................................................................................................... 11System Requirements .................................................................................................................. 11
RFID Sample ApplicationIntroduction ................................................................................................................................... 12Launching the RFID Sample Application .................................................................................... 13Connection .................................................................................................................................... 14Capabilities .................................................................................................................................... 14Configuration Menu Options ....................................................................................................... 16
Tag Storage Settings .............................................................................................................. 16Antenna .................................................................................................................................... 17RF Mode ................................................................................................................................... 18Singulation ............................................................................................................................... 18Power On/Off Radio ................................................................................................................ 20Reset to Factory Default ......................................................................................................... 20
Operations Menu Options ............................................................................................................ 21Antenna Info ............................................................................................................................ 21Filter ......................................................................................................................................... 22Access ...................................................................................................................................... 25Triggers .................................................................................................................................... 29
Management Menu Options ......................................................................................................... 35Help Menu ...................................................................................................................................... 35
5
Table of Contents
Exit ................................................................................................................................................. 35
Tag LocatorIntroduction ................................................................................................................................... 36Using Tag Locator ........................................................................................................................ 37Locating Tags Using a .csv File .................................................................................................. 38
SessionOneIntroduction ................................................................................................................................... 40Installation ..................................................................................................................................... 40Connecting to the RFID Reader ................................................................................................... 41Reading Tags ................................................................................................................................ 43Main Tab ........................................................................................................................................ 43
Tag Reads ................................................................................................................................ 45Reader ...................................................................................................................................... 45Antennas .................................................................................................................................. 46Tag Details ............................................................................................................................... 46RSSI / Direction / Zone ............................................................................................................ 46
Settings Tab .................................................................................................................................. 46Appearance .............................................................................................................................. 48Antenna Colors ....................................................................................................................... 48RSSI Monitoring ...................................................................................................................... 48Read Settings .......................................................................................................................... 48Autosave .................................................................................................................................. 48Product Picture ....................................................................................................................... 49Filters ....................................................................................................................................... 49Tag Match Settings ................................................................................................................. 49Tag Direction ........................................................................................................................... 49RF Modes ................................................................................................................................. 49Start Reading When ................................................................................................................ 50Stop Reading After .................................................................................................................. 50Low Level Stuff ........................................................................................................................ 50Device Discovery .................................................................................................................... 50Autologin ................................................................................................................................. 50
PowerSessionIntroduction ................................................................................................................................... 51Installation ..................................................................................................................................... 51Connecting to the RFID Reader ................................................................................................... 52Reading Tags ................................................................................................................................ 54Main Tab ........................................................................................................................................ 55
General Tag Reads Info .......................................................................................................... 55Tag Reads Details ................................................................................................................... 56Reader Management ............................................................................................................... 57Reader Info .............................................................................................................................. 57
Settings .......................................................................................................................................... 58Application Settings ............................................................................................................... 58Optimization Mode .................................................................................................................. 60
6

Table of Contents
Reader Settings ....................................................................................................................... 60Software Update for Multiple Readers ........................................................................................ 64
RapidReadIntroduction ................................................................................................................................... 66Installation ..................................................................................................................................... 67Options .......................................................................................................................................... 69RapidRead Tag File ....................................................................................................................... 71Using RapidRead .......................................................................................................................... 72RapidRead Lite .............................................................................................................................. 73
Summary Screen ..................................................................................................................... 73Detail Screen ........................................................................................................................... 74
RapidRead Full .............................................................................................................................. 75Summary Screen ..................................................................................................................... 75Detail Screen ........................................................................................................................... 76Gieger Counter ........................................................................................................................ 77
RapidRead Scan ............................................................................................................................ 79Summary Screen ..................................................................................................................... 79Detail Screen ........................................................................................................................... 80
RapidRead Write ........................................................................................................................... 81
Index
7
ABOUT THIS GUIDE
IntroductionThe RFID Demo Applications User Guide provides general instructions for using sample applications which demonstrate the capabilities of Zebra fixed and hand-held RFID readers and how these features can be used in everyday applications.
Chapter DescriptionsTopics covered in this guide are as follows:
• Getting Started introduces the RFID demo applications which demonstrate the capabilities of Zebra fixed and hand-held RFID readers.
• RFID Sample Application provides an overview of the RFID application CS_RFID3Sample6.exe which assists application developers in developing custom applications for hand-held RFID devices.
• Tag Locator describes the Tag Locator application which is used on hand-held RFID devices to detect the relative position of tags.
• SessionOne describes the SessionOne PC-based application used to discover and connect to Zebra fixed and hand-held RFID readers, specifically the FX7400, FX7500, FX9500, FX9600, MC3x90-Z, and MC9x90-Z.
• PowerSession describes PowerSession, a multi-reader, PC-based application used to discover and connect to Zebra fixed and hand-held RFID readers, specifically the FX7400, FX7500, FX9500, FX9600, MC3x90-Z, and MC9x90-Z.
• RapidRead describes RapidRead, an application used on hand-held readers to demonstrate inventory, asset counting, tag writing and item locating, specifically the MC3x90-Z and MC9x90-Z.
8

About This Guide
Notational ConventionsThe following conventions are used in this document:
• Italics are used to highlight the following:• Chapters and sections in this and related documents• Dialog box, window and screen names• Drop-down list and list box names• Check box and radio button names
• Bold text is used to highlight the following:• Key names on a keypad• Button names on a screen.
• bullets (•) indicate:• Action items• Lists of alternatives• Lists of required steps that are not necessarily sequential
• Sequential lists (e.g., those that describe step-by-step procedures) appear as numbered lists.
• Throughout the programming bar code menus, asterisks (*) are used to denote default parameter settings.
Related DocumentsRefer to the Product Reference Guide for the fixed or hand-held RFID reader for product-specific information.
For the latest version of this guide and all Zebra guides, go to: www.zebra.com/support.
*Baud Rate 9600 Feature/Option* Indicates Default
9
About This Guide
Service InformationIf you have a problem using the equipment, contact your facility's technical or systems support. If there is a problem with the equipment, they will contact the Zebra Global Customer Support Center at: www.zebra.com/support.
When contacting Zebra support, please have the following information available:
• Serial number of the unit • Model number or product name • Software type and version number
Zebra responds to calls by e-mail, telephone or fax within the time limits set forth in service agreements.
If your problem cannot be solved by Zebra support, you may need to return your equipment for servicing and will be given specific directions. Zebra is not responsible for any damages incurred during shipment if the approved shipping container is not used. Shipping the units improperly can possibly void the warranty.
If you purchased your business product from a Zebra business partner, please contact that business partner for support.
10
Getting Started
IntroductionThe RFID demo applications demonstrate the capabilities of Zebra fixed and hand-held readers. This guide provides specific information about the following applications:
• RFID Sample Application• Tag Locator• SessionOne• PowerSession• RapidRead
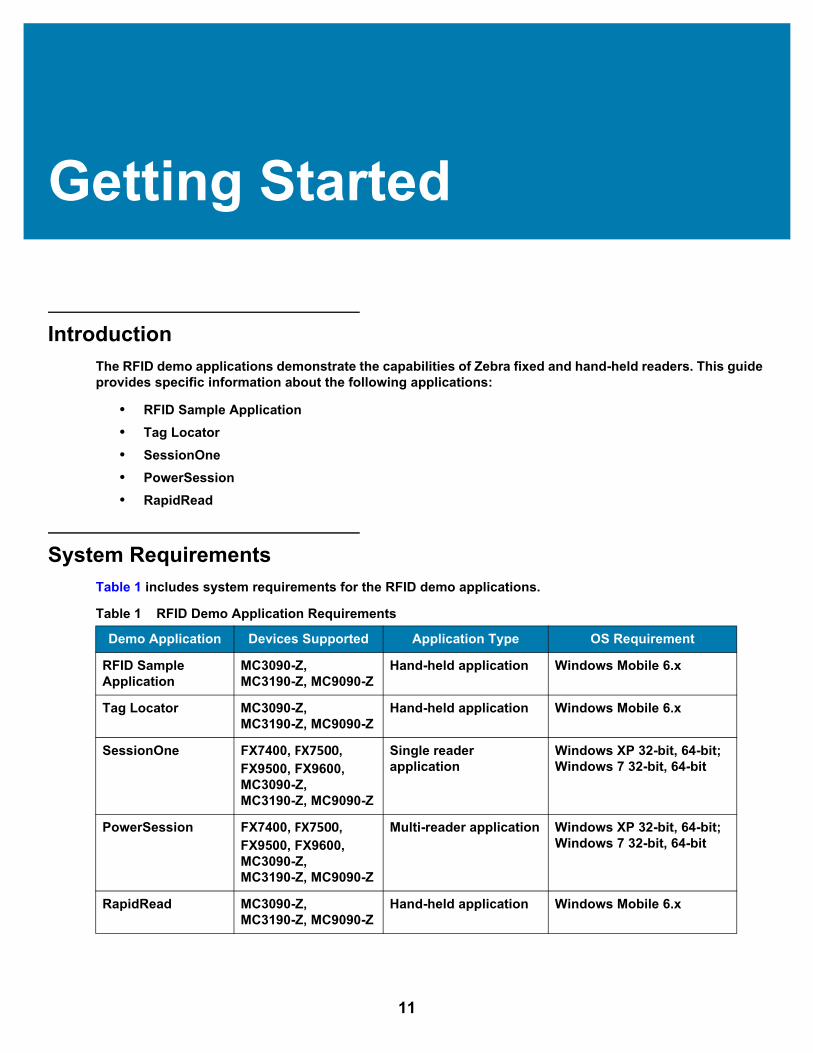
System RequirementsTable 1 includes system requirements for the RFID demo applications.
Table 1 RFID Demo Application RequirementsDemo Application Devices Supported Application Type OS Requirement
RFID Sample Application
MC3090-Z, MC3190-Z, MC9090-Z
Hand-held application Windows Mobile 6.x
Tag Locator MC3090-Z, MC3190-Z, MC9090-Z
Hand-held application Windows Mobile 6.x
SessionOne FX7400, FX7500, FX9500, FX9600, MC3090-Z, MC3190-Z, MC9090-Z
Single reader application
Windows XP 32-bit, 64-bit;Windows 7 32-bit, 64-bit
PowerSession FX7400, FX7500, FX9500, FX9600, MC3090-Z, MC3190-Z, MC9090-Z
Multi-reader application Windows XP 32-bit, 64-bit;Windows 7 32-bit, 64-bit
RapidRead MC3090-Z, MC3190-Z, MC9090-Z
Hand-held application Windows Mobile 6.x
11
RFID Sample Application
IntroductionThe RFID Application CS_RFID3Sample6.exe provides an overview of how the application works and assists application developers in developing custom applications.
The RFID hand-held reader can read, write, lock, kill, and program Gen2 tags. Each tag contains the EPC number (64 or 96 bits), CRC, and kill code. The hand-held reader can also collect data by decoding in-range EPC Gen2 RFID tags.
Initiating the read command within the sample application causes the hand-held reader to interrogate all RFID tags within the radio frequency (RF) field of view. The reader captures data from each new tag and adds it to the list box in the EPC ID window. Select Stop Read to stop interrogating tags.
12
RFID Sample Application
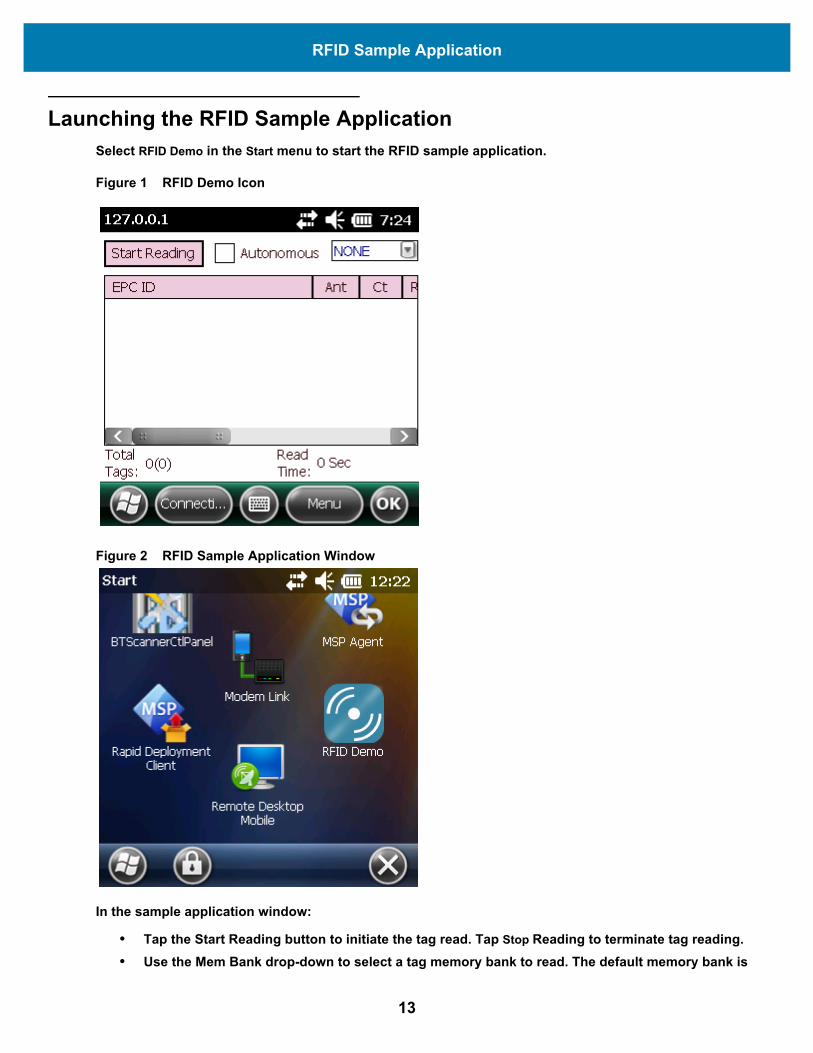
Launching the RFID Sample ApplicationSelect RFID Demo in the Start menu to start the RFID sample application.
Figure 1 RFID Demo Icon
Figure 2 RFID Sample Application Window
In the sample application window:
• Tap the Start Reading button to initiate the tag read. Tap Stop Reading to terminate tag reading.• Use the Mem Bank drop-down to select a tag memory bank to read. The default memory bank is
13
RFID Sample Application
EPC (None). Other options are TID, Reserved, and User.
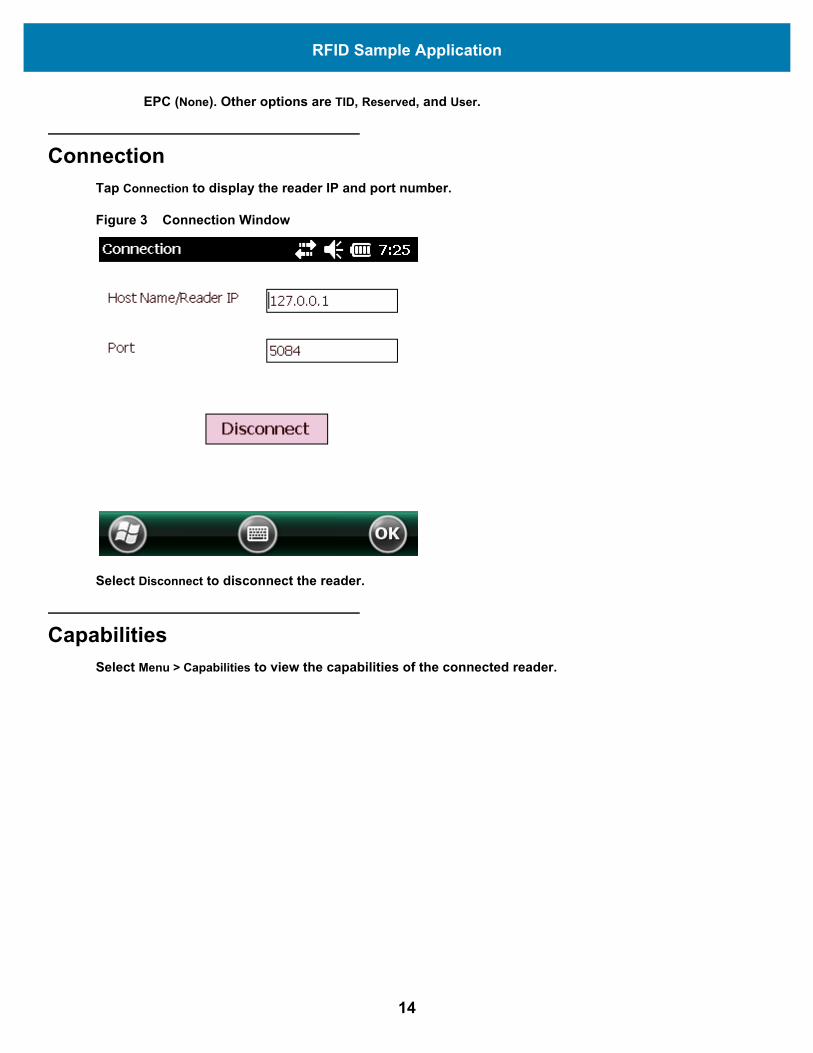
ConnectionTap Connection to display the reader IP and port number.
Figure 3 Connection Window
Select Disconnect to disconnect the reader.
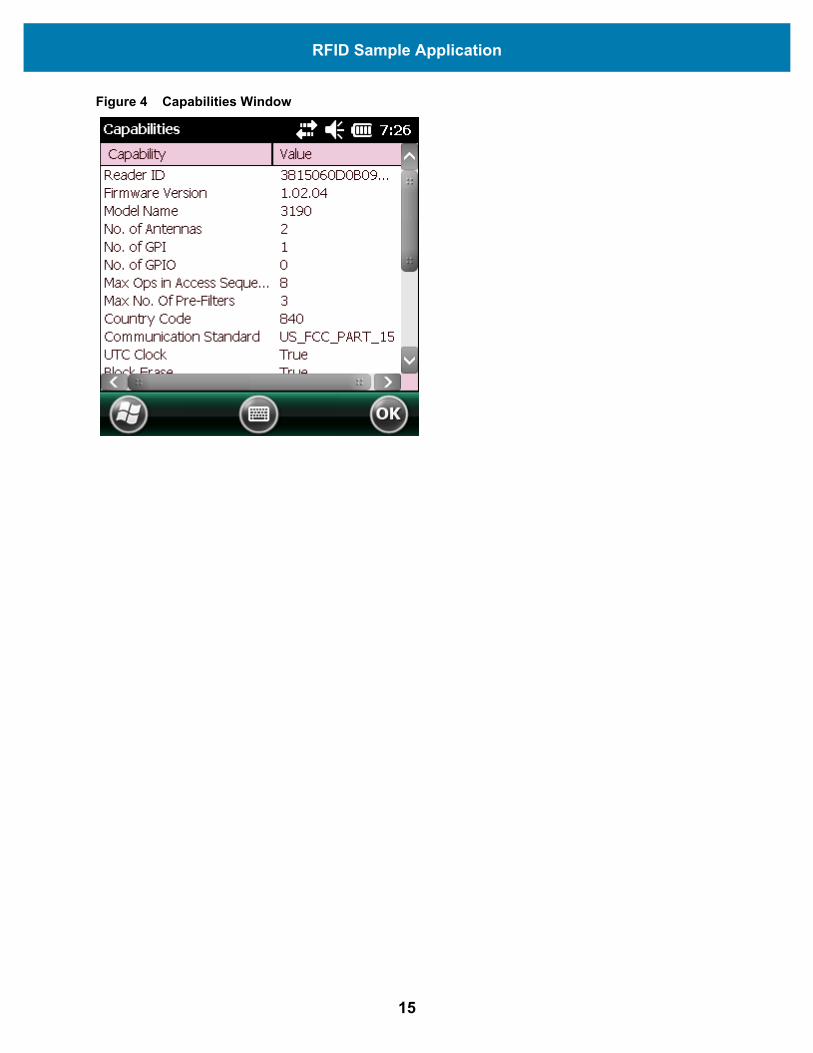
CapabilitiesSelect Menu > Capabilities to view the capabilities of the connected reader.
14
RFID Sample Application
Figure 4 Capabilities Window
15
RFID Sample Application
Configuration Menu OptionsThe Configuration menu includes the following options:
• Tag Storage Settings • Antenna • RF Mode • Singulation • Power On/Off Radio • Reset to Factory Defaults
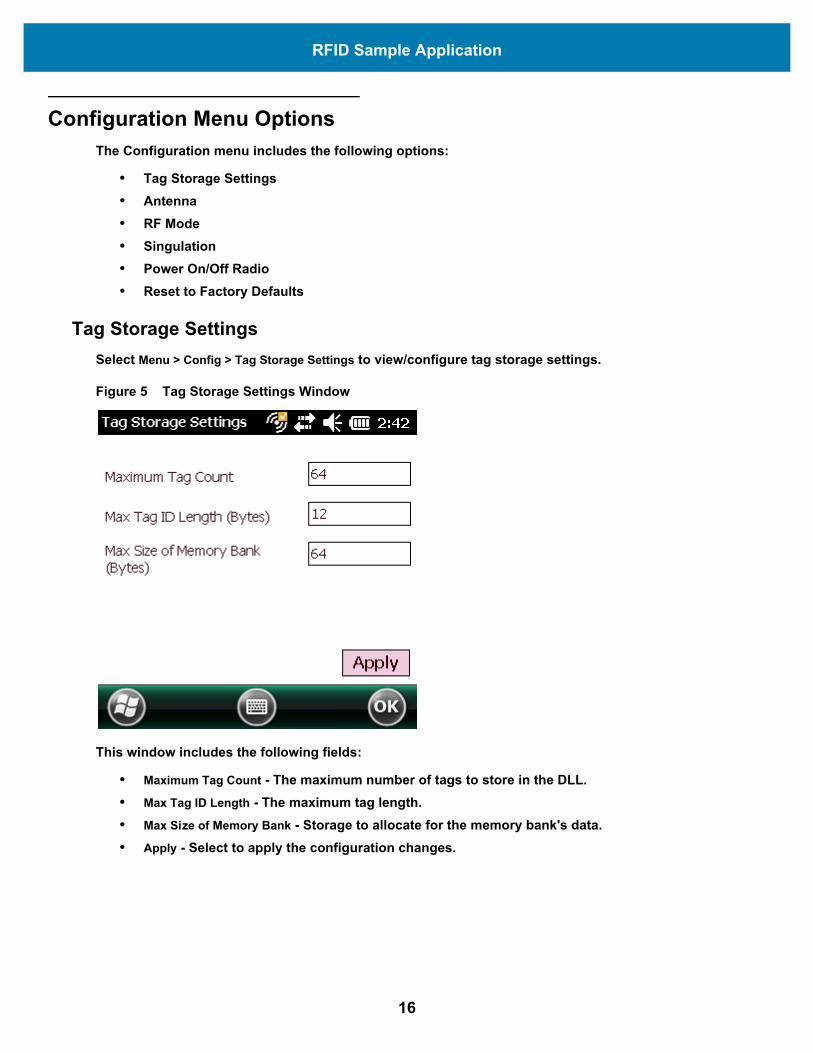
Tag Storage SettingsSelect Menu > Config > Tag Storage Settings to view/configure tag storage settings.
Figure 5 Tag Storage Settings Window
This window includes the following fields:
• Maximum Tag Count - The maximum number of tags to store in the DLL. • Max Tag ID Length - The maximum tag length. • Max Size of Memory Bank - Storage to allocate for the memory bank's data. • Apply - Select to apply the configuration changes.
16
RFID Sample Application
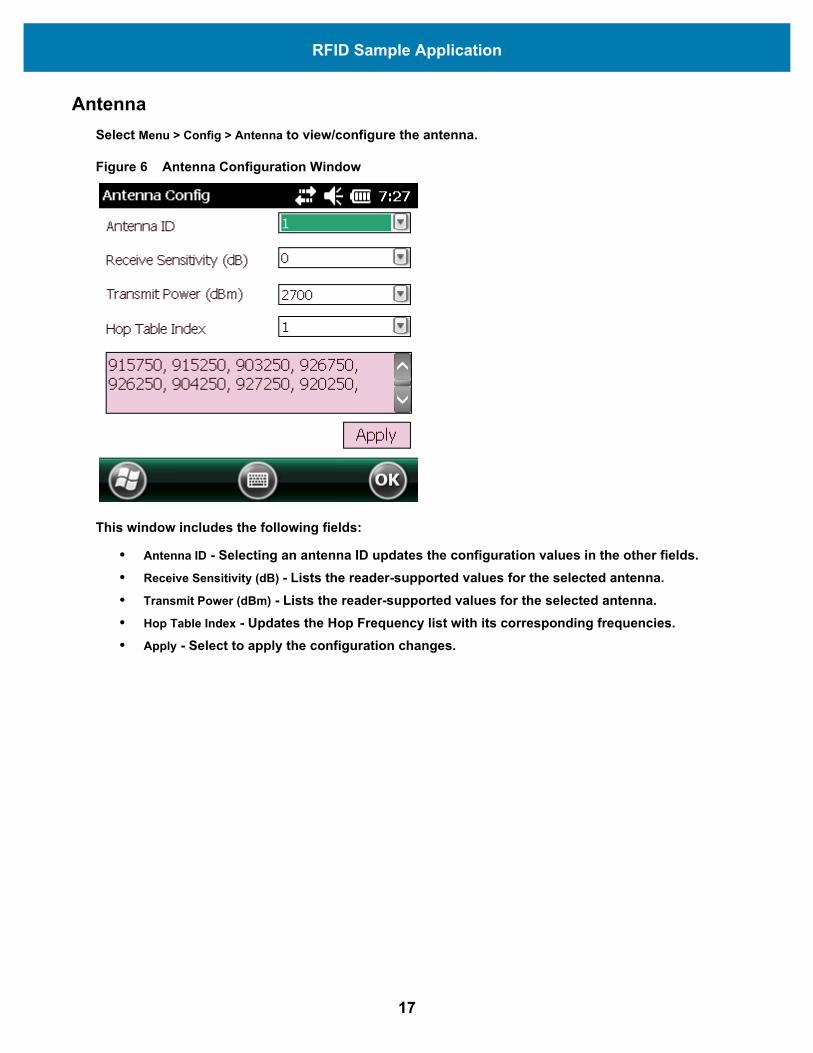
AntennaSelect Menu > Config > Antenna to view/configure the antenna.
Figure 6 Antenna Configuration Window
This window includes the following fields:
• Antenna ID - Selecting an antenna ID updates the configuration values in the other fields. • Receive Sensitivity (dB) - Lists the reader-supported values for the selected antenna. • Transmit Power (dBm) - Lists the reader-supported values for the selected antenna. • Hop Table Index - Updates the Hop Frequency list with its corresponding frequencies. • Apply - Select to apply the configuration changes.
17
RFID Sample Application
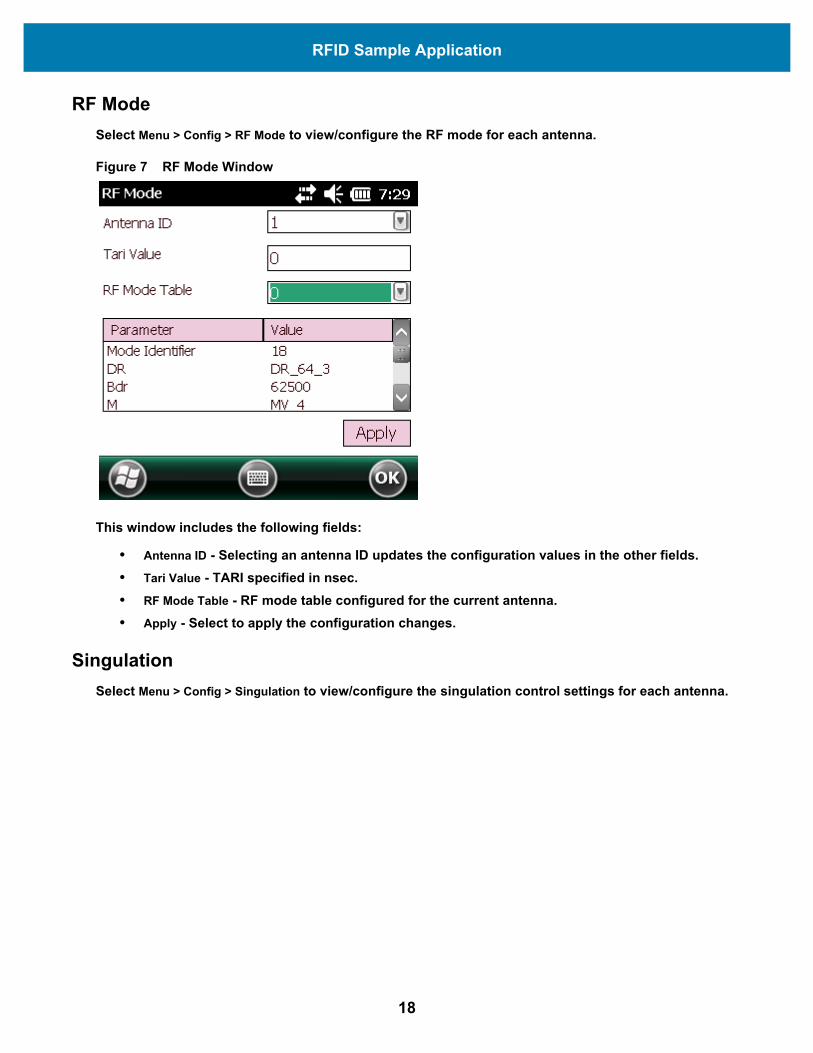
RF ModeSelect Menu > Config > RF Mode to view/configure the RF mode for each antenna.
Figure 7 RF Mode Window
This window includes the following fields:
• Antenna ID - Selecting an antenna ID updates the configuration values in the other fields. • Tari Value - TARI specified in nsec. • RF Mode Table - RF mode table configured for the current antenna. • Apply - Select to apply the configuration changes.
SingulationSelect Menu > Config > Singulation to view/configure the singulation control settings for each antenna.
18
RFID Sample Application
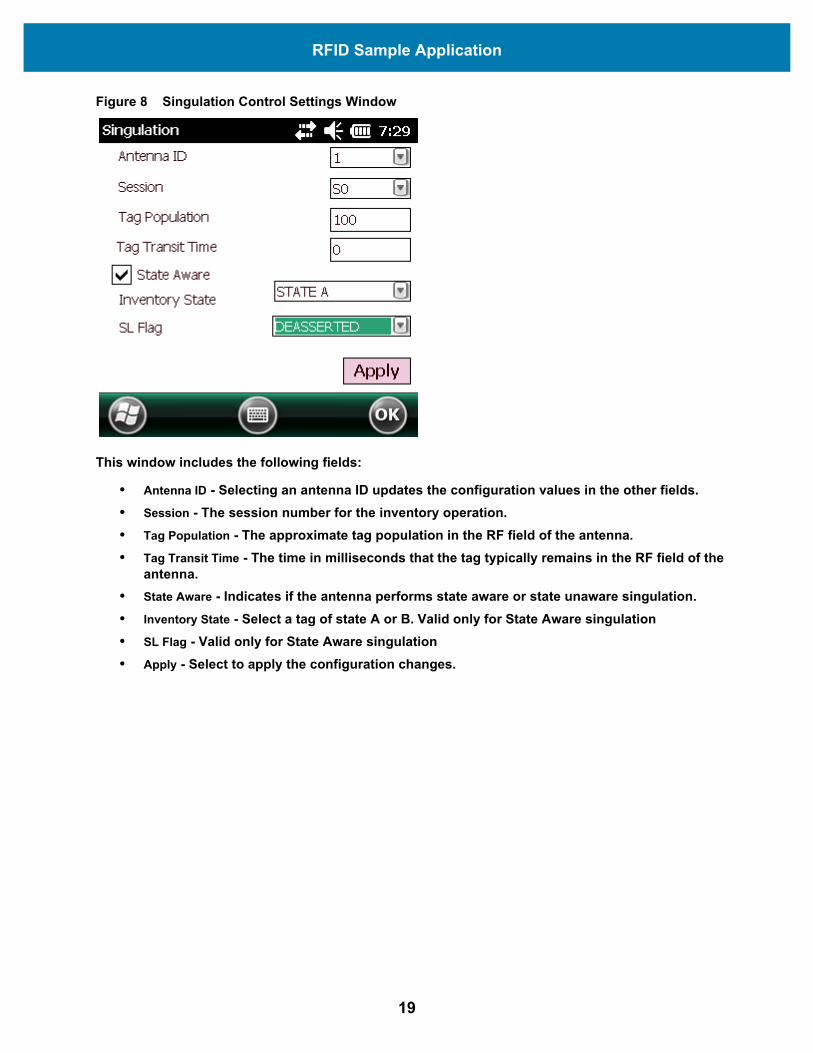
Figure 8 Singulation Control Settings Window
This window includes the following fields:
• Antenna ID - Selecting an antenna ID updates the configuration values in the other fields. • Session - The session number for the inventory operation. • Tag Population - The approximate tag population in the RF field of the antenna. • Tag Transit Time - The time in milliseconds that the tag typically remains in the RF field of the
antenna. • State Aware - Indicates if the antenna performs state aware or state unaware singulation. • Inventory State - Select a tag of state A or B. Valid only for State Aware singulation • SL Flag - Valid only for State Aware singulation • Apply - Select to apply the configuration changes.
19
RFID Sample Application
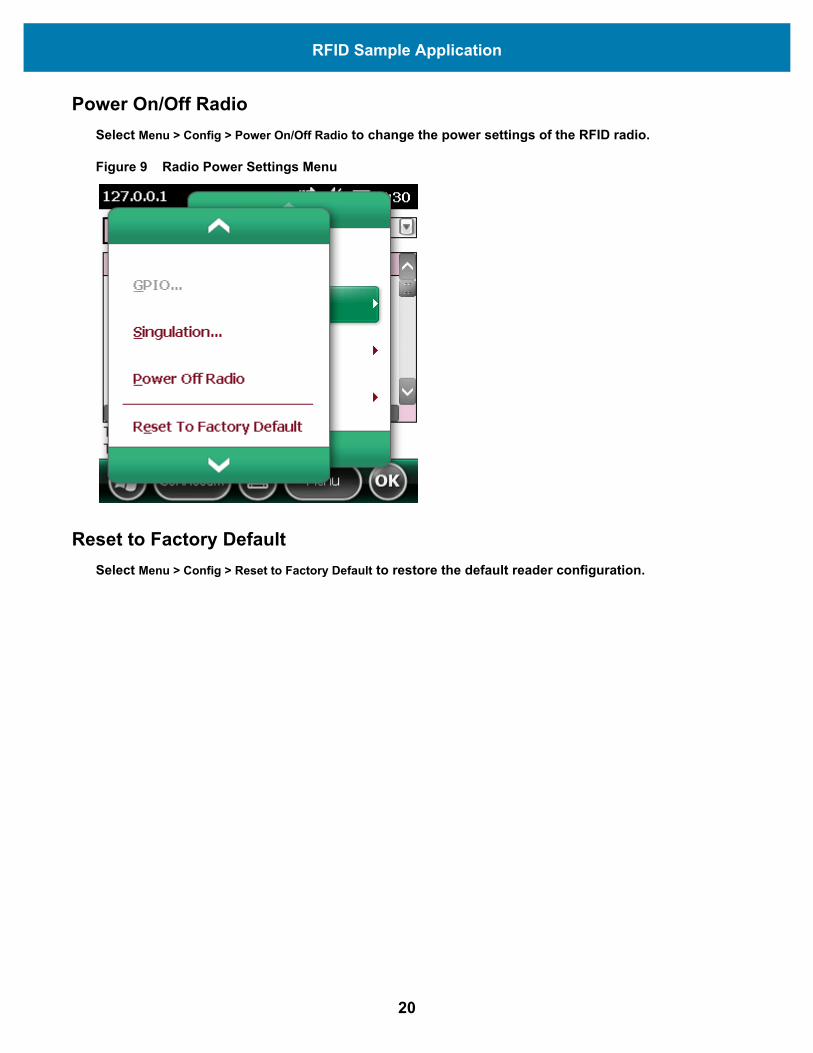
Power On/Off RadioSelect Menu > Config > Power On/Off Radio to change the power settings of the RFID radio.
Figure 9 Radio Power Settings Menu
Reset to Factory DefaultSelect Menu > Config > Reset to Factory Default to restore the default reader configuration.
20
RFID Sample Application
Operations Menu OptionsThe Operations menu includes the following options:
• Antenna Info • Filter • Access • Triggers
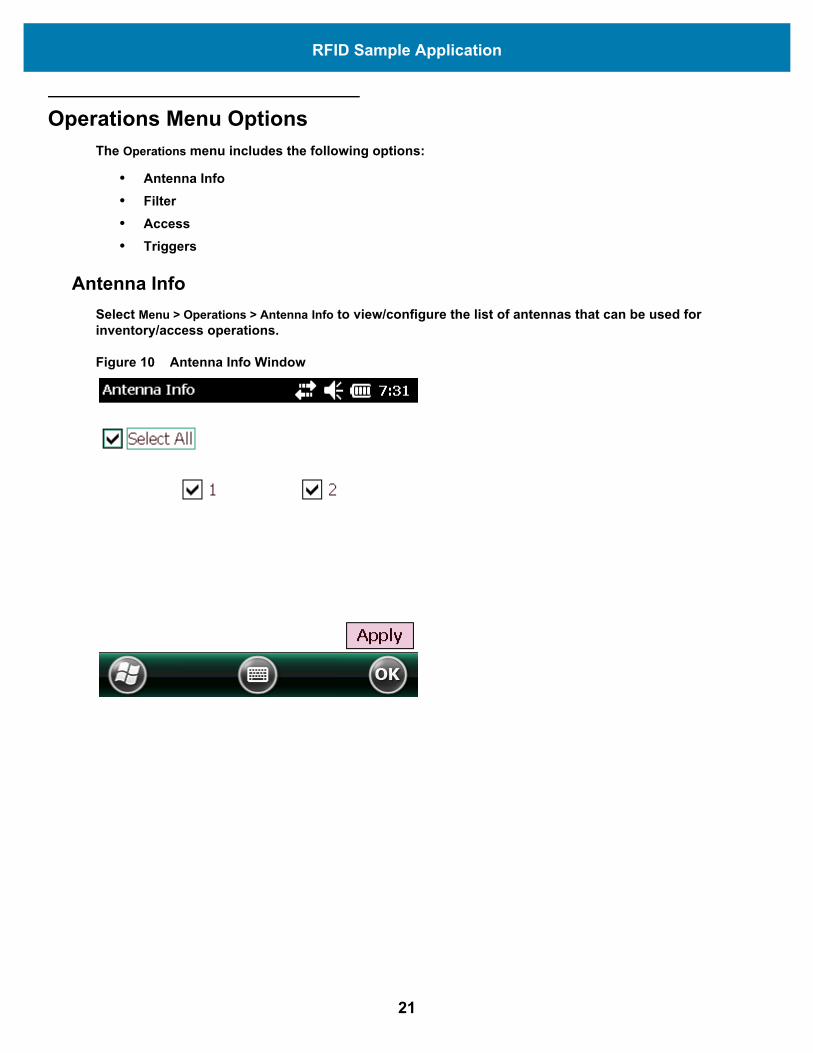
Antenna InfoSelect Menu > Operations > Antenna Info to view/configure the list of antennas that can be used for inventory/access operations.
Figure 10 Antenna Info Window
21
RFID Sample Application
FilterSelect Menu > Operations > Filter to view/configure the following filters:
• Pre-Filter • Post-Filter • Access-Filter
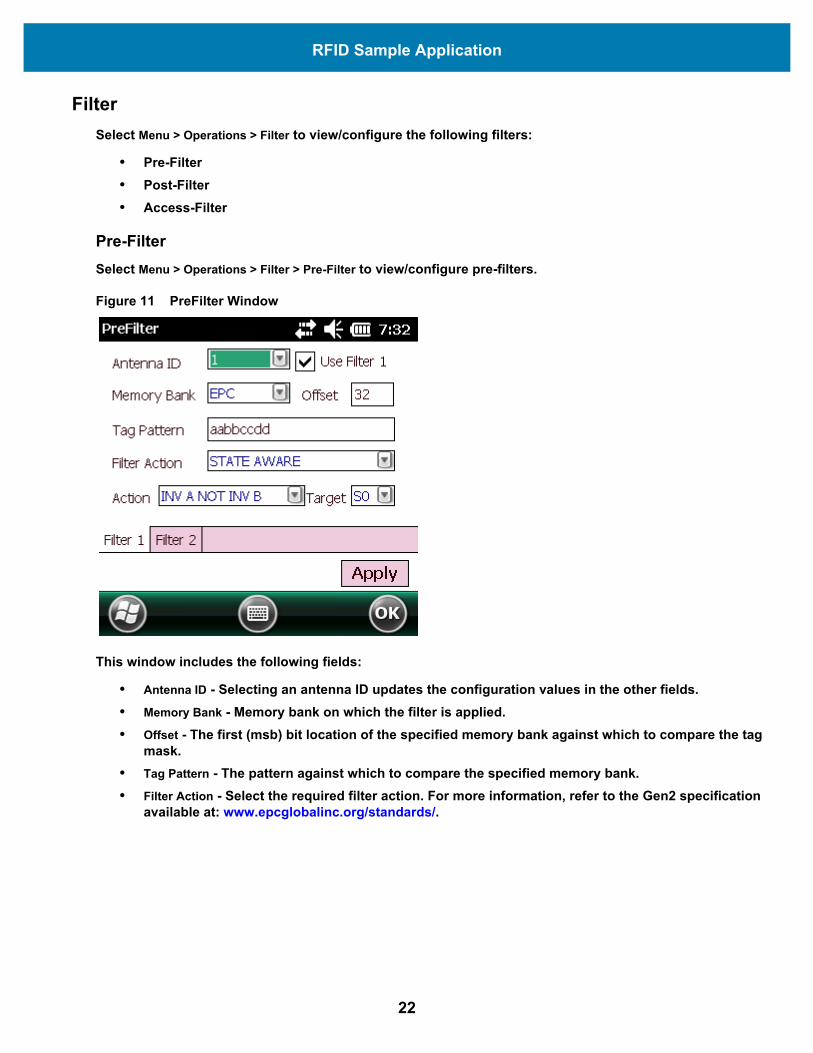
Pre-FilterSelect Menu > Operations > Filter > Pre-Filter to view/configure pre-filters.
Figure 11 PreFilter Window
This window includes the following fields:
• Antenna ID - Selecting an antenna ID updates the configuration values in the other fields. • Memory Bank - Memory bank on which the filter is applied. • Offset - The first (msb) bit location of the specified memory bank against which to compare the tag
mask. • Tag Pattern - The pattern against which to compare the specified memory bank. • Filter Action - Select the required filter action. For more information, refer to the Gen2 specification
available at: www.epcglobalinc.org/standards/.
22
RFID Sample Application
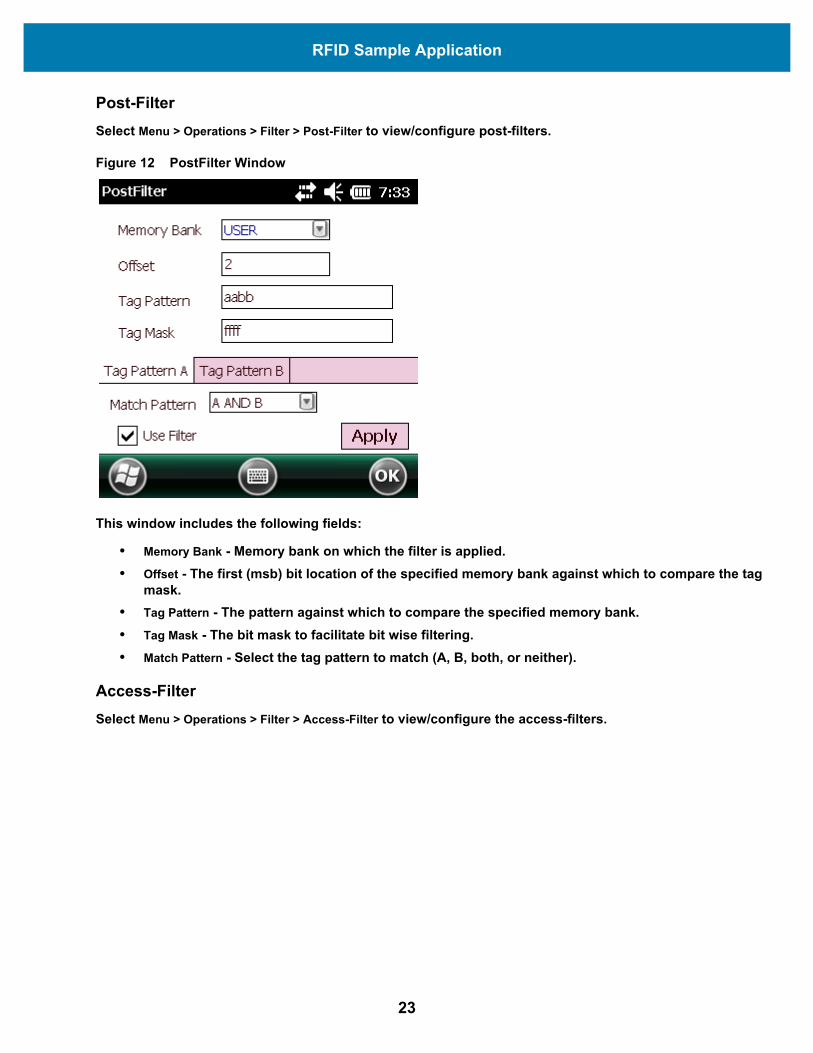
Post-FilterSelect Menu > Operations > Filter > Post-Filter to view/configure post-filters.
Figure 12 PostFilter Window
This window includes the following fields:
• Memory Bank - Memory bank on which the filter is applied.• Offset - The first (msb) bit location of the specified memory bank against which to compare the tag
mask. • Tag Pattern - The pattern against which to compare the specified memory bank. • Tag Mask - The bit mask to facilitate bit wise filtering.• Match Pattern - Select the tag pattern to match (A, B, both, or neither).
Access-FilterSelect Menu > Operations > Filter > Access-Filter to view/configure the access-filters.
23

RFID Sample Application
Figure 13 AccessFilter Window
See Post-Filter on page 23 for field descriptions.
24
RFID Sample Application
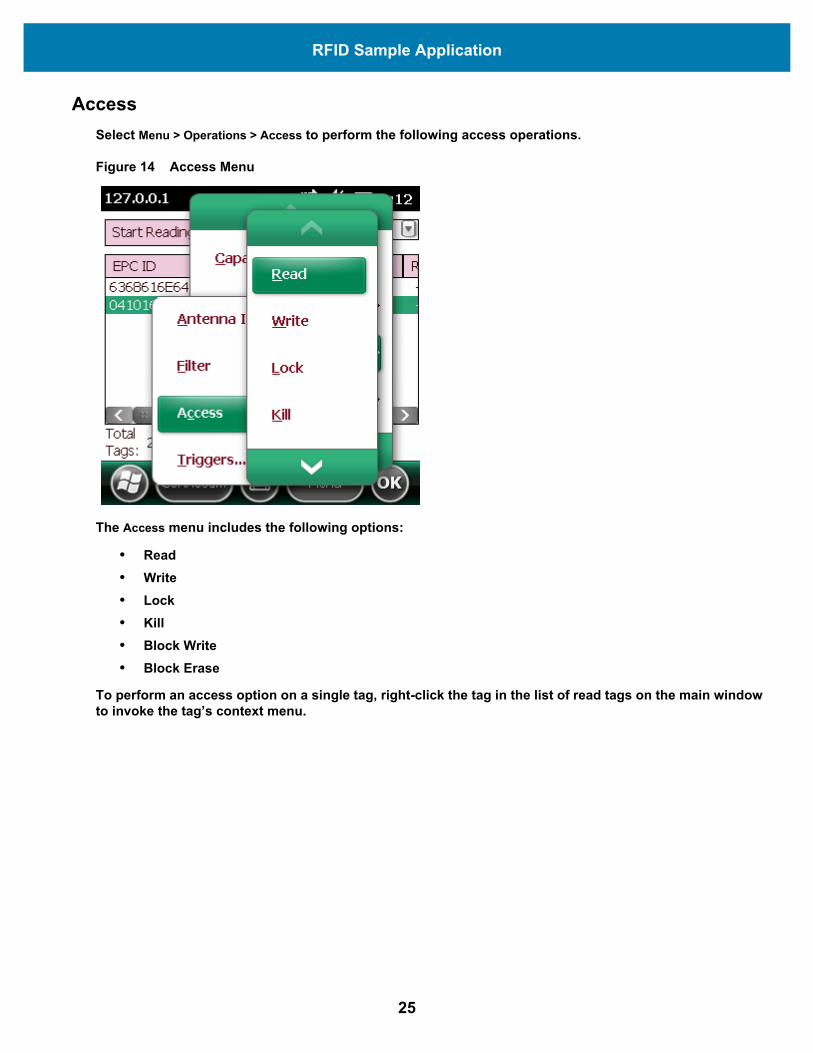
AccessSelect Menu > Operations > Access to perform the following access operations.
Figure 14 Access Menu
The Access menu includes the following options:
• Read • Write • Lock • Kill • Block Write • Block Erase
To perform an access option on a single tag, right-click the tag in the list of read tags on the main window to invoke the tag’s context menu.
25
RFID Sample Application
Figure 15 Tag Context Menu
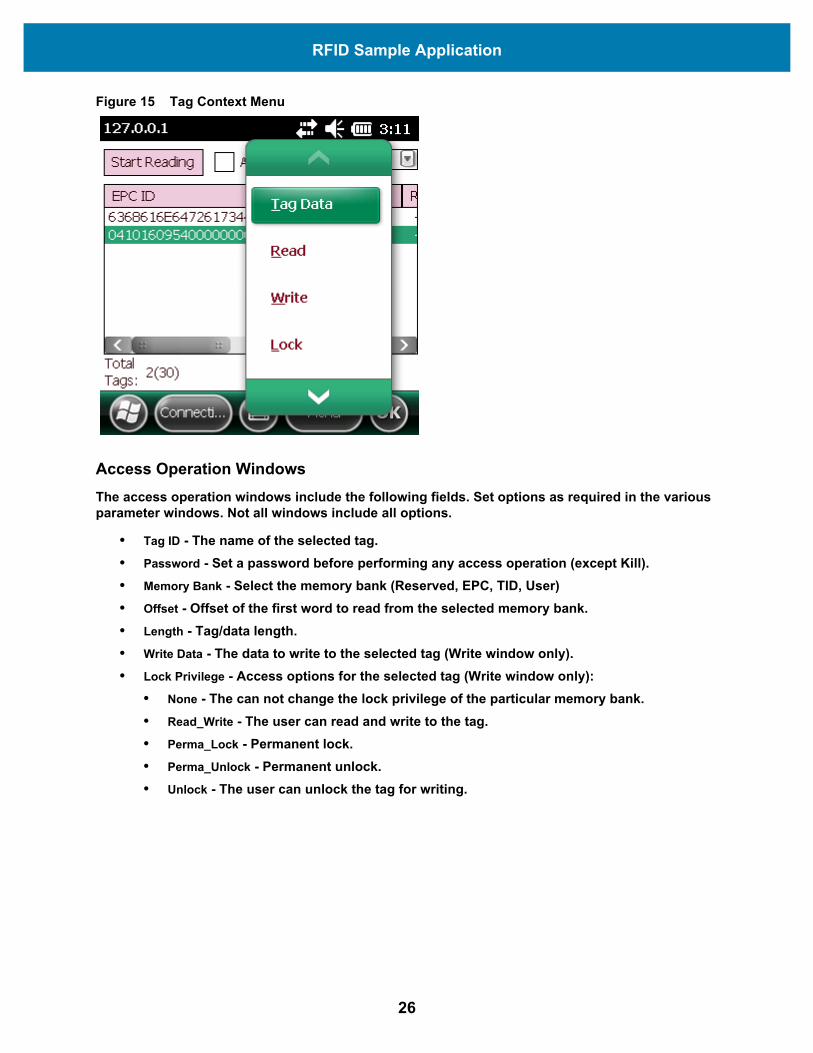
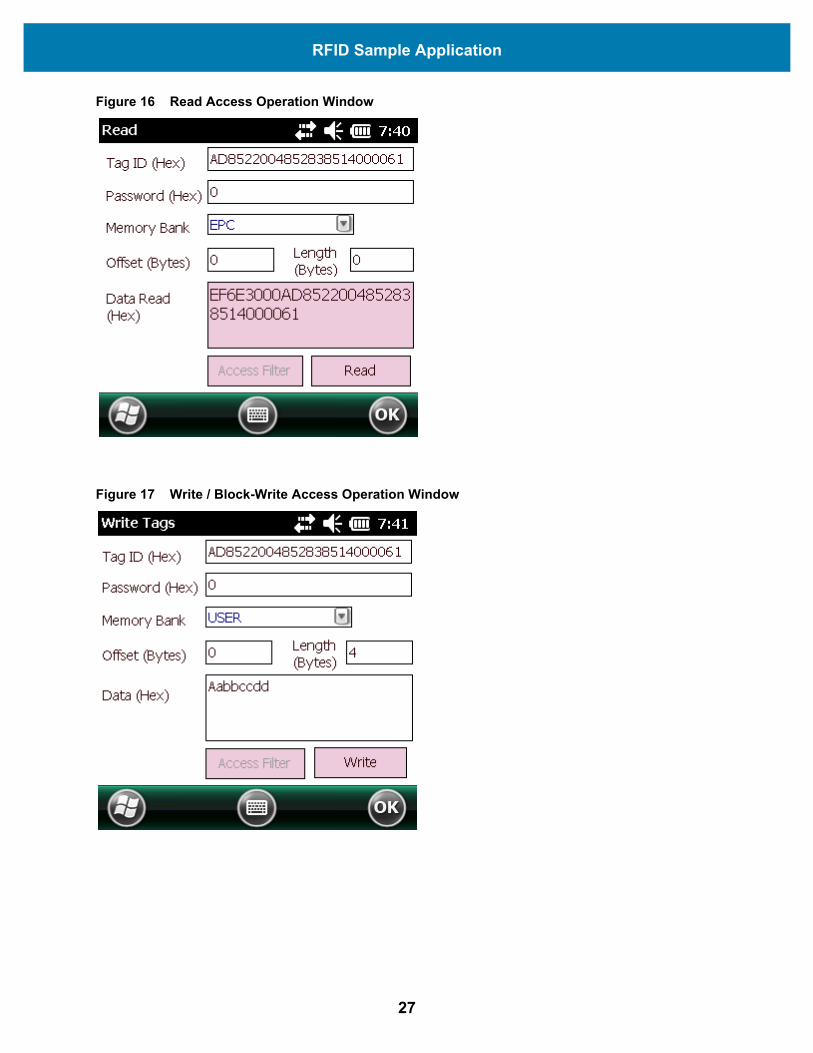
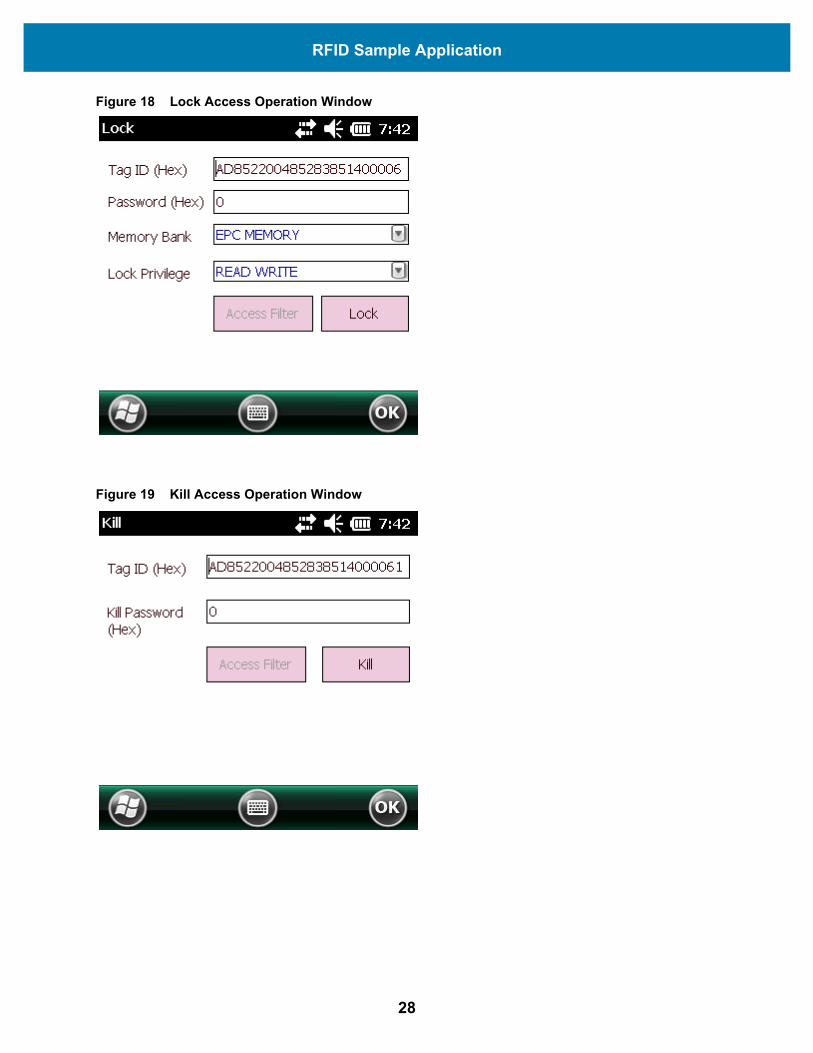
Access Operation WindowsThe access operation windows include the following fields. Set options as required in the various parameter windows. Not all windows include all options.
• Tag ID - The name of the selected tag. • Password - Set a password before performing any access operation (except Kill). • Memory Bank - Select the memory bank (Reserved, EPC, TID, User) • Offset - Offset of the first word to read from the selected memory bank. • Length - Tag/data length. • Write Data - The data to write to the selected tag (Write window only). • Lock Privilege - Access options for the selected tag (Write window only):
• None - The can not change the lock privilege of the particular memory bank. • Read_Write - The user can read and write to the tag. • Perma_Lock - Permanent lock. • Perma_Unlock - Permanent unlock. • Unlock - The user can unlock the tag for writing.
26
RFID Sample Application
Figure 16 Read Access Operation Window
Figure 17 Write / Block-Write Access Operation Window
27
RFID Sample Application
Figure 18 Lock Access Operation Window
Figure 19 Kill Access Operation Window
28
RFID Sample Application
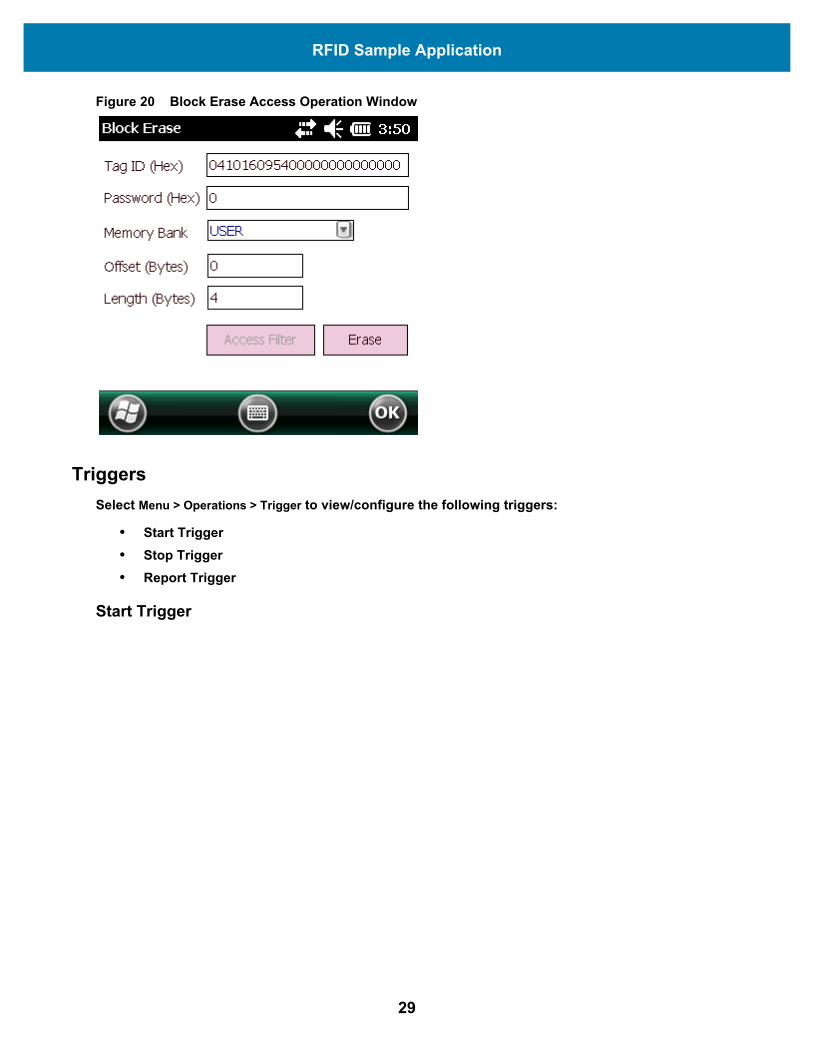
Figure 20 Block Erase Access Operation Window
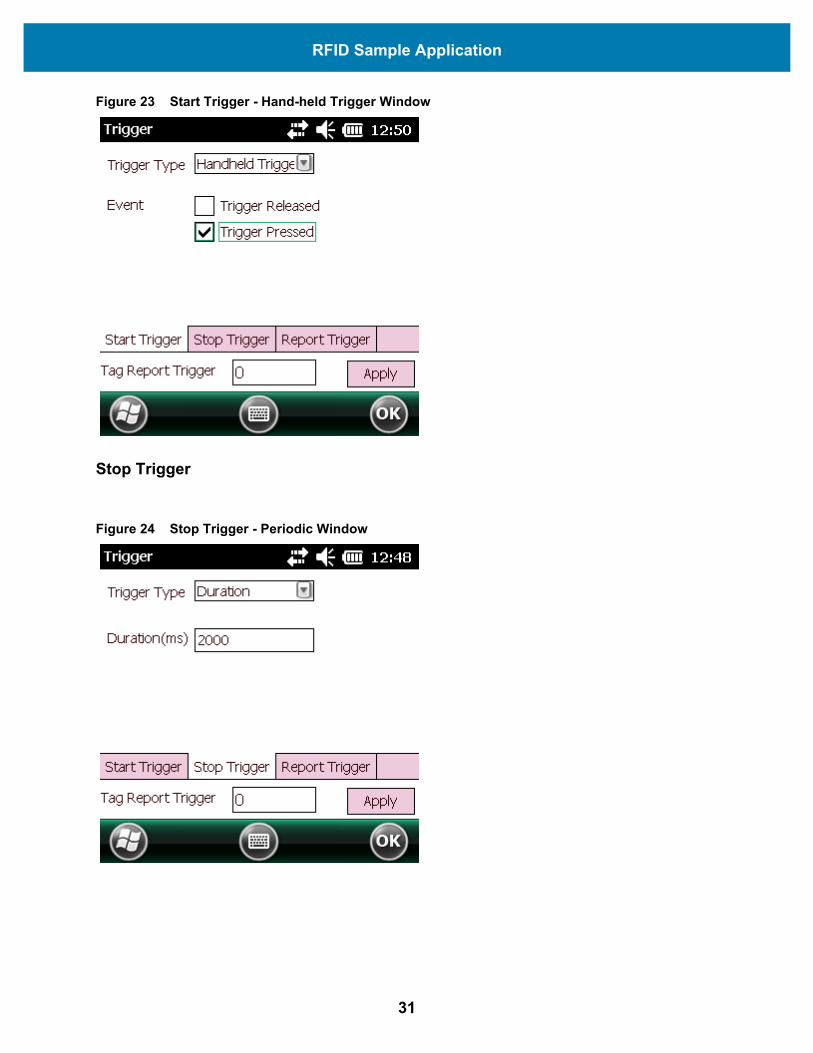
TriggersSelect Menu > Operations > Trigger to view/configure the following triggers:
• Start Trigger • Stop Trigger • Report Trigger
Start Trigger
29
RFID Sample Application
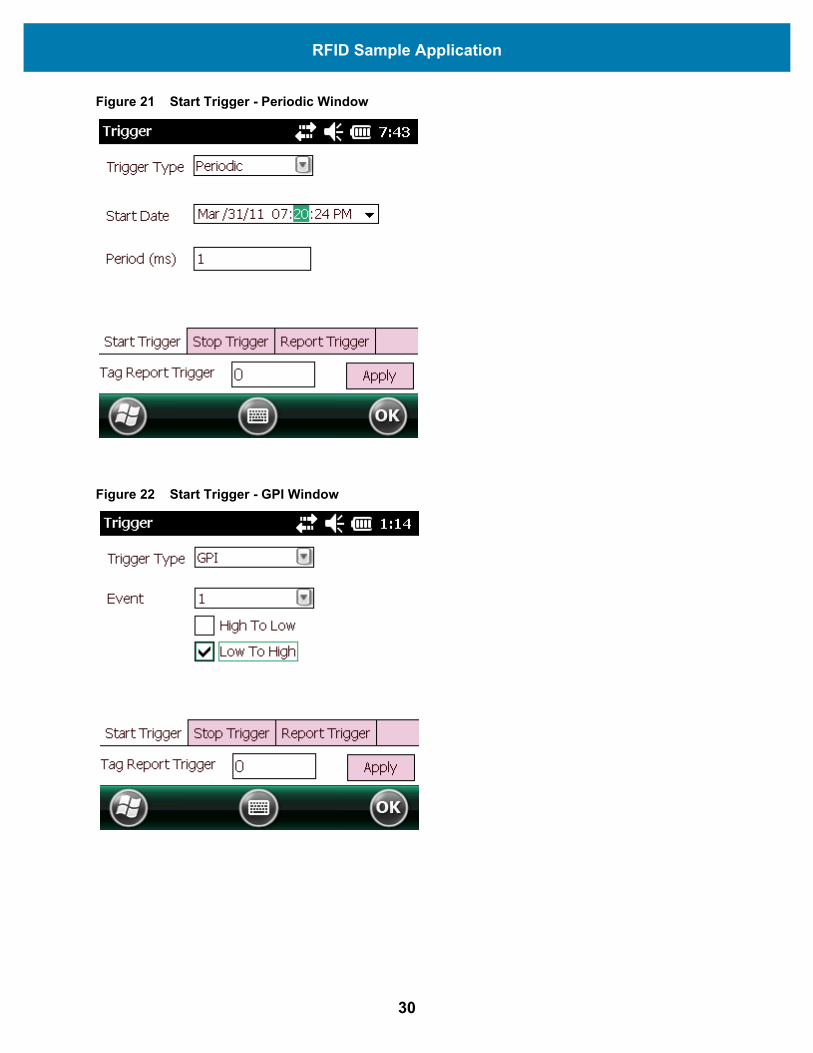
Figure 21 Start Trigger - Periodic Window
Figure 22 Start Trigger - GPI Window
30
RFID Sample Application
Figure 23 Start Trigger - Hand-held Trigger Window
Stop Trigger
Figure 24 Stop Trigger - Periodic Window
31
RFID Sample Application
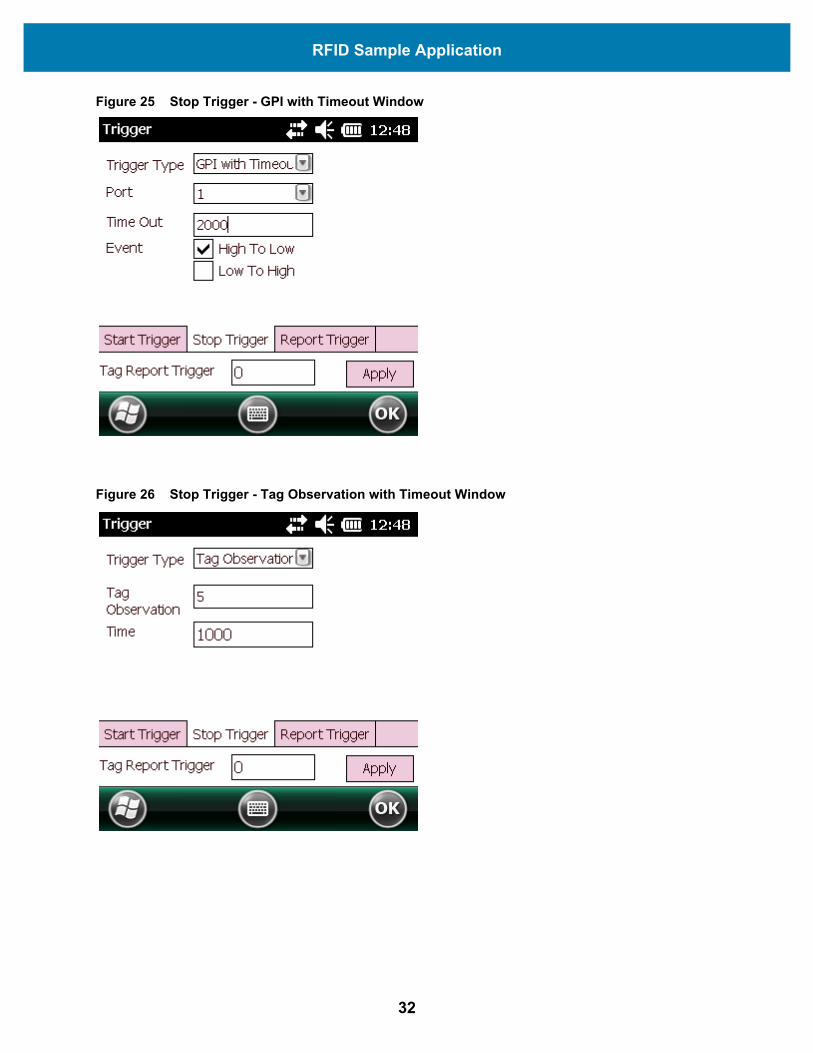
Figure 25 Stop Trigger - GPI with Timeout Window
Figure 26 Stop Trigger - Tag Observation with Timeout Window
32
RFID Sample Application
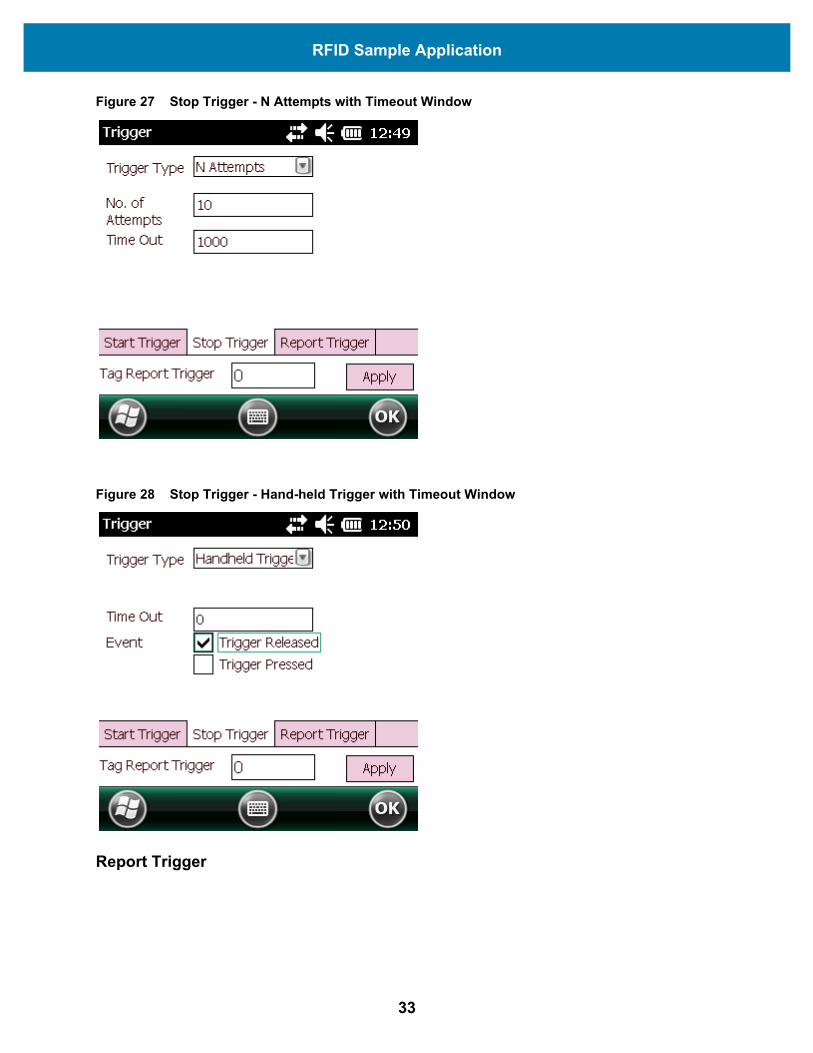
Figure 27 Stop Trigger - N Attempts with Timeout Window
Figure 28 Stop Trigger - Hand-held Trigger with Timeout Window
Report Trigger
33
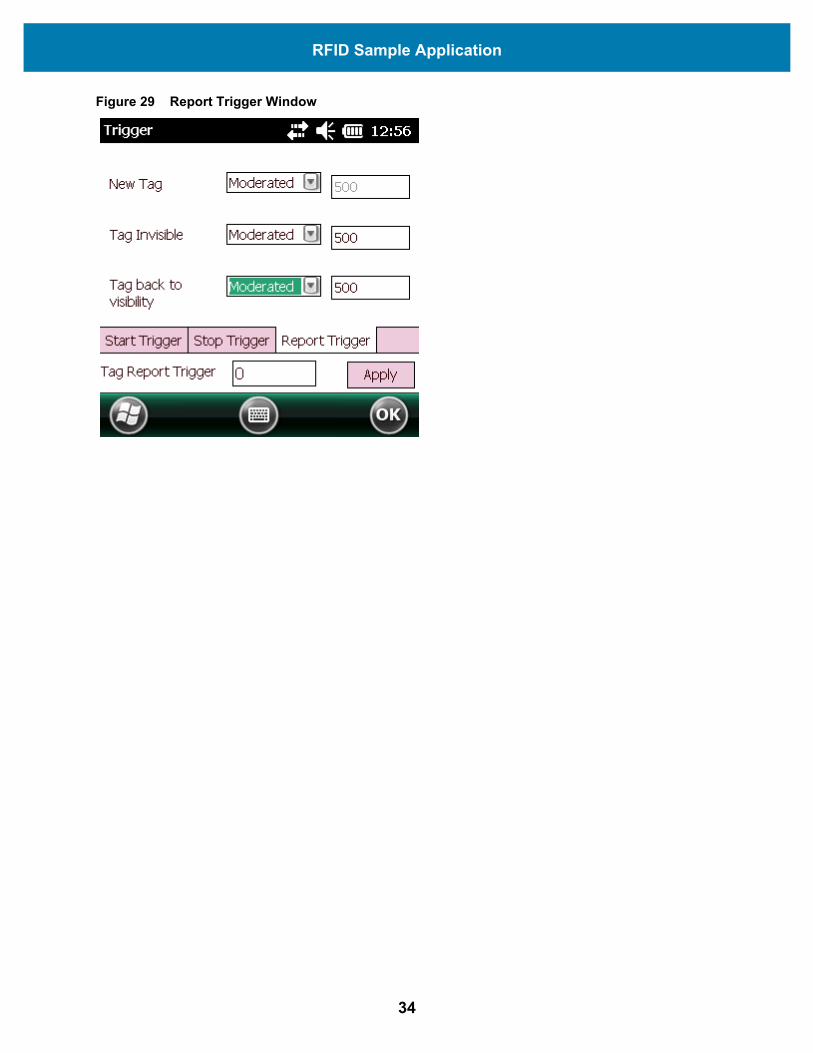
RFID Sample Application
Figure 29 Report Trigger Window
34
RFID Sample Application
Management Menu OptionsManagement options are not applicable for hand-held readers.
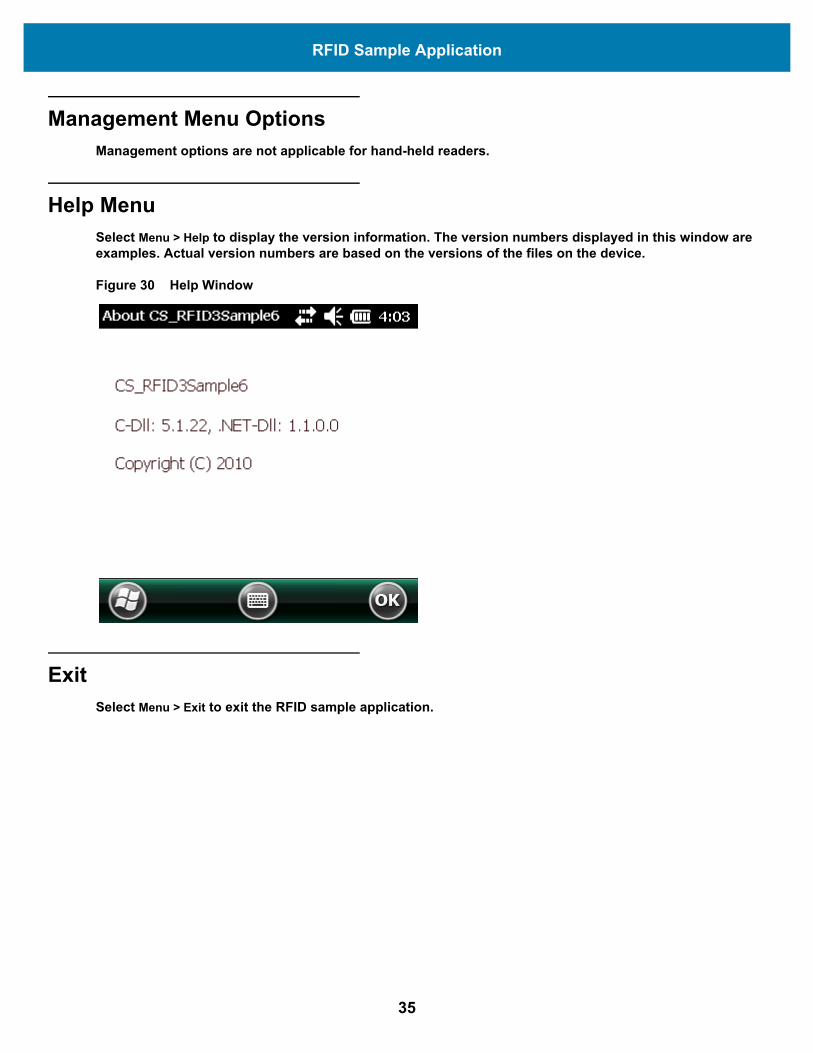
Help MenuSelect Menu > Help to display the version information. The version numbers displayed in this window are examples. Actual version numbers are based on the versions of the files on the device.
Figure 30 Help Window
ExitSelect Menu > Exit to exit the RFID sample application.
35
Tag Locator
IntroductionUse Tag Locator to detect the location of a tag. By providing the TagID of an item, this application can find the relative position of the tag with respect to the hand-held reader. Slowly move the hand-held back and forth. Use the beep frequency and vertical progress bar on the screen to help direct you to the general location of the tag.
The Tag Locater application requires the following components/DLLs on the device:
• RFIDAPI32.dll (Version 5.1.15 or higher)• Symbol.RFID3.Device.dll (Assembly version 1.1.0.1, File version 1.1.0.7 or higher)• Symbol.Audio.dll• Symbol.dll• Symbol.Notification.dll• Symbol.StandardForms.dll
36
Tag Locator
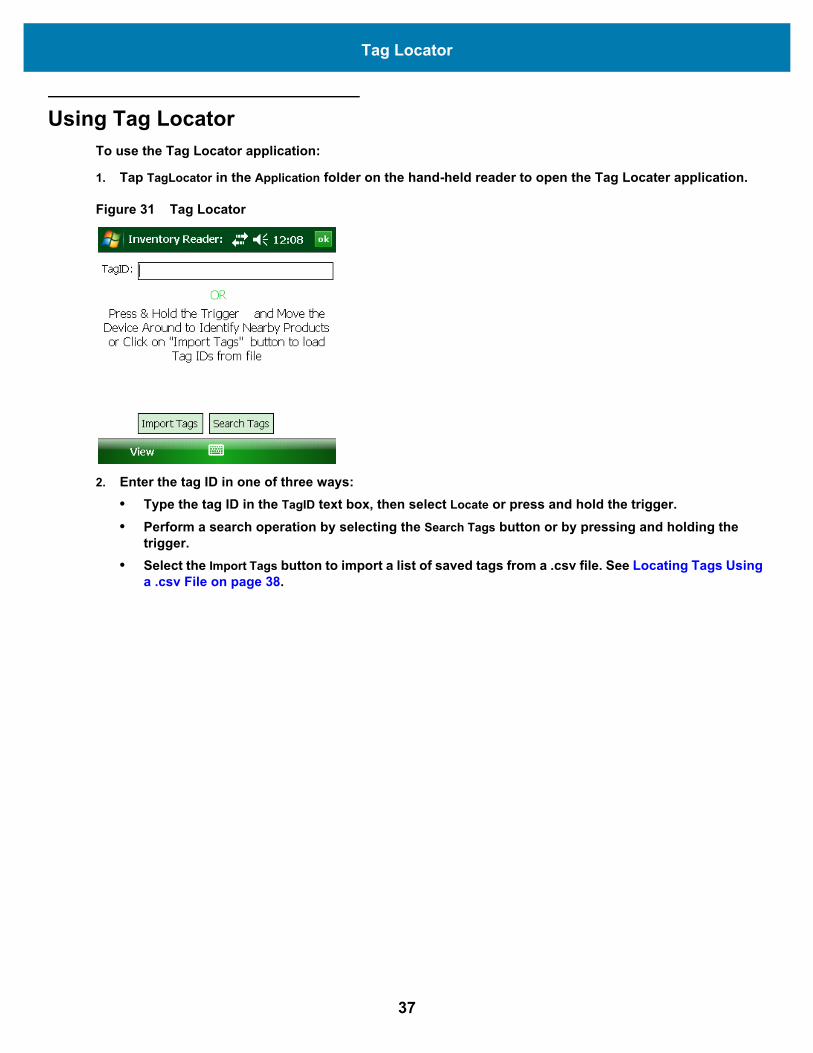
Using Tag LocatorTo use the Tag Locator application:
1. Tap TagLocator in the Application folder on the hand-held reader to open the Tag Locater application.
Figure 31 Tag Locator
2. Enter the tag ID in one of three ways: • Type the tag ID in the TagID text box, then select Locate or press and hold the trigger.• Perform a search operation by selecting the Search Tags button or by pressing and holding the
trigger.• Select the Import Tags button to import a list of saved tags from a .csv file. See Locating Tags Using
a .csv File on page 38.
37
Tag Locator
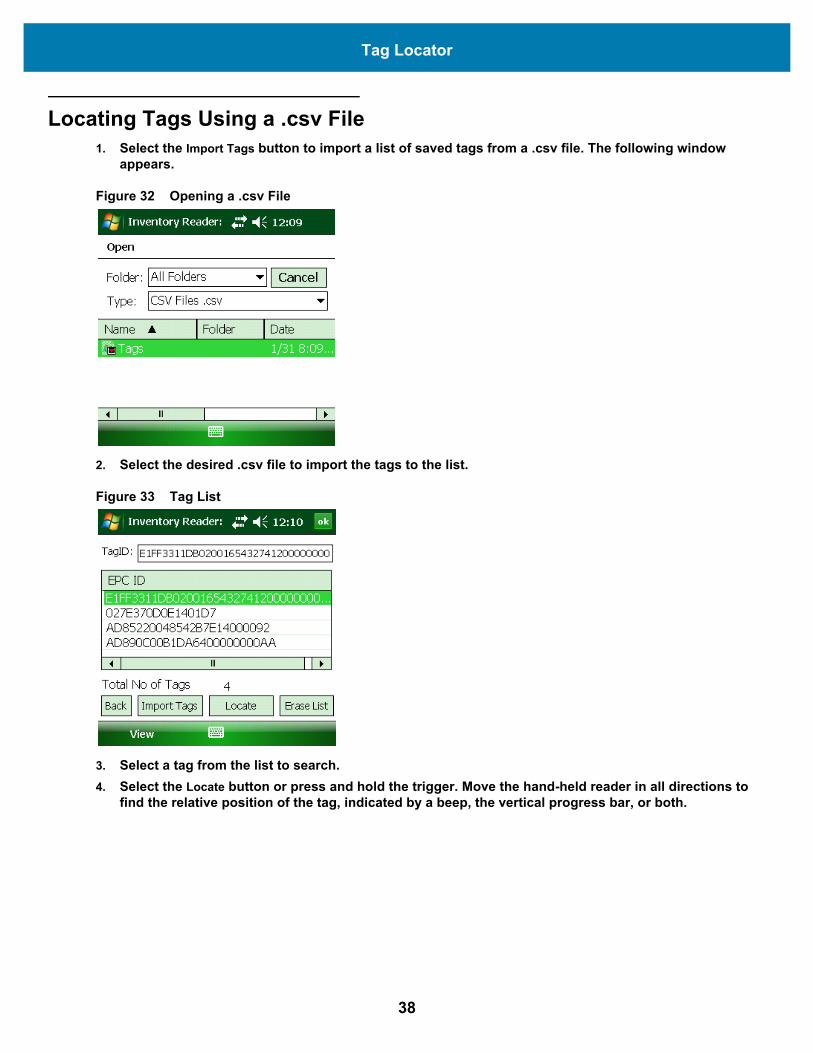
Locating Tags Using a .csv File1. Select the Import Tags button to import a list of saved tags from a .csv file. The following window
appears.
Figure 32 Opening a .csv File
2. Select the desired .csv file to import the tags to the list.
Figure 33 Tag List
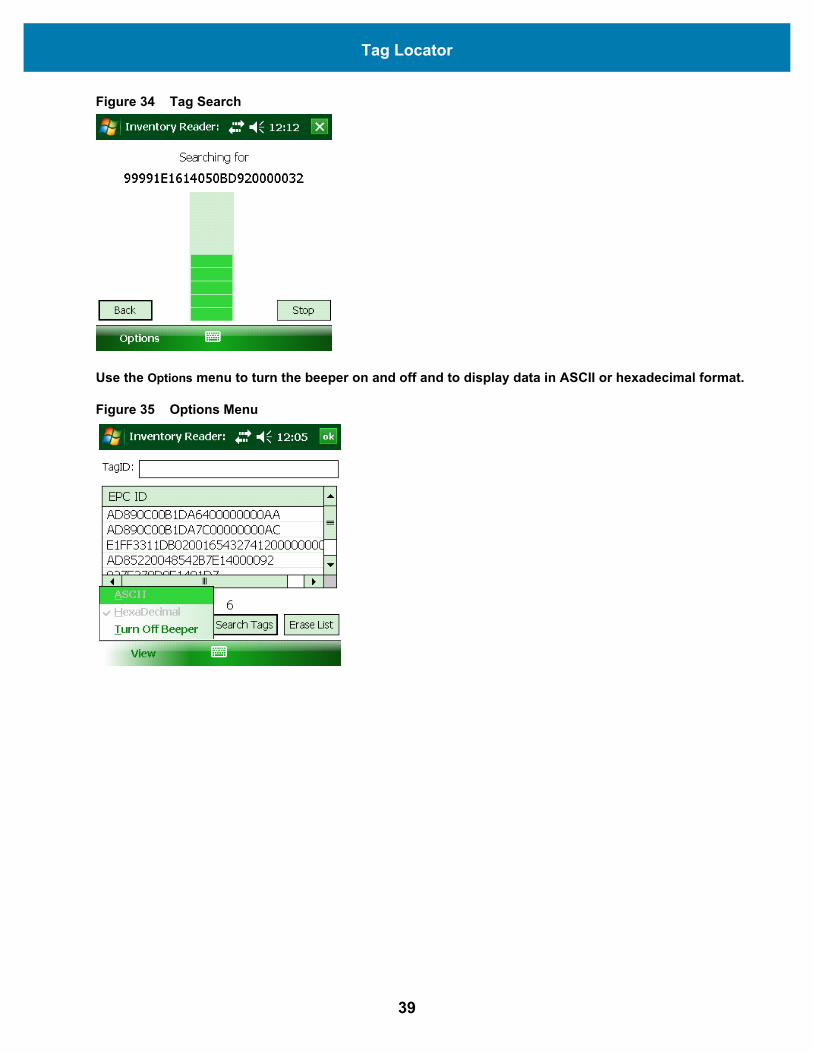
3. Select a tag from the list to search.4. Select the Locate button or press and hold the trigger. Move the hand-held reader in all directions to
find the relative position of the tag, indicated by a beep, the vertical progress bar, or both.
38
Tag Locator
Figure 34 Tag Search
Use the Options menu to turn the beeper on and off and to display data in ASCII or hexadecimal format.
Figure 35 Options Menu
39

SessionOne
IntroductionSessionOne is a single reader, PC-based application used to discover and connect to Zebra fixed and hand-held RFID readers, specifically the FX Series Fixed Readers and MC Series Hand-held Readers. This tool allows users to easily perform tag inventory and access operations.
InstallationTo install SessionOne on the host PC:
1. Locate SessionOne at: www.zebra.com/support.2. Download the SessionOne zip file to the host PC and unzip the file.3. Double-click the sessiononesetup.exe file.4. Follow the screen prompts to complete installation.
40
SessionOne
Connecting to the RFID ReaderTo connect to the reader through SessionOne:
1. Connect the reader to the host PC. Refer to the reader’s Product Reference Guide for instructions.
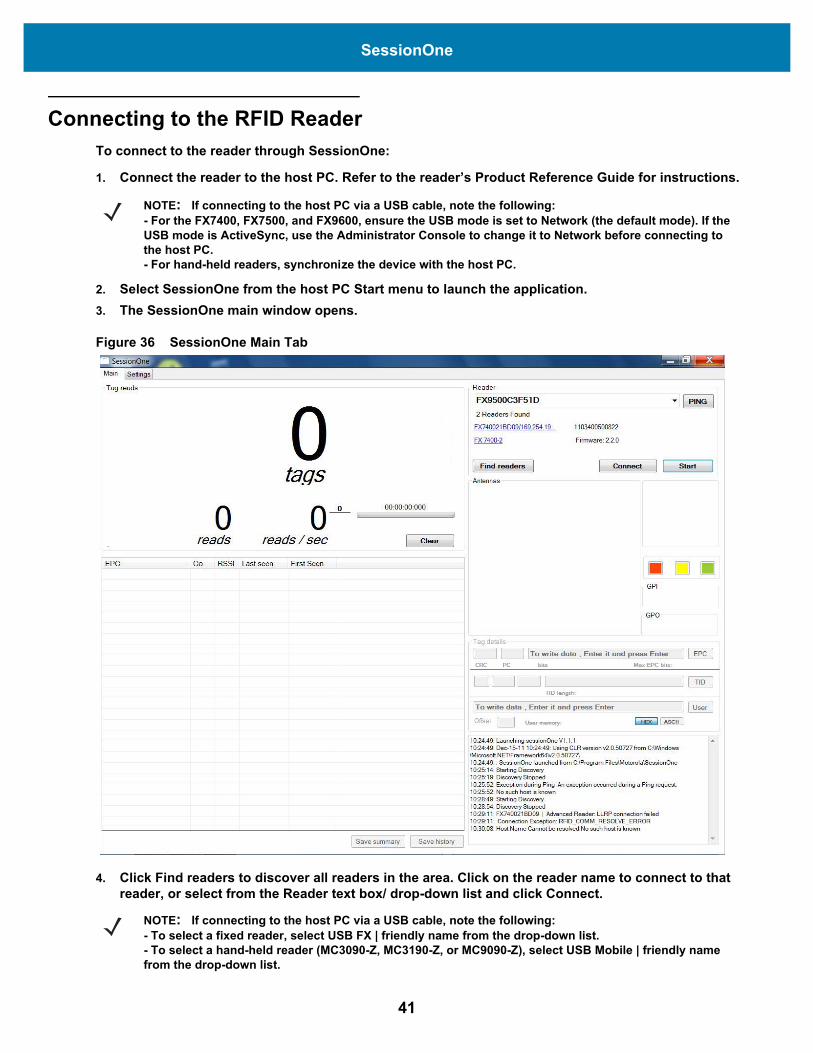
2. Select SessionOne from the host PC Start menu to launch the application.3. The SessionOne main window opens.
Figure 36 SessionOne Main Tab
4. Click Find readers to discover all readers in the area. Click on the reader name to connect to that reader, or select from the Reader text box/ drop-down list and click Connect.
NOTE: If connecting to the host PC via a USB cable, note the following:- For the FX7400, FX7500, and FX9600, ensure the USB mode is set to Network (the default mode). If the USB mode is ActiveSync, use the Administrator Console to change it to Network before connecting to the host PC.- For hand-held readers, synchronize the device with the host PC.
NOTE: If connecting to the host PC via a USB cable, note the following:- To select a fixed reader, select USB FX | friendly name from the drop-down list.- To select a hand-held reader (MC3090-Z, MC3190-Z, or MC9090-Z), select USB Mobile | friendly name from the drop-down list.
41

SessionOne
See the next section if SessionOne does not locate the reader, or to search for a specific reader.To use the host name to search for the reader:1. Enter the reader host name in the Reader text box (e.g., fx7400cd3b0d) with no spaces. The host name
is provided on a label on the reader, or on the CD provided with the reader. Click Find readers. The Find readers button changes to Stop Finding while SessionOne scans for a reader and displays connection activity at the bottom right area of the window.
2. When the message Found Reader appears, select the reader from the Reader drop-down list and click Connect.
3. Click PING to verify that the reader is connected. The button turns green to confirm connection. If the button turns red, continue to the following procedure.
If SessionOne does not find the reader:1. Open a command prompt on the host PC by selecting Start > Programs > Accessories > Command
Prompt. 2. Enter ping <reader host name> and press Return. For example, enter ping fx7400cd3b0d and press
Return. Note the reader’s IP address that displays.3. Close the command prompt and return to SessionOne. Enter the reader’s IP address in the Reader text
box (e.g., 10.11.11.183).4. Click PING to locate and connect to the reader.
42
SessionOne
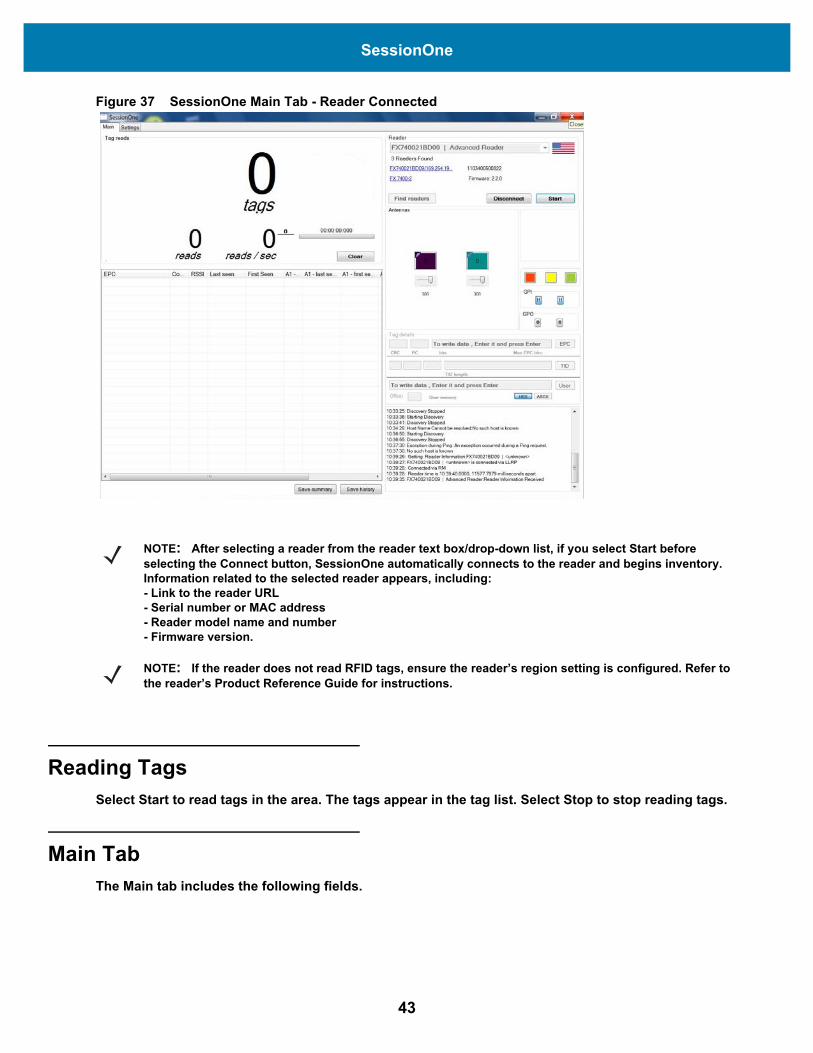
Figure 37 SessionOne Main Tab - Reader Connected
Reading TagsSelect Start to read tags in the area. The tags appear in the tag list. Select Stop to stop reading tags.
Main TabThe Main tab includes the following fields.
NOTE: After selecting a reader from the reader text box/drop-down list, if you select Start before selecting the Connect button, SessionOne automatically connects to the reader and begins inventory. Information related to the selected reader appears, including:- Link to the reader URL- Serial number or MAC address- Reader model name and number- Firmware version.
NOTE: If the reader does not read RFID tags, ensure the reader’s region setting is configured. Refer to the reader’s Product Reference Guide for instructions.
43
SessionOne
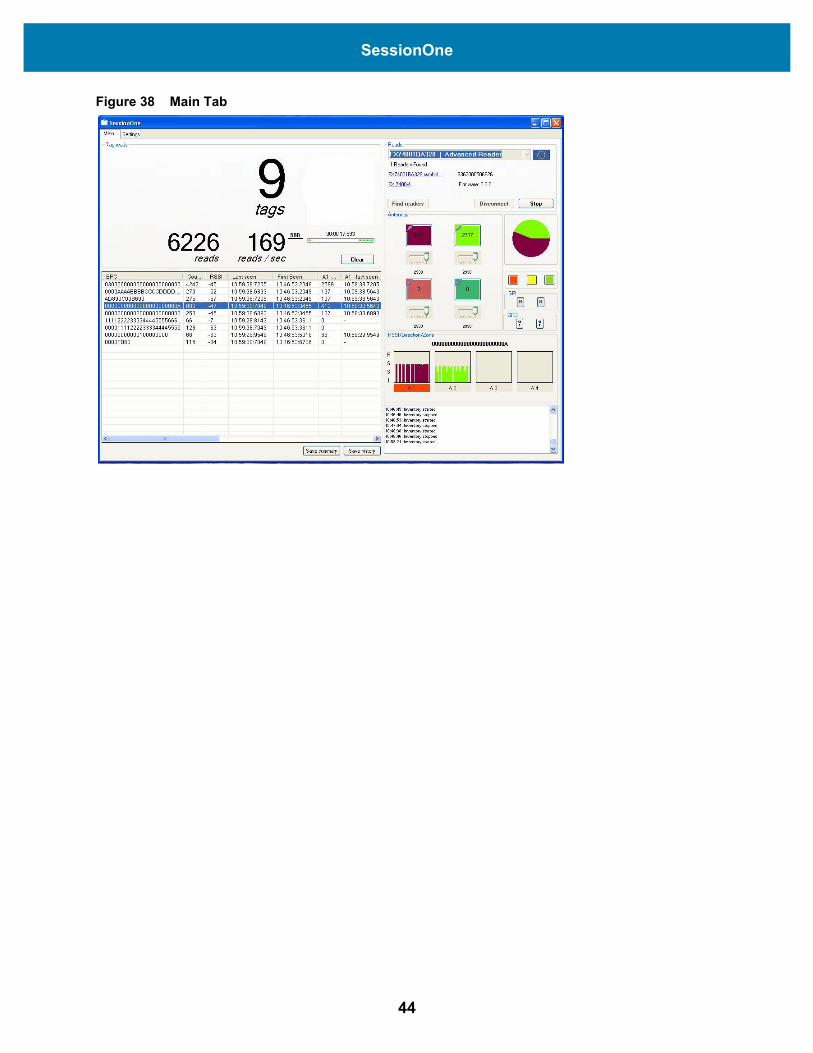
Figure 38 Main Tab
44
SessionOne
Tag ReadsThis field includes the following items:
• Tags - number of tags read.• Reads - total number of reads of all tags.• Reads / sec - number of reads per second.• Time bar - time elapsed in the current read session.• Clear button - click to clear all tags from the list.• Tag table - tracks tag read information:
• EPC - unique tag EPC ID.• Count - number of times that tag was read.• RSSI - Received Signal Strength Indication.• Last Seen - UTC time (in microseconds) when the tag was last seen.• First Seen - UTC time (in microseconds) when the tag was first seen.• Ax - number of times that individual antenna read the tag.• Ax Last Seen - UTC time (in microseconds) when that antenna last saw the tag.• Ax First Seen - UTC time (in microseconds) when that antenna first saw the tag.
• Save summary button - summarizes and saves the details of each tag read.• Save history button - saves and stores the details of each tag read.
ReaderThis field includes the following items:
• Reader text / drop-down box - enter the reader name, hostname, or IP address to connect to and press enter, or select from the drop-down list to view information related to the reader.
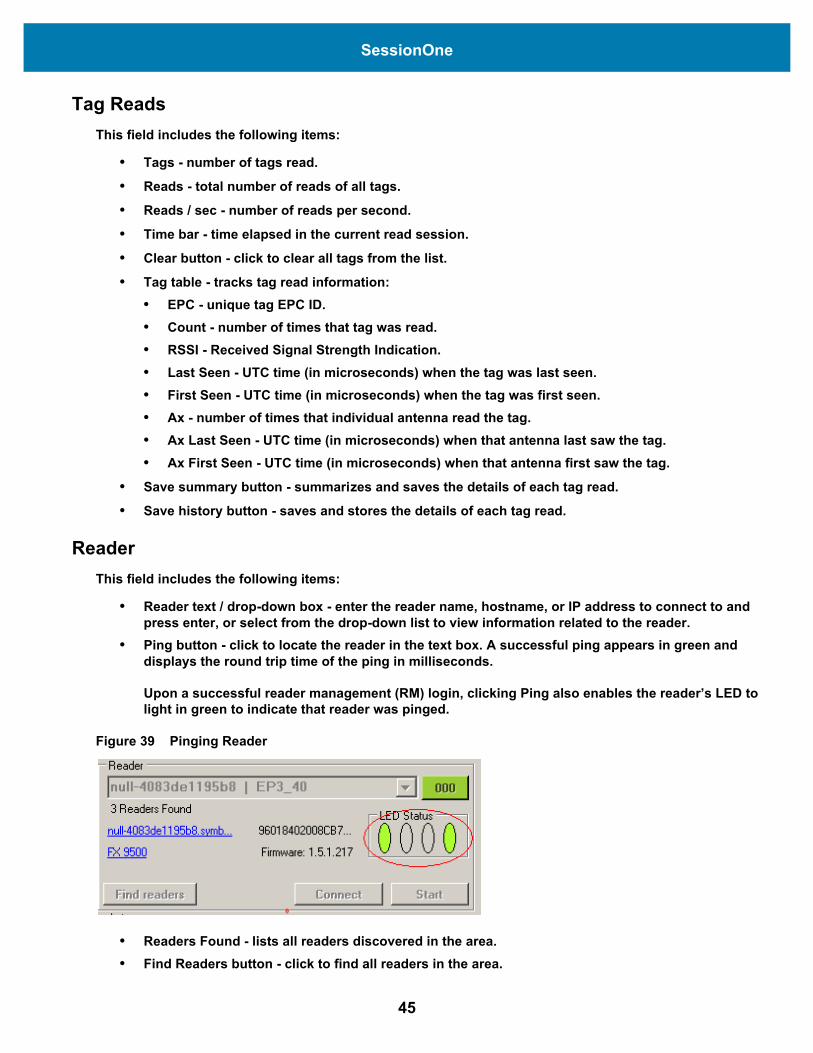
• Ping button - click to locate the reader in the text box. A successful ping appears in green and displays the round trip time of the ping in milliseconds.
Upon a successful reader management (RM) login, clicking Ping also enables the reader’s LED to light in green to indicate that reader was pinged.
Figure 39 Pinging Reader
• Readers Found - lists all readers discovered in the area.• Find Readers button - click to find all readers in the area.
45
SessionOne
• Connect / Disconnect button - click to connect to or disconnect from the selected reader. To connect to a reader, first select that reader from the drop-down list or enter the hostname/IP address, and then click Connect.
• Start / Stop button - click to start or stop reading tags.
AntennasThis field includes the following items:
• Antennas listed by color - each color represents an antenna port in the reader. • A blue icon on top of each antenna indicates whether the antenna is connected or
disconnected. • An enabled antenna appears in the color selected in the Settings tab. A disabled antenna
appears in the control color. To enable or disable an antenna, first ensure you are logged in with a valid user name and password, then click an antenna image. See Autologin on page 50.
• Number value - the number inside each antenna indicates the total reads by that particular antenna.
• Slide bar - the slide located under each antenna indicates the power level of each antenna. Use the slide bar to change the antenna’s power value.
• Pie chart - represents the contribution of each antenna in total tag reads.• User LED (small colored boxes under the pie chart) - the user LED colors available. The LED is set
to a particular reader. To enable or disable the LED, first ensure you are logged in with a valid user name and password, then click an LED image. See Autologin on page 50.
• GPI field (General Purpose Input) - indicates the status of the GPI input.• GPO field (General Purpose Output) - click on a GPO button to change the pin status of the device.
Tag DetailsThis field includes the following items:
• EPC - write tags and read the fields.• TID - read only.• User memory - read and write.
RSSI / Direction / ZoneThis field is active when running inventory. Select a tag in the list to display the RSSI value for that tag in each antenna as a dynamic bar graph.
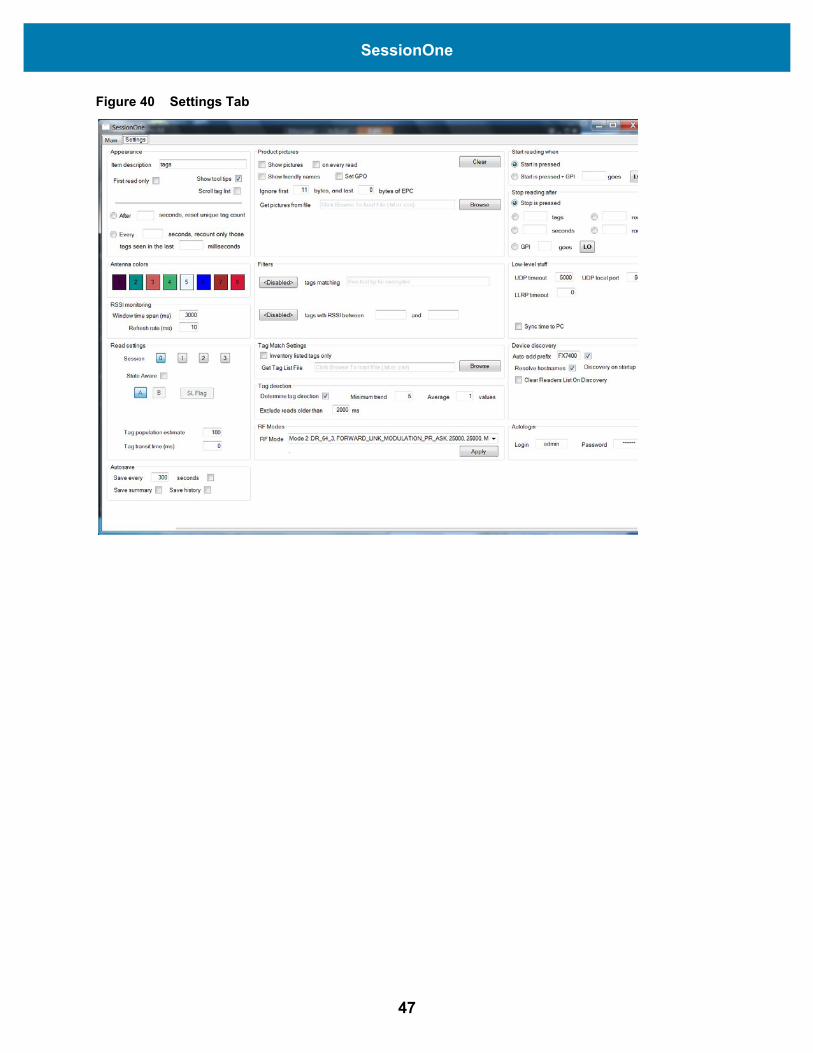
Settings TabThe Settings tab includes the following fields.
46
SessionOne
Figure 40 Settings Tab
47
SessionOne
Appearance• Item description - enter text to appear in the Main tab below the unique tag reads count.• First read only - check to update the list view in the Main tab only for the first read of the tag (no list
view update for subsequent tag reads). Leave unchecked to update everything in the list view (all antenna details, RSSI values, etc.) For optimal performance, enable this option.
• Show tool tips - check to display tool tips for some controls.• Scroll tag list - in a large tag environment where the tags exceed the display limit, check this to
automatically scroll the list to ensure that the latest read tag is visible.• After (text box) seconds, reset unique tag count - select the radio button, then enter the number of
seconds after which the count of unique tags resets in the Main tab.• Every (text box) seconds, recount only those tags seen in the last (text box) milliseconds - for the
value entered in the first text box (in seconds), the unique tags count in the Main tab is set by the value of unique tags entered in the second text box (in milliseconds).
Antenna ColorsSelect an antenna color to change the associated antenna’s display color in the Main tab.
RSSI MonitoringDuring tag inventory, select a tag to plot an RSSI graph for that tag.
• Windows time span - the time frame within which to consider RSSI values of the tag. Exclude any tag read older than this duration.
• Refresh rate - the time interval for refreshing or redrawing the RSSI graph.
Read Settings• Session - specify the session of the reader.• State aware - check to select state aware singulation.
• A, B buttons - after checking State Aware, click to specify the inventoried flag value of the selected session (A or B).
• SL Flag button - after checking State Aware, click to specify the flag (SL) state (asserted or deasserted).
• Tag population estimate - the expected tag population in the field of view of the antenna.• Tag transmit time - the measure of expected tag mobility in the field of view of the antenna where
this inventory operation is executed.
AutosaveThis field includes settings for saving history or a summary.
• Save every - enter the time interval for autosave.• seconds - check to save the tag list in the application data folder.• Save summary - check to store consolidated summary for each tag instead of detailed reads in the
application data folder.• Save history - check to store detailed information on every read in the application data folder.
48
SessionOne
Product PictureThis field includes settings to show a picture in the Main tab where the Zebra logo appears during inventory.
• Show pictures - check to display the picture.• on every read - check to display the picture on every read of the tag rather than on the first read
only.• Show friendly names - check to replace the tag ID in the list with a friendly name.• Set GPO - check to enable GPO (if available in the loaded file).• Ignore first (text box) bytes, and last (text box) bytes of EPC - specify which part of the tag ID to
consider when comparing the tag ID read during inventory with the partial or full tag ID in the loaded file.
• Get pictures from file - click Browse to locate and load the .txt or .csv file. Each line of the file is in the format: <tag ID / part tag ID>,<Location of Image to Show>,<Friendly Name>,GPO<GPO number>
For example: 00,\pics\00.png,My Tag,GPO 1
Filters• Include/Exclude/Disable field - choose whether to include/exclude/disable the filter.• tags matching - enter the filter expression.• tag with RSSI between (text box) and (text box) - enter the RSSI filter range.
Tag Match Settings• Inventory listed tags only - check to load the file which contains the tag list to read.• Get Tag List File - click Browse to browse tag lists. Select the tag list to inventory.
Tags listed that were read appear in green, tags not yet read appear in red. Inventory stops when all tags in the list are read.
Tag DirectionThis field indicates the directionality of the tag if the tag appears in the bottom of the RSSI graph.
• Determine tag direction - check to enable this option.• Minimum trend - enter the number of RSSI value averages to take to determine tag direction.• Average - enter the number of RSSI values to take to calculate the average.• Exclude reads older than - enter the time in which to exclude RSSI values for older tags read when
determining the tag's direction.
RF ModesDisplays the RF mode set in the reader and allows the user to change this mode (applied to all antennas).
49
SessionOne
Start Reading When• Start is pressed - select to start inventory upon clicking the Start button. • Start is pressed+GPI - select to start inventory based on the GPI trigger. Enter the trigger (integer)
in the text box. • goes - select whether the required start trigger is HI or LO.
Stop Reading After• Stop is pressed - select to stop inventory upon clicking the Stop button.• tags - select to specify the number of tags after which to stop inventory.• reads - select to specify the number of reads after which to stop inventory.• seconds - select to specify the number of seconds after which to stop inventory.• rounds - select to specify the number of rounds after which to stop inventory.• GPI - select to stop inventory based on the GPI trigger. Enter the trigger (integer) in the text box.• goes - select whether the required stop trigger is HI or LO.
Low Level Stuff• UDP timeout - enter how long to wait to receive device discovery response information.• UDP local port - enter the port in which the local host binds to send the device discovery message.• LLRP timeout - set the timeout of the reader connection.• Sync time to PC - check to synchronize the reader time with the local time.
Device Discovery• Auto-add prefix - check to add an auto prefix while trying to resolve the hostname. For example,
enter FX7400. Then, to connect to a series of FX7400XXXXX devices, search XXXXX only because FX7400 is already included as an auto-add prefix.
• Resolve hostnames - check to resolve the hostname during device discovery.• Discovery on startup - select to perform device discovery while the application is starting up.• Clear Readers List On Discovery - check to discard discovered reader information when
performing the next discovery.
AutologinEnter the user name and password in these fields to log in to the device. Once logged in, the user can perform all reader management related operations, including enabling and disabling antennas and setting user LEDs.
50

PowerSession
IntroductionPowerSession is a multi-reader, PC-based application used to discover and connect to multiple Zebra fixed and hand-held RFID readers, specifically the FX Series Fixed Readers and MC Series Hand-held Readers. This tool allows users to easily perform inventory operations.
InstallationTo install PowerSession on the host PC:
1. Locate PowerSession at: www.zebra.com/support.2. Download the PowerSession zip file to the host PC and unzip the file.3. Double-click on the powersessionsetup.exe file.4. Follow the screen prompts to complete installation.
51
PowerSession
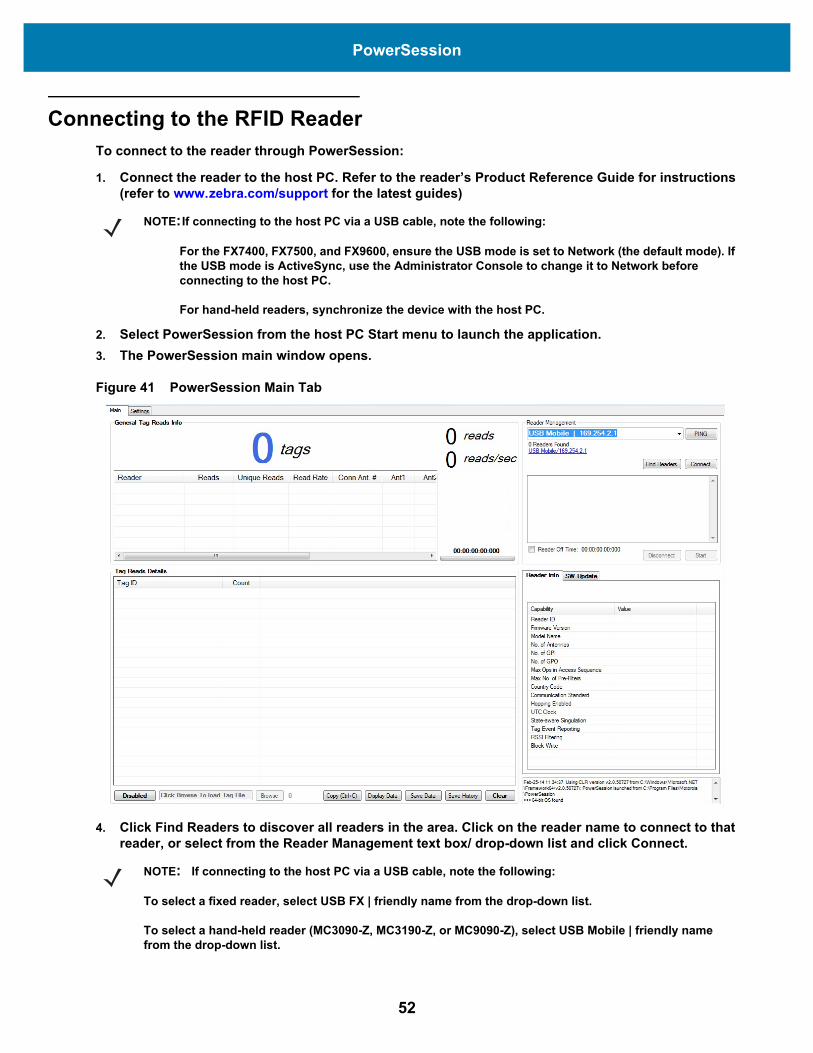
Connecting to the RFID ReaderTo connect to the reader through PowerSession:
1. Connect the reader to the host PC. Refer to the reader’s Product Reference Guide for instructions (refer to www.zebra.com/support for the latest guides)
2. Select PowerSession from the host PC Start menu to launch the application.3. The PowerSession main window opens.
Figure 41 PowerSession Main Tab
4. Click Find Readers to discover all readers in the area. Click on the reader name to connect to that reader, or select from the Reader Management text box/ drop-down list and click Connect.
NOTE:If connecting to the host PC via a USB cable, note the following:
For the FX7400, FX7500, and FX9600, ensure the USB mode is set to Network (the default mode). If the USB mode is ActiveSync, use the Administrator Console to change it to Network before connecting to the host PC.
For hand-held readers, synchronize the device with the host PC.
NOTE: If connecting to the host PC via a USB cable, note the following:
To select a fixed reader, select USB FX | friendly name from the drop-down list.
To select a hand-held reader (MC3090-Z, MC3190-Z, or MC9090-Z), select USB Mobile | friendly name from the drop-down list.
52

PowerSession
To search for a reader using the host name:
1. Enter the reader host name in the Reader Management text box (e.g., fx7400cd3b0d) with no spaces. The host name is provided on a label on the reader, or on the CD provided with the reader. Select Find Readers. The Find Readers button changes to Stop Finding while PowerSession scans for a reader and displays connection activity at the bottom right area of the window.
2. When the message Found Reader appears, select the reader from the Reader Management drop-down list and select Connect.
3. Click PING to verify that the reader is connected. The button turns green to confirm connection. If the button turns red, continue to directions below to search for a specific reader.
To search for a specific reader:
1. Open a command prompt on the host PC by selecting Start > Programs > Accessories > Command Prompt.
2. Enter ping <reader host name> and select Return. For example, enter ping fx7400cd3b0d and select Return. The reader’s IP address displays.
3. Close the command prompt and return to PowerSession. Enter the reader’s IP address in the Reader Management text box (e.g., 10.11.11.183).
4. Select PING to locate and connect to the reader.
53
PowerSession
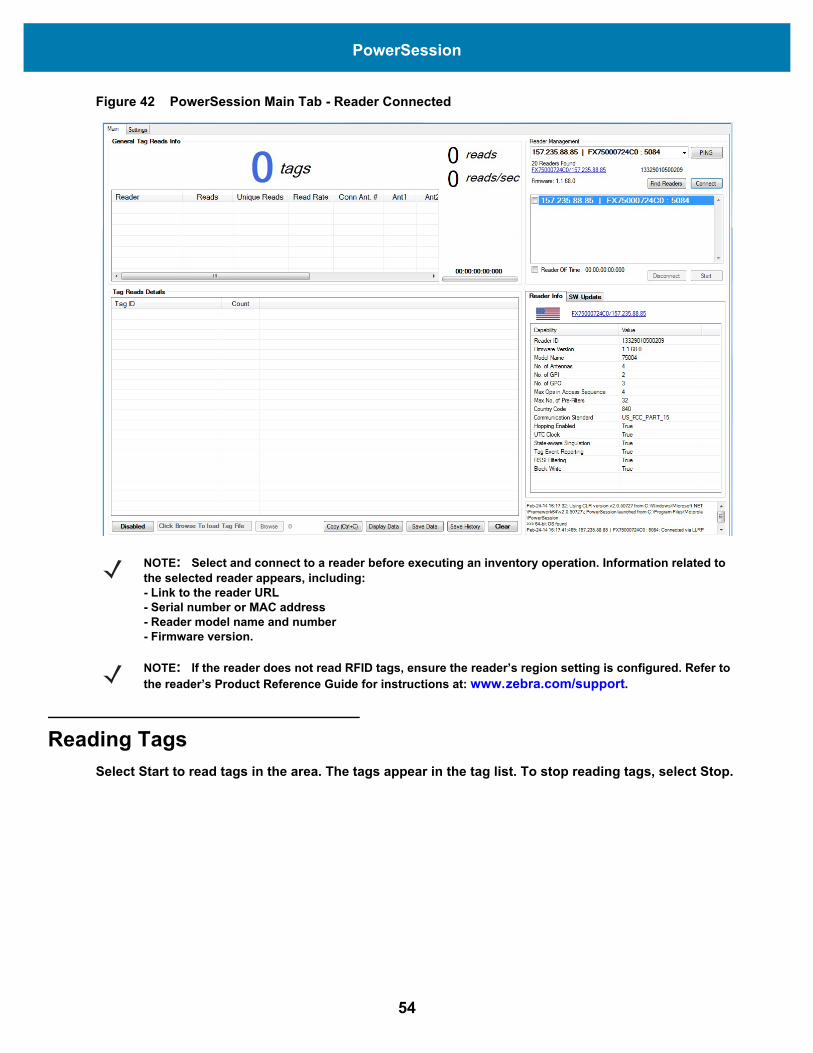
Figure 42 PowerSession Main Tab - Reader Connected
Reading TagsSelect Start to read tags in the area. The tags appear in the tag list. To stop reading tags, select Stop.
NOTE: Select and connect to a reader before executing an inventory operation. Information related to the selected reader appears, including:- Link to the reader URL- Serial number or MAC address- Reader model name and number- Firmware version.
NOTE: If the reader does not read RFID tags, ensure the reader’s region setting is configured. Refer to the reader’s Product Reference Guide for instructions at: www.zebra.com/support.
54
PowerSession
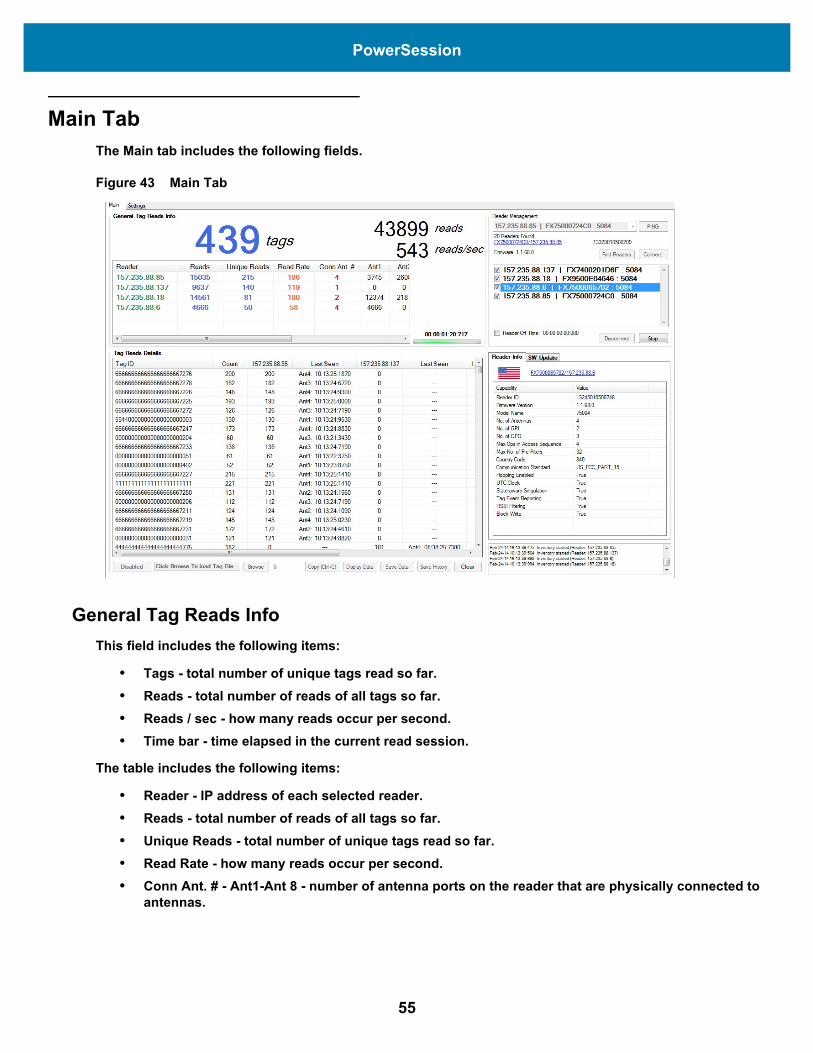
Main TabThe Main tab includes the following fields.
Figure 43 Main Tab
General Tag Reads InfoThis field includes the following items:
• Tags - total number of unique tags read so far.• Reads - total number of reads of all tags so far.• Reads / sec - how many reads occur per second.• Time bar - time elapsed in the current read session.
The table includes the following items:
• Reader - IP address of each selected reader.• Reads - total number of reads of all tags so far.• Unique Reads - total number of unique tags read so far.• Read Rate - how many reads occur per second.• Conn Ant. # - Ant1-Ant 8 - number of antenna ports on the reader that are physically connected to
antennas.
55
PowerSession
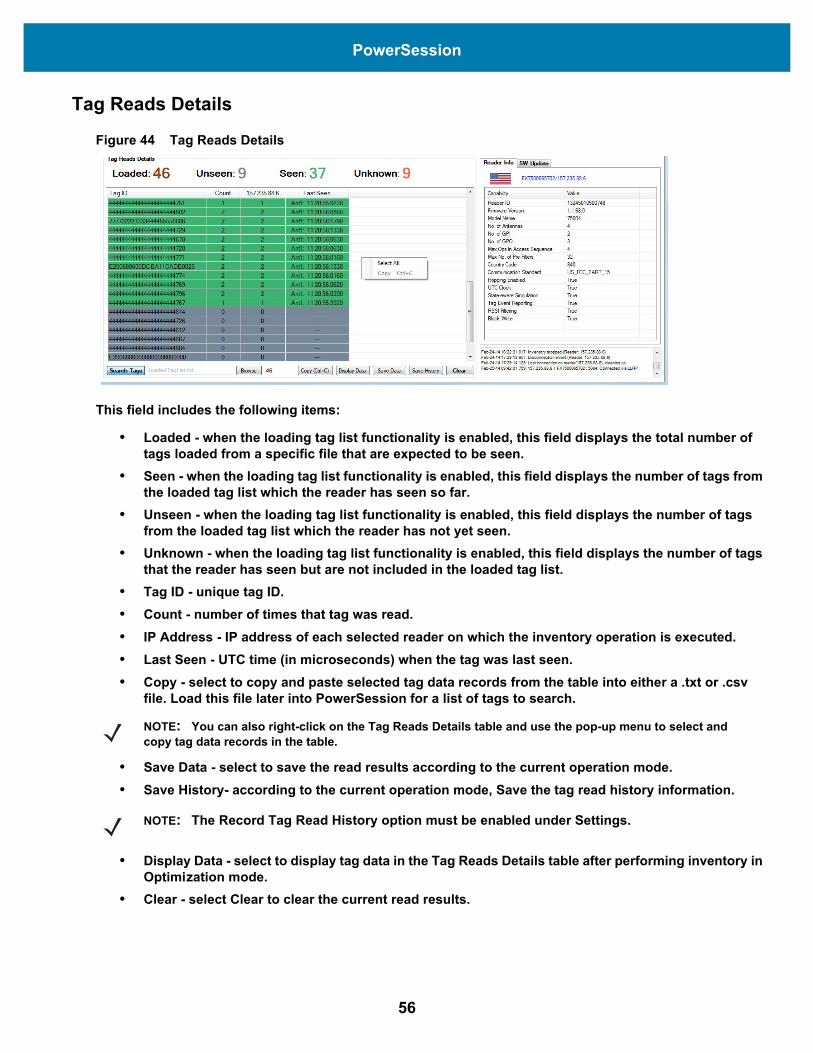
Tag Reads Details Figure 44 Tag Reads Details
This field includes the following items:
• Loaded - when the loading tag list functionality is enabled, this field displays the total number of tags loaded from a specific file that are expected to be seen.
• Seen - when the loading tag list functionality is enabled, this field displays the number of tags from the loaded tag list which the reader has seen so far.
• Unseen - when the loading tag list functionality is enabled, this field displays the number of tags from the loaded tag list which the reader has not yet seen.
• Unknown - when the loading tag list functionality is enabled, this field displays the number of tags that the reader has seen but are not included in the loaded tag list.
• Tag ID - unique tag ID.• Count - number of times that tag was read.• IP Address - IP address of each selected reader on which the inventory operation is executed.• Last Seen - UTC time (in microseconds) when the tag was last seen.• Copy - select to copy and paste selected tag data records from the table into either a .txt or .csv
file. Load this file later into PowerSession for a list of tags to search.
• Save Data - select to save the read results according to the current operation mode. • Save History- according to the current operation mode, Save the tag read history information.
• Display Data - select to display tag data in the Tag Reads Details table after performing inventory in Optimization mode.
• Clear - select Clear to clear the current read results.
NOTE: You can also right-click on the Tag Reads Details table and use the pop-up menu to select and copy tag data records in the table.
NOTE: The Record Tag Read History option must be enabled under Settings.
56
PowerSession
The searching tags section includes the following items:
• Disabled/Search Tags button - click Disabled to enable the loading tag list functionality. The button text changes to Search Tags.
• Browse - select Browse to load a tag file. The file can contain one tag ID per line. After each tag ID you can enter comments separated by commas.
• Start - select Start to start searching tags.• Stop - select Stop to stop searching tags.
Reader ManagementThis field includes the following items:
• Reader Management text box/drop-down list - enter the reader name to connect to, or select from the drop-down list, then press enter or select Connect. It also lists all readers discovered in the area.
• Ping - select Ping to check the connectivity of the selected reader. A successful ping appears in green and displays the round trip time of the ping in milliseconds.
• Find Readers - select Find Readers to find all readers in the area.• Connect / Disconnect - select to connect to or disconnect from the selected reader.• Reader List - lists all readers connected to PowerSession.• Start / Stop - click to start or stop reading tags.
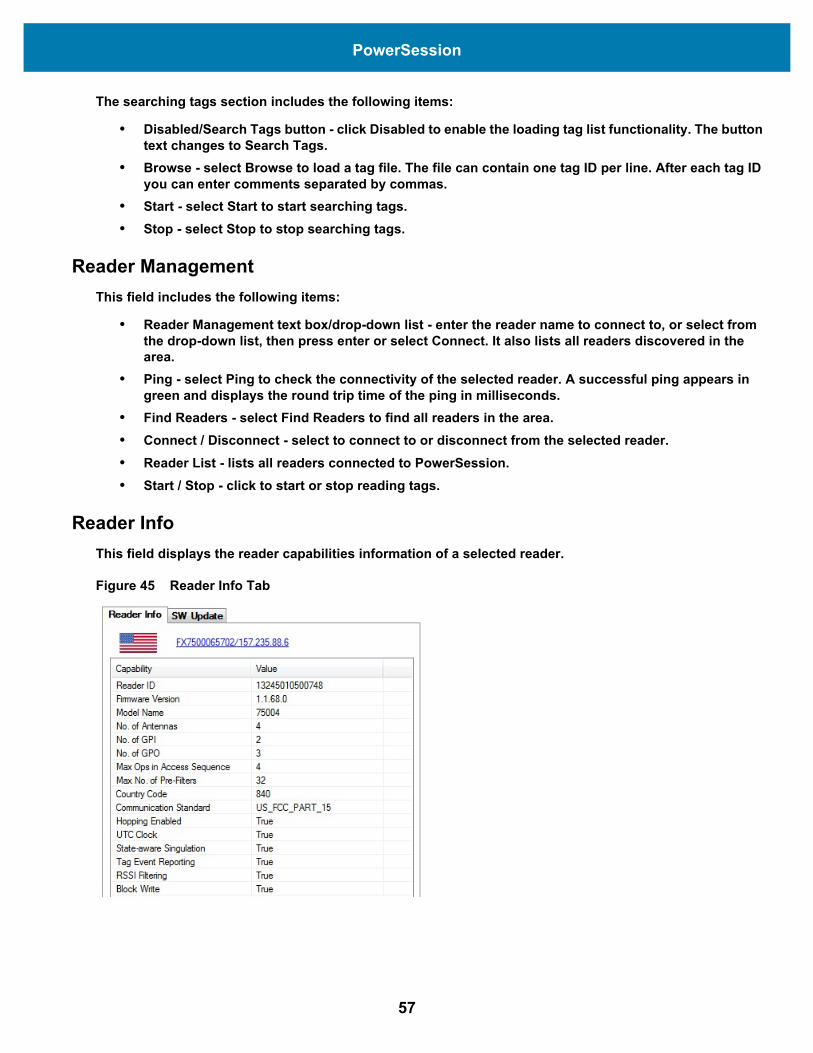
Reader InfoThis field displays the reader capabilities information of a selected reader.
Figure 45 Reader Info Tab
57
PowerSession
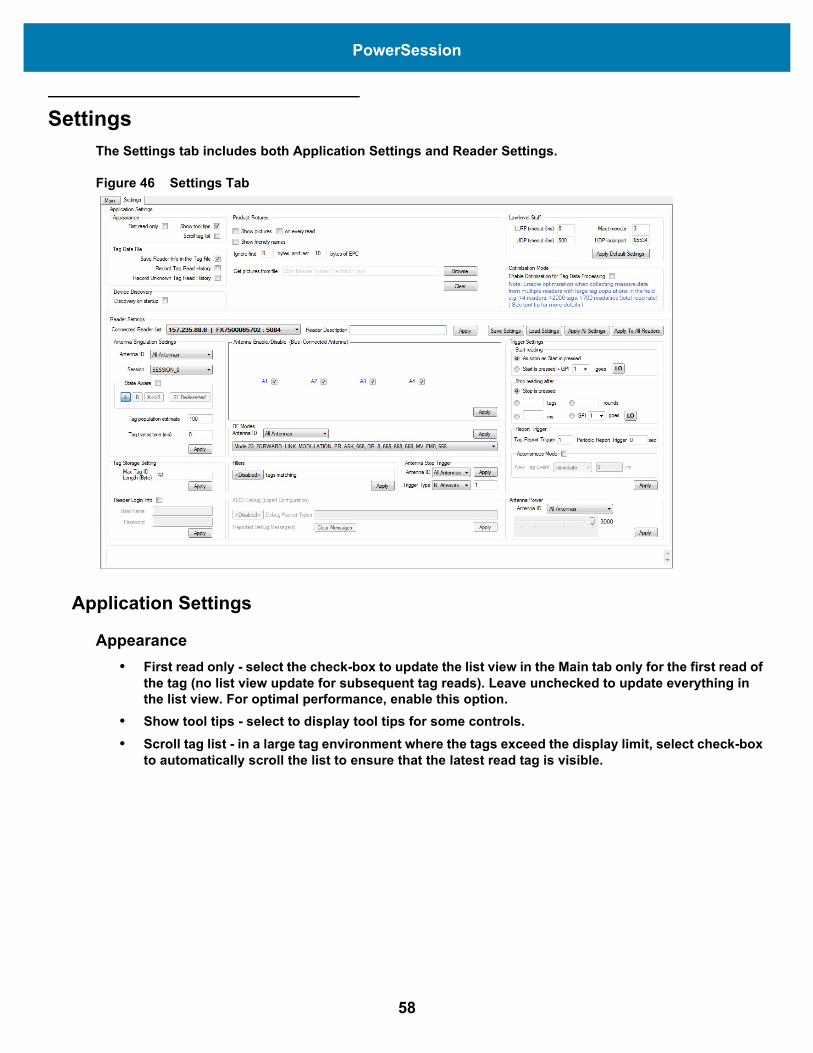
SettingsThe Settings tab includes both Application Settings and Reader Settings.
Figure 46 Settings Tab
Application Settings
Appearance• First read only - select the check-box to update the list view in the Main tab only for the first read of
the tag (no list view update for subsequent tag reads). Leave unchecked to update everything in the list view. For optimal performance, enable this option.
• Show tool tips - select to display tool tips for some controls.• Scroll tag list - in a large tag environment where the tags exceed the display limit, select check-box
to automatically scroll the list to ensure that the latest read tag is visible.
58
PowerSession
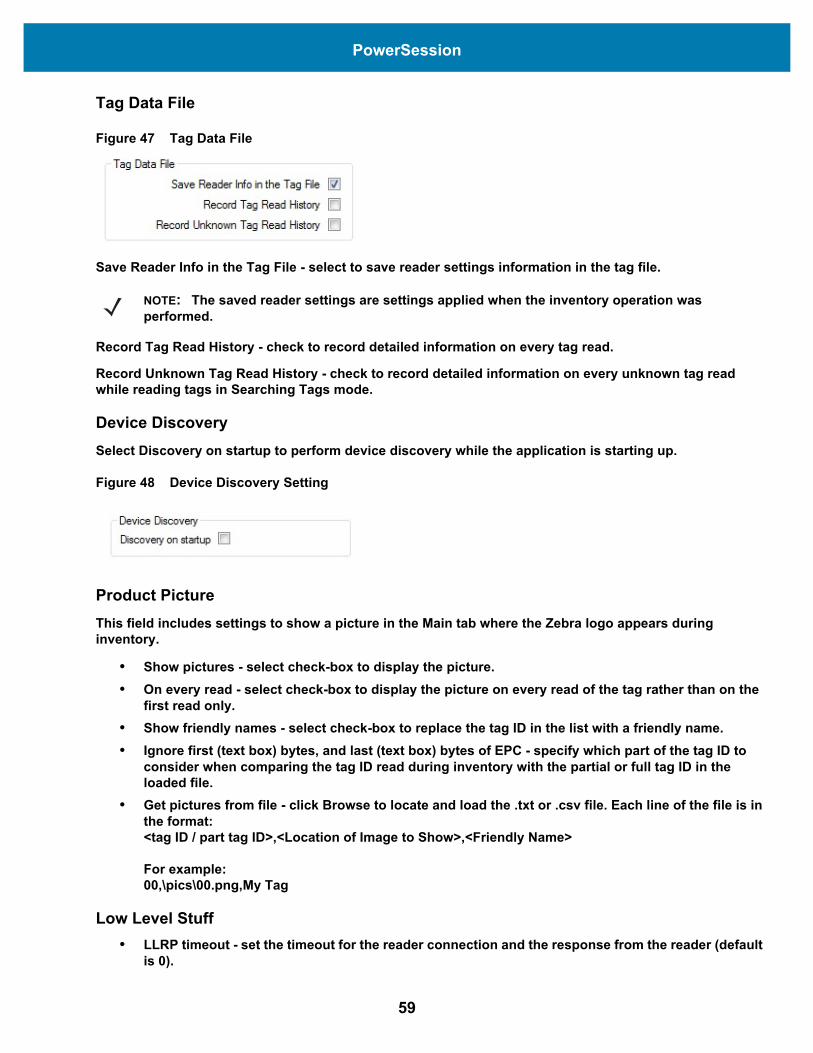
Tag Data File
Figure 47 Tag Data File
Save Reader Info in the Tag File - select to save reader settings information in the tag file.
Record Tag Read History - check to record detailed information on every tag read.
Record Unknown Tag Read History - check to record detailed information on every unknown tag read while reading tags in Searching Tags mode.
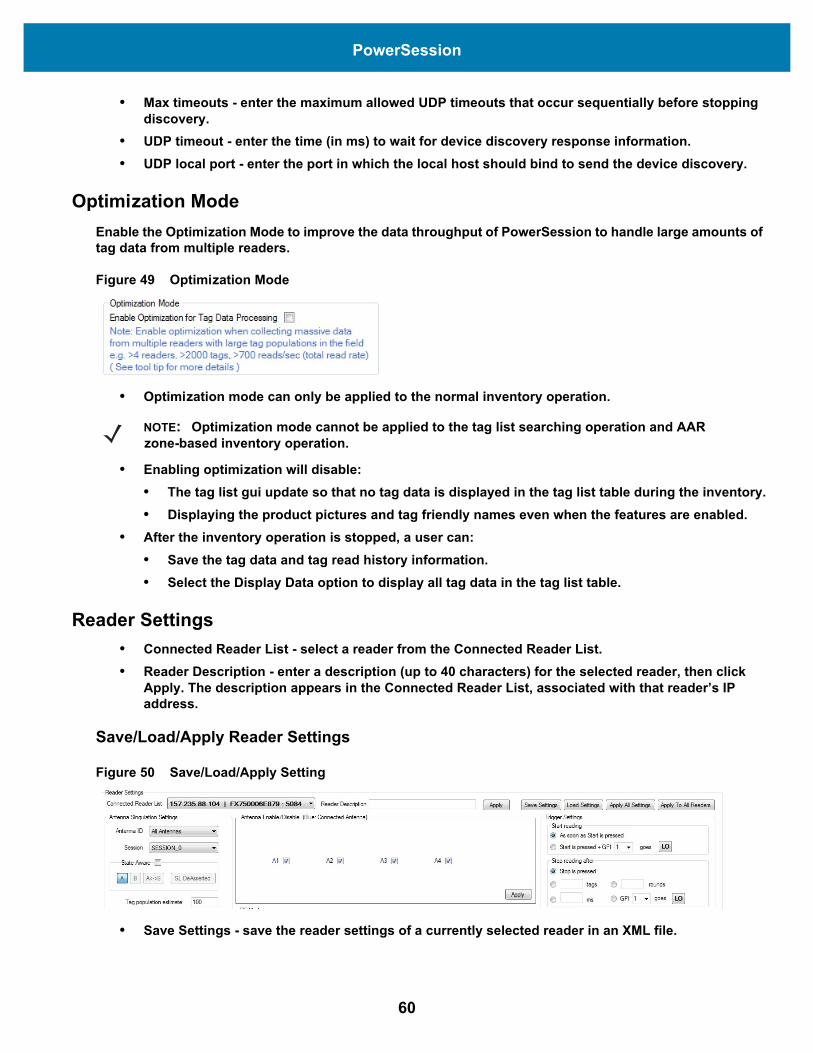
Device Discovery Select Discovery on startup to perform device discovery while the application is starting up.
Figure 48 Device Discovery Setting
Product PictureThis field includes settings to show a picture in the Main tab where the Zebra logo appears during inventory.
• Show pictures - select check-box to display the picture.• On every read - select check-box to display the picture on every read of the tag rather than on the
first read only.• Show friendly names - select check-box to replace the tag ID in the list with a friendly name.• Ignore first (text box) bytes, and last (text box) bytes of EPC - specify which part of the tag ID to
consider when comparing the tag ID read during inventory with the partial or full tag ID in the loaded file.
• Get pictures from file - click Browse to locate and load the .txt or .csv file. Each line of the file is in the format:<tag ID / part tag ID>,<Location of Image to Show>,<Friendly Name>
For example: 00,\pics\00.png,My Tag
Low Level Stuff• LLRP timeout - set the timeout for the reader connection and the response from the reader (default
is 0).
NOTE: The saved reader settings are settings applied when the inventory operation was performed.
59
PowerSession
• Max timeouts - enter the maximum allowed UDP timeouts that occur sequentially before stopping discovery.
• UDP timeout - enter the time (in ms) to wait for device discovery response information.• UDP local port - enter the port in which the local host should bind to send the device discovery.
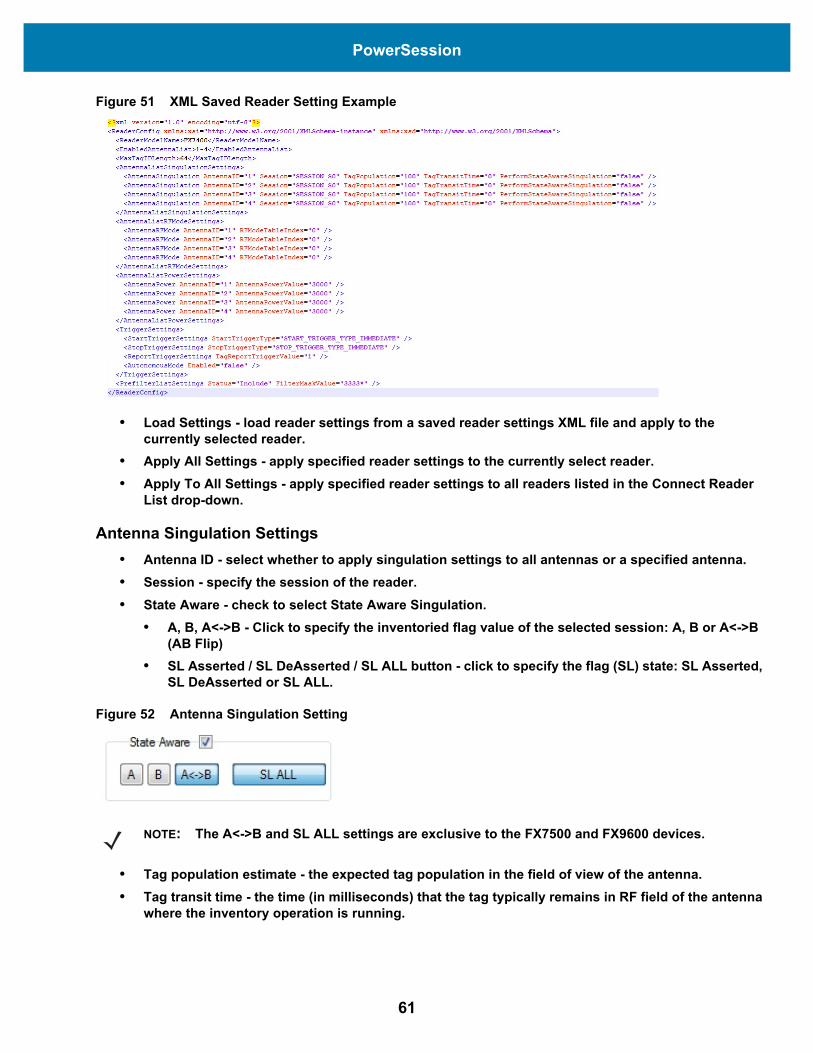
Optimization ModeEnable the Optimization Mode to improve the data throughput of PowerSession to handle large amounts of tag data from multiple readers.
Figure 49 Optimization Mode
• Optimization mode can only be applied to the normal inventory operation.
• Enabling optimization will disable: • The tag list gui update so that no tag data is displayed in the tag list table during the inventory.• Displaying the product pictures and tag friendly names even when the features are enabled.
• After the inventory operation is stopped, a user can:• Save the tag data and tag read history information.• Select the Display Data option to display all tag data in the tag list table.
Reader Settings• Connected Reader List - select a reader from the Connected Reader List. • Reader Description - enter a description (up to 40 characters) for the selected reader, then click
Apply. The description appears in the Connected Reader List, associated with that reader’s IP address.
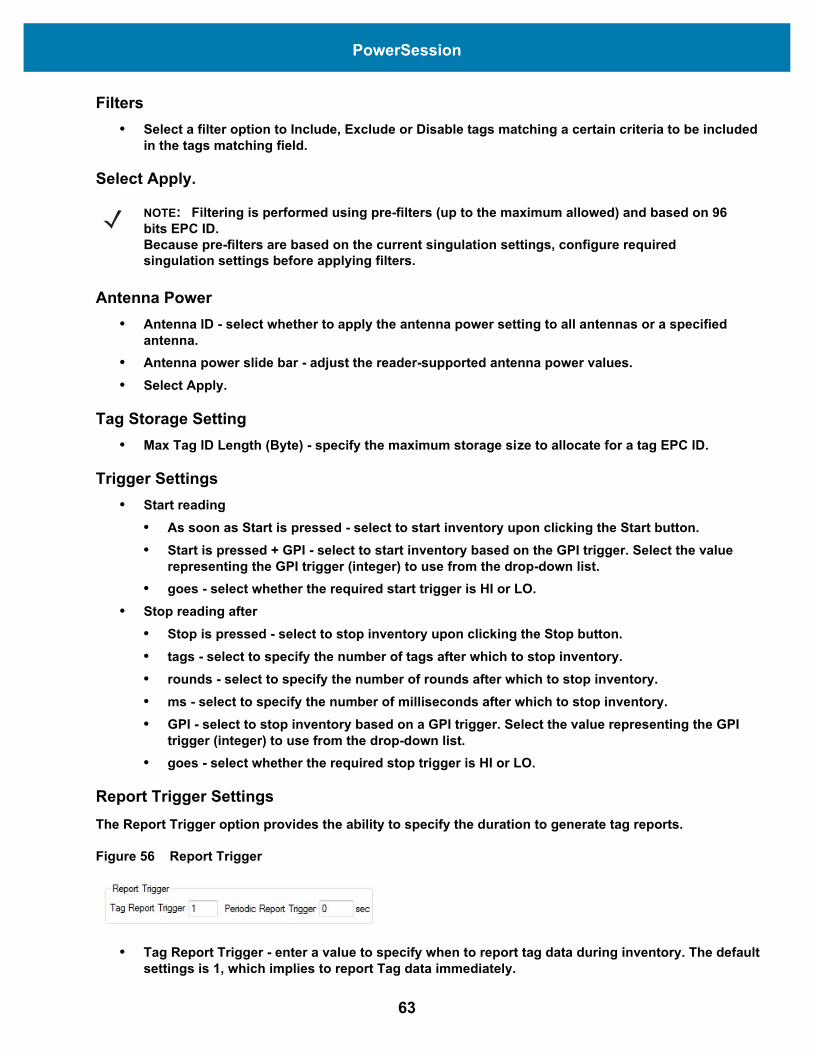
Save/Load/Apply Reader Settings
Figure 50 Save/Load/Apply Setting
• Save Settings - save the reader settings of a currently selected reader in an XML file.
NOTE: Optimization mode cannot be applied to the tag list searching operation and AAR zone-based inventory operation.
60
PowerSession
Figure 51 XML Saved Reader Setting Example
• Load Settings - load reader settings from a saved reader settings XML file and apply to the currently selected reader.
• Apply All Settings - apply specified reader settings to the currently select reader.• Apply To All Settings - apply specified reader settings to all readers listed in the Connect Reader
List drop-down.
Antenna Singulation Settings • Antenna ID - select whether to apply singulation settings to all antennas or a specified antenna.• Session - specify the session of the reader.• State Aware - check to select State Aware Singulation.
• A, B, A<->B - Click to specify the inventoried flag value of the selected session: A, B or A<->B (AB Flip)
• SL Asserted / SL DeAsserted / SL ALL button - click to specify the flag (SL) state: SL Asserted, SL DeAsserted or SL ALL.
Figure 52 Antenna Singulation Setting
• Tag population estimate - the expected tag population in the field of view of the antenna.• Tag transit time - the time (in milliseconds) that the tag typically remains in RF field of the antenna
where the inventory operation is running.
NOTE: The A<->B and SL ALL settings are exclusive to the FX7500 and FX9600 devices.
61

PowerSession
Antenna Stop Trigger SettingSpecify how long an inventory should be performed on a particular antenna port before it stops and switches to the next available antenna port.
Figure 53 Antenna Stop Trigger
The trigger types are:
• N_Attempts: number of inventory attempts • N_Millisecs: inventory duration in Milliseconds • N_Seconds: inventory duration in Seconds.
Reader Login Info Setting Specify the reader RM login credentials and select Apply. The credentials are applied when performing the SW update on the reader.
Figure 54 Reader Login Info
Antenna Enable/Disable• A(x) check boxes - the number of antenna check boxes that appear equals the number of antenna
ports that the reader supports. Check an antenna check box to perform inventory on this antenna port if it is physically connected to an antenna, then click Apply.
Figure 55 Antenna Enable/Disable RF Modes
• Antenna ID - select whether to allow changing the RF mode for all antennas or a specified antenna.• RF Mode drop-down list - lists the reader’s supported RF modes and displays the mode currently
set in the reader.
NOTE: A blue antenna check box indicates that the corresponding antenna port on reader is physically connected to an antenna.
62
PowerSession
Filters• Select a filter option to Include, Exclude or Disable tags matching a certain criteria to be included
in the tags matching field.
Select Apply.
Antenna Power• Antenna ID - select whether to apply the antenna power setting to all antennas or a specified
antenna.• Antenna power slide bar - adjust the reader-supported antenna power values.• Select Apply.
Tag Storage Setting• Max Tag ID Length (Byte) - specify the maximum storage size to allocate for a tag EPC ID.
Trigger Settings• Start reading
• As soon as Start is pressed - select to start inventory upon clicking the Start button.• Start is pressed + GPI - select to start inventory based on the GPI trigger. Select the value
representing the GPI trigger (integer) to use from the drop-down list.• goes - select whether the required start trigger is HI or LO.
• Stop reading after• Stop is pressed - select to stop inventory upon clicking the Stop button.• tags - select to specify the number of tags after which to stop inventory.• rounds - select to specify the number of rounds after which to stop inventory.• ms - select to specify the number of milliseconds after which to stop inventory.• GPI - select to stop inventory based on a GPI trigger. Select the value representing the GPI
trigger (integer) to use from the drop-down list.• goes - select whether the required stop trigger is HI or LO.
Report Trigger SettingsThe Report Trigger option provides the ability to specify the duration to generate tag reports.
Figure 56 Report Trigger
• Tag Report Trigger - enter a value to specify when to report tag data during inventory. The default settings is 1, which implies to report Tag data immediately.
NOTE: Filtering is performed using pre-filters (up to the maximum allowed) and based on 96 bits EPC ID.Because pre-filters are based on the current singulation settings, configure required singulation settings before applying filters.
63
PowerSession
• Periodic Report Trigger (applies to FX7500 and FX9600 only) - specify the time period (in seconds) after which the tag will be reported if the tag is continued to be read after the period. The default settings is 0, which implies that Tag reports will be generated immediately.
Autonomous Mode• Autonomous Mode - check to enable autonomous mode on the reader.• New Tag Event - specify the new tag event mode for subscribing:
• Never - report no tag data.• Immediate - report data for a new tag immediately.• Moderated - report data for a new tag only after the specified moderation time and that tag was
seen for the moderation duration.• ms - when Moderated mode is selected, enter the moderation duration for the new tag event.
Software Update for Multiple ReadersThe Software Update option provides the ability to update multiple devices (FX7400, FX7500, and FX9600) simultaneously using FTP/FTPS or local file based methods.
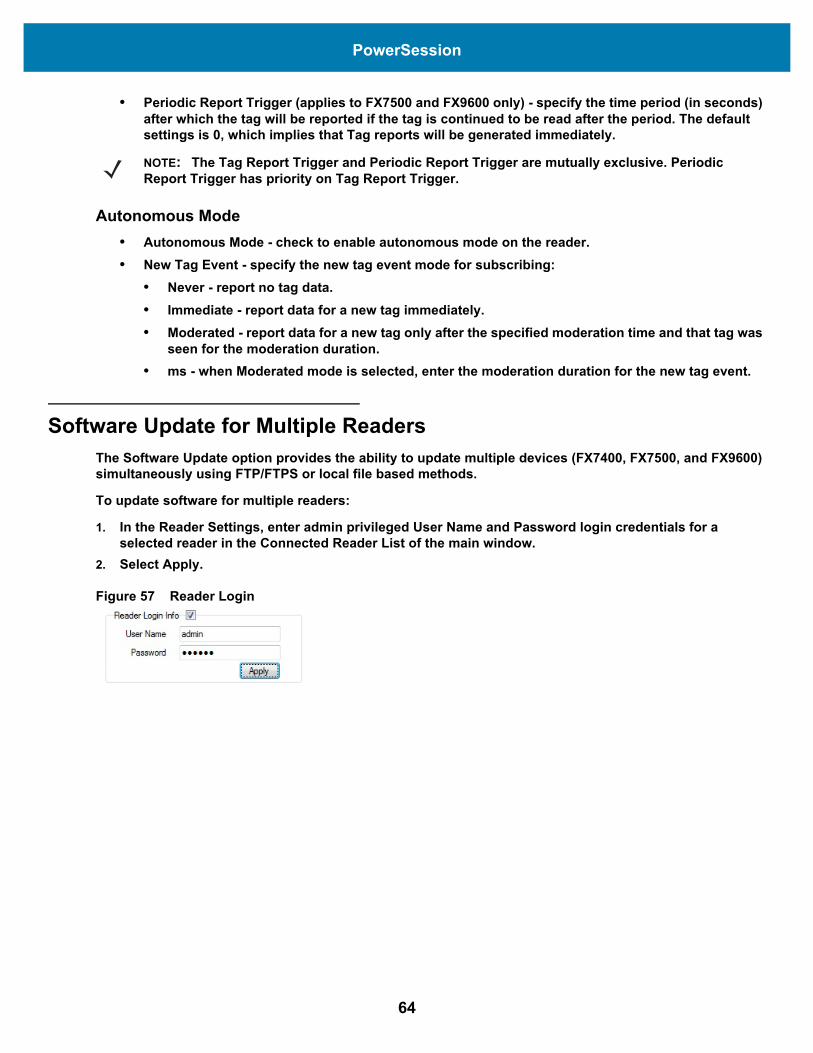
To update software for multiple readers:
1. In the Reader Settings, enter admin privileged User Name and Password login credentials for a selected reader in the Connected Reader List of the main window.
2. Select Apply.
Figure 57 Reader Login
NOTE: The Tag Report Trigger and Periodic Report Trigger are mutually exclusive. Periodic Report Trigger has priority on Tag Report Trigger.
64
PowerSession
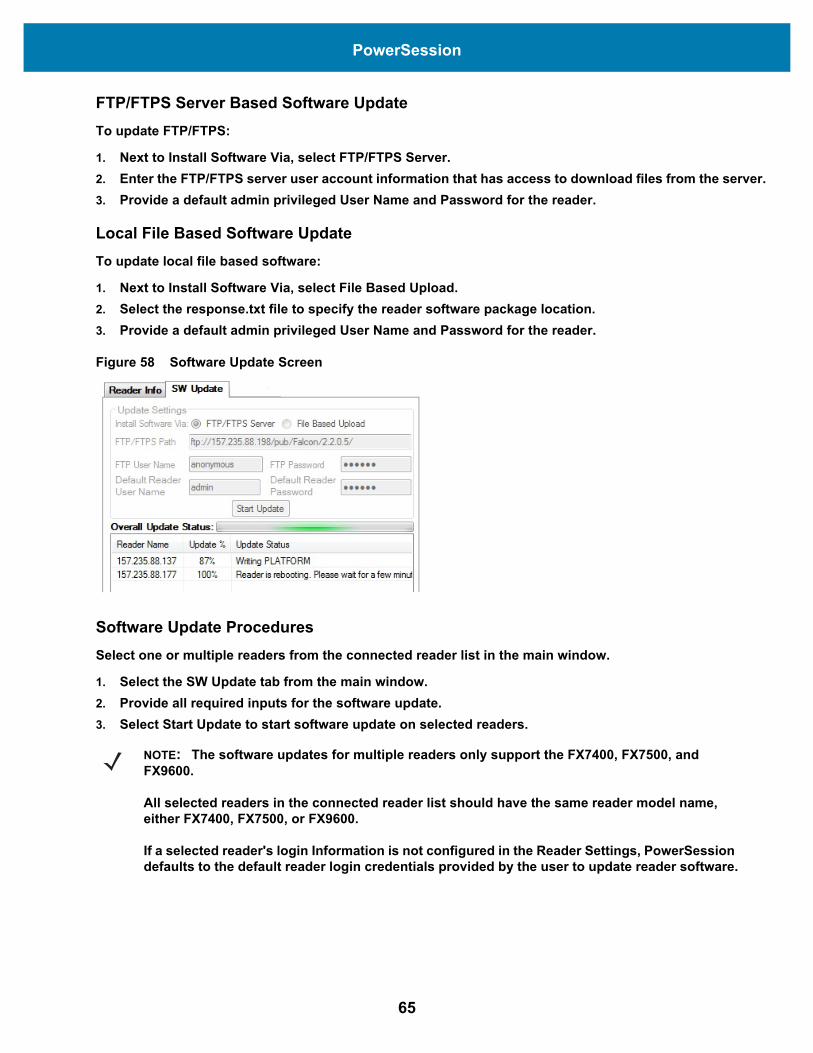
FTP/FTPS Server Based Software UpdateTo update FTP/FTPS:
1. Next to Install Software Via, select FTP/FTPS Server.2. Enter the FTP/FTPS server user account information that has access to download files from the server.3. Provide a default admin privileged User Name and Password for the reader.
Local File Based Software UpdateTo update local file based software:
1. Next to Install Software Via, select File Based Upload.2. Select the response.txt file to specify the reader software package location.3. Provide a default admin privileged User Name and Password for the reader.
Figure 58 Software Update Screen
Software Update ProceduresSelect one or multiple readers from the connected reader list in the main window.
1. Select the SW Update tab from the main window.2. Provide all required inputs for the software update.3. Select Start Update to start software update on selected readers.
NOTE: The software updates for multiple readers only support the FX7400, FX7500, and FX9600.
All selected readers in the connected reader list should have the same reader model name, either FX7400, FX7500, or FX9600.
If a selected reader's login Information is not configured in the Reader Settings, PowerSession defaults to the default reader login credentials provided by the user to update reader software.
65
RapidRead
IntroductionRapidRead is a RFID hand-held reader application used to demonstrate inventory and asset counting, tag writing and item locating.
66
RapidRead
InstallationTo install RapidRead on the hand-held RFID reader:
1. Locate RapidRead at www.zebra.com/support.2. Download the RapidRead zip file to the host PC and unzip the file.3. Using Active Sync (XP) or Windows Mobile Device Center (Win7), connect the PC to the hand-held
reader.4. On the hand-held reader, open File Explorer and double click on the Temp folder (If the Temp folder is
not visible, tap Windows icon > File Explorer > Menu > Show All Files).
Figure 59 Folder Options
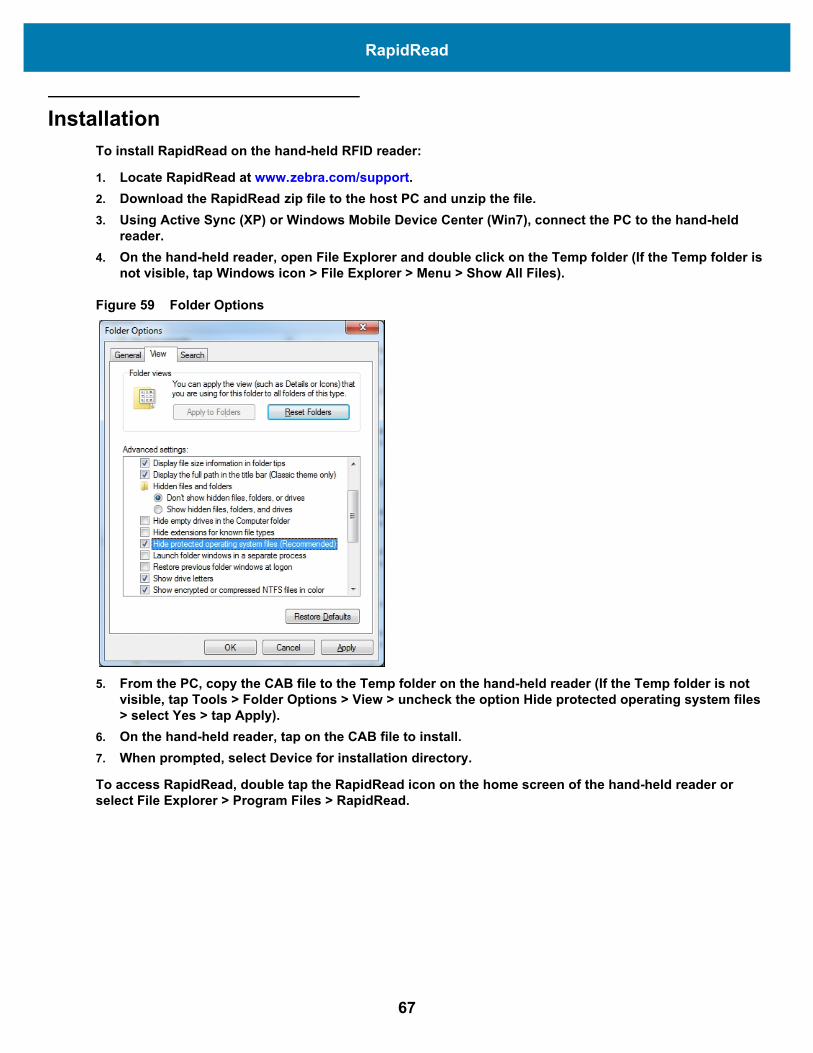
5. From the PC, copy the CAB file to the Temp folder on the hand-held reader (If the Temp folder is not visible, tap Tools > Folder Options > View > uncheck the option Hide protected operating system files > select Yes > tap Apply).
6. On the hand-held reader, tap on the CAB file to install.7. When prompted, select Device for installation directory.
To access RapidRead, double tap the RapidRead icon on the home screen of the hand-held reader or select File Explorer > Program Files > RapidRead.
67
RapidRead
Figure 60 RapidRead Icon
68
RapidRead
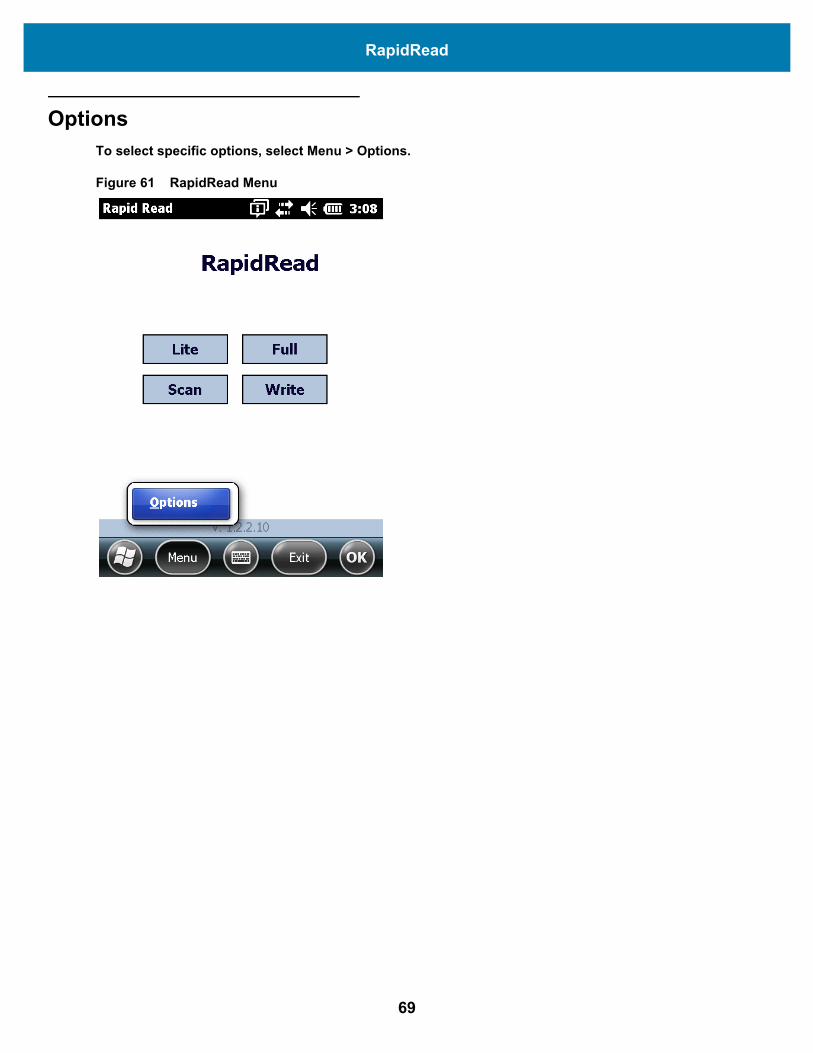
OptionsTo select specific options, select Menu > Options.
Figure 61 RapidRead Menu
69
RapidRead
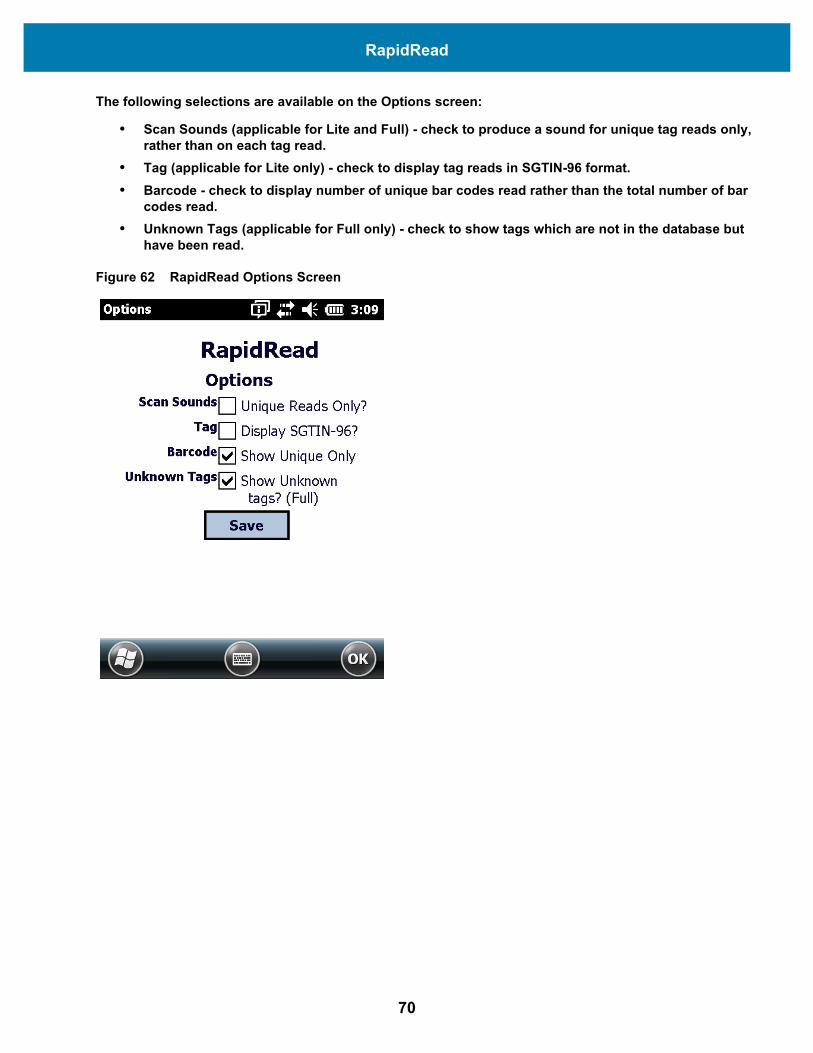
The following selections are available on the Options screen:
• Scan Sounds (applicable for Lite and Full) - check to produce a sound for unique tag reads only, rather than on each tag read.
• Tag (applicable for Lite only) - check to display tag reads in SGTIN-96 format.• Barcode - check to display number of unique bar codes read rather than the total number of bar
codes read. • Unknown Tags (applicable for Full only) - check to show tags which are not in the database but
have been read.
Figure 62 RapidRead Options Screen
70
RapidRead
RapidRead Tag FileRapidRead has the ability to read and compare against an onboard tag database (tags.csv) displaying matching results, missing and unknown items that have been read during a session.
To implement after installation is complete:
1. Locate the tags.csv file in the RapidRead application folder (under Program files) on the hand-held reader.
2. While connected to the PC through ActiveSyc or Windows Mobile Device Center, copy the tags.csv file from the hand-held reader to desktop.
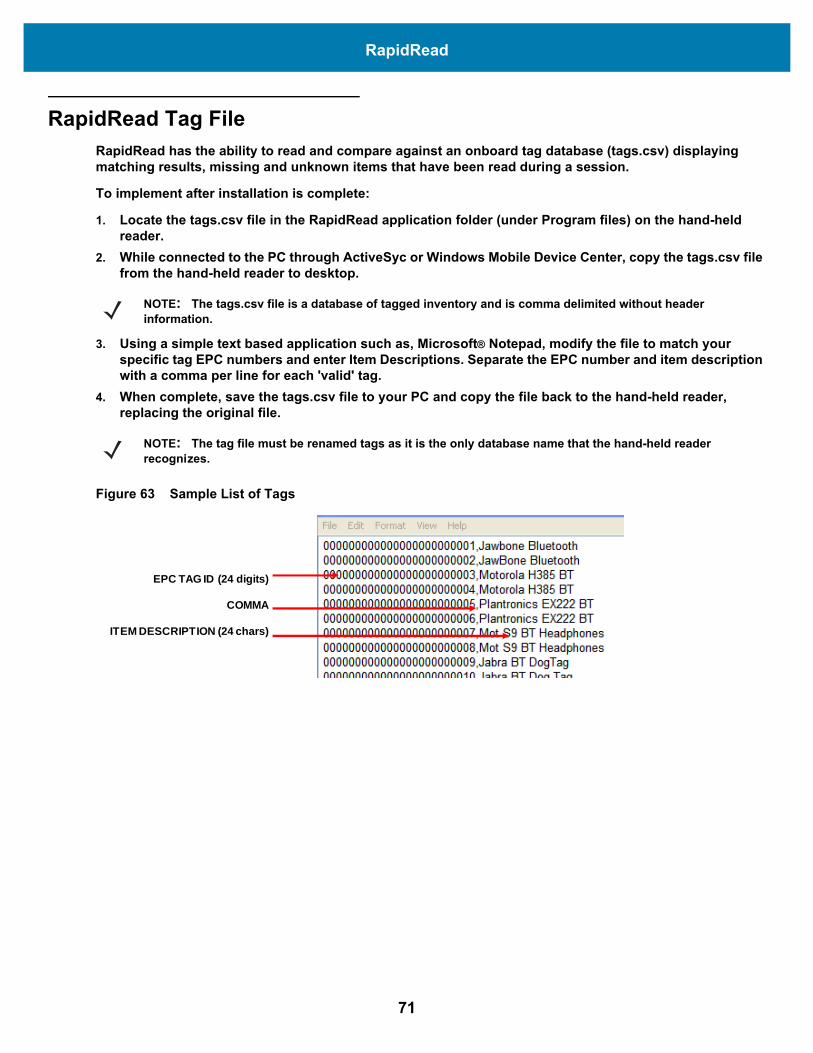
3. Using a simple text based application such as, Microsoft® Notepad, modify the file to match your specific tag EPC numbers and enter Item Descriptions. Separate the EPC number and item description with a comma per line for each 'valid' tag.
4. When complete, save the tags.csv file to your PC and copy the file back to the hand-held reader, replacing the original file.
Figure 63 Sample List of Tags
NOTE: The tags.csv file is a database of tagged inventory and is comma delimited without header information.
NOTE: The tag file must be renamed tags as it is the only database name that the hand-held reader recognizes.
EPC TAG ID (24 digits)
COMMA
ITEM DESCRIPTION (24 chars)
71
RapidRead
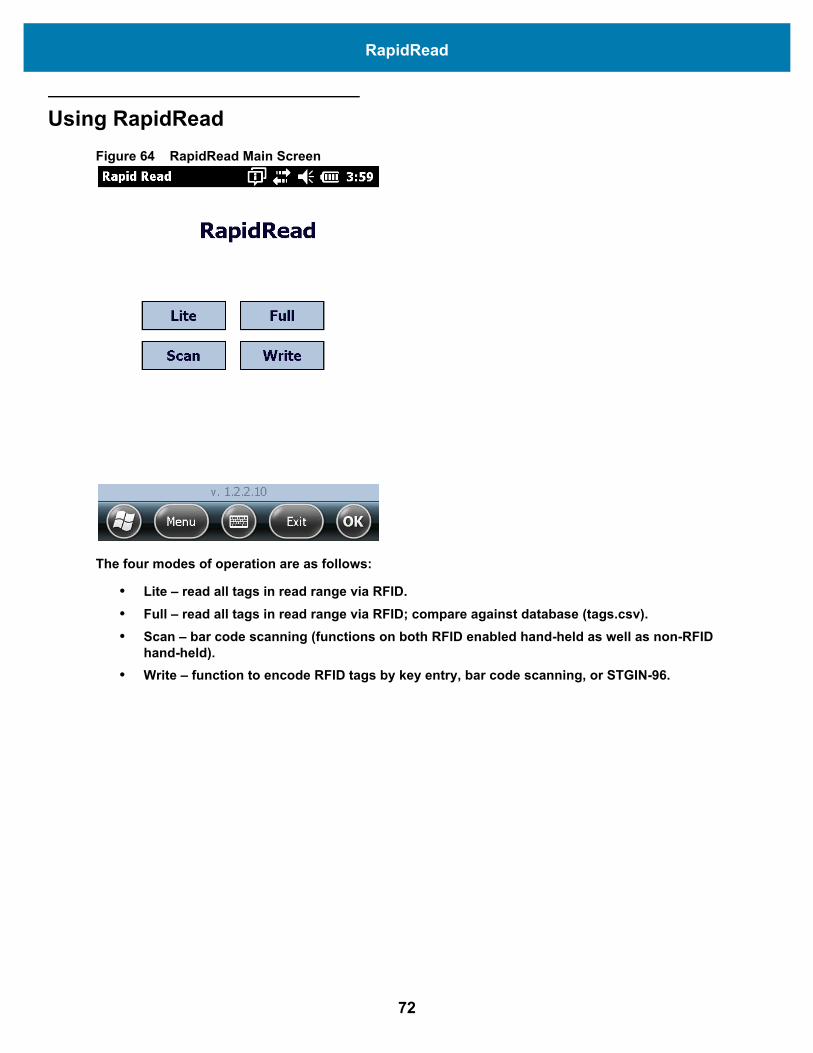
Using RapidReadFigure 64 RapidRead Main Screen
The four modes of operation are as follows:
• Lite – read all tags in read range via RFID.• Full – read all tags in read range via RFID; compare against database (tags.csv).• Scan – bar code scanning (functions on both RFID enabled hand-held as well as non-RFID
hand-held).• Write – function to encode RFID tags by key entry, bar code scanning, or STGIN-96.
72
RapidRead
RapidRead LiteRapidRead Lite offers the following features:
• Ability to scan all standard EPC class1 GEN2 tags within read range and display tag reads.• Display EPC number read.• Display number of times a particular tag has been read.• Display unique tag count.
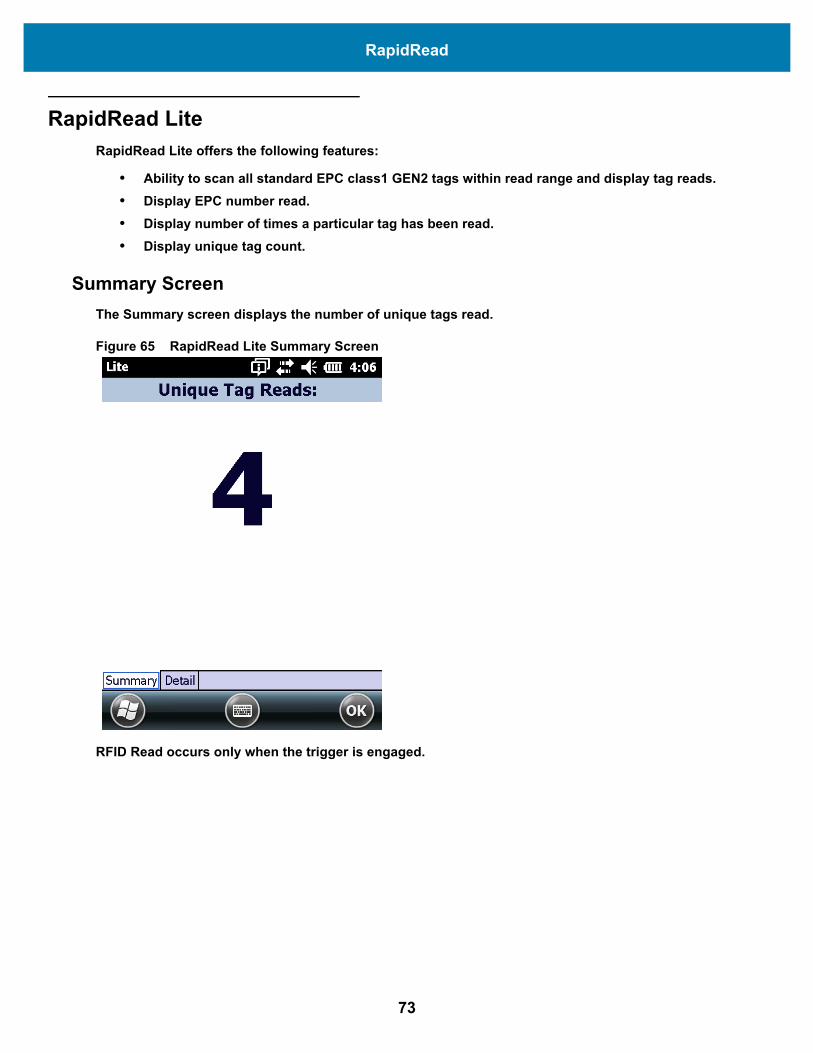
Summary ScreenThe Summary screen displays the number of unique tags read.
Figure 65 RapidRead Lite Summary Screen
RFID Read occurs only when the trigger is engaged.
73
RapidRead
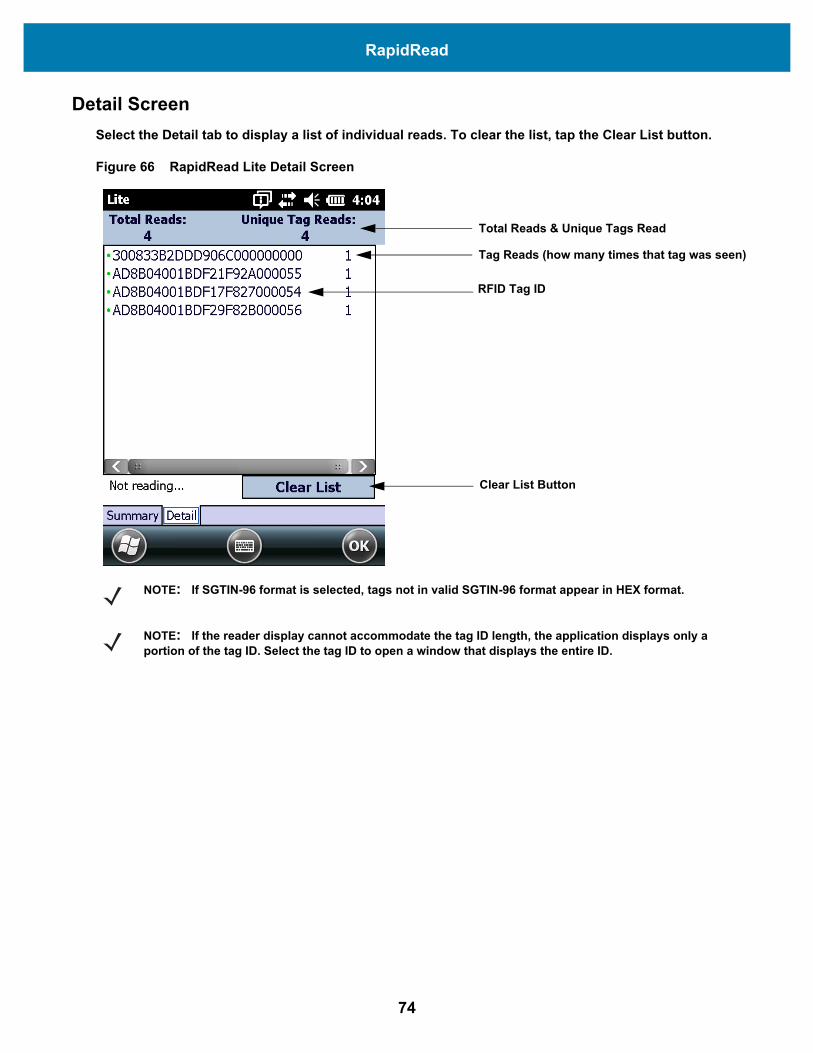
Detail ScreenSelect the Detail tab to display a list of individual reads. To clear the list, tap the Clear List button.
Figure 66 RapidRead Lite Detail Screen
Total Reads & Unique Tags Read
Tag Reads (how many times that tag was seen)
RFID Tag ID
Clear List Button
NOTE: If SGTIN-96 format is selected, tags not in valid SGTIN-96 format appear in HEX format.
NOTE: If the reader display cannot accommodate the tag ID length, the application displays only a portion of the tag ID. Select the tag ID to open a window that displays the entire ID.
74
RapidRead
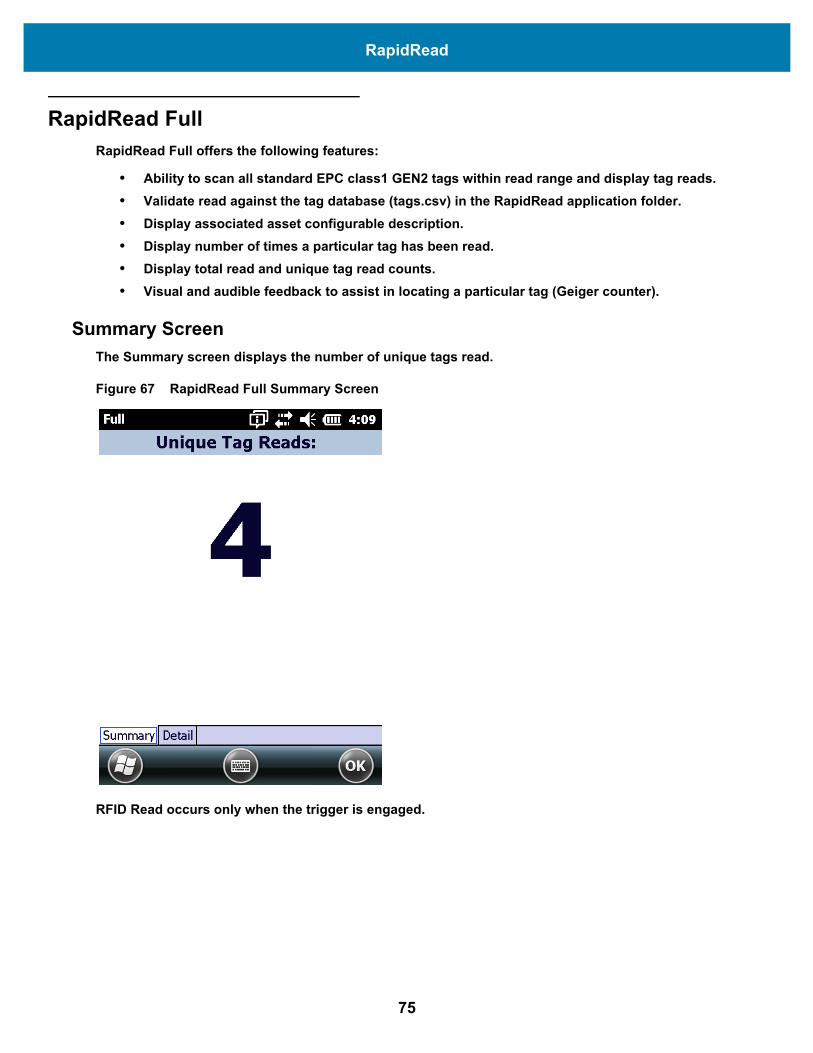
RapidRead FullRapidRead Full offers the following features:
• Ability to scan all standard EPC class1 GEN2 tags within read range and display tag reads.• Validate read against the tag database (tags.csv) in the RapidRead application folder.• Display associated asset configurable description.• Display number of times a particular tag has been read.• Display total read and unique tag read counts.• Visual and audible feedback to assist in locating a particular tag (Geiger counter).
Summary ScreenThe Summary screen displays the number of unique tags read.
Figure 67 RapidRead Full Summary Screen
RFID Read occurs only when the trigger is engaged.
75
RapidRead
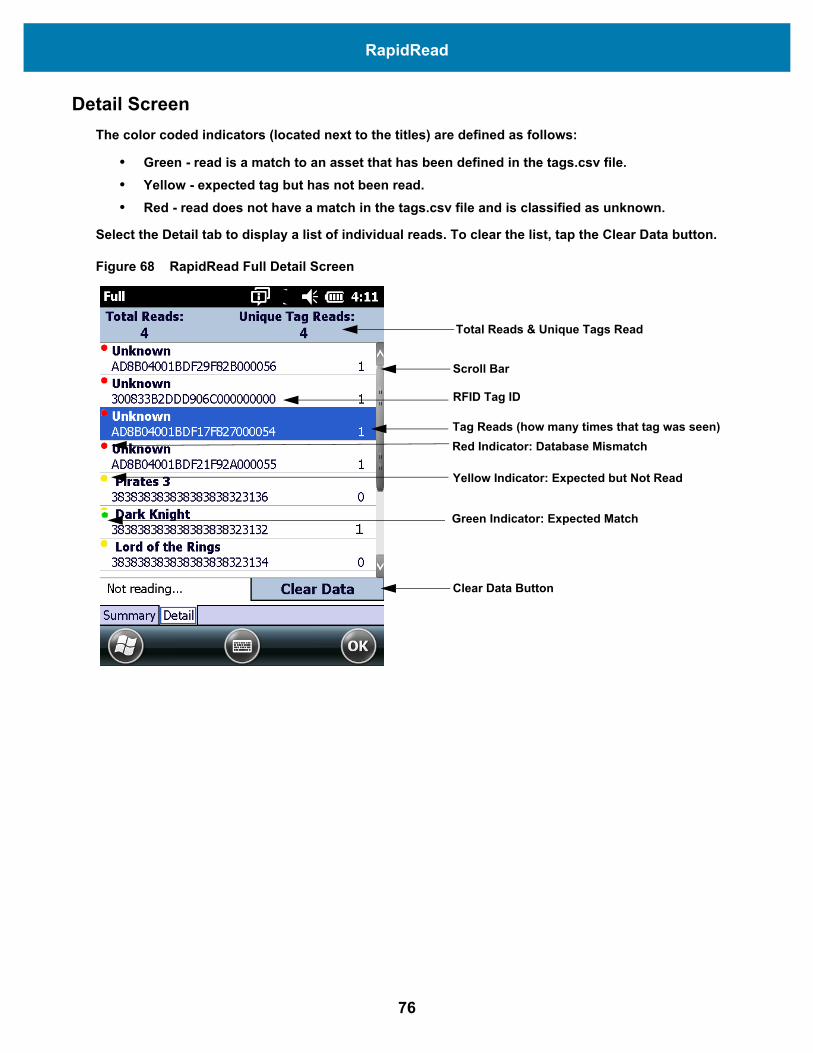
Detail ScreenThe color coded indicators (located next to the titles) are defined as follows:
• Green - read is a match to an asset that has been defined in the tags.csv file.• Yellow - expected tag but has not been read.• Red - read does not have a match in the tags.csv file and is classified as unknown.
Select the Detail tab to display a list of individual reads. To clear the list, tap the Clear Data button.
Figure 68 RapidRead Full Detail Screen
Total Reads & Unique Tags Read
RFID Tag ID
Scroll Bar
Tag Reads (how many times that tag was seen)Red Indicator: Database Mismatch
Yellow Indicator: Expected but Not Read
Clear Data Button
Green Indicator: Expected Match
76

RapidRead
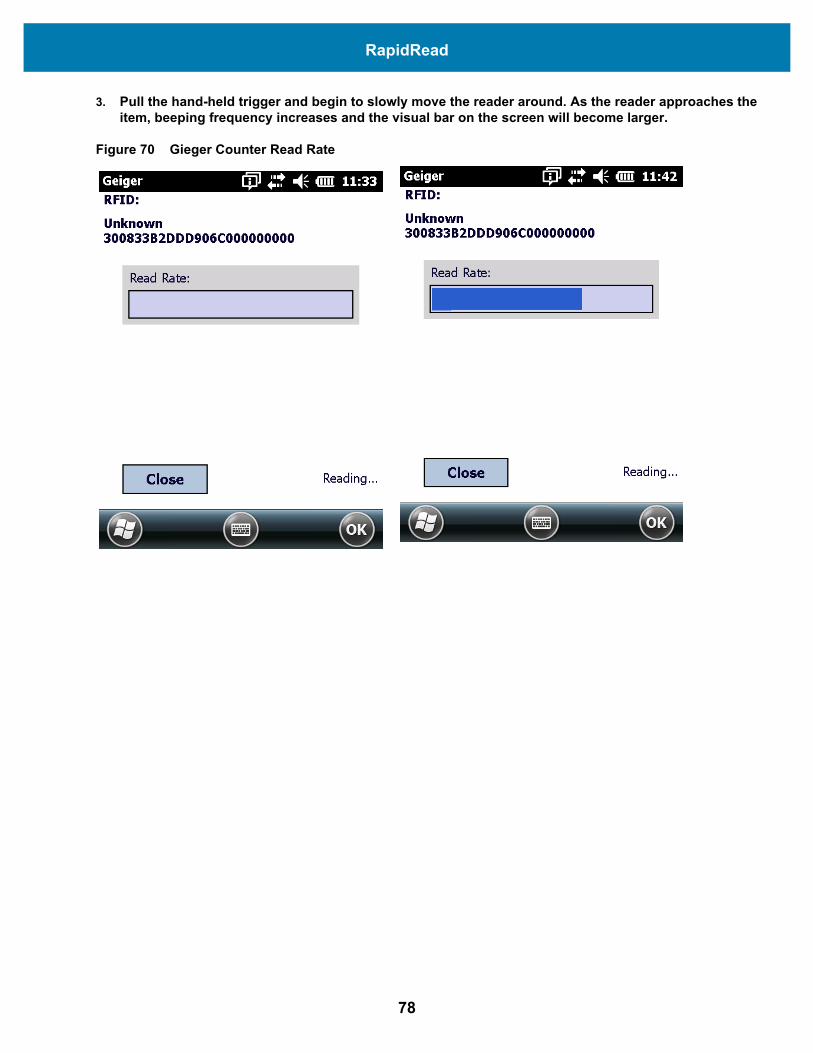
Gieger CounterThe Gieger counter is a tag locator application that assists with locating missing items (applicable to RapidRead Full only). To use the Gieger counter feature:
1. Select the Detail tab.
Figure 69 RapidRead Full Detail Tab
2. Tap one of the missing items. The Geiger Counter screen opens as displayed in Figure 70.
77
RapidRead
3. Pull the hand-held trigger and begin to slowly move the reader around. As the reader approaches the item, beeping frequency increases and the visual bar on the screen will become larger.
Figure 70 Gieger Counter Read Rate
78
RapidRead
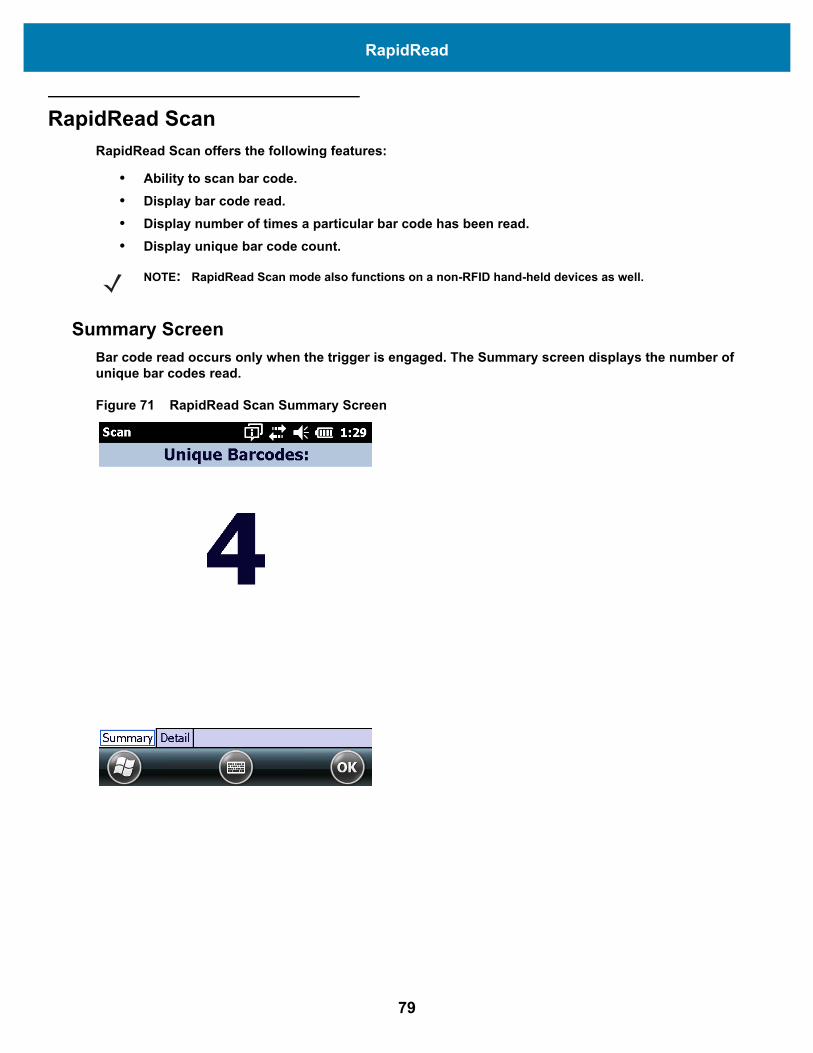
RapidRead ScanRapidRead Scan offers the following features:
• Ability to scan bar code.• Display bar code read.• Display number of times a particular bar code has been read.• Display unique bar code count.
Summary ScreenBar code read occurs only when the trigger is engaged. The Summary screen displays the number of unique bar codes read.
Figure 71 RapidRead Scan Summary Screen
NOTE: RapidRead Scan mode also functions on a non-RFID hand-held devices as well.
79
RapidRead
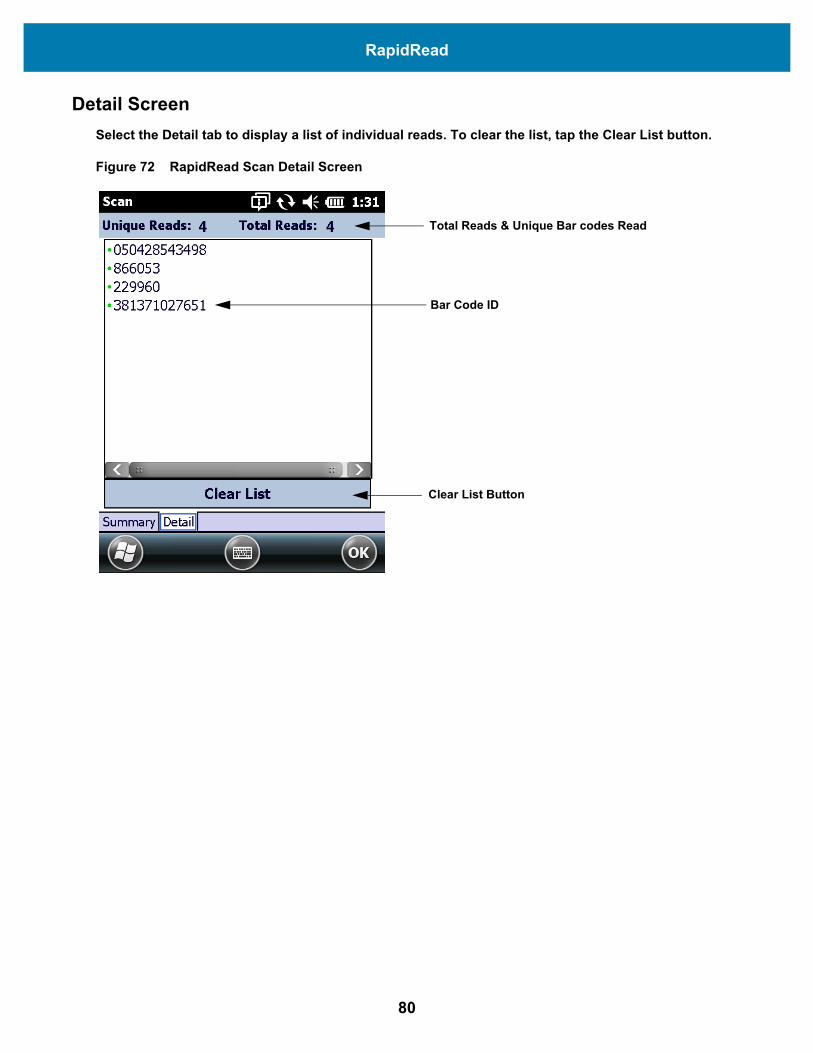
Detail ScreenSelect the Detail tab to display a list of individual reads. To clear the list, tap the Clear List button.
Figure 72 RapidRead Scan Detail Screen
Total Reads & Unique Bar codes Read
Bar Code ID
Clear List Button
80
RapidRead
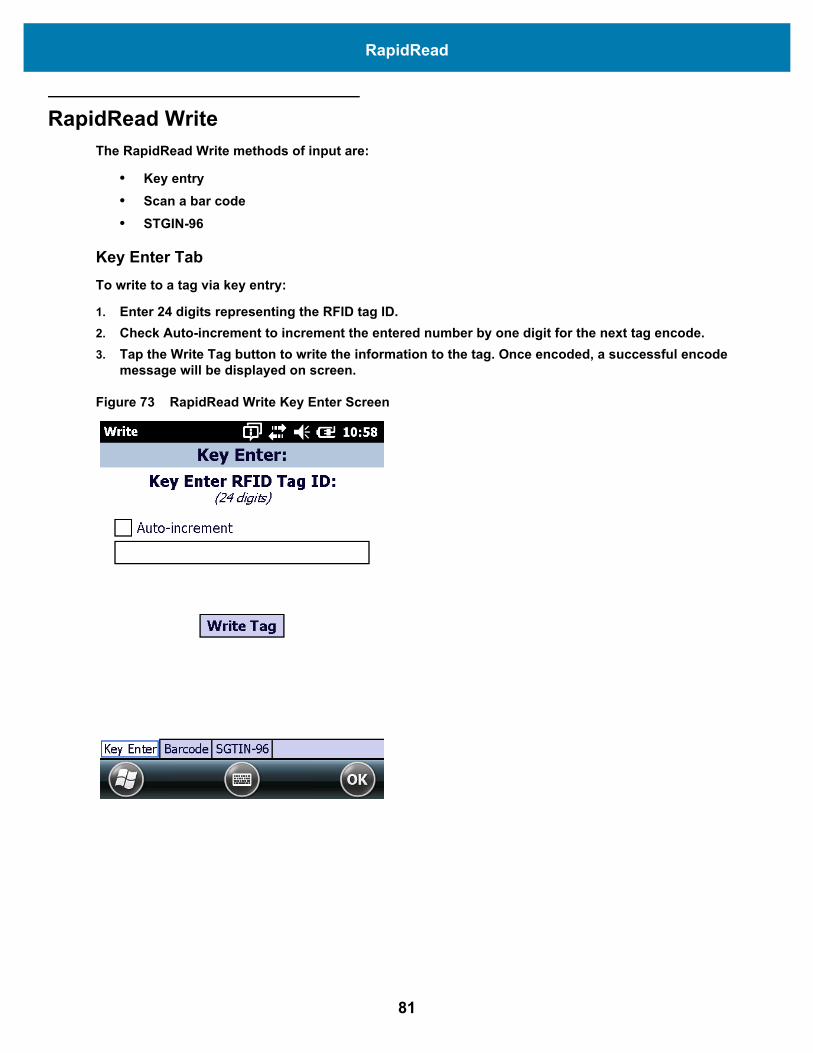
RapidRead WriteThe RapidRead Write methods of input are:
• Key entry • Scan a bar code • STGIN-96
Key Enter TabTo write to a tag via key entry:
1. Enter 24 digits representing the RFID tag ID.2. Check Auto-increment to increment the entered number by one digit for the next tag encode.3. Tap the Write Tag button to write the information to the tag. Once encoded, a successful encode
message will be displayed on screen.
Figure 73 RapidRead Write Key Enter Screen
81

RapidRead
Bar Code TabTo write to a tag via bar code scan:
1. Scan a bar code to enter the bar code data in the text field. Leading zeros are added to the front of the ID if the bar code contains less than 24 digits.
2. Tap the Write Tag button to write the information to the tag. Once encoded, a successful encode message will be displayed on screen.
Figure 74 RapidRead Write Barcode Screen
82
RapidRead
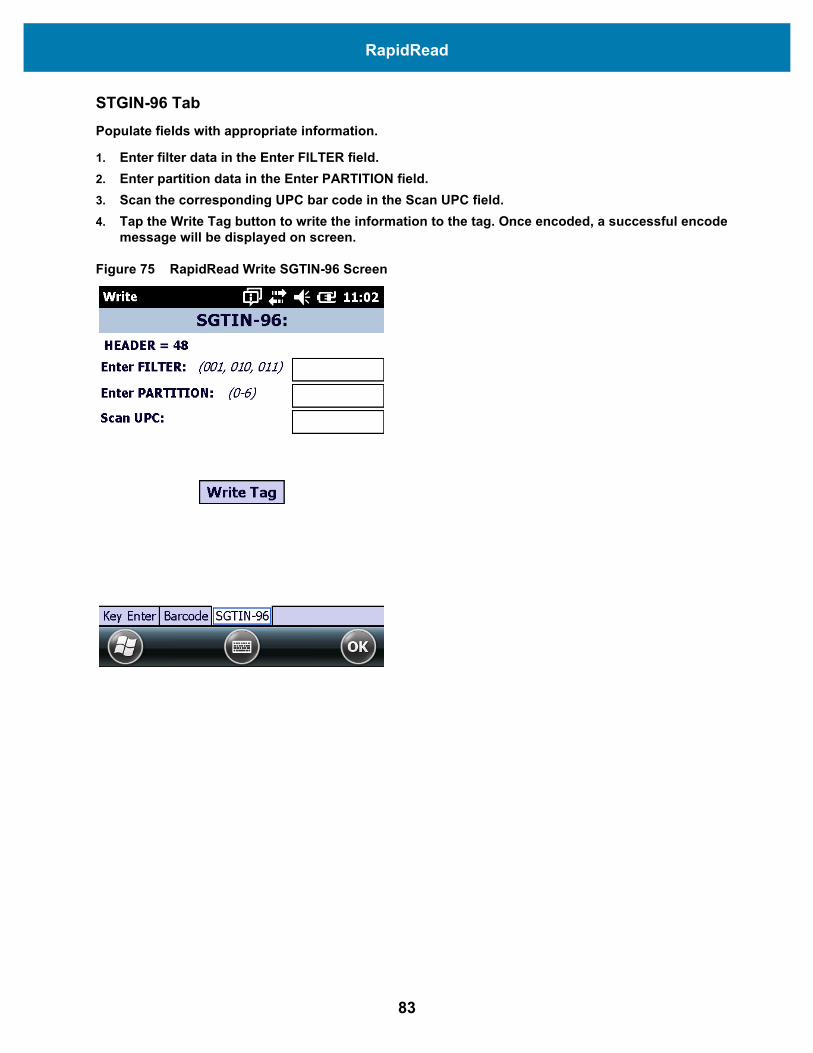
STGIN-96 TabPopulate fields with appropriate information.
1. Enter filter data in the Enter FILTER field.2. Enter partition data in the Enter PARTITION field.3. Scan the corresponding UPC bar code in the Scan UPC field.4. Tap the Write Tag button to write the information to the tag. Once encoded, a successful encode
message will be displayed on screen.
Figure 75 RapidRead Write SGTIN-96 Screen
83
Index
Aantennas . . . . . . . . . . . . . . . . . . . . . . . . . . . . . . . . . . . 46
colors . . . . . . . . . . . . . . . . . . . . . . . . . . . . . . . . . . 48configuring with RFID sample application . . . . 17enabling . . . . . . . . . . . . . . . . . . . . . . . . . . . . . . . . 62GPI . . . . . . . . . . . . . . . . . . . . . . . . . . . . . . . . . . . . 46GPO . . . . . . . . . . . . . . . . . . . . . . . . . . . . . . . . . . . 46ID . . . . . . . . . . . . . . . . . . . . . . . . . . . . . . . . . . . . . 62information . . . . . . . . . . . . . . . . . . . . . . . . . . . . . 21number connected . . . . . . . . . . . . . . . . . . . . . . . 55power . . . . . . . . . . . . . . . . . . . . . . . . . . . . . . . . . . 63singulation settings . . . . . . . . . . . . . . . . . . . . . . 61
autonomous mode . . . . . . . . . . . . . . . . . . . . . . . . . . 64
Cchapter descriptions . . . . . . . . . . . . . . . . . . . . . . . . . . 8connection
RFID sample application . . . . . . . . . . . . . . . . . . 14conventions
notational . . . . . . . . . . . . . . . . . . . . . . . . . . . . . . . . 9
Ddevice discovery . . . . . . . . . . . . . . . . . . . . . . . . . 50, 59devices supported . . . . . . . . . . . . . . . . . . . . . . . . . . . 11discovering devices . . . . . . . . . . . . . . . . . . . . . . 50, 59
EEPC . . . . . . . . . . . . . . . . . . . . . . . . . . . . . . . . . . . . 45, 46
Ffilters . . . . . . . . . . . . . . . . . . . . . . . . . . . . . . . . 22, 49, 63finding readers . . . . . . . . . . . . . . . . . . . . . . . . 45, 50, 59
GGPI . . . . . . . . . . . . . . . . . . . . . . . . . . . . . . . . . 46, 50, 63GPO . . . . . . . . . . . . . . . . . . . . . . . . . . . . . . . . . . . . . . . 46
enabling . . . . . . . . . . . . . . . . . . . . . . . . . . . . . . . . 49
Iinstallation
PowerSession . . . . . . . . . . . . . . . . . . . . . . . . 51, 71connecting to reader . . . . . . . . . . . . . . . . . . 52
RapidRead . . . . . . . . . . . . . . . . . . . . . . . . . . . . . . 67connecting to reader . . . . . . . . . . . . . . . . . . 67
SessionOne . . . . . . . . . . . . . . . . . . . . . . . . . . . . . 40connecting to reader . . . . . . . . . . . . . . . 41, 52
IP address . . . . . . . . . . . . . . . . . . . . . . . . . . . . . . 55, 56
LLLRP timeout . . . . . . . . . . . . . . . . . . . . . . . . . . . . 50, 60
Nnotational conventions . . . . . . . . . . . . . . . . . . . . . . . . 9
Ooperating systems . . . . . . . . . . . . . . . . . . . . . . . . . . 11options
RapidRead . . . . . . . . . . . . . . . . . . . . . . . . . . . . . . 69overview . . . . . . . . . . . . . . . . . . . . . . . . . . . . . . . . . 8, 11
PowerSession . . . . . . . . . . . . . . . . . . . . . . . . . . . 51RapidRead . . . . . . . . . . . . . . . . . . . . . . . . . . . . . . 66sample application . . . . . . . . . . . . . . . . . . . . . . . 12SessionOne . . . . . . . . . . . . . . . . . . . . . . . . . . . . . 40Tag Locator . . . . . . . . . . . . . . . . . . . . . . . . . . . . . 36
Ppinging reader . . . . . . . . . . . . . . . . . . . . . . . . . . . 45, 57PowerSession . . . . . . . . . . . . . . . . . . . . . . . . . . . . . . 51
connecting to reader . . . . . . . . . . . . . . . . . . 52, 57installation . . . . . . . . . . . . . . . . . . . . . . . . . . . 51, 71main tab . . . . . . . . . . . . . . . . . . . . . . . . . . . . . . . . 55
general tag reads . . . . . . . . . . . . . . . . . . . . . 55
84

Index
reader . . . . . . . . . . . . . . . . . . . . . . . . . . . . . . . 57reader info . . . . . . . . . . . . . . . . . . . . . . . . . . . 57
settings tab . . . . . . . . . . . . . . . . . . . . . . . . . . . . . 58antenna enable and disable . . . . . . . . . . . . . 62antenna power . . . . . . . . . . . . . . . . . . . . . . . 63antenna singulation settings . . . . . . . . . . . . 61appearance . . . . . . . . . . . . . . . . . . . . . . . . . . 58autonomous mode . . . . . . . . . . . . . . . . . . . . 64device discovery . . . . . . . . . . . . . . . . . . . . . . 59filters . . . . . . . . . . . . . . . . . . . . . . . . . . . . . . . 63low level . . . . . . . . . . . . . . . . . . . . . . . . . . . . . 59product picture . . . . . . . . . . . . . . . . . . . . . . . 60reader settings . . . . . . . . . . . . . . . . . . . . . . . 60RF mode . . . . . . . . . . . . . . . . . . . . . . . . . . . . 62tag storage setting . . . . . . . . . . . . . . . . . . . . 63trigger settings . . . . . . . . . . . . . . . . . . . . . . . 63
RRapidRead . . . . . . . . . . . . . . . . . . . . . . . . . . . . . . . . . 66
connecting to reader . . . . . . . . . . . . . . . . . . . . . 67full . . . . . . . . . . . . . . . . . . . . . . . . . . . . . . . . . . . . . 75
gieger counter . . . . . . . . . . . . . . . . . . . . . . . . 77installation . . . . . . . . . . . . . . . . . . . . . . . . . . . . . . 67lite . . . . . . . . . . . . . . . . . . . . . . . . . . . . . . . . . . . . . 73options . . . . . . . . . . . . . . . . . . . . . . . . . . . . . . . . . 69scan . . . . . . . . . . . . . . . . . . . . . . . . . . . . . . . . . . . 79tag file . . . . . . . . . . . . . . . . . . . . . . . . . . . . . . . . . 71write . . . . . . . . . . . . . . . . . . . . . . . . . . . . . . . . . . . 81
bar code tab . . . . . . . . . . . . . . . . . . . . . . . . . 82key enter tab . . . . . . . . . . . . . . . . . . . . . . . . . 81STGIN-96 tab . . . . . . . . . . . . . . . . . . . . . . . . . 83
readersconnecting to . . . . . . . . . . . . . . . 41, 46, 52, 57, 67discovering . . . . . . . . . . . . . . . . . . . . . . . . . . 50, 59finding . . . . . . . . . . . . . . . . . . . . . . . . . . . . . . . . . 45in main tab . . . . . . . . . . . . . . . . . . . . . . . . . . . 45, 57information . . . . . . . . . . . . . . . . . . . . . . . . . . . . . 57IP address . . . . . . . . . . . . . . . . . . . . . . . . . . . 55, 56selecting . . . . . . . . . . . . . . . . . . . . . . . . . . . . . . . 57supported . . . . . . . . . . . . . . . . . . . . . . . . . . . . . . 11
reading tags . . . . . . . . . . . . . . . . . . . . . . . . . . . . . 43, 54details . . . . . . . . . . . . . . . . . . . . . . . . . . . . . . . . . . 46main tab fields . . . . . . . . . . . . . . . . . . . . . . . . 45, 55saving . . . . . . . . . . . . . . . . . . . . . . . . . . . . 45, 48, 56settings . . . . . . . . . . . . . . . . . . . . . . . . . . . . . . . . 48starting and stopping . . . . . . . . . . . . . . . 46, 50, 57with RFID sample application . . . . . . . . . . . . . . 13
related documents . . . . . . . . . . . . . . . . . . . . . . . . . . . . 9requirements . . . . . . . . . . . . . . . . . . . . . . . . . . . . . . . 11RF mode . . . . . . . . . . . . . . . . . . . . . . . . . . . . . . . . 49, 62RFID sample application . . . . . . . . . . . . . . . . . . . . . . 12
access options . . . . . . . . . . . . . . . . . . . . . . . . . . 25antenna . . . . . . . . . . . . . . . . . . . . . . . . . . . . . . . . 17antenna information . . . . . . . . . . . . . . . . . . . . . . 21
capabilities . . . . . . . . . . . . . . . . . . . . . . . . . . . . . .14configuration menu . . . . . . . . . . . . . . . . . . . . . . .16connection . . . . . . . . . . . . . . . . . . . . . . . . . . . . . .14exiting . . . . . . . . . . . . . . . . . . . . . . . . . . . . . . . . . .35filter . . . . . . . . . . . . . . . . . . . . . . . . . . . . . . . . . . . .22launching . . . . . . . . . . . . . . . . . . . . . . . . . . . . . . .13operations menu . . . . . . . . . . . . . . . . . . . . . . . . .21power . . . . . . . . . . . . . . . . . . . . . . . . . . . . . . . . . .20reading tags . . . . . . . . . . . . . . . . . . . . . . . . . . . . .13resetting defaults . . . . . . . . . . . . . . . . . . . . . . . .20RF mode . . . . . . . . . . . . . . . . . . . . . . . . . . . . . . . .18singulation . . . . . . . . . . . . . . . . . . . . . . . . . . . . . .18tag storage . . . . . . . . . . . . . . . . . . . . . . . . . . . . . .16triggers . . . . . . . . . . . . . . . . . . . . . . . . . . . . . . . . .29
RSSI . . . . . . . . . . . . . . . . . . . . . . . . . . . . . . . . . . .45, 46monitoring . . . . . . . . . . . . . . . . . . . . . . . . . . . . . .48
Ssaving data . . . . . . . . . . . . . . . . . . . . . . . . . . . . . . . . .56saving history . . . . . . . . . . . . . . . . . . . . . . . . . . . .45, 48saving summary . . . . . . . . . . . . . . . . . . . . . . . . . .45, 48SessionOne . . . . . . . . . . . . . . . . . . . . . . . . . . . . . . . .40
connecting to reader . . . . . . . . . . . . . . . .41, 46, 52installation . . . . . . . . . . . . . . . . . . . . . . . . . . . . . .40main tab . . . . . . . . . . . . . . . . . . . . . . . . . . . . . . . .43
antennas . . . . . . . . . . . . . . . . . . . . . . . . . . . .46reader . . . . . . . . . . . . . . . . . . . . . . . . . . . . . . .45RSSI . . . . . . . . . . . . . . . . . . . . . . . . . . . . . . . .46tag details . . . . . . . . . . . . . . . . . . . . . . . . . . .46tag reads . . . . . . . . . . . . . . . . . . . . . . . . . . . .45
settings tab . . . . . . . . . . . . . . . . . . . . . . . . . . . . .46antenna colors . . . . . . . . . . . . . . . . . . . . . . .48appearance . . . . . . . . . . . . . . . . . . . . . . . . . .48autologin . . . . . . . . . . . . . . . . . . . . . . . . . . . .50autosave . . . . . . . . . . . . . . . . . . . . . . . . . . . .48device discovery . . . . . . . . . . . . . . . . . . . . . .50filters . . . . . . . . . . . . . . . . . . . . . . . . . . . . . . .49low level . . . . . . . . . . . . . . . . . . . . . . . . . . . . .50product picture . . . . . . . . . . . . . . . . . . . . . . .49read settings . . . . . . . . . . . . . . . . . . . . . . . . .48RF mode . . . . . . . . . . . . . . . . . . . . . . . . . . . . .49RSSI monitoring . . . . . . . . . . . . . . . . . . . . . .48start reading when . . . . . . . . . . . . . . . . . . . .50stop reading . . . . . . . . . . . . . . . . . . . . . . . . .50tag direction . . . . . . . . . . . . . . . . . . . . . . . . .49tag match . . . . . . . . . . . . . . . . . . . . . . . . . . . .49
settings . . . . . . . . . . . . . . . . . . . . . . . . . . . . . . . . .46, 58antenna colors . . . . . . . . . . . . . . . . . . . . . . . . . . .48antenna enable and disable . . . . . . . . . . . . . . . .62antenna power . . . . . . . . . . . . . . . . . . . . . . . . . . .63antenna singulation . . . . . . . . . . . . . . . . . . . . . .61appearance . . . . . . . . . . . . . . . . . . . . . . . . . .48, 58autologin . . . . . . . . . . . . . . . . . . . . . . . . . . . . . . .50autonomous mode . . . . . . . . . . . . . . . . . . . . . . .64
85
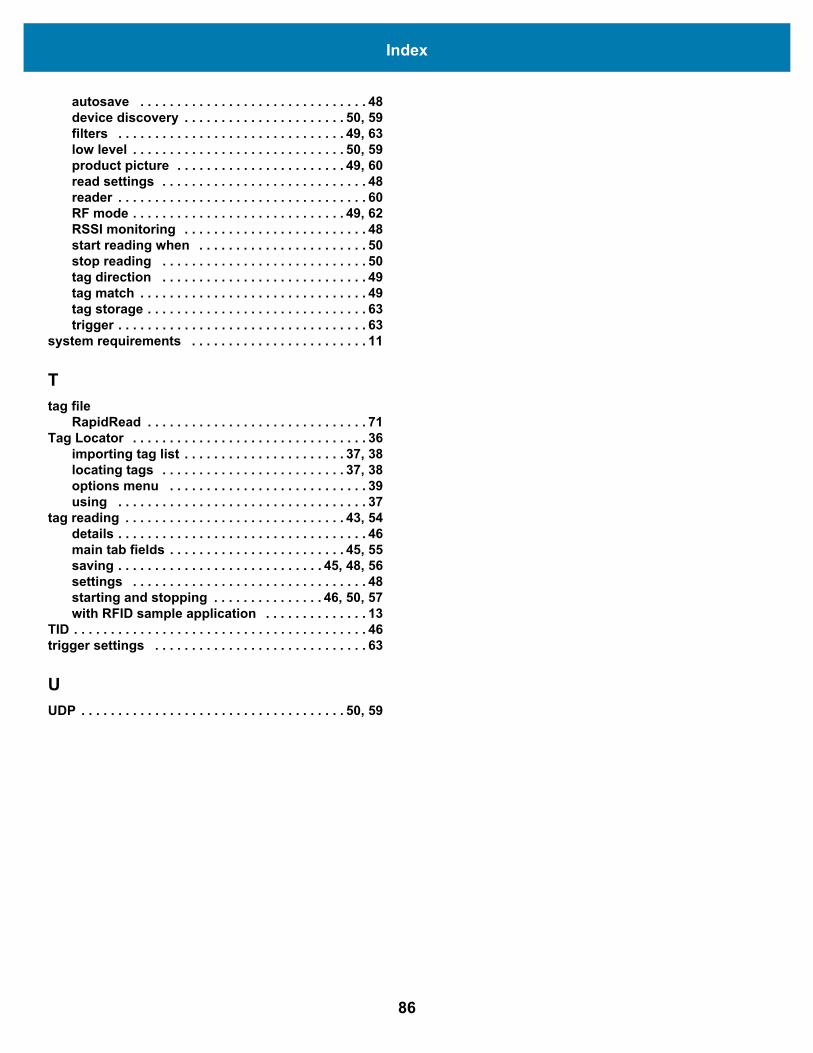
Index
autosave . . . . . . . . . . . . . . . . . . . . . . . . . . . . . . . 48device discovery . . . . . . . . . . . . . . . . . . . . . . 50, 59filters . . . . . . . . . . . . . . . . . . . . . . . . . . . . . . . 49, 63low level . . . . . . . . . . . . . . . . . . . . . . . . . . . . . 50, 59product picture . . . . . . . . . . . . . . . . . . . . . . . 49, 60read settings . . . . . . . . . . . . . . . . . . . . . . . . . . . . 48reader . . . . . . . . . . . . . . . . . . . . . . . . . . . . . . . . . . 60RF mode . . . . . . . . . . . . . . . . . . . . . . . . . . . . . 49, 62RSSI monitoring . . . . . . . . . . . . . . . . . . . . . . . . . 48start reading when . . . . . . . . . . . . . . . . . . . . . . . 50stop reading . . . . . . . . . . . . . . . . . . . . . . . . . . . . 50tag direction . . . . . . . . . . . . . . . . . . . . . . . . . . . . 49tag match . . . . . . . . . . . . . . . . . . . . . . . . . . . . . . . 49tag storage . . . . . . . . . . . . . . . . . . . . . . . . . . . . . . 63trigger . . . . . . . . . . . . . . . . . . . . . . . . . . . . . . . . . . 63
system requirements . . . . . . . . . . . . . . . . . . . . . . . . 11
Ttag file
RapidRead . . . . . . . . . . . . . . . . . . . . . . . . . . . . . . 71Tag Locator . . . . . . . . . . . . . . . . . . . . . . . . . . . . . . . . 36
importing tag list . . . . . . . . . . . . . . . . . . . . . . 37, 38locating tags . . . . . . . . . . . . . . . . . . . . . . . . . 37, 38options menu . . . . . . . . . . . . . . . . . . . . . . . . . . . 39using . . . . . . . . . . . . . . . . . . . . . . . . . . . . . . . . . . 37
tag reading . . . . . . . . . . . . . . . . . . . . . . . . . . . . . . 43, 54details . . . . . . . . . . . . . . . . . . . . . . . . . . . . . . . . . . 46main tab fields . . . . . . . . . . . . . . . . . . . . . . . . 45, 55saving . . . . . . . . . . . . . . . . . . . . . . . . . . . . 45, 48, 56settings . . . . . . . . . . . . . . . . . . . . . . . . . . . . . . . . 48starting and stopping . . . . . . . . . . . . . . . 46, 50, 57with RFID sample application . . . . . . . . . . . . . . 13
TID . . . . . . . . . . . . . . . . . . . . . . . . . . . . . . . . . . . . . . . . 46trigger settings . . . . . . . . . . . . . . . . . . . . . . . . . . . . . 63
UUDP . . . . . . . . . . . . . . . . . . . . . . . . . . . . . . . . . . . . 50, 59
86


www.zebra.com


