86
RFO Basic! for Android A Game Design Tutorial by Michael C Palmer

RFO Basic! for AndroidA Game Design Tutorial
by
Michael C Palmer

Table of ContentsIntroduction...............................................................................4
Part One.....................................................................................6
Getting Started......................................................................................6Our First Game........................................................................................7Basic Graphics........................................................................................8Resolution and Scaling............................................................................9
Examining our Game..........................................................................10Assets....................................................................................................10Starting the Program..............................................................................11Setting up the Screen.............................................................................12Loading Data.........................................................................................14Setting and Resetting Variables.............................................................15Loading a Map from a Text File............................................................16Looping the Game.................................................................................17Getting Input from the User..................................................................19Moving the Character............................................................................20Animating the Character.......................................................................23Finishing Up..........................................................................................24
Going Farther......................................................................................25Features Added in Part II......................................................................26The Final Game.....................................................................................26
Part Two...................................................................................27
Getting Started....................................................................................27New Features.........................................................................................28
Examining our Game..........................................................................29Assets....................................................................................................29Scrolling the Screen..............................................................................31Changing and Saving the World............................................................35Choosing Options from a Menu............................................................40Throwing Balls at Enemies...................................................................44Improving Collisions with Walls...........................................................51

Knowing thy Enemy.............................................................................54Routine Enemy Behavior......................................................................63
Going Farther......................................................................................72Crushed Toys.........................................................................................72More Maps............................................................................................73Better Performance...............................................................................73Improved Throwing..............................................................................73Smarter Behavior..................................................................................73
Part Three................................................................................75
The Final Game...................................................................................76Editor.....................................................................................................76Controls.................................................................................................77Text Windows........................................................................................79Scores and a Status Screen....................................................................80Difficulty Ramping...............................................................................82Enemy Behavior....................................................................................82
Conclusion............................................................................................86

IntroductionRFO Basic! is a BASIC interpreter that allows users create attractive Android programs without the fuss of Java and other programming languages. There's no easier way to write programs for Android, and it can be done with or without a computer. By using the BASIC! Compiler, you can produce APK files that are easily distributed, even through the Google Play Store.
Unfortunately that ease of use comes at a cost. The cost includes somewhat slow performance and a lack of features that would make game design easier. There are better tools for aspiring game designers to try, but if you want to tinker on your Android phone or tablet, and if you have the patience and a creative mind, you can develop games with RFO Basic!
If you're new to programming but want to make a game then this tutorial probably won't provide enough help. Try a game creation tool like GoDot on a PC to get started. If you must make you game with an Android device, you might have better luck with LibGDX than with RFO Basic! It uses Java, which is generally more difficult, but there's tons of books and tutorials to get you started. Aide, a Java compiler for Android, supports LibGDX and even includes a game making tutorial for it.
Other options that you might consider include Terminal IDE and qPython. Terminal IDE grants Android users most of the command line-based build tools available to Linux users. With it you can design SDL-based games in the C or C++ languages, but for those unfamiliar with low-level languages and the Linux command line, it will be a difficult process.
qPython can be used to run object-oriented code that uses either pyGame or Kivy, both of which provide the necessary graphics and input functionality to produce games. Unfortunately, qPython3 doesn't support the pyGame or Kivy libraries, and worse, neither tool allows users to build an APK for Android. So while you can design and a test a game with qPython2, you must build the project in Linux before you can distribute it. There does seem to be a build process for Windows, but reportedly, it's unreliable.

Since you are still reading, you must have an interest or a need to develop Android games with RFO Basic, so let us begin.

Part One
Getting Started
What you Need or Should Have
• The RFO Basic! App - free from the app store• The RFO Basic! Manual and a PDF viewer to read it• The Basic! Compiler - 3$ from the app store• A keyboard or a soft keyboard that has easy access to symbols used in Basic!, such
as ", ', <, $, and others• A vector graphics app for Android, such as Ivy Draw(6$), Inker(10$), or Paper
Simple(free)• A pixel graphics app for Android, such as Pixly(free) or Pixelesque(free)• SFXR to create retro sound effects with ease (free)• An audio editor, such as WavePad (10$, free)• A good understanding of basic programming. There may not be good tutorials for
RFO Basic!, but there's countless tutorials for other basic dialects
Limitations of RFO Basic!
• You cannot make 3D games with RFO Basic!• You cannot make advanced games on par with many of those found on the Play
Store• You can make simple games and learn good game design practices• Many simple games for Android have made people very wealthy, and with a good

idea and lots of luck, you could be the next one• A basic interpreter cannot handle the number of calculations that some games
require• If you have ten monsters on the screen and ten bullets, that's at least 100 possible
collisions to test for, perhaps too many• If you want the enemies to effect other enemies and the bullets to effect other
bullets, then that's way too many collisions to test for in Basic!• If you're smart and careful, you can recreate most games that were available for
Nintendo or Genesis, but with better graphics and with modern touch controls
Our First GameThe game that we will build together is a simple affair. You move your character around a small map and collect the gems scattered about. If you step into a hole then you'll die. There's plenty of room for improvements, as you'll see in the second and third parts of this tutorial.

Basic GraphicsThe graphical commands included with RFO Basic! were designed to create the user interface for apps, not for making state of the art videogames. If you want to use RFO Basic! you must understand that you cannot find a graphics library on the internet and add it to your program. Instead, you need to make the most out of what's offered.
You should read the entire manual RFO Basic! before you try making a game. Then read the graphics section twice more. You need to understand it fully, then consider the advice that I'm about to offer you.
There are basically two ways to draw graphics in RFO Basic! One way is to create and manipulate graphical objects on the screen, the other way is to draw into a bitmap. To develop real-time action games, you must do both.
Graphical objects are memory and resource intensive, and if you create too many, your app will slow down to a halt or even crash. You may draw all you want into a bitmap without these problems, but other problems will present themselves, such as erasing objects and moving them around the screen without leaving a mess behind.
When planning your game, think of which objects need to move around and which ones

are part of the background. The player's character and his enemies should be graphical objects. Also, any text or icons that need to stay visible above the characters should be graphical objects. The background, usually built by a grid of objects called cells, should be drawn into a bitmap. Also, if you're going to have a graphical menu then you should probably draw that into a bitmap too, because the menu borders and all those lines of text will make more graphics objects than you want.
So basically, any object that needs to move around, as well as the icons and the text of your user interface, will all be graphical objects. The rest will be drawn into a single bitmap that's called a buffer. You can draw into the buffer all you want, but erasing it is a little more tricky.
All of your graphical objects will be drawn before the games starts. Then, during the game, you will use gr.modify to move them and to change which frame of animation is displayed.
Resolution and ScalingWhen you're just playing around with demos on your phone you can make things any size you want. If you want to share the game with other people then you need to be aware of the differences between the size and resolution of your users' screens. Considering the DPI, or dots per inch, is important to professional programmers designing mobile apps, but we'll skip that part and just worry about the resolution.
Try to avoid the urge to use specific numbers when placing objects and setting their size. If you do that, and then later you decide to share your game, you'll have quite a time rearranging everything(often called refactoring). There are two ways to solve this problem, the easy way and my way. You could make your game based on the resolution of your screen, lets say 1000 x 700 pixels. Then, when you want to make it work on other devices, you could simply scale the whole display to the resolution of the device that it's running on. This will work, but for some reason, the graphics become very blocky. Instead of scaling the entire screen with the scaling feature of Basic!, we'll scale the individual graphical objects and the text size based on a percentage of the screen's resolution.
Objects that move around are called sprites. Objects that are part of the background grid are called cells. Let's say you want the game to be a grid of squares that's 20 cells wide and 12 high. We will use a variable called gs, or grid size, to measure its size. When the game starts, we'll calculate gs by dividing the screen's height by 12. If your device was 1000x700 pixels, we would have a grid size of 700 divided 12, or 58. That makes the

screen's width 20 cells wide times 58 pixels, or 1,160 pixels. Unfortunately that's too wide for the screen, so you'd need to rethink the grid size.
Designing menus and placing icons should be done in a similar way. Set the text height based on the screen height, such as screen_height/20. If you want an object at the middle of the right edge of the screen, calculate it based on that.
x=SCREEN_WIDTH-(SCREEN_WIDTH*0.1) % ten percent from the right edgey=SCREEN_HEIGHT/2 % at the vertical center
Examining our Game
It's almost time to start looking at the tutorial game's code. But first, let's just discuss the files. The source file is called 'tut.bas' and should be placed in the source folder of RFO Basic!, usually “/rfo-basic/source/” There are also a number of assets that must be placed in the data folder of RFO Basic, usually "/rfo-basic/data/". All of these files can be found in tutorial-1.zip.
Later we'll experiment with level editors, saved settings, and subfolders, and we'll discuss how to compile your app into an APK with those things intact.
Assetstut.bas - the source file for our gameplayer.png - the graphics for our charactercells.png - the graphics for the objects that make up our game worldpickup.mp3 - a 'ting' sound that plays when our users pick up a gemfalling.mp3 - the sound that our character makes when he falls into a holemap.txt - a text file that uses numbers 1 through 4 to represent our game world

Starting the ProgramWith all the assets in place you should be able to open RFO Basic, load tut.bas, and click run to play. Alternatively, you can install the APK and just click on the icon. Once you've tried it out it's time to move from Starting the Program to Starting to Program. We will now discuss the program line by line from the beginning of the file to the end.
The following lines determine whether the program is running from an APK. If it is an APK then isAPK is set to 1 and we'll exit the app instead of returning to the editor after the user finishes playing. The isAPK variable will be used much more when we start loading files.
File.Root t$isAPK=!Is_In("rfo-basic", t$)
The game will be made from a grid of squares. The dimensions of the grid and the array to hold data must be defined before we start setting up the screen and are defined here.
gHeight=21gWidth=29DIM grid[gWidth,gHeight]
We will limit the game to 30 frames per second so that it runs at the same speed on all devices.

tDelay=1000/30
Next we use gosub to jump to the function definitions so that we can call them from anywhere in the program. Then we call the routine that sets up the screen.
GOSUB FunctionsGOSUB SetupScreen
Here is the outer loop for our game. We start by resetting all of our variables. Then we load our map and start the Play routine, which is the inner loop. Once the inner loop sets the quit variable to one we unload all of our data and exit.
DOGOSUB SetVarsGOSUB LoadMapGOSUB Play
UNTIL quitGOSUB UnloadDataIF isAPK THEN EXITEND
Setting up the ScreenWe open the graphics screen in landscape mode with a fully opaque white background. Then we get the screen dimensions(resolution) and store then in ACTUAL_W and ACTUAL_H.
SetupScreen:GR.OPEN 255,255,255,255,0,0GR.SCREEN ACTUAL_W, ACTUAL_H
Next we calculate the grid size based on the screen size and set some other variables that will be frequently used, such as hgs, which is half the grid size. DISPLAY_W and DISPLAY_H represent the used portion of the screen and are calculated based on the grid dimensions and the size of each grid square.
Since gs was calculated based on the screen height, the entire height of the screen will be used, but some of the width will not be. We divide the unused portion by two and store it in the offset variable, which lets us render our background and our character in the middle of our screen, with equally sized bars at either side.
gs=CEIL(ACTUAL_H/gHeight) hgs=FLOOR(gs/2)DISPLAY_W=gs*gWidthDISPLAY_H=gs*gHeightoffset=FLOOR((ACTUAL_W-DISPLAY_W)/2)

We make our character a little bigger then the grid squares by setting the sprite size 1.5 times larger than our grid size. We also store half the sprite size into the hss variable because we'll use it often.
ss=FLOOR(gs*1.5)hss=FLOOR(ss/2) % half the sprite size is often used in calculations
We need to load our data after we open the graphics, which we just did, but before we start drawing stuff, which we'll do in a minute. After calling the LoadData routine we create a bitmap called buffer, which we'll draw our background into a little later.
GOSUB LoadDataGR.BITMAP.CREATE buffer, DISPLAY_W,DISPLAY_H
We'll only have one moving character in the first version of our game. He needs to be a graphical object. We'll also have an on screen directional pad and a score that must be graphical objects. The objects will be draw here in the SetupScreen routine and then moved around later on using the gr.modify command.
The order that graphical objects are drawn must be carefully considered. Objects are drawn above those that were drawn earlier, so objects that you want on top must be drawn after those that they should be drawn over. In our case we only have four objects: the player, the directional pad, the score, and the background. We want the background beneath the player, of course. The score and the directional pad will be drawn with transparency and display above our character.
Notice how bitmap variables are prefixed with the letter b and graphical objects are prefixed with the letter o. We do not want to get our bitmaps and our graphical objects confused. Also note how we use the offset variable to draw the buffer at the center of the screen. Later, we'll need to add the offset to our player's horizontal position or he won't properly align to the grid.
GR.BITMAP.DRAW oBuffer, buffer, offset, 0 % offset to the centerGR.BITMAP.DRAW oPlayer, bPlayer[1,1], 100,100GR.COLOR 100,255,255,255 % a semi-transparent directional padGR.BITMAP.SIZE bpad, x,yGR.BITMAP.DRAW opad, bpad, 0,0GR.HIDE opad %hide it for nowGR.COLOR 255,0,0,0 % opaque black textGR.TEXT.SIZE gsGR.TEXT.DRAW oScore, 2,gs, "blank" % draw the text object near the top left corner
From here on out everything we draw will be drawn into the buffer without new graphical objects being created.
GR.BITMAP.DRAWINTO.START bufferRETURN

Loading DataNow it's time to load all of our data. We'll use some functions that I wrote to load multiple images from a single file and then store them into an array. You may look at the functions if you wish, but I only intend to describe how to use them, not how they work.
There's two arrays that must be created before we load our bitmaps into them. One is for our animated player and one is for the four objects that our background will be drawn from. Our player will have five animations with 5 frames each: stand still, run up, run right, run down, and run left. Our background grid will be made from four cells: empty squares, gems, holes, and walls.
ScaleBitmapArray() requires five parameters. The first is a two dimensional array to store the animations in. The second is the name of the file to load. The third is the size you want the bitmaps to scale to. The last two are the number of frames for each animation and the total number of animations.
The function assumes that the bitmap file is made up of square tiles. The individual images will be accessed by the animation number and then frame number, such as player[animation, frame]. I use a program that I wrote called GW Multi-Tool to create tiled PNG files from the individual bitmaps that I draw using IvyDraw, a vector graphics program. GW Multi-Tool can be found at here.
LoadData:DIM bPlayer[5,5] % 5 animations with 5 frames eachDIM bCells[4] % there are 4 objects to put in our grid
ScaleBitmapArray(bPlayer[], "player.png", ss, 5, 5)ScaleBitmaps(bCells[], "cells.png", gs, 4)
We want our directional pad to be larger than our player. I chose to make it three times his size. It will appear when users touch the screen and disappear when they let go. Since we want to draw it centered around where the user touches, we store half of the pad's width into a variable so that we can offset it later on.
bpad=ScaleBitmap("pad.png", FLOOR(ss*3))po=ss*1.5
Now we open the sound pool and load our sound files. Although we only have two sounds and they won't play often, I usually open the sound pool with for channels and have done so here for no apparent reason.
SOUNDPOOL.OPEN 4SOUNDPOOL.LOAD sPickup, "pickup.mp3"SOUNDPOOL.LOAD sFall, "fall.mp3"RETURN

It's important to unload resources when we're done so we create an UnloadData routine to do the cleanup. Although not entirely necessary in our little demo, it's a habit you should pickup sooner than later.
UnloadData:DeleteBitmapArray(bPlayer[],5,5)DeleteBitmaps(bCells[],4)GR.BITMAP.DELETE bpadSOUNDPOOL.UNLOAD sPickupSOUNDPOOL.UNLOAD sFallSOUNDPOOL.RELEASERETURN
Setting and Resetting VariablesI always include a SetVars routine in my games. It keeps all of our variable definitions in one convenient places and serves three important functions. Firstly, it sets static parameters that will be used during the game. Secondly, it sets variable parameters based on the user's chosen skill level. Thirdly, it resets variables to their default values between games(after the user dies or restarts). We won't have skill levels in the first version of our game but will add them later on.
First we set a few static parameters. pox and poy are offsets used to draw our character so that his x and y positions are based at the center of his feet. We also need to set an animation delay because if we draw a new frame of animation every time we update the screen then the five frames will play way too fast.
pox=-ss/2poy=-ss*0.85anim_delay=4
Next we set our character's run and walk speed, as well as how many gems he must collect. These are the types of variables that we might change depending on the player's chosen skill level.
sp=3: rsp=5 % walk and run speedgems=20 % the gems to start with
Now we reset the variables that might have changed since the last time our user played. The first set is determined by the GetInput routine and then used by the MovePlayer routine. I prefixed them with m because RFO Basic! will otherwise confuse down with do and throw an error.
The second set of variables is used by the AnimatePlayer routine to loop the animation forwards and backwards. After that we reset the number of gems that have been collected

to zero.mleft=0: mright=0: mup=0: mdown=0 % player not moving yet
anim_waiting=0 % restart our animationpframe=1panim=1anim_dir=1
collected=0 % make sure our player has to start collecting all over again
The last thing we will do here is adjust the player's speed based on the resolution of the user's screen. If we don't do this than our character will fly across low resolution screens and crawl across higher resolution ones. The sprite size on my tablet was 52 when I tuned the speed variables, so we base our character's movement on that.
t=ss/52sp*=t: rsp*=tRETURN
Loading a Map from a Text FileIt's a common practice to enter a sample map grid into a game's source file. This could be done with the read.data and read.next commands, but I've always used text files and have decided to do so here. It will be very easy to improve the following subroutine to load multiple maps, either from the same file or from differently named ones, but for now we will just load one map from map.txt. Later we'll add a level editor with level loading and saving features, probably from an SQLite database.
Each row in our map grid is stored as a single line of text, where the values of each cell are represented by numbers separated by commas. We loop through each row and use word$() to get the number from each column.
Notice how we use (x-1)*gs and (y-1)*gs when drawing the cell. This is because arrays in Basic! start with entry 1, but if you multiply 1 by gs and draw a cell there it will leave a blank space above and below the grid. Most game designers and programming languages use base 0 arrays, but this is not an option in RFO Basic! We must remember to always add one when calculating a grid location from a screen location, and to subtract one when drawing graphics from a grid location to a screen location.
LoadMap:TEXT.OPEN r, file, "map.txt" FOR y=1 TO gHeight % loop through each row
TEXT.READLN file, t$

FOR x=1 TO gWidth % now loop through each object in the row t=VAL(WORD$(t$,x,","))
grid[x,y]=t %set the grid square GR.BITMAP.DRAW n, bCells[t], (x-1)*gs,(y-1)*gs %draw the correct bitmap
NEXT xNEXT y
Now that we have a grid that represents a world for our character to explore, we need to put gems into it. A for loop is used to add how many we want, while inside of it, a do loop is used to try out random grid squares until an empty one is found.
FOR i=1 TO gemsDO % keep trying random grid squares until we find an empty one
x=1+FLOOR(RND()*gWidth) y=1+FLOOR(RND()*gHeight)
UNTIL grid[x,y]=1grid[x,y]=3GR.BITMAP.DRAW n, bCells[3], (x-1)*gs,(y-1)*gs %draw the gem
NEXT i
To make it easier for us, we place the player where the last gem was drawn. The following equation is used to position him.
player x = grid number x * the grid size - half the grid size
I recently explained why you must subtract one from the grid position but didn't follow my own rule! In order to place the player at the center of the square we could subtract 1 from the grid number and then add half the grid size, but by subtracting half of the grid size we create the same effect.
px=x*gs-hgs % place the player where the last gem was drawnpy=y*gs-hgsRETURN
Looping the GameNow we'll look at the inner game loop, which is pretty straightforward. The real work is done by the subroutines called from this loop. We may as well look at the Delay routine while we're at it, because without that, our loop would go way too fast. We want things to move at a constant speed on every device.
Two variables are used for frame rate calculations: frames and ti. The dead variable will be used to exit the inner loop. I would rather use done, but Basic! would confuse it with the do command.
The frame rate variables could have been reset in the SetVars routine, but it's best to set

them as close to the loop as possible, and later on, we'll be adding a menu between SetVars and Play. After that the timer would count all of the seconds that a user decides to stare at the menu instead of playing. Also, I like to reset the loop variable for do loops right before the do command.
Play:frames=0 % used for frame rate calculationti=TIME() % also used for frame rate calculationdead=0 % used for the main loop. I would use done but Basic! confuses it with do
DOframes++GOSUB GetInputGOSUB MovePlayerGOSUB AnimatePlayer
GR.RENDERGOSUB Delay
UNTIL dead
The player will have died, finished, or quit by the time we get past the loop. Now we calculate the frame rate and give the player a little message. Note that the frame rate will always be just below thirty frames per second. If you take out the gosub Delay command then the frame rate will jump up and the player will probably run way too fast to control. On my tablet the frame rate is about 60 without the delay in there.
ti=TIME()-ti % calculate the frame rateti=ti/1000
!display a message and ask if the user wants to play againIF collected=gems
DIALOG.MESSAGE "Good Job", "You got all the gems!",quit,"Again","Quit"ELSE
DIALOG.MESSAGE "Woops","You fell in a hole", quit,"Again","Quit"ENDIFPOPUP STR$(frames/ti)+" frames per second",,-DISPLAY_H/3IF quit=1 THEN quit=0 ELSE quit=1 % quit unless button 1 was pressed -or-RETURN % return to the outer loop to play again
The following routine will limit the frame rate to thirty. Earlier, we set the tDelay variable to equal 1000ms/30 frames.
Delay:DOUNTIL TIME()>tLast+tDelaytLast=TIME()PAUSE 10 RETURN

Getting Input from the UserThere are many ways to collect user input from a touch screen. I've tried a dozen or more, each with their own little quirks. For our game we'll center the directional pad wherever users touch the screen and erase it when they let go. That means you have to touch and then move your finger to make the character move instead of just tapping. Tapping can be more responsive, but then it's easy to touch the wrong button because users are looking at their character, not where their finger is going. With the control scheme that we're using it's best to keep your finger down on the screen all the time.
The GetInput routine is divided into three parts because it has to track three events. We need to know when the user first touches the screen, if the user is currently touching the screen, and when the user lets go. We use a variable called touching to determine if the user is currently touching the screen. We set touching=1 when the screen is first touched and then set touching=0 when the user lets go.
The routine that follows is a fairly common design but may be confusing to new game designers because it functions in a logically non-linear order. The first section checks to see if touching=1, which means that the user was touching the screen last time GetInput was called. If the user was touching, then we check to see if the user is still touching.
We start by determining whether the user is still touching. If the finger was lifted, then we reset the movement variables and then hide the on screen directional pad.
GetInput:IF touching
GR.TOUCH touched, tx,ty IF !touched % the user removed his finger
mright=0: mleft=0: mup=0:mdown=0 % reset variables stop character touching=0 % reset this so we won't enter this part of the loop anymore GR.HIDE opad % hide the pad until next time the screen is touched
The next section of the routine is only reached if the user is still touching the screen. This is where we set the movement variables that are later used by the MovePlayer routine. The distance between the center of the direction pad and the user's finger is calculated and stored in two variables that measure the delta, or difference. Technically speaking dx and dy are not truly the distance, for which we would need to calculate the hypotenuse of the right triangle they define, but they serve our purpose well enough for now.
We use our two deltas to set the movement variables mUp, mRight, mDown, and mLeft. Then, if either delta is larger than a certain threshold, we set running=1 so that our character moves faster. Please note that it is possible for both the dx and dy variables to be greater than hss, in which case the character will move diagonally(mRight and mDown, for instance).

ELSEdx=tx-padxdy=ty-padyIF dx>hss THEN mright=1 ELSE mright=0IF dx<-hss THEN mleft=1 ELSE mleft=0
IF dy>hss THEN mdown=1 ELSE mdown=0IF dy<-hss THEN mup=1 ELSE mup=0
!abs generates the absolute value, turning negative numbers positive!if touch is far enough from center then we set running=1
IF ABS(dx)>ss | ABS(dy)>ss THEN LET running=1 ELSE LET running=0ENDIF
The next part of the routine is only reached if touching=0, which means that the user wasn't touching the screen the last time this routine was called. We know that if the screen is touched here then the user just put his finger down.
Since the user is just now touching the screen we store the touch coordinates directly into the direction pad's coordinates. Then we draw the pad centered around our user's finger by subtracting the offset that we calculated in the SetupScreen routine. Finally we set touching=1 so that the player will be moved next frame(but not this one).
ELSE GR.TOUCH touched, padx, pady % IF touched
GR.MODIFY opad, "x",padx-po, "y",pady-poGR.SHOW opad
touching=1ENDIF
ENDIFRETURN
Moving the CharacterNow that we have our user's input we can move the character. Although there's a lot we have to account for in this routine, it's actually more straightforward than the GetInput routine was.
The character's position on the screen are stored in two variables, px and py. The first thing we do here is copy the character's position into x and y, which we'll use during our next calculations. This way we can reset them if the user's new position is illegal(in a wall). After that we set panim=1 so that the character's standing still animation is played unless one of the following conditions are met and he moves.

MovePlayer:x=px: y=pypanim=1
Next we set a temporary variable either to our character's normal speed or to his running speed, depending on whether he's running right now. Then we check for each direction using the mUp, mRight, mDown, and mLeft variables. If they're set to 1 then we move the character in that direction and set pAnim so that the correct animation is played. We check up and down before checking let and right so that the left and right animations take precedence. If the player is moving up and right, for instance, then the running right animation will be played, not the running up animation.
IF running THEN t=rsp ELSE t=sp % set t to the player's speed, running or walking IF mup THEN y-=t: panim=4IF mdown THEN y+=t: panim=5IF mleft THEN x-=t: panim=2IF mright THEN x+=t: panim=3
We need to prevent the player from running off the screen for two reasons. Firstly, it would look foolish if our little character was allowed to do. Secondly, and more importantly, it would cause an error. If we calculate the grid position of the character when he's off the screen and then try to access the grid array it would be out of bounds. The grid only holds variables from 1 to gWidth and from 1 to gHeight.
Good programming practice would require us to make sure that our grid positions are legal before accessing the array, but we're using a basic interpreter and must try to limit how many if/then conditions we check for. Since we want to prevent our character from moving off the screen anyway, we do it in a way that will also prevent an error when we access the grid. That way we kill two birds with one stone.
The way we do this is by limiting x to DISPLAY_W-1 and y to DISPLAY_H-1. Without the -1 there would be a chance that the player is at the very last pixel and our later calculation will try to access beyond the grid's extent, causing an error message.
Once we limit our character's position to the screen dimensions using the min() and max() functions we calculate his grid positions and then set g to the cell number for that square. In our little game there are four cells: 1=blank, 2=hole, 3=gem, and 4=wall.
Remember to add 1 to gridX and to gridY, since we're working with base 1 arrays. Also, it's best to floor the results. We want whole numbers stored in our grid coordinates, not decimals. For instance, if our player is at screen coordinate 253 and the grid size is 50, then the division would produce 50.06. Accessing grid[50.06,y] might be the same as accessing grid[50,y] in Basic!, since it will automatically dump the decimal part. But in other comparisons we would get undesirable results, since 50.06 does not equal 50.

I cannot count the number of times one of my games acted funny because I forgot to round a number down to the nearest whole number.
x=MIN(x,DISPLAY_W-1)x=MAX(x,1)y=MIN(y,DISPLAY_H-1)y=MAX(y,1)
gx=1+FLOOR(x/gs)gy=1+FLOOR(y/gs)g=grid[gx,gy] % represents the object where the player is standing
Now we know where the player is standing so let's act accordingly. We'll use multiple if blocks to handle each possible cell type that the player might be standing on. There may only be four for now, but we'll add more later on.
Most of the squares are easy. We do nothing for empty squares. If the player steps in a hole we play a sound and end the game. If the player steps on a gem we play a different sound and add one to the collected variable. We also check to see if collected=gems, which means that every gem has been collected and the player won. The same dead variable is used to end the game, presumably because possessing so many gems is dangerous.
The most difficult thing we do in this section is erasing the gem after it's collected. We cannot actually erase anything from the buffer so we have to draw over it instead. Since the gems were only placed on empty squares in the LoadMap routine, we draw an empty square over the gem to erase it. Don't forget to set grid[gx,gy]=1 to remove it, otherwise the player will collect a gem for every frame that he steps on the square(thirty times each second, which is more gems than there our in the whole wide world!).
IF g=1! we do nothing on empty squares
ELSEIF g=2 % the player walked into a holeSOUNDPOOL.PLAY n,sfalldead=1
ELSEIF g=3 % the player stepped on a gemSOUNDPOOL.PLAY n, spickupgrid[gx,gy]=1GR.BITMAP.DRAW n, bcells[1], (gx-1)*gs, (gy-1)*gscollected++! multiply collected by ten and show the scoreGR.MODIFY oScore, "text", INT$(collected*10)IF collected=gems THEN dead=1 % I guess being rich is deadly
The next code snippet handles the walls. We simply stop the player in his tracks if he steps into a wall by resetting x and y to their previous values. This works okay, but gamers expect to 'slide' along walls when they move diagonally into them, not to just

suddenly stop. Although I am one of those gamers, I have found, that in real life, running into a wall does in fact stop you. It kind of hurts too.
The following method is much simpler than the smoother, sliding method, so we'll use it for now. Then we'll improve it in the next version. Note that we set panim=1 to make the player stand still when he hits the wall. Otherwise he'll run in place like an idiot.
The last thing that we do after checking the character's position on the grid is to update his position on the screen by setting px=x and py=y.
ELSEx=pxy=pypanim=1 % make sure that player looks like he's standing
ENDIFpx=x: py=y % update the player's position on the screenRETURN
Animating the CharacterNow that we've moved the player it's time to add the animation that I promised earlier. The player has 5 animations that consist of five frames each. They are stored in the bPlayer[] array and are accessed by using bPlayer[animation_number, frame_number]. The animations are as follows: 1=standing still, 2=running left, 3=running right, 4=running up, and 5=running down.
The current animation is stored in the panim variable. The first thing we do is check to see if panim has changed since last frame and reset the animation delay if it has. Then we add one to anim_waiting to determine whether it's time to draw a new frame. If either of those two conditions are met then we advanced the frame by adding anim_dir to pFrame, which might be +1 or -1. This way the animation loops forwards and backwards instead of just starting over at the beginning, which is what I intended when I drew the character in IvyDraw.
AnimatePlayer:IF panim<>opanim THEN anim_waiting=anim_delayIF anim_waiting++>anim_delay % see if it's time for the next frame
anim_waiting=0pframe+=anim_dir
Next we check to see if the animation has reached the beginning or the end and change directions by multiplying anim_dir by -1 if it has. After that we use gr.modify to change which bitmap that our player's graphical object is showing. This is how we achieve our
animation. We also update the x and y positions at the same time.IF pframe=5 | pframe=1 THEN anim_dir*=-1GR.MODIFY oPlayer, "bitmap", bPlayer[panim,pframe],~
"x",offset+px+pox, "y",py+poy
If it isn't time to change to the next frame of animation then we use gr.modify to move our character without changing the bitmap. Then we store the current value of panim into opanim(old player animation) so that we'll know whether the animation changes between now and the next time AnimatePlayer is called.
Notice how we add offset and pox to the player's x coordinate, which is to account for the border at the left side of the screen and to draw him so that his position is based on the center of his feet. Similarly, we add poy to the player's y coordinate. We want to base his position on his feet because that's what the player would expect.
ELSEGR.MODIFY oPlayer, "x",offset+px+pox, "y",py+poy
ENDIFopanim=panimRETURN
Finishing UpWe should take over the back button for two reasons. For one, a player might press the button expecting a menu or to pause the game. Exiting would be an upsetting surprise. Also, we want to make sure that our graphics get unloaded properly. The UnloadData routine would never be called if we let RFO Basic! end the program when the back button gets pressed.
It may not be entirely necessary in our little game, but it is good practice.ONBACKKEY:DIALOG.MESSAGE "Confirm", "Really quit?",quit,"Quit","Cancel"IF quit=1
GOSUB UnloadDataIF isAPK THEN EXITEND
ENDIFBACK.RESUME
We've finished our little game. There's a few other functions included in the source file that we won't analyze at this time. I will, however, summarize them for you.
AwaitTouch:
This subroutine simply pauses until the user either touches and releases the screen or presses a button. The touched position is stored in tx and ty. The button is stored in t$. The routine is not yet used but will be in the next version.
FN.DEF ScaleBitmap(filename$, height)
This function loads a bitmap file pointed to by filename$ and scales it to the given height. The width is set to maintain the bitmap's ratio. The function returns a pointer to the scaled bitmap object.
FN.DEF ScaleBitmaps(array[], filename$, width, count)
This function loads the bitmap file pointed to by filename$ and divides it into count bitmap objects. It scales each one to the given width. The tiles must be square and aligned in a horizontal row. They get stored in the given array[].
FN.DEF ScaleBitmapArray(array[], filename$, width, rows, columns)
This functions loads the bitmap file pointed to by filename$ and divides it into a two dimension array of bitmap objects used for animation. The tiles must be square but there are no row or column limitations.
FN.DEF DeleteBitmaps(array[], count)
This function deletes the bitmaps created by ScaleBitmaps().
FN.DEF DeleteBitmapArray(o[], rows, columns)
This function deletes the bitmaps created by ScaleBitmapArray().
Going Farther
Our game is pretty simple so far. Players can move their little animated character around and collect the twenty gems scattered across the screen. The only danger is falling into a

hole. The second part of this tutorial will add many important features and upgrade our demo into a full fledged game.
For those of you who had trouble following this tutorial, I must warn you that part two grows far more complicated. It may not be as beginner friendly as similar tutorials for other languages, because while RFO Basic! itself is beginner friendly, designing a good game with it is not. To make up for the difficulty in following this tutorial, I promise you this. The final game we create will be far more complete than the demos produced by most other tutorials and books that you might come across.
Features Added in Part IIA Story and a ThemeAn Intro and Help ScreensA MenuA Level EditorScrollingEnemiesA WeaponMore grid Objects
The Final GameIf that's not enough for you, the final game, which is called Cooties, will have even more features. I won't include a tutorial like this one, but important features will be implemented by reusable code that's heavily commented. The source file and all of the assets will be released into the public domain, including the original vector format drawings created in IvyDraw.
You can expect the following features to be included in Cooties.A graphical menu system and Intro ScreenA fully functional Level EditorMultiple Maps and Hi-Scores saved into an SQLite databaseMultiple, highly tuned control optionsGamepad and Keyboard Support

Part Two
Getting Started
We discussed many important details about game design using RFO Basic! in part one of this tutorial. There's far more to cover this time around, including enemy behavior, weapon physics, and a custom level editor. With that in mind, we'll continue under the assumption that you have a thorough understanding of the the BASIC programming language, the specific syntax and commands used in RFO Basic!, and everything that we covered in part one.
Please remember that, while RFO Basic! is a beginner friendly language for general use, designing anything more than the simplest action game with it is difficult. The languages is easy to work with and can create very attractive programs, but if we stop thinking about efficiency and let our imagination go too far, we'll end up with a game that performs slowly or crashes with out of memory errors.
I enjoy a challenge and have enjoyed the experience of porting several games that I originally designed in HotPaw Basic to Android using RFO Basic! The volunteers who created the language did an excellent job, so I decided to show my appreciation by sharing my experience in the form of this tutorial. If you have the game design itch and are up for a challenge, please continue reading. If you're looking for an easy way out, then this tutorial might not be for you.

New Features
Story and a Theme
All games need some type of story to draw players in. Even the earliest Atari games would include a back story printed in the manual, but for our game, we'll print it onto the screen.
The basic concept is this. Your character is a small boy with many toys scattered about the park. Unbeknownst to him, a little girl's princess-themed birthday party was about to begin. Now there's girls everywhere and you must collect all of your toys before you catch cooties.
Menu and Editor
Our original game had no menu. A simple dialog box would appear when you died or pressed the back button, giving you the option to quit or to play again. Real games have more options than our first demo, and they need a menu. We'll supply one using the

dialog.select command provided by Basic! It will allow users to select a skill level, open the editor, view the help file, and exit the game.
As I just hinted, we'll also add a simple level editor, and method for telling users our story and how to play the game. This will be implemented with the dialog.message command.
Scrolling
Our original game played in a world created to fit on a single screen. We'll double the height and the width of our game world and make it scroll across the screen as players move their character.
Enemies and a Weapon
The enemies in our game are innocent little girls who only want to be nice to you. It's not their fault that they all have cooties, but they do, so you must avoid them at all costs. If they catch you they might give you a big, sloppy, totally gross kiss.
In order to collect all of your toys while the enemies chase you about, you'll need a weapon. We wouldn't want to hurt the poor girls, but a firmly tossed soccer ball should knock them down on their butts and give you a chance to sneak by. Unfortunately, you can only hold one ball at a time, so you better make every throw count. Players can throw a ball while running by swiping a second finger across the screen in the direction they want to throw. The ball will fly when they lift their finger.
Examining our Game
AssetsThis version of the game will have many more assets than the original. The code has been written so that the Basic! Compiler available from the Google Play store can compile the game into an APK without any errors. Whether you wish to run the game from Basic! or compile it into an APK, the files must be put in the proper folders.

RFO-Basic/source/• tut2.bas
RFO-Basic/data/tut2/• help.txt• map.txt
RFO-Basic/data/tut2/pics• boy.png• girl.png• cells.png• toys.png• pad.png
RFO-Basic/data/tut2/sounds• pickup.mp3• falling.mp3• smash.mp3• hit.mp3• throw.mp3• kiss.mp3• dead.mp3• see1.mp3• see2.mp3• see3.mp3• see4.mp3

In order to load the files from subfolders and to make sure that the APK runs properly, there's a few small adjustments to make to our source code. We'll start by creating string variables for the root folder, the graphics folder, and the sound folder.
rdir$="Tut2/" %game's root folder gdir$=rdir$+"pics/" %game's graphic foldersdir$=rdir$+"sounds/" %game's sound folder
As before, we must determine whether the game is running from an APK or from the Basic! Editor. If running from Basic!, the data folder will be /rfo-basic/data/. If it is running from an APK it will be /tut2/data/.
If we're running from an APK we check to see if the subfolders exist on the SD Card. If they don't, we create them to avoid error message when trying to access files in a folder that doesn't exist.
FILE.ROOT tmp$isAPK=!IS_IN("rfo-basic",tmp$)IF isAPK
FILE.EXISTS exists, gdir$IF !exists
POPUP "folders created"FILE.MKDIR rdir$FILE.MKDIR gdir$
FILE.MKDIR sdir$ENDIF
ENDIF
From now on we must load our files a little differently. We'll prefix our file names with either rDir$+, gDir$+, or sDir$+, depending on it's existence in the root, graphics, or sound folder. I'll highlight a few lines from LoadData to illustrate this adjustment.
DIM bPlayer[6,5] % 5 animations with 5 frames eachDIM bCells[8] %there are 8 objects to put in our gridScaleBitmapArray(bPlayer[], gdir$+"boy.png", ss, 6, 5)ScaleBitmaps(bCells[], gdir$+"cells.png", gs, 8) SOUNDPOOL.OPEN 4SOUNDPOOL.LOAD sPickup, sdir$+"pickup.mp3"
Scrolling the ScreenMaking the screen scroll is a little more complicated but not too hard to understand.
Like before, the game will be made from a grid of squares drawn from the bitmap cells.png. The main difference is that the buffer, which is graphical object that we draw

all of the cells into, will be twice as wide and twice as tall as the actual screen dimensions. We'll use gr.modify to position its top left origin somewhere off the screen so that only the part that we want to show is visible.
Since we offer much more space for players to explore, we can make the grid squares larger so that they can see more detail and so that our character really pops out. Therefore, while the buffer is twice as tall as before, the number of rows in our grid only increases by about 70 percent. Also, since we're scrolling, we won't have bars on the side of the screen to center the grid.
The first changes to the source code are at the very beginning. We define our new grid size and set a maximum width. The maximum width is meant to prevent the buffer from being to large on an ultra high-resolution device. I don't know how large of a bitmap Basic! can handle, or how high the resolution of future tablets might be.
I set MAX_W to the width of my screen. Feel free to experiment with higher values. Later, in the SetupScreen routine, we'll use gr.scale to set a scale factor if the device we're running on has a width greater than MAX_W.
MAX_W=1280gWidth=60gHeight=36DIM grid[gWidth,gHeight]
Now we'll jump over to the SetupScreen routine. Our ACTUAL_W, ACTUAL_H, DISPLAY_W, and DISPLAY_H variables all have slightly different meanings in this version. The ACTUAL dimensions represent the scaled size of the screen, so they might differ from the screen's physical dimensions. The DISPLAY dimensions represent the background buffer, so they'll be about twice the scaled size of our screen.
The first thing we do is open the graphics display and get the physical dimensions of the screen. We set a dark green background to highlight the color of our grass, since we need to put a thin border around our scrolling buffer. If we don't, then most of our character's body will disappear when he moves to the top of the game world.
Notice that we're printing the dimensions to the console. This should help you better understand our graphic handling, and make it easier if you try to experiment with the sizes of the grid and of the buffer.
GR.OPEN 255,0,100,0,0,0GR.SCREEN ACTUAL_W,ACTUAL_H?"ACTUAL_W",ACTUAL_W,"ACTUAL_H",ACTUAL_H,"ratio", ACTUAL_W/ACTUAL_H
Next we check how wide the screen's dimensions are and set a scaling factor if it exceeds our threshold. We store the scale factor in a variable for later user because the gr.touch command doesn't account for scaling and we'll need to adjust the user's input. Note that

we set the scale factor to one when we aren't scaling so that our input routine still works properly.
Remember that ACTUAL_H and ACTUAL_W now represent our scaled resolution, not our physical resolution. The graphics handling functions will make the transition seamless, however.
IF ACTUAL_W>MAX_WSCALE=ACTUAL_W/MAX_WGR.SCALE SCALE,SCALE
ELSESCALE=1 % set scale to one if the resolution is below the max
ENDIF
!We use ACTUAL_W & ACTUAL_H as our scaled resolution, not our physical resolutionACTUAL_W=CEIL(ACTUAL_W/SCALE)ACTUAL_H=CEIL(ACTUAL_H/SCALE)
Now we calculate our grid size like before. As I said, the transition to scaled graphics mode is seamless for programmers. The users will notice a degradation in image quality, however.
gHeight is how many rows make up our entire grid, so we set our grid size so that half of the rows will fit on our screen at once. Then we set DISPLAY_W and DISPLAY_H to the the size of our scrolling buffer, which should be about twice as wide and twice as tall as the actual screen. Finally set set hsw and hsh to half of the screen width and half of the screen height, which we need to know later so that we can center the camera around our player.
gs=CEIL(ACTUAL_H/(gHeight/2))hgs=CEIL(gs/2) %half the gridsize is often used in calculations
!Set DISPLAY_W and DISPLAY_H to the size of our scrolling bufferDISPLAY_W=gs*gWidthDISPLAY_H=gs*gHeight
!Store half the screen size so we can move the camera laterhsw=ACTUAL_W/2hsh=ACTUAL_H/2
We'll make the player twice the size of our grid squares. No need for little characters now that we have a scrolling screen!
ss=FLOOR(gs*2)hss=FLOOR(ss/2) % half the sprite size is used often in calculations
The next section prints out more information about the screen and the scrolling buffer.

You'll see it after the game exits and get a better idea of what's going on behind the scene.!This information is printed onto the screen to help you understand the display settings?"SCALED_W",ACTUAL_W,"SCALED_H",ACTUAL_H,"scale", SCALE?"grid size",gWidth,gheight, "ratio", gWidth/gheight?"should be "+INT$(gHeight*(ACTUAL_W/ACTUAL_H))+" by "+INT$(gHeight)?"gs",gs,"ss",ss?"DISPLAY_W",DISPLAY_W,"DH",DISPLAY_H,"ratio",DISPLAY_W/DISPLAY_H
We need to load our data after we open the graphics but before we start drawing stuff, so we call LoadData now. Then we create the scrolling buffer based on DISPLAY_W and DISPLAY_H, and draw it onto the screen first so that the buffer will always be at the bottom. Everything else will display on top of it.
GOSUB LoadDataGR.BITMAP.CREATE buffer, DISPLAY_W,DISPLAY_H % create the buffer we will draw our
grid into.
GR.BITMAP.DRAW oBuffer, buffer, 0, 0 % draw the buffer in the middle of the screen
The rest of the scrolling is done in the Play routine, so there's no need to discuss the rest of SetupScreen. There are three things we do every frame in order to make the screen scroll. We calculate the camera's position to be centered around the player, then we adjust it so not to scroll beyond the edge of the game world, and then we move the buffer using the gr.modify command.
The first two steps are done simultaneously with four lines of code. We use px-hsw to subtract half of the screen width from the player's position while also adjusting it to make sure that the results are greater than or equal to minCamX. Then we use the results to make sure that the camera doesn't move farther right then maxCamx.
After using the same process to calculate camY, we position the buffer using gr.modify. The more that our player moves down or to the right, the more the buffer must move up or to the left. That's why we negate camX and camY in our gr.modify command.
camX=MAX(px-hsw,mincamx)camX=MIN(camx,maxcamx)camY=MAX(py-hsh,mincamy)camY=MIN(camy,maxcamy)GR.MODIFY obuffer, "x", -camx, "y",-camy
Now that we can move the buffer around, our scrolling effect has been accomplished. If we stopped here and tried to play our game we would soon find a major flaw, however. Our character would probably be nowhere in sight. If he was, he surely wouldn't be where he was supposed to be.
From now on, whenever we update the position of a moving object on the screen, we must adjust its position by our camX and camY variables. Background objects that are

drawn directly into the buffer, such as toys, do not not need to be adjusted.
As in the first version of our game, we add pox and poy to center the image of our character around his feet because it's his feet that must not pass through walls or step into holes. Now we also subtract camX and camY. Once that is done, our scrolling effect is truly complete.
GR.MODIFY oPlayer, "x",px-camX+pox, "y",py-camY+poy
Changing and Saving the WorldBuilding our big new world by typing numbers into a text editor would be to tedious. We need a graphical representation of the grid while we design it, and then a way to save our changes. We'll accomplish this with just two routines: Edit and SaveMap.
Our editor will need to either scale down the grid to fit on one screen or scroll so that we can reach every square. I decided to make it scroll. Ideally, we should be able to load and save as many maps as we want from either individual text files, or as a collection from one big text file. It would be fairly easy to implement, but since I plan to used an SQLite database for maps and for hi-scores in the final version of Cooties, I decided not to waste time coding text handling routines that will be depreciated long before you read this.
Before entering the Edit routine we need to add some code to SetupScreen that creates a toolbar where users may select which object they want to draw onto the map. I decided to draw a gray rectangle at the right side of the screen and then add icons to it by drawing the same bitmaps that we use to draw the objects on our background. Then we can reuse the onscreen directional pan to scroll the editor window by simply locking it onto the bottom right corner of the screen.
We'll begin by recalling the size of the directional pad and using its width as the width of our panel. Then we set the color of our rectangle to light gray and draw it.
GR.BITMAP.SIZE bpad, x,y % get the pad's size and use it for the panelGR.COLOR 255,200,200,200 % make the panel light grayGR.RECT r1, ACTUAL_W-x, 0, ACTUAL_W, ACTUAL_H % draw the rectangle
Now that the icon bar is drawn, we need to draw the icons above it. We draw them the same size of our grid squares but space them out at the size of a sprite. After we calculate the offset we can store it in a temporary variable because we won't need to know it again.
With our offset in mind we'll draw the icons. Since balls and toys are randomly placed when we load the map we won't be adding them to our map file. That's why we skip from

cell 2 to cell 5.t=(ss-gs)/2 % we won't need the icon offset after this so store in a temporary variableGR.BITMAP.DRAW ic1, bcells[1], ACTUAL_W-ss+t, t % draw icons onto the panelGR.BITMAP.DRAW ic2, bcells[2], ACTUAL_W-ss+t, ss+tGR.BITMAP.DRAW ic3, bcells[5], ACTUAL_W-ss+t, ss*2+tGR.BITMAP.DRAW ic4, bcells[6], ACTUAL_W-ss+t, ss*3+tGR.BITMAP.DRAW ic5, bcells[7], ACTUAL_W-ss+t, ss*4+tGR.BITMAP.DRAW ic6, bcells[8], ACTUAL_W-ss+t, ss*5+t
The last thing we draw is a transparent rectangle that will appear over the currently selected icon. Once that's done we'll put all of the icons into a group, along with the menu bar, so that we can display and hide all of the components together at once. Then we hide them until a user opens the editor.
GR.COLOR 100, 0,200,200GR.RECT oSel, ACTUAL_w-ss,0, ACTUAL_W,ss GR.GROUP oPanel, r1,ic1,ic2,ic3,ic4,ic5,ic6,oSelGR.HIDE oPanel
Now that the interface is ready we'll look at the Edit routine that handles every aspect of our editor, from processing user input to to updating the screen. It should look similar to the GetInput routine, but it handles drawing within its various blocks of code.
First we need to set some variables and make sure that the directional pad and the icon selection box are in the right place. We set touching=0 in case a player died while touching the screen. Then we set paint=7 so the editor defaults to a regular wall, and we draw the selection box over that icon.
Edit:touching=0paint=7GR.MODIFY oSel, "top",(4)*ss, "bottom", 5*ss
Our preparation is half finished. Next we draw the directional pad at the lower-right corner of the screen using its offset, and while we display that, we display the panel and its icons too. Then we set our camera to the middle of the game world and update its position using gr.modify.
!move the pad to the bottom right cornerpadx=ACTUAL_W-popady=ACTUAL_H-poGR.MODIFY opad, "x",padx-po, "y",pady-poGR.SHOW opad % make sure it's showingGR.SHOW oPanel %show the editor panel
!Set the scrolling camera to the middle of the map gridcamx=DISPLAY_W/2 %adjust the camera just like beforecamy=DISPLAY_H/2GR.MODIFY obuffer, "x", -camx, "y",-camy

Now it's time to start the hard work. We'll endlessly loop to gather user input and draw the screen. The only way to exit the editor is to by triggering an onbackkey event by pressing the back button.
The loop begins by setting dead=0 for use as a loop variable and getting the users input with gr.touch. We must adjust the coordinates of the touch event to account for the scale factor of the screen, which would have defaulted to 1 if the screen wasn't scaled in SetupScreen.
dead=0 %used to exit the do loopDO
IF touching %user's finger already touched and now holdingGR.TOUCH touched, tx,ty %check to see if the screen is still touched and wheretx/=scale: ty/=scale %adjust coordinates to the screen's scale factorIF touched=0 THEN touching=0
The first condition we handle is if touching=1. Touching will only equal one when the user is scrolling. We move the camera based on how far from the center of the directional pad the user has touched, but we divide it by 2 so that the screen doesn't flash by too fast.
Our camera position will be limited a bit differently than it was during the game. We don't need a green border around all four sides so that we can see the character sprites, but we do need to scroll farther to the right than before. Otherwise, when we scroll all the way to the right, some of the grid squares will be hidden by the icon bar.
We know that the icon bar is the same width as the directional pad, and that the pad is four grid squares wide. Therefore we allow the camera to move as far as ACTUAL_W+gs*4.
IF touching=1dx=tx-padxdy=ty-padycamx+=dx/2camy+=dy/2
!We need to limit the camera to the edges of the screen and the icon barcamx=MAX(camx,0) camx=MIN(camx,DISPLAY_W-ACTUAL_W+gs*4)camy=MAX(camy,0)camy=MIN(camy,DISPLAY_H-ACTUAL_H)GR.MODIFY obuffer, "x", -camx, "y",-camyGOSUB Delay
The next condition we handle is when the user is touching a grid square. In the future I'll allow users to draw a line or fill a rectangular area with the selected object type by dragging their finger, but for now we will just paint one object per frame based on which grid square was touched.
In order to update the grid we need to first calculate the grid coordinates of the user's touch. In case the user touched the grid and then dragged his finger onto the icon bar, we use min(gx,gWidth) to make sure that the computed gx position is not beyond the width of the grid array.
Once we have the coordinates, we update the grid array and draw the new object into the buffer using gr.bitmap.draw. The paint variable represents the currently selected object and is set to whatever icon that the user picks in the code block following this one.
ELSEIF touching=2 gx=1+FLOOR((tx+camx)/gs)gx=MIN(gx,gWidth)gy=1+FLOOR((ty+camy)/gs)grid[gx,gy]=paintGR.BITMAP.DRAW n, bCells[paint], gx*gs-gs, gy*gs-gs
ENDIF
Now we handle situations where touching=0. Unlike the GetInput routine we used for controlling the player's character during the game, which simply set touching=1 when the user first touched the screen, we need to handle three different conditions here.
If the user taps on the directional pad we set touching=1 so that the map will scroll. If the user taps to the left of the directional pad we set touching=2 so that new objects can be drawn on the map. If the user taps an icon we update the position of the selection box and set paint to the proper value so that we can draw it.
The first of these conditions we handle is icon selection. After we adjust the touch coordinates to account for screen scaling we check to see if the touch was somewhere on the toolbar by using the directional pad's width. If it is, we check to see if the touch was high enough to be one of the icons.
The icons are spaced out by the ss variable, so we divide by ss to determine which icon was touched. The value stored in paint must be adjusted to account for the two cell types that we don't have icons for: balls and toys. Before making that adjustment, however, we update the selection rectangle to highlight the icon we touched. If we do it after the adjustment then the rectangle won't line up.
ELSEGR.TOUCH touched, tx, tytx/=scale: ty/=scaleIF touched
IF tx>ACTUAL_W-po*2IF ty<ss*6 %the user touched an icon
paint=1+FLOOR(ty/ss) %set paint to equal the icon touched
!Move the selection box and then adjust the paint value

GR.MODIFY oSel, "top",(paint-1)*ss, "bottom", paint*ssIF paint>2 THEN paint+=2
The rest of the editor is easy. In this section of the if block, we already know that the user touched somewhere on the toolbar but not on one of the icons, so we set touching=1 so that the map will scroll next frame. Then, after the next ENDIF, we set touching=2 because the user touched to the left of the icon bar. Code that we already discussed above will draw the current paint object onto the grid next frame.
Once that last condition is handled, we close the nested if-thens, render the screen, and delay for 10 milliseconds to prevent the battery drain of constant updates when the user is just staring at our beautiful editor.
ELSEIF ty>ACTUAL_H-(ss*3) %user is touching the dpadtouching=1
ENDIFELSE %user is touching somewhere on the grid
touching=2ENDIF
ENDIFENDIF
GR.RENDERPAUSE 10 %pause to avoid battery drain while idling
UNTIL dead
The onbackkey event handler takes care of exiting the editor and will set dead=1. If the user chooses to exit without saving then it will also set editing=0 and we won't save the map. Either way, we hide the toolbar and exit Edit routine. That will cause the menu to appear on the screen once we implement it.
Now that maps can be edited we must add a routine to save them. It works pretty much the same as the LoadMap routine, but instead of randomly placing balls and toys on our grid, we make sure there aren't any on it.
SaveMap:TEXT.OPEN w, file, rdir$+"map.txt"FOR y=1 TO gHeight %loop through each row of objects
t$="" %reset the string at the beginning of each rowFOR x=1 TO gWidth %now loop through each object in the row
t=grid[x,y]
!make sure that no toys or balls are saved into the mapIF t=3 | t=4 THEN t=1IF t=3.5 | t=4.5 THEN t=2t$+=INT$(t)+"," %add the grid number to the string with a comma delimiter
NEXT x
TEXT.WRITELN file, t$ %write the string into the text fileNEXT yTEXT.CLOSE fileRETURN
Choosing Options from a MenuNow that we have a fully functional map editor in our game, we need to provide a method for users to access it. Therefore we need to add a menu. While we're at it, we should discuss what other options that we might want to put in our menu.
Obviously we need a play, an edit, and an exit option, but what else? We'll add a help screen and three skill levels, that's what!
Getting Help
Our help screen will start by displaying a simple introduction and offer an option to read the contents of a text file called help.txt. We'll use dialog.message to display the text file one line at a time. The dialog box will have two buttons, one to display the next page of text and one to close the help screen and return to the menu.
The lines in our text file each represent one page of information. They can come in three different forms that we must handle. Blank lines will simply be skipped. Lines that begin with the # symbol will be stored in a string variable and displayed in the title bar for the help pages that follow. All other lines will be sent to dialog.message as a page of text.
The first step for our help screen is to show an introduction and to offer an option for more help.
ShowIntro:s$="by Michael C Palmer\n" %set text for the first intro pages$+="Your sister is having a bithday party\n"s$+="Find all your toys without getting cooties\n"s$+="Touch anywhere on the screen to move\n"s$+="Throw soccer balls to keep the girls away\nGood Luck!"
DIALOG.MESSAGE "Cooties v.1", s$,s,"Read More","Play"IF s<>1 THEN RETURN %exit the routine if the user doesn't choose to read more
Now we loop through each line of help.txt. Left$ is used to see if the first character is a # symbol. If it is, we trim off the # and save the results in s$. If the line didn't begin with a # symbol we check to see if it's either a blank line or “EOF,” an end of file message. If it is, then we skip it.

If the text doesn't match any of the earlier conditions then we display it with the dialog.message command, using s$ as the title. We provide 2 buttons, one to display the next page and one to exit our help routine. If a user chooses the cancel option then we set in$ to “EOF” so that the do loop will exit.
TEXT.OPEN r, file, rdir$+"help.txt"DO
TEXT.READLN file, in$IF LEFT$(in$,1)="#"
s$=TRIM$(in$,"#")ELSEIF in$<>"EOF" & trim$(in$)<>""
DIALOG.MESSAGE s$, in$, s, "More", "Cancel"IF s=2 THEN in$="EOF"
ENDIFUNTIL in$="EOF"TEXT.CLOSE fileRETURN
Adjusting for Skill
Not all players are equally skilled. Also, some prefer a challenge while others are easily frustrated or prefer leisurely strolls. For these reasons, our game must offer multiple skill levels to make them all happy.
We will modify our SetVars routine to change some of the game's variables depending one which skill level the user picks. There will be three skills to choose from. The options in the menu will call them easy, medium, and hard, and when selected, we'll set the skill variable to 1, 2, or 3. One will be easy and 3 will be hard.
As before, SetVars sets many variables used for calculations that do not change. It also resets variables, such as the player's score, that must be reset between games
SetVars:!Reset variables used for positioningmLeft=0: mRight=0: mUp=0: mDown=0ogx=1ogy=1pox=-ss/2poy=-ss*0.85
!Set variables usef of the cameramincamx=-hgsmaxcamx=DISPLAY_W-ACTUAL_W+hgsmincamy=ss*-0.66maxcamy=DISPLAY_H-ACTUAL_H-mincamy
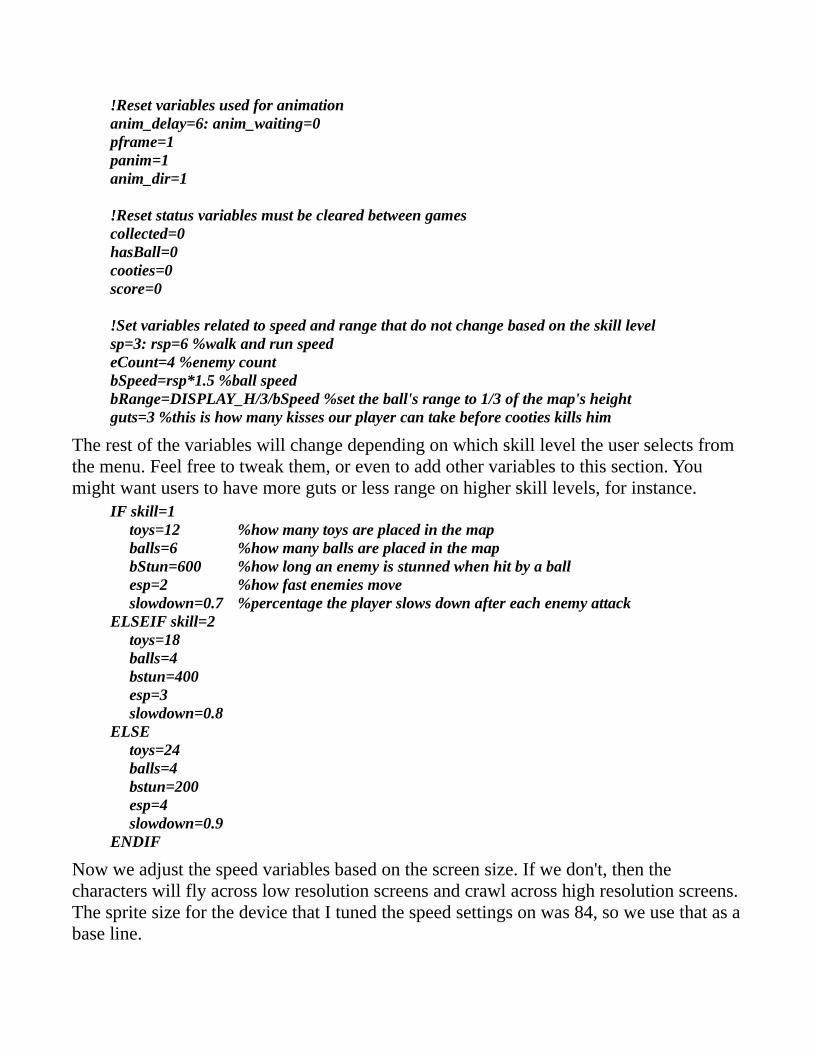
!Reset variables used for animationanim_delay=6: anim_waiting=0pframe=1panim=1anim_dir=1
!Reset status variables must be cleared between gamescollected=0hasBall=0cooties=0score=0
!Set variables related to speed and range that do not change based on the skill levelsp=3: rsp=6 %walk and run speedeCount=4 %enemy countbSpeed=rsp*1.5 %ball speedbRange=DISPLAY_H/3/bSpeed %set the ball's range to 1/3 of the map's heightguts=3 %this is how many kisses our player can take before cooties kills him
The rest of the variables will change depending on which skill level the user selects from the menu. Feel free to tweak them, or even to add other variables to this section. You might want users to have more guts or less range on higher skill levels, for instance.
IF skill=1toys=12 %how many toys are placed in the mapballs=6 %how many balls are placed in the mapbStun=600 %how long an enemy is stunned when hit by a ballesp=2 %how fast enemies moveslowdown=0.7 %percentage the player slows down after each enemy attack
ELSEIF skill=2toys=18balls=4bstun=400esp=3slowdown=0.8
ELSEtoys=24balls=4bstun=200esp=4slowdown=0.9
ENDIF
Now we adjust the speed variables based on the screen size. If we don't, then the characters will fly across low resolution screens and crawl across high resolution screens. The sprite size for the device that I tuned the speed settings on was 84, so we use that as a base line.

t=ss/84sp*=t: rsp*=tesp*=tbSpeed*=t: bRange=DISPLAY_H/3/bSpeed
The last thing that I added here was a pair of arrays that will make it easier to move our enemies depending on which direction they're moving. eDir will be 1 for up, 2 for right, 3 for down, and 4 for left. By using x+=eMoveX[eDir] and y+=eMoveY[eDir], we move the enemy without using any if/then blocks.
ARRAY.LOAD eMoveX[], 0,esp, 0,-espARRAY.LOAD eMoveY[], -esp,0,esp,0RETURN
Tying it Together with a Menu
So we have all of our options now. The menu to choose them from is quite simple. At some point you'll want to add graphical menus that match your game's theme, but for now we'll just use dialog.select. The concepts are the same but with much less coding.
We begin our menu routine by resetting the playing and editing variables. Then we store the menu options into an array that Dialog.select will use to display them.
ShowMenu:playing=0: editing=0ARRAY.LOAD menu$[], "Easy", "Medium", "Hard", "Edit", "Help", "Quit"DIALOG.SELECT s, menu$[], "Main Menu"
With that done, we handle each option that users can choose. The first three options are for the skill levels, so we simply copy the chosen option number from s to the skill variable and set playing=1. If s=4 we set editing=1 so that the editor will open instead of the game. We call ShowHelp when users choose option 5 and set quit=1 when users choose option 6. Simple, right?
IF s=0 !Do nothing so the menu appears again if the user tapped outside the menu
ELSEIF s<4skill=splaying=1 %let the play routine and the onbackkey handler know we're playing
ELSEIF s=4editing=1 %let the play routine and the onbackkey handler know we're editing
ELSEIF s=5GOSUB ShowHelp
ELSEIF s=6quit=1
ENDIFRETURN

Other than calling ShowHelp, this menu doesn't really do anything at all. It's up to our outer game loop to react to the variables set by the chosen option. We could actually combine the outer loop and the menu into one routine, and usually that's exactly what I do. I think that it's easier to understand this way, however, and less error prone as well.
The following code belongs to our new outer game loop, which is located near the top of the source file.
DOGOSUB ShowMenuIF editing
GOSUB SetVarsGOSUB LoadMapGOSUB Edit
ELSEIF playingGOSUB SetVars %reset status and adjust for skill levelGOSUB LoadMap %load the mapGOSUB UnhideStuff %display the player and the scoreGOSUB EnemyPrep %prepare and display the enemiesGOSUB Play %start the gameGOSUB HideStuff %hide the player and the score
ENDIFUNTIL quit
Throwing Balls at EnemiesIn Cooties our enemies are innocent little girls. It's not their fault that they have cooties, and they probably don't even know it. Therefore we don't really want to hurt them, and anyway, our character's toy raygun wouldn't even slow them down. The good hard throw of a soccer ball will knock them on their butt, though, and give us time to get sneak safely by.
Considering the Feature
When considering how to turn our demo from the first part of this tutorial into a real game I had to consider both the theme and the gameplay. I wanted to exhibit the basic concept of shooting as an attack without turning our game into a run and gun shoot-athon. I thought maybe a bow and arrow, which would have a slow rate of fire, or perhaps throwing something.
Once I thought about throwing something the idea of a soccer ball game to mind for no particular reason, and with it, the concept of Cooties began to form. The game would

require you to run around and avoid your enemies whenever possible, with the option to throw a ball at them as a last resort. You would only be able to hold one at a time, and there would be a limited number available in the world. I also wanted to limit the range and the speed of attacks to emphasize skill and careful aim over frantic or twitchy gameplay.
With a weapon in mind, the next consideration was how to use it. Should I add an attack button and make you throw it straight ahead? No, that wouldn't let you throw while also avoiding enemies, and it would slow down the game. Should you use the directional pad to aim while you tap a throw button? No, that would be hard to program and feel clunky to users. The best thing to do was to track a second touch event and let users drag in the direction they wish to attack. It would be fairly easy to implement, provide accurate aiming, and demonstrate the use of gr.touch2.
I decided that it would be best to let the user throw with a second touch anywhere on the screen. An icon would appear whenever a ball is available to throw, offering a hint of how to use it, but users would be allowed to swipe their finger elsewhere. The icon would appear at the opposite side of the screen from where the directional pad was displayed.
With a good idea of how I wanted the throwing to work, I considered all of the details. The first problem I recognized was the difficulty of determining whether a new touch was meant as a throw, or for movement. When the screen is not being touched, the first touch recognized will be touch1. But how to determine the users intention?
Our solution to the problem is more or less this: we ignore it. We'll always treat touch1 as a movement event, no matter which side of the screen users touch. We'll always treat touch2 as an attack event, not matter where the touch occurs. The only drawback to this method is that users must be moving to throw. Or do they?
A throw event will only occur when the user already has one finger on the screen. This is fine because players have little reason to stop running. They may, however, stop moving if they wish to by keeping their finger near the middle of the directional pad. This will teach them to keep their finger down all the time, which from my experience, actually improves gameplay. I never lift my finger anymore, and I can continuously run, change directions, stop, and throw with great accuracy. The gameplay is quite good!
The way we implement our attacks is by adding a second event handler to the GetInput routine. I placed it below the current movement handler. Instead of discussing the entire routine, we'll assume that you already read part one of this tutorial and dive right into the code added for throwing.

Implementing the Throw
The handler begins by checking whether touching2=1, or in other words, whether we already responded to a second touch by setting touching2=1 during a previous call to this routine. After determining that the user was touching with two fingers last frame, we check to see if that second touch is still active using the gr.touch2 command. If we find that touch2=0 then we know that the user lifted his finger.
IF touching2GR.TOUCH2 touch2, tx2,ty2IF touch2=0
Since the user lifted his finger we react by setting up the variables necessary to throw the ball. Note that we don't check to see whether users have a ball or not because that's determined when the touch2 event begins later in this routine. So assuming that our player has a ball and just finished aiming his shot, we play a sound, determine how far his finger moved, calculate the angle, and set all of the variables needed for the HandleBall routine to handle the throw. The HandleBall routine will be called every frame during the game.
SOUNDPOOL.PLAY n, sThrowtouching2=0 %reset touch variabledx=tx2-throwx %calculate the deltasdy=ty2-throwyballa=ATAN2(dx,dy) %determine the angleballx=px %set the ball position to where the player isbally=py-hgs %but adjust from his feet to his body
!set the 'life' of the ball to the range variable, which is how many frames it will moveballL=bRange
Now that the throw is ready, we update the position of its graphical object relative to the camera position and make it visible. We also set hasBall=0 because the user doesn't have it anymore.
GR.MODIFY oBall, "x",ballx-camx-hgs, "y",bally-camy-hgsGR.SHOW oBallGR.HIDE iBallhasBall=0
ENDIF
Because conditions where touching2=1 have been handled, we know that the user wasn't touching the screen with two fingers last frame. We use gr.touch2 to see if the user has since touched the screen with a second finger, and if so, we check to see if a ball is available to throw. Only then do we set touching2=1. Notice how we store the location of the touch2 event in throwX and throwY. Those coordinates will be used to determine how far users swipe their finger after they let go, and in which direction.

ELSEGR.TOUCH2 touch2, throwX,throwYIF touch2 & hasBall THEN touching2=1
ENDIFRETURN
Before we move on to the routine that handles the movement and collisions of our newly thrown ball, we should discuss a bug that I found in Basic!, how I overcame it, and how my fix added an unplanned but beneficial feature to the game. We'll have to briefly revisit the movement handler to do so.
How Bugs become Features
While testing the throwing mechanic I noticed that the directional pad flashed every time I threw a ball. After a few more throws I realized that the pad's position would center around my movement finger every time I released my throwing finger. The reason soon became obvious: whenever a touch2 event clears, the touch1 event is erroneously ended as well. In other words, for a single instant, the program thinks that both fingers were lifted whenever the second finger lifts.
The result of this bug was that the movement handler would react to the lifted finger and set touching=0 in the following code.
IF touching GR.TOUCH touched, tx,ty %might receive false signal that movement finger liftedtx/=scale: ty/=scaleIF !touched %will handle false condition of a lifting movement finger
touching=0…
The way I handled it was by changing the code to:IF touching
GR.TOUCH touched, tx,ty %might receive a false signaltx/=scale: ty/=scaleIF !touched & touchwait--<0 %will ignore false condition when touchwait>0
touching=0…
ELSE %the user is still touching the screenIF touched THEN touchwait=5 %set a value to touchwaitdx=tx-padx %handle moving the character…
I first tried setting touchwait in the touch2 event handler but had trouble making it work. When I first put it into the code block that I just showed, I discovered that it did work but with an unintended result. It caused a short delay between when I lifted my movement finger to stop moving, and when the character actually stopped. It felt odd at first because

it differed from the game's previous behavior, but I soon realized that the delay should be there.
Ever since the first Super Mario Brothers, and perhaps even earlier, game designers have been trying to simulate physics in their games, which was severely limited by their hardware and software platform. The character in our game shouldn't instantly stop just because a player wants it to. The short delay added to our game by my touchwait workaround simulates inertial physics in a very simplistic manner.
Another problem with the first version of the game was that it was hard to make small movements. Whenever I tried to tap the directional pad the character would move an insubstantial amount. When I tapped a little longer he would usually go too far and fall into a hole. Now, because a single tap will set touching=1 for at least 5 frames(1/6 of a second), it is quite easy to take a small step in any direction, nudging the character between obstacles.
After a Ball is Thrown
Now that we know when a player throws a ball, and what direction it's supposed to go, we need a way to move it in that direction. We also need to stop the ball when it hits a wall or has reached the end of its range. Since users should be able to pick up the ball and throw it again, we also need to put it back on the grid unless if flies off the screen or lands in the water. All of these events will be handled in a single routine called HandleBall, which will be called once each frame from the Play routine.
The first thing that we do is determine whether the ball is airborne by checking its life variable. If it is, we subtract one from its life, and if that puts it below one, then we end its flight by calling the PutBall routine.
HandleBall:IF balll>0 %ball needs updating
IF --balll<1 %ball reached its limitGOSUB PutBall %put it down on the grid
ENDIF
Since we know that the ball is still flying, we move it using the simplest bit of trigonometry. First we multiply the sine of its angle by its speed and add that to its x position. Then we multiply the cosine of its angle by its speed and add that to its y position. Those two additions will move the ball to its new position and store it into temporary x and y variables.
x=ballX+SIN(balla)*bSpeedy=ballY+COS(balla)*bSpeed
The first condition that we'll now consider now is whether the new position is outside of

the screen. If so, we stop the ball by setting ballL=-1 and hide it. We don't call PutBall to place it on the grid. The ball will simply cease to exist.
IF x<1 | x>DISPLAY_W-1 | y<1 | y>DISPLAY_H-1ballL=-1GR.HIDE oBallRETURN
ENDIF
Next we handle wall collisions. We already confirmed that the ball is still on the screen, so when we divide its coordinates by the grid size, the results should be a legal position within the grid array. If the object in that grid location is greater than 6 then we know that it's a wall so we call PutBall. The PutBall routine uses the bX and bY variables, not the x and y position that we recently calculated. Therefore it ignores the movement that resulted in the ball hitting a wall without needing us to reset its position.
If the ball didn't hit a wall this frame then we update its position by setting bX=x and bY=y.
!Determine which square the ball is ont=grid[1+FLOOR(x/gs),1+FLOOR(y/gs)]IF t>6 %put it down if it hit a wall
GOSUB PutBallELSE
ballx=x %otherwise update it's position based on the temporary valuesbally=y
ENDIF
!Draw the ball at it's new positionGR.MODIFY oBall, "x",ballx-camx-hgs, "y",bally-camy-hgs
ENDIFRETURN
Since the code for placing a thrown ball back on the grid when it lands is fairly long, we'll put it in its own routine. The routine may be called from 2 places in HandleBall, either when it reaches the end of its range or when it hits a wall.
The first thing that we do in this routine is hide the ball. Then we set ballL=-1 so that it won't move anymore. After that we determine its grid location and store the object that's already in that position into a temporary variable.
PutBall:GR.HIDE oBallballl=-1x=1+FLOOR(ballx/gs)y=1+FLOOR(bally/gs)t=grid[x,y]

We only want to put the ball down on grass, on a floor, or on a toy. If it lands in the water or in a hole it will disappear. If it lands on a tile that already holds a ball we just let the old ball stay and ignore the new one.
We need to distinguish between tiles where a ball is on grass from tiles where a ball is on the floor. Balls with grass underneath will be set to 3.0 and balls with floor underneath will be set to 3.5. Either way we can draw the ball over that existing ground
IF t=1 %ball landed on grassgrid[x,y]=3GR.BITMAP.DRAW n, bToys[1], (x-1)*gs, (y-1)*gs %draw the ball on the grass
ELSEIF t=2 %ball landed on floorgrid[x,y]=3.5 %set grid to equal a ball on floor so we can erase it laterGR.BITMAP.DRAW n, bToys[1], (x-1)*gs, (y-1)*gs %draw the ball on the floor
It get's just a bit more complicated when a ball lands on a toy. We need to determine whether the toy was placed on grass or on a floor tile, then erase the toy by drawing either grass or floor above it. Then we can draw the ball. After that we need to reduce the toy count to reflect that the toy that was broken by our ball.
ELSEIF t=4 %the ball landed on a toy on grassgrid[x,y]=3 %set the grid to equal ball on grassGR.BITMAP.DRAW n, bcells[1], (x-1)*gs, (y-1)*gs %erase the toy by drawing grass GR.BITMAP.DRAW n, bToys[1], (x-1)*gs, (y-1)*gs %draw the balltoys-- %reduce the toy count
ELSEIF t=4.5 %ball landed on a toy on floorgrid[x,y]=3.5GR.BITMAP.DRAW n, bcells[2], (x-1)*gs, (y-1)*gsGR.BITMAP.DRAW n, bToys[1], (x-1)*gs, (y-1)*gs toys--
ENDIF RETURN
I hope you enjoyed our little ball throwing project and that it gave you an idea of how to turn a gameplay concept into a theme for your game, and then how to realize it all with a bit of programming. Also, I hope that you've learned that not all bugs are bad. Sometimes they can lead to useful features. If you're too rigid or to stubborn to accept unintended consequences during the evolutionary lifecycle that is game development, then you might miss out on great additions to your game. Trying too hard to maintain its previous behavior often leads to clunky code or clunky gameplay.
In the next section we'll be discussing better wall collisions in the MovePlayer routine. This is where the code for picking up a ball from the ground will be introduced.

Improving Collisions with WallsIn the first version of our game we handled wall collision in a simplistic manner. We just reset our character's position and made him stop. I mentioned that a better way to handle it would have been to make him slide along the wall if he's moving diagonally. I also promised to add that feature in the next version, and so I've done so. The sliding itself isn't terribly difficult, but while implementing it a new problem revealed itself.
Imagine that a player is moving diagonally toward two walls which are diagonally aligned with only their corners touching. If the square at the other side of the two touching corners is empty then there's only one pixel separating the player from the opposite side. Since the character moves several pixels each frame, he could slip right between the two walls and continue on the other side as if they weren't even there.
This condition must be detected in the new wall collision code in our MovePlayer routine. Both that and the sliding requires a new set of variables that hold the grid coordinates that the player stood on during the previous frame. With that information, we can compare the character's old and new grid positions and use the results to determine where to position him now.
We cannot rely on the knowledge of the player's current grid square alone if we want to make him slide along walls. We must separately determine whether his new x position and his new y position are legal. This is done by accessing the grid twice, once with his new grid x position and his old grid y position, then again with his old grid x position and his new grid y position. We store the object type for the square in goX when we use his old x position and goY when we use his old y position.
MovePlayer:…!Find the player's new grid position and the object he stands ongx=1+FLOOR(x/gs)gy=1+FLOOR(y/gs)g=grid[gx,gy]
!Find the object in the new x postion and the new y positiongox=grid[ogx,gy] %old x position but new y positiongoy=grid[gx,ogy] %new x position but old y position
This following code is hard to explain without an illustration or a lengthy discussion, but I'll try to keep it simple. If the player has moved diagonally into a new grid square then goX and goY will be the values of the grid squares at either side of him. If both of those squares are walls then the player has just slipped through two diagonal blocks and we must reset his position.
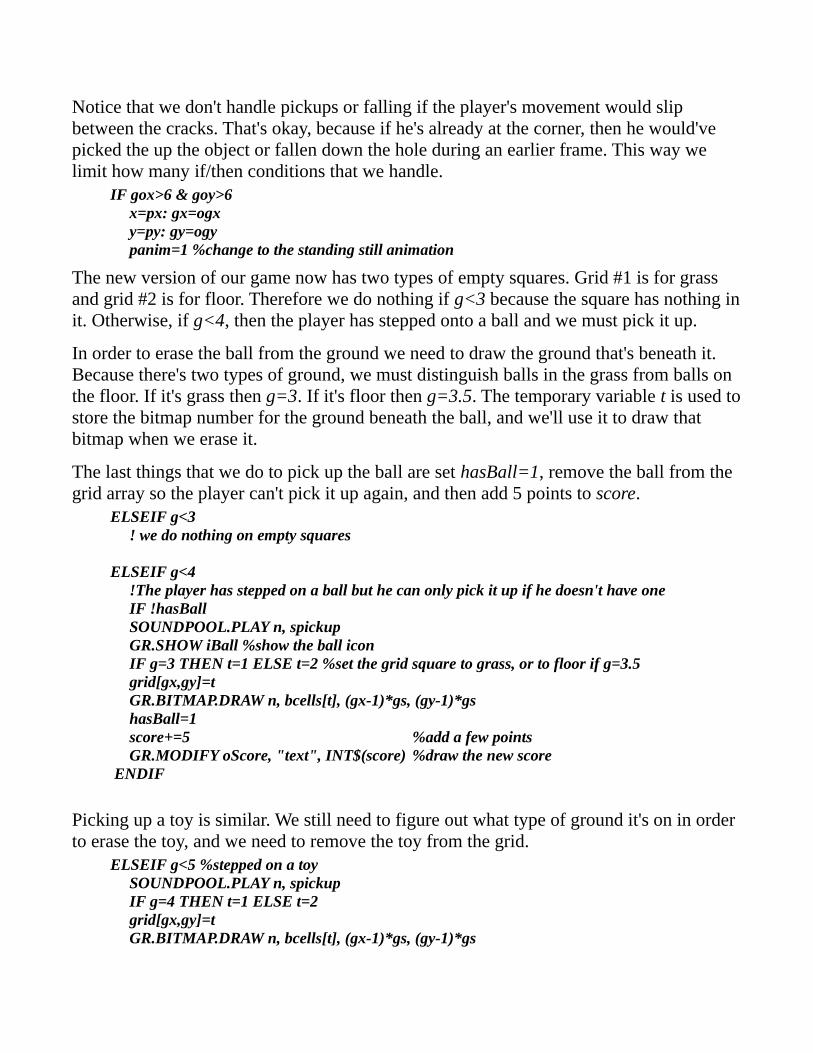
Notice that we don't handle pickups or falling if the player's movement would slip between the cracks. That's okay, because if he's already at the corner, then he would've picked the up the object or fallen down the hole during an earlier frame. This way we limit how many if/then conditions that we handle.
IF gox>6 & goy>6x=px: gx=ogxy=py: gy=ogypanim=1 %change to the standing still animation
The new version of our game now has two types of empty squares. Grid #1 is for grass and grid #2 is for floor. Therefore we do nothing if g<3 because the square has nothing in it. Otherwise, if g<4, then the player has stepped onto a ball and we must pick it up.
In order to erase the ball from the ground we need to draw the ground that's beneath it. Because there's two types of ground, we must distinguish balls in the grass from balls on the floor. If it's grass then g=3. If it's floor then g=3.5. The temporary variable t is used to store the bitmap number for the ground beneath the ball, and we'll use it to draw that bitmap when we erase it.
The last things that we do to pick up the ball are set hasBall=1, remove the ball from the grid array so the player can't pick it up again, and then add 5 points to score.
ELSEIF g<3! we do nothing on empty squares
ELSEIF g<4!The player has stepped on a ball but he can only pick it up if he doesn't have oneIF !hasBall
SOUNDPOOL.PLAY n, spickup GR.SHOW iBall %show the ball icon IF g=3 THEN t=1 ELSE t=2 %set the grid square to grass, or to floor if g=3.5 grid[gx,gy]=t GR.BITMAP.DRAW n, bcells[t], (gx-1)*gs, (gy-1)*gs hasBall=1 score+=5 %add a few points GR.MODIFY oScore, "text", INT$(score) %draw the new score ENDIF
Picking up a toy is similar. We still need to figure out what type of ground it's on in order to erase the toy, and we need to remove the toy from the grid.
ELSEIF g<5 %stepped on a toySOUNDPOOL.PLAY n, spickupIF g=4 THEN t=1 ELSE t=2grid[gx,gy]=tGR.BITMAP.DRAW n, bcells[t], (gx-1)*gs, (gy-1)*gs

collected++ %count the toy as collectedscore+=20 %add some pointsGR.MODIFY oScore, "text", INT$(score)
!exit the game loop when all the toys are collectedIF collected=toys THEN dead=1
The new version of our game now has two things that players can fall into: water and pits. Cell #5 is for the water and cell #6 is for the pits. The only difference between the ways that we handle them is the message that we display to the user. Either “You fell into the water!” or “You fell in a hole!” is stored into msg$.
To make things a little more interesting, a new falling animation was added to the game. We set panim=6 so that it'll play. Later, when that animation finishes, the game will end and msg$ will be displayed.
ELSEIF g<7 %stepped into a holeIF g=5 THEN msg$="You fell in the water!": SOUNDPOOL.PLAY n, sSplashIF g=6 THEN msg$="You fell in a hole!": SOUNDPOOL.PLAY n, sFall
!center player position in the square so the falling animation looks rightx=gx*gs-hgsy=gy*gs-hgspanim=6
Here is where we make the player slide along the wall. We already checked to see if both goX and goY are walls and they're not. Since he's in a wall now then we know that either his new X position or his new Y position is in a wall. All we need to do is reset the coordinate that's in the wall to its previous value and let the other coordinate stay as it is. The sliding effect is achieved because the character is allowed to move in one direction.
ELSEIF goy>6 THEN x=px: gx=ogxIF gox>6 THEN y=py: gy=ogy
ENDIF
All that's left is to finalize the player's new position and to save his current grid coordinates into the old coordinate variables. They'll be used next frame if the player either runs into a wall or tries to slip between a diagonally aligned pair of them.
px=x: py=y %update the player's position on the screenogx=gx: ogy=gy %save his current grid position to handle wall collisions next frameRETURN

Knowing thy EnemyA lot went into adding a weapon to our little project, but adding enemies will take far more thought and far more code. Where do we begin, you might wonder. That's a good question with many possible answers. Enemy behavior can be a difficult thing to get right and has been a limiting factor since the dawn of videogames.
Some History and Theory
Some early games simply moved your opponent in a constant direction or traced your own movement. In pong the artificial opponent would track the ball at a speed determined by its difficulty level. In many shooters the enemy ships just moved toward the bottom of the screen, while in others, such as Space Invaders, they moved in set patterns. That worked fine for those games but wouldn't in others.
While considering early games that let players explore a top down map like ours, I remembered some that used set patterns for the various monsters, such as Venture for the ColecoVision.
In Venture you explored a dungeon and shot your bow at monsters that moved in set patterns. Aiming your weapon where the monsters would be was difficult but the monsters never posed much threat to you. If you couldn't kill them fast enough, however, the real threat appeared. A ghostly beast that ignored obstacles and couldn't be killed would race toward you faster than you might hope to evade. If you were lucky enough to escape the room the ghost would disappear and you could enter the room again, but all the monsters would be back!
Venture provided a challenging experience that was often frustrating, but the gamers of that era enjoyed the challenge of its early attempt at exploration. It's a great example of how enemy behavior limits, and often defines, gameplay.
A Plan for Our Game
So how should the enemies behave in our game? Decision making and path finding algorithms are complicated and time consuming, and too slow for an interpreted language like Basic! Intelligent enemies are beyond the scope of this tutorial, and beyond the limits of my own meager brain. Thankfully, they aren't necessary to make a game enjoyable.
All that our enemies need to do is provide variety and some challenge to our players. If we can make them interesting and believable then we're two steps ahead, and I think we just might pull that off. In fact that's why I choose little girls as our enemies. They're much easier to simulate than ninja assassins!

So imagine our enemies as little girls just running around in a park. We provide a few simple patterns, such as circling and endlessly roaming, and then we switch between them once in a while. By doing that we should spread them out well enough around the map and make them interesting. Then, when the player moves into their line of sight, we make them run straight at him.
This behavior should provide the necessary variety and challenge. It lets players explore our map with the tension of knowing that the enemy might spring at any moment. It offers gameplay that favors moving between obstacles without being seen, but with the knowledge that an enemy might lay just outside the screen.
Our scrolling camera, in a way, has become a sort of enemy of its own. Thoughtful players will try to remember the layout of the map that lies outside their view, and will consider where unseen enemies might have wandered to. Other players might just run around as fast as they can, collecting toys and dreading the sudden onslaught of not just one, but two charging girls that might be hiding right around the corner.
Outlining our Plan
Implementing our enemy behavior is more difficult than brainstorming, but less important. We need a good concept and a thoughtful plan for our game to be fun. Without them, no matter how long you spend tweaking the code, the game won't work.
Perhaps professional game developers don't need to think so much about enemy behavior during the early design period of their projects, because they can just throw money at bunch of programmers and all of the tools necessary to realize their vision. For us, constrained within the limitations of RFO Basic!, and of our own abilities, enemy behavior and gameplay are more closely linked. If they don't compliment each other well then our game will be a failure.
So let me outline my plan to add enemies to our game.
• We will have four enemies that must be handled every frame.
• Enemies will never step into water or through a wall.
• Enemies will stop and cry for a set amount of time if hit by a ball.
• The running speed and crying time will be determined by the chosen skill level.
• If an enemy touches the player it will kiss him, then reappear elsewhere on the screen and chase him again.
• When kissed, the player speed will be reduced to simulate cooties, making it easier

for other enemies to catch him.
• A single EnemyMove routine will be called every frame to control them all.
• EnemyMove will call one of several subroutines according to their current behavioral mode.
• Every once in a while EnemyMove will check to see if an enemy can see the player, and if so, set it into Chase mode.
• The collision detection and animation for each enemy will be done in the EnemyMove routine so that we only have to loop through the enemies once, optimizing the performance of our game.
Preparing our Enemies
Two routines will be necessary to prepare our enemies for some semblance of life. EnemyInit, which will be called only once from the SetupScreen routine, will dimension the arrays and create the graphical objects that we need. EnemyPrep will be called from the Play routine and get them ready for a new game both at startup, and after the player dies and starts again.
Several variables are necessary to govern enemy behavior. They must be stored in arrays so that we can loop through them for each individual enemy. The use of each variable will be summarized below.
EnemyInit:eCount=4 %this is the maximum number of enemies, fewer may be used but not more
DIM ex[eCount] %the enemy's x positionDIM ey[eCount] %the enemy's y position
!Each enemy's previous grid position will be stored to determine if it moved into a wallDIM eogx[eCount]DIM eogy[eCount]
!There are 5 modes that govern enemy behavior: chase, flee, circle, roam, and zag!They are stored in this variableDIM em[eCount]
DIM eDir[eCount] %the enemy's current directionDIM eSteps[eCount] %how many steps to take before changing directionDIM eCheck[eCount] %how long before checking if the player is in sightDIM eFrame[eCount] %the current frame number for the enemy's animationDIM eStunned[eCount] %if and for how long the enemy is stunnedDIM oEnemy[eCount] %a pointer to the graphical object for this enemy

Now that we have all of the arrays, we must create the graphical objects for each enemy. A a simple for loop will draw each one, using oEnemy[i] as the object pointer to store it.
FOR i=1 TO eCount GR.BITMAP.DRAW oEnemy[i], bEnemy[1,1], 0,0
NEXT iRETURN
The EnemyPrep routine is just as straightforward as EnemyInit. We begin by cycling through each enemy and then looping until we find a random empty square to put it in. Once found, we set the enemy's position to that square. As an exercise, you might want to make sure that the enemies are spread apart at least some minimum distance. I decided to keep it purely random.
EnemyPrep:FOR i=1 TO eCount %cycle through each enemy
DO %loop through random grid positionsx=1+FLOOR(RND()*gWidth)y=1+FLOOR(RND()*gHeight)
UNTIL grid[x,y]<3 %find an empty squareex[i]=x*gs-hgs %set the enemy position to the squareey[i]=y*gs-hgs
Now we set the enemy's old grid position to its current one in order to avoid possible errors later on. After that we reset the stunned variable in case the enemy was hit by a ball just before the player died or quit the last game. Also, we set each enemy to a different frame of animation so that they don't all run in unison like some secret girly army.
eogx[i]=xeogy[i]=yeStunned[i]=0eFrame[i]=i
Each enemy's initial mode and direction will be randomly set by the eChangeMode routine. That routine is usually called during gameplay so it stores its settings into temporary variables named mode and eDir. Therefore we must copy its settings into the permanent arrays or they won't take effect and we'll get errors later on.
The last thing that we do in EnemyPrep is make sure that the enemies are visible. We do this because the HideStuff routine hides the enemies before showing the menu or the editor. Note that this routine will only display the number of enemies set in eCount. You may reduce this number in SetVars if you want fewer enemies running around in lower skill levels.
gosub eChangeModeem[i]=mode: eDir[i]=eDirGR.SHOW oEnemy[i] %show the graphical object
NEXT i
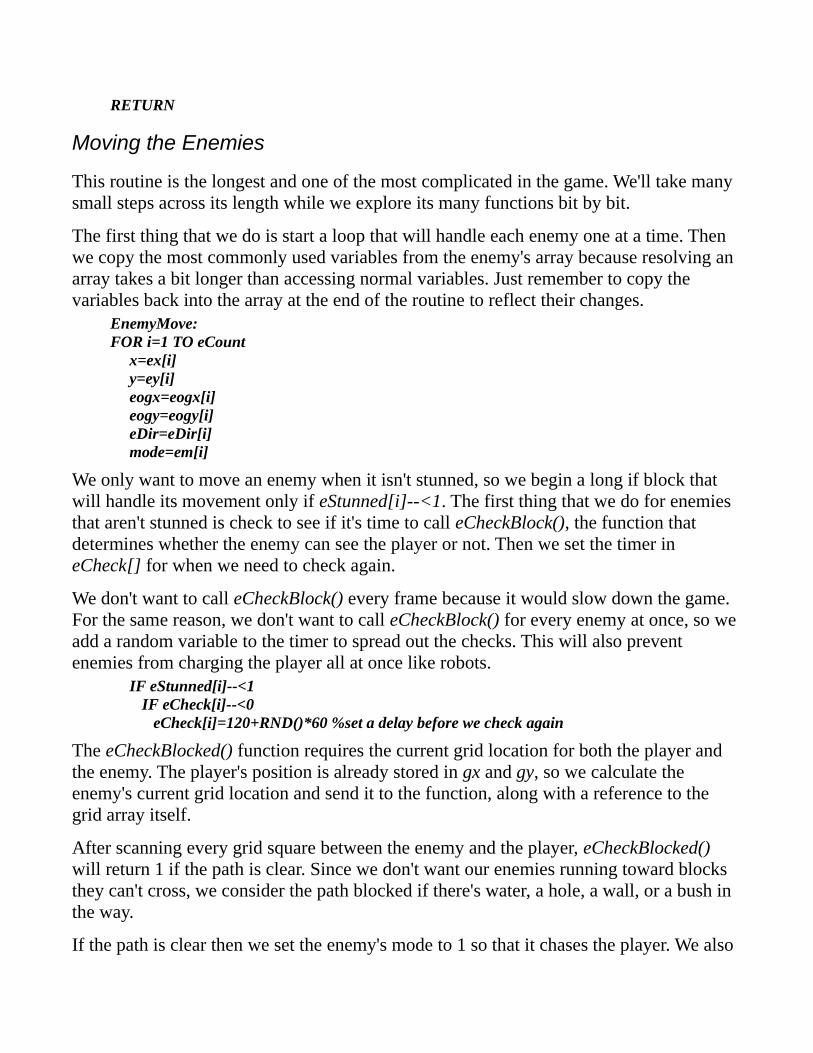
RETURN
Moving the Enemies
This routine is the longest and one of the most complicated in the game. We'll take many small steps across its length while we explore its many functions bit by bit.
The first thing that we do is start a loop that will handle each enemy one at a time. Then we copy the most commonly used variables from the enemy's array because resolving an array takes a bit longer than accessing normal variables. Just remember to copy the variables back into the array at the end of the routine to reflect their changes.
EnemyMove:FOR i=1 TO eCount
x=ex[i]y=ey[i]eogx=eogx[i]eogy=eogy[i]eDir=eDir[i]mode=em[i]
We only want to move an enemy when it isn't stunned, so we begin a long if block that will handle its movement only if eStunned[i]--<1. The first thing that we do for enemies that aren't stunned is check to see if it's time to call eCheckBlock(), the function that determines whether the enemy can see the player or not. Then we set the timer in eCheck[] for when we need to check again.
We don't want to call eCheckBlock() every frame because it would slow down the game. For the same reason, we don't want to call eCheckBlock() for every enemy at once, so we add a random variable to the timer to spread out the checks. This will also prevent enemies from charging the player all at once like robots.
IF eStunned[i]--<1IF eCheck[i]--<0
eCheck[i]=120+RND()*60 %set a delay before we check again
The eCheckBlocked() function requires the current grid location for both the player and the enemy. The player's position is already stored in gx and gy, so we calculate the enemy's current grid location and send it to the function, along with a reference to the grid array itself.
After scanning every grid square between the enemy and the player, eCheckBlocked() will return 1 if the path is clear. Since we don't want our enemies running toward blocks they can't cross, we consider the path blocked if there's water, a hole, a wall, or a bush in the way.
If the path is clear then we set the enemy's mode to 1 so that it chases the player. We also

play one of four sounds that are variations of my best imitation of a little girl yelling “There he is!” Notice that we only do this if mode<>1. It's possible that the enemy has been chasing the player since the last check and we don't want to repeat the sound if it has been.
egx=1+FLOOR(x/gs) %calculate the enemies current grid positionegy=1+FLOOR(y/gs)t=eCheckBlocked(egx,egy,gx,gy,grid[]) %check for a clear pathIF t
IF mode<>1%path is clear and enemy not already chasingmode=1 %set chase modet=1+FLOOR(RND()*4) %pick one of the four soundsSOUNDPOOL.PLAY n, sSeeHim[t]
ENDIFELSE
Now we know that the enemy doesn't have a clear path to the player. Since we make this check every 4 to 6 seconds, and changing the enemy's movement routine that often would result in chaotic behavior, we limit the change to roughly 30 percent of the time using the rnd() command. The eChangeMode routine will randomly change an enemy's mode and direction for us.
IF RND()<0.3 THEN gosub eChangeModeENDIF
ENDIF
Now we check to see if the enemy and the ball have collided using the gr_collision() function provided by RFO Basic! If they have, then we stun the enemy, play a sound, and award the player some points. Remember to update the score's graphical object, and that bStun is set in the SetVars routine to adjust how long enemies stay stunned depending on the chosen skill level.
IF GR_COLLISION(oEnemy[i],oBall)eStunned[i]=bStun %stun the enemy for a set timeSOUNDPOOL.PLAY n, sHit %play the getting hit soundscore+=10 %add some pointsGR.MODIFY oScore, "text", INT$(score) %update the score
ENDIF
Next we check to see if the enemy is close enough for the player to kiss him. Although gr_collision() would be faster than checking manually, we can't use it because our characters are twice the size of our grid squares. Gr_collision() would detect collisions even when there's a wall between the player and the enemy, which would grant an unwanted ability to our enemies. They would be able to leap right through a wall to get you!
Collisions are detected by determining the horizontal and vertical distance between the

player and the enemy. If both distances are less the the size of a grid square then they're on the same square and close enough for the player to catch cooties.
When the characters collide we set mode=9, which will be used later in this routine. We also set eStunned=bStun/2 to give the enemy time to rest, and we set eFrame=0 to make sure that the attack animation plays from the beginning. Then we play a smooching sound.
dx=px-x %calculate the deltasdy=py-yIF ABS(dx)<gs & ABS(dy)<gs %use absolute value to check if they're close enough
mode=9 %set the enemy to 'attack mode'eStunned[i]=bStun/2 %stun the enemy for a little whileeframe[i]=0 %make sure animation starts at the beginningSOUNDPOOL.PLAY n, sKiss %play a sound
ENDIF
The last thing that we do to handle the enemy's movement is call the proper behavioral subroutine. As you can see there are 5 of them that can be called depending on the value of mode. Notice that there is no ninth value. We do not call any routine if the enemy is attacking.
GOSUB mode, eChase, eFlee, eCircle, eZag, eRoamENDIF
The next part of this routine handles animation. This occurs even when the enemy is stunned or is attacking because we have animations for both of those events.
We use the mod() function to divide frames+i by anim_delay, and we only change to the next frame when the remainder is zero. This is an effective method to delay animations to occur only after a set number of frames. We use frames+i for the numerator so that the enemies don't all animate at the same time.
Unlike AnimatePlayer, where we use anim_dir to determine whether to play the animation forward or backward, we'll store a value between 1 and 10 in eFrame. Values from 5 through ten will be inverted to handle the animation's reverse loop without needing a directional variable for each enemy.
IF MOD(frames+i,anim_delay)=0f=++eframe[i]IF f>5
f=5-(f-5)
The next bit of code needs to detect the end of an an attack animation for several reasons. For one, the enemy needs to be given a new position. We can't do that as soon as we detect the attack's collision because then we would never see the animation. The enemy would be off of the screen. Also, when the player is killed by an attack, the animation would never play at all because the game would immediately end. As a bonus, the delay
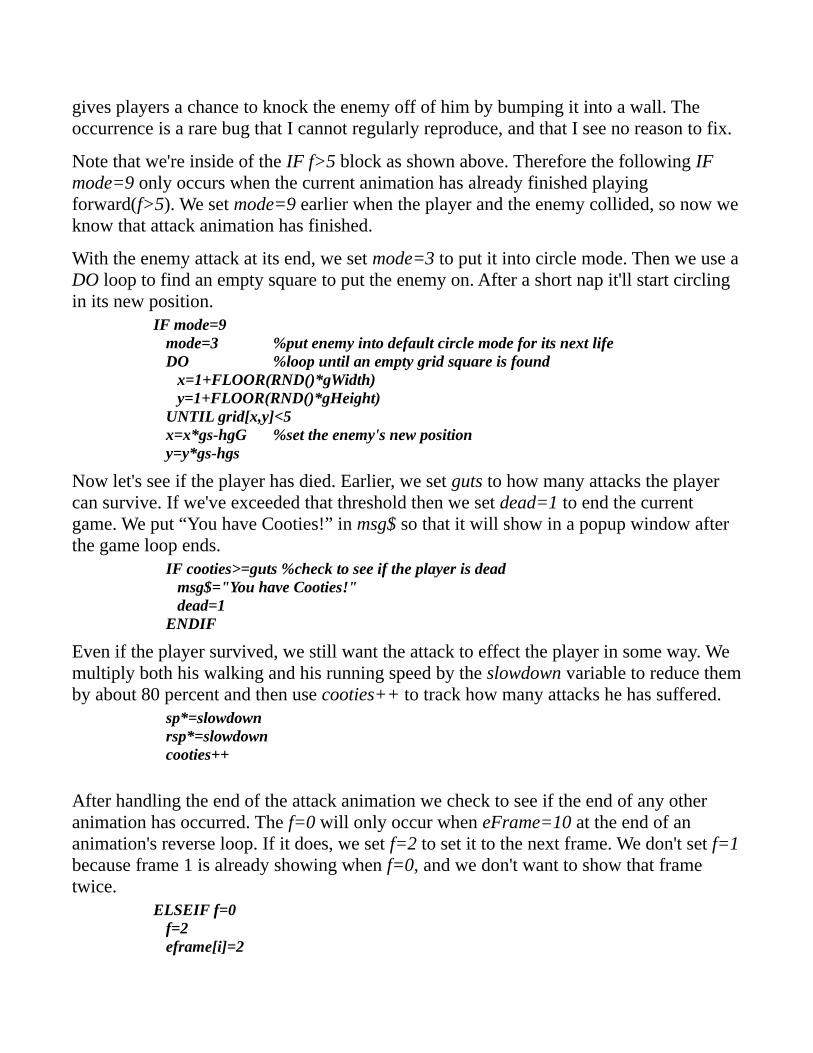
gives players a chance to knock the enemy off of him by bumping it into a wall. The occurrence is a rare bug that I cannot regularly reproduce, and that I see no reason to fix.
Note that we're inside of the IF f>5 block as shown above. Therefore the following IF mode=9 only occurs when the current animation has already finished playing forward(f>5). We set mode=9 earlier when the player and the enemy collided, so now we know that attack animation has finished.
With the enemy attack at its end, we set mode=3 to put it into circle mode. Then we use a DO loop to find an empty square to put the enemy on. After a short nap it'll start circling in its new position.
IF mode=9mode=3 %put enemy into default circle mode for its next lifeDO %loop until an empty grid square is found
x=1+FLOOR(RND()*gWidth)y=1+FLOOR(RND()*gHeight)
UNTIL grid[x,y]<5x=x*gs-hgG %set the enemy's new positiony=y*gs-hgs
Now let's see if the player has died. Earlier, we set guts to how many attacks the player can survive. If we've exceeded that threshold then we set dead=1 to end the current game. We put “You have Cooties!” in msg$ so that it will show in a popup window after the game loop ends.
IF cooties>=guts %check to see if the player is deadmsg$="You have Cooties!"dead=1
ENDIF
Even if the player survived, we still want the attack to effect the player in some way. We multiply both his walking and his running speed by the slowdown variable to reduce them by about 80 percent and then use cooties++ to track how many attacks he has suffered.
sp*=slowdownrsp*=slowdowncooties++
After handling the end of the attack animation we check to see if the end of any other animation has occurred. The f=0 will only occur when eFrame=10 at the end of an animation's reverse loop. If it does, we set f=2 to set it to the next frame. We don't set f=1 because frame 1 is already showing when f=0, and we don't want to show that frame twice.
ELSEIF f=0f=2eframe[i]=2

ENDIFENDIF
Now that we know what frame to show we determine which animation to play. I know this sounds kind of backwards, but I swear it works just fine. Not really sure why my routine ended up this way but it works so I won' fix it.
We'll check a number of conditions to determine ea, my shorthand for enemy animation. The animations available are similar to what we use for the player, except that the standing still animations has been replaced by a crying animation and the falling in a hole animation has been replaced by an attack animation.
The animations will play based on the following values of ea: 1=crying, 2=running up, 3=running right, 4=running down, 5=running left, 6=attacking player.
First we check for mode=9 and set ea=6 if the enemy is attacking. Then we check to see which direction the enemy is moving and set ea based on that. If none of those conditions are met then ea defaults to 1 and the enemy will cry.
IF mode=9ea=6
ELSEIF x<ex[i]-0.25 %enemy moving more than a little bit leftea=5
ELSEIF x>ex[i]+0.25 %enemy moving more than a little bit rightea=3
ELSEIF y<ey[i %enemy moving up, less than a little bit right or leftea=2
ELSEIF y>ey[i] %enemy moving down, less than a little bit right or leftea=4
ELSE %enemy not moving or attacking. We make it cryea=1
ENDIF
The last thing that we do to handle the animation is update the graphical object for the enemy, using the bitmap stored in bEnemy[ea,f] to display it. The enemy's position is adjusted based on the location of the scrolling camera.
GR.MODIFY oEnemy[i], "bitmap", bEnemy[ea,f], "x",x-camx+pox, "y",y-camy+poy
We made it all the way to the end. All that we have left to do is to update the enemy's position if we didn't change its frame, and then to copy the temporary variables that we've been using back into their array. Don't forget that we called one of the movement routines earlier, so those temporary variables may have been accessed far more times than we've yet discussed.
ELSE!Update the enemy's position if we didn't animate

GR.MODIFY oEnemy[i], "x",x-camx+pox, "y",y-camy+poyENDIF
!Update the enemy arrays to match the values of the temporary variablesex[i]=x: ey[i]=yeogx[i]=egx: eogy[i]=egyeDir[i]=eDirem[i]=mode
NEXT iRETURN
Routine Enemy BehaviorThere are five different modes of enemy behavior in our game: Chase, Flee, Circle, Zag, and Roam. Each one has its own routine, and the EnemyMove routine will call one of them every frame for each enemy that isn't stunned.
Chase mode is only set when an enemy can see the player, and Flee mode is only set when an enemy gets stuck in a corner while in Chase mode. The remaining modes, Circle, Zag, and Roam, are randomly chosen by the eChangeMode routine that follows.
The eChangeMode routine has a simple job. It picks a random mode, and depending on which is chosen, it sets a random direction either between 1 and 4, or between 1 and 8. For some modes it also sets eSteps to limit how many steps the enemy will take before changing directions.
eChangeMode:mode=3+FLOOR(RND()*3) %set a random modeIF mode=3 %prep eCircle
eDir=1+FLOOR(RND()*8) %set a random direction esteps[i]=frames+30+(30*i %set how many steps to take
ELSEIF mode=4 %prep eZageDir=1+FLOOR(RND()*4)
ELSEIF mode=5 %prep eRoam eDir=1+FLOOR(RND()*4) esteps[i]=frames+CEIL(RND()*3)*180
ENDIFRETURN
Chase
The first movement routine we'll discuss is also the simplest. It only gets called after eCheckBlock() determines that there's a clear path to the player. Note that water is

considered to block enemies so that they don't go running hopelessly along the shore. The use of a path finding algorithm to find a bridge across the water is beyond the scope of this tutorial.
We facilitate the chase by determining the angle between the enemy and the player, and then moving it in that direction. The first step is to calculate the deltas and to store their tangent in the angle variable. Then we multiply the sine of the angle by the the enemy's speed and add it to its x coordinate. After using cosine to adjust its y coordinate we have its new position.
eChase:dx=px-x %calculate the delta between the enemy and the playerdy=py-yang=ATAN2(dx,dy) %calculate the angle of the deltax+=SIN(ang)*esp %move the enemy in the determined angley+=COS(ang)*esp
With the new position at hand, we calculate the enemy's grid location and determine which type of tile it's on. Then, if the enemy has moved into a block, we reset its x or y coordinates as necessary. This adjustment is made the same way we did it for our player. We know that its old grid coordinates were legal, so we use them to check the legality of its the new x and y grid coordinates one at a time.
egx=1+FLOOR(x/gs)egy=1+FLOOR(y/gs)eg=grid[egx,egy]blocked=0 %reset this variable
!Check if the new x position is legal and reset x if nott=grid[egx,eogy]IF t>4 THEN x=ex[i]: egx=eogx: blocked+
!Check the new y position is legal and reset y if nott=grid[eogx,egy]IF t>4 THEN y=ey[i]: egy=eogy: blocked++
If the enemy is blocked in both directions then it must have hit a corner. Instead of keeping it stuck there, we set mode=2 so that it reverses direction in flee mode.
IF blocked=2 THEN mode=2RETURN
Flee
We only put an enemy into flee mode when it runs into a corner inside the Chase routine,

which is almost identical to this one. In fact there's only two lines that have changed. One of them adds 180 degrees to the angle so the enemy runs the opposite direction. The other one sets the enemy back into chase mode the first time it hits any obstacle.
eFlee:dx=px-xdy=py-y
!Move the enemy in the opposite directions by adding 180 degreesang=ATAN2(dx,dy)+TORADIANS(180)x+=SIN(ang)*espy+=COS(ang)*espegx=1+FLOOR(x/gs)egy=1+FLOOR(y/gs)
IF egx<1 | egy<2 | egx=gWidth | egy=gHeightegx=eogx: egy=eogyx=ex[i]: y=ey[i]mode=1
ENDIFeg=grid[egx,egy]
blocked=0t=grid[egx,eogy]IF t>4 THEN x=ex[i]: egx=eogx: blocked++t=grid[eogx,egy]IF t>4 THEN y=ey[i]: egy=eogy: blocked++
!Put the enemy back into chase mode the first time a barrier is hitIF blocked>0 THEN mode=1RETURN
Circle
Our next routine makes the enemy run in little circles. Okay, so technically they're squares, but if I told you that someone was running around in squares you'd probably give me a funny look.
In this routine we'll set eDir between 1 and 4 for clockwise circles, or between 5 and 8 for counter-clockwise circles. The enemy will turn either after a certain number of steps, or when it hits a wall. Making it turn is almost as easy as adding or subtracting 1 from eDir. The only other thing we have to do is make sure that eDir is still within bounds.
We begin by handling counterclockwise circles by subtracting 4 to get the real direction when eDir>4.
eCircle:

IF eDir>4eDir-=4 %subtract 4 to get the real direction
Now we check to see if it's time to turn and subtract one from eDir if it is. If our subtraction brought it down to 0 then we fix it by setting eDir=4 instead. Then we set eSteps for its next turn.
In case you're wondering, the frames variable is incremented every time a new frame is drawn in the main game loop. It's used to count how many frames per second are being drawn. We use it here to set how many frames should pass before the next directional change. In order to make each enemy move in a differently sized circle, we set eFrame=frames+30+(i*30), which adds thirty steps for each enemy beyond the first.
IF frames>esteps[i]eDir--IF eDir=0 THEN eDir=4esteps[i]=frames+30+(i*30)
ENDIF
We move the enemy by using the eMoveX and eMoveY arrays that we created earlier. Then we add 4 to eDir to make sure that the enemy still moves counter-clockwise next time this routine gets called.
x+=eMoveX[eDir]y+=eMoveY[eDir]eDir+=4
Now we handle clockwise circles the same way. The only differences are that we don't need to add or subtract 4 to adjust eDir, and we use eDir++ instead of eDir-- to handle the turn.
ELSEIF frames>esteps[i]
eDir++ %add instead of subtractIF eDir=5 THEN eDir=1esteps[i]=frames+30+(30*i)
ENDIFx+=eMoveX[eDir]y+=eMoveY[eDir]
ENDIF
Now that the enemy has moved we can calculate the enemy's grid location. After that we check to see if the enemy has moved outside of the screen and set g=10 if it has. This will make the following code block think that it hit a wall. If we determined that enemy is still on the screen, then we use its grid location to see what type of tile it's really standing on.
egx=1+FLOOR(x/gs)egy=1+FLOOR(y/gs)

IF x<1 | y<1 | x>DISPLAY_W-1 | y>DISPLAY_H-1g=10 %simulate hitting a wall if outside the grid borders
ELSEg=grid[egx,egy] %otherwise store the cell for the current grid location into g
ENDIF
Now we reset the enemy's position and make it turn if g>4, which includes tiles that are walls or water. The variable will also be greater than 4 if the previous code determined that the enemy has moved beyond the edge of the screen. To turn the enemy we simply set eSteps=0 so that the next time this routine is called we know to make it turn.
We could turn the enemy right now by adding or subtracting from eDir, but that would require several if blocks to determine which way to turn, and whether eDir has gone below 1 or above 4. Setting eSteps=0 is a simple trick that accomplishes it in a much more efficient manner.
IF g>4 x=ex[i] %reset the enemy's positiony=ey[i]egx=eogx: egy=eogyeSteps[i]=0 %make eSteps < frames so the enemy turns next frame
ENDIFRETURN
Zag
The next routine is a little harder to explain. When I was trying to think about ways to make the enemies move without getting stuck I thought about having them zig-zag across the screen in the direction of the player. A direction would be picked and it would continue to move in that direction while zagging back and forth, changing its diagonal direction each time it hits a wall.
Implementing the behavior that I imagined took a bit of thought but soon resulted in some fairly simple code that comes close to my original concept. Each enemy has an overall direction for it to move stored in eDir. We start out by determining if that direction is horizontal or vertical by using the mod() function.
Mod(eDir, 2) will return zero when eDir/2 divides evenly without a remainder, or in other words, when eDir=2 or eDir=4. Therefor the following IF will handle moving left or right and the ELSE will handle moving up or down.
eZag:IF eDir=0 THEN eDir=1+FLOOR(RND()*4)
IF MOD(edir,2)=0
Since eDir shows that the enemy's overall direction is horizontal, we add eMoveX[eDir]

to its x position to make it move that way. Then we make it move diagonally either up or down depending on whether the player is above or below it.
We add or subtract hgs from the player's vertical position so that the enemy ignores small differences. Otherwise, it will continuously 'shake' a few pixels up and down because the two characters will never be at the same exact position.
x+=eMoveX[eDir] IF py-hgs<y THEN y-=espIF py+hgs>y THEN y+=esp
Now we do the opposite of the above code to handle an enemy whose overall direction is vertical.
ELSEy+=eMoveY[eDir]IF px-hgs<x THEN x-=espIF px+hgs>x THEN x+=esp
ENDIF
With the movement done we continue by calculating the enemy's grid location and making sure that it hasn't move beyond the edge of its world. If it has move beyond the edge, then we reset its position and make it turn around by adding eDir+=2.
egx=1+FLOOR(x/gs)egy=1+FLOOR(y/gs)
!Turn around if the enemy reaches the edge of the screenIF x<1 | x>DISPLAY_W-1 | y<1 | y>DISPLAY_H-1
egx=eogx: egy=eogyx=ex[i]: y=ey[i]eDir+=2IF eDir>4 THEN eDir-=4
Next we use our now familiar method to handle walls collisions by making the enemy slide against them. The only addition is that we turn the enemy around if it hits a wall that blocks it in its overall direction.
ELSEblocked=0 %reset the variable
!Handle vertical edgest=grid[egx,eogy] %check to see if the new x position is blockedIF t>4
x=ex[i]: egx=eogxblocked++IF !MOD(eDir,2) THEN eDir+=2 %turn around if eDir is left or right
ENDIF
!Handle horizontal edges

t=grid[eogx,egy]IF t>4
y=ey[i]: egy=eogyblocked++IF MOD(eDir,2) THEN eDir+=2 %turn around if eDir is up or down
ENDIF
We have two more conditions to handle. First, we turn around enemies that get stuck in a corner. Then, since we turned our enemies around by adding eDir+=2, we need to adjust eDir by subtracting 4 if it's too high.
IF blocked>1 THEN eDir++IF edir>4 THEN eDir-=4
ENDIFRETURN
Roam
We only have one more behavior to explore. When in roam mode, an enemy will move in a straight line until it either hits a barrier or it goes too far, then it turns in a random direction. It might turn left or right, or turn completely around. We set a random threshold for how far it can move in one direction after it turns.
This behavior adds a bit of random movement to our game. It doesn't take the player's position into account at all. Like the Circle and Zag modes we just discussed, this behavior is fairly simple and wouldn't do well to simulate an intelligent opponent, but for little girls just running around, it feels right to me.
The first thing that we do is check to see if our enemy has gone too far in one direction and set r=1 if it has. After that we move the enemy using our movement helper arrays.
eRoam:IF frames>esteps[i] THEN r=1
x+=eMoveX[eDir] %move the enemyy+=eMoveY[eDir]
Next we make sure that the enemy hasn't crossed beyond the edge of the world. Like usual, we reset its position if it has. Then we set r=1 so that it turns later on.
IF x<1 | y<1 | x>DISPLAY_W-1 | y>DISPLAY_H-1x=ex[i]: y=ey[i] %reset the enemy's positionegx=eogx: egy=eogyr=1 %set r to roam in a new direction
ENDIF
Now that we know the enemy's position is legal we can figure out what tile it's on. If the

tile blocks its path we reset its position and set r=1. Since enemies don't roam diagonally, there's no need to reset their positions one dimension at a time so that they slide.
egx=1+FLOOR(x/gs) %calculate the grid positionegy=1+FLOOR(y/gs)g=grid[egx,egy]
!Check if enemy hit a wallIF g>4
x=ex[i]y=ey[i]r=1 %set r to roam in a new direction
ENDIF
All the conditions have been checked, and we set r=1 if the enemy needs to turn. Now we'll do the turning, but first, we set eSteps to a new random value to limit the enemy's movement in its new direction.
The turn itself is handled a bit differently than we did before. We add a random number between 1 and 3 to eDir, and then we subtact 4 if the sum is greater than 4. This should guarantee that its new direction is any direction other than its old one.
IF r=1esteps[i]=frames+CEIL(RND()*3)*180eDir+=1+FLOOR(RND()*3)IF eDir>4 THEN eDir-=4r=0 %reset this variable
ENDIF RETURN
The Blocked Check
The last thing to discuss regarding the enemies in our game is the eCheckBlocked() function. It operates similarly to the ray-casting code used in old first-person shooter games like Wolfenstein 3D and Doom. The algorithm has been used for years because of its speed and scalability. It allowed 3D games to work on ancient 16-bit computers, and even on 8-bit graphing calculators.
Traditionally, ray-casting algorithms have been written in assembly or in low level languages like C. My code written in Basic! isn't quite fast enough to perform every frame without slowing down the game, but it works well enough to use it as I intended, by calling it for one enemy at a time every few seconds. Even called every frame I still get close to 30 frames per second.
The way this function works is by forming an imaginary line between the enemy and the player, and then determining its slope. It uses the slope to find each grid line between the

enemy and the player, then checks to see if the square blocks its path. I start by checking the horizontal grid lines and then I check the vertical ones.
FN.DEF eCheckBlocked(ex,ey,px,py,g[])
!Calculate the deltadx=px-exdy=py-ey
!Only check vertical grid lines if the characters aren't on different columns !Otherwise we get a divide by 0 error
IF dxIF ex<px THEN st=1 %set st to step right if player is to the rightIF ex>px THEN st=-1 %set st to step left if player is to the leftdy=dy/ABS(dx) %calculate the slope
y=ey-dy %put ey in y and subtract the slope because enemy square can't be a wallx=ex %put ex in x
!step through every vertical grid line between the enemy and the playerFOR x=ex TO px-st STEP st
y+=dy %add the slope!set b=1 if we found a wall and exit the for/next loopIF g[x,y]>4 THEN b=1: F_N.BREAK
NEXT x!exit the function by returning 0 if we were blockedIF b THEN FN.RTN !b %if we were blocked we can exit the function by returning 0
ENDIF
!Now reset dy and do the same thing for horizontal grid lines!But only if the characters aren't on the same row to avoid a divide by 0 errordy=py-eyIF dy
IF ey<py THEN st=1IF ey>py THEN st=-1dx=dx/ABS(dy) %calculate the slopex=ex-dx %put ex into x and subtract the slope
!step through every vertical grid line between the enemy and the playerFOR y=ey+st TO py-st STEP st %now loop through the horizontal grid lines
x+=dx!set b=1 if we found a wall and exit the for/next loopIF g[x,y]>4 THEN b=1: F_N.BREAK
NEXT yENDIF FN.RTN !b %return 0 if blocked
FN.END

Going Farther
Our little game now has a story, a goal, a weapon, and some enemies. More importantly, it's actually fun to play. It's been a long journey to get here, but hopefully, it's been an enjoyable and an informative one too. Sticking with it to the end is an accomplishment you can be proud of.
I remember when I read my first game design book, Teach Yourself Game Programming in 21 Days, which was published by Sam's Publishing in 1994. I had so many ideas about how to improve the game demos, and so many ideas for my own games. Unfortunately, the demos were far from complete, and they hardly provided a rewarding gameplay experience. I realize that this tutorial may not offer enough explanation for novices to easily follow it, but I believe that I've accomplished my primary goal. I've shared, from beginning to end, how to create a real game using RFO Basic!
Of course there's still plenty of room for improvement. The final version of Cooties will be discussed in the third part of this tutorial. Unlike parts one and two, I won't discuss the code in any detail. In fact the conversation won't involve RFO Basic! at all. The new features will at least double the length of the source code, which won't be optimized for learning.
What the third tutorial will do is discuss game theory, and the reasons for adding every feature that I do. Implementation will be summarized in the text and heavily commented in the source code. If you're curious about what features to expect, please review part one of this tutorial. In the mean time, I offer you some ideas to experiment with the code, and I challenge you to think of your own.
Crushed ToysThose clumsy girls often trample our toys but nothing actually happens. Modify the EnemyMove routine to remove toys from the ground when an enemies steps on them. Make sure that you reduce the toy count to reflect its destruction, and consider tracking the number of broken toys and informing users how many they failed to rescue. You might also want to set the eStunned variable to make the poor girl cry after she hurts her foot.

More MapsConsider how to modify the editor to save multiple maps, and then make the game pick one randomly each time someone plays. There's many ways to do it: you can store more maps in maps.txt, you can scan the sdcard to find files named map01 through map99, or you can store the maps in an SQLite database. I use a database in the final version of Cooties.
Better PerformanceEvery if/then statement that you can remove from the enemy movement code will make the game perform better. I tried to design the game to be both easy to understand and efficient, but I couldn't really do both. I'll offer you an example of where you might optimize the game and challenge you to find your own.
Every time an enemy is moved the EnemyMove routine must determine which animation to play. Four conditions are checked with if/elseif commands to determine which direction, if any, the enemy has moved. That information is then used to set ea to the animation that gets displayed.
You can remove the if/then block from EnemyMove and set ea in each of the five movement routines. It might be more complicated and require more code, but with some thought, you should be able to reduce the four ifs down to one or two depending on which mode the enemy is in.
Improved ThrowingThere are plenty of ways to improve throwing. Perhaps the ball should bounce when it hits a wall or stop when it hits an enemy. Perhaps its speed or range should be tweaked. Perhaps you should change how you handle enemy collision so that it doesn't knock down girls when it didn't quite hit them.
Smarter BehaviorSome of the movement routines cause the enemies to behave strangely once in a while.

Also, there's plenty of potential for new behaviors that might be more interesting. Experiment with it.

Part ThreeThis is the third and final part of my game design tutorial for RFO Basic! users. Instead of focusing on the Basic! language and the source code for the final version of our game, we'll discuss the new features and why I chose to implement them. It's more about game design theory then about game programming in practice.
Source code will be shown in a few places where it's necessary to follow the conversation, but otherwise I only list the routines that have been changed or added. Curious readers may look at the routines in Cooties.bas, which have been heavily commented.

The Final Game
EditorRoutines Changed: EditRoutines Added: EditMenu, MapOpenDB, MapLoad, MapRandom, MapPick, MapClear,
MapSave
The editor for Cooties has been drastically improved. The first thing I changed was the code that handles touches on the grid. When users first touch the screen the coordinates are stored as the origin square. Then, instead of just changing the grid square that's touched every frame, a transparent rectangle is drawn from the origin square to the currently touched square. A simple loop fills the rectangular area when the touch event ends.
The new selection method makes level editing much quicker. Not only can users draw long lines, but they can draw buildings by first making a square of walls and then drawing a square of floors inside to hollow it out. Also, when a grid square is tapped, the selection rectangle flashes above the square as a nice effect to show that it was touched.

The code that fills the selection rectangle can also update a single square, but I went one step farther. If a single square is tapped and it matches the currently selected paint object, the object is erased by drawing the current erase object. The erase object is changed to the old paint object whenever users select a new paint object.
Once the usability for the editor was improved, I copied the code from one of my former level editors to handle all of the loading and saving into an SQLite database. MapOpenDB must be called first and it will count the number of maps in the database and fill a list called lMaps with pointers to each of them. From then on, maps can be loaded by MapLoad, MapRandom or MapPick. They may be saved by MapSave or cleared by MapClear.
All of the new map functionality required a menu for the editor so I created one with the following options: Copy, Clear, Delete, Load, Save, Revert, and Exit. Also, I changed the OnBackKey event handler to set ShowMenu=1, which sends a message to the Edit routine so that it will open the menu. Lastly, I added a new menu icon to the toolbar.
ControlsRoutines Changed: GetInput, MovePlayer, Show MenuRoutines Added: LoadPad
The second improvement that I made to Cooties was to providing a thoroughly revamped control system. The simple up, down, left, right, and run variables didn't fully utilize the power of touch screen controls. Not only were the controls somewhat clunky, but they were inefficient too. I replaced the several if/then statements that were used to handle the cardinal directions with code that calculates the angle and the distance that the user's finger moves from the center of the directional pad.
For those who never noticed, our earlier control scheme caused the character to move faster in diagonal directions. This is because its movement vector was never normalized. Adding the player's move speed to both its x and y position for diagonal movement granted it a 30 percent speed boost. In order to fix it I would need to do the following:
x+=speed*0.70y+=speed*0.70
Adding additional logic to a clunky control scheme seemed illogical to me, so I completely revamped it. Now, whenever the movement finger is touching, dX and dY are used to determine the angle and the magnitude of the vector between the center of the control pad and the current touch location. The magnitude is limited to half the width of the control pad, and positions less than one quarter of the way from the center are

ignored. This provides a good dead zone where players can rest their finger on the pad without moving their character.
When a user's finger moves beyond the pad's dead zone the character will move in the proper angle, and at a speed proportional to the distance from the center of the pad(minus the 25% that gets ignore for the dead zone). Separate run and walk speeds are no longer needed because players can smoothly adjust their speed from zero to their maximum.
Determining which one of the run animations to play from the player's current angle was a bit challenging. I created an array called aDir, which contains 12 entries, and I filled it with animations numbers by dividing the 360 degrees of a circle into twelve equal parts. Each time GetInput is called while the player is moving, the angle of his movement is divided by 12 to choose which array element to access. The code used is as follows.
!Setup done in SetVarsarray.load aDir[], 2,3,3,3,3,4,4,5,5,5,5,2,2pi=pi()aFix=12/(pi()*2)
!Calulations performed in GetInputdx=tx-padx % calculate the delta, or distance between the touch and the center of the paddy=ty-padyang=atan2(dx,dy) %calculate the anglemag=min(hypot(dx,dy),po) %limit the magnitude to the pad's radius
!Finishing in MovePlayerpanim=aDir[1+floor(12-(ang+pi)*aFix)]if mag>dz then mag-=dz else mag=0: panim=1 x+=sin(ang)*mag*spy+=cos(ang)*mag*sp
Although the old controls worked well, the new method is the greatest improvement yet. Cooties might still be a simple game with a silly theme, but it plays about as well as any Android game could. Still, I wanted to add one more thing. I wanted to offer the player three options for the size of the directional pad. A smaller pad could offer quicker response at the cost of accurate speed control, whereas a larger pad might be easier for young players. Also, depending on the size of the player's screen, a proportionally larger or smaller pad might be desired.
A small, medium, and large pad size are now offered from the new options menu. The setting is saved into the map database. Also, because the pad size must be known when its bitmap is loaded by ScaleBitmap(), and because it could change during the game, I added a LoadPad routine that will delete any existing bPad bitmap, load an newly scaled one, and then update the oPad graphic object. LoadPad is also called by the Edit routine because the editor requires the original pad size to operate properly.

Text WindowsRoutines Changed: ShowMenu, EditMenu, ShowIntro, OnBackKeyRoutines Added: HelpGetText, HelpPrepText, HelpShowText, PrepTextWindow,
PrepHelpWindow, MenuSelect
My next project proved to be the most challenging. I wanted to add graphical text windows to replaced all of the dialog boxes. I could have just borrowed the code from one of my earlier Basic! games and stopped there, but I also wanted to adapt the graphics to match the theme of our game. I considered how adding toys or other bitmaps might enhance the interface but decided to keep it simple.
Instead, the graphical window for each of the text menus and displays look like lined yellow paper, complete with three holes on one side and some extra room at the top for a title. I even made the paper slightly transparent so that you can see a faint hint of the background behind it. It's supposed to suggest a sunny day outside at the park.
Why lined paper, you might ask. Well, because if there's one thing that our protagonist hates even more than girls, it must be homework, of course! Adjusting the PrepTextWindow routine to simulate paper required much trial and error.
I almost gave up on transparent holes at the edge of the page because of a problem that I was never able to solve before. I can easily draw a yellow rectangle, but drawing a transparent circle for a hole has no effect. The circles that I drew for holes were invisible no matter what I did. Erasing graphics from a bitmap is impossible except by drawing a solid color into it, which doesn't work with transparency.
Solving my transparent problem required a creative solution. Instead of drawing a yellow rectangle for the paper, we now draw a black outline and leave the inside blank. Next we draw three yellow outlines for the circles, again leaving the inside blank. Finally, when we use the gr.bitmap.fill command to paint the paper yellow, the rectangular area fills but the circles remain empty.
With the paper drawn, the next thing to do was to pick the right font. I found a font called TudorRose that looks kind of like a young boy's handwriting. It's a free .otf format font that gets distributed with IvyDraw. Although not quite perfect because the numbers are too small, it's the best I had so I used it. I decided on a blue color and three sizes: a small size for the help text, a large size for buttons and menu options, and a huge size that barely fits on the paper for the title bar.
One last consideration was how to 'erase' the text window before showing another page or returning to the game. In the past I simply made a copy of the background buffer before drawing the text window, then displayed the copy and deleted the original when I was done. Since this game has scrolling, the background buffer is huge and I don't want

to make copies of it all the time. I considered redrawing the grid into the existing buffer to erase the text, but that would cause a notable delay.
My solution was to create new bitmap and to draw it into a new graphical object that displays over the existing graphics. The bitmap is the size of the entire screen, but since it's transparent when it gets created, only the graphics that get drawn into it are visible. Every time a new text window is generated the old bitmap is deleted and a new one is created. This is necessary because of the transparency issue I discussed earlier. I cannot find a way to erase graphics in an existing bitmaps so that new transparent objects can be drawn above it.
The text handling routine is fairly complicated and I won't discus it much here. Many amateur programmers who are used to having easy access to dialog boxes don't realize how much work those dialogs save them. Having to worry about breaking lines between words and the potential for words that don't fit on a line is annoying.
Once I had a way to draw my lined paper and some text on it, I needed to add a MenuSelect routine and update all of the existing menus to use it. Since functions in Basic! can't access global variables, and I didn't want to duplicate the PrepTextWindow code into a function, I decided to make MenuSelect a routine instead of a function like in most of my earlier games. In hind sight, I probably should have converted PrepTextWindow into function instead, and put all of the variables for fonts and colors into a bundle so it could access them. Still, this way works well and the results are pretty.
Using MenuSelect requires you to put the menu options into the menu$ variable. The title must go first, followed by the options, all of which must be separated by commas. Then, if you don't want to allow the user to cancel the menu by clicking outside of it, set menu=2. After calling MenuSelect the results will be stored in the sel variable.
menu=2%player can't cancel the main menumenu$="Main Menu,Easy,Medium,Hard,Options,Edit,Help,Exit"gosub MenuSelectif sel=1 then skill=1if sel=7 then end
Scores and a Status ScreenRoutines Changed: PlayRoutines Added: ShowStatus, AddScore, ShowScores, ScoreGetName, GetKeyChar(name$)
All of my games have a high score system, so Cooties needed one too. Before copying the necessary code from one of my other games I worked on a status screen to show players how well they did. ShowStatus uses the PrepTextWindow routine to draw the lined

paper and then prints out some text depending on certain variables. It took a little extra work, but I made it print No or None instead of 0, and One instead of 1. An example of what ShowStatus might print follows.
You got Cooties!You saved 9 toys in 42 seconds3 girls kissed you but you got 2 of themNo toys were broken5 toys were lostYour score was 512
After users close the status window the AddScore routine is called. Then, if the score is better than one of the top eight scores, ScoreGetName is called. That routine will bring up the keyboard and print what the user types one character at a time. The keys are detected by the GetKeyChar(name$) function, which alters the name$ variable by either adding one character to it, or by removing one if backspace is pressed.
GetKeyChar has one major flaw, which is that it cannot detect the shift key. Therefore it uses only capital letters. When the user presses enter or uses the back button to close the keyboard the ScoreGetName routine will make sure that the keyboard closes and then return to AddScore with the user's name stored in name$. If name$ is blank, one of several random names from the names$[] array will be used instead.
Once it has a name to use, AddScore finishes its job by adding the score, name, time, and skill level to the scores table of the database. Then it calls ShowHiScores, which prints the top eight scores for the current skill level in a new text window. The user's new high score is printed in a larger font and without the date or the time, which wouldn't fit on the line when using the larger font. The rest of the scores will include the name, the score, and the date or time. Scores added within the last 24 hours display the time, the rest display the date instead.
The last thing that the hi-score system needed was an option to clear the hi-score database. I added it to the same option menu that lets users change the size of the directional pad.
Although none of the features added to facilitate the hi-score system improved gameplay or were truly necessary, I believe that they makes the app feel more like a real game. It might not be able to compete with many of the mobile games being released today, but if it came out when smartphones were first released a mere decade ago, I think it would have fared well.

Difficulty RampingRoutines Changed: MovePlayerRoutines Added: Ramp
Up until now, collecting all of the toys in a map would end the game. That makes a certain sense because the entire concept revolves around a boy trying to find all of his toys and then escaping the female invaders who ruined his day at the park. I briefly considered how to continue the game so that it didn't just end after only a minute or two, but no great ideas occurred to me, so I just went with the simplest solution and decided not to even try explaining it to users.
Whenever a player collects the last toy on the map MovePlayer will call the Ramp routine, which has three simple jobs. First it calculates a time bonus based on how quickly the player collected all of his toys and adds it to the score. Then it changes some variables to increase the difficulty and recover some of the players 'guts'. Lastly, it loads a new map and resets the enemies to continue the game.
Perhaps some players might feel cheated when the game doesn't end after the last toy is collected. The game is now unwinnable: it continues getting more difficult until the player either catches cooties or falls into a hole. The only accomplishment users can hope for is a new high score. Hopefully that's enough.
Generally, modern games offer players a winnable experience and try to explain why things are happening. But in the old days of Atari and NES, games often grew continually more difficult without ever actually ending. Since this is a retro game, I think it's appropriate to do the same thing. Explaining why players must get more toys when the map is clear might be nice, but what answer is there? The only thing that I can think of is making the character automatically run to the edge of the map while displaying a message like "You cleared this area, now go find the toys over here." It wouldn't be impossible to do, but I don't think it would really add anything to the game.
Enemy Behaviorchanged routines: EnemyMove, eChangeMode, eChase, eCircle, eZag, eRoamadded routines: eEscaperemoved routines: eFlee
Breaking Toys
I decided to improve the enemy behavior somewhat. The first and easiest thing was to

make them trip over and break toys that they run into. When it happens I subtract one from toys, add one to broken, and set eStunned to make the enemy to cry for a little while. I also needed to determine whether the broken toy was the last one and handle the situation. Otherwise, if an enemy broke the last toy, the game could never end because the player would never be able to collect another toy. Although it is possible to complete a map after toys are broken by an enemy, if the last toy on the map is broken by one, the game will end with with the message "A girl broke your toy!"
Animation
Those who fully examined the code for the final version of Cooties may have noticed that the animation system has been overhauled.
Earlier, the MovePlayer and EnemyMove routines would determine which animation to play after all of the movement was performed. That was bad game design that I used because it's often easier, and because I thought it would be easier to explain.
There's two reasons why I changed how we choose which animation to play. One reason was for efficiency. Determining which animation to play with a bunch of if/then conditions after the movement is performed would be unnecessary if it was determined during the movement instead. This is true for both player and enemy animation. The second reason was to properly illustrate how animation should be done.
Simple games may not require it, but as a rule, animation should be controlled by the AI for enemies or by the input routine for player characters. Then, if necessary, the physics engine can override it. The animation routines should only handle the actual graphics display(and perhaps sound effect playback).
An example of good design is this: Enemy AI determined that an enemy needs to stop its careful navigation of a lava pit and run hurry to navigation point 2. When it calculates the angle to that point it also sets the animation to the closest possible approximation of the angle. Then, as the enemy moves, it steps into a hidden pit. The physics engine applies gravity to move the enemy downward. It also checks the current animation state and uses it to determine which falling animation to play.
A bad way to handle the previous situation is this: AI says hurry to the way point and calculates the angle. Then physics detects a pit and makes the enemy fall. Then animation gets called and redetermines which angle the enemy is moving. Then it checks how fast it's moving. Then it checks to see if its jumping. Since it's not jumping it checks to see if it's shooting. Since it's not shooting it checks to see if it's falling. It is falling, so it finally knows which animation to play.
So in short, although changing the ea variable in several different places for every

behavioral routine might seem more complicated than just determining the angle in the EnemyMove routine, it's a bad idea. Once more animations get added, such as walking, tripping, and shooting, the eventual complexity of 'the easy' way will soon outweigh the initial complexity of the right way.
Better Chase
The next thing that I decided to do was improve enemy chase behavior so they wouldn't get stuck running into a wall when the player hides on the other side of it. I decided to add an eChasePoint mode, which would mimic chase mode but use seek a specific point instead of the player's current location. The chase point would be set when the enemy went into chase mode, and if it then hit a wall while chasing, it would switch to chase point mode. It would chase the point until it touched it, then return to regular chase mode.
Enemy behavior got very interesting. They would run around obstacles and often seemed intelligent. Unfortunately, they would sometimes back track like idiots. I knew that I need to update the chase point so that the enemy wouldn't get ahead of it, but never found a good way to do it. The proper solution would be to frequently call eCheckBlocked. If the enemy could still see the player it would update the chase point, and if it couldn't, then it would go into chase point mode and chase the point where it last saw him. I think that it would work quite well, but the effect on performance might be too great.
Back to the drawing board, I considered a new way to fix chase mode and soon found it. While working on eChasePoint I had solved one of the problems, which was that enemies moved too slowly when navigating around walls that they bumped into. In that routine, I decided to check which direction the player was and make the enemy move its full speed parallel to the wall that it had bumped into. At first the enemy would move too fast because adding eSp to the x or y variables was inappropriate. The enemy had already moved that frame. Instead I added eSp to ex[] or to ey[].
The new movement worked well, making enemies run along a wall that blocked it, instead of slowly sliding along toward the player. The only problem left to solve was the frequent condition where the player was directly behind a wall and a chasing enemy couldn't approach by running parallel to the it. All I needed to do was detect the situation and exit chase mode by calling eChangeMode. To further improve the behavior, I also set eCheck[i]=20 so that the enemy would look for the player a few frames after the mode switch. It usually finds him if he was hiding right around the corner.
Escaping Confines
The last thing that I wanted to improve about enemy behavior was situations where enemies got stuck in the confines of an enclosure. If they were surrounded by walls with

only a small opening they rarely ever found the opening and would only exit by following the player if he needed to go inside to get a toy. The eEscape behavior is guaranteed to eventually lead the enemy out.
The way the behavior works is fairly simple. An initial direction is set and the enemy runs that way until it hits a wall. Then it'll turn right, go straight until it hits another wall, and then turn right again. It will continue taking right turns while checking the grid square to its left. If the left square is empty then it turns left and goes into roam mode, thereby escaping any confines that it was in. In order to guarantee escape, eChangeMode will not exit eEscape mode until after at least four right turns are taken.
While testing eEscape mode, I forced all of the enemies to permanently stay in the mode so that I could observe their behavior. It was kind of neat to watch them continuously follow rivers and walls until they eventually circled back to their origins. Sometimes they would hit a bush and just run around it forever. Other times, they would run around the interior of a building, find the exit, run around the exterior of the same building, and then go back inside to start again. As neat as it was, it didn't serve the purpose of escaping the enclosure, so I sadly ended my experiment and finalized the behavior.
Final Analysis
There's many ways we could adjust the eChasePoint and eEscape modes to add more interesting behaviors. I could have them run continually between distant points, forever follow a river, or dance around a bush. Such behavior might suit the 'little girl' theme just fine, but it wouldn't increase the game's difficulty or improve its gameplay. Instead, I took out eFlee and eChasePoint, and then locked eEscape into doing only its intended job.
During final tests of the game I realized, that while enemies looked interesting while they wandered around, they spent too much time away from the player. It made the game a little too easy. To compensate, I modified eChangeMode to manually set enemies into chase mode on occasion, and also put the enemies into chase mode after they get stunned. Now they tend to find the player a bit more often instead of only charging him when he wanders too close.
Another problem with the difficulty stemmed from enemy placement. Sometimes several would start right next to the player and surround him before he could get a ball. Other times, they would start in a distant cluster and give the player too much freedom to explore the map without any challenge. Now the map is split into quadrants when the enemies are positioned on it. One enemy is randomly placed in the top left quadrant, one in the top right, one in the bottom left, and one in the bottom right.
The final state machine includes only 5 enemy behaviors: eChase, eEscape, eCircle,

eZag, and eRoam. Other then checking for a clear path between enemies and the player, the AI(artificial intelligence) doesn't make any weighted decisions or detect any conditions. It's a fairly simple but quite efficient system that generates interesting behavior and avoids most situations that make enemies look stupid, although eZag mode leaves room for improvement. It should be noted that although eEscape will eventually escape any confines, the confines are not actually detected by any of the AI routines. The eChangeMode routine will eventually set a trapped enemy into escape mode by random chance, but it could take a while.
Conclusion
Cooties has become a polished game with good controls, reasonably behaved enemies, and a nice map editor. It tracks high scores, provides gameplay and skill level options, and with ramping difficulty, should offer plenty of replayablility.
There's always room for improvement, of course. One of the nice things about indie games, and especially free games, is that the creators usually care more about perfecting their game then optimizing their profits. Cooties has the potential to outgrow any commercial limitations that a publisher might set for it. It's free, so please feel free to alter it any way you wish, or to use it as the basis for your own game.
Readers may contact me about this tutorial, the game of Cooties, or their own creations based upon it. If anyone decides to develop a version where players control a girl, please send it to me so that I can merge it with my own version. I had considered doing so myself but couldn't decide how. Leaving the gameplay intact and just having a girl flee from boys seems too simple, however. Perhaps players should chase a single boy while fighting the other girls, or perhaps there should be several boys and she has to get as many as she can before being knock over by a ball three times. Who knows?
Thanks for reading,Michael C [email protected]


