25
Rice Architecture Mentorship Recess Exercises
Rice Architecture Mentorship
Recess Exercises

Credits
©Rice Architecture, 2018
Exercises authored by:
David Rader
Ana Escobar
With thanks to:
JesÚs Vassallo
Ian Searcy
JP Jackson
Keegan Hebert

04
08
13
18
22
Paper TowerThis exercise is an introduction to the structural concepts of tension and
compression. Students will investigate the structural properties of geometric
modules. Once tested and evaluated, students will work in teams to use these
modules to construct a paper tower.
Object HouseThis exercise is an introduction to the ways in which visual and verbal
communication are utilized through the design of the built environment. Students
will explore the concepts of visual and verbal communication by designing and
producing conventional drawings for a conceptual house.
Spatial PlanningThis exercise will challenge students to evaluate the quantitative and qualitative
components of space. The focus on scale will build upon the previous exercises of
structure and communication while allowing students to understand the ways in
which architectural planning relates to real space.
Community CityCities are made up of communities. In this exercise, students will work independently
to develop a community plan, then aggregate their plans together to create a larger
design for a city. Students will gain an understanding of the elements of the built
environment which make up a community, and how communities are connected to
form a city.
Learning ParkThis exercise will focus on the environment. The environment encompasses
everything around us, including built components, the global climate, the context of
local conditions, and our immediate landscape. This exercise will allow students to
design a small park with a solar classroom to consider how architecture may respond
to the environment.
Exercise Order
SummaryThis exercise is an introduction to the structural concepts of tension and compression. Students will investigate the structural properties of geometric modules. Once evaluated, students will work in teams to use these modules to construct a paper tower.
Exercise 1Paper Tower

Paper Tower Activity
Key Terms
Arch
Column
Compression
Gravity
Horizontal
Load
Structure
Tension
Vertical
Exercise Organization
Time
60 minutes
Space requirements
One room with open space for students and facilitators to move around in.
There should be tables for students to work on.
Facilitator requirements
1-2 facilitators per group of students. It is recommended that students work
in groups of no more than five.
– Facilitators should review the lesson ahead of time and be
familiar with the structural concepts discussed.
Materials
– Letter-sized, multi-colored paper (50 pages per group)
– Scotch tape (1 per group)
– Glue sticks (1 per group)
– Scissors
Preparation
Students will form teams of five. Facilitators will distribute the appropriate
amount of materials as listed above to each group of students.
A curved structure that serves as a support
A vertical supporting member
The application of pressure against an object
The force which pulls things to the Earth
Parallel to the plane of the horizon
A weight borne by structural members
Something that is constructed
A pulling force that pulls on a material
Perpendicular to the plane of the horizon
Exercise Set Up
Paper Tower Activity
Geometry diagrams
Slit joint design
Paper tower, MJW Architecture
5

Paper Tower Activity
Procedure
Summary
Part I will allow students to experiment with structural principles. Students
will construct paper modules based on the geometry diagrams (left). Once
the modules are complete, students will apply loads to the modules in
vertical and horizontal orientations. The objective is to develop strategies
which will be applied to the tower in Part II. Questions to consider: What
orientation are the modules strongest in? Will adding materials increase the
strength of the module?
Step 1
10 minutes
– Students should construct structural modules with the paper provided.
Have students experiment with joint techniques, including folding, cutting,
splitting, and gluing.
– Structural shapes include cylinders, cubes, and triangular prisms
Step 2
5 minutes
– Students will test the shapes they’ve made by applying pressure (or loads)
to the shapes in vertical and horizontal orientations.
– Students should pay attention to the points of failure of the modules
they’ve constructed in each orientation as they relate to tensile and
compressive forces.
Step 3
5 minutes
– Students will present their modules to their team. Each student should
communicate the strategies explored to translate successful design
decisions into the tower design.
– Facilitators will lead the group discussion.
Discuss
The desired outcome of Part I is to have students develop an understanding
of the structural principles discussed. By constructing and testing the
geometric modules, students will develop strategies for the design of the
paper tower.
Part I: Modules
Paper Tower Activity
Modules are tested
Students build modules
Cube
Module Geometries
Key Terms
Horizontal
Vertical
Loads
Connections
Cylinder
Prism
6

Paper Tower Activity
Break-Out Discussion
At the end of the exercise, each team will present their tower to the larger
group. These presentations should communicate why they selected each
structural strategy, and how successful these strategies were in the tower’s
design. Questions to pose include: How were the modules incorporated into
the assembly of the tower? How are the forces of tension and compression
addressed? If the group had a chance to rebuild the tower, what would they have
done differently? Where is the tower strongest, and where is it weakest?
Procedure
Summary
Students will appropriate the strategies explored in Part I to construct a paper
tower. The tower will use the modules designed in Part I. Facilitators will
work with each team to develop the tower. Students should work to achieve
a maximum height in the alloted time. Care and attention should be given to
joints, connections, and material assembly. Questions to consider: How are
the modules aggregated? What will the connections be between modules? Will
reinforcement make the structure stronger?
Step 1
10 minutes
– Each group will develop a plan for construction while utilizing the structural
strategies explored in Phase I. Facilitators will assist with the communication
and development of each plan.
– Students should address material efficiency and expression.
Step 2
30 minutes
– Working in groups, students will assemble the paper tower while taking
care with joints and connections. Students should seek to build the tower as
high as possible in the time alloted.
Part II: Tower
Paper Tower Activity
Key Terms
Student tower example
Student tower example
Students present their tower
Module
Vertical
Forces
Connection
7

SummaryThis exercise is an introduction to the ways in which visual and verbal communication is used through the design of the built environment. Students will explore the concepts of visual and verbal communication by designing and producing conventional drawings for a conceptual house.
Exercise 2Object House
Object House Activity
Exercise Organization
Time
60 minutes
Space Requirements
One room with open space for students and facilitators to move around in.
There should be tables for students to work on.
Facilitator Requirements
1-2 facilitators per group of students. It is recommended that students work
in groups of no more than five.
– Facilitators should review the lesson ahead of time and be
familiar with the structural concepts discussed.
Materials
– Letter-sized, multi-colored paper (students will select pages and colors)
– Writing utensils (colored pencils, crayons, pencils, pens, colored markers)
Preparation
Students will form teams of five. Facilitators will distribute the appropriate
amount of materials as listed above to each group of students. One
3-dimensional object should be distributed to each group.
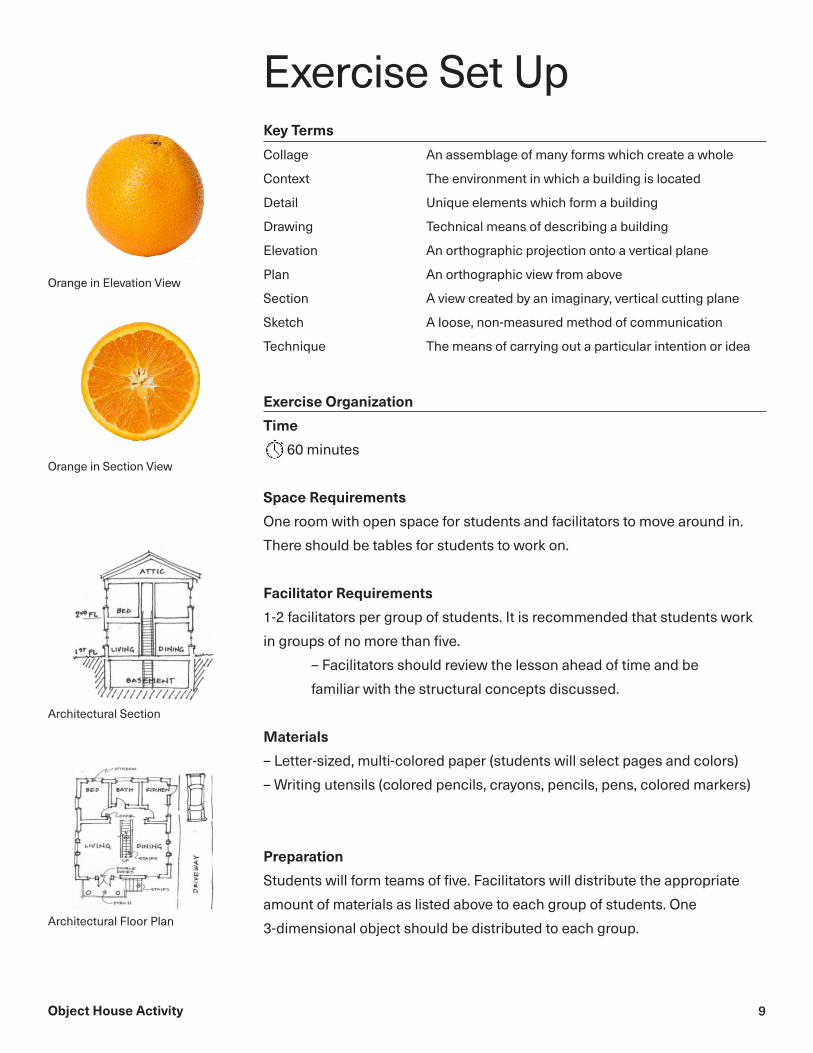
Key Terms
Collage
Context
Detail
Drawing
Elevation
Plan
Section
Sketch
Technique
An assemblage of many forms which create a whole
The environment in which a building is located
Unique elements which form a building
Technical means of describing a building
An orthographic projection onto a vertical plane
An orthographic view from above
A view created by an imaginary, vertical cutting plane
A loose, non-measured method of communication
The means of carrying out a particular intention or idea
Exercise Set Up
Orange in Elevation View
Orange in Section View
Architectural Floor Plan
Architectural Section
9

Object House Activity
Procedure
Summary
Facilitators will give each group a 3-dimensional object to reinterpret through
the design of a house. Students will communicate their designs through
conventional architectural drawings: plan, section, and elevation. Students
should consider their choice of technique. Questions to consider: How will I
communicate my idea about the house? Will I draw with colored pencils, or cut
out shapes and glue them together? How will I arrange the rooms and spaces
inside the house?
Step 1
5 minutes
– Students should sit in groups, according to their teams. Facilitators
will assign one object (see page 5) to each team. Students will work
independently with the same object to develop personal designs for a house.
Step 2
10 minutes
– Facilitators should offer feedback on technique and process to help the
student decide on their strategy for communication.
– Students should develop a technique based on the conventional drawing
types (see left), but may be given the flexibility to modify the convention.
Step 3
20 minutes
– Students will execute their technique to describe the design for the house.
Designs should include a kitchen, a living room, bedrooms, and a garage.
Students should also include the landscape around the house.
– Final drawings should include one plan, one section, and one elevation.
These may be composed on the same page or on separate pages.
Discuss
The desired outcome of Part I is for students to reinterpret the object
through the design for a house, then use the conventional drawing types to
communicate their design.
Conventional Drawing Types
Key Terms
Elevation
Plan
Section
Technique
Part I: Graphic Communication
Elevation
Plan Section
Student works on the house design
Blue foam object is reinterpreted
10

Object House Activity
Conventional Drawing Types
Break-Out Discussion
There are many ways that architects communicate their ideas to those
around them. The most common methods include graphic and verbal
communication. Drawing conventions ensure that architects speak a
“language” that those involved will understand. Architects also communicate
through sketches, collage, and other non-conventional techniques to
communicate ideas about architecture. Questions to pose include: How did
you use the conventional drawings to communicate your idea about the house?
Were there ideas that the conventional drawings didn’t communicate well?
Procedure
Summary:
Students will present their designs for the house to the larger group. Verbal
communication is just as important as graphic communication, and students
should work with facilitators to hone their technique for presentation.
Questions to consider: What elements of my drawing should I point to in order
to communicate an idea? Who is my audience? What are the most important
elements of the design that I would like to tell others about?
Step 1
10 minutes
– Once the drawing for the house is complete, students will practice a verbal
presentation of their work with the facilitators. Students should make bullet
points for the items they would like to present to the larger group.
Step 2
20 minutes
– Students will present their designs to the larger group. Facilitators will
select students to speak in order to maintain an orderly process.
– Students should be clear in their verbal presentations about the important
features of the design.
Part II: Verbal Communication
Student verbally presents drawing
Key Terms
Elevation
Plan
Section
Technique
Student displays their drawing
Elevation
Plan Section
11
Object House Activity
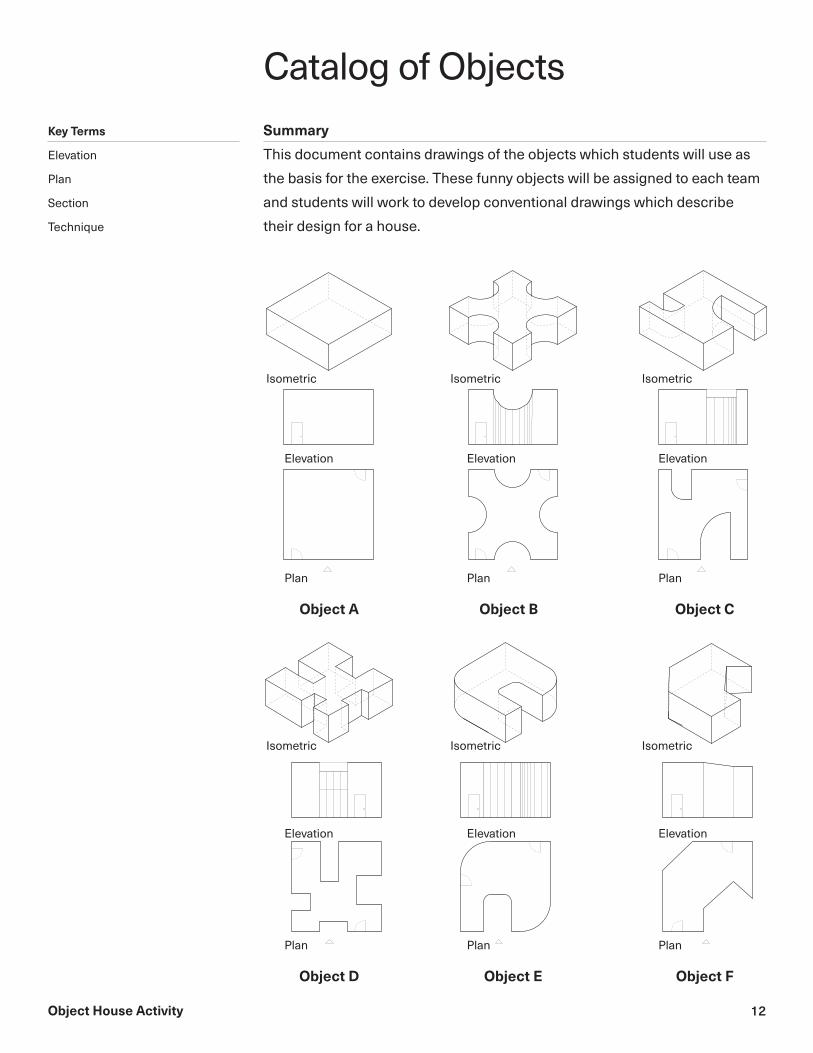
Summary
This document contains drawings of the objects which students will use as
the basis for the exercise. These funny objects will be assigned to each team
and students will work to develop conventional drawings which describe
their design for a house.
Catalog of ObjectsKey Terms
Elevation
Plan
Section
Technique
Object A
Object D
Object B
Object E
Object C
Object F
Plan
Plan
Plan
Plan
Plan
Plan
Elevation
Elevation
Elevation
Elevation
Elevation
Elevation
Isometric
Isometric
Isometric
Isometric
Isometric
Isometric
12
SummaryThis exercise will challenge students to evaluate the quantitative and qualitative components of space. The focus on scale will build upon the previous activities of structure and communication while allowing students to understand the ways in which architectural planning relates to real space.
Exercise 3Defining Space
Spatial Planning Activity
Exercise Organization
Time
60 minutes
Space Requirements
One large room with ample space and open floor area for students and
facilitators to move around and work in. Tables are required for Part I.
Facilitator Requirements
1-2 facilitators per group of students. It is recommended that students work
in groups of no more than five.
– Facilitators should review the lesson ahead of time and be
familiar with the concepts discussed.
Materials
– Letter-sized, multi-colored paper (students will select pages and colors)
– Writing utensils (colored pencils, crayons, pencils, pens, colored markers)
– Painter’s tape (1 roll per group)
– Measuring tape (1 per group)
Preparation
Students will form teams of five. Facilitators will distribute the appropriate
amount of materials as listed above to each group of students. One roll of
tape should be distributed to each group.
Key Terms
Area
Dimensions
Plan
Program
Qualitative
Quantitative
Scale
Space
Volume
The 2-dimensional space taken up by a building (unit2)
The real measurements in an architectural drawing
An orthographic view from above
The statement of requirements for a building
A descriptor of the way a space feels or is experienced
A descriptor of space through numbers or measurement
The relative size of architectural elements and spaces
The air between things; described by feeling or numbers
The 3-dimensional space taken up by a building (unit3)
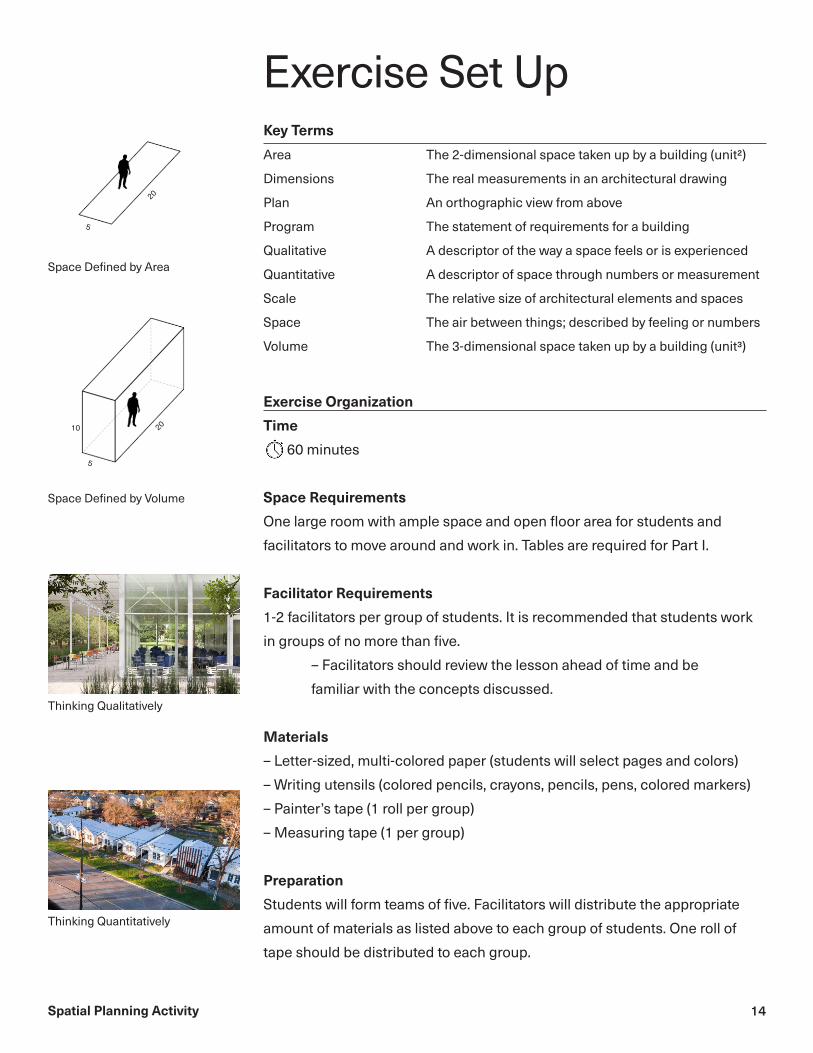
Exercise Set Up
Space Defined by Area
Space Defined by Volume
5
5
10
20
20
Thinking Quantitatively
Thinking Qualitatively
14
Spatial Planning Activity
Procedure
Summary
Students will work together to design a floor plan for a shipping container
house. While the exterior of the house should conform to the standard
shipping container dimension (8’-0” x 19’-0”), creativity should be applied to
the organization and layout of the interior spaces. Questions to consider: How
will the design affect the quantitative and qualitative components of the house?
Where should entries, windows, and doors be located? How do spaces relate to
each other?
Step 1
2 minutes
– Students should sit in teams. Facilitators will introduce the program to each
group (see page 5). Students should be given paper and writing utensils to
graphically produce the design.
Step 2
5 minutes
– Working independently, students in each team will produce a sketch with
their proposal for the house.
– Facilitators will lead a discussion within each group to synthesize the ideas
from each student into a group design.
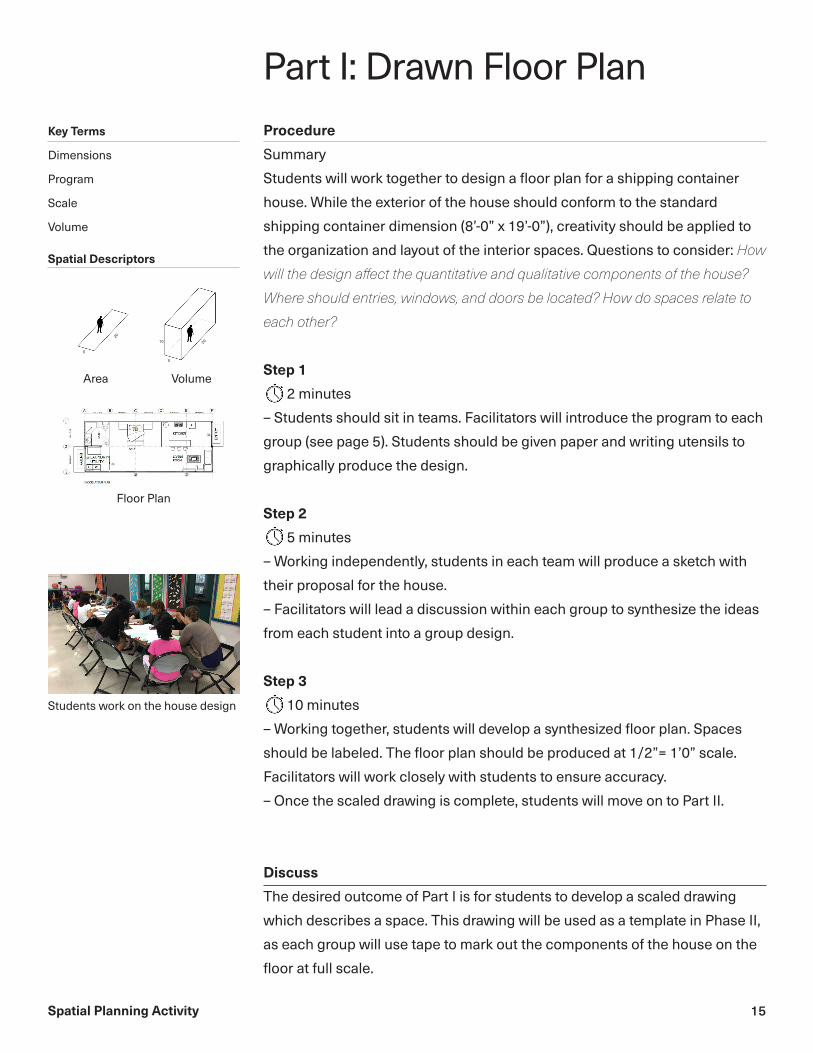
Step 3
10 minutes
– Working together, students will develop a synthesized floor plan. Spaces
should be labeled. The floor plan should be produced at 1/2”= 1’0” scale.
Facilitators will work closely with students to ensure accuracy.
– Once the scaled drawing is complete, students will move on to Part II.
Discuss
The desired outcome of Part I is for students to develop a scaled drawing
which describes a space. This drawing will be used as a template in Phase II,
as each group will use tape to mark out the components of the house on the
floor at full scale.
Spatial Descriptors
Key Terms
Dimensions
Program
Scale
Volume
Part I: Drawn Floor Plan
Students work on the house design
Floor Plan
5
5
1020
20
Area Volume
15

Spatial Planning Activity
Break-Out Discussion
Space is the air between things, and it may be described qualitatively
or quantitatively. The goal of this exercise is to allow students to gain
an understanding of scale, and how objects drawn on a page represent
dimensions in real space. The qualities of the shipping container home can
be imagined by students when standing inside the taped outlines. Questions
to pose include: How is the translated space different from what I had imagined
on paper? Are the spaces too big or too small? What would I have done differently
if given the chance?
Procedure
Summary:
Working together, students will translate their scaled plan for the shipping
container house onto the floor of the exercise space at full scale with painters
tape. This process will allow students to visually experience the scale of the
spaces they drew on paper in reality. Once the spaces are taped off, students
should gather inside the taped outline to evaluate the design. Questions
to consider: What elements of the design affect the quantitative aspects of the
space? What elements affect the qualitative aspects? Does the scale of the
spaces affect their relationship to each other?
Step 1
30 minutes
– Students will work together to translate the scaled dimensions from the
group drawing to taped outlines on the floor. Facilitators should work closely
with students to ensure accuracy. Multiple students may tape at the same
time if necessary.
– Be sure to include windows, doors, furniture elements, plumbing fixtures,
and other components of the design to maintain accuracy.
Step 2
13 minutes
– Each team will present their design to the larger group by pointing out the
design considerations which were translated into the taped plan.
Part II: Taped Floor Plan
Students with taped floor plan
Students with taped floor plan
Spatial Descriptors
Key Terms
Dimensions
Program
Scale
Volume
Container House Floor Plan
5
5
1020
20
Area Volume
16
Spatial Planning Activity
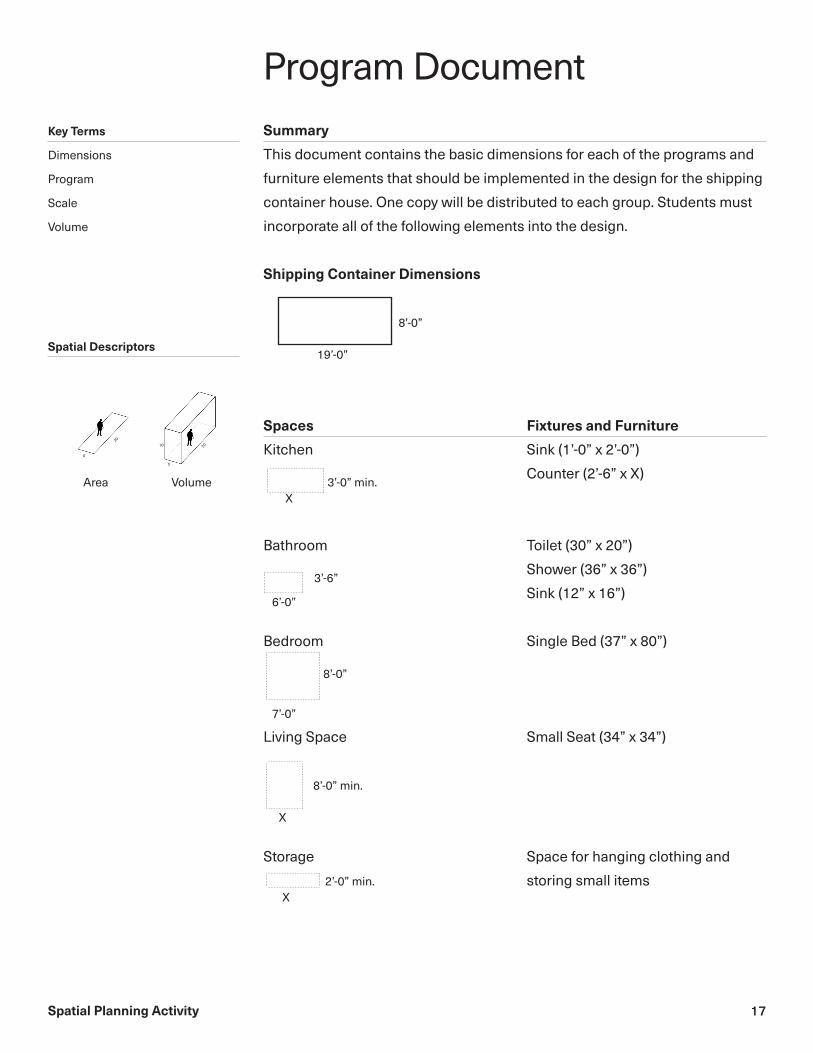
Summary
This document contains the basic dimensions for each of the programs and
furniture elements that should be implemented in the design for the shipping
container house. One copy will be distributed to each group. Students must
incorporate all of the following elements into the design.
Shipping Container Dimensions
Program Document
5
5
1020
20
Spaces
Kitchen
Bathroom
Bedroom
Living Space
Storage
Spatial Descriptors
Key Terms
Dimensions
Program
Scale
Volume
Area Volume
8’-0”
3’-0” min.
3’-6”
8’-0”
19’-0”
X
6’-0”
7’-0”
X
2’-0” min.X
8’-0” min.
Fixtures and Furniture
Sink (1’-0” x 2’-0”)
Counter (2’-6” x X)
Toilet (30” x 20”)
Shower (36” x 36”)
Sink (12” x 16”)
Single Bed (37” x 80”)
Small Seat (34” x 34”)
Space for hanging clothing and
storing small items
17

SummaryCities are made up of communities. In this exercise, students will work independently to develop a community plan, then aggregate their plans together to create a larger design for a city. Students will gain an understanding of the elements of the built environment which make up a community, and how communities combine to form a city.
Exercise 4Community City
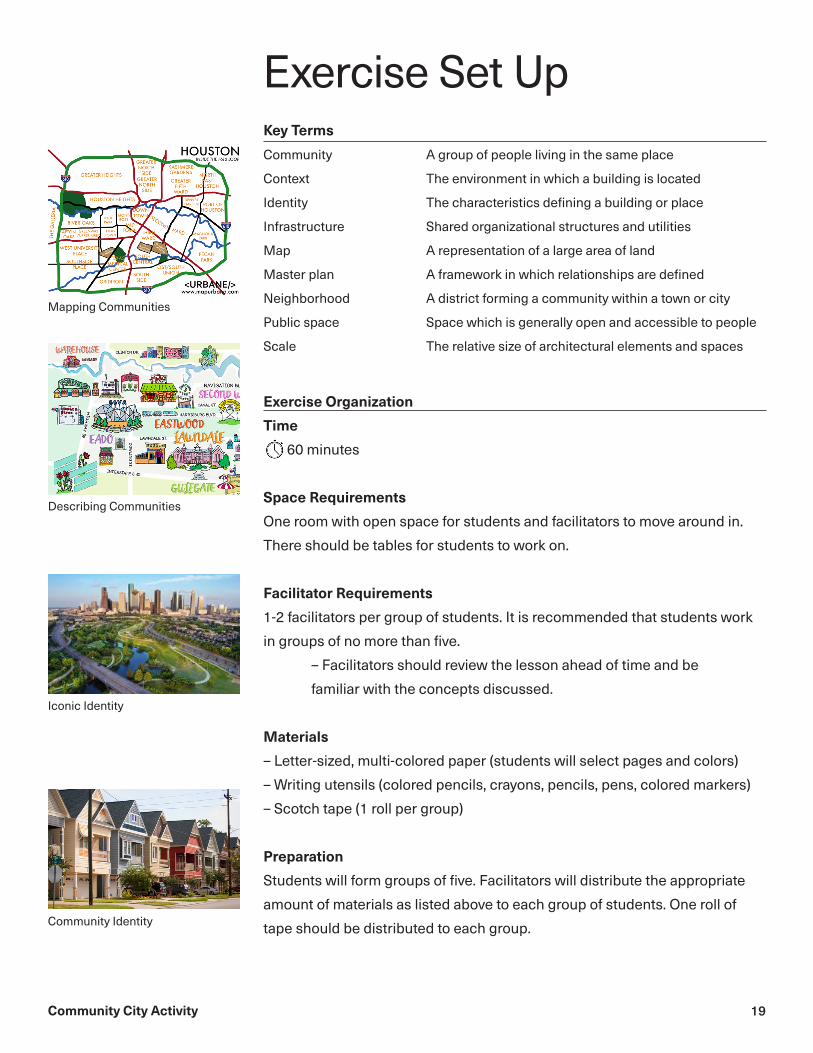
Community City Activity
Key Terms
Community
Context
Identity
Infrastructure
Map
Master plan
Neighborhood
Public space
Scale
Exercise Organization
Time
60 minutes
Space Requirements
One room with open space for students and facilitators to move around in.
There should be tables for students to work on.
Facilitator Requirements
1-2 facilitators per group of students. It is recommended that students work
in groups of no more than five.
– Facilitators should review the lesson ahead of time and be
familiar with the concepts discussed.
Materials
– Letter-sized, multi-colored paper (students will select pages and colors)
– Writing utensils (colored pencils, crayons, pencils, pens, colored markers)
– Scotch tape (1 roll per group)
Preparation
Students will form groups of five. Facilitators will distribute the appropriate
amount of materials as listed above to each group of students. One roll of
tape should be distributed to each group.
A group of people living in the same place
The environment in which a building is located
The characteristics defining a building or place
Shared organizational structures and utilities
A representation of a large area of land
A framework in which relationships are defined
A district forming a community within a town or city
Space which is generally open and accessible to people
The relative size of architectural elements and spaces
Exercise Set Up
Community Identity
Iconic Identity
Mapping Communities
Describing Communities
19
Community City Activity
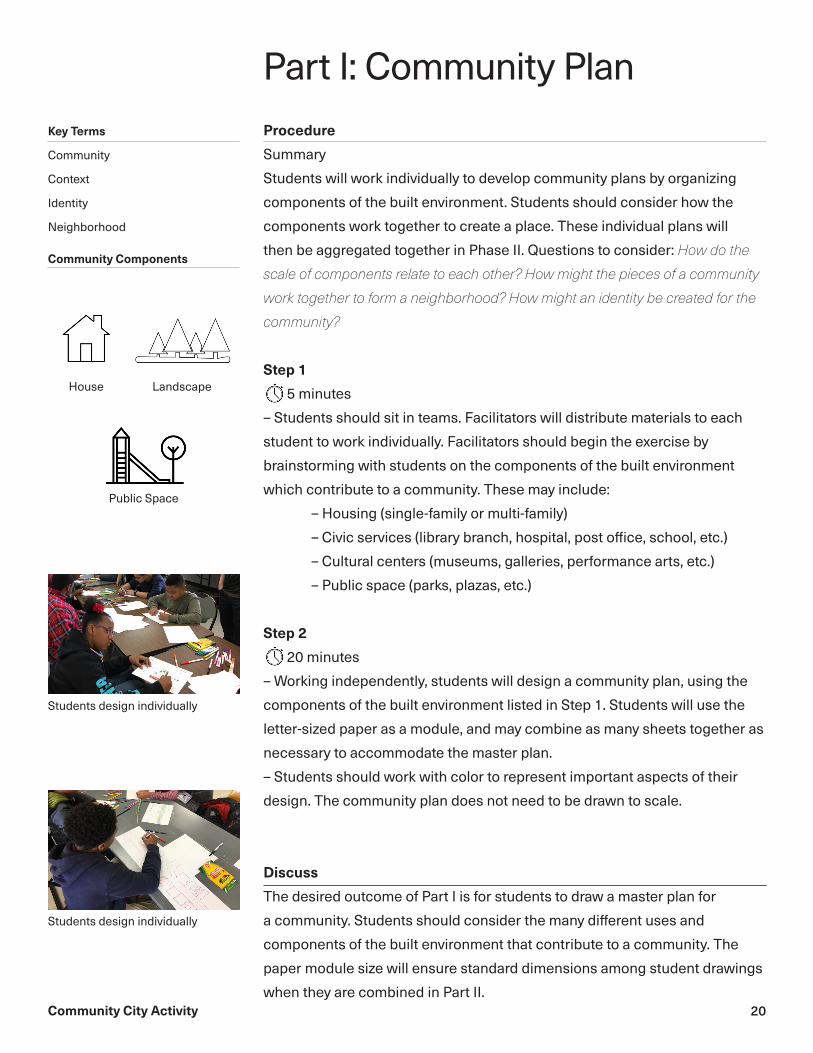
Procedure
Summary
Students will work individually to develop community plans by organizing
components of the built environment. Students should consider how the
components work together to create a place. These individual plans will
then be aggregated together in Phase II. Questions to consider: How do the
scale of components relate to each other? How might the pieces of a community
work together to form a neighborhood? How might an identity be created for the
community?
Step 1
5 minutes
– Students should sit in teams. Facilitators will distribute materials to each
student to work individually. Facilitators should begin the exercise by
brainstorming with students on the components of the built environment
which contribute to a community. These may include:
– Housing (single-family or multi-family)
– Civic services (library branch, hospital, post office, school, etc.)
– Cultural centers (museums, galleries, performance arts, etc.)
– Public space (parks, plazas, etc.)
Step 2
20 minutes
– Working independently, students will design a community plan, using the
components of the built environment listed in Step 1. Students will use the
letter-sized paper as a module, and may combine as many sheets together as
necessary to accommodate the master plan.
– Students should work with color to represent important aspects of their
design. The community plan does not need to be drawn to scale.
Discuss
The desired outcome of Part I is for students to draw a master plan for
a community. Students should consider the many different uses and
components of the built environment that contribute to a community. The
paper module size will ensure standard dimensions among student drawings
when they are combined in Part II.
Community Components
Key Terms
Community
Context
Identity
Neighborhood
Part I: Community Plan
House Landscape
Public Space
Students design individually
Students design individually
20

Community City Activity
Procedure
Summary:
Working together, students will attach their individual community plans
together to form a city. Once the attachment is complete, students will react
to each other’s plans by adding connective infrastructure to tie the city
together. Questions to consider: How do communities relate to one another?
What elements of the built environment provide connections?
Step 1
10 minutes
– Students will aggregate their individual community plan sheets together
with tape to form a city plan. Coordination among students determine which
individual plans might work best together.
Step 2
20 minutes
– Once the team has agreed upon and connected the city plan, students will
work to add connective infrastructure to link the individual plans together.
This may include:
– Streets and sidewalks
– Bike paths and walking trails
– Public parks and landscape features
Step 3
5 minutes
– In the remaining time, each team will present their city plan to the larger
group, pointing out the elements of the individual communities as well as the
ways in which the communities have been connected together.
Break-Out Discussion
Our city is a collection of many communities. These communities retain an
individual identity through social connections and the built environment.
These different communities are joined together with infrastructure which we
all share. Questions to pose include: What components of the built environment
give an identity to my community? How might I contribute to my community?
Part II: City Plan
Teams work to aggregate plans
Team presents their city plan
Connective Components
Key Terms
Community
Infrastructure
Map
Public space
Road & Sidewalk Paths
Public park
21
SummaryThis exercise will focus on the environment. The environment encompasses everything around us, including built components, the global climate, the context of local conditions, and our immediate landscape. This exercise will allow students to design a small park with a solar classroom to consider how architecture may respond to the environment.
Exercise 5Learning Park

Solar Park Activity
Exercise Organization
Time
60 minutes
Space Requirements
One room with open space for students and facilitators to move around in.
There should be tables for students to work on.
Facilitator Requirements
1-2 facilitators per table of students.
– Facilitators should review the lesson ahead of time and be
familiar with the concepts discussed.
Materials
– Letter-sized, multi-colored paper (students will select pages and colors)
– Writing utensils (colored pencils, crayons, pencils, pens, colored markers)
– Scissors
– Glue sticks
– Cardboard sheets, cut to 12” x 12” (3 sheets per student)
– Materials for Solar Classroom structure:
– Binder clips, Popsicle sticks, marshmallows, toothpicks
Preparation
Facilitators should distribute materials evenly among the tables where
students will be working.
Key Terms
Built environment
Climate
Community
Global environment
Landscape
Public space
Social environment
Sustainable design
Topography
All of the things around us that have been built by people
Prevailing weather conditions in an area
A group of people living in the same place
The closed ecosystem which encompasses the Earth
Physical features of an area of land, including vegetation
Space which is generally open and accessible to people
The immediate social setting in which people live
Design for a social, environmental, and ecological context
The composition of natural physical features of an area
Exercise Set Up
Cardboard Topography Model
Cardboard Topography Model
23

Solar Park Activity
Procedure
Summary
Students will work individually to design topography for their park. The shape
of the ground will determine the design for the program which will be added
to the park in Part II. This initial phase is meant to encourage students to
break away from thinking of the ground as flat. Questions to consider: How
can the ground be shaped? How might water be collected by the shape of the
ground? Will the solar classroom be located to obtain views? How might people
use the ground?
Step 1
10 minutes
– Students will draw contours onto the cardboard sheets (see diagrams at
left). Multiple contours of a smaller size may be traced on the same sheet.
One cardboard sheet must remain intact as a base for the smaller pieces to
be glued to.
– The site should contain high areas and low areas, as well as a considered
location for the solar classroom
Step 2
10 minutes
– Students will trace the cardboard shapes onto colored paper, then glue the
paper onto the cardboard to represent material.
– Green paper may be used for grass, blue for water, etc.
Step 3
5 minutes
– Once the cardboard shapes have an associated material, students will glue
the cardboard pieces together and attach them to the 12” x 12” base. This
will create the site for Part II.
Discuss
The desired outcome of Part I is for students to design a site model that will
be used in the design of Part II. The model should take into account elevation
changes, ground materials, and a site suitable for the solar classroom.
Cardboard Contour Template
Key Terms
Landscape
Public space
Sustainable design
Topography
Part I: Designing the Site
Base
Align Attach
12”
12”
12”
12”
Piece A Piece B
Students design the site
Materials are added to cardboard
24

Solar Park Activity
Procedure
Summary:
Working with the site from Part I, students will add programs to the park.
These programs will complement the landscape and add public uses.
Students should consider the ways in which landscape can be leveraged
through their design. Questions to consider: How might sustainable design be
implemented to enhance the environment? What will the public experience of the
park be?
Step 1
30 minutes
– Students will design and construct programs to add to the park with the
remaining materials. These programs may include:
– An outdoor learning space (solar classroom)
– A community garden
– Water feature
– Seating or rest area
– Picnic area
– Other
Step 2
5 minutes
– Once students have completed their designs, each student will present
their park individually to the larger group.
– Students should point out the important design features, as well as the
ways in which the design responds to the environment.
Break-Out Discussion
The environment is a critical for design consideration. The environment not
only includes physical landscape, but climate and social conditions as well.
It’s important that we recognize our environment and think about the ways in
which design might enhance it. Questions to pose include: How is the design
for the park sustainable? How might the specific park programs enhance the
social environment?
Part II: Designing the Park
Array of completed park models
Students work on park programs
Key Terms
Landscape
Public space
Sustainable design
Topography
Student solar classroom
25


