OWNERS MANUAL: HANDLING & SAFETY INSTRUCTIONS WARNING: READ THIS MANUAL AND THE OPERATOR’S MANUAL FOR THE HOST FIREARM IN THEIR ENTIRETY BEFORE OPERATING THIS SUPPRESSOR. FAILURE TO FOLLOW THE INSTRUCTIONS CONTAINED IN THESE MANUALS MAY RESULT IN DEATH, SERIOUS BODILY INJURY AND OR DAMAGE TO THE SUPPRESSOR AND THE HOST FIREARM. RIFLE CALIBER SUPPRESSORS
Transcript
OWNERS MANUAL: HANDLING & SAFETY INSTRUCTIONSWARNING: READ THIS MANUAL AND THE OPERATOR’S MANUAL FOR THE HOST FIREARM IN THEIR ENTIRETY BEFORE OPERATING THIS SUPPRESSOR. FAILURE TO FOLLOW THE INSTRUCTIONS CONTAINED IN THESE MANUALS MAY RESULT IN DEATH, SERIOUS BODILY INJURY AND OR DAMAGE TO THE SUPPRESSOR AND THE HOST FIREARM.
IN THIS MANUAL WARNINGS ARE INSTRUCTIONS OR INFORMATION THAT, IF IGNORED, CAN POTENTIALLY RESULT IN BODILY HARM, DEATH AND OR CATASTROPHIC MALFUNCTION OF THE SUPPRESSOR OR HOST WEAPON.
In this manual cautions are instructions or information that, if ignored, can potentially result in damage to the suppressor or host weapon, loss of functionality of the suppressor or host weapon and or lost parts.
W WARNING
W CAUTION
4
www.sigsauer.com
1.2 Safety Procedures for SIG SAUER Rifle Caliber Suppressors
ALWAYS ENSURE HOST FIREARM IS UNLOADED BY REMOVING THE MAGAZINE, LOCKING THE BOLT OR SLIDE TO THE REAR AND PHYSICALLY AND VISUALLY INSPECTING THE CHAMBER PRIOR TO INSTALLING, TIGHTENING OR REMOVING A SUPPRESSOR. FAILURE TO DO SO MAY RESULT IN DEATH SERIOUS BODILY HARM AND OR DAMAGE TO THE SUPPRESSOR AND HOST WEAPON.
DURING ROUTINE OPERATION SUPPRESSORS BECOME HOT ENOUGH TO PRODUCE SEVERE BURNS ON UNPROTECTED SKIN, DAMAGE TO NON HEAT RESISTANT MATERIALS AND MAY IGNITE FLAMMABLE MATERIALS OR LIQUIDS. ALWAYS WEAR HEAT RESISTANT GLOVES OR MITTS WHEN HANDLING SUPPRESSORS AFTER FIRING. DO NOT PLACE A SUPPRESSOR OR HOST WEAPON ON A SURFACE THAT CAN BE DAMAGED OR IGNITED BY HOT METAL AFTER FIRING.
W WARNING
W WARNING
5
YOUR SIG SUPPRESSOR IS DESIGNED TO REDUCE THE SOUND PRESSURE OF THE CARTRIDGE IT IS INTENDED FOR TO BELOW 140 Db. THIS IS THE OSHA STANDARD FOR “HEARING SAFE” SOUND PRESSURES OF IMPULSE OR IMPACT NOISE. NOISE EXPOSURE STANDARDS FOR A MORE SUSTAINED DURATION BEYOND IMPULSE OR IMPACT LEVELS WILL BE LOWER THAN 140 Db AND THE USE OF ADDITIONAL HEARING PROTECT MAY BE REQUIRED TO MAINTAIN A “HEARING SAFE” LEVEL.
1.3 General Firearms Safety Rules and Procedures1.3.1 Safety Rulesa. Treat every weapon as if it were loaded.
b. Never point a weapon at anything you do not intend to shoot.
c. Keep your trigger finger out of the trigger guard and off the trigger until you are ready to shoot.
d. Keep the weapon on safe (if so equipped) until you are ready to shoot.
e. Be sure of you have identified your intended target and know what lies beyond.
W WARNING
6
www.sigsauer.com
1.3.2 Safety Proceduresa. Always wear OSHA approved hearing and eye protection when shooting firearms.
b. When handing a weapon to someone else or prior to accepting a weapon from another person, always physically and visually check the chamber so both people can ensure the weapon is unloaded.
c. Every SIG SAUER firearm is shipped with a chamber safety flag. The chamber safety flag prevents the chambering of a round when installed and provides a readily visible indication that the weapon’s chamber is empty. Regardless of the manufacturer of the host firearm, SIG SAUER recommends using a chamber safety flag when not actually firing the firearm.
d. Ensure that unauthorized people never have access to a firearm. Never operate or handle a weapon when you are under the influence of alcohol or drugs.
e. Be aware of the direction that the muzzle of the weapon is pointed at all times while handling or operating the weapon. Never allow the muzzle to be inadvertently pointed at another person.
f. Always use serviceable, clean ammunition that has been manufactured to the Sporting Arms and Ammunition Manufacturers’ Institute (SAAMI) specification of the proper caliber for the weapon. Never oil or otherwise lubricate ammunition. Do not use damaged or dented ammunition.
g. Always ensure weapons are unloaded prior to storage, maintenance or when otherwise not in use.
h. Any maintenance or disassembly beyond the user level described in this manual is to be performed by qualified personnel specifically trained on the maintenance of SIG products in accordance with the SIG Sauer technical manual for this suppressor.
7
2.0 SpecificationsSIG SAUER Rifle Caliber Suppressors are constructed from either stainless steel or titanium (Ti). There are Quick Detach (QD) variants and Direct Thread variants in each caliber with the exception of .338 caliber suppressors which are only available in Titanium, QD configuration. The mount, blast baffle, sound reduction baffles and end cap of SIG SAUER Rifle Caliber Suppressors are a permanent weldment and cannot be disassembled.
MODEL LENGTH DIAMETER WEIGHT THREADS ON MOUNTING
SRD556 6.2 in (158 mm) 1.625 in (40.6mm) 14.8 oz (420 g) 1/2 in-28 TAPER THREAD
SRD762 7.2 in (183 mm) 1.625 in (40.6 mm) 17.4 oz (493 g) 5/8 in-24 TAPER THREAD
SRD556-QD 6.4 in (163 mm) 1.625 in (40.6 mm) 15.6 oz (442 g) 1/2 in-28 TAPER-LOK™
SRD762-QD 7.3 in (185 mm) 1.625 in (40.6 mm) 18.9 oz (536 g) 5/8 in-24 TAPER-LOK™
SRD556Ti 6.4 in (163 mm) 1.75 in (44.5 mm) 12.7 oz (360 g) 1/2 in-28 TAPER THREAD
SRD762Ti 9.3 in (236 mm) 1.75 in (44.5 mm) 19.1 oz (541 g) 5/8 in-24 TAPER THREAD
SRD556Ti-QD 7.05 in (179 mm) 1.75 in (44.5 mm) 13.2 oz (374 g) 1/2 in-28 TAPER-LOK™
SRD762Ti-QD 8.4 in (213 mm) 1.75 in (44.5 mm) 16.9 oz (479 g) 5/8 in-24 TAPER-LOK™
SRD338Ti-QD 9.5 in (241 mm) 1.75 in (44.5 mm) 19.4 oz (550 g) M18-1.5 TAPER-LOK™
8
www.sigsauer.com
2.1 Components2.1.1 Direct Mount Rifle Caliber Suppressors
Wrench Flats
Wrench Flats
Baffle Stack
MountFig. 2.2a
9
2.1.2 QD Rifle Caliber Suppressor Components
QD Base
CrushWasher
MuzzleBreak
Latch
Baffle Stack
Mount
Flash Hider
Fig. 2.2b
10
www.sigsauer.com
3.0 Operating
3.1 Attaching SIG SAUER Direct Mount Rifle Caliber Suppressors3.1.1 After ensuring the host weapon is unloaded, follow the steps to attach your SIG SAUER Direct Mount Suppressor.
ALWAYS ENSURE HOST FIREARM IS UNLOADED (SEE SECTION 1.2). FAILURE TO DO SO MAY RESULT IN DEATH, SERIOUS BODILY HARM AND OR DAMAGE TO THE SUPPRESSOR AND HOST WEAPON.
DISCHARGING A FIREARM WITH AN IMPROPERLY INSTALLED SUPPRESSOR CAN RESULT IN SERIOUS INJURY AND OR DAMAGE TO THE SUPPRESSOR AND OR HOST FIREARM.
Note: All references to clockwise and counterclockwise in this manual are from the perspective of looking at the front of the suppressor.
W WARNING
W WARNING
11
Prolonged full automatic fire or heavy volumes of semi-automatic fire can result in overheating which will reduce the service life of your suppressor, particularly titanium suppressors. Host weapons with short barrels will accelerate the heating effect.
a. Ensure the threads on the host firearm’s muzzle match the threads on your suppressor.
b. Being careful to avoid cross threading the parts, place the opening of the mount portion of the suppressor on the muzzle of the host firearm and screw the suppressor on firmly hand tight. If a torque wrench is available it is recommended to torque your suppressor to 25-30 ft lb (See Fig. 3.1).
W CAUTION
2
1 Fig. 3.1
12
www.sigsauer.com
2
3
1
3.2 Attaching SIG SAUER QD Rifle Caliber Suppressors
3.2.1 After ensuring the host weapon is unloaded, follow these steps to attach your SIG SAUER QD Suppressor Base.
a. Ensure the threads on the host firearm’s muzzle and the interior of the QD Base are clean, free from oil and dry (cleaning with acetone is recommended). It is recommended to use a receiver fixture designed for the host weapon when removing or installing muzzle devices. Do not use any washers or shims when installing the QD Base.
b. Apply 2-3 drops of Rocksett™ adhesive (supplied) to the threads of the host weapon’s muzzle and spread evenly across the threaded portion of the muzzle.
c. Tighten QD Base and torque to 20-30 ft lb and wipe off any excess Rocksett™. Allow 24 hours to cure before use (See Fig 3.2a).
Fig. 3.2a
13
d. When installing the muzzle brake use the provided crush washer with the taper of the crush washer facing forward. Align the ports of the muzzle brake to the left and right (See Fig. 3.2b) When installing the flash hider do not use the crush washer.
Fig. 3.2b
14
www.sigsauer.com
2
1
3.2.2 After ensuring the host weapon is unloaded, follow these steps to attach your SIG SAUER QD Suppressor to the QD Base.
a. Ensure the threads and tapered bearing surfaces of the suppressor and the base are clean and undamaged. Do not lubricate the threads or bearing surface.
b. Start threading the suppressor clockwise onto the QD base by hand until the tapered bearing surfaces of the suppressor and the QD base come into contact and tighten until snug (See Fig. 3.2c).
Fig. 3.2c
15
3.3 Operating SIG SAUER Rifle Caliber Suppressors
WHEN FIRING SUPPRESSED FIREARMS, FOLLOW ALL NORMAL SAFETY RULES AND PRACTICES APPLYING TO UNSUPPRESSED FIREARMS. FAILURE TO DO SO CAN RESULT IN DEATH, SERIOUS INJURY, AND DAMAGE TO THE SUPPRESSOR AND OR HOST FIREARM.
DO NOT CONTINUE TO FIRE AMMUNITION THRU AN OVERHEATED SUPPRESSOR. THIS CAN RESULT IN FAILURE OF THE SUPPRESSOR ACCOMPANIED BY FRAGMENT AND HOT GAS HAZARDS. DEATH, SERIOUS INJURY, AND DAMAGE TO THE SUPPRESSOR AND OR HOST FIREARM.
DO NOT FIRE NON-JACKETED, FRANGIBLE, PRE-FRAGMENTED, MULTI-PROJECTILE OR SHOT CARTRIDGES THROUGH SIG CENTERFIRE PISTOL OR RIFLE SUPPRESSORS. FIRING ANYTHING BUT JACKETED PROJECTILES MANUFACTURED TO SAAMI SPECIFICATION THRU CENTERFIRE SUPPRESSORS MAY RESULT IN A FRAGMENT HAZARD, DEATH, SERIOUS INJURY, AND OR DAMAGE TO THE SUPPRESSOR OR HOST FIREARM.
W WARNING
W WARNING
W WARNING
16
www.sigsauer.com
Subsonic ammunition projectiles generally requires a faster rifling twist rate to stabilize than comparable super-sonic projectiles. Prior to firing subsonic ammunition consult the ammunition manufacturer’s recommended twist rate and ensure your host firearm conforms to their recommendation. Firing ammunition through a suppressed weapon with an insufficient twist rate may result in damage to your suppressor.
3.3 (cont.) Operating SIG SAUER Rifle Caliber Suppressorsa. SIG SAUER recommends firing jacketed, subsonic ammunition thru your suppressor. The service life of your suppressor is directly related to the firing schedule it is subjected to. Overheating the suppressor will shorten its service life and in extreme cases may result in immediate damage to your suppressor. Firing supersonic ammunition thru the suppressor will accelerate the rate of heat buildup compared to subsonic ammunition. Discoloration of the suppressor tube is an indication of excessive heat buildup.
b. Check frequently during firing to ensure the suppressor remains securely threaded to the host firearm.
4.0 MaintenanceCleaning the inside of SIG SAUER Rifle Caliber Suppressors is not required. Avoid getting cleaning solvents or lubricants inside of the suppressor. The outside of the suppressor may be cleaned with a bristle brush and solvent. Ensure the suppressor is dry before use.
W CAUTION
17
ALWAYS ENSURE HOST FIREARM IS UNLOADED BY REMOVING THE MAGAZINE, LOCKING THE BOLT OR SLIDE TO THE REAR AND PHYSICALLY AND VISUALLY INSPECTING THE CHAMBER PRIOR TO INSTALLING, TIGHTENING OR REMOVING A SUPPRESSOR. FAILURE TO DO SO MAY RESULT IN DEATH SERIOUS BODILY HARM AND OR DAMAGE TO THE SUPPRESSOR AND HOST WEAPON.
4.1 Removing Direct Mount Suppressor4.1.1 After ensuring the host weapon is unloaded, follow these steps to remove your SIG SAUER Direct Mount Suppressor.
a. SIG SAUER recommends removing the Direct Mount suppressor every 500 rounds to ensure built up carbon does not seize the suppressor to the barrel of the host firearm. Use of a receiver fixture is recommended when removing suppressors.
b. Removing the suppressor prior to cleaning the bore of the host firearm is recommended. If you must to clean the host firearm’s bore with suppressor attached do not allow solvents or cleaners inside of the suppressor. Cleaning patches should be pulled from the muzzle towards the chamber to avoid patches snagging and/or getting trapped inside the suppressor. Rope style (Bore Snake™) bore cleaning swabs are not recommended when cleaning the host firearm’s bore with suppressor attached.
W WARNING
18
www.sigsauer.com
4.2 Removing QD SuppressorSIG SAUER recommends removing the QD Suppressor every 250 rounds to ensure built up carbon does not seize the suppressor to the QD Base.
4.2.1 After ensuring the host weapon is unloaded, follow these steps to remove your SIG SAUER QD Suppressor.
a. Brace the host firearm and loosen the suppressor by rotating counter clockwise until it breaks loose from the taper.
b. Once suppressor is loose, depress the latch and rotate the suppressor counter clockwise to remove from QD Base.
Attempting to remove a SIG SAUER QD Suppressor without disengaging the latch may result in damage to the latch.
W CAUTION
21
Fig. 4.2a
19
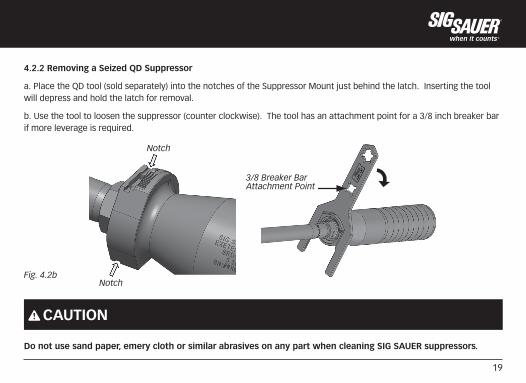
4.2.2 Removing a Seized QD Suppressor
a. Place the QD tool (sold separately) into the notches of the Suppressor Mount just behind the latch. Inserting the tool will depress and hold the latch for removal.
b. Use the tool to loosen the suppressor (counter clockwise). The tool has an attachment point for a 3/8 inch breaker bar if more leverage is required.
Do not use sand paper, emery cloth or similar abrasives on any part when cleaning SIG SAUER suppressors.
W CAUTION
Notch
Notch
3/8 Breaker BarAttachment Point
Fig. 4.2b
20
www.sigsauer.com
SIG SAUER® Limited Lifetime WarrantySIG SAUER® warrants that the enclosed suppressor was originally manufactured free of defects in material, workmanship, and mechanical function. For the lifetime of the original purchaser, SIG SAUER agrees to correct any defect in the suppressor for the original purchaser by repair or adjustment, at SIG SAUER’s option, with the same or comparable quality components; provided, however, that the suppressor is returned with a copy of the original purchaser’s tax stamp (Stamped form 4 from the BATFE) and freight paid to:
SIG SAUER18 Industrial DriveExeter, NH 03833
This limited warranty is null and void if the suppressor has been misused, damaged (by accident or otherwise), improperly mounted to the host firearm, fired with hand loaded, reloaded or improper ammunition, fired with an obstruction in the barrel, damaged through failure to provide reasonable and necessary maintenance as described in the manual accompanying the suppressor, or if unauthorized repair or any alteration, including of a cosmetic nature, has been performed to the suppressor. This limited warranty does not apply to normal wear and tear of any parts. Subject to the foregoing, this limited warranty confers the right to have the covered suppressor or its parts repaired or adjusted exclusively upon the original purchaser, which right is not transferable to any other person. No implied warranties of any kind are made herein and this warranty does not apply to any accessory items attached or appurtenant to the firearm. In no event shall SIG SAUER be liable for any incidental or consequential damages arising from or in connection with this limited warranty.
21
Notes:
22
www.sigsauer.com
Notes:
23
Notes:
72 Pease Boulevard, Newington, NH 03801 USA
P/N 8501925-01 REV00
FOR PRODUCT SERVICE ON THIS MODEL, PLEASE CALL (603) 610-3000 EXT. 1