27
RightFax Connector for SharePoint 2007 Version 2.0 Administrator‟s Guide

RightFax Connector for SharePoint 2007
Version 2.0
Administrator‟s Guide

Edition
Information in this document applies to version 2.0 of the RightFax Connector for SharePoint 2007 Administrator’s Guide.
Copyright Notice
©2008 Captaris. All rights reserved. No part of this publication may be reproduced, transmitted, transcribed, stored in a retrieval system, or translated into any language in any form by any means without the written permission of Captaris. Captaris products Interchange, RightFax and
Teamplate are trademarks of Captaris. All other company, brand and product names are the property and/or trademarks of their respective
companies.
Captaris
301 116th Ave SE, Suite 400
Bellevue, WA 98104 (425) 455-6000
http://www.captaris.com Information in this document is subject to change without notice. Companies, names, and data used in examples herein are fictitious unless
otherwise noted.
Portions of this product Copyright © 2002-2006 Glyph & Cog, LLC. Portions Copyright © 2001 artofcode LLC. This software is based in part on the work of the Independent JPEG Group. This software is based in part on the work of the Freetype Team. Portions Copyright © 1998 Soft
Horizons. Portions Copyright © 2001 URW++. All Rights Reserved. Outside In® Viewer Technology © 1992-2004 Stellent Chicago, Inc. All
rights reserved. Includes Adobe® PDF Library technology. Adobe, Acrobat and the Acrobat logo are trademarks of Adobe Systems Incorporated. Portions Copyright ©1999 Ligature. Portions Copyright © TMS, Inc. 1994-2001. All rights reserved.
Certain portions of this software are copyrighted by Ligature Ltd. who makes no representation or warranties with respect to the contents hereof
and specifically disclaims any implied warranties of merchantability and fitness for any particular purpose. The Ligature portion of the software is licensed by Ligature as is.
For More Information
Captaris is a leading provider of Business Information Delivery solutions that integrate, process and automate the flow of messages, data and documents. Captaris produces a suite of proven products and services, in partnership with leading enterprise technology companies, delivered
through a global distribution network. Captaris has installed over 80,000 systems in 44 countries, with 93 of the Fortune 100 using the company's
award-winning products and services to reduce costs and increase the performance of critical business information investments. For more information please contact us at www.captaris.com or call +1.520.320.7000.
RightFax Connector for SharePoint 2007 Administrator’s Guide
Captaris Page 3 of 27
Table of Contents
Chapter 1—Overview of Features ............................................................................... 4
Chapter 2—Upgrading from an Older Version ........................................................... 5
Removing the Existing Connector from the RightFax Server ...................................5
Removing the Existing Connector from the SharePoint Server ...............................6
Chapter 3—Installing the RIGHTFAX CONNECTOR FOR SHAREPOINT 2007 .............. 7
Installation Prerequisites ................................................................................................7
Installing in a Shared Services (“Collective”) Environment ......................................8
Installing in a Cluster Environment ............................................................................ 11
Installing the RightFax Package ................................................................................ 13
Installing the SharePoint Package ............................................................................ 15
Giving the RightFax Administrative User „Log On as a Service‟ Permissions ...... 16
Chapter 4—Administering the RIGHTFAX CONNECTOR FOR SHAREPOINT 2007 .... 17
Connecting to a RightFax Server .............................................................................. 17
Scheduling the Fax Receiver and Sender Services ............................................... 17
Monitoring the Error Queue and Correcting In-Error Faxes .................................. 18
Managing Subscriptions ............................................................................................. 19
Managing Farm Features ........................................................................................... 20
Monitoring Timer Job Status ....................................................................................... 21
Activating and Deactivating Site Collection Features ......................................... 21
Chapter 5—Using the RIGHTFAX CONNECTOR FOR SHAREPOINT 2007 .................. 22
Creating a New Fax Library from a Template ........................................................ 22
Accessing Fax Import and Send Settings ................................................................ 22
Configuring Fax Import Settings ................................................................................ 23
Configuring Fax Sending Settings ............................................................................. 25
Sending Faxes .............................................................................................................. 25
Fax Content Type: Paper ........................................................................................... 26
Creating a Site with the „Paper Center‟ Template ................................................ 27

RightFax Connector for SharePoint 2007 Administrator’s Guide
Captaris Page 4 of 27
Chapter 1—Overview of Features
With the RIGHTFAX CONNECTOR FOR SHAREPOINT 2007, you can:
Send and receive faxes through Document Libraries without the RightFax client
application being installed on the client machine.
Make subscriptions to Document Libraries by configuring fax import-and-send settings
and specifying grouping options.
RightFax or Windows NT authentication.
Comprehensive error logging via the RFMOSS event viewer on the RightFax server, or
text files in the SharePoint Logs directory.
Turn the Connector on or off by enabling or disabling all site collections from the Central
Administration, or per site collection.
Seamless integration with SharePoint 2007, following standards of the default SharePoint
settings.

RightFax Connector for SharePoint 2007 Administrator’s Guide
Captaris Page 5 of 27
Chapter 2—Upgrading from an Older Version
This chapter explains what to do if you have an existing version of the RightFax Connector for
SharePoint 2007. If you are performing a fresh install (you do not have an existing copy of the
Connector on your computer), then skip this chapter and proceed to ―Chapter 3—Installing the
RIGHTFAX CONNECTOR FOR SHAREPOINT 2007‖ on page 7.
Removing the Existing Connector from the RightFax Server
CAUTION: When you remove the existing Connector software, do NOT remove the existing
Connector database. See Step 7 of this procedure.
1. On the RightFax server, open Add/Remove Programs.
2. Click RightFax Connector for SharePoint 2007 > Change/Remove.
The InstallShield Wizard opens.
3. Follow the prompts.
4. At the Modify, repair, or remove the program screen, click Remove.
5. At the prompt Do you want to completely remove the selected application and all of
its features?, click Yes.
6. At the prompt Do you want to delete settings?, click No.
Note: This prompt appears only if you are upgrading from an environment in which both the
RightFax and SharePoint components of the Connector are installed on the same physical
computer. (Captaris does not support such a ―single computer‖ configuration.) If you are
using separate computers for the RightFax and SharePoint servers, then you will not see
this prompt. For information on this ―single computer‖ configuration issue, see
―Installation Prerequisites‖ on page 7.
7. At the prompt Do you want to delete the RightFax Connector database?, click No
(Figure 1).
Figure 1: CAUTION -- Click NO to keep the existing Connector database.
8. When removal of the application is complete, continue with ―Removing the Existing
Connector from the SharePoint Server‖ on page 6.

RightFax Connector for SharePoint 2007 Administrator’s Guide
Captaris Page 6 of 27
Removing the Existing Connector from the SharePoint Server
1. On the SharePoint server, open Add/Remove Programs.
2. Click RightFax Connector for SharePoint 2007 > Change/Remove.
The InstallShield Wizard opens.
3. Follow the prompts.
4. At the Modify, repair, or remove the program screen, click Remove.
5. At the prompt Do you want to completely remove the selected application and all of
its features?, click Yes.
6. At the prompt Do you want to delete settings?, click No.
7. When removal of the application is complete, continue with ―Chapter 3—Installing the
RIGHTFAX CONNECTOR FOR SHAREPOINT 2007‖ on page 7.
RightFax Connector for SharePoint 2007 Administrator’s Guide
Captaris Page 7 of 27
Chapter 3—Installing the RIGHTFAX CONNECTOR FOR
SHAREPOINT 2007
Installation Prerequisites
RightFax Server prerequisites:
Microsoft Windows Server 2003
Access to an SQL Server 2005 database
Administrator privilege on the local machine
Microsoft .NET Framework 3.0
RightFax Server version 9.3 and most current Service Release or Feature Packs
English Only Support
SharePoint Server prerequisites:
Microsoft Windows Server 2003
IIS 6.0
Administrator privilege on the local machine
Microsoft .NET Framework 3.0
Microsoft Office SharePoint Server 2007 with most recent updates
English Only Support
Configuration prerequisites:
The RightFax Connector for SharePoint 2007 deploys two distinct pieces of software: one that
you install on the RightFax server to communicate with SharePoint, and one that you install on
the SharePoint server to communicate with RightFax.
CAUTION: You must install RightFax and SharePoint on different physical computers.
Captaris does not support any configuration in which both products, or both
pieces of the Connector software, are on the same computer.
Some of our customers have deployed a "single computer" configuration for testing,
demonstrations, etc. in the past. Accordingly, ―Chapter 2—Upgrading from an Older Version‖
(page 5) makes special note of steps to take to remove our software in a "single computer"
configuration.
Despite this acknowledge that such configurations might well exist among our customers,
Captaris recommends that you use the RightFax Connector for SharePoint 2007 only in a "dual
computer" configuration. We do not support the "single computer" configuration.
RightFax Connector for SharePoint 2007 Administrator’s Guide
Captaris Page 8 of 27
Installing in a Shared Services (“Collective”) Environment
For information on installing in a cluster, see ―Installing in a Cluster Environment‖ on page 11.
Deployment prerequisites
Domain Server: Microsoft Windows Server 2003 with Active Directory
Database Server : Microsoft Windows Server 2003 with SQL 2005
RightFax Collective: two servers running Microsoft Windows Server 2003 with
RightFax in collective mode using the Database Server as a shared database and Data
Sharing Configured from the Server Module service
Single MOSS Server:
Microsoft Windows Server 2003
SQL 2005
Microsoft Office SharePoint Server 2007
—OR—
MOSS Medium Farm:
SQL Server
Application Server
Two Web Front Ends
Note: If you use a MOSS medium farm, install the RFMOSS on all the SharePoint servers
(Application server and Web Front End servers).
Note: Configure all servers to connect to the same domain.

RightFax Connector for SharePoint 2007 Administrator’s Guide
Captaris Page 9 of 27
To install in a collective environment:
1. Install the RFMOSS on the MOSS Server/Farm (see ―Chapter 3—Installing the
RIGHTFAX CONNECTOR FOR SHAREPOINT 2007‖ on page 7).
2. In the first node of the RightFax collective, run the RFMOSS setup in the same way as
with a single RightFax server.
3. In the second node, run the RFMOSS setup.
Note: If you are upgrading from an existing Connector, you kept the existing database in Step 7
of the procedure ―Removing the Existing Connector from the RightFax Server‖ (page 5).
In that scenario, you will see the prompt shown in Figure 4.
4. At the prompt RightFax Connector database„<DatabaseName>‟ already exists on
server „<ServerName>‟, click Yes (Figure 4).
Figure 2: CAUTION -- Click YES to reuse the existing Connector database.
CAUTION: If you choose No (and create a new database), the old database will be deleted
and the collective will use the new one.
5. Verify that the RightFax Connector for SharePoint 2007 service is running on both
servers.
6. From SharePoint Central Administration, create a server configuration for each RightFax
server in the collective.

RightFax Connector for SharePoint 2007 Administrator’s Guide
Captaris Page 10 of 27
7. In SharePoint, create two fax libraries: one to import from the first node in the collective;
and one to import from the second node.
8. In RightFax Enterprise Fax Manager, in the relevant server tree, click Users, and then
verify that the user that you configured for this library exists (Figure 3).
Figure 3: Use Enterprise Fax Manager to verify that the user exists on the collective.
9. Test the collective by sending faxes from FaxUtil on one of the nodes, and observing
how the faxes are imported into the fax library.
To configure a SharePoint Library for redundancy:
1. Install the RFMOSS connector on each node of the collective.
2. Create a server in SharePoint operations for the load balancer virtual server.
3. Create a document library that use the load balancer virtual server.

RightFax Connector for SharePoint 2007 Administrator’s Guide
Captaris Page 11 of 27
Installing in a Cluster Environment
For information on installing in a collective, see ―Installing in a Shared Services (―Collective‖)
Environment‖ on page 8.
Deployment Prerequisites
Domain Server: Microsoft Windows Server 2003 with Active Directory
Database Server: Microsoft Windows Server 2003 with SQL 2005
RightFax Collective: two servers running Microsoft Windows Server 2003 with
RightFax in cluster mode using the Database Server as a shared database and the Win
Cluster Quorum Disk for Data Sharing Configured from the Server Module service
Single MOSS Server:
Microsoft Windows Server 2003
SQL 2005
Microsoft Office SharePoint Server 2007
—OR—
MOSS Medium Farm:
SQL Server
Application Server
Two Web Front Ends
Note: If you use a MOSS medium farm, install the RFMOSS on all the SharePoint servers
(Application server and Web Front End servers).
Note: Configure all servers to connect to the same domain.
To install in a cluster environment:
1. Install the RFMOSS on the MOSS Server/Farm (see ―Installing the RightFax Package‖
on page 13).
2. In the first node of the RightFax collective, run the RFMOSS setup in the same way as
with a single RightFax server.
3. In the second node, run the RFMOSS setup.

RightFax Connector for SharePoint 2007 Administrator’s Guide
Captaris Page 12 of 27
Note: If you are upgrading from an existing Connector, you kept the existing database in step 7
of the procedure ―Removing the Existing Connector from the RightFax Server‖ (page 5).
In that scenario, you will see the prompt shown in Figure 4.
4. At the prompt RightFax Connector database„<DatabaseName>‟ already exists on
server „<ServerName>‟, click Yes (Figure 4).
Figure 4: CAUTION -- Click YES to reuse the existing Connector database.
CAUTION: If you choose No (and create a new database), the old database will be deleted
and both clusters will use the new one.
5. In Cluster Administrator, add a new Generic service resource for the RightFax
Connector for SharePoint 2007service.
6. Verify that the RightFax Connector for SharePoint 2007 service is running on the
active cluster node.
7. In SharePoint Central Administration, create a server configuration for the Virtual
Cluster Server.
8. In SharePoint, create a Fax Library, and configure it to import from the Virtual Cluster
Server.
9. In RightFax Enterprise Fax Manager, in the relevant server tree, click Users, and then
verify that the user that you configured for this library exists (Figure 5).
Figure 5: Use Enterprise Fax Manager to verify that the user exists on the cluster.
10. Test the cluster by sending faxes from FaxUtil on the active node, and observing how the
faxes are imported into the fax library.

RightFax Connector for SharePoint 2007 Administrator’s Guide
Captaris Page 13 of 27
Installing the RightFax Package
1. To launch the installation program, open the Setup file.
The RightFax Connector for SharePoint 2007 InstallShield Wizard opens.
2. Follow the on-screen prompts.
3. At the Select Features screen (Figure 6), select RightFax Package, and click Next.
Figure 6: Installing the RightFax components
RightFax Connector for SharePoint 2007 Administrator’s Guide
Captaris Page 14 of 27
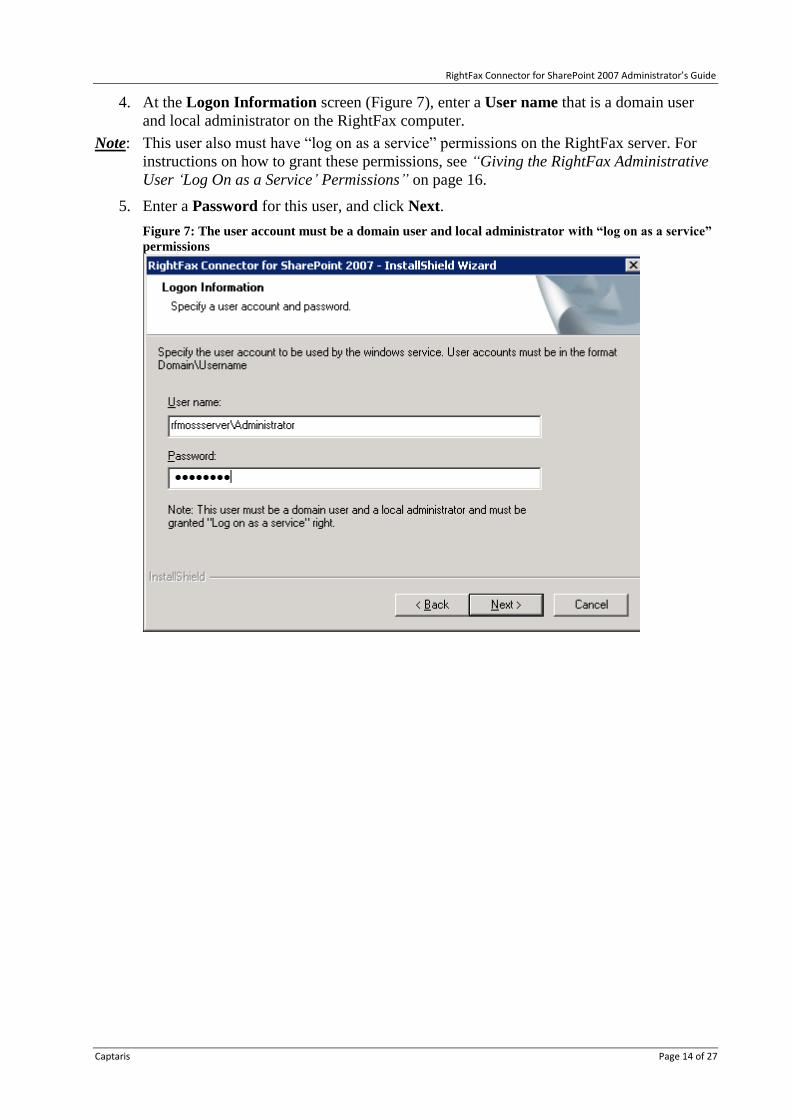
4. At the Logon Information screen (Figure 7), enter a User name that is a domain user
and local administrator on the RightFax computer.
Note: This user also must have ―log on as a service‖ permissions on the RightFax server. For
instructions on how to grant these permissions, see “Giving the RightFax Administrative
User „Log On as a Service‟ Permissions” on page 16.
5. Enter a Password for this user, and click Next.
Figure 7: The user account must be a domain user and local administrator with “log on as a service”
permissions

RightFax Connector for SharePoint 2007 Administrator’s Guide
Captaris Page 15 of 27
6. At the SQL Server screen (Figure 8), select either Windows or SQL Server
authentication to provide the credentials for accessing the SQL database.
Windows authentication – This user has to be a domain account with permissions in
SQL. It does not have to be the same user that starts the service.
SQL Server authentication – uses the credentials that you supply on this screen in
the Login ID and Password fields.
Figure 8: Provide credentials to access the database
7. Continue following the on-screen prompts to finish the installation.
Installing the SharePoint Package
Repeat the steps described in ―Installing the RightFax Package‖ (page 13) except, at the
Select Features screen, select SharePoint Package.
No credentials will be required during this installation phase.

RightFax Connector for SharePoint 2007 Administrator’s Guide
Captaris Page 16 of 27
Giving the RightFax Administrative User ‘Log On as a Service’ Permissions
Step 4 of ―Installing the RightFax Package‖ (page 13) requires you to identify an administrative
account for the RightFax server. This account must have ―log on as a service‖ permissions. The
current procedure describes how to give such permissions.
1. On the RightFax server computer, click Start > Administrative Tools > Local Security
Settings.
The Local Security Settings window opens (Figure 9).
Figure 9: Giving "log on as a service" permissions to the RightFax administrative account
2. In the left pane, expand Local Policies and select User Rights Assignment.
3. In the right pane, double-click Log on as a service.
4. In the resulting dialog box, enter the user name that you want to use for the service (the
name that you entered in Step 4 of ―Installing the RightFax Package‖ on page 13.)

RightFax Connector for SharePoint 2007 Administrator’s Guide
Captaris Page 17 of 27
Chapter 4—Administering the RIGHTFAX CONNECTOR FOR
SHAREPOINT 2007
Connecting to a RightFax Server
1. From the SharePoint Central Administration, click the Operations tab, and then
RightFax Servers/Incoming Fax/Outgoing Fax Settings.
The RightFax Servers/Incoming Fax/Outgoing Fax Settings page opens (Figure 10).
Figure 10: Managing Servers and Schedules
2. In the Servers area, click Add.
A new area opens, with configurable options for the RightFax server.
3. Enter information for the Friendly Name, Server/IP, Port (default is 9000), and UPN
Identity (the same domain user as the one you entered in Step 4 of ―Installing the
RightFax Package‖ on page 13.)
4. Click Apply.
The friendly name now appears in the list.
Scheduling the Fax Receiver and Sender Services
Two timer jobs automatically run when you install the RIGHTFAX CONNECTOR FOR
SHAREPOINT 2007: the Fax Receiver Service and the Fax Sender Service. By default, they are
configured to run every 5 minutes.
You can modify this schedule by specifying the time interval for these services to run. These
schedules impact the frequency of importing and sending faxes to and from RightFax and within
the subscribed Document Libraries.
To change the schedule:
In the Timer Jobs Schedule area, enter the desired number of minutes for the Receiver
and Sender services, and then click Save.

RightFax Connector for SharePoint 2007 Administrator’s Guide
Captaris Page 18 of 27
Monitoring the Error Queue and Correcting In-Error Faxes
The error queue is a Document Library that contains all faxes that were not sent successfully. On
a scheduled basis that you can configure, the Fax Sender Service monitors the error queue and
attempts to resend in-error faxes. You can use the error queue to monitor and correct problem
faxes manually, too.
1. From the the SharePoint Central Administration home page, click View All Site
Content, and then Error Queue.
The Error Queue page opens (Figure 11).
Figure 11: The Error Queue shows faxes that did not send successfully
2. To attempt to correct an in-error fax, right-click the item and select Edit Properties.

RightFax Connector for SharePoint 2007 Administrator’s Guide
Captaris Page 19 of 27
Managing Subscriptions
Manage Subscriptions is a list that shows all subscriptions in the Farm. Each item in the list
corresponds to a subscription. The item properties contain information about the subscription,
including Subscribing Library Title, URL, the subscription type (which can be either Server or
Library), and the Subscription Name.
1. From the the SharePoint Central Administration home page, click View All Site
Content, and then Manage Subscriptions.
The Manage Subscriptions page opens (Figure 12).
Figure 12: The Manage Subscriptions page shows all subscriptions in the Farm
2. To cancel a subscription, delete the item from the list.
Note: A best practice for removing subscriptions would be to delete the doc library as opposed
to deleting the subscription. Removing the subscription should be done only if it is a
problem. In that case, select Delete/Remove from the item’s drop-down list.

RightFax Connector for SharePoint 2007 Administrator’s Guide
Captaris Page 20 of 27
Managing Farm Features
Installing the Connector adds two farm features:
RightFax Integration Services – allows for additional communication capabilities
through fax and MFP, including receiving and sending faxes.
RightFax Integration Settings – used for RightFax Servers/Incoming Fax/Outgoing Fax
Settings.
1. From the SharePoint Central Administration home page, click the Operations tab, and
then Manage Farm Features.
The Manage Farm Features page opens (Figure 13).
Figure 13: Access Integration Services and Settings from the Manage Farm Features page
2. Select RightFax Integration Services or RightFax Integration Settings to make
changes those two elements.
RightFax Connector for SharePoint 2007 Administrator’s Guide
Captaris Page 21 of 27
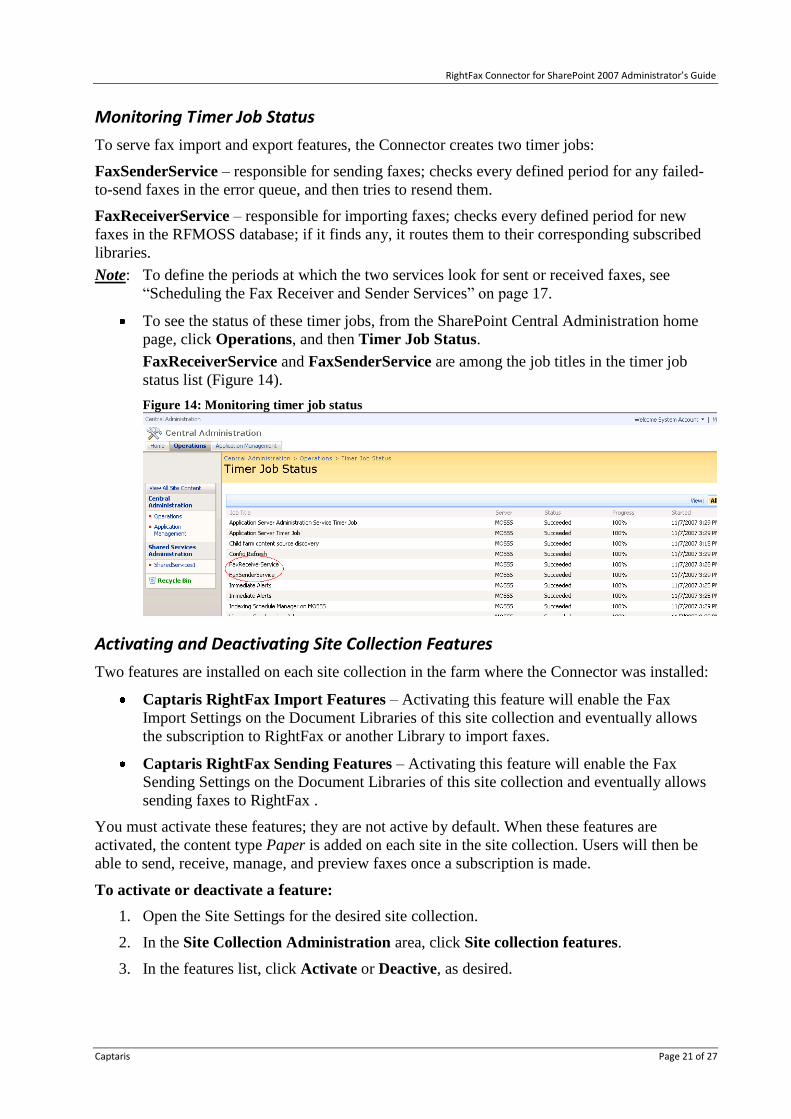
Monitoring Timer Job Status
To serve fax import and export features, the Connector creates two timer jobs:
FaxSenderService – responsible for sending faxes; checks every defined period for any failed-
to-send faxes in the error queue, and then tries to resend them.
FaxReceiverService – responsible for importing faxes; checks every defined period for new
faxes in the RFMOSS database; if it finds any, it routes them to their corresponding subscribed
libraries.
Note: To define the periods at which the two services look for sent or received faxes, see
―Scheduling the Fax Receiver and Sender Services‖ on page 17.
To see the status of these timer jobs, from the SharePoint Central Administration home
page, click Operations, and then Timer Job Status.
FaxReceiverService and FaxSenderService are among the job titles in the timer job
status list (Figure 14).
Figure 14: Monitoring timer job status
Activating and Deactivating Site Collection Features
Two features are installed on each site collection in the farm where the Connector was installed:
Captaris RightFax Import Features – Activating this feature will enable the Fax
Import Settings on the Document Libraries of this site collection and eventually allows
the subscription to RightFax or another Library to import faxes.
Captaris RightFax Sending Features – Activating this feature will enable the Fax
Sending Settings on the Document Libraries of this site collection and eventually allows
sending faxes to RightFax .
You must activate these features; they are not active by default. When these features are
activated, the content type Paper is added on each site in the site collection. Users will then be
able to send, receive, manage, and preview faxes once a subscription is made.
To activate or deactivate a feature:
1. Open the Site Settings for the desired site collection.
2. In the Site Collection Administration area, click Site collection features.
3. In the features list, click Activate or Deactive, as desired.

RightFax Connector for SharePoint 2007 Administrator’s Guide
Captaris Page 22 of 27
Chapter 5—Using the RIGHTFAX CONNECTOR FOR
SHAREPOINT 2007
Creating a New Fax Library from a Template
Creating a new library from this template results in a document library with the content type
Paper added by default and the essential Paper properties, Fax Metadata, added.
1. From the site Actions menu, click Create.
2. In the Libraries area, click Fax Library.
Accessing Fax Import and Send Settings
The Connector adds two links to the document library settings: Fax Import Settings and Fax
Sending Settings. Figure 15 shows an example.
Figure 15: Example document library settings
The following sections show configurations made to the sample template that you created in
―Creating a New Fax Library from a Template‖ (page 22). You need not configure those settings
on that particular Fax Library Template. You can use any Document Library to configure the
settings.
RightFax Connector for SharePoint 2007 Administrator’s Guide
Captaris Page 23 of 27
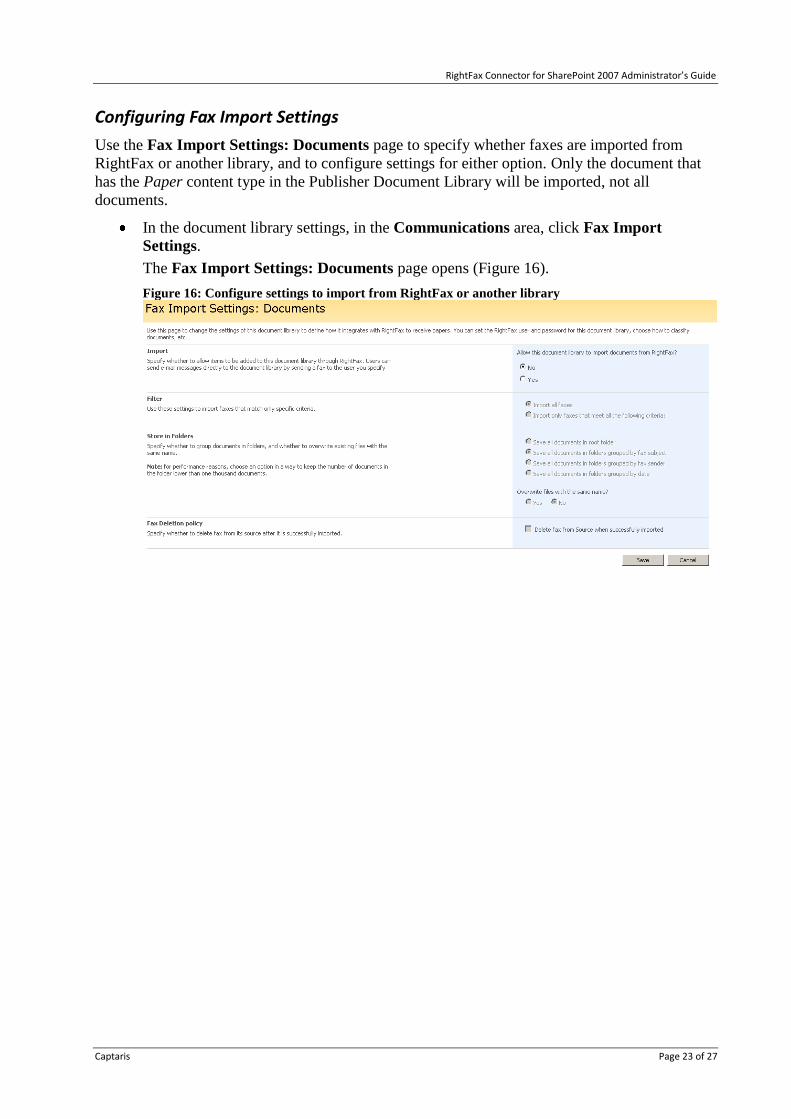
Configuring Fax Import Settings
Use the Fax Import Settings: Documents page to specify whether faxes are imported from
RightFax or another library, and to configure settings for either option. Only the document that
has the Paper content type in the Publisher Document Library will be imported, not all
documents.
In the document library settings, in the Communications area, click Fax Import
Settings.
The Fax Import Settings: Documents page opens (Figure 16).
Figure 16: Configure settings to import from RightFax or another library
RightFax Connector for SharePoint 2007 Administrator’s Guide
Captaris Page 24 of 27
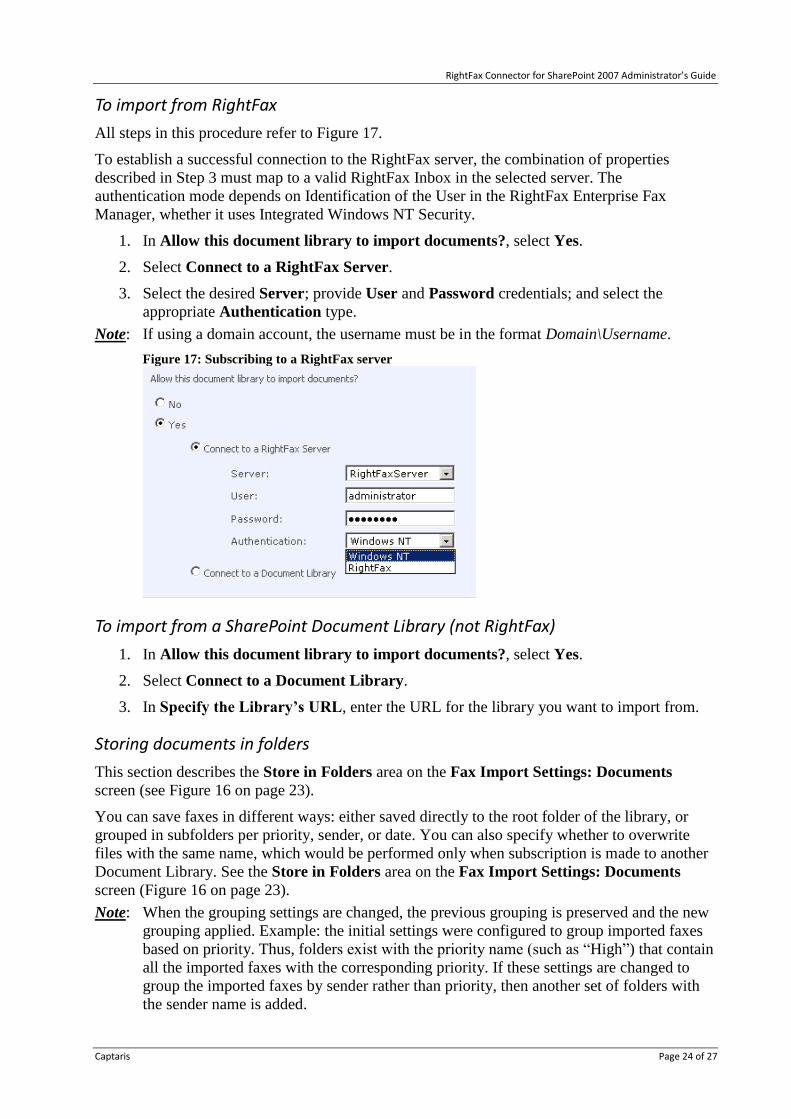
To import from RightFax
All steps in this procedure refer to Figure 17.
To establish a successful connection to the RightFax server, the combination of properties
described in Step 3 must map to a valid RightFax Inbox in the selected server. The
authentication mode depends on Identification of the User in the RightFax Enterprise Fax
Manager, whether it uses Integrated Windows NT Security.
1. In Allow this document library to import documents?, select Yes.
2. Select Connect to a RightFax Server.
3. Select the desired Server; provide User and Password credentials; and select the
appropriate Authentication type.
Note: If using a domain account, the username must be in the format Domain\Username.
Figure 17: Subscribing to a RightFax server
To import from a SharePoint Document Library (not RightFax)
1. In Allow this document library to import documents?, select Yes.
2. Select Connect to a Document Library.
3. In Specify the Library‟s URL, enter the URL for the library you want to import from.
Storing documents in folders
This section describes the Store in Folders area on the Fax Import Settings: Documents
screen (see Figure 16 on page 23).
You can save faxes in different ways: either saved directly to the root folder of the library, or
grouped in subfolders per priority, sender, or date. You can also specify whether to overwrite
files with the same name, which would be performed only when subscription is made to another
Document Library. See the Store in Folders area on the Fax Import Settings: Documents
screen (Figure 16 on page 23).
Note: When the grouping settings are changed, the previous grouping is preserved and the new
grouping applied. Example: the initial settings were configured to group imported faxes
based on priority. Thus, folders exist with the priority name (such as ―High‖) that contain
all the imported faxes with the corresponding priority. If these settings are changed to
group the imported faxes by sender rather than priority, then another set of folders with
the sender name is added.

RightFax Connector for SharePoint 2007 Administrator’s Guide
Captaris Page 25 of 27
Setting a policy for deleting faxes
This section describes the Fax Deletion Policy area on the Fax Import Settings: Documents
screen (see Figure 16 on page 23).
The Delete fax from Source when successfully imported option is available only for libraries
that import faxes from RightFax. It is disabled for library-to-library subscriptions. Selecting this
option deletes faxes from the RightFax Inbox after they are successfully imported.
Configuring Fax Sending Settings
Use the Fax Sending Settings: Documents page to specify whether faxes are sent from a
document library through a subscribed RightFax server.
1. In the document library settings, in the Communications area, click Fax Sending
Settings.
The Fax Sending Settings: Documents page opens.
2. In Allow this document library to send out faxes through RightFax?, select Yes.
3. Select the desired Server; provide User and Password credentials; and select the
appropriate Authentication type.
Note: If using a domain account, the username must be in the format Domain\Username.
4. To enable sending faxes via drag-and-drop in the document library, select Enable
DropBox.
Sending Faxes
End-users can send faxes in three ways:
Send faxes manually – From the document library: hover the mouse pointer over a
document name; click the resulting down-arrow, and select Send Fax. Then, enter a
recipient, fax number, and cover sheet notes.
Create a “new paper” fax – From the document library: click New > Paper. Save the
document, and then enter a recipient, fax number, and cover sheet notes.
Note: You must select the Enable NewPaper box on the Fax Sending Settings screen for end-
users to have this option available to them.
Drag and Drop – Drag a valid document to the document library in explorer view.
Note: You must select the Enable DropBox box on the Fax Sending Settings screen for end-
users to have this option available to them.
Note: A ―valid document‖ is of a file type supported by RightFax and with the naming
convention Recipient_Fax# (Example: John_105.tif).
RightFax Connector for SharePoint 2007 Administrator’s Guide
Captaris Page 26 of 27
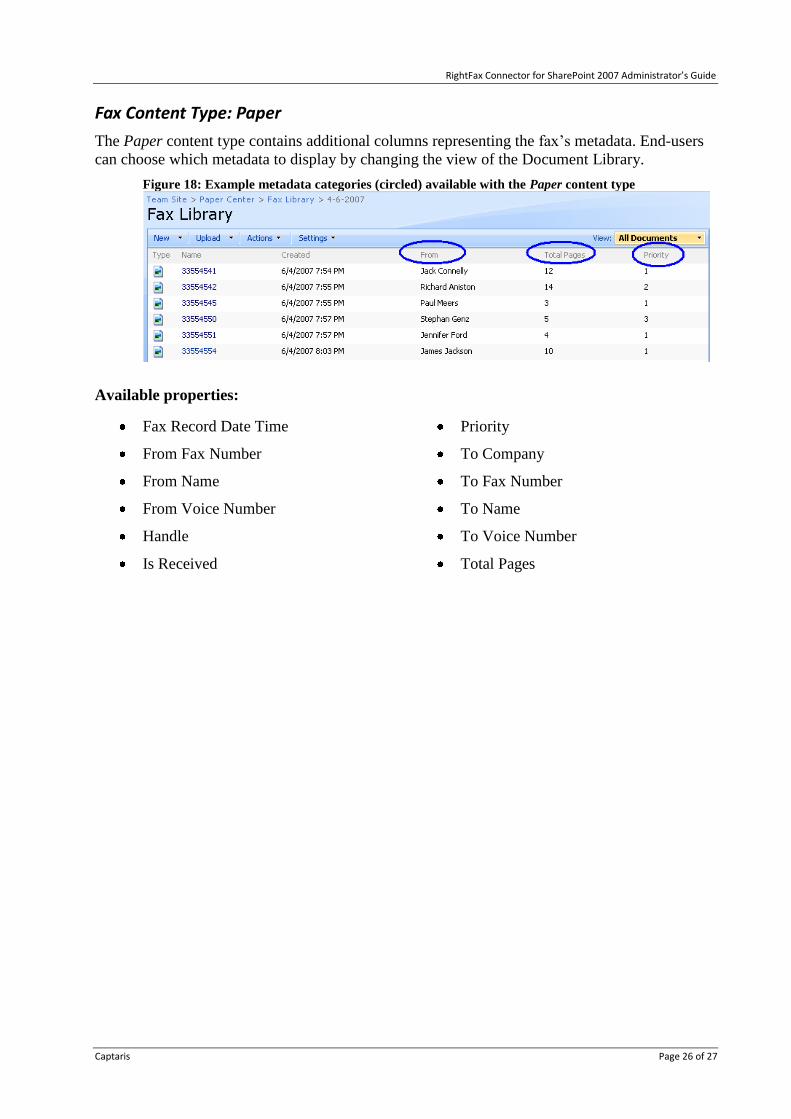
Fax Content Type: Paper
The Paper content type contains additional columns representing the fax’s metadata. End-users
can choose which metadata to display by changing the view of the Document Library.
Figure 18: Example metadata categories (circled) available with the Paper content type
Available properties:
Fax Record Date Time
From Fax Number
From Name
From Voice Number
Handle
Is Received
Priority
To Company
To Fax Number
To Name
To Voice Number
Total Pages
RightFax Connector for SharePoint 2007 Administrator’s Guide
Captaris Page 27 of 27
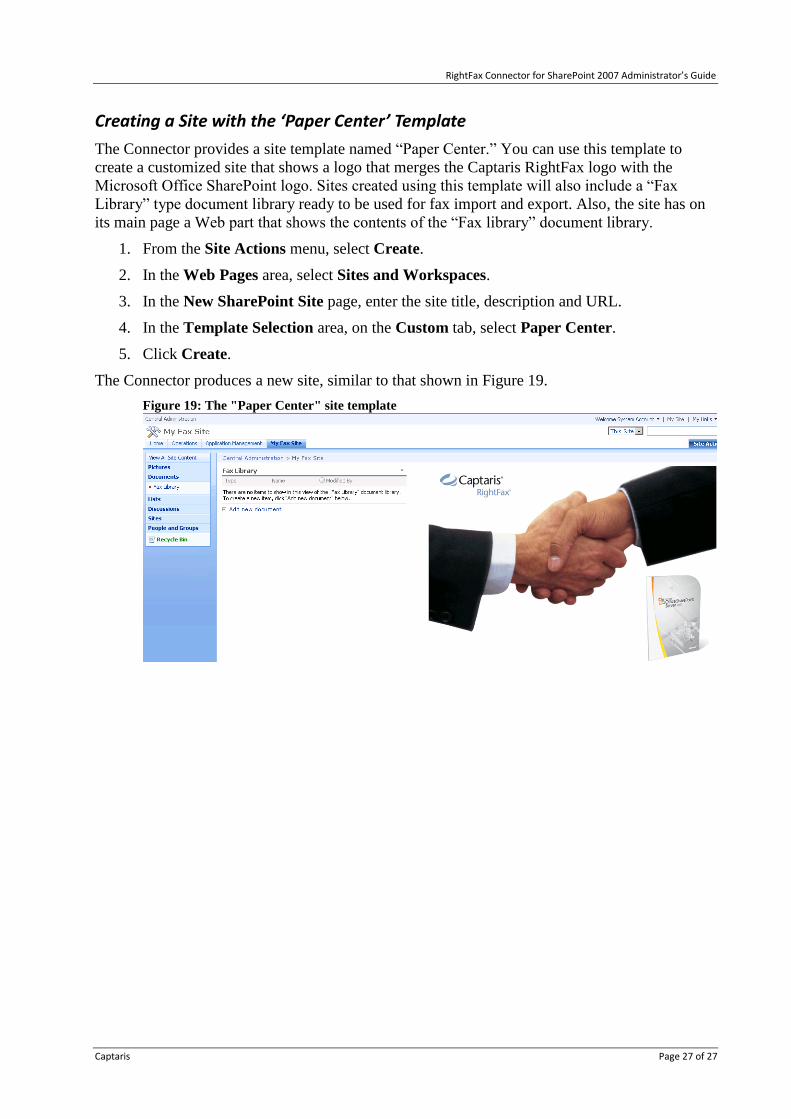
Creating a Site with the ‘Paper Center’ Template
The Connector provides a site template named ―Paper Center.‖ You can use this template to
create a customized site that shows a logo that merges the Captaris RightFax logo with the
Microsoft Office SharePoint logo. Sites created using this template will also include a ―Fax
Library‖ type document library ready to be used for fax import and export. Also, the site has on
its main page a Web part that shows the contents of the ―Fax library‖ document library.
1. From the Site Actions menu, select Create.
2. In the Web Pages area, select Sites and Workspaces.
3. In the New SharePoint Site page, enter the site title, description and URL.
4. In the Template Selection area, on the Custom tab, select Paper Center.
5. Click Create.
The Connector produces a new site, similar to that shown in Figure 19.
Figure 19: The "Paper Center" site template


