28
Release Notes Dell ® Wyse Enhanced SUSE Linux Enterprise Release 11 SP2 Build 11.2.053 Issue: 022114 Rev. A General Release

Release NotesDell® Wyse Enhanced SUSE Linux EnterpriseRelease 11 SP2 Build 11.2.053
Issue: 022114 Rev. AGeneral Release

Copyright Notices© 2014, Dell Inc. All Rights Reserved.
This manual and the software and firmware described in it are copyrighted. You may not reproduce, transmit, transcribe, store in a retrieval system, or translate into any language or computer language, in any form or by any means, electronic, mechanical, magnetic, optical, chemical, manual or otherwise, any part of this publication without express written permission.
About this GuideThis guide is intended for administrators. This document is updated periodically as more information becomes available.
Finding the Information You Need in this Guide
You can use either the Search window or Find toolbar to locate a word, series of words, or partial word in an active PDF document. For detailed information on using these features, refer to the Help in your PDF reader.
Dell Technical SupportTo access Dell technical resources, visit http://www.wyse.com/support. If you still have questions, you can submit your questions using the Self-Service Center athttp://support.wyse.com/selfservice.html or call Customer Support at 1-800-800-9973 (toll free in U.S. and Canada). Hours of operation are from 6:00 A.M. to 5:00 P.M. Pacific Time, Monday through Friday.
To access international support, visit http://www.wyse.com/global.
Dell Online Community
Dell maintains an online community where users of our products can seek and exchange information on user forums. Visit the Online Community forums at:http://community.wyse.com/forum.

Contents
Copyright Notices iiAbout this Guide ii
Finding the Information You Need in this Guide iiDell Technical Support ii
Dell Online Community ii
1 Release 11 SP2 Build 11.2.053 1
New Features 2Fixes 7Known Issues 8Upgrading 9Build Details 11BIOS Details 13Supported Platforms 16
Cloud Client Support 16Software Compatibility 16
Wireless Security Support Details 17Tested USB Peripherals 18Smart Card Support 20Tested Media Files for HDX 21Supported Resolutions 21
Tables 23

iv Contents
This page intentionally blank.

1 Release 11 SP2 Build 11.2.053
This section contains:
• "New Features"
• "Fixes"
• "Known Issues"
• "Upgrading"
• "Build Details"
• "BIOS Details"
• "Supported Platforms"
• "Wireless Security Support Details"
• "Tested USB Peripherals"
• "Smart Card Support"
• "Tested Media Files for HDX"
• "Supported Resolutions"
NOTE: File extractor version used for testing:
• WinRAR Version: 3.9
• WinZip Version: 11.1
• 7-Zip Version: 9.20

2 Chapter 1
New Features• VMware View 2.2 - VMware Horizon View (formerly VMware View) is a virtual
desktop infrastructure solution that simplifies desktop management and provides users with what they need when they need it. In this release, VMware View 2.2 is supported and was tested using VMware 5.2 and 5.3 server set-ups.
• Citrix 13.0 - Citrix Receiver for Linux provides users with access to resources published on XenApp or XenDesktop servers. It combines ease of deployment and use, offering quick and secure access to applications, content, and virtual desktops. Users can connect to resources published on XenApp servers using either individual ICA connections or, if using Citrix XenApp, predefined ICA connection configurations from servers running the Web Interface. Users can also connect to virtual desktops provided by XenDesktop, enabling them to use those virtual desktops as if they were connecting to a local Windows desktop.Note the following Citrix 13.0 features:
· Storebrowse & Storefront - Storebrowse is the command line utility to access Storefront servers. PNABrowse is a similar command line utility to access PNServer. Both are used to enumerate the published applications and launch sessions apart from other specific features. In this release PNAbrowse and Store browse are supported but in future releases PNAbrowse will be deprecated and no longer supported due to Citrix side changes. Storebrowse can be used as a replacement for PNABrowse to access PNServer with different command line options. The known stores must be added first using the addstore option of stores before listing or enumerating the resources on that store. Storebrowse requires the libcurl package and libxml2 packages.
· HDX Media Stream for Windows Media & Client-Side Fetching - Client-Side Content Fetching allows Citrix Receiver to stream media directly from http://, mms://, or rtsp:// URLs. The server is responsible for pointing the client device at the media, and sending control commands including Play, Pause, Stop, Volume, Seek, etc. It does not handle any media data. Requirements: XenDesktop 7 and that GStreamer support is on the client.
· H264 for 2D and 3D Graphics - Citrix Receiver supports the display of H.264 graphics, including HDX 3D Pro graphics that are served by XenDesktop 7. This support uses the deep compression codec feature, which is enabled by default. The feature provides better performance of rich and professional graphics applications on WAN networks compared with the existing JPEG codec. HDX optimizes the performance of 2D and 3D graphics and video. XenDesktop HDX 3D for Professional Graphics is a feature of XenDesktop Enterprise and Platinum editions for delivering high-end applications, including OpenGL and DirectX based applications, that demand the power of a graphics processing unit (GPU) for hardware acceleration. Requirements: XenDesktop 7.
· H264 for Webcam Redirection (UC) - Allows webcam output in compressed H.264 format to an Excalibur server for webcam redirection and webcam conference. For webcams without H.264 encoding capability, either a hardware H.264 encoder or the software program Theora can be used to accomplish the compression task. By default, Theora encoding is enabled. If encodebin fails to find the H264 encoder, it reverts to Theora encoding. Requirements: XenDesktop 7 and that GStreamer Version 0.10.31 or any later release in the 0.10 series is available on the user device.
· Multimedia Stability (CSCF) - These settings determine how the Citrix receiver should it operate gst_play under various situations. Gst_play is GStreamer pipeline to play multimedia streams. Requirements: Xen App 6.5 and XenDesktop7 and that GStreamer is on client.

Release 11 SP2 Build 11.2.053 3
· Improved VoIP (UDP Audio) - This feature allows audio to be sent across UDP instead of TCP. UDP Audio only supports medium-quality audio. Medium-quality audio can be specified by adding AudioBandwidthLimit=1 in the [WFClient] section of the wfclient.ini. If UDP is enabled but the quality is not medium, audio transmission will revert to TCP. Audio data is not encrypted over a UDP connection, so UDP Audio is not available with encrypted sessions (using SSL or ICA Encryption) and audio transmission will revert to TCP. UDP Audio is disabled by default in the Receiver. Requirements: XenDesktop 7.
· Graphics/Audio Multithreading - By default, Receiver for Linux 13.0 uses a thread for Thinwire graphics and another for client audio input and output. This reduces the load on the main thread, making other virtual channel data more likely to be processed in a timely manner.
· Self-service GUI and SDK - Self-service GUI is not supported in this release. Connection Manager is used instead of a self-service GUI.
The following are some identified constraints and limitations for the Citrix 13.0 feature:
• PAM implementation for storefront connection is not supported.
• Smart card authentication is not supported in Receiver for Linux deployments using StoreFront.
• Smart card is supported only for the server option in the Connection Manager.
• Desktop Appliance mode works only for PNServer.
• Single sign-on with Smartcard is not supported.
• Only https is supported for storefront connections.
• It is recommended to use FQDN for all connections.
• SP1 to SP2 upgrade has following limitations: 1 - In SP2 while creating connections for HTTPS, the user must use a FQDN instead of an IP address. However, a user could use IP for http. This limitations is because of CITRIX 13 where it is mandatory to use fqdn for https connections.2 - Cannot launch PN published apps after an upgrade from SP1 to SP2. Only server connections can be launched as it uses wfica. PN published apps could not be launched as some mandatory parameters required in SP2 are missing. One of the mandatory parameters for Citrix 13 storebrowse to work is resource id which is unique and is received after enumeration. For this, user credentials are required.NOTE: In SP1 it was not mandatory to provide user credentials for published applications. If such connections are created in SP1 and then upgraded to SP2, enumeration would fail. Therefore, only those Published application connections created in SP1 with user credentials can be launched in SP2 as well.

4 Chapter 1
• 802.1x and AD Authentication - The Linux thin clients now support Microsoft Active Directory Authentication where user login credentials can be authenticated via an AD server (with or without using a radius server or 802.1x protocol). With the MR3 release, the Linux thin clients also support the security protocol 802.1x. 802.1x is an IEEE standard for port-based network access control, offering the capability to permit or deny network connectivity which can be dynamically enabled or disabled based on the identity of the device or end user. 802.1x uses EAP (Extensible Authentication Protocol) to provide a way for the supplicant and authenticator to negotiate an authentication method (EAP method). The EAP authentication method defines the credential type and how it is submitted from the supplicant to the authentication server using the EAP framework. On an SLETC device, the user can create 802.1x network connections either through the Network Connections UI or the INI method. Only an administrator user is allowed to create network connections in the Network Connections applet. The following diagram depicts communication between the components in an 802.1x thin client solution.
NOTE: When an Active Directory user password is expired, there is no option to change the password at the GDM login screen. Since Microsoft LDAP servers are not RFC3062 compliant, it is not possible to allow users themselves to change their current password using their expired credentials without a middleware/facilitator.
• Simple Certificate Enrollment Protocol (SCEP) - SCEP is a PKI communication protocol which leverages existing technology by using PKCS#7 and PKCS#10. SCEP is a proposed protocol for automated certificate enrollment. SCEP offers a standard interface to communicate with a Certificate Authority. It includes several properties that allow it to do an automatic enrollment without much manual interaction. The typical usage scenarios of SCEP are large network environments with many network devices that require automatic enrollment of certificates.SCEP request/response model based on HTTP (GET method; optional support for POST method).
• Custom Gnome - SLETC has three default built in local users admin, thinuser, and guest having High, Low, and No privilege levels respectively. Similarly along with these three local users, SLETC also provides an option for remote INI users. That is, the INI user privilege level can be equivalent to any of three built in local users. Depending on different privilege levels, a user will have access to different sets of panels, applets, and icons. The INI parameter name will specify Enable or Disable user Privilege Levels keywords and the INI parameter value will specify the custom settings to be applied. Table 1 lists the various applications and corresponding .desktop file names.

Release 11 SP2 Build 11.2.053 5
NOTES:
1 - Only applets mentioned in this table are allowed to disable/enable using the INI parameter. If any of the applets other than specified applet from the above table is disabled using disable (Applets.Disable.{High/Low} ) privilege then system behavior will be undefined.
Table 1 Applications and corresponding .desktop file names
Application NameDefault Location of the Applet .desktop file name
Add-on Manager Control Center addon-manager.desktop
Appearance Control Center gnome-appearance-properties.desktop
Bluetooth Application Browser bluetooth-properties.desktop
Citrix Settings Control Center CitrixSettings_wyse-settings.desktop
Configure VDA Control Center configcheetah.desktop
Connection Manager Application Browser conmgr.desktop
Desktop Appliance Control Center appliance.desktop
Device Settings Control Center DeviceSettings_wyse-settings.desktop
Diagnostics Log Viewer Application Browser extDiagnostics.desktop
Diagnostics Application Browser Diagnostics_wyse-settings.desktop
Display Control Center display-properties.desktop
Import Certificates Control Center ImportCertificates_wyse-settings.desktop
INI Settings Control Center IniSettings_wyse-settings.desktop
Keyboard Control Center keyboard.desktop
Language Control Center dmlangsel.desktop
Mouse Control Center gnome-settings-mouse.desktop
Network Connections Control Center nm-connection-editor.desktop
Power Management Control Center gnome-power-preferences.desktop
Printing Control Center system-config-printer.desktop
Scep Client Configuration Control Center config-scepclient.desktop
Screensaver Control Center gnome-screensaver-preferences.desktop
System information Control Center sysinfo.desktop
Take Screenshot Application Browser gnome-screenshot.desktop
TCX USB Virtualizer Control Center tcxusbconfig.desktop
Touchpad Control Center gsynaptics.desktop
User Administration Control Center UserAdministration.desktop
VNC Server Application Browser vino-preferences.desktop

6 Chapter 1
2 - Apart from application specific .desktop files listed in above table /usr/share/applications or any of the .desktop standard directories will also contain system configuration specific .desktop files those .desktop files must not be disabled using any of disable ini parameter.
How to identify system specific .desktop files: System specific .desktop files will usually contain "Hidden=true" or "NoDisplay=true" in the .desktop file.
Note: Applets.Disable.{High/Low}Privilege ini parameters will only disable particular specified applets, if some particular applet is disabled but the same applet can be lunched / enabled via some other applet i.e. as expected.EXAMPLE: If Power Management applet is disabled using ini parameter, but still this Power management application can be can be accessed via the Screensaver applet.
Note: Applets.{Enable/Disable}.{High/Low}Privilege ini parameters should not be used in single for enabling and disabling particular set of applets in tandem; when INI download source is set to ('INI Source') 'If server is available, use INI files from server only; otherwise use local INI files'. In such scenario both enable and disable ini parameters combinations must be used.EXAMPLES: Select INI download source as 'If server is available, use INI files from server only; otherwise use local INI files'
Configure wlx.ini with single INI parameter Applet.Enable.HighPrivilege=display-properties;keyboard;
Reboot the device and login as 'admin' user notice there will not be any change to 'Control Center' applet list since these applets are enabled by default.
Reconfigure wlx.ini with single INI parameter Applet.Disable.HighPrivilege=display-properties;keyboard;
Reboot the device and login as 'admin' user notice these two applets are still enabled in 'Control Center'.
When INI download source ('INI Source') is selected as 'If server is available, use INI files from server only; otherwise use local INI files'. The current in use ini file will be cached and this cached ini will be parsed during subsequent initial phase of boot. Note at this stage old cached ini is having ini parameter 'Applet.Enable.HighPrivilege' and during final phase of boot i.e. when network interface comes up the changed INI file will be downloaded and parsed i.e. this will also configure ini parameter 'Applet.Disable.HighPrivilege'. In this scenario both the ini parameters are active and both ini parameters are trying to enable and disable same applet so no action will be taken on such applets.
Note: Desktop short cuts and panel short cuts created by drag and drop method by 'admin'/high privilege user will be visible to all the users even though panel applet corresponding to the short cut is disabled.
Note: Disable 'Connection Manger' applet will not remove the Desktop short cuts created by different connection.
Note: When all the applets from 'Application Browser' panel are disabled, in case of auto login configured device with very less autologin delay or if the ini is downloaded and parsed inside the login session it needs one logout and re-login to reflect the changes to the 'Computer > More Applications…' button. Otherwise the More Applications…' button will still be accessible but when accessed it will pop up a "Failure loading - applications menu' warning message.
• NEW FEATURE NOTE - RALINK Wireless Module Support on D50D: The RALINK wireless module is now supported on the D50D platform. A new part number has been created for this hardware option. The default wireless module shipped with the D50D will continue to be the Atheros module.

Release 11 SP2 Build 11.2.053 7
Fixes
• TIR67220: Speed and duplex settings to be displayed in VXCM.
• TIR71961: Junk characters appear in "Host" field when creating a connection from opening the Ericom Powerterm GUI from Connection Manager.
• TIR72254: Progress interval to be configurable through ini parameter.
• TIR72543: USB 3.0 webcam becomes unresponsive after some video captures.
• TIR72617: while WLAN with hidden SSID is successfully configured via wlx.ini, it does not auto connect.
• TIR73332: Network connection does not establish after Un Check "Enable Networking" , reboot the TC and Check "Enable Networking"
• TIR73672: When creating or editing an Ericom connection in Connection MGR, the "Terminal Type" drop down has many wrongly labeled choices which results in the connection configuration files being built wrong when connection is launched.
• TIR73883: D50D time zone redirection issue with Windows Server 2008 R2 + XenApp6.5.
• TIR74008: D50D I/W to support PEAP connection creation via wlx.ini wlan= param.
• TIR74011: Add Warning Message to Boot Time Reimaging.
• TIR74048: LINUX D50D 11.2.030 - Cannot connect to windows 2003 server.
• TIR74834: D50D - two keys present in some ABNT2 Keyboards works locally but not in View.
• TIR75258: local Wyse Linux screen lock cannot successfully authenticate for unlocking when using pnagent site for authentication.
• TIR76362: Login Password Expired Notification.
• TIR76671: ICA connection to published application that's defined in INI or Connection Manager fails.

8 Chapter 1
Known Issues
• TIR75408: For published application option, while editing connection, empty store name doesn't clear 'Published Apps' field in login tab.
• TIR75571: RDP - Audio is not audible when we seek the media files (mp3/wmv).
• TIR75609: VMware View 2.2: Unable to launch RDP session for Windows 8 desktop with desktop Size "Full Screen".
• TIR75616: UK keyboard mapping issues.
• TIR75617: Japanese keyboard (Kana and Kanji) mapping is not working properly.
• TIR75787: Citrix 13:FR: XD 5.6 & 7.1:YouTube video files are not playing for the first time, black screen is appearing.
• TIR75818: VMView2.2 : X50M-Inbuilt webcam and HD web camera are not redirecting to the session.
• TIR75835: Unable to play media files(wmv2 onwards), mp3 on Win7 and win8 through vmware-rdp.
• TIR75841: VMWare View 2.2: Keyboard is not working in Windows 8 with VMWare View RDP Protocol.
• TIR76048: Citrix 13: Connections process not getting closed its take ~4 to 5 minutes, if we close the Published Applications for XenApp6.5.
• TIR76219: Citrix-13 - Xendesktop7.1:No sound after unplugging USB headsets (as part of USB Audio redirection).
• TIR76229: Citrix 13 - Keyboard & Mouse functionality not working properly after maximizing published application for Adobe Reader.

Release 11 SP2 Build 11.2.053 9
Upgrading
CAUTION: Upgrade from SP1 to SP2 or Downgrade from SP2 to SP1 and with preserve changes is not supported.IMPORTANT: Only X50m, Z50D, and Z50S running Wyse® Enhanced SUSE Linux Enterprise Release 11 SP1 build 11.1.070 or 11.1.052 are supported for upgrading. NOTE: Addons-11.2.053-Wyse.zip, RPM's extract into two folders—base and optional. Base folder contains installed add-ons which are part of the build; optional folder
Table 2 Image Upgrade Details
Title Description
File Name image-upgrade-11.2.053-Wyse.zip
Version 1.4.1115
Build Number 11.2.053
Size (Bytes) 428403141
MD5 788CFEF6862CDA5C3B3C2A16742BC0E9
Checksum32 E658AE30
Table 3 Addons Upgrade Details
Title Description
File Name addons-11.2.053-Wyse.zip
Version 1.4.1115
Build Number 11.2.053
Size (Bytes) 455348831
MD5 3F5C156F13027926F2A2A64F52639D1E
Checksum32 8516F27A
Table 4 RSP Package Details
Title Description
File Name 11.2.053.zip (RSP Package)
Version 1.4.1115
Build Number 11.2.053
Size (Bytes) 428377773
MD5 09C92712C3F90A20CBDF265DED196C11
Checksum32 E6023023
10 Chapter 1
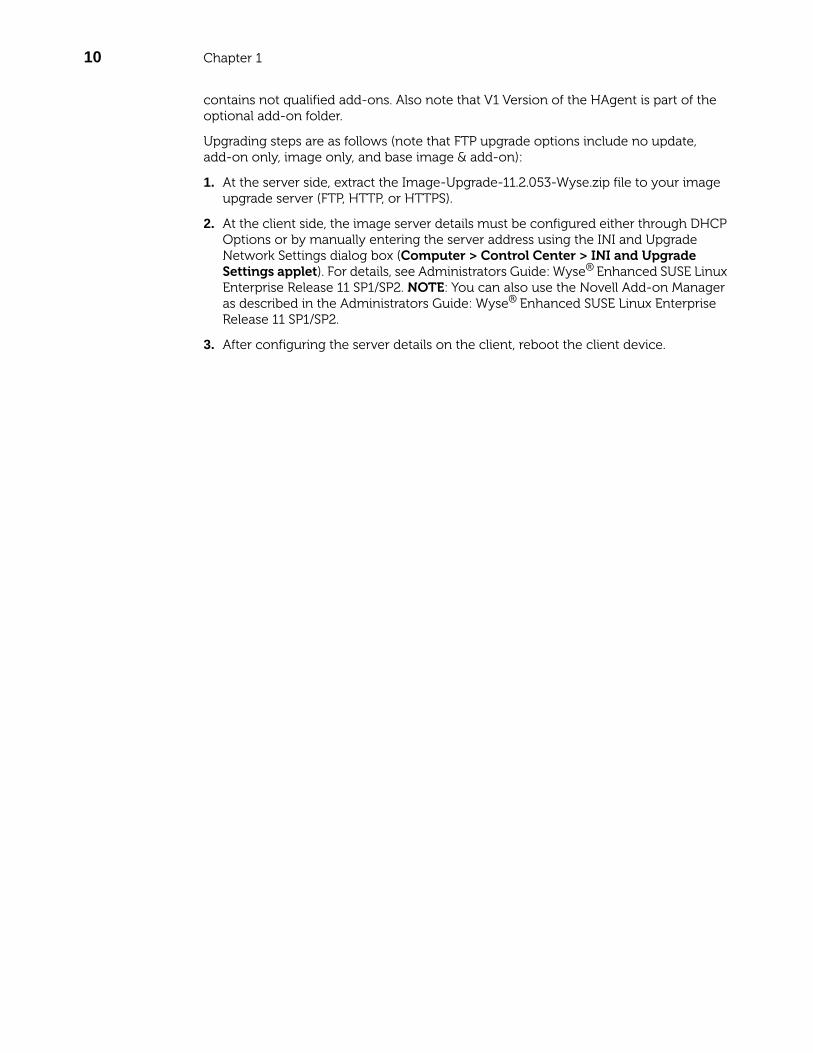
contains not qualified add-ons. Also note that V1 Version of the HAgent is part of the optional add-on folder.
Upgrading steps are as follows (note that FTP upgrade options include no update, add-on only, image only, and base image & add-on):
1. At the server side, extract the Image-Upgrade-11.2.053-Wyse.zip file to your image upgrade server (FTP, HTTP, or HTTPS).
2. At the client side, the image server details must be configured either through DHCP Options or by manually entering the server address using the INI and Upgrade Network Settings dialog box (Computer > Control Center > INI and Upgrade Settings applet). For details, see Administrators Guide: Wyse® Enhanced SUSE Linux Enterprise Release 11 SP1/SP2. NOTE: You can also use the Novell Add-on Manager as described in the Administrators Guide: Wyse® Enhanced SUSE Linux Enterprise Release 11 SP1/SP2.
3. After configuring the server details on the client, reboot the client device.

Release 11 SP2 Build 11.2.053 11
Build Details
Table 5 D50D Build Details
Title Description
Platform(s) D50D
Version 1.4.1115
Build Number 11.2.053
Build File Name 11.2.053_D50D_merlin.exe
Size (Bytes) 1090145327
MD5 58B700FB34E3F50CDF8F065FD7DE810D
Checksum32 AF409DEF
Localization U.S.
Table 6 X50m Build Details
Title Description
Platform(s) X50m
Version 1.4.1115
Build Number 11.2.053
Build File Name 11.2.053_X50M_merlin.exe
Size (Bytes) 1143724783
MD5 D290C8919AE965D70271C05DC524DDE3
Checksum32 6E571E09
Localization U.S.

12 Chapter 1
Table 7 Z50D and Z50S Non-NIST BIOS Build Details
Title Description
Platform(s) Z50D (Non-NIST BIOS)
Version 1.4.1115
Build Number 11.2.053
Build File Name 11.2.053_Z50D_merlin.exe
Size (Bytes) 1128113856
MD5 753D21B5CD124551545BCA017A989270
Checksum32 D22C3CB1
Localization U.S.
Table 8 Z50D NIST BIOS Build Details
Title Description
Platform(s) Z50D (NIST BIOS)
Version 1.4.1115
Build Number 11.2.053
Build File Name 11.2.053_Z50D_NIST_merlin.exe
Size (Bytes) 1128148016
MD5 948A4DFBA40EA698ED285E91E4F1BC35
Checksum32 D257F09F
Localization U.S.

Release 11 SP2 Build 11.2.053 13
BIOS Details
NOTE: BIOS versions include D50D (3.0B), X50m (2.0C), and Z50D/S (3.0B).
Steps to update the BIOS manually:
1. Unzip the BIOS file and copy the extracted folder onto a bootable USB flash drive.
2. Boot the device from the USB flash drive (most C class and R class device users can also use the one time boot menu - press and hold the P key, select the USB drive option that is displayed for your BIOS version, and then press Enter). For details on booting your device from a USB flash drive, see your device documentation.
3. Change directory to the respective BIOS folder.
4. Run the f.bat file, and when completed, reboot the device.
5. Enter the BIOS setup again and press the F9 key to load default configurations.
6. Enable ACPI P-state in Power management.
7. (Optional) Restore the boot order accordingly.
8. Press the F10 key to save changes and exit.
Steps to update NON-NIST BIOS to NIST BIOS manually:
1. Copy the base 4.0A and F4.0AN NIST BIOS to a bootable USB device.
2. Be sure the client is shut down and disconnected from any network. Insert the configured USB key into a thin client USB 2.0 port.
3. Power on the Non-NIST BIOS (3.0B) client and during boot, press and hold the Delete key.
4. Enter the password Fireport (this is case sensitive) and press Enter to enter the BIOS.
5. Select the Advanced tab. Using the down arrow key, select the Boot from USB option and press Enter.
6. Select the Enabled option and press Enter.
7. Press the F10 key to save and exit, and during boot, press and hold the P key.
8. Select the USB Device option and press Enter to enter the DOS mode.
9. Go to the directory IEEPROG, and then type command ieeprog /l.
10.Check the Security Key and Wyse Flag box, and then type the command ieeprog /F 0003.
11.Then update the base BIOS 4.0A.
12.Go to BIOS setup. Select the Advanced tab. Using the down arrow key, select the Boot from USB option and press Enter.
13.Select the Enabled option and press Enter.
14.Press the F10 key to save and exit, and during boot, press and hold the P key.
15.Then update the NIST BIOS 4.0AN.
NOTES:
• Non-NIST BIOS can be updated to the NIST BIOS but the reverse is not possible.
• NIST BIOS can be upgraded with another NIST BIOS version but a down-grade is not possible.

14 Chapter 1
Table 9 D50D BIOS Details
Title Description
Platform D50D
Version 3.0B
File Name Common_30B.ZIP
Size (Bytes) 1876322
MD5 Check sum 9F3E07E352F1CC85EAC2060489C5AFC4
Checksum32 E5B228B
Table 10 X50m BIOS Details
Title Description
Platform X50m
Version 2.0C
File Name 2.0C.ZIP
Size (Bytes) 1863087
MD5 Check sum A4407355D40CA6F3B4BAA5EB18F8B549
Checksum32 E41B6F2
Table 11 Z50D and Z50S Non-NIST BIOS BIOS Details
Title Description
Platform Z50D (Non-NIST BIOS)
Version 3.0B
File Name Common_30B.ZIP
Size (Bytes) 1876322
MD5 Check sum 9F3E07E352F1CC85EAC2060489C5AFC4
Checksum32 E5B228B

Release 11 SP2 Build 11.2.053 15
Table 12 Z50D NIST BIOS BIOS Details
Title Description
Platform Z50D (NIST BIOS)
Version 4.0BN
File Name 40BN.ZIP
Size (Bytes) 3346542
MD5 Check sum C8479566C7CC97AD5B58ACF97393A841
Checksum32 19702503

16 Chapter 1
Supported Platforms
This section contains:
• "Cloud Client Support"
• "Software Compatibility"
Cloud Client Support
• D50D with 2 GB Flash/2 GB RAM (BIOS 3.0B)
• X50m with 2 GB Flash/2 GB RAM (BIOS 2.0C)
• Z50D (TPM) with 2 GB Flash/2 GB RAM (BIOS 4.0BN (NIST))
• Z50D/Z50S with 2 GB Flash/2 GB RAM (BIOS 3.0B)
Software Compatibility
• Wyse TCX Suite 6.0.06.
• Wyse VDA 3.1.0.0.1631 (support available only for 24-bit color depth on RDP connections with Windows XP Pro 32-bit/64-bit and Windows 2003 R2 32-bit/64-bit).
• Wyse USB Firmware Tool 1.20.0.1
• WDM Server 4.9.1 build 241 with Hotfix HF04091013713 and Hotfix HF04091034412 on Windows Server 2008 R2 (Enterprise) 64-bit (Hotfixes available at the Self Service Center at: http://support.wyse.com/selfservice.html).
• HAgent 5.2.93-00.00.
NOTES:
• Order of HAgent Discovery
· Through INI parameter file
· DNS SRV Record
· DNS Hostname
· DNS Alias (CNAME)
· DHCP option tags
· Manual discovery
Release 11 SP2 Build 11.2.053 17
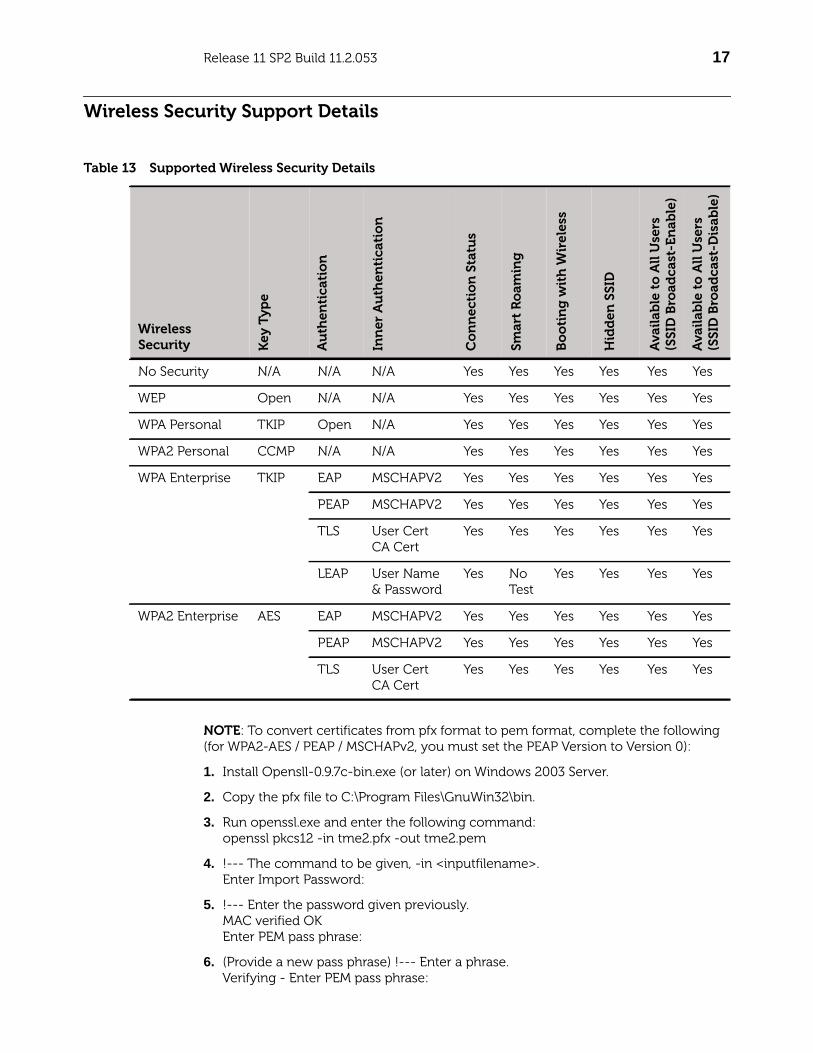
Wireless Security Support Details
NOTE: To convert certificates from pfx format to pem format, complete the following (for WPA2-AES / PEAP / MSCHAPv2, you must set the PEAP Version to Version 0):
1. Install Opensll-0.9.7c-bin.exe (or later) on Windows 2003 Server.
2. Copy the pfx file to C:\Program Files\GnuWin32\bin.
3. Run openssl.exe and enter the following command:openssl pkcs12 -in tme2.pfx -out tme2.pem
4. !--- The command to be given, -in <inputfilename>.Enter Import Password:
5. !--- Enter the password given previously.MAC verified OKEnter PEM pass phrase:
6. (Provide a new pass phrase) !--- Enter a phrase.Verifying - Enter PEM pass phrase:
Table 13 Supported Wireless Security Details
Wireless Security K
ey T
ype
Au
then
tica
tio
n
Inn
er A
uth
enti
cati
on
Co
nn
ecti
on
Sta
tus
Smar
t R
oam
ing
Bo
oti
ng
wit
h W
irel
ess
Hid
den
SSI
D
Ava
ilab
le t
o A
ll U
sers
(S
SID
Bro
adca
st-E
nab
le)
Ava
ilab
le t
o A
ll U
sers
(S
SID
Bro
adca
st-D
isab
le)
No Security N/A N/A N/A Yes Yes Yes Yes Yes Yes
WEP Open N/A N/A Yes Yes Yes Yes Yes Yes
WPA Personal TKIP Open N/A Yes Yes Yes Yes Yes Yes
WPA2 Personal CCMP N/A N/A Yes Yes Yes Yes Yes Yes
WPA Enterprise TKIP EAP MSCHAPV2 Yes Yes Yes Yes Yes Yes
PEAP MSCHAPV2 Yes Yes Yes Yes Yes Yes
TLS User CertCA Cert
Yes Yes Yes Yes Yes Yes
LEAP User Name & Password
Yes No Test
Yes Yes Yes Yes
WPA2 Enterprise AES EAP MSCHAPV2 Yes Yes Yes Yes Yes Yes
PEAP MSCHAPV2 Yes Yes Yes Yes Yes Yes
TLS User CertCA Cert
Yes Yes Yes Yes Yes Yes

18 Chapter 1
Tested USB Peripherals
IMPORTANT:
• Qualified USB Peripherals - USB Headset Redirection Exclusion for ICA and VMWare View Client Connections - It is recommended to disable redirection for Audio devices. Use the exclusion INI parameters (ICADenyUSB, VMWareViewExcludeUSBFamily, VMWareViewExcludeUSBID) found in the Reference Guide: Wyse ® Enhanced SUSE Linux Enterprise INI Files. For example, in the case of Plantronics, modify the ICADenyUSB parameter in the wlx.ini file as follows: ICADenyUSB=vid047fThis line in the wlx.ini file will ensure that Plantronics devices (with vendor ID 047f will not be USB redirected (that is, the thin client will manage the default device).
• Test Environment Includes:
• Build 11.2.053
• VMView 5.2 and 5.3
• XenDesktop 5.6 and 7.1
• Wyse TCX 6.0.06
• With the following INI parameters: ICADesktopApplianceMode=yesICAMMVideo=yesICAMMAudio=no (NOTE: Use =yes for analog headset)
• ICA Client 13.0
• USB 2.0 and 3.0 Ports
• USB devices were attached before log in to Windows XP Pro 32-bit/64-bit, Windows 7 Enterprise 64-bit, Windows 2003 Server 32-bit/64-bit, and Windows 2008 Server 32-bit/64-bit XenDesktop sessions.
• USB devices were attached after log in to Windows XP Pro 32-bit/64-bit, Windows 7 Enterprise 64-bit, Windows 2003 Server 32-bit/64-bit, and Windows 2008 Server 32-bit/64-bit XenDesktop sessions.
• USB devices were attached before booting the thin client and then logging in to Windows XP Pro 32-bit/64-bit, Windows 7 Enterprise 64-bit, Windows 2003 Server 32-bit/64-bit, and Windows 2008 Server 32-bit/64-bit XenDesktop sessions.

Release 11 SP2 Build 11.2.053 19
Table 14 Tested USB Peripherals
USB Device Category Models
DVD RW Drive Iomega DVD-RW
Floppy Drive Sony 2X FDD Model: MPF88E
Hard Disk Seagate 2.0, 320 GB
Multicard Reader SanDisk - ImageMate 12 in 1.Model # SDDR-89 V4
Pen Drive Kingston USB 2.0 Pendrive 4 GB
Printer** Epson LX 300+ and HP Business Inkjet 1000 supports:
• IPP Printing
• LPD/LPR Printing
• USB Printing
HP LaserJet 1320 supports:
• IPP Printing
• LPD/LPR Printing
• Parallel Printing
• SMB Printing
• USB Parallel Printing
• USB Printing
USB Headset* • Jabra BIZ 2400 Duo USB
• Jabra BIZ 2400 Mono USB
• Jabra GN2000 USB Duo
• Jabra GN2000 USB Mono
• Jabra GO 6470 Wireless Headset
• Jabra handset cisco 450
• Jabra Link 360
• Jabra Pro 9450 Duo (Wireless)
• Jabra Pro 9450 Mono (Wireless)
• Jabra Pro 9470 Mono
• Jabra Speak 410 USB
• Jabra UC Voice 250
• Microsoft LX-3000
• P420 Calisto USB speaker phone
• Plantronic savi 720
• Plantronic Voyager Pro UC v2
• Plantronic WO300 Savi Office
• Plantronics Blackwire C210 Mono
• Plantronics Blackwire C220
• Plantronics Blackwire C310 Mono• Plantronics Blackwire C320-M
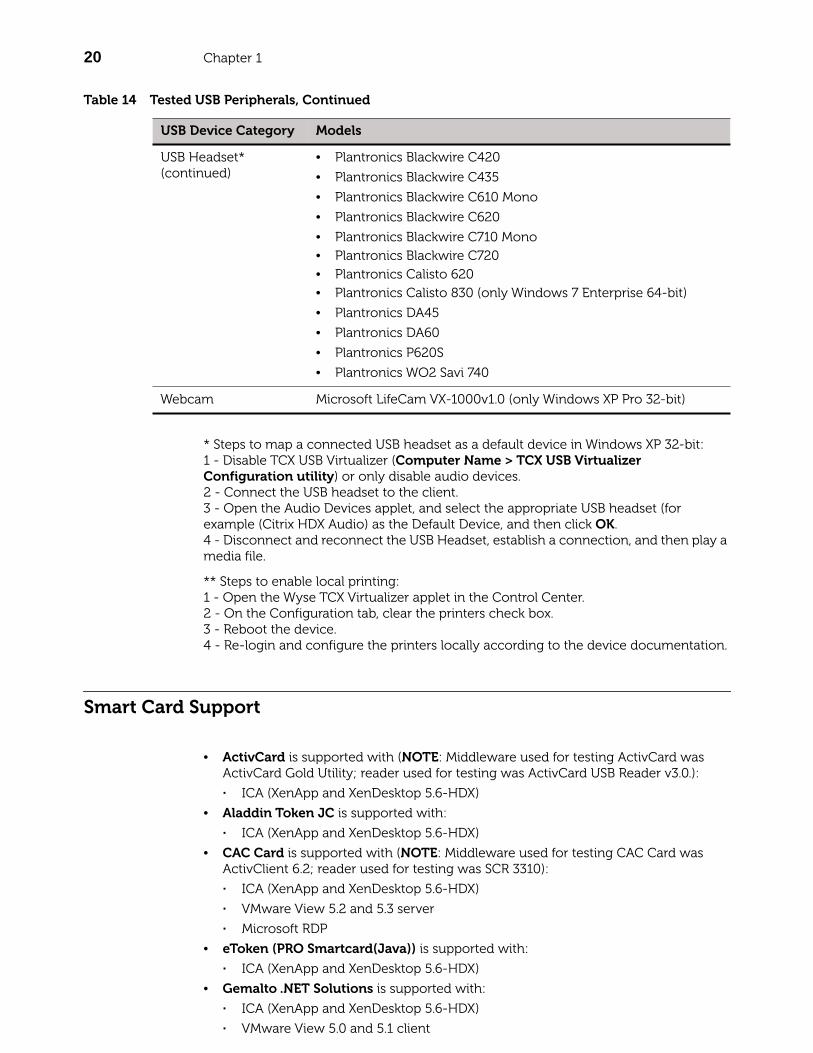
20 Chapter 1
* Steps to map a connected USB headset as a default device in Windows XP 32-bit:1 - Disable TCX USB Virtualizer (Computer Name > TCX USB Virtualizer Configuration utility) or only disable audio devices.2 - Connect the USB headset to the client.3 - Open the Audio Devices applet, and select the appropriate USB headset (for example (Citrix HDX Audio) as the Default Device, and then click OK.4 - Disconnect and reconnect the USB Headset, establish a connection, and then play a media file.
** Steps to enable local printing:1 - Open the Wyse TCX Virtualizer applet in the Control Center.2 - On the Configuration tab, clear the printers check box.3 - Reboot the device.4 - Re-login and configure the printers locally according to the device documentation.
Smart Card Support
• ActivCard is supported with (NOTE: Middleware used for testing ActivCard was ActivCard Gold Utility; reader used for testing was ActivCard USB Reader v3.0.):
· ICA (XenApp and XenDesktop 5.6-HDX)
• Aladdin Token JC is supported with:
· ICA (XenApp and XenDesktop 5.6-HDX)
• CAC Card is supported with (NOTE: Middleware used for testing CAC Card was ActivClient 6.2; reader used for testing was SCR 3310):
· ICA (XenApp and XenDesktop 5.6-HDX)
· VMware View 5.2 and 5.3 server
· Microsoft RDP
• eToken (PRO Smartcard(Java)) is supported with:
· ICA (XenApp and XenDesktop 5.6-HDX)
• Gemalto .NET Solutions is supported with:
· ICA (XenApp and XenDesktop 5.6-HDX)
· VMware View 5.0 and 5.1 client
USB Headset* (continued)
• Plantronics Blackwire C420
• Plantronics Blackwire C435
• Plantronics Blackwire C610 Mono
• Plantronics Blackwire C620
• Plantronics Blackwire C710 Mono• Plantronics Blackwire C720• Plantronics Calisto 620• Plantronics Calisto 830 (only Windows 7 Enterprise 64-bit)
• Plantronics DA45
• Plantronics DA60
• Plantronics P620S
• Plantronics WO2 Savi 740
Webcam Microsoft LifeCam VX-1000v1.0 (only Windows XP Pro 32-bit)
Table 14 Tested USB Peripherals, Continued
USB Device Category Models

Release 11 SP2 Build 11.2.053 21
Tested Media Files for HDX
IMPORTANT:
• Mpeg1 and Mpeg2 Media Files Do Not Play Without Codecs Installed on the Thin Client: It is recommended to use files with a bit rate less than 3 Mbps for better performance.
• Test Environment Includes:
• Build 11.2.053
• XenDesktop 5.6 and 7.1
• Wyse TCX 6.0.06
• With the following INI parameters: ICADesktopApplianceMode=yesICAMMVideo=yesICAMMAudio=no (NOTE: Use =yes for analog headset)
• ICA Client 13.0
• DisplaySettings=MON1 rotate-normal DDC MON2 rotate-normal DDC on-right
• Without Codec on Windows XP 32-bit and Windows 7 64-bit XenDesktop sessions.
• With Codec gst_mmr_mpeg2_plugin-0.10.18-1 add-on on Windows XP 32-bit and Windows 7 64-bit XenDesktop sessions.
Tested Media Files Include:
• MPEG1
• MPEG2
• AVI
• ASF
• MP3
• WMV
Supported Resolutions
TIP: All resolutions support 16-bit and 32-bit color depth.
Monitors Tested
• DELL 1505FP
• Dell 1905FP
• Dell 2007WFP
• DELL 2405FPW
• DELL U3011
• Samsung 2243swx
• Samsung 226BW
• Samsung B2230
• Samsung SyncMaster 305T
• ViewSonic VX2835wm

22 Chapter 1
D50D Supported Resolutions
• 800 x 600
• 1024 x 768
• 1152 x 864 (at 75Hz only)
• 1280 x 800 (at 60Hz only)
• 1280 x 1024
• 1600 x 1200 (at 60Hz only)
• 1680 x 1050 (VGA with DVI to VGA converter at 60Hz; clone and span modes with DVI and VGA Y splitter at 60Hz)
• 1920 x 1080 (at 60Hz only)
• 1920 x 1200 (at 60Hz only)
• 2048 x 1280 (VGA: DVI to VGA converter at 60Hz only)
• 2560 x 1600 (Display Port at 60Hz only)
X50m Supported Resolutions
• 800 x 600
• 1024 x 600
• 1024 x 768
• 1280 x 720
• 1280 x 768
• 1360 x 768
• 1366 x 768 (default)
Z50D and Z50S Supported Resolutions
• 800 x 600
• 1024 x 768
• 1152 x 864 (at 75Hz only)
• 1280 x 800 (at 60Hz only)
• 1280 x 1024
• 1600 x 1200 (at 60Hz only)
• 1440 X 900 (clone and span modes with DVI and VGA Y cable at 60Hz only)
• 1680 x 1050 (VGA with DVI to VGA converter at 60Hz; clone and span modes with DVI and VGA Y cable at 60Hz)
• 1920 x 1080 (at 60Hz only)
• 1920 x 1200 (at 60Hz only)
• 2048 x 1280 (VGA with DVI to VGA converter at 60Hz only)
• 2560 x 1600 (Display port at 60Hz only)

Tables1 Applications and corresponding .desktop file names 52 Image Upgrade Details 93 Addons Upgrade Details 94 RSP Package Details 95 D50D Build Details 116 X50m Build Details 117 Z50D and Z50S Non-NIST BIOS Build Details 128 Z50D NIST BIOS Build Details 129 D50D BIOS Details 1410 X50m BIOS Details 1411 Z50D and Z50S Non-NIST BIOS BIOS Details 1412 Z50D NIST BIOS BIOS Details 1513 Supported Wireless Security Details 1714 Tested USB Peripherals 19

Release Notes
Dell® Wyse Enhanced SUSE Linux Enterprise Release 11 SP2 Issue: 022114
Written and published by: Dell Inc, February 2014
Created using FrameMaker® and Acrobat®


![[Citrix] Perforce Standardisation at Citrix](https://static.documents.pub/doc/80x56/545591f6b1af9f40378b492e/citrix-perforce-standardisation-at-citrix.jpg)


