30
Robomow app
Robomow app
1
TABLE OF CONTENTS
1 General .............................................................................................................................................................................................. 2
2 Compatibility ..................................................................................................................................................................................... 2
2.1 Device Compatibility................................................................................................................................................................. 2
2.2 Mower Compatibility ................................................................................................................................................................ 2
3 Downloading and Installation ........................................................................................................................................................... 3
3.1 First time installation ................................................................................................................................................................ 3
3.2 Reinstalling Robomow App ...................................................................................................................................................... 3
4 Registration ....................................................................................................................................................................................... 4
4.1 Registration Flow ...................................................................................................................................................................... 4
4.2 Registration Troubleshooting ................................................................................................................................................... 7
5 Connection with a mower ................................................................................................................................................................. 8
5.1 Connection Troubleshooting .................................................................................................................................................... 9
5.2 Connection range of the Robomow App ................................................................................................................................ 10
5.3 Connection range in Remote Control mode ........................................................................................................................... 10
5.4 Reconnection with a mower .................................................................................................................................................. 10
5.5 Removing a mower from the list of paired devices ................................................................................................................ 10
6 Robomow App Operation ............................................................................................................................................................... 13
6.1 Main Operational Screen ........................................................................................................................................................ 13
6.2 Changing mower’s settings with Robomow App .................................................................................................................... 14
6.2.1 Changing “Lawn Options” via Robomow App .................................................................................................................... 15
6.2.2 Changing “Mower Options” via Robomow App ................................................................................................................. 22
6.3 Settings that are available in the Robomow App, but not available in the mower, and vice versa ....................................... 24
7 Remote Control Function ................................................................................................................................................................ 25
7.1 Manual mowing with the remote control function ................................................................................................................ 25
8 App Settings .................................................................................................................................................................................... 26
8.1 Changing the Robomow App language .................................................................................................................................. 26
8.2 Setting “Share Operational data” ........................................................................................................................................... 26
8.3 Deleting an Account ............................................................................................................................................................... 26
9 GSM Module ................................................................................................................................................................................... 27
9.1 Setting the type of alerts to be sent by the GSM Module ...................................................................................................... 27
9.2 Testing your GSM Module ...................................................................................................................................................... 27
10 Remote Access ................................................................................................................................................................................ 28
10.1 Establishing a Remote Access session .................................................................................................................................... 28
11 Known issues ................................................................................................................................................................................... 29
2
1 GENERAL
The Robomow App is a mobile application available for Android and iOS that enables user friendly and intuitive operation of
your Robomow, through a variety of menu options and features.
The unique advantages of Robomow App include:
The Robomow App is completely free and works with all Robomow models produced since 2014. You do not need to
purchase an expensive accessory for your Robomow in order to operate it with the Robomow App.
The Robomow App has a unique Remote Control feature, which includes a manual mowing function.
The Robomow App provides the unique ability of establishing a remote connection between your Robomow and a
service center, to enable remote diagnostics.
Robomow App supports English, German, French, Danish, Swedish, Norwegian, Italian, and Dutch.
Robomow App uses the popular and advanced Bluetooth Low Energy (BLE) wireless communication standard to connect to
your mower. It provides you with a longer range than the traditional Bluetooth, and is less energy-consuming, which is an
essential advantage for battery-powered devices like robotic lawnmowers.
2 COMPATIBILITY
2.1 DEVICE COMPATIBILITY
The Robomow App supports the following operating systems:
Android 4.3 or higher
iOS 7.0 or higher
The iOS version of Robomow App supports the following Apple devices:
iPhone 4s/5c/5s/6/6s/6+
iPad 3 and later (including iPad Air)
iPad mini
The Android version of the Robomow App works with most Android devices that support the Bluetooth® 4.0 (a.k.a.
Bluetooth® SMART or BLE) standard. The most popular devices used with the Robomow App include:
Samsung Galaxy S3, S4, S5, S6, S6 Edge
Samsung Galaxy Samsung Galaxy Note 2 (from 30/05/2014), Note 3
HTC One X One, Nexus 5/6, LG G2/G3/G4
For the full list of mobile devices supporting the Bluetooth® 4.0 standard, please see the following link:
http://www.bluetooth.com/Pages/Bluetooth-Smart-Devices-List.aspx.
2.2 MOWER COMPATIBILITY
The Robomow App is compatible with all Robomow models manufactured since 2014. Note that the Robomow App does
not support RL/RM models.
3
3 DOWNLOADING AND INSTALLATION
3.1 FIRST TIME INSTALLATION
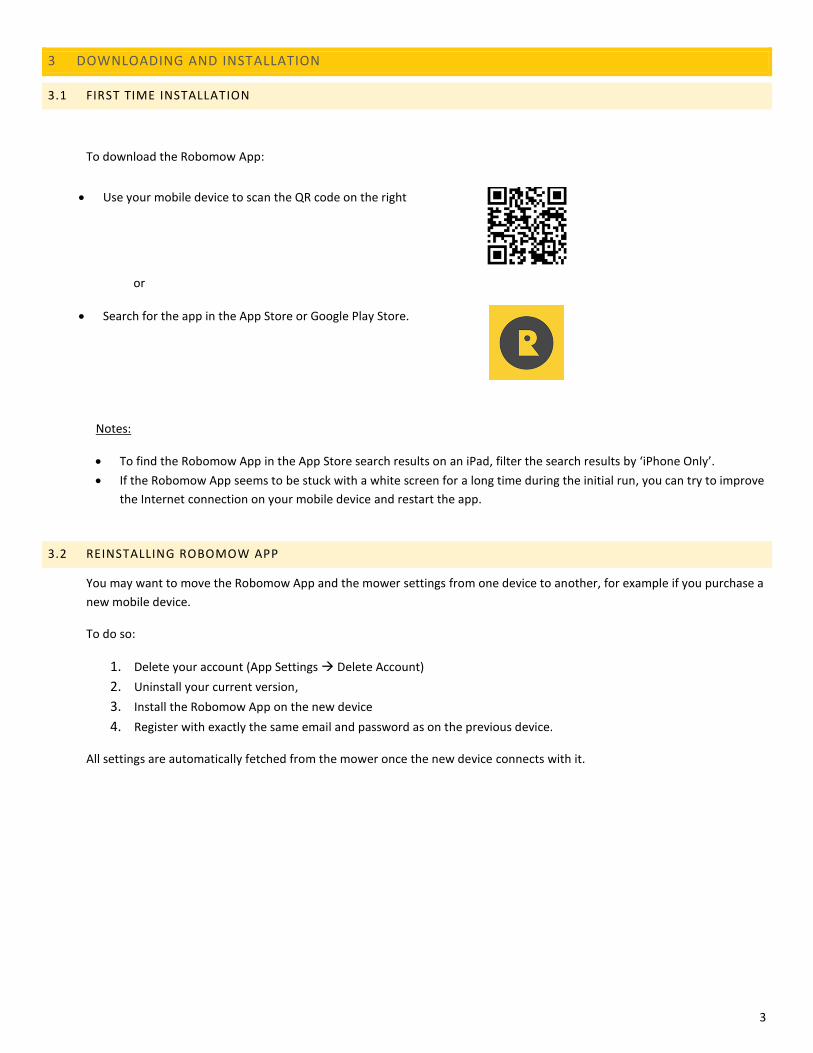
To download the Robomow App:
Use your mobile device to scan the QR code on the right
or
Search for the app in the App Store or Google Play Store.
Notes:
To find the Robomow App in the App Store search results on an iPad, filter the search results by ‘iPhone Only’.
If the Robomow App seems to be stuck with a white screen for a long time during the initial run, you can try to improve
the Internet connection on your mobile device and restart the app.
3.2 REINSTALLING ROBOMOW APP
You may want to move the Robomow App and the mower settings from one device to another, for example if you purchase a
new mobile device.
To do so:
1. Delete your account (App Settings Delete Account)
2. Uninstall your current version,
3. Install the Robomow App on the new device
4. Register with exactly the same email and password as on the previous device.
All settings are automatically fetched from the mower once the new device connects with it.
4
4 REGISTRATION
4.1 REGISTRATION FLOW
The following steps describe how to register the Robomow app.
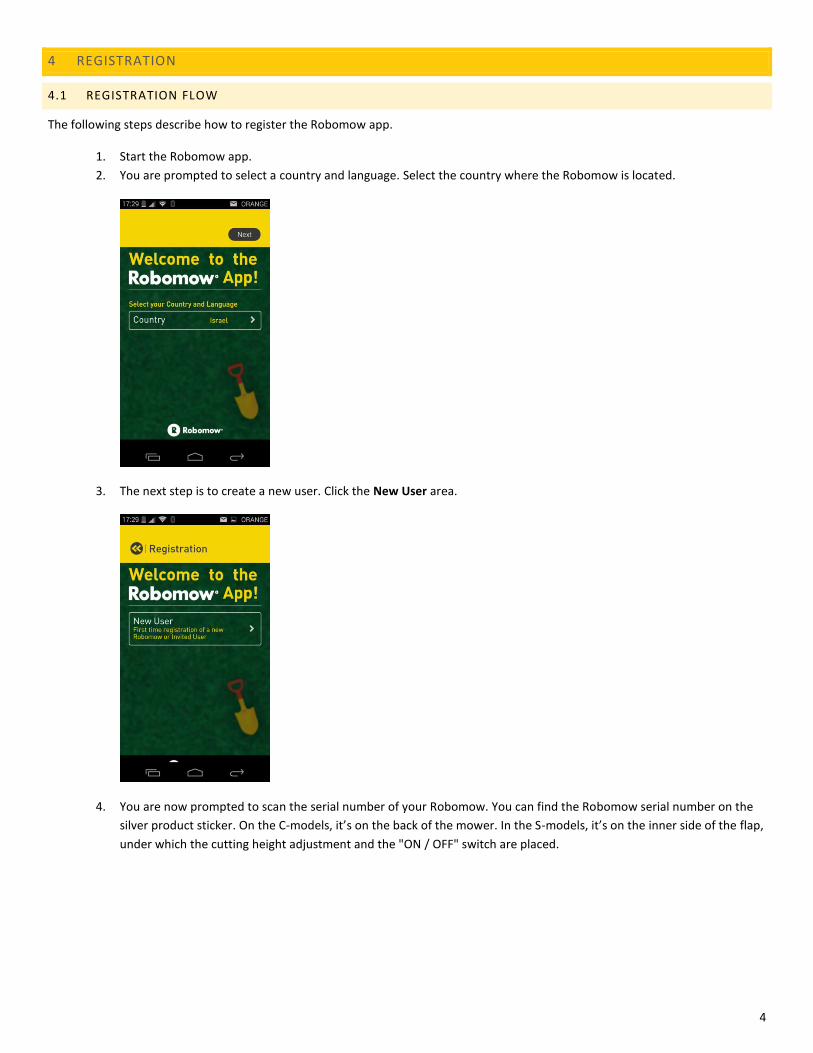
1. Start the Robomow app.
2. You are prompted to select a country and language. Select the country where the Robomow is located.
3. The next step is to create a new user. Click the New User area.
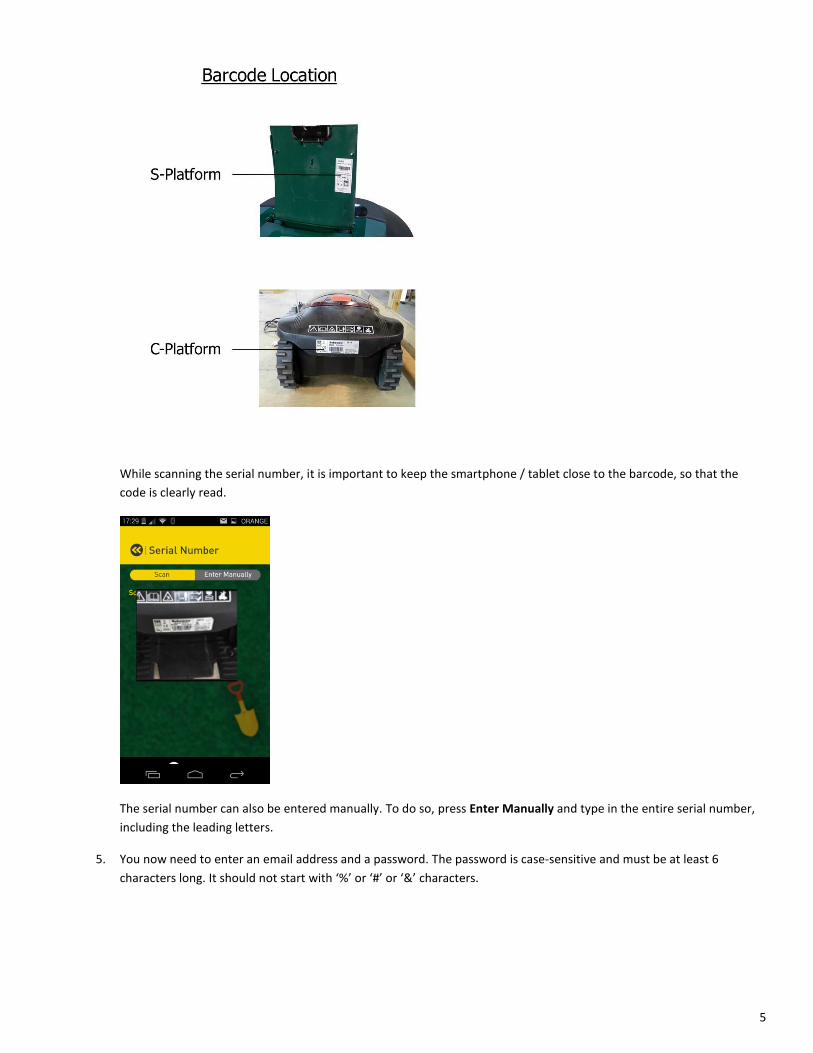
4. You are now prompted to scan the serial number of your Robomow. You can find the Robomow serial number on the
silver product sticker. On the C-models, it’s on the back of the mower. In the S-models, it’s on the inner side of the flap,
under which the cutting height adjustment and the "ON / OFF" switch are placed.
5
While scanning the serial number, it is important to keep the smartphone / tablet close to the barcode, so that the
code is clearly read.
The serial number can also be entered manually. To do so, press Enter Manually and type in the entire serial number,
including the leading letters.
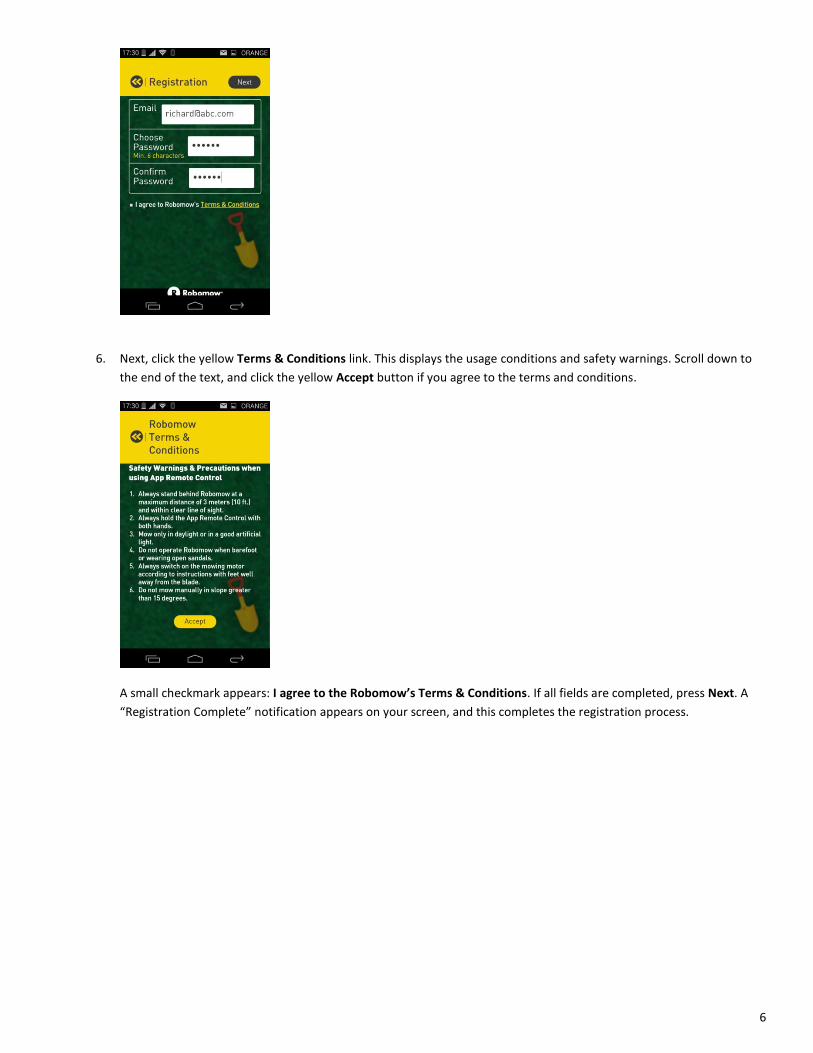
5. You now need to enter an email address and a password. The password is case-sensitive and must be at least 6
characters long. It should not start with ‘%’ or ‘#’ or ‘&’ characters.
6
6. Next, click the yellow Terms & Conditions link. This displays the usage conditions and safety warnings. Scroll down to
the end of the text, and click the yellow Accept button if you agree to the terms and conditions.
A small checkmark appears: I agree to the Robomow’s Terms & Conditions. If all fields are completed, press Next. A
“Registration Complete” notification appears on your screen, and this completes the registration process.

7
4.2 REGISTRATION TROUBLESHOOTING
The following table describes the various registration-failure sub-messages that may appear, and the corrective action to
take in each case.
# Sub-message Corrective Action
1 This serial number is already registered. The person currently registered with the mower needs to delete his account (App Settings > Delete Account).
Alternatively, register with exactly the same credentials as the person currently registered.
2 No Internet connection. Make sure there is a working Internet connection. Try again later.
3 The server is not responding. Try again later.
4 The provided serial number is not recognized.
Make sure the serial number you enter is the correct serial number (including all characters and letters), as written on the mower.
5 Some information about the serial number is missing.
Call the Robomow Hotline for assistance.
6 The provided email is recognized, but the password is wrong.
Use the password used during initial registration, or call the Robomow Hotline to reset the password.

8
5 CONNECTION WITH A MOWER
The Robomow App communicates with your mower via the BLE (Bluetooth Low Energy) communication protocol.
Upon successful registration and upon every launch of the app, the app automatically scans for available BLE devices and tries
to connect automatically to the registered mower:
Figure 1 - Successful Registration
Figure 2 - Scanning for mowers
Important!
Make sure the mower is switched on and awake.
Make sure you’re within a few meters of the mower.
Make sure your Robomow is not currently connected with another mobile device that is running the Robomow app.
When the Robomow app successfully connects with the mower, the buttons and the status bar become active (note the
connection status icon encircled in red):
Figure 3 - Successful connection (pairing) with a mower
9
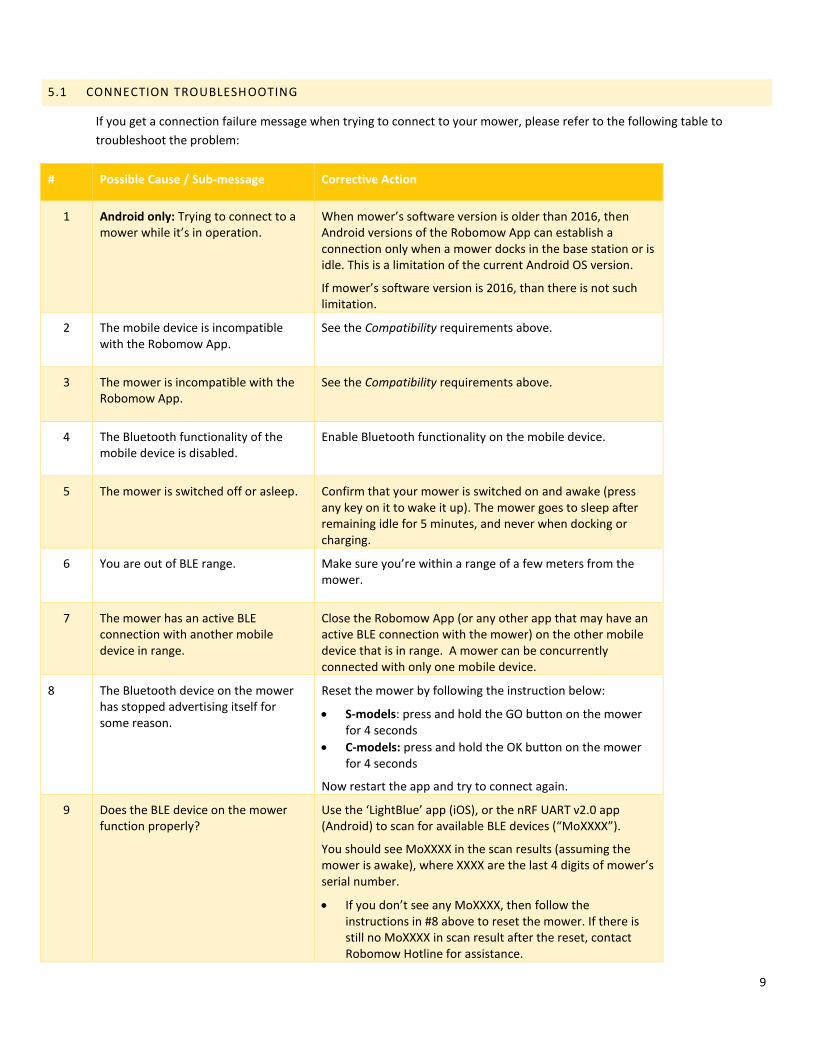
5.1 CONNECTION TROUBLESHOOTING
If you get a connection failure message when trying to connect to your mower, please refer to the following table to
troubleshoot the problem:
# Possible Cause / Sub-message Corrective Action
1
Android only: Trying to connect to a mower while it’s in operation.
When mower’s software version is older than 2016, then Android versions of the Robomow App can establish a connection only when a mower docks in the base station or is idle. This is a limitation of the current Android OS version.
If mower’s software version is 2016, than there is not such limitation.
2 The mobile device is incompatible with the Robomow App.
See the Compatibility requirements above.
3 The mower is incompatible with the Robomow App.
See the Compatibility requirements above.
4 The Bluetooth functionality of the mobile device is disabled.
Enable Bluetooth functionality on the mobile device.
5 The mower is switched off or asleep. Confirm that your mower is switched on and awake (press any key on it to wake it up). The mower goes to sleep after remaining idle for 5 minutes, and never when docking or charging.
6 You are out of BLE range. Make sure you’re within a range of a few meters from the mower.
7 The mower has an active BLE connection with another mobile device in range.
Close the Robomow App (or any other app that may have an active BLE connection with the mower) on the other mobile device that is in range. A mower can be concurrently connected with only one mobile device.
8 The Bluetooth device on the mower has stopped advertising itself for some reason.
Reset the mower by following the instruction below:
S-models: press and hold the GO button on the mower for 4 seconds
C-models: press and hold the OK button on the mower for 4 seconds
Now restart the app and try to connect again.
9 Does the BLE device on the mower function properly?
Use the ‘LightBlue’ app (iOS), or the nRF UART v2.0 app (Android) to scan for available BLE devices (“MoXXXX”).
You should see MoXXXX in the scan results (assuming the mower is awake), where XXXX are the last 4 digits of mower’s serial number.
If you don’t see any MoXXXX, then follow the instructions in #8 above to reset the mower. If there is still no MoXXXX in scan result after the reset, contact Robomow Hotline for assistance.

10
If you see MoMT or MoNA in scan results, contact Robomow Hotline for assistance.
When you see the proper MoXXXX in scan results, close LightBlue/nRF UART app, open Robomow App and try to connect again. If still unable to connect, contact Robomow Hotline for assistance.
5.2 CONNECTION RANGE OF THE ROBOMOW APP
The range of wireless connection between the Robomow App and your mower varies between 10 to 25 meters under normal
conditions, depending on the mower’s orientation (side, front, or back). Note that when you are facing away from the
mower, the range is reduced approximately by half.
5.3 CONNECTION RANGE IN REMOTE CONTROL MODE
For safety reasons, the communication link with a mower in Remote Control mode is very sensitive and thus less tolerant to
communication errors. This requires a shorter range with the mower than in other Robomow App modes.
Either way, you need to maintain line of sight and no more than 3 meters (10 ft.) distance when operating the mower in
Remote Control mode.
5.4 RECONNECTION WITH A MOWER
If the app loses connection with a mower, it automatically tries to reconnect and displays a “trying to reconnect to your
Robomow…” message. If automatic reconnection fails, a message appears describing the possible failure reason, and
suggesting that you try to reconnect again.
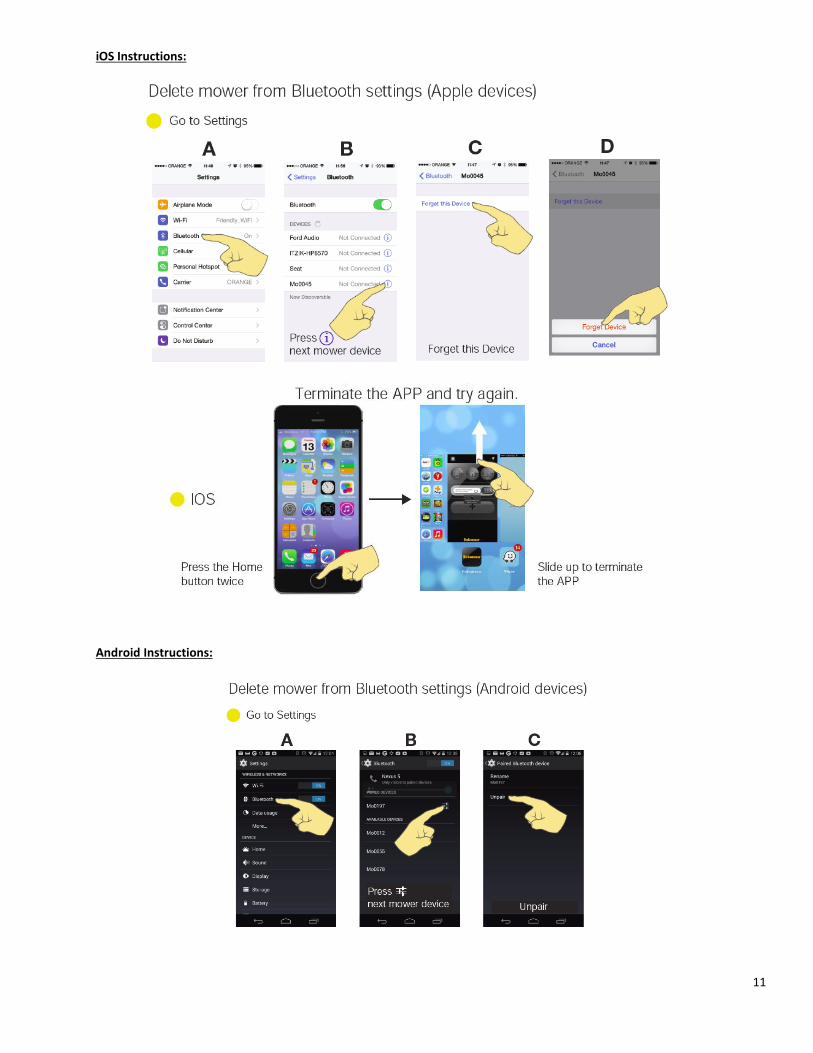
5.5 REMOVING A MOWER FROM THE LIST OF PAIRED DEVICES
In some cases a connection with a mower may fail because the mower is already paired with your mobile device, but with a
wrong Bluetooth connection key. This usually happens when an electronic component, such as the main board, is replaced on
the mower.
To resolve this issue, refresh the BLE connection key stored on the mobile device by removing the mower from the list of
paired Bluetooth devices on the phone/tablet, as described below.
11
iOS Instructions:
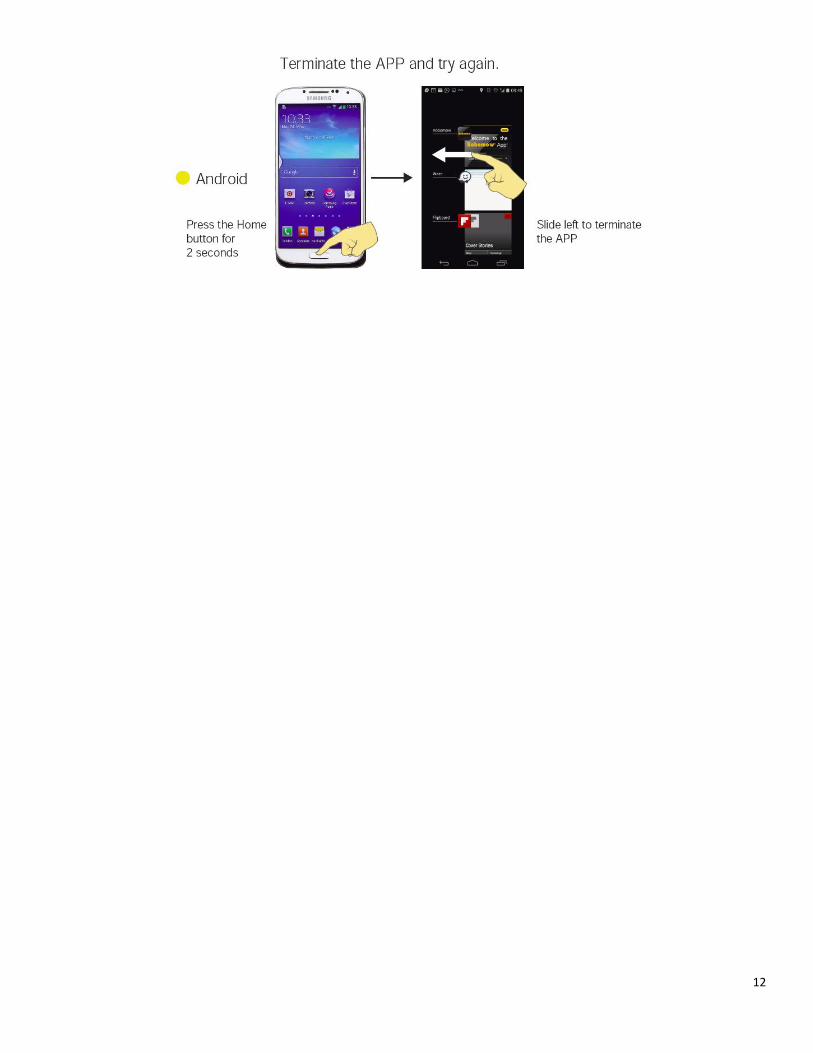
Android Instructions:
12

13
6 ROBOMOW APP OPERATION
6.1 MAIN OPERATIONAL SCREEN
The following figure illustrates all the features/components available in the Robomow App main operational screen.
Access to main menu
Battery capacityof the mower
Status of Bluetooth® SMART connection with the mower: Connected/Disconnected
Note: when disconnected, only access to main menu is available. Any other status or control on the screen is not available or not updated.
Mower’s status:• Docking in the base• Mowing/edge-mowing• Stopped/idle• Winter charge
Shows next departure time when automatic operation is enabled and the mower is fully charged*
(*) in some cases the app may report 100% capacity, while the mower is still charging (battery sign is blinking)
This button enables/disables automatic operation.
IMPORTANT! If automatic operation is disabled (grey), the mower will stay in the base until further notice.Remote Control button
Manual operation buttons: Mow / Home / Edge & Mow
Figure 4 - Main Operational Screen

14
6.2 CHANGING MOWER’S SETTINGS WITH ROBOMOW APP
To view and change mower or lawn settings using the Robomow App:
1. Click the “Menu” button on the Robomow app’s home screen. The main menu is displayed, as shown below.
2. Click Lawn & Mower Options. A new window appears with all of the lawn options that can be set for the Robomow.
Here you can view and change Lawn Options (additional zones, inactive periods, etc.) and Mower Options (Rain Sensor,
child locks, etc.)
The available Lawn options include:
Inactive Time
Operations / Mowing Extent(*)
Zones
Islands
Near Wire Follow
Smart Mow (*)
Turbo Mow (*)
15
Program On/Off (*)
External Base (RC models only)
The available Mower options include:
Child Lock
Rain Sensor
Sound On/Off
Edge On/Off
Mobile Communication System
(*) In the 2015 software version
6.2.1 CHANGING “LAWN OPTIONS” VIA ROBOMOW APP
To change lawn options, navigate to Main Menu Lawn & Mower Options.
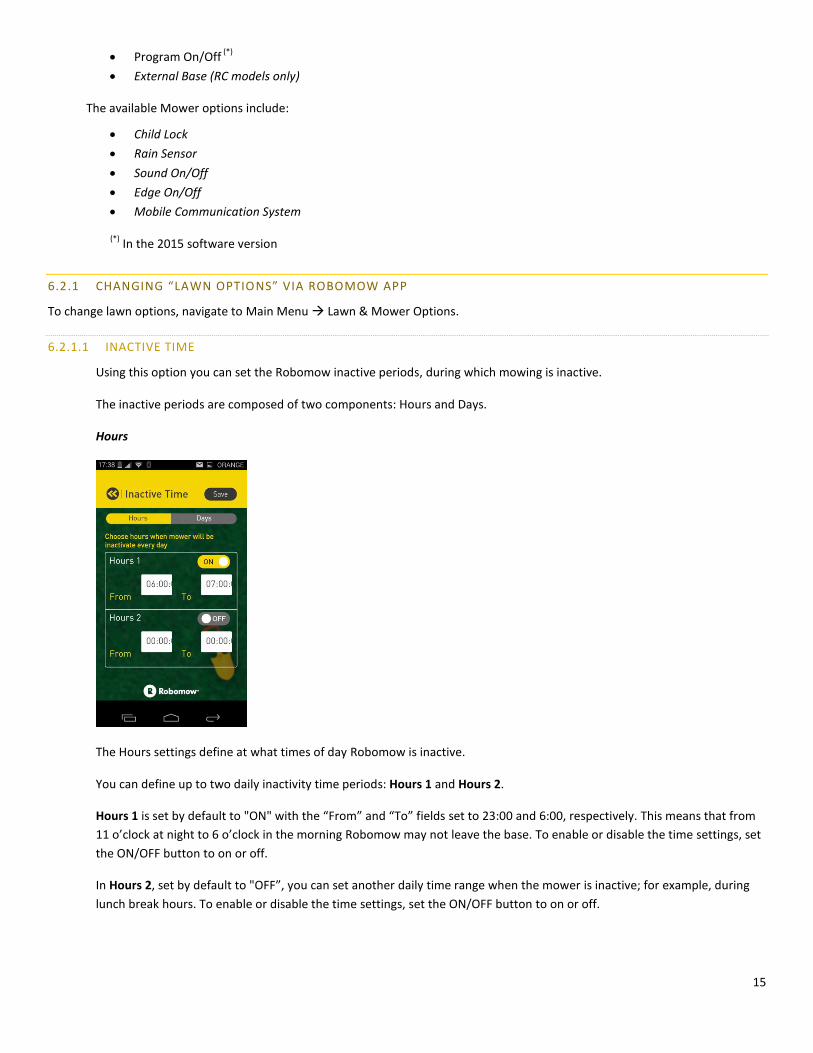
6.2.1.1 INACTIVE TIME
Using this option you can set the Robomow inactive periods, during which mowing is inactive.
The inactive periods are composed of two components: Hours and Days.
Hours
The Hours settings define at what times of day Robomow is inactive.
You can define up to two daily inactivity time periods: Hours 1 and Hours 2.
Hours 1 is set by default to "ON" with the “From” and “To” fields set to 23:00 and 6:00, respectively. This means that from
11 o’clock at night to 6 o’clock in the morning Robomow may not leave the base. To enable or disable the time settings, set
the ON/OFF button to on or off.
In Hours 2, set by default to "OFF”, you can set another daily time range when the mower is inactive; for example, during
lunch break hours. To enable or disable the time settings, set the ON/OFF button to on or off.

16
Important:
In the 2014 mower’s software version, once you enable the “Hours 2” slot via the app on the C-model mower, the
entire “Inactive Times” menu become unavailable via the mower. To regain control of the “Inactive Times” menu
via the mower, disable “Hours 2” in the app.
In the 2015 mower’s software version, there is no such limitation. You can always change “Inactive Times” via the
mower, but only for “Hours 1”. The “Hours 2” option is only available via the app.
Days
The Days settings define the days in a week when Robomow is not allowed to leave the base (i.e., remains inactive). By
default, Sunday is set as an inactive day. To make a particular day inactive, select it in the list. A day displayed in yellow is an
inactive day. A day displayed in gray is an active day.
6.2.1.2 OPERATIONS (“MOWING EXTENT” IN 2015 ROBOMOW MODELS)
This option enables making adjustments to the mowing cycle, both in Intensity (“Mowing Hours %” in 2015 models) and
Interval (“Mowing Frequency” in 2015 models).

17
6.2.1.2.1 INTENSITY (“MOWING HOURS %” IN 2015 MODELS)
Robomow by default allocates a certain number mowing hours per a given area size.
Using the Intensity setting, you can make adjustments to the default setting and increase/decrease the number of
operating hours per area size (in %).
‘Zero’ indicates Robomow’s default number of required mowing hours for the given area.
You can adjust the intensity for each zone separately.
6.2.1.2.2 INTERVAL (“MOWING FREQUENCY” IN 2015 MODELS)
The Interval setting controls the mowing frequency for each zone.
Select the desired frequency for the specific zone. The selected option is displayed in yellow.
You can choose between: ‘Every 2 days’, ‘Twice a week’ or ‘Once a week’ (corresponding to ‘High’, ‘Medium’ and ‘Low’
mowing frequency).
18
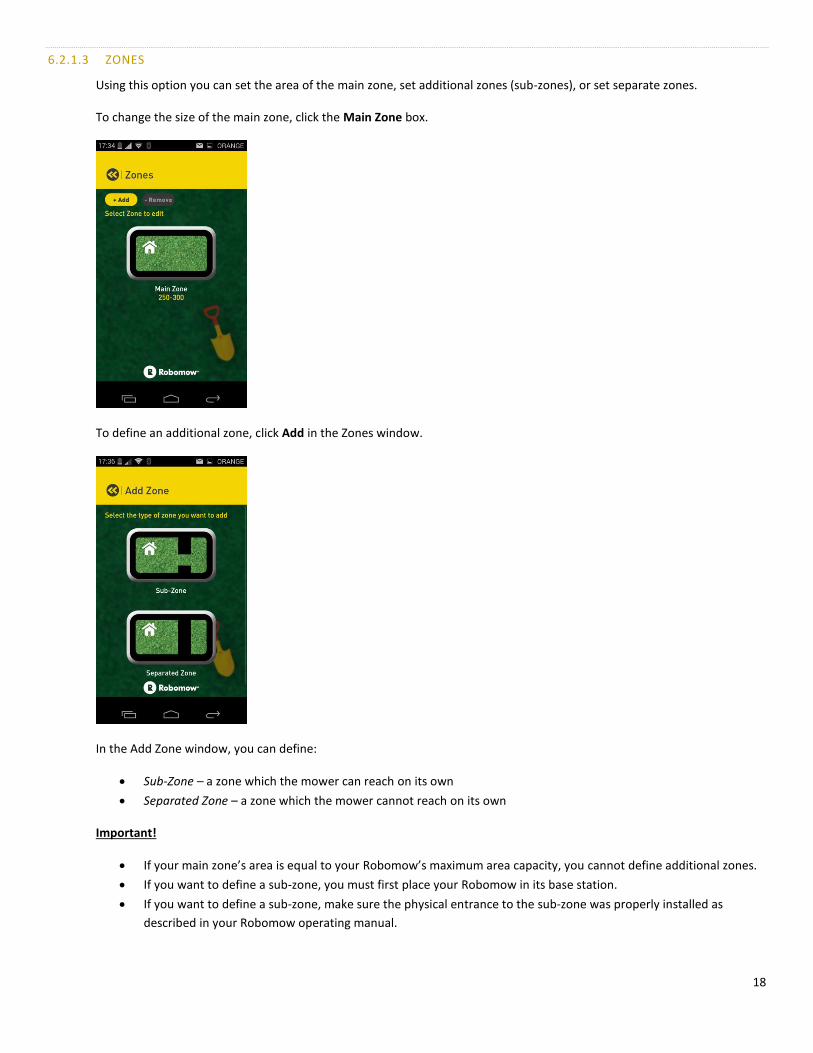
6.2.1.3 ZONES
Using this option you can set the area of the main zone, set additional zones (sub-zones), or set separate zones.
To change the size of the main zone, click the Main Zone box.
To define an additional zone, click Add in the Zones window.
In the Add Zone window, you can define:
Sub-Zone – a zone which the mower can reach on its own
Separated Zone – a zone which the mower cannot reach on its own
Important!
If your main zone’s area is equal to your Robomow’s maximum area capacity, you cannot define additional zones.
If you want to define a sub-zone, you must first place your Robomow in its base station.
If you want to define a sub-zone, make sure the physical entrance to the sub-zone was properly installed as
described in your Robomow operating manual.
19
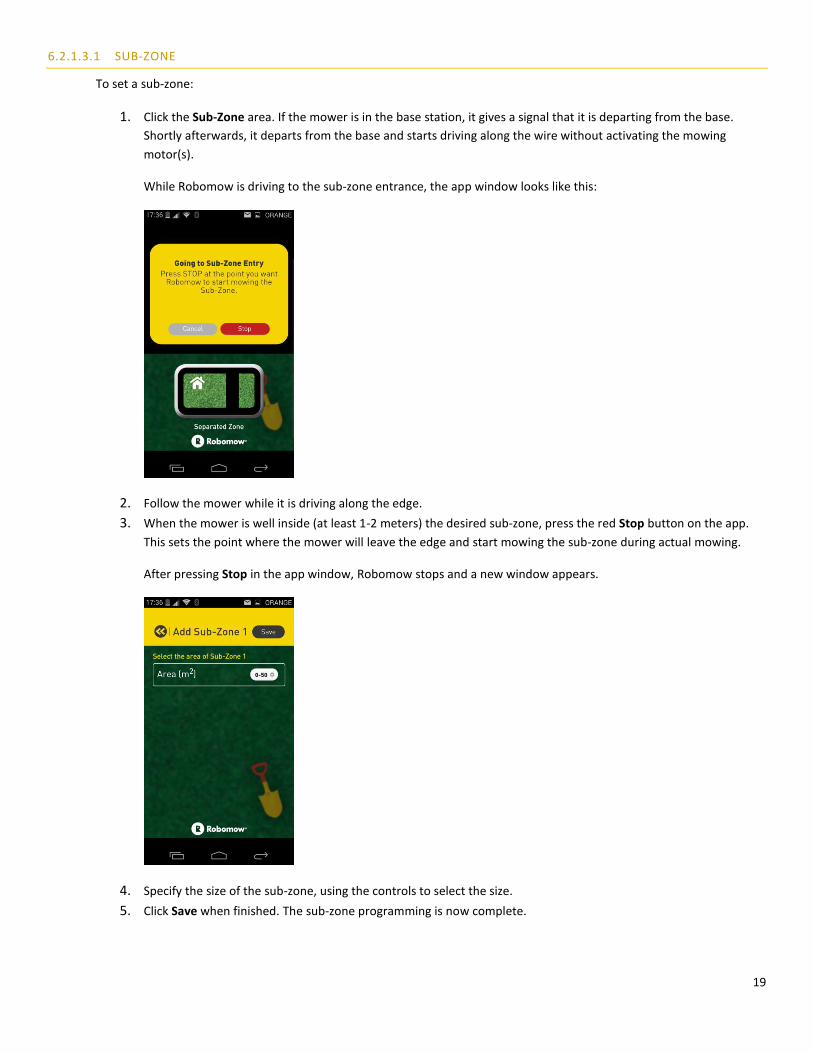
6.2.1.3.1 SUB-ZONE
To set a sub-zone:
1. Click the Sub-Zone area. If the mower is in the base station, it gives a signal that it is departing from the base.
Shortly afterwards, it departs from the base and starts driving along the wire without activating the mowing
motor(s).
While Robomow is driving to the sub-zone entrance, the app window looks like this:
2. Follow the mower while it is driving along the edge.
3. When the mower is well inside (at least 1-2 meters) the desired sub-zone, press the red Stop button on the app.
This sets the point where the mower will leave the edge and start mowing the sub-zone during actual mowing.
After pressing Stop in the app window, Robomow stops and a new window appears.
4. Specify the size of the sub-zone, using the controls to select the size.
5. Click Save when finished. The sub-zone programming is now complete.

20
6.2.1.3.2 SEPARATED ZONE
To set a separated zone:
1. Click Separated Zone (see the figure below).
2. Click the area size setting to set the area of the separated zone.
3. Click Save to save the settings.
6.2.1.4 ISLANDS
In rare cases, you may notice the mower unnecessarily circling around a Perimeter Island, while searching for
the Base Station.
The Islands option helps overcome this situation. To avoid such cases in a zone, turn the Islands feature On in
that zone.

21
Important!
When the Islands feature is set to On, the mower executes a special method of searching for the Base Station. As
a result it may take the mower a longer time to arrive at the Base Station.
6.2.1.5 NEAR WIRE FOLLOW
Using this option you can define how closely Robomow follows the perimeter wire on its way to the base station. You can
set this option for each zone separately.
You can set the following:
Max. Distance - sets how far Robomow may go from the wire while riding back to the base station.
Min. Distance - sets how close Robomow may get to the wire while riding back to the base station.
Note that the numbers do not represent the actual units of measurement.
Turn this option on and off per zone by setting the controller to "ON" or "OFF".
6.2.1.6 EXTERNAL BASE
Note: This option is only available for C-models (RC / MC).
Using the External Base option, you can set up an off-the-lawn installation of a base station.

22
1. Before using this option, make sure the external charging station was installed correctly. Refer to the Operating
Manual for the installation instructions.
2. Select the zone in which the external charging station is located – the Main Zone, or if relevant, a Separated Zone.
3. Enable or disable the External Base option by setting the controller to "ON" or "OFF".
4. Specify the distance of the base station from the edge using the Distance slider. This specifies how far (in
meter/feet) Robomow should drive back when departing from the base.
6.2.2 CHANGING “MOWER OPTIONS” VIA ROBOMOW APP
To change the mower options:
1. Press the "Menu" button on the home screen of the Robomow app. The main menu appears, as shown in the
image below.
2. Click Lawn Mower & Options. A new window appears with all the options that can be set for your lawn as well as
for your Robomow.

23
3. Select the Mower tab to change mower settings such as child lock, rain sensor, , etc.
24
6.2.2.1 CHILD LOCK SETTINGS (PARENTAL CONTROL)
The Child Lock feature locks the mower’s buttons to prevent unintended operation, especially by children.
Note: this feature only locks buttons on the mower itself. The operational buttons in the app are not locked.
When the Child Lock is set to 'On', to operate the mower you must first press one of the mower’s operating
mode buttons and then press OK to confirm.
6.2.2.2 SOUND
This option turns operational sound signals of the mower on or off. Note that some signals, such as safety or antitheft
signals, cannot be switched off. To enable or disable this option, set the controller to either "ON" or "OFF".
6.2.2.3 EDGE MODE
This option enables skipping edging operations when working in automatic mode. That is, if this setting is set to Off,
Robomow does not cut the edges of your lawn at the beginning of each mowing cycle.
However, if the edging is started manually (by pressing the Edge&Mow button on the mower or in the app), it is performed
regardless of the setting of the Edge Mode parameter.
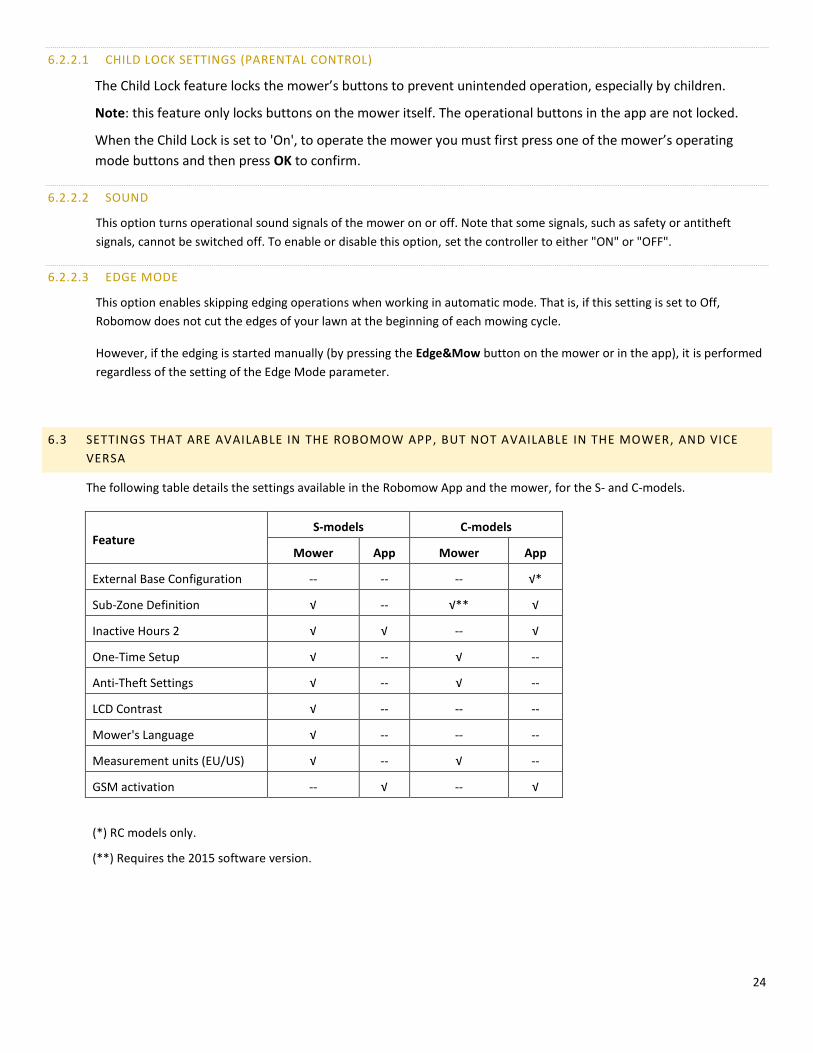
6.3 SETTINGS THAT ARE AVAILABLE IN THE ROBOMOW APP, BUT NOT AVAILABLE IN THE MOWER, AND VICE
VERSA
The following table details the settings available in the Robomow App and the mower, for the S- and C-models.
Feature S-models C-models
Mower App Mower App
External Base Configuration -- -- -- √*
Sub-Zone Definition √ -- √** √
Inactive Hours 2 √ √ -- √
One-Time Setup √ -- √ --
Anti-Theft Settings √ -- √ --
LCD Contrast √ -- -- --
Mower's Language √ -- -- --
Measurement units (EU/US) √ -- √ --
GSM activation -- √ -- √
(*) RC models only.
(**) Requires the 2015 software version.

25
7 REMOTE CONTROL FUNCTION
The Remote Control function is a unique Robomow App functionality, which enables you to remotely drive your Robomow and
perform manual mowing. It is completely free of charge for all Robomow models. The Remote Control function can be accessed by
pressing Remote in the Main Operation Screen, as shown in the figure below:
7.1 MANUAL MOWING WITH THE REMOTE CONTROL FUNCTION
To perform manual mowing in remote control mode:
1. Press and hold the safety lock with your right thumb.
2. While holding the safety lock, press the mow button with your left thumb. The blade(s) start.
3. Release the safety lock, but keep holding your left thumb on the mow button.
4. Use the Joystick to navigate.
26
8 APP SETTINGS
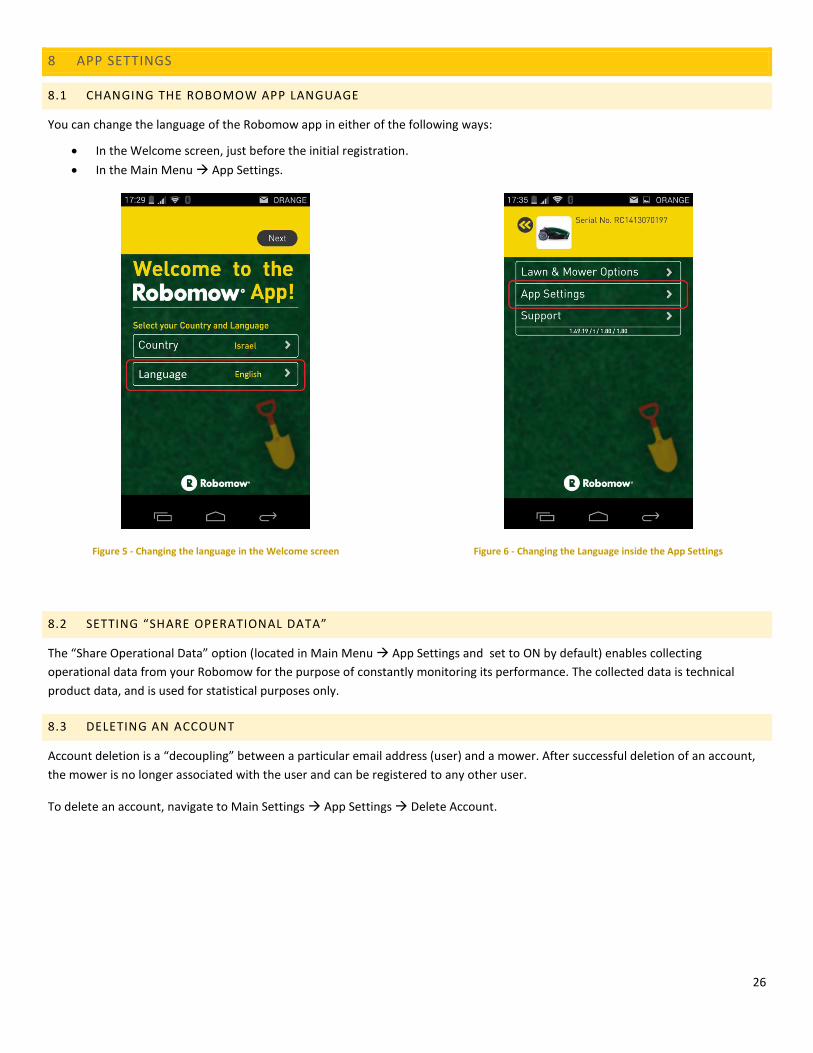
8.1 CHANGING THE ROBOMOW APP LANGUAGE
You can change the language of the Robomow app in either of the following ways:
In the Welcome screen, just before the initial registration.
In the Main Menu App Settings.
Figure 5 - Changing the language in the Welcome screen
Figure 6 - Changing the Language inside the App Settings
8.2 SETTING “SHARE OPERATIONAL DATA”
The “Share Operational Data” option (located in Main Menu App Settings and set to ON by default) enables collecting
operational data from your Robomow for the purpose of constantly monitoring its performance. The collected data is technical
product data, and is used for statistical purposes only.
8.3 DELETING AN ACCOUNT
Account deletion is a “decoupling” between a particular email address (user) and a mower. After successful deletion of an account,
the mower is no longer associated with the user and can be registered to any other user.
To delete an account, navigate to Main Settings App Settings Delete Account.
27
9 GSM MODULE
The main purpose and value of the GSM accessory is the ability to send alerts by push notification to the mower’s owner. The GSM
Module itself provides an Internet data connection, but the push notifications mechanism requires registering a mobile device as a
push notifications recipient. This is where the Robomow App comes in.
The GSM Module can send two types of alerts (push notifications) to your mobile device:
- Theft Detect Alerts - Sent if your mower has been removed from the designated area.
- Operation Stop Alerts - Sent if your mower has stopped in the middle of an operation.
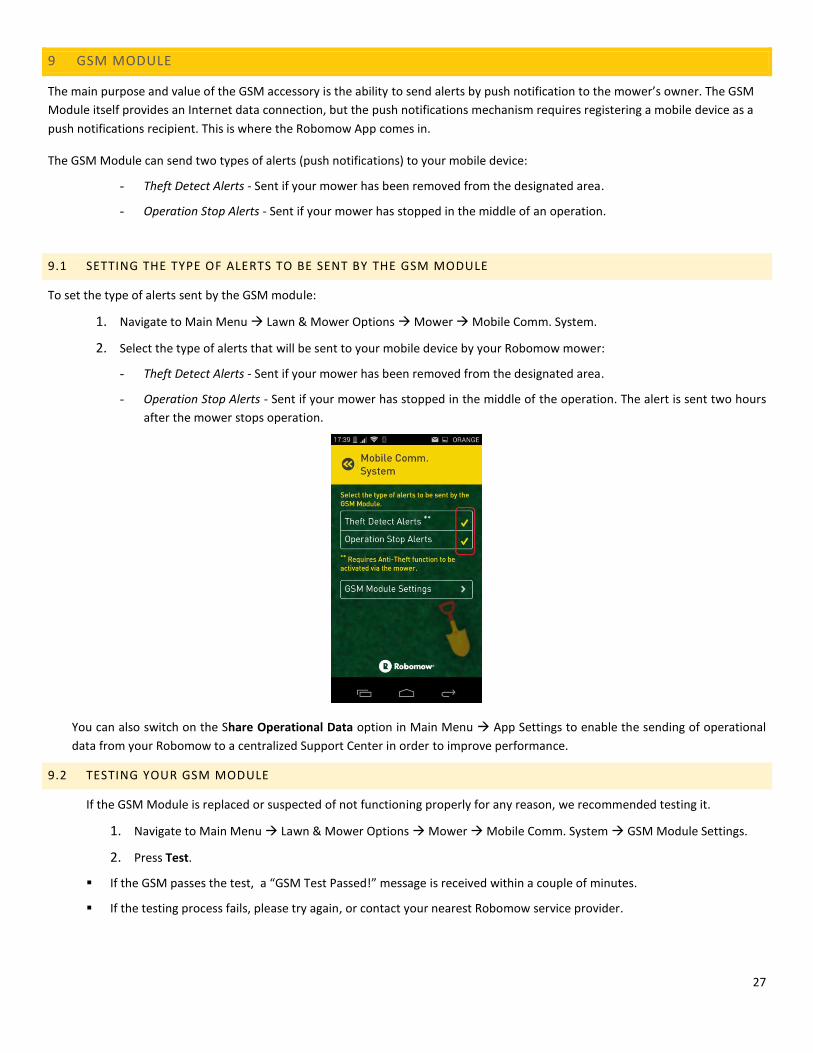
9.1 SETTING THE TYPE OF ALERTS TO BE SENT BY THE GSM MODULE
To set the type of alerts sent by the GSM module:
1. Navigate to Main Menu Lawn & Mower Options Mower Mobile Comm. System.
2. Select the type of alerts that will be sent to your mobile device by your Robomow mower:
- Theft Detect Alerts - Sent if your mower has been removed from the designated area.
- Operation Stop Alerts - Sent if your mower has stopped in the middle of the operation. The alert is sent two hours
after the mower stops operation.
You can also switch on the Share Operational Data option in Main Menu App Settings to enable the sending of operational
data from your Robomow to a centralized Support Center in order to improve performance.
9.2 TESTING YOUR GSM MODULE
If the GSM Module is replaced or suspected of not functioning properly for any reason, we recommended testing it.
1. Navigate to Main Menu Lawn & Mower Options Mower Mobile Comm. System GSM Module Settings.
2. Press Test.
If the GSM passes the test, a “GSM Test Passed!” message is received within a couple of minutes.
If the testing process fails, please try again, or contact your nearest Robomow service provider.
28
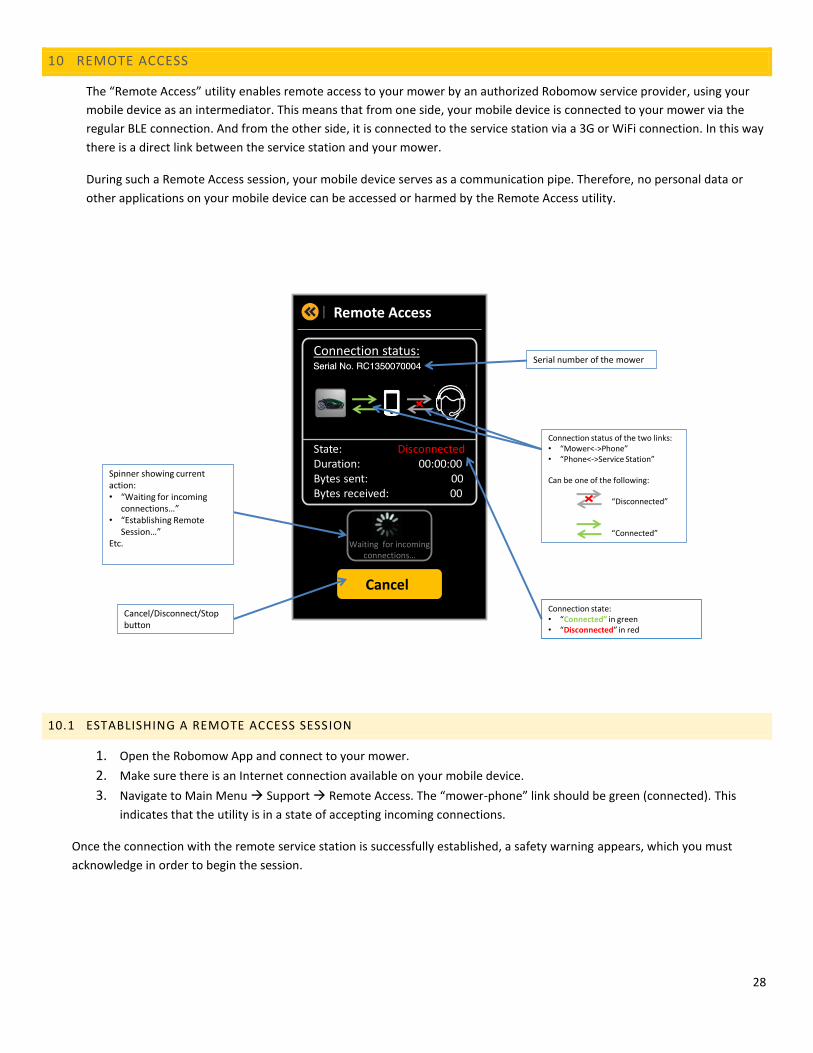
10 REMOTE ACCESS
The “Remote Access” utility enables remote access to your mower by an authorized Robomow service provider, using your
mobile device as an intermediator. This means that from one side, your mobile device is connected to your mower via the
regular BLE connection. And from the other side, it is connected to the service station via a 3G or WiFi connection. In this way
there is a direct link between the service station and your mower.
During such a Remote Access session, your mobile device serves as a communication pipe. Therefore, no personal data or
other applications on your mobile device can be accessed or harmed by the Remote Access utility.
Connection status of the two links: • “Mower<->Phone”• “Phone<->Service Station”
Can be one of the following:
“Disconnected”
“Connected”
Remote Access
Cancel
Connection status:
State: DisconnectedDuration: 00:00:00Bytes sent: 00Bytes received: 00
Waiting for incoming connections…
Serial number of the mower
Connection state: • “Connected” in green • “Disconnected” in red
Spinner showing current action:• “Waiting for incoming
connections…”• “Establishing Remote
Session…”Etc.
Cancel/Disconnect/Stop button
10.1 ESTABLISHING A REMOTE ACCESS SESSION
1. Open the Robomow App and connect to your mower.
2. Make sure there is an Internet connection available on your mobile device.
3. Navigate to Main Menu Support Remote Access. The “mower-phone” link should be green (connected). This
indicates that the utility is in a state of accepting incoming connections.
Once the connection with the remote service station is successfully established, a safety warning appears, which you must
acknowledge in order to begin the session.

29
Important notes:
Only an authorized service station that knows the exact serial number of your mower can connect remotely to
your mower. It can only connect to your mower when your mobile device is connected to the mower by itself, and
running the Remote Access utility.
You can abort a remote connection to your mower at any moment by pressing the Disconnect button.
You can speak with the service operator on the same phone that is running a remote connection with your mower.
The remote access session is not disturbed by a phone call from the same mobile device.
11 KNOWN ISSUES
If mower’s software version is older than 2016, then current Android version of Robomow App cannot connect to such
mower while it’s in operation. The connection can be established only when a mower docks in the base station or when it is
idle (for example, after the STOP button is pressed).
Some reconnection issues with a mower may occur. Most reconnection issues can be resolved by exiting the app and
launching it again.
Some camera and graphical-related issues have been reported for the following devices: Nexus 7, Nexus 4, Samsung Tab S,
Motorola Moto X, Sony Xperia.


