Roland-PrintServer User Manual Thank you very much for purchasing the product. • To ensure correct and safe usage with a full understanding of this product's performance, please be sure to read through this manual completely and store it in a safe location. • Unauthorized copying or transferral, in whole or in part, of this manual is prohibited. • The contents of this operation manual and the specifications of this product are subject to change without notice. • The operation manual and the product have been prepared and tested as much as possible. If you find any misprint or error, please inform us. • Roland DG Corp. assumes no responsibility for any direct or indirect loss or damage which may occur through use of this product, regardless of any failure to perform on the part of this product. • Roland DG Corp. assumes no responsibility for any direct or indirect loss or damage which may occur with respect to any article made using this product.
Transcript
Roland-PrintServer User Manual
Thank you very much for purchasing the product.
• To ensure correct and safe usage with a full understanding of this product's performance,please be sure to read through this manual completely and store it in a safe location.
• Unauthorized copying or transferral, in whole or in part, of this manual is prohibited.
• The contents of this operation manual and the specifications of this product are subject tochange without notice.
• The operation manual and the product have been prepared and tested as much as possible.If you find any misprint or error, please inform us.
• Roland DG Corp. assumes no responsibility for any direct or indirect loss or damage whichmay occur through use of this product, regardless of any failure to perform on the part ofthis product.
• Roland DG Corp. assumes no responsibility for any direct or indirect loss or damage whichmay occur with respect to any article made using this product.
TradenamesMicrosoft, Windows 98 and 95, Windows NT, and MS-DOS are registered trademarks of Microsoft Corp. IEEE is a registered trademark of Institute of Electrical and Electronics Engineers, Inc.
ImprintRoland DG Corporation has endeavoured to ensure that the information in all manuals is correct. If you detect any inaccuracies please inform us. Roland DG Corporation will not accept any liability for any error or omission. The information in this manul is subject to change without notification.All rights are reserved. Copying, other reproduction or translation without the prior written consent from Roland DG Corporation is prohibited. User Manual release 6.1; date: 5.7.2002
CHAPTER 1 Your Print Server Introduces Itself ........................ 1-11.1 What Does Your Print Server Offer?..............................................................................1-2
1.2 Symbols and Conventions...............................................................................................1-3
CHAPTER 2 Print Server Homepage ........................................ 2-12.1 Calling the Print Server Homepage ................................................................................2-2
2.3 Displaying the Status Information ..................................................................................2-5
2.4 Configuring the Print Server ...........................................................................................2-62.4.1. General Configuration....................................................................................................................... 2-62.4.2. Configuring TCP/IP .......................................................................................................................... 2-62.4.3. Configuring Microsoft Windows .....................................................................................................2-7
2.5 Restart and Parameter Reset ...........................................................................................2-82.5.1. Restarting the Print Server ................................................................................................................ 2-82.5.2. Resetting the Print Server Parameters............................................................................................... 2-8
REFERENCE A Technical Data ......................................................A-1A.1 Basic Principles.............................................................................................................A-1
A.2 Controls .........................................................................................................................A-2A.2.1. Function of the LEDs...................................................................................................................... A-3A.2.2. Function of the Button .................................................................................................................... A-4
Contents
ii Print Server User Manual
A.3 Pin Assignment of the RJ-45 Connector ......................................................................A-6
This chapter contains information concerning the following topics:
What Does Your Print Server Offer?
Symbols and Conventions
Introduction
What Does Your Print Server Offer?
1-2 Print Server User Manual
1.1 What Does Your Print Server Offer?
Flexibility The Roland-PrintServer supports protocols, such as TCP/IP as well as the most widely used operating systems, such as Windows 98/95 and NT 4.0.
Simple Administration
You can call device and status information at any time using the print server homepage.
Symbols and Conventions
1-3 Print Server User Manual
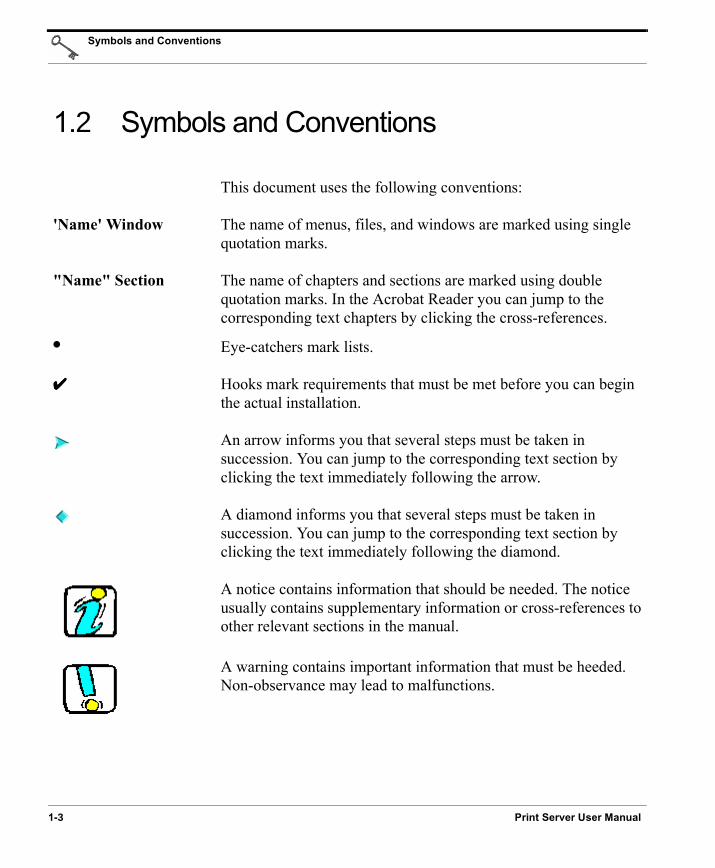
1.2 Symbols and Conventions
This document uses the following conventions:
'Name' Window The name of menus, files, and windows are marked using single quotation marks.
"Name" Section The name of chapters and sections are marked using double quotation marks. In the Acrobat Reader you can jump to the corresponding text chapters by clicking the cross-references.
● Eye-catchers mark lists.
✔✔✔✔ Hooks mark requirements that must be met before you can begin the actual installation.
An arrow informs you that several steps must be taken in succession. You can jump to the corresponding text section by clicking the text immediately following the arrow.
A diamond informs you that several steps must be taken in succession. You can jump to the corresponding text section by clicking the text immediately following the diamond.
A notice contains information that should be needed. The notice usually contains supplementary information or cross-references to other relevant sections in the manual.
A warning contains important information that must be heeded. Non-observance may lead to malfunctions.
Print Server User Manual 2-1
CHAPTER 2 Print Server Homepage
This chapter contains information concerning the following topics:
Calling the Print Server Homepage
Displaying the Status Information
Configuring the Print Server
Restart and Parameter Reset
Homepage
Calling the Print Server Homepage
2-2 Print Server User Manual
2.1 Calling the Print Server Homepage
The print server homepage is stored in your Roland-PrintServer and can be called by means of an Internet browser (Internet Explorer 4.x or later, Netscape 3.x or later). When using another browser, the full functionality of the print server homepage will not be guaranteed.
Requirements Make sure that:
� The print server is connected, and the printer is turned on.� The IP address is saved in the print server.
Procedure Proceed as follows:
1. Open your Internet browser.2. Enter the IP address of the print server as the URL.
The following page appears:
Fig. 2-1: Print server homepage
Calling the Print Server Homepage
Print Server User Manual 2-3
A selection bar with the available topics is located on the left of the screen, while an information window is on the right.
Basic Priniciples
2-4 Print Server User Manual
2.2 Basic Priniciples
Using the 'Home' link, you can return to the starting page of the print server homepage at any time.
Displaying the Status Information
Print Server User Manual 2-5
2.3 Displaying the Status Information
The 'General' page shows general status information, such as the name of the print server, the hardware address, and the serial and version numbers.
Under 'Description,' the text appears which you previously entered under 'Configuration - General.' A description can be used to gain a better overview of the print servers and printers in the system. Here, for example, you can enter a printer description or the location of the printer.
Configuring the Print Server
2-6 Print Server User Manual
2.4 Configuring the Print Server
Using the 'Configuration' selection bar on the left of the screen, you can call pages by means of which you can configure TCP/IP parameters, for example.
The following topics are described:
General Configuration
Configuring TCP/IP
Configuring Microsoft Windows
2.4.1. General Configuration
The 'General' page is used for configuring general print server parameters.
Under 'Description,' you can enter a description of the print server or printer to gain a better overview of the print servers and printers in the system.
'Print server language' refers to the language of the print server status and configuration information. Here you can select your preferred language. The printer language remains untouched.
2.4.2. Configuring TCP/IP
The 'TCP/IP' page is used for configuring the TCP/IP parameters.
Configuring the Print Server
Print Server User Manual 2-7
Using 'IP address,' 'Subnet mask,' and 'Gateway,' you can configure the respective addresses.
In addition, you can also type a host name, the printer location, and a contact partner for the printer.
Under 'DHCP,' 'BOOTP,' 'RARP,' and 'ARP/PING,' you can enable or disable the respective boot protocols and the saving of the IP address using 'arp' and 'ping.' We recommend that you deselect this box when the IP address is finally assigned to the print server.
2.4.3. Configuring Microsoft Windows
The 'Microsoft Windows' page is used for configuring the NetBIOS and WINS parameters.
Peer-to-peer printing is enabled or disabled via 'NetBIOS.'
The print server name is entered under 'NetBIOS name.'
The name of an already existing domain must be entered under 'NetBIOS domain.' The print server will then be displayed in this domain.
'NetBIOS refresh' indicates the refresh time.
Using 'WINS registration,' you can enable or disable the WINS services.
If you have enabled 'WINS via DHCP,' you can enter the IP address of the WINS server via DHCP. If you have not enabled 'WINS via DHCP,' you can enter the IP address of the WINS server manually.
Configuring the Print Server
2-8 Print Server User Manual
2.5 Restart and Parameter Reset
By means of the 'Actions' selection bar on the left of the screen, you can call pages by means of which you can restart the print server or reset the parameters.
The following topics will be described:
Restarting the Print Server
Resetting the Print Server Parameters
2.5.1. Restarting the Print Server
You can use the 'Restart' page for the manual restart of the print server.
Procedure Proceed as follows:
1. Click 'Restart Print Server.'The print server will be restarted.
2.5.2. Resetting the Print Server Parameters
You can use the 'Default Settings' page for resetting the print server parameters.
Procedure Proceed as follows:
1. Click 'Default Settings.'The parameters will be reset.
Print Server User Manual A-1
REFERENCE A Technical Data
A.1 Basic Principles
The following topics will be described:
Controls
Pin Assignment of the RJ-45 Connector
Network Specifications
Controls
A-2 Print Server User Manual
A.2 Controls
Different print server controls are available which are described in the following paragraphs. According to the printer model the controls are arranged in the following way:
Fig. D-1: Print server controls variant 1
1 RJ-45 connector for 100BaseTX and 10BaseT2 Green, link LED3 Button4 Yellow LED receive data and error indicator5 Green, ready mode LED
Controls
Print Server User Manual A-3
Fig. D-2: Print server controls variant 2
In this section, the function of the LEDs and the button will be described. For information concerning the connectors, please read the "Pin Assignment of the RJ-45 Connector" section on page A-6 if necessary.
A.2.1. Function of the LEDs
The print server has a yellow and a green, ready mode LED. The ready mode LED signals that the print server is operational. The yellow LED lights up whether data packets are received or not. The meaning of these LEDs is described in the following text.
The green, link LED indicates whether a data connection (link) has been established or not. The link LED is illuminated if a link exists. In the following text it is not described anymore.
1 Button2 Green, ready mode LED3 Yellow LED receive data and error indicator4 RJ-45 connector for 100BaseTX and 10BaseT5 Green, link LED
Controls
A-4 Print Server User Manual
Meanig of LEDs
A.2.2. Function of the Button
The button can be used for the following purpose:
• Resetting the configuration parameters
Procedure Proceed as follows:
1. Turn the printer off.
LED display Explanation StateBoth LEDs light up for a short time
After the print server is turned on both LEDs light up for a short time and then extinguish again. Internal tests are undertaken and the network connection is detected while both LEDs are dark.
Activation procedure
The yellow LED is lit
The internal tests after print server activation were carried out successfully. The yellow LED lights up until the printer recognises the print server.
Activation procedure
The ready mode LED is blinking
The internal tests after print server activation and printer recognition occurred without error. The print server is now looking for the network configuration, the print queues and so on.
Activation procedure
The yellow LED blinks consistently
An error occurred during the internal tests after print server activation. This can occur if a firmware update was, for example, canceled. In this case repeat the firmware update.
Error during the acti-vation procedure
The ready mode-LED is perma-nently lit
The print server is operational. Normal operating state
The yellow LED is blinking
A data package is received. Normal operating state
The yellow LED is permanently lit
A firmware update is executed.A configuration parameter download is executed.
Print server installa-tion or configuration
The yellow LED is blinking rhythmi-cally
An internal error has occurred. Turn the print server off and back on. If the error persists, please note the blink cycle and write to or call the hotline.
Error in the print ser-ver
Controls
Print Server User Manual A-5
2. Keep the button pressed.3. Turn the printer on.
Both LEDs are blinking rapidly.4. Release the button within five seconds.
Both LEDs are blinking alternatingly.5. Press the button again.
The parameters are reset and both LEDs blink three times. The yellow LED then blinks regularly.
6. Turn the printer off and back on.
Pin Assignment of the RJ-45 Connector
A-6 Print Server User Manual
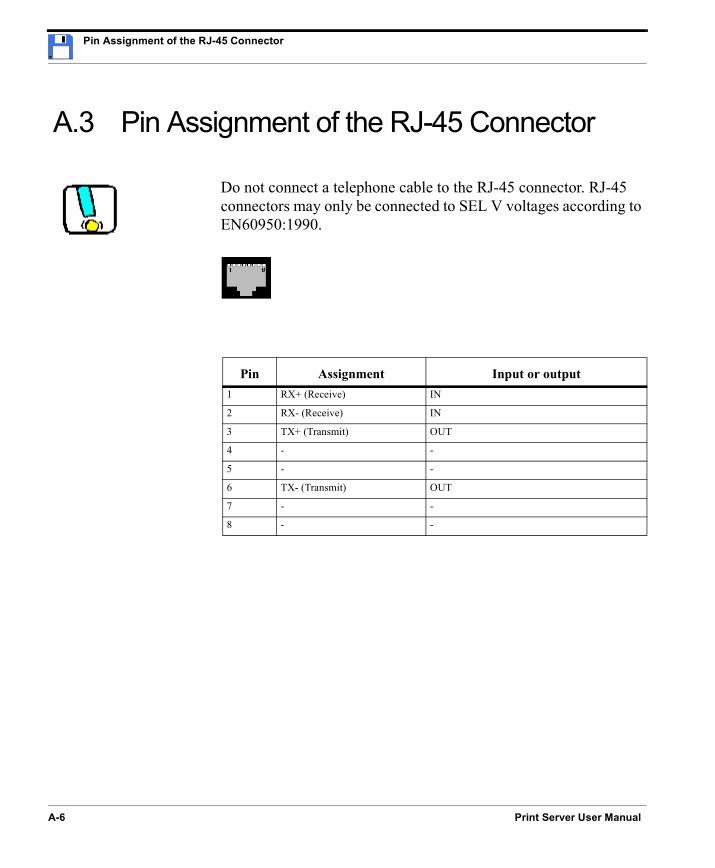
A.3 Pin Assignment of the RJ-45 Connector
Do not connect a telephone cable to the RJ-45 connector. RJ-45 connectors may only be connected to SEL V voltages according to EN60950:1990.
Pin Assignment Input or output1 RX+ (Receive) IN
2 RX- (Receive) IN
3 TX+ (Transmit) OUT
4 - -
5 - -
6 TX- (Transmit) OUT
7 - -
8 - -
Network Specifications
Print Server User Manual A-7
A.4 Network Specifications
Select your network from the following list:
10BaseT Ethernet Networks
100BaseTX Ethernet Networks
A.4.1. 10BaseT Ethernet Networks
For the cabling of the 10BaseT network of the print server, all ISO/IEC8802-3 standard apply. The most important data is listed in the following table:
In 10BaseT networks, a shielded twisted-pair cable of the category 5 should be used for print server cabling. This guarantees proper EMC behaviour (electromagnetic compatibility).
Data ValuesMax. cable lenght 100 m
Cable type S/UTP Typ "category 5"
Impedance 100 Ohm
Connector type RJ-45
Network Specifications
A-8 Print Server User Manual
A.4.2. 100BaseTX Ethernet Networks
For the cabling of the 100BaseTX network of the print server, all specifications of the ISO/IEC 8802-3u standard apply. The most important data is listed in the following table:
In 100BaseTX networks, a shielded, twisted-pair cable of the category 5 should be used for print server cabling. This guarantees proper EMC behavior (electromagnetic compatibility).
Data ValuesMax. cable lenght 100 m
Cable type S/UTP Typ "category 5"
Impedance 100 Ohm
Connector type RJ-45
Roland-PrintServers are products of Roland DG Corporation, Japan.
Technical specification are subjects to change. Errors excepted.
Names of companies and their products mentioned in this manual are registered trademarks of the companies.