Star BroochFeel free to experiment with these dimensions, you should make a template you are happy with, the method still works.
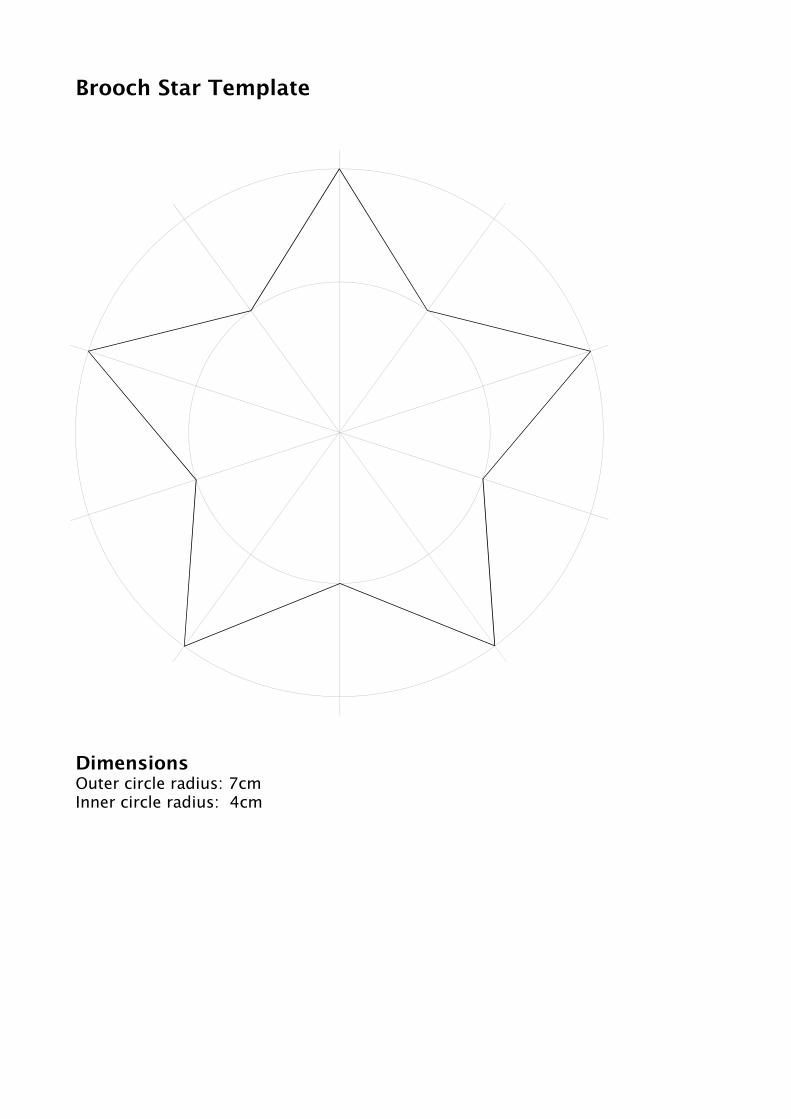
1) Creating the templateUsing a compass draw a 7cm radius circle on a sheet of plain card, mark the centre.
Draw a line through the centre ofthe circle top to bottom.
With the compass still set at 7cm place thepoint where the centreline intersects the top of the circle. Scribe small arcs across thecircumference of the circle on both sides.Now place the point of the compass whereeach arc intersects the circumference andrepeat on both sides.
Draw another circle, 4cm radius inside the first. Draw lines through the centre of both circles joining all intersections. You should end upwith lines every 36 degrees.
Starting at the top of the outer circle draw a line to the next intersection with the inner circle. Now go to the next intersection with the outer circle. Repeat all the away around alternating between the inner and outer circle.
Cut it out with a craft knife and a metal ruler. There is a full size star brooch template at the end of this tutorial.
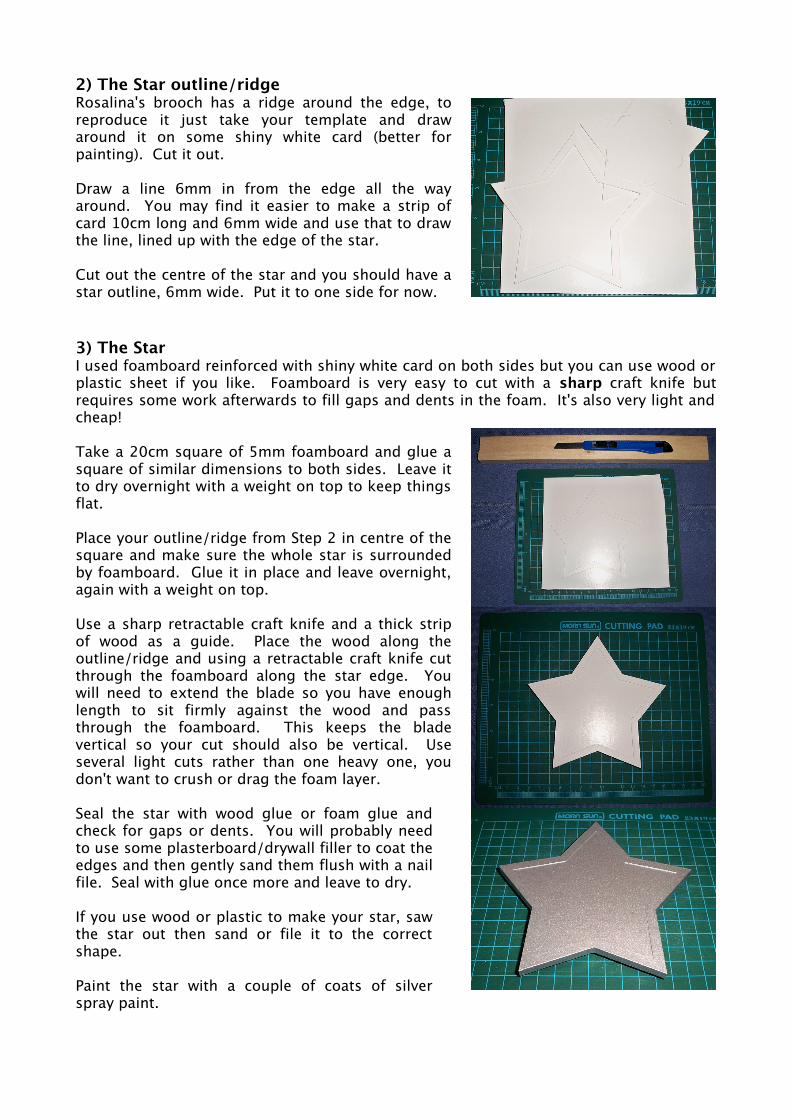
2) The Star outline/ridgeRosalina's brooch has a ridge around the edge, to reproduce it just take your template and draw around it on some shiny white card (better for painting). Cut it out.
Draw a line 6mm in from the edge all the way around. You may find it easier to make a strip of card 10cm long and 6mm wide and use that to draw the line, lined up with the edge of the star.
Cut out the centre of the star and you should have a star outline, 6mm wide. Put it to one side for now.
3) The StarI used foamboard reinforced with shiny white card on both sides but you can use wood or plastic sheet if you like. Foamboard is very easy to cut with a sharp craft knife but requires some work afterwards to fill gaps and dents in the foam. It's also very light and cheap!
Take a 20cm square of 5mm foamboard and glue a square of similar dimensions to both sides. Leave it to dry overnight with a weight on top to keep things flat.
Place your outline/ridge from Step 2 in centre of the square and make sure the whole star is surrounded by foamboard. Glue it in place and leave overnight, again with a weight on top.
Use a sharp retractable craft knife and a thick strip of wood as a guide. Place the wood along the outline/ridge and using a retractable craft knife cut through the foamboard along the star edge. You will need to extend the blade so you have enough length to sit firmly against the wood and pass through the foamboard. This keeps the blade vertical so your cut should also be vertical. Use several light cuts rather than one heavy one, you don't want to crush or drag the foam layer.
Seal the star with wood glue or foam glue and check for gaps or dents. You will probably need to use some plasterboard/drywall filler to coat the edges and then gently sand them flush with a nail file. Seal with glue once more and leave to dry.
If you use wood or plastic to make your star, saw the star out then sand or file it to the correct shape.
Paint the star with a couple of coats of silver spray paint.
3) The DomeFind one of those transparent acrylic sphere Christmas tree decorations, 8cm diameter. They come in two halves so you can place something inside and glue them together. I found mine at Michaels, a friend's suggestion.
Take one of the halves and snap off the hanging tab. Place it on a flat surface and put a thick strip of wood about 2cm high, 3cm wide, 15cm long alongside.
Take your retractable knife and put the blade flat against the wood, the sharp edge should be facing the side of the dome.
Keeping the dome pushed against the blade carefully rotate the dome to score a line all the way around. Carefully!
Using some masking tape, protect the dome above the line and then take a hacksaw and slowly and gently cut all the way around, just make a notch and gradually increase the depth until you cut through. You could also use a rotary tool if you have one, use a low speed setting and be gentle.
Rub the dome firmly on some sandpaper to even the edge and get to the correct height/diameter – You want the dome to fit snugly in the centre of your star's ridge.
Paint the inside of dome with some transparent yellow model paint or glass paint, you can use a brush or pour some paint inside the dome and swish it around, tipping out the excess.
When everything's dry you can glue the dome to the star or use some thin strips of double-sided tape (which works really well actually).
4) Light up?So... How about making it light up? LEDs work best and use less energy so you should get at least half a day out of a couple of CR2032 button cells. The problem with most LEDs is the narrow field of their light output; In other words their light comes out in a focused beam rather than all around like a filament light bulb. You can attempt to diffuse this beam or just just group several wide angle LEDs together in an array.
I'm still waiting for parts, once I have them I'll test battery life and such – then I'll update this section.
Star WandAfter a lot of experimenting and looking for materials I settled on foambaord... Again... I'd very much like to cast a yellow transparent acrylic star with LEDs but for now this works.
1) Creating the templateAs with the brooch start by making a template. It's the same method but it uses additional measurements for the inner star cut-out. See the template at the end of this tutorial.
2) The StarUsing your template cut out two foamboard stars. This assumes you're using 5mm thick foamboard, which you can get at WalMart. As with the Star Brooch, use a retractable knife and a strip of wood to keep the blade vertical.
Cut out their centres and remove a strip of card as wide as your handle from the foamboard at the bottom of each star on the inside (the two surfaced which will be glued together). This makes the next step much easier. You can see it in the bottom left of the picture.
Glue them together, leaving them overnight to dry completely.
Using a series of drill bits, starting small and working your way up to your handle's diameter, carefully create a hole in the bottom of your star.
This is why the card strip was removed from each star before we glued them together. From experience it makes it much harder to create this hole with the harder card-glue barrier right in the middle.
Repeat this step from the Star Brooch:Seal the star with wood glue or foam glue and check for gaps or dents. You will probably need to use some plasterboard/drywall filler to coat the edges and then gently sand them flush with a nail file. Seal with glue once more and leave to dry.
You may need to carefully open up the handle hole afterwards.
Paint the star yellow and let it dry. Check for bumps and smooth down with some wet and dry paper where required. Take your time and paint, let dry and smooth until you reach a nice hard gloss finish.
3) The HandleYou can make your handle from wooden dowelling, plastic tube or even an aluminium rod. Each has its benefits and drawbacks. Wood is light, strong and perhaps more con friendly but takes more preparation work to smooth out the grain. Plastic tube is light and smooth but can be flimsy requiring a support insert. Aluminium rod is perfect, light, strong, cheap and doesn't even require painting if you don't want to but may not be permitted at your con – check first.
Here I used plastic (styrene) tube, ¼ inch diameter and 2 feet long – those seem to be the perfect dimensions for Rosy's wand. I picked up a 5 pack at a model store.
I've also used wooden dowel of the same dimensions and I've got some ¼ inch aluminium rod to see how that works.
Since these are tubes you need to block one end, I used Bondo and carefully sanded the ends as flat as I could with wet and dry (used dry).
Clean the tube to remove grease/dirt and hang it somewhere appropriate for painting. Use plastic spray paint for a nice smooth finish. I used masking tape, rolled one end of the tape and pushed it down the open end of the tube.
I found that the tube was too flimsy when I test fitted a star. I shaved down a wooden dowel so it slipped inside the tube and then glued it in place.
If you use a wooden dowel apply several coats of wood glue and then gently sand it smooth, repeat as many time as you feel is required. Paint and then sand and repaint if you need to. For aluminium rod just polish and then apply a clear-coat to prevent oxidation.
4) Attaching the Star to the Handle.Use either wood glue or super glue and tack the star on to the handle.
Test fit things first and open up the hole a little bit if your handle refuses to fit. You want it to be snug but at the same time don't force things too much. Line things up by eye and once you're happy apply the glue.
5) StrapVery useful! After my first con brandishing the wand I though it would be a good idea to be able to clip it somewhere when not “in use”. Use a small clear hair elastic and double it over the handle. Use a camera strap and loop it through the hair elastic. Get a cheap mini carabiner clip and clip it to a shoulder strap. Done!
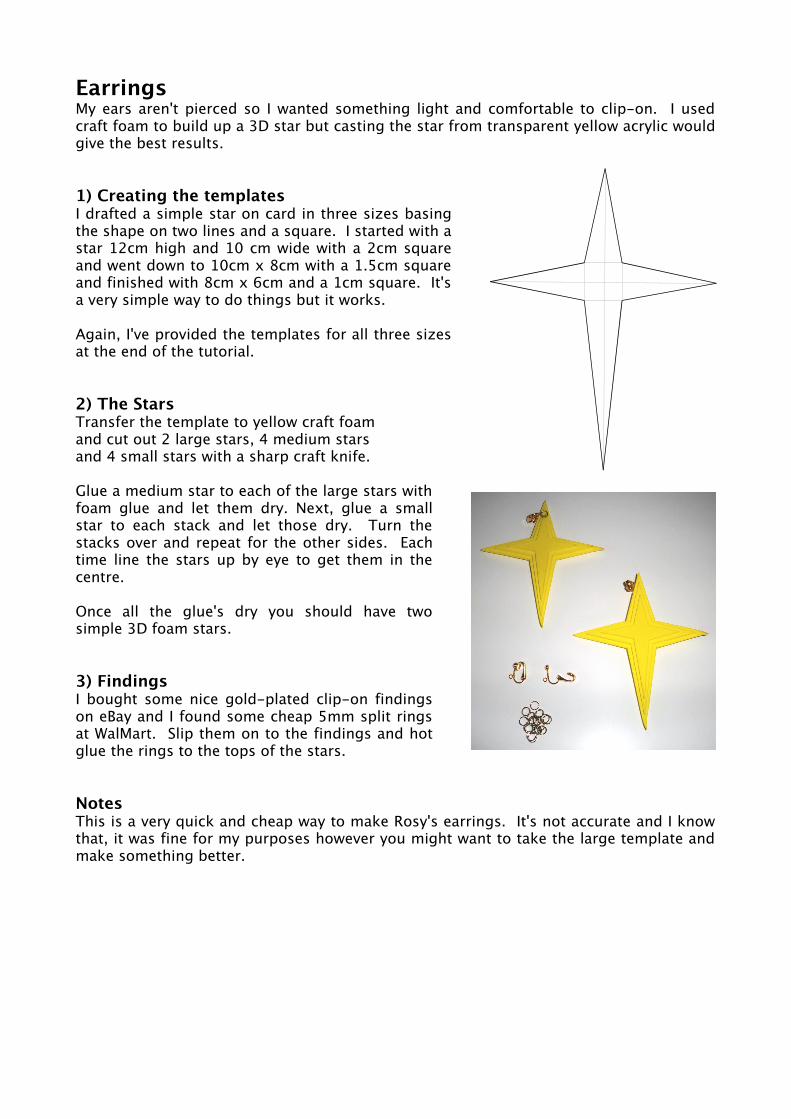
EarringsMy ears aren't pierced so I wanted something light and comfortable to clip-on. I used craft foam to build up a 3D star but casting the star from transparent yellow acrylic would give the best results.
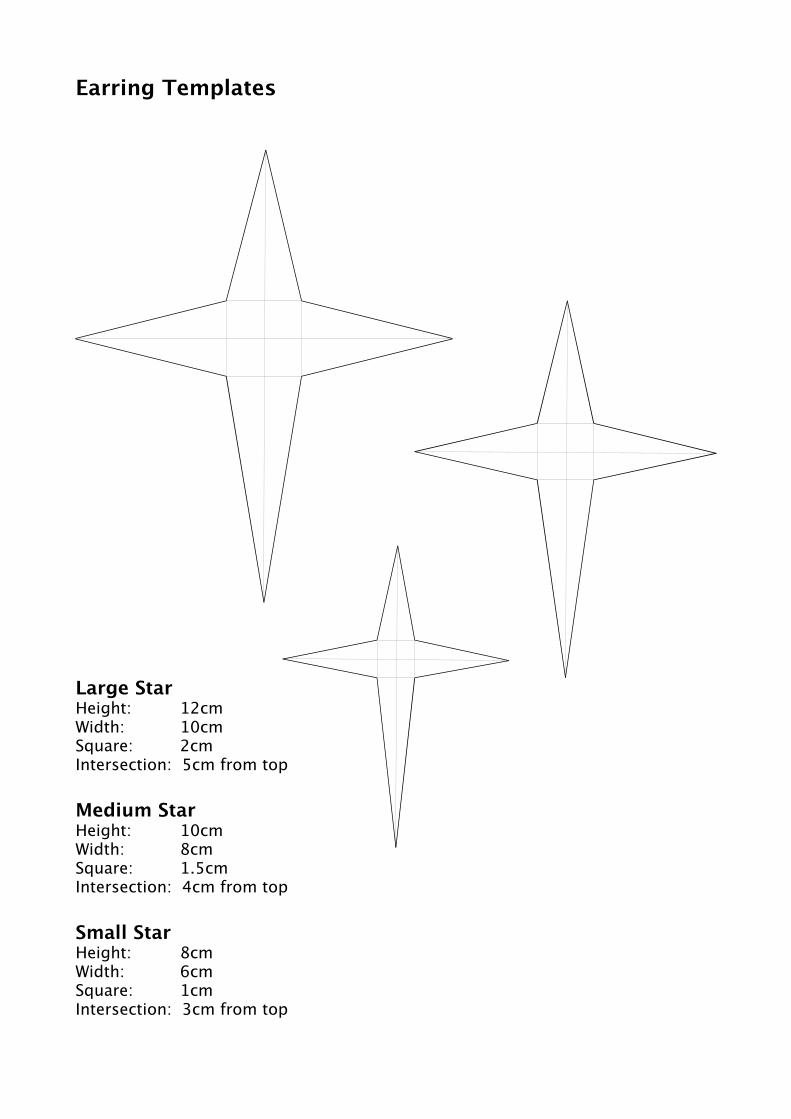
1) Creating the templatesI drafted a simple star on card in three sizes basing the shape on two lines and a square. I started with a star 12cm high and 10 cm wide with a 2cm square and went down to 10cm x 8cm with a 1.5cm square and finished with 8cm x 6cm and a 1cm square. It's a very simple way to do things but it works.
Again, I've provided the templates for all three sizes at the end of the tutorial.
2) The StarsTransfer the template to yellow craft foamand cut out 2 large stars, 4 medium starsand 4 small stars with a sharp craft knife.
Glue a medium star to each of the large stars with foam glue and let them dry. Next, glue a small star to each stack and let those dry. Turn the stacks over and repeat for the other sides. Each time line the stars up by eye to get them in the centre.
Once all the glue's dry you should have two simple 3D foam stars.
3) FindingsI bought some nice gold-plated clip-on findings on eBay and I found some cheap 5mm split rings at WalMart. Slip them on to the findings and hot glue the rings to the tops of the stars.
NotesThis is a very quick and cheap way to make Rosy's earrings. It's not accurate and I know that, it was fine for my purposes however you might want to take the large template and make something better.
Brooch Star Template
DimensionsOuter circle radius: 7cmInner circle radius: 4cm
Wand Star Template
Dimensions: Outer starOuter circle radius: 7cmInner circle radius: 3.5cm
Dimensions: Inner starOuter circle radius: 4cmInner circle radius: 2cm
Earring Templates
Large StarHeight: 12cmWidth: 10cmSquare: 2cmIntersection: 5cm from top
Medium StarHeight: 10cmWidth: 8cmSquare: 1.5cmIntersection: 4cm from top
Small StarHeight: 8cmWidth: 6cmSquare: 1cmIntersection: 3cm from top