13


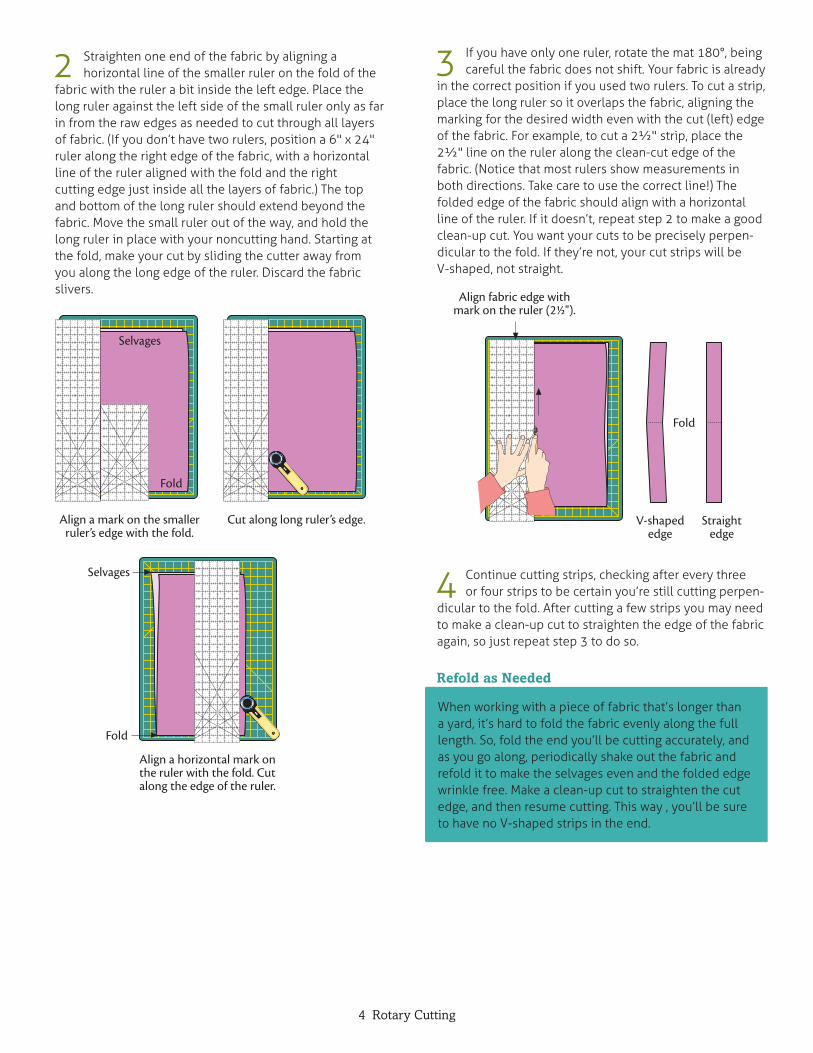
2 Rotary Cutting
Rotary Cutters, Quilt Rulers, and Self-Healing Cutting Mats
It’s hard to imagine quilting before the rotary cutter was introduced in 1979. Pizza-cutter shaped, surgical-steel
attendant self-healing mats and clear acrylic rulers revolu-tionized quilting.
Today, there are many sizes and shapes of cutters, rulers, and mats available. If you’re just starting out, I recommend you have a mat at least 17½" x 23½", a cutter with a 45 mm blade, and a minimum of two rulers: a long one that measures 6" x 24" and a shorter one, either 6" x 12" or 6" x 6", with the diagonal marked for cutting on the bias (diagonally to the grain). Of course you may prefer some-
comfortable using. If you do a lot of quilting you’ll prob-
Rolling the circular blade of a rotary cutter over fabric is
How to Use Rotary Cutters Safely
I can’t over-emphasize the importance of safety when using a rotary cutter. Those blades are wickedly sharp and have resulted in many trips to emergency rooms.
Get into the habit of closing and locking the blade every time you put the rotary cutter down, especially if you have children or pets. Have you ever noticed how some rotary cutters look like popsicles? Need I explain in detail what a very careful friend with a two-year old averted because she locked her blade? She was out of the room for only a minute to grab her phone and came back to see her baby with the
your noncutting hand from sneaking over the edge of the ruler. The blade cuts skin just as easily as it does
Change the blade as soon as it feels dull or skips some threads, leaving them uncut. Cutting with a dull blade makes you press down harder to make your cuts, leading to strain on your wrists, arms, and shoul-ders. Nicks in the blade are annoying. Nicks cause the blade to skip threads. I like to break out a new blade when I start a new project. I love the way a really sharp blade slices through the fabric, and it leads to less stress on my wrist and arm.
How to Rotary Cut Strips
allowances, but if you don’t cut accurately you’ll have just
you had sewn with inaccurate seam allowances.
I don’t recommend using the lines on your mat to measure and cut. The lines can be helpful for positioning fabric on
-suring with a ruler. Also, self-healing mats can develop grooves if you make repeated cuts along the same lines. Grooves make the mats very hard to use, and mats are
Make Your Mat Last Longer
just as easily on it, there are no lines to distract you from placing your ruler accurately, and you can avoid all those grooves you’ve worn into the side with the lines.

3 Rotary Cutting
Cutting Strips from the Left Edge of the Fabric
Cutting from the left is the most common method for cut-
cutter, and at least one acrylic ruler. A 6" x 24" ruler and a mat about 18" x 24" are often used, though larger mats and additional rulers can make cutting easier. For a second ruler, either a 6" x 6" or 6" x 12" size is handy.
Hold the rotary cutter with your dominant hand and brace the ruler with your other hand. The instructions and illus-trations that follow are for right-handed quilters. If you’re left-handed you’ll need to reverse the instructions.
1 Iron the fabric; then fold it with wrong sides together, with opposite selvage edges aligned. If the fabric
the selvage edges in opposite directions until the wrinkles disappear. Lay the fabric on the cutting mat with the folded edge toward you. The raw edges may be uneven.
Left-HandedRight-Handed
Selvages
Fold
Shift until wrinkles disappear.
Timesaver Trick: How to Cut through Multiple Layers of Fabric
Once you’re comfortable using a rotary cutter, you might want to try cutting multiple strips at a time. If you need strips of identical width cut from several fabrics, layer
Cut through all the layers. Cutting through more than two layers of fabric is easiest with a large cutter, 60 mm or 65 mm. Depending on your comfort level and the size and sharpness of your rotary blade, you can layer up to
of fabric) and still make accurate cuts. Keep the strips layered when crosscutting squares, rectangles, or other shapes from them.
4 Rotary Cutting
3 If you have only one ruler, rotate the mat 180°, being
in the correct position if you used two rulers. To cut a strip, place the long ruler so it overlaps the fabric, aligning the marking for the desired width even with the cut (left) edge of the fabric. For example, to cut a 2½" strip, place the 2½" line on the ruler along the clean-cut edge of the fabric. (Notice that most rulers show measurements in
folded edge of the fabric should align with a horizontal line of the ruler. If it doesn’t, repeat step 2 to make a good
-dicular to the fold. If they’re not, your cut strips will be V-shaped, not straight.
4 Continue cutting strips, checking after every three or four strips to be certain you’re still cutting perpen-
dicular to the fold. After cutting a few strips you may need to make a clean-up cut to straighten the edge of the fabric again, so just repeat step 3 to do so.
2 Straighten one end of the fabric by aligning a horizontal line of the smaller ruler on the fold of the
fabric with the ruler a bit inside the left edge. Place the long ruler against the left side of the small ruler only as far in from the raw edges as needed to cut through all layers of fabric. (If you don’t have two rulers, position a 6" x 24" ruler along the right edge of the fabric, with a horizontal line of the ruler aligned with the fold and the right cutting edge just inside all the layers of fabric.) The top and bottom of the long ruler should extend beyond the fabric. Move the small ruler out of the way, and hold the long ruler in place with your noncutting hand. Starting at the fold, make your cut by sliding the cutter away from you along the long edge of the ruler. Discard the fabric slivers.
Cut along long ruler’s edge.Align a mark on the smaller ruler’s edge with the fold.
Fold
Selvages
Align a horizontal mark on the ruler with the fold. Cut along the edge of the ruler.
Fold
Selvages
Align fabric edge withmark on the ruler (2!").
V-shapededge
Straightedge
Fold
Refold as Needed
When working with a piece of fabric that’s longer than a yard, it’s hard to fold the fabric evenly along the full length. So, fold the end you’ll be cutting accurately, and as you go along, periodically shake out the fabric and refold it to make the selvages even and the folded edge wrinkle free. Make a clean-up cut to straighten the cut edge, and then resume cutting. This way , you’ll be sure to have no V-shaped strips in the end.

5 Rotary Cutting
1 With your noncutting hand near the base of the ruler,
cutting, but don’t lift the cutter from the fabric.
Pause cutting level with tips of fingers but do not
lift cutter from fabric.
“Inchworm” hand up ruler.
Continue cutting.
Tilting Trouble
It’s annoying when your ruler slips or tilts as you cut against it, creating an uneven cut. Rulers can slip espe-cially often if you have fairly small hands, like I do. At your
to help with this problem, and all of them are meant to be put on the back of your ruler to help it grip the fabric. There are little sandpaper dots, and there’s a clear plastic
prefer sticky rulers, these products can work great. I don’t use them because, sometimes, I want my ruler to slide easily. I minimize the tilting trouble by “inchworming” my
2 Keeping very light pressure on the ruler with your
of the ruler.
3 Continue cutting, inching your hand forward as before if needed.
6 Rotary Cutting
Slide measuring rulerto check accuracy.
1 Arrange your fabric on the cutting mat as in step 1 of “Cutting Strips from the Left Edge of the
Fabric” on page 3. Make a clean-up cut on the right edge of the fabric, positioning a horizontal line on the long ruler with the fold of the fabric. Position the long edge of the ruler only as far in from the raw edges as needed to cut through all layers. Hold the long ruler in place with your left hand. Starting at the fold, make your cut by rolling the cutter blade along the long edge of the ruler. Discard the fabric slivers.
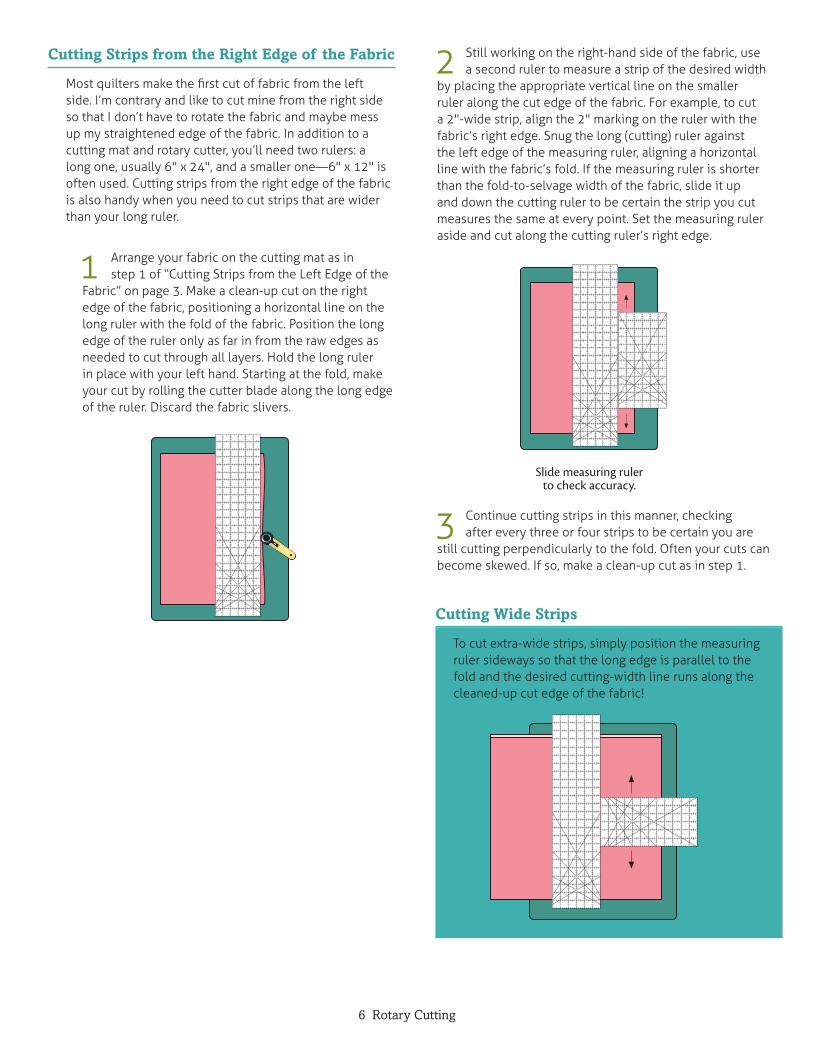
Cutting Strips from the Right Edge of the Fabric
side. I’m contrary and like to cut mine from the right side so that I don’t have to rotate the fabric and maybe mess up my straightened edge of the fabric. In addition to a cutting mat and rotary cutter, you’ll need two rulers: a
often used. Cutting strips from the right edge of the fabric is also handy when you need to cut strips that are wider than your long ruler.
2 Still working on the right-hand side of the fabric, use a second ruler to measure a strip of the desired width
by placing the appropriate vertical line on the smaller ruler along the cut edge of the fabric. For example, to cut a 2"-wide strip, align the 2" marking on the ruler with the fabric’s right edge. Snug the long (cutting) ruler against the left edge of the measuring ruler, aligning a horizontal line with the fabric’s fold. If the measuring ruler is shorter than the fold-to-selvage width of the fabric, slide it up and down the cutting ruler to be certain the strip you cut measures the same at every point. Set the measuring ruler aside and cut along the cutting ruler’s right edge.
3 Continue cutting strips in this manner, checking after every three or four strips to be certain you are
still cutting perpendicularly to the fold. Often your cuts can become skewed. If so, make a clean-up cut as in step 1.
Cutting Wide Strips
To cut extra-wide strips, simply position the measuring ruler sideways so that the long edge is parallel to the fold and the desired cutting-width line runs along the

7 Rotary Cutting
Straight grain
Selvage45° line
Trim.
How to Cut Bias StripsBecause they stretch, bias strips are used to bind quilts that have curved edges. In appliqué, bias strips are used for curvy stems and other thin objects. It can be fun to make bias strips from striped or plaid fabrics. The design becomes diagonal when on the bias, creating visual movement.
There are two popular methods for cutting bias strips. One is to simply cut one layer of fabric at a 45° angle to the selvage, and instructions for that method follow. The other way is to cut a square, mark the width of strip desired, sew the top to the bottom, and then cut along marked lines to
making continuous bias strips in Binding a Quilt.
1 Open your fabric to a single layer and place it on your cutting mat with a selvage edge closest to you.
2 Place your ruler on the fabric, aligning one of the diagonal 45° lines with the selvage.
3 Cut along the edge of the ruler to create a bias edge. Measuring from the cut edge, cut strips to
the width desired.
4 Bias strips often need to be sewn together to make a longer strip. Notice that the strips you’ve
cut have angled ends that slant in opposite directions. For a binding, you may want to take care that all the angles face in the same direction.
Another Way to Cut Your Bias Strips
A slight variation on cutting bias strips from a single layer of fabric is to straighten one cut edge; then fold the cut edge over so it aligns with the selvage. Align your ruler’s 45° line with the selvage edge and place the cutting edge of the ruler just next to the diagonal fold. Cut a thin slice of folded fabric.
Selvage
Remove the large triangle and set it aside. Cut diagonal strips as in step 3 of “How to Cut Bias Strips.”

8 Rotary Cutting
1 To cut a square or rectangle, begin by cutting strips of the appropriate width.
How to Cut Squares, Rectangles, Half-Square Triangles, and Quarter-Square Triangles
majority of patchwork quilts made today. It’s amazing how
There are numerous techniques for sewing them together, many of which are covered in Piecing Quilts: How to Sew Seams, Chain Piece, Match Points, and Press for Success.
Cutting Squares and Rectangles
Quilts pieced only from squares and rectangles are the easiest types of quilts to make. If you’re following a pattern, the sizes to cut will be given in it. If you’re creating your own design, you’ll need to add ½" to the
seam allowance on all sides. All edges of squares and rectangles should be cut on the straight of grain to minimize stretching.
2 Place the strip of fabric horizontally on the cutting
through both layers at the same time. If you do so, cut
3 sponds to the desired length of the piece. For
squares, this will be the same measurement the strip was cut. Align the vertical line with the clean-cut edge of the strip. Cut through both layers of fabric.
4 Continue cutting along the length of the strip. If there is enough fabric, you can open the fold and
cut an additional piece from that.
!"#"
!"#"
Add !$%" to squares and rectangles.
Finished size
Place a line on the ruler on the edge of the strip.
Fold
Fold
Slice Off Selvages
It’s better not to include selvages in your quilt pieces. Selvages are more tightly woven than the rest of the fabric, may or may not be printed with the fabric’s design, and sometimes have permanent little holes. If you use pieces that contain selvages, the tight weave can cause trouble when you’re sewing pieces
selvage part of the fabric, the selvage edge will wash
As a side note, quilters who design their quilts in metric
7.5 mm, and some use 5 mm. That Patchwork Place/
and the cutting dimensions include this seam allowance.

9 Rotary Cutting
Cutting Half-Square and Quarter-Square Triangles
years before attempting triangles. I learned I was foolish
not hard to work with, and it takes only a bit of practice to
piecing squares and triangles is that with triangles there are a few more points to match, and triangles have bias edges.
Why should you care about bias edges? When piecing a block, quilters try to position all the bias edges so that none of them are on the outer edge of the block. This is because bias edges stretch, and it’s better to sew them
ironing, and sewing.
Most triangles in quilts have two sides that are the same length, a “square” or 90° corner, and two sharper points. If you didn’t fail geometry like I did you may remember this is called an isosceles triangle. There are two types of quilt-
the bias edges are located.
When a square is cut in half diagonally, two half-square triangles are created. These triangles have a long stretchy bias edge and two shorter edges that are not very stretchy. Use these when the short sides are on the outer edge of the block or quilt; for example, as corner setting triangles.Cutting is easy. Place the square on your cutting mat so that corner points are at top and the bottom, and then place a ruler so that it bisects the points. Cut exactly from corner to corner to make two half-square triangles.
If you’re making half-square triangles from squares, cut the squares triangle. Why not ½" as with squares and rectangles? It’s because the seam allowance for the sharp triangle tips
know when you design your own projects. When following a pattern, this seam allowance has already been included in the cutting dimensions.
If a square is cut into quarters diagonally, four quarter-square triangles are created. These triangles have stretchy bias edges on the two short sides and a long edge that is not very stretchy. Use these when the long side is on the outer edge of the block or quilt; for example, as side set-ting triangles. Place a fabric square on the mat as shown. Cut from corner to corner as for half-square triangles. Without moving the pieces, cut again on the opposite diagonal, once again being careful to cut precisely from corner to corner, to make four quarter-square triangles.
Cut one diagonal. Do not move pieces.
Cut opposite diagonal.
Cut in half diagonally. Do not move pieces. !en cut on the opposite diagonal.
!"
""
Finished size
Add #" for half-square triangles.
triangles.
!"
Finished size
!"
Add 1"" for quarter-square triangles.
10 Rotary Cutting
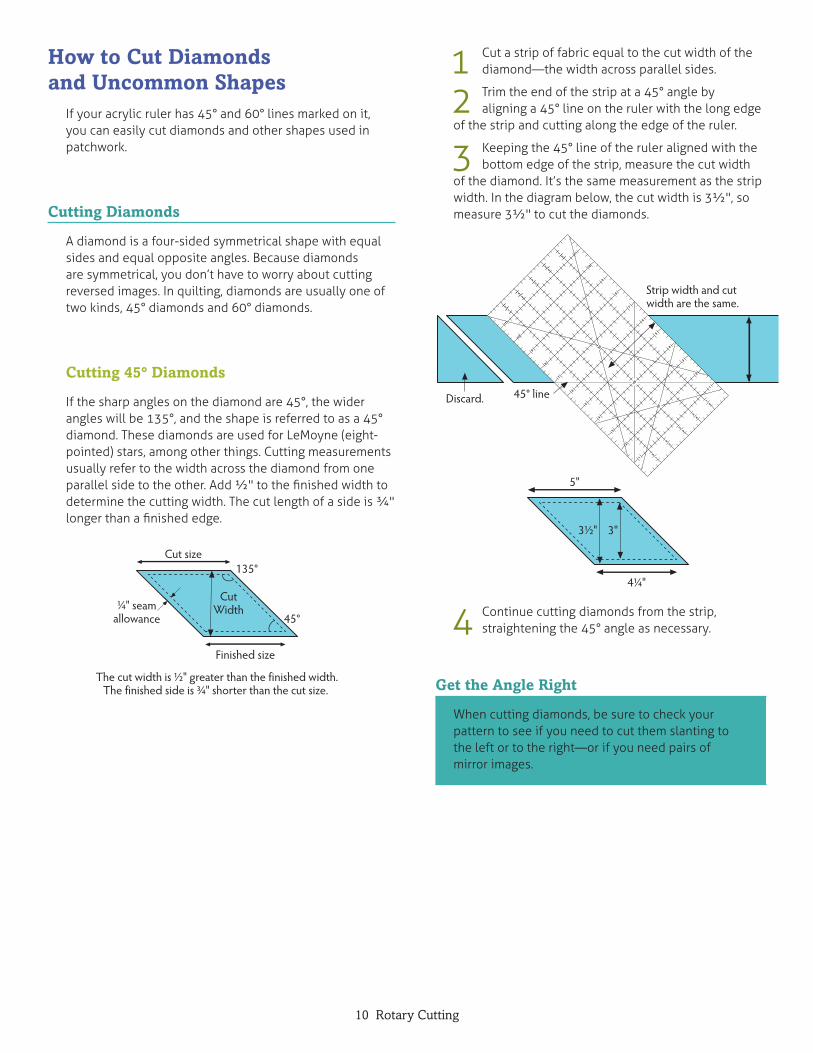
How to Cut Diamonds and Uncommon Shapes
If your acrylic ruler has 45° and 60° lines marked on it, you can easily cut diamonds and other shapes used in patchwork.
Cutting Diamonds
A diamond is a four-sided symmetrical shape with equal sides and equal opposite angles. Because diamonds are symmetrical, you don’t have to worry about cutting reversed images. In quilting, diamonds are usually one of two kinds, 45° diamonds and 60° diamonds.
Cutting 45° Diamonds
If the sharp angles on the diamond are 45°, the wider angles will be 135°, and the shape is referred to as a 45° diamond. These diamonds are used for LeMoyne (eight-pointed) stars, among other things. Cutting measurements usually refer to the width across the diamond from one
determine the cutting width. The cut length of a side is ¾"
!"#" seamallowance 45°
135°
CutWidth
Cut size
Finished size
The cut width is !"$" greater than the finished width.The finished side is %"#" shorter than the cut size.
1 Cut a strip of fabric equal to the cut width of the
2 Trim the end of the strip at a 45° angle by aligning a 45° line on the ruler with the long edge
of the strip and cutting along the edge of the ruler.
3 Keeping the 45° line of the ruler aligned with the bottom edge of the strip, measure the cut width
of the diamond. It’s the same measurement as the strip width. In the diagram below, the cut width is 3½", so measure 3½" to cut the diamonds.
45° line
Strip width and cut width are the same.
3!"#" 3"
4!"$"
5"
Discard.
4 Continue cutting diamonds from the strip, straightening the 45° angle as necessary.
Get the Angle Right
When cutting diamonds, be sure to check your pattern to see if you need to cut them slanting to
mirror images.
11 Rotary Cutting
60°120°
Cut size
Finished size
!"#" seamallowance
StripWidth
The cut width is !"$" wider than the finished width.The finished side is %"&" shorter than the cut side.
When cut in half, the diamond becomes two equilateral triangles. The height of the cut
triangle is '"#" greater than the finished height.
60° line
Strip width and cut width are the same.
Discard.
4!"#"
4"
4$"%"
4&"'"
4"
4!"#"
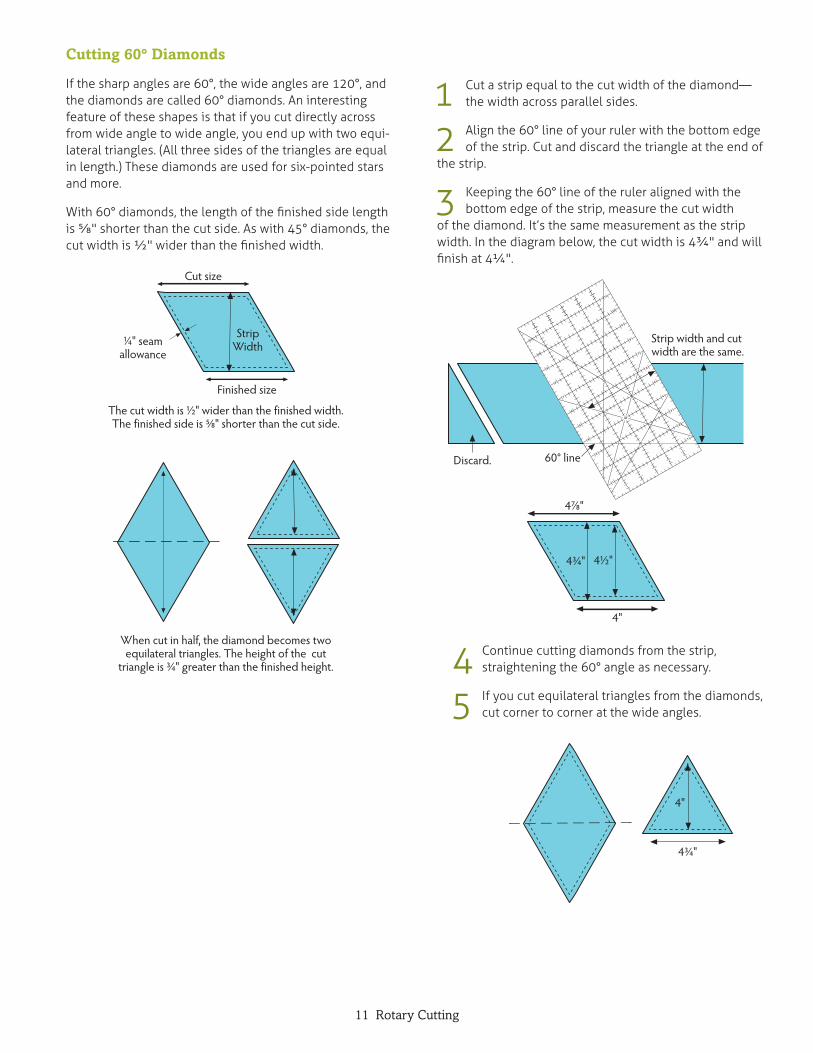
Cutting 60° Diamonds
If the sharp angles are 60°, the wide angles are 120°, and the diamonds are called 60° diamonds. An interesting feature of these shapes is that if you cut directly across from wide angle to wide angle, you end up with two equi-lateral triangles. (All three sides of the triangles are equal in length.) These diamonds are used for six-pointed stars and more.
1 the width across parallel sides.
2 Align the 60° line of your ruler with the bottom edge of the strip. Cut and discard the triangle at the end of
the strip.
3 Keeping the 60° line of the ruler aligned with the bottom edge of the strip, measure the cut width
of the diamond. It’s the same measurement as the strip width. In the diagram below, the cut width is 4¾" and will
4 Continue cutting diamonds from the strip, straightening the 60° angle as necessary.
5 If you cut equilateral triangles from the diamonds, cut corner to corner at the wide angles.

12 Rotary Cutting
Cutting Long 90° Triangles
Long triangles have three uneven sides and a 90° angle at one corner. Templates are often used to cut these shapes, but you can also cut them with a rotary cutter and ruler. Because these triangles aren’t symmetrical, you might
will specify what’s needed.
Here, the long triangles all slant the same direction.
Here, the long triangles are mirror images.
90°
Add 1!"#" to long side
Add !!"$%" toshort side.
Hypotenuse(diagonal)
!"#" seamallowance
Shortside
Long side
RegularLayer fabrics
wrong sides together
Reversed
1 If you’re drafting your own pattern, you’ll need to
paper, add the seam allowances, and then measure the
-cise of drawing and measuring your triangle, start with the
geometry?
2 Cut strips the width calculated for the short side’s cut measurement.
3 Cut rectangles the length calculated for the long side in step 1.
4 Cut the rectangles in half diagonally, from corner to corner.
5 If you need to cut reversed images, cut the rect- angles in half diagonally in the opposite direction.
right sides) together. Proceed as in steps 1–4, cutting
regular triangles and one layer with reversed triangles.
13 Rotary Cutting
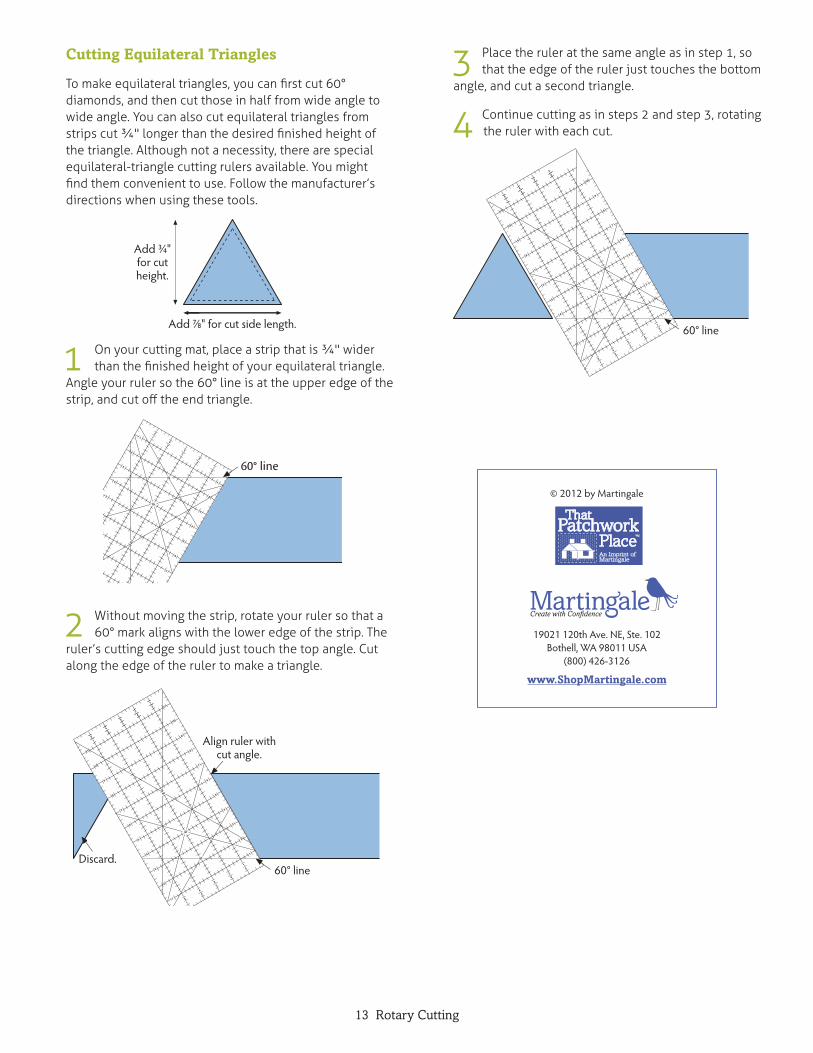
Add !"#"for cutheight.
Add $"%" for cut side length.
60° line
Discard.60° line
Align ruler withcut angle.
60° line
Cutting Equilateral Triangles
diamonds, and then cut those in half from wide angle to
the triangle. Although not a necessity, there are special
directions when using these tools.
1 On your cutting mat, place a strip that is ¾" wider
Angle your ruler so the 60° line is at the upper edge of the
2 Without moving the strip, rotate your ruler so that a 60° mark aligns with the lower edge of the strip. The
ruler’s cutting edge should just touch the top angle. Cut along the edge of the ruler to make a triangle.
3 Place the ruler at the same angle as in step 1, so that the edge of the ruler just touches the bottom
angle, and cut a second triangle.
4 Continue cutting as in steps 2 and step 3, rotating the ruler with each cut.
© 2012 by Martingale
19021 120th Ave. NE, Ste. 102Bothell, WA 98011 USA
(800) 426-3126
www.ShopMartingale.com
Create with Confidence
An Imprint ofMartingale
™


![THE UNION - digifind-it. · PDF fileIUHl uppt ... dlle, Ill .. """"' "'l'o llr. King'• Nc w 0iHI'O\'el'1·f OWe Ill\' life. \\'"H tn]tell with Ill grippe nne I· trit·cl nil till'](https://static.documents.pub/doc/80x56/5a9fab337f8b9a7f178d1daa/the-union-digifind-it-uppt-dlle-ill-lo-llr-king-nc-w-0ihioel1f.jpg)


