52
Routine Dosing in Rodents University of South Florida February 2008

Routine Dosing in Rodents
University of South Florida
February 2008

OBJECTIVES
• To provide an overview of basic restraint and handling techniques in rodent species.
• To demonstrate common routes of injection and oral dosing procedures in rodent species.

Rat Restraint “V” Hold
• Held between "v" formed by index
and second finger. • Supported by thumb and ring finger
under elbows.
USES/ADVANTAGE • Intraperitoneal and oral dosing. • Less confining than other types of
restraint, e.g., restrainers/scruffing. • Avoids unnecessary stress of
surgical incision sites, e.g., thoracic, abdominal, neck regions.

Rat Restraint
Uses/Advantages • Works well for subcutaneous
injection
• Not well tolerated in obese or large animals
• Places stress on incision sites of the neck and chest
“Scruff” Hold • Held by bunching the skin
over the shoulder blades.

Rat Restrainers
• DecapiCone® bag • Plastic Commercial
Holder • Towel Arrows indicate breathing holes
for each device.
These types restrain without enclosing the head.

Rat Restrainers (Cont’d)
Rat is loaded tail-in or head-in. Rat size, loaded direction, and stopper position combine to allow access to tail vein.
“head in” (large rat)
“tail in” (small rat)
Adjustable stoppers
Commercial Plastic (round)

Rat Restrainers (Cont’d)
Stopper is at half-way point of restrainer, preventing rat from moving forward. Rat is positioned “head in.”
Can be used with the “stopper” positioned midway for hindquarter bleeds or injections. The animals head is placed within the device to prevent biting, while leaving access to the hindquarters.
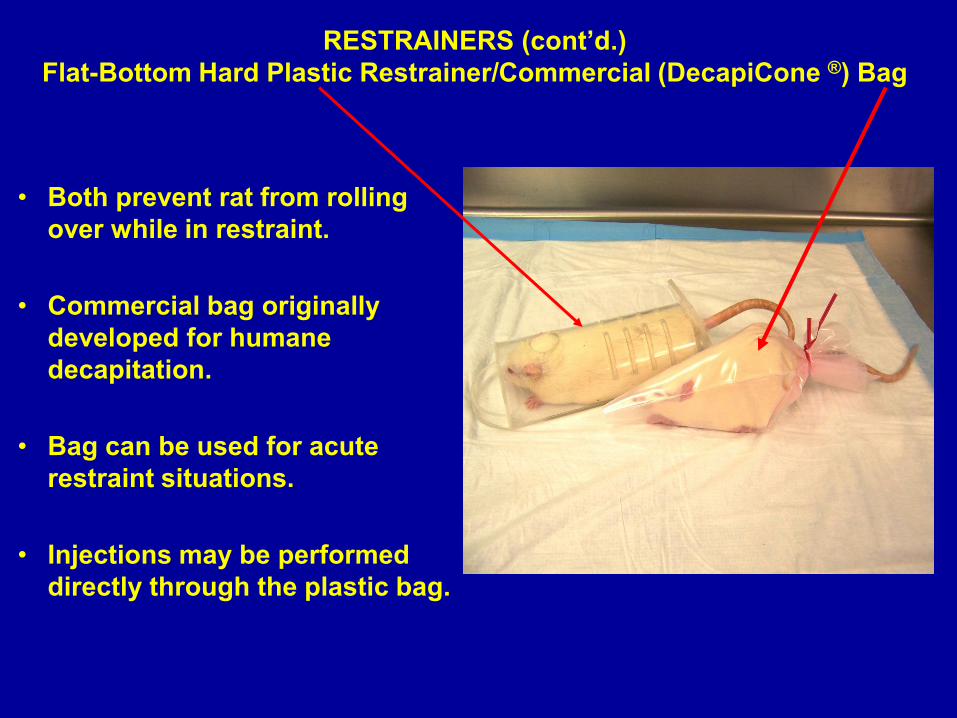
RESTRAINERS (cont’d.) Flat-Bottom Hard Plastic Restrainer/Commercial (DecapiCone ®) Bag
• Both prevent rat from rolling over while in restraint.
• Commercial bag originally developed for humane decapitation.
• Bag can be used for acute restraint situations.
• Injections may be performed directly through the plastic bag.

Rat Restraint
Toweling – provides gentle restraint • Oral dosing
• General exam • Nail/Teeth trimming

Mouse Restraint
• Scruff – Allows for all
routes of administration – Skin from nape of
neck to lower back is incorporated
– Positioning is straight
– Immobilizes head and limbs

Mouse Restraint
One Handed Pickup
Pick up with non-dominant hand, allowing dominant hand to control instruments, syringes, needles, etc. Grasp tail close to base, then “roll” hand up and grasp scruff. Harder to master in more fractious strains.

Mouse Restraint
Two Handed Pickup
Grasp tail in dominant hand & apply gentle tension (so mouse will pull away). Non-dominant hand scruffs skin from head to lower dorsum. Works well in fractious mice.
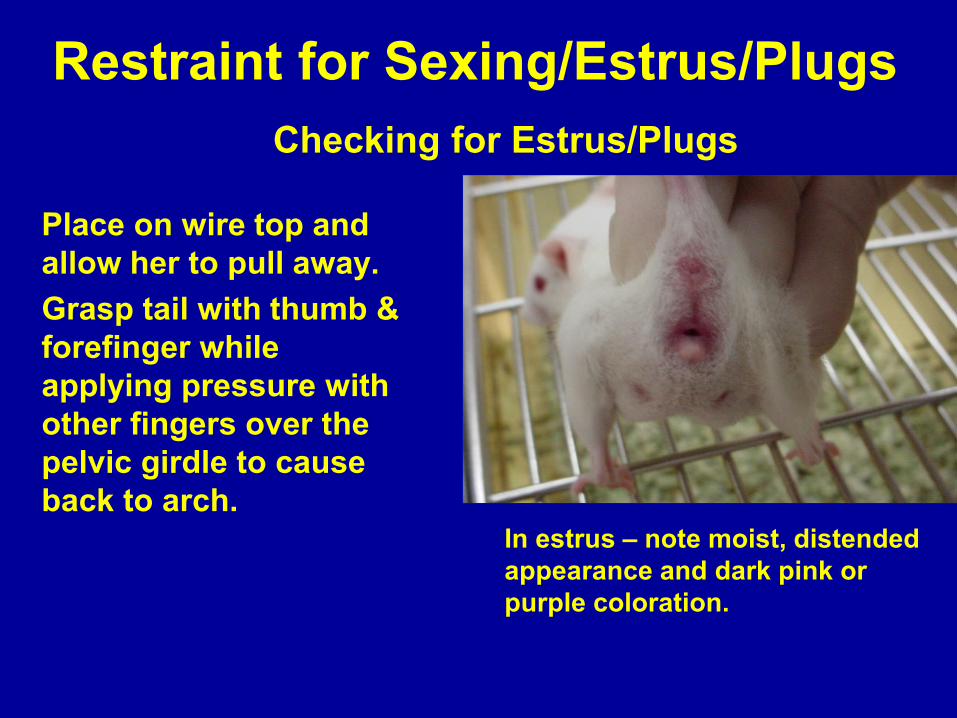
Restraint for Sexing/Estrus/Plugs
Place on wire top and allow her to pull away. Grasp tail with thumb & forefinger while applying pressure with other fingers over the pelvic girdle to cause back to arch.
In estrus – note moist, distended appearance and dark pink or purple coloration.
Checking for Estrus/Plugs

Restraint for Sexing/Estrus/Plugs
Note – Estrus plugs, sexing, and weaning are covered in separate training presentation.
Male Female
Checking Sex at Weaning
Can be done side-by-side for comparison sake

Mouse Restrainers
• Conical tube – homemade; 50ml
conical tube; holes are drilled in cap & end for ventilation & tail access
• DecapiCone® bags – commercially available
bag originally developed for humane decapitation
– can be used for acute restraint situations.
Plastic Commercial – can be loaded either way – same as rat version

Mouse Restrainers • Commercial Plastic (A)
– Can load either direction – Fully adjustable
• Conical Tube (B) – Economical and easy to
replace – “One size fits all”
• DecapiCone® Bag (C) – Can inject through plastic – Fits any size mouse
Arrows indicate breathing holes in each device.
A B C

Hamster Restraint “Pinch” – Figure A; for quick transportation from cage to cage.
A
B
C
Cup– can be used to scoop animal up and transfer quickly to secondary containment (vs. pinch).
Special or commercial restrainers designed for hamsters are hard to find.
“Scruff” -Figure B and Figure C; large amount of dorsal skin secured; allows for exam and/or dosing.

Oral Dosing Also known as “gavaging,” “per os,” or PO.
Gauges
–18g x 3” for most adult rats.
–20g x 1” for typical adult mouse.
–25g x ¾” used typically for tissue perfusion, NOT gavaging.
18g
20g
25g

Oral Dosing (Continued)
18g blunt needle
Rigid gavage needle
Flexible Tube - 18g blunt needle slipped inside feeding tube; for use in hamsters.
Flexible feeding tube
Rigid Gavage Needle
vs. vs.

Oral Dosing (Continued)
Tips
olive tip ball tip
Olive tip commonly used with mice. Highly recommended for ---
•repeat dosing
• long term dosing
•dosing of the very young
•dosing the geriatric
•dosing the immuno-compromised mouse.
Ball tip typically used in rats.

Oral Dosing - Rat
• Animal is restrained with a “v” hold that allows handler to straighten the neck/throat for easier passage.
• Needle tip is
introduced to the side of the teeth, then passed along the roof of the mouth (stimulating the swallowing reflex).

Oral Dosing – Rat (Continued)
• Full length of needle (from tip to hub) should easily pass.
• Plunger is depressed with
a smooth, even pressure. • Total time from pick-up, to
needle passage, to delivery, to removal of needle should be 15-30 seconds.

Oral Dosing - Mouse
Needle tip is introduced and run along roof of the mouth. When the needle “hits the bump,” it has reached the appropriate depth. At this point, a gag reflex may be noted.
Needle tip is here , along backside of the “voice box”

Oral Dosing – Mouse (Continued)
The tip is seated against the point of resistance and delivery of material is made. Note – the needle is inserted to only 50% of its total length. When extracting/removing the needle, it is important to follow the same curve used as when inserting it.
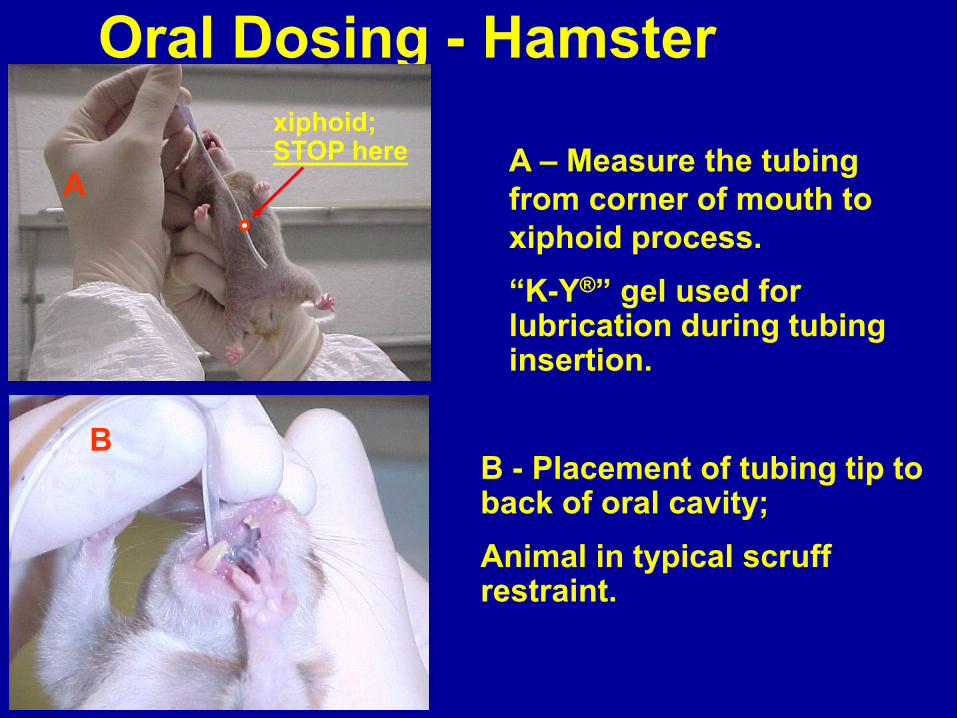
Oral Dosing - Hamster
A
B
A – Measure the tubing from corner of mouth to xiphoid process. “K-Y®” gel used for lubrication during tubing insertion.
B - Placement of tubing tip to back of oral cavity; Animal in typical scruff restraint.
xiphoid; STOP here

Oral Dosing – Hamster (Continued)
C
D
C - Passage of tubing down throat using tips of fingers. Syringe is left to “hang”.
D - Tubing passed to hub; Syringe grasped and material delivered.

Intraperitoneal Dosing • Most common method used to deliver
therapeutics and test compounds to rodents. • Absorption rate, depending on vehicle, may be
comparable to intravenous infusion. • Minimal restraint, with no anesthesia, is all that
is normally required. • Technique easily mastered in multiple species
when simple guidelines are followed.
Intraperitoneal Dosing
• The animal is placed in either the “v” or scruff hold, with body in linear position.
• Needle placement is just through the
muscle layer. • Depending on material to be injected and
size of animal, use 18 to 23 gauge, 5/8” to 1” length.

Intraperitoneal Dosing (Continued)
• Use the “map” (see next slide for photo) to help ensure proper needle placement, thus avoiding organ damage.
– Below xiphoid process/rib triangulation – avoids the liver – Above knees – avoids sex organs – Not directly on midline – avoids bladder – Not beyond elbows or knees – avoids kidneys – 45° off midline (with needle pointed towards midline)
– 45° off body plane; Do not go too shallow – Either side is appropriate

IP – “Map”
Below xiphoid process/rib triangulation
NOT directly on midline
Inject either side
NOT beyond elbows or knees
Above knees

IP injection - Rat Shown is a one-handed restraint. The “v” can incorporate a second person, setting/pressing the animal’s hindquarters against a firm surface or against the handler. However, “less is more” with most rats. They resent being over restrained. Do NOT use a restraint glove unless the animal is extremely fractious! If you cannot feel the rat, then you have no idea how tight you’re restraining. This can cause the animal to become even more fractious.

IP injection – Rat (Continued)
Injection to either side of midline is acceptable.
45° “off and out”
off midline
out from body plane
Note that needle is angled towards mid-line and held approximately 45 degrees off the abdominal plane.
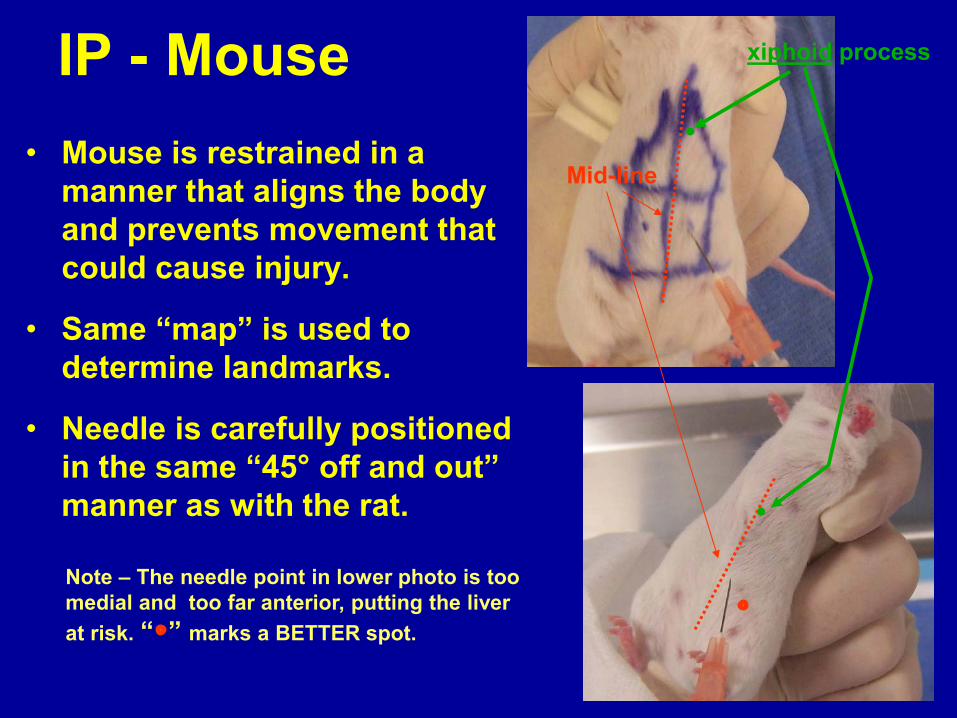
IP - Mouse • Mouse is restrained in a
manner that aligns the body and prevents movement that could cause injury.
• Same “map” is used to determine landmarks.
• Needle is carefully positioned in the same “45° off and out” manner as with the rat.
xiphoid process
Mid-line
Note – The needle point in lower photo is too medial and too far anterior, putting the liver at risk. “ ” marks a BETTER spot.

IP Injection – Hamster
• Hamster is scruffed to prevent injury to both handler and animal.
• Same “map” is used to
determine landmarks.

IP Injection – Hamster
• Needle is carefully positioned in the same “45° off and out” manner as with rats and mice.
• As with rats and mice,
the needle needs be inserted only enough for passage through the skin and muscle wall, not full-needle insertion

Subcutaneous (SC) Injection • SC is commonly used to deliver veterinary treatments,
e.g., fluids, antibiotics, analgesics.
• Less common route for test materials.
• Faster absorption rate than intramuscular; slower than intraperitoneal or intravenous routes.
• Needle is introduced under the skin to deliver materials.
• Rapid delivery of large volumes WILL cause discomfort.
• Delivery of oily or less aqueous materials may also cause discomfort.
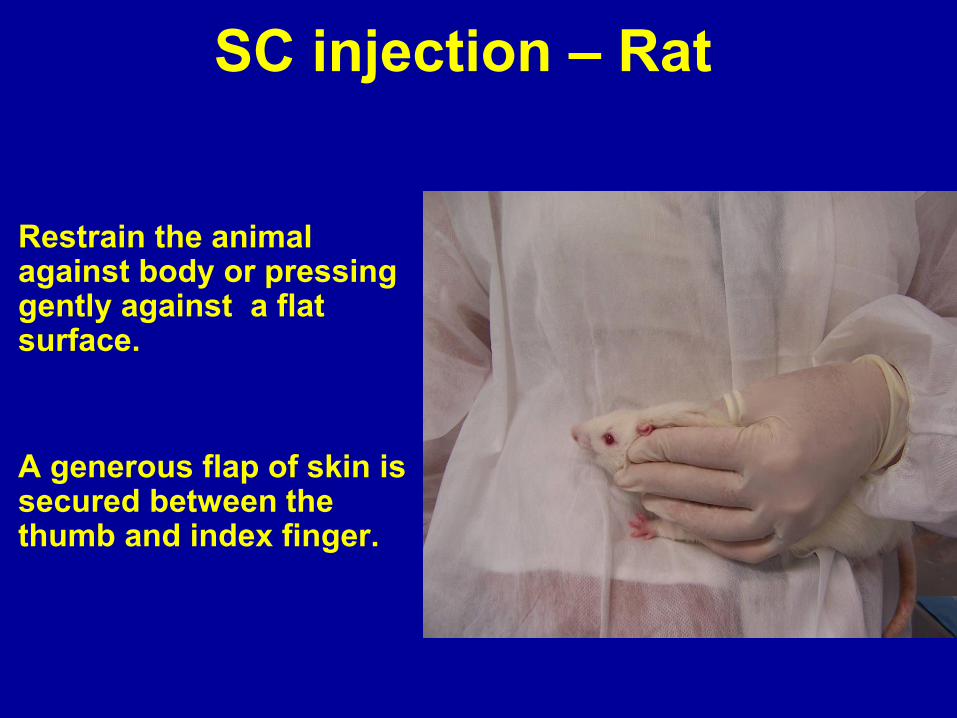
SC injection – Rat
Restrain the animal against body or pressing gently against a flat surface. A generous flap of skin is secured between the thumb and index finger.

SC injection – Rat (Continued)
Injection is between the shoulder blades. Take care to ensure needle tip is not pointed toward the spinal cord.

SC Injection - Mouse
• Can be done in the scapular region as with rats, or in the flank.
• Modified SC injection in
the flank area is often used to deliver tumor cells in oncology models.
Needle bevel is down and skin is loose to allow fluid to flow. Only a slightly raised look will result at injection site.
Needle bevel is up to force fluids against skin, trapping them. This forms a well defined “bleb” at injection site.

Intravenous Injections • Fastest route of absorption; often used when
injecting cells, e.g., bone marrow.
• Catheters can be used for slow infusion of viscous materials or for large volumes.
• Typically, the tail vein is used. Vasodilation is easily accomplished with warm water. Tail vein injections do not require anesthesia.
• Anesthesia is required when the penile vein or when the intracardiac route is used.
• Multiple/serial injections, over time, require planning and care to preserve access to the selected venous route.

Tail Vein Injection
Typical set up for mouse tail vein injections
–Elevation –Restraint –Securing –Vasodilation
Warm water for vasodilation

Tail Vein Injection (Continued)
Identification of vein and artery –Arteries are dorsal and ventral –Veins are lateral
artery
vein
artery

IV Injection
• Tail is held straight and parallel to the table surface.
• Hands are positioned in a manner to provide tension, in the event the animal moves.
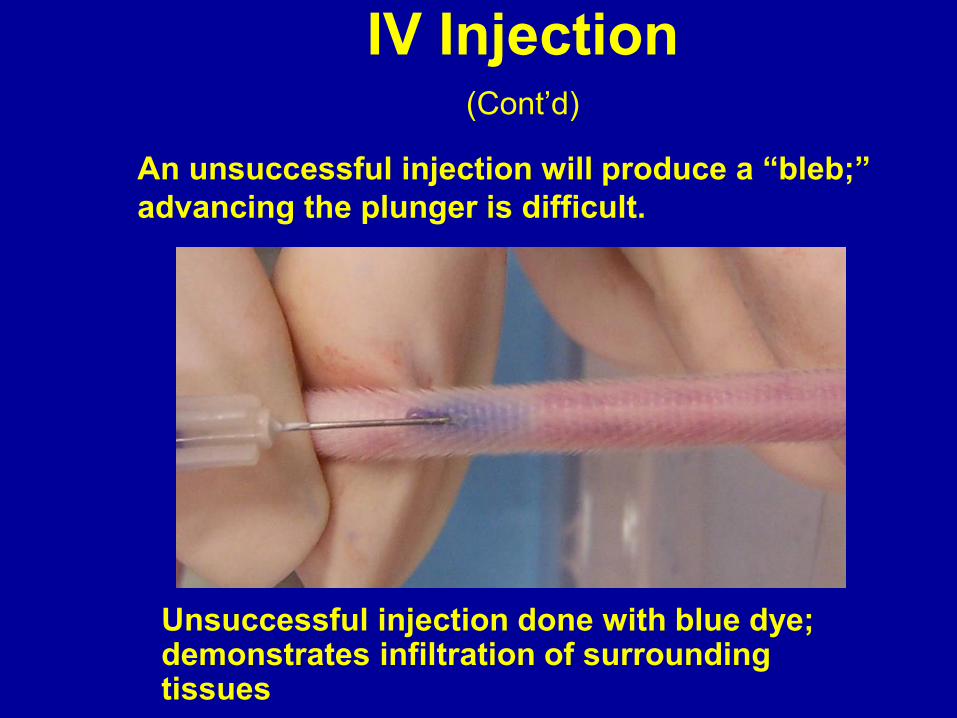
An unsuccessful injection will produce a “bleb;” advancing the plunger is difficult.
IV Injection (Cont’d)
Unsuccessful injection done with blue dye; demonstrates infiltration of surrounding tissues

A successful injection - rapid and easy delivery of materials.
vein
artery
anus
IV Injection (Cont’d)
Successful injection here with blue dye; highlights the vein’s position relative to the artery.
Penile Vein Injection This procedure can be done in rats, guinea pigs and mice. This technique is very useful in animals with no other easily accessible veins (i.e., hamsters and g. pigs), colored mice or animals with damaged tail veins.
Care must be taken to not damage the penis.
The obvious draw back is that it may only be performed in male animals.
Use of this technique in very young animals is not recommended; the handler can easily injure the penis trying to expose the glans.

Penile Vein Injection (Cont’d)
The animal is lightly anesthetized. Isoflurane is preferred; other agents may be used.
The glans penis is exposed by placing the thumb over the lower abdominal area and, while applying gentle downward pressure, sliding the thumb towards the animals tail. The penis will normally slide out and forward as the thumb nears the base of the penis.
The tip is held GENTLY and the penis is GENTLY extended.
The penile vein is easily identified as a distinct central vessel.
Penile Vein Injection (Cont’d)
Used for small volumes with a 25g or smaller needle. The needle is inserted mid-penis; the bevel should be visualized in the lumen of the vein. If inserted at a higher point, the needle will actually stop at the point of the os penis. Proper needle placement results in easy injection, clearing of the vein during fluid injection, and failure of fluid to backflow the insertion point. After delivery, gentle pressure is applied at injection site. The glans is allowed to retract into the prepuce. This route of injection may be used again with little or no problems, as long as there are no injections into surrounding tissue.

Penile Vein Injection
Holding the glans; gently extending penis.
Gentle abdominal pressure used to extrude penis from prepuce.
Repetitive injections may produce bruising (hematomas).

Intracardiac Injection
This procedure is suited for the injection of non-irritating substances into darkly pigmented rodents, or rodents with no discernible tail veins. Distribution of substances is similar to the intravenous route; high blood levels are rapidly achieved. Intra-cardiac injection is generally a one-time injection; anesthesia is required. Rodent injection volumes should not exceed 0.1 to 0.3 ml
Intracardiac Injection Anesthesia is induced and maintained throughout the injection. A 25-30 g needle, with loaded syringe attached, is introduced into the left ventricle via the 4th and 5th intercostal rib space. The needle is introduced just under the animal’s left elbow, at a plane parallel with the table. As the needle is advanced, the syringe is held with slight back pressure to aid in the immediate identification of blood in the aspirate. When the needle hub “flashes blood,” placement has been achieved. The plunger is depressed. While injecting, do not push down or apply other-than-gentle pressure. The ventricle may be torn/damaged, resulting in life threatening trauma. Upon delivery, the needle is simply be backed out. The ventricle will return to its normal rhythm and position. There is no need to apply pressure; doing so may interfere with breathing.
Credits
Ideas and Genius – M. Baldwin Control of Idea and Genius Person – No One
Props and Most of the Actual Work– Baldwin/Larson Photography, Still and Action – J. Larson
Gaffer – Anyone Walking By Best Boy/Girl – Ya Gotta Be Kidding!
Key Grip – None to be had, especially on reality Funding – By “Shoestring”
See University of South Florida Institutional Animal Care and Use Committee (IACUC) guidelines on injection routes, injection volumes, injection sites, and needle sizes.

![Hyperpolarized [1-13C] pyruvate MR spectroscopy detect altered … · 2019-09-04 · Intraperitoneal insulin tolerance test (IPITT) The intraperitoneal insulin tolerance test was](https://static.documents.pub/doc/80x56/5e9660a450107a20a856158f/hyperpolarized-1-13c-pyruvate-mr-spectroscopy-detect-altered-2019-09-04-intraperitoneal.jpg)


